


Bulk Paper Feeder
Papierzuführung
Chargeur de papier
Alimentatore carta
Alimentador de papel
User's Manual
Bedienungsanleitung
Manuel d'utilisation
Istruzioni per l'uso
Manual del usario
For the Kyocera Mita Page Printers Für Kyocera Mita Seitendrucker
Pour imprimantes de page Kyocera Mita Per la stampanti Kyocera Mita
Para la impresora de páginas Kyocera Mita
PF8-cvr.pm6 |
1 |
12/19/00, 8:21 PM |

PF8-cvr.pm6 |
2 |
12/19/00, 8:21 PM |

Note on Paper
Before purchasing paper, test a sample on the printer installed with the paper feeder and check that printing quality is satisfactory.
Notice
We shall have no liability or responsibility to customers or any other person or entity with respect to any liability, loss or damage caused or alleged to be caused directly or indirectly by equipment sold or furnished by us, including but not limited to, any interruption of service, loss of business or anticipatory profits, or consequential damages resulting from the use or operation of the equipment or software.
Caution
NO LIABILITY IS ASSUMED FOR ANY DAMAGE CAUSED BY IMPROPER INSTALLATION.
The information in this manual is subject to change without notification. Additional pages may be inserted in future editions. The user is asked to excuse any technical inaccuracies or typographical errors in the present edition.
No responsibility is assumed if accidents occur while the user is following the instructions in this manual.
The contents of this manual are protected by copyright. No part of this manual may be reproduced or copied by any means without the permission of the copyright holder.
English
1
pf8-Eng.pm6 |
1 |
12/19/00, 8:21 PM |
Radio interference requirement in European countries
The option bulk paper feeder PF-8E is intended for use with the printer models FS-1800, FS-1800N, FS-3800, and FS-3800N which are type tested and categorized as a Class B computing devices in accordance with the EN55022 rules.
Device in the Class B category may cause interference to radio or television reception particularly in a residential installation.
Information to users:
This equipment has been tested and found to comply with the limits for a Class B digital device, pursuant to Part 15 of FCC Rules. These limits are designed to provide reasonable protection against harmful interference in a residential installation. This equipment generates, uses, and can radiate radio frequency energy and, if not installed and used in accordance with the instructions, may cause harmful interference to radio communications. However, there is no guarantee that interference will not occur in a particular installation. If this equipment does cause harmful interference to radio or television reception, which can be determined by turning the equipment off and on, the user is encouraged to try to correct the interference by one or more of the following measures:
Reorient or relocate the receiving antenna.
Increase the separation between the equipment and receiver.
Connect the equipment into an outlet on a circuit different from that to which the receiver is connected.
Consult the dealer or an experienced radio/TV technician for help.
Changes or modifications not expressly approved by the manufacturer for compliance could void the user’s authority to operate the equipment.
Table of contents
Introduction ............................................................................................ |
3 |
Packing List ..................................................................................... |
4 |
Setup ......................................................................................................... |
4 |
Choosing a Location ........................................................................ |
4 |
Installation .............................................................................................. |
5 |
Removing the MP Tray ................................................................... |
5 |
Installing the Base and the Printer ................................................ |
7 |
Installing the Bulk Paper Feeder ................................................... |
8 |
Operating the Optional Bulk Paper Feeder ................................. |
10 |
Loading Paper ................................................................................ |
10 |
Cleaning Paper Jam ........................................................................... |
13 |
Specifications ....................................................................................... |
14 |
2 |
|
pf8-Eng.pm6 |
2 |
12/19/00, 8:21 PM |
Introduction
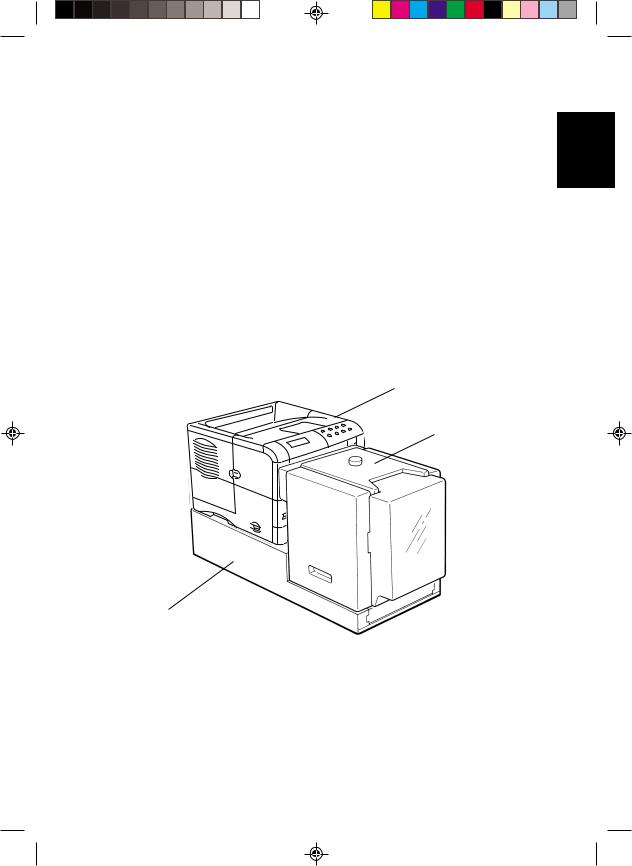
The PF-8E is a bulk paper feeder for Kyocera Mita page printers. By removing the MP tray and attaching the bulk paper feeder to the front of the printer, you can continuously print on up to approximately 2,000 sheets of paper (at paper thickness of 0.1 mm). At the same time, you can still select the printer’s normal paper cassette for the alternative paper source. The bulk paper feeder is shipped with a base that provides mounting for both the printer and the paper feeder. You can select the source of paper supply yourself using the printer’s operator panel or the printer driver.
Before using the optional bulk paper feeder, please read this manual, then carefully follow all instructions given for installing and using the optional paper feeder.
Printer
Paper Feeder (PF-8E)
Base PB-60 (Option)
English
3
pf8-Eng.pm6 |
3 |
12/19/00, 8:21 PM |
Packing List
Make sure that the optional bulk paper feeder package contains each of the following items in the indicated quantities.
PF-8E optional bulk paper feeder, 1
User’s Manual (this booklet), 1
Setup
The PF-8E is set up by placing itself and the printer on the base (option), removing the printer’s MP tray and attaching the bulk paper feeder to the front of the printer. Power for the paper feeder is supplied directly from the printer through connectors on the base.
Before installing (or removing) the optional bulk paper feeder, be sure to turn off the printer’s power.
Choosing a Location
The feeder will work best if it is installed in a location that is:
Level and well-supported: Place the base on a sturdy table or desk.
Not exposed to sunlight or other bright light (not next to an uncurtained window).
Well ventilated, not too hot or cold, and not too damp or dry: Temperature should be 10 to 32.5 °C, ideally about 23 °C (50 to 90 °F, ideally about 68 °F). Humidity should be 20 to 80%, ideally 60%.
4
pf8-Eng.pm6 |
4 |
12/19/00, 8:21 PM |
Installation
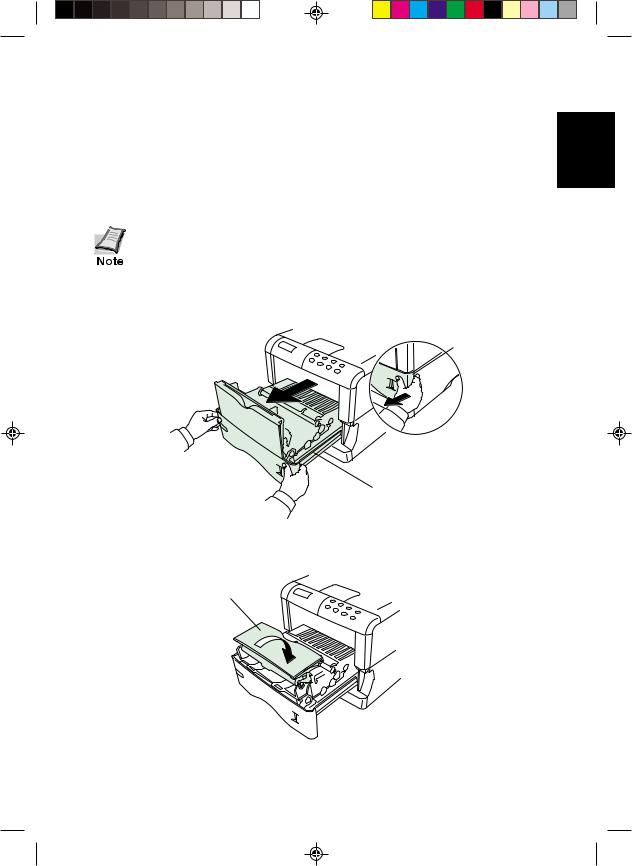
Removing the MP Tray
Before installing the bulk paper feeder, remove the MP tray from the front of the printer. The procedure is as follows.
The printer’s MP tray cannot be used together with the optional bulk feeder.
1.Pull the printer’s paper feed unit release lever, then draw the paper feed unit fully out of the printer.
Paper Feed Unit
Release Lever
Paper Feed Unit
2.Gently tilt the MP tray toward the printer until that it rests on its side as shown in the figure.
MP Tray
5
English
pf8-Eng.pm6 |
5 |
12/19/00, 8:21 PM |
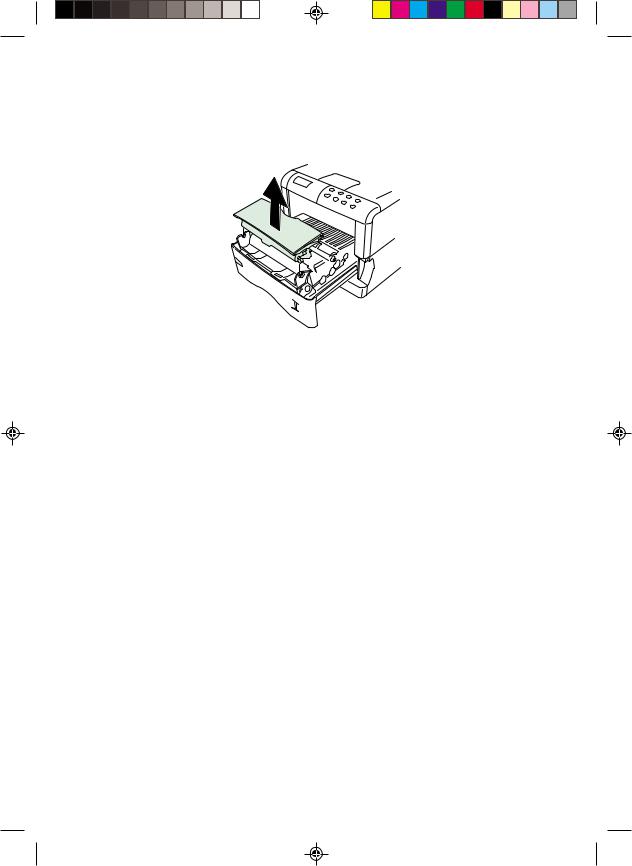
3.Remove the MP tray from the printer by lifting it straight upward.
4.After removing the MP tray, return the paper feed unit to its original position.
6
pf8-Eng.pm6 |
6 |
12/19/00, 8:21 PM |
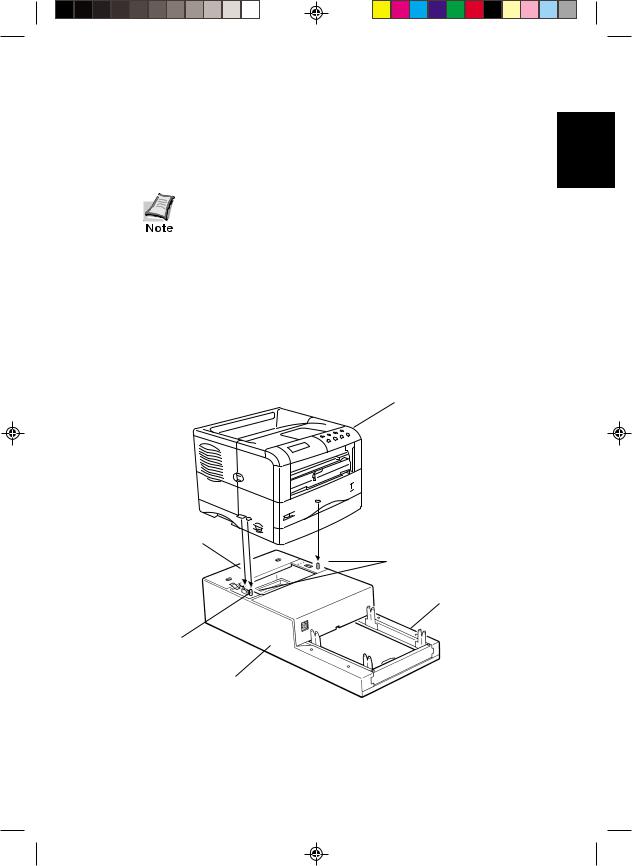
Installing the Base and the Printer
The printer is mounted on the upper deck of the base. See figure below.
1.Place the base onto a firm, sturdy table or desk.
The table or desk must be larger than the base.
2.Align the positioning pins on the top of the base with the holes in the base of the printer, then slowly and carefully lower the printer onto the base. You can easily set the printer on the base by aligning the back edge of the printer with the end of the base. Make sure that the connector on the base fits squarely into the corresponding connector in the base of the printer. See figure below.
Printer
Upper Deck
Positioning Pins
Lower Deck for the Feeder
Connector
Base
English
7
pf8-Eng.pm6 |
7 |
12/19/00, 8:21 PM |
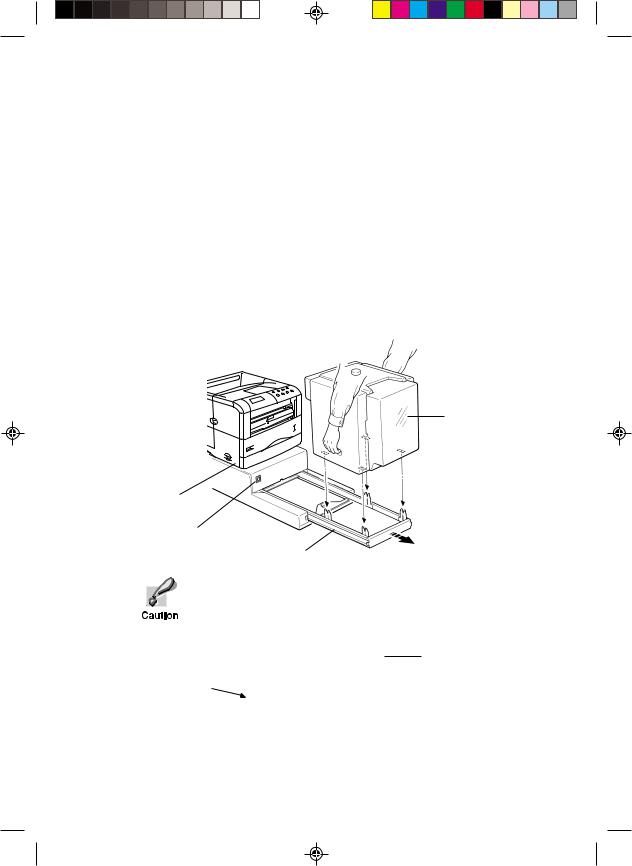
Installing the Bulk Paper Feeder
Mount the bulk paper feeder onto the rail in the lower deck of the base. The rail is movable and must be pulled out before installing the bulk paper feeder.
1.Pull the rail fully out until it stops. See figure below.
2.Grasp the feeder by the two handles in the side covers.
3.Facing the paper output slot of the feeder toward the printer, align the (four) positioning tabs on the rail of the base with the holes in the base of the feeder. Then slowly and carefully lower the feeder onto the base.
Feeder
Printer
Connector
Rail
Ensure that the arrow marks on the rail are correctly aligned with the arrow marks on the front side of the feeder before proceeding.
PF-8E
Arrow Marks
 Rail
Rail
8
pf8-Eng.pm6 |
8 |
12/19/00, 8:21 PM |
4. Slide the rail with the feeder mounted back toward the printer |
|
|
English |
||
until the connector on the front side of the feeder is fully |
||
the both hands. |
||
connected to the connector on the base, holding the feeder by |
|
|
|
|
When mounting the feeder to the printer, be careful to avoid pinching your fingers between the two.
Do not use the adjuster knob on the top of the feeder or the feeder plastic cover as a handle for sliding the feeder.
Bulk Paper Feeder |
Adjuster Knob |
Option Feeder 
Slot
Plastic Cover
Connector
Rail
Make sure that the connector of the bulk paper feeder is properly aligned with the connector on the front side of the printer base unit.
This completes setting up the feeder with the printer. Before using the feeder, plug the printer to power and load paper in the bulk paper feeder (explained in the following pages).
9
pf8-Eng.pm6 |
9 |
12/19/00, 8:22 PM |
Operating the Optional Bulk Paper Feeder
This chapter describes how to load paper in the feeder and to select the feeder as the paper source.
When the tray is rising or descending, please observe the following precautions.
Keep your fingers out of the slot on the inner side of the feeder.
While the tray is descending, keep your hands out from under the tray.
Do not push down on the tray or pull it upward.
Loading Paper
Once the feeder has been installed in accordance with the instructions provided previously; you can prepare to load paper. Before loading paper, you must adjust the side plates inside the feeder to the actual width of the paper to be loaded.
The legal-size paper is not usable with the bulk paper feeder. For details on paper size, see the printer’s
User’s Manual.
1.Turn printer power on. The paper feeder is turned on simultaneously.
2.Gently open the feeder’s tray cover. The paper tray will lower.
10
pf8-Eng.pm6 |
10 |
12/19/00, 8:22 PM |
3. Make sure that the paper tray is lowered and stopped. Then, |
English |
while watching the side plates inside the feeder, rotate the |
|
rotating the knob when the side plates have been set to their |
paper adjuster knob on top of the feeder clockwise. Stop widest settings (outmost positions). See figure below.
4. Place several sheets of the paper you are going to use with the
feeder on the center of the paper tray. |
|
Inside Panel |
Knob |
|
|
Side Plates |
Cover |
|
5.Adjust the side plates by rotating the adjuster knob on top of the feeder counterclockwise so that the left and right side edges of the paper are flush with the left and right side plates.
Then, rotate the adjuster knob half a turn clockwise. This allows an approximately 1 mm gap between each side of the paper stack and the side plate, which is needed to ensure the proper paper feeding. See figure below.
Make sure that the paper edges are evenly aligned on the center of the tray and the front edge of the stack fully abuts on the feeder’s inside panel
11
pf8-Eng.pm6 |
11 |
12/19/00, 8:22 PM |

6.Load up to 2,000 sheets of paper (four standard reams of packages of paper with a thickness of 0.1 mm) onto the tray. Fan and flex each ream as you load it. Load the paper with the side on which printing is done facing upward in the feeder.
Don’t put in more paper than the load limit indicated on the inside of the feeder. See figure below.
Adjuster Knob
Load Limit
7.Close the cover. The tray will rise and a sheet will feed partially into the printer. The printer indicates Ready and the feeder is ready for operation.
12
pf8-Eng.pm6 |
12 |
12/19/00, 8:22 PM |

Cleaning Paper Jam
If the printer’s message display shows Paper jam or Add paper (even though the feeder has paper loaded inside), detach the paper feeder from the printer by sliding with the rail away from the printer, holding the bulk paper feeder by both hands as shown below.
If paper is partially fed out from the feeder’s output slot, pull the paper out by hand as shown.
Jammed Paper
When paper is protruding from the feeder’s output slot, always remove it by pulling the paper in its normal direction of travel. Never pull paper backwards.
If paper is not stuck at the feeder’s output slot, open the feeder cover and pull the paper in the feeder.
If no paper is found jammed inside the paper feeder, slide the bulk paper feeder away from the printer, and check if paper is jammed inside the printer.
English
13
pf8-Eng.pm6 |
13 |
12/19/00, 8:22 PM |

Specifications
PF-8E Bulk paper feeder
Item |
Specification |
|
Applicable printer |
Kyocera Mita FS-1800, FS-1800N, FS-3800, and FS-3800N |
|
|
|
|
Print speed with feed from |
With FS-1800 and FS-1800N: 14 pages/minute |
|
PF-8E |
||
With FS-3800 and FS-3800N: 22 pages/minute |
||
(when feeding A4 size paper) |
||
|
|
|
Paper size |
Width: 76 to 216 mm (3 to 8-1/2") x Height: 148 to 305 mm |
|
|
(5-13/16 to 12") |
|
|
|
|
Paper capacity |
2,000 sheets maximum, 0.1mm |
|
|
|
|
Environmental requirements |
Temperature: 10 to 32.5 °C |
|
|
Humidity: 20 to 80% RH |
|
|
Ideal conditions are 23 °C/60% RH, altitude under 2000 m. |
|
|
|
|
Noise |
Max. 54 dB(A) during paper feeding |
|
(Excl. peak values) |
Max. 60 dB(A) during moving tray |
|
|
|
|
Dimensions |
345 (13-9/16") W x 352 (13-7/8") H x 376 mm (14-13/16") D |
|
(Excl. protrusions) |
||
|
||
|
|
|
Weight |
7.5 kg (16-9/16 lb) |
|
|
|
|
Power supply |
+24 V/+5 V supplied from printer through mount base |
|
|
|
PB-60 Base (Option)
Item |
Specification |
|
Applicable printer |
Kyocera Mita FS-1800, FS-1800N, FS-3800, and FS-3800N |
|
|
equipped with PF-8E |
|
|
|
|
Dimensions |
345 (13-9/16") W x 168 (6-5/8") H x 682 mm (26-7/8") D |
|
(Excl. protrusions) |
||
|
||
|
|
|
Weight |
5.8 kg (12-3/4 lb) |
|
|
|
14
pf8-Eng.pm6 |
14 |
12/19/00, 8:22 PM |
Hinweis zum Papier
Bevor Sie Papier kaufen, drucken Sie einige Testblätter bei installierter Papierzuführung aus um festzustellen, ob die Druckqualität zufriedenstellend ist.
Hinweis
Wir haften nicht für direkte oder indirekte Verluste oder Schäden, die einem Kunden oder irgendeiner anderen Person oder Rechtsperson durch von uns verkaufte oder ausgerüstete Geräte direkt oder indirekt entstehen oder geltend gemacht werden, und lehnen jedwede Haftung für eine eventuelle Unterbrechung einer Dienstleistung, für Geschäftsverluste oder für den Verlust erwarteter Profite sowie von Folgeschäden, die aus der Benutzung des Gerätes oder der Software entstehen könnten, ab.
Vorsicht
FÜR SCHÄDEN, DIE AUF UNRICHTIGE INSTALLATION ZURÜCKZUFÜHREN SIND, WIRD KEINE HAFTUNG ÜBERNOMMEN.
Der Inhalt dieser Anleitung kann ohne Vorankündigung geändert werden. In zukünftigen Ausgaben können zusätzliche Seiten eingefügt werden. Wir bitten den Benutzer, eventuelle technische Ungenauigkeiten oder drucktechnische Fehler in dieser Ausgabe zu entschuldigen.
Für Unfälle, die sich während dem Befolgen der Anweisungen in dieser Anleitung ereignen, wird keine Haftung übernommen.
Der Inhalt dieser Anleitung ist urheberrechtlich geschützt. Kein Teil dieser Anleitung darf in welcher Form auch immer ohne schriftliche Genehmigung des Urheberrechtinhabers reproduziert oder kopiert werden.
Deutsch
15
pf8-Ger.pm6 |
15 |
12/19/00, 8:23 PM |

Vorschriften zur Funkentstörung in europäischen Staaten
Die optionale Massenpapierzuführung PF-8E wird mit den Druckermodellen FS-1800, FS-1800N, FS-3800 und FS-3800N benutzt. Diese Drucker wurden einer Typenprüfung unterzogen und in Übereinstimmung mit den unter EN55022 definierten Regeln als Geräte der Klasse B eingestuft.
Geräte der Klasse B, besonders wenn sie in Wohnbereichen aufgestellt sind, können den Radiooder Fernsehempfang stören.
Inhaltsverzeichnis |
|
Einleitung ............................................................................................. |
17 |
Verpackungsinhalt ........................................................................ |
18 |
Aufstellen ............................................................................................. |
18 |
Auswahl des Aufstellungsortes.................................................... |
18 |
Installation ........................................................................................... |
19 |
Entfernen der Mehrzweckzuführung ......................................... |
19 |
Sockel und Drucker installieren ................................................. |
21 |
Massenpapierzuführung installieren .......................................... |
22 |
Betrieb der optionalen Massenpapierzuführung ...................... |
24 |
Papier einlegen ............................................................................. |
24 |
Papierstau beseitigen........................................................................ |
27 |
Technische Daten ............................................................................... |
28 |
16
pf8-Ger.pm6 |
16 |
12/19/00, 8:23 PM |

Einleitung
Die PF-SE ist eine Massenpapierzuführung für Kyocera Mita Seitendrucker. Wenn die Mehrzweckzuführung entfernt und die Massenpapierzuführung vorne am Drucker installiert wird, können bis zu etwa 2000 Blätter (mit einer Blattstärke von 0,1 mm) fortlaufend bedruckt werden. Die normale Papierkassette des Druckers kann weiterhin als zweite Papierquelle gewählt werden. Die Massenpapierzuführung wird mit einem Sockel geliefert, auf dem der Drucker und die Papierzuführung montiert werden können. Über das Bedienfeld des Druckers oder über den Druckertreiber können Sie die Papierquelle selbst wählen.
Lesen Sie diese Anleitung bitte vor Verwendung der optionalen Massenpapierzuführung durch und folgen Sie anschließend genau den Anleitungen zum Installieren und Benutzen der Papierzuführung.
Drucker
Papierzufü hrung (PF-8E)
Sockel PB-60 (optional)
Deutsch
17
pf8-Ger.pm6 |
17 |
12/19/00, 8:23 PM |

Verpackungsinhalt
Überprüfen Sie, ob sich in der Verpackung der optionalen Massenpapierzuführung alle nachfolgend aufgelisteten Teile befinden.
Optionale Massenpapierzuführung PF-8E, 1
Bedienungsanleitung (diese Broschüre), 1
Aufstellen
Die PF-8E und der Drucker werden auf den Sockel (Option) gestellt, wobei Sie die Mehrzweckzuführung des Druckers entfernen und die Massenpapierzuführung vorne am Drucker anbringen. Die Stromversorgung der Papierzuführung erfolgt über Anschlüsse im Sockel direkt vom Drucker aus.
Schalten Sie vor dem Installieren (oder Entfernen)  der optionalen Massenpapierzuführung den Drucker Vorsicht unbedingt aus.
Auswahl des Aufstellungsortes
Um beste Ergebnisse zu erzielen, sollte der Aufstellungsort folgende Bedingungen erfüllen:
Eben und stabil. Den Sockel auf einen stabilen Tisch oder Schreibtisch stellen.
Keine direkte Sonneneinwirkung oder helles Licht (z. B. nicht neben einem Fenster ohne Vorhang).
Gute Belüftung, nicht zu heiß oder zu kalt, nicht zu trocken oder zu feucht. Die Temperatur sollte zwischen 10 und 32,5 ºC liegen; ideal wären etwa 23 ºC. Die Luftfeuchtigkeit sollte zwischen 20 und 80% liegen; ideal wären 60%.
18
pf8-Ger.pm6 |
18 |
12/19/00, 8:23 PM |

Installation
Entfernen der Mehrzweckzufü hrung
Bevor Sie die Massenpapierzuführung anbringen, müssen Sie die Mehrzweckzuführung von der Vorderseite des Druckers entfernen. Dies geschieht wie folgt.
Die Mehrzweckzuführung des Druckers kann nicht zusammen mit der optionalen Massenpapierzuführung benutzt werden.
1.Ziehen Sie am Freigabehebel der Papierzuführung des Druckers und ziehen Sie die Papierzuführung vollständig aus dem Drucker heraus.
Freigabehebel der
Papierzufü hrung
Papierzufü hrung
2.Kippen Sie die Mehrzweckablage behutsam in Richtung Drucker, bis sie wie in der Abbildung gezeigt zu liegen kommt.
Mehrzweckablage
Schutzabdeckung
19
Deutsch
pf8-Ger.pm6 |
19 |
12/19/00, 8:23 PM |

3.Entfernen Sie die Mehrzweckablage, indem Sie sie nach oben vom Drucker abheben.
4.Nachdem Sie die Mehrzweckablage entfernt haben, bringen Sie die Papierzuführung wieder in die ursprüngliche Stellung zurück.
20
pf8-Ger.pm6 |
20 |
12/19/00, 8:23 PM |
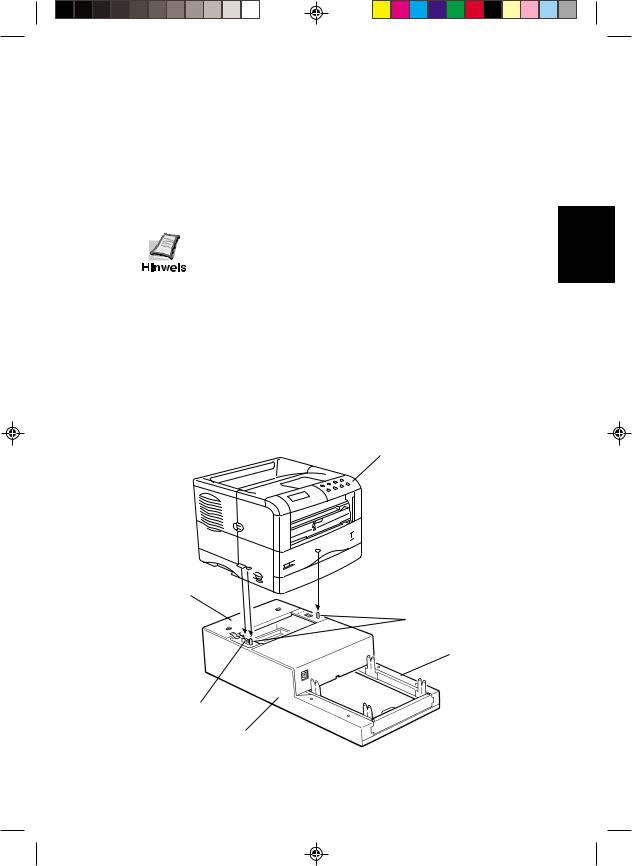
Sockel und Drucker installieren
Der Drucker wird auf die obere Sockelebene aufgesetzt (siehe Abbildung unten).
1.Den Sockel auf einen stabilen, standfesten Tisch oder Schreibtisch stellen.
Der Tisch oder Schreibtisch muß größer als der Sockel sein.
2.Die Positionierungsstifte auf der oberen Ebene des Sockels an den Öffnungen im Boden des Druckers ausrichten und den Drucker langsam und behutsam auf den Sockel absenken. Der Drucker läßt sich einfach auf den Sockel stellen, indem Sie die hintere Kante des Druckers am Ende des Sockels ausrichten. Achten Sie besonders darauf, daß der Steckanschluß auf dem Sockel rechtwinkelig in den entsprechenden Anschluß auf der Unterseite des Druckers eingeführt wird (siehe Abbildung unten).
Drucker
Obere Ebene
Positionierungsstifte
Untere Ebene fü r
Zufü hrung
Steckanschluß
Sockel
21
Deutsch
pf8-Ger.pm6 |
21 |
12/19/00, 8:23 PM |
 Loading...