


400/520 SX, EXC RACING
BEDIENUNGSANLEITUNG
OWNERS HANDBOOK MANUALE D’USO MANUEL D’UTILISATION
MANUAL DE INSTRUCCIONES
2000
Art.Nr. 3.205.72 11/99
IMPORTANT
WE STRONGLY SUGGEST THAT YOU READ THIS MANUAL CAREFULLY AND COMPLETELY BEFORE GOING ON YOUR FIRST RIDE. IT CONTAINS A GREAT DEAL OF INFORMATION AND ADVICE WHICH WILL HELP YOU USE AND HANDLE YOUR BIKE PROPERLY. IN YOUR OWN INTEREST, PLEASE PAY PARTICULAR ATTENTION TO NOTICES THAT ARE MARKED AS FOLLOWS:
WARNING
IGNORING THESE INSTRUCTIONS, CAN ENDANGER YOUR BODY AND YOUR LIFE.
! |
CAUTION |
! |
IGNORING THESE INSTRUCTIONS COULD CAUSE DAMAGE TO PARTS OF YOUR MOTORCYCLE OR THAT THE MOTOR-CYCLE IS NOT ROAD-SAFE ANYMORE.
Please insert the series numbers of your motorcycle in the boxes below
Frame number
Engine number
Stamp of dealer
COMSUMER INFORMATION FOR AUSTRALIA ONLY
Tampering with noise control system prohibited
Owners are warned that the law may prohibit:
(a)The removal or rendering inoperative by any person other than for purposes of maintenance, repair or replacement, of any device or element of design incorporated into any new vehicle for the purpose of noise control prior to its sale or delivery to the ultimate purchaser or while it is in use; and
(b)the use of the vehicle after such device or element of design has been removed or rendered inoperative by any person.
KTM SPORTMOTORCYCLE AG RESERVES THE RIGHT TO MODIFY ANY EQUIPMENT, TECHNICAL SPECIFICATIONS, COLORS,
MATERIALS, SERVICES OFFERED AND RENDERED, AND THE LIKE SO AS TO ADAPT THEM TO LOCAL CONDITIONS WITHOUT PREVIOUS ANNOUNCEMENT AND WITHOUT GIVING REASONS, OR TO CANCEL ANY OF THE ABOVE ITEMS WITHOUT SUBSTI-
TUTING THEM WITH OTHERS. IT SHALL BE ACCEPTABLE TO STOP MANUFACTURING A CERTAIN MODEL WITHOUT PREVIOUS ANNOUNCEMENT. IN THE EVENT OF SUCH MODIFICATIONS, PLEASE ASK YOUR LOCAL KTM DEALER FOR INFORMATION. WE SHALL NOT BE HELD LIABLE FOR ANY PRINTING ERRORS.
ENGLISH 1

|
Introduction |
|
We would like to congratulate you on your purchase of a KTM motorcycle. Let us also take this |
|
opportunity to thank you for putting your trust in us; we will not let you down. |
|
You are now owner of a sporty and modern motorcycle which you are bound to have a great time |
|
with provided you care for it properly. Before going for a first ride on your motorbike, you should |
|
read this Owner’s Handbook carefully, even if this takes some of your precious time, so as to |
|
familiarize yourself with how your motorbike is to be operated and which features it offers you. |
|
Only by doing so will you learn how you can best tune your motorcycle to your needs and how |
ENGLISH |
you can avoid bodily injuries. In addition, this Owner’s Handbook contains invaluable informa- |
your case, you will be able to use this Owner’s Handbook to carry out most of the maintenance |
|
|
tion about motorcycle maintenance. At the time of printing, this User's Guide corresponded to the |
|
latest state of this model family. It is, however, possible that we may have made slight modificati- |
|
ons in the meantime due to development in our motorcycle design. |
|
The Owner’s Handbook is an essential part of the motorbike and should - when the bike is sold - |
|
be handed over to the new owner. |
|
Many motorcyclists have a good working knowledge of motorcycle mechanics; if this is true in |
|
steps yourself. If, on the other hand, you are not very familiar with motorcycles, it might be better |
2to have a professional KTM dealer perform those steps marked by * found in the chapter entitled “Maintenance Work on Chassis and Engine” of this manual.
Take special care to follow the recommended run in, inspection, and maintenance intervals. Heeding these guidelines will significantly increase the life of your motorcycle. Be sure to have any maintenance jobs performed by an authorized KTM dealer.
Address your special requests to an authorized KTM dealer who, should the need arise, will be supported by the KTM importer.
Please do not forget to don your helmet, eye protection, and protective clothing when going for a ride. KTM riders are responsible riders! We wish you a lot of fun when driving !
KTM Austria’s certificate of achievement for its Quality System ISO 9001 is the beginning of an on-going total re-engineering quality plan for a brighter tomorrow.
KTM SPORTMOTORCYCLE AG 5230 MATTIGHOFEN, AUSTRIA
Attachments: 1 spare parts manual chassis 1 spare parts manual engine
ALL RIGHTS RESERVED TO MAKE ALTERNATIONS TO DESIGN AND MODEL.
© by KTM SPORTMOTORCYCLE AG, AUSTRIA All rights reserved

INDEX
Page SERIAL NUMBER LOCATIONS . . . . . . . . . . . . . . . . . . . . . .4 Chassis number . . . . . . . . . . . . . . . . . . . . . . . . . . . . . . . .4 Engine number, engine type . . . . . . . . . . . . . . . . . . . . . .4
OPERATION INSTRUMENTS . . . . . . . . . . . . . . . . . . . . . . .4 Clutch lever . . . . . . . . . . . . . . . . . . . . . . . . . . . . . . . . . .4 Hand decompression lever . . . . . . . . . . . . . . . . . . . . . . .4 Hand brake lever . . . . . . . . . . . . . . . . . . . . . . . . . . . . . . .4 Digital speedometer, indicator lamps (EXC) . . . . . . . . . . .5 Digital speedometer (EXC) . . . . . . . . . . . . . . . . . . . . . . .5 Odometer (EXC USA) . . . . . . . . . . . . . . . . . . . . . . . . . . .5 Speedometer, indicator lamps (EXC - Australia) . . . . . . . .5 Short circuit button (SX) . . . . . . . . . . . . . . . . . . . . . . . . .5 Combination switch (EXC) . . . . . . . . . . . . . . . . . . . . . . . .6 Headlamp switch (EXC USA) . . . . . . . . . . . . . . . . . . . . . .6 Flasher switch . . . . . . . . . . . . . . . . . . . . . . . . . . . . . . . . .6 Emergency OFF button (EXC) . . . . . . . . . . . . . . . . . . . . .6 Emergency OFF switch (EXC Australia) . . . . . . . . . . . . . .6 Filler cap . . . . . . . . . . . . . . . . . . . . . . . . . . . . . . . . . . . . .7 Fuel . . . . . . . . . . . . . . . . . . . . . . . . . . . . . . . . . . . . . . . . .7 Fuel tap . . . . . . . . . . . . . . . . . . . . . . . . . . . . . . . . . . . . . .7 Choke . . . . . . . . . . . . . . . . . . . . . . . . . . . . . . . . . . . . . . .8 Shift lever . . . . . . . . . . . . . . . . . . . . . . . . . . . . . . . . . . . .8 Kickstarter . . . . . . . . . . . . . . . . . . . . . . . . . . . . . . . . . . . .8 Foot brake pedal . . . . . . . . . . . . . . . . . . . . . . . . . . . . . . .8 Compression damping of fork . . . . . . . . . . . . . . . . . . . . .8 Rebound damping of fork . . . . . . . . . . . . . . . . . . . . . . . .9 Compression damping of shock absorber . . . . . . . . . . . .9 Rebound damping of shock absorber . . . . . . . . . . . . . . .9 Steering lock . . . . . . . . . . . . . . . . . . . . . . . . . . . . . . . . . .9 Side stand . . . . . . . . . . . . . . . . . . . . . . . . . . . . . . . . . . . .9
DRIVING INSTRUCTIONS . . . . . . . . . . . . . . . . . . . . . . . . .10
PERIODIC LUBRICATIONAND MAINTENANCE-SCHEDULE . .13
MAINTENANCE WORK ON CHASSIS AND ENGINE . . . . .14 Changing the original position of the clutch lever . . . . .14 Checking and adjusting the steering head bearing . . . . .14 Breather plug front fork . . . . . . . . . . . . . . . . . . . . . . . . .15 Cleaning the dust sleeves of the telescopic fork . . . . . . .15 How to change the handlebar position . . . . . . . . . . . . .15 Changing the spring preload of shock absorber . . . . . . .16 Pivot bearing . . . . . . . . . . . . . . . . . . . . . . . . . . . . . . . . .16 Check chain tension . . . . . . . . . . . . . . . . . . . . . . . . . . .16 Correct chain tension . . . . . . . . . . . . . . . . . . . . . . . . . .17 Chain maintenance . . . . . . . . . . . . . . . . . . . . . . . . . . . .17 Chain wear . . . . . . . . . . . . . . . . . . . . . . . . . . . . . . . . . .17 General informations about KTM disc brakes . . . . . . . .18 Adjusting of free travel at the hand brake lever . . . . . . .18 Checking of brake fluid level - front brake . . . . . . . . . . .19 Refilling the front brake fluid reservoir . . . . . . . . . . . . . .19
Page Checking the front brake pads . . . . . . . . . . . . . . . . . . .19 Replacing the front brake pads . . . . . . . . . . . . . . . . . . .19 Changing the basic position of the brake pedal . . . . . .20 Checking rear brake fluid level . . . . . . . . . . . . . . . . . . .20 Refilling the rear brake fluid reservoir . . . . . . . . . . . . . .20 Checking the rear brake pads . . . . . . . . . . . . . . . . . . . .21 Replacing the rear brake pads . . . . . . . . . . . . . . . . . . .21 Dismounting and mounting the front wheel . . . . . . . . .21 Dismounting and mounting the rear wheel . . . . . . . . .22 Tires, air pressure . . . . . . . . . . . . . . . . . . . . . . . . . . . . .23 Checking spoke tension . . . . . . . . . . . . . . . . . . . . . . . .23 Replacing the battery of the digital speedometer . . . . .23 Adjusting digital speedometer . . . . . . . . . . . . . . . . . . .24 Check/set distance of magnetic sensor . . . . . . . . . . . . .25 Battery (EXC) . . . . . . . . . . . . . . . . . . . . . . . . . . . . . . . .26 Charging battery . . . . . . . . . . . . . . . . . . . . . . . . . . . . .26 Fuse (EXC) . . . . . . . . . . . . . . . . . . . . . . . . . . . . . . . . . .27 Replacing head light lamp (H4) . . . . . . . . . . . . . . . . . .27 Cooling system . . . . . . . . . . . . . . . . . . . . . . . . . . . . . .28 Checking the coolant level . . . . . . . . . . . . . . . . . . . . . .28 Bleeding the cooling system . . . . . . . . . . . . . . . . . . . . .28 Cleaning the air filter . . . . . . . . . . . . . . . . . . . . . . . . . .29 Replacing the glass fiber yarn packing of the silencer . .29 Cleaning the spark arrestor (EXC USA) . . . . . . . . . . . . .29 Draining of float chamber of the carburetor . . . . . . . . .27 Checking adjustment of the hand decompression release cable .30 Adjust the throttle cables . . . . . . . . . . . . . . . . . . . . . . .30 Checking the oil level of the hydraulic clutch . . . . . . . .30 Bleeding of the hydraulic clutch . . . . . . . . . . . . . . . . . .30 Carburetor adjust idling . . . . . . . . . . . . . . . . . . . . . . . .31 Adjusting the mixture control screw . . . . . . . . . . . . . . .31 Checking the float level . . . . . . . . . . . . . . . . . . . . . . . .31 Draining of float chamber of the carburetor . . . . . . . . .32 Oil circuit . . . . . . . . . . . . . . . . . . . . . . . . . . . . . . . . . . .32 Checking engin oil level . . . . . . . . . . . . . . . . . . . . . . . .32 Engine oil . . . . . . . . . . . . . . . . . . . . . . . . . . . . . . . . . . .33 Changing the engine oil . . . . . . . . . . . . . . . . . . . . . . . .33
TROUBLE SHOOTING . . . . . . . . . . . . . . . . . . . . . . . . . . .35
CLEANING . . . . . . . . . . . . . . . . . . . . . . . . . . . . . . . . . . . .37
CONSERVATION FOR WINTER OPERARION . . . . . . . . .37
STORAGE . . . . . . . . . . . . . . . . . . . . . . . . . . . . . . . . . . . . .37 Re-initiation after time of storage . . . . . . . . . . . . . . . . .37
TECHNICAL SPECIFICATIONS - ENGINE . . . . . . . . . . . . .38
TECHNICAL SPECIFICATIONS - CHASSIS . . . . . . . . . . . . .40
HEAD WORD INDEX . . . . . . . . . . . . . . . . . . . . . . . . . . . .41
WIRING DIAGRAMME . . . . . . . . . . . . . . . . . . . . . .Appendix
ENGLISH 3
ENGLISH 4
SERIAL NUMBER LOCATIONS
Chassis number
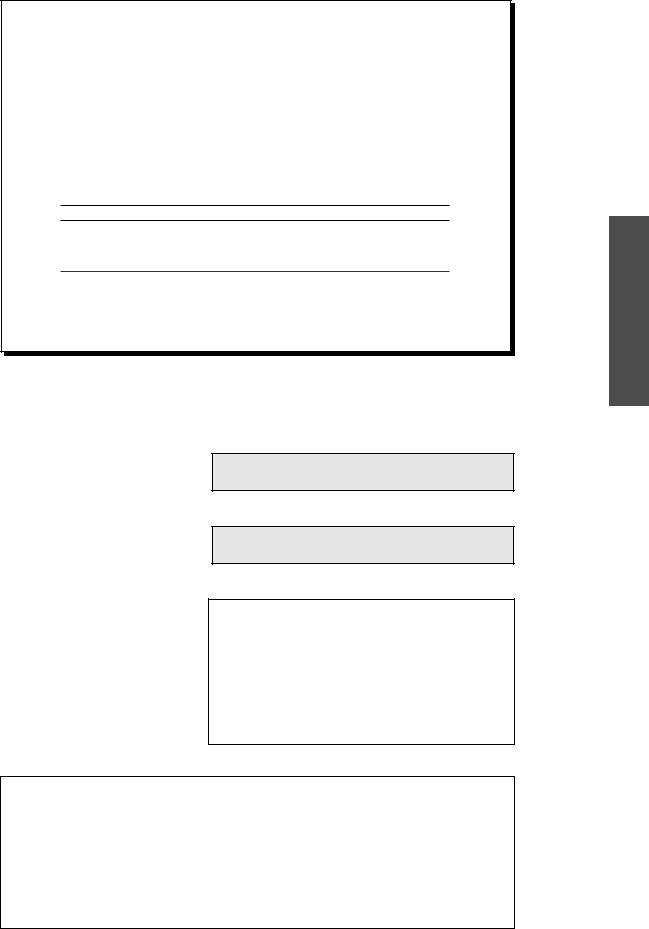
The chassis number is stamped on the right side of the steering head tube.
Write this number into the field on page no 1.
Engine number, engine type
The engine number and the engine type are stamped into the left side of the engine below the engine sprocket. Please note this number down on page 1.
|
|
|
|
|
OPERATION INSTRUMENTS |
|
|
|
|
|
|
1 |
|
|
|
|
Clutch lever |
|
|
|
|
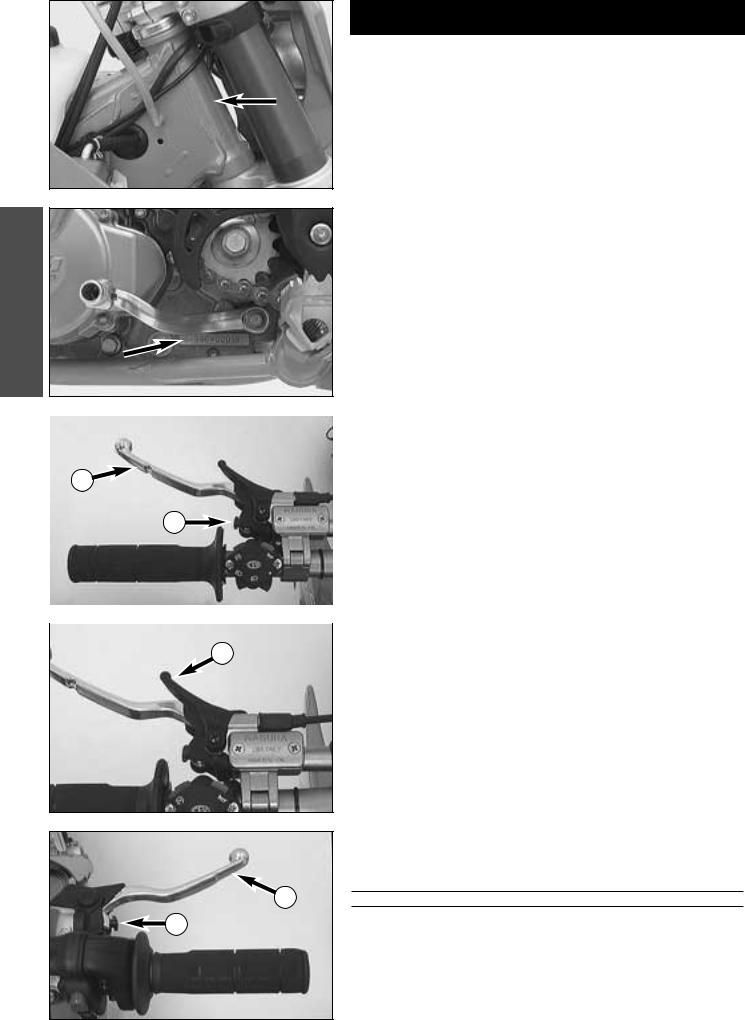
The clutch lever 1 is located on the left side of the handlebar. The adju- |
|
|
|
|
|
|
|
|
|
|
|
|
sting screw A is used to change the original position of the clutch lever (see |
|
|
A |
|
|
maintenance work on chassis and engine). |
|
|
|
|
|
|
|
|
|
|
|
|
|
|
Hand decompression lever |
|
|
2 |
|
The hand decompression lever 2 is needed only if a fall on your motorcycle |
||
|
causes overflowing in the carburetor. To "pump the engine free", pull the |
|||
|
|
|||
|
|
hand decompression lever during the starting procedure. |
|
|
|
|
The outer end of the lever must at all times provide for a backlash of |
||
|
|
approx. 10mm (0,4 in). Only thereafter may it cause valve motion (to be |
||
|
|
recognized by the stronger resistance which the hand decompression level |
||
|
|
encounters). |
|
|
|
|
|
|
|
|
|
! |
CAUTION |
! |
–NEVER USE THE HAND DECOMPRESSION LEVER TO TURN OFF THE ENGINE. RATHER,
USE THE SHORT-CIRCUIT BUTTON OR THE EMERGENCY-OFF BUTTON.
– THE SETTING OF THE DECOMPRESSION CABLE SHOULD BE REGULARLY CHECKED. A LACK OF PLAY IN THE DECOMPRESSION LEVER CAN RESULT IN ENGINE DAMAGE.
Hand brake lever
The hand brake lever 3 is mounted on the handle bars on the right and actuates the front wheel brake. The adjusting screw B can be used to change the basic position of the hand brake lever (see "Maintenance").
3 |
|
WARNING |
|
IF THE RESISTANCE IN THE HAND BRAKE LEVER OR FOOT BRAKE PEDAL FEELS “SPONGY” B (TOO MUCH GIVE), THIS IS AN INDICATION THAT SOMETHING IS WRONG WITH THE BRAKE SYSTEM. DON’T RIDE YOUR MOTORCYCLE ANYMORE WITHOUT FIRST HAVING THE
BRAKE SYSTEM LOOKED OVER BY A KTM DEALER.
Digital speedometer, indicator lamps (EXC)
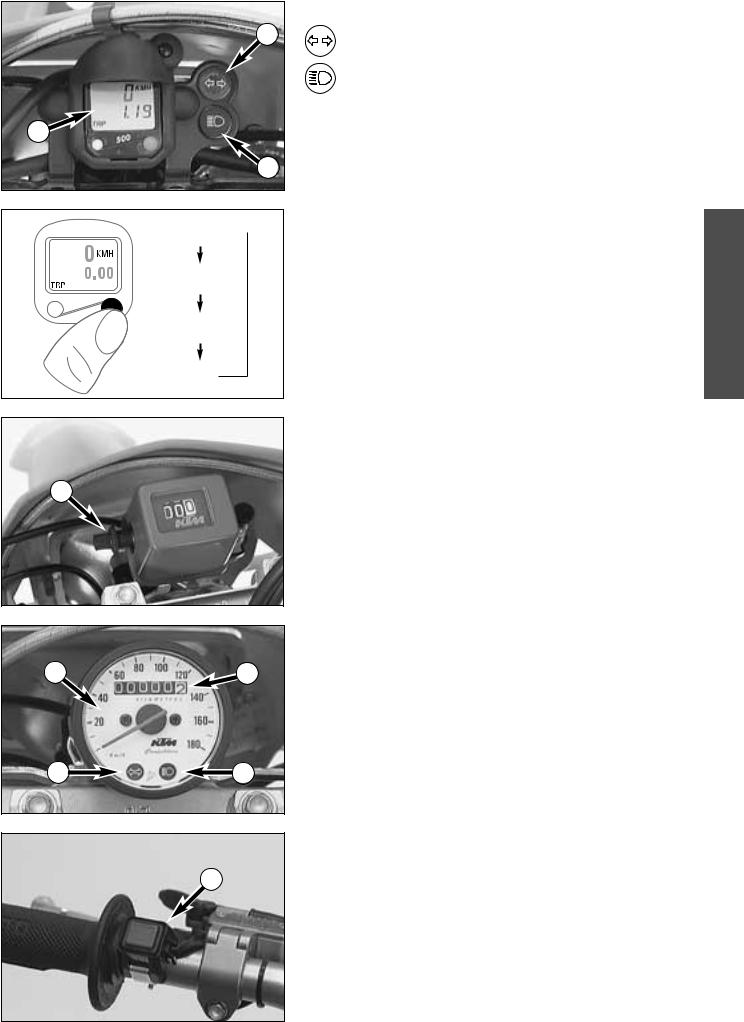
The green control lamp 1 flashes when the indicator is working in the same rhythm as the flashing indicator.
The blue control lamp 2 lights up when the high beam is on.
3
2
TRP
STP

 DST
DST

 CLK
CLK
4
Speedometer – digital (EXC)
Some models are equipped with a digital speedometer 3.
KMH = Speed, max. 200 km/h (is always indicated)
Aside from speed indication the following indications can be selected:
TRP |
= Trip distance |
STP |
= Stopwatch max. 10 h, automatic start/stop function |
DST |
= Total distance up to 99.999 km |
CLK |
= Clock |
See maintenance work for change of battery and basic setting.
Odometer (EXC USA)
The odometer is a mileage indicator and can be set to 0 by means of the adjustment wheel 4.
Speedometer, indicator lamps (EXC AUS)
The mileage indicator A in the speedometer 5 indicates overall mileage. When the turn indicator is on, the green indicator lamp 6 will be flashing in the same rhythm.
The blue indicator lamp 7 will be lit when the high beam is on
7
ENGLISH 5
Short circuit button (SX)
The short circuit button 8 turns off the engine. When pressing this button,
the ignition circuit is short-cicuited.
8
ENGLISH 6
|
|
Combination switch (EXC) |
2 |
1 |
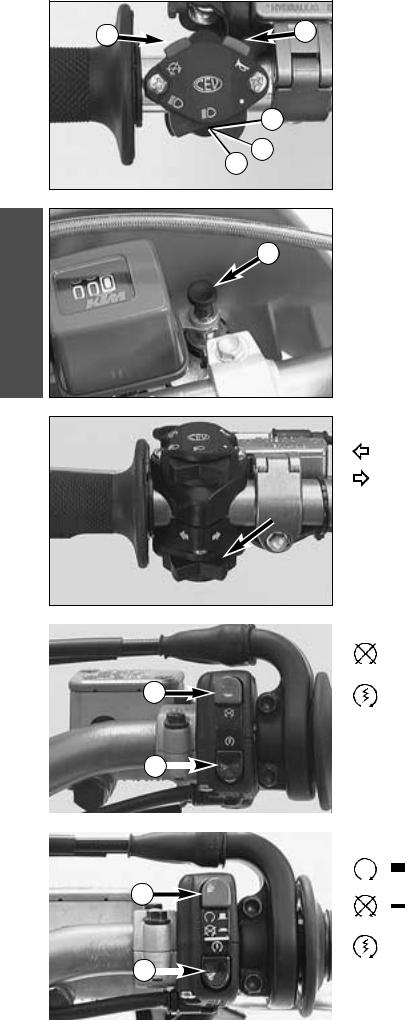
The light switch has 2, respetively 3 switch positions. |
A = Light off (this function is not available in all models) |
||
|
|
B = Low beam on |
|
|
C = High beam on |
|
|
You may use button 1 to actuate the horn. |
|
|
The red short circuit button 2 serves to switch off the engine. Leave the |
|
|
switch pressed until the engine stops. |
C
Headlamp switch (EXC USA)
In this model the headlamp is switched on with the pull switch 3.
3
Flasher switch
Flasher left
Flasher right
|
|
|
|
Emergency OFF button (EXC) |
|
|
|
|
|
|
The red emergency-OFF button 4 is arranged adjacent to the |
||
|
|
|
|
throttle grip. To turn off the engine, push the button until the engine |
||
|
|
|
|
comes to a standstill. |
|
|
4 |
|
|
Pushing of the black starter button 5 actuates the E-starter. |
|||
|
|
|
|
|
|
|
|
|
|
|
|
WARNING |
|
|
|
|
|
ALWAYS VERIFY THAT THE TRANSMISSION HAS BEEN SET TO IDLE (NEUTRAL) BEFORE |
||
|
|
|
|
ACTUATING THE STARTER BUTTON. IF YOU START THE MOTORCYCLE WITH A GEAR |
||
|
|
|
|
ENGAGED, THE MOTORCYCLE WILL MOVE FORWARD. |
|
|
|
|
|
|
|
||
|
|
|
|
|
|
|
|
|
|
|
|
Emergency OFF switch (EXC Australia) |
|
|||
|
|
|
|
|
The red emergency-OFF switch 6 is arranged adjacent to the throttle grip. |
||||
|
|
|
|
|
|
|
In this position, the E-starter is operational and the engine can |
||
6 |
|
|
|
|
|
be started. |
|
|
|
|
|
|
|
|
|
|
|||
|
|
|
|
|
In this position, the E-starter and ignition circuits are interrup- |
||||
|
|
|
|
|
|
|
ted. The E-starter cannot be actuated, and the engine will not |
||
|
|
|
|
|
|
|
|||
|
|
|
|
|
|
|
start, not even if you attempt to start it with the kickstarter. |
||
|
|
|
|
|
Pushing of the black starter button 5 actuates the E-starter. |
||||
|
|
|
|
|
|
|
|
|
|
|
|
|
|
|
|
WARNING |
|
||
|
|
|
|
|
|||||
|
|
|
|
|
ALWAYS VERIFY THAT THE TRANSMISSION HAS BEEN SET TO IDLE (NEUTRAL) BEFORE |
||||
|
|
|
|
|
ACTUATING THE STARTER BUTTON. IF YOU START THE MOTORCYCLE WITH A GEAR |
||||
|
|
|
|
|
ENGAGED, THE MOTORCYCLE WILL MOVE FORWARD. |
|
|||
1
35 mm
OFF ON RES
SX
EXC
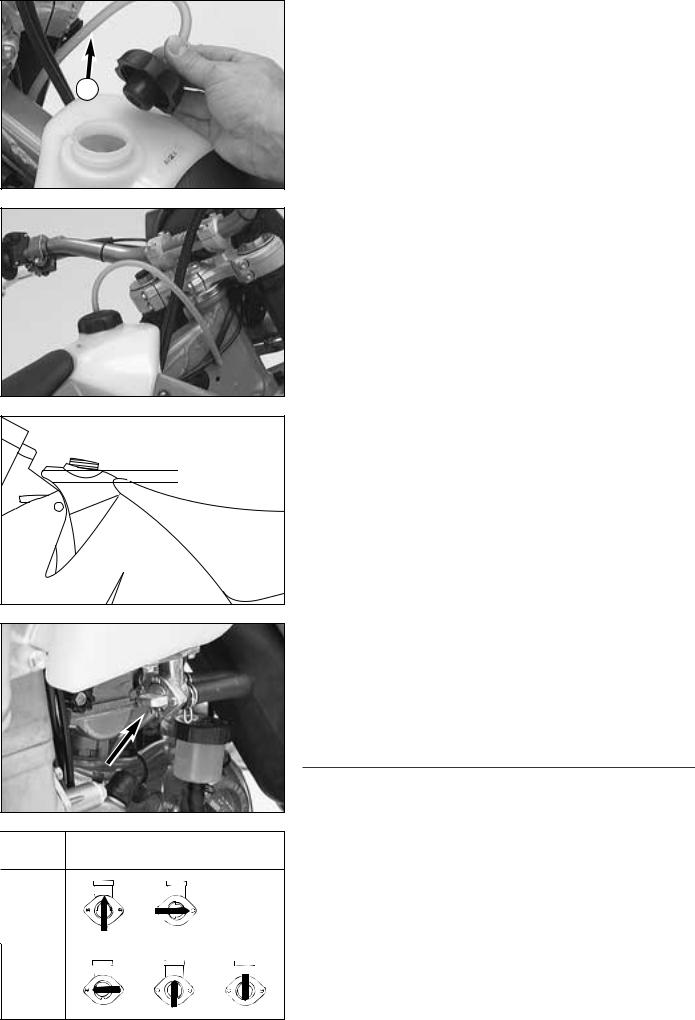
Filler cap
To open filler cap: Turn the filler cap counter-clockwise.
To close filler cap: ut filler cap on and tighten it by turning it clockwise. Install tank breather hose 1 without kinks.
Fuel |
|
|
|
ENGLISH |
|
The LC4 engine needs premium gasoline with an octane number of 95 or |
|||||
|
|||||
higher. |
|
|
|
|
|
|
|
|
|
|
|
! |
CAUTION |
! |
|
|
|
USE LEADED OR UNLEADED PREMIUM GRADE GASOLINE (95 OCTANES). NEVER USE ANY |
|
||||
GASOLINE HAVING LESS THAN 95 OCTANES BECAUSE IT MAY DAMAGE THE ENGINE. |
|
||||
|
|
|
|
|
|
|
WARNING |
|
|
|
|
GASOLINE IS HIGHLY FLAMMABLE AND POISONOUS. EXTREME CAUTION SHOULD BE USED |
|
||||
WHEN HANDLING GASOLINE. DO NOT REFUEL THE MOTORCYCLE NEAR OPEN FLAMES OR |
|
||||
BURNING CIGARETTES. ALWAYS SWITCH OFF THE ENGINE BEFORE REFUELLING. BE |
|
||||
CAREFUL NOT TO SPILL GASOLINE ON THE ENGINE OR EXHAUST PIPE WHILE THE ENGINE IS |
|
||||
HOT. WIPE UP SPILLS PROMPTLY. IF GASOLINE IS SWALLOWED OR SPLASHED IN THE EYES, |
7 |
||||
SEEK A DOCTOR’S ADVICE IMMEDIATELY. |
|
|
|
||
|
|
|
|||
Fuel expands when its temperature rises. Therefore do not fill the tank to the top (see fig.).
Fuel tap
OFF In this position the fuel tap is closed. No fuel may flow to the carburetor. ON During operation the twist grip must be turned to ON. This means that the fuel can flow to the carburetor. With the twist grip in this
position the tank will be emptied until only the reserve is left.
RES The reserve tank cannot be tapped until the rotating handle is turned to the RES position. Fill the tank as soon as possible and remember to turn the rotating handle back to the ON position so that you will have backup fuel next time, too.
Reserve (EXC). . . . . . . . . . . . . 1.0 l (0,3 US gallons)
! |
CAUTION |
! |
THE FUEL TAP SHOULD BE LOCKED WHENEVER THE MOTORCYCLE IS PARKED. IF THE TAP IS NOT CLOSED THE CARBURETOR MAY OVERFLOW AND FUEL GET INTO THE ENGINE.
ENGLISH 8
1
2,3,4 (5,6)
N
1
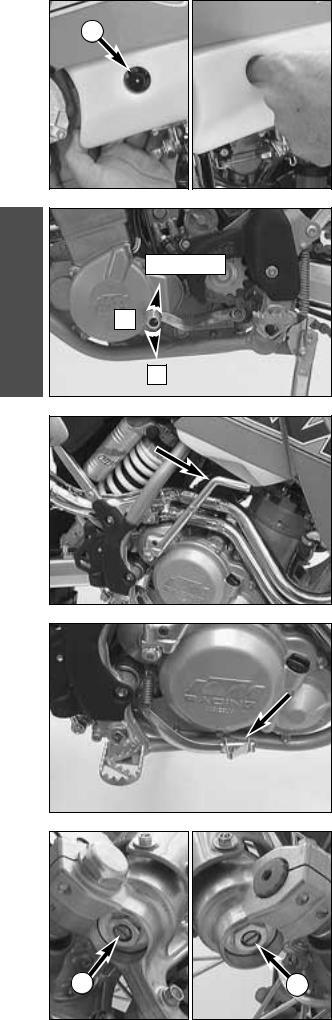
Choke
If you pull the choke button 1 out as far as possible, a bore in the carburetor will be unblocked through which the engine may take in additional fuel. The result is a „fat“ fuel-air mixture of the type needed for cold starts.
To deactivate the choke, push the choke button back into its basic position.
Shift lever
The shift lever is mounted on the left side of the engine. The position of the gears is shown in the illustration. Neutral, or the idle speed, is located between first and second gear.
Kickstarter
The kickstarter is mounted on the left side of the engine. Its upper part can be swivelled.
|
WARNING |
|
– IF YOU WANT TO START THE ENGINE, MAKE SURE THAT YOU ALWAYS PUT ON STURDY MOTORCYCLE BOOTS IN ORDER TO AVOID INJURIES. YOU MIGHT SLIP OFF THE KICK- STARTER, OR THE ENGINE MAY KICK BACK AND PROPEL YOUR FOOT UPWARD WITH GREAT VEHEMENCE.
–ALWAYS KICK KICKSTARTER BRISKLY ALL THE WAY WITHOUT OPENING THE THROTTLE. KICKING THE KICKSTARTER WITH NOT ENOUGH MOMENTUM, AND AN OPENED
THROTTLE GRIP INCREASE THE KICK-BACK HAZARD.
Foot brake pedal
The foot brake pedal is disposed in front of the right foot rest. Its basic position can be adjusted to your seat position (see maintenance work).
|
WARNING |
|
IF THE RESISTANCE IN THE HAND BRAKE LEVER OR FOOT BRAKE PEDAL FEELS “SPONGY” (TOO MUCH GIVE), THIS IS AN INDICATION THAT SOMETHING IS WRONG WITH THE BRAKE SYSTEM. DON’T RIDE YOUR MOTORCYCLE ANYMORE WITHOUT FIRST HAVING THE BRAKE SYSTEM LOOKED OVER BY A KTM DEALER.
Compression damping of fork
Hydraulic compression damping determines the reaction when the fork is compressed. The degree of compression can be adjusted with adjusting screws at the bottom of the fork legs.
Turn the adjusting screws 2 clockwise to increase damping, turn it counterclockwise to reduce damping during compression.
STANDARD ADJUSTMENT
–turn adjusting screw clockwise as far as it will go
–turn it back by as many clicks as are specified for the relevant type of fork
2 |
2 |
WP 0518U782 . . . . . . . . . |
14 clicks |
|
|
WP 0518U791 . . . . . . . . . |
14 clicks |
1 1
2
3
4
Rebound damping of fork
Hydraulic rebound damping determines the reaction when the fork is rebound. By turning the adjusting screw 1 (REB), the degree of damping of the rebound can be adjusted. Turn the knob clockwise to increase damping, turn it counterclockwise to reduce damping during rebounding.
STANDARD ADJUSTMENT
–turn adjusting screw clockwise as far as it will go
–turn it back by as many clicks as are specified for the relevant type of fork
WP 0518U782 . . . . . . . . . 14 clicks
WP 0518U791 . . . . . . . . . 14 clicks
Compression damping of shock absorber |
|
ENGLISH |
||
The damping force of the compression damping can be adjusted with knob |
||||
|
||||
2 The higher the number the higher the damping force. |
|
|
||
STANDARD ADJUSTMENT: |
|
|
|
|
WP 1218U716 . . . . . . . . . . |
. . . . . . . . . 5 clicks |
|
|
|
WP 1218U721 . . . . . . . . . . |
. . . . . . . . . 4 clicks |
|
|
|
|
|
|
|
|
|
WARNING |
|
|
|
THE DAMPING UNIT OF THE SHOCK ABSORBER IS FILLED WITH HIGH-COMPRESSION NITROGEN. NEVER TRY TO TAKE THE SHOCK ABSORBER APART OR TO DO ANY MAINTEN- ANCE WORK YOURSELF. SEVERE INJURIES COULD BE THE RESULT.
9
Rebound damping of shock absorber
By using the adjusting screw 3, the degree of damping of the rebound can be adjusted. Turn the knob to the right side to increase damping, turn it to the left side to reduce damping during rebounding.
STANDARD ADJUSTMENT:
–Turn the adjusting screw clockwise to the stop.
–Then turn the adjusting screw counterclockwise, counting the number of clicks that corresponds to the respective type of shock absorber.
WP 1218U716 . . . . . . . . . . . . . . . . . . 18 clicks
WP 1218U721 . . . . . . . . . . . . . . . . . . 20 clicks
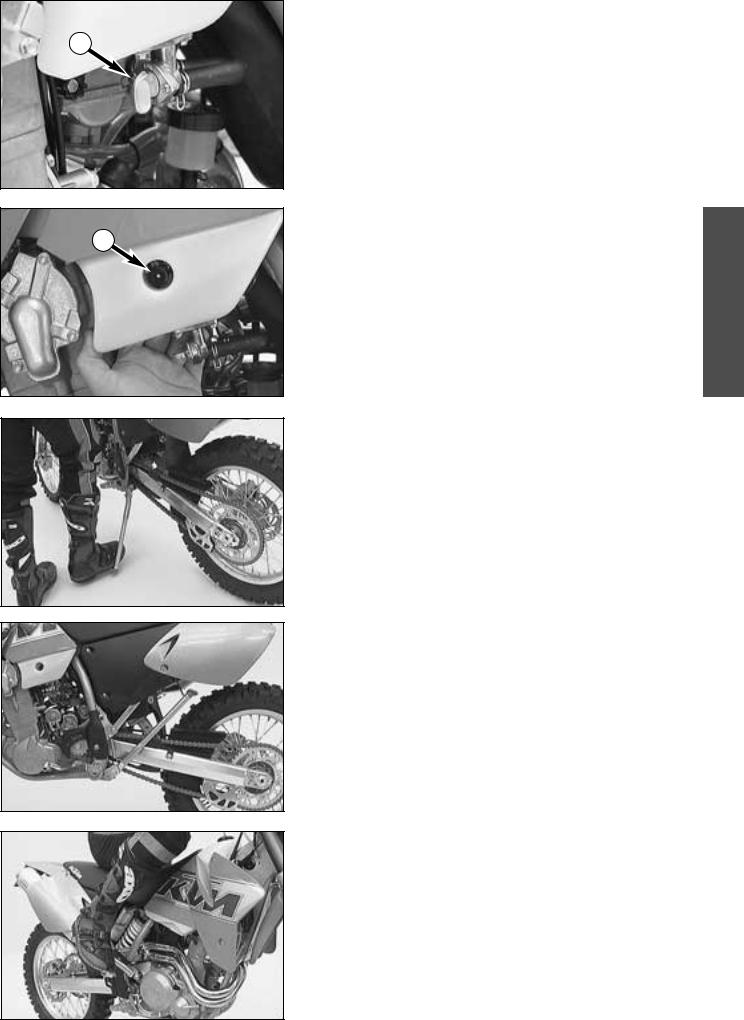
Steering lock
The handlebar can be locked by means of the lock located on the steering head. To lock it, turn handlebar all the way to the right, insert key, turn it to left, press it in, turn it to right, and remove it.
! |
CAUTION |
! |
NEVER LEAVE THE KEY INSERTED IN THE STEERING LOCK. IF YOU TURN THE HANDLEBAR TO THE LEFT THE KEY COULD GET DAMAGED.
Side stand
Push the side stand to the ground with your foot and load it with the motorcycle. Make sure that you put your bike on solid ground and in a secure position. For off-road riding, you can use the rubber band 4 to additionally secure the center stand in its folded-up position.
! |
CAUTION |
! |
– THE SIDE STAND IS ONLY DESIGNED FOR THE WEIGHT OF THE MOTORCYCLE. IF YOU GET ON THE MOTORCYCLE AND THUS PUT ADDITIONAL WEIGHT ON THE SIDE STAND, THE SIDE STAND OR THE FRAME CAN BE DAMAGED AND THE MOTORCYCLE MAY FALL ON THE SIDE.
– ALWAYS CHECK BEFORE GOING FOR A RIDE THAT YOU HAVE FOLDED UP THE SIDE STAND AS FAR AS POSSIBLE. IF THE STAND TOUCHES THE GROUND WHILE YOU ARE DRIVING, YOU MAY LOSE CONTROLL OF YOUR MOTORCYCLE.

DRIVING INSTRUCTIONS
ENGLISH
10
Check the following before each start
When you start off, the motorcycle must be in perfect mechanical condition. For safety reasons, you should make a habit of performing an overall check of your motorcycle before each start.
The following checks should be performed:
1CHECK THE OIL LEVEL
Insufficient oil results in premature wear and consequently to engine damage.
2FUEL
Check that there is sufficient fuel in the tank; when closing the filler cap, check that the tank venting hose is free of kinks.
3CHAIN
A loose chain can fall from the chain wheels; an extremely worn chain can tear, and insufficient lubrication can result in unnecessary wear to the chain and chain wheels. Excessive tensioning of the chain will put additional load on the components of the secondary drivetrain (chain, bearings of transmission and rear wheel). Aside from resulting premature wear, if worst comes to worst the chain may rupture or the countershaft of the transmission may break.
4TIRES
Check for damaged tires. Tires showing cuts or dents must be replaced. The tread depth must comply with the legal regulations. Also check the air pressure. Insufficient tread and incorrect air pressure deteriorate the driving performance.
5BRAKES
Check correct functioning of the braking system. Check for sufficient brake fluid in the reservoir. The reservoirs have been designed in such a way that brake fluid does not need to be refilled even when the brake pads are worn. If the level of brake fluid falls below the minimum value, this indicates a leak in the braking system or completely worn out brake pads. Arrange for the braking system to be checked by a KTM specialist, as complete failure of the braking system can be avoided.
Also check the state of the brake hose and the thickness of the brake linings.
Check free travel at hand brake lever and foot brake lever.
6CABLES
Check correct setting and easy running of all control cables.
7COOLING FLUID
Check the level of cooling fluid when the engine is cold.
8ELECTRICAL SYSTEM
Check correct functioning of headlamps, tail-lights, brake lights, indicators, control lamps and horn while the engine is running.
9LUGGAGE
If you are taking luggage with you, check that this is securely fastened.
|
WARNING |
|
–WEAR SUITABLE CLOTHING WHEN DRIVING A MOTORCYCLE. CLEVER KTM DRIVERS ALWAYS WEAR A HELMET, BOOTS, GLOVES AND A
JACKET, REGARDLESS OF WHETHER DRIVING ALL DAY OR JUST FOR A SHORT TRIP. THE PROTECTIVE CLOTHING SHOULD BE BRIGHTLY COLO- RED SO THAT OTHER VEHICLE CAN SEE YOU AS EARLY AS POSSIBLE.
– ALWAYS TURN ON THE LIGHT TO MAKE SURE THAT OTHER DRIVERS BECOME AWARE OF YOU AS EARLY AS POSSIBLE.
–DO NOT DRIVE AFTER HAVING CONSUMED ALCOHOL.
–ONLY USE ACCESSORIES THAT HAVE BEEN RELEASED BY KTM. FOR
EXAMPLE, FRONT PANELLING CAN IMPAIR THE DRIVING PROPERTIES OF THE MOTORCYCLE. CASES, EXTRA TANKS ETC. CAN ALTER THE WEIGHT DISTRIBUTION AND THUS ALSO IMPAIR THE VEHICLES DRIVING PROPERTIES.
– THE FRONT AND REAR WHEEL ARE ALLOWED TO BE FITTED ONLY WITH TIRES THAT HAVE THE SAME PROFILE TYPE.
– THE RACING MODELS ARE DESIGNED AND DIMENSIONED FOR 1 PER- SON ONLY. NEVER TAKE ANOTHER RIDER ALONG.
|
WARNING |
|
– THE SX MODELS ARE NOT APPROVED FOR USE ON PUBLIC ROADS AND FREEWAYS.
– WHEN RIDING YOUR MOTORCYCLE, PLEASE BEAR IN MIND THAT OTHER PEOPLE MAY FEEL MOLESTED BY EXCESSIVE NOISE.
Instructions for initial operation
–Verify that your KTM dealer performed the PREPARATION OF VEHICLE jobs (see Customer Service Manual).
–Read these operating instructions carefully before your first ride.
–Familiarize yourself with the operating elements.
–Set the clutch lever, the handbrake lever, and the footbrake pedal to the positions that are most convenient for you.
–Get used to handling the motorcycle on an empty parking lot or open space, before starting on a longer drive. Also try to drive as slowly as possible and in standing position, to improve your feeling for the vehicle.
–Do not drive along off-road tracks which go beyond your abitily and experience.
–Hold the handle bars with both hands and leave your feet on the foot rests while driving.
–Remove your foot from the foot brake lever when you are not braking. If the foot brake lever is not released the brake pads rub continuously and the braking system is overheated.
–Do not make any alterations to the motorcycle and always use ORIGINAL KTM SPARE PARTS. Spare parts from other manufacturers can impair the safety of the motorcycle.
–Motorcycles are sensitive to alterations in the distribution of weight. If you are taking luggage with you, this should be secured as close as possible to the middle of the vehicle; distribute the weight evenly between the front and rear wheel. Never exceed the maximum permissible laden weight and the axle weights. The maximum permissible laden weight is made up of the following components:
–Motorcycle ready for operation and tank full
–Luggage
–Driver with protective clothing and helmet.
–Pay attention to running-in procedure.
Running in the Racing models
Even very precisely machined sections of engine components have rougher surfaces than components which have been sliding across one another for quite some time. Therefore, every engine needs to be broken in.
For this reason, do not load the engine more than 50% of its capacity during the first 3 operating hours. Besides, the engine speed must not exceed 7000 rpm. Avoid going full-throttle!
In the following 12 operating hours, you may load the engine up to 75% of its capacity. Use the motorcycle on various types of terrain (road, easy off-road trails).
! |
CAUTION |
! |
THE 400/520 SC/EXC RACING MODELS WERE UNCOMPROMISINGLY DESIGNED FOR OFF-ROAD COMPETITION PURPOSES ONLY. EVEN THOUGH THE EXC MODELS ARE APPROVED FOR USE ON PUBLIC ROADS, THEIR USE ON ROADS IS RECOMMENDABLE ONLY TO A VERY LIMITED EXTENT. AVOID EXTENDED ON-ROAD RIDES AT FULL THROTTLE.
1
2
Starting when the engine is cold
1Open the fuel tap 1.
2Swing up the side stand or center stand.
3Put the gear in neutral.
4Operate the choke 2.
5Leave throttle closed and kick the kickstarter briskly ALL THE WAY or actuate the E-starter.
|
WARNING |
|
– IF YOU WANT TO START THE ENGINE, MAKE SURE THAT YOU ALWAYS PUT ON STURDY MOTORCYCLE BOOTS IN ORDER TO AVOID INJURIES. YOU MIGHT SLIP OFF THE KICK- STARTER, OR THE ENGINE MAY KICK BACK AND PROPEL YOUR FOOT UPWARD WITH GREAT VEHEMENCE.
–ALWAYS KICK KICKSTARTER BRISKLY ALL THE WAY WITHOUT OPENING THE THROTTLE. KICKING THE KICKSTARTER WITH NOT ENOUGH MOMENTUM, AND AN OPENED
|
THROTTLE GRIP INCREASE THE KICK-BACK HAZARD. |
|
|
ENGLISH |
|
– |
DO NOT START THE ENGINE AND ALLOW IT TO IDLE IN A CLOSED AREA. EXHAUST |
||||
|
FUMES ARE POISONOUS AND CAN CAUSE LOSS OF CONSCIOUSNESS AND DEATH. |
||||
|
|
||||
|
ALWAYS PROVIDE ADEQUATE VENTILATION WHILE THE ENGINE IS RUNNING. |
|
|||
|
|
|
|
|
|
|
! |
CAUTION |
! |
|
|
– |
MAXIMAL PERIOD FOR CONTINUOUS STARTING: 5 SECONDS. WAIT AT LEAST 5 |
|
|||
|
SECONDS BEFORE TRYING AGAIN. |
|
|
|
|
– |
DON’T RIDE YOUR MOTORCYCLE WITH FULL LOAD AND DON’T REV ENGINE WHEN |
|
|||
|
COLD. BECAUSE THE PISTON IS WARMING UP FASTER THAN THE WATER COOLED |
|
|||
|
CYLINDER, IT CAN CAUSE ENGINE DAMAGE. |
|
|
|
|
Starting when the engine is warm |
11 |
|
1Open the fuel tap 1.
2Swing up the side stand.
3Put the gear in neutral.
4Leave throttle closed and kick the kickstarter briskly ALL THE WAY or actuate the E-starter.
What to do when the engine is „flooded”
In the event of a fall, more fuel than necessary may get into the engine. In order to "pump the engine free", pull the hand decompression lever, fully rev up the engine, actuate the kickstarter 5 to 10 times or actuate the E- starter 2 times for 5 seconds each. Then, start the engine as described above.
If the engine fails to start, unscrew the spark plug and dry it. NOTE:
The carburetor has an accelerator pump. Every time you open the throttle, fuel will be injected into the intake passage. When starting, be sure that you open the throttle completely only once.
Starting off
Pull the clutch lever. Put the engine into first gear, slowly release the clutch lever and open throttle at the same time.
|
WARNING |
|
–BEFORE YOU START OFF, CHECK THAT THE SIDE STAND HAS BEEN SWUNG UP FULLY. IF THE STAND DRAGS ON THE GROUND, THE MOTORCYCLE CAN GO OUT OF
CONTROL.
– ALWAYS TURN ON THE LIGHT TO MAKE SURE THAT OTHER DRIVERS BECOME AWARE OF YOU AS EARLY AS POSSIBLE.
Shifting/Riding
You are now in first gear, refered to as the drive or uphill gear. Depending on the conditions (traffic, hill size, etc.), you can shift to a higher gear. Close throttle, at the same time pull clutch lever in and shift to the next higher gear. Let clutch lever go again and give gas. If you turned on the choke, make sure you turn it off again as soon as engine is warm.
When you reach full speed through opening the throttle all the way, turn throttle back to 3/4; the speed hardly decreases although the engine will use less gas.

Only give as much gas as the engine can handle. Through quick and high reving of throttle, the fuel usage increases.
By shifting down, use the brakes if necessary and close throttle at the same time. Pull clutch lever and shift down to the next gear. Let clutch lever go slowely and open throttle or shift down again.
NOTE:
DEDICATED TO NOTHING BUT OFFROAD RACING, 400/520 SX/EXC MODELS MAKE NO COMPROMISES IN THEIR DESIGN. AS SUCH, THEY DO NOT INCLUDE ANY RADIATOR FAN, AND THE SIZE OF THE RADIATOR IS DIMENSIONED FOR OPTIMUM ERGONOMICS.
IN NORMAL RACING, THE COOLING SYSTEM IS SUFFICIENT.
IF YOU USE YOUR MOTORBIKE IN OTHER CONDITIONS, PLEASE NOTE THAT
– THE E-STARTER ALLOWS YOU TO START EXC MODELS AGAIN AT ANY TIME. THEREFORE, TURN OFF THE ENGINE IF YOU INTEND TO RUN
ENGLISH |
|
|
YOUR MOTORCYCLE IN IDLE OR AT STANDSTILL FOR LONGER PERIODS |
||
|
|
OF TIME (MORE THAN 2 MINUTES). |
|
||
|
|
|
|
||
|
|
– |
AVOID LETTING THE CLUTCH SLIP FREQUENTLY AND FOR EXTENDED |
||
|
|
|
PERIODS. THIS WOULD CAUSE THE ENGINE OIL TO HEAT UP, THEREBY |
||
|
|
|
HEATING UP THE ENGINE AND THE COOLING SYSTEM. RATHER, YOU |
||
|
|
|
SHOULD DRIVE AT LOW SPEEDS (4-STROKE STYLE - LETTING THE |
||
|
|
|
ENGINE PULL YOU) AND NOT AT HIGH SPEEDS NOT BY LETTING THE |
||
|
|
|
CLUTCH SLIP (2-STROKE STYLE). |
|
|
|
|
|
|
|
|
|
|
|
|
WARNING |
|
|
|
– OBSERVE THE TRAFFIC REGULATIONS, DRIVE DEFENSIVELY AND TRYING |
|||
|
|
|
TO LOOK AHEAD AS FAR AS POSSIBLE SO THAT ANY HAZARDS CAN BE |
||
|
|
|
RECOGNIZED AS EARLY AS POSSIBLE. |
|
|
12 |
|
– |
ADJUST YOUR DRIVING SPEED ACCORDING TO THE CONDITIONS AND |
||
|
|
YOUR DRIVING SKILLS. |
|
|
|
|
|
|
|
|
|
–DRIVE CAREFULLY UN UNKNOWN ROADS OR ON UNFAMILIAR TRIALS.
–WHEN DRIVING OFF-ROAD, ALWAYS HAVE A FRIEND ON A SECOND
MOTORCYCLE TO KEEP YOU COMPANY, SO THAT YOU CAN HELP EACH OTHER SHOULD DIFFICULTIES ARISE.
– REPLACE HELMET VISOR OR GOGGLE LENS WHEN SCRATCHED OR DAMAGED. IF BRIGHT LIGHT SHINES THROUGH A SCRATCHED VISOR OR LENS, THE OPERATOR WILL BE BLINDED.
– AFTER FALLING WITH THE MOTORCYCLE, CHECK ALL FUNCTIONS THOROUGHLY BEFORE STARTING UP OPERATIONS AGAIN.
– A TWISTED HANDLEBAR MUST ALWAYS BE REPLACED. DO NOT ADJUST THE HANDLEBAR, IT WILL LOSE STA-BILITY.
! |
CAUTION |
! |
– HIGH RPM RATES WHEN THE ENGINE IS COLD HAVE AN ADVERSE EFFECT ON THE LIFE OF YOUR ENGINE. WE RECOMMEND YOU RUN THE ENGINE IN A MODERATE RPM RANGE FOR A FEW MILES GIVING IT A CHANCE TO WARM UP. AFTER THAT NO FURTHER PRECAUTIONS IN THIS RESPECT NEED BE TAKEN. THE ENGINE HAS REACHED ITS OPERA- TING TEMPERATURE AS SOON AS THE RADIATORS BECOME WARM.
– NEVER HAVE THE THROTTLE WIDE OPEN WHEN CHANGING DOWN TO A LOWER GEAR. THE ENGINE WILL OVER-REV, DAMAGING THE VALVES. IN ADDITION, THE REAR WHEEL LOCKS SO THAT THE MOTORCYCLE CAN EASILY GET OUT OF CONTROL.
– LONG WHEELIES LEAD TO A DROP IN THE OIL PRESSURE WHICH CAN LEAD TO MOTOR DAMAGE.
– IF ANY ABNORMAL VIBRATIONS OCCUR WHILE DRIVING, CHECK THAT THE ENGINE FASTENING BOLTS ARE TIGHT.
– IN THE EVENT THAT, WHILE RIDING ON YOUR MOTORCYCLE, YOU NOTICE ANY UNUSUAL OPERATION-RELATED NOISE, STOP IMMEDIA- TELY, TURN THE ENGINE OFF, AND CONTACT AN AUTHORIZED KTM DEALER.
– NEVER START YOUR MOTORCYCLE IF NO AIR FILTER HAS BEEN MOUN- TED; OTHERWISE, DUST AND DIRT MAY ENTER THE ENGINE AND CAUSE INCREASED WEAR.
Braking
Close throttle and apply the hand and foot brakes at the same time. When driving on sandy, wet or slippery ground use mainly the rear wheel brake. Always brake with feeling, blocking wheels can cause you to skid or fall. Also change down to lower gears depending on your speed.
When driving down hill, use the braking effect of the engine. Change down one or two gears but do not overspeed the engine. In this way, you will not need to brake so much and the brakes will not overheat.
|
WARNING |
|
– IN CASE OF RAIN, AFTER WASHING THE MOTORCYCLE, AFTER RIDES THROUGH WATER AND IN CASE OF RIDES ON WET OFF-ROAD TRACKS, HUMID OR DIRTY BRAKE DISCS CAN DELAY THE BRAKING EFFECT. THE BRAKES MUST BE PULLED UNTIL THEY ARE DRY OR CLEAN.
– RIDES ON SALT-STREWED OR DIRTY ROADS CAN ALSO DELAY THE BRA- KING EFFECT. THE BRAKES MUST BE PULLED UNTIL THEY ARE CLEAN.
– DIRTY BRAKE DISCS CAUSE INCREASED TEAR OF BRAKE PADS AND BRAKE DISCS.
– WHEN YOU BRAKE, THE BRAKE DISCS, BRAKE PADS, BRAKE CALIPER AND BRAKE FLUID HEAT UP. THE HOTTER THESE PARTS GET, THE WEA- KER THE BREAKING EFFECT. IN EXTREME CASES, THE ENTIRE BRAKING SYSTEM CAN FAIL.
Stopping and parking
Apply the brakes fully and put the engine into neutral. To turn off the engine, push the short-circuit button or the emergencyOFF button with the engine at idling speed until the engine stops. Turn the fuel tap to the OFF position, park on an area where the ground is firm, and lock the motorcycle.
|
WARNING |
|
– NEVER |
LEAVE YOUR MOTORCYCLE WITHOUT SUPERVISION IF THE |
|
ENGINE IS RUNNING.
– MOTORCYCLE ENGINES PRODUCE A GREAT AMOUNT OF HEAT WHILE RUNNING. THE ENGINE, EXHAUST PIPE, MUFFLER, BRAKE ROTORS, AND SHOCK ABSORBERS CAN BECOME VERY HOT. DO NOT TOUCH ANY OF THESE PARTS AFTER OPERATING THE MOTORCYCLE, AND TAKE CARE TO PARK IT WHERE PEDESTRIANS ARE NOT LIKELY TO TOUCH IT AND GET BURNED.
! CAUTION !
– NEVER USE THE HAND DECOMPRESSION LEVER TO TURN OFF THE ENGINE. RATHER, USE THE SHORT-CIRCUIT BUTTON OR THE EMER- GENCY-OFF BUTTON.
– CLOSE THE FUEL TAP WHEN LEAVING YOUR VEHICLE.OTHERWISE THE CARBURETTOR CAN FLOOD AND FUEL WILL ENTER THE ENGINE.
– NEVER PARK YOUR MOTORCYCLE IN PLACES WHERE THERE EXIST FIRE HAZARDS DUE TO DRY GRASS OR OTHER EASILY FLAMMABLE MATERIALS.
NOTE REGARDING THE SIDE STAND:
Use your foot to kick side stand forward up to the stop and lean the motorcycle sideways. Make sure that the ground is solid and that your motorcycle is standing securely. Just in case, you can shift into first gear.
! |
CAUTION |
! |
THE SIDE STAND IS DESIGNED TO BEAR ONLY THE LOAD OF THE MOTORCYCLE. THE SIDE STAND AND/OR THE FRAME CAN BE DAMAGED AND THE MOTORCYCLE CAN FALL OVER IF YOU MOUNT THE MOTOR- CYCLE, THUS PUTTING AN ADDITIONAL LOAD ON THE SIDE STAND.

|
|
PERIODIC MAINTENANCE SCHEDULE |
KTM |
|
|
KTM |
|
|||||||
|
|
rider |
|
|
dealer |
|
||||||||
|
|
|
|
|
11.99 |
|
starteachbefore |
|
washingafter |
afterservice,1st orhours3 consumptionfuell20 |
orhours15after consumptionfuell001 |
orhours30after consumptionfuell002 |
yearaonceleastat |
|
|
|
|
|
|
|
|
|
|
||||||
|
|
|
|
|
400/520 SX RACING |
|
|
|
|
|
|
|
|
|
|
|
|
|
|
400/520 EXC RACING |
|
|
|
|
|
|
|
|
|
|
|
|
|
|
|
|
|
|
|
|
|
|
|
|
|
|
|
|
|
|
|
|
|
|
|
|
|
|
|
|
|
|
|
|
|
|
|
|
|
|
|
|
|
|
|
|
IF THE MOTORCYCLE IS USED PRIMARILI FOR OFF ROAD RIDING OR COMPETITIVE |
|
|
|
|
|
|
|
|||||
|
|
RACING, THE 15 HOUR SERVICE NEEDS TO BE CARRIED OUT AFTER EACH RACE |
|
|
|
|
|
|
|
|
|
|||
|
|
|
|
|
|
|
|
|
|
|
|
|
|
|
|
|
|
|
|
|
|
|
|
|
|
|
|
|
|
|
|
Check engine oil level |
|
|
|
|
|
|
|
|||||
|
|
Change engine oil |
|
|
|
|
|
|
|
|||||
|
|
|
|
|
|
|
|
|
|
|
|
|
|
|
|
|
Clean short and long oil screens and magnet of the drain plug whenever you exchange the engine oil |
|
|
|
|
|
|
|
|||||
|
|
|
|
|
|
|
|
|
|
|
|
|
|
|
|
|
Change short and long oil filter unit |
|
|
|
|
|
|
|
|||||
|
|
|
|
|
|
|
|
|
|
|
|
|
|
|
|
|
Check oil line for leakage and proper instalment |
|
|
|
|
|
|
|
|||||
|
|
Check valve clearance and adjust if necessary |
|
|
|
|
|
|
|
|||||
|
|
|
|
|
|
|
|
|
|
|
|
|
|
|
|
|
Change spark plug |
|
|
|
|
|
|
|
|||||
|
|
Drain and clean carburator float bowl |
|
|
|
|
|
|
|
|||||
|
|
|
|
|
|
|
|
|
|
|
|
|
|
|
|
|
Adjust idling |
|
|
|
|
|
|
|
|||||
|
|
Check breather hoses of engine gase, gas tank and carburator for correct position without |
buckles |
|
|
|
|
|
|
|||||
|
|
Clean air filter and air filter box |
|
|
|
|
|
|
|
|||||
|
|
|
|
|
|
|
|
|
|
|
|
|
|
|
|
|
Check sprockets, chain guides and chain for wear |
|
|
|
|
|
|
|
|||||
|
|
Clean and lube chain |
|
|
|
|
|
|
|
|||||
|
|
|
|
|
|
|
|
|
|
|
|
|
|
|
|
|
Check chain tension |
|
|
|
|
|
|
|
|||||
|
|
Check cooling liquid level |
|
|
|
|
|
|
|
|||||
|
|
|
|
|
|
|
|
|
|
|
|
|
|
|
|
|
Check quality of antifreeze |
|
|
|
|
|
|
|
|||||
|
|
Check cooling system for leaks |
|
|
|
|
|
|
|
|||||
|
|
|
|
|
|
|
|
|
|
|
|
|
|
|
|
|
Check exhaust system for leakage |
|
|
|
|
|
|
|
|||||
|
|
Change exhaust muffler packing |
|
|
|
|
|
|
|
|||||
|
|
|
|
|
|
|
|
|
|
|
|
|
|
|
|
|
Clean spark arrestor (EXC USA) |
|
|
|
|
|
|
|
|||||
|
|
Check exhaust brackets |
|
|
|
|
|
|
|
|||||
|
|
|
|
|
|
|
|
|
|
|
|
|
|
|
|
|
Check brake fluid level front and rear |
|
|
|
|
|
|
|
|||||
|
|
Change brake fluid |
|
|
|
|
|
|
|
|||||
|
|
|
|
|
|
|
|
|
|
|
|
|
|
|
|
|
Check brake pad thickness |
|
|
|
|
|
|
|
|||||
|
|
Check brake discs for wear and damage |
|
|
|
|
|
|
|
|||||
|
|
Check condition and correct instalment of brake hoses |
|
|
|
|
|
|
|
|||||
|
|
|
|
|
|
|
|
|
|
|
|
|
|
|
|
|
Check freeplay and easy operation of hand brake lever and foot brake lever |
|
|
|
|
|
|
|
|||||
|
|
Check oil level of the master cylinder of the hydraulic clutch |
|
|
|
|
|
|
|
|||||
|
|
|
|
|
|
|
|
|
|
|
|
|
|
|
|
|
Change the oil of the hydraulic clutch |
|
|
|
|
|
|
|
|||||
|
|
Check adjustment and function of telescopic fork |
|
|
|
|
|
|
|
|||||
|
|
|
|
|
|
|
|
|
|
|
|
|
|
|
|
|
Check telescopic fork for leaks |
|
|
|
|
|
|
|
|||||
|
|
|
|
|
|
|
|
|
|
|
|
|
|
|
|
|
Loosen breather screws at fork legs (overpressure) |
|
|
|
|
|
|
|
|||||
|
|
Change fork oil |
|
|
|
|
|
|
|
|||||
|
|
|
|
|
|
|
|
|
|
|
|
|
|
|
|
|
Perform a full maintenance job for the telescopic fork |
|
|
|
|
|
|
|
|||||
|
|
Clean dust scrabber on telescopic fork |
|
|
|
|
|
|
|
|||||
|
|
Check steering head bearing clearance and adjust if necessary |
|
|
|
|
|
|
|
|||||
|
|
|
|
|
|
|
|
|
|
|
|
|
|
|
|
|
Clean and grease steering head bearings and its seals |
|
|
|
|
|
|
|
|||||
|
|
Check adjustment and funktion of shock absorber |
|
|
|
|
|
|
|
|||||
|
|
|
|
|
|
|
|
|
|
|
|
|
|
|
|
|
Perform a full maintenance job for the shock absorber |
|
|
|
|
|
|
|
|||||
|
|
Servicing swingarm pivots |
|
|
|
|
|
|
|
|||||
|
|
Check tightness of spokes and rim join |
|
|
|
|
|
|
|
|||||
|
|
|
|
|
|
|
|
|
|
|
|
|
|
|
|
|
Check wheel bearings for clearance |
|
|
|
|
|
|
|
|||||
|
|
Check tire condition and air pressure |
|
|
|
|
|
|
|
|||||
|
|
|
|
|
|
|
|
|
|
|
|
|
|
|
|
|
Check cables for damage and easy working |
|
|
|
|
|
|
|
|||||
|
|
Lube and adjust cables |
|
|
|
|
|
|
|
|||||
|
|
|
|
|
|
|
|
|
|
|
|
|
|
|
|
|
Check the electrical system |
|
|
|
|
|
|
|
|||||
|
|
Check adjustment of head light |
|
|
|
|
|
|
|
|||||
|
|
|
|
|
|
|
|
|
|
|
|
|
|
|
|
|
Spray emergency OFF switch, short circuit button and light switch with contact spray |
|
|
|
|
|
|
|
|||||
|
|
|
|
|
|
|
|
|
|
|
|
|
|
|
|
|
Check all screws, nuts and hose clamps for proper tightness |
|
|
|
|
|
|
|
|||||
|
|
|
|
|
|
|
|
|
|
|
|
|
|
|
|
|
Grease or lube all pivot points and sliding components |
|
|
|
|
|
|
|
|||||
|
|
|
|
|
|
|
|
|
|
|
|
|
|
|
ENGLISH
13
 Loading...