


ED English foreword.qxp 10/9/2007 3:25 PM Page 1
KIA, THE COMPANY
Now that you are the owner of a Kia Vehicle, you’ll probably be asked a lot of questions about your vehicle and the company like “What is a Kia?,” “Who is Kia?,” “What does ‘Kia’ mean?”
Here are some answers. First, Kia is the oldest car company in Korea. It’s a company that has thousands of employees focused on building high-quality vehicles at affordable prices.
The first syllable, Ki, in the word “Kia” means “to arise from to the world” or “to come up out of to the world.” The second syllable, a, means “Asia.” So, the word Kia, means “to arise from” or “to come up out of Asia to the world.”
Enjoy your Vehicle! 
ED English foreword.qxp 10/9/2007 3:25 PM Page 2
F O R E W O R D
Thank you for choosing a Kia vehicle.
When you require service, remember that your dealer knows your vehicle best. Your dealer has factory-trained technicians, recommended special tools, genuine Kia replacement parts and is dedicated to your complete satisfaction.
Because subsequent owners require this important information as well, this publication should remain with the vehicle if it is sold.
This manual will familiarize you with operational, maintenance and safety information about your new vehicle. It is supplemented by a Warranty and Maintenance book that provides important information on all warranties regarding your vehicle. We urge you to read these publications carefully and follow the recommendations to help assure enjoyable and safe operation of your new vehicle.
Kia offers a great variety of options, components and features for its various models.
Therefore, the equipment described in this manual, along with the various illustrations, may not all be applicable to your particular vehicle.
The information and specifications provided in this manual were accurate at the time of printing. Kia reserves the right to discontinue or change specifications or design at any time without notice and without incurring any obligation. If you have questions, always check with your Kia Dealer.
We assure you of our continuing interest in your motoring pleasure and satisfaction in your Kia vehicle.
© 2007 Kia Motors.
All rights reserved. Reproduction by any means, electronic or mechanical, including photocopying, recording, or by any information storage and retrieval system or translation in whole or part is not permitted without written authorization from Kia Motors.
i

ED English foreword.qxp 10/9/2007 3:25 PM Page 3
TABLE OF CONTENTS 
Introduction |
|
1 |
|
|
|
|
|
|
Your vehicle at a glance |
|
2 |
|
|
|
|
|
|
Knowing your vehicle |
|
3 |
|
|
|
|
|
|
Driving your vehicle |
|
4 |
|
|
|
|
|
|
Driving tips |
|
5 |
|
|
|
|
|
|
In case of an emergency |
|
6 |
|
|
|
|
|
|
Maintenance |
|
7 |
|
|
|
|
|
|
Specifications |
|
8 |
|
|
|
|
|
|
Index |
|
9 |
|
|
|
ii

ED English 1.qxd 3/22/2007 10:59 AM Page 1
|
|
|
|
|
|
|
|
|
|
|
|
|
Introduction |
|
1 |
|
|
|
|
|
|
|
|
|
|
|
|
|
|
|
|
How to use this manual / 1-2 |
|
|
|
|
|
Vehicle break-in process / 1-3 |
|
|
|
|
|
|
|
|
|
|
|
|
|
|
|
|
|
|
|
|
|
|
|
|
|
|
|
|
|
|
|
|
|
ED English 1.qxd 3/22/2007 10:59 AM Page 2
INTRODUCTION
HOW TO USE THIS MANUAL
We want to help you get the greatest possible driving pleasure from your vehicle. Your Owner’s Manual can assist you in many ways. We strongly recommend that you read the entire manual. Especially, in order to minimize the chance of death or injury, you must read the WARNING and CAUTION sections spread throughout the manual.
Illustrations complement the words in this manual to best explain how to enjoy your vehicle. By reading your manual, you learn about features, important safety information, and driving tips under various road conditions.
The general layout of the manual is provided in the Table of Contents. A good place to start is the index; it has an alphabetical listing of all information in your manual.
Sections: This manual has eight sections plus an index. Each section begins with a brief list of contents so you can tell at a glance if that section has the information you want.
You’ll find various WARNING’s, CAUTION’s, and NOTICE’s in this manual. These were prepared to enhance your personal safety. You should carefully read and follow ALL procedures and recommendations provided in these WARNING’s, CAUTION’s and NOTICE’s.
 WARNING
A WARNING indicates a situation in which harm, serious bodily injury or death could result if the warning is ignored.
CAUTION
A CAUTION indicates a situation in which damage to your vehicle could result if the caution is ignored.
NOTICE
A NOTICE indicates interesting or helpful information is being provided.
1 2

ED English 1.qxd 3/22/2007 10:59 AM Page 3
INTRODUCTION
VEHICLE BREAK-IN PROCESS
No special break-in period is needed. By following a few simple precautions for the first 1,000 km (600 miles) you may add to the performance, economy and life of your vehicle.
•Do not race the engine.
•Do not maintain a single speed for long periods of time, either fast or slow. Varying engine speed is needed to properly break-in the engine.
•Avoid hard stops, except in emergencies, to allow the brakes to seat properly.
•Avoid full-throttle starts.
1 3

ED English 2.qxp 6/27/2007 6:42 PM Page 1
|
|
|
|
|
|
|
|
|
|
|
|
|
|
|
Your vehicle at a glance |
|
2 |
|
|
|
|
|
|
|
|
|
|
|
|
|
|
|
|
|
|
|
Interior overview / 2-2 |
|
|
|
|
|
|
Instrument panel overview / 2-3 |
|
|
|
|
|
|
Engine compartment / 2-4 |
|
|
|
|
|
|
|
|
|
|
|
|
|
|
|
|
|
|
|
|
|
|
|
|
|
|
|
|
|
|
|
|
|
|
|
|
|
|
|
ED English 2.qxp 6/27/2007 6:42 PM Page 2
Your vehicle at a glance
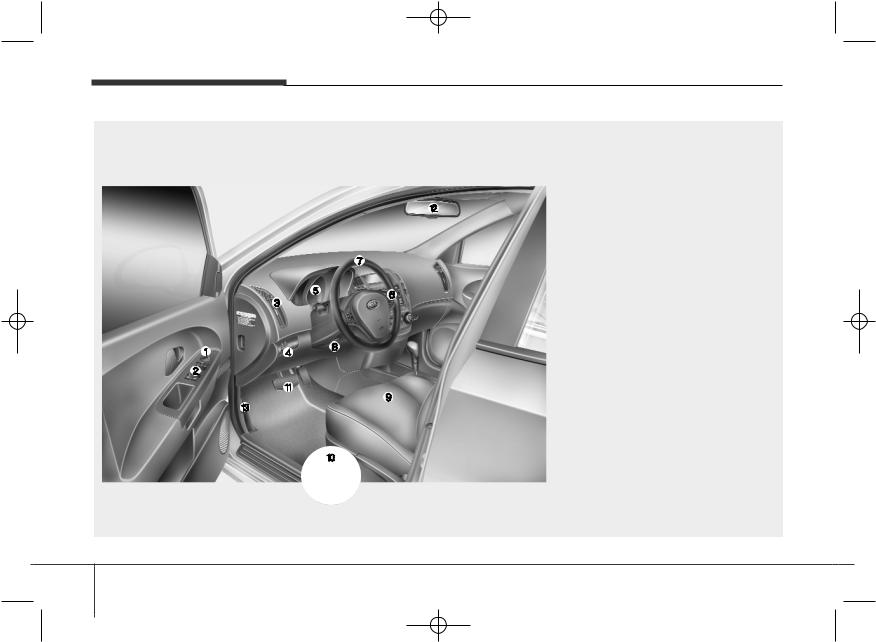
INTERIOR OVERVIEW
1. Outside rearview mirror control switch (if equipped)
2. Power window switches (if equipped)
3. Vent controls
4. Instrument panel illumination (if equipped)
5. Instrument cluster
6. Cruise control (if equipped)
7. Steering wheel
8. Steering wheel tilt (if equipped)
9. Seat
10. Fuel filler lid release lever
11. Brake pedal
12. Inside rearview mirror
13. Hood release lever
OED026001/OLD026018
2 2

ED English 2.qxp 6/27/2007 6:42 PM Page 3
Your vehicle at a glance
INSTRUMENT PANEL OVERVIEW
1. Driver’s Air Bag (if equipped)
2. Light control / Turn signals
3. Instrument cluster
4. Wiper/Washer
5. Ignition switch
6. Trip computer / Information monitor (if equipped)
7. Audio controls (if equipped)
8. Seat warmer (if equipped)
9. Hazard
10. Climate control system
11. Shift lever
12. Power outlet (if equipped)
13. Passenger’s airbag (if equipped)
14. Glove box
OED028002
2 3
ED English 2.qxp 6/27/2007 6:42 PM Page 4
Your vehicle at a glance
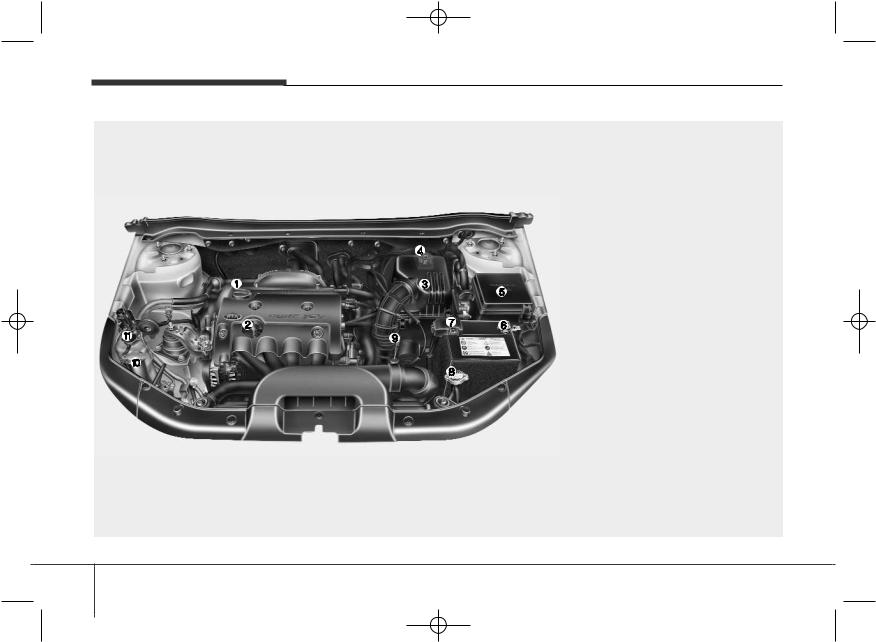
ENGINE COMPARTMENT
1. Engine oil filler cap
2. Engine oil dipstick
3. Air cleaner
4. Brake fluid reservoir
5. Fuse box
6. Negative battery terminal
7. Positive battery terminal
8. Radiator cap
9. Auto transaxle oil dipstick (if equipped)
10. Windshield washer fluid reservoir
11. Engine coolant reservoir
* The actual engine room in the vehicle may differ from the illustration.
OED076001
2 4
ED English 3.qxp 10/4/2007 5:53 PM Page 1
Keys / 3-2
Remote keyless entry / 3-3
Theft-alarm system / 3-5
Immobilizer system / 3-7
Door locks / 3-8
Windows / 3-15
Knowing your vehicle |
3 |
Seat / 3-20
Seat belts / 3-30
Air bag - supplemental restraint system / 3-53
Hood / 3-77
Fuel filler lid / 3-79
Mirrors / 3-82
Interior lights / 3-86
Storage compartment / 3-87
Interior features / 3-89
Sunroof / 3-93
Luggage net / 3-98
Mounting bracket for roof carrier / 3-99
Roof rack / 3-100
Antenna / 3-101
Barrier net / 3-102
Tonneau cover / 3-104
Luggage under tray / 3-105
Audio system / 3-106

ED English 3.qxp 10/4/2007 5:53 PM Page 2
Knowing your vehicle
KEYS
OED036001
The key code number is stamped on the plate attached to the key set. Should you lose your keys, this number will enable an authorized Kia Dealer to duplicate the keys easily. Remove the plate and store it in a safe place. Also, record the code number and keep it in a safe and handy place, but not in the vehicle.
Type A |
Type B |
Type C |
OED036001B
Key operations
(1)Master key
Used to start the engine, lock and unlock the doors, and the rear hatch.
(2)Transmitter (if equipped)
Used to lock and unlock the doors and the rear hatch.
WARNING - Ignition key
•Leaving children unattended in a vehicle with the ignition key is dangerous even if the key is not in the ignition. Children copy adults and they could place the key in the ignition. The ignition key would enable children to operate power windows or other controls, or even make the vehicle move, which could result in serious bodily injury or even death. Never leave the keys in your vehicle with unsupervised children.
•Use only Kia original parts for the ignition key in your vehicle. If an aftermarket key is used, the ignition switch may not return to ON after START. If this happens, the starter will continue to operate causing damage to the starter motor and possible fire due to excessive current in the wiring.
3 2

ED English 3.qxp 10/4/2007 5:53 PM Page 3
REMOTE KEYLESS ENTRY (IF EQUIPPED)
Type A |
Type B |
OED036002/OED037002
(1) Lock (  )
)
All doors are locked if the lock button is pressed.
(2) Unlock ( )
)
All doors are unlocked if the unlock button is pressed.
After depressing this button, the doors will be locked automatically unless you open them within
30seconds.
(3)Rear hatch unlock (  , if equipped)
The rear hatch is unlocked for 30 seconds if this button is pressed when all doors are locked.
After opening the rear hatch while all doors are locked, the rear hatch will lock when closed.
If any door is unlocked, the rear hatch will not lock when closed.
NOTICE
The transmitter will not work if any of following occur:
-The ignition key is in ignition switch.
-You exceed the operating distance limit (30 m).
-The battery in the transmitter is weak.
-Other vehicles or objects may be blocking the signal.
-The weather is extremely cold.
-The transmitter is close to a radio transmitter such as a radio station or an airport which can interfere with normal operation of the transmitter.
When the transmitter does not work correctly, open and close the door with the ignition key. If you have a problem with the transmitter, contact an authorized Kia Dealer.
Knowing your vehicle
CAUTION
Keep the transmitter away from water or any liquid. If the keyless entry system is inoperative due to exposure to water or liquids, it will not be covered by your manufacturer vehicle warranty.
Operational distance may vary depending upon the area the transmitter is used in. For example, if the vehicle is parked near police stations, government and public offices, broadcasting stations, military installations, airports, or transmitting towers, etc.
3 3

ED English 3.qxp 10/4/2007 5:53 PM Page 4
Knowing your vehicle
Type A |
|
|
|
2. Insert a slim tool into the slot and |
|
|
|
|
gently pry open the transmitter |
|
|
|
|
centre cover (2). |
|
|
|
|
3. Remove the battery cover (3, Type |
|
|
|
|
A only). |
|
|
|
|
4. Replace the battery with new one. |
|
|
|
|
When replacing the battery, make |
|
|
|
|
sure the battery positive “+” sym- |
|
|
|
|
bol faces up as indicated in the |
|
|
OED036003 |
|
illustration. |
Type B |
|
|
|
5. Install the battery in the reverse |
|
|
|
|
order of removal. |
CAUTION
CAUTION
•Using the wrong battery can cause the transmitter to malfunction. Be sure to use the correct battery.
•To avoid damaging the transmitter, don't drop it, get it wet, or expose it to heat or sunlight.
OED037003
Battery replacement
Transmitter uses a 3 volt lithium battery which will normally last for several years. When replacement is necessary, use the following procedure.
1.Remove the screw (1) using a cross-tip screwdriver. (Type A only)
The keyless entry system transmitter is designed to give you years of troublefree use, however it can malfunction if exposed to moisture or static electricity. If you are unsure how to use your transmitter or replace the battery, contact an authorized Kia dealer.
For replacement transmitters, see an Authorized Kia Dealer for reprogramming.
3 4

ED English 3.qxp 10/4/2007 5:53 PM Page 5
THEFT-ALARM SYSTEM (IF EQUIPPED)
Armed
stage
Disarmed |
Theft alarm |
stage |
stage |
Theft alarm system will not operate when the ignition key is in the ignition switch.
If the doors are locked by the transmitter key, unlock the doors with the transmitter.
Armed stage
When the ignition switch is in the “LOCK” position, and key is not in the ignition, the system will be armed and the hazard lights will flash once when the following conditions are met:
•The hood, rear hatch and doors are all closed and locked with the transmitter.
•If a door or the rear hatch is not opened within approximately 30 seconds after unlocking with the transmitter, all doors will be locked again and theft alarm system armed.
NOTICE
Do not arm the system until all passengers have left the vehicle. If the system is armed while a passenger(s) remains in the vehicle, the alarm may be activated when the remaining passenger(s) leave the vehicle. If any door (or rear hatch) or engine hood is opened within 30 seconds after the system enters the armed stage, the system is disarmed to prevent an unnecessary alarm.
Knowing your vehicle
CAUTION
Before leaving your vehicle, check if the hazard warning lights flash once, to see whether the vehicle entered the armed stage. If the hazard warning lights does not flash, the vehicle will not operate the theft alarm system as it does not enter the armed stage. Therefore, have your vehicle checked by an authorized Kia dealer as soon as possible.
3 5

ED English 3.qxp 10/4/2007 5:53 PM Page 6
Knowing your vehicle
Theft alarm stage
The alarm will be activated when:
•Any door (or rearhatch) is opened without using the transmitter.
•The engine hood is opened.
The alarm sound and flash will be ON for 30 seconds.
Disarmed stage
The armed stage will be deactivated when:
•The “  ” button on the transmitter is pressed.
After depressing unlock button, you must open the doors within 30 seconds or all doors will be locked again and automatically placed into the armed stage.
•The ignition switch is in the “ON” position.
The alarm will be deactivated when:
•The lock (  ) or unlock (
  ) button on the transmitter is pressed.
•The ignition switch is in the “ON” position for 30 seconds or more.
•The engine starts by turning the ignition key to the starting position.
NOTICE
If the ignition key is in the ignition switch, the transmitter will not function. Avoid trying to start the engine with the alarm activated.
3 6

ED English 3.qxp 10/4/2007 5:53 PM Page 7
IMMOBILIZER SYSTEM (IF EQUIPPED)
Your vehicle is equipped with an electronic engine immobilizer system to reduce the risk of unauthorized vehicle use.
The immobilizer system is comprised of a small transponder in the ignition key and electronic devices inside the vehicle.
With the immobilizer system, whenever you insert your ignition key into the ignition switch and turn it to ON, it checks and determines whether the ignition key is valid or not.
If the key is determined to be valid, the engine will start.
If the key is determined to be invalid, the engine will not start.
To deactivate the immobilizer system:
Insert the ignition key into the key cylinder and turn it to the ON position.
To activate the immobilizer system:
Turn the ignition key to the OFF position. The immobilizer system activates automatically. Without a valid ignition key for your vehicle, the engine will not start.
NOTICE
When starting the engine, do not use the key with other immobilizer keys around.
Otherwise the engine may not start or may stop soon after it starts. Keep each key separately not to have any malfunction after you receive your new vehicle.
CAUTION
Do not put metal accessories near the key or ignition key.
The engine may not start for the metal accessories may interrupt the transponder signal from normally transmitting
Knowing your vehicle
CAUTION
The transponder in your ignition key is an important part of the immobilizer system. It is designed to give years of troublefree service, however you should avoid exposure to moisture, static electricity and rough handling. Immobilizer system malfunction could occur.
CAUTION
Do not change, alter or adjust the immobilizer system because it could cause the immobilizer system to malfunction and should only be serviced by an authorized Kia dealer.
Malfunctions caused by improper alterations, adjustments or modifications to the immobilizer system are not covered by your vehicle manufacturer warranty.
3 7
ED English 3.qxp 10/4/2007 5:53 PM Page 8
Knowing your vehicle
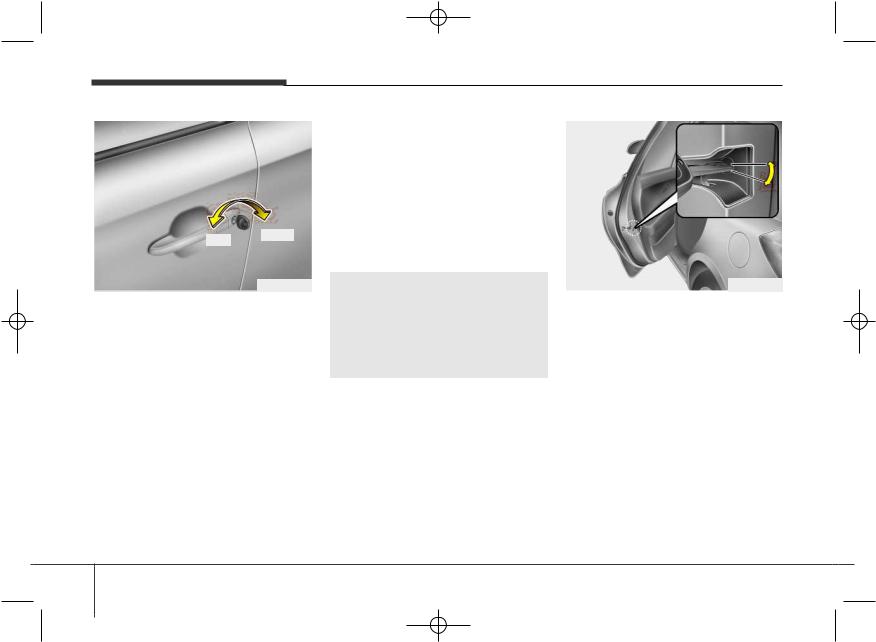
DOOR LOCKS
Lock Unlock
OED036006
Operating door locks from outside the vehicle
•Turn the key toward rear of vehicle to unlock and toward front of vehicle to lock.
•Doors can also be locked and unlocked with the transmitter key.
• Once the doors are unlocked, it |
|
|
|
may be opened by pulling the door |
|
|
|
handle. |
|
Lock |
|
• When closing the door, push the |
|
|
|
door by hand. Make sure that |
|
|
|
Unlock |
|||
doors are closed securely. |
|||
|
|
||
• If you lock/unlock the front door |
|
|
|
with a key, all vehicle doors will |
|
|
|
lock/unlock automatically. |
|
|
|
CAUTION
Always remove the ignition key, engage the parking brake, close all windows and lock all doors when leaving your vehicle unattended.
NOTICE
If the door is locked/unlocked multiple times in rapid succession with either the vehicle key or door lock switch, the system may stop operating temporarily in order to protect the circuit and prevent damage to system components.
OED036094
In case of an emergency
If the power door lock switch does not operate electrically, you can only lock the door(s) with the ignition key from the outside key hole.
The doors without the outside key hole, you can lock as follows;
1.Open the door.
2.Insert the key into the emergency door lock hole and turn the key toward the rear of the vehicle to lock.
3.Close the door securely.
The rear hatch will lock and will not unlock if you close the rear hatch when the power door lock switch does not operate electrically.
3 8
ED English 3.qxp 10/4/2007 5:53 PM Page 9
Knowing your vehicle
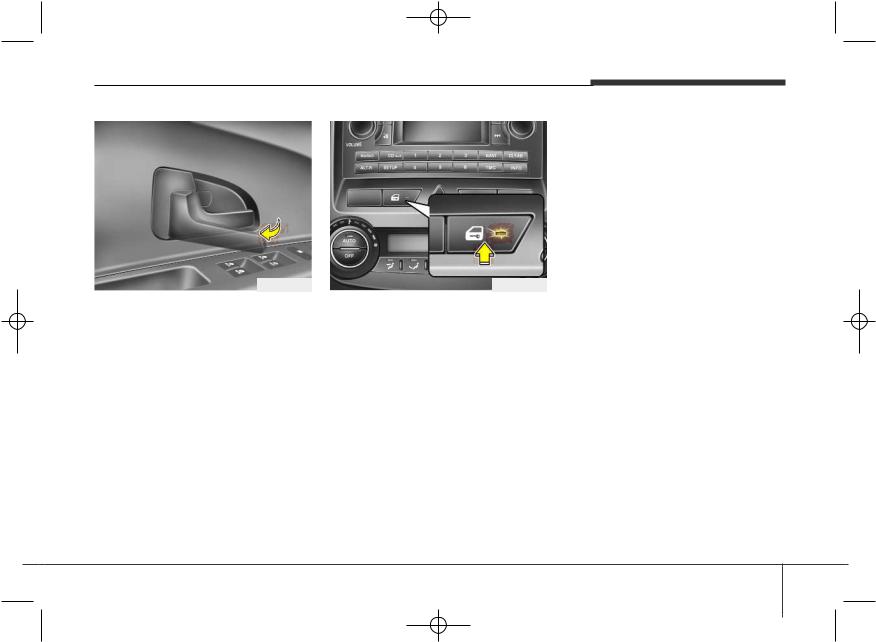
OED036008
Operating door locks from inside the vehicle
With the door handle
•Driver's side door
If the inner door handle of the front door is pulled when the door is locked, the door will unlock and open.
•Passenger's side door
If the inner door handle is pulled once when the door is locked, the door will unlock.
If the inner door handle is pulled twice, the door will open.
OED036007
With central door lock switch
It is operated by depressing the door lock switch.
•When pushing the door lock switch, all vehicle doors will lock and the indicator light on the switch will illuminate.
If any door is opened when the switch is pushed, all doors will not lock.
•If any door is unlocked, the indicator of the door lock switch will blink. If you push the switch when the indicator is blinking, all doors will lock.
•When pushing the door lock switch again, all vehicle doors will unlock and the indicator light on the switch will not illuminate.
3 9
ED English 3.qxp 10/4/2007 5:53 PM Page 10
Knowing your vehicle
Super lock system (if equipped)
If you turn the key to the “LOCK” position or depress the “LOCK” button on the transmitter to lock the doors, the locked doors are not unlocked by other tools except unlocking with the key or transmitter.
This feature is to prevent potential intruders from opening the door.
 WARNING
Do not lock the doors by super locking with the key or the transmitter with anybody left in the vehicle. The passenger in the vehicle cannot unlock the doors with the inside handle or the door lock switch. For example, if the door is locked with the transmitter, the passenger in the vehicle cannot unlock the door without the transmitter.
 WARNING
•The doors should always be fully closed and locked while the vehicle is in motion to prevent accidental opening of the door. Locked doors will also discourage potential intruders when the vehicle stops or slows.
•Be careful when opening doors and watch for vehicles, motorcycles, bicycles or pedestrians approaching the vehicle in the path of the door. Opening a door when something is approaching can cause damage or injury.
 WARNING
Leaving your vehicle unlocked can invite theft or possible harm to you or others from someone hiding in your vehicle while you are gone. Always remove the ignition key, engage the parking brake, close all windows and lock all doors when leaving your vehicle unattended.
WARNING - Unattended children
An enclosed vehicle can become extremely hot, causing death or severe injury to unattended children or animals who cannot escape the vehicle. Furthermore, children might operate features of the vehicle that could injure them, or they could encounter other harm, possibly from someone gaining entry to the vehicle. Never leave children or animals unattended in your vehicle.
3 10
ED English 3.qxp 10/4/2007 5:53 PM Page 11
Knowing your vehicle
Impact sensing door unlock system
All doors will be automatically unlocked when the impact is delivered to impact sensors while the ignition switch ON.
However, the doors may not be unlocked when there are some problems of mechanical door lock system or battery.
Speed sensing door lock system
When the speed of the vehicle keeps above 40 km/h for 1 second, it will automatically lock all doors. For deactivation of this feature, contact an authorized Kia dealer.
OED036009
Rear door child safety lock
The child safety lock is provided to help prevent children from accidentally opening the rear doors from inside the vehicle. The rear door safety locks should be used whenever children are in the vehicle.
1. Open the rear door.
2.Push the child safety lock located on the rear edge of the door to the
“lock” position. When the child safety lock is in the “lock (  )” position, rear door will not open when the inner door handle is pulled inside the vehicle.
3.Close the rear door.
4.To open the rear door, pull the outside door handle (1) .
Even though the doors may be unlocked, the rear door will not open by pulling the inner door handle (2) until rear door child safety lock is unlocked (  ).
).
3 11
ED English 3.qxp 10/4/2007 5:53 PM Page 12
Knowing your vehicle
WARNING - Rear door locks
If children accidentally open the rear doors while the vehicle is in motion, they could fall out and be severely injured or killed. To prevent children from opening the rear doors from the inside, the rear door safety locks should be used whenever children are in the vehicle.
OED036010
Rear hatch
Opening the rear hatch
•You can lock/unlock the latch (but not release it) with the central door lock system.
•If unlocked, the rear hatch can be opened by pressing the handle (1) and pulling the hatch up.
CAUTION
Do not put any heavy object on the covering shelf. It may damage the covering shelf.
 WARNING
•Do not put any object on the covering shelf. If the vehicle suddenly stops or makes a curve, the object may injure passengers.
•Watch out for the edge of the covering shelf, when you are using the luggage room. You may injure yourself.
3 12

ED English 3.qxp 10/4/2007 5:53 PM Page 13
Knowing your vehicle
Type A
OED036011
Type B
OED037011L
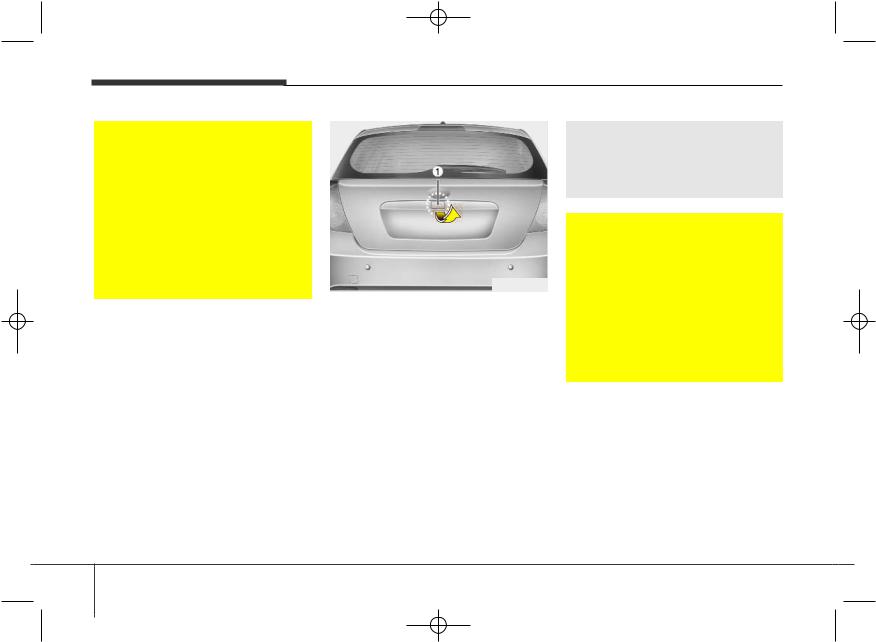
Emergency rear hatch safety release
Your vehicle is equipped with emergency rear hatch safety release lever located on the bottom of the rear hatch.
When someone is inadvertently locked in the luggage compartment, if the lever is pushed, the rear hatch latch mechanism is released and the rear hatch is opened by pushing backward.
 WARNING
•For emergency, be fully aware of the location of the emergency rear hatch safety release lever in their vehicle and how to open the rear hatch if you are accidentally locked in the luggage compartment.
•No one should be allowed to occupy the luggage compartment of the vehicle at any time. The luggage compartment is a highly dangerous location in the event of a crash.
•Use the release lever for emergency only. Use extreme caution while the vehicle is in motion.
OED036074
Luggage room lamp (if equipped)
Luggage room lamp turns on when the rear hatch is opened. It remains on until the rear hatch is securely closed.
NOTICE
Make sure to close the rear hatch securely. If it remains open while engine is not running, it may cause battery discharge because luggage room lamp remains on.
3 13

ED English 3.qxp 10/4/2007 5:53 PM Page 14
Knowing your vehicle
NOTICE
•In cold and wet climates door lock and door mechanisms may not work properly due to freezing conditions.
•When jacking up the vehicle to change a tire or repair the vehicle, do not operate the rear hatch. This could cause the rear hatch to close improperly.
WARNING - Rear hatch
The rear hatch swings upward. Make sure no objects or people are near the rear of the vehicle when opening the rear hatch.
CAUTION
Make certain that you close the rear hatch before driving your vehicle. Possible damage may occur to the rear hatch lift cylinders and attaching hardware if the rear hatch is not closed prior to driving.
WARNING - Exhaust fumes
If you drive with the rear hatch open, you will draw dangerous exhaust fumes into your vehicle which can cause serious injury or death to vehicle occupants.
If you must drive with the rear hatch open, keep the air vents and all windows open so that additional outside air comes into the vehicle.
WARNING - Rear cargo area
Occupants should never ride in the rear cargo area where no restraints are available. To avoid injury in the event of an accident or sudden stops, occupants should always be properly restrained.
3 14

ED English 3.qxp 10/4/2007 5:53 PM Page 15
WINDOWS
Type A |
Type B |
Type C |
OED036012
Knowing your vehicle
Power windows (if equipped)
(1)Driver’s door power window switch
(2)Front passenger’s door power window switch
(3)Rear door (left) power window switch (if equipped)
(4)Rear door (right) power window switch (if equipped)
(5)Window opening and closing
(6)Automatic power window (if equipped)
(7)Power window lock switch
• Power window timer
The power windows can be operated for approximately 30 seconds after the ignition key is removed or turned to the ACC or LOCK position. However, if the front doors are opened, the power windows cannot be operated even within the 30 seconds after the ignition key removal.
3 15

ED English 3.qxp 10/4/2007 5:53 PM Page 16
Knowing your vehicle
Power windows (if equipped)
The ignition switch must be in the ON position for power windows to operate. Each door has a power window switch that controls that door’s window. However, the driver has a power window lock switch which can block the operation of passenger windows.
If you notice buffeting and pulsation (wind shock) with either side window open, you should open the opposite window slightly to reduce the condition.
CAUTION
•To prevent the power window system from the possibility of damage, do not open or close two windows at the same time. This will also ensure the longevity of the fuse.
•Never try to operate the main switch on the driver's door and the individual door window switch in opposing directions at the same time. If this is done, the window will stop and cannot be opened or closed.
 WARNING
•Make sure heads and hands are safely out of the way before closing a window.
•Do not allow children to play with the power windows. Keep the driver’s door power window lock switch in the LOCK position (depressed). Serious injury can result from unintentional window operation by the child.
•Do not extend face or arms outside through the window opening while driving.
•Always double check to make sure all arms, hands and other obstructions are safely out of the way before closing a window
3 16

ED English 3.qxp 10/4/2007 5:54 PM Page 17
Knowing your vehicle
Type A
OED036084
Window opening and closing
Type A
The driver’s door has a master power window switch that controls all the windows in the vehicle. To open or close a window, press down (5) or pull up (5) the front portion of the corresponding switch.
Type B
OED036085
Type B - Automatic power window down (driver’s window, if equipped)
Depressing the power window switch momentarily to the second detent position (6) completely lowers the driver’s window even when the switch is released. To stop the window at the desired position while the window is in operation, pull up the switch momentarily to the opposite direction of the window movement.
Type C
OED036086
Type C - Automatic power window
Depressing or pulling up the power window switch momentarily to the second detent position (6) completely lowers or lifts the window even when the switch is released. To stop the window at the desired position while the window is in operation, pull up or depress the switch momentarily to the opposite direction of the window movement.
3 17
ED English 3.qxp 10/4/2007 5:54 PM Page 18
Knowing your vehicle
OED036087
Automatic window reversal (When window is closed by the automatic power window)
If the upward movement of the window is blocked by an object or part of the body, the window will detect the resistance and will stop upward movement. The window will then lower approximately 30cm (11.8 in) from the top to allow the object to be cleared.
 WARNING
•The automatic window reversal feature will only operate when the automatic power window operation feature is used. Automatic window reversal will not operate if the window is raised using the first detent position (5) on the power window switch. Always double check to make sure all faces, arms, hands and other obstructions are safely out of the way of before operating the power window.
•If an object less than 4 mm in diameter is caught between the window glass and the upper window channel, the automatic reversal may not detect the resistance and will not operate. Therefore, always check for any obstructions before raising any window.
If the automatic power window system does not operate properly, you may reset as follows:
1.Turn the ignition key to ON position.
2.Close each window and continue pulling up on each power window switch for at least 0.5 second after the window is completely closed.
3 18

ED English 3.qxp 10/4/2007 5:54 PM Page 19
Knowing your vehicle
OED036013
Power window lock switch (if equipped)
•The driver can disable the power window switches on a rear passenger door by depressing the power window lock switch located on the driver’s door to LOCK (pressed).
•When the power window lock switch is ON, the driver’s master control cannot operate the rear passenger door power windows either.
OED036088
Manual windows (if equipped)
Use the window crank to open and close each window.
3 19

ED English 3.qxp 10/4/2007 5:54 PM Page 20
Knowing your vehicle
SEAT
Driver’s seat
(1) Seat adjustment, forward / backward
(2) Seatback recliner
(3) Seat adjustment, height*
(4) Seat warmer*
(5) Lumbar support*
(6) Headrest adjustment
Front passenger seat
(7) Seat adjustment, forward / backward
(8) Seatback recliner
(9) Seat warmer*
(10) Lumbar support*
(11) Headrest adjustment
Rear seat
(12) Split folding rear seat
(13) Armrest*
(14) Headrest adjustment * ; if equipped
OED036014
3 20
 Loading...