


KCA-BT100
Bluetooth HANDS FREE BOX
INSTRUCTION MANUAL
BOÎTIER MAINS-LIBRES Bluetooth
MODE D’EMPLOI
CAJA DE MANOS LIBRES Bluetooth
MANUAL DE INSTRUCCIONES
Take the time to read through this instruction manual.
Familiarity with installation and operation procedures will help you obtain the best performance from your new Bluetooth hands free box.
For your records
Record the serial number, found on the back of the unit, in the spaces designated on the warranty card, and in the space provided below. Refer to the model and serial numbers whenever you call upon your Kenwood dealer for information or service on the product. Model KCA-BT100 Serial number
US Residence Only
Register Online
Register your Kenwood product at www.Kenwoodusa.com
© B64-3478-00/00 (KW)

Contents
Safety Precautions |
3 |
Notes |
4 |
Setting up the Bluetooth Function |
5 |
Before Use |
5 |
Registering Your Cell-Phone |
5 |
Downloading the Phone Book |
5 |
Hands-Free Unit Control |
12 |
Hands-Free Control screen |
12 |
Remote Controller |
13 |
Key Operation |
13 |
When Called |
14 |
When Dialing |
14 |
Quick Dialing |
14 |
Calling by Phone Book |
15 |
Redialing |
16 |
Setting up the Hands-Free Phone |
16 |
Selecting a Hands-Free Phone |
17 |
Deleting the Hands-Free Phone |
17 |
Accessories/ |
|
Installation Procedure |
18 |
Connection |
19 |
Installation |
20 |
Troubleshooting Guide |
21 |
Specifications |
21 |
General Features |
6 |
Answering a Phone Call |
6 |
Switching to the Private Mode |
6 |
Clearing the Disconnection Message |
6 |
Adjusting the Voice Volume during a Call |
6 |
Disconnecting a Call |
6 |
Switching between Display Modes |
6 |
Dialing Method |
7 |
Selecting the Dialing Mode |
7 |
Making a Call by Entering a Phone Number |
7 |
Dialing by Using the Quick Dialing Function |
7 |
Registering to the Preset Dial Number List |
8 |
Dialing by Using the Phone Book |
8 |
Dialing by Using the Outgoing Call List |
8 |
Dialing by Using the Incoming Call List |
9 |
Remote Control |
9 |
Functions of the buttons |
9 |
Menu System |
10 |
Menu System |
10 |
Selecting the Cell-Phone You Wish to |
|
Connect |
10 |
Deleting a Registered Cell-Phone |
10 |
Displaying the Cell-Phone Status |
10 |
Setting the Time Interval for Automatic |
|
Answer |
11 |
Setting up the Voice Output Speakers |
11 |
Setting the Beep of the Incoming Call |
11 |
2 | English

Safety Precautions
2WARNING
To prevent injury or fire, take the following precautions:
•To prevent a short circuit, never put or leave any metallic objects (such as coins or metal tools) inside the unit.
•Mounting and wiring this product requires skills and experience. For safety’s sake, leave the mounting and wiring work to professionals.
2CAUTION
To prevent damage to the machine, take the following precautions:
•Do not install the unit in a spot exposed to direct sunlight or excessive heat or humidity. Also avoid places with too much dust or the possibility of water splashing.
FCC Notice
This device complies with part 15 of the FCC rules. Operation is subject to the following two conditions:
(1) this device may not cause harmful interference, and (2) this device must accept any interference received, including interference that may cause undesired operation.
CAUTION:
To maintain compliance with FCC's RF exposure guidelines, use only the supplied antenna. Unauthorized antenna, modification, or attachments could damage the transmitter and may violate FCC regulations.
IC Regulatory Information
This device complies with RSS210 of Industry Canada. Operation is subject to the following two condition:
(1) this device may not cause interference, and (2) this device must accept any interference, including interference that may cause undesired operation of this device.
This Class B digital apparatus complies with Canadian ICES-003.
The Bluetooth word mark and logos are owned by the Bluetooth SIG, Inc. and any use of such marks by Kenwood Corporation is under license. Other trademarks and trade names are those of their respective owners.
English | 3

Notes
•If you experience problems during installation, consult your Kenwood dealer.
•When you purchase optional accessories, check with your Kenwood dealer to make sure that they work with your model and in your area.
•The illustrations of the display and the panel appearing in this manual are examples used to explain more clearly how the controls are used. Therefore, what appears on the display in the illustrations may differ from what appears on the display on the actual equipment, and some of the illustrations on the display may be inapplicable.
Kenwood Receivers available for this unit
The receiver units that can be used with KCA-BT100 are as follows: (As of September 2006)
Audio receiver
DPX501*, DPX701, KDC-MP532U*, KDC-MP632U*, KDC-MP832U, KDC-X590*, KDC-X890, KDV-412*
Monitor receiver
DDX6019
For details on the compatible receivers to be released in the future, access the following URL: http://www.kenwood.com/bt/bt100/
• *: Set the display character conversion function switch to "2". For more details, see <Display Character Conversion Function> (page 18).
About the Remote Controller
The audio receiver requires a remote controller with numeric buttons to enter phone numbers directly. To make a call using the remote controller, the [ ] button must be provided on the remote controller. For more details, access the following URL: http://www.kenwood.com/bt/bt100/
•You cannot use a remote controller depending on the type of your control unit.
About the Cell-Phone
This unit conforms to the following Bluetooth specifications:
Version |
Bluetooth Standard Ver. 1.2 |
Profile |
HFP (Hands Free Profile) |
|
OPP (Object Push Profile) |
For the cell-phones verified for compatibility, access the following URL: http://www.kenwood.com/bt/bt100/
•The units supporting the Bluetooth function have been certified for conformity with the Bluetooth Standard following the procedure prescribed by Bluetooth
SIG. However, it may be impossible for such units to communicate with your cell-phone depending on its type.
•HFP is a profile used to make a hands-free call.
•OPP is a profile used to transfer data such as a phone book between units.
4 | English

Setting up the Bluetooth Function
Before Use
•You need to register your cell-phone before using it with this unit. For more details, see <Registering Your Cell-Phone> (page 5).
•If you have registered two or more cell-phones, you need to select one of them. For more details, see <Selecting the Cell-Phone You Wish to Connect> (page 10) or <Selecting a Hands-Free Phone> (page 17).
•To use the Phone Book, it must be downloaded to this unit in advance. For details, see <Downloading the Phone Book> (page 5).
•You can set up the voice output speaker. For more details, see <Setting up the Voice Output Speakers> (page 11) or <Setting up the Hands-Free Phone> (page 16).
Registering Your Cell-Phone
To make your cell-phone usable with this unit, you need to register it (pairing). You can register up to five cell-phones to this unit.
1Turn on the control unit.
2Start cell-phone registration on the cell-phone
By operating the cell-phone, carry out hands-free phone registration (pairing). Select "KCA-BT100" from the list of connected units.
3Enter a path key
Enter "1234" as a path key.
Check that registration is complete on the cellphone.
4By operating the cell-phone, start hands-free connection.
•For how to operate the cell-phone, refer to the Instruction Manual that comes with your cell-phone.
•You can register up to five cell-phones. Registering the sixth cell-phone will delete the cell-phone registered most previously.
•You cannot register a cell-phone when another cellphone is in the hands-free connection status. End the hands-free connection, and then register a new cellphone.
•If two or more "KCA-BT100" are displayed in the list of connected units, another "KCA-BT100" is probably used nearby. Move your car, and then check that only one "KCA-BT100" is displayed.
Downloading the Phone Book
Download the phone book data from the cellphone to this unit so that you can use the Phone Book of this unit.
1By operating the cell-phone, end the hands-free connection.
2By operating the cell-phone, send the phone book data to this unit
By operating the cell-phone, download the phone book data to this unit.
During downloading:
"Downloading", "DOWNLOAD", or "Now Downloading…" is displayed.
After completion of downloading (for Audio receiver):
"Complete", "Completed", or "COMPLETE" is displayed.
3By operating the cell-phone, start the handsfree connection.
To clear the downloading completion message (for Audio receiver):
Press any button.
•For how to operate the cell-phone, refer to the Instruction Manual that comes with your cell-phone.
•Up to 300 phone numbers can be registered for each registered cell-phone.
•Up to 32 digits can be registered for each phone number along with up to 40 characters representing a name.
•Depending on the type of your cell-phone, the following restrictions are placed:
-The phone book data cannot be downloaded normally.
-Characters in the Phone Book are garbled.
-The phone book data cannot be downloaded normally if it contains images. It may take several hours to a full day to download the phone book depending on the total image size.
•To cancel downloading of the phone book data, operate the cell-phone.
English | 5
General Features (For Audio receiver)
Answering a Phone Call
When "CALL" or "Call" is displayed, "(Calling party name)" or "(Phone number)" is also displayed.
Press the [AUDIO] button or one of [1] – [6] buttons.
Rejecting an Incoming Call
Press the [ATT] button for at least 1 second.
•You can set up the unit so that the incoming call is received after lapse of a predetermined time. For more details, see <Setting the Time Interval for Automatic Answer> (page 11).
•Inserting a disc such as a CD will disconnect your call.
•Setting the cell-phone in the private mode can disable the hands-free function.
•When a call without caller ID arrives, "No Name No Number", "No Number", or "NO-NMBER" is displayed.
•The name of the calling party is displayed if it has already been registered in the Phone Book.
Switching to the Private Mode
You can switch between the private mode (talking directly on the cell-phone) and the hands-free mode.
Press the Control knob ([38]).
Talk modes are switched as follows:
Display |
Talk mode |
"Private"/ "PRIVATE"/ "PV TALK" |
Private talk |
"Handsfree"/ – / "HF TALK" |
Hands-free talk |
•Depending on the type of your cell-phone, switching to the private talk mode may select the source that was used before commencing the hands-free connection. If this happens, the source cannot be switched back to
the hands-free talk mode by operating this unit. Operate your cell-phone to return to the hands-free talk mode.
Clearing the Disconnection Message
You can clear the message displayed after disconnection of the cell-phone.
Press the [ATT] button for at least 1 second.
"Disconnect" or "DISCONCT" disappears.
•It may take some time before the disconnected cellphone is reconnected.
Adjusting the Voice Volume during a Call
You can adjust the voice volume during a call.
Turn the [VOL] knob.
•The volume adjusted during the current call will be effective for the next and subsequent calls.
•Increasing the volume excessively is more likely to produce echo. If echo is produced, turn down the volume as low as possible. Echo increases in proportion to the volume.
Disconnecting a Call
Press the [SRC] button.
•You can also press the [ATT] button for at least 1 second to end a call.
Switching between Display Modes
You can switch between the Phone Book and the Call List.
Press the [DISP]/ [AUTO]/ [TI] button.
If the [DISP] button is not provided, press the [AUTO] or [TI] button.
For the Audio receiver with Multi-function Key System:
Press the [AUTO]/ [TI] button.
Pressing this button toggles between the name list and the phone number list.
Scrolling the Display
You can scroll through the list of phone numbers or names. For the operation method, refer to <Text/ Title Scroll> in the Instruction Manual that comes with the control unit.
•With the control unit on which only the name of the calling party is displayed when receiving a call or quick dialing, you can switch to the phone number display mode by performing the above operation.
•Depending on the type of your control unit, the following restrictions are placed.
-Up to 19 characters can be displayed.
-The # letter cannot be displayed, or "|" (all segments are lit) is displayed for #.
-You cannot switch between display modes.
6 | English

Dialing Method (For Audio receiver)
Selecting the Dialing Mode
You can dial in five different ways.
1Enter the dialing method selection mode
Press the [ATT] button for at least 1 second.
"DIAL" or "N-DIAL" is displayed.
2Select a dialing method
Press the Control knob ([38]).
Pressing this knob toggles between the following dialing methods:
For the Audio receiver with Multi-function Key System:
1Press the [NEXT] button.
Select the key function section.
2Press the [1] ("DIAL") – [4] ("IN-C") button.
Display |
Multi key |
Dialing method |
"DIAL"/ |
[1] ("DIAL") |
Dial by entering a phone number. |
"N-DIAL" |
|
(page 7) |
|
|
Dial by using the quick dialing function. |
|
|
(page 7) |
"INITIAL"/ |
[2] |
Dial by searching for the initial in the |
"PH-BOOK1" |
("PHBK")* |
Phone Book (page 8) |
"PH.BOOK"/ |
[2] |
Dial by searching the Phone Book in the |
"PH-BOOK2" |
("PHBK")* |
alphabetical order. (page 8) |
"OUT"/ |
[3] ("OUT-C") |
Dial by using the outgoing call list. |
"OUT-CALL" |
|
(page 8) |
"IN"/ |
[4] ("IN-C") |
Dial by using the incoming call list. |
"IN-CALL" |
|
(page 9) |
3Exit the dialing method selection mode
Press the [ATT] button for at least 1 second.
•To use the Phone Book, it must have been downloaded from the cell-phone. For more details, see <Downloading the Phone Book> (page 5).
•The outgoing call list and the incoming call list are the lists of calls originated from and received at this unit. They are not the ones stored in the cell-phone memory.
•* With the Multi-function Key System, pressing the [2] ("PHBK") button switches between the Phone Book search methods.
Function of remote controller
Making a Call by Entering a Phone Number
You can make a call by entering a phone number.
1Enter the number dial mode
Select the "DIAL" or "N-DIAL" display.
Refer to <Selecting the Dialing Mode> (page 7).
2Enter a phone number
Press the number ([1] – [0]), #([FM]), *([AM]), or +([¢]) button on the remote controller.
3Make a call
Press the [DIRECT] button on the remote controller.
"CALL" or "Call" is displayed.
To erase the entered phone number digit by digit:
Press the [4] button on the remote controller.
•You can input max 32 digits.
•Depending on the type of your control unit, "|" (all segments are lit) is displayed for #.
Dialing by Using the Quick Dialing Function
You can dial by calling the phone number registered to the preset dial number list. For how to preset a phone number, refer to <Registering to the Preset Dial Number List> (page 8).
1Enter the number dialing mode
Select the "DIAL" or "N-DIAL" display.
Refer to <Selecting the Dialing Mode> (page 7).
2Select the button corresponding to the preset dial number
Press the [1] – [3] button.
"Preset #" or "PRESET #" is displayed.
For the Audio receiver with Multi-function Key System:
1Press the [NEXT] button.
Select the key function section.
2Press the [1] ("1") – [3] ("3") button.
"DIAL #" is displayed.
3Make a call
Press the Control knob ([38]) for at least 1 second.
"CALL" or "Call" is displayed.
• If the desired number is not registered to the preset dial number list, "No Name No Number", "No Number", or "NO-NUMBER" is displayed.
English | 7

Dialing Method (For Audio receiver)
Registering to the Preset Dial Number List
You can register up to 3 phone numbers for quick dialing.
1Enter the phone number you wish to register
Enter the phone number with reference to the following:
-<Making a Call by Entering a Phone Number> (page 7)
-<Dialing by Using the Phone Book> (page 8)
-<Dialing by Using the Outgoing Call List> (page 8)
-<Dialing by Using the Incoming Call List> (page 9)
2Select the button you wish to register
Press the [1] – [3] button for at least 2 seconds.
For the Audio receiver with Multi-function Key System:
1 Press the [NEXT] button.
Select the key function section.
2 Press the [1] ("1"/ "MEM.1") – [3] ("3"/ "MEM.3") button for at least 2 seconds.
"Memory" or "MEMORY" display blinks 1 time.
3Exit the dialing method selection mode
Press the [ATT] button for at least 1 second.
Dialing by Using the Phone Book
You can dial by using the downloaded Phone Book.
1Enter the Phone Book mode
Select the "INITIAL", "PH-BOOK1", "PH.BOOK", or "PHBOOK2" display.
Refer to <Selecting the Dialing Mode> (page 7). If you have selected, "PH.BOOK" or "PH-BOOK2", proceed to step 4.
For the Audio receiver with Multi-function Key System:
Press the [2] ("PHBK") button.
Pressing this button toggles between the following search methods:
Display |
Search method |
"INITIAL"/ |
Search by the initial. |
"PH-BOOK1" |
|
"PH.BOOK"/ |
Search in the alphabetical order. |
"PH-BOOK2" |
Proceed to step 4. |
2Select the initial to be searched for
Push the Control knob towards [4], [¢],
[FM] or [AM].
Move the cursor to the initial to be searched for.
Knob |
Operation |
[4]/ [¢] |
Move to the next character. |
[FM]/ [AM] |
Move to the next row. |
3Determine the selected initial
Press the Control knob ([38]) for at least 1 second.
4Select the name
Push the Control knob towards [FM], [AM], [4] or [¢].
Select the name.
Knob |
Operation |
[FM]/ [AM] |
Change the name. |
[4]/ [¢] |
Change the initial. |
5Make a call
Press the Control knob ([38]) for at least 1 second.
"CALL" or "Call" is displayed.
•To use the Phone Book, it must have been downloaded from the cell-phone. For details, see <Downloading the Phone Book> (page 5).
•Initials including no corresponding name will not be displayed.
•On the control unit that displays three rows, the name in the middle row is the selected one.
•During search, a non-accent character such as "u" is searched for instead of an accent character such as "ü".
•Characters that the control unit cannot display are searched for in the order in which they were registered to the Phone Book.
Dialing by Using the Outgoing Call List
You can dial by using the outgoing call list. Up to ten phone numbers of the originated calls are recorded in the outgoing call list.
1Enter the outgoing call list mode
Select the "OUT" or "OUT-CALL" display.
Refer to <Selecting the Dialing Mode> (page 7).
8 | English

2Select a name or phone number
Push the Control knob towards [FM] or [AM].
3Make a call
Press the Control knob ([38]) for at least 1 second.
"CALL" or "Call" is displayed.
•The outgoing call list is the list of calls originated from this unit. It is not the one stored in the cell-phone memory.
•On the control unit that displays three rows, the phone number in the middle row is the selected one.
•Depending on the type of your control unit, "0" is displayed for the tenth call in the outgoing call list.
Dialing by Using the Incoming Call List
You can dial by using the incoming call list. Up to ten phone numbers of the received calls are stored recorded in the incoming call list.
1Enter the incoming call list mode
Select the "IN" or "IN-CALL" display.
Refer to <Selecting the Dialing Mode> (page 7).
2Select a name or phone number
Push the Control knob towards [FM] or [AM].
3Make a call
Press the Control knob ([38]) for at least 1 second.
"CALL" or "Call" is displayed.
•The incoming call list is the list of calls received at this unit. It is not the one stored in the cell-phone memory.
•On the control unit that displays three rows, the phone number in the middle row is the selected one.
•Depending on the type of your control unit, "0" is displayed for the tenth call in the incoming call list.
Remote Control (For Audio receiver)
Functions of the buttons
[SRC] button*
During a call: End the call.
[VOL] buttons*
During a call: Adjusts the voice volume.
[ ] button
Enters the dialing method selection mode. When a call comes in: Answers the call.
[38] button*
During a call:
Switches between the private talk mode and the hands-free talk mode.
In dialing method selection mode: Selects a dialing method.
[¢] button*
Number dial input: Inputs "+".
[4] button*
Number dial input:
Clears the entered phone number.
[FM] button*
Number dial input: Inputs "#".
[AM] button*
Number dial input: Inputs "*".
[0] – [9] buttons*
Number dial input: Inputs a digit.
[DIRECT] button*
Makes a call.
Remote Control Mode selector switch
Switch to "AUD" when dialing.
•* If your remote controller has a mode selection switch, set it to "AUD".
•Remote controllers with the [  ] button and/or numeric buttons are available optionally. Purchase a remote
controller with a desired function.
English | 9
Menu System (For Audio receiver)
Menu System
Set up various functions. The Menu system basic operation method is explained here. The reference for the Menu items and their setting content is after this operation explanation.
1Enter Menu mode
Press the [MENU] button for at least 1 second.
"MENU" is displayed.
2Select the menu item
Push the Control knob towards [FM] or [AM].
3Set the menu item
Push the Control knob towards [4] or [¢].
4Exit Menu mode
Press the [MENU] button.
•Three menu items appear on the display. The menu item displayed at the center is the one you can adjust.
In Standby mode
Selecting the Cell-Phone You Wish to Connect
When two ore more cell-phones have already been registered, you need to select the cell-phone you wish to use.
1Select the phone selection mode
Push the Control knob towards [FM] or [AM].
Select the "Phone Selection" or "PHN-SEL" display.
2Enter the selected phone selection mode
Press the Control knob ([38]) for at least 1 second.
"(name)" is displayed.
3Select the cell-phone you wish to connect
Push the Control knob towards [FM] or [AM].
4Set up the cell-phone you wish to connect
Push the Control knob towards [4] or [¢].
" (name)" or "-(name)" is displayed.
" " (dark color) or " ": The selected cell-phone is busy.
" " (light color) or "_": The selected cell-phone is on standby.
5Exit the phone selection mode
Press the [MENU] button.
In Standby mode
Deleting a Registered Cell-Phone
You can delete a registered cell-phone.
1Select the phone deletion mode
Push the Control knob towards [FM] or [AM].
Select the "Phone Delete" or "PHN-DEL" display.
2Enter the phone deletion mode
Press the Control knob ([38]) for at least 1 second.
"(name)" is displayed.
3Select the cell-phone you wish to delete
Push the Control knob towards [FM] or [AM].
4Delete the selected cell-phone
Press the Control knob ([38]) for at least 1 second.
"Delete" or "DELETE" is displayed.
5Exit the phone deletion mode
Press the [MENU] button.
•When a registered cell-phone is deleted, its Phone Book, list of outgoing calls, and list of incoming calls are also deleted.
Displaying the Cell-Phone Status
You can display the connection status, signal strength, and battery level.
1Select the status display item
Push the Control knob towards [FM] or [AM].
Select the "P-STATUS" display.
2Enter the status display mode
Press the Control knob ([38]) for at least 1 second.
3Select the item you wish to display
Push the Control knob towards [FM] or [AM].
4Exit the status display mode
Press the [MENU] button.
10 | English
If your control unit supports a graphic display function:
1Select the status display item
Push the Control knob towards [FM] or [AM].
Select the "Phone Status" display.
2Display the statuses
Push the Control knob towards [4] or [¢].
All statuses are indicated with icons.
3Exit Menu mode
Press the [MENU] button.
Bluetooth connection status
|
Display |
Icon |
Information |
|
"BT-CON Y" |
|
Connected |
|
|
|
|
|
"BT-CON N" |
|
Disconnected |
|
|
|
|
Battery level of cell-phone |
|
||
|
Display |
Icon |
Information |
|
"BAT FULL" |
|
Full |
|
|
|
|
|
"BAT MID" |
|
… |
|
|
|
|
|
|
|
|
|
|
|
… |
|
|
|
|
|
"BAT LOW" |
|
Nearly dead |
|
|
|
|
|
"BAT - - -" |
|
Cannot get information. |
|
|
||
Signal strength of cell-phone |
|||
|
Display |
Icon |
Information |
|
"SGNL MAX" |
|
Maximum |
|
|
|
|
|
"SGNL MID" |
|
… |
|
|
|
|
|
|
|
|
|
|
|
… |
|
|
|
|
|
"SGNL LOW" |
|
Minimum |
|
|
|
|
|
"NO SGNAL" |
|
Outside the service range |
|
|
|
|
|
"SGNL - - -" |
|
Cannot get information. |
|
|
|
|
•Since the number of steps of the control unit is different from that of the cell-phone, the statuses displayed on the control unit may discord from those displayed on the cell-phone.
In Standby mode
Setting the Time Interval for
Automatic Answer
This function automatically answers (responds to) a call after lapse of the preset time interval for automatic answer.
Display |
Setting |
"Auto Answer: OFF"/ |
Does not answer the phone call automatically. |
"ANS OFF" |
|
"Auto Answer: 0s"/ |
Automatically answers the phone call at once. |
"ANS 0" |
|
… |
|
|
|
"Auto Answer: 8s"/ |
Automatically answers the phone call after lapse |
"ANS 8" |
of 8 seconds (original setting). |
… |
|
|
|
"Auto Answer: 99s"/ |
Automatically answers the phone call after lapse |
"ANS 99" |
of 99 seconds. |
•If the time set in the cell-phone is shorter than that set in the unit, the former will be used.
In Standby mode
Setting up the Voice Output Speakers
You can specify the voice output speakers.
Display |
Setting |
"SP Select: Front"/ |
Outputs voice from the front-left and front-right |
"SPK FRT" |
speakers. |
"SP Select: F-R"/ |
Outputs voice from the front-right speaker. |
"SPK F-R" |
|
"SP Select: F-L"/ |
Outputs voice from the front-left speaker. |
"SPK F-L" |
|
•Select the speaker which is further from the microphone in order to prevent howling or echos.
In Standby mode
Setting the Beep of the Incoming Call
You can output a beep from the speaker when a call comes in.
Display |
Setting |
"Call Beep: ON"/ "C-BP ON" |
Beep is heard. |
"Call Beep: OFF"/ "C-BP OFF" |
Beep is canceled. |
English | 11

Hands-Free Unit Control (For Monitor receiver)
Hands-Free Unit control
Hands-Free Control screen
Or when a call comes in …
|
TEL |
|
|
|
|
Hands-Free Control screen |
|
|
|
|
|
Hands |
Free |
|
8 |
9 |
10 |
|
|
|
AUTO |
||
|
|
|
|
||
1 |
KENWOOD |
0123456789 |
|
11 |
|
|
P1 |
15 |
|
||
2 |
1 |
2 |
3 |
|
|
|
|
||||
P2 |
|
|
|
|
|
|
|
|
|
|
|
|
|
|
|
|
4 |
5 |
6 |
|
|
|
|
12 |
|
3 |
|
|
P3 |
|
|
|
|
|
|
||||
|
|
|
|
|
|
|
|
|
|
|
|
||
|
|
|
|
|
|
|
|
|
|
|
|
|
|
|
|
|
|
|
|
|
|
|
|
|
|
||
|
|
|
6 |
7 |
8 |
9 |
|
|
|
Clear |
|||
|
|
|
|
|
|
|
|||||||
4 |
|
|
|
|
|
|
|||||||
|
|
|
|
13 |
|||||||||
|
|
+ |
* |
0 |
# |
|
|
|
|
|
|||
|
|
|
|
|
|
|
|
|
|||||
|
|
|
|
|
|
|
|
|
|||||
|
|
|
|
|
|
|
|
|
|||||
5 |
|
|
|
|
|
|
|
14 |
|||||
SetUp |
7 |
|
|
|
|
||||||||
|
|
|
|
|
|
|
|
Return |
|||||
|
|
|
|
|
|
|
|||||||
Control screen
|
|
DVD VIDEO |
|
|
13:50 |
|
|
|
|
|
|
|
|
||
|
|
|
|
|
|
|
|
|
|
|
|
|
|
16 |
|
|
|
|
|
|
|
|
|
|
|
|
|
|
|
TEL |
|
|
|
|
|
|
|
||
|
|
|
|
|
|
IN |
|
|
|
|
|
|
|
||
|
|
|
|
|
|
||
|
N ex t |
REP |
SCRL TIME |
|
|
||
|
|
T i t l e 1 C h a p 3 |
T 0 : 0 5 : 2 0 |
|
|
||
|
|
K E N WO O D |
|
|
|
|
|
|
|
|
|
|
|
|
|
|
|
|
|
|
|
|
|
1Displays the Search for Phone Book screen. (See the <Calling by Phone Book>, page 15)
2Displays the Out Going Calls screen. (See the <Redialing>, page 16)
3Displays the Incoming Calls screen. (See the <Redialing>, page 16)
4Switches between the private and hands-free modes (only when a call in progress).
5Displays the Hands-Free Set Up screen.
(See the <Setting up the Hands-Free Phone>, page 16)
6Enter three phone numbers for quick dialing. (See the <Quick Dialing>, page 14)
7Enters a phone number.
(See the <When Dialing>, page 14)
12 | English
8Displays the signal strength.*
The more the number of bar segments, the stronger the signal.
9Displays the present Auto Answering status
When Auto Answering is on:  AUTO When Auto Answering is off:
pDisplays the battery drain of the cell-phone.*
The more the number of bar segments, the higher the battery level.
qStarts the call.
wEnds the call.
Clears the phone number being entered.
e Clears the entered phone number. r Returns to the previous screen.
tDisplays the calling and called phone numbers. If you have registered a phone number in the Phone Book, the destination person name is displayed.
yDisplays the status of connection with the cellphone.
White: The cell-phone is connected.
Orange: The cell-phone is not connected, or it is outside the service range.
•While your car is moving, some functions are disabled for safety’s sake. The buttons associated with the disabled functions become ineffective if pressed.
•When the Hands-Free Control screen appears, the name of the connected cell-phone is displayed for 5 seconds.
•* Since the number of steps of the control unit is different from that of the cell-phone, the statuses displayed on the control unit may discord from those displayed on the cell-phone. No status
is displayed if information about it cannot be obtained.
•Setting the cell-phone in the private mode can disable the hands-free function.

Remote Controller
17 |
|
18 |
|
19 |
24 |
|
|
20 |
|
|
25 |
21 |
26 |
|
|
22 |
|
23 |
|
u[SRC] key
During a call: Ends the call.
i[*] key (When f is set to "AUD") Number dial input: Inputs "+".
o[FM+] key (When f is set to "AUD") Number dial input: Inputs "#".
;[AM-] key (When f is set to "AUD") Number dial input: Inputs "*".
a[4] key (When f is set to "AUD") Number dial input:
Clears the entered phone number.
s[0] – [9] key (When f is set to "AUD")
Number dial input: Inputs a phone number digit.
d[DIRECT] key (When f is set to "AUD") Make a call.
fRemote Control Mode selector switch
Switch to "AUD" when dialing.
g[5]/ [∞] key
During a call: Adjusts the voice volume.
h[  ] key
] key
Displays the Hands-Free Control screen. When a call comes in: Answers the call.
•The voice volume level adjusted during a call will be effective for the next and subsequent calls.
•Increasing the volume excessively is more likely to produce echo. If echo is produced, turn down the volume as low as possible. Echo increases in proportion to the volume.
Key Operation
|
SRC |
27 |
28 |
j[u]/ [d] key
During a call: Adjusts the voice volume.
k[SRC] key
During a call: Ends the call.
English | 13

Hands-Free Unit Control (For Monitor receiver)
When Called
When you receive a call, you can use the hands-free phone.
1 Responds to a call
When a call arrives, the Hands-Free Control screen appears automatically.
2 End the call
The previous screen reappears.
When Dialing
Make a call by entering a phone number.
1 Enter a phone number
0 — 9 ,
+ |
, |
* |
, |
# |
|
|
|
2 Make a call
Quick Dialing
You can register up to 3 phone numbers for quick dialing.
To register a phone number:
1Display a phone number you wish to register
See the <Calling by Phone Book> (page 15), <Redialing> (page 16) and <When Dialing> (page 14).
2Register the phone number
P1 — P3
Continue to touch more than 2 seconds.
To call a phone number from memory:
1 Recall the phone number
P1 — P3
2 Make a call
You can start talking when the destination responds.
•Only the phone numbers can be registered for Quick Dialing. Therefore, the destination subscriber name and others are not displayed during dialing.
• To clear your incorrect entry, touch Clear .
3 End the call
The previous screen reappears.
• You can input max 32 digits.
14 | English
Calling by Phone Book
You can call a person using his/her phone number that you have registered in the Phone Book.
1 Display the Phone Book screen
The Initial Input screen appears.
Initial Input screen
3 Select a destination you wish to call
Name
4 Confirm the destination
OK
The Hands-Free Control screen appears again. The selected destination data is displayed.
Phone |
Book |
L i s t |
|
|
|
AUTO |
5 |
|
|
|
|
|
|||||
|
|
|
|
|
|
|
|
|
|
|
|
|
|
|
|
2 |
|
|
a |
b |
c |
d |
e |
f |
g |
|
|
h |
i |
j |
k |
l |
m |
n |
|
1 |
o |
p |
q |
r |
s |
t |
u |
|
|
|
|||||||
1 |
v |
w |
x |
y |
z |
|
3 |
|
|
|
|
|
|
|
Return |
|
|
Make a call
You can start talking when the destination responds.
1 Scrolls the character array display.
2 Displays the Phone Book beginning with the name whose first character you have touched.
3 Returns to the Hands-Free Control screen.
2Select the initial character of a person name in memory
a etc.
The Phone Book List screen appears.
Phone Book List screen
AUTO
Phone Book L i s t 1234567890
2
1 |
Name |
|
Name
1 |
3 |
Name |
OK |
Name |
4 |
Return |
6 End the call
The previous screen reappears.
•To use the Phone Book, it must have been downloaded from the cell-phone. For more details, see <Downloading the Phone Book> (page 5).
•Up to 16 characters can be displayed for each name in the Phone Book.
•Initials including no corresponding name will not be displayed.
•During search, a non-accent character such as "u" is searched for instead of an accent character such as "ü".
1 Scrolls the list.
2 Enters the destination name.
3 Enters the destination data and returns to the Hands-Free Control screen.
4 Returns to the Hands-Free Control screen.
English | 15

Hands-Free Unit Control (For Monitor receiver)
Redialing |
5 End the call |
You can redial, one of the last 10 phone numbers that you have called or received.
1
2
3
4
Display the Search for Out Going Calls or Incoming Calls screen
Out Going Calls
or
Incoming Calls
The Out Going Calls or Incoming Calls list screen appears.
Out Going Calls or Incoming Calls screen
Incoming Calls |
AUTO |
|
|
2 |
Kenwood |
|
|
|
1234567890 |
Kenwood 1234567890
|
Kenwood |
3 |
|
DISP |
|
|
1234567890 |
|
|
|
|
1 |
Kenwood |
4 |
1234567890 |
OK |
|
1 |
Kenwood |
Return 5 |
1234567890 |
1 Scrolls the list.
2 Enters the destination name.
3 Change to record of redial list.
4 Enters the destination data and returns to the Hands-Free Control screen.
5 Returns to the Hands-Free Control screen.
Select a destination you wish to call
Confirm the destination
OK
The Hands-Free Control screen appears again. The selected destination data is displayed.
Make a call
You can start talking when the destination responds.
The previous screen reappears.
•The Out Going Calls list screen or Incoming Calls list screen shows the list of the calls originated from or received at this unit. They are not the ones stored in the cell-phone memory.
Setting up the Hands-Free Phone
The Hands-Free system can be set as follows.
SetUp
Hands-Free Set Up screen
Hands Free |
Set Up |
|
AUTO |
|
|
||
Au t o Answering |
|||
1 |
8 |
|
1 |
Phone Voice |
|
2 |
|
2 |
F-Right |
||
Beep |
|
3 |
|
|
On |
|
|
4 |
Sellect |
5 |
DSeelleetcet |
6 Return
1 Sets an automatic response time after call termination. ( "8")
"8")
"Off": |
This function can not use. |
|
"0-99": Sets to calling ring time (second). |
||
2 Sets a ringing tone output position. |
||
( "F-Right") |
||
"F-Left": |
|
Outputs the tone from the front |
|
|
left-hand side speaker. |
"F-Right": |
Outputs the tone from the front |
|
|
|
right-hand side speaker. |
"Front All": |
Outputs the tone from the both |
|
|
|
front speakers. |
3 Set the beep of the incoming call. ( "On") "On": Beep is heard.
"Off": Beep is canceled.
4 Display the Phone Select screen.
5 Display the Phone Delete screen.
6 Returns to the Hands-Free Control screen.
16 | English
•Either the time interval for automatic answer set on this unit or the time interval set on the cell-phone, whichever is shorter, takes effect.
•Select the speaker which is further from the microphone in order to prevent howling or echos.
Selecting a Hands-Free Phone
You can choose the Hands-Free phone from the list.
1 Display the Hands-Free Set Up screen
SetUp
2 Display the Phone Select list
Sellect
Phone Select screen
AUTO
Phone Select
1
Kenwood 1
Kenwood 2
Kenwood 3 |
|
Kenwood 4 |
|
Kenwood 5 |
Return 2 |
Deleting the Hands-Free Phone
You can cancel a registration of Hands-Free phone.
1 Display the Hands-Free Set Up screen
SetUp
2 Display the Phone Delete list
DSelletcet
Phone Delete screen
AUTO
Phone Delete
1
Kenwood 1
Kenwood 2
Kenwood 3 |
|
Kenwood 4 |
|
Kenwood 5 |
Return2 |
1 Selects the cell-phone to be deleted from the list.
2 Returns to the Hands-Free Set Up screen.
3 Select a Hands-Free phone you wish to delete
Kenwood 3
1 Selects the cell-phone to be used as a handsfree phone.
2 Returns to the Hands-Free Set Up screen.
3 Select a Hands-Free phone you wish to use
Kenwood 1
•The Phone Book, outgoing call list, and incoming call list are deleted together with the deleted Hands-Free phone.
English | 17
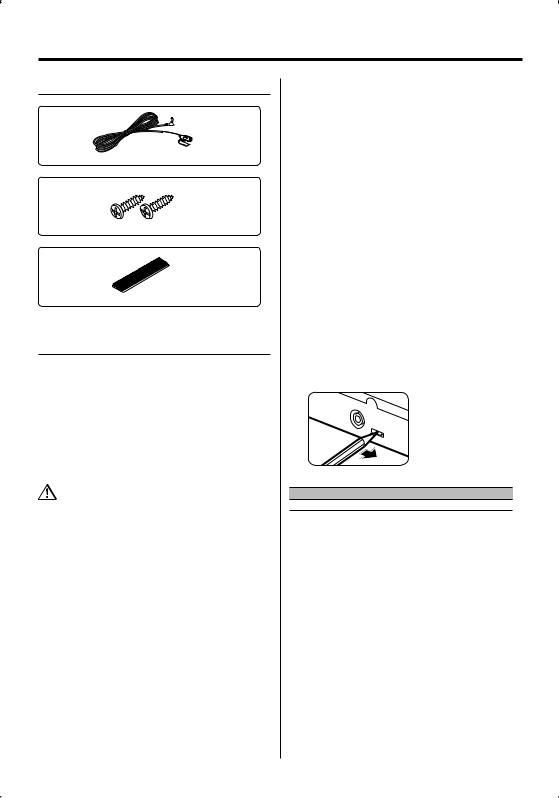
Accessories/ Installation Procedure
Accessories
1
3 m (9.5 ft) .......... |
1 |
2
..........2
3
..........1
Installation Procedure
1.To prevent a short circuit, remove the key from the ignition and disconnect the - battery.
2.Set the display character conversion function switch.
3.Make the proper input and output wire connections for each unit.
4.Install the unit in your car.
5.Reconnect the - battery.
6.Press the reset button on the control unit.
•Insulate unconnected wires with vinyl tape or other similar material. To prevent a short circuit, do not remove the caps on the ends of the unconnected wires or the terminals.
•After the unit is installed, check whether the brake lamps, blinkers, wipers, etc. on the car are working properly.
For Good Reception
To assure good reception, note the following:
•Communicate with the cell-phone within the line- of-sight distance of 10 m (30 ft). The communication range becomes shorter depending on the surrounding environment. The communication range also becomes
shorter when there is an obstacle between this unit and the cell-phone. The above maximum communication range (10
m)is not always assured.
•Keep this unit away from other electric components (AV components) as far as possible. If they are near, call
connection can fail, TV or radio noise can be generated, or poor reception can occur.
•A broadcast station or walkie-talkie located nearby can interfere with communication due to too strong signal.
Display Character Conversion Function
If the control unit cannot display accent characters such as "ü" and "ä", set the display character conversion function switch to "2" to convert them to "U" and "A".
When one of the following control units is connected, set the switch to "2". (As of September 2006)
KDV-412, KDC-X590, KDC-MP632U, KDC-MP532U, DPX501
1 |
2 |
Conversion Table
Conversion character
A : À, à, Á, á, Ã, ã, Ä, ä, Â, â, Å, å
C : |
Ç, ç |
D : |
Ð, ð |
E : |
È, è, É, é, Ê, ê, Ë, ë |
I : |
Ì, ì, Í, í, Î, î, Ï, ï |
N : |
Ñ, ñ |
O : |
Ò, ò, Ó, ó, Ô, ô, Õ, õ, Ö, ö, Ø, ø |
S : |
ß |
U : |
Ù, ù, Ú, ú, Û, û, Ü, ü |
X : |
× |
Y : |
Ý, ý, ÿ |
18 | English
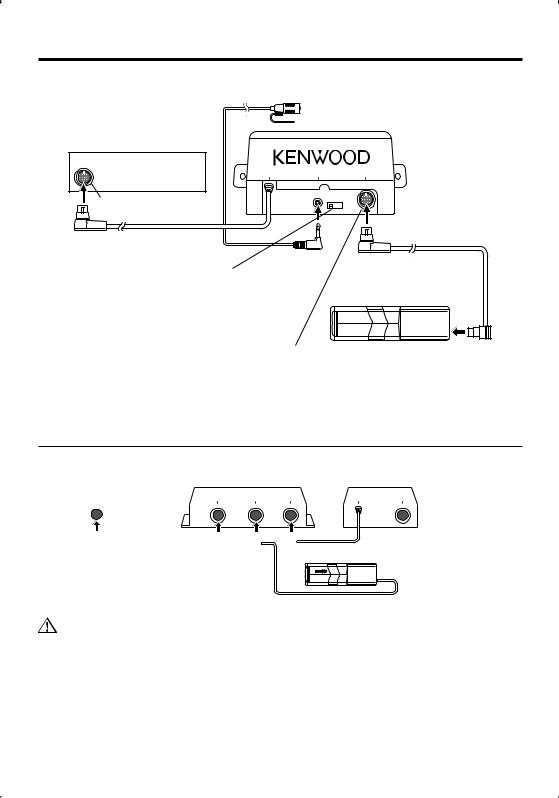
Connection
Accessory 1 (3 m, 9.5 ft)
Hands-Free Box
Control Unit
TO HEAD UNIT |
MIC |
TO 5L I/F |
Disc changer input
(1.5 m, 5ft)
Display character conversion switch
For the operation method refer to <Display Character Conversion Function> (page 18).
1 2
Connection cable (Provided with the disc changer)
Disc Changer
Connector for external device
Items sold separetely such as a disc changer and KCAiP500 can be connected here. For the connectable units, refer to the Instruction Manual that comes with your control unit.
If You Want to Connect KCA-S220A
Connect the Hands-Free Box to the terminal labelled TO CHANGER 2.
Control Unit |
|
KCA-S220A |
Hands-Free Box |
||||||||||||||||||
|
|
|
|
|
|
|
|
|
|
|
|
|
|
|
|
|
|||||
|
|
|
|
|
|
TO HEAD UNIT TO CHANGER 1 TO CHANGER 2 |
TO HEAD UNIT |
TO 5L I/F |
|||||||||||||
|
|
|
|
|
|
|
|
|
|
|
|
|
|
|
|
|
|
|
|
|
|
|
|
|
|
|
|
|
|
|
|
|
|
|
|
|
|
|
|
|
|
|
|
|
|
|
|
|
|
|
|
|
|
|
|
|
|
|
|
|
|
|
|
|
|
|
|
|
|
|
|
|
|
|
|
|
|
|
|
|
|
|
|
|
|
|
|
Disc Changer
•Please keep the total extension of the control cable from the control unit to the disc changer to 13 m (43 ft) or less. Control cable lengths in excess of 13 m will cease to function properly.
English | 19

Installation
Installation the Hands-Free Box
•Determine the installation position after making sure that the unit can communicate with the cell-phone.
•Please do not install the unit near the dashboard, the rear tray, or other important components. Doing so could lead to injury or accident should the unit come off due to a shock and strike a person or an important component. Tapping screws should be used for mounting. (Attachment with velcro strips, although easy, can come off with a shock.)
Securing to audio board
Accessory 2 (Ø4 × 16 mm)
Antenna part
Securing to pile carpet
Antenna part
Accessory 3
•Do not stick the velcro tape over the serial number.
•If the installation place is stepped, cut the velcro tape into two pieces and stick them at two positions as shown.
Installation the Microphone Unit
1Check the installation position of the microphone (accessory 1).
2Remove oil and other dirt from the installation surface.
3Install the microphone.
4Wire the microphone cable up to the hands-free box with it secured at several positions using tape or the like.
Fix a cable with a commercial item of tape.
Peel the release coated paper of double-face adhesive tape to fix on the place shown in the left-hand example.
Adjust the direction of the microphone to the driver.
20 | English
 Loading...