


KAC-9105D
CLASS D MONO POWER AMPLIFIER
INSTRUCTION MANUAL
AMPLIFICATEUR MONO CLASSE D
MODE D’EMPLOI
AMPLIFICADOR DE POTENCIA CLASE D MONOFÓNICO
MANUAL DE INSTRUCCIONES
Take the time to read through this instruction manual.
Familiarity with installation and operation procedures will help you obtain the best
performance from your new power amplifier.
For your records
Record the serial number, found on the back of the unit, in the spaces designated on the
warranty card, and in the space provided below. Refer to the model and serial numbers
whenever you call upon your Kenwood dealer for information or service on the product.
Model KAC-9105D Serial number
US Residence Only
Register Online
Register your Kenwood product at
www.Kenwoodusa.com
© B64-4576-00/00 (KV/EV)
Safety precautions
2Ω
8Ω
4Ω
4Ω 4Ω
4Ω
WARNING
To prevent injury or fire, take the following
precautions:
• Mounting and wiring this product requires skills and
experience. For safety’s sake, leave the mounting and
wiring work to professionals.
• When extending the ignition, battery, or ground wires,
make sure to use automotive-grade wires or other wires
with the range of 8 mm (AWG 8) or more to prevent
wire deterioration and damage to the wire coating.
• To prevent a short circuit, never put or leave any metallic
objects (such as coins or metal tools) inside the unit.
• If the unit starts to emit smoke or strange smells, turn
off the power immediately and consult your Kenwood
dealer.
• Do not touch the unit during use because the surface of
the unit becomes hot and may cause burns if touched.
CAUTION
To prevent damage to the machine, take the following
precautions:
• Be sure the unit is connected to a 12V DC power supply
with a negative ground connection.
• Do not open the top or bottom covers of the unit.
• Do not install the unit in a spot exposed to direct
sunlight or excessive heat or humidity. Also avoid places
with too much dust or the possibility of water splashing.
• When replacing a fuse, only use a new one with the
prescribed rating. Using a fuse with the wrong rating
may cause your unit to malfunction.
• To prevent a short circuit when replacing a fuse, first
disconnect the wiring harness.
NOTE
• If you experience problems during installation, consult
your Kenwood dealer.
• If the unit does not seem to be working right, consult
your Kenwood dealer.
Cleaning the unit
If the front panel gets dirty, turn off the power and wipe
the panel with a dry silicon cloth or soft cloth.
CAUTION
Do not wipe the panel with a hard cloth or a cloth
dampened by volatile solvents such as paint thinner and
alcohol. They can scratch the surface of the panel and/or
cause the indicator letters to peel off.
Protection function
The protection function is activated in the following
situations:
This unit is equipped with a protection function for
protecting this unit and your speakers from various
accidents or problems that can occur.
When the protection function is triggered, the power
indicator goes off and the amplifier stops operating.
• When a speaker wire may be short-circuited.
• When a speaker output contacts ground.
• When the unit malfunctions and a DC signal is sent to
the speaker output.
Wiring
• Take the battery wire for this unit directly from the
battery. If it's connected to the vehicle’s wiring harness, it
can cause blown fuses etc.
• If a buzzing noise is heard from the speakers when the
engine is running, connect a line noise filter (optional) to
each of the battery wire.
• Do not allow the wire to directly contact the edge of the
iron plate by using Grommets.
• Connect the ground wire to a metal part of the car
chassis that acts as an electrical ground passing
electricity to the battery‘s negative s terminal. Do not
turn the power on if the ground wire is not connected.
• Be sure to install a protective fuse in the power cord
near the battery. The protective fuse should be the same
capacity as the unit’s fuse capacity or somewhat larger.
• For the power cord and ground, use a vehicle type
(fireproof) power wring cord. (Use a power wiring cord
with the range of 8 mm (AWG 8) or more.)
• When more than one power amplifier are going to be
used, use a power supply wiring wire and protective
fuse of greater current-handling capacity than the total
maximum current drawn by each amplifier.
Speaker Selection
• The rated input power of the speakers that are going
to be connected should be greater than the maximum
output power (in Watts) of the amplifier. Use of speakers
having input power ratings that are less than the output
power of the amplifier will cause smoke to be emitted as
well as damage.
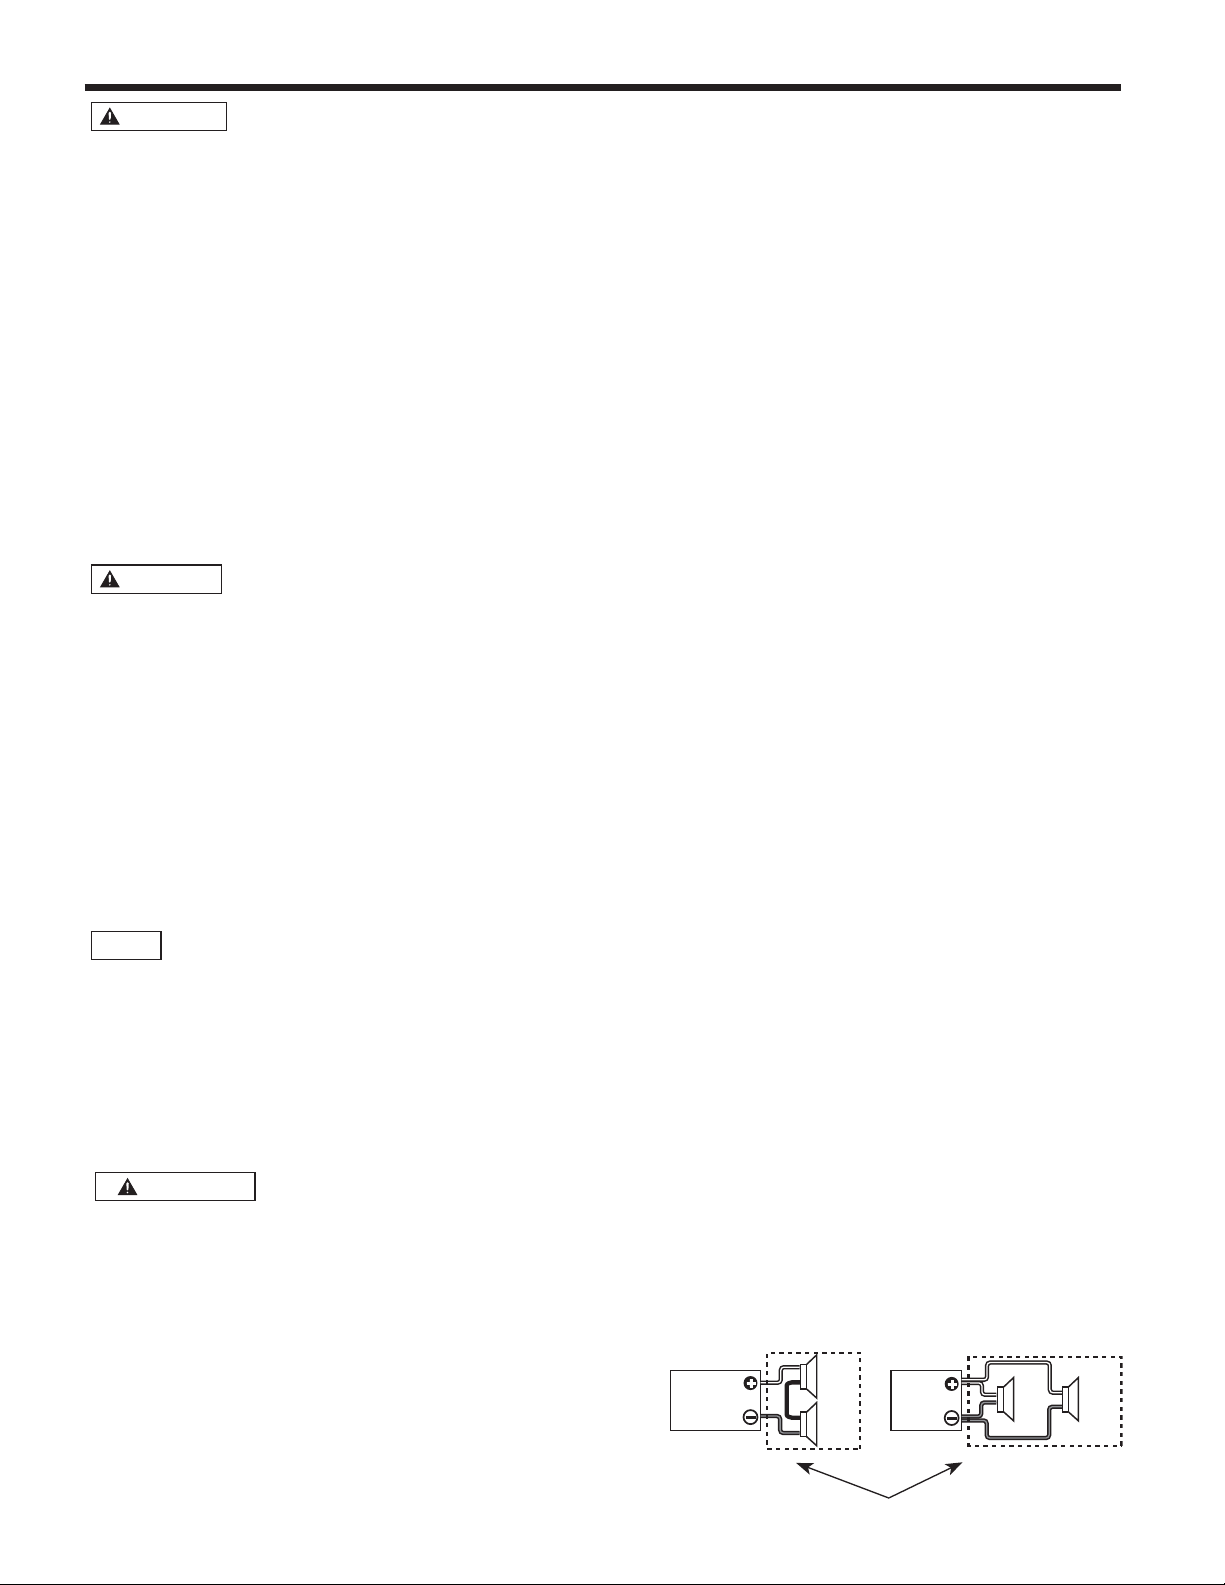
• Use speakers that have an impedance of 1 or greater.
When more than one set of speakers are going to
be used, calculate the combined impedance of the
speakers and then connect suitable speakers to the
amplifier.
<Example>
To prevent battery rise
When the unit is used in the ACC ON position without
turning the engine ON, it depletes the battery. Use it after
starting the engine.
Combined impedance
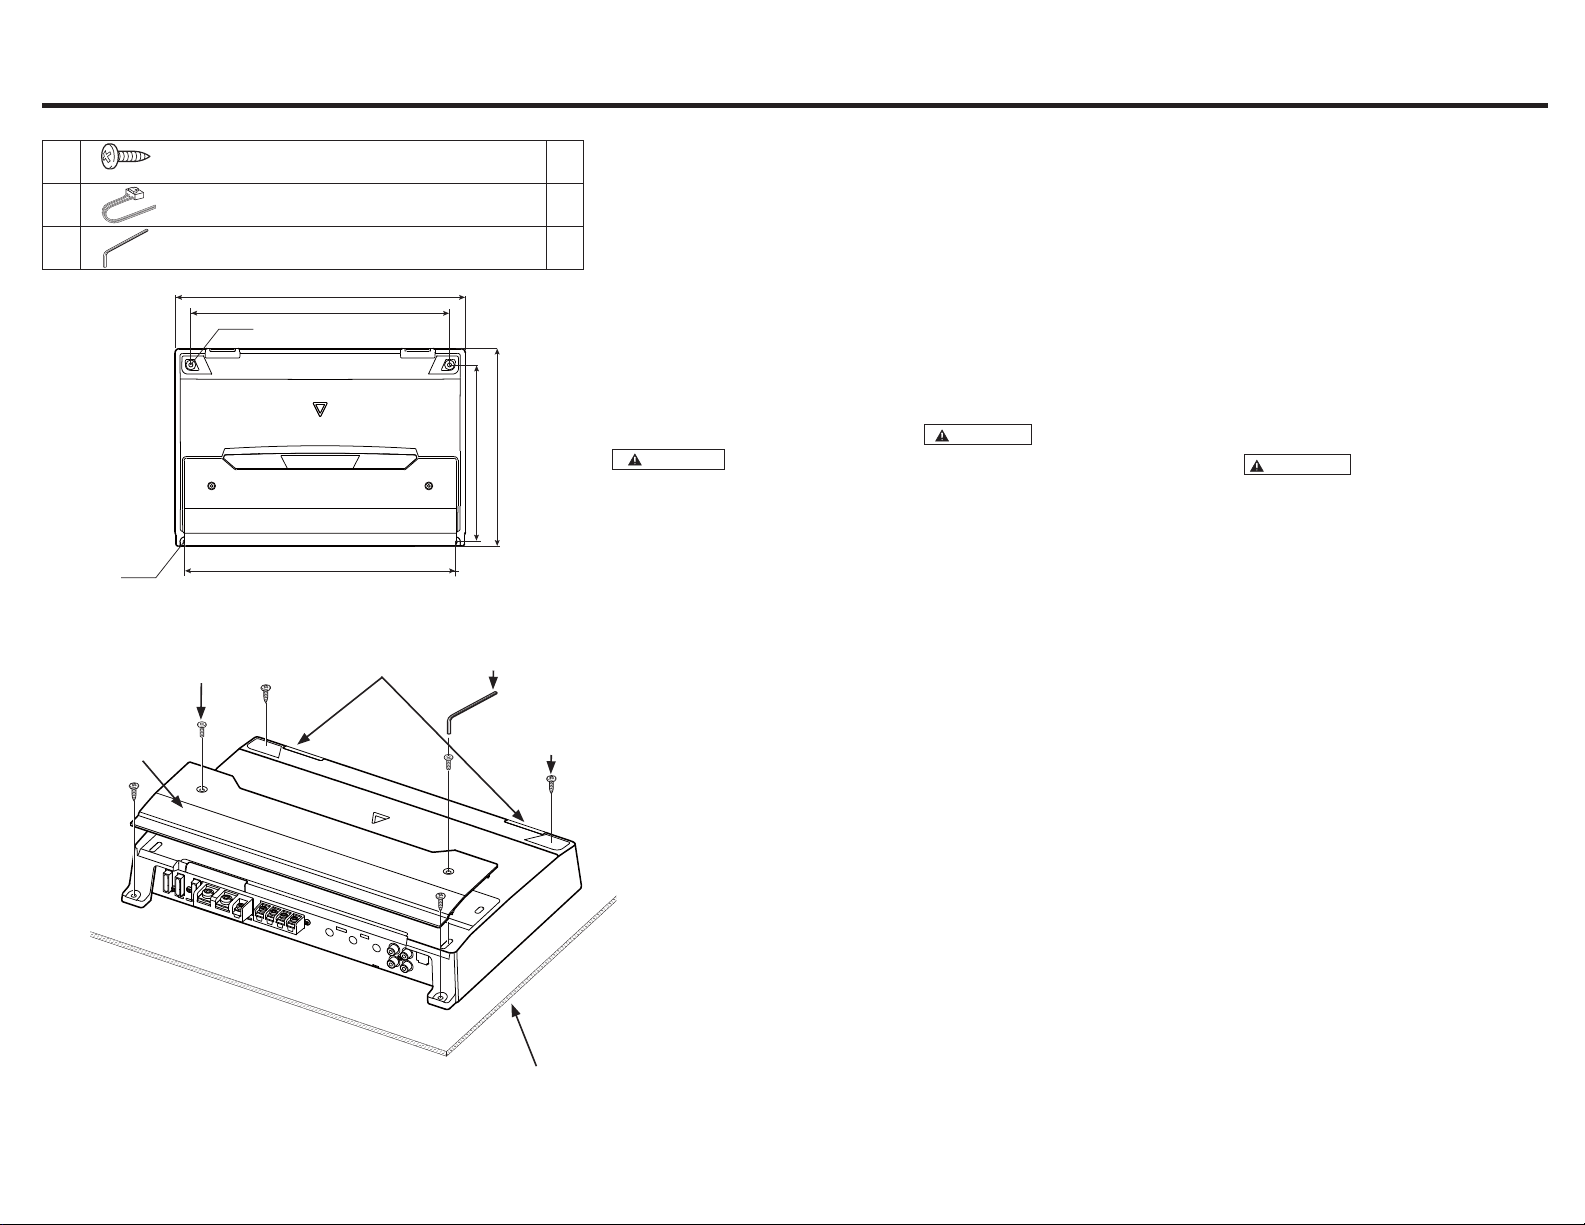
Installation / Installation / Instalación
Accessories / Accessoires / Accesorios
ø 4 x 16 mm
M4 × 8 mm
Hexagon socket head cap screw
Vis d’assemblage à six pans creux
Tornillo de cabeza hexagonal
Dressing cover
Enjoliveur
Cubierta de adorno
Self-tapping screws / Vis taraudeuses / Tornillo
autorroscantes
Speaker level input cable / Câble d’entrée de niveau
d’enceinte / Cable de entrada del nivel de altavoces
Hexagon wrench / Clé polygonale / Llave hexagonal
350 mm
ø4.6
ø4.6
312 mm
326 mm
Installation board, etc. (thickness : 15 mm or more)
Tableau d’installation, etc. (épaisseur: 15 mm ou plus)
Tablero de instalación, etc. (grosor: 15 mm o más)
Cooling fan
Ventilateur de
refroidissement
Ventilador de
refrigeración
238 mm
214 mm
Parts included
Pieces comprises
Partes incluidas
Parts included
Pieces comprises
Partes incluidas
Installation procedure
Since there are large variety of settings and
4
connections possible according to applications,
read the instruction manual well to select the
proper setting and connection.
1
1. Remove the ignition key and disconnect the
negative s terminal of the battery to prevent
1
short circuits.
2. Set the unit according to the intended usage.
3. Remove the Dressing cover.
4. Connect the input and output wires of the
units.
5. Connect the speaker wires.
6. Connect the power wire, power control wire
and grounding wire following this order.
7. Install the installation fittings in the unit.
8. Attach the unit.
9. Attach the Dressing cover.
10. Connect the negative s terminal of the
battery.
CAUTION
• Do not install in the below locations;
(Unstable location, In a location that interferes
with driving, In a location that gets wet, In a
dusty location, In a place that gets hot, In a place
that gets direct sunlight, In a location that gets
hit by hot air)
• Do not install the unit under the carpet.
Otherwise heat build-up occurs and the unit
may be damaged.
• Install this unit in a location which allows heat to
easily dissipate.
Once installed, do not place any object on top
of the unit.
• The surface temperature of the amplifier will
become hot during use. Install the amplifier in a
place where people, resins, and other substances
that are sensitive to heat will not come into
contact with it.
• This unit has cooling fan to decrease the internal
temperature. Do not mount the unit in a place
where the cooling fan and ducts of the unit are
blocked. Blocking these openings will inhibit the
cooling of the internal temperature and result in
malfunction.
• When making a hole under a seat, inside the
trunk, or somewhere else in the vehicle, check
that there is nothing hazardous on the opposite
side such as a gasoline tank, brake pipe, or wiring
harness, and be careful not to cause scratches or
other damage.
• Do not install near the dashboard, rear tray, or air
bag safety parts.
• The installation to the vehicle should securely
fasten the unit to a place in which it will not
obstruct driving. If the unit comes off due to a
shock and hits a person or safety part, it may
cause injury or an accident.
• After installing the unit, check to make sure that
electrical equipment such as the brake lamps,
turn signal lamps and windshield wipers operate
normally.
Procédure d'installation
Etant donné que le nombre de réglages et de
raccordements est assez important, il importe de
prendre pleinement connaissance du mode d'emploi.
1. Retirer la clé de contact et débrancher la borne
négative s de la batterie pour éviter les courtcircuits.
2.
Régler l'appareil en fonction de l'utilisation désirée.
3. Déposer l’enjoliveur.
4.
Raccorder les câbles d’entrée et de sortie de l’appareil.
5. Raccorder les câbles de haut-parleur.
6. Relier, dans l'ordre, le câble d'alimentation, le
câble de commande d'alimentation et le câble
de masse.
7. Mettre en place les accessoires d’installation sur
l’unité.
8. Brancher l’unité.
9. Fixer l’enjoliveur.
10. Raccorder la borne négative s de la batterie.
ATTENTION
• Ne pas procéder à l’installation de l’appareil si
vous vous trouvez dans l’un des lieux suivants;
(Lieu instable, Lieu où la conduite du véhicule
peut être gênée, Lieu exposé à l’humidité, Lieu
exposé à la poussière, Lieu surchauffé, Lieu
exposé directement à la lumière du jour, Lieu
exposé à l’air chaud)
• Ne pas recouvrir l’appareil d’une nappe,
tapis, etc; la chaleur qui s’accumulerait risque
d’endommager l’appareil.
•
Installer cet appareil à un emplacement tel que
la chaleur puisse se dissiper aisément. Après
l’installation, ne placer aucum objet sur l’appareil.
• La surface de l’amplificateur va chauffer pendant
l’utilisation. Installer l’amplificateur à un endroit
où des passagers, de la résine ou d’autres
substances sensibles à la chaleur n’entreront pas
en contact avec lui.
• Cette unité dispose d’un ventilateur de
refroidissement permettant d’abaisser la
température interne. Ne pas monter l’unité dans
un endroit où le ventilateur de refroidissement et
les conduites de l’unité sont bloquées. En effet,
si la chaleur interne ne peut pas être éliminée
par la ventilation de l'appareil, une anomalie de
fonctionnement peut aisément survenir.
• Lors du forage d’un trou sous le siège, à
l’intérieur du coffre ou partout ailleurs dans
le véhicule, vérifier s’il n’y a pas d’élément
dangereux de l’autre côté, tel qu’un réservoir à
carburant, une conduite de frein, une gaine de
câbles, et faire attention de ne pas faire de griffes
ou d’autres dégâts.
•
Ne pas l’installer près du tableau de bord, de la
plage arrière ou d’éléments de sécurité de l’airbag.
• Lors de l’installation dans un véhicule, l’appareil
doit être fermement fixé à un endroit ou il ne
gênera pas la conduite. Si l’appareil se détache
suite à un choc et heurte quelqu’un ou un
élément de sécurité, il peut occasionner des
blessures ou un accident.
• Après installation de l’appareil, s’assurer que
les différents équipments électriques tels que
lampes frein et les clignotants de direction
fonctionnent normalement.
Procedimiento de instalación
Como se puede hacer una gran variedad de
ajustes y conexiones según las aplicaciones, lea
atentamente el manual de instrucciones para
seleccionar el ajuste y la conexión apropiados.
1. Retire la llave de encendido y desconecte el
terminal negativo s de la batería para evitar
cortocircuitos.
2. Prepare el aparato según el uso que vaya a
hacer de él.
3. Quite la cubierta de adorno.
4. Conecte los cables de entrada y salida de las
unidades.
5. Conecte los cables del altavoz.
6. Conecte el cable de alimentación, el cable de
control de alimentación y el cable de tierra en
este orden.
7.
Coloque los elementos de instalación en la unidad.
8. Coloque la unidad.
9. Coloque la cubierta de adorno.
10. Conecte la terminal negativa s de la batería.
PRECAUCIÓN
• No instale el equipo en las siguientes
ubicaciones; (Ubicación inestable; En un lugar
que interfiera a la conducción; En un lugar en el
que pueda mojarse; En un lugar con exceso de
polvo; En un lugar en el que pueda recalentarse;
En un lugar en el que reciba la luz directa del sol;
En un lugar situado en el flujo de aire caliente)
• No utilice el aparato bajo una alfombra porque
en caso contrario, éste podría sobrecalentarse y
estropearse.
• Instale este aparato en un lugar donde el calor
pueda disiparse fácilmente. Una vez instalado,
no ponga nada sobre él.
• La temperatura de la superficie del amplificador
se elevará durante su uso. Instale el amplificador
en un lugar seguro donde personas, resinas y
otras substancias sensibles al calor no entren en
contacto con esta superficie.
• Esta unidad tiene un ventilador de refrigeración
para reducir la temperatura interna. No instale
la unidad en un lugar donde estén bloqueados
el ventilador y los ductos de refrigeración.
Al tapar estas aberturas no podrá reducirse
adecuadamente la temperatura interior y podrá
producirse un fallo en el funcionamiento.
• Cuando haga un orificio bajo el asiento o en
el portaequipajes o en algún otro lugar del
vehículo, verifique que no existan objetos
peligrosos al lado opuesto tales como un tanque
de gasolina, tubo del freno, o los alambres del
cableado del coche y tenga cuidado de no rayar
las piezas del vehículo o causar algún otro daño.
•
No lo instale cerca del panel de controles, bandeja
trasera, o piezas de seguridad del colchón de aire.
• La instalación de esta unidad debe ser realizada
en un lugar donde no estorbe la conducción.
Si la unidad se sale de su posición debido a un
choque y golpea a una persona o a alguna pieza
de seguridad, puede causar o un accidente.
• Después de instalar el aparato, cerciórese de
que los equipos eléctricos (luces de freno,
intermitentes y limpiadores) funcionen
normalmente.
Connection / Raccordements / Conexiones
WARNING
Particular attention must be given to making good
electrical contact at the amplifier-output and speaker
terminals.
Poor or loose connections can cause sparking or
burning at the terminals because of the very high
power that the amplifier can deliver.
CAUTION
• If sound is not output normally, immediately turn power
off and check connections.
• Be sure to turn the power off before changing the setting
of any switch.
• If the fuse blows, check wires for shorts, then replace the
fuse with one of the same rating.
• Check that no unconnected wires or connectors are
touching the car body. Do not remove caps from
unconnected wires or connectors to prevent short
circuits.
• Connect the speaker wires to appropriate speaker
connectors separately. Sharing the negative wire of the
speaker or grounding speaker wires to the metal body of
the car can cause this unit to fail.
• After installation, check that the brake lamps, turn signal
lamps and windshield wipers work properly.
AVERTISSEMENT
Veillez à ce que le contact électrique à la sortie de
l’amplificateur et aux prises des enceintes soit bien
établi.
Un mauvais branchement ou un branchement lâche
peut causer des étincelles ou un réchauffement
des prises du fait de la très grande puissance de
l’amplificateur.
ATTENTION
• En cas d'anomalie, mettre immédiatement l'appareil hors
tension et vérifier tous les raccordements.
• Veiller à mettre l'appareil hors tension avant de changer
la position des commutateurs.
• Si le fusible saute, vérifier si les câbles ne sont pas courtcircuités, et remplacer le fusible par un autre fusible de
même capacité nominale.
Vérifier qu’aucun câble ou connecteur non raccordé
•
ne touche la carrosserie de la voiture. Ne pas retirer les
capuchons des câbles ou connecteurs non raccordés afin
d’éviter tout courtcircuit.
• Raccorder séparément les câbles de haut-parleur aux
connecteurs de haut-parleur appropriés. La mise en
commun du câble négatif d’un haut-parleur ou des fils
de masse des haut-parleurs à la carrosserie métallique de
la voiture pourrait rendre l’appareil inopérant.
• Après l’installation, vérifier que les voyants de frein,
les clignotants et les essuie-glace fonctionnent
correctement.
ADVERTENCIA
Debe ponerse especial atención para que se
haga un buen contacto eléctrico en la salida del
amplificador y en los terminales de los altavoces.
Las conexiones mal hechas o las conexiones
flojas pueden causar chispas o quemaduras en
los terminales debido a la potencia muy alta que
puede suministrar el amplificador.
PRECAUCIÓN
• Si el sonido no sale normalmente, desconecte
inmediatamente la alimentación y compruebe las
conexiones.
• No se olvide de desconectar la alimentación antes
de cambiar el ajuste de cualquier conmutador.
• Si el fusible se quema, compruebe que no haya un
cortocircuito en los cables, luego cambie el fusible
por uno que tenga el mismo amperaje.
Verifique que ninguno de los cables o conectores
•
que están sin conectar se encuentren tocando la
carrocería del automóvil. No retire las tapas de los
cables o conectores que están sin conectar para
evitar de que se produzcan cortocircuitos.
• Conecte los cables del altavoz a los conectores
adecuados del altavoz separadamente. La puesta en
contacto de terminales de altavoces distintos, o la
conexión como toma de tierra de los terminales del
altavoz al coche del automóvil, pueden causar daños
a la unidad.
Después de la instalación, compruebe que las
•
lámparas del freno, luces de destello y limpiaparabrisas
funcionar correctamente.
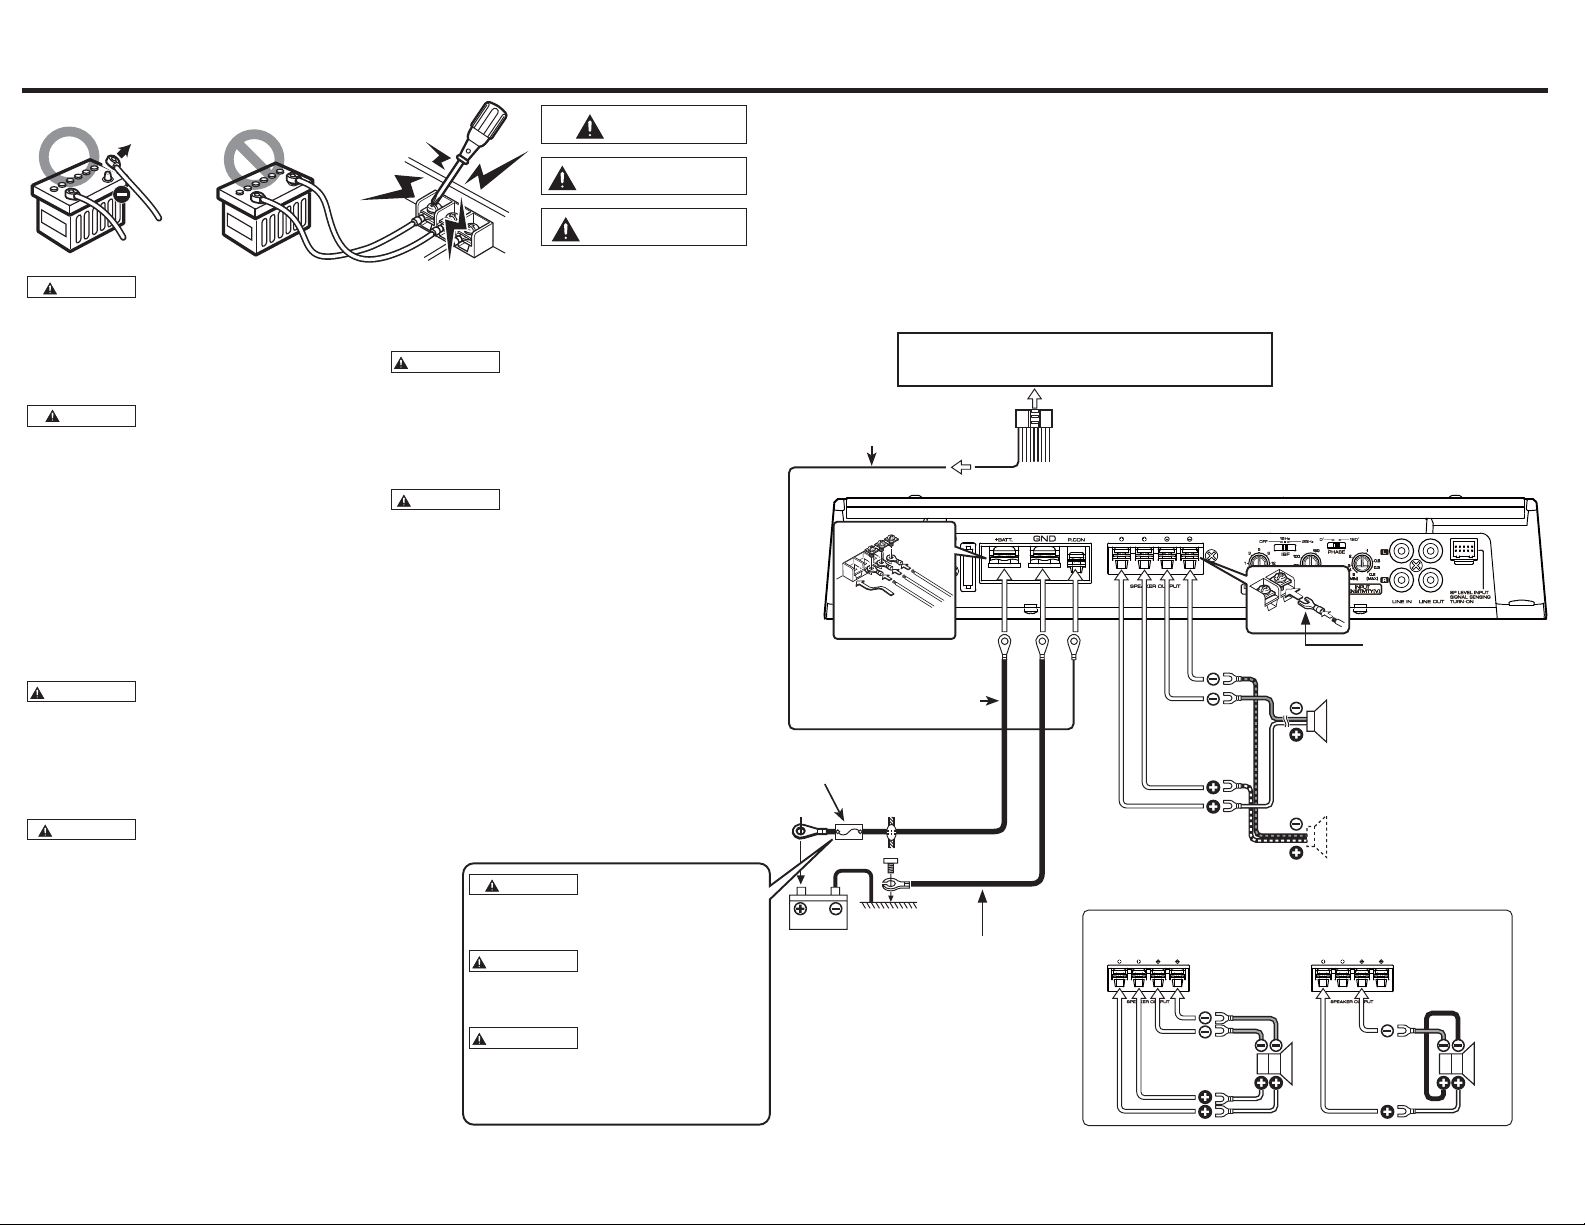
To prevent fire caused by a short in the wiring,
connect a fusible link or breaker nearby the
battery’s positive terminal.
Pour éviter tout incendie dû à un courtcircuit, insérer un fusible ou un coupecircuit à
proximité de la borne de la batterie.
Para evitar incendios producidos por
cortocircuitos en el cableado, conecte un
fusible o cortacircuito entre la batería y los
terminales de la batería.
WARNING
AVERTISSEMENT
ADVERTENCIA
Remove the ignition key and disconnect the negative s terminal of the
WARNING
AVERTISSEMENT
ADVERTENCIA
battery to prevent short circuits.
Retirer la clé de contact et débrancher la borne négative s de la batterie
pour éviter les court-circuits.
Retire la llave de encendido y desconecte el terminal negativo s de la
batería para evitar cortocircuitos.
Power wire and Speaker wire connection
Fil d'alimentation et connexion de fil d'enceinte
Conexión del cable de alimentación y del altavoz
Center unit (CD receiver, etc.)
Unité centrale (récepteur/ lecteur de CD, etc.)
Aparato central (reproductor de discos compactos, etc.)
Power control wire
Câble de commande de l’alimentation
Cable de control de alimentación
Battery wire
Câble de la batterie
Cable de la batería
Protective fuse
Fusible de protection
Fusible de protección
Battery
Batterie
Batería
Ground wire
Câble de masse
Cable de masa
Lead terminal
Cosse pour câble
Terminal de cable
Subwoofer (L + R)
Haut-parleurs d'extrêmes graves
(G + D)
Altavoz de subgraves (I + D)
When two subwoofers are
connected.
Lorsque deux two subwoofers
sont connectés.
Al conectar dos subwoofers.
Dual voice coil subwoofer / Subwoofer à Bobine Double
Voix / Subwoofer de bobina de voz doble
Dual 4 Ω
Double 4 Ω
Dual 4 Ω
Dual 2 Ω
Double 2 Ω
Dual 2 Ω
Connection / Raccordements / Conexiones
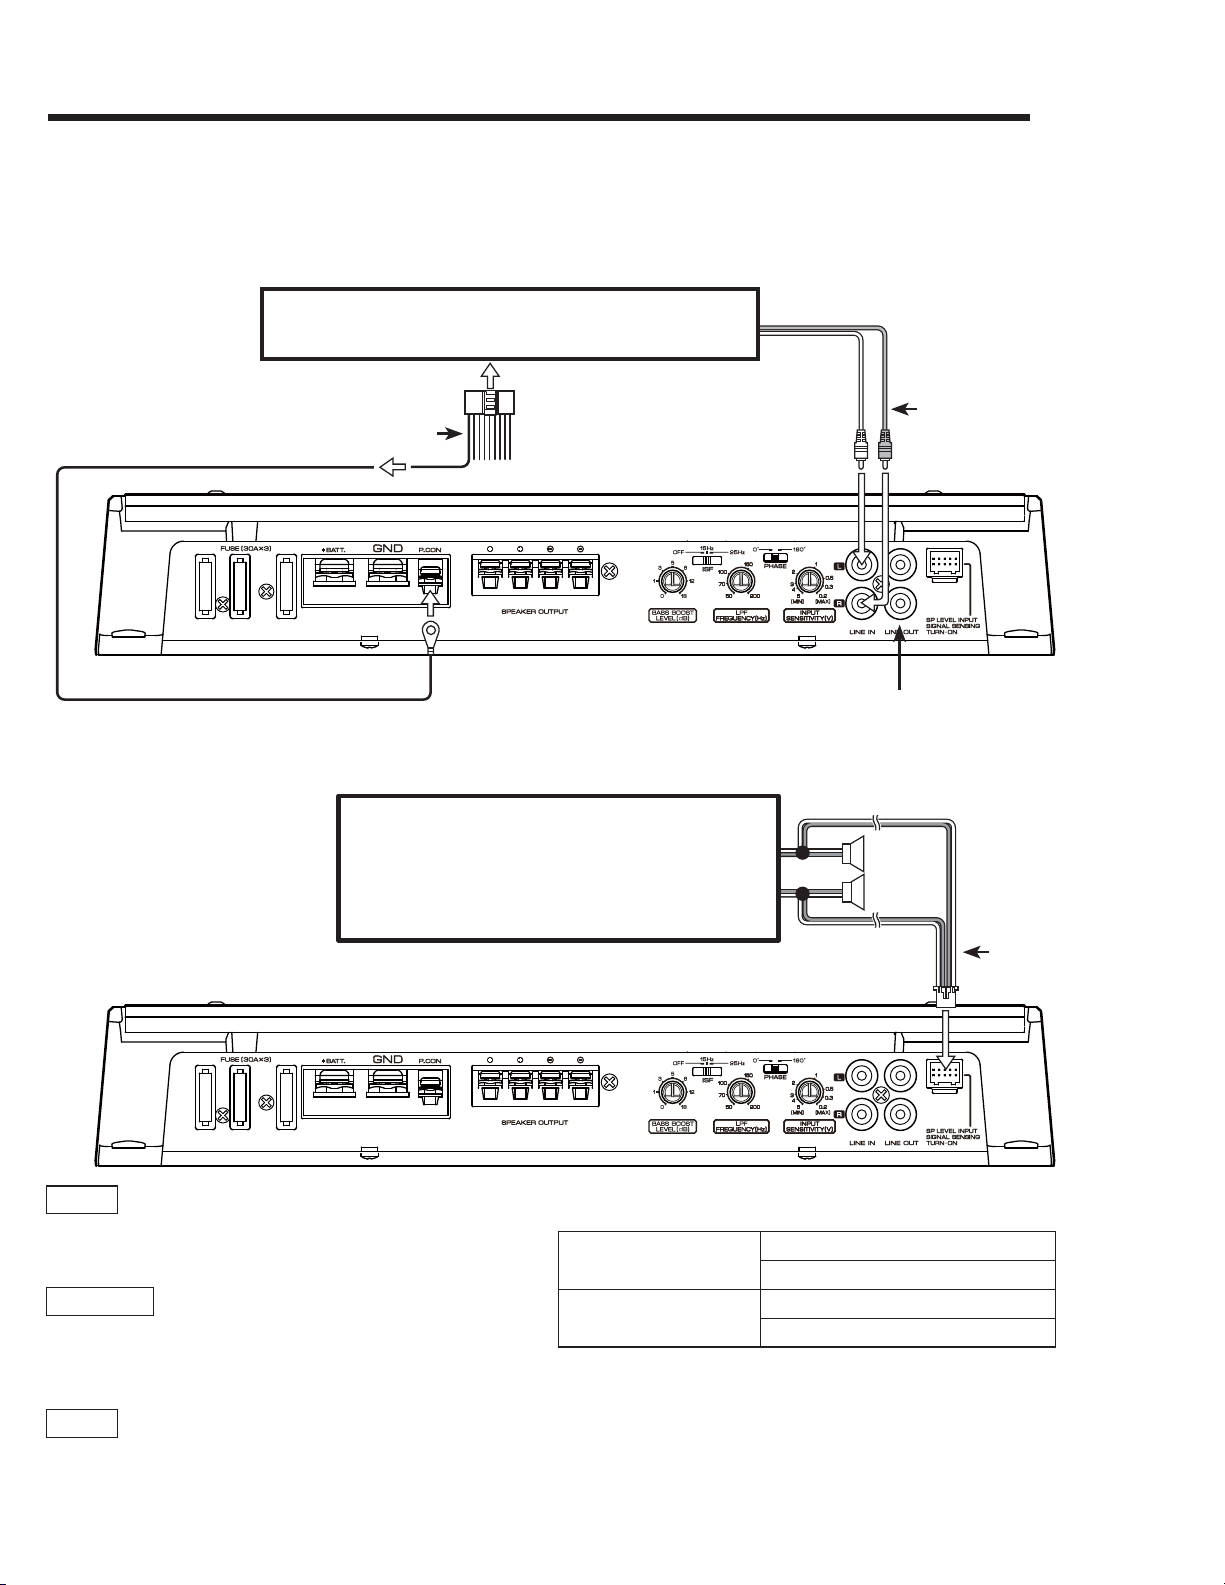
RCA cable or Speaker level input connection
Câble RCA ou connexion d'entrée de niveau d'enceinte
Conexión de entrada del cable RCA o del nivel del altavoz
RCA cable connections / Raccordement d'un câble à fiche Cinch (RCA) / Conexión de cable de RCA
Center unit (CD receiver, etc.)
Unité centrale (récepteur/ lecteur de CD, etc.)
Aparato central (reproductor de discos compactos, etc.)
Power control wire
Câble de commande de l’alimentation
Cable de control de alimentación
Speaker level input connections / Raccordement au niveau haut-parleur /
Conexión para entrada de altavoz
Genuine-accessory car stereo
(No line output center unit etc.)
Autoradio stéréo d’origine
(Aucune sortie de ligne de l’unité centrale, etc.)
Equipo estéreo suministrado con el automóvil
(No hay unidad central de salida de línea etc.)
RCA cable
Câble RCA
Cable RCA
LINE OUT terminal
Borne LINE OUT
Terminal LINE OUT
Parts included
Pieces comprises
Partes incluidas
NOTE
Do not connect cables and leads to both RCA cable input jacks
and the speaker level input terminals simultaneously, for this
may cause malfunction or damage.
REMARQUE
Ne pas raccorder des câbles ou conducteurs à la fois aux prises
de sortie pour câble RCA et aux prises d'entrée de haut-parleur
car l'appareil risquerait d'être endommagé ou de mal fonctionner.
NOTA
No conecte simultáneamente cables ni conductores a las
tomas de entrada de cables RCA o a los terminales de entrada
de altavoces porque podría producirse una avería.
Cable color of the connector / Couleur de câble du connecteur /
Color del cable del conector
Left / Gauche / Izquierdo
¥
Right / Droite / Derecho
White / Blanc / Blanco
s
White-Black / Blanc-Noir / Blanco-Negro
Gray / Gris / Gris
s
Gray-Black / Gris-Noir / Gris-Negro

Z
Fuse (30 A x 3)
NOTE
If you can’t find the specified capacity fuse at your store etc.,
consult your Kenwood dealer.
Battery terminal (BATT.)
Ground terminal (GND)
Power control terminal (P.CON)
Controls the unit ON/OFF.
NOTE
Controls the unit power. Be sure to connect it with all the
systems.
Speaker output terminals
As this unit accepts speakers with a minimum impedance
of 1 ohm, connect speakers with 1- ohm or higher impedance to these terminals.
BASS BOOST LEVEL control
Sets the low frequency level to be compensated.
LPF (Low-Pass Filter) FREQUENCY control
This control adjusts the frequency band output from this
unit.
INPUT SENSITIVITY control
Set this control according to the pre-output level of the
center unit connected with this unit.
NOTE
For the pre-output level, refer to the <Specifications> in the
instruction manual of the center unit.
ISF (infrasonic filter) switch
Ultralow frequencies that cannot be reproduced even by
a subwoofer speaker do not become sound but become
unnecessary oscillations, which affect the sound by causing
distortion, etc. Setting this switch to "15 Hz" or "25 Hz" cuts
the frequencies below the respective frequency.
This improves the reproduction performance of the speakers by eliminating unnecessary oscillations which will not
become sound.
PHASE switch
When this switch is set "180°" (Reverse) the speaker output
phase is reversed.
LINE IN terminal
LINE OUT terminal
The signal that’s input from the line input terminal is output.
Z SP LEVEL INPUT terminal
The genuine-accessory car stereo shall have a maximum
power output of no more than 40 W.
The power is turned on and off as the unit detects input
signal (SIGNAL SENSING TURN-ON). Therefore it is not necessary to connect the power control wire.
Power indicator
When the power is turned on, the Power indicator lights.
Fusible (30 A × 3)
REMARQUE
Si vous ne trouvez pas de fusible de calibre adéquat dans le
commerce, etc., contacter votre agent Kenwood.
Borne BATT. (alimentation)
Borne GND (masse)
Borne P.CON (fil de commande d’alimentation)
Commande l’unité ON/OFF.
REMARQUE
Commande l’unité d’alimentation. Assurez-vous de le
connecter à l’ensemble des différents systèmes.
Bornes SPEAKER OUTPUT
Cet appareil étant conçu pour fonctionner avec une
impédance de charge de 1 Ohm, tout hautparleur dont
l'impédance est égale ou supérieure à 1 Ohm peut être
branché sur ces prises.
Commande BASS BOOST LEVEL
Règle le niveau de basse fréquence devant être compensé.
Commande LPF (Filtre passe-bas) FREQUENCY
Cette commande permet de régler la bande de fréquence
en sortie de cet appareil.
Commande INPUT SENSITIVITY (sensibilité
d’entrée)
Régler cette commande selon le niveau de pré-sortie de
l’unité centrale branché à cet amplificateur.
REMARQUE
Se référer à la section <Spécifications> du manuel des
instructions de l’unité centrale à propos du niveau de présortie.
Commutateur ISF (filtre infrasonore)
Les fréquences très graves que même un haut-parleur
d'extrêmes graves n'est pas en mesure de reproduire,
génèrent des oscillations parasites qui altèrent les sons
audibles et les déforment, etc. En plaçant le commutateur
sur la position "15Hz" ou "25Hz", vous mettez en service le
filtre passe-haut ayant une de ces valeurs pour fréquence
de coupure.
Cette disposition permet d'accroître les performances des
haut-parleurs qui ne sont plus tenus de reproduire des
vibrations inutiles puisqu'elles ne sont pas perçues par
l'oreille.
Commutateur PHASE
Lorsque cet interrupteur est sur "180°" (Inverse), la phase de
sortie du hautparleur est inversée.
Borne d'entrée de ligne (LINE IN)
Borne de sortie de ligne (LINE OUT)
Le signal entrant du terminal d’entrée de ligne constitue la
sortie.
Z Borne SP LEVEL INPUT (niveau haut-parleur)
La puissance de sortie maximum de l'autoradio stéréo
d'origine ne doit pas dépasser 40W.
L'alimentation est activée et désactivée lorsque l'appareil
détecte le signal d'entrée (SIGNAL SENSING TURN-ON). C'est
pourquoi il n'est pas nécessaire de connecter le câble de
commande de l’alimentation.
Indicateur Power
Lorsque l’alimentation est activée, l’indicateur POWER
s’illumine.

Fusible (30 A × 3)
NOTA
Si no puede encontrar el fusible de la capacidad
especificada en su almacén etc., consulte su distribuidor
Kenwood.
Terminal BATT. (alimentación)
Terminal GND (tierra)
Terminal del control de corriente (P.CON)
Controla la conexión / desconexión de la unidad.
NOTA
Controla la potencia de la unidad. Asegúrese de conectarlo
con todos los sistemas.
Terminales SPEAKER OUTPUT
Como este aparto acepta altavoces con una impedancia
mínima de 1 ohmio, conecte altavoces con una impedancia
de 1 ohmio o más a estos terminales.
Control BASS BOOST LEVEL
Ajusta el nivel de baja frecuencia que se va a compensar.
Control LPF (filtro de paso bajo) FREQUENCY
Este control ajusta la salida de la banda de frecuencia de
esta unidad.
Control INPUT SENSITIVITY (sensibilidad de
entrada) (A.ch/B.ch)
Ajustar este control de acuerdo con el nível de presalida de
la unidad central conectada a este amplificador.
NOTA
Referir a <Especificaciones> del manual de instrucciones de
la unidad central con respecto al nível de presalida.
Conmutador ISF (filtro infrasónico)
Las frecuencias ultrabajas que no pueden ser reproducidas
ni siquiera por un altavoz de subgraves no se convierten
en sonido, sino en oscilaciones innecesarias que afectan al
sonido y causan distorsión, etc. Al poner este conmutador
en "15Hz" o "25Hz" se cortan las frecuencias por debajo de
sus frecuencias respectivas.
Esto mejorará la reproducción de los altavoces al eliminar
las oscilaciones innecesarias que no se convierten en
sonido.
Conmutador PHASE
Cuando este interruptor se coloca en la posición "180°"
(Inversa) la fase de salida del altavoz se invierte.
Terminal LINE IN (entrada de línea)
Terminal LINE OUT (salida de línea)
La señal de entrada del terminal de entrada de línea es la
de salida.
Z Terminal SP LEVEL INPUT (entrada de altavoz)
El equipo estéreo suministrado con el automóvil deberá
tener una potencia de salida máxima no superior a 40W.
La alimentación se enciende y apaga conforme la unidad
detecte una señal de entrada (SIGNAL SENSING TURN-ON).
Por lo tanto no es necesario conectar el cable de control de
alimentación.
Indicador POWER
Cuando la alimentación se activa, el indicador de POWER
se ilumina.

Troubleshooting Guide
What might appear to be a malfunction in your unit may just be the result of slight misoperation or miswiring.
Before calling service, first check the following table for possible problems.
PROBLEM POSSIBLE CAUSE SOLUTION
No sound.
(No sound from one
side.)
(Blown fuse.)
The output level is too
small (or too large).
The sound quality is
bad.
(The sound is distorted.)
• Input (or output) cables are disconnected.
• Protection circuit may be activated.
• Volume is too high.
• The speaker cord is shorted.
• The input sensitivity adjusting control is
not set to the correct position.
• The speakers wire are connected with
wrong V/spolarity.
• A speaker wire is pinched by a screw in
the car body.
• The switches may be set improperly.
• Connect the input (or output) cables.
• Check connections by referring to
<Protection function>.
• Replace the fuse and use lower volume.
• After check the speaker cord and fixing the
cause of the short, replace the fuse.
• Adjust the control correctly referring to
<Controls>.
• Connect them properly checking the V/s
of the terminals and wires well.
• Connect the speaker wire again so that it is
not pinched by anything.
• Set switches properly by referring to
<Controls>.
Guide de dépannage
Ce qui peut apparaître comme un mauvais fonctionnement de votre appareil n’est peut-être que le résultat d’une
mauvaise opération ou d’une mauvaise connexion. Avant d’appeler un centre de service, vérifiez d’abord dans le
tableau suivant les problèmes possibles.
PROBLEME CAUSE POSSIBLE SOLUTION
Absence de sons.
(Pas de son d’un côté)
(Fusible grillé)
Niveau de sortie trop
faible (ou trop fort).
La qualité sonore est
manuvaise.
(Le son est distordu.)
•
Les câbles d’entrée (ou de sortie) sont débranchés.
• Le circuit de protection peut être actionné.
• Le volume est trop fort.
• Les fils de raccordement d’enceinte sont en
court-circuit.
• La commande de réglage de la sensibilité
d’entrée n’est pas amenée sur la bonne
position.
• Les câbles de haut-parleur ont été
raccordés en inversant la polarité V/s.
• Un câble de haut-parleur est pincé par une
vis dans le châssis de la voiture.
• Les commutateurs ne sont peut-être pas
positionnés comme il convient.
• Brancher les câbles d’entrée (ou de sortie).
• Vérifier les raccordements en se reportant au
paragraphe <Fonction de protection>.
• Remplacez le fusible et utilisez un niveau de
volume plus faible.
• Après avoir vérifié le câble d’enceinte et réparé
la cause du court-circuit, remplacez le fusible.
• Faire le réglage correctement en se reportant
aux indications données en <Contrôles>.
• Raccorder correctement en respectant les
indications V et s des bornes et des câbles.
• Rebrancher le câble de haut-parleur en
évitant tout pincement
• Positionner les commutateurs en tenant
compte des indications fournies aux
paragraphes <Contrôles>.
Guía sobre localización de averías
Lo que podría parecer una falla de funcionamiento de su unidad podría ser simplemente el resultado de un
pequeño error de operación o de un defecto de conexión. Antes de acudir al servicio, verifique primero el
siguiente cuadro sobre los problemas que se podrían presentar.
PROBLEMA CAUSA POSIBLE SOLUCION
No hay sonido.
(No hay sonido de un
lado.)
(Fusible fundido)
El nivel de salida está
muy bajo (o muy alto)
La calidad del sonido
es mala.
(El sonido está
distorsionado.)
•
Los cables de entrada (o salida) están desconectados.
• El circuito de protección puede estar
activado.
• El volumen está demasiado alto.
• El cable del altavoz está cortocircuitado.
• El control de ajuste de sensibilidad de
entrada no está en la posición correcta.
• Los cables de los altavoces están conectados
con las polaridades V / s invertidas.
• Un cable de altavoz está pellizcado por un
tornillo de la carrocería del automóvil.
• Los conmutadores pueden estar mal
ajustados.
• Conecte los cables de entrada (o salida).
• Compruebe las conexiones consultando
<Función de protección>.
• Reemplace el fusible y utilice volumen bajo.
Después de revisar el cable del altavoz y arreglar
•
la causa del cortocircuito, reemplace el fusible.
• Ajuste bien el control consultando en
<Controles>.
• Conéctelos correctamente asegurándose
bien de cuáles son los terminales V y s.
• Vuelva a conectar los cables de los altavoces
de forma que no queden pellizcados.
• Ponga bien los conmutadores consultando
<Controles>.

Specifications
Specifications subject to change without notice.
Audio Section
Max Power Output ..................................................................1800 W
Rated Power Output (+B = 14.4V)
(4 ) (20 Hz – 200 Hz, ≤ 1.0 % THD) .....................500 W × 1
(2 ) (100 Hz, ≤ 1.0 % THD) .......................................900 W × 1
(1 ) ............................................................................. ≥ 900 W × 1
Speaker impedance .............................................................1 – 8
Frequency Response (+0, –3 dB) ....................10 Hz – 200 Hz
Sensitivity (rated output) MAX. ............................................0.2 V
MIN. ............................................. 5.0 V
Signal to Noise Ratio .................................................................100 dB
Input Impedance ...........................................................................10 k
Low Pass Filter Frequency (-24 dB/oct.) ......50 Hz–200 Hz (variable)
Spécifications
Les spécifications sont sujettes à changements sans
notification.
Section audio
Puissance de sortie max. ......................................................1800 W
Puissance de sortie norminale (+B = 14,4V)
(4 ) (20 Hz – 200 Hz, ≤ 1,0 % THD) .....................500 W × 1
(2 ) (100 Hz, ≤ 1,0 % THD) .......................................900 W × 1
(1 ) ............................................................................. ≥ 900 W × 1
Impédance d'enceinte .......................................................1 – 8
Réponse en fréquence (+0, –3 dB) ................10 Hz – 200 Hz
Sensibilité (puissance nominale) MAX. ........................... 0,2 V
MIN. ..............................5,0 V
Taux de Signal/Bruit .................................................................. 100 dB
Impédance d’entrée ....................................................................10 k
Fréquence du filtre passe-bas (-24 dB/oct.)
.......................................50 Hz – 200 Hz (variable)
Infrasonic Filter Frequency (-18 dB/oct.) ............15 Hz / 25 Hz
Bass Boost Control (40 Hz) .....................0 – +18 dB (variable)
General
Operating Voltage ........................14.4 V (11 – 16 V allowable)
Current Consumption ..................................................................57 A
Dimensions (W × H × D) ...........................350 × 59 × 238 mm
13-3/4 × 2-5/16 × 9-3/8 inch
Weight .........................................................................3.3 kg (7.2 lbs)
CEA-2006
RMS Watts per channel @ 4 ohms, ≤1% THD+N
........................................................................500 W × 1
Signal to Noise Ratio (Reference: 1Watt into 4
ohms) ..........................................................................75 dBA
Fréquence de coupure du filtre infrasonore (-18 dB/oct.)
................................................................. 15 Hz / 25 Hz
Control d’amplification des basses (40 Hz)
................................................0 – +18 dB (variable)
Général
Tension de fonctionnement ...14,4 V (11 – 16 V admissible)
Courant absorbé ..............................................................................57 A
Taille d’installation (L × H × P) ................350 × 59 × 238 mm
13-3/4 × 2-5/16 × 9-3/8 pouce
Masse .........................................................................3,3 kg (7,2 lbs)
CEA-2006
RMS Watts par channel @ 4 ohms, ≤ 1 %
THD+N
........................................................................500 W × 1
Taux signal/bruit (référence : 1 Watt/4 ohms)
...............................................................................75 dBA
Especificaciones
Las especificaciones se encuentran sujetas a cambios
sin previo aviso.
Sección de audio
Máxima potencia de salida ................................................1800 W
Salida de potencia nominal (+B = 14,4V)
(4 ) (20 Hz – 200 Hz, ≤ 1,0 % de distorsión armónica total)
..................................................................................500 W × 1
(2 ) (100 Hz, ≤ 1,0 % de distorsión armónica total)
............................................................................................900 W × 1
(1 ) ............................................................................. ≥ 900 W × 1
Impedancia de altavoz .......................................................1 – 8
Respuesta de frecuencia (+0, –3 dB) ............10 Hz – 200 Hz
Sensibilidad (salida nominal) MAX. .................................... 0,2 V
MIN. ......................................5,0 V
Relación señal a ruido .............................................................. 100 dB
Impedancia de entrada .............................................................10 k
Frecuencia del filtro pasa bajos (-12 dB/octava)
.................................................50 Hz – 200 Hz (variable)
Frecuencia del filtro infrasónico (-18 dB/octava)
................................................................. 15 Hz / 25 Hz
Control acentuador de graves (40 Hz)
.....................................................0 – +18 dB (variable)
General
Tensión de funcionamiento
................ 14,4 V (margen de 11 – 16 V permitido)
Consumo ............................................................................................... 57 A
Tamaño de instalación (Anch × Alt × Prof )
............................................................350 × 59 × 238 mm
13-3/4 × 2-5/16 × 9-3/8 pulgada
Peso ................................................................... 3,3 kg (7,2 libras)
CEA-2006
Vatios RMS por canal @ 4 ohms, ≤ 1 % THD+N
........................................................................500 W × 1
Relación señal a ruido (referencia: 1 vatio en 4
ohmios) .......................................................................75 dBA

Declaration of Conformity with regard
to the EMC Directive 2004/108/EC
Manufacturer:
Kenwood Corporation
2967-3 Ishikawa-machi, Hachioji-shi, Tokyo,
192-8525 Japan
EU Representative's:
Kenwood Electronics Europe BV
Amsterdamseweg 37, 1422 AC UITHOORN,
The Netherlands
Déclaration de conformité se rapportant
à la directive EMC 2004/108/EC
Fabricant :
Kenwood Corporation
2967-3 Ishikawa-machi, Hachioji-shi, Tokyo, 192-8525
Japon
Représentants dans l'UE :
Kenwood Electronics Europe BV
Amsterdamseweg 37, 1422 AC UITHOORN, Pays-Bas
Declaración de conformidad con
respecto a la Directiva EMC 2004/108/CE
Fabricante:
Kenwood Corporation
2967-3 Ishikawa-machi, Hachioji-shi, Tokyo, 192-8525
Japón
Representante en la UE:
Kenwood Electronics Europe BV
Amsterdamseweg 37, 1422 AC UITHOORN, Países
Bajos
FCC WARNING
This equipment may generate or use radio frequency energy.
Changes or modifications to this equipment may cause harmful
interference unless the modifications are expressly approved in the
instruction manual. The user could lose the authority to operate
this equipment if an unauthorized change or modification is made.
Information on Disposal of Old Electrical
and Electronic Equipment (applicable for EU
countries that have adopted separate waste
collection systems)
Products with the symbol (crossed-out wheeled
bin) cannot be disposed as household waste.
Old electrical and electronic equipment should
be recycled at a facility capable of handling
these items and their waste byproducts.
Contact your local authority for details in
locating a recycle facility nearest to you. Proper
recycling and waste disposal will help conserve
resources whilst preventing detrimental effects
on our health and the environment.
This Product is not installed by the manufacturer of a
vehicle on the production line, nor by the professional
importer of a vehicle into an EU Member State.
Information sur l’élimination des anciens
équipements électriques et électroniques
(applicable dans les pays de l’Union
Européenne qui ont adopté des systèmes de
collecte sélective)
Les produits sur lesquels le pictogramme
(poubelle barrée) est apposé ne peuvent pas
être éliminés comme ordures ménagères.
Les anciens équipements électriques et
électroniques doivent être recyclés sur des
sites capables de traiter ces produits et leurs
déchets. Contactez vos autorités locales pour
connaître le site de recyclage le plus proche. Un
recyclage adapté et l’élimination des déchets
aideront à conserver les ressources et à nous
préserver des leurs effets nocifs sur notre santé
et sur l’environnement.
Ce produit n’est pas installé par le constructeur d’un véhicule
sur le site de production, ni par l’importateur professionnel
d’un véhicule dans un Etat membre de l’UE.
FCC NOTE
This equipment has been tested and found to comply with
the limits for a Class B digital device, pursuant to Part 15 of the
FCC Rules. These limits are designed to provide reasonable
protection against harmful interference in a residential installation.
This equipment may cause harmful interference to radio
communications, if it is not installed and used in accordance with
the instructions. However, there is no guarantee that interference
will not occur in a particular installation. If this equipment does
cause harmful interference to radio or television reception, which
can be determined by turning the equipment off and on, the user
is encouraged to try to correct the interference by one or more of
the following measures:
• Reorient or relocate the receiving antenna.
• Increase the separation between the equipment and receiver.
• Connect the equipment into an outlet on a circuit different from
that to which the receiver is connected.
• Consult the dealer or an experienced radio/TV technician for
help.
Información acerca de la eliminación de
equipos eléctricos y electrónicos al final
de la vida útil (aplicable a los países de la
Unión Europea que hayan adoptado sistemas
independientes de recogida de residuos)
Los productos con el símbolo de un
contenedor con ruedas tachado no podrán ser
desechados como residuos domésticos.
Los equipos eléctricos y electrónicos al final
de la vida útil, deberán ser reciclados en
instalaciones que puedan dar el tratamiento
adecuado a estos productos y a sus
subproductos residuales correspondientes.
Póngase en contacto con su administración
local para obtener información sobre el punto
de recogida más cercano. Un tratamiento
correcto del reciclaje y la eliminación de
residuos ayuda a conservar los recursos y evita
al mismo tiempo efectos perjudiciales en la
salud y el medio ambiente.
Este producto no ha sido instalado en la línea de
producción por el fabricante de un vehículo, ni tampoco
por el importador profesional de un vehículo dentro del
estado miembro de la UE.

Andorra
Andorra
Andorra
Esllffiado
Usuarlodelos
Esllffiado
Usuarlodelos
Esllffiado
Usuarlodelos
Kenwood
Kenwood
Kenwood
Gracias
por
haber
Gracias
por
haber
Gracias
por
haber
Kenwood
Kenwood
Kenwood
Sj
resulla
defeeluoso
Sj
resulla
defeeluoso
Sj
resulla
defeeluoso
KENWOOD IBERICA, S.A
KENWOOD IBERICA, S.A
KENWOOD IBERICA, S.A
T81.+34-93-507-5252
T81.+34-93-507-5252
T81.+34-93-507-5252
www.kenwood.es
www.kenwood.es
www.kenwood.es
ATENCt6N
ATENCt6N
ATENCt6N
Norge
Norge
Norge
Kjrerekurlde
Kjrerekurlde
Kjrerekurlde
TUkk
for at De vrJlgte
TUkk
for at De vrJlgte
TUkk
for at De vrJlgte
pHxluklet
pHxluklet
pHxluklet
somerOppT0rl nedenTor
somerOppT0rl nedenTor
somerOppT0rl nedenTor
vedr0rendereklamasjOll/garanli
vedr0rendereklamasjOll/garanli
vedr0rendereklamasjOll/garanli
Dalen·sElekt.onikkS"nrlce.{s
Dalen·sElektronikkS"nrlce.{s
Dalen·sElektronikkS"nrlce.{s
B..nnav"ien4
B
..
B
..
N-1483Skyttlt
N-1483Skyttlt
N-1483Skyttlt
Tel. 67-060157
Tel. 67-060157
Tel. 67-060157
OBSI
OBSI
OBSI
DBtlekDrlCgkviltenfl\lernMveOOigtcr~ic:Jr.penyttpanel
DBtlekDrlCgkviltenfl\lernMveOOigtcr~ic:Jr.penyttpanel
DBtlekDrlCgkviltenfl\lernMveOOigtcr~ic:Jr.penyttpanel
~BO
eventuell
sic:adeellerty'liBri
~BO
eventuell
sic:adeellerty'liBri
~BO
eventuell
sic:adeellerty'liBri
SUisse
SUisse
SUisse
Cher
utlllS('urdeKENWOOD
Cher
ulll,S('urdeKENWOOD
Cher
ulll,S('urdeKENWOOD
Merei
d'avoir
Merei
d'avoir
Merei
d'avoir
KENWOOD
KENWOOD
KENWOOD
normales,
veullle"
normales,
veullle"
normales,
veullle"
dlstllbuteLJr
ofllc'el
dlstllbuteLJr
ofllc'el
dlstllbuteLJr
ofllc'el
estavolredrspos,tionpourtoules.ntulrnallDns
estavolredrsposltionpourtoutes.ntulrnallDns
estavolredrsposltionpourtoutes.ntulrnallDns
degarantle
degarantle
degarantle
KENWOOD
KENWOOD
KENWOOD
RembriidrerStr,1S
RembriidrerStr,1S
RembriidrerStr,1S
D-63150Heusensumffl
D-63150Heusensumffl
D-63150Heusensumffl
TeI.0049-f>10'-6901-0
TeI.0049-f>10'-6901-0
TeI.0049-f>10'-6901-0
www.kenwood.de
www.kenwood.de
www.kenwood.de
ATTENnON
ATTENnON
ATTENnON
Laca1eclegarJmieetlapreuved'acha1(O'Jlalaclure)
Laca1eclegarJmieetlapreuved'acha1(O'Jlalaclure)
Laca1eclegarJmieetlapreuved'acha1(O'Jlalaclure)
wnI~S53lfesal'achilld'uneFlOln'elle1a~
wnI~S53lfesal'achiltd'uneFlOln'elle1a~
wnI~S53lfesal'achiltd'uneFlOln'elle1a~
detachableencas
lie
dom:nagesou
detachable
en
cas
lie
dom:nagesou
detachable
en
cas
lie
dom:nagesou
BelgiqueetGrand-duchedeLuxembourg
BelgiqueetGrand-duchedeLuxembourg
BelgiqueetGrand-duchedeLuxembourg
KENWOOD ELECTRONICS BELGIUM N.V.
KENWOOD ELECTRONICS
KENWOOD ELECTRONICS
u.uvenses1ll<Hl_lil248
u.uvenses1ll<Hl_lil248
u.uvenses1ll<Hl_lil248
1800VihroOfdB.B,lgium
1800VihroOfdB.B,lgium
1800VihroOfdB.B,lgium
Tet321021757-9060
Tet321021757-9060
Tet321021757-9060
www.kltnwood.b.
www.kltnwood.b.
www.kltnwood.b.
Gooserve!
prec;e'J5~ment
Gooserve!
Gooserve!
II1~r:lj)e·lS.3D'eDDultou:eTOCIam.J.t:cn
II1~r:lj)e·lS.3D'eDDultou:eTOCIam.J.t:cn
II1~r:lj)e·lS.3D'eDDultou:eTOCIam.J.t:cn
Goad~i=
A.
Belgle &
Belgle &
Belgle &
tJdi[nrrX'll!f.uonliHl:aalilllrgv~j,g
IJdi[nrrX>ll!f.uonliHl:aallllllgv~j,g
IJdi[nrrX>ll!f.uonliHl:aallllllgv~j,g
ooodlarelill'isoollJy;oar,sproken
ooodla(elill'isoollJy;",mspr"kenupreleGi!r~ntift~oornl}lldell
ooodla(elill'isoollJy;",mspr"kenupreleGi!r~ntift~oornl}lldell
cette
or!c;e'J5~menl
celte
or!c;e'J5~menl
celte
Toole
roclillTJ(lilonllX!1lulee
accomp.l1;nee
r)J
la
pre5illlle
E1OOCIJmt,":s~ulYa~ls
Groothertogdom
Groothertogdom
Groothertogdom
KENWOOD
ELECTRONICS BELGIUM N,V,
KENWOOD ELECTRONICS BELGIUM N.V,
KENWOOD ELECTRONICS BELGIUM N.V,
l.e"vf>M"..teenwtlg248J.
Le"vf>M"..
Le"vf>M"..
11l00ViIWlonle,Belglum
11100
Vilvmm:le,
11100
Vilvmm:le,
Tel. 32102)751·!060
Tel. 32102)751·!060
Tel. 32102)751·!060
www.kenwflod.be
www.kenwflod.be
www.kenwflod.be
proauctos
proauctos
proauctos
elegido
este
elegido
este
elegido
este
dlJ1te
Ken
dlJ1te
Ken
dlJ1te
Ken
leil
under
normal
leil
under
normal
leil
under
normal
nnav"ien4
nnav"ien4
produit
produit
produit
S.V.p
S.V.p
S.V.p
montionne
ci-dessous
montionne
ci-dessous
montionne
ci-dessous
ELECTllONICS
GMBH
ELECTllONICS GMBH
ELECTllONICS GMBH
clevol
clevol
clevol
BELGIUM
BELGIUM
J,
J,
J,
Cil1~
deG
....
lfI:,eC3l
Cil1~
deG
....
lfI:,eC3l
Cil1~
deG
....
lfI:,eC3l
I)II.-e~~
(Ie
I~
Garant:e
C~lledeGar~~lie
Ell
00:;
Luxemburg
Luxemburg
Luxemburg
teenwtlg248J.
teenwtlg248J.
Belgium
Belgium
blltellCt.lOilrlaJ"~~I~IIJ
blltellCt.lOilrlaJ"~~I~IIJ
blltellCt.lOilrlaJ"~~I~IIJ
uprele
Gi!1~ntift
Iceland
Iceland
Iceland
Krerr
no~andl
Kenwood
Krerr
no~andr
Krerr
no~andr
Til
hamingiu
Til
hamingiu
Til
hamingiu
Efeinhverjll
Efeinhverjll
Efeinhverjll
Producto
Producto
Producto
SudurlendWreut26.
SudurlendWreut26.
SudurlendWreut26.
AbYlgoorlimi"reitt
AbYlgoortimi
AbYlgoortimi
KaLJ,;<lndi
KaUf;<Jndi
KaUf;<Jndi
:)
cigin
:)
cigin
:) !Jigin
framTeitlslugolium fara
framleitlslugolium
framleitlslugolium
kostnabarlausu
kostnaOarlausu
kostnaOarlausu
Schweiz
Schweiz
Schweiz
.....
ood
.....
ood
.....
ood
Hcr711chcn
Her711chen
Her711chen
KcnwQod-PrOCLJKl
KcnwQod-Produkl
KcnwQod-Produkl
bruk.
bruk.
bruk.
Falls
Falls
Falls
ButllebsbedlllgLJogen
ButlrebsbedlllgLJogen
ButlrebsbedlllgLJogen
Sll:~
slch
SIC
slch
SIC
slch
Vertretung
Vertretung
Vertretung
Erne Liste
Erne Liste ailer
Erne Liste ailer
aile
informatlonen
aile
intormatlonen
aile
intormatlonen
www.kcnwood.de
www.kcnwood.dc
www.kcnwood.dc
ZUR BEACHTUNG
ZUR
SEACHTUNG
ZUR
SEACHTUNG
DreseGarantiekarteunddeTKa]'beleg~rdenbenOligt,
DreseGarantiekarteundd!lTKa]'beleg~rdenbenOligt,
DreseGarantiekarteundd!lTKa]'beleg~rdenbenOligt,
l1I'nimFalledes\lerluslesellllletfsBt'dielileillu
l1I'nimFalledes\lerlus1esellllletfsBt'dielileillu
l1I'nimFalledes\lerlus1esellllletfsBt'dielileillu
ervrerbell
ervrerben
ervrerben
Svenge
Svenge
Svenge
Bil.sle
Biisle
Biisle
Tack
f(jr
Tack
f(jr
Tack
f(jr
de
de
de
votro
votro
votro
II
II
II
81ertorsaITarcn(lnkbpsslaITel}.
8tertorsallarcn(lnkbpsstallet}.
8tertorsallarcn(lnkbpsstallet}.
OBS!
OSS!
OSS!
KENWOOD ELECTRONICS BELGIUM N.V.
KENWOOD ELECTRONICS BELGIUM N.V.
KENWOOD ELECTRONICS BELGIUM N.V.
(a)
Vorre
(a)
VorlE
(a)
VorlE
(b)
lecpn,:icatrfaGharoutOO:"ulrerlcwmertet.Jblis.'.lo'lTIad;ie
(b)
Lecpn,:icatrfaGharoutOU:"ulredcwmertet.Jblis.'.lo'llladale
(b)
Lecpn,:icatrfaGharoutOU:"ulredcwmertet.Jblis.'.lo'llladale
d;l;Quisll'onduProdurl"~esd'u'lll1!1aillant!Jl<~lil;tmoll
d;l;Quislt'onduProduila~esd'U'l~illant!Jl<~lil;tmoLl
d;l;Quislt'onduProduila~esd'U'l~illant!Jl<~lil;tmoLl
Cff
Cff
Cff
(e)
L';derliteetl'orIrEls~ecmpleleder.euBl3ill<Jnt
(c)
L·;rlerliteetl'arIrElS~ccmplereder.euBl3ill.lnt
(c)
L·;rlerliteetl'arIrElS~ccmplereder.euBl3ill.lnt
(dl
LenulOOlo(lestJrieetlellOl11oorr"llXJ\reOOPH)QUlt
(d)
LenulOOlooostJrieeilellOll1oof!"ll)(J\reOOPH)dult
(d)
LenulOOlooostJrieeilellOll1oof!"ll)(J\reOOPH)dult
Si
GElS
mIOlIIldl:ol~
SiGlJSmIOln\ll:ol~"el>aJvenlet'etournllJS
SiGlJSmIOln\ll:ol~"el>aJvenlet'etournllJS
~Iood.eoo
~Iood.eoo
~Iood.eoo
da:qu;sitllJfl
da:qu;sitl(K1
da:qu;sitl(K1
Pmdu'tilll'COIllftIOllSrJelapr!!CflIoGJran:iB
Pmdu'l
illl'
Pmdu'l
illl'
B.le
PloCU~
B.le
PloCU~
B.le
PloCU~
el
e.l'1Ji-OC1JS
el
e.l'1Ji-OC1JS
el
e.l'1Ji-OC1JS
paysdepremllremTS!!HJlIeIP<lehe~n
P<lysdepremllremwHJllewa"cheen
P<lysdepremllremwHJllewa"cheen
I1lsm;xl,h-..ltiuns
l1lsrn;)dlh-..ltiuns
l1lsrn;)dlh-..ltiuns
trt<:,cda'llmnef,01tpasr.ot.r<P.l1llS[la
trt<:lcda"lmncsoolpasr.ot.r<P.l1llS[la
trt<:lcda"lmncsoolpasr.ot.r<P.l1llS[la
L:!re~onoabll,leilel'\enM«lll'pourraetreeugl(lOOpourloule
Iar8~onoabll,leool'\enM«l~pourraetreeugl(lOOpDUrloule
Iar8~onoabll,leool'\enM«l~pourraetreeugl(lOOpDUrloule
plfSfa!IJ~
plfSfa!IJ~
p'fSfa!'J~
et
r~,Llrt~nl
et
r~~L1rt~n1
et
r~~L1rt~n1
N.V.
N.V.
S;lePwduitestutll,seil.Jn,ullpa,sEurtlPl!oolJ.n;lequelilesl
S;
ie
Pwduit
S;
ie
Pwduit
~lIIJmis
~
des
slllJmis~des
slllJmis~des
daH.~paysEurootJe(lccprt;n~fmlse;urloimilchi?parle
da~.~paysEurootJe(lccprtm~fmlse;urloimilchi?p.lrle
da~.~paysEurootJe(lccprtm~fmlse;urloimilchi?p.lrle
t.J.~ri~u<Vlt.
1a~ri~u<Vlt.
1a~ri~u<Vlt.
s~ra~~~mise
s~ra~~~mise
s~ra~J~mise
el~
VOlIS
~era
clI<lIgt
el~
VOlIS
el~
VOlIS
0011
/tre
inlClmdliono
~oornlJlldell
I~s
~era
~era
cll<llgtl~stralsdillap~atloncuf'rcduitauxr.or~Bte'l\lllnteS
cll<llgtl~stralsdillap~atloncuf'rcduitauxr.or~Bte'l\lllnteS
aODI'ca~'cs
aODI'ca~'cs
aODI'ca~'cs
proo,lIr\
rTlIS
proo.llr\
rTlIS
proo.llr\
rTlIS
~tITePr(){lUiteslpresen'epourre~arit,:)I1aut-tredelagarantie
~tllfPr(){llliteslpresen'epoorrt~aritl:)l1aot-tredelag.Jrantie
~tllfPr(){llliteslpresen'epoorrt~aritl:)l1aot-tredelag.Jrantie
e1QIJCI~sp<lX.esre
e1Quel~sp<lX.csrerl'Chanoeapproprlresl1fw"lpasdlspc"ibles
e1Quel~sp<lX.csrerl'Chanoeapproprlresl1fw"lpasdlspc"ibles
IiJnSCCP,l1S,ou~lareparat!l)fl~garilfll.~u'est>llSpossobie
IiJnsceP,l1S,oo~lilrepJral!l)fl~gaJilfII'fn'est>llSPOSsobic
IiJnsceP,l1S,oo~lilrepJral!l)fl~gaJilfII'fn'est>llSPOSsobic
r:lJ"SCCpai'SP~1I
r:lJ"scep.li'SP~1I
r:lJ"scep.li'SP~1I
lranSjlUlt
~:IEf
~anSjlUlt~illlllelOIll
~anSjlUlt~illlllelOIll
pr!lfTllllle,j(.QlllSltim
pr!lfTllllle,j(.[Jllsltim
pr!lfTllllle,j(.[Jllsltim
CLoprMIeG.JiJr1ielle~ou
CLaprMIeG.JiJr1ilJlle~oo
CLaprMIeG.JiJr1ilJlle~oo
(a)
lesa'lt,al'JIlsduProoull,lesadaptal'orn;elentrll:lens
(al
lesa'lt,allJ(lsduPrOOull,lesada.ptlt'orn;elentrll:lens
(al
lesa'lt,allJ(lsduPrOOull,lesada.ptlt'orn;elentrll:lens
normJiJl,~comprlslesconlrcles
I1O!mJIJ1,~comprlslescollircles
I1O!mJIJ1,~comprlslescollircles
fTl(WtKllJIQ,!tln,lell'nJ!llpnldllP'odJt
fTl(WtKllJlQsdlnslell'nJ!llpnldUPrOOJI
fTl(WtKllJlQsdlnslell'nJ!llpnldUPrOOJI
Ib]
leoorml}OjCtalJSIiiIJPrWi;~r/!:lull<lnl
Ib]
leoorml}OjCtalJSIiiIJPrWi;~r/!:lull<lnl
Ibl
leoorml"lOJCtalJSIiiIJPIWi;~r/!:lullanl
ItI"Ip~rO>-"lJesoul~q:;alesert~IJ6e~
IlI;lp~ro",-,lJes
IlI;lp~ro",-,lJes
n'Mont
n'M<J]tpas
n'M<J]tpas
00
l)ariJlt
00
lliJr<J]t
00
lliJr<J]t
KENWOOD ELECTRONICS BELGIUM N.V.
KENWOOD ELECTRONICS BELGIUM N.V.
KENWOOD ELECTRONICS BELGIUM N.V.
van<Linkoopbilero(Je1alrh,u1delaar~8vesli!Jl
van
iLinkoop
van
iLinkoop
verrndis
verrndis
verrndis
(c)
OeYo~IIld;oe
(c)
OeYO~ied;OB
(c)
OeYO~ied;OB
hetProdJk!..erd~;Jekocht
heIProdJk!..erd~;Jekocht
heIProdJk!..erd~;Jekocht
I~l
tffi1sarleoullmtre~oert;;amYarJhctmllC~lvilnhelProourJ
I~]
tffiIsorlllllUllmtre~
I~]
tffiIsorlllllUllmtre~
IndleflOil/elntcrlOlal,eniet<an
IUdlffiOillelOtcrlOlal,eniet<an
IUdlffiOillelOtcrlOlal,eniet<an
ProcuklDDenl~leiwijleMldsGtw:umvandeaankoop~rd
Procukt
DP
Procukt
DP
yw.ill'IJl,l,
\jIN<i)/llJI,l.
\jIN<i)/llJI,l.
we,gerenhe\toc:;lclwhelslel!mtJllliJrOOI'lJOrw.-lard\JlI'and8le
wg,geren
heI
wg,geren
heI
Gar<lfltl~
Garantl~
Garantl~
B
Hl'tPrOOul;Tl'l'erdveriaafll,g~I1[M.ElffiS~mingmBialili
B
Hl'tPrOOul;ll'l'erd\'ervac,flI,g~I1[M.effiS~mingmE!lalili
B
Hl'tPrOOul;ll'l'erd\'ervac,flI,g~I1[M.effiS~mingmE!lalili
lId:ionol~
of
lId:ionole01iokale
lId:ionole01iokale
nnloeDilssinglijninh!llfu~liI'ld·N3ilIdefabriir.alrthfl
Y.lnloeDilssinglijninh!llEu:~liI'ld·N3ilIdefabriir.alrthft
Y.lnloeDilssinglijninh!llEu:~liI'ld·N3ilIdefabriir.alrthft
lXl(Spl()(l'eli:kvi'flochthee:tDea.-n;J=,ngend,enoo1/dke!·t'
OCIIspron,eli:~vi'l'lociithee:t
OCIIspron,eli:~vi'l'lociithee:t
"In \1XY
tet
liin \'00"
tet
liin \'00"
tet
Glra[lri~,
endefabrikwltisniel
Glrailrie,
e~
Glrailrie,
e~
rDJdlakelilillljnfldaJilol'lleillingVilnulOge":l<eilillrp3S:;lngoJnoi
rDJdlaI<elililllinfldaJilil'l18illingvand~ge'l:keilill~lnll'Jnol
rDJdlaI<elililllinfldaJilil'l18illingvand~ge'l:keilill~lnll'Jnol
VOOf
sch30eaanhGt
VOO!
sctl308aan
VOO!
sctl308aan
l00kia
Kenwood
lookia
Kenwood
lookia
mel> n
'yja
Kenwo8d
mel> n ·yja
mel> n ·yja
r.I.354-569-1500
T.I.354-569-1500
T.I.354-569-1500
fOr
fOr
skal
flytirJ ta:!kib
skal
flytjrJ Ia:!kib
skal
flytjrJ Ia:!kib
koslnab.
koslnab.
koslnab.Abooru laill
Dank.
Dank.
Dank.
cln
Delekt
cln
Delekt
c'n
Detekl
bitteanIhre oHIl:l€lle
bincanIhre oHIl:l€lle
bincanIhre oHIl:l€lle
alTer
Kenwood·Fachhand~er
Kenwood·Fachhand~er
Kenwood·Fachhand~er
KENWOOO ELECTROMCS GMBH
KENWOOO
KENWOOO
Rembrirek... St
Rembrirek...
Rembrirek...
D-'ti31SOHeUMr\Stamm
D-'ti31SOHeUMn$Umm
D-'ti31SOHeUMn$Umm
Tel. 0049-6104-6901·0
Tel. 0049-6104-6901·0
Tel. 0049-6104-6901·0
www.kenwood.d"
www.kenwood.d"
www.kenwood.d"
Kenwood
Kenwood
Kenwood
attNivall
altNivalt
altNivalt
ASSIST
WOftKSHOP
ASSIST
WOftKSHOP
ASSIST
WOftKSHOP
RoltVlkslllto1llll
RO!MkSllltaroll
RO!MkSllltaroll
1i8213ltlllu'iplng
1i827311lllu'iplnll
1i827311lllu'iplnll
Tel.013-3S62S2
Tel.013-3S6252
Tel.013-3S6252
IdentlltlrT
aOO:Sl.e
ldentlltlrl aOO:Sl.e
ldentlltlrl aOO:Sl.e
lie
I>aJVen!
aI1&el:lequelqJp.
aI1&ede
quelqJp.
aI1&ede
quelqJp.
Kerwioo:l,erM'!!'I~drOit
Kerwiood,er!\ser'!!'I~drOit
Kerwiood,er!\ser'!!'I~drOit
COIllft'Ol1500
COIllft'Ol1500
~
til!
cooslru;11:1e
~
til!
cooslru,t
~
til!
cooslru,t
desOCu!~~
desOCu!~~
desOCu!~~
nOCessdilll:i~I'ulili5aiiooQu
nOCBSSdirlJS~I'ulili5aiioodu
nOCBSSdirlJS~I'ulili5aiioodu
"rtec1u!e
a
cene
"rtec1u!e
a
cene
"rtectueeacene
(Ie lej'es
prestl~lons.
(Ie lej'lJS
orestl~lons.
(Ie lej'lJS
orestl~lons.
~st
utilise
il.Jns
~st
utilise
il.Jns
rKlrmes
et
rKlO1l8S
et
rKlO1l8S
et
tDtJlt
p~!atioo
tDUle
pes!atione~e.>.OCullonde
tDUle
pes!atione~e.>.OCullonde
i11~
oond~iQ:l
i11~
oond~iQ:l
i11~
oond~iQ:l
Ira,S
dillap~atlon
tnOlJlre,
slle
tnOl!lre,
slle
tnOl!lre,
slle
sur
I~
lll(l"nepall'mportate~roMlCiel
sur
I~
fll(lr.nepa'l·mplJrtate~rO~lCiel
sur
I~
fll(lr.nepa'l·mplJrtate~rO~lCiel
rl'Chanoe~ppropliresnew"1
rCUleilulre
ruUleaUlre
ruUleaUlre
IEllOw
iJoJ
iJoJProouitpour
iJoJProouitpour
5ewntall
5tloolall
5tloolall
00
l~q:;alesert~I.S
00
l~q:;alesert~I.S
pas
r.abilitee
habililaepal
habililaepal
e
pou~
Ie
e
poo~
Ie
e
poo~
Ie
bil
em
bil
em
ndilmeJheI
IldilmeJheI
IldilmeJheI
enl~1ei
wijleMlds
enl~1ei
wijleMlds
be~ou::t:
KePlWOIXl
be~ou::t:
KerlWood
be~ou::t:
KerlWood
toe:;lclIfherslellm
toe:;lclIfherslellm
iokille
rJUrrBllBn'<'8llighesd5'iOOfSGlllltt!01
rJ()Irren~n'(I3llighesd5voorSGllllttl!ll
rJ()Irren~n'(I3llighesd5voorSGllllttl!ll
g&tJlU'k
OIl
I}lCJIU'k
(],:I
I}lCJIU'k
(],:I
de
fabrikwll
de
fabrikwll
Ploduk]
~Gt
Ploduk]
~Gt
Ploduk]
took~
Kenwo8d
took~
Kenwo8d
took~
Itoma I
liDS
Itoma f
liDS
Itoma f
liDS
Haimilistnki
Haimilistnki
Haimilistnki
Box
5200,128
R"ylJllvik
Box
5200,128
R"ylJllvik
Box
5200,128
R"ylJllvik
ar
eitt
ar
eitt
ar
I"
ell
"',mk';I~O
t,'
ell
"',mk';I~O
t,'
ell
"',mk';I~O
Ao ooru lail,
Ao ooru lail,
BeniJt7cr
BeniJt7C!
BeniJt7C!
entschieden
enlschieden
enlschieden
fur
fur
fur
ELECTROMCS
ELECTROMCS
kund
kund
kund
denna
denna
denna
Ia
Ia
re
re
rliltlamTesellocal;l5
r\iltlam!eselloC<lI;l5
r\iltlam!eselloC<lI;l5
III00IcL-t
III00IcL-t
ill
eJll!)elll;B~
eJll(Jefll;B~
eJll(Jefll;B~
e~
q,e
q,e
Q,e
PrOC:ult
PrOC:ult
PrOC:ult
Produit
...
...
...
par
COTll:le~ece1e
OOTll:le~ece1e
OOTll:le~ece1e
delalrhilndelaar
delalrhilndelaar
rJelliiamYill
rJelliiamYill
I'!!Il
een
een
is
ni~l12nspro,eI;;k
is
ni~l12nspro,eI;;k
vitlgmb
vitlgmb
vibgmb
tram
kaupanda
lara
tram
kaupanda
lara
tram
kaupanda
von
KENWOOD
von
KENWOOD
von
KENWOOD
dass
SIC
sich
fur
dass
SIC
sich
fur
dass
SIC
sich
fur
haben
haben
haben
unter
norrnalen
unter
norrnalen
unter norrnaTen
81ntrelen soll1a,
wenden
81ntrelen sollla,
wenden
81ntrelen sollla,
wenden
Kenwood
Kenwood
Kenwood
Garantielinden
Sle
Garantielinden
Sle
Garantielinden
Sle
GMBH
GMBH
•.
1~
Str.15
Str.15
!
!
!
Kenwood-produkt
Kenwood-produkt
Kenwood-produkt
UNKOPING
UNKOf'ING
UNKOf'ING
com~l!!te
corn~l!!te
corn~l!!te
et'e
tournl~
~u
5'
Ie
PlI)duit
~U5'
Ie
PlI)duill
~U5'
Ie
PlI)duill
mlnlllreq~Cl)S-(JllceplllST1
mJn,llreq~Cl)s.nliCBpIJISIl
mJn,llreq~Cl)s.nliCBpIJISIl
rJeleTu58!deIllp,rlll
rl8lelll5e!00Illp,rlll
rl8lelll5e!00Illp,rlll
pr!!CflIoGoran:i~
pr!!CflIoGoran:i~
rTIdl,;~'e
~
5e
wnloliller
rTIdl';~'t
rTIdl';~'t
uri
uri
cu
.mer€
.mer€
.mer€
<lUX
~
se
wnloliOOI
<lUX
~
se
wnloliOOI
<lUX
ilppli:;;lbles
ilppli:;;lbles
ilppli:;;lbles
lUlcpe~rIBlilbrlC3r'
lUlcpe~rl~lilbrlC3r'
lUlcpe~rl~lilbrlC3r'
Pro-d~II.l
Pro-d~II.l
Pro-d~II.l
rla
rtresemeG;r.wilert
rla
rtresemtG;r.wilert
rla
rtresemtG;r.wilert
dWmaQo
C3lJ5eaul'Todult
dWmaQo
C3lJ5eaul'Todult
OIJ
IcL-t
dWmaQo
C3lJ5eaul'Todult
pa,S
EurtlPl!oo
d.n;
Iequel
pa,S
EurtlPl!oo
d.n;
Iequel
a,~ereo:e~Qecell~
en
a,~e1eo:e~Qecell~
en
a,~e1eo:e~Qecell~
e.>.OCuIIOO
r,lson
raison
raison
elBS
eoas
eoas
K!l!lWGOCI
KellwGOdae.>.aw~eroes
KellwGOdae.>.aw~eroes
actes
actes
actes
wordenmeeoeoeelo,ottl1;henhet
wordenmeeoelleeIO,ottl1;henhet
wordenmeeoelleeIO,ottl1;henhet
CorporahJ!lI,rJ1
CorpcrahJ!ll,rJ1
CorpcrahJ!ll,rJ1
[)ea.D;J<lSS,n!JBl'ld,eroo1/dke!·t'
[)ea.D;J<lSS,n!JBl'ld,eroo1/dke!·t'
Oletl3illu(';oc~vloc;t
Ole
Ole
en
de
I~
prt,enle
Garante
Ii
prt5enleGaranl:e
Ii
prt5enleGaranl:e
rutl:,Siiieur00ProduJ
prennea
rutl:,Siiieur00ProduJ
prennea
rut':'Siileur00ProduJ
preonea
f'rcduit
aux
normesBte''lllllltts
cst
d
~ntyoedi~NI)III
cst
d
~ntyoedi~Nent
cst
d
~ntyoedi~Nent
oop.:Jj'S
OOp.:Jj'S
OOp.:Jj'S
pas
dlspc"ibles
l!Jgitlme,
leotralS
IELlIIT~.u
l!Jgillme,
leotralS
IELlIII~au
l!Jgillme,
leotralS
IELlIII~au
plJlJIrep,lfaTlOOdl1>IelJd'J's
r!p,lfallOOdl1sIeIJd'J's
r!p,lfallOOdl1sIeIJd'J's
Gtwge
de
l'utiliSillecl
Gtwgedel'uiiliSillecl
Gtwgedel'uiiliSillecl
ptriod.~ues
teTs
perioo~ues
tels
perioo~ues
tels
oor~oaratiO<1O
oor~oaratiO<1O
oorep~ratiO<lS
partoo'e
D~SOOO~
partoo'e
p~soooe
partoo'e
p~soooe
~
e1lOCu~~r
oes
r~pa!ahorl.'i
rtpa!ahorl1i
rtpa!ahorl1i
defn
lere,
dCfn
lere,
dCfn
lere,
in
ElIopa
g~\'esli!Jl
in
EIIOp.l
g~\'esli!Jl
in
EIIOp.l
'I1ln
dede1aithande!aar
'I1ln
dedetaithandelac,r
'I1ln
dedetaithandelac,r
hctmOCelvan
he1
hctmOCelvan
he1
CIt
w:um
v~nde
ac,nkoop
CIt
w:um
v~nde
ac,nkoop
het
rocht
het
rocht
het
rocht
OflIiJr00l'OO:w.aardffi
OflIiJr00l'OO:w.aardffi
die
die
die
plaais
~alle<l
nlet
Cfller
plaats
~alle<l
noet
Cfller
plaats
~alle<l
noet
Cfller
JallSprOkd;;k
_oaT
InslellillJllfl
<oaT
herslsllingen
<oaT
herslsllingen
dlillu(
'ioc~vloc;t
dlillu(
'ioc~vloc;t
Malta
Malta
Malta
Chatit
Killent tal-Prodotti
Chatit
Killent tal-Prodotti
Chatit
pitt
pin
pin
vitl
vitl
vitl
d,cscs
d,cses
d,cses
sowie
sowie
sowie
unter
unter
unter
I
da!~
dil!~
dil!~
rllJlrre:I
"oUTes
"oUTes
iJ;;ns
iJ;;ns
iJ;;ns
u'
u'
u'
il
~Sl
il
~Sl
\'I{lueur
\'I{lueur
\'I{lueur
~~
~es
~es
oans
oans
oans
00
00
00
q~e
q~B
q~B
~:I
~:I
~:I
ProourJ
ProourJ
~rd
~rd
V(lO(t~
V(lO(t~
V(lO(t~
I'an
d~l~
I'an
d~l~
OOlD
WD
WD
Killent tal-Prodotti
Grazzi talli
Grani
Grani
-KENWOOD-
-KENWOOD-
-KENWOOD-
Jekk
qatt
Jekk
qatt
Jekk
qatt
l:eghu.
jekk
I:eghu.
jekk
I:eghu.
jekk
Distributul
Distributul
Distributul
imnillel
imoillel
t'efn
imoillel
t'efn
garanltla
garanltla
garanltla
fJ
fJ
fJ
ab
80
80
ATTENZJONI
ATTENZJONI
ATTENZJONI
IHartalaT-g:ral\ljjallimicienmal-lrce~ulali5kalihu:na
IHartalal-g:ranzijallimicienmal-lrce~ulali5kalihu:na
IHartalal-g:ranzijallimicienmal-lrce~ulali5kalihu:na
lRessarji
biex
lRessarji
biex
lRessarji
biex
la'serQlewhso3ra
la'serQllfflhso3ra
la'serQllfflhso3ra
Svizzerra
Svizzerra
Svizzerra
Gentile
Gentile
Gentile
Sc.
111
normali
Se.
In
normal;
Se.
In
normal;
contatlareilnoslro
contattareilnoslro
contattareilnoslro
seguenteindiriao
seguenteindiriao
seguenteindiriao
TalenostlodistribUlOresaraasuadisposll;OIle
TalenostlodistribUlOresaraasuadisposfl;one
TalenostlodistribUlOresaraasuadisposfl;one
perqualunqueintormazione
perqualunqueintormazione
perqualunqueintormazione
KENWOOD
KENWOOD ELECTRONICS
KENWOOD ELECTRONICS
ATTENZIONE
ATTENZIONE
ATTENZIONE
Queslodocumenl0clarIGcvlItad'ilLquisl0{olattura)
QlJeslodocum8nloelarlccvlItad'ilLquisl0{olattura)
QlJeslodocum8nloelarlccvlItad'ilLquisl0{olattura)
sono
necessari
sono
necessari
sono
necessari
C<isoditlirlOodilllnO
C<isoditlirlOodilllnO
casoditlirlOodilllnO
Dear
Customer,
Dear
Customer,
Dear
Customer,
Thank
you
Thank
you for purchasing this kenwood
Thank
you for purchasing this kenwood
product.
product.
product.
booklet,
booklet,
booklet,
countrieslisted.
countries listed. If yourcountry is
countries listed. If yourcountry is
please contact your retailer
please contact your retailer
please contact your retailer
on warranty procedure,
on warranty procedure,
on
warranty
KENWOOD
KENWOOD
KENWOOD
Information
Information
Information
1-16-2,
Hakusan,
1-16-2, Hakusan, Midori-ku,
1-16-2, Hakusan, Midori-ku,
Yokohama-shi. Kanagawa, 226-8525
Yokohama-shi. Kanagawa, 226-8525
Yokohama-shi.
Japan
Japan
Japan
(c)
Leooll1'aoeC<lJstauProdUlI~ltamd'uoell€o!iQCnCl:
(c)
LtOOll1'aoeC<lJstauProdUli~ltamd'uoeneoliQCnCl:
(c)
LtOOll1'aoeC<lJstauProdUli~ltamd'uoeneoliQCnCl:
fUlliK;Cltlent.ilelT'()dlt~I!.'OS,d'ulleln~taltatloncudUll
fUfliK;Cldent.rlelT'()dll~I!.fl,';,d'ullelnstaltatloncudllll
fUfliK;Cldent.rlelT'()dll~I!.fl,';,d'ullelnstaltatloncudllll
ernIJallagecte1adue-J•.dmlutlllSa'IUIl
!lITJIAJ.llagecte1adu€'Jl.dmlutlllSO'IUI1
!lITJIAJ.llagecte1adu€'Jl.dmlutlllSO'IUI1
1'tJ11IisatiJ~
1'tJ11IisatiJ~
1'tJ1llisatiJ~oop'OCesooredJaf1Qili~opr;re;
(tI)
LeOOrl1li(lecaJstauProduildDaulw,flrrmers>Olldans
(d)
Le
OOrl1li(le
(d)
Le
OOrl1li(le
t'lliIiJ,
1;1
tOJcte,untrerrtlemenl
I'IliIiI,litoJcte, untrerrtlemenldeleflE,l-'l:
I'IliIiI,litoJcte, untrerrtlemenldeleflE,l-'l:
et~
I
nadC
qJ;l!c.
I
nadC
qJ;l![. lin
I
nadC
qJ;l![. lin
et~
et~
Q"elq~G,w~GUlJGe,cd,avoclJ!lf:ten:;iJ<leTer::li!que
Q"elq~r<l~~GIJIJGf"cd,avoclJ!lf:ten:;io<lelecli!que
Q"elq~r<l~~GIJIJGf"cd,avoclJ!lf:ten:;io<lelecli!que
Ie
Ie
fallillenl3:iooi~()Ilocl~outou:e;JJt,e(.i[II~IlOISdu
Ie
fallillenl3:iooi~()Ilocl~outou:e;JJt,e(.i[II~IlOISdu
faTlillenl3:iooi~Gllocl~OIJtOlJ:e<JJt't(.i[u~hr:tsl1u
cOl~rlile
rJeKe'lwoJd
[OI~rlile
deKe'lwoJd
[OI~rlile
deKe'lwoJd
(e)
L~ha~s·parleurseribTt:1lall6S~u'lealt:ll"tI;il,5;llona
(e)
Lcsha~s·parleurserrbTt:1lall6S~u'lea
(e)
Lcsha~s·parleurserrbTt:1lall6S~u'lea
Ie
u"epulss;;noo~:\II~,ne~l;IIllelnj,quce.elletlo;m)i9l
Ie
u"epulss;;nce~:\II'l\ne~l;IIlilllnj,qlllle.elledo;m)i9l
Ie
u"epulss;;nce~:\II'l\ne~l;IIlilllnj,qlllle.elledo;m)i9l
cau>e~ux
cau>e~ux
cau>e~ux
C~d;5CS,OuIoJlautreb,tnQuln'eslpasrcProcudl)ll
C~d;5CS,OuIoJlauireb,tnquln'eslpasrcProcuden
C~d;5CS,OuIoJlauireb,tnquln'eslpasrcProcuden
l.mtqUt1~,
l.ont
que
lei,
l.ont
que
lei,
(t)
Le~
b:e~
(t)
Le~b:e~=~rnabIe:lOlllespit[esd'usl'lcocvanl
(t)
Le~b:e~=~rnabIe:lOlllespit[esd'usl'lcocvanl
ilrere:r>~lid'esenra,sondelellrutil~:lonllOrr:Jale.E1
ilrere:r>~lid'esenra,sondelel,rutil~:lonnorr:Jale.E1
ilrere:r>~lid'esenra,sondelel,rutil~:lonnorr:Jale.E1
nJlaTlllenll~s
n~laTlllenll~s
n~laTlllenll~s
lesa:ouiliesph&lO,
lesa:ouillesphono,les
lesa:ouillesphono,les
d'enre<;lstrement.l,sratks.le:lDat!erleSsech~,~natlEries
d'enre<;.strement.l,sratk:s.le:loat!erleSsech~,~natlEries
d'enre<;.strement.l,sratk:s.le:loat!erleSsech~,~natlEries
re[)I"I1}Bab:~s,
re[)I"I1}Bab:~s,
re[)I"I1}Bab:~s,
(g)
le
Plcooit
(0)
le
Plcooit
(0)
le
Plcooit
m:l!()'alEmenl
sa
m:ecralemenl
sa
m:ecralemenl
sa
l;]
pres~nte Gar~nlie
l;]
pr~~nte
G.J.r~rtieestCOIl,'i-l'HJeel'J11avrur
l;]
pr~~nte
G.J.r~rtieestCOIl,'i-l'HJeel'J11avrur
<lCqui'IeProdl,litaem.ln~reIe!JaIB
<lCquisieProdl,litaem.ln~reIegaIB
<lCquisieProdl,litaem.ln~reIegaIB
le
PrtICl;itselar~mpla:;li()lJ
Ie
PrtICliitselarempla:;liou
Ie
PrtICliitselarempla:;liou
e~pos~ci·lltssusSII'utlisal,ur~>lunnoo1Jro~ssionneluuoo
e~posoosci'uessu:;
e~posoosci'uessu:;
cOlisonrnatim.llbe-net,CltUentu.t.1it!1
consorn1l.lt.J)1.IItle-netlCltUentu.!t
consorn1l.lt.J)1.IItle-netlCltUentu.!t
le'J3letnCdS
00
[j!1du1s
le:;ale
tn
cas00llt!fdu1s
le:;ale
tn
cas00llt!fdu1s
ATTENnON
ATTENnON
ATTENnON
La
carte
lie
yarl~ti~e!I~
La
carte
lie
yarl~ti~e!I~
La
carte
lie
Y1rl~ti~
ImsS<liresal'achald'unencu~lefa~adedEt1r.habiefficas
ImsS<liresal'achald'unencu~lefa~adedEtar.habiefficas
ImsS<liresal'achald'unencu~lefa~adedEtar.habiefficas
dedommages
o~de~oI
dedommages
o~de~()1
dedommages
o~de~()1
01
perSO)!1
01
perSO)!1
01
perSO)!1
g,lrll'tiellers:eTtllgen
g,lrlftiellers:eltl1gen
g,lrlftiellers:eltl1gen
Ie)
~tJlaje
vercom,aKt
Ie)
~cha:le
vercom,arJ
Ie)
~cha:le
vercom,arJ
""e
""e
""e
0fIIJev31.
W;Tli~lnr,:en,
0fIIJe'la1.
W;lli~lnr,:en,
0fIIJe'la1.
W;lli~lnr,:en,
v~rkeero
'}£llIruikofgebruik
v~rreero
l}£llIruikofgebruik
v~rreero
l}£llIruikofgebruik
(d)
s[;had~
Vllr(lC1Z&lkt
(d)
s[;had~
Vllr(lC1Z&lkt
(d)
s[;had~
Vllr(lC1Z&lkt
onjerdompelirMJin'","·eJ,bli~minsl.lg,aar(f)'Nirlg.
onjerdompelirMJin'","·eJ,bli~minslag.oarrll'Nl1g.
onjerdompelirMJin'","·eJ,bli~minslag.oarrll'Nl1g.
onaan~~te\'fnll~""Dvermacht,araanr,:epasle
onaan~~te\'fnll~""Dvermachl,oraanr,:epasle
onaan~~te\'fnll~""Dvermachl,oraanr,:epasle
slroo~!S!8rkte
~lroo~TS!erkte
~lroo~TS!erkte
waamverl':errwoodgeell~Qrl:luleheelt
waam~trl':errwootJgeell~on:luleheelt
waam~trl':errwootJgeell~on:luleheelt
Ie)
SGha<llJaaliluid51'1~~slfll{jlNolge~an
(e)
~Gha<llJaaliluidsl'lek.~slfll{jlNolge~an
(e)
~Gha<llJaaliluidsl'lek.~slfll{jlNolge~an
,all
O(lHloelllSl
'oll
OfIHlOBIllSl
'oll
OfIHlOBIllSl
allC'ocossetles,
allC'oca5S-elles,
allC'oca5S-elles,
,oOlMHpilalniftttllltPrudut1ttlliS,enaj\olllJcachtoo
<oOlMHpWlnifttlllltPrudutlltlliS,fnO;\O"!Jeachtoo
<oOlMHpWlnifttlllltPrudutlltlliS,fnO;\O"!Jeachtoo
-,
-,
-,
If)
ve<lItuiksj;ocdcI8rlollH1cerOOi{lnwaar.iln..n-,l'l(llng
die
If)
ve<l!tuiksj;ocdcI8rloloncerOOi{flwaar.iln..n-,l'l(llng
die
If)
ve<l!tuiksj;ocdcI8rloloncerOOi{flwaar.iln..n-,l'l(llng
die
nOO'J
Istell
nOOIJlstetlOl.WoiQe'laIlslij!al)eb'loollTmlge~ruik
nOOIJlstetlOl.WoiQe'laIlslij!al)eb'loollTmlge~ruik
~lIlt
lnOO!JflP
~lIlt
lnOO!JflP
~lIlt
lnOO!JflP
\1ilrnITl(:Jloc.-Ielem~en.oram:nlllcom2<lIOOn,a1r(lriltrlerTlfn
\1ilrnrTl(JlQ(.-lelemC'f(en.oram:nolcom2<lIOOn.a1~driltrlerTlfn
\1ilrnrTl(JlQ(.-lelemC'f(en.oram:nolcom2<lIOOn.a1~driltrlerTlfn
lec'eof.pnomekGppen,racic:s,ba1H1Jerl,opL:!/obalf
lee'eof.pllOmr.kGppen,racic:s,rn1H1Jerl,npla,abalf
lee'eof.pllOmr.kGppen,racic:s,rn1H1Jerl,npla,abalf
ba1E~Bje,
ba1E~lIje,
ba1E~lIje,
(g)
hetProdul::IK,oorV<!"ICesenert:.JIl"rTleI'SOeheelotQcooeltcl'l'
(g)
h~tPrlKlul::tK,,"rY<l"lcese"ert:JrrmersoeheelotocooelU:l'Ik
(g)
h~tPrlKlul::tK,,"rY<l"lcese"ert:JrrmersoeheelotocooelU:l'Ik
1'i!ll(Jen
verwl;Jer~,
l'i1ll(Jen
>'Crwl;Jer~,
l'i1ll(Jen
>'Crwl;Jer~,
D~rn
nara1l:e
"NC!
D~rn
nara1I:r.
''''lei
D~rn
nara1I:r.
''''lei
w:",e
nE:tPro:Ju!l¥U"'eg,ntleu~1lO
Wi)/e
nEitPro:Ju!l¥U"'eg~nlleu~1lO
Wi)/e
nEitPro:Ju!l¥U"'eg~nlleu~1lO
Kenwood.
Kenwood.
Kenwood.
ghazilt
dan
talli
ghazilt
talli
ghazilt
jinqalalu"idllett
jinqalaiuxidflett
jinqalaiuxidflett
joghogbok
joghogbok
joghogbok
AW10lluat
AW10lluat
AW10lluat
f'cln
IH,sla
IH,sla
IH,sla
CUTAJAR LTD.
CUTAJAR
CUTAJAR
T.i"L
.....
kwadott,
T.i"L
.....
kwadott,
T.i"L
.....
kwadott,
Tel. 2144172(l
Tel. 2144172(l
Tel. 2144172(l
toori
laccata
toori
taccata
toori
taccata
cliente,
18
cliente,
18
cliente,
18
cOIldizlonrdlfunzionumenl0.
condizlonrd!funzionumenl0.
condizlonrd!funzionumenl0.
ELECTRONICS
RemtwUc:kerStr.15
RemtwUc:kerStr.15
RemtwUc:kerStr.15
D-63150Heusenstamm
D-63150Heusenstamm
D-63150Heusenstamm
reI.
0049-610'-6901-0
Tel.
0049-610'-6901-0
Tel.
0049-610'-6901-0
www.kenwood.de
www.kenwood.de
www.kenwood.de
per
1'1lCQUisto
per
1'1lCQUistodiun
per
1'1lCQUistodiun
for
purchasing
As mentioned in the
As mentioned in the pages
As mentioned in the pages
our
warranty is only valid in the
our
warranty is only valid in the
our
warranty is only valid in the
If
procedure,orwrite
Corporation
Corporation
Corporation
Center
Center
Center
00
PIOCesde
00
PIOCesde
GaJstauProduil
GaJstauProduil
un
cas
(Ie
1orc-c
cas
oc
10rce
cas
oc
10rce
llt,qlJe,.llilmlg:;
llt,que,.llilmlllS
llt,que,.llilmlllS
l'IG~tpeIIeQll'enso~12rau1e
I'IG~
!pelle
QIl'en
I'IG~
!pelle
QIl'en
=~mable:l
~~MPnts
~~MPnts
~~MPnts
Ies
courrOles,
oourrOies,
oourrOies,
~IIEIS
lubes
elles
lubes
elles
lubes
dJfl1Ie
n~mero
dJfl1
Ie
n~merodes~"ea
dJfl1
Ie
n~merodes~"ea
rel~e,
modrt~
rl'l~e,
modrt~
rl'l~e,
modrt~
est
COI\,'i-lIHJee
~parl!gr,tuitf)men:au~coodi:lJfl~
~parl!gr,tuitf)men:2u~coodi:lJfl~
~parl!gr,tuitf)men:2u~coodi:lJfl~
51
i'utlisat,ure>l
51
i'utlisat,ure>l
ou
I:Ie
vlC€~
DU
de
VIC€~
DU
de
VIC€~
preu~e
preu~e
el
la
preu~e
die
niel
00)1'
dit
niel
00)1'
dit
niel
00)1'
voor
voor
voor
ilil~
~et
ilil~
~et
ilil~
~et
UebrekKtge
Utbrekkige
Utbrekkige
.l1In
net
ililn
neI
ililn
neI
Ol1lfrel~"HUHlCof;
IlITl
frel~"
Hum
IlITl
frel~"
Hum
vermD\llll1.
vermogen.
vermogen.
Y1r!'J0C3SSet!eS,
Y1r!'J[){;3SSet!es,
Y1r!'J[){;3SSet!es,
Ql,woH)e'laIlslij!ageb'l
Villi
Inwr
nl(:\
Villi
Inwr
nl(:\
vall
Inwr
nl(:\
en
elrdJu:rel'l
en
elrdJu:l81'1
en
elrdJu:l81'1
gc""jI:C~
geNIj/:C101UI!j;NlSt
geNIj/:C101UI!j;NlSt
gel)ll\'~n
a<i1
oegev~n
a<i1
oegev~n
a<i1
lI-prodott
dan
II-prooon
dan
II-prooon
waqll·uzu
nOlmali
waqll·uzu
nOlmali
waqll·uzu
nOlmali
ghamel
kuntatt
mad-
ghamel
kuntatt
mad-
ghamel
kuntatt
mad-
taO
pajjizekIiqieghed
taO
pajjizekIiqieghed
taO
pajjizekIiqieghed
ghall·inTormazzjoni,
ghall·inTormazzjoni,
ghall·inTormazzjoni,
gdida
gdida
gdida
distributore
dislributore
dislributore
di
your
Midori-ku.
Kanagawa,
rediaf1Qll
rediaf1Qll
rna~e
rna~eure,unoutili
rna~eure,unoutili
~wre:;
~wrcs
~wrcs
so~!a
so~!a
OIl
les
dB
oramu,oooe
dB
oramo,1KlOC
dB
oramo,1KlOC
tm)x
tm)x
tm)x
rJe
s~flea
ouc~ace
ouc~ace
ouc~ace
l'J11aveur
IitII
IitII
caches
caches
caches
d'acllat
d'acllat
d'acllat
IIelaJrlOil~t
IIelaJrlOil~t
IIelaJrlOil~t
lil'1
li,n
li,n
Prod~!d
Prod~!d
Prod~!d
'Ia~
'Ia~
'Ia~
Produ':l
Produ':l
Produ':l
ilnschajea3npla:en,
ilnschajea3npla:en,
ilnschajea3npla:en,
~£"erkt
~£"erkt
~£"er't
01
alii
per~one~
alii
persllnen
alii
persllnen
dwm
dwm
dwm
LTD.
LTD.
Birllirkara
Birllirkara
Birllirkara
OhaHetliegna
l'kas
OhaHetliegna
t'kas
OhaHetliegna
t'kas
GMB
...
GMB
...
GMB
...
lin
nuo~o
1ronta:inc
ill
nuo~o
1rontil:inc
ill
nuo~o
1rontil:inc
ill
this kenwood
pages
ollhis
ollhis
ollhis
countryisnollisted
nollisted
nollisted
lor
information
lor
information
lor
information
10:
or
write
10:
or
write
10:
Customer
Customer
Customer
226-8525
-
-
-
IOCOlfoctBoo
00
IOCOlrOCIBOO
00
IOCOlrOCIBOO
00
in<wropr;re;
in<wropr;re;
~D
au
Iw,
f,rrmersiOlloons
~D
au
Iw,
f,rrmersiOlloons
delerre,
Ill:
I'lJntllilllO~
ventllalion
ventllalion
III
e,U
Ill)
utili
sal~on,
pou
r
sal~on,
pou
r
sal~on,
pou
r
Iro-rAil,satona
Iro-rAil,satona
ilwio,
«l\settes
~Ili!o
~udio,
YSsettes
~Illt!o
~udio,
YSsettes
~Illt!o
GaU1e
GaU1e
p~(es
d'usl"c
I:Ieva~1
remplao;alll~.
remplao;alll~.
remplao;alll~.
lesleltsCerlXtureet
leslciesceriXlureet
leslciesceriXlureet
i!Ie
oa~iellerne~t
()IJ
i!Ie
oa~iellerne~t
()IJ
i!Ie
oa~iellerne~t
()IJ
delo~te
p'lrscnne
il'{iH'i
delo~teP'lrsGnneil'fari
delo~teP'lrsGnneil'fari
unnoo1Jro~ssionnel
uuoo
unnoo1Jro~ssionnel
uuoo
decar.;~de
iauar~rtie
de
car.;~
de
Ia
uarartie
de
car.;~
de
Ia
uarartie
du
ProCu~
du
Pn)Cu~
du
Pn)Cu~
(00
Ia
laClure]
sonl
(00
Ia
laClure]
sonl
(00Ialaclure]
sonl
W!:IC
erl:!~d
om
W!:IC
erl:!~d
om
W!:IC
erl:!~d
om
rekenlng
UltI~\'Oeren
rekenlng
UltI~\'08ren
rekenlng
UltI~\'08ren
dooro~actlllllamOO;a,
dooro~actllIaamOO:d,
dooro~actllIaamOO:d,
illSlaliat'e
of
~erPil,ljng
illSlallat'e
ol
~erPil,l;ing
illSlallat'e
ol
~erPil,l;ing
or.aacgepasleWlsseiSlul<<en
or.alcgepasleWlsseiSlul<i<l:n
or.alcgepasleWlsseiSlul<i<l:n
door
brarld
door
bralld
door
bralld
oleTileanoereoooaak
Caf;
ul
elileanoere
oooa~k
Caf;
ul
elileanoere
oooa~k
he!;LJnwenden
he!;LJnwendl.'n
he!;LJnwendl.'n
tJilnooll
lJilndeli
lJilndeli
comoi£l
d;scs,01elk
ander
comoi£l
d;scs,otelk
aoder
comoi£l
d;scs,otelk
aoder
OOllTl"lillge~ruik
tol)V(r",sselo~re
tol)V(r",sselo~re
tol)V(r",ssel~~re
UI!j;NISI
d~~w
redltmlt90
d~~w
redltmlt90
d~~w
redltmlt90
Kenwood Warranty Card
Kenwood Warranty Card
Kenwood Warranty Card
KENWOOD ELECTRONICS EUROPE B.V.
KENWOOD ELECTRONICS EUROPE B.V.
Suomi
Suomi
Suomi
KENWOOD
ELECTRONICS EUROPE B,V.
KENWOOD ELECTRONICS EUROPE B,V.
KENWOOD ELECTRONICS EUROPE B,V.
Amsterd.mseweg
Amsterd.mseweg
Amsterd.mseweg
5ail'/lfllarna
5ail'/lfllarna
5ail'/lfltanta
m~,taD;JJic:sissil
m~,taD;JJic:sissil
m~,IaDatJic:sissil
luolet.Jkuuoovolmilssd,I-:Bn'o'UoGenaJ>l1lali<uperalsestao,topa,vasta
lUoletalruuoovolmilssd,I-:en'>'l)oGenaJ>lflali<~peralsestao,topa,..aot.l.
lUoletalruuoovolmilssd,I-:en'>'l)oGenaJ>lflali<~peralsestao,topa,..aot.l.
la~tieo,
IO~
la~tieo,
lOS
la~tieo,
lOS
ruoleL3kuul<attaa5Cl<amJ1eria~li-erulvalllr.;tllsvirheet.t·fll:kor)at~n
ruolelakuul<altaasel<amJ1eria~li-erulvalllr.;tllsvirheet.l·nekor)atilin
ruolelakuul<altaasel<amJ1eria~li-erulvalllr.;tllsvirheet.l·nekor)atilin
.1:naise~l.
.1:nai$BKsI.
.1:nai$BKsI.
¥ial"~la
tll:lll'l.1
Yi~IIi~la
tllJlI'I.JEiPl'slyta
Yi~IIi~la
tllJlI'I.JEiPl'slyta
Pakic:JIIS-.
Pakic:JIIS-.
Pakic:JIIS-.
!ustalH~ukset
!ustalH~ukset
!ustalH~ukset
.aalnlrS!d·Ill:Crtet3allefl\seen
vaalnlrS!d'Ill:Crtetaanefl\seen
vaalnlrS!d'Ill:Crtetaanefl\seen
2.Sapimusehdol
2.Sopimusehdol
2.Sopimusehdol
A.
Kai,tlln
A.
Kai,tlln
A.
Kai,tlln
Ol'i
li,lettava
011
li,lettava
011
li,lettava
Danmark
Danmark
Danmark
li1bruoere,afKcnw~d"sprodlikter
li1txuoere~afKcnw~d"sprodllkttr
li1txuoere~afKcnw~d"sprodllkttr
13k
lei
l}ercs
lakICll}ercs"algatdel:eKen;wooj-prlKlJkt("pcCuk!~·).IN,srer
lakICll}ercs"algatdel:eKen;wooj-prlKlJkt("pcCuk!~·).IN,srer
apstalen
oostaJ'fn
oostaJ'fn
e'ler
u;1s1;~teT
e'lt!r
ujsl;~tel
e'lt!r
ujsl;~tel
Idi:lleoaramw'5HvlsprodlJld~lerlolttielEtJ-12ndO\lder
I
di:lleoarambe>',sHvl~
I
di:lleoarambe>',sHvl~
O;lst.Veipablell,be:lP.SDeHl\lIe>'!lIep~lJktettilenh'lilkffiW1l
o;Jst.Velpobl~ll,be::lP.SDeHl\lIe'ierep~lJkteitilenlriilkffiSG'1l
o;Jst.Velpobl~ll,be::lP.SDeHl\lIe'ierep~lJkteitilenlriilkffiSG'1l
htisto,~;cieI
htisto,~;cielKfrJ'lioo:j-irrJll:>rtlr,"'Ollserlil[)(n3nj'er,auif){lwet
htisto,~;cielKfrJ'lioo:j-irrJll:>rtlr,"'Ollserlil[)(n3nj'er,auif){lwet
:;erviCH\f'I~t
serviCH\fII~tetltlldetallhdij~IEUSiimmenmedtilstr.6kcli1Ot
serviCH\fII~tetltlldetallhdij~IEUSiimmenmedtilstr.6kcli1Ot
uevo:;tor,atl.:.f;be:harlun.:l8ls'ed.ltvI5kOOstl3rlQtslcdweninr
bev<stor.atl.:.f;br.:harlun.:l8ls'ed.ltVl5kOOstlirlQtstedudenlllr
bev<stor.atl.:.f;br.:harlun.:l8ls'ed.ltVl5kOOstlirlQtstedudenlllr
W,skalorOCu",ct
W,5kalorOCuklctlfl(!levereshosaendlt,lI:haOOier,ho5Imm
W,5kalorOCuklctlfl(!levereshosaendlt,lI:haOOier,ho5Imm
p~[Il;!etb'I:"\'ic:lJbt
p~[llJelb'I:'\'ic:lJbt
p~[llJelb'I:'\'ic:lJbt
H.,SPlodlI'telerloJ:bliFtJ,OJl}eBIlS"-e!aIVlOO,hl'Orl[Utlen
H.,sproduktelerloJ:bliFU,oJDeBIlSke!JlvlI;k!.hl'Orl[Udtn
H.,sproduktelerloJ:bliFU,oJDeBIlSke!JlvlI;k!.hl'Orl[Udtn
10(
tkll
n<errrteste
lortkll
n<ermesteaulori~eredeXlrhMldier
lortkll
n<ermesteaulori~eredeXlrhMldier
ic:onIa+rteneCerlstAe~derolname,e
ic:onIa+rteneCenstAe~derorrlamele
ic:onIa+rteneCenstAe~derorrlamele
Plodlll<1elerlorS)'IICtnJedetarsga
Plodul<1elerlorS)'IICtnledetarsga
Plodul<1elerlorS)'IICtnledetarsga
kebelt~rst
kiltJel
tDrst
kiltJel
tDrst
ill
KenYiood-orodukter.Gara~t'eodifkkers.'lvel
~I
KerlWood-OIodurJer.Gara~t'eodifkkers.'l'<'t1
~I
KerlWood-OIodurJer.Gara~t'eodifkkers.'l'<'t1
<)orl
arbetdSIM~s",e
()orl
arbet~SIM~s",e
()orl
arbet~SIM~s",e
Vi
la~~okEr
\Ii
Imbr.hOlder0,rei~Ialu.1sic:I'le
\Ii
Imbr.hOlder0,rei~Ialu.1sic:I'le
~ilo:lOOl;~~end
~ilo:lOl1l;~~r.nd
~ilo:lOl1l;~~r.nd
Pakn;"gS·O(lIns!at'at'O~som.OsIrIHI'1Efsam(anCreom'os:nin~;
Pakn;ogs·
Pakn;ogs·
ellar
flsicl,
eller
"sicl,
eller
"sicl,
iepar:llim,
iepar:llim,erlic:ke
iepar:llim,erlic:ke
!!il!iogelser
Billiogelser
Billiogelser
A,Entwertordcingur:<Jerdennegarantlsl;alltjsar.l"Satr1ette
A,Entwertordcingur:<JerdBnncgaranllsl;alit(j:;ao;r;satdette
A,Entwertordcingur:<JerdBnncgaranllsl;alit(j:;ao;r;satdette
Q.1lantibevi~
Q.1lantibe~is
Q.1lantibe~is
(1)
l'\unden:rulcenlVll[IiJadresse
(~)
l'\unden:ruloenlVll[IiJadresse
(~)
l'\unden:ruloenlVll[IiJadresse
(~J
Kv;nenngeneIINelaooetrlrl<urneMder,ngivEI.trlornAr
(bJ
K"nerrngentller(ll;if\oe!ool[umerideranoivEI.tN'orn.lr
(bJ
K"nerrngentller(ll;if\oe!ool[umerideranoivEI.tN'orn.lr
k;>telhal
I\;'tel
I\;'tel
KENWOOD
KENWOOD
KENWOOD
Rembriicller-Str.
Rembriicller-Str.
Rembriicller-Str.
37,1422
AC
37,1422
AC
37,1422
AC
Tel.0Z!l7-519900
Tet0Z97-519900
Tet0Z97-519900
www.kenwoodeurope.com
www.kenwoodeurope.com
www.kenwoodeurope.com
tooletal<l'ukartll,
si'lll!arv,lstls,ttkorvausva"ti
tooletal<l'ukartll,
si'lll!arv,lstls,ttkorvausva"ti
tootetal<l'UkOrtll,
si'lll!arv,lstTs'ttkorvaosva"ti
tuuleO~osteau
I'\enwoo:l,tuol:nlc~
tuuleO~osteau
I'\enwood·tuol:nle~
tuuleO~osteau
I'\enwood·tuol:nle~
Pidaritirme
i!setl',TITle
afic:euren
PidaritiTmr.
PidaritiTmr.
Ei
Pl'slyt~
asenoos-I~IIIUlIt
asenoos-
asenoos-
j;I
m~ut
j;I
mJul
j;I
mJul
t:<mafI
tuotet3lfuun
t:<marI
tuotet3lfuun
t:<marI
tuotet3lfuun
lama
lama
lama
~~
ill
de:et.1
1'00
de:et.1
1'00
de:et.1
1'00
wen
uden
uden
KfnYiQrxHmp:>rtlr,<UO(lserli
etltll
Indlevereshosdood!t;II:h.JOO~el,ho5tmm
aulori~ereIE
ble'llorel,~et
bie'IIOTela~et
bie'IIOTela~et
o.
rei~Ialu;1sic:,'le
en
en
en
og
1ns!aI'at'O~som.OSlnHl'Jl-f
og
1ns!aI'at'O~som.OSlnHl'Jl-f
d€o"
kan
dill"
kan
dill"
kan
er
lic:kcind~nokjti
ind~hokjt
ind~hokjt
S<nI'
S<nI'
S<nI'
turalsted t.ae,
har
tundel
har
tundel
fUCTRONICS
fUCTRONICS
fUCTRONICS
H,ht2at~Jltee:l
itsell',Tme
ofic:eiKEn
Hlht2al~Jltee~
itsell',Tme
ofic:eiKEn
Hlht2al~Jltee~
koiJLoftlmaan
Ilrke'/in
ko:'jaLoltlmaan
Ilrke'/in
ko:'jaLoltlmaan
Ilrke'/in
kO(j;lusloiMI
I~
IIIllIJt
,Ofj;lusloiMI
I~
IIIllIJt
,Ofj;lusloiMI
epasuQrat
flsk,t
eivat
wub
epasUOlat
IIsk,t
eivat
WuI~
epasUOlat
IIsk,t
eivat
WuI~
per~te€ll~
tehty;hin
per~teell~
lehty'hin
per~teell~
lehty'hin
tlJOll:takuUkorIIi
~ek:l
rTl'j~s
tuou:takuukorlli
~ek:l
rTl'j~S
tuou:takuukorlli
~ek:l
rTl'j~S
(lel:c
Ken;wooj-prodJk1
nJrmaJ
nJrma:!
nJrma:!
IJereO/ll~'
1JereOn"'~)
1JereOn"'~)
aeti!llhdij~,
ELEKTnONIK-SERVlCE
ELEKTRONIK-SERVlCE
ELEKTRONIK-SERVlCE
lepa-atir:rn
lePJatitrn
lePJatitrn
\'ieI"e
\'ieI"e
\'ieI"e
("pcCuk!~·).I"M
a,vencel~e,
I'll
prlXlUll:et
a,l'€lICel~e,
l'1i
prIXlUk:e1
a,l'€lICel~e,
l'1i
prIXlUk:e1
o\'erensstwmeise
J
o\'erensstwmeise
J
o\'erensstwmeise
prooUkl~lerk.ettiel
EU-Iac-dogder
prooUkl~lerk.ettiel
EU-Iac-dogder
100nanj'er,aulwwet
EtJ
samlTle~
med
!<lrhMld~er
be:lmlel
be:rmlcl~io,
be:rmlcl~io,
rn1Ol1TJa:ioo
m1OllTJa:ion
m1OllTJa:ion
Nav..-l.nd29
Nav
..
l.nd29
Nav
..
l.nd29
DK-2600,Glostrup
DK-2600,Glo&trup
DK-2600,Glo&trup
Tel,4J~llO!lO
Tel,4J~llO!lO
Tel,4J~llO!lO
..
all1ireq1ellra:l<n~
..
all1ireq181Ifa[\<n~
..
all1ireq181Ifa[\<n~
IraennvilkensOOl
helstdclaithilr>elet
Ira
l1I1
n~iiken
som
heI~t
Ira
l1I1
n~iiken
som
heI~t
marerialtrsom
marerialtrsom
udEn
cmk~SOlill(Jer
uden
cmk~Sb1illQ8lIOf
uden
cmk~Sb1illQ8lIOf
produio:1et
produio:1et.
produio:1et.
S<lrnlanCre
S<lrnlanCre
Im:l,r~k:e
l(J'bun:lel
mer11:1en
Irt[j,r~k:e
101'bun:lel
mer1
Irt[j,r~k:e
101'bun:lel
mer1
Q.UlntOOOlJ
>kalallIJ:dmatkurxlen
i
Q.Uantooog
skal
i
Q.Uantooog
skal
elaoierel
1,/ed
trae,elaolerel
1,/ed
trae,elaolerel
DEUTSCHLAND GMBH
DEUTSCHLANO
DEUTSCHLANO
15, 63150 Heusenst.1mm
15, 63150
Heusem:t.1mm
15, 63150
Heusem:t.1mm
Tel. 06104-69010
Tel. 06104-69010
Tel. 06104-69010
marerialtrsom
h~l~
h~l~
h~l~
aIllJ~dm
aIllJ~dm
detlilh<Vldl~r
iIrt.lilh<Vldl~r
iIrt.lilh<Vldl~r
udr~:ebe
udf~:ebe
udf~:ebe
w_,kenwood,lSe
w_,kenwood,lSe
w_,kenwood,lSe
KENWOOD ELECTRONICS EUROPE B.V.
("
("
("
(d)
(d)
(d)
Uittloorn
Uittloorn
Uittloorn
van,nalsmlY~tt,i
~an,nalsml'Y~tt.i
~an,nalsml'Y~tt.i
UU~~l'J1,
]OS
uu~~l'J1,
]OS
uu~~l'J1,
]OS
~uslannuksin
~ustannuk:sin
~ustannuk:sin
~Soorasl'
li'ttvviI
~Soorasl'
li't!VI'iI
~Soorasl'
li't!VI'iI
lUOtfla'LOO
pllrlln
lUOlela'LUfl
pllrlln
lUOlela'LUfl
pllrlln
'or"'<ius~aatei!-ii~
kor"'<ius~aatei!-ii~
kor"'<ius~aatei!-ii~
ELEKTRONIK·SERVICE
ELEKTRONIK·SERVICE
ELEKTRONIK·SERVICE
1"
rer
'"
'"
bTi~e
rEtP"rere:
bli~e
r(tp"reret
bli~e
r(tp"reret
rT:oobelingelsemc
n:oobe\lngelseme
n:oobe\lngelseme
sio,
dclaithar>elet
dclaithar>elet
10(
~etteelmer~
~etteelmer~
~etteelmer~
ren
ren
tlvi,dermintO(matiooikkel<antllveletr'noese:l~hVl~prodllK1e1
Ilvisdermintormationiilkekarllllveletr'ooese:lorh
Ilvisdermintormationiilkekarllllveletr'ooese:lorh
erbleveln1\lj,l:ceretellera!ndretp.\en[lvll;'ensOOlhetstrndde
~rbleveln1\lj,l:ceretellera!ndrelp.\en
~rbleveln1\lj,l:ceretellera!ndrelp.\en
Sidell
ic:ilbsdatoon,
Sidell
ic:ilbsdatoon,
Sidell
lilstr.6kcli1Ot
bedes
bedes
bedes
k~r,den
k~r,deo
k~r,deo
om'-ClS:nin\lC;
om'-ClS:nin\lC;
eJJeI~I[(Je
eger~I[(J8
eger~I[(J8
at
at
ic:ilbsdatoon,
rep.rereprrlti~klet
rep.rereprnti~ktet
rep.rereprnti~ktet
B.
Prodlilfleler
lablikerEll.
B.
Produlfleter
lalJIikerEit.,~
B.
Produlfleter
lalJIikerEit.,~
~ilalestllldllTderO\lsikkerMesbestelrll"<!fsel.OCrrram~oo
~ilale,tlJldiITderoosikkerMosoosterrll'<!fser,derrram~oo
~ilale,tlJldiITderoosikkerMosoosterrll'<!fser,derrram~oo
itlel
iafH],lworsaJ~et
itlel
iafH],lworsaJ~et
i
tlellarHl,
trvor
nadvtrnllaetoratprowk1etkanarM3naesarlllresl\itler,eri~ke
nadveudloetoratprowk1etkanarrvenaesaOO-fsleder,eri~(e
nadveudloetoratprowk1etkanarrvenaesaOO-fsleder,eri~(e
d.Hllela/demel;al<flti,O(lvitrJsknreloselm'ertarlsvarIOI
d.HllE'l
at
deme
d.HllE'l
at
deme
[Ie
le:lal<tioner,dermatl\'>r.freioretalldlrJenrJetornmlse~lIere~
[Ie
re:lal;tioner,
der
re:lal;tioner,
der
h\'II~nsomnelstte:s'allgtJlsealp~oCuldet.derrllitleoJs"som
hl'll~nsomnelstte:s<.actIg.'Jsealp~oCllldet.derrllitleoas"som
hl'll~nsomnelstte:s<.actIg.'Jsealp~oCllldet.derrllitleoas"som
1~lqeali'flsjdan
1~lqeali'flsjdan
1~lqeali'flsjdan
Hvh
plodul::lElbrugeS
Hvh
pmdul::tEltxuges
Hvh
pmdul::tEltxuges
un:Jerka,tel,ro.1restilldi.rtlerogtlftingelwenddem.<1l;rcr
un:Jerkastelaro.1resti'J1di,rtlerogoetingelwenddcm.<1l;rcr
un:Jerkastelaro.1resti'J1di,rtlerogoetingelwenddcm.<1l;rcr
grelaencteioet
greillende
i
dellafld,
greillende
i
dellafld,
garami1orpli~tels~r
garamilorpliotelser~~ullderkastel
garamilorpliotelser~~ullderkastel
alholreromic:ostningernelO(buI1tlelmedlilpasningalprodlll<1etril
alholreromic:ClStningernelOiburdelmed
alholreromic:ClStningernelOiburdelmed
de
greTdallde
degreidendestaOOaroo-ogllelinoelscr,ffllt,irerc,l,visprIJdlA1e1
degreidendestaOOaroo-ogllelinoelscr,ffllt,irerc,l,visprIJdlA1e1
ertors<eTligt
trade
trlorsi(elligtlrtdeprow:aer.OCrmarl:edslmftS,jldenD~idelle
trlorsi(elligtlrtdeprow:aer.OCrmarl:edslmftS,jldenD~idelle
imporclH
i
cId
imporclH
i
cIet
imporclH
i
cIet
gar,rtienogdenmooioere~efliedeleikkeeitilr!tdi(l'lediddle
garartienogdenmooigere~ef'ledeleikktertilr!tdi(l'looidelle
garartienogdenmooigere~ef'ledeleikktertilr!tdi(l'looidelle
land
etler
~ara~ti.-ser\'ir;~
land
e1leJ
~ara~ti.-ser\'icetl
land
e1leJ
~ara~ti.-ser\'icetl
IovTIll
mag,sa
Iov11ll
maO,sa
Iov11ll
maO,sa
at
prtlCuttellil
al
prtlduttellil
al
prtlduttellil
alllclr1esallJrlJqereo
atilclrJesallJrlJqereo
atilclrJesallJrlJqereo
C(Joone!JIranlid;e;o:keflkke
COmne!JIranli(1;e;o:ke1'ikke
COmne!JIranli(1;e;o:ke1'ikke
(3)
i&Jdrin:Jeralprodul.tetOllnormalvedlroenol(letseoJ
(a)
i&Jdrin:Jeralorodut.tetO\ll\OOTlal~dIrQer.oldelseoJ
(a)
i&Jdrin:Jeralorodut.tetO\ll\OOTlal~dIrQer.oldelseoJ
JU~tering.
j1Jstering.
j1Jstering.
loerm
dellB
loerm
dellB
loerm
deIIB
Ihl
Be5ka.1,~eise~1
Ib)
Bf~ka1r~eiseil
Ib)
Bf~ka1r~eiseil
!ellar1ige
!ellaJ1igeflwr,t'cner
!ellaJ1igeflwr,t'cner
lirma,
de!
tirma,
der
tirma,
der
g;lr.rllleparatiorJervAd~flnes\leg~
!)lrarlileparatiorlervad~nnes\leg~
!)lrarlileparatiorlervad~nnes\leg~
(c)
Besic:<l.:Ji[lClse31~rCJdIJk1etpaorul)dilllorsfmmeriQ'led,~ld
(c)
Be;~igeb8al~roouk!elp,lorundallurs£mmerkiied,itJeld
(c)
Be;~igeb8al~roouk!elp,lorundallurs£mmerkiied,itJeld
modilika.til)ller,
modilikalil)ller,
modilikalil)ller,
mistruo
mistruo
mistruo
KENWOOD ELECTRONICS DEUTSCHLAND
KENWOOD ELECTRONICS DEUTSCHLAND
KENWOOD ELECTRONICS DEUTSCHLAND
kurxlen
kurxlen
i
ElJapa
i N()p<l
i N()p<l
GMBH
GMBH
[Ie
HaViMeHoealllo-le MOAeI1lo-l~ceplt1YlHbllll
HavtMeHoaalllo-le
HavtMeHoaalllo-le
Identification
Identification
Identification
IdentificationduproduiV
IdentificationduproduiV Produkt
IdentificationduproduiV Produkt
ModeloyNumerodeseriel
ModeloyNumerodeseriel Malli ja sarjanumerol
ModeloyNumerodeseriel Malli ja sarjanumerol
Movn':i\o
Movn':i\o
Movn':i\o
Modell og
Modell og
Modell og
Apparat typ
Apparat typ
Apparat
MOdel heiti
MOdel heiti
MOdel heitiograonumer/ll-Mudell
Model
Model
Model
H33eaHVie,
H33eaHvte, aApec
H33eaHvte, aApec
Stempel
Stempel
Stempel
Forhandlerl
Forhandlerl Distribuidor y sello/ Jalleenmyyja & leimal
Forhandlerl Distribuidor y sello/ Jalleenmyyja & leimal
Llj.IiXlviOo
Llj.IiXlviOo
Llj.IiXlviOo
Forhandlerens
Forhandlerens navn og
Forhandlerens navn og
Aterforsaljare & stampeJl
Aterforsaljare & stampeJl Dealer & stempel!
Aterforsaljare & stampeJl Dealer & stempel!
Undirrilun
Undirrilun og slimpill
Undirrilun og slimpill
Dealer&stamp
Dealer
Dealer
,QaTa
,QaTa
,QaTa
Kebsdatol
Kebsdatol
Kebsdatol
Datadiacquislol
Data
Data
Aankoopdatum!
Aankoopdatum!
Aankoopdatum!
Purchase
Purchase date
Purchase date
I
~-,-"
I
~-,-"
I
~-,-"
Name
Name
Name
Kebers
Kebers
Kebers
Asiakkaan
Asiakkaan nimi & osoileJ
Asiakkaan nimi & osoileJ
Nome
Nome
Nome
Nomeemoradadocompradorl
Nomeemoradadocompradorl
Nomeemoradadocompradorl
Naarn &
Naarn & adres van de klant/Nafnogheimilisfang kaupandaJ
Naarn & adres van de klant/Nafnogheimilisfang kaupandaJ
L-isem u I-indirizz
L-isem u I-indirizz tax-xerrej/
L-isem u I-indirizz tax-xerrej/
1l>'11;'~somhetstmdde
1l>'11;'~somhetstmdde
torUhJ~cer
K~m.oo:l
NS
torUIIJ:cer
Kem.oo:tNSs'O
torUIIJ:cer
Kem.oo:tNSs'O
Indeniorrarn'mHleatdoo~~
IndenlorrarTVmrneatdoo~~
IndenlorrarTVmrneatdoo~~
s~
del
imodekom'ller
del
imodekom'ller
del
imodekom'ller
'lIISl0:e<llITe1aO~1
'lIISl0:e<llITe1aO~1
saJ~et
''''51
o~e.
I'IIIe1aQel
~ti,
U(l
vi
trasknl'€!
os
~ti,
U(l
vi
trasknl'€!
os
matt\'
Y,fre
lorelagdIrlenrJe
matt\'
Y,fre
lorelagdIrlenrJe
leP/l;a:i()f1
repa:a:iun
repa:a:iun
ieieuropiEfsk
land,
ieleur(]JIiEi:;k
00d,
ieleur(]JIiEi:;k
00d,
land,
nVlllsalgct
IBrste~aIlCjlordsled,
n>'llfsalgct
IBrsle
~ang
n>'llfsalgct
IBrsle
~ang
~~
underkastet
den
den
den
Iilpasning,1produl<1el
stanoaroo-og
lond,
lond,
lond,
skal
skal
skal
Oll
O<l
O<l
In''lUSlve
1IIk1~Slve
1IIk1~Slve
nwrat'cner
ik"e
ik"e
ik"e
sal'll
~arJ1
~arJ1
Iilpasning,1produl<1el
lIelin~er.;er,
ffllt,irerc,
produlfler.
c1er
fIlilrl:ectslares
~'Icr
lep.:!ral'cn
sli~le'i
h'lcr
lep.:!ral'cn
5ti~le'i
h'lcr
lep.:!ral'cn
5ti~le'i
ikl<e
kan
gives
ikl<e
kan
gives
ikl<e
kan
gives
omic:ostninoem~
klrbund~t
omic:oslnillQem~
klrbund~t
omic:oslnillQem~
klrbund~t
tr~
1<11t1e!,
h~or
eel
ourinaellg~
tra
1a1t1e!,
h~or
cel
aurin(Jellgf
tra
1a1t1e!,
h~or
cel
aurin(Jellgf
~errodl~ke
etttn,n
~errodJ~ke
erttn;n
~errodJ~ke
erttn;n
eoproduk1el
eoproduk1el
eoprodu'1e!
,rQdut1N,l:Iersky:Ces
,rQdutler,
der
skyiC~
,rQdutler,
der
skyiC~
uClf~atenhv~r
uC!f~atentN'~rDe"oli
uC!f~atentN'~rDe"oli
~r
~ulori.'iBrlll
al
prcdocenle"
~r
~ll!ori.'iBrel
al
prcdocenle"
~r
~ll!ori.'iBrel
al
prcdocenle"
mal);)ellukl
inSlallotion
man;)elluld
instaliatiOll
man;)elluld
instaliatiOll
bruI;loiIcrkene
r~5ertedele
bruI;laiIorkene
rf5~rtedele
bruI;laiIorkene
rf5~rtedele
MOAeI1lo-l~cep"'H1Hbl1ll
MOAeI1lo-l~cep"'H1Hbl1ll
du
produiV
Gerale~Typ
du
produiV
Gerate~Typ
du
produiV
Gerate~Typ
Produkt
KOI
Op(a~<:
KOI
Op(a~<:
KOI
Op(a~<:
serienummerl
serienummerl
serienummerl
typ &
&
&
og
og
number
number
number
aApec
und
Unterschrift
und
Unterschrift
und
Unterschrift
Distribuidor y
ETotpia<:/
ETOIpia<:/
ETOIpia<:/
og slimpill sOluaOilaJ
& stamp
& stamp
nOKynKlo-ll
nOKynKlo-ll
nOKynKlo-ll
Fechadecompra/
Fecha de compra/ Ostopaival Hllf:pOllllVia avopacj
Fecha de compra/ Ostopaival Hllf:pOllllVia avopacj
di
acquislol
di
acquislol
dale
,-
,-
,-
und
Anschrifl
und
Anschrifl
und
Anschrifl
navnogadresse/
navn
navn
nimi
e indirizzo del
e indirizzo del clientel Kundens navn og adresse/
e indirizzo del clientel Kundens navn og adresse/
adres
....
sprodulr1e1
....
sprodulr1e1
S:g
retrIat~11
reirIat
~
reirIat
~
rp'J,ii
(jiI'JJli
(jiI'JJli
aile
lIatillnale
[IiJ
aile
lIaMnille
[IiJ
aile
lIaMnille
[IiJ
Modll,katIO~fr.(lerfl
Modll,katIO~fr.(lerfl
Mooll,katIO~fr.(ler
erm'ert
arl~Vilr
101
erm'ert
arl~Vilr
101
tor01!ldelse
~lIer
tor01!ldelse
~lIer
h\'{)[d~t
er
h\'{)[d~t
eI
h\'{)[d~t
eI
~~il.lle
lord
sled,
~
~il
lord
sled,
~
~il
teliaqelse,alm-;;elerl
t:e!i~qelse,
al
m-;;eltrl
t:e!i~qelse,
al
m-;;eltrl
t,vis
prlldlA1et
oT
den
D~idelle
Iii
rMighed
UfidlOl
Iii
rMighed
under
Iii
rMighed
under
i
de~~
1<I~:i
a!anCerl
i
de~~
ta~1
alanCeIl
i
de~~
ta~1
alanCeIl
med
rorscrtdelsEfl
med
rorsertdelsen
med
rorsertdelsen
kIl~
tard:
sied
kIl~
tord
sl~d
kIl~
tord
sl~d
na:vnt'
\'elle\1ninge,1
m:<ntI\'elle\1nirwJe,1
m:<ntI\'elle\1nirwJe,1
uliISlr.E<kelige~tler
uliISlr.E~elige
~tier
uliISlr.E~elige
~tier
r;<nOIl
ell~1
~hI'ert
ell~1
ethl'frt
ell~1
ethl'frt
tiT
111
udtare
til
:Ii
udtare
til
:Ii
udtare
elter
in1Dak~,nc
cller
in1pak~,nc
cller
in1pak~,nc
Malli ja
Oftpa<;l
Madeliaenumerodimatricolal
Oftpa<;l
Modello e
Oftpa<;l
Modello e
Modeloenumerodeseriel
Modeloenumerodeseriel
Modeloenumerodeseriel
serienummer/ldentificatie
serienummer/ldentificatie
serienummer/ldentificatie
raonumer/ll-Mudell
raonumer/ll-Mudell
& serial
number
& serial
number
& serial
number
lo-l
Wr3Mrl Alo-lllepalRevendeur &
lo-l
WT3MO
A~lIepalRevendeur
lo-l
WT3MO
A~lIepalRevendeur
des
des
des
sello/
Timbro
del rivendiloreJ
Timbro del rivenditoreJ
Timbro del rivenditoreJ
navnogstempell
stempell
stempell
Dealer&stempel!
sOluaOilaJ
sOluaOilaJ
Date
d'achtatl
Date
d'achtatl
Date
d'achtatl
Kjept
daloJ
Kjept
daloJ
Kjept
daloJ
Soludagur/ld-data
Soludagur/ld-data
Soludagur/ld-data
-".,"
-".,"
-".,"
des
Kaufers/
des
Kaufersl Nom & adresseduclient!
des
Kaufersl Nom & adresseduclient!
Nombre
og adresse/
Nombre
og adresse/
Nombre
& osoileJ
Ovo~a
Ovo~a
Ovo~a
cliental
....
andeklanf/Nafnogheimilisfang
tax-xerrejl
HUOM.
HUOM.
HUOM.
TamalailuukGrtti
TamalailuuilGrlti
TamalailuuilGrlti
~Jrao,telun
t~i
~Jrao,tellln
tai
~Jrao,tellln
tai
(d)
Bes!ad:gelseaTproduklelp~grurnlalbrand,nedsmnirg
(d)
Br.sk;Hj:gelsealprodulllelo~gruudalbrand,nedsmnirg
(d)
Br.sk;Hj:gelsealprodulllelo~gruudalbrand,nedsmnirg
i~iIld,lvrmdsl,g,jorrls~I~,util,trJi'.eTigYIlO:i:Ellng
i~<fld,lvrmdslag,jonls~I~,util,trJi'.eligYIlO:i:H1ng
i~<fld,lvrmdslag,jonls~I~,util,trJi'.eligYIlO:i:H1ng
lo~ce
majeu~e,
lo~cemajeu~e,
lo~cemajeu~e,
efln\trilllden~,SOIllKllOwoo:li'keerlle:Tecver
Cf1n.-eranden~,lamKllOwoodi'keerlle:Tec\'er
Cf1n.-eranden~,lamKllOwoodi'keerlle:Tec\'er
(ei
IItjlta~,deler~skcdiqetvedanvenctelseaTsIr~'I1stvrl;er
(ei
tltjllalere,(\eltr~skcdiqel~edanvenctelsealslm'l1stvrl;er
(ei
tltjllalere,(\eltr~skcdiqel~edanvenctelsealslm'l1stvrl;er
hlJi~re
lilJi~re
lilJi~re
b.!IrxI,ka$selteMnd,
b.!Irxl,kosselteMnd,videub!rod,cUmoilCtdiscsellerenlw€f
b.!Irxl,kosselteMnd,videub!rod,cUmoilCtdiscsellerenlw€f
11
11
anoenviltl,oerik~u~QI:,sel,ep'oouirlet
anoen
anoen
Irl
U(l$kittei;~eel~cr
Irl
U(lSkittei:~e€l~cr
Irl
U(lSkittei:~e€l~cr
i
clen
al:mnclel
i
clen
~1:lHndelij;e
i
clen
~1:lHndelij;e
be~rierlselt
be~r;enselt
be~r;enselt
fl
lm!ffivedel,
100!ffi~edeI,
100!ffi~edeI,
llanerierogbiliejlaT
oonerierogbiliejlaT
oonerierogbiliejlaT
Ig)
Produl<1er.
Ig)
Produl<1er.
Igi
ProdlJl<1er.llal'lYi,kelnOf,lleelleral:ese'iellUlllrEerbievet
en
en
lil'frwl,
lil'frTel,
lil'frTel,
()E-Ilne~ara"tillar
()E-llneqara"llllar
()E-llneqara"llllar
ptlovl~,is
pllovlig,is
pllovlig,is
(rmet,
SO'n
r<E.'VTlthero,ersul1produi:te:.v~bH..cref)aHelelie,
(rmet,SO'nr<E.'VTltl"lllro.er5uJ1produlde:.v~bli'lerepmrelfllel
(rmet,SO'nr<E.'VTltl"lllro.er5uJ1produlde:.v~bli'lerepmrelfllel
~II~
~II~
udski1tetudenbe'et1,irogOisseret;]lledergr'be!ikkep.'lncgcn
udski1tetudenbe'et1,irogOisseret;]lledergr'be!ikkep.'lncgcn
urlskllretudenbe'e<1,ir'1lDisseretj]lledergr'be!ik'ep.'lncgcn
nlOOe.o:JieIIeIPl:lfl1enmMe~rke!rE'i'i~'1l*m-elortfugererl21
Iii
nlOOe.oJiellelol:lf11enmMe~rkerrE'i'i~'ll*rnefortfugerenal
Iii
nlOOe.oJiellelol:lf11enmMe~rkerrE'i'i~'ll*rnefortfugerenal
~rO<iJi1ctundl'fdelJil'klendebvtEstem~tser.
~rodui1ctund€frelJd'klendebvtEstffil~tser.
~rodui1ctund€frelJd'klendebvtEstffil~tser.
OPWCRKSOMHEO
OPWCRKSOMHEO
OPWCRKSOMHEO
Delle
kart
OQ
Dea.e
kortOQkvflterfng
Dea.e
kortOQkvflterfng
~19SdeTeellervedt~l'er;
kOOes
19SdeIe
kOOes
19SdeIe
("
I"~
I"~
(d)I\~i
1d)I\~i
1d)I\~i
1>'
1>'
1>'
Uiese
Garr.ntieKam
UieseG.lrr.ntieKam·;on~llenPerslJnenttJllsprtTlIlII'l'i'fCen.d;ed:l,
UieseG.lrr.ntieKam·;on~llenPerslJnenttJllsprtTlIlII'l'i'fCen.d;ed:l,
Pro:Lkt
l
<.1Jaler.vorllerllia:>ell
Pru:Lktl<.1Jaler..-orberllu:>erl
Pru:Lktl<.1Jaler..-orberllu:>erl
HOMepl
HOMepl
HOMepl
und
Seriennummerl
und
Seriennummerl
und
Seriennummerl
navn
09 serie nummerl
navn
09 serie nummerl
navn
09 serie nummerl
sarjanumerol
numero
numero
van
van het produkt!
van het produkt!
us-serial
numberl
us-serial
numberl
us-serial
numberl
Handlersl
Revendeur
Handlers! Revendeur & cacheV
Handlers! Revendeur & cacheV
Jalleenmyyja&leimal
Agenleecarimbol
Agente e
carimbol
Agente e
carimbol
Timbru
tal-bejjieghl
Timbru tal-bejjieghl
Timbru tal-bejjieghl
Kaufdaluml
Date
Kaufdatuml Date
Kaufdatuml Date
OstopaivaJ
Hllf:pOllllVia
Datade
comprallnkopsdatuml
Dalude
compra/ Inkopsdatuml
Dalude
compra/ Inkopsdatuml
la'
meta
oxtara!
la'
meta
nxtaral
la'
meta
nxtaral
".....""..
".....""..
".....""..
Nom&adresseduclienf/
y dircccion del c1ientel
y dircccion del cliente!
y dircccion del cliente!
Kat
OIEUOU
....
OIl oyopooTijl
KOI
OIEUOUVOIl
KOI
OIEUOUVOIl
Kundens
navn og
Kundens
namn&adressl
Kundens namn &
Kundens namn &
Name&addressofcustomer
Name
& address of customer
Name
& address of customer
To3
kuilti tallasku
on
esiletta~a
103
kuilti
tal
iasku
on
esiletta~a
103
kuilti
tal
iasku
on
~ahmljGltluneen
~lIhm!j!Jlttuneen
~lIhm!j!Jlttuneen
end,
end,
end,
~iItl,
~iItl,
;eudlet
;endlet
;endlet
kvllterlng
eller
eller
esiletta~a
ellIp<Jlleel:n
clllp<Jlleel:n
clllp<Jlleel:n
\tl 846-0807-00/01 (W) (09/03)
\tl 846-0807-00/01 (W) (09/03)
\tl 846-0807-00/01 (W) (09/03)
1J(''II'rekl
h(m(1sD~nding
1J(''lI'rek1Iio'VedsD~nding
1J(''lI'rek1Iio'VedsD~nding
h~ad
der
er
ang,vet
u~
h~od
der
er
arlglvet
u~
h~od
der
er
arlglvet
u~
~ideob!nd,CCmoilCtdisc:;ellerenll\'er
oer
ikl.e
U~Ql:1
sel,e
p'oo~irlet
oer
ikl.e
U~Ql:1
sel,e
p'oo~irlet
sl~d~are
cleie,
riel
sl~d~ar~
cle:e,
riel
sl~d~ar~
cle:e,
riel
ij;e
~edTig~~okle:se,
~edlig~hokleise,
~edlig~hokleise,
II
pladekassetter.
pkh~~Ie,
II
pilldekassetter.
pkh~~ie,
II
pilldekassetter.
pkh~~ie,
tand5~nrp,
t<I~e:emer.er.
tands~nrp,
t<I~e:emer.er.
tands~nrp,
t<I~e:emer.er.
Ila
l'M,kel
nOl,lie
~ller
a1~e
Ila
l'M,kel
nOl,lie
~ller
a1~e
e'ler
uj~islfet
e'ler
~j"isi(et
e'ler
~j"isi(et
til
'adi1ledlor
ellh'ler,som
Iii
ladi11edlor
erlh'ler,som
Iii
ladi11edlor
erlh'ler,som
(taklUla)
Br
nedvendi~
(faklUIa)
Br
nedvendi~
(faklUIa)
Br
nedvendi~
ved
t~ver;
ved
t~ver;
GMBH
GMBH
GMBH
';on~ller1
Personen
teJllsprlllll1
di matricolal
di matricolal
het
produkf/
cacheV
&
cacheV
&
cacheV
& cacheV
d'achtatl
d'achtatl
d'achtatl
avopilcj
ayopooTijl
ayopooTijl
adressel
adressl
adressl
kaupandal
ennen
ennen
ennen
tlinrkrntaa
tlimkrnlaa
tlimkrnlaa
Im~elArsagerl
eller
ImselArsagerleller
ImselArsagerleller
beskZl~er.;ei
~Iad"r
beskZl~er.;ea'
~/i{h~r
beskZl~er.;ea'
~/i{h~r
sk<Il
!ld~~ines
~om
lea
sk<Il
!ld~~ines
~OOlI~a
sk<Il
!ld~~ines
~OOlI~a
Inklus!Vll
(men
r'klle
Inklus!Vll
(men
r'klle
Inklus!Vll
(men
r'klle
~i'lIIem:ne,
~:rlllem:nE,
~:rlllem:nE,
geno;l'arell(;e
geno;l'arell(;e
geno;l'arell(;e
s~,ienumrE
er
b1e>t1
s~,ienumrE
er
b1e>t1
nai
~nskot:etprodlJl:lct
nai
a~skat:elpr(l(jlJl:lct
nai
a~skat:elpr(l(jlJl:lct
h~is
der
skal
h~is
der
skal
h~is
der
skal
"e1ce~.
d;edos
OPGELET
OPGELET
OPGELET
ZUR
BEACHTUNG
ZUR
BEACHTUNG
ZUR
(",
I"'
I"'
BEACHTUNG
D,ese
Gilranll~karle
D,csr.
Gilrantl~karte
D,csr.
Gilrantl~karte
im
ralie
de~
~'crkJstes
im
ralie
de~
~'crkJstes
im
ralie
de~
~'crkJstes
und
'kr
Katl!l£I~g
und
'kr
Katl!l:cl~g ~p-rdCll
und
'kr
Katl!l:cl~g ~p-rdCll
ellt
II~Uf.S
Bedienteilwerwerberr
ellt
II~Uf.S
Bedienteil
ellt
II~Uf.S
Bedienteil
~p-rdm
~:I\{jTlgt,
~:rlrillgt,
~:rlrillgt,
werwerberr
werwerberr
Inl
Inl
Inl

Nederland
Nederland
Nederland
6eacr1eQetlulk~rv.t'lMflWoodpradtl"1en.
6eacr1eQetlulk~rv.t'lMflWoodpradtl"1en.
6eacr1eQetlulk~rv.t'lMflWoodpradtl"1en.
.,./~
<;l;nllin
1I
'(Ifl
hel
lle!t!l1l3l1
0'1
Kl'fWI'OOd
.,./~
<;l;nllin
1I
'(Ifl
hel
.,./~
<;l;nllin
1I
'(Ifl
hel
\1Jel'P,odlkj')
~:l(JIhl:l
\1Jel'P,odlkj')
~:l(JIhl:l
\1Jel'P,odlkj')
~:l(JIhl:l
'tllllufl\Jl,
1l11'8l~laliS'''llIoen~elsle!doll'el''o-.l<lQtnC'o'erMll:tII:lSIi~
'tllllufl\Jl,
1l11'8l~laliS'''llIoen~elsle!doll'el''o-.l<lQtnC'o'erMll:tII:lSIi~
'tllllufl\Jl,
1l11'8l~laliS'''llIoen~elsle!doll'el''o-.l<lQtnC'o'erMll:tII:lSIi~
lk~l;rQetllQ1dfJeG~ilnIiekaanlllC*"ne(Il'(X1JIdal.'lCeIoDdll
lk~l;rQetllQ1dfJeG~ilnIiekaanlllC*"ne(Il'(X1JIdal.'lCeIoDdll
lk~l;rQetllQ1dfJeG~ilnIiekaanlllC*"ne(Il'(X1JIdal.'lCeIoDdll
'Oo€fdlnel'JlH(;lc~eoUllljroetQtlY\ll',er'<il~~ICllItroerl
'Oo€fdlnel'JlH(;lc~eoUllljroetQtlY\ll',er'<il~~ICllItroerl
'Oo€fdlnel'JlH(;lc~eoUllljroetQtlY\ll',er'<il~~ICllItroerl
ondelw....
oeliMllellla!laanletieoe:1tr1~otl'CltIe~od
ondelw....
oeliMllellla!laanletieoe:1tr1~otl'CltIe~od
ondelw....
oeliMllellla!laanletieoe:1tr1~otl'CltIe~od
"I~:lIi€Ul'.[I;erlll\'!fdllef.EJ~etlClSerVQC~'ll!fold!llil"laPdelllll'
"I~:lIi€Ul'.[I;erlll\'!fdllef.EJ~etlClSerVQC~'ll!fold!llil"laPdelllll'
"I~:lIi€Ul'.[I;erlll\'!fdllef.EJ~etlClSerVQC~'ll!fold!llil"laPdelllll'
<xrKenwtodp'OIMteo"ce[{G.leS¥neII~l'eIaanII:lCPt'eIOiJS
<xrKenwtodp'OIMteo"ce[{G.leS¥neII~l'eIaanII:lCPt'eIOiJS
<xrKenwtodp'OIMteo"ce[{G.leS¥neII~l'eIaanII:lCPt'eIOiJS
01
IUW.M
l!lX;UI!lti'II
01
IUW.M
l!lX;UI!lti'II
01
IUW.M
l!lX;UI!lti'II
~1~1
!fIllle·lleli"rodJl(J_d~OUIItlI;Mfl.ERirro:le1
~1~1
!fIllle·lleli"rodJl(J_d~OUIItlI;Mfl.ERirro:le1
~1~1
!fIllle·lleli"rodJl(J_d~OUIItlI;Mfl.ERirro:le1
1'le\.lK'~~wt·cenaan(le·~
1'le\.lK'~~wt·cenaan(le·~
1'le\.lK'~~wt·cenaan(le·~
lr-lod"l-e'd
lr-lod"l-e'd
lr-lod"l-e'd
1rd,.he1J1::Glklwo;;!!t.:I;h1
1rd,.he1J1::Glklwo;;!!t.:I;h1
1rd,.he1J1::Glklwo;;!!t.:I;h1
'<fldeiHI'lll:1tII1lIf'lI!fr
'<fldeiHI'lll:1tII1lIf'lI!fr
'<fldeiHI'lll:1tII1lIf'lI!fr
~e-.-e(b"
U''Il.ldOC'''I!:''''e'HI't!
~e-.-e(b"
U''Il.ldOC'''I!:''''e'HI't!
~e-.-e(b"
U''Il.ldOC'''I!:''''e'HI't!
KfNWOOO ELECTRONICS EUROf'E
KfNWOOO ELECTRONICS EUROf'E
KfNWOOO ELECTRONICS EUROf'E
Am5t",.m_~
Am5t",.m_~
Am5t",.m_~
Udletllce.'"tGn1t~
Udletllce.'"tGn1t~
Udletllce.'"tGn1t~
It)[):..:i-\IIli,,~OlIIu....nl'''''.t1ql!p:eG~~dJ!'n9!'·:li!I'
It)[):..:i-\IIli,,~OlIIu....nl'''''.t1ql!p:eG~~dJ!'n9!'·:li!I'
It)[):..:i-\IIli,,~OlIIu....nl'''''.t1ql!p:eG~~dJ!'n9!'·:li!I'
OeifJ'","lo()I;ff'el""oo.AllSgNl;lIl")"'~!IlnIall'·'wl
OeifJ'","lo()I;ff'el""oo.AllSgNl;lIl")"'~!IlnIall'·'wl
OeifJ'","lo()I;ff'el""oo.AllSgNl;lIl")"'~!IlnIall'·'wl
(l!CiIlrlilll'·~Wf'l
(l!CiIlrlilll'·~Wf'l
(l!CiIlrlilll'·~Wf'l
".,,~
'lllCJtd<!fI.DtglJld",stRlrowlOiltrroot,;l!
".,,~
'lllCJtd<!fI.DtglJld",stRlrowlOiltrroot,;l!
".,,~
'lllCJtd<!fI.DtglJld",stRlrowlOiltrroot,;l!
*.mtlI"';teI1.Id!IIll!I"~.'l!f\e·<:the<1le·orJTlIIJImO'iJi!.
*.mtlI"';teI1.Id!IIll!I"~.'l!f\e·<:the<1le·orJTlIIJImO'iJi!.
*.mtlI"';teI1.Id!IIll!I"~.'l!f\e·<:the<1le·orJTlIIJImO'iJi!.
(Jl:~e1""lr~CIIlS~!'I'ettnl'll!fP.O',,"lZ'OItI\")[lQe~
(Jl:~e1""lr~CIIlS~!'I'ettnl'll!fP.O',,"lZ'OItI\")[lQe~
(Jl:~e1""lr~CIIlS~!'I'ettnl'll!fP.O',,"lZ'OItI\")[lQe~
IIl,1.rn~,l"eflle1Il!f',!>"i!l'Ir«~~""'"1'O'toOl~1S..
IIl,1.rn~,l"eflle1Il!f',!>"i!l'Ir«~~""'"1'O'toOl~1S..
IIl,1.rn~,l"eflle1Il!f',!>"i!l'Ir«~~""'"1'O'toOl~1S..
Vt:;:.otJ."liJ'·.II'l>lMU'.,e
Vt:;:.otJ."liJ'·.II'l>lMU'.,e
Vt:;:.otJ."liJ'·.II'l>lMU'.,e
~.aa.'de!!lQfr,I.t~!'lIO.I1"l1Jrlllfle{;r
~.aa.'de!!lQfr,I.t~!'lIO.I1"l1Jrlllfle{;r
~.aa.'de!!lQfr,I.t~!'lIO.I1"l1Jrlllfle{;r
~""e!l"IUIIe~R'l\;eoe<end*Of<lel1
~""e!l"IUIIe~R'l\;eoe<end*Of<lel1
~""e!l"IUIIe~R'l\;eoe<end*Of<lel1
G.J,-;r;::oMY.:romlOlll
G.J,-;r;::oMY.:romlOlll
G.J,-;r;::oMY.:romlOlll
A.E"n~~:.,;a~dM!\I*~leqlllel""ll!'."e"(lIJllva"1W8
A.E"n~~:.,;a~dM!\I*~leqlllel""ll!'."e"(lIJllva"1W8
A.E"n~~:.,;a~dM!\I*~leqlllel""ll!'."e"(lIJllva"1W8
G.b¥·~e'dIeI'!c.w·tflbcJwoe,IIeO'l!fInEkl!n
G.b¥·~e'dIeI'!c.w·tflbcJwoe,IIeO'l!fInEkl!n
G.b¥·~e'dIeI'!c.w·tflbcJwoe,IIeO'l!fInEkl!n
(~)
1)II'~~~lI1<1011'S
(~)
1)II'~~~lI1<1011'S
(~)
1)II'~~~lI1<1011'S
\~!
!-l!:l
oJII"'::WJew"rI~
\~!
!-l!:l
oJII"'::WJew"rI~
\~!
!-l!:l
oJII"'::WJew"rI~
OJfl~"'llqIlIIIeendeLa;I'I(,fl(le,a<ll!l£"~lqllnfd~[13
OJfl~"'llqIlIIIeendeLa;I'I(,fl(le,a<ll!l£"~lqllnfd~[13
OJfl~"'llqIlIIIeendeLa;I'I(,fl(le,a<ll!l£"~lqllnfd~[13
Portugal .
Portugal .
Portugal .
c...oullll[oI4XJ!lOSI.CMCl$~
c...oullll[oI4XJ!lOSI.CMCl$~
c...oullll[oI4XJ!lOSI.CMCl$~
Ob'IQd::I11
POI
ler
escotnoo
Ob'IQd::I11
POI
ler
escotnoo
Ob'IQd::I11
POI
ler
escotnoo
!"rllltNT't~I~OOSqI;lOOr.oo
!"rllltNT't~I~OOSqI;lOOr.oo
!"rllltNT't~I~OOSqI;lOOr.oo
nOlrl1ol1S
delu'ICKXOlm~~o,
nOlrl1ol1S
delu'ICKXOlm~~o,
nOlrl1ol1S
delu'ICKXOlm~~o,
~k.
s,d
1~""<JbDU".I$I~I"r1O
~k.
s,d
1~""<JbDU".I$I~I"r1O
~k.
s,d
1~""<JbDU".I$I~I"r1O
Cl!IT!llS1<.llTV,i()i:slfr,IdtoI1l!Ciu~Ii,l~easodeoPIOdl.to
Cl!IT!llS1<.llTV,i()i:slfr,IdtoI1l!Ciu~Ii,l~easodeoPIOdl.to
Cl!IT!llS1<.llTV,i()i:slfr,IdtoI1l!Ciu~Ii,l~easodeoPIOdl.to
I~I
lidO
lcqU1rid~
~m
qJ!IQul'l
I~I
lidO
lcqU1rid~
~m
qJ!IQul'l
I~I
lidO
lcqU1rid~
~m
qJ!IQul'l
lei
~1qJ"'1
orutlt~l~
de
lei
~1qJ"'1
orutlt~l~
de
lei
~1qJ"'1
orutlt~l~
de
,1II1l"mnadorOlcial~_llOd,Vel'(le:H;rOfIClal,Cenrro~c
,1II1l"mnadorOlcial~_llOd,Vel'(le:H;rOfIClal,Cenrro~c
,1II1l"mnadorOlcial~_llOd,Vel'(le:H;rOfIClal,Cenrro~c
5t1."OSP.ulorilacOOlJr~rldedor(l!liIOdUlos~em:oodIl.lCll,.
5t1."OSP.ulorilacOOlJr~rldedor(l!liIOdUlos~em:oodIl.lCll,.
5t1."OSP.ulorilacOOlJr~rldedor(l!liIOdUlos~em:oodIl.lCll,.
w:mDlnMoln
CO
reclt-ode
w:mDlnMoln
CO
reclt-ode
w:mDlnMoln
CO
reclt-ode
~,taIJ.ilMj(JJIs~o,Se(i,er~I:IOJdqulI>(lQlor.rtaCfF.oPlloO.JkJ
~,taIJ.ilMj(JJIs~o,Se(i,er~I:IOJdqulI>(lQlor.rtaCfF.oPlloO.JkJ
~,taIJ.ilMj(JJIs~o,Se(i,er~I:IOJdqulI>(lQlor.rtaCfF.oPlloO.JkJ
dr>t.\e!
~,a.1O
~rt~enil!oorondelOO~OI"l()lilO:l
dr>t.\e!
~,a.1O
~rt~enil!oorondelOO~OI"l()lilO:l
dr>t.\e!
~,a.1O
~rt~enil!oorondelOO~OI"l()lilO:l
$euf'rOO;.o[olOlloXluorK):JnaCHr:le(lescjJIsatt!tlI'llle(llX.i'i
$euf'rOO;.o[olOlloXluorK):JnaCHr:le(lescjJIsatt!tlI'llle(llX.i'i
$euf'rOO;.o[olOlloXluorK):JnaCHr:le(lescjJIsatt!tlI'llle(llX.i'i
~ntco(r.ll
0
VetO':ltlor
Aub'Qal»rTLlt;S
~ntco(r.ll
0
VetO':ltlor
Aub'Qal»rTLlt;S
~ntco(r.ll
0
VetO':ltlor
Aub'Qal»rTLlt;S
H.
H.
H.
r
r
r
....
ail:~
....
ail:~
....
ail:~
POI
l,M:J.
tetWvcesJe
POI
l,M:J.
tetWvcesJe
POI
l,M:J.
tetWvcesJe
1~"rl$l':l~W'a
1~"rl$l':l~W'a
1~"rl$l':l~W'a
OOFr::dtltcm~t¥lIlIctl.J'll-.oatGll3rOil'Wadolswal;Jll~~
OOFr::dtltcm~t¥lIlIctl.J'll-.oatGll3rOil'Wadolswal;Jll~~
OOFr::dtltcm~t¥lIlIctl.J'll-.oatGll3rOil'Wadolswal;Jll~~
(JIqIlJlI1oOOlq;,alQ_e<IMl1OellCIl2prOOJf:lSI'¥/IOOll
(JIqIlJlI1oOOlq;,alQ_e<IMl1OellCIl2prOOJf:lSI'¥/IOOll
(JIqIlJlI1oOOlq;,alQ_e<IMl1OellCIl2prOOJf:lSI'¥/IOOll
"'IiJI:<IIt<i.tlltIrtPf:ta;$,T01cKIe«Jr1'l~~wimt;ll>1llil
"'IiJI:<IIt<i.tlltIrtPf:ta;$,T01cKIe«Jr1'l~~wimt;ll>1llil
"'IiJI:<IIt<i.tlltIrtPf:ta;$,T01cKIe«Jr1'l~~wimt;ll>1llil
1l'000;r.l.I'Wlle
~!'Sef;~olt"'iJor~Lbl'uuoPlu:J;jg~~
1l'000;r.l.I'Wlle
~!'Sef;~olt"'iJor~Lbl'uuoPlu:J;jg~~
1l'000;r.l.I'Wlle
~!'Sef;~olt"'iJor~Lbl'uuoPlu:J;jg~~
..ao
DlMI
ser
teo.llllbdelllGXl
..ao
DlMI
ser
teo.llllbdelllGXl
..ao
DlMI
ser
teo.llllbdelllGXl
Cu:s:~dioenGl,l}!JTldio'~QeQlWlCI",wIIlr:!n:,;l;pi
Cu:s:~dioenGl,l}!JTldio'~QeQlWlCI",wIIlr:!n:,;l;pi
Cu:s:~dioenGl,l}!JTldio'~QeQlWlCI",wIIlr:!n:,;l;pi
lllllSaJS~rll!rB:ac.~Cll'tIa"'mtJal«'(l3'ac:J~rao
lllllSaJS~rll!rB:ac.~Cll'tIa"'mtJal«'(l3'ac:J~rao
lllllSaJS~rll!rB:ac.~Cll'tIa"'mtJal«'(l3'ac:J~rao
~'lCbllosnu;~.(lJSile!JOl_e.tIl:l'ClIiIIl!f~r.veS<f
~'lCbllosnu;~.(lJSile!JOl_e.tIl:l'ClIiIIl!f~r.veS<f
~'lCbllosnu;~.(lJSile!JOl_e.tIl:l'ClIiIIl!f~r.veS<f
iJii~csOfb"Nli:Ol
iJii~csOfb"Nli:Ol
iJii~csOfb"Nli:Ol
"ClIM.IlUIIIl!f:~o!b'~oal'O'tSlil)lf""'dMrl~"
"ClIM.IlUIIIl!f:~o!b'~oal'O'tSlil)lf""'dMrl~"
"ClIM.IlUIIIl!f:~o!b'~oal'O'tSlil)lf""'dMrl~"
""""'"
""""'"
""""'"
JC\lIlO;IIl/WpolatCl:UOdeG¥ilI'4,..-oara-
JC\lIlO;IIl/WpolatCl:UOdeG¥ilI'4,..-oara-
JC\lIlO;IIl/WpolatCl:UOdeG¥ilI'4,..-oara-
tal
~conH.H~~
tal
~conH.H~~
tal
~conH.H~~
(blllec(loOlJOIlIollo:urerl'.oi'dtarl:loae;ude~isi:ao
(blllec(loOlJOIlIollo:urerl'.oi'dtarl:loae;ude~isi:ao
(blllec(loOlJOIlIollo:urerl'.oi'dtarl:loae;ude~isi:ao
p10dJkl
lle!t!l1l3l1
0'1
Kl'fWI'OOd
p10dJkl
lle!t!l1l3l1
0'1
Kl'fWI'OOd
p10dJkl
PIOOtJtt,bijnommi (Jl:tluil.lJfb'elomlW
PIOOtJtt,bijnommi (Jl:tluil.lJfb'elomlW
PIOOtJtt,bijnommi (Jl:tluil.lJfb'elomlW
tall1l'C3C:r.>¥O
......OlllIQlt!el Pro:l-;"
tall1l'C3C:r.>¥O
......OlllIQlt!el Pro:l-;"
tall1l'C3C:r.>¥O
......OlllIQlt!el Pro:l-;"
...
oPe<~ll!O!t'IlIrrrxU:1
...
oPe<~ll!O!t'IlIrrrxU:1
...
oPe<~ll!O!t'IlIrrrxU:1
....
alll~HGenUdeootll(llIl,r~
....
alll~HGenUdeootll(llIl,r~
....
alll~HGenUdeootll(llIl,r~
:¥VIJlt;'erll~:lGo081iiIrr>ffne"'Ii!P.
:¥VIJlt;'erll~:lGo081iiIrr>ffne"'Ii!P.
:¥VIJlt;'erll~:lGo081iiIrr>ffne"'Ii!P.
31,
lt22
AC l.JiI:hoorn
31,
lt22
AC l.JiI:hoorn
31,
lt22
AC l.JiI:hoorn
r,I.C2:91·S1!:l!1OO
r,I.C2:91·S1!:l!1OO
r,I.C2:91·S1!:l!1OO
_k..,wooc1'"
_k..,wooc1'"
_k..,wooc1'"
rJQ'lVl~
bill; toJ:lrn.l.'!1"9lI8l
rJQ'lVl~
bill; toJ:lrn.l.'!1"9lI8l
rJQ'lVl~
bill; toJ:lrn.l.'!1"9lI8l
·~iIllr}OIXflaol~~'t;rd;'WI
·~iIllr}OIXflaol~~'t;rd;'WI
·~iIllr}OIXflaol~~'t;rd;'WI
eta1:left~!'lolrl$:tO~QI"I,:d:tsln:~
eta1:left~!'lolrl$:tO~QI"I,:d:tsln:~
eta1:left~!'lolrl$:tO~QI"I,:d:tsln:~
ole.cWl(JCI
00&-1''''\ !O\WqJlEf.JIlr.l
ole.cWl(JCI
00&-1''''\ !O\WqJlEf.JIlr.l
ole.cWl(JCI
00&-1''''\ !O\WqJlEf.JIlr.l
e51e
~rl)ljutDKtnwuxI
e51e
~rl)ljutDKtnwuxI
e51e
~rl)ljutDKtnwuxI
·PliKl!.Io·j
Se,~tm!i~
·PliKl!.Io·j
Se,~tm!i~
·PliKl!.Io·j
Se,~tm!i~
Ie
,tlIil"cl,
ilIlIuma~
...
Ie
,tlIil"cl,
ilIlIuma~
...
Ie
,tlIil"cl,
ilIlIuma~
...
Q'''IJ>tamt'l'lleemCOniotmillillle
Q'''IJ>tamt'l'lleemCOniotmillillle
Q'''IJ>tamt'l'lleemCOniotmillillle
[stJdo
~tlT\blo
d!
[stJdo
~tlT\blo
d!
[stJdo
~tlT\blo
d!
IUl1ClOIlamento,
pur
Tl',or1e~e
IUl1ClOIlamento,
pur
Tl',or1e~e
IUl1ClOIlamento,
pur
Tl',or1e~e
CO'f'IOra
au
de
01l11~
Dr\lI'~JdQ.Jad.l
CO'f'IOra
au
de
01l11~
Dr\lI'~JdQ.Jad.l
CO'f'IOra
au
de
01l11~
Dr\lI'~JdQ.Jad.l
crO~IfTJl,
CDIIJ'Q'
crO~IfTJl,
CDIIJ'Q'
crO~IfTJl,
GONCALVES, LOA
GONCALVES, LOA
GONCALVES, LOA
·351·9161601IO&
·351·9161601IO&
·351·9161601IO&
.351·2128981·41
.351·2128981·41
.351·2128981·41
....
nwood.pt
....
nwood.pt
....
nwood.pt
..
wood(ijlll.llIWOod.pt
..
wood(ijlll.llIWOod.pt
..
wood(ijlll.llIWOod.pt
~'I.1ede
Gal~i;;
~'I.1ede
Gal~i;;
~'I.1ede
Gal~i;;
CCl'l~i'IIlXI
CCl'l~i'IIlXI
CCl'l~i'IIlXI
CDIIJ'Q'
tr.iII~(IlZ0ll:
tr.iII~(IlZ0ll:
tr.iII~(IlZ0ll:
F.
F.
F.
....
....
....
_
_
_
KENWOOD ELECTRONICS EUROPE B.V. KENWOOD ELECTRONICSUKLTD.
KENWOOD ELECTRONICS EUROPE B.V. KENWOOD ELECTRONICSUKLTD.
KENWOOD ELECTRONICS EUROPE B.V. KENWOOD ELECTRONICSUKLTD.
vflm!:ldls
vflm!:ldls
vflm!:ldls
1c)
DevO:~9~lDa'Iltll~e1mSVlince(!cUil~nclelaabilwie
1c)
DevO:~9~lDa'Iltll~e1mSVlince(!cUil~nclelaabilwie
1c)
DevO:~9~lDa'Iltll~e1mSVlince(!cUil~nclelaabilwie
he1l'Jodukl""rda.aIlQfkOCilI
he1l'Jodukl""rda.aIlQfkOCilI
he1l'Jodukl""rda.aIlQfkOCilI
Ic}
tielsrriervT:-I1l!ftlltiellailmwanJle!rnOOtl\';l1l1elflodutt
Ic}
tielsrriervT:-I1l!ftlltiellailmwanJle!rnOOtl\';l1l1elflodutt
Ic}
tielsrriervT:-I1l!ftlltiellailmwanJle!rnOOtl\';l1l1elflodutt
InlIl!rllleltirtor!l'alil:rlel"".ooroen~:o.otWld,en~
InlIl!rllleltirtor!l'alil:rlel"".ooroen~:o.otWld,en~
InlIl!rllleltirtor!l'alil:rlel"".ooroen~:o.otWld,en~
Prcwl:o;ll!fll;,er't1wiJle$l~"IlaIurll\';l1oeaan<ooowerd
Prcwl:o;ll!fll;,er't1wiJle$l~"IlaIurll\';l1oeaan<ooowerd
Prcwl:o;ll!fll;,er't1wiJle$l~"IlaIurll\';l1oeaan<ooowerd
Ot".lliilV1~~Oldl'Jin'I'JCoColJlOl:l1CnllC/lllellttJ'llWOOll'l
Ot".lliilV1~~Oldl'Jin'I'JCoColJlOl:l1CnllC/lllellttJ'llWOOll'l
Ot".lliilV1~~Oldl'Jin'I'JCoColJlOl:l1CnllC/lllellttJ'llWOOll'l
toei(lt;er,tE~lell!:lslellefl~ae\l)CfoJ:lil
toei(lt;er,tE~lell!:lslellefl~ae\l)CfoJ:lil
toei(lt;er,tE~lell!:lslellefl~ae\l)CfoJ:lil
Go
...
Go
...
Go
...
B.~Frocr.*l1Otlil.e.'Yilolldig(lonC\Ot_~l.ITgn-.rallll
B.~Frocr.*l1Otlil.e.'Yilolldig(lonC\Ot_~l.ITgn-.rallll
B.~Frocr.*l1Otlil.e.'Yilolldig(lonC\Ot_~l.ITgn-.rallll
l\ilio"oIlGb~QOI1ll!r.,",...,I~"'dof
l\ilio"oIlGb~QOI1ll!r.,",...,I~"'dof
l\ilio"oIlGb~QOI1ll!r.,",...,I~"'dof
YiflloepilSS-rr,;I1Jninl1:l:ElJ':!jlIeSbcd'lQlfdef;abl~llft
YiflloepilSS-rr,;I1Jninl1:l:ElJ':!jlIeSbcd'lQlfdef;abl~llft
YiflloepilSS-rr,;I1Jninl1:l:ElJ':!jlIeSbcd'lQlfdef;abl~llft
WI~II,~hi¥'_lle~...."..O.~.QIdkeI;~
WI~II,~hi¥'_lle~...."..O.~.QIdkeI;~
WI~II,~hi¥'_lle~...."..O.~.QIdkeI;~
q"_hetlJ!b~:k~llPla·lll!ftc·ilillS\'l'\eJlneltn:\tlDet'l!
q"_hetlJ!b~:k~llPla·lll!ftc·ilillS\'l'\eJlneltn:\tlDet'l!
q"_hetlJ!b~:k~llPla·lll!ftc·ilillS\'l'\eJlneltn:\tlDet'l!
GnrI'li! l!lIoetllt"iUIl is
GnrI'li! l!lIoetllt"iUIl is
GnrI'li! l!lIoetllt"iUIl is
l~li;nrai!l~Clllll'
l~li;nrai!l~Clllll'
l~li;nrai!l~Clllll'
voo.:;d'(40i91taPr«utto.ellaaru~'I:ICll'<loe~
voo.:;d'(40i91taPr«utto.ellaaru~'I:ICll'<loe~
voo.:;d'(40i91taPr«utto.ellaaru~'I:ICll'<loe~
a.v.
a.v.
a.v.
Jr(!enIlelFrr.Ul~OCI'l!.nctl1r~Ia"O'II"iil'lltl
Jr(!enIlelFrr.Ul~OCI'l!.nctl1r~Ia"O'II"iil'lltl
Jr(!enIlelFrr.Ul~OCI'l!.nctl1r~Ia"O'II"iil'lltl
(Y.-(ft"'l:-;<!f1i5~w.~n~\/OOllC!I!dl!niJe~"'SC/'lil1;l1ll
(Y.-(ft"'l:-;<!f1i5~w.~n~\/OOllC!I!dl!niJe~"'SC/'lil1;l1ll
(Y.-(ft"'l:-;<!f1i5~w.~n~\/OOllC!I!dl!niJe~"'SC/'lil1;l1ll
1if1
1if1
1if1
'>l!ft;)Jfdl:a0!~6Jrt~fll:t'(li.d<n;1Ihel;ot,lItII;l\w~
'>l!ft;)Jfdl:a0!~6Jrt~fll:t'(li.d<n;1Ihel;ot,lItII;l\w~
'>l!ft;)Jfdl:a0!~6Jrt~fll:t'(li.d<n;1Ihel;ot,lItII;l\w~
~
l!"<$!l~o"dm~orcl!J"wtrpenl1"~I~'\O.Y'Jfj)"!t
~
l!"<$!l~o"dm~orcl!J"wtrpenl1"~I~'\O.Y'Jfj)"!t
~
l!"<$!l~o"dm~orcl!J"wtrpenl1"~I~'\O.Y'Jfj)"!t
!t.Ildl;qiDUliall!
!t.Ildl;qiDUliall!
!t.Ildl;qiDUliall!
ru1JldDldei~p..-.tll~1ftetl1rdien
ru1JldDldei~p..-.tll~1ftetl1rdien
ru1JldDldei~p..-.tll~1ftetl1rdien
tn
tn
tn
o~6!.t~rooell'll'~'lOCroenQilDf.K:1'JofIl'oetl¥d
o~6!.t~rooell'll'~'lOCroenQilDf.K:1'JofIl'oetl¥d
o~6!.t~rooell'll'~'lOCroenQilDf.K:1'JofIl'oetl¥d
telprtd.M~reillMcron-deztG;nrtll''WII~t<lQ!ll,
telprtd.M~reillMcron-deztG;nrtll''WII~t<lQ!ll,
telprtd.M~reillMcron-deztG;nrtll''WII~t<lQ!ll,
~oeroo"'~~-"-~IlIe1"1Hl~\IOM8tl-:""lpl.r'II
~oeroo"'~~-"-~IlIe1"1Hl~\IOM8tl-:""lpl.r'II
~oeroo"'~~-"-~IlIe1"1Hl~\IOM8tl-:""lpl.r'II
~er~iflC(lf:lftn~e
~er~iflC(lf:lftn~e
~er~iflC(lf:lftn~e
r.l':tl"1L~CMI''':)egetlful~diWl~\I!!~·"'
r.l':tl"1L~CMI''':)egetlful~diWl~\I!!~·"'
r.l':tl"1L~CMI''':)egetlful~diWl~\I!!~·"'
t«ll'l-III~;J51""'hr'i'ltlYOlJ
t«ll'l-III~;J51""'hr'i'ltlYOlJ
t«ll'l-III~;J51""'hr'i'ltlYOlJ
tltf'rOCl.t1'1if1enllYre:;pt
tltf'rOCl.t1'1if1enllYre:;pt
tltf'rOCl.t1'1if1enllYre:;pt
...
"~lle
...
"~lle
...
"~lle
C.DM;{ia·ol1eSlIiI"';'~;JIl!ll/llkll
C.DM;{ia·ol1eSlIiI"';'~;JIl!ll/llkll
C.DM;{ia·ol1eSlIiI"';'~;JIl!ll/llkll
[;oj
[;oj
[;oj
(tl)sdl3-:le'"i!locmaIJ&I'IniJl'Jall,lIo:1o;l(J1~
(tl)sdl3-:le'"i!locmaIJ&I'IniJl'Jall,lIo:1o;l(J1~
(tl)sdl3-:le'"i!locmaIJ&I'IniJl'Jall,lIo:1o;l(J1~
H.F.GONI;ALVES. LDA.
H.F.GONI;ALVES. LDA.
H.F.GONI;ALVES. LDA.
Ie)
Ie)
(dbal<U
(dbal<U
(dbal<U
~
~
~
CEF.
CEF.
CEF.
Ie)
no
illlOl,hJ
no
illlOl,hJ
no
illlOl,hJ
IdJ
IdJ
IdJ
~8esl.a
~8esl.a
~8esl.a
~mmJCi'itaaollUdeal~mmorlCa:1eradoO!POildaClmd!
~mmJCi'itaaollUdeal~mmorlCa:1eradoO!POildaClmd!
~mmJCi'itaaollUdeal~mmorlCa:1eradoO!POildaClmd!
e
tie
vir
a
e
tie
vir
a
e
tie
vir
a
aquislo;;'>o,aKen*'OOd
aquislo;;'>o,aKen*'OOd
aquislo;;'>o,aKen*'OOd
0
PrOOJIO
II'PNoY,30doPIOdu:oS!'9L;OOOOSlenmSCleSlag,ranlla
0
PrOOJIO
II'PNoY,30doPIOdu:oS!'9L;OOOOSlenmSCleSlag,ranlla
0
PrOOJIO
II'PNoY,30doPIOdu:oS!'9L;OOOOSlenmSCleSlag,ranlla
B 0
P'OOJ:O
B 0
P'OOJ:O
B 0
P'OOJ:O
DU
DU
DU
da
EI.f8fl.loo~l",o1JI~!li,end,jJIldJor()(lult>l
da
EI.f8fl.loo~l",o1JI~!li,end,jJIldJor()(lult>l
da
EI.f8fl.loo~l",o1JI~!li,end,jJIldJor()(lult>l
'-'1){n~_~"1
'-'1){n~_~"1
'-'1){n~_~"1
1P,'er~
1P,'er~
1P,'er~
nerhnlilre:l~tlli1J~peidl!l\'l'lrli?Olll~pIO;OC<lOOS
nerhnlilre:l~tlli1J~peidl!l\'l'lrli?Olll~pIO;OC<lOOS
nerhnlilre:l~tlli1J~peidl!l\'l'lrli?Olll~pIO;OC<lOOS
corb:lt
noFIOllIJloe,nt(Ol!JeQ(l'3llClilCtta'~IllOlI,Ir.a,,~
corb:lt
noFIOllIJloe,nt(Ol!JeQ(l'3llClilCtta'~IllOlI,Ir.a,,~
corb:lt
noFIOllIJloe,nt(Ol!JeQ(l'3llClilCtta'~IllOlI,Ir.a,,~
Se
Se
Se
.wrlJ!,~!'lI!5el~l1;lSdi'tli!l.ilSduS<lPloCrbSllIlp.1lsOtll.lo
.wrlJ!,~!'lI!5el~l1;lSdi'tli!l.ilSduS<lPloCrbSllIlp.1lsOtll.lo
.wrlJ!,~!'lI!5el~l1;lSdi'tli!l.ilSduS<lPloCrbSllIlp.1lsOtll.lo
lolllligim'rre<e>e:1doo""EI/I[liIliCbpnxIJlol.~~CS
lolllligim'rre<e>e:1doo""EI/I[liIliCbpnxIJlol.~~CS
lolllligim'rre<e>e:1doo""EI/I[liIliCbpnxIJlol.~~CS
SfJfY~w!Jlf.l"'1aE!SL1o-:lnsu~~"",",it<lOCelp!clJt~lladoo
SfJfY~w!Jlf.l"'1aE!SL1o-:lnsu~~"",",it<lOCelp!clJt~lladoo
SfJfY~w!Jlf.l"'1aE!SL1o-:lnsu~~"",",it<lOCelp!clJt~lladoo
o~trxmoswsk!I~~~~~
o~trxmoswsk!I~~~~~
o~trxmoswsk!I~~~~~
1''9a.>aiilj:ld\Ie,sAle'ac.ssO.stOPllICilIolOIoenodeIC
1''9a.>aiilj:ld\Ie,sAle'ac.ssO.stOPllICilIolOIoenodeIC
1''9a.>aiilj:ld\Ie,sAle'ac.ssO.stOPllICilIolOIoenodeIC
.lglJ1lO
a'elenle~Wf-Odo:I,liIirooo1i<:OlOSol(&I/llJPO~
.lglJ1lO
a'elenle~Wf-Odo:I,liIirooo1i<:OlOSol(&I/llJPO~
.lglJ1lO
a'elenle~Wf-Odo:I,liIirooo1i<:OlOSol(&I/llJPO~
'ncee-eI':y:oc:r:::stfI\d)OdQre'"...JII.;aoIlO.im,*,diIQ:lB·t~t
'ncee-eI':y:oc:r:::stfI\d)OdQre'"...JII.;aoIlO.im,*,diIQ:lB·t~t
'ncee-eI':y:oc:r:::stfI\d)OdQre'"...JII.;aoIlO.im,*,diIQ:lB·t~t
stol~~SObl~S:leIert...'1tllDr:Jllr~~eSlWtlemd'sponl_
stol~~SObl~S:leIert...'1tllDr:Jllr~~eSlWtlemd'sponl_
stol~~SObl~S:leIert...'1tllDr:Jllr~~eSlWtlemd'sponl_
·~pa,.sw~eo~Jde\li!faman.loOllCl!f:lerlNbr.Ioones:e
·~pa,.sw~eo~Jde\li!faman.loOllCl!f:lerlNbr.Ioones:e
·~pa,.sw~eo~Jde\li!faman.loOllCl!f:lerlNbr.Ioones:e
caiS(lCfo..maCiU1rar.-.bl~ma
caiS(lCfo..maCiU1rar.-.bl~ma
caiS(lCfo..maCiU1rar.-.bl~ma
c-o"'~-NOPil'a'epill~O!ep;lJaGoais(l!.-c;~~t'l~:IaI
c-o"'~-NOPil'a'epill~O!ep;lJaGoais(l!.-c;~~t'l~:IaI
c-o"'~-NOPil'a'epill~O!ep;lJaGoais(l!.-c;~~t'l~:IaI
~SfI~:epebtJIdL'aIb
~SfI~:epebtJIdL'aIb
~SfI~:epebtJIdL'aIb
C~(lilld.\1ni;HulJll
C~(lilld.\1ni;HulJll
C~(lilld.\1ni;HulJll
(.'JI.</lenl;!'JlsmPrOlU!lelaba:tC'l\le~ou
(.'JI.</lenl;!'JlsmPrOlU!lelaba:tC'l\le~ou
(.'JI.</lenl;!'JlsmPrOlU!lelaba:tC'l\le~ou
{lIldlros~oP,cdLelcaMCOS\lCI~~OO
{lIldlros~oP,cdLelcaMCOS\lCI~~OO
{lIldlros~oP,cdLelcaMCOS\lCI~~OO
{()lI<rm·op.Ol,1dgta:lUCO!SPI:'~ao:ltl1!S.
{()lI<rm·op.Ol,1dgta:lUCO!SPI:'~ao:ltl1!S.
{()lI<rm·op.Ol,1dgta:lUCO!SPI:'~ao:ltl1!S.
mel
mel
mel
__
~"qIlloe:l~·gllhellilw:lvande~ileliNi
__
~"qIlloe:l~·gllhellilw:lvande~ileliNi
__
~"qIlloe:l~·gllhellilw:lvande~ileliNi
n.»;l'lOOldo~,.-qath(f
n.»;l'lOOldo~,.-qath(f
n.»;l'lOOldo~,.-qath(f
I'n:Jd.*:,qlet!l\lft'S;:ti&'l:l
I'n:Jd.*:,qlet!l\lft'S;:ti&'l:l
I'n:Jd.*:,qlet!l\lft'S;:ti&'l:l
o«o"'~g~l«lel'lroe!
o«o"'~g~l«lel'lroe!
o«o"'~g~l«lel'lroe!
W1Jll9'n;JffiMlhtill>r.J.lho1.e1relye-a:ltlJocl?l"ullen
W1Jll9'n;JffiMlhtill>r.J.lho1.e1relye-a:ltlJocl?l"ullen
W1Jll9'n;JffiMlhtill>r.J.lho1.e1relye-a:ltlJocl?l"ullen
aro='",..
~~""';lqel
aro='",..
~~""';lqel
aro='",..
~~""';lqel
1'CD/l2fl15"'dl!Gw-J~Ij1"!lI'!"~lllffdh<l
1'CD/l2fl15"'dl!Gw-J~Ij1"!lI'!"~lllffdh<l
1'CD/l2fl15"'dl!Gw-J~Ij1"!lI'!"~lllffdh<l
?"ulbd.
?"ulbd.
?"ulbd.
01""~ee<doo~~he'*",~:tJi'lIlZtll1l1iIe<1
01""~ee<doo~~he'*",~:tJi'lIlZtll1l1iIe<1
01""~ee<doo~~he'*",~:tJi'lIlZtll1l1iIe<1
:t.~lIien'!ldolrdelJlYb1l1otJ(ll'l"<eJld~'Yl
:t.~lIien'!ldolrdelJlYb1l1otJ(ll'l"<eJld~'Yl
:t.~lIien'!ldolrdelJlYb1l1otJ(ll'l"<eJld~'Yl
"Lm",,~OO'l'SIn'eodo"ahl'OPol
"Lm",,~OO'l'SIn'eodo"ahl'OPol
"Lm",,~OO'l'SIn'eodo"ahl'OPol
NOTECOT,.:1I1o
~
en!ll:liJ;:ll
NOTECOT,.:1I1o
~
en!ll:liJ;:ll
NOTECOT,.:1I1o
~
en!ll:liJ;:ll
~;1;1o
~;1;1o
~;1;1o
~\'nel"~se-ieell(Jl~clomo:Jclodol'rodJi~
~\'nel"~se-ieell(Jl~clomo:Jclodol'rodJi~
~\'nel"~se-ieell(Jl~clomo:Jclodol'rodJi~
informa~J
r:io
PIldt!5CltI:f/leCI{l/lOU
informa~J
r:io
PIldt!5CltI:f/leCI{l/lOU
informa~J
r:io
PIldt!5CltI:f/leCI{l/lOU
Corpor<lllt.r.
Corpor<lllt.r.
Corpor<lllt.r.
to'
manu';s;luraoo
to'
manu';s;luraoo
to'
manu';s;luraoo
loc
..
nell<101~il5IIlGIil:S
lIti$lluul"'JC;Ia~lir.ll;oa;~
loc
..
nell<101~il5IIlGIil:S
lIti$lluul"'JC;Ia~lir.ll;oa;~
loc
..
nell<101~il5IIlGIil:S
lIti$lluul"'JC;Ia~lir.ll;oa;~
p,rJ
p,rJ
p,rJ
~30
s~
,ot-ertls~lI:lla
~30
s~
,ot-ertls~lI:lla
~30
s~
,ot-ertls~lI:lla
0
P,oD.!lo
Iur
Il.-.aj~
IUfIfIoli$~UI(!fIflJ
0
P,oD.!lo
Iur
Il.-.aj~
IUfIfIoli$~UI(!fIflJ
0
P,oD.!lo
Iur
Il.-.aj~
IUfIfIoli$~UI(!fIflJ
~lcsrarmftn:tlirmasrewnOe:sllt'·6cas
~lcsrarmftn:tlirmasrewnOe:sllt'·6cas
~lcsrarmftn:tlirmasrewnOe:sllt'·6cas
r.1.ttnl:".ll1lsnoMu.ualllUl!~~oProo.r.o.
r.1.ttnl:".ll1lsnoMu.ualllUl!~~oProo.r.o.
r.1.ttnl:".ll1lsnoMu.ualllUl!~~oProo.r.o.
"'o';m:.-as~lca:::Opot~DeMClOJertJ<lIii:t
"'o';m:.-as~lca:::Opot~DeMClOJertJ<lIii:t
"'o';m:.-as~lca:::Opot~DeMClOJertJ<lIii:t
n;o~·iu"..a5pdo!W01ltpar.lJ~OSst"''Ol;Iloe
n;o~·iu"..a5pdo!W01ltpar.lJ~OSst"''Ol;Iloe
n;o~·iu"..a5pdo!W01ltpar.lJ~OSst"''Ol;Iloe
",-
",-
",-
l:lOOiIlil:a(OeS.lllS'.ala;:aowNl'bl~JIfW(eo.
l:lOOiIlil:a(OeS.lllS'.ala;:aowNl'bl~JIfW(eo.
l:lOOiIlil:a(OeS.lllS'.ala;:aowNl'bl~JIfW(eo.
na~~()JD.:J~l:Iepr(:JlSSiODI'm.e-e<OeS
na~~()JD.:J~l:Iepr(:JlSSiODI'm.e-e<OeS
na~~()JD.:J~l:Iepr(:JlSSiODI'm.e-e<OeS
[)m;;iC~loJdis:
[)m;;iC~loJdis:
[)m;;iC~loJdis:
...
~t!e1e
...
~t!e1e
...
~t!e1e
~Sfl"eU"
<DOl
M~~t"'d
<DOl
M~~t"'d
<DOl
M~~t"'d
de
de
de
...
a;1
...
a;1
...
a;1
1dalIJ~l3n
1dalIJ~l3n
1dalIJ~l3n
r.t.'d1l
we.
r.t.'d1l
we.
r.t.'d1l
we.
orde 0
1'1L(1JIU
orde 0
1'1L(1JIU
orde 0
1'1L(1JIU
seOProd~IOI"li1
seOProd~IOI"li1
seOProd~IOI"li1
0
~,rcilO
(!O
recusar
a
0
~,rcilO
(!O
recusar
a
0
~,rcilO
(!O
recusar
a
O~
paj'00e~
ml:lOllaiS
O~
paj'00e~
ml:lOllaiS
O~
paj'00e~
ml:lOllaiS
Illllo,llSd.l
Illllo,llSd.l
Illllo,llSd.l
"kio:;er~;uilc
"kio:;er~;uilc
"kio:;er~;uilc
ollCeesll:ll
subne!iOO
ollCeesll:ll
subne!iOO
ollCeesll:ll
subne!iOO
Pro~'I-'«lS
llat!'Or"
Pro~'I-'«lS
llat!'Or"
Pro~'I-'«lS
llat!'Or"
e
e
e
klo
klo
klo
~Sfl"eU"
~Sfl"eU"
....
:lt'Igtlifltillllll~fIlol
....
:lt'Igtlifltillllll~fIlol
....
:lt'Igtlifltillllll~fIlol
tl'Pf
~&nO!ltlf,elliD
tl'Pf
~&nO!ltlf,elliD
tl'Pf
~&nO!ltlf,elliD
...
r.
...
r.
...
r.
..
·.ll1"f.(IISJ!loo<ebjl.lQrl.ooo
..
·.ll1"f.(IISJ!loo<ebjl.lQrl.ooo
..
·.ll1"f.(IISJ!loo<ebjl.lQrl.ooo
td
OOI·3doel
td
OOI·3doel
td
OOI·3doel
00
H.'I'!IQ.OOI
00
H.'I'!IQ.OOI
00
H.'I'!IQ.OOI
l!'Serva
l!'Serva
l!'Serva
cor.1crroe
iodo.!
cor.1crroe
iodo.!
cor.1crroe
iodo.!
ul<Jnl,mtill(llttr~rl~(hl
ul<Jnl,mtill(llttr~rl~(hl
ul<Jnl,mtill(llttr~rl~(hl
\ld'''~1d
\ld'''~1d
\ld'''~1d
lDdIlO&lo.'\boo~~
lDdIlO&lo.'\boo~~
lDdIlO&lo.'\boo~~
(lnfltiehers:el~n!Jffi
W){K
iiin
rEkerling
uilll:
(lnfltiehers:el~n!Jffi
W){K
(lnfltiehers:el~n!Jffi
(C)
(C)
(C)
(al
(al
(al
j.)sttOOe.e1'tMhrrf~~"o<,Inl'el~ol9l
j.)sttOOe.e1'tMhrrf~~"o<,Inl'el~ol9l
j.)sttOOe.e1'tMhrrf~~"o<,Inl'el~ol9l
(f)
(f)
(f)
l.GJ1\fI1'1:n&!Ml<f·-a1c3se-eIUR1'I'!I"S!J;I'ed~"
l.GJ1\fI1'1:n&!Ml<f·-a1c3se-eIUR1'I'!I"S!J;I'ed~"
l.GJ1\fI1'1:n&!Ml<f·-a1c3se-eIUR1'I'!I"S!J;I'ed~"
llelrGr.t'.e
llelrGr.t'.e
llelrGr.t'.e
.hr'i?t::lC_ldttro~he:illl!fl
.hr'i?t::lC_ldttro~he:illl!fl
.hr'i?t::lC_ldttro~he:illl!fl
()rdef0!~~~ev;)-:r_l.'811"l'l'lffl;l\llj;;~ifl$
()rdef0!~~~ev;)-:r_l.'811"l'l'lffl;l\llj;;~ifl$
()rdef0!~~~ev;)-:r_l.'811"l'l'lffl;l\llj;;~ifl$
·OO'otl\rf1Sl1!:'olvtJ'_r-r..Ikl,1IC";l1l'1I1lJ1o;;Ql:5'1l1"k:1e~
·OO'otl\rf1Sl1!:'olvtJ'_r-r..Ikl,1IC";l1l'1I1lJ1o;;Ql:5'1l1"k:1e~
·OO'otl\rf1Sl1!:'olvtJ'_r-r..Ikl,1IC";l1l'1I1lJ1o;;Ql:5'1l1"k:1e~
1Se~11C'leI'1da!"~L~_I><tPlaUl~~u~
1Se~11C'leI'1da!"~L~_I><tPlaUl~~u~
1Se~11C'leI'1da!"~L~_I><tPlaUl~~u~
JrolI"alC~~~Il(I'"",enli5lrereEri~_"i\J1
JrolI"alC~~~Il(I'"",enli5lrereEri~_"i\J1
JrolI"alC~~~Il(I'"",enli5lrereEri~_"i\J1
OPGElET
OPGElET
OPGElET
!Je1ekaa1ena?1l.NollW""'oeIer;lunemr.iCl.w
!Je1ekaa1ena?1l.NollW""'oeIer;lunemr.iCl.w
!Je1ekaa1ena?1l.NollW""'oeIer;lunemr.iCl.w
aiJa'.n:mr
aiJa'.n:mr
aiJa'.n:mr
Olt:e<.c'larllgulQ
Olt:e<.c'larllgulQ
Olt:e<.c'larllgulQ
{df
{df
{df
(f)
(f)
(f)
111
111
111
19)
19)
19)
fSLlp-ao'Iliir~oIele61i
fSLlp-ao'Iliir~oIele61i
fSLlp-ao'Iliir~oIele61i
l~leIltro~rocu;c
l~leIltro~rocu;c
l~leIltro~rocu;c
lalCorro
lalCorro
lalCorro
QIl'~l\aI1ente
QIl'~l\aI1ente
QIl'~l\aI1ente
."Im
."Im
."Im
,_slore,I,,"
,_slore,I,,"
,_slore,I,,"
ATENCAO
ATENCAO
ATENCAO
EsreCa1tlelJ1lrecibo(OlJ~l1ur,;is,ID~io$pala
EsreCa1tlelJ1lrecibo(OlJ~l1ur,;is,ID~io$pala
EsreCa1tlelJ1lrecibo(OlJ~l1ur,;is,ID~io$pala
mAlJf"lnp:imOO'l'DlmCISIJiI!!roubooull,,-,;);lo
mAlJf"lnp:imOO'l'DlmCISIJiI!!roubooull,,-,;);lo
mAlJf"lnp:imOO'l'DlmCISIJiI!!roubooull,,-,;);lo
""""'.
""""'.
""""'.
W){K
schade\ltrOOl7llal<1aa~I'lelProdu(tdo!J'O'lal;1ltwmhela
schade\ltrOOl7llal<1aa~I'lelProdu(tdo!J'O'lal;1ltwmhela
schade\ltrOOl7llal<1aa~I'lelProdu(tdo!J'O'lal;1ltwmhela
Cf'l(je';a1.
''''jlig~.~rfU:cein~aHJteol~lifpa<ki~.
Cf'l(je';a1.
''''jlig~.~rfU:cein~aHJteol~lifpa<ki~.
Cf'l(je';a1.
''''jlig~.~rfU:cein~aHJteol~lifpa<ki~.
~Getrlli~otgebruill1Q"lonaar.~VI'Ioo~ken
~Getrlli~otgebruill1Q"lonaar.~VI'Ioo~ken
~Getrlli~otgebruill1Q"lonaar.~VI'Ioo~ken
st~~er007iJ!>tOl.],ll1el"ro(UltbJrl!<arlll
st~~er007iJ!>tOl.],ll1el"ro(UltbJrl!<arlll
st~~er007iJ!>tOl.],ll1el"ro(UltbJrl!<arlll
ordIrll;~nQIl'fl'kr.tlits<rrw~I.1lJ.~tlevw'll
ordIrll;~nQIl'fl'kr.tlits<rrw~I.1lJ.~tlevw'll
ordIrll;~nQIl'fl'kr.tlits<rrw~I.1lJ.~tlevw'll
UI~~\IIlIf.iIiIiil.[IWe<1"1Jl1l1~~
UI~~\IIlIf.iIiIiil.[IWe<1"1Jl1l1~~
UI~~\IIlIf.iIiIiil.[IWe<1"1Jl1l1~~
~l,;eom'ole!lereWlOO<ole!lIiI~rMoori'3.i.
~l,;eom'ole!lereWlOO<ole!lIiI~rMoori'3.i.
~l,;eom'ole!lereWlOO<ole!lIiI~rMoori'3.i.
'lI'.D1M'I
KHrr.axl~II!IIl:Dlllrllll!
'lI'.D1M'I
KHrr.axl~II!IIl:Dlllrllll!
'lI'.D1M'I
KHrr.axl~II!IIl:Dlllrllll!
WJr.0Ull~~e1'ld1id1!iliWIpl,*,,-bin:len,
WJr.0Ull~~e1'ld1id1!iliWIpl,*,,-bin:len,
WJr.0Ull~~e1'ld1id1!iliWIpl,*,,-bin:len,
a..c~.•m.~.lDJ1Iiddisciole"'allIel
a..c~.•m.~.lDJ1Iiddisciole"'allIel
a..c~.•m.~.lDJ1Iiddisciole"'allIel
~xr~C<lIn&C1fWil?tol1-1c1lE.i!,rndit~;te
~xr~C<lIn&C1fWil?tol1-1c1lE.i!,rndit~;te
~xr~C<lIn&C1fWil?tol1-1c1lE.i!,rndit~;te
oorr.rat.
oorr.rat.
oorr.rat.
Rl1)l'uiksi;Cledmrol:n:UJIe8I~r."I:I'4lg·~
Rl1)l'uiksi;Cledmrol:n:UJIe8I~r."I:I'4lg·~
Rl1)l'uiksi;Cledmrol:n:UJIe8I~r."I:I'4lg·~
no:li;<15len~1l1ge'ollll5·iJbl~liijrD"1lail~:tlUil.
no:li;<15len~1l1ge'ollll5·iJbl~liijrD"1lail~:tlUil.
no:li;<15len~1l1ge'ollll5·iJbl~liijrD"1lail~:tlUil.
1'IO~"P'4-I~nie1be:ler"I:llI\\tf"<r='::a-t
1'IO~"P'4-I~nie1be:ler"I:llI\\tf"<r='::a-t
1'IO~"P'4-I~nie1be:ler"I:llI\\tf"<r='::a-t
~t1t'I~flfMU':lJ:waaCl!fl.WOij(Tir1lell.
~t1t'I~flfMU':lJ:waaCl!fl.WOij(Tir1lell.
~t1t'I~flfMU':lJ:waaCl!fl.WOij(Tir1lell.
~-t'l'Ji)lOT-fb.)l!!Jl.I¥~lliIe·~en.opI<.1&IJare
~-t'l'Ji)lOT-fb.)l!!Jl.I¥~lliIe·~en.opI<.1&IJare
~-t'l'Ji)lOT-fb.)l!!Jl.I¥~lliIe·~en.opI<.1&IJare
!lO~Jenell"~'"tIl.
!lO~Jenell"~'"tIl.
!lO~Jenell"~'"tIl.
.-mon"_;<1~~!JI'lo~!j1J
.-mon"_;<1~~!JI'lo~!j1J
.-mon"_;<1~~!JI'lo~!j1J
..
tl~!J:~a<Il.~tr;')(l';ll~<pl«1l:l'1lriJ)e
..
tl~!J:~a<Il.~tr;')(l';ll~<pl«1l:l'1lriJ)e
..
tl~!J:~a<Il.~tr;')(l';ll~<pl«1l:l'1lriJ)e
fnrJ
~n~
Ie
bestellen. inhet
fnrJ
~n~
Ie
bestellen. inhet
fnrJ
~n~
Ie
bestellen. inhet
1lda;"~P,cduklcaus.Jocs.U'J1too,;o.mel~~Ill~.Iol.
1lda;"~P,cduklcaus.Jocs.U'J1too,;o.mel~~Ill~.Iol.
1lda;"~P,cduklcaus.Jocs.U'J1too,;o.mel~~Ill~.Iol.
tJCh'r
..
l.ls.tJern[lles.oeT£:Ir.,'IiCI1II!a:;:20ila~lJil.
tJCh'r
..
l.ls.tJern[lles.oeT£:Ir.,'IiCI1II!a:;:20ila~lJil.
tJCh'r
..
l.ls.tJern[lles.oeT£:Ir.,'IiCI1II!a:;:20ila~lJil.
~ol\apTl
uo:rccta
~II
~ol\apTl
uo:rccta
~II
~ol\apTl
uo:rccta
~II
u!Ken"OOd.
u!Ken"OOd.
u!Ken"OOd.
,,~o·lllantelO
(\(lJl~lc<!dos
,,~o·lllantelO
(\(lJl~lc<!dos
,,~o·lllantelO
(\(lJl~lc<!dos
mle~l:l.JtleICf1Cl<l5lJPllrioresaespl'cltrildilparaudil
mle~l:l.JtleICf1Cl<l5lJPllrioresaespl'cltrildilparaudil
mle~l:l.JtleICf1Cl<l5lJPllrioresaespl'cltrildilparaudil
~:Odelo,
~S5iln
oom:J
darius
~:Odelo,
~S5iln
oom:J
darius
~:Odelo,
~S5iln
oom:J
darius
erndl~cos,
1,1~ll1iIIJle:Ir.as,Q1!Se:t!Saudio<llJ
erndl~cos,
1,1~ll1iIIJle:Ir.as,Q1!Se:t!Saudio<llJ
erndl~cos,
1,1~ll1iIIJle:Ir.as,Q1!Se:t!Saudio<llJ
co~c(osouw!rosben:;qveI1dOW"lst.llIiIfnup<tplio
co~c(osouw!rosben:;qveI1dOW"lst.llIiIfnup<tplio
co~c(osouw!rosben:;qveI1dOW"lst.llIiIfnup<tplio
Prm..n
Prm..n
Prm..n
[IeI',<lS5tJI(it;r;~~~st~rl'gul<J'~[Uja5Ubsli1U~1a;
[IeI',<lS5tJI(it;r;~~~st~rl'gul<J'~[Uja5Ubsli1U~1a;
[IeI',<lS5tJI(it;r;~~~st~rl'gul<J'~[Uja5Ubsli1U~1a;
ll'l'1~tElKII5IllV~IIOf!n.olincllJirdJlmO'SnJulimil'lClrla)
ll'l'1~tElKII5IllV~IIOf!n.olincllJirdJlmO'SnJulimil'lClrla)
ll'l'1~tElKII5IllV~IIOf!n.olincllJirdJlmO'SnJulimil'lClrla)
W""I)J!yifY~,"'lllus.COlleiilS,Dilhdlisecas,pilhds
W""I)J!yifY~,"'lllus.COlleiilS,Dilhdlisecas,pilhds
W""I)J!yifY~,"'lllus.COlleiilS,Dilhdlisecas,pilhds
1~[alll!\)dWlse""'ulas.
1~[alll!\)dWlse""'ulas.
1~[alll!\)dWlse""'ulas.
oProd"loooq-"lI.I~'1nwk:dJ5m~Umtr(l·;lieSo'le
oProd"loooq-"lI.I~'1nwk:dJ5m~Umtr(l·;lieSo'le
oProd"loooq-"lI.I~'1nwk:dJ5m~Umtr(l·;lieSo'le
Iffi
....
m~m~irUls.lT"«1i!i:.3cbsOJde5l'lP'ados
Iffi
....
m~m~irUls.lT"«1i!i:.3cbsOJde5l'lP'ados
Iffi
....
m~m~irUls.lT"«1i!i:.3cbsOJde5l'lP'ados
.1JI<'1;lIeI
.1JI<'1;lIeI
.1JI<'1;lIeI
100
ilClIll2 rtltrido. 0
100
ilClIll2 rtltrido. 0
100
ilClIll2 rtltrido. 0
b1eSdlnl\llsllolll\.tt1tremllf
b1eSdlnl\llsllolll\.tt1tremllf
b1eSdlnl\llsllolll\.tt1tremllf
allda,"osIWOl
~nrtosde.lIIn~lo
allda,"osIWOl
~nrtosde.lIIn~lo
allda,"osIWOl
~nrtosde.lIIn~lo
1JlI1
.....
1JlI1
.....
1JlI1
.....
voer~n:
iiin
rEkerling
uilll:
voer~n:
iiin
rEkerling
uilll:
voer~n:
~ee/I,
~ee/I,
~ee/I,
d
.....
;1
d
.....
;1
d
.....
;1
~..~
~..~
~..~
QlIa:QI.tf
outra
causabl~otor,IOIu
QlIa:QI.tf
outra
causabl~otor,IOIu
QlIa:QI.tf
outra
causabl~otor,IOIu
~nI
~i~oceni~>~
~nI
~i~oceni~>~
~nI
~i~oceni~>~
G<IU.<.lIJJS
>'Or
qJII'1Jllf
G<IU.<.lIJJS
>'Or
qJII'1Jllf
G<IU.<.lIJJS
>'Or
qJII'1Jllf
yide~,rJiscn~
yide~,rJiscn~
yide~,rJiscn~
f';B:SQ;llp:
ImhJ~
f';B:SQ;llp:
ImhJ~
f';B:SQ;llp:
ImhJ~
P,CdtI105~.I_dIOJ
P,CdtI105~.I_dIOJ
P,CdtI105~.I_dIOJ
rminI9J"
rminI9J"
rminI9J"
tli*lpllch'ls.
tli*lpllch'ls.
tli*lpllch'ls.
SWS~ltJilll)
SWS~ltJilll)
SWS~ltJilll)
....
....
....
110
110
110
UI!
UI!
UI!
dle'SlaI
dle'SlaI
dle'SlaI
rat.lo
rat.lo
rat.lo
ri:lol
ri:lol
ri:lol
mMI
mMI
mMI
rrollllv
rrollllv
rrollllv
ow
USefrJl".emooodProOOcts
ow
USefrJl".emooodProOOcts
ow
USefrJl".emooodProOOcts
rt\ri}'OlJfOIhavi<J;lcMs'l1Ih~j(~oodp'cdJ[;l(the"rodw.·)
rt\ri}'OlJfOIhavi<J;lcMs'l1Ih~j(~oodp'cdJ[;l(the"rodw.·)
rt\ri}'OlJfOIhavi<J;lcMs'l1Ih~j(~oodp'cdJ[;l(the"rodw.·)
"l\blcimlsillltocliV!llln.l1IIrl'l;llllpfl"iIlrJcoodil"oros.~
"l\blcimlsillltocliV!llln.l1IIrl'l;llllpfl"iIlrJcoodil"oros.~
"l\blcimlsillltocliV!llln.l1IIrl'l;llllpfl"iIlrJcoodil"oros.~
repatOOfJlrfPlaced~eeotcr.J'Q!li~~,.ith1toelfTl"1SrJ
repatOOfJlrfPlaced~eeotcr.J'Q!li~~,.ith1toelfTl"1SrJ
repatOOfJlrfPlaced~eeotcr.J'Q!li~~,.ith1toelfTl"1SrJ
t~ISW;marl)'Con1I'l"lfewnll""lfl;~rOCocl_plll1\;l5Blln
t~ISW;marl)'Con1I'l"lfewnll""lfl;~rOCocl_plll1\;l5Blln
t~ISW;marl)'Con1I'l"lfewnll""lfl;~rOCocl_plll1\;l5Blln
anrHC
M~dlll
Sb!ealld
)lWeqe~2fU
a
anrHC
M~dlll
Sb!ealld
anrHC
M~dlll
Sb!ealld
IheP,OOu::IIJl~orr;c",}jKen"MXldI~pII'\eI.Au:."CnRClOealtr.
IheP,OOu::IIJl~orr;c",}jKen"MXldI~pII'\eI.Au:."CnRClOealtr.
IheP,OOu::IIJl~orr;c",}jKen"MXldI~pII'\eI.Au:."CnRClOealtr.
AuI.'UlimiSerwittCln..
AuI.'UlimiSerwittCln..
AuI.'UlimiSerwittCln..
rcgelt.er
,.;l:1I'leI
....
.r{~Z~
rcgelt.er
,.;l:1I'leI
....
.r{~Z~
rcgelt.er
,.;l:1I'leI
....
.r{~Z~
Oll)l.ltnm
II
~
.-zC'Urcilasalou:~idelt.e£EC.lIlt
Oll)l.ltnm
II
~
.-zC'Urcilasalou:~idelt.e£EC.lIlt
Oll)l.ltnm
II
~
.-zC'Urcilasalou:~idelt.e£EC.lIlt
tJkl!1101I1e
r$i'er
t,:n
tJkl!1101I1e
r$i'er
t,:n
tJkl!1101I1e
r$i'er
t,:n
11"'f'!OlJ.iClw.D(!IJ~iIIt!"-l'UC.n:yw.mr..rcknowThe
11"'f'!OlJ.iClw.D(!IJ~iIIt!"-l'UC.n:yw.mr..rcknowThe
11"'f'!OlJ.iClw.D(!IJ~iIIt!"-l'UC.n:yw.mr..rcknowThe
1c:a:lcnOl~Ul'Glf.st~rif!dDeiiIl!fIn:r-eH(.pIelSeUIfUCI
1c:a:lcnOl~Ul'Glf.st~rif!dDeiiIl!fIn:r-eH(.pIelSeUIfUCI
1c:a:lcnOl~Ul'Glf.st~rif!dDeiiIl!fIn:r-eH(.pIelSeUIfUCI
ll\efl)
f)tri..-~Ior
,,*,,rmTen
ll\efl)
f)tri..-~Ior
,,*,,rmTen
ll\efl)
f)tri..-~Ior
,,*,,rmTen
IlENWOOD
IlENWOOD
IlENWOOD
lC.en_od
Ho
.....
lC.en_od
Ho
.....
lC.en_od
Ho
.....
_J1."""wood-el_i<:s..",,_u"
_J1."""wood-el_i<:s..",,_u"
_J1."""wood-el_i<:s..",,_u"
Pl2'lCek!l!ll
t"
~Villfll':l:'/Cild;r;
Pl2'lCek!l!ll
t"
~Villfll':l:'/Cild;r;
Pl2'lCek!l!ll
t"
~Villfll':l:'/Cild;r;
~-
~-
~-
T/'tl'r'l;:rb;l il.pneedbrlJ:le.,..
T/'tl'r'l;:rb;l il.pneedbrlJ:le.,..
T/'tl'r'l;:rb;l il.pneedbrlJ:le.,..
P:.ttl'o:5lI:ToI¥l1I!""al~~T'!P'J~
P:.ttl'o:5lI:ToI¥l1I!""al~~T'!P'J~
P:.ttl'o:5lI:ToI¥l1I!""al~~T'!P'J~
IltI"I;l1blmlfTdllla:so11ll!.,;rrlmal>llp.oI;lllhlW¥y--lIlbll
IltI"I;l1blmlfTdllla:so11ll!.,;rrlmal>llp.oI;lllhlW¥y--lIlbll
IltI"I;l1blmlfTdllla:so11ll!.,;rrlmal>llp.oI;lllhlW¥y--lIlbll
I31"dtU~6!C::c.'1i11~
I31"dtU~6!C::c.'1i11~
I31"dtU~6!C::c.'1i11~
,j.C<lIlllbo'rq:g~l'ffi:unic;;Uy
,j.C<lIlllbo'rq:g~l'ffi:unic;;Uy
,j.C<lIlllbo'rq:g~l'ffi:unic;;Uy
~llSIal
.....
~llSIal
.....
~llSIal
.....
r~obtlea:t_a"t');l"nrr::tn:lullld"',~~~{5l!fYees
r~obtlea:t_a"t');l"nrr::tn:lullld"',~~~{5l!fYees
r~obtlea:t_a"t');l"nrr::tn:lullld"',~~~{5l!fYees
.aM
'bCd'ri!C:d
.aM
'bCd'ri!C:d
.aM
'bCd'ri!C:d
Ct:J'.(!ihtIlS
Ct:J'.(!ihtIlS
Ct:J'.(!ihtIlS
AA"tllinlUlll:e<~1I3"11':1jollllt;jbe;;cco:n~ty,.s
AA"tllinlUlll:e<~1I3"11':1jollllt;jbe;;cco:n~ty,.s
AA"tllinlUlll:e<~1I3"11':1jollllt;jbe;;cco:n~ty,.s
'A'iIIl
.....
·C<Ja
...
'A'iIIl
.....
·C<Ja
...
'A'iIIl
.....
·C<Ja
...
[I)
rcu-fun'_llXIiId-~ess
[I)
rcu-fun'_llXIiId-~ess
[I)
rcu-fun'_llXIiId-~ess
'Dll",~orO'rtJdoc.men:S/lOIIo'.natne~iJllPd\iI:ie
'Dll",~orO'rtJdoc.men:S/lOIIo'.natne~iJllPd\iI:ie
'Dll",~orO'rtJdoc.men:S/lOIIo'.natne~iJllPd\iI:ie
_gma"etailer~II!lJe(lIfl[w~.
_gma"etailer~II!lJe(lIfl[w~.
_gma"etailer~II!lJe(lIfl[w~.
[t)
Ihr·"III'3:1,iIldarkte!'.oIt1~Iw.\erkcm,..lOO1The
[t)
Ihr·"III'3:1,iIldarkte!'.oIt1~Iw.\erkcm,..lOO1The
[t)
Ihr·"III'3:1,iIldarkte!'.oIt1~Iw.\erkcm,..lOO1The
P1C:1-Jt:C1I3SCt/ldla.I:&.l
P1C:1-Jt:C1I3SCt/ldla.I:&.l
P1C:1-Jt:C1I3SCt/ldla.I:&.l
Osterreich
Osterreich
Osterreich
S€/I~I::J.Ilde.
S€/I~I::J.Ilde.
S€/I~I::J.Ilde.
\lIlr
clirll:ell
1h1ll!l11i1r
\lIlr
clirll:ell
1h1ll!l11i1r
\lIlr
clirll:ell
1h1ll!l11i1r
1
1
1
50
11t
O!!Sts
P10d1j]
50
11t
O!!Sts
P10d1j]
50
11t
O!!Sts
P10d1j]
'-'.nerial·oc!'lV!l'arbe.tUl1Qs'lll1!1'I.ItIf..el5(J1,"'C<OC11
'-'.nerial·oc!'lV!l'arbe.tUl1Qs'lll1!1'I.ItIf..el5(J1,"'C<OC11
'-'.nerial·oc!'lV!l'arbe.tUl1Qs'lll1!1'I.ItIf..el5(J1,"'C<OC11
lJbe<CIlSi"'m.J1lO
In~
lJbe<CIlSi"'m.J1lO
In~
lJbe<CIlSi"'m.J1lO
In~
WIil'HQS
OO~iIl~".
WIil'HQS
OO~iIl~".
WIil'HQS
OO~iIl~".
FilibSllllilsPlowkllneinenlEG-Milgl:edo<JiIiIle.l"'lJIOCnh.Jt'(fl
FilibSllllilsPlowkllneinenlEG-Milgl:edo<JiIiIle.l"'lJIOCnh.Jt'(fl
FilibSllllilsPlowkllneinenlEG-Milgl:edo<JiIiIle.l"'lJIOCnh.Jt'(fl
'OOnenSll!o;r;f'fOIM,llmSchaoo"slllidl1Tldti~118nK(J\'M1Oll·
'OOnenSll!o;r;f'fOIM,llmSchaoo"slllidl1Tldti~118nK(J\'M1Oll·
'OOnenSll!o;r;f'fOIM,llmSchaoo"slllidl1Tldti~118nK(J\'M1Oll·
Ilnpl)rilllJl.oinemiltll\llloieotenFa:hMlljlelocereiIIEldalisier~
Ilnpl)rilllJl.oinemiltll\llloieotenFa:hMlljlelocereiIIEldalisier~
Ilnpl)rilllJl.oinemiltll\llloieotenFa:hMlljlelocereiIIEldalisier~
Scr.i(:e·'Wr
..
)r;inind<:lfG,lIISllMlenm~deITlLiefol>etl€il1,OO
Scr.i(:e·'Wr
..
)r;inind<:lfG,lIISllMlenm~deITlLiefol>etl€il1,OO
Scr.i(:e·'Wr
..
)r;inind<:lfG,lIISllMlenm~deITlLiefol>etl€il1,OO
Roctml,,-wJ<XifreilV'!1l<llllle'(:ilNad1lo(iSdes~aJIOOlu~welceben
Roctml,,-wJ<XifreilV'!1l<llllle'(:ilNad1lo(iSdes~aJIOOlu~welceben
Roctml,,-wJ<XifreilV'!1l<llllle'(:ilNad1lo(iSdes~aJIOOlu~welceben
I
I
I
I'.;lil!'nemal.6el'ha
I'.;lil!'nemal.6el'ha
I'.;lil!'nemal.6el'ha
OrbEG(jekillftellP,cduk!\\€f1doo$iesichOitlf
OrbEG(jekillftellP,cduk!\\€f1doo$iesichOitlf
OrbEG(jekillftellP,cduk!\\€f1doo$iesichOitlf
oJloe"l"'It.~""wllcr,t:r.iQ;mSicd~~Qi"I:all"ha()2fl
oJloe"l"'It.~""wllcr,t:r.iQ;mSicd~~Qi"I:all"ha()2fl
oJloe"l"'It.~""wllcr,t:r.iQ;mSicd~~Qi"I:all"ha()2fl
Wem
UJ,1
F'rod.m
trne1'albdel [G9f<oun
Wem
UJ,1
F'rod.m
trne1'albdel [G9f<oun
Wem
UJ,1
F'rod.m
trne1'albdel [G9f<oun
r\n$ch"htln~ltnste!'ouklli:l:enenF<ldltL\l~mwkSet1mCld*n
r\n$ch"htln~ltnste!'ouklli:l:enenF<ldltL\l~mwkSet1mCld*n
r\n$ch"htln~ltnste!'ouklli:l:enenF<ldltL\l~mwkSet1mCld*n
so",en:lo:"'~ldlMun
so",en:lo:"'~ldlMun
so",en:lo:"'~ldlMun
K1NWOOD
K1NWOOD
K1NWOOD
~I!iO"""""namm
~I!iO"""""namm
~I!iO"""""namm
lWnotmd~~r;udi=GeliI~,re:i;n":t.e~eiren.I.JhJiIb
lWnotmd~~r;udi=GeliI~,re:i;n":t.e~eiren.I.JhJiIb
lWnotmd~~r;udi=GeliI~,re:i;n":t.e~eiren.I.JhJiIb
~laI:lll!:l1~.uflQod<lKaLlle.f(j~~·~
~laI:lll!:l1~.uflQod<lKaLlle.f(j~~·~
~laI:lll!:l1~.uflQod<lKaLlle.f(j~~·~
~Ga·l/Il"~1idlaul\llaleri2l-III1-:VlDtIl!.t_~·~I.
~Ga·l/Il"~1idlaul\llaleri2l-III1-:VlDtIl!.t_~·~I.
~Ga·l/Il"~1idlaul\llaleri2l-III1-:VlDtIl!.t_~·~I.
'NIOtftiIII(!fIU1$ClaSP.fcJI.W/JI.t:asPruW>1I11ll1itl:lK1le'allsane
'NIOtftiIII(!fIU1$ClaSP.fcJI.W/JI.t:asPruW>1I11ll1itl:lK1le'allsane
'NIOtftiIII(!fIU1$ClaSP.fcJI.W/JI.t:asPruW>1I11ll1itl:lK1le'allsane
'llimcna~ICIIl!kIIla:uset'Jnll~1""tl'fmtl<.l:':his;.
'llimcna~ICIIl!kIIla:uset'Jnll~1""tl'fmtl<.l:':his;.
'llimcna~ICIIl!kIIla:uset'Jnll~1""tl'fmtl<.l:':his;.
ol,t!5lIe'I;"'~IUl;l:l'"'CklsblQ.1Ji"_e.nle<e~lenu-d
ol,t!5lIe'I;"'~IUl;l:l'"'CklsblQ.1Ji"_e.nle<e~lenu-d
ol,t!5lIe'I;"'~IUl;l:l'"'CklsblQ.1Ji"_e.nle<e~lenu-d
!h"'IfIz,.$M1~mlIoerelO;le-I-:JlillIlnslar~~$ft:l
!h"'IfIz,.$M1~mlIoerelO;le-I-:JlillIlnslar~~$ft:l
!h"'IfIz,.$M1~mlIoerelO;le-I-:JlillIlnslar~~$ft:l
/IIdIlmtB'Gn'tdt,~!l1hImtnl'*tl"d!n"Ri:dlrll1ll
/IIdIlmtB'Gn'tdt,~!l1hImtnl'*tl"d!n"Ri:dlrll1ll
/IIdIlmtB'Gn'tdt,~!l1hImtnl'*tl"d!n"Ri:dlrll1ll
"""-
"""-
"""-
~luG~,=~",r.:hen~
~luG~,=~",r.:hen~
~luG~,=~",r.:hen~
"'""'-
"'""'-
"'""'-
!J..."",~llIi&rGif~\[jgInl!~ri7~t.:JI·
!J..."",~llIi&rGif~\[jgInl!~ri7~t.:JI·
!J..."",~llIi&rGif~\[jgInl!~ri7~t.:JI·
tal
hi'limlm;lwd!il)1dgerAestfl.
tal
hi'limlm;lwd!il)1dgerAestfl.
tal
hi'limlm;lwd!il)1dgerAestfl.
{DI1)(!f~"eOo:IIfllleie:tftlWJ"'ll5i11en!lll[G·~
{DI1)(!f~"eOo:IIfllleie:tftlWJ"'ll5i11en!lll[G·~
{DI1)(!f~"eOo:IIfllleie:tftlWJ"'ll5i11en!lll[G·~
~""EI1re~(Is.aJ~~rIas"'...(ILirlf,iid.e
~""EI1re~(Is.aJ~~rIas"'...(ILirlf,iid.e
~""EI1re~(Is.aJ~~rIas"'...(ILirlf,iid.e
prOOler:l.plei!St
)lWeqe~2fU
a
prOOler:l.plei!St
)lWeqe~2fU
a
prOOler:l.plei!St
eOlr!lai~~ll<ttNo'OCdprocu:tslnI:1eE[C.
eOlr!lai~~ll<ttNo'OCdprocu:tslnI:1eE[C.
eOlr!lai~~ll<ttNo'OCdprocu:tslnI:1eE[C.
reuiplu
~
~_*
reuiplu
reuiplu
w:-om
w:-om
w:-om
El.ECTRONICS UK LTD.
El.ECTRONICS UK LTD.
El.ECTRONICS UK LTD.
Dwig
Dwig
Dwig
V\-1)1891E8
V\-1)1891E8
V\-1)1891E8
TeI.0192J--81M44
TeI.0192J--81M44
TeI.0192J--81M44
~re!l""iE"'n'!JhIkI'~Ih!lMcdud
~re!l""iE"'n'!JhIkI'~Ih!lMcdud
~re!l""iE"'n'!JhIkI'~Ih!lMcdud
OOltsnla::'1rA:P.1ru;horlisl.5incJi:!dtJ
OOltsnla::'1rA:P.1ru;horlisl.5incJi:!dtJ
OOltsnla::'1rA:P.1ru;horlisl.5incJi:!dtJ
:Ij.,l:1dl~
:Ij.,l:1dl~
:Ij.,l:1dl~
ilIlII
~.a1J1
ilIlII
~.a1J1
ilIlII
~.a1J1
IIfllet'
MmHl/J1
IIfllet'
MmHl/J1
IIfllet'
MmHl/J1
dlI~
r.a:nlalgmmn
dlI~
r.a:nlalgmmn
dlI~
r.a:nlalgmmn
bro'l
dir;
bro'l
dir;
bro'l
dir;
RlIRlbriicl:.StJ.15
RlIRlbriicl:.StJ.15
RlIRlbriicl:.StJ.15
Tel.lCl49-4il04-ti9010
Tel.lCl49-4il04-ti9010
Tel.lCl49-4il04-ti9010
_.ullW-t.dt
_.ullW-t.dt
_.ullW-t.dt
cr~~l
~
~_*
cr~~l
~
~_*
cr~~l
Pro.1J::t
Pro.1J::t
f_IlU'~!d.
f_IlU'~!d.
f_IlU'~!d.
....
R....d,
Watford.
....
R....d,
Watford.
....
R....d,
Watford.
'I"lI-..iIlneerlil:~twld
'I"lI-..iIlneerlil:~twld
'I"lI-..iIlneerlil:~twld
...
~CJrltl1't:*
...
~CJrltl1't:*
clQ"Qret
...
~CJrltl1't:*
clQ"Qret
OieselKe/lwlJiXl
?rodl."J~
OieselKe/lwlJiXl
?rodl."J~
OieselKe/lwlJiXl
?rodl."J~
fleln~bsbe<:lr9m(lef1
fleln~bsbe<:lr9m(lef1
fleln~bsbe<:lr9m(lef1
GolI..,tl!ilJe:s!lmm~
GolI..,tl!ilJe:s!lmm~
GolI..,tl!ilJe:s!lmm~
Gllfat
um1.lusd1~l
Gllfat
um1.lusd1~l
Gllfat
um1.lusd1~l
_cle
lJlld$~d:e
_cle
lJlld$~d:e
_cle
lJlld$~d:e
EllCTRQNlCS
GMBH
EllCTRQNlCS
GMBH
EllCTRQNlCS
GMBH
(OJ
ItleS9l'r.lJNu:1'il/l1i1ldrAadtilrwr.eoflhll~mGoct
(OJ
ItleS9l'r.lJNu:1'il/l1i1ldrAadtilrwr.eoflhll~mGoct
(OJ
ItleS9l'r.lJNu:1'il/l1i1ldrAadtilrwr.eoflhll~mGoct
.lh,sttorrml.cr>Cil:lfJOlOOlKO"i:!elj,Ola~ProdLJ:ih"sOOm
.lh,sttorrml.cr>Cil:lfJOlOOlKO"i:!elj,Ola~ProdLJ:ih"sOOm
.lh,sttorrml.cr>Cil:lfJOlOOlKO"i:!elj,Ola~ProdLJ:ih"sOOm
rrooj,edOllliellil:1l~II'f"""sinctllE(IaI!oIpu<d1im.~CIlWL'OO
rrooj,edOllliellil:1l~II'f"""sinctllE(IaI!oIpu<d1im.~CIlWL'OO
rrooj,edOllliellil:1l~II'f"""sinctllE(IaI!oIpu<d1im.~CIlWL'OO
..
IiIlJ!
..
IiIlJ!
..
IiIlJ!
Ccfl/C!aI!O'lrese<Yl!stl'e"ghllorel~l~rl:plirhJProCuclun.:et
Ccfl/C!aI!O'lrese<Yl!stl'e"ghllorel~l~rl:plirhJProCuclun.:et
Ccfl/C!aI!O'lrese<Yl!stl'e"ghllorel~l~rl:plirhJProCuclun.:et
~IIl\el'1'601IT:isWJrranlV
~IIl\el'1'601IT:isWJrranlV
~IIl\el'1'601IT:isWJrranlV
1*
BTt..,Pr()QolCl~IJ!i:llm;",.!a:tlJod'~ttlljlt~C~"'1tllil!l
1*
BTt..,Pr()QolCl~IJ!i:llm;",.!a:tlJod'~ttlljlt~C~"'1tllil!l
1*
BTt..,Pr()QolCl~IJ!i:llm;",.!a:tlJod'~ttlljlt~C~"'1tllil!l
na'
..
cr.al
0'
lOcal
~~';lltlilrll
11'13
sat-ty
na'
..
cr.al
0'
lOcal
na'
..
cr.al
0'
lOcal
inlltCW'lllytillifslSJlellyl!lefflllU'oIdu'tfI'fUlcpe
inlltCW'lllytillifslSJlellyl!lefflllU'oIdu'tfI'fUlcpe
inlltCW'lllytillifslSJlellyl!lefflllU'oIdu'tfI'fUlcpe
ollhe
cIaIc
t..kOfiCllionsnec~l:J<u~eerst'oIlIIlel'taren:l!CQW!'I'CJ.lbJtn~
ollhe
cIaIc
t..kOfiCllionsnec~l:J<u~eerst'oIlIIlel'taren:l!CQW!'I'CJ.lbJtn~
ollhe
cIaIc
t..kOfiCllionsnec~l:J<u~eerst'oIlIIlel'taren:l!CQW!'I'CJ.lbJtn~
Pro.1J::t
flIISl tl!;
flIISl tl!;
flIISl tl!;
.,qqotJ.arCllOli~~~ri'ttQir
.,qqotJ.arCllOli~~~ri'ttQir
.,qqotJ.arCllOli~~~ri'ttQir
~rrj"llll.ltJrlelllll1r100mect00n.(lfa...,~lOthePr):J_d
~rrj"llll.ltJrlelllll1r100mect00n.(lfa...,~lOthePr):J_d
~rrj"llll.ltJrlelllll1r100mect00n.(lfa...,~lOthePr):J_d
l/1S
'llJ~om
~uch
l/1S
'llJ~om
~uch
l/1S
'llJ~om
~uch
.ll1ePI(l(lLdi5Ulellll\afurat:tI1C01J\lry-..h!·e~lSs~1
.ll1ePI(l(lLdi5Ulellll\afurat:tI1C01J\lry-..h!·e~lSs~1
.ll1ePI(l(lLdi5Ulellll\afurat:tI1C01J\lry-..h!·e~lSs~1
lOot1!JstlnCar<l:!.<oIlI.lreq..I!JJl!ft3l1liJl1N::Se~lGabItlo
lOot1!JstlnCar<l:!.<oIlI.lreq..I!JJl!ft3l1liJl1N::Se~lGabItlo
lOot1!JstlnCar<l:!.<oIlI.lreq..I!JJl!ft3l1liJl1N::Se~lGabItlo
lIlttW1lry~tcst~l1fhlrrin.U:llJ9l'IlflY.oc:e.IMl3t1
lIlttW1lry~tcst~l1fhlrrin.U:llJ9l'IlflY.oc:e.IMl3t1
lIlttW1lry~tcst~l1fhlrrin.U:llJ9l'IlflY.oc:e.IMl3t1
HRrts,
HRrts,
HRrts,
_,atlly~\"t::I
_,atlly~\"t::I
_,atlly~\"t::I
be4llheccstriA1aJtIl"J~ProdudlDt'1f';lfl)cabI!SlEfads
be4llheccstriA1aJtIl"J~ProdudlDt'1f';lfl)cabI!SlEfads
be4llheccstriA1aJtIl"J~ProdudlDt'1f';lfl)cabI!SlEfads
and.~~lltitcn.illhrP'Od...aio;<Iilrmotr..<l
and.~~lltitcn.illhrP'Od...aio;<Iilrmotr..<l
and.~~lltitcn.illhrP'Od...aio;<Iilrmotr..<l
"""t"0'iII!1I\iI1lel..'I.ltlilfl,oI'icral~rA".ft'''eJt0UU1ll)"1OIH~
"""t"0'iII!1I\iI1lel..'I.ltlilfl,oI'icral~rA".ft'''eJt0UU1ll)"1OIH~
"""t"0'iII!1I\iI1lel..'I.ltlilfl,oI'icral~rA".ft'''eJt0UU1ll)"1OIH~
~iSOlIeT.lb«1llJill'llyI'f(J3ir,ant:l_~W3'tca:ts
~iSOlIeT.lb«1llJill'llyI'f(J3ir,ant:l_~W3'tca:ts
~iSOlIeT.lb«1llJill'llyI'f(J3ir,ant:l_~W3'tca:ts
~dlirn
Ite~l1Mill)~illt'1<SCOJn:rrOll'le"lQ'mty~~!3r.mbe
~dlirn
Ite~l1Mill)~illt'1<SCOJn:rrOll'le"lQ'mty~~!3r.mbe
~dlirn
Ite~l1Mill)~illt'1<SCOJn:rrOll'le"lQ'mty~~!3r.mbe
CXJJI<'ceclinll\1SC~Jt"teta1O'.rl!l'le~'iToilI"~:Jfl.~h!
CXJJI<'ceclinll\1SC~Jt"teta1O'.rl!l'le~'iToilI"~:Jfl.~h!
CXJJI<'ceclinll\1SC~Jt"teta1O'.rl!l'le~'iToilI"~:Jfl.~h!
t~.lolSn~(heProcr..d:tller.ulDn:llron~(Qlo'''101
t~.lolSn~(heProcr..d:tller.ulDn:llron~(Qlo'''101
t~.lolSn~(heProcr..d:tller.ulDn:llron~(Qlo'''101
clQ"Qret
Qr1OII11lpwtholSeSfTlll~lDnItl)'ltlIIllSII
Qr1OII11lpwtholSeSfTlll~lDnItl)'ltlIIllSII
Qr1OII11lpwtholSeSfTlll~lDnItl)'ltlIIllSII
CIIl.SWJt~"tt««>rctW-.er
CIIl.SWJt~"tt««>rctW-.er
CIIl.SWJt~"tt««>rctW-.er
~
a:E+iJmsolle~rw.d.OIl[,IlDmaI~;n:l
~
a:E+iJmsolle~rw.d.OIl[,IlDmaI~;n:l
~
a:E+iJmsolle~rw.d.OIl[,IlDmaI~;n:l
a:lj~Wo:.todilgO!Jiod'c:tJI!ct.lD:ffloreCIl~lk
a:lj~Wo:.todilgO!Jiod'c:tJI!ct.lD:ffloreCIl~lk
a:lj~Wo:.todilgO!Jiod'c:tJI!ct.lD:ffloreCIl~lk
IoIrJalused"fIlhePr:ld.tt;
IoIrJalused"fIlhePr:ld.tt;
IoIrJalused"fIlhePr:ld.tt;
(lI)t:laUal}elOThe~t1~ty~OII"n;U"o:-e<
(lI)t:laUal}elOThe~t1~ty~OII"n;U"o:-e<
(lI)t:laUal}elOThe~t1~ty~OII"n;U"o:-e<
rlfl"lscarlieo
rlfl"lscarlieo
rlfl"lscarlieo
lc':'lll11etlllJtt.tN/1':*l:""lIJpeltilrr1_",~:ys£Jlitts
lc':'lll11etlllJtt.tN/1':*l:""lIJpeltilrr1_",~:ys£Jlitts
lc':'lll11etlllJtt.tN/1':*l:""lIJpeltilrr1_",~:ys£Jlitts
O'1;LSDealt.
O'1;LSDealt.
O'1;LSDealt.
(0:)
dWi"agel0TheI':'o.1.:tUt:Sll'l.lbrneo;ligror.t.IlD:l!m.
(0:)
dWi"agel0TheI':'o.1.:tUt:Sll'l.lbrneo;ligror.t.IlD:l!m.
(0:)
dWi"agel0TheI':'o.1.:tUt:Sll'l.lbrneo;ligror.t.IlD:l!m.
mcx:)c:II!'O::s..1!1!tL"·Slo1I!ilI(JIlOl~inr;a.
mcx:)c:II!'O::s..1!1!tL"·Slo1I!ilI(JIlOl~inr;a.
mcx:)c:II!'O::s..1!1!tL"·Slo1I!ilI(JIlOl~inr;a.
.1lC\&o1ina:p'OCraleSllaltClarli:
.1lC\&o1ina:p'OCraleSllaltClarli:
.1lC\&o1ina:p'OCraleSllaltClarli:
(O)
dr..agelOtneP"otll:dWlW:lt,h..,nllli'Slo""''"''''''''.
(O)
dr..agelOtneP"otll:dWlW:lt,h..,nllli'Slo""''"''''''''.
(O)
dr..agelOtneP"otll:dWlW:lt,h..,nllli'Slo""''"''''''''.
~~'nnr"'ear;·IQUI\t.~wmtiL"r,gn.J\tIs(:lGoo
~~'nnr"'ear;·IQUI\t.~wmtiL"r,gn.J\tIs(:lGoo
~~'nnr"'ear;·IQUI\t.~wmtiL"r,gn.J\tIs(:lGoo
1flC00r!dacPhC3I.(t101l'Y"IY'ilo1)ln~,,,sl~~[.
1flC00r!dacPhC3I.(t101l'Y"IY'ilo1)ln~,,,sl~~[.
1flC00r!dacPhC3I.(t101l'Y"IY'ilo1)ln~,,,sl~~[.
ilI!'fOll1CfQlU!,tbe)Ofld"~C01t~ullC«!<loOll.
ilI!'fOll1CfQlU!,tbe)Ofld"~C01t~ullC«!<loOll.
ilI!'fOll1CfQlU!,tbe)Ofld"~C01t~ullC«!<loOll.
KENWOOD
KENWOOD
KENWOOD
Ka~Iaa.m~!I"1<Illeht
Ka~Iaa.m~!I"1<Illeht
Ka~Iaa.m~!I"1<Illeht
l<J
CelwolllD':l~NI!11IiIII1l:1d1eA1SCnnnre;EIIIi:e:~..i.I1j:e<s.
l<J
CelwolllD':l~NI!11IiIII1l:1d1eA1SCnnnre;EIIIi:e:~..i.I1j:e<s.
l<J
CelwolllD':l~NI!11IiIII1l:1d1eA1SCnnnre;EIIIi:e:~..i.I1j:e<s.
belcemOllI'r(I(M;lgeIo:ilU~...udll
belcemOllI'r(I(M;lgeIo:ilU~...udll
..
,r(ll~ln
..
,r(ll~ln
..
,r(ll~ln
•
.N'.tIictlM
•
.N'.tIictlM
•
.N'.tIictlM
belcemOllI'r(I(M;lgeIo:ilU~...udll
(~)
Dill
sel'el'ILlTYl~
(~)
Dill
sel'el'ILlTYl~
(~)
Dill
sel'el'ILlTYl~
!<tnWI),)(Jbe!UII:;ii1(1;r,H,'d1I\'Cl!>:lranlielr.i:'it(JflQlflaIJrolmrm
!<tnWI),)(Jbe!UII:;ii1(1;r,H,'d1I\'Cl!>:lranlielr.i:'it(JflQlflaIJrolmrm
!<tnWI),)(Jbe!UII:;ii1(1;r,H,'d1I\'Cl!>:lranlielr.i:'it(JflQlflaIJrolmrm
1OiiIlI1dle,olg;."IW1I1Ii
1OiiIlI1dle,olg;."IW1I1Ii
1OiiIlI1dle,olg;."IW1I1Ii
F.rSle<~lb
I,Irs
F.rSle<~lb
I,Irs
F.rSle<~lb
I,Irs
R
R
R
/um
Ir;l!lulllc\dcl
/um
Ir;l!lulllc\dcl
/um
Ir;l!lulllc\dcl
f'roo,l'llllle
i~llleSlinlllll.JlQSllIld
f'roo,l'llllle
i~llleSlinlllll.JlQSllIld
f'roo,l'llllle
i~llleSlinlllll.JlQSllIld
SlchC!l~eit<;I'OI~I1II:1/)f1
SlchC!l~eit<;I'OI~I1II:1/)f1
SlchC!l~eit<;I'OI~I1II:1/)f1
Erb'derlltheM:lditi~iO'ltrl1U'll1kIrlelldesG"atesinL1lmn
Erb'derlltheM:lditi~iO'ltrl1U'll1kIrlelldesG"atesinL1lmn
Erb'derlltheM:lditi~iO'ltrl1U'll1kIrlelldesG"atesinL1lmn
a",lerna'noesrlettilllmu~Ia~cle'l!~IIef1nicnl,nle<dle
a",lerna'noesrlettilllmu~Ia~cle'l!~IIef1nicnl,nle<dle
a",lerna'noesrlettilllmu~Ia~cle'l!~IIef1nicnl,nle<dle
vOfQenan~1ell
vOfQenan~1ell
vOfQenan~1ell
";rkein!'lleiHlllul1Q!l.rAJttilff1lf1diesemlUSl.m~.I1\l/ll.ll:1
";rkein!'lleiHlllul1Q!l.rAJttilff1lf1diesemlUSl.m~.I1\l/ll.ll:1
";rkein!'lleiHlllul1Q!l.rAJttilff1lf1diesemlUSl.m~.I1\l/ll.ll:1
lGtaescna~~OlrsPrucukle!.dieGultloso~ArDe~El1
lGtaescna~~OlrsPrucukle!.dieGultloso~ArDe~El1
lGtaescna~~OlrsPrucukle!.dieGultloso~ArDe~El1
"""'"
"""'"
"""'"
w>-(l(1U
'~ol1lO:l.r.f<rli!l1Ilallil
w>-(l(1U
'~ol1lO:l.r.f<rli!l1Ilallil
w>-(l(1U
'~ol1lO:l.r.f<rli!l1Ilallil
~'MP.en
IJ1I]nelQeSlell..ordlrl
~'MP.en
IJ1I]nelQeSlell..ordlrl
~'MP.en
IJ1I]nelQeSlell..ordlrl
nJr();jll1a~Q!lIl'~"",rn(Jlf~1II1ti1rlJrnii:!tur.Q~Ger»es
nJr();jll1a~Q!lIl'~"",rn(Jlf~1II1ti1rlJrnii:!tur.Q~Ger»es
nJr();jll1a~Q!lIl'~"",rn(Jlf~1II1ti1rlJrnii:!tur.Q~Ger»es
Unatoco.llIQll'l:,ga N
Unatoco.llIQll'l:,ga N
Unatoco.llIQll'l:,ga N
IIen:rtwG!lfo1lJllf\1OE<t\eo'I
IIen:rtwG!lfo1lJllf\1OE<t\eo'I
IIen:rtwG!lfo1lJllf\1OE<t\eo'I
\JrlI!r<orJe:lelsrcbaJliademrlasPl(llk.lU1lliJ1llKnllo!ll
\JrlI!r<orJe:lelsrcbaJliademrlasPl(llk.lU1lliJ1llKnllo!ll
\JrlI!r<orJe:lelsrcbaJliademrlasPl(llk.lU1lliJ1llKnllo!ll
3'1'IIr.I~I"Itlor1aJ
3'1'IIr.I~I"Itlor1aJ
3'1'IIr.I~I"Itlor1aJ
!le:laf
......
llItseS
!le:laf
......
llItseS
!le:laf
......
llItseS
I:1er~datKMlenrorHirl-u.I(r:\'am:m<le!Gm'es~
I:1er~datKMlenrorHirl-u.I(r:\'am:m<le!Gm'es~
I:1er~datKMlenrorHirl-u.I(r:\'am:m<le!Gm'es~
&sKaul'll1lIk3gefI
&sKaul'll1lIk3gefI
&sKaul'll1lIk3gefI
GltI:rd
Q~
.....
GltI:rd
Q~
.....
GltI:rd
Q~
.....
Gn.11<len
1:to1eGlfill*tlNlU¥ol/lO!OJIIlI-.leJ;;{men
Gn.11<len
1:to1eGlfill*tlNlU¥ol/lO!OJIIlI-.leJ;;{men
Gn.11<len
1:to1eGlfill*tlNlU¥ol/lO!OJIIlI-.leJ;;{men
CAosIjellon-..enoro'O!llGara:olICleI!b1~~na
CAosIjellon-..enoro'O!llGara:olICleI!b1~~na
CAosIjellon-..enoro'O!llGara:olICleI!b1~~na
~l
Vt!3ndt'\l1:jll!f1o¥11ProdJ'tSc"""'ll1UmlleViilD.Jr;;~'
~l
Vt!3ndt'\l1:jll!f1o¥11ProdJ'tSc"""'ll1UmlleViilD.Jr;;~'
~l
Vt!3ndt'\l1:jll!f1o¥11ProdJ'tSc"""'ll1UmlleViilD.Jr;;~'
\Jl!lMs~bil'fJl..e\~.t/ldtf"'(;J"
\Jl!lMs~bil'fJl..e\~.t/ldtf"'(;J"
\Jl!lMs~bil'fJl..e\~.t/ldtf"'(;J"
E1ej~U1IJl!f"4r1!l!f1~59l!flKlrirrffll
E1ej~U1IJl!f"4r1!l!f1~59l!flKlrirrffll
E1ej~U1IJl!f"4r1!l!f1~59l!flKlrirrffll
{tllSttD1;l1llPl<Xbddilrd.a:h~odeIr.m
{tllSttD1;l1llPl<Xbddilrd.a:h~odeIr.m
{tllSttD1;l1llPl<Xbddilrd.a:h~odeIr.m
~M:!>ten~Vlcl,fItjl1~
~M:!>ten~Vlcl,fItjl1~
~M:!>ten~Vlcl,fItjl1~
....
lBtar1WOllO<i:tl:~~!lt-a.{jeoW;hi
....
lBtar1WOllO<i:tl:~~!lt-a.{jeoW;hi
....
lBtar1WOllO<i:tl:~~!lt-a.{jeoW;hi
1160~1IOI,c;.n~1SII)l!flflllml!nllt!;
1160~1IOI,c;.n~1SII)l!flflllml!nllt!;
1160~1IOI,c;.n~1SII)l!flflllml!nllt!;
~Hl"ar~s.~
~Hl"ar~s.~
~Hl"ar~s.~
(QSc.'MendllrdlN;«ll~lUrtll!'.Ardrrtflpl.
(QSc.'MendllrdlN;«ll~lUrtll!'.Ardrrtflpl.
(QSc.'MendllrdlN;«ll~lUrtll!'.Ardrrtflpl.
~~!b1~~"V!J~
~~!b1~~"V!J~
~~!b1~~"V!J~
FttJIIl!o:IaUlJ;)fO!~..,glalSdIl!f£ml.d,*~e-·-8
FttJIIl!o:IaUlJ;)fO!~..,glalSdIl!f£ml.d,*~e-·-8
FttJIIl!o:IaUlJ;)fO!~..,glalSdIl!f£ml.d,*~e-·-8
fl!tu,remt:1t!
~~';lltlilrll
11'13
sat-ty
fl!tu,remt:1t!
~~';lltlilrll
11'13
sat-ty
fl!tu,remt:1t!
...
be~lnrf3ll!Xlac
...
be~lnrf3ll!Xlac
...
be~lnrf3ll!Xlac
Wl;1t..
Wl;1t..
Wl;1t..
MIl
:;eWlrmD
1~.a:rdill<l11talll2.
MIl
:;eWlrmD
1~.a:rdill<l11talll2.
MIl
:;eWlrmD
1~.a:rdill<l11talll2.
OLtO~I/f{pem1
or
tdiI{lIf.".idI is
OLtO~I/f{pem1
or
tdiI{lIf.".idI is
OLtO~I/f{pem1
or
tdiI{lIf.".idI is
ELECTRONICS
ELECTRONICS
ELECTRONICS
..
..
..
....
W!>JIUIl<;(:<'
....
W!>JIUIl<;(:<'
....
W!>JIUIl<;(:<'
AuSliel1fUIV,l:ll1
AuSliel1fUIV,l:ll1
AuSliel1fUIV,l:ll1
G.lJ\ti~lrrm;J~cn.
G.lJ\ti~lrrm;J~cn.
G.lJ\ti~lrrm;J~cn.
OI1lllr1UIr\lSlcllllf'1!itsvoc5CI'R11'!r.V[Fl
OI1lllr1UIr\lSlcllllf'1!itsvoc5CI'R11'!r.V[Fl
OI1lllr1UIr\lSlcllllf'1!itsvoc5CI'R11'!r.V[Fl
'IC~neOO1cn
'IC~neOO1cn
'IC~neOO1cn
P,OOJIde:.
P,OOJIde:.
P,OOJIde:.
lIll
oeu~
lIll
oeu~
lIll
oeu~
GMBH
GMBH
GMBH
LI~J
llitl
'-'lIcllllbE:rl:d1n"1l1l
LI~J
llitl
'-'lIcllllbE:rl:d1n"1l1l
LI~J
llitl
'-'lIcllllbE:rl:d1n"1l1l
III~.rnl<llioloen!d.oo[)fJer""JM~t
III~.rnl<llioloen!d.oo[)fJer""JM~t
III~.rnl<llioloen!d.oo[)fJer""JM~t
~nl
PrQllill:.1
~cr~mmmtri
~nl
PrQllill:.1
~cr~mmmtri
~nl
PrQllill:.1
~cr~mmmtri
tk.'f1H5ldel
ffililltdi8Sl~5
tk.'f1H5ldel
ffililltdi8Sl~5
tk.'f1H5ldel
ffililltdi8Sl~5
(l:Jlllpen
NIlrmen
(l:Jlllpen
NIlrmen
(l:Jlllpen
NIlrmen
Aui'\etCtm
iOell1etlm~"
Aui'\etCtm
iOell1etlm~"
Aui'\etCtm
iOell1etlm~"
CIJIJl?I../Ur
(jaB
dif:!.es
CIJIJl?I../Ur
(jaB
dif:!.es
CIJIJl?I../Ur
(jaB
dif:!.es
~t.
cam
_C!f\Garl"lliMbIllll'l1
~t.
cam
_C!f\Garl"lliMbIllll'l1
~t.
cam
_C!f\Garl"lliMbIllll'l1
PlgO'~
LOO
S~'Il:rrJijl
PlgO'~
LOO
S~'Il:rrJijl
PlgO'~
LOO
S~'Il:rrJijl
Er$:itt:~
!eritN~:qo-
Er$:itt:~
!eritN~:qo-
Er$:itt:~
!eritN~:qo-
lDla.:silQ81l1l!f1C'1~
lDla.:silQ81l1l!f1C'1~
lDla.:silQ81l1l!f1C'1~
(!JllH.IOSjlWk!fS~Irt~pl~t!l.l'lotp(l\toUlfM!I,t»1ycr.d
(!JllH.IOSjlWk!fS~Irt~pl~t!l.l'lotp(l\toUlfM!I,t»1ycr.d
(!JllH.IOSjlWk!fS~Irt~pl~t!l.l'lotp(l\toUlfM!I,t»1ycr.d
Iter..:~specilie.1tLoo.a:-Il.Im-nJgl!'irn.l'oedlcrwholt'v!l
Iter..:~specilie.1tLoo.a:-Il.Im-nJgl!'irn.l'oedlcrwholt'v!l
Iter..:~specilie.1tLoo.a:-Il.Im-nJgl!'irn.l'oedlcrwholt'v!l
reascJllor.:eor:ls.lilpes,~sscrtelapes.videobpe~.PO:l1j'.ill:t
reascJllor.:eor:ls.lilpes,~sscrtelapes.videobpe~.PO:l1j'.ill:t
reascJllor.:eor:ls.lilpes,~sscrtelapes.videobpe~.PO:l1j'.ill:t
Oislls.(JI
"'Ydtltl'gooas"hich"'~fIOl~II!!Proc:utt~setl.
Oislls.(JI
"'Ydtltl'gooas"hich"'~fIOl~II!!Proc:utt~setl.
Oislls.(JI
"'Ydtltl'gooas"hich"'~fIOl~II!!Proc:utt~setl.
(I)
consu:rOOlccr
.....
.¥,r.Qil!.mlfQ'JlrnoreDIiiCemln!as~
(I)
consu:rOOlccr
.....
.¥,r.Qil!.mlfQ'JlrnoreDIiiCemln!as~
(I)
consu:rOOlccr
.....
.¥,r.Qil!.mlfQ'JlrnoreDIiiCemln!as~
tlrumallerviCe.~~inQ(tIL(l1Otr.moltOrc)~rtoo
tlrumallerviCe.~~inQ(tIL(l1Otr.moltOrc)~rtoo
lIll~~Il%'~
lIll~~Il%'~
lIll~~Il%'~
Ii':;
Ii':;
Ii':;
",-"rtf!
",-"rtf!
",-"rtf!
u
u
u
sm,
sm,
sm,
tlrumallerviCe.~~inQ(tIL(l1Otr.moltOrc)~rtoo
l:iIiIrU;jt!. SlJG.
dnve
tlerts.
l:iIiIrU;jt!. SlJG.
dnve
tlerts.
l:iIiIrU;jt!. SlJG.
dnve
tlerts.
redTI"~!itllt~jesl'OlNI1ui)!'S
redTI"~!itllt~jesl'OlNI1ui)!'S
redTI"~!itllt~jesl'OlNI1ui)!'S
\~)
~·el'llllb::thcml'l"Chlrt;OlallcltteSEl'al~r'.~r..n
\~)
~·el'llllb::thcml'l"Chlrt;OlallcltteSEl'al~r'.~r..n
\~)
~·el'llllb::thcml'l"Chlrt;OlallcltteSEl'al~r'.~r..n
~':ltlret1lJ'ftd.mvdll$lOl~
~':ltlret1lJ'ftd.mvdll$lOl~
~':ltlret1lJ'ftd.mvdll$lOl~
It,sW;,r""<ll'YIS'''-dl:.UllroaryPlf5:l'1~lI;lslagall1(jDrl!l:1
It,sW;,r""<ll'YIS'''-dl:.UllroaryPlf5:l'1~lI;lslagall1(jDrl!l:1
It,sW;,r""<ll'YIS'''-dl:.UllroaryPlf5:l'1~lI;lslagall1(jDrl!l:1
~d·lOCk.d
~d·lOCk.d
~d·lOCk.d
SLt.>:lda'illlfr"{Q:;lalJ:n,ll.I'ePlow;t
SLt.>:lda'illlfr"{Q:;lalJ:n,ll.I'ePlow;t
SLt.>:lda'illlfr"{Q:;lalJ:n,ll.I'ePlow;t
lJa!ot~"ar1J!
1:eiI:'qt5i<lIJJ*",,/II\lerIlnWlt'1CIQl.'!e<";'\JI
lJa!ot~"ar1J!
1:eiI:'qt5i<lIJJ*",,/II\lerIlnWlt'1CIQl.'!e<";'\JI
lJa!ot~"ar1J!
1:eiI:'qt5i<lIJJ*",,/II\lerIlnWlt'1CIQl.'!e<";'\JI
~.ll!r;g-LSull1e_rlJllhli"lIW[j,"",lt"otlCpI~
~.ll!r;g-LSull1e_rlJllhli"lIW[j,"",lt"otlCpI~
~.ll!r;g-LSull1e_rlJllhli"lIW[j,"",lt"otlCpI~
l£glIlprO'lis-ons
l£glIlprO'lis-ons
l£glIlprO'lis-ons
AITENTlON
AITENTlON
AITENTlON
ThlSC2JI1.mr~(~IirMlla:larel'ltCesw,l\loorcnase
ThlSC2JI1.mr~(~IirMlla:larel'ltCesw,l\loorcnase
ThlSC2JI1.mr~(~IirMlla:larel'ltCesw,l\loorcnase
aleWl·p;;nd"l:iT:ll:l:JltdIo-l!arnalie
aleWl·p;;nd"l:iT:ll:l:JltdIo-l!arnalie
aleWl·p;;nd"l:iT:ll:l:JltdIo-l!arnalie
rGl
rGl
rGl
....
S~
....
S~
....
S~
f!~iIlul
f!~iIlul
f!~iIlul
1df
~'li.chFWI;r,W.lSSII:;cT1.dln,BI~~ag,E(dteDen
1df
~'li.chFWI;r,W.lSSII:;cT1.dln,BI~~ag,E(dteDen
1df
~'li.chFWI;r,W.lSSII:;cT1.dln,BI~~ag,E(dteDen
UI'ItIlI[i<J1endlllloJHi~ul'CJ.l'(Ine:ter~,
UI'ItIlI[i<J1endlllloJHi~ul'CJ.l'(Ine:ter~,
UI'ItIlI[i<J1endlllloJHi~ul'CJ.l'(Ine:ter~,
Pm1J~ts
1<Istt.et~
Pm1J~ts
Pm1J~ts
nldll
nldll
nldll
~ie
~ie
~ie
flLB
flLB
flLB
..'t;'p;lml!l'IJ0r1l.1SOO';1ii'Je\'l)liQwl'.o.oodnletll\l
1<Istt.et~
..'t;'p;lml!l'IJ0r1l.1SOO';1ii'Je\'l)liQwl'.o.oodnletll\l
1<Istt.et~
..'t;'p;lml!l'IJ0r1l.1SOO';1ii'Je\'l)liQwl'.o.oodnletll\l
iOt'<1I'ltvrollelltleUrro~"
iOt'<1I'ltvrollelltleUrro~"
iOt'<1I'ltvrollelltleUrro~"
Ie)
SClla1en:il1l.au1sOredeInOLlcflcen8cllleb!n
Ie)
SClla1en:il1l.au1sOredeInOLlcflcen8cllleb!n
Ie)
SClla1en:il1l.au1sOredeInOLlcflcen8cllleb!n
hOhertllLtislungenalsrjena.1CeQeOenen$cnwnJII
hOhertllLtislungenalsrjena.1CeQeOenen$cnwnJII
hOhertllLtislungenalsrjena.1CeQeOenen$cnwnJII
5c:h<lII~lall~n,
TonOOlll:1em,
5c:h<lII~lall~n,
TonOOlll:1em,
5c:h<lII~lall~n,
TonOOlll:1em,
KO'll~Tsth~l!plane<i
uI\(J
KO'll~Tsth~l!plane<i
uI\(J
KO'll~Tsth~l!plane<i
uI\(J
E!estlr;ttell
I!fs
f"r«t.J~,IS
E!estlr;ttell
I!fs
f"r«t.J~,IS
E!estlr;ttell
I!fs
f"r«t.J~,IS
II)
I,ILlItrauen~·
coerverstnl8llltelJ~.
II)
I,ILlItrauen~·
coerverstnl8llltelJ~.
II)
I,ILlItrauen~·
coerverstnl8llltelJ~.
norrTlll~n
~ull<.le<!<Jlen$tlS
norrTlll~n
~ull<.le<!<Jlen$tlS
norrTlll~n
~ull<.le<!<Jlen$tlS
TooatnetVTl!<SJS1~IIll!~n,~'1lnIOSferren,I[Jll;0!l1~.
TooatnetVTl!<SJS1~IIll!~n,~'1lnIOSferren,I[Jll;0!l1~.
TooatnetVTl!<SJS1~IIll!~n,~'1lnIOSferren,I[Jll;0!l1~.
~lns;;I'\Jbe.l~i.lroct..en:lall!l'.en.""ederalll'lItlarc
~lns;;I'\Jbe.l~i.lroct..en:lall!l'.en.""ederalll'lItlarc
~lns;;I'\Jbe.l~i.lroct..en:lall!l'.en.""ederalll'lItlarc
AAW5.
leolli.Jng:$·fr'K,W)'}.'tf1
AAW5.
leolli.Jng:$·fr'K,W)'}.'tf1
AAW5.
leolli.Jng:$·fr'K,W)'}.'tf1
1~)AHeF,odliae.l»,ffileI1dlCSet!~(n)~uiJec
1~)AHeF,odliae.l»,ffileI1dlCSet!~(n)~uiJec
1~)AHeF,odliae.l»,ffileI1dlCSet!~(n)~uiJec
le>Mt~e:1r,,"!1I.""~Odertlllkelltlochgen:;rJt
le>Mt~e:1r,,"!1I.""~Odertlllkelltlochgen:;rJt
le>Mt~e:1r,,"!1I.""~Odertlllkelltlochgen:;rJt
......-(I<}(nl
......-(I<}(nl
......-(I<}(nl
Dlest:GararlOllkan'wenal!l'IPeo_lJearl:;ll'U{t'I
Dlest:GararlOllkan'wenal!l'IPeo_lJearl:;ll'U{t'I
Dlest:GararlOllkan'wenal!l'IPeo_lJearl:;ll'U{t'I
P1o:liJklll!f}llltl1OO"lJJ1hi11:en
P1o:liJklll!f}llltl1OO"lJJ1hi11:en
P1o:liJklll!f}llltl1OO"lJJ1hi11:en
lnOtoens&mln;:rilden
lnOtoens&mln;:rilden
lnOtoens&mln;:rilden
ws
ProdJl:1lns1fn1c~
ws
ProdJl:1lns1fn1c~
ws
ProdJl:1lns1fn1c~
tEe·1-Ir1(tfilIiP.~l!f
tEe·1-Ir1(tfilIiP.~l!f
tEe·1-Ir1(tfilIiP.~l!f
l'.aII!r1Qf
l'.aII!r1Qf
l'.aII!r1Qf
nsbr_w:aot:e'~1teoo.\l!I'lliIl1t'l'erll"ljfllJ'9\li!1
nsbr_w:aot:e'~1teoo.\l!I'lliIl1t'l'erll"ljfllJ'9\li!1
nsbr_w:aot:e'~1teoo.\l!I'lliIl1t'l'erll"ljfllJ'9\li!1
(:"~l
(:"~l
(:"~l
""*'IJE"""olleARsolrfJ;;"'~'XI~lnsllESOIUJlI<DJ:l'"
""*'IJE"""olleARsolrfJ;;"'~'XI~lnsllESOIUJlI<DJ:l'"
""*'IJE"""olleARsolrfJ;;"'~'XI~lnsllESOIUJlI<DJ:l'"
.~"ua.b:u1~00ll~
.~"ua.b:u1~00ll~
.~"ua.b:u1~00ll~
ZUR
ZUR
ZUR
~GaI
~GaI
~GaI
il1~a~~\'etUilc:se·lineues3ediente-ll\l~
il1~a~~\'etUilc:se·lineues3ediente-ll\l~
il1~a~~\'etUilc:se·lineues3ediente-ll\l~
.....
~1ra~~wira
.....
~1ra~~wira
.....
~1ra~~wira
11S~lIlll.ler
11S~lIlll.ler
11S~lIlll.ler
.....
edt'$)fISlil):flfcllteatSlleIoAIersim
.....
edt'$)fISlil):flfcllteatSlleIoAIersim
.....
edt'$)fISlil):flfcllteatSlleIoAIersim
IjJ!IO"'MhtlitJ'ttlllt!t
IjJ!IO"'MhtlitJ'ttlllt!t
IjJ!IO"'MhtlitJ'ttlllt!t
BEActfTUNG
BEActfTUNG
BEActfTUNG
....
~In!<EI~WC"~.beo(:tigl.!JIlI
....
~In!<EI~WC"~.beo(:tigl.!JIlI
....
~In!<EI~WC"~.beo(:tigl.!JIlI
tlt'l!~.
racts.
dI~
ce~s.
tlt'l!~.
racts.
dI~
ce~s.
tlt'l!~.
racts.
dI~
ce~s.
..
U!leICPil.'!lJCI'~
..
U!leICPil.'!lJCI'~
..
U!leICPil.'!lJCI'~
~1W1tuR
""
~1W1tuR
""
~1W1tuR
""
Ion·
LII1i:1VkI!oloa~Ie:t!n,
Ion·
Ion·
alldl!r~~
alldl!r~~
alldl!r~~
'Ino
'Ino
'Ino
aUl.Il.l1.Jschlrlllind,
aUl.Il.l1.Jschlrlllind,
aUl.Il.l1.Jschlrlllind,
O~o'I
O~o'I
O~o'I
CU·
LII1i:1VkI!oloa~Ie:t!n,
CU·
LII1i:1VkI!oloa~Ie:t!n,
CU·
GeQo!n~lande11.
die
nlr./11
GeQo!n~lande11.
die
nlr./11
GeQo!n~lande11.
die
nlr./11
d;elmflaM"1I1
cko~
d;elmflaM"1I1
cko~
d;elmflaM"1I1
cko~
..
iII
1.8
..
..
iII
1.8
..
..
iII
1.8
..
.....
'1!len.II.ediis
.....
'1!len.II.ediis
.....
'1!len.II.ediis
ulIIQI:",2I,.I$;~t
l}",,~
I«m
ulIIQI:",2I,.I$;~t
l}",,~
I«m
ulIIQI:",2I,.I$;~t
l}",,~
Tnvq!r,.
Tnvq!r,.
Tnvq!r,.
I«m
E.\Aac;
E.\Aac;
E.\Aac;
rl~~1P1etlLio'·.DOIDo~·#o'Il,[N"1()OO
rl~~1P1etlLio'·.DOIDo~·#o'Il,[N"1()OO
rl~~1P1etlLio'·.DOIDo~·#o'Il,[N"1()OO
l:X~r.Olltlmt...wp:)J~lOr.coowl(E"'''''''OO&
l:X~r.Olltlmt...wp:)J~lOr.coowl(E"'''''''OO&
l:X~r.Olltlmt...wp:)J~lOr.coowl(E"'''''''OO&
EOf~of.ld!JDr.'~_:lI<n10'7~CL~{;IfGl';
EOf~of.ld!JDr.'~_:lI<n10'7~CL~{;IfGl';
EOf~of.ld!JDr.'~_:lI<n10'7~CL~{;IfGl';
Bo~~8eowrMmcroeu~·llUL_"'rooc~
Bo~~8eowrMmcroeu~·llUL_"'rooc~
Bo~~8eowrMmcroeu~·llUL_"'rooc~
OJ1OIl~UJ.1lcJ.lf"fYL01Clll>
OJ1OIl~UJ.1lcJ.lf"fYL01Clll>
OJ1OIl~UJ.1lcJ.lf"fYL01Clll>
~<J:U~""lIlII~lt(l(:IfI;:.:J6:ro1l:o.:JQlnc:1It.1lx;
~<J:U~""lIlII~lt(l(:IfI;:.:J6:ro1l:o.:JQlnc:1It.1lx;
~<J:U~""lIlII~lt(l(:IfI;:.:J6:ro1l:o.:JQlnc:1It.1lx;
'lTJl;EQl{,~'IO.~llm'llOO1'OCOlD.rbll·:m:
'lTJl;EQl{,~'IO.~llm'llOO1'OCOlD.rbll·:m:
'lTJl;EQl{,~'IO.~llm'llOO1'OCOlD.rbll·:m:
~~lfNWOOO,~~~r¢aom.
~~lfNWOOO,~~~r¢aom.
~~lfNWOOO,~~~r¢aom.
U:OOO'.OOOl¥wou;-llOO~«;~~~llUlI..'lOn-><:
U:OOO'.OOOl¥wou;-llOO~«;~~~llUlI..'lOn-><:
U:OOO'.OOOl¥wou;-llOO~«;~~~llUlI..'lOn-><:
lol\il\1O,ilo1
lol\il\1O,ilo1
lol\il\1O,ilo1
~!i1JJlcrn.Wlcno6D!Jl1T'Jl:'Ilt~co::~~
~!i1JJlcrn.Wlcno6D!Jl1T'Jl:'Ilt~co::~~
~!i1JJlcrn.Wlcno6D!Jl1T'Jl:'Ilt~co::~~
TtlC)'J,IC1011:.<rt1:l"
TtlC)'J,IC1011:.<rt1:l"
TtlC)'J,IC1011:.<rt1:l"
M1C>p:lMr.'IK1'I(I1loIl.."!CWC:OT1(l'O'OnelOIOC'!1l.»:xnt
M1C>p:lMr.'IK1'I(I1loIl.."!CWC:OT1(l'O'OnelOIOC'!1l.»:xnt
M1C>p:lMr.'IK1'I(I1loIl.."!CWC:OT1(l'O'OnelOIOC'!1l.»:xnt
EIJo'ClYQPCl!Xl1!T\I~O·lrWIT'olI\PC1U:J1!"!':EOK<ol.r.Il".'l,unlo:l
EIJo'ClYQPCl!Xl1!T\I~O·lrWIT'olI\PC1U:J1!"!':EOK<ol.r.Il".'l,unlo:l
EIJo'ClYQPCl!Xl1!T\I~O·lrWIT'olI\PC1U:J1!"!':EOK<ol.r.Il".'l,unlo:l
y;v~mooullPL~fl:J.oTTi.Tp;'ltO'ltOOl:.d.~I'fJt;""'r.>OCl<'lO<l<:
y;v~mooullPL~fl:J.oTTi.Tp;'ltO'ltOOl:.d.~I'fJt;""'r.>OCl<'lO<l<:
y;v~mooullPL~fl:J.oTTi.Tp;'ltO'ltOOl:.d.~I'fJt;""'r.>OCl<'lO<l<:
O'TT1"COK.~dJ!YOtrII"O'"""""'IYI\I~~t<;'ITTf'
O'TT1"COK.~dJ!YOtrII"O'"""""'IYI\I~~t<;'ITTf'
O'TT1"COK.~dJ!YOtrII"O'"""""'IYI\I~~t<;'ITTf'
""ol.o<b)!T~
""ol.o<b)!T~
""ol.o<b)!T~
~yo~r~llInlTOWno£v'VLV>"l'·\lTiIi'<lll
~yo~r~llInlTOWno£v'VLV>"l'·\lTiIi'<lll
~yo~r~llInlTOWno£v'VLV>"l'·\lTiIi'<lll
~\TITOOCN;pl11""1f1in1ryeipl;re~
~\TITOOCN;pl11""1f1in1ryeipl;re~
~\TITOOCN;pl11""1f1in1ryeipl;re~
iojr'i'JUltr.l~Tol"l,::o;oi7olll',lUtlY,:jMC!OC~'l!IV~Il'Illp:X
iojr'i'JUltr.l~Tol"l,::o;oi7olll',lUtlY,:jMC!OC~'l!IV~Il'Illp:X
iojr'i'JUltr.l~Tol"l,::o;oi7olll',lUtlY,:jMC!OC~'l!IV~Il'Illp:X
.....e
!'o'uwtloftO(lO
.....e
!'o'uwtloftO(lO
.....e
!'o'uwtloftO(lO
rV'lU'::T.IuldnQ
rV'lU'::T.IuldnQ
rV'lU'::T.IuldnQ
"1XV\I:IlIOIlXIOI~
"1XV\I:IlIOIlXIOI~
"1XV\I:IlIOIlXIOI~
£oDc>~$1\lOJo-.>ClOC'oIQOWIMOT~1)r_
£oDc>~$1\lOJo-.>ClOC'oIQOWIMOT~1)r_
£oDc>~$1\lOJo-.>ClOC'oIQOWIMOT~1)r_
w.-~m:N'"1'OOIln~JOrw/llCllUll:)"JI!.'lE.(lVAo.reHl(
w.-~m:N'"1'OOIln~JOrw/llCllUll:)"JI!.'lE.(lVAo.reHl(
w.-~m:N'"1'OOIln~JOrw/llCllUll:)"JI!.'lE.(lVAo.reHl(
~OOI.:.l;IlUD.I'IU~VW<C:.OIlOU;
~OOI.:.l;IlUD.I'IU~VW<C:.OIlOU;
~OOI.:.l;IlUD.I'IU~VW<C:.OIlOU;
~
....
w.e,1lOl.:
~
....
w.e,1lOl.:
~
....
w.e,1lOl.:
1.n=1thY'JtPOC;I:oo..,.;ltIJ;""'''''{'~·~'
1.n=1thY'JtPOC;I:oo..,.;ltIJ;""'''''{'~·~'
1.n=1thY'JtPOC;I:oo..,.;ltIJ;""'''''{'~·~'
...
...
...
lIlo3tlo.al1ml~.3lIIJ~twVLJPfJ:~"i"="'~
lIlo3tlo.al1ml~.3lIIJ~twVLJPfJ:~"i"="'~
lIlo3tlo.al1ml~.3lIIJ~twVLJPfJ:~"i"="'~
1ni1lloklnoE'I"lUPl':r.Ulmr.o--
1ni1lloklnoE'I"lUPl':r.Ulmr.o--
1ni1lloklnoE'I"lUPl':r.Ulmr.o--
Espana
Espana
Espana
hl-dll~.bs>roU1DSl:tl'o«ll
hl-dll~.bs>roU1DSl:tl'o«ll
hl-dll~.bs>roU1DSl:tl'o«ll
{;-~Jl(lI'.'Ta'~Jtslrll'COOlteNo:xiCl·elfmA:l·'So!t
{;-~Jl(lI'.'Ta'~Jtslrll'COOlteNo:xiCl·elfmA:l·'So!t
{;-~Jl(lI'.'Ta'~Jtslrll'COOlteNo:xiCl·elfmA:l·'So!t
"-'CO.ttt."..
"-'CO.ttt."..
"-'CO.ttt."..
!tC1lt011~!)ca'"tldlO~
!tC1lt011~!)ca'"tldlO~
!tC1lt011~!)ca'"tldlO~
....
..,-e:$lK~IIII$laIJI'.lO!Gi·.uEneltfiJ"'q..e
....
..,-e:$lK~IIII$laIJI'.lO!Gi·.uEneltfiJ"'q..e
....
..,-e:$lK~IIII$laIJI'.lO!Gi·.uEneltfiJ"'q..e
!lPr~i.e"JXl:l"OJI1.Ie:~.ooe
!lPr~i.e"JXl:l"OJI1.Ie:~.ooe
!lPr~i.e"JXl:l"OJI1.Ie:~.ooe
df.iaIl1,
df.iaIl1,
df.iaIl1,
~"trCllrtcil(~.[)llrOJGtJ"'-tt1illro.Sl'JW:1[ITt':1!CO
~"trCllrtcil(~.[)llrOJGtJ"'-tt1illro.Sl'JW:1[ITt':1!CO
~"trCllrtcil(~.[)llrOJGtJ"'-tt1illro.Sl'JW:1[ITt':1!CO
A."'llj,;J)ok'ldllJpCl':llM\ls(1J"I(IlJl1~I!I""JlI!lill
A."'llj,;J)ok'ldllJpCl':llM\ls(1J"I(IlJl1~I!I""JlI!lill
A."'llj,;J)ok'ldllJpCl':llM\ls(1J"I(IlJl1~I!I""JlI!lill
~13G"J:.r;o'Wl"1I~O[.POI:JI~IM\ltt!CM"lOlNlIiIll:ll<:
~13G"J:.r;o'Wl"1I~O[.POI:JI~IM\ltt!CM"lOlNlIiIll:ll<:
~13G"J:.r;o'Wl"1I~O[.POI:JI~IM\ltt!CM"lOlNlIiIll:ll<:
w::~s
w::~s
w::~s
,,~·ttII~
,,~·ttII~
,,~·ttII~
s.iJa~rof'CJt;ereID:SlIolluOOI".lCIWICI1IlSteJf.II'.1,",La
s.iJa~rof'CJt;ereID:SlIolluOOI".lCIWICI1IlSteJf.II'.1,",La
s.iJa~rof'CJt;ereID:SlIolluOOI".lCIWICI1IlSteJf.II'.1,",La
CIT
CIT
CIT
~oc;:"IAOSOUf
~oc;:"IAOSOUf
~oc;:"IAOSOUf
Of
CJ<~AHTIA
Of
CJ<~AHTIA
Of
CJ<~AHTIA
RfA\U.A~
RfA\U.A~
RfA\U.A~
C:<1dl,i(>'ot:~
C:<1dl,i(>'ot:~
C:<1dl,i(>'ot:~
~
Cw~oer
~
Cw~oer
~
Cw~oer
(;~rarl.an~I):!":'M1!'e.Il!'Ia~a(lt'll,ilLtCNl:'>to
(;~rarl.an~I):!":'M1!'e.Il!'Ia~a(lt'll,ilLtCNl:'>to
(;~rarl.an~I):!":'M1!'e.Il!'Ia~a(lt'll,ilLtCNl:'>to
!011
!011
!011
,:.~
,:.~
,:.~
h'lI.P'fl\lIlIIllnlavr~'u'(c;~
h'lI.P'fl\lIlIIllnlavr~'u'(c;~
h'lI.P'fl\lIlIIllnlavr~'u'(c;~
..
vl:;9l'o',()QOlf11J'/fI)l(L'"l"cnc6til~t7(.IiXlC
..
vl:;9l'o',()QOlf11J'/fI)l(L'"l"cnc6til~t7(.IiXlC
..
vl:;9l'o',()QOlf11J'/fI)l(L'"l"cnc6til~t7(.IiXlC
Uito<;[(lI(.!'4'tl'otIOUIt;lDllUl'OOI:'1
Uito<;[(lI(.!'4'tl'otIOUIt;lDllUl'OOI:'1
Uito<;[(lI(.!'4'tl'otIOUIt;lDllUl'OOI:'1
r,E.4HMHTPIOY
A.E,I.L
r,E.4HMHTPIOY
A.E,I.L
r,E.4HMHTPIOY
fI.KHQlIIOY 6.
fI.KHQlIIOY 6.
fI.KHQlIIOY 6.
;1Lo6te¥mI{MioIIo;1oIt
;1Lo6te¥mI{MioIIo;1oIt
;1Lo6te¥mI{MioIIo;1oIt
...
a'Cl"ll;ata,O~cv~~~~ltmer~-.cr--l.
...
a'Cl"ll;ata,O~cv~~~~ltmer~-.cr--l.
...
a'Cl"ll;ata,O~cv~~~~ltmer~-.cr--l.
.5ail;lrII1011i!J1&
.5ail;lrII1011i!J1&
.5ail;lrII1011i!J1&
u!O:lJn::~lAIlIleIH[
u!O:lJn::~lAIlIleIH[
u!O:lJn::~lAIlIleIH[
lO-Xot"OffltlQl;t10.e--oCl
lO-Xot"OffltlQl;t10.e--oCl
lO-Xot"OffltlQl;t10.e--oCl
1lI\loI1!Ct>$Ill,cledol
1lI\loI1!Ct>$Ill,cledol
1lI\loI1!Ct>$Ill,cledol
BoI;Y;III.
BoI;Y;III.
BoI;Y;III.
CoJ"'-~
CoJ"'-~
CoJ"'-~
CllAl.(JUIJ-~
CllAl.(JUIJ-~
CllAl.(JUIJ-~
rW~1\ilCod"
rW~1\ilCod"
rW~1\ilCod"
SunclOOrer.orrl()l£101Cter.t:"·'"
SunclOOrer.orrl()l£101Cter.t:"·'"
SunclOOrer.orrl()l£101Cter.t:"·'"
CoP
~
~
CoP
~
~
CoP
~
~
l<l1itttl"lffitolUlAl~ll/tIl,1cLIIlDI~CelprID1.;l()IClUIl
l<l1itttl"lffitolUlAl~ll/tIl,1cLIIlDI~CelprID1.;l()IClUIl
l<l1itttl"lffitolUlAl~ll/tIl,1cLIIlDI~CelprID1.;l()IClUIl
A.E,I.L
11241
'UrAA,EO
11241
'UrAA,EO
11241
'UrAA,EO
THI\:.J0210SlI64QO
THI\:.J0210SlI64QO
THI\:.J0210SlI64QO
Nse
Nse
Nse
"'_'II
'iII"
"'_'II
'iII"
"'_'II
'iII"
laI
....
,(
/W"Il."I':J«Io(
10l'0"1'p)I.N1
laI
....
,(
/W"Il."I':J«Io(
10l'0"1'p)I.N1
laI
....
,(
/W"Il."I':J«Io(
10l'0"1'p)I.N1
KIOO
rol»..ooCOQOtUI"",
KIOO
KIOO
IC.ENWOOO
IC.ENWOOO
IC.ENWOOO
~tuniF
~tuniF
~tuniF
ial'K1Jra.
ial'K1Jra.
ial'K1Jra.
IP!'X1\I
rol»..ooCOQOtUI"",
IP!'X1\I
rol»..ooCOQOtUI"",
IP!'X1\I
"""",oet-.:aol1lltJ,:lOO
"""",oet-.:aol1lltJ,:lOO
"""",oet-.:aol1lltJ,:lOO
:")WmDlI:W):lUr.'ItCfIm..n'ltOl
:")WmDlI:W):lUr.'ItCfIm..n'ltOl
:")WmDlI:W):lUr.'ItCfIm..n'ltOl
'T31)11tJ!!~;.:Il1IllUII<l:Im~hs
'T31)11tJ!!~;.:Il1IllUII<l:Im~hs
'T31)11tJ!!~;.:Il1IllUII<l:Im~hs
,.Estm
,.Estm
,.Estm
·1!"lt~P1OU1Oa~
·1!"lt~P1OU1Oa~
·1!"lt~P1OU1Oa~
e
ll':I¥IJ
l:e!Ie!!oeIf.t'1Cmpur
e
ll':I¥IJ
l:e!Ie!!oeIf.t'1Cmpur
e
ll':I¥IJ
l:e!Ie!!oeIf.t'1Cmpur
"'IoI~w
.
.o1a
"'IoI~w
.
.o1a
"'IoI~w
.
.o1a
tH-RI:A
S.A.
tH-RI:A
S.A.
tH-RI:A
S.A.
239-IlItl20
Barulvna
239-IlItl20
Barulvna
239-IlItl20
Barulvna
Tel..U(UIS07S2S2
Tel..U(UIS07S2S2
Tel..U(UIS07S2S2
_.kenwood.n
_.kenwood.n
_.kenwood.n
Ofllln4~um
Y
Gl!AMlE
Ofllln4~um
Y
Gl!AMlE
Ofllln4~um
Y
Gl!AMlE
rllt:Stt~TACIO~ES
t~CES!JMP4~4
rllt:Stt~TACIO~ES
t~CES!JMP4~4
rllt:Stt~TACIO~ES
t~CES!JMP4~4
R.CI,A.tAACI()'l
R.CI,A.tAACI()'l
R.CI,A.tAACI()'l
~·'Ii
~ <J..(;mpal'l~
~·'Ii
~ <J..(;mpal'l~
~·'Ii
~ <J..(;mpal'l~
U
c1lnOO:I.~o
",!b.l~BI
U
c1lnOO:I.~o
",!b.l~BI
U
c1lnOO:I.~o
",!b.l~BI
(a<'lfIV~
(a<'lfIV~
(a<'lfIV~
TO."t;IOlO'<c:OV
TO."t;IOlO'<c:OV
TO."t;IOlO'<c:OV
....
~EIMOOD
....
~EIMOOD
....
~EIMOOD
a 'It'Wll!W1
a 'It'Wll!W1
a 'It'Wll!W1
~
~
~
...
...
...
]llUt~
]llUt~
]llUt~
EST:..
TAR£l~
EST:..
TAR£l~
EST:..
TAR£l~
\1l:e-.;ta
14itlJ
lie
\1l:e-.;ta
14itlJ
lie
\1l:e-.;ta
14itlJ
lie
mlJl";lte
mlJl";lte
mlJl";lte
H
H
H
r.E.llHMHTPIOY A.E.B.E.
r.E.llHMHTPIOY A.E.B.E.
r.E.llHMHTPIOY A.E.B.E.
(:J!T\I~U:qw~~
(:J!T\I~U:qw~~
(:J!T\I~U:qw~~
~
J,.or.old.rl;"",,\:J.bqyClC.f\'lorOlOon::->lliDOII"1ll'l
~
J,.or.old.rl;"",,\:J.bqyClC.f\'lorOlOon::->lliDOII"1ll'l
~
J,.or.old.rl;"",,\:J.bqyClC.f\'lorOlOon::->lliDOII"1ll'l
rlJlWllll"lJ~:nOW'lt.n'qlllADY.JJJC~rw
rlJlWllll"lJ~:nOW'lt.n'qlllADY.JJJC~rw
rlJlWllll"lJ~:nOW'lt.n'qlllADY.JJJC~rw
txD'"lIt6;lc·\IU(Jf
....
Eu"'"=l
txD'"lIt6;lc·\IU(Jf
....
Eu"'"=l
txD'"lIt6;lc·\IU(Jf
....
!"I)loOYll')lI;~~O/);"I5ot:u3w7)1:lUqrQxlI~
!"I)loOYll')lI;~~O/);"I5ot:u3w7)1:lUqrQxlI~
!"I)loOYll')lI;~~O/);"I5ot:u3w7)1:lUqrQxlI~
151
151
151
8I'·"'.-':p:n:Jl/lIl-~«'<IJOO;Xi..-VCl'l:lPCO¥.~'lliJv
8I'·"'.-':p:n:Jl/lIl-~«'<IJOO;Xi..-VCl'l:lPCO¥.~'lliJv
8I'·"'.-':p:n:Jl/lIl-~«'<IJOO;Xi..-VCl'l:lPCO¥.~'lliJv
11'>~:iwt'l,tlqlQ'17"01);c:;~gU~I-t\l'~IlOl!l:or'li:lcno
11'>~:iwt'l,tlqlQ'17"01);c:;~gU~I-t\l'~IlOl!l:or'li:lcno
11'>~:iwt'l,tlqlQ'17"01);c:;~gU~I-t\l'~IlOl!l:or'li:lcno
11)'<
'li'tilO\ll..aT?o.~.
11)'<
'li'tilO\ll..aT?o.~.
11)'<
'li'tilO\ll..aT?o.~.
~T",,"'c;MJill:iTlJ"~TOIIf\:lOll)O,"TOl\OW'J(.."I'JUl:loYt;
~T",,"'c;MJill:iTlJ"~TOIIf\:lOll)O,"TOl\OW'J(.."I'JUl:loYt;
~T",,"'c;MJill:iTlJ"~TOIIf\:lOll)O,"TOl\OW'J(.."I'JUl:loYt;
~'ITJ':E'f'l\'T'pIJl;
~'ITJ':E'f'l\'T'pIJl;
~'ITJ':E'f'l\'T'pIJl;
Tc
nPOlO~
Tc
nPOlO~
Tc
nPOlO~
'OITtn1<OTTPClTlJ'10"o.lo:a."",yo\'fc~lO(nwt'IU;>II(:(O'101
'OITtn1<OTTPClTlJ'10"o.lo:a."",yo\'fc~lO(nwt'IU;>II(:(O'101
'OITtn1<OTTPClTlJ'10"o.lo:a."",yo\'fc~lO(nwt'IU;>II(:(O'101
Iml
~",DO
Iml
~",DO
Iml
~",DO
{)U&T0TP\I~i>::11IlUtT1OITOIN1U.~1lIl)iJDll~1lGvmrrrovro.l
{)U&T0TP\I~i>::11IlUtT1OITOIN1U.~1lIl)iJDll~1lGvmrrrovro.l
{)U&T0TP\I~i>::11IlUtT1OITOIN1U.~1lIl)iJDll~1lGvmrrrovro.l
01'"
IT,'
01'"
IT,'
01'"
IT,'
lJLJI<WIl~Llon;vwtuO!a11Ol.ltXl'II;I('t:.\u<ir.ra../l0T0nl,oo.,
lJLJI<WIl~Llon;vwtuO!a11Ol.ltXl'II;I('t:.\u<ir.ra../l0T0nl,oo.,
lJLJI<WIl~Llon;vwtuO!a11Ol.ltXl'II;I('t:.\u<ir.ra../l0T0nl,oo.,
nOUI\Xlt~lllll<J1l'lTfJ"",Aoyl.Itpyoul~
nOUI\Xlt~lllll<J1l'lTfJ"",Aoyl.Itpyoul~
nOUI\Xlt~lllll<J1l'lTfJ"",Aoyl.Itpyoul~
Eir>lo~~tOl~e~~DJPloi1IIIO'L~6r:OUur.Oo:tM(ll
Eir>lo~~tOl~e~~DJPloi1IIIO'L~6r:OUur.Oo:tM(ll
Eir>lo~~tOl~e~~DJPloi1IIIO'L~6r:OUur.Oo:tM(ll
otoAAa~TU'"Oo.o.IL[N()'{[(t:rOCllloJcrlliJ~VTOllJf1\
otoAAa~TU'"Oo.o.IL[N()'{[(t:rOCllloJcrlliJ~VTOllJf1\
otoAAa~TU'"Oo.o.IL[N()'{[(t:rOCllloJcrlliJ~VTOllJf1\
~"",,~r.iI/l'?)l;~TOL'lLIIOO'(rooctlIIY!fI'IEUClLlI'l.tOTlOI
~"",,~r.iI/l'?)l;~TOL'lLIIOO'(rooctlIIY!fI'IEUClLlI'l.tOTlOI
~"",,~r.iI/l'?)l;~TOL'lLIIOO'(rooctlIIY!fI'IEUClLlI'l.tOTlOI
,~I";'f'iJItq;6cl~VTOI(!!CO\'~ono~~IOl
,~I";'f'iJItq;6cl~VTOI(!!CO\'~ono~~IOl
,~I";'f'iJItq;6cl~VTOI(!!CO\'~ono~~IOl
talf;bJr~'''lW~''''C:O:c(1.lOV1a~<a.
talf;bJr~'''lW~''''C:O:c(1.lOV1a~<a.
talf;bJr~'''lW~''''C:O:c(1.lOV1a~<a.
~t.[mlwv~10]W;(l'I'lnoQIOW1fOOtl,""''r\I'''''''C1'll10111O
~t.[mlwv~10]W;(l'I'lnoQIOW1fOOtl,""''r\I'''''''C1'll10111O
~t.[mlwv~10]W;(l'I'lnoQIOW1fOOtl,""''r\I'''''''C1'll10111O
I!OUOrilrp;J;~lltMl'lWa01'll"lJy\llltlI"IC.l,llIPXurLIU
I!OUOrilrp;J;~lltMl'lWa01'll"lJy\llltlI"IC.l,llIPXurLIU
I!OUOrilrp;J;~lltMl'lWa01'll"lJy\llltlI"IC.l,llIPXurLIU
r~OI"f'IJ""IIl!lOlJury;tvnrrr.f;"'loJollIlWt)Ml
r~OI"f'IJ""IIl!lOlJury;tvnrrr.f;"'loJollIlWt)Ml
r~OI"f'IJ""IIl!lOlJury;tvnrrr.f;"'loJollIlWt)Ml
0Y1~1..omu.u.~lJflJX...-xlOlllil~&v1.fDl1(i1lO
0Y1~1..omu.u.~lJflJX...-xlOlllil~&v1.fDl1(i1lO
0Y1~1..omu.u.~lJflJX...-xlOlllil~&v1.fDl1(i1lO
;:QlUJ'A.s..'l1Dloc~'rp;:rniJP'lC011lr.Jllllcf,cut"o:l'.UoJ
;:QlUJ'A.s..'l1Dloc~'rp;:rniJP'lC011lr.Jllllcf,cut"o:l'.UoJ
;:QlUJ'A.s..'l1Dloc~'rp;:rniJP'lC011lr.Jllllcf,cut"o:l'.UoJ
1Q.Il.QI.~lrncXf.ll'lrmy;;&;~"I"&cn:r"lUlU1lo:tlq;
1Q.Il.QI.~lrncXf.ll'lrmy;;&;~"I"&cn:r"lUlU1lo:tlq;
1Q.Il.QI.~lrncXf.ll'lrmy;;&;~"I"&cn:r"lUlU1lo:tlq;
roo~'jt!ltl\.l:'lM),.el('fI'lxtill101I\OCIPtlO'\l:IJYOPOl:'"
roo~'jt!ltl\.l:'lM),.el('fI'lxtill101I\OCIPtlO'\l:IJYOPOl:'"
roo~'jt!ltl\.l:'lM),.el('fI'lxtill101I\OCIPtlO'\l:IJYOPOl:'"
[l.:J1~~0lr11Tl1tOliO
[l.:J1~~0lr11Tl1tOliO
[l.:J1~~0lr11Tl1tOliO
'I
Ey,U'pTmn1IlllYw(mn:
'I
Ey,U'pTmn1IlllYw(mn:
'I
Ey,U'pTmn1IlllYw(mn:
(Oi~"'lou~oc.lll~~OWIfllW',crL&lCllhJt
(Oi~"'lou~oc.lll~~OWIfllW',crL&lCllhJt
(Oi~"'lou~oc.lll~~OWIfllW',crL&lCllhJt
G!lWtt:11ta;\lo.(rlIlO'J~:JIOf!"lCPid(;
G!lWtt:11ta;\lo.(rlIlO'J~:JIOf!"lCPid(;
G!lWtt:11ta;\lo.(rlIlO'J~:JIOf!"lCPid(;
KENWOOD IBERICA S.A.
KENWOOD IBERICA S.A.
KENWOOD IBERICA S.A.
It)
It)
It)
(i1Ila~IieaJ11;U
(i1Ila~IieaJ11;U
(i1Ila~IieaJ11;U
!>i5i!II'1DrJrlilltitllnop::elleJ;fotl\llcio'lll'llosielprndu:!iJl'Ia
!>i5i!II'1DrJrlilltitllnop::elleJ;fotl\llcio'lll'llosielprndu:!iJl'Ia
!>i5i!II'1DrJrlilltitllnop::elleJ;fotl\llcio'lll'llosielprndu:!iJl'Ia
Imn:JilrlColCOv~dlalr}Jrllllmlilllt;llelil~delol
Imn:JilrlColCOv~dlalr}Jrllllmlilllt;llelil~delol
Imn:JilrlColCOv~dlalr}Jrllllmlilllt;llelil~delol
~.I\er-..:n:IC(ll;Jl1lilimse~elll:ItdUCtr~liI
~.I\er-..:n:IC(ll;Jl1lilimse~elll:ItdUCtr~liI
~.I\er-..:n:IC(ll;Jl1lilimse~elll:ItdUCtr~liI
repr..riOll():>llllOlU:IOt.aplawoccreDen~la
repr..riOll():>llllOlU:IOt.aplawoccreDen~la
repr..riOll():>llllOlU:IOt.aplawoccreDen~la
Ii
EIJI'oda:loha\idolii:rcm~cuse~lt~toooslos
Ii
EIJI'oda:loha\idolii:rcm~cuse~lt~toooslos
Ii
EIJI'oda:loha\idolii:rcm~cuse~lt~toooslos
~<slotalesollJtilmI5Yllosr!Qlei"erwosDe
~<slotalesollJtilmI5Yllosr!Qlei"erwosDe
~<slotalesollJtilmI5Yllosr!Qlei"erwosDe
stl;u'r.3l~;lrLltles~ei::asdelaotJ:t.1orr;oallltllel'al:rQ-Je
stl;u'r.3l~;lrLltles~ei::asdelaotJ:t.1orr;oallltllel'al:rQ-Je
stl;u'r.3l~;lrLltles~ei::asdelaotJ:t.1orr;oallltllel'al:rQ-Je
enLJ·;r.,.a.blil(jOlar4Qrow:ne~r-:OUIlUU-ll!S~1IJ5
enLJ·;r.,.a.blil(jOlar4Qrow:ne~r-:OUIlUU-ll!S~1IJ5
enLJ·;r.,.a.blil(jOlar4Qrow:ne~r-:OUIlUU-ll!S~1IJ5
pra'Jsa·elp".n.(;(Orn;l:.ll~yIllGwa.'l1oaOtll'<td.a:roll()
pra'Jsa·elp".n.(;(Orn;l:.ll~yIllGwa.'l1oaOtll'<td.a:roll()
pra'Jsa·elp".n.(;(Orn;l:.ll~yIllGwa.'l1oaOtll'<td.a:roll()
.lSl'gI/Ial.:l.njU;.oiin~I~.:lIleSUI't~oIa1aI~
.lSl'gI/Ial.:l.njU;.oiin~I~.:lIleSUI't~oIa1aI~
.lSl'gI/Ial.:l.njU;.oiin~I~.:lIleSUI't~oIa1aI~
~d6ltU
~d6ltU
~d6ltU
~QuilJr:\oilolll1elprld.c1or.~~1tI1lOIt.JlkaWl~
~QuilJr:\oilolll1elprld.c1or.~~1tI1lOIt.JlkaWl~
~QuilJr:\oilolll1elprld.c1or.~~1tI1lOIt.JlkaWl~
Sidpl(dJrn1lii~usd.lenllnpat,fJ.OOtl\~nrdllloenolrO'
Sidpl(dJrn1lii~usd.lenllnpat,fJ.OOtl\~nrdllloenolrO'
Sidpl(dJrn1lii~usd.lenllnpat,fJ.OOtl\~nrdllloenolrO'
esl.ll'(l,'ll!S
esl.ll'(l,'ll!S
esl.ll'(l,'ll!S
ia''l11la
ia''l11la
ia''l11la
lOCIIH:Orl'
lOCIIH:Orl'
lOCIIH:Orl'
lEiII'.oV:i11fIPlodtOO.lIIsf:5'.'i1l1ia:l"iil,liaWdY'l:l1U6'mi!:110\
lEiII'.oV:i11fIPlodtOO.lIIsf:5'.'i1l1ia:l"iil,liaWdY'l:l1U6'mi!:110\
lEiII'.oV:i11fIPlodtOO.lIIsf:5'.'i1l1ia:l"iil,liaWdY'l:l1U6'mi!:110\
;,i<:illes
;,i<:illes
;,i<:illes
j:(Jl'IilTlllt1i<ldo"eo'ici<ll
j:(Jl'IilTlllt1i<ldo"eo'ici<ll
j:(Jl'IilTlllt1i<ldo"eo'ici<ll
t<1g,r¥l!i.1
t<1g,r¥l!i.1
t<1g,r¥l!i.1
disaolliO~ene.~le
disaolliO~ene.~le
disaolliO~ene.~le
~i1~DJ
~i1~DJ
~i1~DJ
el1'o~1i
el1'o~1i
el1'o~1i
amPla
amPla
amPla
C
QJed~
C
QJed~
C
QJed~
ial
ial
ial
Ib:,
Ib:,
Ib:,
I.)
I.)
I.)
,m
,m
,m
Eu"'"=l
r.w/,')oru;:rWnr..,.,:lOO~lltro!¥G)~
r.w/,')oru;:rWnr..,.,:lOO~lltro!¥G)~
r.w/,')oru;:rWnr..,.,:lOO~lltro!¥G)~
T~W~~'OI1llWO)~...,..,daulO;ll\lol)O'fO(
T~W~~'OI1llWO)~...,..,daulO;ll\lol)O'fO(
T~W~~'OI1llWO)~...,..,daulO;ll\lol)O'fO(
~
(101PiO
~E,'iWCOU
tllUl.>'.JCOC1CilIOU
~
(101PiO
~E,'iWCOU
tllUl.>'.JCOC1CilIOU
~
(101PiO
~E,'iWCOU
tllUl.>'.JCOC1CilIOU
eXtL"oTQOlll;uooTli
YIIJ
""
lJ'Il:rlO"lIw..
'OI(Jt:
c.I.a
ra
eXtL"oTQOlll;uooTli
YIIJ
""
eXtL"oTQOlll;uooTli
w;;npli",l":
w;;npli",l":
w;;npli",l":
E'fV_"TlO'1
E'fV_"TlO'1
E'fV_"TlO'1
Plaocm:OIVII~_r
Plaocm:OIVII~_r
Plaocm:OIVII~_r
~r.lIIar.l~«)t01oDfOU'f\:>OItw1O(
~r.lIIar.l~«)t01oDfOU'f\:>OItw1O(
~r.lIIar.l~«)t01oDfOU'f\:>OItw1O(
~ob.COtoel!JLXo1
~ob.COtoel!JLXo1
~ob.COtoel!JLXo1
Ilo::llno>~'eb
Ilo::llno>~'eb
Ilo::llno>~'eb
~"~oel~
~"~oel~
~"~oel~
1~>lI_1J
1~>lI_1J
1~>lI_1J
o,;~
o,;~
o,;~
A~~.siel..oW!::lO~(~\;(nl~ilI(1!IW"l\tlootl&;!o
A~~.siel..oW!::lO~(~\;(nl~ilI(1!IW"l\tlootl&;!o
A~~.siel..oW!::lO~(~\;(nl~ilI(1!IW"l\tlootl&;!o
~n
~n
~n
~
IIIOIII.dO
~
IIIOIII.dO
~
IIIOIII.dO
ollQinal
ollQinal
ollQinal
!!'ciulr);)
!!'ciulr);)
!!'ciulr);)
Lor.;
ill~"",iI:ne~
Lor.;
ill~"",iI:ne~
Lor.;
ill~"",iI:ne~
a,JSIf";.intIWl'fltJrI!'i<.>om;
a,JSIf";.intIWl'fltJrI!'i<.>om;
a,JSIf";.intIWl'fltJrI!'i<.>om;
MJHlllll'llhegilOO
MJHlllll'llhegilOO
MJHlllll'llhegilOO
[rJr~S
[rJr~S
[rJr~S
'WWJJUOO
'WWJJUOO
'WWJJUOO
.!:I'IUII~lltlitlili:ldIlUiIJtorlm~POI"e1
.!:I'IUII~lltlitlili:ldIlUiIJtorlm~POI"e1
.!:I'IUII~lltlitlili:ldIlUiIJtorlm~POI"e1
!)""1S~nerf"ro:dJ.tot.~POllleOlq;I'(Q,;IC.C'W1I~
!)""1S~nerf"ro:dJ.tot.~POllleOlq;I'(Q,;IC.C'W1I~
!)""1S~nerf"ro:dJ.tot.~POllleOlq;I'(Q,;IC.C'W1I~
nod,1QltIPI'l!S
nod,1QltIPI'l!S
nod,1QltIPI'l!S
111l01'.lj[1;UIldfoQfor~oeroo.,c~
111l01'.lj[1;UIldfoQfor~oeroo.,c~
111l01'.lj[1;UIldfoQfor~oeroo.,c~
IJarrn.tntlf'rtd:l:1Gt.l:UX6Clf.rl"t17am.~CI'a"!comp
IJarrn.tntlf'rtd:l:1Gt.l:UX6Clf.rl"t17am.~CI'a"!comp
IJarrn.tntlf'rtd:l:1Gt.l:UX6Clf.rl"t17am.~CI'a"!comp
t11:J1:1;(I.lfI11!:'ISI(Ilenllliq..ll.lil'O.seis'l1O.mLl;:~
t11:J1:1;(I.lfI11!:'ISI(Ilenllliq..ll.lil'O.seis'l1O.mLl;:~
t11:J1:1;(I.lfI11!:'ISI(Ilenllliq..ll.lil'O.seis'l1O.mLl;:~
lJ'Il:rlO"lIw..
YIIJ
""
lJ'Il:rlO"lIw..
nd~CI/';
0110
,CO\'
nd~CI/';
0110
,CO\'
nd~CI/';
0110
,CO\'
0'.111]
I<:JI
Ol:.yivl:TfII/,lO:Tti
0'.111]
I<:JI
Ol:.yivl:TfII/,lO:Tti
0'.111]
I<:JI
Ol:.yivl:TfII/,lO:Tti
~'eco6ol,iieIIIll!Jl~1Jt~cXJllIellP!l
~'eco6ol,iieIIIll!Jl~1Jt~cXJllIellP!l
~'eco6ol,iieIIIll!Jl~1Jt~cXJllIellP!l
lJ<IIoJ
~mil"!<J
rone"lrll'l1
lJ<IIoJ
~mil"!<J
rone"lrll'l1
lJ<IIoJ
~mil"!<J
rone"lrll'l1
J
r~l.O.niei1l)S
qJe l:;llf.llo<;
J
r~l.O.niei1l)S
qJe l:;llf.llo<;
J
r~l.O.niei1l)S
qJe l:;llf.llo<;
Jill
:!"J'~'
tr.:Hit.arfeetl
Jill
:!"J'~'
tr.:Hit.arfeetl
Jill
:!"J'~'
tr.:Hit.arfeetl
ljIfa,llLl r'M'J
S!1,eIr.aq,,'
ljIfa,llLl r'M'J
S!1,eIr.aq,,'
ljIfa,llLl r'M'J
S!1,eIr.aq,,'
~Ilelwis
dU:lO.le!iep,~!IJl~D<Jar.l6"
~Ilelwis
dU:lO.le!iep,~!IJl~D<Jar.l6"
~Ilelwis
dU:lO.le!iep,~!IJl~D<Jar.l6"
yto,
pl')rol,
or
Itfll..tS1C'lq~
yto,
pl')rol,
or
Itfll..tS1C'lq~
yto,
pl')rol,
or
Itfll..tS1C'lq~
PillS
~~I~€fYo~
PillS
~~I~€fYo~
PillS
~~I~€fYo~
e!le
~oaiS
OJI
CU;llq:I~!l'
e!le
~oaiS
OJI
CU;llq:I~!l'
e!le
~oaiS
OJI
CU;llq:I~!l'
p.lr~~Llrepollat'OO
p.lr~~Llrepollat'OO
p.lr~~Llrepollat'OO
SId
WrolllM
~Hldo
SId
WrolllM
~Hldo
SId
WrolllM
~Hldo
iii<
I~
G"'onlla
iii<
I~
G"'onlla
iii<
I~
G"'onlla
~I
Pil>i:II.dIl,
~I
Pil>i:II.dIl,
~I
Pil>i:II.dIl,
IJ110
all~o:lJCJ.~
IJ110
all~o:lJCJ.~
IJ110
all~o:lJCJ.~
enfi
PrD(hlJ\lOCasio~;ldO:S
enfi
PrD(hlJ\lOCasio~;ldO:S
enfi
PrD(hlJ\lOCasio~;ldO:S
u
"T'pU(li;l.~'le-;dlSaI:OOoUUl
u
"T'pU(li;l.~'le-;dlSaI:OOoUUl
u
"T'pU(li;l.~'le-;dlSaI:OOoUUl
'<WoI·ilIlo"oemt:lilllleSlleletl~U5O:l
'<WoI·ilIlo"oemt:lilllleSlleletl~U5O:l
'<WoI·ilIlo"oemt:lilllleSlleletl~U5O:l
e&vl<,(l
'OI(Jt:
c.I.a
ra
e&vl<,(l
'OI(Jt:
c.I.a
ra
e&vl<,(l
'O'IlO"'IAXlI~
l:JlTlV
E~'l
'O'IlO"'IAXlI~
l:JlTlV
E~'l
'O'IlO"'IAXlI~
l:JlTlV
E~'l
"""',JIII~cQw~Ylo
Iriv
"""',JIII~cQw~Ylo
Iriv
"""',JIII~cQw~Ylo
Iriv
....
~~1I)!.I
....
~~1I)!.I
....
~~1I)!.I
..
..
..
r~opils.
0
r~opils.
0
r~opils.
0
~Ol~~
ell
(II~I~
~Ol~~
ell
(II~I~
~Ol~~
ell
(II~I~
Eurwa.W.~T
!iel'V'l-iO
Eurwa.W.~T
!iel'V'l-iO
Eurwa.W.~T
!iel'V'l-iO
A
1l$(IlIIO~Oj:Il<Ierl':O')e
A
1l$(IlIIO~Oj:Il<Ierl':O')e
A
1l$(IlIIO~Oj:Il<Ierl':O')e
StIl[:I:I)Sill~~noesllo"1
StIl[:I:I)Sill~~noesllo"1
StIl[:I:I)Sill~~noesllo"1
cegalillltl.l
no
t'JM~
l!l
cegalillltl.l
no
t'JM~
l!l
cegalillltl.l
no
t'JM~
l!l
i_llrvon
1f.9~~""
COlli!
i_llrvon
1f.9~~""
COlli!
i_llrvon
1f.9~~""
COlli!
n;lC
..
y~elpa;'de
n;lC
..
y~elpa;'de
n;lC
..
y~elpa;'de
PI~elL~UOlIO
PI~elL~UOlIO
PI~elL~UOlIO
111o'lI~(l'lirnielll0
IIwml V
111o'lI~(l'lirnielll0
IIwml V
111o'lI~(l'lirnielll0
IIwml V
lliJ<iCdCllSlTllimnlli(llleonl
lliJ<iCdCllSlTllimnlli(llleonl
lliJ<iCdCllSlTllimnlli(llleonl
pot
'ep;l1i)C!01e1
pot
'ep;l1i)C!01e1
pot
'ep;l1i)C!01e1
CIJoI!Qu"
CIJoI!Qu"
CIJoI!Qu"
rilb!ltal~e
rilb!ltal~e
rilb!ltal~e
lnaluso
lnaluso
lnaluso
France
France
France
Q;er
\J'JT:slI
.....dePrrdJilsl<tJMw1.
Q;er
\J'JT:slI
.....dePrrdJilsl<tJMw1.
Q;er
\J'JT:slI
1.o....,»D;<rJULUD;
....~;..
1.o....,»D;<rJULUD;
1.o....,»D;<rJULUD;
1:"d,:J..oolIC11¥Y.\lXIC9'lDiI:Im11\lIOmd.tmJv'!'D
1:"d,:J..oolIC11¥Y.\lXIC9'lDiI:Im11\lIOmd.tmJv'!'D
1:"d,:J..oolIC11¥Y.\lXIC9'lDiI:Im11\lIOmd.tmJv'!'D
•
.qql.OO"'laJ~ll)na:!l;lE"'evY'J1'T.I
•
.qql.OO"'laJ~ll)na:!l;lE"'evY'J1'T.I
•
.qql.OO"'laJ~ll)na:!l;lE"'evY'J1'T.I
M
(rpl(lI1Of\:IOi-'<IIlCOIfliA.'JYl:JIlXu:An:l.:l1UJ:1"\IO.
M
(rpl(lI1Of\:IOi-'<IIlCOIfliA.'JYl:JIlXu:An:l.:l1UJ:1"\IO.
M
(rpl(lI1Of\:IOi-'<IIlCOIfliA.'JYl:JIlXu:An:l.:l1UJ:1"\IO.
1IllC1plT1tI;d:Jf1"ll:J!Wl~q:JUClltUClllia.-I\
1IllC1plT1tI;d:Jf1"ll:J!Wl~q:JUClltUClllia.-I\
1IllC1plT1tI;d:Jf1"ll:J!Wl~q:JUClltUClllia.-I\
\Il'1OX'UC'l""OhO:1L'J.~cYI~<\O
\Il'1OX'UC'l""OhO:1L'J.~cYI~<\O
\Il'1OX'UC'l""OhO:1L'J.~cYI~<\O
(61(rpl(V1ol'\lole.nouCllf'V.7II"Jlot~,MI:JIl
(61(rpl(V1ol'\lole.nouCllf'V.7II"Jlot~,MI:JIl
(61(rpl(V1ol'\lole.nouCllf'V.7II"Jlot~,MI:JIl
0'10VtllO.<tI)(IJ.v,j.=1-i._fIllI'<'I~
0'10VtllO.<tI)(IJ.v,j.=1-i._fIllI'<'I~
0'10VtllO.<tI)(IJ.v,j.=1-i._fIllI'<'I~
~o.<aro.UllAJ1uJ')~'¥lll,,;y..~no.:l~
~o.<aro.UllAJ1uJ')~'¥lll,,;y..~no.:l~
~o.<aro.UllAJ1uJ')~'¥lll,,;y..~no.:l~
~.na,QI1'JlI~"""f1'i:L":iI~Iimrn><~,~'"li
~.na,QI1'JlI~"""f1'i:L":iI~Iimrn><~,~'"li
~.na,QI1'JlI~"""f1'i:L":iI~Iimrn><~,~'"li
tlH
ili'ffll
"1\
~ENWOOO
tlH
ili'ffll
"1\
~ENWOOO
tlH
ili'ffll
"1\
~ENWOOO
Itl~l1OU~~TalJXti~OJ'llItVT""l1ouill.oo
Itl~l1OU~~TalJXti~OJ'llItVT""l1ouill.oo
Itl~l1OU~~TalJXti~OJ'llItVT""l1ouill.oo
~~l.o1'ilfla;'llTIl;"a
~~l.o1'ilfla;'llTIl;"a
~~l.o1'ilfla;'llTIl;"a
11OuJWl«L\liVTcL
'f1J
11OuJWl«L\liVTcL
'f1J
11OuJWl«L\liVTcL
'f1J
~MIO'OI.Ni~..;oo:Ji:u:~CD~OAAoo"'L>:t1,J1:vo
~MIO'OI.Ni~..;oo:Ji:u:~CD~OAAoo"'L>:t1,J1:vo
~MIO'OI.Ni~..;oo:Ji:u:~CD~OAAoo"'L>:t1,J1:vo
~~~POl;10uir:oou~l:t;
~~~POl;10uir:oou~l:t;
~~~POl;10uir:oou~l:t;
1m)
I,'illlplil~f'Ila~O'IIIJ.ti~l'lImuOCvOVT[JIl(><plw~
1m)
I,'illlplil~f'Ila~O'IIIJ.ti~l'lImuOCvOVT[JIl(><plw~
1m)
I,'illlplil~f'Ila~O'IIIJ.ti~l'lImuOCvOVT[JIl(><plw~
n.\oo.llTOv~,Ni!JWIlli«lToocrUIJ:rOUCO'.llI~I\OO
n.\oo.llTOv~,Ni!JWIlli«lToocrUIJ:rOUCO'.llI~I\OO
n.\oo.llTOv~,Ni!JWIlli«lToocrUIJ:rOUCO'.llI~I\OO
OllllI«l100TollclJ';,l1Toomia1TEj>.\OJ$O\oOOY1Ol(~Ili,Uo.~'V)
OllllI«l100TollclJ';,l1Toomia1TEj>.\OJ$O\oOOY1Ol(~Ili,Uo.~'V)
OllllI«l100TollclJ';,l1Toomia1TEj>.\OJ$O\oOOY1Ol(~Ili,Uo.~'V)
'~.Oll\f.\.""'~LIiM~.""~":""M~.JI'.pOlfiO
'~.Oll\f.\.""'~LIiM~.""~":""M~.JI'.pOlfiO
'~.Oll\f.\.""'~LIiM~.""~":""M~.JI'.pOlfiO
~C'la'xrLOU1(l'CIfOP'T~~IlI\O~t(lOl~
~C'la'xrLOU1(l'CIfOP'T~~IlI\O~t(lOl~
~C'la'xrLOU1(l'CIfOP'T~~IlI\O~t(lOl~
10
TO~O""",Ilf1I)'L"O~qtt,",,~oo.o.Ol(lx.am<;OfT4iOi
10
TO~O""",Ilf1I)'L"O~qtt,",,~oo.o.Ol(lx.am<;OfT4iOi
10
TO~O""",Ilf1I)'L"O~qtt,",,~oo.o.Ol(lx.am<;OfT4iOi
tX<J.N~llti,fM:r«J.\:J8r1~lQJC~i
tX<J.N~llti,fM:r«J.\:J8r1~lQJC~i
tX<J.N~llti,fM:r«J.\:J8r1~lQJC~i
IlEV'Y~ourI,1llalfItT(lI~t"ilEII:T1jIOOL."Tl:lOOtlt.t'll"1om,otlttl
IlEV'Y~ourI,1llalfItT(lI~t"ilEII:T1jIOOL."Tl:lOOtlt.t'll"1om,otlttl
IlEV'Y~ourI,1llalfItT(lI~t"ilEII:T1jIOOL."Tl:lOOtlt.t'll"1om,otlttl
l'\lo.tNlE'liullJLIWll
l'\lo.tNlE'liullJLIWll
l'\lo.tNlE'liullJLIWll
"'''''''''~.ofJITlt·;aI''''ICpu.Qi:II'JIllUtI'l\MtIU.-oo-1IDJ
"'''''''''~.ofJITlt·;aI''''ICpu.Qi:II'JIllUtI'l\MtIU.-oo-1IDJ
"'''''''''~.ofJITlt·;aI''''ICpu.Qi:II'JIllUtI'l\MtIU.-oo-1IDJ
lOU!bcl¢VTnc:
~arrf1tf~~
lOU!bcl¢VTnc:
~arrf1tf~~
lOU!bcl¢VTnc:
~arrf1tf~~
r.or4~.o~I:lJ,IptI'J(ouwiJl:IlllVt:1o'1;>/lml~lt.
r.or4~.o~I:lJ,IptI'J(ouwiJl:IlllVt:1o'1;>/lml~lt.
r.or4~.o~I:lJ,IptI'J(ouwiJl:IlllVt:1o'1;>/lml~lt.
lJl'plqlD.JllI1OC(Ito
....
on~1
lJl'plqlD.JllI1OC(Ito
....
on~1
lJl'plqlD.JllI1OC(Ito
....
on~1
nP010IH
nP010IH
nP010IH
"'~'lo1lplo_'l~I~~lllftJ,""'~'V\'iGTfJ"
"'~'lo1lplo_'l~I~~lllftJ,""'~'V\'iGTfJ"
"'~'lo1lplo_'l~I~~lllftJ,""'~'V\'iGTfJ"
~W:w1llM1..~UM:\c;~~
~W:w1llM1..~UM:\c;~~
~W:w1llM1..~UM:\c;~~
~illPl:ca;U1,",UlI<:cloled'-dIate
~illPl:ca;U1,",UlI<:cloled'-dIate
~illPl:ca;U1,",UlI<:cloled'-dIate
llellnsblclJro~~lltUIIa.omcqJll!f"'Q.SlIu!l~
llellnsblclJro~~lltUIIa.omcqJll!f"'Q.SlIu!l~
llellnsblclJro~~lltUIIa.omcqJll!f"'Q.SlIu!l~
dI:lalf(Joldli~
dI:lalf(Joldli~
dI:lalf(Joldli~
{~INIMltl5mra1O!fIlJfl<~dtnM:to!s~pcItnC'a
{~INIMltl5mra1O!fIlJfl<~dtnM:to!s~pcItnC'a
{~INIMltl5mra1O!fIlJfl<~dtnM:to!s~pcItnC'a
PIII~bs~!1itaciIresm.ns.,c.'klsca.lSUJ!
PIII~bs~!1itaciIresm.ns.,c.'klsca.lSUJ!
PIII~bs~!1itaciIresm.ns.,c.'klsca.lSUJ!
:li)/n:aI'lolllra;)l~IliSl::l5,ci'1Bs..r'0a5deoMro~
:li)/n:aI'lolllra;)l~IliSl::l5,ci'1Bs..r'0a5deoMro~
:li)/n:aI'lolllra;)l~IliSl::l5,ci'1Bs..r'0a5deoMro~
ClscsoQll1qUle"o:ro(l[:jttOca.e/llJst8!IPlaliJ:Io~SI
ClscsoQll1qUle"o:ro(l[:jttOca.e/llJst8!IPlaliJ:Io~SI
ClscsoQll1qUle"o:ro(l[:jttOca.e/llJst8!IPlaliJ:Io~SI
m:;m;}.
m:;m;}.
m:;m;}.
(I)
AI1ln'CStOllSU1lmg~1~rfGll:tiocx;0
(I)
AI1ln'CStOllSU1lmg~1~rfGll:tiocx;0
(I)
AI1ln'CStOllSU1lmg~1~rfGll:tiocx;0
Pil"~D!
sea"oClI1f\OlI1lIl.rolJl'llllOOpe::l-OlmlbCosa.
Pil"~D!
sea"oClI1f\OlI1lIl.rolJl'llllOOpe::l-OlmlbCosa.
Pil"~D!
sea"oClI1f\OlI1lIl.rolJl'llllOOpe::l-OlmlbCosa.
~.'z;
4/i3!..t!lJ""~
~.'z;
4/i3!..t!lJ""~
~.'z;
4/i3!..t!lJ""~
oIz;SlIIZ.~locarlj;lbl!::i1"411:;Asdt~~
oIz;SlIIZ.~locarlj;lbl!::i1"411:;Asdt~~
oIz;SlIIZ.~locarlj;lbl!::i1"411:;Asdt~~
I.\ll
fnlt:!.t<MSl:l1CUI!.lnU=1lrotlese'tI1l:Uoll1(I,J~e)tIt!l
I.\ll
fnlt:!.t<MSl:l1CUI!.lnU=1lrotlese'tI1l:Uoll1(I,J~e)tIt!l
I.\ll
fnlt:!.t<MSl:l1CUI!.lnU=1lrotlese'tI1l:Uoll1(I,J~e)tIt!l
Prfljo/joll,ipsodoehClIll(lJ
Prfljo/joll,ipsodoehClIll(lJ
Prfljo/joll,ipsodoehClIll(lJ
[!ltiI(}II"lh~ohe&eLnir..JIm1:Eal.lspa5(RlSwp,Iiay.I'
[!ltiI(}II"lh~ohe&eLnir..JIm1:Eal.lspa5(RlSwp,Iiay.I'
[!ltiI(}II"lh~ohe&eLnir..JIm1:Eal.lspa5(RlSwp,Iiay.I'
[llo'Ii,:11Iegollfl'!lll,]erpro1J[;J0
[llo'Ii,:11Iegollfl'!lll,]erpro1J[;J0
[llo'Ii,:11Iegollfl'!lll,]erpro1J[;J0
l)J
Ill!
dW~roo~
kI
Decoma1iJ..,
l)J
Ill!
dW~roo~
kI
Decoma1iJ..,
l)J
Ill!
dW~roo~
kI
Decoma1iJ..,
call1,ilI1J''IIf.ll\lu.lg.nJ
call1,ilI1J''IIf.ll\lu.lg.nJ
call1,ilI1J''IIf.ll\lu.lg.nJ
pe'J~ltlo.foI.eredles.eln.arlodelproM1l:l.IJo
pe'J~ltlo.foI.eredles.eln.arlodelproM1l:l.IJo
pe'J~ltlo.foI.eredles.eln.arlodelproM1l:l.IJo
IlOSnl!lJ_laclonnlegllesnclonalesoa;.ltllplkMln
IlOSnl!lJ_laclonnlegllesnclonalesoa;.ltllplkMln
IlOSnl!lJ_laclonnlegllesnclonalesoa;.ltllplkMln
nudlmomUlo
nudlmomUlo
nudlmomUlo
ATENCION
ATENCION
ATENCION
Estlt"ljffi!y
Estlt"ljffi!y
Estlt"ljffi!y
1.11
fecihojo
1.11
fecihojo
1.11
ilel
ilel
ilel
I~
I~
I~
fecihojo
:ldquirirunacar:ltuianle'laencasodeIOOoolWlore
:ldquirirunacar:ltuianle'laencasodeIOOoolWlore
:ldquirirunacar:ltuianle'laencasodeIOOoolWlore
lanllsma
lanllsma
lanllsma
:a::IWOl:wtiI(lO
....~;..
:a::IWOl:wtiI(lO
....~;..
:a::IWOl:wtiI(lO
""'(/1<1"
""'(/1<1"
""'(/1<1"
__
,~np»IJ'I'P["tl;ti~,Jltt;
__
,~np»IJ'I'P["tl;ti~,Jltt;
__
,~np»IJ'I'P["tl;ti~,Jltt;
lJI1OOij"joolC
~/l'l'00li
liiu<.ou<;
lJI1OOij"joolC
~/l'l'00li
liiu<.ou<;
lJI1OOij"joolC
~/l'l'00li
liiu<.ou<;
I1llU
iIl'v
I1llU
iIl'v
I1llU
iIl'v
...
OI
...
OI
...
OI
m~ll:I1iwmW1:i1Xw
m~ll:I1iwmW1:i1Xw
m~ll:I1iwmW1:i1Xw
__
'IJ:JlOl:lU
__
'IJ:JlOl:lU
__
..
..
..
calen:a.
calen:a.
calen:a.
rllJd;lo:.D.'loilt::Jg;.oloW
rllJd;lo:.D.'loilt::Jg;.oloW
rllJd;lo:.D.'loilt::Jg;.oloW
er
p'ulhrt~<;IJa
l'rIl'l"Hl
er
p'ulhrt~<;IJa
l'rIl'l"Hl
er
p'ulhrt~<;IJa
l'rIl'l"Hl
~1T~n
~1T~n
~1T~n
son
noc:esaliospara
son
noc:esaliospara
son
noc:esaliospara
'IJ:JlOl:lU
~t!SiIbdil
~t!SiIbdil
~t!SiIbdil
r.'uellItS.
r.'uellItS.
r.'uellItS.
0
0
0
sin
sin
sin
__
IrlX'.kJ.O(&(lIlI(tl(
__
IrlX'.kJ.O(&(lIlI(tl(
__
IrlX'.kJ.O(&(lIlI(tl(
~lrD:iOn
~lrD:iOn
~lrD:iOn
ca.
ca.
ca.
hIM
IIr;ItC~M!Ie
hIM
IIr;ItC~M!Ie
hIM
IIr;ItC~M!Ie
ractllla)
ractllla)
ractllla)
.....dePrrdJilsl<tJMw1.
...
..olJSw:.usfl!1l(]timsd"
.....
ch7i:si~p!
...
..olJSw:.usfl!1l(]timsd"
...
..olJSw:.usfl!1l(]timsd"
Procult"j.!"c:el"l-cl
Procult"j.!"c:el"l-cl
Procult"j.!"c:el"l-cl
<leo"til~"''ts!J~IIetIIl,I:ll!fJa'~a..olerl\ll3dl
<leo"til~"''ts!J~IIetIIl,I:ll!fJa'~a..olerl\ll3dl
<leo"til~"''ts!J~IIetIIl,I:ll!fJa'~a..olerl\ll3dl
aI1'Ol!l'_JI:Illlanj;llor.s!lclaGfesmtetaJede;:;~:iI1lIl!.S;
aI1'Ol!l'_JI:Illlanj;llor.s!lclaGfesmtetaJede;:;~:iI1lIl!.S;
aI1'Ol!l'_JI:Illlanj;llor.s!lclaGfesmtetaJede;:;~:iI1lIl!.S;
'errod~l'f!I.!~!iml#llJ't:ta1IJleElal·~;l'l"l:tettlirCtl
'errod~l'f!I.!~!iml#llJ't:ta1IJleElal·~;l'l"l:tettlirCtl
'errod~l'f!I.!~!iml#llJ't:ta1IJleElal·~;l'l"l:tettlirCtl
tjs,
...
pr~~prtstnlll.flW!'IOUS1J!;u:;sdebirn~h!
tjs,
...
pr~~prtstnlll.flW!'IOUS1J!;u:;sdebirn~h!
tjs,
...
pr~~prtstnlll.flW!'IOUS1J!;u:;sdebirn~h!
flItsenwaupl!:Sdl.l1l"lll:or.&eur~uffoo~l.o1unD5Ir;tAAeur
flItsenwaupl!:Sdl.l1l"lll:or.&eur~uffoo~l.o1unD5Ir;tAAeur
flItsenwaupl!:Sdl.l1l"lll:or.&eur~uffoo~l.o1unD5Ir;tAAeur
~\lI~
d'
..
Clnre Iertlntqc'ilAg!le.ood'oodla.\Lndo!jlIOOO«S
~\lI~
d'
..
Clnre Iertlntqc'ilAg!le.ood'oodla.\Lndo!jlIOOO«S
~\lI~
d'
..
Clnre Iertlntqc'ilAg!le.ood'oodla.\Lndo!jlIOOO«S
KtJMOOlllildl.lid.JosleCfEl'1yjoiqwJlllllcutildd'<II:hIlouklle
KtJMOOlllildl.lid.JosleCfEl'1yjoiqwJlllllcutildd'<II:hIlouklle
KtJMOOlllildl.lid.JosleCfEl'1yjoiqwJlllllcutildd'<II:hIlouklle
:um~lflIrte
OijIPIO;J(o(J"!OO
:um~lflIrte
OijIPIO;J(o(J"!OO
:um~lflIrte
OijIPIO;J(o(J"!OO
lilI!acq"lSdal'lsrnpoirlde"-:1Ie'li1lP1IlJ"s~!aCEf.iltlctl'.~le
lilI!acq"lSdal'lsrnpoirlde"-:1Ie'li1lP1IlJ"s~!aCEf.iltlctl'.~le
lilI!acq"lSdal'lsrnpoirlde"-:1Ie'li1lP1IlJ"s~!aCEf.iltlctl'.~le
IX!sff1~~OOpo"de
IX!sff1~~OOpo"de
IX!sff1~~OOpo"de
Silerrlw1u,lal'J!aetluisrnnsI.JCU~Q\E\OOS~!T!'.I[(fiIoI\lele
Silerrlw1u,lal'J!aetluisrnnsI.JCU~Q\E\OOS~!T!'.I[(fiIoI\lele
Silerrlw1u,lal'J!aetluisrnnsI.JCU~Q\E\OOS~!T!'.I[(fiIoI\lele
[liSTIb.Jt,rAg'l!elel:'iuSploc!~.I>CIJS.GlJSp'io"'deb:enW(luio:r
[liSTIb.Jt,rAg'l!elel:'iuSploc!~.I>CIJS.GlJSp'io"'deb:enW(luio:r
[liSTIb.Jt,rAg'l!elel:'iuSploc!~.I>CIJS.GlJSp'io"'deb:enW(luio:r
1'OIJ51P.11Sf'}lfliUlxesde
1'OIJ51P.11Sf'}lfliUlxesde
1'OIJ51P.11Sf'}lfliUlxesde
KENWOOD
KENWOOD
KENWOOD
sa,.II"dMlmpf'ft$iormistes
sa,.II"dMlmpf'ft$iormistes
sa,.II"dMlmpf'ft$iormistes
95944
RotSSV
95944
RotSSV
95944
RotSSV
_.kenwood.I.,;l~on~l~
_.kenwood.I.,;l~on~l~
_.kenwood.I.,;l~on~l~
Conserl'e1
~lld!I:JSI-'T81
Conserl'e1
~lld!I:JSI-'T81
Conserl'e1
~lld!I:JSI-'T81
1~Pl!l"1SiiWepOUrkUer!okriii:n
1~Pl!l"1SiiWepOUrkUer!okriii:n
1~Pl!l"1SiiWepOUrkUer!okriii:n
I.tP,llI1.J,ICS!~;QltKlurUlle(Juretd~oilola{:(tJlCIercl!lallale"
I.tP,llI1.J,ICS!~;QltKlurUlle(Juretd~oilola{:(tJlCIercl!lallale"
I.tP,llI1.J,ICS!~;QltKlurUlle(Juretd~oilola{:(tJlCIercl!lallale"
llItmitleacquisil.c"aJ~:tsd"undr::a.lliIll:ciepmcltlit>~l!flWOOl.l.la
llItmitleacquisil.c"aJ~:tsd"undr::a.lliIll:ciepmcltlit>~l!flWOOl.l.la
llItmitleacquisil.c"aJ~:tsd"undr::a.lliIll:ciepmcltlit>~l!flWOOl.l.la
Oillillltiecr:u;relllllles~it!:tscl!redlanl;~quelirrnai"dlleunell,J
Oillillltiecr:u;relllllles~it!:tscl!redlanl;~quelirrnai"dlleunell,J
Oillillltiecr:u;relllllles~it!:tscl!redlanl;~quelirrnai"dlleunell,J
rtpnliOll!-elirl:etliftQraruil!rner4.~::CL'Sltser;unsieltui:
rtpnliOll!-elirl:etliftQraruil!rner4.~::CL'Sltser;unsieltui:
rtpnliOll!-elirl:etliftQraruil!rner4.~::CL'Sltser;unsieltui:
oelt~Iatto'IePrMullsisa,!Pall1iOnfll!'s?tre-pas:uw~:e.
oelt~Iatto'IePrMullsisa,!Pall1iOnfll!'s?tre-pas:uw~:e.
oelt~Iatto'IePrMullsisa,!Pall1iOnfll!'s?tre-pas:uw~:e.
le$trll$d·en~~.lI'llI!tTl.llion~lIISlq.elOUSalIJCS1ril~Cu
le$trll$d·en~~.lI'llI!tTl.llion~lIISlq.elOUSalIJCS1ril~Cu
le$trll$d·en~~.lI'llI!tTl.llion~lIISlq.elOUSalIJCS1ril~Cu
1.sques
..
direde:nenrli!:silla
1.sques
..
direde:nenrli!:silla
1.sques
..
direde:nenrli!:silla
Ql'iJ1Ieel~,tl~dioUilis.dlu.
Ql'iJ1Ieel~,tl~dioUilis.dlu.
Ql'iJ1Ieel~,tl~dioUilis.dlu.
CO.-.
CO.-.
CO.-.
A
IJoJ!er«~'oolomU~e~"""o:laG.l<>lleoo:l~
A
IJoJ!er«~'oolomU~e~"""o:laG.l<>lleoo:l~
A
IJoJ!er«~'oolomU~e~"""o:laG.l<>lleoo:l~
~l!oedelaplMe!CarledioGnm~el;i(os
~l!oedelaplMe!CarledioGnm~el;i(os
~l!oedelaplMe!CarledioGnm~el;i(os
Italla
Italla
Italla
'\1U~T101iored-
'\1U~T101iored-
'\1U~T101iored-
1ar
....
:arall'O!lIi_~l()q..oeslOlllo:lolo){(Jw<ocd(j1
1ar
....
:arall'O!lIi_~l()q..oeslOlllo:lolo){(Jw<ocd(j1
1ar
....
:arall'O!lIi_~l()q..oeslOlllo:lolo){(Jw<ocd(j1
'i'rod:tlf>']SeinlUltlalolXlfl!lUlij!j~eno
'i'rod:tlf>']SeinlUltlalolXlfl!lUlij!j~eno
'i'rod:tlf>']SeinlUltlalolXlfl!lUlij!j~eno
tislltlsWliI!!tolo,wrrar~aJos~o~itl.-oflel'l!fXl/lClO
tislltlsWliI!!tolo,wrrar~aJos~o~itl.-oflel'l!fXl/lClO
tislltlsWliI!!tolo,wrrar~aJos~o~itl.-oflel'l!fXl/lClO
iltr.'ftlrtdel'lpol::5.el*Co1ItlI:alliGnmB.a..
iltr.'ftlrtdel'lpol::5.el*Co1ItlI:alliGnmB.a..
iltr.'ftlrtdel'lpol::5.el*Co1ItlI:alliGnmB.a..
(JIesl<U
un
ftf:osia
(JIesl<U
un
ftf:osia
(JIesl<U
un
ftf:osia
str.o~iSlNIl1lt:p~uabroll~:£i~fIIf:ntJ
str.o~iSlNIl1lt:p~uabroll~:£i~fIIf:ntJ
str.o~iSlNIl1lt:p~uabroll~:£i~fIIf:ntJ
Ewrcmt::a
u.oaa
Ewrcmt::a
u.oaa
Ewrcmt::a
u.oaa
inllXr"'O:tte""'~laIell.!'1rwootl.Rlal(litoltAuJ(ru~.~·-:l
inllXr"'O:tte""'~laIell.!'1rwootl.Rlal(litoltAuJ(ru~.~·-:l
inllXr"'O:tte""'~laIell.!'1rwootl.Rlal(litoltAuJ(ru~.~·-:l
AssISlellIiAlr.nrL1'1
AssISlellIiAlr.nrL1'1
AssISlellIiAlr.nrL1'1
l.IlIwreolelna"el-;Llid.n:L.sIoo<:lrollowrtf1llr~.
l.IlIwreolelna"el-;Llid.n:L.sIoo<:lrollowrtf1llr~.
l.IlIwreolelna"el-;Llid.n:L.sIoo<:lrollowrtf1llr~.
lla'.ad'olallJ'SIIOfdst!kla-;(;UislaIoaldh.ao:llaCEr~FrDCdlO
lla'.ad'olallJ'SIIOfdst!kla-;(;UislaIoaldh.ao:llaCEr~FrDCdlO
lla'.ad'olallJ'SIIOfdst!kla-;(;UislaIoaldh.ao:llaCEr~FrDCdlO
dtwrj
I!>...,.,e
PiT"*'
dtwrj
I!>...,.,e
PiT"*'
dtwrj
I!>...,.,e
PiT"*'
SeiIPmdB1nt5'allo.nPs:..kJi',u~pz.o;ei¥JIII.~aI\1l
SeiIPmdB1nt5'allo.nPs:..kJi',u~pz.o;ei¥JIII.~aI\1l
SeiIPmdB1nt5'allo.nPs:..kJi',u~pz.o;ei¥JIII.~aI\1l
Co
..
u"it;faJ':IlI'Ci.h.cpe.aelellleSiwatJ~rllldirino~1
Co
..
u"it;faJ':IlI'Ci.h.cpe.aelellleSiwatJ~rllldirino~1
Co
..
u"it;faJ':IlI'Ci.h.cpe.aelellleSiwatJ~rllldirino~1
lloeroC'il:oIe/«lI
lloeroC'il:oIe/«lI
lloeroC'il:oIe/«lI
riwlk'¥~llS1lg\Oole':Qrilm:
riwlk'¥~llS1lg\Oole':Qrilm:
riwlk'¥~llS1lg\Oole':Qrilm:
KF.NWOOO ELECTRONICS
KF.NWOOO ELECTRONICS
KF.NWOOO ELECTRONICS
Vi"G.
Vi"G.
Vi"G.
l~"rEqll.1modicCMe".~eQUEw.C<:rtclin.ldl
l~"rEqll.1modicCMe".~eQUEw.C<:rtclin.ldl
l~"rEqll.1modicCMe".~eQUEw.C<:rtclin.ldl
,,!rra(~,,~>nQ\orlir!CI.wno
,,!rra(~,,~>nQ\orlir!CI.wno
,,!rra(~,,~>nQ\orlir!CI.wno
111'I(l(loIIO
~garanliloper
111'I(l(loIIO
~garanliloper
111'I(l(loIIO
~garanliloper
IJll.IS~I\/l!ndiTOle
IJll.IS~I\/l!ndiTOle
IJll.IS~I\/l!ndiTOle
~I"
I
ol,Jlerlill,
chllia
~I"
I
ol,Jlerlill,
chllia
~I"
I
ol,Jlerlill,
chllia
lJI;II~II,II~111e
KenWIJUdsiIIslHo;1
lJI;II~II,II~111e
KenWIJUdsiIIslHo;1
lJI;II~II,II~111e
KenWIJUdsiIIslHo;1
r;un
L.ll()
iocnlial
r;un
L.ll()
iocnlial
r;un
L.ll()
iocnlial
uiYJtJlidtrll!cheCil'allelisllr.l\e(f.1O:01~,~sooil1sirrdacabiI<cQi~,io
uiYJtJlidtrll!cheCil'allelisllr.l\e(f.1O:01~,~sooil1sirrdacabiI<cQi~,io
uiYJtJlidtrll!cheCil'allelisllr.l\e(f.1O:01~,~sooil1sirrdacabiI<cQi~,io
iltOSlodt1wripalJ.(iul:efossemolloelp.v"lo
iltOSlodt1wripalJ.(iul:efossemolloelp.v"lo
iltOSlodt1wripalJ.(iul:efossemolloelp.v"lo
Ktn""Cod
nOlll'altro
Ktn""Cod
nOlll'altro
Ktn""Cod
nOlll'altro
g.ilra
11i,icOS!llcl,li';aTilroalklfdaliacisirJ;s!<lllalioneflll!.l,;lwlDilf
g.ilra
11i,icOS!llcl,li';aTilroalklfdaliacisirJ;s!<lllalioneflll!.l,;lwlDilf
g.ilra
11i,icOS!llcl,li';aTilroalklfdaliacisirJ;s!<lllalioneflll!.l,;lwlDilf
Bel
CIOCOllo,
I
tm~CLIra:s~"~
Bel
CIOCOllo,
I
tm~CLIra:s~"~
Bel
CIOCOllo,
I
tm~CLIra:s~"~
c_~
c_~
c_~
A.U",_,ll*l:).1cI1eiIJI)oIfa1!ia.Clals!ilSllecl.rt>ore.e~e
A.U",_,ll*l:).1cI1eiIJI)oIfa1!ia.Clals!ilSllecl.rt>ore.e~e
A.U",_,ll*l:).1cI1eiIJI)oIfa1!ia.Clals!ilSllecl.rt>ore.e~e
acmmll1R)'l<lO
acmmll1R)'l<lO
acmmll1R)'l<lO
(a)
IllOOO"!IT
(a)
IllOOO"!IT
(a)
IllOOO"!IT
(b)
RQw!loallroilOClrmoctlfillllMirr.etieatloa:-.1j1JISIO
(b)
RQw!loallroilOClrmoctlfillllMirr.etieatloa:-.1j1JISIO
(b)
RQw!loallroilOClrmoctlfillllMirr.etieatloa:-.1j1JISIO
..
.....
ch7i:si~p!
..
.....
ch7i:si~p!
..
unsoew'dilicrlsd"tA :sa;;)JlltJma:es.
unsoew'dilicrlsd"tA :sa;;)JlltJma:es.
unsoew'dilicrlsd"tA :sa;;)JlltJma:es.
La
Ilale'"
sm
a(IlItisition
La
Ilale'"
sm
a(IlItisition
La
Ilale'"
sm
a(IlItisition
\'linte
\'linte
\'linte
ELECmONICS
ELECmONICS
ELECmONICS
L·EtoileP.';'No.d"J.
L·EtoileP.';'No.d"J.
L·EtoileP.';'No.d"J.
IW
58416 VII.LEPINTE
IW
58416 VII.LEPINTE
IW
58416 VII.LEPINTE
CHARLES
DE
CHARLES
DE
CHARLES
DE
Tel..33101825800
Tel..33101825800
Tel..33101825800
CIIllt
G,y.e
de
!>¥anI
CIIllt
G,y.e
de
!>¥anI
CIIllt
G,y.e
de
!>¥anI
....
imln~s:nt~cOll'l'i:1sp.r1.l
....
imln~s:nt~cOll'l'i:1sp.r1.l
....
imln~s:nt~cOll'l'i:1sp.r1.l
plaIaIIIN:l'OOOI:l
plaIaIIIN:l'OOOI:l
plaIaIIIN:l'OOOI:l
fcr..E~.
!aprllQ~"&!IOdI
fcr..E~.
!aprllQ~"&!IOdI
fcr..E~.
!aprllQ~"&!IOdI
..
~Ol'l!flClJ~lf,')u:t.rtll\elloooOOttllirCEl
..
~Ol'l!flClJ~lf,')u:t.rtll\elloooOOttllirCEl
..
~Ol'l!flClJ~lf,')u:t.rtll\elloooOOttllirCEl
.llegoW
Ie
111
wi
~
.llegoW
Ie
111
wi
~
.llegoW
Ie
111
wi
~
..
ilr"~bcrr2leip;,;.il:ioolapre;;lh~CI
..
ilr"~bcrr2leip;,;.il:ioolapre;;lh~CI
..
ilr"~bcrr2leip;,;.il:ioolapre;;lh~CI
S+rton
1/9.20129
S+rton
1/9.20129
S+rton
1/9.20129
T~
.•
39'10Z]2lM821
T~
.•
39'10Z]2lM821
T~
.•
39'10Z]2lM821
_.kenwood.it
_.kenwood.it
_.kenwood.it
lIT1alJ'wGalktr'.ltloiacqulOloprcsso
lIT1alJ'wGalktr'.ltloiacqulOloprcsso
lIT1alJ'wGalktr'.ltloiacqulOloprcsso
CEEdllJ~dcIli
i(eno'l[l(Jj
CEEdllJ~dcIli
i(eno'l[l(Jj
CEEdllJ~dcIli
i(eno'l[l(Jj
1TI.J1a
iJ'tlpeld
~
I,
rltJdlillillll1
1TI.J1a
iJ'tlpeld
~
I,
rltJdlillillll1
1TI.J1a
iJ'tlpeld
~
I,
rltJdlillillll1
d:llrto
d:llrto
d:llrto
0
,,~II'iPJblqL.eslul1!>.1I~'&.
0
,,~II'iPJblqL.eslul1!>.1I~'&.
0
,,~II'iPJblqL.eslul1!>.1I~'&.
l;jarao:isc:eInpa:II[{)l.lre
l;jarao:isc:eInpa:II[{)l.lre
l;jarao:isc:eInpa:II[{)l.lre
t.l.r3mua
t.l.r3mua
t.l.r3mua
l!aIl~
C2I'Idim0,£.ata"lllit
l!aIl~
C2I'Idim0,£.ata"lllit
l!aIl~
C2I'Idim0,£.ata"lllit
to~'ooref'llirldilillo
to~'ooref'llirldilillo
to~'ooref'llirldilillo
KENWOOD ELECTRONICS FRANCE
KENWOOD ELECTRONICS FRANCE
KENWOOD ELECTRONICS FRANCE
ell!ocu-oents""f".lICs"
ell!ocu-oents""f".lICs"
Ki:""OCd(1e
Ki:""OCd(1e
Ki:""OCd(1e
FRANCE
FRANCE
FRANCE
GAULLE
GAULLE
GAULLE
109
109
109
~(;<r
~(;<r
~(;<r
...
...
...
~(\(,;J(1oIll~lasl
~(\(,;J(1oIll~lasl
~(\(,;J(1oIll~lasl
sI.;JIn
iCtJlsIaIo
sI.;JIn
iCtJlsIaIo
sI.;JIn
iCtJlsIaIo
ITAU"
ITAU"
ITAU"
MiI.,Q
MiI.,Q
MiI.,Q
G]'.J:Vja.d.iIOctw:I~
G]'.J:Vja.d.iIOctw:I~
G]'.J:Vja.d.iIOctw:I~
L.1ga'<""~r;u,,,e
L.1ga'<""~r;u,,,e
L.1ga'<""~r;u,,,e
\tlI1~
\tlI1~
\tlI1~
di
lo'Jitllirgil
di
lo'Jitllirgil
di
lo'Jitllirgil
P~IIH(l.lOnQ,con
P~IIH(l.lOnQ,con
P~IIH(l.lOnQ,con
IlGI'l
~OI1U
IlGI'l
~OI1U
IlGI'l
~OI1U
r..Y1tO
~er
r..Y1tO
~er
r..Y1tO
~er
ed ffit!re
ed ffit!re
ed ffit!re
ell!ocu-oents""f".lICs"
(al
(al
(al
(til
(til
(til
..
<l!uilerr.ert
..
<l!uilerr.ert
..
<l!uilerr.ert
lei
lei
lei
ldl
ldl
ldl
SJ~,rlermalionsnec!l'''''/I.~e,"
SJ~,rlermalionsnec!l'''''/I.~e,"
SJ~,rlermalionsnec!l'''''/I.~e,"
rn~lilil!oualltll~lTequctJl!lBlallil:<e!p!fI!"Il.de(I"ISl:l<lale
rn~lilil!oualltll~lTequctJl!lBlallil:<e!p!fI!"Il.de(I"ISl:l<lale
rn~lilil!oualltll~lTequctJl!lBlallil:<e!p!fI!"Il.de(I"ISl:l<lale
!ot:llUIS~.on,
!ot:llUIS~.on,
!ot:llUIS~.on,
Si
Ie
1'r0tl;l~
a
Prol1lIlau
Si
Ie
1'r0tl;l~
a
Prol1lIlau
Si
Ie
1'r0tl;l~
a
Prol1lIlau
BLeP!OOUiI~llll!~tnJjtr)emanib'easett:do~&o'.n:.-1l'e
BLeP!OOUiI~llll!~tnJjtr)emanib'easett:do~&o'.n:.-1l'e
BLeP!OOUiI~llll!~tnJjtr)emanib'easett:do~&o'.n:.-1l'e
!t
!t
!t
~
~
~
Lamoo,lit:at'oll!n6:essd,raah~:I,salionCllProeu~aul
Lamoo,lit:at'oll!n6:essd,raah~:I,salionCllProeu~aul
Lamoo,lit:at'oll!n6:essd,raah~:I,salionCllProeu~aul
erdroilaulrerreSCf1loascuiM'rtMD.rllpresmleGa'"illlI:eel
erdroilaulrerreSCf1loascuiM'rtMD.rllpresmleGa'"illlI:eel
erdroilaulrerreSCf1loascuiM'rtMD.rllpresmleGa'"illlI:eel
l~rr.!pCIIl§30illlt(lC~oocIn!poufla~treenaaoeePOUltou:e
l~rr.!pCIIl§30illlt(lC~oocIn!poufla~treenaaoeePOUltou:e
l~rr.!pCIIl§30illlt(lC~oocIn!poufla~treenaaoeePOUltou:e
ctesta:io~eIlec1lll!eacettelnoulO:HcommaoeC<IUseauProdu:l
ctesta:io~eIlec1lll!eacettelnoulO:HcommaoeC<IUseauProdu:l
ctesta:io~eIlec1lll!eacettelnoulO:HcommaoeC<IUseauProdu:l
elr~~llanlOetellesD<nlltion>
elr~~llanlOetellesD<nlltion>
elr~~llanlOetellesD<nlltion>
Si
Si
Si
SOUIlll$. OlilllOlmu
SOUIlll$. OlilllOlmu
SOUIlll$. OlilllOlmu
cl<ns
cl<ns
cl<ns
CEDfX
CEDfX
CEDfX
l~trlQ~l,
l~trlQ~l,
l~trlQ~l,
S~~SCU11LS!II!OOfl(III{:Ilque
S~~SCU11LS!II!OOfl(III{:Ilque
S~~SCU11LS!II!OOfl(III{:Ilque
cr¥O!leslra!sl1.!WJlo!tl(lfl~uPrQ:Iu.au,
cr¥O!leslra!sl1.!WJlo!tl(lfl~uPrQ:Iu.au,
cr¥O!leslra!sl1.!WJlo!tl(lfl~uPrQ:Iu.au,
i1w
i1w
i1w
Illll!
\/OIl!
It'fa
Illll!
\/OIl!
It'fa
Illll!
\/OIl!
It'fa
~'OOui1!.m~:stlIlllrr"'~pirrimluD'ao"clil:ielwll<--ysIl;lltS
~'OOui1!.m~:stlIlllrr"'~pirrimluD'ao"clil:ielwll<--ysIl;lltS
~'OOui1!.m~:stlIlllrr"'~pirrimluD'ao"clil:ielwll<--ysIl;lltS
leQ.Jeilt"ICWlestllftseoll!llO\I'r~aliOl'lllil:nedela!i1'311i1,
leQ.Jeilt"ICWlestllftseoll!llO\I'r~aliOl'lllil:nedela!i1'311i1,
leQ.Jeilt"ICWlestllftseoll!llO\I'r~aliOl'lllil:nedela!i1'311i1,
e1q.Jeltspift:tsdell!d1a'lltacgrODl~srresonlD<lStbpooiblts
e1q.Jeltspift:tsdell!d1a'lltacgrODl~srresonlD<lStbpooiblts
e1q.Jeltspift:tsdell!d1a'lltacgrODl~srresonlD<lStbpooiblts
dlrnscej)<'l'.cucuela'~r.;IiQnll!gn;'lten·!Sloas~
dlrnscej)<'l'.cucuela'~r.;IiQnll!gn;'lten·!Sloas~
dlrnscej)<'l'.cucuela'~r.;IiQnll!gn;'lten·!Sloas~
iUnsCtjlirspaurlCUlea.ter.li!llllleCili~lestlil~'eI<I;1!.ilIJ
iUnsCtjlirspaurlCUlea.ter.li!llllleCili~lestlil~'eI<I;1!.ilIJ
iUnsCtjlirspaurlCUlea.ter.li!llllleCili~lestlil~'eI<I;1!.ilIJ
lfaJISpOI1,'lefte!Ol,1lJ
lfaJISpOI1,'lefte!Ol,1lJ
lfaJISpOI1,'lefte!Ol,1lJ
PrtlTibtalQlisitiUll:leltl\l;t.acrillgederlfi!1iI-"t:.I.
PrtlTibtalQlisitiUll:leltl\l;t.acrillgederlfi!1iI-"t:.I.
PrtlTibtalQlisitiUll:leltl\l;t.acrillgederlfi!1iI-"t:.I.
c.U prtse*
c.U prtse*
c.U prtse*
(a)
(a)
(a)
(b)La<b~t_
(b)La<b~t_
(b)La<b~t_
'llo,.-...:u..s
'llo,.-...:u..s
'llo,.-...:u..s
KENWOOD ELECTRONICS
KENWOOD ELECTRONICS
KENWOOD ELECTRONICS
(~)'Io'rle.cog:torre!'ll~tld~4aQJjtl'l::.o-::fto
(~)'Io'rle.cog:torre!'ll~tld~4aQJjtl'l::.o-::fto
(~)'Io'rle.cog:torre!'ll~tld~4aQJjtl'l::.o-::fto
1(f)~a(ll~tr((tlIelfWlCldlcllelP.:)):;,".O
1(f)~a(ll~tr((tlIelfWlCldlcllelP.:)):;,".O
1(f)~a(ll~tr((tlIelfWlCldlcllelP.:)):;,".O
aili"nlcb:'.ottoe
1}ja.l:unon~.ap:lSSlliJennire~<'IOmlV1tI1I.ost~
aili"nlcb:'.ottoe
1}ja.l:unon~.ap:lSSlliJennire~<'IOmlV1tI1I.ost~
aili"nlcb:'.ottoe
1}ja.l:unon~.ap:lSSlliJennire~<'IOmlV1tI1I.ost~
P'1:ld:X:~e$:,JQIf'llIC,:q:OO_'ii1Oll(J.:o1b.l~IIl'Jj()~
P'1:ld:X:~e$:,JQIf'llIC,:q:OO_'ii1Oll(J.:o1b.l~IIl'Jj()~
P'1:ld:X:~e$:,JQIf'llIC,:q:OO_'ii1Oll(J.:o1b.l~IIl'Jj()~
acqU.slO,~..aCcJp(l<iJ(II\~I~_~IiJrtlor)
acqU.slO,~..aCcJp(l<iJ(II\~I~_~IiJrtlor)
deI.lCc~
deI.lCc~
deI.lCc~
lii"lte
lii"lte
lii"lte
acqU.slO,~..aCcJp(l<iJ(II\~I~_~IiJrtlor)
n~ra",o:leIleIPfl!(JcAloVilXl1CO'le/lIIIlrdl~tal:¥<l·L!lil
n~ra",o:leIleIPfl!(JcAloVilXl1CO'le/lIIIlrdl~tal:¥<l·L!lil
n~ra",o:leIleIPfl!(JcAloVilXl1CO'le/lIIIlrdl~tal:¥<l·L!lil
8
PrCKli:~OIS"IeaIl1!'o1'nllllmolillsoo~:edr\J'i
8
PrCKli:~OIS"IeaIl1!'o1'nllllmolillsoo~:edr\J'i
8
PrCKli:~OIS"IeaIl1!'o1'nllllmolillsoo~:edr\J'i
sWno:l¥drwiona'lnloca'ilid
sWno:l¥drwiona'lnloca'ilid
sWno:l¥drwiona'lnloca'ilid
r~tre:llM~~r~fIlI:dlier.ell!llX!Ssarietiiil
r~tre:llM~~r~fIlI:dlier.ell!llX!Ssarietiiil
r~tre:llM~~r~fIlI:dlier.ell!llX!Ssarietiiil
1'WliuullllltJiPoJll5~~l;;~edilJUiS"
1'WliuullllltJiPoJll5~~l;;~edilJUiS"
1'WliuullllltJiPoJll5~~l;;~edilJUiS"
Se~"'tdOIn.~onlQia."'treu:i·lidIoin~nan.tio-t
Se~"'tdOIn.~onlQia."'treu:i·lidIoin~nan.tio-t
Se~"'tdOIn.~onlQia."'treu:i·lidIoin~nan.tio-t
etlnpe.l,(\OIoICe,;oeSC9QellOlstarldi·ae,tQ:.isihdiwasir.
etlnpe.l,(\OIoICe,;oeSC9QellOlstarldi·ae,tQ:.isihdiwasir.
etlnpe.l,(\OIoICe,;oeSC9QellOlstarldi·ae,tQ:.isihdiwasir.
::uerijl..I>i:lErll.(JI.11W;;se
::uerijl..I>i:lErll.(JI.11W;;se
::uerijl..I>i:lErll.(JI.11W;;se
i
~1~:ri01e
i
~1~:ri01e
i
~1~:ri01e
:ICXICIOaglllbr~ilIceoailt(lJ;Slliwplti
:ICXICIOaglllbr~ilIceoailt(lJ;Slliwplti
:ICXICIOaglllbr~ilIceoailt(lJ;Slliwplti
S.p.A
tlg:A;lIitl:cm.taliil~l!1~~IC[[CV\!wigo1OstneilceroculSlll
S.p.A
tlg:A;lIitl:cm.taliil~l!1~~IC[[CV\!wigo1OstneilceroculSlll
S.p.A
tlg:A;lIitl:cm.taliil~l!1~~IC[[CV\!wigo1OstneilceroculSlll
C;>e/Si
C;>e/Si
C;>e/Si
~!lOIIHTlerlll'Il/]llCInIICCOI~IIOOSlOOI!ldol3al!ilp:od..-.:lJ
~!lOIIHTlerlll'Il/]llCInIICCOI~IIOOSlOOI!ldol3al!ilp:od..-.:lJ
~!lOIIHTlerlll'Il/]llCInIICCOI~IIOOSlOOI!ldol3al!ilp:od..-.:lJ
iIIIli
iIIIli
iIIIli
$IoIC'IIllOOI~!f$Oi1lCIlIlIlI<:UT1'l1!ltil>lll<fJ~llrll'T1pJl'~e
$IoIC'IIllOOI~!f$Oi1lCIlIlIlI<:UT1'l1!ltil>lll<fJ~llrll'T1pJl'~e
$IoIC'IIllOOI~!f$Oi1lCIlIlIlI<:UT1'l1!ltil>lll<fJ~llrll'T1pJl'~e
un.::
un.::
un.::
llaUnM
llaUnM
llaUnM
rltamblu~~.u:;rioIIOlll!1
rltamblu~~.u:;rioIIOlll!1
rltamblu~~.u:;rioIIOlll!1
moh..o,
moh..o,
moh..o,
~
~
~
C5C\JLI.til
IIIQI~o,
C5C\JLI.til
IIIQI~o,
C5C\JLI.til
IIIQI~o,
~Iodollo
C
lIJGstiI
~Iodollo
C
lIJGstiI
~Iodollo
C
lIJGstiI
la)
la)
la)
incl\!sl
neil!
incl\!sl
neil!
incl\!sl
neil!
(0)
(0)
(0)
(el
(el
(el
d~
d~
d~
(0)
(0)
(0)
SA
SA
SA
n·~;zt..tJi~pa"'Ktrr"'lXlCl~~otS:eparallo-~
n·~;zt..tJi~pa"'Ktrr"'lXlCl~~otS:eparallo-~
voni.ler(lltellO'dstX~
voni.ler(lltellO'dstX~
voni.ler(lltellO'dstX~
le
een~'CIl
c'att.il
00
lOIf
a~nt!loo:Jr:'J.n'
le
een~'CIl
c'att.il
le
een~'CIl
c'att.il
:l'1CCI~lSll(lflOllrrt«lIlo1"J~oun,*..1IIIamI!labI,c.ansla
:l'1CCI~lSll(lflOllrrt«lIlo1"J~oun,*..1IIIamI!labI,c.ansla
:l'1CCI~lSll(lflOllrrt«lIlo1"J~oun,*..1IIIamI!labI,c.ansla
ca
ca
ca
l'deNit!ldr~call'lllMlceoedl!,,*,1
l'deNit!ldr~call'lllMlceoedl!,,*,1
l'deNit!ldr~call'lllMlceoedl!,,*,1
Le~odeoo"ecl"enondullllld.1·~dJ"1(d."t
Le~odeoo"ecl"enondullllld.1·~dJ"1(d."t
Le~odeoo"ecl"enondullllld.1·~dJ"1(d."t
lier1WOCXlS/!'~'ot
lier1WOCXlS/!'~'ot
lier1WOCXlS/!'~'ot
ll
ll
ll
tor'Jd<tiJl1Sdelaprl!S/!lteG!Jll'Ilie
tor'Jd<tiJl1Sdelaprl!S/!lteG!Jll'Ilie
tor'Jd<tiJl1Sdelaprl!S/!lteG!Jll'Ilie
eJlQerlCl'S
de
slJI:uile
~iliOIIa:es
eJlQerlCl'S
de
slJI:uile
~iliOIIa:es
eJlQerlCl'S
de
slJI:uile
~iliOIIa:es
de
prl)11it1e
m,:lO
l,.le
de
prl)11it1e
m,:lO
l,.le
de
prl)11it1e
m,:lO
l,.le
Ie
rrocu~
eSllAiliSeda~S
Ie
rrocu~
eSllAiliSeda~S
Ie
rrocu~
eSllAiliSeda~S
e~
c";lCnce~
e~
c";lCnce~
e~
c";lCnce~
Ie
pa~s
Euro;lt!en
dl
Ie
pa~s
Euro;lt!en
dl
Ie
pa~s
Euro;lt!en
dl
lOUIe
orlShT:on
lOUIe
orlShT:on
lOUIe
orlShT:on
lic<1blesfnwlE.siltF'roaulesl!1"tllll\P!liIl'tlwtnrJl;s
lic<1blesfnwlE.siltF'roaulesl!1"tllll\P!liIl'tlwtnrJl;s
lic<1blesfnwlE.siltF'roaulesl!1"tllll\P!liIl'tlwtnrJl;s
Pr«lJ~jlW'lt.1ill"iOIIGlRSlello1"isde
Pr«lJ~jlW'lt.1ill"iOIIGlRSlello1"isde
Pr«lJ~jlW'lt.1ill"iOIIGlRSlello1"isde
GaJa"fie
fie
l.O\N<e
GaJa"fie
fie
l.O\N<e
GaJa"fie
fie
l.O\N<e
Lel:
onsllJProrUI.IIIS
Lel:
onsllJProrUI.IIIS
Lel:
onsllJProrUI.IIIS
BJf'T
yQ)llj:ult!.woollIesp(l('odiQu!::;ltlslJ,lll
BJf'T
yQ)llj:ult!.woollIesp(l('odiQu!::;ltlslJ,lll
BJf'T
yQ)llj:ult!.woollIesp(l('odiQu!::;ltlslJ,lll
ff!lllIOh"1b:lilll:'iIr;M.IulI"nAJi""JIlUl
ff!lllIOh"1b:lilll:'iIr;M.IulI"nAJi""JIlUl
ff!lllIOh"1b:lilll:'iIr;M.IulI"nAJi""JIlUl
1WODIl68sw
1WODIl68sw
1WODIl68sw
(lft5SOU'\'iJeTdill:Je~"luroca
(lft5SOU'\'iJeTdill:Je~"luroca
(lft5SOU'\'iJeTdill:Je~"luroca
~sla:oEO.iSI\o
~sla:oEO.iSI\o
~sla:oEO.iSI\o
che
rur
\llliIoIt
che
rur
\llliIoIt
che
rur
\llliIoIt
CiWi!lI;
ita(l¥1i.
CiWi!lI;
ita(l¥1i.
CiWi!lI;
ita(l¥1i.
51n!uC
ee1.i
lmis!ti
51n!uC
ee1.i
lmis!ti
51n!uC
ee1.i
lmis!ti
...
'e~I\lI,."il"leOoo't._(XIIltol*ld(lP.IOllio1e'~
...
'e~I\lI,."il"leOoo't._(XIIltol*ld(lP.IOllio1e'~
...
'e~I\lI,."il"leOoo't._(XIIltol*ld(lP.IOllio1e'~
1ltl1l
qLJe11.l
na.·I~""
1ltl1l
qLJe11.l
na.·I~""
1ltl1l
qLJe11.l
na.·I~""
!('<..".i
III
ijQIoJllia
!('<..".i
III
ijQIoJllia
!('<..".i
III
ijQIoJllia
f~(JklIlo
Ltil
rip;I'~IO,1ll1
f~(JklIlo
Ltil
rip;I'~IO,1ll1
f~(JklIlo
Ltil
rip;I'~IO,1ll1
~llaSWltlluilidaliiJ!ili!l:in:e
~llaSWltlluilidaliiJ!ili!l:in:e
~llaSWltlluilidaliiJ!ili!l:in:e
Ga18111\a
II[)!1
~cp<e
Ga18111\a
II[)!1
~cp<e
Ga18111\a
II[)!1
~cp<e
allerl!liorlitleIProdo:WI~nOlrnaliopt'lil1i(,nidi
allerl!liorlitleIProdo:WI~nOlrnaliopt'lil1i(,nidi
allerl!liorlitleIProdo:WI~nOlrnaliopt'lil1i(,nidi
11".an'JIet11ia~e~lar'ilIlra,comp~sii,aM(D'lipcrlOHI
11".an'JIet11ia~e~lar'ilIlra,comp~sii,aM(D'lipcrlOHI
11".an'JIet11ia~e~lar'ilIlra,comp~sii,aM(D'lipcrlOHI
1T1eniionaii
ner
lAanuoll!
1T1eniionaii
ner
lAanuoll!
1T1eniionaii
ner
lAanuoll!
~I~
ilIl'llJCotto
do~lI1i
~I~
ilIl'llJCotto
do~lI1i
~I~
ilIl'llJCotto
do~lI1i
CfICt1uale~aQualsl<sPtlf1ur.;o,ueIiIltIIGlIMJi!l""Jdal
CfICt1uale~aQualsl<sPtlf1ur.;o,ueIiIltIIGlIMJi!l""Jdal
CfICt1uale~aQualsl<sPtlf1ur.;o,ueIiIltIIGlIMJi!l""Jdal
w!.tllJn()l!a:j~ltl2restHllll'l~~lIl1J":IlJOI~
w!.tllJn()l!a:j~ltl2restHllll'l~~lIl1J":IlJOI~
w!.tllJn()l!a:j~ltl2restHllll'l~~lIl1J":IlJOI~
llarll'l
II
PrPOOl\l)~U\I~1a1~lgEnloi.lrDd£1~I.mlW:i:ilm,
llarll'l
II
PrPOOl\l)~U\I~1a1~lgEnloi.lrDd£1~I.mlW:i:ilm,
llarll'l
II
PrPOOl\l)~U\I~1a1~lgEnloi.lrDd£1~I.mlW:i:ilm,
'''lSlol·lII~J:OI'rlt:illlaoooosOOglilh
'''lSlol·lII~J:OI'rlt:illlaoooosOOglilh
'''lSlol·lII~J:OI'rlt:illlaoooosOOglilh
~ipo;t'idirt:.1"lIinll{lloc:anl
~ipo;t'idirt:.1"lIinll{lloc:anl
~ipo;t'idirt:.1"lIinll{lloc:anl
dano!i;llI'Jr.e:ttod:l'<";lollJlXl).lnIT'tl"-Orl!:iAiICQU'.
dano!i;llI'Jr.e:ttod:l'<";lollJlXl).lnIT'tl"-Orl!:iAiICQU'.
dano!i;llI'Jr.e:ttod:l'<";lollJlXl).lnIT'tl"-Orl!:iAiICQU'.
~Jlmtm.le'llernoU.Ilt'llliZllOlleIIDC~Ta.cousetilor.!3
~Jlmtm.le'llernoU.Ilt'llliZllOlleIIDC~Ta.cousetilor.!3
~Jlmtm.le'llernoU.Ilt'llliZllOlleIIDC~Ta.cousetilor.!3
t..dssH12oliiIE
00
lOIf
a~nt!loo:Jr:'J.n'
t..dssH12oliiIE
00
lOIf
a~nt!loo:Jr:'J.n'
t..dssH12oliiIE
...
nr.;ru~llel'J~atl:
...
nr.;ru~llel'J~atl:
...
nr.;ru~llel'J~atl:
I!
o:to~
~(elo&l
,je'/VaJfr
I!
o:to~
~(elo&l
,je'/VaJfr
I!
o:to~
~(elo&l
,je'/VaJfr
tI
kJC;1e$
awl~~
tI
kJC;1e$
awl~~
tI
kJC;1e$
awl~~
mlrl;!J/i
M
UJ:~
Dillie
mlrl;!J/i
mlrl;!J/i
U~
U~
U~
tJem~!
tJem~!
tJem~!
111
111
111
....
;r.tU:I,boIJrIoor4¥dll:lI1S
....
;r.tU:I,boIJrIoor4¥dll:lI1S
....
;r.tU:I,boIJrIoor4¥dll:lI1S
~elf<QIMl'IIlwIlIptI&mf
~elf<QIMl'IIlwIlIptI&mf
~elf<QIMl'IIlwIlIptI&mf
...
...
...
il
semlioOi Q.¥"'la
il
semlioOi Q.¥"'la
il
semlioOi Q.¥"'la
M
M
M
pOs.s.:l11Ot"..'ie!e
pOs.s.:l11Ot"..'ie!e
pOs.s.:l11Ot"..'ie!e
ll'{:I~i(
ll'{:I~i(
ll'{:I~i(
n.Villlll)
n.Villlll)
n.Villlll)
1~1l'ica.:M
M
UJ:~
Dillie
1~1l'ica.:M
M
UJ:~
Dillie
1~1l'ica.:M
O>M
Eur~
dar.s
ltQlrel~eo(
O>M
Eur~
dar.s
ltQlrel~eo(
O>M
Eur~
dar.s
ltQlrel~eo(
drTttrentes
at
Ctllil~en~igueJr
drTttrentes
at
Ctllil~en~igueJr
drTttrentes
at
Ctllil~en~igueJr
rri~
5tJr
la
nvdlepar
rri~
5tJr
la
nvdlepar
rri~
5tJr
la
nvdlepar
ex6tLfion
r1e
1:1
~~i'A!I:eGar<ll1:;~
ex6tLfion
r1e
1:1
~~i'A!I:eGar<ll1:;~
ex6tLfion
r1e
1:1
~~i'A!I:eGar<ll1:;~
I'Ul1llsaltUrduPrOQllIp'elr.e~Si1
I'Ul1llsaltUrduPrOQllIp'elr.e~Si1
I'Ul1llsaltUrduPrOQllIp'elr.e~Si1
fUmes
ele."IQeIlGtS
fUmes
ele."IQeIlGtS
fUmes
ele."IQeIlGtS
pas.
pas.
pas.
.......
lIIlIele:1net-1IR!
.......
lIIlIele:1net-1IR!
.......
lIIlIele:1net-1IR!
ITAUA
ITAUA
ITAUA
~1
~1
~1
ItlQIJISltid
SIDJ·wa'9ti
ItlQIJISltid
SIDJ·wa'9ti
ItlQIJISltid
SIDJ·wa'9ti
..
GIla"ll"
..
GIla"ll"
..
GIla"ll"
·1l0'esol'~no1a'·ft;lire
·1l0'esol'~no1a'·ft;lire
·1l0'esol'~no1a'·ft;lire
~i
aaull
II
WS'(1 iii
D1:lare
~i
aaull
II
WS'(1 iii
D1:lare
~i
aaull
II
WS'(1 iii
D1:lare
Uo).LII'IltITl~jltI
Uo).LII'IltITl~jltI
Uo).LII'IltITl~jltI
sa~
rfSll
sa~
rfSll
sa~
rfSll
~gertJ,lrloltf~,
QUaIll"
ill'fodol:o
~gertJ,lrloltf~,
QUaIll"
ill'fodol:o
~gertJ,lrloltf~,
QUaIll"
ill'fodol:o
non
Slil"1C
diSPO~I~:li
11llJU'I
non
Slil"1C
diSPO~I~:li
11llJU'I
non
Slil"1C
diSPO~I~:li
11llJU'I
11'Sl,
Il€I
all!o.alioo
11'Sl,
Il€I
all!o.alioo
11'Sl,
Il€I
all!o.alioo
CfJsiurBl;;ii
..
~allaSjD:Jllion-,
CfJsiurBl;;ii
..
~allaSjD:Jllion-,
CfJsiurBl;;ii
..
~allaSjD:Jllion-,
MI'ot~513\(]
acqUis~lO,
MI'ot~513\(]
acqUis~lO,
MI'ot~513\(]
acqUis~lO,
1crn~o
~"nil~rnr.olto:
1crn~o
~"nil~rnr.olto:
1crn~o
~"nil~rnr.olto:
a
r,oalA/lom
irud!Q.J.l:efj
a
r,oalA/lom
irud!Q.J.l:efj
a
r,oalA/lom
irud!Q.J.l:efj
utiliuo",lc.lOONIJSO
utiliuo",lc.lOONIJSO
utiliuo",lc.lOONIJSO
n·~;zt..tJi~pa"'Ktrr"'lXlCl~~otS:eparallo-~
oe~:elltU"leCOl'llJl~~cette:lel1",".
oe~:elltU"leCOl'llJl~~cette:lel1",".
oe~:elltU"leCOl'llJl~~cette:lel1",".
It)
ICt1'.:Jrm):i(catlStauhQlfun!tSUD1tl!lJ'll!n$glI;IIlflC8.
It)
ICt1'.:Jrm):i(catlStauhQlfun!tSUD1tl!lJ'll!n$glI;IIlflC8.
It)
ICt1'.:Jrm):i(catlStauhQlfun!tSUD1tl!lJ'll!n$glI;IIlflC8.
lI'~n~.llefl1Clj',caM"!$.d(tle~~IOlIw!",
lI'~n~.llefl1Clj',caM"!$.d(tle~~IOlIw!",
lI'~n~.llefl1Clj',caM"!$.d(tle~~IOlIw!",
lI'Il.'IiIl~del«:ll8Jl.!unel,(llrsaI(III~lllC!
lI'Il.'IiIl~del«:ll8Jl.!unel,(llrsaI(III~lllC!
lI'Il.'IiIl~del«:ll8Jl.!unel,(llrsaI(III~lllC!
ru!il;s.JIonOlr~./lo::e$~r~incllli'qJfiee:s.
ru!il;s.JIonOlr~./lo::e$~r~incllli'qJfiee:s.
ru!il;s.JIonOlr~./lo::e$~r~incllli'qJfiee:s.
f~J
lerlu:tllf9]!c;rJ!lI!ar,I'JtlI),J~dJilUletI.rinn~r,"="T(bns
f~J
lerlu:tllf9]!c;rJ!lI!ar,I'JtlI),J~dJilUletI.rinn~r,"="T(bns
f~J
lerlu:tllf9]!c;rJ!lI!ar,I'JtlI),J~dJilUletI.rinn~r,"="T(bns
1"!it'.lJrOld'!.unl,cml*:<ro1.d!l/:!'e.u'le~i!alCl/1
1"!it'.lJrOld'!.unl,cml*:<ro1.d!l/:!'e.u'le~i!alCl/1
1"!it'.lJrOld'!.unl,cml*:<ro1.d!l/:!'e.u'le~i!alCl/1
1~:e(l1t.JSmkIHJjff"laleu'C.(IAl)IJIIis-1\'CJ'I.poJl
1~:e(l1t.JSmkIHJjff"laleu'C.(IAl)IJIIis-1\'CJ'I.poJl
1~:e(l1t.JSmkIHJjff"laleu'C.(IAl)IJIIis-1\'CJ'I.poJl
'e
~klueCOltSeQ.el:C!so;l.iWI!CU"CI!in'i.we'tdrillJt
'e
~klueCOltSeQ.el:C!so;l.iWI!CU"CI!in'i.we'tdrillJt
'e
~klueCOltSeQ.el:C!so;l.iWI!CU"CI!in'i.we'tdrillJt
d21ilre1lill'al;n:::OIt1!de~otOUlC.urecaosehOlsdJ
d21ilre1lill'al;n:::OIt1!de~otOUlC.urecaosehOlsdJ
d21ilre1lill'al;n:::OIt1!de~otOUlC.urecaosehOlsdJ
oon:r!t:~
oe
i<e<1wo3d.
oon:r!t:~
oe
i<e<1wo3d.
oon:r!t:~
oe
dans
dans
dans
Ie
Ie
Ie
...
...
...
I
I
I
-'l1a1'H
-'l1a1'H
-'l1a1'H
di
di
di
Imnmf.ll".
Imnmf.ll".
Imnmf.ll".
Ie
Ie
Ie
S.p.A.
S.p.A.
S.p.A.
tl3
tl3
tl3
oelI<.
oelI<.
oelI<.
t
t
t
i<e<1wo3d.
~el
les
r.auLS·paJ:tl.a"$
er«mnaQtS
~el
les
r.auLS·paJ:tl.a"$
~el
les
r.auLS·paJ:tl.a"$
une~ui~e~elIMeacerle
une~ui~e~elIMeacerle
une~ui~e~elIMeacerle
~use
lUX
~use
lUX
~use
lUX
oo:r\llactail(S,aulOUlall1retliffiauln'tsIPnIePrClClJilen
oo:r\llactail(S,aulOUlall1retliffiauln'tsIPnIePrClClJilen
oo:r\llactail(S,aulOUlall1retliffiauln'tsIPnIePrClClJilen
taIlt
Ql.t
!!iI,
taIlt
Ql.t
!!iI,
taIlt
Ql.t
!!iI,
(1)
les
tie<l~
(1)
les
tie<l~
(1)
les
tie<l~
eln!mr¥llaceesrnr~isondeleutuliliWionncrmale,!1
eln!mr¥llaceesrnr~isondeleutuliliWionncrmale,!1
eln!mr¥llaceesrnr~isondeleutuliliWionncrmale,!1
IlOl<Immenlle:lel«nemoegramoo/l:)~ere'T1plilIt<bld
IlOl<Immenlle:lel«nemoegramoo/l:)~ere'T1plilIt<bld
IlOl<Immenlle:lel«nemoegramoo/l:)~ere'T1plilIt<bld
leis
~,g~lles
leis
~,g~lles
leis
~,g~lles
l1o''''Cl;listrllllent.ltsrar.kS,IeS~l'Iene~~.ilIsbal:".lles
l1o''''Cl;listrllllent.ltsrar.kS,IeS~l'Iene~~.ilIsbal:".lles
l1o''''Cl;listrllllent.ltsrar.kS,IeS~l'Iene~~.ilIsbal:".lles
~argea.bles.el'rt5I00tsliNu~
~argea.bles.el'rt5I00tsliNu~
~argea.bles.el'rt5I00tsliNu~
IU)
ltI'lOOJ'IJn1flllnull1tnJtleS/llllalllePol"IIl:811tI'lw
IU)
ltI'lOOJ'IJn1flllnull1tnJtleS/llllalllePol"IIl:811tI'lw
IU)
ltI'lOOJ'IJn1flllnull1tnJtleS/llllalllePol"IIl:811tI'lw
III!tD,a''''''iOlrtjIlO,rnodIhiIlOJert:ret
III!tD,a''''''iOlrtjIlO,rnodIhiIlOJert:ret
III!tD,a''''''iOlrtjIlO,rnodIhiIlOJert:ret
LIOfo!!ielllelia«ltieI5lOO'lSl't.eenlaoeo.'~Ico.IeOf!lsmneayJrt
LIOfo!!ielllelia«ltieI5lOO'lSl't.eenlaoeo.'~Ico.IeOf!lsmneayJrt
LIOfo!!ielllelia«ltieI5lOO'lSl't.eenlaoeo.'~Ico.IeOf!lsmneayJrt
rl;ui!.le
~rllCu~del1\amertlt!lale
rl;ui!.le
~rllCu~del1\amertlt!lale
rl;ui!.le
~rllCu~del1\amertlt!lale
LePl1:d.rit~rerrpllJtfw~<nt:Jileflle(llaJ,(:(I'I(\.r.(ltlS
LePl1:d.rit~rerrpllJtfw~<nt:Jileflle(llaJ,(:(I'I(\.r.(ltlS
LePl1:d.rit~rerrpllJtfw~<nt:Jileflle(llaJ,(:(I'I(\.r.(ltlS
e.o:postes~'~SSIll.Sir":il.saltUleslunllllll·~lo;run
e.o:postes~'~SSIll.Sir":il.saltUleslunllllll·~lo;run
e.o:postes~'~SSIll.Sir":il.saltUleslunllllll·~lo;run
tlJIlHIII~Ia!UI".lIoent1Clt'<eoIl:J..(MCeeaJstdeliTliill~!e
tlJIlHIII~Ia!UI".lIoent1Clt'<eoIl:J..(MCeeaJstdeliTliill~!e
tlJIlHIII~Ia!UI".lIoent1Clt'<eoIl:J..(MCeeaJstdeliTliill~!e
~rncasdtc~OIIoeviustacMS~PmcUI
~rncasdtc~OIIoeviustacMS~PmcUI
~rncasdtc~OIIoeviustacMS~PmcUI
AnENTlOH
AnENTlOH
AnENTlOH
lacarl~deg~allleet
lacarl~deg~allleet
lacarl~deg~allleet
,"etess.l7l=s~rdd"-illd'u:le~o.r.rtl'ellaltaOe~t1aIIJle",cao;
,"etess.l7l=s~rdd"-illd'u:le~o.r.rtl'ellaltaOe~t1aIIJle",cao;
,"etess.l7l=s~rdd"-illd'u:le~o.r.rtl'ellaltaOe~t1aIIJle",cao;
dedO'TllWgC501JIEv:Jl.
dedO'TllWgC501JIEv:Jl.
dedO'TllWgC501JIEv:Jl.
~oc:tlica..;o;elli1r:~Cl~enllll
~oc:tlica..;o;elli1r:~Cl~enllll
~oc:tlica..;o;elli1r:~Cl~enllll
O::J:I1~O:'~II"D,Oqw~"'ltal$.lillcliQ!:~
O::J:I1~O:'~II"D,Oqw~"'ltal$.lillcliQ!:~
O::J:I1~O:'~II"D,Oqw~"'ltal$.lillcliQ!:~
$~Y)'tI'UCli~.
$~Y)'tI'UCli~.
$~Y)'tI'UCli~.
leJ;d(l:illlril~clIi"')Il"a:tlicuiorltllilliYelillip~o!!\I,I
leJ;d(l:illlril~clIi"')Il"a:tlicuiorltllilliYelillip~o!!\I,I
leJ;d(l:illlril~clIi"')Il"a:tlicuiorltllilliYelillip~o!!\I,I
Cl(c«le~IIec¥r.e'SllChI!weroo;nerORllaliei2nni
Cl(c«le~IIec¥r.e'SllChI!weroo;nerORllaliei2nni
Cl(c«le~IIec¥r.e'SllChI!weroo;nerORllaliei2nni
Ploanl
Ploanl
Ploanl
...oe[QSsrIf'e.w~lXI~ua.,~ct'tImSll1ll
...oe[QSsrIf'e.w~lXI~ua.,~ct'tImSll1ll
...oe[QSsrIf'e.w~lXI~ua.,~ct'tImSll1ll
P~aIIo~,
P~aIIo~,
P~aIIo~,
t'i
lIIIII::or.ertISU!J!l!llaar-SlmOUOl5.Qt!lttCre:ll;lllO
t'i
lIIIII::or.ertISU!J!l!llaar-SlmOUOl5.Qt!lttCre:ll;lllO
t'i
lIIIII::or.ertISU!J!l!llaar-SlmOUOl5.Qt!lttCre:ll;lllO
'Isr.:iliI>JIioit.:
'Isr.:iliI>JIioit.:
'Isr.:iliI>JIioit.:
(nallOl1
(nallOl1
(nallOl1
liIIl!Jlt.testiltcdl'I!QI$.lI"crof.n3~tlD.t~"'aser:co.
liIIl!Jlt.testiltcdl'I!QI$.lI"crof.n3~tlD.t~"'aser:co.
liIIl!Jlt.testiltcdl'I!QI$.lI"crof.n3~tlD.t~"'aser:co.
tlltlllJ:ali:
tlltlllJ:ali:
tlltlllJ:ali:
Ig]
ilPrcdrd:laaJipa1eoMlilU1l!fl~If'\lll!l:nlniJlOs.:al
Ig]
ilPrcdrd:laaJipa1eoMlilU1l!fl~If'\lll!l:nlniJlOs.:al
Ig]
ilPrcdrd:laaJipa1eoMlilU1l!fl~If'\lll!l:nlniJlOs.:al
uor'ClSsLIOOdiI:caIIioreSl~l!Wbili.
uor'ClSsLIOOdiI:caIIioreSl~l!Wbili.
uor'ClSsLIOOdiI:caIIioreSl~l!Wbili.
OUl5'.<:Garawlat
OUl5'.<:Garawlat
OUl5'.<:Garawlat
In
o),;Sl.'SSOl:1eif'nlCGnll
In
o),;Sl.'SSOl:1eif'nlCGnll
In
o),;Sl.'SSOl:1eif'nlCGnll
fa10"'''CHJU.l'llOCltall{\ilPJn:ClC,.~
fa10"'''CHJU.l'llOCltall{\ilPJn:ClC,.~
fa10"'''CHJU.l'llOCltall{\ilPJn:ClC,.~
=llllrto"--J·ul.IT1e:ie.QJilI1IOseprallOllln:erIer<S1".t~oooll1t'<JlSCr
=llllrto"--J·ul.IT1e:ie.QJilI1IOseprallOllln:erIer<S1".t~oooll1t'<JlSCr
=llllrto"--J·ul.IT1e:ie.QJilI1IOseprallOllln:erIer<S1".t~oooll1t'<JlSCr
Inl!l).Rlrfl()Ju!U'~I~Id!llrulll,lI<lIU"titlll!f'lud:f.lo~I'I'lIm.1~1!!
Inl!l).Rlrfl()Ju!U'~I~Id!llrulll,lI<lIU"titlll!f'lud:f.lo~I'I'lIm.1~1!!
Inl!l).Rlrfl()Ju!U'~I~Id!llrulll,lI<lIU"titlll!f'lud:f.lo~I'I'lIm.1~1!!
...
;p1Ildi~Q1i<lI(Jll(iollW
...
;p1Ildi~Q1i<lI(Jll(iollW
...
;p1Ildi~Q1i<lI(Jll(iollW
ATTENZIONE
ATTENZIONE
ATTENZIONE
Dt.esIodorulltelltU elaTlt:e1Iula
Dt.esIodorulltelltU elaTlt:e1Iula
Dt.esIodorulltelltU elaTlt:e1Iula
nocessariperl'acquisTOdilJnl'JJOVOtronialinoincasodi
nocessariperl'acquisTOdilJnl'JJOVOtronialinoincasodi
nocessariperl'acquisTOdilJnl'JJOVOtronialinoincasodi
IUll00
iMnrw
IUll00
iMnrw
IUll00
iMnrw
$YiltaletJr
er«mnaQtS
$YiltaletJr
er«mnaQtS
$YiltaletJr
IfO'oo!e,~ieclo:nT.IQe
IfO'oo!e,~ieclo:nT.IQe
IfO'oo!e,~ieclo:nT.IQe
d,SCfUl!~,
baOOes
cas,s~aucio,
d,SCfUl!~,
baOOes
cas,s~aucio,
d,SCfUl!~,
baOOes
cas,s~aucio,
efce
QIlei:t
qu.!II
SOiII.lC~UJl;
efce
QIlei:t
qu.!II
SOiII.lC~UJl;
efce
QIlei:t
qu.!II
SOiII.lC~UJl;
COl1!CIIlf'I1iID'CSOulIS
piece~
COl1!CIIlf'I1iID'CSOulIS
piece~
COl1!CIIlf'I1iID'CSOulIS
piece~
p~al'l).1es
1;OUfJ'01CS.
p~al'l).1es
1;OUfJ'01CS.
p~al'l).1es
1;OUfJ'01CS.
1a~·etHe~achal(llU
1a~·etHe~achal(llU
1a~·etHe~achal(llU
Dl!fl)J)IWSllll::tMlldl:sl:fU..~'.~JtI!Itl.
Dl!fl)J)IWSllll::tMlldl:sl:fU..~'.~JtI!Itl.
Dl!fl)J)IWSllll::tMlldl:sl:fU..~'.~JtI!Itl.
....
pom 611I1·L1l!fI/icn:.aI1Vl!f1dMi
....
pom 611I1·L1l!fI/icn:.aI1Vl!f1dMi
....
pom 611I1·L1l!fI/icn:.aI1Vl!f1dMi
~lllJ!ia]~r~l:n3!ir.Jhtne.lJl.'IlR.cinchledi
~lllJ!ia]~r~l:n3!ir.Jhtne.lJl.'IlR.cinchledi
~lllJ!ia]~r~l:n3!ir.Jhtne.lJl.'IlR.cinchledi
.dls;l.'lS1110llt01
CfUU'l~.e~
.dls;l.'lS1110llt01
CfUU'l~.e~
.dls;l.'lS1110llt01
CfUU'l~.e~
I'I(l(flllO
I'I(l(flllO
I'I(l(flllO
d'1Ir.<~JI~oto
d'1Ir.<~JI~oto
d'1Ir.<~JI~oto
~1illl'oall...,
~1illl'oall...,
~1illl'oall...,
caSSI!~es
caSSI!~es
caSSI!~es
r:l"usu<e
(lCY<lnl
r:l"usu<e
(lCY<lnl
r:l"usu<e
(lCY<lnl
IIllffts
Ija
ltt:lurE
IIllffts
Ija
ltt:lurE
IIllffts
Ija
ltt:lurE
la'actl.rel$(J11
la'actl.rel$(J11
la'actl.rel$(J11
ae'(li1ro
·e;JllII"'iI!Ir.!
ae'(li1ro
·e;JllII"'iI!Ir.!
ae'(li1ro
·e;JllII"'iI!Ir.!
W!fla
"PilaIIOo
W!fla
"PilaIIOo
W!fla
"PilaIIOo
la~lrralSf.C1O
la~lrralSf.C1O
la~lrralSf.C1O
1
1
1
~ideO
~ideO
~ideO
el
el
el

KENWOOD
KENWOOD
This
warranty
will
be
This
warranty
This
warranty
KENWOOD
KENWOOD
KENWOOD
HOW
HOW
HOW
Kenwood
Kenwood
Kenwood
WHAT
WHAT
WHAT
Except as specified
Except as specified
Except as specified
following
following
following
1.
Any
1.
Any
1.
Any
Kenwood
Kenwood
Kenwood
Service.
Service.
Service.
2.
Any
2.
Any
2.
Any
3.
Damage,
3.
Damage,
3.
Damage,
a.
a.
a.
b.
b.
b.
c. Accident, actsofnature,
c. Accident, actsofnature,
c. Accident, actsofnature,
d.
d.
d.
e
e
e
WHO
WHO
WHO
This
wanantyisenforceable
This
wanantyisenforceable
This
wanantyisenforceable
WHATWEWILL
WHATWEWILL
WHATWEWILL
We
will
We
will
We
will
of
this
of
this
of
this
HOWTOOBTAIN
HOWTOOBTAIN
HOWTOOBTAIN
If
your
If
your
If
your
1 Take
1 Take
1 Take
{if
{if
{if
1·800-536-9663).
1·800-536-9663).
1·800-536-9663).
2
2
2
Although
Although
Although
shipping
shipping
shipping
3
Whenever
3
Whenever
3
Whenever
proofofwarranty
proofofwarranty
proofofwarranty
LIMITATIONOFIMPLIED
LIMITATIONOFIMPLIED
LIMITATIONOFIMPLIED
ALLIMPLIED WARRANTIES. INCLUDING WARRANTIESOFMERCHANTABILITY
ALLIMPLIED WARRANTIES. INCLUDING WARRANTIESOFMERCHANTABILITY
ALLIMPLIED WARRANTIES. INCLUDING WARRANTIESOFMERCHANTABILITY
LIMITED IN DURATION TO THE LENGTH
LIMITED IN DURATION TO THE LENGTH
LIMITED IN DURATION TO THE LENGTH
EXCLUSIONOFDAMAGES
EXCLUSIONOFDAMAGES
EXCLUSIONOFDAMAGES
KENWOOD'S LIABILITY
KENWOOD'S LIABILITY
KENWOOD'S LIABILITY
OPTION. KENWOOD SHALL
OPTION. KENWOOD SHALL
OPTION. KENWOOD SHALL
1. INSTALLATION
1. INSTALLATION
1. INSTALLATION
STEREO COMPONENTS,
STEREO COMPONENTS,
STEREO COMPONENTS,
2.
ANY
2.
ANY
2.
ANY
SOME STATES
SOME STATES
SOME STATES
EXCLUSION
EXCLUSION
EXCLUSION
MAY
NOT
MAY
NOT
MAY
NOT
Ttlis
warranty
Ttlis
warranty
Ttlis
warranty
problem
problem
problem
If a
If a
If a
product,
product,
product,
not
handled10your
not
handled10your
not
handled10your
ATTENTION
ATTENTION
ATTENTION
This
card
This
card
This
card
honored
will
be
honored
will
be
honored
LIMITED
LIMITED
LIMITED
LONGISTHE
LONGISTHE
LONGISTHE
U.S.A.
U.S.A.
U.S.A.
IS COVERED
IS COVERED
IS COVERED
are
are
are
product
product
product
productonwhich
productonwhich
productonwhich
Any
Any
Any
Installationorremovalofthe
Installationorremovalofthe
Installationorremovalofthe
supplied
supplied
supplied
Repairorattempted
Repairorattempted
Repairorattempted
Any
Any
Any
IS PROTECTED
IS PROTECTED
IS PROTECTED
pay
for
pay
for
pay
for
warranty.
warranty.
warranty.
KENWOOD
KENWOOD
KENWOOD
or
ship
or
ship
or
ship
you
are
you
are
you
are
OTHER DAMAGES, WHETHER INCIDENTAL, CONSEQUENTIALOROTHERWISE.
OTHER DAMAGES, WHETHER INCIDENTAL, CONSEQUENTIALOROTHERWISE.
OTHER DAMAGES, WHETHER INCIDENTAL, CONSEQUENTIALOROTHERWISE.
APPLYTOYOU
APPLYTOYOU
APPLYTOYOU
you
you
you
and receipt
and receipt
and receipt
WARRANTY
WARRANTY
WARRANTY
Corporation
Corporation
Corporation
below,
this
below,
this
below,
this
not
cover~d
by
not
cover~d
by
not
cover~d
by
whichisnot
whichisnot
whichisnot
car
stereo
deilleroran
car
stereo
deilleroran
car
stereo
deilleroran
the
the
the
deteriorationormalfunction
deteriorationormalfunction
deteriorationormalfunction
shipment01the
shipment01the
shipment01the
with
the
product
with
the
product
with
the
product
other
cause
which
other
cause
which
other
cause
which
PAY FOR
PAY FOR
PAY FOR
all
lilbor
and
all
lilbor
and
all
lilbor
and
WARRANTY
WARRANTY
WARRANTY
product
ever
product
ever
product
ever
it10.my
KENWOOD
it10.my
KENWOOD
it10.my
KENWOOD
uncertain
ilStowhether
uncertain
ilStowhether
uncertain
ilStowhether
you
must
pay
you
must
pay
you
must
pay
chargesifthe
chargesifthe
chargesifthe
your
units
are
your
units
are
your
units
are
coverage.
coverage.
coverage.
FOR
FOR
FOR
OR
REMOVAL CHARGES,
OR
REMOVAL CHARGES,
OR
REMOVAL CHARGES,
DO
NOT
ALLOW
DO
NOT
ALLOW
DO
NOT
ALLOW
OR
LIMITATION OF INCIDENTALORCONSEOUENTIAl
OR
LIMITATION OF INCIDENTALORCONSEOUENTIAl
OR
LIMITATION OF INCIDENTALORCONSEOUENTIAl
gives
you
specific
gives
you
specific
gives
you
specific
develops
duringoraher
develops
duringoraher
develops
duringoraher
should
contact
should
contact
should
contact
satisfaction, please
satisfaction, please
satisfaction, please
P.O
P.O
P.O
(or
inVOice)
(or
inVOice)
(or
inVOice)
KENWOOD
onlyinthe
U.S.A.
onlyinthe
U.S.A.
onlyinthe
U.S.A.
WARRANTY
WARRANTY
WARRANTY
ihKenwood~l
ihKenwood~l
ihKenwood~l
AND
WHATISNOT
AND
WHATISNOT
AND
WHATISNOT
warrantY
covers
warrantY
covers
warrantY
covers
the
worranty·
the
worranty·
the
worranty·
distributedinthe
distributedinthe
distributedinthe
automobile
automobile
automobile
serial
number
serial
number
serial
number
product
!cl<Jirns
product
!cl<Jirns
product
!cl<Jirns
product.
product.
product.
misuse,
misuse,
misuse,
repairbyanyone
repairbyanyone
repairbyanyone
does
not
relatetoa
does
not
relatetoa
does
not
relatetoa
onlybythe
original
onlybythe
original
onlybythe
original
material
expenses
material
expenses
material
expenses
SERVICE
SERVICE
SERVICE
needs service:
needs service:
needs service:
Authorized
Authorized
Authorized
a Service Center is
a Service Center is
a Service Center is
any
shipping
chargesifitisnecessO'lrytoship
any
shipping
chargesifitisnecessO'lrytoship
any
shipping
chargesifitisnecessO'lrytoship
repairs
are
coveredbythe
repairs
are
coveredbythe
repairs
are
coveredbythe
to'lkenorsent
to'lkenorsent
to'lkenorsent
WARRANTIES
WARRANTIES
WARRANTIES
OF
OF
OF
ANY
DEFECTIVE PRODUCT IS L1MITEDTOTHE
ANY
DEFECTIVE PRODUCT IS L1MITEDTOTHE
ANY
DEFECTIVE PRODUCT IS L1MITEDTOTHE
NOTBELIABLE FOR:
NOTBELIABLE FOR:
NOTBELIABLE FOR:
DAMAGES
BASED UPON INCONVENIENCE. LOSSOFUSEOFTHE PRODUCT;
DAMAGES
BASED UPON INCONVENIENCE. LOSSOFUSEOFTHE PRODUCT;
DAMAGES
BASED UPON INCONVENIENCE. LOSSOFUSEOFTHE PRODUCT;
LIMITATIONS ON
LIMITATIONS ON
LIMITATIONS ON
legal
rights,
legal
rights,
legal
rights,
the
Limited
the
Limited
the
Limited
your
KENWOOD
your
KENWOOD
your
KENWOOD
contact
contact
contact
Box
22745, 2201 East
Box
22745, 2201 East
Box
22745, 2201 East
are
necessary 10
are
necessary 10
are
necessary 10
USA
CORPORATION MILITARY
USA
CORPORATION MILITARY
USA
CORPORATION MILITARY
FOR
CAR
STEREO
FOR
CAR
STEREO
FOR
CAR
STEREO
warrants
this
product
warrants
warrants
all defectsinmaterial
all defectsinmaterial
all defectsinmaterial
U.S.A.byKenwoodorwhichisnot
U.S.A.byKenwoodorwhichisnot
U.S.A.byKenwoodorwhichisnot
dealer,
dealer,
dealer,
has
beon
has
beon
has
beon
resulting
resulting
resulting
mustbepresentedtothe
mustbepresentedtothe
mustbepresentedtothe
abuse, neglect,
abuse, neglect,
abuse, neglect,
not
authorizedbyKenwood.
not
authorizedbyKenwood.
not
authorizedbyKenwood.
purchaser.
purchaser.
purchaser.
for
covered
for
covered
for
covered
Service
Service
Service
for
warranty
for
warranty
for
warranty
THIS WARRANTY.
THIS WARRANTY.
THIS WARRANTY.
DAMAGETOOTHER PROPERTY CAUSED BY
DAMAGETOOTHER PROPERTY CAUSED BY
DAMAGETOOTHER PROPERTY CAUSED BY
HOW
HOW
HOW
and
you
and
you
and
you
Wilrrilnty
Wilrrilnty
Wilrrilnty
Authoriled
Authoriled
Authoriled
our
our
our
KENWOOD
KENWOOD
KENWOOD
purchil~t'
purchil~t'
purchil~t'
foraperiodofone
this
product
foraperiodofone
this
product
foraperiodofone
COVERED
COVERED
COVERED
and
and
and
unless
the
product
unless
the
product
unless
the
product
defaced,
modifiedorremoved.
defaced,
modifiedorremoved.
defaced,
modifiedorremoved.
from:
from:
from:
unauthorized
unauthorized
unauthorized
product
defect.
product
defect.
product
defect.
items.
Paymentofshipping
items.
Paymentofshipping
items.
Paymentofshipping
Center in
the
U.S.A.
Center in
the
U.S.A.
Center in
the
U.S.A.
authorized,
please
authorized,
please
authorized,
please
warranty
within
warranty
within
warranty
within
service,
you
must
service,
you
must
service,
you
must
LONGANIMPLIED WARRANTY LASTS AND/OR DO
LONGANIMPLIED WARRANTY LASTS AND/OR DO
LONGANIMPLIED WARRANTY LASTS AND/OR DO
DAMAGES,
DAMAGES,
DAMAGES,
may
also
hilve
may
may
Customer
Customer
Customer
Dominguez
Dominguez
Dominguez
Tel:
Tel:
Tel:
other
also
hilve
other
also
hilve
other
Period,orif
Period,orif
Period,orif
DealerorAuthorized
DealerorAuthorized
DealerorAuthorized
Relations
Relations
Relations
USA
CORPORATION
USA
CORPORATION
USA
CORPORATION
Street,
Street,
Street,
(3101
639-5300
(3101
639-5300
(3101
639-5300
il
new
il
new
il
new
COMPONENTS
COMPONENTS
COMPONENTS
(1)
yeilr
from
the
(1)
(1)
workmanshipinKenwood
workmanshipinKenwood
workmanshipinKenwood
purchasedinthe
purchasedinthe
purchasedinthe
is purchased
is purchased
is purchased
carrier).
carrier).
carrier).
product
modificationorfailuretofollow
product
modificationorfailuretofollow
product
modificationorfailuretofollow
charges
charges
charges
along
with&complete
along
with&complete
along
with&complete
call1-800-KENWOOD
call1-800-KENWOOD
call1-800-KENWOOD
the
product
for
the
product
for
the
product
for
the
United
States,
the
United
States,
the
United
States,
includeacopyofthe
includeacopyofthe
includeacopyofthe
AND
FITNESS
AND
FITNESS
AND
FITNESS
REPAIRORREPLACEMENTOFTHE PRODUCT
REPAIRORREPLACEMENTOFTHE PRODUCT
REPAIRORREPLACEMENTOFTHE PRODUCT
SO THE ABOVE LIMITATIONS
SO THE ABOVE LIMITATIONS
SO THE ABOVE LIMITATIONS
rights
which
vary
rights
which
vary
rights
which
vary
you
have
any
questions
you
have
any
questions
you
have
any
questions
Service Center. It
Service Center. It
Service Center. It
Department
at the
Department
at the
Department
at the
Long
Beach, CA 90801·5745
Long
Beach, CA 90801·5745
Long
Beach, CA 90801·5745
dateoforiginal
yeilr
from
the
dateoforiginal
yeilr
from
the
dateoforiginal
car st!!reo
car st!!reo
car st!!reo
U.S.A.
U.S.A.
U.S.A.
through
the
U.S.A
through
the
U.S.A
through
the
U.S.A
is discussed in the
is discussed in the
is discussed in the
descriptionofthe
descriptionofthe
descriptionofthe
for
the
nearest Service Center-
for
the
nearest Service Center-
for
the
nearest Service Center-
w<Jrranty service,wewill
w<Jrranty service,wewill
w<Jrranty service,wewill
original
dated
original
dated
original
dated
FOR
A PARTICULAR PURPOSE, ARE
FOR
A PARTICULAR PURPOSE, ARE
FOR
A PARTICULAR PURPOSE, ARE
ANY
DEFECTS IN KENWOOD CAR
ANY
DEFECTS IN KENWOOD CAR
ANY
DEFECTS IN KENWOOD CAR
from
statetostate.
from
statetostate.
from
statetostate.
regarding
the
regarding
the
regarding
the
the
problemoryour
the
problemoryour
the
problemoryour
address
listed
below:
address
listed
below:
address
listed
below:
purchase.
purchase.
purchase.
cwnpormnts_
cwnpormnts_
cwnpormnts_
fromanauthoriled
fromanauthoriled
fromanauthoriled
Military
Exchange
Military
Exchange
Military
Exchange
instructions
instructions
instructions
next
section
next
section
next
section
problem.
problem.
problem.
pay
the
return
pay
the
return
pay
the
return
sales
receipt
sales
receipt
sales
receipt
ATOUR
ATOUR
ATOUR
OR
OR
OR
NOT
ALLOW
NOT
ALLOW
NOT
ALLOW
AND
EXCLUSIONS
AND
EXCLUSIONS
AND
EXCLUSIONS
operationofthe
operationofthe
operationofthe
question
question
question
THE
THE
THE
KENWOOD
AuntORlZED
SERVICE
UnitspurctlasedthrooghtlleU.S.A.mililaryexchanoeser~lceo~erseasmaybeserviced
UnitspurctlasedthrooghtlleU.S.A.mililaryexchanoeser~lceo~erseasmaybeserviced
UnitspurctlasedthrooghtlleU.S.A.mililaryexchanoeser~lceo~erseasmaybeserviced
under
warrantyintheconlillenlal
under
warrantyintheconlillenlal
under
warrantyintheconlillenlal
1j
lh8
original
1j
lh8
original
1j
lh8
original
2j
Proofolpurcha3eisprovidedtotheservicer
2j
Proofolpurcha3eisprovidedtotheservicer
2j
Proofolpurcha3eisprovidedtotheservicer
Kenwood
corporationisproud
Kenwood
corporationisproud
Kenwood
corporationisproud
This
unit
has
This
unit
has
This
unit
The
The
The
as
as
as
is
is
is
has
you.lfpropert;'instal~andoperatedin<lCcordancewithinstruciionsfumished,it
you.lfpropert;'instal~andoperatedin<lCcordancewithinstruciionsfumished,it
you.lfpropert;'instal~andoperatedin<lCcordancewithinstruciionsfumished,it
should
give
youanoptirnJm
should
give
youanoptirnJm
should
give
youanoptirnJm
This
prOducliswarranted
This
prOducliswarranted
This
prOducliswarranted
purchase
purchase
purchase
Except
as
s~cified
Except
as
s~cified
Except
as
s~cified
oltileKenwoodbrandproducls
oltileKenwoodbrandproducls
oltileKenwoodbrandproducls
Duri
rig
Ihewarranty
Duri
rig
Ihewarranty
Duri
rig
Ihewarranty
lisledinthebnof
lisledinthebnof
lisledinthebnof
labor
requiredlocorrect
labor
requiredlocorrect
labor
requiredlocorrect
The
folfowing
The
folfowing
The
folfowing
1
VoltageconverslDns
1
VoltageconverslDns
1
VoltageconverslDns
2.
Pellodlccheck-upswtJich
2.
Pellodlccheck-upswtJich
2.
Pellodlccheck-upswtJich
3.
Catlinets,
grilles.
3.
Catlinets,
grilles.
3.
Catlinets,
grilles.
paris
al1d
accessories
paris
al1d
accessories
paris
al1d
accessories
4.
Unitsonwhich
4.
Unitsonwhich
4.
Unitsonwhich
5.lnslaliationand/orremovalctJarges
5.lnslaliationand/orremovalctJarges
5.lnslaliationand/orremovalctJarges
6.
Damaged
magnelicl~pes
6.
Damaged
magnelicl~pes
6.
Damaged
magnelicl~pes
7.
House
call
7.
House
call
7.
House
call
8.
SllIppmgord81ivery
8.
SllIppmgord81ivery
8.
SllIppmgord81ivery
9.1hlswarranlywlllnolcoveranyfailurethatisdueloanyofthefollowing
9.1hlswarranlywlllnolcoveranyfailurethatisdueloanyofthefollowing
9.1hlswarranlywlllnolcoveranyfailurethatisdueloanyofthefollowing
aWJldancewlth
aWJldancewlth
aWJldancewlth
'Improperrnainlenaficeorrepair.m~lud:ngthcinstaliationolpartsoraccessoriesthat
'Improperrnainlenaficeorrepair.m~lud:ngthcinstaliationolpartsoraccessoriesthat
'Improperrnainlenaficeorrepair.m~lud:ngthcinstaliationolpartsoraccessoriesthat
do
Ilot
conform10lhe
do
Ilot
conform10lhe
do
Ilot
conform10lhe
'Misuse,
abuse.
'Misuse,
abuse.
'Misuse,
abuse.
instructions
instructions
instructions
•
Accidenlal
orintenlional
•
Accidenlal
orintenlional
•
Accidenlal
orintenlional
•
Repairsorattempledrepairsbyanunaulhorizedag€ncv.(Allrepa:rsmuslbeperlcrmed
•
Repairsorattempledrepairsbyanunaulhorizedag€ncv.(Allrepa:rsmuslbeperlcrmed
•
Repairsorattempledrepairsbyanunaulhorizedag€ncv.(Allrepa:rsmuslbeperlcrmed
alanaulhorized
alanaulhorized
alanaulhorized
'Damagesordeteriorations
'Damagesordeteriorations
'Damagesordeteriorations
tothecJtrler)
tothecJtrler)
tothecJtrler)
Damagesordeteriorations
Damagesordeteriorations
Damagesordeteriorations
,
,
,
AslhepurchasedolanewKenwoodbrandoroducl,youarerequesledtodolhefollowiflg
AslhepurchasedolanewKenwoodbrandoroducl,youarerequesledtodolhefollowiflg
AslhepurchasedolanewKenwoodbrandoroducl,youarerequesledtodolhefollowiflg
in
ordertoobtain
in
ordertoobtain
in
ordertoobtain
1.
Ketal[]
your
1.
Ketal[]
your
1.
Ketal[]
your
requestillgKenwood\Vanantyscr~lce
requestillgKenwood\Vanantyscr~lce
requestillgKenwood\Vanantyscr~lce
2.
Make
your
2.
Make
your
2.
Make
your
lIIalketlormspectlonaooapprovOOWal"ranlys8rvice,
lIIalketlormspectlonaooapprovOOWal"ranlys8rvice,
lIIalketlormspectlonaooapprovOOWal"ranlys8rvice,
ciulonboxoreQuivalenl.fulfyinsuredandshippingchar\;csprepald,lolheaulliorized
ciulonboxoreQuivalenl.fulfyinsuredandshippingchar\;csprepald,lolheaulliorized
ciulonboxoreQuivalenl.fulfyinsuredandshippingchar\;csprepald,lolheaulliorized
Kenwood
Service
Kenwood
Service
Kenwood
Service
Any
and
all
impliedwananlics,
Any
and
all
impliedwananlics,
Any
and
all
impliedwananlics,
Palflcular
purpose,
Palflcular
purpose,
Palflcular
purpose,
KENWDDD'sliabilitytoranydefecliveprodoctislimitedtotherepairorreplacerr:ento!
KENWDDD'sliabilitytoranydefecliveprodoctislimitedtotherepairorreplacerr:ento!
KENWDDD'sliabilitytoranydefecliveprodoctislimitedtotherepairorreplacerr:ento!
saidproduct,alourpotion,;Jt]d$llalinolinCludedamagesofanykind,whelherinClderltal,
saidproduct,alourpotion,;Jt]d$llalinolinCludedamagesofanykind,whelherinClderltal,
saidproduct,alourpotion,;Jt]d$llalinolinCludedamagesofanykind,whelherinClderltal,
corlscQOO1tialorotherwise,
corlscQOO1tialorotherwise,
corlscQOO1tialorotherwise,
ATTENTION
ATTENTION
ATTENTION
This
(,ud
and
This
(,ud
and
This
(,ud
and
U.S.A
,sul!jccllo
lhefoilowlrJgcornJit
U.S.A
,sul!jccllo
lhefoilowlrJgcornJit
U.S.A
,sul!jccllo
warrantyisin
8flect.
warrantyisin
8flect.
warrantyisin
8flect.
WARRANTY
WARRANTY
WARRANTY
o11he
o11he
o11he
lleen
ptGocrly
designed.
lleen
ptGocrly
designed.
lleen
ptGocrly
designed.
reliable
reliable
reliable
WARRANTY
WARRANTY
WARRANTY
foraperiOdof(1)
foraperiOdof(1)
foraperiOdof(1)
SCOPE OF
SCOPE OF
SCOPE OF
below.lhiswarrant;'
below.lhiswarrant;'
below.lhiswarrant;'
periOd,
any
authorized
periOd,
any
authorized
periOd,
any
authorized
tIlis
warranty
tIlis
warranty
tIlis
warranty
any
delec1Inmaterialsorworkmanship
any
delec1Inmaterialsorworkmanship
any
delec1Inmaterialsorworkmanship
are
not
covaredbythis
are
not
covaredbythis
are
not
covaredbythis
do
not
do
not
do
not
otlll;r
exterior
otlll;r
exterior
otlll;r
exterior
the
serial
nuTIber
the
serial
nuTIber
the
serial
nuTIber
charges
for
any
repair5
charges
for
any
repair5
charges
for
any
repair5
cl1argestoorlromanauthorized
cl1argestoorlromanauthorized
cl1argestoorlromanauthorized
tlievlsual
inspcction
tlievlsual
inspcction
tlievlsual
inspcction
qualiiyand
qualiiyand
qualiiyand
neglect.
unaUlhoriled
neglect.
unaUlhoriled
neglect.
unaUlhoriled
containedinthe
CNmer's
containedinthe
CNmer's
containedinthe
CNmer's
damages
damages
damages
Kenwood5arvice
Kenwood5arvice
Kenwood5arvice
caused
caused
caused
resulting
resulting
resulting
PURCHASER'S RESPONSIBILITIES
PURCHASER'S RESPONSIBILITIES
PURCHASER'S RESPONSIBILITIES
Kenwoodwarranty:;ervice
Kenwoodwarranty:;ervice
Kenwoodwarranty:;ervice
sales
slipororher
sales
slipororher
sales
slipororher
ooitavailabfetoan
ooitavailabfetoan
ooitavailabfetoan
Cenler.
Cenler.
Cenler.
LIMITATION OF IMPLIED WARRANTIES
LIMITATION OF IMPLIED WARRANTIES
LIMITATION OF IMPLIED WARRANTIES
including
including
including
shallbelimited
shallbelimited
shallbelimited
EXCLUSION OF CERTAIN
EXCLUSION OF CERTAIN
EXCLUSION OF CERTAIN
C:qJccttothe
C:qJccttothe
C:qJccttothe
lhefoilowlrJgcornJit
FOR MILITARY
FOR MILITARY
FOR MILITARY
card
card
card
linishes,
linishes,
linishes,
eVidenceotpurchase
eVidenceotpurchase
eVidenceotpurchase
aufhorized
aufhorized
aufhorized
illvoic{'j ilre necessarytopurchase a
illvoic{'j ilre necessarytopurchase a
illvoic{'j ilre necessarytopurchase a
MARKET
MARKET
MARKET
~ality
and
workmanshipofits
~ality
and
workmanshipofits
~ality
and
workmanshipofits
tested
and
inspected
tested
and
inspected
tested
and
inspected
performance
performance
performance
PERIOD
PERIOD
PERIOD
year
from
year
from
year
from
WARRANTY
WARRANTY
WARRANTY
covers
all
defeclsinmalerials
covers
all
defeclsinmalerials
covers
all
defeclsinmalerials
Kenwood
$erviceCenlerinfhemiI
Kenwood
$erviceCenlerinfhemiI
Kenwood
$erviceCenlerinfhemiI
will
provide
you
Iree-oI-d1arge
will
provide
you
Iree-oI-d1arge
will
provide
you
Iree-oI-d1arge
warranty.
warranty.
warranty.
disclose
any
delec1coveredbyttxl
disclose
any
delec1coveredbyttxl
disclose
any
delec1coveredbyttxl
ocl1s,
tap8
tlCads.
ocl1s,
tap8
tlCads.
ocl1s,
tap8
tlCads.
has
beeneflaced,f11(]difiedorremoved
has
beeneflaced,f11(]difiedorremoved
has
beeneflaced,f11(]difiedorremoved
Kenl't'Ood
Kenl't'Ood
Kenl't'Ood
01
the
authorized
Kenl'iood
01
the
authorized
Kenl'iood
01
the
authorized
Kenl'iood
specifications
01
the
01
the
01
the
product
modificationorfailuretofolfow
product
modificationorfailuretofolfow
product
modificationorfailuretofolfow
Manual
Manual
Manual
during
shipment
during
shipment
during
shipment
from
removal
and/or
from
removal
and/or
from
removal
and/or
KenwoOd
KenwoOd
KenwoOd
warranliesof
nlerchanlabilily
warranliesof
nlerchanlabilily
warranliesof
nlerchanlabilily
DAMAGES
DAMAGES
DAMAGES
exlent
prohibited
exlent
prohibited
exlent
prohibited
original
original
original
(Claims
(Claims
(Claims
replacement
replacement
replacement
for
proving
for
proving
for
proving
Service
Service
Service
Dfshlpyourunltinl
Dfshlpyourunltinl
Dfshlpyourunltinl
b~appllcable
b~appllcable
b~appllcable
specifications
specifications
Center)
Center)
Center)
indurallonfolhe lengrhofl
indurallonfolhe lengrhofl
indurallonfolhe lengrhofl
audio
audio
audio
tlefore
ilwas
tlefore
ilwas
tlefore
ilwas
the
dateofthe
the
dateofthe
the
dateofthe
and
and
and
amI
al.hermm-durable
amI
al.hermm-durable
amI
al.hermm-durable
SCrviceCefi
SCrviceCefi
SCrviceCefi
pans
pans
pans
musl
musl
musl
your
your
your
Cenlerinthe
Cenlerinthe
Cenlerinthe
his
warranty
his
warranty
his
warranty
bolh
bolh
bolh
mranty.
mranty.
mranty.
ServiceCenler
ServiceCenler
ServiceCenler
and
and
and
KENWOOD
AuntORlZED
KENWOOD
ions
ions
ions
eQuipmem
eQuipmem
eQuipmem
shipped
to
shipped
to
shipped
to
original
original
original
workmanship
workmanship
workmanship
itary
market
itary
market
itary
market
pans
and
pans
and
pans
and
fer
fer
fer
conditions
in
conditions
in
conditions
in
tlc
presented
tlc
presented
tlc
presented
~Iiglbilil~
for
~Iiglbilil~
for
~Iiglbilil~
for
military
military
military
tsorlglnal
tsorlglnal
tsorlglnal
litness
fer
a
litness
fer
a
litness
fer
a
law
law
law
n€w
n€w
n€w
AuntORlZED
JAPAN:
JAPAN:
JAPAN:
Yokota
Yokota
Yokota
Kenwood Rep,: c/o
Kenwood Rep,: c/o
Kenwood Rep,: c/o
Yokota
BX,
JAAX
Yokota
BX,
JAAX
Yokota
BX,
JAAX
APO
Snn
Francisco 96328
APO
Snn
Francisco 96328
APO
Snn
Francisco 96328
lama
lama
lama
Kenwood
Rep,:
Kenwood
Rep,:
Kenwood
Rep,:
Zama
Zama
Zama
PX,
JAAX
PX,
JAAX
PX,
JAAX
APO
San
Francisco 96343
APO
San
Francisco 96343
APO
San
Francisco 96343
Misawa
Misawa
Misawa
Kenwood Rep,;clo
Kenwood Rep,;clo
Kenwood Rep,;clo
ax,
JAAX AAfE$-PAC.
ax,
JAAX AAfE$-PAC.
ax,
JAAX AAfE$-PAC.
Misawa
Misawa
Misawa
APO
San Frilncisco 95519
APO
San Frilncisco 95519
APO
San Frilncisco 95519
Yokosuka
Yokosuka
Yokosuka
Kenwood
Rep,:
Kenwood
Rep,:
Kenwood
Rep,:
A·33. Yokosuka
A·33. Yokosuka
A·33. Yokosuka
FPO
Seattle
98760
FPO
Seattle
98760
FPO
Seattle
98760
Atsugi
Atsugi
Atsugi
KenwOQd
Rep,;
KenwOQd
Rep,;
KenwOQd
Rep,;
Atsugi
NEX
No. 260·020
Atsugi
NEX
No. 260·020
Atsugi
NEX
No. 260·020
Iwakuni
Iwakuni
Iwakuni
Kanwood Rep,: clo
Kanwood Rep,: clo
Kanwood Rep,: clo
Marine Corps Ellchange, Marine Corps Air Stallon,
Marine Corps Ellchange, Marine Corps Air Stallon,
Marine Corps Ellchange, Marine Corps Air Stallon,
FPO
Seattle
98764
FPO
Seattle
98764
FPO
Seattle
98764
Sasebo
Sasebo
Sasebo
Sasobo
NEX;
Sasobo
NEX;
Sasobo
NEX;
Nsvy Exchnnge
Nsvy Exchnnge
Nsvy Exchnnge
EA. Box
115
FPO
EA. Box
115
FPO
EA. Box
115
FPO
Okinawa
Okinawa
Okinawa
KenwOQd
Rep,;
KenwOQd
Rep,;
KenwOQd
Rep,;
OWAX,
AAFES"PAC,
OWAX,
AAFES"PAC,
OWAX,
AAFES"PAC,
KOREA:
KOREA:
KOREA:
Kenwood Rep,; clo
Kenwood Rep,; clo
Kenwood Rep,; clo
KOAX Repair Shop,
KOAX Repair Shop,
KOAX Repair Shop,
DO-Camp Mark!!l,
DO-Camp Mark!!l,
DO-Camp Mark!!l,
GUAM;
GUAM;
GUAM;
Kenwood
Rep,;
Kenwood
Rep,;
Kenwood
Rep,;
Guam
Guam
Guam
NEX
No.
NEX
No.
NEX
No.
FPO
San
Francisco
FPO
San
Francisco
FPO
San
Francisco
Kenwood
Rep,;
Kenwood
Rep,;
Kenwood
Rep,;
GUAX,
AAFES·PAC,
GUAX,
AAFES·PAC,
GUAX,
AAFES·PAC,
U.S.A.:
U.S.A.:
U.S.A.:
Hawaii
Hawaii
Hawaii
KUl1woud
factory
KUl1woud
factory
KUl1woud
factory
99-994
IwamlaSt..
99-994
IwamlaSt..
99-994
IwamlaSt..
Alaska
Alaska
Alaska
Vil;ta Radio
Vil;ta Radio
Vil;ta Radio
TV
TV
TV
861
East
Loop Rond, Am:homge, Alaskil
861
East
Loop Rond, Am:homge, Alaskil
861
East
Loop Rond, Am:homge, Alaskil
Anchorage Commercial Electronics, Inc.;
Anchorage Commercial Electronics, Inc.;
Anchorage Commercial Electronics, Inc.;
1"'SO
Enst9th Avc., Anchorage, Alaska
1"'SO
Enst9th Avc., Anchorage, Alaska
1"'SO
Enst9th Avc., Anchorage, Alaska
In
The
Continental
In
The
Continental
In
The
Continental
For Nearest
Authoriwd
For Nearest
Authoriwd
For Nearest
Authoriwd
Tel:
1-800-536-9663
Tel:
1-800-536-9663
Tel:
1-800-536-9663
Kenwood
Service
Kenwood
Service
Kenwood
Service
Kanwood Factory Service:
Kanwood Factory Service:
Kanwood Factory Service:
P.O.
Box
22745.
P.O.
Box
22745.
P.O.
Box
22745.
Long Beach, Calitornia90801-5745
Long Beach, Calitornia90801-5745
Long Beach, Calitornia90801-5745
Tel:
(310) 1i39-5300
Tel:
(310) 1i39-5300
Tel:
(310) 1i39-5300
EUROPE:
EUROPE:
EUROPE:
Please inquire
Please inquire
Please inquire
Kenwood products,
Kenwood products,
Kenwood products,
KENWOOD
ELECTRONICS
KENWOOD
ELECTRONICS
KENWOOD
ELECTRONICS
RembrOcker-Str.
RembrOcker-Str.
RembrOcker-Str.
Tal.; 49-06104-69010
Tal.; 49-06104-69010
Tal.; 49-06104-69010
AAFES-PAC,
AAFES-PAC,
AAFES-PAC,
c/o
c/o
c/o
AAFES,PAC,
AAFES,PAC,
AAFES,PAC,
clo
clo
clo
NEX
NEX
NEX
cia
cia
cia
260-Q40
260-Q40
260-Q40
Seattle 98766
Seattle 98766
Seattle 98766
cia
cia
cia
c/o
c/o
c/o
230-010.
230-010.
230-010.
c/o
c/o
c/o
..
..
..
2201
2201
2201
atthe
atthe
atthe
15,
15,
15,
CENTERSINMILITARY
SERVICE
CENTERSINMILITARY
SERVICE
CENTERSINMILITARY
No.
260-010
No.
260-010
No.
260-010
FPO
Seattle
98767
FPO
Seattle
98767
FPO
Seattle
98767
APO
San
Francisco
APO
APO
AAFES·PAC
AAFES·PAC
AAFES·PAC
APO
San Francisco
APO
San Francisco
APO
San Francisco
96630
96630
96630
APO
APO
APO
Service
Service
Service
A'!!a, Hawaii
A'!!a, Hawaii
A'!!a, Hawaii
U_S_A
U_S_A
U_S_A
Service Center;
Service Center;
Service Center;
U.S.A,
U.S.A,
U.S.A,
East
East
East
mililary resale outlets where you bought your
mililary resale outlets where you bought your
mililary resale outlets where you bought your
or
or
or
63150
63150
63150
96230
San
Francisco
96230
San
Francisco
96230
96488
96488
96488
San Francisco
96334
San Francisco
96334
San Francisco
96334
96701
96701
96701
99501
99501
99501
99501
99501
99501
Dominguez Slreet.
Dominguez Slreet.
Dominguez Slreet.
DEUTSCHLAND GMBH;
DEUTSCHLAND GMBH;
DEUTSCHLAND GMBH;
Heusenstamm. Germany
Heusenstamm. Germany
Heusenstamm. Germany
MARKET
MARKET
MARKET
CANADA
CANADA
CANADA
KENWOOD ELECTRONICS
KENWOOD ELECTRONICS
KENWOOD ELECTRONICS
customllrofeelch
customllrofeelch
customllrofeelch
KENWOOD,
KENWOOD,
KENWOOD,
KENWOOD
warrants
KENWOOD
warrants
KENWOOD
warrants
conditions
sct
conditions
sct
conditions
sct
labour
when
labour
when
labour
when
or
workmanshipattimeofmanufactUic.
or
workmanshipattimeofmanufactUic.
or
workmanshipattimeofmanufactUic.
KENWOOD,
KENWOOD,
KENWOOD,
WARRANTY PERIOD
WARRANTY PERIOD
WARRANTY PERIOD
This
Kenwood
This
Kenwood
This
Kenwood
or
rentai, except
or
rentai, except
or
rentai, except
ninery
(90) days
ninery
(90) days
ninery
(90) days
WARRANTY EXCLUSIONS
WARRANTY EXCLUSIONS
WARRANTY EXCLUSIONS
This
warranty
This
warranty
This
warranty
~il)
Products
~il)
Products
~il)
Products
~b)
Products
~b)
Products
~b)
Products
~cf
Products
~cf
Products
~cf
Products
(dl
Periodic check-ups
(dl
Periodic check-ups
(dl
Periodic check-ups
(e~
Defects
(e~
Defects
(e~
Defects
unauthorized
unauthorized
unauthorized
(f)
Defectsordilmilgeasil
(f)
Defectsordilmilgeasil
(f)
Defectsordilmilgeasil
(g) Defects reSUlting
(g) Defects reSUlting
(g) Defects reSUlting
(h) Damageordeterioration
(h) Damageordeterioration
(h) Damageordeterioration
diSCSorfaults
diSCSorfaults
diSCSorfaults
(i)
Defectsordamage
(i)
Defectsordamage
(i)
Defectsordamage
(j) Producl voir age
(j) Producl voir age
(j) Producl voir age
(k) Product
(k) Product
(k) Product
TO
OBTAIN WARRANTY SERVICE
TO
OBTAIN WARRANTY SERVICE
TO
OBTAIN WARRANTY SERVICE
Should
your
Should
your
Should
your
the
original
copyofyour
the
original
copyofyour
the
original
copyofyour
prepaidtothe nearest
prepaidtothe nearest
prepaidtothe nearest
properly
packed. Include a
properly
packed. Include a
properly
packed. Include a
home
and
lor
home
and
lor
home
and
lor
within
warranty
within
warranty
within
warranty
relilted costs for
relilted costs for
relilted costs for
ENTIRE WARRANTY
ENTIRE WARRANTY
ENTIRE WARRANTY
This
w<Jrranty
This
w<Jrranty
This
w<Jrranty
agentsoremployees
agentsoremployees
agentsoremployees
statementoradvertisement01promotion,
statementoradvertisement01promotion,
statementoradvertisement01promotion,
or
service centre, unless
or
service centre, unless
or
service centre, unless
DISCLAIMER
DISCLAIMER
DISCLAIMER
KENWOOD
disclaims
KENWOOD
disclaims
KENWOOD
disclaims
damagetoother
damagetoother
damagetoother
NOTICE TO CONSUMER
NOTICE TO CONSUMER
NOTICE TO CONSUMER
The
provisions
The
provisions
The
provisions
warrantiesorrights
warrantiesorrights
warrantiesorrights
IMPORTANT
IMPORTANT
IMPORTANT
This
warranty
This
warranty
This
warranty
you
must
prcsent
you
must
prcsent
you
must
prcsent
be keptina safe place,
be keptina safe place,
be keptina safe place,
ATTENTION
ATTENTION
ATTENTION
lh,.,r,mi
i1l!d
lh,.,r,mi
i1l!d
lh,.,r,mi
i1l!d
CANADA
CANADA
CANADA
new
Kenwood
new
new
torth
torth
torth
such defects Bre
such defects Bre
such defects Bre
productiswarranted
productiswarranted
productiswarranted
for
for
for
for
for
for
excludes:
excludes:
excludes:
purchased
purchased
purchased
purchased
purchased
purchased
with
with
with
resulting
resulting
resulting
modilicillionorf<liluretofollow
modilicillionorf<liluretofollow
modilicillionorf<liluretofollow
installationorremoval
installationorremoval
installationorremoval
Kenwood
Kenwood
Kenwood
work
work
work
willbereturned
willbereturned
willbereturned
Ule
Ule
Ule
constitutes
constitutes
constitutes
productsorgoods,
productsorgoods,
productsorgoods,
containedinthis
containedinthis
containedinthis
cardbyitselfisnot
cardbyitselfisnot
cardbyitselfisnot
the
the
the
producl
Kenwood
producl
Kenwood
producl
that
each
new
that
each
new
that
each
new
betow. II a
delect
betow. II a
delect
betow. II a
delect
determinedbyKENWOODorits'
determinedbyKENWOODorits'
determinedbyKENWOODorits'
products
which
products
which
products
which
parts
and
labour
parts
and
labour
parts
and
labour
in a
foreign
in a
foreign
in a
foreign
from
a dealer
from
a dealer
from
a dealer
the serial
number
the serial
number
the serial
number
whichdonot
whichdonot
whichdonot
from
disaster, accident, abuse,
from
disaster, accident, abuse,
from
disaster, accident, abuse,
resultofrepairs
resultofrepairs
resultofrepairs
from
the
useofpartsordevices
from
the
useofpartsordevices
from
the
useofpartsordevices
occurringtoany
occurringtoany
occurringtoany
or
darna~le
causedbydefectiveorleaking
or
darna~le
causedbydefectiveorleaking
or
darna~le
causedbydefectiveorleaking
occurring
during
occurring
during
occurring
during
and
/or
line
frequency
and
/or
line
frequency
and
/or
line
frequency
product
require
product
require
product
require
billofsale
billofsale
billofsale
authorized
KENWOOD
authorized
KENWOOD
authorized
KENWOOD
copyofyour
copyofyour
copyofyour
telephone
number!s),acomplete
telephone
number!s),acomplete
telephone
number!s),acomplete
freight
freight
freight
return
01
product(s~
return
01
product(s~
return
01
product(s~
the
entire
the
entire
the
entire
are
authorizedtoextendorenlarge
are
authorizedtoextendorenlarge
are
authorizedtoextendorenlarge
approvedinwritingbyKENWOOD.
approvedinwritingbyKENWOOD.
approvedinwritingbyKENWOOD.
any
responsibility
any
responsibility
any
responsibility
wrinen
wrinen
wrinen
you
mav
have
you
mav
have
you
mav
have
consideredbyKENWOODasa
consideredbyKENWOODasa
consideredbyKENWOODasa
original
copyofyour
original
copyofyour
original
copyofyour
should
theyberequiredinthe
should
theyberequiredinthe
should
theyberequiredinthe
6070
6070
6070
(DI
I[woir (')
ill('
(DI
I[woir (')
ill('
(DI
I[woir (')
ill('
KENWOOO ELECTRONICS
KENWOOO ELECTRONICS
KENWOOO ELECTRONICS
KENWOOD
KENWOOD
KENWOOD
INC,
(hereinilher
called
INC,
(hereinilher
INC,
(hereinilher
distributed
distributed
distributed
Kenwood
Kenwood
Kenwood
should
occur
should
occur
should
occur
Please
Please
Please
for
parts
and
for
parts
and
for
parts
and
are usedina
are usedina
are usedina
and
are
subjecttothe
and
are
subjecttothe
and
are
subjecttothe
countryorpurchasedinCanada
countryorpurchasedinCanada
countryorpurchasedinCanada
not
authorizedbyKENWOOD
not
authorizedbyKENWOOD
not
authorizedbyKENWOOD
defaced,
defaced,
defaced,
disclose
disclose
disclose
performedbya
performedbya
performedbya
shipping
shipping
shipping
conversions.
conversions.
conversions.
charges.
charges.
charges.
warranty
warranty
warranty
and
this
warranty
and
this
warranty
and
this
warranty
service
service
service
original
original
original
prepaidtodestinations
prepaidtodestinations
prepaidtodestinations
to
destinations
to
destinations
to
destinations
wrillen
warranty
wrillen
warranty
wrillen
warranty
including
including
including
for
lossoftimeoruscofthe
for
lossoftimeoruscofthe
for
lossoftimeoruscofthe
inconvenienceorcommercial
inconvenienceorcommercial
inconvenienceorcommercial
warranty
warranty
warranty
which
are set
which
are set
which
are set
billofsale
billofsale
billofsale
KENWOOD
KENWOOD
KENWOOD
Kestrel
Kestrel
Kestrel
m-'n~o"dry
to
m-'n~o"dry
to
m-'n~o"dry
to
"KENWOOD"j,
called
"KENWOOD"j,
called
"KENWOOD"j,
in CanadabyKENWOOD
in CanadabyKENWOOD
in CanadabyKENWOOD
product,
under
product,
under
product,
under
within
the
within
the
within
the
contact
KENWOODtoconfirmifa
contact
KENWOODtoconfirmifa
contact
KENWOODtoconfirmifa
labour
foraperiodofone
labour
foraperiodofone
labour
foraperiodofone
professionalorcommercial
professionalorcommercial
professionalorcommercial
terms
terms
terms
alteredormissing.
alteredormissing.
alteredormissing.
any
defects
coveredbythis
any
defects
coveredbythis
any
defects
coveredbythis
misuse,
misuse,
misuse,
instructionsinthe
instructionsinthe
instructionsinthe
thatdonot
thatdonot
thatdonot
exterior
finishes,
exterior
finishes,
exterior
finishes,
(claims
shouldbepresentedtothe
(claims
shouldbepresentedtothe
(claims
shouldbepresentedtothe
service,
deliveritto
service,
deliveritto
service,
deliveritto
cardasproofofwarranty,orsend
cardasproofofwarranty,orsend
cardasproofofwarranty,orsend
centre. To
centre. To
centre. To
billofsale
and
billofsale
and
billofsale
and
return
address and a
return
address and a
return
address and a
outside
outside
outside
givenbyKENWOOD.Noperson,
givenbyKENWOOD.Noperson,
givenbyKENWOOD.Noperson,
this
this
this
any
extended
any
extended
any
extended
are
nOI
intendedtolimit,
are
nOI
intendedtolimit,
are
nOI
intendedtolimit,
forthInany
forthInany
forthInany
and
this
and
this
and
this
future
future
future
ELECTRONICS
ELECTRONICS
ELECTRONICS
Road,
Misslssauga,
Road,
Misslssauga,
Road,
Misslssauga,
Tel.:
Tel.:
Tel.:
(90S1
(90S1
(90S1
Fax: (905} 670-7248
Fax: (905} 670-7248
Fax: (905} 670-7248
purdld51'
.-l
rl!'W
purdld51'
.-l
rl!'W
purdld51'
.-l
rl!'W
CANADA
CANADA
CANADA
WARRANTY
WARRANTY
WARRANTY
gives
gives
gives
normal
use, is free
normal
use, is free
normal
use, is free
warranty
period,
warranty
period,
warranty
period,
authorized
service centrestobe
authorized
service centrestobe
authorized
service centrestobe
(1)
(1)
(1)
and
conditionsofthe
and
conditionsofthe
and
conditionsofthe
and
takentoa
and
takentoa
and
takentoa
warranty.
warranty.
warranty.
lightning,
power
lightning,
power
lightning,
power
owner's
owner's
owner's
personorparty
personorparty
personorparty
batteries,
batteries,
batteries,
warrantyonbehalf
warrantyonbehalf
warrantyonbehalf
applicable
applicable
applicable
not
not
not
conformtoKENWOOD
conformtoKENWOOD
conformtoKENWOOD
cosmetic
parts,
cosmetic
parts,
cosmetic
parts,
any
authorized
any
authorized
any
authorized
avoid
pOSSible
avoid
pOSSible
avoid
pOSSible
this
warranty
card as
this
warranty
card as
this
warranty
card as
detailed
detailed
detailed
within
Canada.
within
Canada.
within
Canada.
Canada.
Canada.
Canada.
warranty
programorplan
warranty
programorplan
warranty
programorplan
productoranv
productoranv
productoranv
loss.
loss.
loss.
modify,
modify,
modify,
provincial
provincial
provincial
valid
proofofpurchase.
valid
proofofpurchase.
valid
proofofpurchase.
warranty
cardasproofofwarranty,sowe
warranty
cardasproofofwarranty,sowe
warranty
cardasproofofwarranty,sowe
CANADA
CANADA
CANADA
Ontario,
Canada L5T 1S8
Ontario,
Canada L5T 1S8
Ontario,
Canada L5T 1S8
670-7211
670-7211
670-7211
INC.
INC.
INC.
rim
following
writtun
writtun
writtun
fromadealer
fromadealer
fromadealer
defects,
subjecttothe
defects,
subjecttothe
defects,
subjecttothe
freeofcharge
freeofcharge
freeofcharge
nttributabletofaulty
nttributabletofaulty
nttributabletofaulty
the
dateoforiginal
the
dateoforiginal
the
dateoforiginal
which
arc
warranted
which
arc
warranted
which
arc
warranted
country.
country.
country.
specifications
specifications
specifications
adaptors,
adaptors,
adaptors,
company)
company)
company)
service
service
service
your
product
your
product
your
product
make
make
make
by
any
by
any
by
any
that
maV be
that
maV be
that
maV be
indirect,
incidentalorconsequential
indirect,
incidentalorconsequential
indirect,
incidentalorconsequential
disclaimorexclude
disclaimorexclude
disclaimorexclude
legislation.
legislation.
legislation.
When
applying
When
applying
When
applying
warrantytothe
warrantytothe
warrantytothe
antennas, cables, tapes,
antennas, cables, tapes,
antennas, cables, tapes,
centre
centre
centre
fully
fully
fully
sure the
sure the
sure the
along
along
along
fault(s).
fault(s).
fault(s).
writtenorverbal
writtenorverbal
writtenorverbal
rim
following
rim
following
and
purchased
and
purchased
and
purchased
from
<Iny
from
<Iny
from
<Iny
repairs
willbemade
repairs
willbemade
repairs
willbemade
dealerorservice centre is authorized
dealerorservice centre is authorized
dealerorservice centre is authorized
year
from
year
from
year
from
application,
application,
application,
warranty.
warranty.
warranty.
foreign
foreign
foreign
surges,
neglectorlackofperiodic
surges,
neglectorlackofperiodic
surges,
neglectorlackofperiodic
manual.
manual.
manual.
authorizedbyKENWOOD
authorizedbyKENWOOD
authorizedbyKENWOOD
tape
heads,
tape
heads,
tape
heads,
shipping
shipping
shipping
KENWOOD
KENWOOD
KENWOOD
shipping
damage,
shipping
damage,
shipping
damage,
proofofwarranty
proofofwarranty
proofofwarranty
descriptionofthe
descriptionofthe
descriptionofthe
The
customerisresponsible
The
customerisresponsible
The
customerisresponsible
party, dealerorservice centreortheir
party, dealerorservice centreortheir
party, dealerorservice centreortheir
of KENWOOD
of KENWOOD
of KENWOOD
other
other
other
take away,
take away,
take away,
or fuderai laws or
or fuderai laws or
or fuderai laws or
INC.
INC.
INC.
authorized
authorized
authorized
terms
terms
terms
for
for
for
purchase. lease
purchase. lease
purchase. lease
foraperiod
foraperiod
foraperiod
milinlenance,
milinlenance,
milinlenance,
and
present
and
present
and
present
insured
insured
insured
product
product
product
with
your
with
your
with
your
Products
Products
Products
for
all
freight
for
all
freight
for
all
freight
offeredbythe
offeredbythe
offeredbythe
any
any
any
for
warranty
for
warranty
for
warranty
recommend
recommend
recommend
parts
parts
parts
materials
materials
materials
and
and
and
repaired
repaired
repaired
repairs,
repairs,
repairs,
that
that
that
original
original
original
by
by
by
and
and
and
by
by
by
freight
freight
freight
is
is
is
name,
name,
name,
and
and
and
dealer
dealer
dealer
they
they
they
GARANTIE
GARANTIE
KENWOOD
ELECTRONICS
KENWOOD
ELECTRONICS
KENWOOD
ELECTRONICS
originaldechaque
originaldechaque
originaldechaque
KENWOOD
KENWOOD
KENWOOD
KENWOOD
garantit,
KENWOOD
garantit,
KENWOOD
garantit,
dans
des
conditions
dans
des
conditions
dans
des
and
and
and
01
01
01
conditions
KENWOOD
s'engageitassumer
KENWOOD
s'engageitassumer
KENWOOD
s'engageitassumer
reparations
pourvu
reparations
pourvu
reparations
pourvu
Kenwood
ouala
Kenwood
ouala
Kenwood
ouala
pour
verifiersiun
pour
verifiersiun
pour
verifiersiun
PERIODEDEGARANTIE
PERIODEDEGARANTIE
PERIODEDEGARANTIE
Les piecesetla
Les piecesetla
Les piecesetla
(l)
"nacompterdeIii
(l)
"nacompterdeIii
(l)
"nacompterdeIii
dansunbut
professionneloucommercial,oula
dansunbut
professionneloucommercial,oula
dansunbut
professionneloucommercial,oula
peri
odedequatre-vingt-dix
peri
odedequatre-vingt-dix
peri
odedequatre-vingt-dix
EXCLUSIONS DE GARANTIE
EXCLUSIONS DE GARANTIE
EXCLUSIONS DE GARANTIE
Cette
garantienecouvre
Cette
garantienecouvre
Cette
garantienecouvre
(a) les
(a) les
(a) les
produits
produits
produits
(b) les
produits
(b) les
produits
(b) les
produits
produits
produits
produits
(c) les
(c) les
(c) les
(d) les
services
(d) les
services
(d) les
services
(e) las
defauts
(e) las
defauts
(e) las
defauts
les
manquesdesoinsoud'entreticns
les
manquesdesoinsoud'entreticns
les
manquesdesoinsoud'entreticns
d'emploi;
d'emploi;
d'emploi;
(f)
les
defautsoules
(f)
les
defautsoules
(f)
les
defautsoules
KENWOOD;
KENWOOD;
KENWOOD;
(gIles
defauts
(gIles
defauts
(gIles
defauts
(h)
(h)
(h)
les
finitions
les
finitions
les
finitions
les
les
les
disques
disques
disques
(i) les
dcfautsoudommages
(i) les
dcfautsoudommages
(i) les
dcfautsoudommages
reclamations
reclamations
reclamations
(j)
les
conversionsuetension
(j)
les
conversionsuetension
(j)
les
conversionsuetension
(k,
les
frais
(k,
les
frais
(k,
les
frais
COMMENT
COMMENT
COMMENT
Au
cas Oilunservice
Au
cas Oilunservice
Au
cas Oilunservice
centre
de service KENWOOD et
centre
de service KENWOOD et
centre
de service KENWOOD et
de
gilrilntieouveuillez
de
gilrilntieouveuillez
de
gilrilntieouveuillez
Pour
evitel
toutes
Pour
evitel
toutes
Pour
evitel
toutes
du
conlral
de vente origin<llelcelte
du
conlral
de vente origin<llelcelte
du
conlral
de vente origin<llelcelte
telephoneaupostedetravail
telephoneaupostedetravail
telephoneaupostedetravail
garelnlip. Hiparus
garelnlip. Hiparus
garelnlip. Hiparus
taus
fraisdetransportetd'ilutres
taus
fraisdetransportetd'ilutres
taus
fraisdetransportetd'ilutres
L:ENTIERE
L:ENTIERE
L:ENTIERE
Cette
garantie
Cette
garantie
Cette
garantie
de
toutes
extensions
de
toutes
extensions
de
toutes
extensions
concessionnairesoucentres
concessionnairesoucentres
concessionnairesoucentres
verbalesouucrites,
verbalesouucrites,
verbalesouucrites,
les
concessionnairesoules
les
concessionnairesoules
les
concessionnairesoules
RENONCIATION
RENONCIATION
RENONCIATION
KENWOOD
renonceiJTOutes
KENWOOD
renonceiJTOutes
KENWOOD
renonceiJTOutes
aecessoires causes
aecessoires causes
aecessoires causes
AVIS
AUX CONSOMMATEURS
AVIS
AUX CONSOMMATEURS
AVIS
AUX CONSOMMATEURS
les
stipulations
les
stipulations
les
stipulations
d'eKclure
d'aurres
d'eKclure
d'aurres
d'eKclure
d'aurres
IMPORTANT
IMPORTANT
IMPORTANT
KENWOOD ne
KENWOOD ne
KENWOOD ne
sous
garantic,ilfaudra
sous
garantic,ilfaudra
sous
garantic,ilfaudra
preuvedegarantie.Onrecommandedeles
preuvedegarantie.Onrecommandedeles
preuvedegarantie.Onrecommandedeles
ATTENTION
ATTENTION
ATTENTION
CANADA
CANADA
CANADA
nouveau
produit
nouveau
produit
nouveau
produit
sous
reserve
sous
reserve
sous
reserve
d'cmp[oi
normales,
d'cmp[oi
normales,
d'cmp[oi
normales,
Ie COttt
Ie COttt
Ie COttt
quedetels dt'!fauts
quedetels dt'!fauts
quedetels dt'!fauts
main,d'oeuvre
main,d'oeuvre
main,d'oeuvre
main-d'oeuvre
main-d'oeuvre
main-d'oeuvre
achetcsitl'etrangerouachetes
achetcsitl'etrangerouachetes
achetcsitl'etrangerouachetes
achetes itunconcessionnaire
achetes itunconcessionnaire
achetes itunconcessionnaire
dontIenumerodeserie
dontIenumerodeserie
dontIenumerodeserie
d'enlreti'Hl
d'enlreti'Hl
d'enlreti'Hl
causes
causes
causes
causes
causes
causes
exterieures, Ics pieces
exterieures, Ics pieces
exterieures, Ics pieces
endommagesoudeperis,
endommagesoudeperis,
endommagesoudeperis,
ilupres
ilupres
ilupres
d'installationoud'enlevementduproduit,
d'installationoud'enlevementduproduit,
d'installationoud'enlevementduproduit,
ORTENIRDUSERVICE
ORTENIRDUSERVICE
ORTENIRDUSERVICE
seront
seront
seront
GARANTIE
GARANTIE
GARANTIE
represente
represente
represente
contenues
contenues
contenues
considere
considere
considere
tel
tel
tel
concessionnaireouun
concessionnaireouun
concessionnaireouun
necessaires
necessaires
necessaires
date
d'achal,debail
date
d'achal,debail
date
d'achal,debail
(Sal
jours
(Sal
jours
(Sal
jours
pas:
pas:
pas:
pE!riOlliques
pE!riOlliques
pE!riOlliques
par
les
desastres, les accidents, les
par
les
desastres, les accidents, les
par
les
desastres, les accidents, les
dommages
dommages
dommages
par
I'emploi
par
I'emploi
par
I'emploi
quiseproduisenl
quiseproduisenl
quiseproduisenl
des
compagniesdetransport);
des
compagniesdetransport);
des
compagniesdetransport);
et!oudefrequenceduproduit:
et!oudefrequenceduproduit:
et!oudefrequenceduproduit:
sous
garantiedevotre
sous
garantiedevotre
sous
garantiedevotre
presenterlacopie
presenterlacopie
presenterlacopie
faire
parvenir
faire
parvenir
faire
parvenir
possibilitesuedommages
possibilitesuedommages
possibilitesuedommages
eVou au
eVou au
eVou au
retoumes
retoumes
retoumes
I'enticre
I'enticre
I'enticre
ni de
toutes
ni de
toutes
ni de
toutes
de serviceoupar
de serviceoupar
de serviceoupar
d'annonces
ou de
d'annonces
ou de
d'annonces
ou de
centres
centres
centres
responsabilitesdepertedetemps,
responsabilitesdepertedetemps,
responsabilitesdepertedetemps,
iI
d'autres
produitsaubiens, de
iI
d'autres
produitsaubiens, de
iI
d'autres
produitsaubiens, de
danslapresente
danslapresente
danslapresente
garanties
IIi
droits
garanties
IIi
droits
garanties
IIi
droits
pas
cene
pas
cene
pas
cene
presenlerlacopie
presenlerlacopie
presenlerlacopie
GARANTIE
INC. (ci-<lprcs
INC. (ci-<lprcs
INC. (ci-<lprcs
Kenwood
distribue
Kenwood
distribue
Kenwood
distribue
des
termesetdes
des
termesetdes
des
termesetdes
est
exemptdetous
est
exemptdetous
est
exemptdetous
des
pieces dtHectueusesetdelamain-d'oeuvre
des
pieces dtHectueusesetdelamain-d'oeuvre
des
pieces dtHectueusesetdelamain-d'oeuvre
sont
attribuablesades
sont
attribuablesades
sont
attribuablesades
qu'etabli
par
KENWOODoupar
qu'etabli
par
KENWOODoupar
qu'etabli
par
KENWOODoupar
centredeservice
centredeservice
centredeservice
pourlareparation
pourlareparation
pourlareparation
011
de
location
011
de
location
011
de
location
garantie
garantie
garantie
sous
reserve
sous
reserve
sous
reserve
au Canada
au Canada
au Canada
non
non
non
manque,
manque,
manque,
qui
n'indiqrmnt
qui
n'indiqrmnt
qui
n'indiqrmnt
pcriodiques,
pcriodiques,
pcriodiques,
causes
lorsdereparations
causes
lorsdereparations
causes
lorsdereparations
de pieces oudedispositifs
de pieces oudedispositifs
de pieces oudedispositifs
cosmctiqucs,
cosmctiqucs,
cosmctiqucs,
niles
defautsoudommages
niles
defautsoudommages
niles
defautsoudommages
pendantl'expedition
pendantl'expedition
pendantl'expedition
SOUS
GARANTIE
SOUS
GARANTIE
SOUS
GARANTIE
produit
produit
produit
votre
produil
votre
produil
votre
produil
pendantIetransport,
pendantIetransport,
pendantIetransport,
Cilrte
till
garantie
Cilrte
till
garantie
Cilrte
till
garantie
domicile,
votre
domicile,
votre
domicile,
votre
port
paye
aux
port
port
frais
frais
frais
augmentationsdeGene
augmentationsdeGene
augmentationsdeGene
6070
6070
6070
destinationsaI'intcrieurduCanada. La
paye
aux
destinationsaI'intcrieurduCanada. La
paye
aux
destinationsaI'intcrieurduCanada. La
qui
s'y
rapportent
qui
s'y
rapportent
qui
s'y
rapportent
garanlie
donnue
garanlie
donnue
garanlie
donnue
leurs
leurs
leurs
promotions,yinclus
promotions,yinclus
promotions,yinclus
de service, a
mains
de service, a
mains
de service, a
mains
garantie
garantie
garantie
cnonces
dans
cnonces
dans
cnonces
dans
garantie
toute
seule
garantie
toute
seule
garantie
toute
seule
originaleducontratdevente
originaleducontratdevente
originaleducontratdevente
conserver
conserver
conserver
KENWOOD ELECTRONICS
KENWOOD ELECTRONICS
KENWOOD ELECTRONICS
Kestrel
Road,
Kestrel
Road,
Kestrel
Road,
Telephone:
Telephone:
Telephone:
Telecopieur:
Telecopieur:
Telecopieur:
Id1a<tLJrf')
Id1a<tLJrf')
Id1a<tLJrf')
KENWOOD
KENWOOD
KENWOOD
appclce
"KENWooD"I,
appclce
"KENWooD"I,
appclce
"KENWooD"I,
au Canada
par
au Canada
au Canada
conditions
conditions
conditions
des
ternH~S
des
ternH~S
des
ternH~S
auto
rise
auto
rise
auto
rise
a ete effaceaumodifie;
a ete effaceaumodifie;
a ete effaceaumodifie;
aucun
aucun
aucun
les
les
les
les tetes de batldes, les
les tetes de batldes, les
les tetes de batldes, les
Kenwood
Kenwood
Kenwood
originaleducontratdevente
originaleducontratdevente
originaleducontratdevente
assureHIport
assureHIport
assureHIport
en t<lnt
en t<lnt
en t<lnt
adresseetune
adresseetune
adresseetune
par
cerit
par
cerit
par
cerit
agentsouemployesaunom
agentsouemployesaunom
agentsouemployesaunom
que
que
que
tous
tous
tous
ecrite
ecrite
ecrite
n'importe
n'importe
n'importe
comme
comme
comme
dansunlieu
dansunlieu
dansunlieu
Mississauga.
Mississauga.
Mississauga.
,orltnecessJiresa
,orltnecessJiresa
,orltnecessJiresa
KENWOODetachete a un
par
KENWOODetachete a un
par
KENWOODetachete a un
anoncas
ci-dessous,
anoncas
ci-dessous,
anoncas
ci-dessous,
defauts.Sirun
defauts.Sirun
defauts.Sirun
pieces dtHectueuses
pieces dtHectueuses
pieces dtHectueuses
I'un
de ses
I'un
de ses
I'un
de ses
est
autorise
par
est
autorise
par
est
autorise
par
des
produils
des
produils
des
produils
origin<lle,
sauf
origin<lle,
origin<lle,
des piecesetde
des piecesetde
des piecesetde
pour
pour
pour
gilr.mtie
gilr.mtie
gilr.mtie
inconvenientsoude
inconvenientsoude
inconvenientsoude
dans
sauf
dans
sauf
dans
la
la
la
et des
conditions
et des
conditions
et des
conditions
eltransportcsaret
eltransportcsaret
eltransportcsaret
par
KENWOOD;
par
KENWOOD;
par
KENWOOD;
dcfaul
couvcrt
dcfaul
couvcrt
dcfaul
couvcrt
abus,
les
emplois
abus,
les
emplois
abus,
les
emplois
modifications
non
modifications
non
modifications
non
effectuees
par
effectuees
par
effectuees
par
quinese
conforment
quinese
conforment
quinese
conforment
causes
causes
causes
des
des
des
s'aYEne necessaire, veuillp.z
s'aYEne necessaire, veuillp.z
s'aYEne necessaire, veuillp.z
paye au
centre
paye au
centre
paye au
centre
veuillez
veuillez
veuillez
que
preuvedegarantic
que
preuvedegarantic
que
preuvedegarantic
description
description
description
faire
expedier
faire
expedier
faire
expedier
par
KENWOOD. KENWOOD ne se
par
KENWOOD. KENWOOD ne se
par
KENWOOD. KENWOOD ne se
faitesouentrcprises
faitesouentrcprises
faitesouentrcprises
t[JIlS IlrogrHrnrnes
t[JIlS IlrogrHrnrnes
t[JIlS IlrogrHrnrnes
KENWOOD
n'v
KENWOOD
n'v
KENWOOD
n'v
d'emploiduproduit,detous
d'emploiduproduit,detous
d'emploiduproduit,detous
n'ont
pas
pour
n'ont
pas
pour
n'ont
pas
pour
queUes
loisoulegislations
queUes
loisoulegislations
queUes
loisoulegislations
erant
une
preuve
erant
une
preuve
erant
une
preuve
auss!
auss!
auss!
sur
au cas ou elles s'averer<lient nec:esaircs.'1
sur
au cas ou elles s'averer<lient nec:esaircs.'1
sur
au cas ou elles s'averer<lient nec:esaircs.'1
CANADA
CANADA
CANADA
Ontario,
Ontario,
Ontario,
49051
670-7211
49051
670-7211
49051
670-7211
(9051
670-7248
(9051
670-7248
(9051
670-7248
donne
pill
eCfilla
garantie
donne
pill
eCfilla
donne
pill
eCfilla
que
que
que
defautseproduit
defautseproduit
defautseproduit
employees
employees
employees
centres
de service
centres
de service
centres
de service
KENWOOD
KENWOOD
KENWOOD
Kenwood
sont
Kenwood
sont
Kenwood
sont
les casoules
les casoules
les casoules
main~d'oeuvre
main~d'oeuvre
main~d'oeuvre
de la
gmantie.
de la
gmantie.
de la
gmantie.
ranger;
ranger;
ranger;
par
celie
garantic;
par
celie
garantic;
par
celie
garantic;
incorrects,
incorrects,
incorrects,
auloriseesoules
auloriseesoules
auloriseesoules
une
personneoupar
une
personneoupar
une
personneoupar
pas
pas
pas
adaptateurs,
adaptateurs,
adaptateurs,
par
des
piles
par
des
piles
par
des
piles
produits
Kenwood
produits
Kenwood
produits
Kenwood
et cette cartedegarantieentant
et cette cartedegarantieentant
et cette cartedegarantieentant
de service KENWOOD
de service KENWOOD
de service KENWOOD
bien
emballerIeproduit.
bien
emballerIeproduit.
bien
emballerIeproduit.
ilussi
ilussi
ilussi
detaillee
detaillee
detaillee
les
prodlJits;1
les
prodlJits;1
les
prodlJits;1
de KENWOOD au
de KENWOOD au
de KENWOOD au
Oll
phmsdeg<lrantie
Oll
phmsdeg<lrantie
Oll
phmsdeg<lrantie
ait
consenti
ait
consenti
ait
consenti
toutes
pertes
toutes
pertes
toutes
pertes
butdelimiter,demodifier,dediminuer,
butdelimiter,demodifier,dediminuer,
butdelimiter,demodifier,dediminuer,
d'achat
d'achat
d'achat
bien
que
cette cartedegarantieentant
bien
que
cette cartedegarantieentant
bien
que
cette cartedegarantieentant
INC.
INC.
INC.
Cllnada
L5T
158
Cllnada
L5T
158
Cllnada
L5T
158
suivantearacheteur
garantie
suivantearacheteur
garantie
suivantearacheteur
concessionnaire
concessionnaire
concessionnaire
chaque
nouveau
chaque
chaque
necesSilires
necesSilires
necesSilires
gilrilnties
gilrilnties
gilrilnties
les eclairs, les
les eclairs, les
les eclairs, les
aux
aux
aux
les
les
les
livrer
livrer
livrer
bien
bien
bien
des
des
des
consommateur
consommateur
consommateur
destinationsaI'exterieurduCanada.
destinationsaI'exterieurduCanada.
destinationsaI'exterieurduCanada.
par
par
par
par
par
par
commerciales,
commerciales,
commerciales,
provincialesoufederales,
provincialesoufederales,
provincialesoufederales,
valide.
valide.
valide.
produit
nouveau
produit
nouveau
produit
pendantlaperiodcdegarantie.
pendantlaperiodcdegarantie.
pendantlaperiodcdegarantie.
pour
effectuer
pour
effectuer
pour
effectuer
lorsdela
fabricationduproduit
lorsdela
fabricationduproduit
lorsdela
fabricationduproduit
autoris~s.
Appelez
autoris~s.
Appelez
autoris~s.
Appelez
pendantlaperiode
pendantlaperiode
pendantlaperiode
produits
Kenwood
produits
Kenwood
produits
Kenwood
demeureenvigueur
demeureenvigueur
demeureenvigueur
surtensionsdecourant,
surtensionsdecourant,
surtensionsdecourant,
manquesderespectdumode
manquesderespectdumode
manquesderespectdumode
une
partie
non
une
partie
non
une
partie
dcvrail
dcvrail
dcvrail
Ip.
Ip.
Ip.
que
que
que
defauts.
defauts.
defauts.
tient
tient
tient
Lorsqu'on
Lorsqu'on
Lorsqu'on
produit.'
produit.'
produit.'
Veuillez
Veuillez
Veuillez
vOlfe
vOlfe
vOlfe
aueunement
aueunement
aueunement
personnes,
personnes,
personnes,
moyen
moyen
moyen
etendue
etendue
etendue
non
les cables, les bandes,
les cables, les bandes,
les cables, les bandes,
deposerdetclles
deposerdetclles
deposerdetclles
n'importe
n'importe
n'importe
autOliscIeplus
autOliscIeplus
autOliscIeplus
inclure
inclure
inclure
nom,
nom,
nom,
les
produits
les
produits
les
produits
sera
responsable
sera
responsable
sera
responsable
d'ilffirmations
d'ilffirmations
d'ilffirmations
que
que
que
indirects
indirects
indirects
demandeduservice
demandeduservice
demandeduservice
exigencesdeKENWOOD;
exigencesdeKENWOOD;
exigencesdeKENWOOD;
antennes,
antennes,
antennes,
defectueusesouqui
defectueusesouqui
defectueusesouqui
(On
(On
(On
loutes
loutes
loutes
ecrit d'avance.
ecrit d'avance.
ecrit d'avance.
dommagcs
dommagcs
dommagcs
autorise
autorise
autorise
Kenwood,
Kenwood,
Kenwood,
sont
sont
sont
pendant
pendant
pendant
autorisee
autorisee
autorisee
fuient;
fuient;
fuient;
que
que
que
numeros
numeros
numeros
responsable
responsable
responsable
p<lrtics,
p<lrtics,
p<lrtics,
puissent
puissent
puissent
ou
ou
ou
dfl
dfl
dfl
I'avcnir
I'avcnir
I'avcnir
les
les
les
KENWOOD
KENWOOD
KENWOOD
d'un
d'un
d'un
ernployes
ernployes
ernployes
quel
quel
quel
preuve
preuve
preuve
proche.
proche.
proche.
une
copie
une
copie
une
copie
sous
sous
sous
rejeter ni
rejeter ni
rejeter ni
que
que
que
unll
unll
unll
de
de
de
de
de
de
oflrir
oflrir
oflrir
par
par
par
par
par
par

AUSTRALIA KENWOOD elECTRONICS AUSTRALIA
AUSTRALIA KENWOOD elECTRONICS AUSTRALIA
AUSTRALIA KENWOOD elECTRONICS AUSTRALIA
The
warranly
will
The
The
EXPRESS
EXPRESS
EXPRESS
COMPONENTS
COMPONENTS
COMPONENTS
KENWOOD ElECTRONICS AUSTRALIA
KENWOOD ElECTRONICS AUSTRALIA
KENWOOD ElECTRONICS AUSTRALIA
been
been
been
instructions
instructions
instructions
SCOPE OF EXPRESS WARRANTY
SCOPE OF EXPRESS WARRANTY
SCOPE OF EXPRESS WARRANTY
Eschofthe
Eschofthe
Eschofthe
and
and
and
KENWOOD AuthOrised
KENWOOD AuthOrised
KENWOOD AuthOrised
matarial
matarial
matarial
not
not
not
EXPRESS
EXPRESS
EXPRESS
The
The
The
d;:,teofthe
d;:,teofthe
d;:,teofthe
CONDITIONS OF THE EXPRESS
CONDITIONS OF THE EXPRESS
CONDITIONS OF THE EXPRESS
When
When
When
toanauthorised
toanauthorised
toanauthorised
The
The
The
1.
1.
1.
2.
2.
2.
3.
3.
3.
<t.
<t.
<t.
5.
5.
5.
6.
6.
6.
1.
1.
1.
B.
B.
B.
9.
9.
9.
10
10
10
EXCLUSION OF CERTAIN
EXCLUSION OF CERTAIN
EXCLUSION OF CERTAIN
KENWOOD's
KENWOOD's
KENWOOD's
include
include
include
PROCEDURE WHEN REOUESTING SERVICE UNDER THE WARRANTY
PROCEDURE WHEN REOUESTING SERVICE UNDER THE WARRANTY
PROCEDURE WHEN REOUESTING SERVICE UNDER THE WARRANTY
1
1
1
:i!
:i!
:i!
3.
3.
3.
IMPORTANT NOTICE
IMPORTANT NOTICE
IMPORTANT NOTICE
1.
1.
1.
I
I
I
:i!
:i!
:i!
3.
3.
3.
...
...
...
5.
5.
5.
AITENTION
AITENTION
AITENTION
I
h,~
I
h,~
I
h,~
pMlel 1Co..eoflhoefloldamilgl?
pMlel 1Co..eoflhoefloldamilgl?
pMlel 1Co..eoflhoefloldamilgl?
onlybehonouredinthe
warranly
will
onlybehonouredinthe
warranly
will
onlybehonouredinthe
WARRANTY
WARRANTY
WARRANTY
properly
designed.lested
properly
designed.lested
properly
designed.lested
furnished,itshould
furnished,itshould
furnished,itshould
KENWOOD
KENWOOD
KENWOOD
workmanst'tip.
workmanst'tip.
workmanst'tip.
or
wor~manship.
or
wor~manship.
or
wor~manship.
coveredbythis
coveredbythis
coveredbythis
WARRANTY
WARRANTY
WARRANTY
KENWOOD
brand
KENWOOD
brand
KENWOOD
brand
original
original
original
reQuesting
service
reQuesting
service
reQuesting
service
KENWOOD
KENWOOD
KENWOOD
following
are
following
are
following
are
Voltageconvltl'$lons.
Voltageconvltl'$lons.
Voltageconvltl'$lons.
Cabinets,
grilles,
Cabinets,
grilles,
Cabinets,
grilles,
Any
fauh
causedbyfaulty
Any
fauh
causedbyfaulty
Any
fauh
causedbyfaulty
power
supply.
power
supply.
power
supply.
Pltriodic
chllCk·ups
Pltriodic
chllCk·ups
Pltriodic
chllCk·ups
Unitsonwhich
Unitsonwhich
Unitsonwhich
D;
..
.,;t'\,c
or
deterioration:
D;
..
.,;t'\,c
or
deterioration:
D;
..
.,;t'\,c
or
deterioration:
a.
Resuhinglrom
a.
Resuhinglrom
a.
Resuhinglrom
b.
Resulting
Irom
b.
Resulting
Irom
b.
Resulting
Irom
in
the
Owner'$
in
the
Owner'$
in
the
Owner'$
I;.
Resuhing
from
I;.
Resuhing
from
I;.
Resuhing
from
d.
Resulting
from
d.
Resulting
from
d.
Resulting
from
ltCcessories.
ltCcessories.
ltCcessories.
e Occ\lrril'\fl
during
e Occ\lrril'\fl
during
e Occ\lrril'\fl
during
Damaged
ma'lnelic
Damaged
ma'lnelic
Damaged
ma'lnelic
Installetion
and
Installetion
and
Installetion
and
This
express
warranty
This
express
warranty
This
express
warranty
Thr.
b!ln~lih
conll;!rredbythis
Thr.
b!ln~lih
conll;!rredbythis
Thr.
b!ln~lih
conll;!rredbythis
consumer
has
consumer
has
consumer
has
Iiabilitv
Iiabilitv
Iiabilitv
dtllna\.l~s
of
dtllna\.l~s
of
dtllna\.l~s
of
Maku
your
eqUIpment
Maku
your
eqUIpment
Maku
your
eqUIpment
purchase.orthe
purchase.orthe
purchase.orthe
lully
insured
and
lully
insured
and
lully
insured
and
Atl1ich
oolailml
Atl1ich
oolailml
Atl1ich
oolailml
M4kc
sure
vou
M4kc
sure
vou
M4kc
sure
vou
Ploper
maintenance
Ploper
maintenance
Ploper
maintenance
your
IIlSUUChOIl
your
IIlSUUChOIl
your
IIlSUUChOIl
Retain
your
purchase
Retain
your
purchase
Retain
your
purchase
warran'Ywork.
warran'Ywork.
warran'Ywork.
WI;!
recommend
WI;!
recommend
WI;!
recommend
eqUlpmelllinthe
eqUlpmelllinthe
eqUlpmelllinthe
Locationofncarest
Locationofncarest
Locationofncarest
ThiS
warrantyisin
ThiS
warrantyisin
ThiS
warrantyisin
card
olnd
re<
elpc lor
card
olnd
re<
elpc lor
card
olnd
re<
elpc lor
brand
brand
brand
During
the
During
the
During
the
Service
Service
Service
However.
However.
However.
express
express
express
car
stereo
car
stereo
car
stereo
purchase.
purchase.
purchase.
under
under
under
nol
coveredbythis
nol
coveredbythis
nol
coveredbythis
olher
exterior
olher
exterior
olher
exterior
whichdonot
whichdonot
whichdonot
the
serial
the
serial
the
serial
installation
installation
installation
accident.
accident.
accident.
Manual
Manual
Manual
rcpailbyanyone
rcpailbyanyone
rcpailbyanyone
installatiotlofpansoraccessories
installatiotlofpansoraccessories
installatiotlofpansoraccessories
shipment
shipment
shipment
tapes.
tapes.
tapes.
removal
removal
removal
elCcludes
elCcludes
elCcludes
under
the
under
the
under
the
for
any
for
any
for
any
allY
kind,
allY
kind,
allY
kind,
available.
available.
available.
nearest
nearest
nearest
shipping
shipping
shipping
dr-scriptionof11m
dr-scriptionof11m
dr-scriptionof11m
recover
this
recover
this
recover
this
and
and
and
manual.
manual.
manual.
docket
docket
docket
that
you
that
you
that
you
futme.
futme.
futme.
KENWOOD
KENWOOD
KENWOOD
additiontoaAd
additiontoaAd
additiontoaAd
involrc)
involrc)
involrc)
STATEMENT
STATEMENT
STATEMENT
PTY.
PTY.
PTY.
and
inspected
and
inspected
and
inspected
give
optimum
give
optimum
give
optimum
productsisexpressly
productsisexpressly
productsisexpressly
express
warranty
express
warranty
express
warranty
CentreinAustralia
CentreinAustralia
CentreinAustralia
the
el(Clusions
the
el(Clusions
the
el(Clusions
warranty.
warranty.
warranty.
PERIOD
PERIOD
PERIOD
and
personal
and
personal
and
personal
KENWOOD
KENWOOD
KENWOOD
Service
Centre
Service
Centre
Service
Centre
express
express
express
finishes.
finishes.
finishes.
installation,
water
installation,
water
installation,
water
disclose
disclose
disclose
number
has
been
number
has
been
number
has
been
and/or
removal01the
and/or
removal01the
and/or
removal01the
misuse.
abuse.
misuse.
abuse.
misuse.
abuse.
not
not
not
Iclaims
mustbepresentedtoshipper).
Iclaims
mustbepresentedtoshipper).
Iclaims
mustbepresentedtoshipper).
charges
are
not
charges
are
not
charges
are
not
shippingordelivery
shippingordelivery
shippingordelivery
express
warranty
express
warranty
express
warranty
Trade Practices
Trade Practices
Trade Practices
DAMAGES
DAMAGES
DAMAGES
defective
productislimitedtothe
defective
productislimitedtothe
defective
productislimitedtothe
whether
incidental,
whether
incidental,
whether
incidental,
with
this
with
this
with
this
authorised
KENWOOD
authorised
KENWOOD
authorised
KENWOOD
charges
pre-paid.tothe
charges
pre-paid.tothe
charges
pre-paid.tothe
fMobtt!m encountered,
fMobtt!m encountered,
fMobtt!m encountered,
card,
your
purchase
card,
your
purchase
card,
your
purchase
use are
imponanttothe
use are
imponanttothe
use are
imponanttothe
logelhor
with
logelhor
with
logelhor
with
~eep
all
the
original
~eep
all
the
original
~eep
all
the
original
Service
Cenlre
Service
Cenlre
Service
Cenlre
notinplace
notinplace
notinplace
KENWOOD
KENWOOD
KENWOOD
16
GIFFNOCK
16
GIFFNOCK
16
GIFFNOCK
afC'
f)('(
C;;~"HY
afC'
f)('(
C;;~"HY
afC'
f)('(
C;;~"HY
countryinwhich
countryinwhich
countryinwhich
LTD.isproudofthe
LTD.isproudofthe
LTD.isproudofthe
WARRANTY
WARRANTY
WARRANTY
express
express
express
with
with
with
belts.,
belts.,
belts.,
any
any
any
authorisedbyKENWOOD.
authorisedbyKENWOOD.
authorisedbyKENWOOD.
covered.
covered.
covered.
ACT
ACT
ACT
WiHHlnly
WiHHlnly
WiHHlnly
thIS
thIS
thIS
;:0
;:0
;:0
The
The
The
FOR
FOR
FOR
beforeitwas
shipped
beforeitwas
shipped
beforeitwas
shipped
reliable
performance.
reliable
performance.
reliable
performance.
warranted
warranted
warranted
period.
KENWOOD
period.
KENWOOD
period.
KENWOOD
freeofcharge
freeofcharge
freeofcharge
noted
under
noted
under
noted
under
audio
components
audio
components
audio
components
wammty
record,
wammty
record,
wammty
record,
your
equipmenT.
your
equipmenT.
your
equipmenT.
walfanty:
walfanty:
walfanty:
tape
heitds.
and
tape
heitds.
and
tape
heitds.
and
damage.
the
vehicle
damage.
the
vehicle
damage.
the
vehicle
defeels
coveredbythe
defeels
coveredbythe
defeels
coveredbythe
delaced,
modifiedorremoved.
delaced,
modifiedorremoved.
delaced,
modifiedorremoved.
product.
product.
product.
neglect.
unauthorised
neglect.
unauthorised
neglect.
unauthorised
'hatdono'
'hatdono'
'hatdono'
chargesto01
chargesto01
chargesto01
areinadditiontoall
areinadditiontoall
areinadditiontoall
andlor
other
State or
andlor
other
State or
andlor
other
State or
consequentialorotherwise.
consequentialorotherwise.
consequentialorotherwise.
record
<lnd
record
<lnd
record
<lnd
Sorvice
Contre, or llt1ill
Sorvice
Contre, or llt1ill
Sorvice
Contre, or llt1ill
authorised
authorised
authorised
including
including
including
docket
and
repair
docket
and
repair
docket
and
repair
performance
performance
performance
warranly
r!!Cord
warranly
r!!Cord
warranly
r!!Cord
packaging
as it
packaging
as it
packaging
as it
Will
be
sent
upon
Will
be
sent
upon
Will
be
sent
upon
of
SlJoCtI
rights;,t
of
SlJoCtI
rights;,t
of
SlJoCtI
rights;,t
ELECTRONICS
ELECTRONICS
ELECTRONICS
AVENUE,
tENTREtOURT
AVENUE,
tENTREtOURT
AVENUE,
tENTREtOURT
N.S.W. 2113, AUSTRALIA
N.S.W. 2113, AUSTRALIA
N.S.W. 2113, AUSTRALIA
TEL
102)
TEL
102)
TEL
102)
FAX.
(02) 8879·2233
FAX.
(02) 8879·2233
FAX.
(02) 8879·2233
purcM..e
it
~
purcM..e
it
~
purcM..e
it
~
unit
was
originally
unit
unit
CAR
CAR
CAR
quality
quality
quality
loyell.lf
loyell.lf
loyell.lf
under
under
under
the
heading
the
heading
the
heading
are
are
are
other
other
other
product
product
product
conlorAltothe
conlorAltothe
conlorAltothe
fromanauthorised
fromanauthorised
fromanauthorised
Tllrritury
Tllrritury
Tllrritury
repairorreplacamantofsaid
repairorreplacamantofsaid
repairorreplacamantofsaid
purchuse
purchuse
purchuse
KENWOOD
KENWOOD
KENWOOD
details01any
details01any
details01any
docket
docket
docket
levelofall
levelofall
levelofall
inaso'..fc
inaso'..fc
inaso'..fc
provides
provides
provides
req\lest.
req\lest.
req\lest.
lheo.....
lheo.....
lheo.....
AUSTRAUA
AUSTRAUA
AUSTRAUA
8879·2222
8879·2222
8879·2222
purchased.
was
originally
purchased.
was
originally
purchased.
STEREO
STEREO
STEREO
tlnd
workmanshipofits
tlnd
workmanshipofits
tlnd
workmanshipofits
properly
properly
properly
normal
installation
normal
installation
normal
installation
ELECTRONICS AUSTRALIA
ELECTRONICS AUSTRALIA
ELECTRONICS AUSTRALIA
both
parts
and
both
both
non·durable
non·durable
non·durable
(inclUding
(inclUding
(inclUding
other
other
other
labour
parts
and
labour
parts
and
labour
~CONOITIONS
~CONOITIONS
~CONOITIONS
elCpressly
warranled
elCpressly
warranled
elCpressly
warranled
together
with;:,
together
with;:,
together
with;:,
pans
pans
pans
its
eleclrical
its
eleclrical
its
eleclrical
walfanty.
walfanty.
walfanty.
modificalionorfailuretofollow
modificalionorfailuretofollow
modificalionorfailuretofollow
qualilyorspecificallonsofthe
qualilyorspecificallonsofthe
qualilyorspecificallonsofthe
lights
and
lights
and
lights
and
Law!;.
Law!;.
Law!;.
docket
aUuched,tothe
docket
aUuched,tothe
docket
aUuched,tothe
your
equiplllent
your
equiplllent
your
equiplllent
Service
Centre.
Service
Centre.
Service
Centre.
interconnections
interconnections
interconnections
when
accepting
when
accepting
when
accepting
KENWOOD
KENWOOD
KENWOOD
plactt, amJ
~resent
plactt, amJ
~resent
plactt, amJ
~resent
the
best
prOtection
the
best
prOtection
the
best
prOtection
ner
may
haveatlaw.
ner
may
haveatlaw.
ner
may
haveatlaw.
P'TY.
LTD.
P'TY.
LTD.
P'TY.
LTD.
ESTATE. NORTH RVDE.
ESTATE. NORTH RVDE.
ESTATE. NORTH RVDE.
PTY.
LTD.
PTY.
LTD.
PTY.
LTD.
AND
PERSONAL
AND
PERSONAL
AND
PERSONAL
audio
equipment.
audio
equipment.
audio
installed
installed
installed
valid
valid
valid
and
and
and
KENWOOD
KENWOOD
KENWOOD
remediesinrcspectofthe
remediesinrcspectofthe
remediesinrcspectofthe
brand
brand
brand
equipment.
and
opEtrated in
and
opEtrated in
and
opEtrated in
and
usc
against
and
usc
against
and
usc
against
PTY.
LTD.
PTY.
LTD.
PTY.
LTD.
necessarytocorrect
necessarytocorrect
necessarytocorrect
OF
THE
EXPRESS
OF
THE
EXPRESS
OF
THE
EXPRESS
fOfaperiod
of
fOfaperiod
of
fOfaperiod
of
purchase
dod:.et
purchase
dod:.et
purchase
dod:.et
accessor;!l'S.
accessor;!l'S.
accessor;!l'S.
system)orconnectiontoan
system)orconnectiontoan
system)orconnectiontoan
Service
Centre.
Service
Centre.
Service
Centre.
productatour
productatour
productatour
dealer
from
dealer
from
dealer
from
ill
its
original
packaging,orvquivalent,
ill
its
original
packaging,orvquivalent,
ill
its
original
packaging,orvquivalent,
madetoassociilted f!quipmf!nt.
madetoassociilted f!quipmf!nt.
madetoassociilted f!quipmf!nt.
the
equipment
back
the
equipment
back
the
equipment
back
products.
Therefore.
products.
Therefore.
products.
Therefore.
Ihe•.,
bolh10prove
Ihe•.,
bolh10prove
Ihe•.,
bolh10prove
you
can
have
for
you
can
have
for
you
can
have
for
AUDIO
AUDIO
AUDIO
This
unit
This
unit
This
unit
accord~II11;t'
accord~II11;t'
accord~II11;t'
defcclsinmaterial
defcclsinmaterial
defcclsinmaterial
will
provide10any
will
provide10any
will
provide10any
any
defe<:t
any
defe<:t
any
defe<:t
WARRANTY~
WARRANTY~
WARRANTY~
ONE
YEAR
hom
ONE
YEAR
hom
ONE
YEAR
hom
mustbepresenled
mustbepresenled
mustbepresenled
IIlcorrcCf
IIlcorrcCf
IIlcorrcCf
illStructions
contained
illStructions
contained
illStructions
contained
original
~rts
original
~rts
original
~rts
product
which
product
which
product
which
option.
and
shall
option.
and
shall
option.
and
shall
whom
you
made
whom
you
made
whom
you
made
after
repair.
after
repair.
after
repair.
you
$hould
you
$hould
you
$hould
your
cligibi'Jly
your
cligibi'Jly
your
cligibi'Jly
tran&portationofyour
tran&portationofyour
tran&portationofyour
with
with
with
read
read
read
KENWOOD ELECTRONICS (MALAYSIA) SON.
KENWOOD ELECTRONICS (MALAYSIA) SON.
MALAYSIA
MALAYSIA
MALAYSIA
The
wtlrranty
will
The
The
EXPRESS
EXPRESS
EXPRESS
COMPONENTS
COMPONENTS
has
has
has
are
are
are
Iht!
Iht!
Iht!
the
the
the
not
not
not
the
the
the
COMPONENTS
KENWOOD
KENWOOD
KENWOOD
has
has
has
with
with
with
SCOPE OF EXPRESS
SCOPE OF EXPRESS
SCOPE OF EXPRESS
E8Chofthe
E8Chofthe
E8Chofthe
and
and
and
in
in
in
any
any
any
materialorworkmanship.
materialorworkmanship.
materialorworkmanship.
not
not
not
EXPRESS
EXPRESS
EXPRESS
The
The
The
date
date
date
CONDITIONS OF THE EXPRESS
CONDITIONS OF THE EXPRESS
CONDITIONS OF THE EXPRESS
When
When
When
toanauthorised
toanauthorised
toanauthorised
The
The
The
1.
1.
1.
2.
2.
2.
3.
3.
3.
4.
4.
4.
S.
S.
S.
6.
6.
6.
or
or
or
7.
7.
7.
8.
8.
8.
9.
9.
9.
10.
10.
10.
EXCLUSION OF CERTAIN
EXCLUSION OF CERTAIN
EXCLUSION OF CERTAIN
KENWOOO's
KENWOOO's
KENWOOO's
include
include
include
PROCEDURE
PROCEDURE
PROCEDURE
2.
2.
2.
3.
3.
3.
IMPORTANT NOTICE
IMPORTANT NOTICE
IMPORTANT NOTICE
1.
1.
1.
for
for
for
2.
2.
2.
3.
3.
3.
4.
4.
4.
6.
6.
6.
ATTENTION
ATTENTION
ATTENTION
Ih'i
Ih'i
Ih'i
panel
panel
panel
onlybehonouredinthe
wtlrranty
will
onlybehonouredinthe
wtlrranty
will
onlybehonouredinthe
WARRANTY
WARRANTY
WARRANTY
elECTRONICS
elECTRONICS
elECTRONICS
been
properly
designed,
been
properly
designed,
been
properly
designed,
instructions
furnished,itshould
instructions
furnished,itshould
instructions
furnished,itshould
KENWOOD
KENWOOD
KENWOOD
workmanship.
workmanship.
workmanship.
KENWOOD
KENWOOD
KENWOOD
coveredbythis
coveredbythis
coveredbythis
KENWOOD
KENWOOD
KENWOOD
ofthe
ofthe
ofthe
following
following
following
Vohage
Vohage
Vohage
Cabinels,
Cabinels,
Cabinels,
Any
Any
Any
power
power
power
Periodic
Periodic
Periodic
Unllson
Unllson
Unllson
Damageordeterioralion:
Damageordeterioralion:
Damageordeterioralion:
II.
II.
II.
b.
b.
b.
c.
c.
c.
d
d
d
e.
e.
e.
Dllmlged
Dllmlged
Dllmlged
Installation
Installation
Installation
This
This
This
The
The
The
r.onsurnCI
r.onsurnCI
r.onsurnCI
Make
Make
Make
purcllase,orthe
purcllase,orthe
purcllase,orthe
fully
fully
fully
Anach
Anach
Anach
Make
Make
Make
Proper
Proper
Proper
your
your
your
Relain
Relain
Relain
warrantywOlk
warrantywOlk
warrantywOlk
We
We
We
equipmentinthe
equipmentinthe
equipmentinthe
Locationofnearest
Locationofnearest
Locationofnearest
This
This
This
l4rd
l4rd
l4rd
WARRANTY
WARRANTY
WARRANTY
original
original
original
requesting
requesting
requesting
are
are
are
conversions.
conversions.
conversions.
grilles.
grilles.
grilles.
fault
causedbyfaulty
fault
causedbyfaulty
fault
causedbyfaulty
supply.
supply.
supply.
che<:k·ups
che<:k·ups
che<:k·ups
which
which
which
Resulting
Resulting
Resulting
Resulting
Resulting
Resulting
in
the
Owner's
in
the
Owner's
in
the
Owner's
Resulting
Resulting
Resulting
Resulting
Resulting
Resulting
acccssones.
acccssones.
acccssones.
Occurrin'l
Occurrin'l
Occurrin'l
rnagnetictapes.
rnagnetictapes.
rnagnetictapes.
express
express
express
benefits
benefits
benefits
liability
liability
liability
damagesofany
damagesofany
damagesofany
your
your
your
insured
insured
insured
detailed
detailed
detailed
sure
sure
sure
maintenance
maintenance
maintenance
instruction
instruction
instruction
your
your
your
recommend
recommend
recommend
warrantyisin
warrantyisin
warrantyisin
<tod
l{'Cl,pt (or iO'.'Of(e) are
<tod
l{'Cl,pt (or iO'.'Of(e) are
<tod
l{'Cl,pt (or iO'.'Of(e) are
in
caSE"
cl
thel1 ()(
in
caSE"
cl
thel1 ()(
in
caSE"
cl
thel1 ()(
During
During
During
Authorised
Authorised
Authorised
elCpress
elCpress
elCpress
brand
brand
brand
purchase.
purchase.
purchase.
service
service
service
KENWOOD
KENWOOD
KENWOOD
not
not
not
other
other
other
the
the
the
from
from
from
from
from
from
from
from
from
from
from
from
during
during
during
and
removal
and
removal
and
removal
.....
olffanly
.....
olffanly
.....
olffanly
conferredbythis
conferredbythis
conferredbythis
has
under
has
under
has
under
tor
tor
tor
WHEN
WHEN
WHEN
equipment
equipment
equipment
nearest
nearest
nearest
<Illd
shipping
<Illd
shipping
<Illd
shipping
description
description
description
you
recover
you
recover
you
recover
manual.
manual.
manual.
pUfchase
pUfchase
pUfchase
that
that
that
future.
future.
future.
IMALAYSIAt
IMALAYSIAt
IMALAYSIAt
bland
bland
bland
the
the
the
Servil.."e
Servil.."e
Servil.."e
However,
However,
However,
.....
.....
.....
car
stereo
car
stereo
car
stereo
under
under
under
covered
covered
covered
exterior
exterior
exterior
whichdonot
whichdonot
whichdonot
serial
number
serial
number
serial
number
inslallation
inslallation
inslallation
accident.
accident.
accident.
Manual.
Manual.
Manual.
repairbyanyone
repairbyanyone
repairbyanyone
inSlal1l1tionofpartsoraccessories
inSlal1l1tionofpartsoraccessories
inSlal1l1tionofpartsoraccessories
shipment
shipment
shipment
charges
charges
charges
excludes
excludes
excludes
SalesofGoods
SalesofGoods
SalesofGoods
(Illy
(Illy
(Illy
kind.
kind.
kind.
REOUESTING SERVICE UNDER THE
REOUESTING SERVICE UNDER THE
REOUESTING SERVICE UNDER THE
available,
available,
available,
this
this
this
and
use
and
use
and
use
docket
docket
docket
you
keep
you
keep
you
keep
KENWOOD
KENWOOD
KENWOOD
addItiontoand
addItiontoand
addItiontoand
#4.01 LEVEL
#4.01 LEVEL
#4.01 LEVEL
daffid~W
daffid~W
daffid~W
KENWOOD ELECTRONICS (MALAYSIA) SON.
(;ounlryinwhich
(;ounlryinwhich
(;ounlryinwhich
STATEMENT
STATEMENT
STATEMENT
SON.
SON.
SON.
tested
ilnd
if\$pected
tested
ilnd
if\$pected
tested
ilnd
if\$pected
give
optimum
give
optimum
give
optimum
WARRANTY
WARRANTY
WARRANTY
productsiselCpressly
productsiselCpressly
productsiselCpressly
express
warranty
express
warranty
express
warranty
CentreinMalaysia
CentreinMalaysia
CentreinMalaysia
the
exclusions
the
exclusions
the
exclusions
arranty.
arranty.
arranty.
PERIOD
PERIOD
PERIOD
and
personal
and
personal
and
personal
KENWOOD
express
KENWOOD
express
KENWOOD
Centre
Centre
Centre
by
this
express
by
this
express
by
this
express
finishes.
finishes.
finishes.
installalian.
water
installalian.
water
installalian.
water
disclose
disclose
disclose
has
been
has
been
has
been
andior
removal01the
andior
removal01the
andior
removal01the
misuse.
abuse.
misuse.
abuse.
misuse.
abuse.
nOI
nOI
nOI
(claims
mu&tbepresentedtoshipper).
(claims
mu&tbepresentedtoshipper).
(claims
mu&tbepresentedtoshipper).
arc
nol
arc
nol
arc
nol
shippingordelivery
shippingordelivery
shippingordelivery
express
w;'Hranty
express
w;'Hranty
express
w;'Hranty
Act
Act
Act
DAMAGES
DAMAGES
DAMAGES
product
product
product
whether
incidental.
whether
incidental.
whether
incidental.
with
this
with
this
with
this
KENWOOD
KENWOOD
KENWOOD
charges
pm·paid.totho
charges
pm·paid.totho
charges
pm·paid.totho
oftne
problem
oftne
problem
oftne
problem
c;Jld.
you/
purchase
c;Jld.
you/
purchase
c;Jld.
you/
purchase
ate
Importanttothe
ate
Importanttothe
ate
Importanttothe
logether
with
logether
with
logether
with
all
the
oriQifUll pack3{Jing
all
the
oriQifUll pack3{Jing
all
the
oriQifUll pack3{Jing
Service
Centre
Service
Centre
Service
Centre
not;n
not;n
not;n
KENWOOO
KENWOOO
KENWOOO
....
WISMA
....
WISMA
....
WISMA
neces~'y
neces~'y
neces~'y
express
with
with
with
bellS.
bellS.
bellS.
any
any
any
authorisedbyKENWOOD.
authorisedbyKENWOOD.
authorisedbyKENWOOD.
covcred.
covcred.
covcred.
1951
1951
1951
encounlared,
encounlared,
encounlared,
placeofsuch
placeofsuch
placeofsuch
Service
Service
Service
defective
defective
defective
authorised
authorised
authorised
WARRANTY
WARRANTY
WARRANTY
warranty
warranty
warranty
Ihe
unit
Ihe
unit
Ihe
unit
FOR
CAR
FOR
CAR
FOR
CAR
BI~D.
is
proudofthe
BI~D.
is
proudofthe
BI~D.
is
proudofthe
before
it
was
shippedtoyou.Ifproperly
before
it
was
shippedtoyou.Ifproperly
before
it
was
shippedtoyou.Ifproperly
reliable
performance.
reliable
performance.
reliable
performance.
warranted
under
warranted
under
warranted
under
period,
KENWOOD
period,
KENWOOD
period,
KENWOOD
free
of
charge
free
of
charge
free
of
charge
noted
undftr
the
noted
undftr
the
noted
undftr
the
audio
componenls
audio
audio
your
your
your
warranry:
warranry:
warranry:
tope
tope
tope
damage,
damage,
damage,
defects
defects
defects
del""ccd,
del""ccd,
del""ccd,
"egled.
"egled.
"egled.
arcinaddition
arcinaddition
arcinaddition
(Revised
(Revised
(Revised
islimiled10the
islimiled10the
islimiled10the
r:ons8quantialorotherwise.
r:ons8quantialorotherwise.
r:ons8quantialorotherwise.
Service
Service
Service
dockel
dockel
dockel
pertormance
pertormance
pertormance
this
warranty
this
warranty
this
warranty
willbesent
willbesent
willbesent
ELECTRONICS [MALAYSIA] SON. BHD.
ELECTRONICS [MALAYSIA] SON. BHD.
ELECTRONICS [MALAYSIA] SON. BHD.
ACADEMY.
ACADEMY.
ACADEMY.
SELANGOR,
SELANGOR,
SELANGOR,
10
pUlclklscitH('W
10
pUlclklscitH('W
10
pUlclklscitH('W
are
componenls
are
componenls
are
warranty
record,
warranty
record,
warranty
record,
eqUipment.
eqUipment.
eqUipment.
tleads.
;Jnd
other
tleads.
;Jnd
other
tleads.
;Jnd
other
the
vohkte
the
vohkte
the
vohkte
coveredbythe
coveredbythe
coveredbythe
modifiedorrt:movad.
modifiedorrt:movad.
modifiedorrt:movad.
prodllct.
prodllct.
prodllct.
unauthorised
unauthorised
unauthorised
Ihatdonot
Ihatdonot
Ihatdonot
chargestoor
chargestoor
chargestoor
tnaUother
tnaUother
tnaUother
19891.
19891.
19891.
repairorreplacementofsaid
repairorreplacementofsaid
repairorreplacementofsaid
record
and
purchase
record
and
purchase
record
and
purchase
Centre,orship
Centre,orship
Centre,orship
uutnOti500
KENWOOD
uutnOti500
KENWOOD
uutnOti500
KENWOOD
inclUding
datailsofany
inclUding
datailsofany
inclUding
datailsofany
arId
repair
arId
repair
arId
repair
level
level
level
record
iA a
record
iA a
record
iA a
IlS
it
p'ovides
IlS
it
p'ovides
IlS
it
p'ovides
upon
requl!'St
upon
requl!'St
upon
requl!'St
rightsalthe
rightsalthe
rightsalthe
LOT"'A
LOT"'A
LOT"'A
MALAYSIA
MALAYSIA
MALAYSIA
TEL (03) 1958-B333
TEL (03) 1958-B333
TEL (03) 1958-B333
FAX.
(0311954·1233
FAX.
(0311954·1233
FAX.
(0311954·1233
product
product
product
conformtoIhe
conformtoIhe
conformtoIhe
docket
docket
docket
JALAN19/1•.46300
JALAN19/1•.46300
JALAN19/1•.46300
was
originally
purchased.
was
originally
purchased.
was
originally
purchased.
STEREO
STEREO
STEREO
quality
and
workmanshipofits
quality
and
workmanshipofits
quality
and
workmanshipofits
normal
installation
normal
installation
normal
installation
ELECTRONICS
ELECTRONICS
ELECTRONICS
both
pl:Irts
and
both
pl:Irts
and
both
pl:Irts
and
heading
MCONOlnONSOFTHE
heading
MCONOlnONSOFTHE
heading
MCONOlnONSOFTHE
expressly
warranted
expressly
warranted
expressly
warranted
togeTher
with a
togeTher
with a
togeTher
with a
non-dulable
parls
non-dulable
parls
non-dulable
parls
(including
its
electrical
(including
its
electrical
(including
its
electrical
.....
arranty.
.....
arranty.
.....
arranty.
modiflC8tionorfait\lretofollow
modiflC8tionorfait\lretofollow
modiflC8tionorfait\lretofollow
qualityOfspecificationsofthe
qualityOfspecificationsofthe
qualityOfspecificationsofthe
flOmanauthorised
flOmanauthorised
flOmanauthorised
rights
ond
remediesinrespect
rights
ond
remediesinrespect
rights
ond
remediesinrespect
WARRANTY
WARRANTY
WARRANTY
docket
attached.tothe
docket
attached.tothe
docket
attached.tothe
your
equipmentinits
your
equipmentinits
your
equipmentinits
Service
Centre.
Service
Centre.
Service
Centre.
interconnections
interconnections
interconnections
when
accepting
when
accepting
when
accepting
ot
811
KENWOOD
ot
811
KENWOOD
ot
811
KENWOOD
safe
place.
and
safe
safe
owner
owner
owner
prcseollham
place.
and
prcseollham
place.
and
prcseollham
the
best
protection
the
best
protection
the
best
protection
may
tlaveatlaw.
may
tlaveatlaw.
may
tlaveatlaw.
(MALAYSIA)
(MALAYSIA)
(MALAYSIA)
labour
labour
labour
valid
valid
valid
KENWOOD
KENWOOD
KENWOOD
brand
brand
brand
PETAUNG JAYA,
PETAUNG JAYA,
PETAUNG JAYA,
BHD.
BHD.
BHD.
AND
PERSONAL
AND
PERSONAL
AND
PERSONAL
audio
audio
audio
installed
and
operaledinaccordance
installed
and
operaledinaccordance
installed
and
operaledinaccordance
and
usc
against
and
usc
against
and
usc
against
SON.
SON.
SHO.
SON.
SHO.
necessarytocorrect
necessarytocorrect
necessarytocorrect
EXPRESS
EXPRESS
EXPRESS
loraperiod
of
loraperiod
of
loraperiod
of
purchase
docket
purchase
docket
purchase
docket
and
accessolies.
and
accessolies.
and
accessolies.
system)orconnoctioo
system)orconnoctioo
system)orconnoctioo
Service
Centre.
Service
Centre.
Service
Centre.
ollhe
ollhe
ollhe
productatour
productatour
productatour
deiller
from
deiller
from
deiller
from
original
packaging,01equivalent,
original
packaging,01equivalent,
original
packaging,01equivalent,
madetoassoeiatflrl equij'Vllol1l.
madetoassoeiatflrl equij'Vllol1l.
madetoassoeiatflrl equij'Vllol1l.
the
equipment
back
the
equipment
back
the
equipment
back
products.
Therefore.
products.
Therefore.
products.
Therefore.
both10prove
both10prove
both10prove
you
can
have
for
you
can
have
for
you
can
have
for
AUDIO
AUDIO
AUDIO
equipment.
This
equipment.
This
equipment.
This
defectsinmalerial
defectsinmalerial
defectsinmalerial
SHO.
will
provide
will
provide
will
provide
any
defecl
any
defecl
any
defecl
WARRANTY" are
WARRANTY" are
WARRANTY" are
ONE YEAR
from
ONE YEAR
from
ONE YEAR
from
mustbepresented
mustbepresented
mustbepresented
toanincorrect
toanincorrect
toanincorrect
instructions
conlained
instructions
conlained
instructions
conlained
original
parts
original
parts
original
parts
product
whir.h
product
whir.h
product
whir.h
option,
and
shall
option,
and
shall
option,
and
shall
whom
you
mode;
whom
you
mode;
whom
you
mode;
after
repair.
after
repair.
after
repair.
you
should
you
should
you
should
your
eligibilily
your
eligibilily
your
eligibilily
Iransponationofyour
Iransponationofyour
Iransponationofyour
unit
unit
unit
read
read
read
to
to
to
in
in
in
the
the
the
or
or
or
the
the
the
not
not
not
the
the
the
lor
lor
lor
BRASIL KENWOOD ELECTRONICS BRASIL
BRASIL KENWOOD ELECTRONICS BRASIL
BRASIL KENWOOD ELECTRONICS BRASIL
o
fabricante
garanle0produto
o
fabricante
garanle0produto
o
fabricante
garanle0produto
de
materia·prima
de
materia·prima
de
materia·prima
aparelho
confOlme0manualdeinstrucoes.
aparelho
confOlme0manualdeinstrucoes.
aparelho
confOlme0manualdeinstrucoes.
PERioDODEGARANTIA
PERioDODEGARANTIA
PERioDODEGARANTIA
Este
produtoegarantido
Este
produtoegarantido
Este
produtoegarantido
cDmprDvada
medianteaapresental;Bodarespeetiva
cDmprDvada
medianteaapresental;Bodarespeetiva
cDmprDvada
medianteaapresental;Bodarespeetiva
Eventuais
reparos
Eventuais
reparos
Eventuais
reparos
EXCLUSAo DA GARANTIA
EXCLUSAo DA GARANTIA
EXCLUSAo DA GARANTIA
(a)
Produtos
com
(a)
Produtos
com
(a)
Produtos
com
(Il)
Dcfcitos
rcsultarllesdeacidentes
(Il)
Dcfcitos
rcsultarllesdeacidentes
(Il)
Dcfcitos
rcsultarllesdeacidentes
litJlli;"iio 0
fontedetensilo
litJlli;"iio 0
fontedetensilo
litJlli;"iio 0
fontedetensilo
(e)
Danos
causados
(e)
Danos
causados
(e)
Danos
causados
(dl
D()foitosoudanosemtlet:Ofrenciadeconsertos
(dl
D()foitosoudanosemtlet:Ofrenciadeconsertos
(dl
D()foitosoudanosemtlet:Ofrenciadeconsertos
(e)
Deleitosoudanos
(e)
Deleitosoudanos
(e)
Deleitosoudanos
(f1
Danosoudeterior3l;oes
(f1
Danosoudeterior3l;oes
(f1
Danosoudeterior3l;oes
gravadoras,
CDsoudanos
gravadoras,
CDsoudanos
gravadoras,
(9\
(9\
(9\
(h)
(h)
(h)
(I)
(I)
(I)
01
01
01
CQNSERTQEMGARANTIA
CQNSERTQEMGARANTIA
CQNSERTQEMGARANTIA
E
E
E
Fiscaldecompradoproduto
Fiscaldecompradoproduto
Fiscaldecompradoproduto
o
o
o
InStalacaoeremocaodoproduto,
InStalacaoeremocaodoproduto,
InStalacaoeremocaodoproduto,
CDsoudanos
Dcloitosoudanos
Dcloitosoudanos
Dcloitosoudanos
Gualquer
outra
Gualquer
outra
Gualquer
outra
Danos
causados
Danos
causados
Danos
causados
Danos
causados
Danos
causados
Danos
causados
indispensavelaapresental;BO
indispensavelaapresental;BO
indispensavelaapresental;BO
QUE
NAoECOBERTO
QUE
NAoECOBERTO
QUE
NAoECOBERTO
identificadonaNota
identificadonaNota
identificadonaNota
Clurante 0
periododegarantia.
Clurante 0
periododegarantia.
Clurante 0
periododegarantia.
pelo
prazo
de
pelo
prazo
de
pelo
prazo
de
realizadosnoproduto
realizadosnoproduto
realizadosnoproduto
0
l1IimmodeserieDUeertificadodegarantia
0
l1IimmodeserieDUeertificadodegarantia
0
l1IimmodeserieDUeertificadodegarantia
por
por
por
devidoaotrallsporte
devidoaotrallsporte
devidoaotrallsporte
causa
causa
causa
par
par
par
por
por
por
(quedas,
(quedas,
(quedas,
dilelentedaespecificadanoManuilldeInstrUf;6es,
dilelentedaespecificadanoManuilldeInstrUf;6es,
dilelentedaespecificadanoManuilldeInstrUf;6es,
agentesdanaturela
agentesdanaturela
agentesdanaturela
resultantesdousodepecasaudispositivos
resultantesdousodepecasaudispositivos
resultantesdousodepecasaudispositivos
aos
acabamenlos
aos
acabamenlos
aos
acabamenlos
causados
causados
causados
que
nao
esleja
que
nao
esleja
que
nao
esleja
tentativaderoubooufurto;
tentativaderoubooufurto;
tentativaderoubooufurto;
usodeCDsdema
usodeCDsdema
usodeCDsdema
deste
deste
deste
PELA
PELA
PELA
despesasdefrete.
despesasdefrete.
despesasdefrete.
FiscaldevendaaDcnllsurnidor
FiscaldevendaaDcnllsurnidor
FiscaldevendaaDcnllsurnidor
Esta
Esta
Esta
01
~um)
ano,
01
~um)
ano,
01
~um)
ano,
Nota
Nota
Nota
durante0periododeoaranlia
durante0periododeoaranlia
durante0periododeoaranlia
batidaseetd,
batidaseetd,
batidaseetd,
(Ex:
Chuvas.
(Ex:
Chuvas.
(Ex:
Chuvas.
rcalilados
rcalilados
rcalilados
elllernos.
elllernos.
elllernos.
par
pilhas
defeituosasoucom
par
pilhas
defeituosasoucom
par
pilhas
defeituosasoucom
(rcclama~s
(rcclama~s
(rcclama~s
relacionadaadefeitosdemaleria-prima8de
relacionadaadefeitosdemaleria-prima8de
relacionadaadefeitosdemaleria-prima8de
quahdade.
quahdade.
quahdade.
CertiflcadodeGarantia
CertiflcadodeGarantia
CertiflcadodeGarantia
GARANTIA
GARANTIA
GARANTIA
seguroeem
seguroeem
seguroeem
KENWOOO
ELECTRONICS
KENWOOO
ELECTRONICS
KENWOOO
ELECTRONICS
Tel, 0800-7717270
Tel, 0800-7717270
Tel, 0800-7717270
www.kenwood.com.br
www.kenwood.com.br
www.kenwood.com.br
garanlia0validanolenit6rio
garanlia0validanolenit6rio
garanlia0validanolenit6rio
incluindoflperfodfl
incluindoflperfodfl
incluindoflperfodfl
Fiscal
Fiscal
Fiscal
raios,
raios,
raios,
~rtl!S
~rtes
~rtl!S
devem
devem
devem
ria
vltnditaoconl;umidor
ria
vltnditaoconl;umidor
ria
vltnditaoconl;umidor
niru
niru
niru
msurados,
msurados,
msurados,
usoemdesaccrdo
usoemdesaccrdo
usoemdesaccrdo
mllresia,
p.nchentcscetd;
mllresia,
p.nchentcscetd;
mllresia,
p.nchentcscetd;
por
pe~soas
por
pe~soas
por
pe~soas
nao
conformes
nao
conformes
nao
conformes
cosmelicas.
cosmelicas.
cosmelicas.
va/amcnto;
va/amcnto;
va/amcnto;
sel
leitas
sel
leitas
sel
leitas
devidamanta
devidamanta
devidamanta
bOlla
gem
bOlla
gem
bOlla
gem
BRASIL
BRASIL
BRASIL
Ftstabelecido
Ftstabelecido
Ftstabelecido
implil;;Jn!nadilatai;"<lodoseu
implil;;Jn!nadilatai;"<lodoseu
implil;;Jn!nadilatai;"<lodoseu
adutterildosouileglveis;
adutterildosouileglveis;
adutterildosouileglveis;
nito
nito
nito
cabos,
cabos,
cabos,
juntoitempresa
juntoitempresa
juntoitempresa
sao
sao
sao
com0manualdeinstru!foes,mautilizal;ac,
com0manualdeinstru!foes,mautilizal;ac,
com0manualdeinstru!foes,mautilizal;ac,
modificacoes
modificacoes
modificacoes
autoriladas;
autoriladas;
autoriladas;
i1s
i1s
i1s
<a(\<lptadores,
<a(\<lptadores,
<a(\<lptadores,
praemc.hido.
praemc.hido.
praemc.hido.
de
re~nsabi'idade
de
re~nsabi'idade
de
re~nsabi'idade
LTDA.
LTDA.
LTDA.
LTDA.
LTDA.
LTDA.
contra
qualquer
contra
contra
hrasileiro,
hrasileiro,
hrasileiro,
especifica(:oesdaKenwood;
especifica(:oesdaKenwood;
especifica(:oesdaKenwood;
fabricacao;
fabricacao;
fabricacao;
defeito
qualquer
defeito
qualquer
defeito
condicionado
condicionado
condicionado
por
lei,apartirdadatadnaquisiciio.
por
lei,apartirdadatadnaquisiciio.
por
lei,apartirdadatadnaquisiciio.
final.
final.
final.
nao
autoriladas;
nao
autoriladas;
nao
autoriladas;
anteoas,
anteoas,
anteoas,
transportadoral;
transportadoral;
transportadoral;
ac.ompanhadodarespectiva
ac.ompanhadodarespectiva
ac.ompanhadodarespectiva
do
proprietario.
do
proprietario.
do
proprietario.
prazo.
prazo.
prazo.
filas,
filas,
filas,
de
fabric~o
de
fabric~o
de
fabric~o
ao
uso
ao
uso
ao
uso
cabecas
cabecas
cabecas
correto
correto
correto
NOla
NOla
NOla
000
«KEHBYA
000
PYCCK"''''
PYCCK"''''
PYCCK"''''
ou
ou
ou
do
do
do
Y8aw;aeMbll1
nOKynaTeltb!
Y8aw;aeMbll1
nOKynaTeltb!
Y8aw;aeMbll1
nOKynaTeltb!
6narOJlapMM
B.lC
6narOJlapMM
6narOJlapMM
Bcny-'ae. ccnH
Bcny-'ae. ccnH
Bcny-'ae. ccnH
UeHTpbl
UeHTpbl
UeHTpbl
npoAaBLld
npoAaBLld
npoAaBLld
http;/f'IWww.kenwood-rus.Rllsupport/service/
http;/f'IWww.kenwood-rus.Rllsupport/service/
http;/f'IWww.kenwood-rus.Rllsupport/service/
AaHHI>IM
AaHHI>IM
AaHHI>IM
npe/t0ClilillneHa BAoIIOJ1Hel<lIIl'IInpaBdM flolpe6l11Tl'llH
npe/t0ClilillneHa BAoIIOJ1Hel<lIIl'IInpaBdM flolpe6l11Tl'llH
npe/t0ClilillneHa BAoIIOJ1Hel<lIIl'IInpaBdM flolpe6l11Tl'llH
nOllynaTelHO
nOllynaTelHO
nOllynaTelHO
Gel
Gel
Gel
cepTIo1¢\I'IKaTBMeCTe
cepTIo1¢\I'IKaTBMeCTe
cepTIo1¢\I'IKaTBMeCTe
Ha
Ha
Ha
H3 I
H3 I
H3 I
BMarepl1allllXMll1'I pa60Te,
BMarepl1allllXMll1'I pa60Te,
BMarepl1allllXMll1'I pa60Te,
ycnoBI1RX.
ycnoBI1RX.
ycnoBI1RX.
rapaHnniiHble ycnoBMJI
rapaHnniiHble ycnoBMJI
rapaHnniiHble ycnoBMJI
A.
A.
A.
6.
6.
6.
(.HaoCHIUlilH
(.HaoCHIUlilH
(.HaoCHIUlilH
HacToAl4aR
HacToAl4aR
HacToAl4aR
HaCToRUldfl raplIl'THfl
HaCToRUldfl raplIl'THfl
HaCToRUldfl raplIl'THfl
1I0TOpl>le
1I0TOpl>le
1I0TOpl>le
JanoKyn,.;y )fOf'O "3/l.enMH MapllM
B.lC
JanoKyn,.;y )fOf'O "3/l.enMH MapllM
B.lC
JanoKyn,.;y )fOf'O "3/l.enMH MapllM
8awe
MJAenMe
6Yllel
8awe
MJAenMe
6Yllel
8awe
MJAenMe
Kenwood
Kenwood
Kenwood
HIlM
HIlM
HIlM
rap;lHTMMHblMTanOHJlCMl:TOMH!neH
rap;lHTMMHblMTanOHJlCMl:TOMH!neH
rap;lHTMMHblMTanOHJlCMl:TOMH!neH
JaIlOHOM
JaIlOHOM
JaIlOHOM
npeAbRBlIeHIo1R
npeAbRBlIeHIo1R
npeAbRBlIeHIo1R
OCHOBati"'l-1lTOM
OCHOBati"'l-1lTOM
OCHOBati"'l-1lTOM
(OAIo1H}
rOti. IIa'''''Hali C
(OAIo1H}
rOti. IIa'''''Hali C
(OAIo1H}
rOti. IIa'''''Hali C
Tax""e
Tax""e
Tax""e
PeMoHT
l1eq.eIlTHOrOH3IlCJlIIH
PeMoHT
l1eq.eIlTHOrOH3IlCJlIIH
PeMoHT
l1eq.eIlTHOrOH3IlCJlIIH
rilp""T14"'Horo
rilp""T14"'Horo
rilp""T14"'Horo
(a) ([)aMMnl1'"
(a) ([)aMMnl1'"
(a) ([)aMMnl1'"
(6)
nonttoro
(6)
nonttoro
(6)
nonttoro
{tl}
Hal'lMeHOBi'IHMft
{tl}
Hal'lMeHOBi'IHMft
{tl}
Hal'lMeHOBi'IHMft
(r)
A 'ill<lKC
otoKCOIIoro1110llitptioro..eKCI
(r)
A 'ill<lKC
otoKCOIIoro1110llitptioro..eKCI
(r)
A 'ill<lKC
otoKCOIIoro1110llitptioro..eKCI
unOHa,
e cnY'!<Ie
unOHa,
e cnY'!<Ie
unOHa,
e cnY'!<Ie
MJAen",,,
MJAen",,,
MJAen",,,
~PMil
Kenwood
~PMil
Kenwood
~PMil
Kenwood
C
c06nlO.qeHMeM
C
c06nlO.qeHMeM
C
c06nlO.qeHMeM
COOT8CTClB"14Cl\eWCTBylOUlI'IM
COOT8CTClB"14Cl\eWCTBylOUlI'IM
COOT8CTClB"14Cl\eWCTBylOUlI'IM
14)At:""",Q,
yrea3amf041fI"'HCTpyteLtl414no3«Cnnyata41114
14)At:""",Q,
yrea3amf041fI"'HCTpyteLtl414no3«Cnnyata41114
14)At:""",Q,
yrea3amf041fI"'HCTpyteLtl414no3«Cnnyata41114
(a)
peMOKT
npe.qYCMOTpetllAHClPYIILlMeiIno3I<CnnyaraL\l'll'l
(a)
peMOKT
npe.qYCMOTpetllAHClPYIILlMeiIno3I<CnnyaraL\l'll'l
(a)
peMOKT
npe.qYCMOTpetllAHClPYIILlMeiIno3I<CnnyaraL\l'll'l
nepl1olllll..eclI~e
nepl1olllll..eclI~e
nepl1olllll..eclI~e
(6)
peMOHT.
np0I11Bellel-ll-lbl";HeynOJlHOIo4O'lettHblMlllita
(6)
peMOHT.
np0I11Bellel-ll-lbl";HeynOJlHOIo4O'lettHblMlllita
(6)
peMOHT.
np0I11Bellel-ll-lbl";HeynOJlHOIo4O'lettHblMlllita
lOPMJ\M'IfillltX
lOPMJ\M'IfillltX
lOPMJ\M'IfillltX
(BI14l,l:lenl4e Bblwno
(BI14l,l:lenl4e Bblwno
(BI14l,l:lenl4e Bblwno
ttereBanlMfw.4"poedHHOO
ttereBanlMfw.4"poedHHOO
ttereBanlMfw.4"poedHHOO
(r) n08peIllAetllt(' l4.ll\enMA Ilbf.lBilHHOe
(r) n08peIllAetllt(' l4.ll\enMA Ilbf.lBilHHOe
(r) n08peIllAetllt(' l4.ll\enMA Ilbf.lBilHHOe
HenpaltHnbtlOI4 _TI'IJIAUMIII.
HenpaltHnbtlOI4 _TI'IJIAUMIII.
HenpaltHnbtlOI4 _TI'IJIAUMIII.
lAl
rpor.ll<OlQ80pHTenM nOllpe}K,/\t>HHble
lAl
rpor.ll<OlQ80pHTenM nOllpe}K,/\t>HHble
lAl
rpor.ll<OlQ80pHTenM nOllpe}K,/\t>HHble
nporpa!'ollMuoro06ec:ne'leHM:Il Mntt
nporpa!'ollMuoro06ec:ne'leHM:Il Mntt
nporpa!'ollMuoro06ec:ne'leHM:Il Mntt
(e) paOO.l!Hble MiliTepl'la.nbl Hy».lIalOl4MeCR(I3aMeHe,
(e) paOO.l!Hble MiliTepl'la.nbl Hy».lIalOl4MeCR(I3aMeHe,
(e) paOO.l!Hble MiliTepl'la.nbl Hy».lIalOl4MeCR(I3aMeHe,
pal'bCMOBIIl npO'll1x .qeraneril.
pal'bCMOBIIl npO'll1x .qeraneril.
pal'bCMOBIIl npO'll1x .qeraneril.
(Ml
eCJlM
ceP!"'I;IIII>1"
(Ml
eCJlM
ceP!"'I;IIII>1"
(Ml
eCJlM
ceP!"'I;IIII>1"
rap.a.'HMM
rap.a.'HMM
rap.a.'HMM
Io1CnOJlblYIOl(A
Io1CnOJlblYIOl(A
Io1CnOJlblYIOl(A
6Yllel
{.Qanee
A(UI..nl1eMilt.l}"",
{.Qanee
A(UI..nl1eMilt.l}"",
{.Qanee
A(UI..nl1eMilt.l}"",
HacaMTc
HacaMTc
HacaMTc
0 JaUI,He
0 JaUI,He
0 JaUI,He
H<I(lOlll.L\ero
H<I(lOlll.L\ero
H<I(lOlll.L\ero
C'leIlO
...
nOllynllMHaBect>
C'leIlO
...
nOllynllMHaBect>
C'leIlO
...
nOllynllMHaBect>
nOTpe6HTenbcKoit
nOTpe6HTenbcKoit
nOTpe6HTenbcKoit
j:laTt>I
j:laTt>I
j:laTt>I
ACU
ACU
ACU
Mbl
ocratlnlleMlac060u
Mbl
ocratlnlleMlac060u
Mbl
ocratlnlleMlac060u
TJnOHa,CBHeCetlMblMHIIHero
TJnOHa,CBHeCetlMblMHIIHero
TJnOHa,CBHeCetlMblMHIIHero
11
aAJ)Cca
floKynJrenfl:
11
aAJ)Cca
floKynJrenfl:
11
aAJ)Cca
floKynJrenfl:
l1alllitHl'lfll'l
C1llpel:a
l1alllitHl'lfll'l
C1llpel:a
l1alllitHl'lfll'l
C1llpel:a
MOJlenl11'1
Ceplo1~'lOtO
MOJlenl11'1
Ceplo1~'lOtO
MOJlenl11'1
Ceplo1~'lOtO
OT<:ytCT81'1l'1
OT<:ytCT81'1l'1
OT<:ytCT81'1l'1
>Ie
UPIolHI'IMdIOT"1
>Ie
UPIolHI'IMdIOT"1
>Ie
UPIolHI'IMdIOT"1
y,qemlCl 60J1blUoe BHI1Maillte
y,qemlCl 60J1blUoe BHI1Maillte
y,qemlCl 60J1blUoe BHI1Maillte
npallHn ",rccnnyaTaLt"M
npallHn ",rccnnyaTaLt"M
npallHn ",rccnnyaTaLt"M
rdpaHT141lHepacnpocTpalUlCICH Hit cne,a)'lOwee:
rdpaHT141lHepacnpocTpalUlCICH Hit cne,a)'lOwee:
rdpaHT141lHepacnpocTpalUlCICH Hit cne,a)'lOwee:
npoBCp«14.
npoBCp«14.
npoBCp«14.
nOnHOMO'l14U
nOnHOMO'l14U
nOnHOMO'l14U
loll
ClPOIlIIoelyJlbfaTeMeX,:lHM'teCKOro noepelKneHI'IR.
loll
ClPOIlIIoelyJlbfaTeMeX,:lHM'teCKOro noepelKneHI'lR.
loll
ClPOIlIIoelyJlbfaTeMeX,:lHM'teCKOro noepelKneHI'IR.
y<raHOBI\OI4
y<raHOBI\OI4
y<raHOBI\OI4
ItaMep
1"1114
ItaMep
1"1114
ItaMep
1"1114
p.a.cnpocrpaHHcTcA
p.a.cnpocrpaHHcTcA
p.a.cnpocrpaHHcTcA
Aei1<'m
..,enbHIIR T01IbIlOIl"" ",Jtlen14K Io4CnonblyeMblx
Aei1<'m
..,enbHIIR T01IbIlOIl"" ",Jtlen14K Io4CnonblyeMblx
Aei1<'m
..,enbHIIR T01IbIlOIl"" ",Jtlen14K Io4CnonblyeMblx
WTlIIIOMMep'le<:KHX.
WTlIIIOMMep'le<:KHX.
WTlIIIOMMep'le<:KHX.
000
Kenwood",
Kenwood",
Kenwood",
"yllll\lllbCH
Ell
apal<lMI1HOM
"yllll\lllbCH
Ell
apal<lMI1HOM
"yllll\lllbCH
Ell
apal<lMI1HOM
tIle
BbI
tIle
BbI
tIle
BbI
10nt>llO"
10nt>llO"
10nt>llO"
npaa
1101
pe6"'1t.'IlI;!M14APyl'i'lM14
npaa
1101
pe6"'1t.'IlI;!M14APyl'i'lM14
npaa
1101
pe6"'1t.'IlI;!M14APyl'i'lM14
rap<lHTMMHOro
TanOI"l
rap<lHTMMHOro
TanOI"l
rap<lHTMMHOro
TanOI"l
nepl'lo.q rllpallTl'U1110ro 06cl1ylllMUatllt"
nepl'lo.q rllpallTl'U1110ro 06cl1ylllMUatllt"
nepl'lo.q rllpallTl'U1110ro 06cl1ylllMUatllt"
rapaHTHI1
Kenwood
rapaHTHI1
Kenwood
rapaHTHI1
nepeOHil'l,WbHO'" "Ollyllll14.
nepeOHil'l,WbHO'" "Ollyllll14.
nepeOHil'l,WbHO'" "Ollyllll14.
Kenwood
Kenwood
Kenwood
oCYlll@C!enneTUlllonpe/lMlllnC""",tlOlpe6..1CJK'M
oCYlll@C!enneTUlllonpe/lMlllnC""",tlOlpe6..1CJK'M
oCYlll@C!enneTUlllonpe/lMlllnC""",tlOlpe6..1CJK'M
M
M
M
Kenwood
6e<:01laTHo
6e<:01laTHo
6e<:01laTHo
npaBOl.'lMeHhI "'31\ell"'A, eCllH
npaBOl.'lMeHhI "'31\ell"'A, eCllH
npaBOl.'lMeHhI "'31\ell"'A, eCllH
cne,qylOl1l"'MH
cne,qylOl1l"'MH
cne,qylOl1l"'MH
,:(l4JlepaY'Ioro
6blJ1
,:(l4JlepaY'Ioro
6blJ1
,:(l4JlepaY'Ioro
6blJ1
IlOMepil
illll1dp3la;
IlOMepil
illll1dp3la;
IlOMepil
illll1dp3la;
Io1n",
1lI060ro
Io1n",
1lI060ro
Io1n",
1lI060ro
e i'lli'M
no"..otii
....
e i'lli'M
no"..otii
....
e i'lli'M
no"..otii
....
rapaHTIt~>lI>I";
peMOHrHenpOI13eOIlI1l(A.
rapaHTIt~>lI>I";
peMOHrHenpOI13eOIlI1l(A.
rapaHTIt~>lI>I";
peMOHrHenpOI13eOIlI1l(A.
red'lCCTsy
red'lCCTsy
red'lCCTsy
£poreeecnyll<.6b1
£poreeecnyll<.6b1
£poreeecnyll<.6b1
]dl«)IKl/ldTcnbCT
]dl«)IKl/ldTcnbCT
]dl«)IKl/ldTcnbCT
'114crrey
'114crrey
'114crrey
npol11BOJlMTb
npol11BOJlMTb
npol11BOJlMTb
owne6a1l1l14
owne6a1l1l14
owne6a1l1l14
HOMep
HOMep
HOMep
"'OM
"'OM
"'OM
i1YAI4Or/B14I\C01'"OrlOIKlI\;
i1YAI4Or/B14I\C01'"OrlOIKlI\;
i1YAI4Or/B14I\C01'"OrlOIKlI\;
peuoHT:
peuoHT:
peuoHT:
I1nH
liCflpaO\1Jlbtloro McnonbloBaHMA;
I1nH
liCflpaO\1Jlbtloro McnonbloBaHMA;
I1nH
liCflpaO\1Jlbtloro McnonbloBaHMA;
He<'taClH_
He<'taClH_
He<'taClH_
HitnpJllKt!HltlltlIIHbllC
HitnpJllKt!HltlltlIIHbllC
HitnpJllKt!HltlltlIIHbllC
xone6itHIo'IeM
xone6itHIo'IeM
xone6itHIo'IeM
CbC'MH""lI
HOCIIITeneM.
CbC'MH""lI
HOCIIITeneM.
CbC'MH""lI
HOCIIITeneM.
06naJ\<llOU\Mx
orp8HM'ofCIUiblM
06naJ\<llOU\Mx
orp8HM'ofCIUiblM
06naJ\<llOU\Mx
orp8HM'ofCIUiblM
MOQenMHaM3.qenllllt M)MeHeH, YAaneH, crepT ",nlllllepaJ.60p'lIllBbuO
MOQenMHaM3.qenllllt M)MeHeH, YAaneH, crepT ",nlllllepaJ.60p'lIllBbuO
MOQenMHaM3.qenllllt M)MeHeH, YAaneH, crepT ",nlllllepaJ.60p'lIllBbuO
fonbKOHao¢lM4ManbHo
fonbKOHao¢lM4ManbHo
fonbKOHao¢lM4ManbHo
npoMt>lWneHHbllC
npoMt>lWneHHbllC
npoMt>lWneHHbllC
3nEKTPOH~KC
«KEHBYA
3nEKTPOH~KC
«KEHBYA
3nEKTPOH~KC
"'IJ1('('M(l4,
"'IJ1('('M(l4,
"'IJ1('('M(l4,
06cny"'..«aH
06cny"'..«aH
06cny"'..«aH
npM06pen14 Mlllcnl1C
npM06pen14 Mlllcnl1C
npM06pen14 Mlllcnl1C
TOMl:TpaHe,
rAe
TOMl:TpaHe,
rAe
TOMl:TpaHe,
rAe
lillIe
ylllcM"fl('1 " ..lIaK ..eAPyrMe npaBa,
lillIe
ylllcM"fl('1 " ..lIaK ..eAPyrMe npaBa,
lillIe
ylllcM"fl('1 " ..lIaK ..eAPyrMe npaBa,
roonu~r(lllylO/JI""'1II
roonu~r(lllylO/JI""'1II
roonu~r(lllylO/JI""'1II
Ml>I
liP.
[MOIlll2'M
OOCOIl''1'''lb
Ml>I
liP.
[MOIlll2'M
OOCOIl''1'''lb
Ml>I
liP.
[MOIlll2'M
OOCOIl''1'''lb
rapaHT"'p~TO'fCYTClIl
rapaHT"'p~TO'fCYTClIl
rapaHT"'p~TO'fCYTClIl
ECIl'"
1:1
1t!'I<!H"'e
ECIl'"
1:1
1t!'I<!H"'e
ECIl'"
1:1
1t!'I<!H"'e
orpeMol",pylOl
310
orpeMol",pylOl
310
orpeMol",pylOl
310
.tlaHHblMI'I:
.tlaHHblMI'I:
.tlaHHblMI'I:
npl106pereH
annapar:
npl106pereH
annapar:
npl106pereH
annapar:
Ilpyroro
,QOK)lMeHra.
Ilpyroro
,QOK)lMeHra.
Ilpyroro
,QOK)lMeHra.
¢IopMd4I'1MMJ1M
npM
¢IopMd4I'1MMJ1M
¢IopMd4I'1MMJ1M
0 npd8ilX110rpe6&'ITcneti. As!aIlTill.l ..MIIlllllMe+lCHMM c
0 npd8ilX110rpe6&'ITcneti. As!aIlTill.l ..MIIlllllMe+lCHMM c
0 npd8ilX110rpe6&'ITcneti. As!aIlTill.l ..MIIlllllMe+lCHMM c
cny'laeM. MexaHIt,«,cKIIM nOBpell\JteHl'leM.y.qapoM
cny'laeM. MexaHIt,«,cKIIM nOBpell\JteHl'leM.y.qapoM
cny'laeM. MexaHIt,«,cKIIM nOBpell\JteHl'leM.y.qapoM
>lanpAJo:eHIIlA
>lanpAJo:eHIIlA
>lanpAJo:eHIIlA
ra","p
ra","p
ra","p
HanM'I1I1t
npM
HanM'I1I1t
npM
HanM'I1I1t
Ob/ny<KCIeMotii
Ob/ny<KCIeMotii
Ob/ny<KCIeMotii
!>loJoter
lK3'1ltTen....o
!>loJoter
lK3'1ltTen....o
!>loJoter
lK3'1ltTen....o
K3CTOlll1le";
rapaHTHHiHenOKpbl88IOTOl.
K3CTOlll1le";
rapaHTHHiHenOKpbl88IOTOl.
K3CTOlll1le";
rapaHTHHiHenOKpbl88IOTOl.
foUl'"
IIllrlAelCA
foUl'"
IIllrlAelCA
foUl'"
IIllrlAelCA
rOCepBI'ICHblU14
rOCepBI'ICHblU14
rOCepBI'ICHblU14
npM'IMH.
npM'IMH.
npM'IMH.
I.e
COO18CICIBVIOUI
I.e
COO18CICIBVIOUI
I.e
COO18CICIBVIOUI
tte
IIenlllOUlIllXCM
tte
IIenlllOUlIllXCM
tte
IIenlllOUlIllXCM
K.all
tHOHeorpaHH'I"'lI<IeICR): aYAMo}8l1J\corOJlOeotlt. ace BttAbI 6aTapelil. Wftyp08.
K.all
tHOHeorpaHH'I"'lI<IeICR): aYAMo}8l1J\corOJlOeotlt. ace BttAbI 6aTapelil. Wftyp08.
K.all
tHOHeorpaHH'I"'lI<IeICR): aYAMo}8l1J\corOJlOeotlt. ace BttAbI 6aTapelil. Wftyp08.
CPOKOM
CPOKOM
CPOKOM
III11H
nPQ¢\e<CI'IOHanbHI>lX
III11H
nPQ¢\e<CI'IOHanbHI>lX
III11H
nPQ¢\e<CI'IOHanbHI>lX
CHr»
CHr»
CHr»
\410
OMO
B.aMflotlp.lBl4TCR.
\410
OMO
B.aMflotlp.lBl4TCR.
\410
OMO
B.aMflotlp.lBl4TCR.
..... flolllanyMCTa.
..... flolllanyMCTa.
..... flolllanyMCTa.
Kenwood.
Kenwood.
Kenwood.
M]Ha\4anbHO
M]Ha\4anbHO
M]Ha\4anbHO
"fOro
"fOro
"fOro
11;1l1enltl!
I1jtlelllte
11;1l1enltl!
ero
P"!Mo~r
ero
P"!Mo~r
ero
P"!Mo~r
nonTBep~al(H~I1M
nonTBep~al(H~I1M
nonTBep~al(H~I1M
npOAyre~M14.
npOAyre~M14.
npOAyre~M14.
'11101>10
'11101>10
'11101>10
Iletllp<lMM
Iletllp<lMM
Iletllp<lMM
80.lJle~CTIl"'1l
80.lJle~CTIl"'1l
80.lJle~CTIl"'1l
HaxOAMlJ.tMlCCR
HaxOAMlJ.tMlCCR
HaxOAMlJ.tMlCCR
'1iKTbIO
'1iKTbIO
'1iKTbIO
I4(nOllblOBaHI'IR;
I4(nOllblOBaHI'lR;
I4(nOllblOBaHI'IR;
nOCTaBnReMble
nOCTaBnReMble
nOCTaBnReMble
AnA
AnA
AnA
06pal.L\alo1u!Cb
06pal.L\alo1u!Cb
06pal.L\alo1u!Cb
(1IMCOf(
Cepel'lCHbiX
(1IMCOf(
Cepel'lCHbiX
(1IMCOf(
Cepel'lCHbiX
6b1n
lIynneH
af1napaT.
6b1n
lIynneH
af1napaT.
6b1n
lIynneH
af1napaT.
1I0TOpbH'
1I0TOpbH'
1I0TOpbH'
laKoHaMM.
laKoHaMM.
laKoHaMM.
r<llpaHH1I1110e
05cnY>KHB.JIIHC.
r<llpaHH1I1110e
05cnY>KHB.JIIHC.
r<llpaHH1I1110e
05cnY>KHB.JIIHC.
..e e IIIJ/leJ1I1"lle4!eIlToa
..e e IIIJ/leJ1I1"lle4!eIlToa
..e e IIIJ/leJ1I1"lle4!eIlToa
rap<lltTl'I"'Horo qlOlI<I
rap<lltTl'I"'Horo qlOlI<I
rap<lltTl'I"'Horo qlOlI<I
'" 3aMelU1l
ero
/le;jleIlHll>le
'" 3aMelU1l
ero
/le;jleIlHll>le
'" 3aMelU1l
ero
/le;jleIlHll>le
:'IIIO,"OM",
...
eCIlIo1
flcllenecoo[ipa_lClI.
:'IIIO,"OM",
...
eCIlIo1
flcllenecoo[ipa_lClI.
:'IIIO,"OM",
...
eCIlIo1
flcllenecoo[ipa_lClI.
'1etIlO, npalWlnbtlOM nonHOCTblOJJnonfloClllloro
'1etIlO, npalWlnbtlOM nonHOCTblOJJnonfloClllloro
'1etIlO, npalWlnbtlOM nonHOCTblOJJnonfloClllloro
nOllyn'ly
nOllyn'ly
nOllyn'ly
lIaIlItX'J1M60
M3MeHeHM~U
lIaIlItX'J1M60
M3MeHeHM~U
lIaIlItX'J1M60
M3MeHeHM~U
nplt
I1cnonb306a..,..14
nplt
I1cnonb306a..,..14
nplt
I1cnonb306a..,..14
"peelKI'ITb
o¢IMI.\ManbHblliI
"peelKI'lTb
o¢IMI.\ManbHblliI
"peelKI'ITb
o¢IMI.\ManbHblliI
06bl'Hforo
TeXHI1'H!CKOfO
06bl'Hforo
TeXHI1'H!CKOfO
06bl'Hforo
TeXHI1'H!CKOfO
"'1l"Apyr"'M~
m'lI.\i1MH
"'1l"Apyr"'M~
m'lI.\i1MH
"'1l"Apyr"'M~
m'lI.\i1MH
Ha
HCtOllOM<lUJ""X",..eOIHblX
Ha
HCtOllOM<lUJ""X",..eOIHblX
Ha
HCtOllOM<lUJ""X",..eOIHblX
BHe
KOHTponA
BHe
KOHTponA
BHe
KOHTponA
..M
l:neLtI1¢l~II.aU"It.
..M
l:neLtI1¢l~II.aU"It.
..M
l:neLtI1¢l~II.aU"It.
IUllenM1l
Kenwood;
IUllenM1l
Kenwood;
IUllenM1l
Kenwood;
M3,QenIo1R.
M3,QenIo1R.
M3,QenIo1R.
lIH"HblX
61>1TOllbiX
lIH"HblX
lIH"HblX
HYlKll. '"HepaCrlpocl paHl'letO<l
61>1TOllbiX
HYlKll. '"HepaCrlpocl paHl'letO<l
61>1TOllbiX
HYlKll. '"HepaCrlpocl paHl'letO<l
ueIll'l4.
ueIll'l4.
ueIll'l4.
a A8TopMl06aHHble Cep9Ho4ble
a A8TopMl06aHHble Cep9Ho4ble
a A8TopMl06aHHble Cep9Ho4ble
l.leHTpOO
MOlKtW
l.leHTpOO
l.leHTpOO
Moryr61>1Tb npCAO<TaaneHbI
Moryr61>1Tb npCAO<TaaneHbI
Moryr61>1Tb npCAO<TaaneHbI
6Milreplo1<1J'1i1xItpll60Te;(:p0l<oM
6Milreplo1<1J'1i1xItpll60Te;(:p0l<oM
6Milreplo1<1J'1i1xItpll60Te;(:p0l<oM
III1J1\CI1I1Io1
III1J1\CI1I1Io1
III1J1\CI1I1Io1
OUJ\enMR.
OUJ\enMR.
OUJ\enMR.
CpoK
CpoK
CpoK
",nH
",nH
",nH
Monl1l11lt,
Monl1l11lt,
Monl1l11lt,
Kenwood;
Kenwood;
Kenwood;
flOnyw"nb y
MOlKtW
flOnyw"nb y
MOlKtW
flOnyw"nb y
HaCTOHwaA
rapaftTi'lA
HaCTOHwaA
HaCTOHwaA
npOCHM
npOCHM
npOCHM
06ItdPYII'''Tc''Ae,*,~lIrl>l
06ItdPYII'''Tc''Ae,*,~lIrl>l
06ItdPYII'''Tc''Ae,*,~lIrl>l
'1,leTI'I
'1,leTI'I
'1,leTI'I
683 npe.qbAeneHMR A3HHoro
683 npe.qbAeneHMR A3HHoro
683 npe.qbAeneHMR A3HHoro
raJ10HC.
raJ10HC.
raJ10HC.
ee AnA
n14'1HblX
ee AnA
n14'1HblX
ee AnA
n14'1HblX
CJTY>K6bl.
CJTY>K6bl.
CJTY>K6bl.
06b1'1HOU
06b1'1HOU
06b1'1HOU
o6cnylll",naH14I1, BllnlO'l;r1l
o6cnylll",naH14I1, BllnlO'l;r1l
o6cnylll",naH14I1, BllnlO'l;r1l
opr,,""ldI1"'MM'"He"'
opr,,""ldI1"'MM'"He"'
opr,,""ldI1"'MM'"He"'
JaTonneHMeM.
JaTonneHMeM.
JaTonneHMeM.
11
noepe)l(,QClllIll'l
11
noepe)l(,QClllIll'l
11
noepe)l(,QClllIll'l
5YAeT
rapaftTi'lA
5YAeT
rapaftTi'lA
5YAeT
R;ICCU~P"'''''I>
R;ICCU~P"'''''I>
R;ICCU~P"'''''I>
11,1
IlP"'lICIll'IIIl"'X
IlP"'lICIll'IIIl"'X
IlP"'lICIll'IIIl"'X
(6""TOBblX]
(6""TOBblX]
(6""TOBblX]
y<TaHoonCllInliM
y<TaHoonCllInliM
y<TaHoonCllInliM
c¢leplol
IlpIo1MeHe"'14M
c¢leplol
IlpIo1MeHe"'14M
c¢leplol
IlpIo1MeHe"'14M
111114
I~Ce«()MblX.
111114
I~Ce«()MblX.
111114
I~Ce«()MblX.
Itntt
Itntt
Itntt
flOlolapo
flOlolapo
flOlolapo
norcp"
norcp"
norcp"
1<<1
1<<1
1<<1
""lIIe
""lIIe
""lIIe
...
...
...
"3/1P.I1MM,
"3/1P.I1MM,
"3/1P.I1MM,
11,1
11,1
npcleHJMI'I 'IIICI'It'(rIlY
npcleHJMI'I 'IIICI'It'(rIlY
npcleHJMI'I 'IIICI'It'(rIlY
H)lJt(A
H)lJt(A
H)lJt(A
elOl1l"'''
elOl1l"'''
elOl1l"'''
BilW
BilW
BilW
II
II
II
....
....
....
ATEN~AO
ATEN~AO
ATEN~AO
f-rn
til,O
de
danoouPC'rd<ldoI)<1lnel
f-rn
til,O
de
danoouPC'rd<ldoI)<1lnel
f-rn
til,O
de
danoouPC'rd<ldoI)<1lnel
Nota
,"Iscaldecompra
Nota
,"Iscaldecompra
Nota
,"Iscaldecompra
serao
serao
serao
requillti'ldos
requillti'ldos
requillti'ldos
frontal.
.:'5112
frontal.
.:'5112
frontal.
.:'5112
pilrilailqIJis,\.'iodp
pilrilailqIJis,\.'iodp
pilrilailqIJis,\.'iodp
(eniflccldodeGalanlia
(eniflccldodeGalanlia
(eniflccldodeGalanlia
urn
novo
urn
novo
urn
novo
(' a
(' a
(' a
~Ifl(~
~Ifl(~
~Ifl(~
BHIIIMAH"'E
BHIIIMAH"'E
BHIIIMAH"'E
rapilHT~litHb';'
lolrlOH
1/1
lolrlOH
lolrlOH
HOB<»!
HOB<»!
HOB<»!
'K'II
1/1
'K'II
1/1
'K'II
nitH('!1111
nitH('!1111
nitH('!1111
rapilHT~litHb';'
rapilHT~litHb';'
npM()()peWI1~H
npM()()peWI1~H
npM()()peWI1~H
(1Oa<lIJHbll1
(1Oa<lIJHbll1
(1Oa<lIJHbll1
RrJlY'lileCCllorep
RrJlY'lileCCllorep
RrJlY'lileCCllorep
000
«KEHBYA 3J1EKTPOHIIIKC
000
«KEHBYA 3J1EKTPOHIIIKC
000
«KEHBYA 3J1EKTPOHIIIKC
~J1~
K<!ttOBbllii)
~-Ie06XOJII-1MblI1J\A
~J1~
K<!ttOBbllii)
~-Ie06XOJII-1MblI1J\A
~J1~
K<!ttOBbllii)
~-Ie06XOJII-1MblI1J\A
....
/r::p.'l>l\1II
....
/r::p.'l>l\1II
....
/r::p.'l>l\1II
www.kenwood-rus.ru
www.kenwood-rus.ru
www.kenwood-rus.ru
~JII'I
n00Pf';>t;llel'WII"
~JII'I
n00Pf';>t;llel'WII"
~JII'I
n00Pf';>t;llel'WII"
CHrll
CHrll
CHrll
 Loading...