


User Manual
GPS navigation software for Audiovox NVX200
English
Owners manual :128-8219
VER : 00
Copyright note
Audiovox Electronics Corp. 150 Marcus Blvd., Hauppauge, NY 11788 Call center: 800 290 6650
The product and the information contained herein may be changed at any time without prior notification.
This manual or any parts of it may not be reproduced, transmitted in any form either electronically or mechanically (including photocopying) without the express written consent of Audiovox Electronics Corp.
© Copyright 2007, Audiovox Electronics Corp. Data Source © 2007, Tele Atlas N.V.
All rights reserved.
II
Thank you for choosing the NVX200 Navigator as your door-to-door in-car navigator. The memory card version is very easy to use. Read the Quick Start Guide first and start using The NVX200 Navigator right away. This document is the detailed description of the software. Although The NVX200 Navigator can easily be discovered by experience, it is still recommended that you read through this manual to clearly understand the exact function of each button and icon.
NOTICE TO DRIVERS IN CALIFORNIA AND MINNESOTA: State law prohibits drivers in California and Minnesota from using suction mounts on their windshields while operating motor vehicles. Other Audiovox dashboard mounting options should be used. Audiovox does not take any responsibility
for any fines, penalties, or damages that may be incurred as a result of disregarding this notice. (See California Vehicle Code Section 26708(a); Minnesota Statutes 2005, Section 169.71)
III
Table of contents
1 Warnings and safety information .................................................... |
8 |
|||
2 General information ........................................................................ |
10 |
|||
3 Operating The NVX200 Navigator (Controls) ............................... |
12 |
|||
3.1 |
Hardware buttons..................................................................................... |
12 |
||
3.2 Screen buttons and controls................................................................... |
15 |
|||
3.2.1 |
Direct selectors ................................................................................... |
15 |
||
3.2.2 |
List selectors ....................................................................................... |
16 |
||
3.2.3 |
Sliders ................................................................................................. |
16 |
||
3.2.4 |
Switches.............................................................................................. |
16 |
||
3.2.5 |
Special switches.................................................................................. |
17 |
||
3.2.6 |
Switches in the Quick menu................................................................ |
17 |
||
3.2.7 |
Virtual keyboards ................................................................................ |
17 |
||
|
3.2.7.1 |
ABC-type keyboards .................................................................... |
18 |
|
|
3.2.7.2 |
QWERTY-type keyboards............................................................ |
18 |
|
|
3.2.7.3 |
The numeric keyboard ................................................................. |
19 |
|
4 Discovering the program through the screens............................ |
20 |
|||
4.1 |
Main menu................................................................................................. |
20 |
||
4.2 |
About screen ............................................................................................ |
21 |
||
4.3 |
GPS Data screen ...................................................................................... |
21 |
||
4.3.1 |
GPS data displayed ............................................................................ |
21 |
||
4.3.2 |
GPS connection indicator.................................................................... |
22 |
||
4.3.3 |
GPS data quality indicator................................................................... |
22 |
||
4.3.4 |
Time synchronization .......................................................................... |
23 |
||
4.4 |
The map .................................................................................................... |
23 |
||
4.4.1 |
2D and 3D map views ......................................................................... |
24 |
||
4.4.2 |
Zoom levels......................................................................................... |
24 |
||
4.4.3 |
Daylight and night color schemes ....................................................... |
25 |
||
4.4.4 |
Streets and roads................................................................................ |
26 |
||
4.4.5 |
Other objects....................................................................................... |
26 |
||
4.4.6 |
Current position and Lock-on-Road .................................................... |
26 |
||
4.4.7 |
Selected map point, also known as the Cursor ................................... |
27 |
||
4.4.8 |
Marked map points (Pin) ..................................................................... |
27 |
||
4.4.9 |
Visible POIs (Points of Interest) .......................................................... |
28 |
||
4.4.10 |
Elements of the Active Route.............................................................. |
29 |
||
|
4.4.10.1 The start point, via points and the destination.............................. |
29 |
||
|
4.4.10.2 |
Animated turn guidance ............................................................... |
29 |
|
|
4.4.10.3 The active leg of the route............................................................ |
29 |
||
IV
|
4.4.10.4 |
Inactive legs of the route .............................................................. |
29 |
|
|
4.4.10.5 |
Roads in the route excluded by your preferences ........................ |
29 |
|
4.5 |
Screens with map..................................................................................... |
30 |
||
4.5.1 |
Turn preview (No. 1) ........................................................................... |
31 |
||
4.5.2 |
Zoom in and out (No. 2 & 3)................................................................ |
31 |
||
4.5.3 |
Tilt up and down (No. 4 & 5)................................................................ |
32 |
||
4.5.4 |
Lock to GPS position and heading (No. 6) .......................................... |
32 |
||
4.5.5 |
Cursor (No. 7) ..................................................................................... |
33 |
||
4.5.6 |
Map scale (No. 8)................................................................................ |
33 |
||
4.5.7 |
Menu (No. 9) ....................................................................................... |
34 |
||
4.5.8 |
Map orientation and Overview (No. 10)............................................... |
34 |
||
4.5.9 |
GPS position quality (No. 11).............................................................. |
35 |
||
4.5.10 |
Battery status (No. 12) ........................................................................ |
35 |
||
4.5.11 |
Sound muting (No. 13) ........................................................................ |
35 |
||
4.5.12 |
Track Log recording/playback indicator (No. 14)................................. |
36 |
||
4.5.13 |
Cursor menu (No. 15).......................................................................... |
36 |
||
4.5.14 |
Current street (No. 16) ........................................................................ |
38 |
||
4.5.15 |
Travel and Route data (No. 17)........................................................... |
38 |
||
4.5.16 |
Distance to next turn (No. 18) ............................................................. |
38 |
||
4.5.17 |
Next street / Next settlement (No. 19) ................................................. |
39 |
||
4.5.18 |
Approaching next turn (No. 20) ........................................................... |
39 |
||
4.6 |
Route Information screen........................................................................ |
39 |
||
4.6.1 |
Route data displayed (for destination and via points).......................... |
39 |
||
|
4.6.1.1 |
Route line ..................................................................................... |
40 |
|
|
4.6.1.2 |
Distance Left ................................................................................ |
40 |
|
|
4.6.1.3 |
Method ......................................................................................... |
40 |
|
|
4.6.1.4 |
Time Left ...................................................................................... |
40 |
|
|
4.6.1.5 |
Estimated Arrival .......................................................................... |
41 |
|
|
4.6.1.6 |
Destination / Via point .................................................................. |
41 |
|
4.6.2 |
Warning icons ..................................................................................... |
41 |
||
4.6.3 |
Fit to screen ........................................................................................ |
42 |
||
4.6.4 |
Parameters.......................................................................................... |
42 |
||
4.7 |
Menu |
.......................................................................................................... |
43 |
|
4.7.1 |
Find ...............................................................................................tab |
43 |
||
4.7.2 |
Quick .............................................................................................tab |
43 |
||
|
4.7.2.1 ........................................................................................ |
3D Map |
43 |
|
|
4.7.2.2 ................................................................................... |
Zoom & Tilt |
44 |
|
|
4.7.2.3 ................................................................................... |
Night Mode |
44 |
|
|
4.7.2.4 ................................................... |
Manage POI (Points of Interest) |
44 |
|
|
4.7.2.5 .................................................................................... |
Popup Info |
47 |
|
|
4.7.2.6 ..................................................................... |
Manage Track Logs |
47 |
|
4.7.3 |
Route .............................................................................................tab |
49 |
||
|
4.7.3.1 .................................................................................. |
Recalculate |
50 |
|
|
4.7.3.2 ........................................................................................... |
Delete |
51 |
|
|
4.7.3.3 ........................................................................................ |
Itinerary |
51 |
|
|
4.7.3.4 ....................................................................................... |
Fly Over |
53 |
|
|
4.7.3.5 ............................................................................................... |
Edit |
53 |
|
|
4.7.3.6 ............................................................................................... |
Info |
54 |
|
4.7.4 |
Main .........................................................................................button |
54 |
||
V
5 Settings |
............................................................................................ |
56 |
||
5.1 |
General settings ....................................................................................... |
56 |
||
5.1.1 |
Safety ........................................................................................Mode |
56 |
||
5.1.2 |
Set ....................................................................Favorite Destinations |
57 |
||
5.1.3 |
Automatic ........................................................................Night Colors |
57 |
||
5.1.4 |
Warn .........................................................................When Speeding |
57 |
||
|
5.1.4.1 ...................................................................... |
Speeding tolerance |
58 |
|
|
5.1.4.2 .................................................................. |
Alternative speed limit |
58 |
|
|
5.1.4.3 ..................................................... |
Alternative speeding tolerance |
58 |
|
5.1.5 |
Off ........................................................................-route Recalculation |
59 |
||
|
5.1.5.1 ..................................................................................... |
Automatic |
59 |
|
|
5.1.5.2 ....................................................................................... |
Ask First |
59 |
|
|
5.1.5.3 ....................................................................................... |
Disabled |
59 |
|
5.2 |
Map settings ............................................................................................. |
60 |
||
5.2.1 |
Daylight ................................................................/ Night color profile |
60 |
||
5.2.2 |
Cockpit ........................................................./ Map mode map details |
60 |
||
5.2.3 |
Alternative .....................................................................Road Names |
60 |
||
5.2.4 |
Show .............................................................................Street Labels |
60 |
||
5.2.5 |
Textured ..............................................................................Polygons |
61 |
||
5.3 |
Sound .........................................................................................settings |
61 |
||
5.3.1 |
Master ...............................................................sound volume/switch |
61 |
||
5.3.2 |
Voice ............................................................guidance volume/switch |
61 |
||
5.3.3 |
Key ....................................................................sound volume/switch |
61 |
||
5.3.4 |
Dynamic .................................................................................Volume |
62 |
||
5.3.5 |
Attention .....................................................................................Tone |
62 |
||
5.4 |
Route ........................................................................parameter settings |
62 |
||
5.4.1 |
Method ................................................................................................ |
63 |
||
5.4.2 |
Route................................................................................................... |
63 |
||
|
5.4.2.1 ........................................................................................ |
Shortest |
63 |
|
|
5.4.2.2 ......................................................................................... |
Fastest |
63 |
|
|
5.4.2.3 .................................................................................. |
Economical |
63 |
|
5.4.3 |
Vehicle ................................................................................................ |
63 |
||
5.4.4 |
Road ............................................................types to include/exclude |
64 |
||
|
5.4.4.1 ........................................................................... |
Unpaved Roads |
64 |
|
|
5.4.4.2 .................................................................................... |
Motorways |
64 |
|
|
5.4.4.3 .......................................................................................... |
Ferries |
64 |
|
|
5.4.4.4 ......................................................................................... |
U - turns |
64 |
|
|
5.4.4.5 .............................................................................. |
Permit needed |
65 |
|
|
5.4.4.6 .................................................................................... |
Toll Roads |
65 |
|
5.5 |
Language .....................................................................................& Units |
65 |
||
5.5.1 |
Program ...............................................................................language |
65 |
||
5.5.2 |
Voice ...................................................................................language |
66 |
||
5.5.3 |
Units.................................................................................................... |
66 |
||
5.5.4 |
Set ......................................................................Date & Time Format |
66 |
||
5.6 |
Advanced ...................................................................................settings |
66 |
||
5.6.1 |
Display ....................................................................................options |
67 |
||
|
5.6.1.1 ................................. |
2D in Map mode (and north - up orientation) |
67 |
|
|
5.6.1.2 ............................. |
3D in Cockpit mode (and track - up orientation) |
67 |
|
|
5.6.1.3 ......................................................................... |
Zoom in after find |
67 |
|
|
5.6.1.4 ............................................................ |
Coordinate display format |
68 |
|
VI
5.6.1.5 |
Cockpit layout .............................................................................. |
68 |
|
5.6.2 |
Backlight settings ................................................................................ |
68 |
|
5.6.2.1 |
Power management..................................................................... |
68 |
|
5.6.2.2 |
Brightness .................................................................................... |
69 |
|
5.6.3 |
Smart Zoom ........................................................................................ |
69 |
|
5.6.3.1 |
Smart Zoom settings.................................................................... |
69 |
|
5.6.3.2 |
Enable Overview mode................................................................ |
69 |
|
5.6.3.3 |
Restore Lock-to-Position and Smart Zoom .................................. |
70 |
|
5.6.4 |
Route options ...................................................................................... |
71 |
|
5.6.4.1 |
Off-route sensitivity and Recalculation delay ............................... |
71 |
|
5.6.4.2 |
U-turn penalty .............................................................................. |
72 |
|
5.6.4.3 |
Cross-border planning.................................................................. |
72 |
|
5.6.4.4 |
Keep position on road (Lock-on-Road) ........................................ |
72 |
|
5.6.5 |
User data management....................................................................... |
72 |
|
5.6.5.1 |
Backup Data ................................................................................ |
73 |
|
5.6.5.2 |
Restore Data................................................................................ |
73 |
|
5.6.5.3 |
Remove Pins................................................................................ |
73 |
|
5.6.5.4 |
Clear Data.................................................................................... |
73 |
|
5.6.5.5 |
Reset Advanced Settings............................................................. |
74 |
|
6 Find |
................................................................................................... |
|
76 |
6.1 Find & GO (Main menu) .............................................................. |
76 |
||
6.2 Selection by tapping the map.................................................................. |
76 |
||
6.3 Using the Find menu................................................................................ |
77 |
||
6.3.1 |
Find an Address, Street, Intersection or City....................................... |
77 |
|
6.3.1.1 |
Selecting the city, state and country to search in ......................... |
78 |
|
6.3.1.2 |
Selecting a street or the centre of the settlement......................... |
80 |
|
6.3.1.3 |
Selecting a house number or the midpoint of the street............... |
81 |
|
6.3.1.4 |
How to select an intersection instead of a house number............ |
82 |
|
6.3.2 |
Find in History ..................................................................................... |
82 |
|
6.3.3 |
Find Coordinates................................................................................. |
83 |
|
6.3.4 |
Find a POI........................................................................................... |
84 |
|
6.3.5 |
Find one of the Favorites (Home/Work) .............................................. |
86 |
|
VII
1 Warnings and safety information
The NVX200 Navigator is a navigation system that helps you find your way to your selected destination. It will determine your exact location with the help of an attached GPS device. The position information obtained from the GPS receiver will not be transmitted anywhere, so others will not be able to track you.
If you are the driver of the vehicle, we recommend that you operate The NVX200 Navigator before beginning your journey. The driver’s attention should be on the road. Plan your route before departure and pull over if you need to change route parameters. The NVX200 Navigator has a built-in (optional) Safety Mode that will prevent you from using the screen functions if your car is in motion. Unless a passenger will be the only one to operate The NVX200 Navigator, we strongly encourage you to turn on the Safety Mode.
It is also important that you look at the display only if it is absolutely safe to do so.
You should always observe traffic signs and road geometry before you obey any instruction from The NVX200 Navigator. If you need to deviate from the recommended direction, The NVX200 Navigator will suggest a modified route according to the new situation.
Never place the NVX200 where it can obstruct the view of the driver, is within the deployment zone of airbags, or where it can cause injuries in case of an accident.
8
2 General information
To Enter a Destination address Skip to Page 76 of this Owners manual for detailed instruction
The NVX200 Navigator is a navigation system optimized for in-car use. It provides door-to-door navigation for both single and multi-point routes using adaptable route parameters. The NVX200 Navigator is capable of planning routes throughout the whole map region installed on the memory card. Unlike some other products, The NVX200 Navigator does not require that you change maps or switch to a poorly detailed general map to navigate between map segments or countries. You always have complete freedom to go wherever you wish. Just insert the memory card and go.
A stylus to use The NVX200 Navigator is located on the Lower Right Rear of the unit. All screen buttons and controls are designed so that you can operate them with your fingertips, or Stylus.
When using The NVX200 Navigator, you do not need to ‘double tap’ or ‘tap & hold’ the touch screen as these functions cannot be used reliably in a moving vehicle. A single tap triggers most of the screen controls. The only exceptions are ‘drag & drop’ for moving the map, or scaling it in Map mode (4.5.6).
Most of the screens have a Return ( ) button in the top left corner. This arrow returns to the previous screen or directly to one of the map screens.
Settings screens also have a Help ( ) button in the top right corner. This will show a detailed description of the current settings screen.
10

3 Operating The NVX200 Navigator (Controls)
The NVX200 Navigator is designed for easy operation. All controls are operable by fingertips, or Stylus. Wherever possible, pushbuttons and lists are provided to make accessing functions or changing settings as easy as possible.
3.1 Hardware buttons
Hardware buttons are mostly used on map screens to zoom, tilt and rotate the map, or to open other screens. In addition you can use the direction buttons and Enter on list screens to make your selection.
|
|
2 |
1 |
|
|
|
|
|
|
|
|
|
|
|
1.Touch Screen |
Display the output of your appliance. Tap the screen with the |
|
stylus to select menu commands or enter |
|
information. |
2. Battery Charge Indicator When the battery is charging the Indicator is red, When the battery is fully charged, the Indicator will
turn to green.
12
VIEWS
Back View
5 6
4 3
3.Stylus Take the pen out of its compartment in order to use it, and replace it after use. The pointer pen is required for operating the touch screen.
4.Loudspeaker Plays back language statements and warnings.
5.Reset button Press it to reset the unit.
6.External aerial interface Interface for an optional second aerial.
13

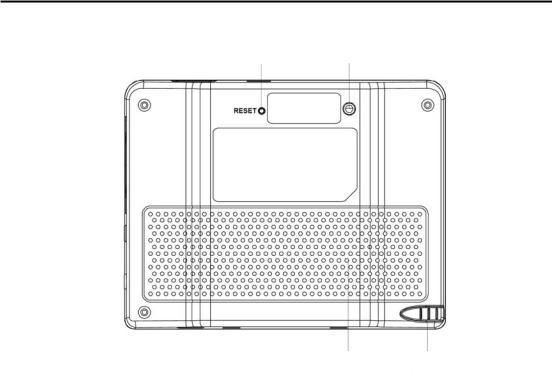
VIEWS
Top / Bottom View
7
8
7.Sleep/Wake up Button Press and hold Sleep/Wake up button for about two seconds to Wake up the unit.
8. USB Interface Interface for connecting to a PC by means of the ActiveSync Cable (for data matching).
Left / Right View
9
10
11
9.SD/MMC Slot Accepts an optional SD (Secure Digital) or MMC (Multi Media Card) Card for removable storage.
10.Headphone Connects to a pair of stereo headphones.
11.Power Port Connection to external power supply.
14

GPS(Global Positioning System)
GPS is a satellite-backed system for determining your position. With the help of 24 satellites revolving around the earth, it is possible to determine your position on earth with the accuracy of a few meters. The satellite signals are received by the antenna of the built-in GPS receiver, which must have a “line of sight” to at least 4 of these.
Note:
By limited line of sight (e.g. in tunnels, between houses, in woods or also in vehicles with metal-coated windows) it is not possible to determine the position. The satellite reception however automatically picks up again as soon as the obstacle has been passed and there line of sight is reestablished again.
Please note that your appliance is preset to not shut down automatically after a few minutes without activity. You can Change this preset in the Settings mode.
If the GPS receiver has not been active for some hours, it must orientate itself
again. This process may take a while.
Memory Card Quick Installation
This option is only available to you if your navigation system is equipped with a prepared memory card. In this
case, you will ready be able to use the Navigation function of your device after a short time, without carrying out the pre-installation on a PC.
The initial setting up must be carried out as described on page 15 in any case. The following installation limits
3.2 ) USB Interface - Interface for connecting to a PC by means of the ActiveSync Screen
buttons and controls
The primary input channel of The NVX200 Navigator is the touch screen. If you read on, you will realize that most parts of the screen are not only used to display information but also to initiate functions by tapping. Below you will find a list of the most frequently used controls in the program.
3.2.1 Direct selectors
Some of the settings can be chosen from a short list of possible values. If the values can be described graphically, all values are available on the screen, with the currently selected one in a different color.
Tap one of the icons to change the value.
15
3.2.2 List selectors
When the values in the list need to be named, only the current value is shown (sometimes together with a short description) in a horizontal stripe with arrows at both ends.
The arrows are buttons. Tap  to move left in the list or tap
  to move right. You need not confirm your selection. As soon as you leave the screen, the selected value becomes effective.
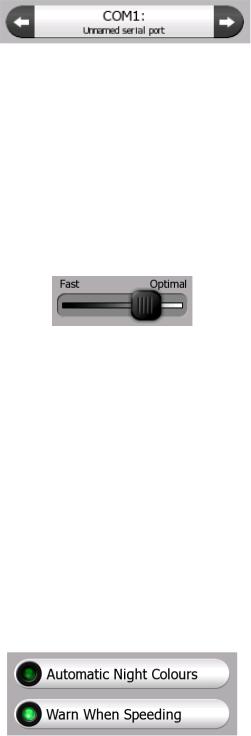
3.2.3 Sliders
When a feature has several different unnamed (numeric) values, The NVX200 Navigator will show sliders that look like analogue potentiometers to set the desired value.
If the value limits are not displayed at the ends of the slider, the leftmost position means the minimum value, while the rightmost position represents the maximum value.
This control can be operated in two ways. Either drag the handle to move the slider to its new position, or tap the slider where you want the handle to appear (the thumb jumps there immediately). As with the list selectors, there is no need to confirm your selection. As soon as you leave the screen, the selected value becomes effective.
3.2.4 Switches
When a function can only have two values (mainly Enabled and Disabled), a switch is used. Unlike with list selectors, the horizontal line contains the name of the function and not the actual status. There is a lamp on the left to show whether the function is active or not.
When the lamp is dark ( ), the function is not selected. When it is lit (
 ), the function is enabled. The whole strip works as a button. Tap anywhere to toggle between the enabled and disabled status.
16
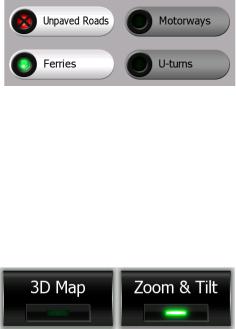
3.2.5 Special switches
Some switches behave differently. Instead of being dark when not selected, the light
turns red and the lamp becomes crossed out ( ) to emphasize the prohibition of use. Furthermore the switches used for the road types (to be included or avoided when planning a route) in the Route Parameters screen (5.4.4) cannot be changed for some vehicle types. When such a vehicle is selected, not only the lamp but also the whole line becomes inactive and dark.
Use these buttons the same way as you would other switches. Tap them anywhere to toggle between the enabled and disabled states.
3.2.6 Switches in the Quick menu
The switches of the Quick menu (4.7.2) behave as normal switches but they look different in order to fit in with the other menu buttons.
Tap the button to toggle between the enabled and disabled states.
3.2.7 Virtual keyboards
The NVX200 Navigator is designed in a way that you only need to enter letters or numbers when it is inevitable. In these cases a full screen keyboard pops up that can easily be operated with your fingertips. You can choose between a separate ABC and numeric keypad, or a set of QWERTY-type keyboards that contain both letters and numbers. The NVX200 Navigator will remember your last choice and offer it the next time you need to enter data.
The alphabetic keyboards in The NVX200 Navigator do not contain special characters, because you do not need to enter accents when searching for a destination. Type only the base letters (the letter most similar to the accented one) and The NVX200 Navigator will search for all their combinations in the database (e.g. for the street ‘Néfrue’ you only need to type ‘Nefrue’, and the rest is done by the program).
When you type in POI or track log names, The NVX200 Navigator will automatically turn all initials into capitals to create names that look pleasant.
17

3.2.7.1ABC-type keyboards
These keyboards contain only letters (Latin, Hebraic, Greek or Cyrillic). If you wish to
enter numbers, you need to tap the Keys ( ) button to switch to the numeric keyboard.
Use Backspace ( ) to delete the last letter you have entered if you have made a
mistake, tap Space ( ) to enter more words, and hit Done (
 ) to finish entering the text.
This type of keyboard has large, finger-friendly buttons.
If you are used to computer keyboards, you may consider trying one of the QWERTY-type keypads.
3.2.7.2QWERTY-type keyboards
QWERTY-type keyboards have both letters and numbers on them. Their layout is the same as of the standard QWERTY and AZERTY (French) keyboards. To switch to your desired QWERTY-type keyboard, press the Keys button repeatedly until the appropriate keyboard appears.
Due to the high number of buttons to be displayed in one line, in portrait and square modes these keyboards have narrow buttons. Still, with some practice they can be easily fingertip operated.
The special keys described in the previous section are also available here.
18
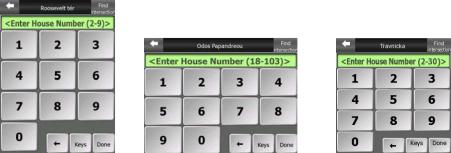
3.2.7.3The numeric keyboard
The numeric keyboard only contains numbers, on huge buttons. The special keys you find on the other keyboards (except Space) are available here as well.
Although QWERTY-type keyboards also contain number keys, when entering a house number, the program offers the more convenient numeric keypad.
19

4 Discovering the program through the screens
The best way to discover The NVX200 Navigator is to explore each screen in detail, and to find out how to move from one to another. Read this chapter for a guided tour.
The NVX200 Navigator starts by displaying the Main menu. This is the root of the screen hierarchy, but you only need to return here in a few cases. Many of the screens are also accessible from each other to reduce the number of actions needed to initiate a function or change a setting.
4.1 Main menu
The Main menu is the first screen of The NVX200 Navigator. Most parts of the program are directly accessible from here by using the buttons described below.
No. Content
1Audiovox logo
2Battery Status indicator
3Button to open Cockpit screen
4Button to open Find menu
5Button to open Settings
6Button that displays GPS Status and Opens GPS Data screen
8Current position
9Current date and time
10Button to open Map screen
11Button to open About screen
*Depends on program settings
20
** Same as removing the SD card
4.2 About screen
Tap About on the Main menu screen to open this screen. The About screen is not used in no
It is here to inform you about the map licenses you have, the creators of The NVX200 Navigator and the legal aspects of using the program.
4.3 GPS Data screen
Tap the small satellite dish icon in the Main menu to open this screen. The GPS Data screen is a collection of information received from the GPS device and it also serves as the entry point to the Time Sync screen.
4.3.1 GPS data displayed
The virtual sky on the left represents the currently visible part of the sky above you, with your position as the centre. The satellites are shown at their current positions. The GPS receives data from the green and grey satellites but not from the red ones. Signals from the grey satellites are only received, while green ones are used by the GPS to calculate your current location. On the right you can see the satellite signal strength bars. Grey bars are for the grey and black bars are for the green satellites. To identify satellites use their numbers also shown in the virtual sky. The more satellites your GPS tracks (the green ones), the better your calculated position will be.
21

Additional pieces of information on this screen are: current position in latitude/longitude format, elevation, speed, date, time and calculated accuracy.
Note: Accuracy can be affected by several factors the GPS cannot take into account. Use this accuracy information only as estimation.
There are two icons on the left to show the status of the GPS connection and the quality of reception.
4.3.2 GPS connection indicator
In the middle to the left there is a lamp similar to the ones used for switches. This one has more colors and represents more values:
• - Dark lamp means there is no communication on the selected port,
• - Red lamp means connection to any GPS receiver has not been established yet, so you need to set it up by using the Detect or Config. Buttons,
• - A slowly blinking yellow lamp means that there is no connection to the GPS receiver, but The NVX200 Navigator is trying to connect,
• - A fast blinking green lamp means that there is communication with the GPS and data is being received.
4.3.3 GPS data quality indicator
In the top left corner there is a satellite dish to show the quality of the GPS position. Different colors represent different signal quality:
• - Black with a red cross means there is no connection with the GPS device,
• - Red means the GPS is connected but no GPS position is available,
• - Yellow means 2D reception. A GPS position has been acquired, The NVX200 Navigator is ready for navigation, but the GPS is using enough satellites for calculating the horizontal position only. Elevation data is not provided, and the position error may be significant.
22
• - Green means 3D reception. The GPS receiver has enough satellites to calculate altitude. Position is generally correct (yet it can still be inaccurate due to different environmental factors). The NVX200 Navigator is ready for navigation.
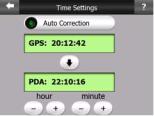
4.3.4 Time synchronization
In the top right corner of the screen you have another button that leads to a new screen where you can synchronize the clock of your PND to the very accurate time provided by the connected GPS.
Turn on the Auto Correction switch to let The NVX200 Navigator frequently check and correct the PND time with the GPS time.
Below that button you will see the current values of the GPS and the PND clocks.
You can check here whether any correction is needed. Tap the  button to manually synchronize the time.
Below the PND time you have  and
and  controls to manually correct the time with or without a valid GPS time. It also gives you the chance to correct the time after synchronization if your PND does not support time zones or daylight saving time.
You can also use these buttons if you prefer to set the PND time from this screen instead of using the time setup features of the operating system.
4.4 The map
The most important and most frequently used screens of The NVX200 Navigator are the two screens with the map (Map screen and Cockpit screen). They are similar in look and in possible controls but are optimized for different uses. The map they display is common. The elements of the map are described here. For the controls and special functions of the two map screens see 4.5.
The current version of The NVX200 Navigator is primarily intended for land navigation. That is why maps in The NVX200 Navigator look similar to paper roadmaps (when using daytime colors and 2D map mode). However, The NVX200
23

Navigator provides much more than regular paper maps can. The look and the contents can be changed.
4.4.1 2D and 3D map views
Besides the classical top down view of the map (called 2D mode), you have the possibility to tilt the map to have a perspective view (3D mode) that gives a view similar to that seen through the windscreen with the possibility to see far ahead.
It is easy to change between 2D and 3D modes. You have two options. You can use hardware buttons (Error! Reference source not found.) or the semi-transparent screen icons (4.5.3) to tilt the map seamlessly between 2D and all 3D angles, or you can use the switch in the Quick menu (4.7.2.1) to quickly switch between the two modes.
Note: You may find that 2D mode is more useful in North-up Map mode when looking for a certain part of the map or an object to select as destination. On the other hand, 3D mode in Track-up Cockpit mode with Smart Zoom makes navigation very comfortable. The description of these modes will come later in this manual.
Note: Using the Advanced settings, you can force Map mode to always start in 2D North-up view and/or Cockpit mode to always start in 3D Track-up view (5.6.1). You can still rotate and tilt the maps in either mode, but the next time you enter this screen, the preset look will reappear.
4.4.2 Zoom levels
The NVX200 Navigator uses high quality vector maps that let you see the map at various zoom levels, always with optimized content (the density of the map details can be independently set for Map and Cockpit screens in Map settings (5.2.2)). Street names and other text objects are always displayed with the same font size, never upside down, and you only see as many streets and objects as needed to find your way around the map. Zoom in and out to see how the map changes in either the 2D or 3D view.
Changing the scale of the map is very easy. You can drag and stretch the scale (4.5.6) at the bottom of the Map screen, use hardware buttons (Error! Reference source not found.) or semi-transparent screen icons (4.5.2) on both Map and Cockpit screens.
Note: If you need to zoom out briefly to locate your position on the map, use the Overview mode instead of zooming out and back in. The Overview mode is a 2D North-up view that can be started by tapping the compass button on the right (see 4.5.8).
Note: The NVX200 Navigator has a special Smart Zoom function for navigation that automatically rotates, scales and tilts the map in 3D map mode to always give you
24
the optimal view in your current situation. When approaching a turn, it will zoom in and raise the view angle to let you easily recognize your maneuver at the next junction. If the next turn is at a distance, it will zoom out and lower the view angle to flat in order to let you see the road in front of you.
4.4.3 Daylight and night color schemes
The different color schemes let you adjust The NVX200 Navigator to the brightness of the environment. Use the daylight and night color schemes accordingly. Daylight colors are similar to paper roadmaps, while the night color schemes use dark tints for large objects to keep the average brightness of the screen low, with carefully selected colors to still keep you informed about all the necessary information on the screen.
You can change between day and night views manually in the Quick Menu (4.7.2.3) or let The NVX200 Navigator do it automatically (5.1.3) for you.
Note: The automatic day/night mode is based upon the current date and GPS position by which The NVX200 Navigator calculates the exact sunrise and sunset times on the particular day at the particular location. Using that information The NVX200 Navigator can automatically switch between the color schemes a few minutes before sunrise, when the sky has already turned bright, and a few minutes after sunset before it gets dark.
Tip: There are several daytime and night color schemes included with The NVX200 Navigator. To select the one that suits your needs the best, make your selection in Settings (5.2.1).
Note: The colors mentioned and screenshots included in this manual refer to the default daytime and night color schemes. They may not look the same in the schemes you have chosen.
Tip: If you use The NVX200 Navigator after sunrise or before sunset, look for the sun in the sky in the map background using a flat 3D view. It is displayed at its actual position to give you another way to orientate, and also to provide some eye candy.
25
4.4.4 Streets and roads
The similarity of The NVX200 Navigator to paper roadmaps is also convenient when it comes to streets, the most important elements of the map concerning navigation. The NVX200 Navigator uses similar color codes to those you are accustomed to, and the width of the streets also refers to their importance, so it will not be difficult to tell a highway from a small street.
Streets and roads have names or numbers for identification. Of course, this information can be displayed on the map. The NVX200 Navigator uses two different ways to show street labels. The conventional way is the same as a roadmap – it displays the name of the street aligned with the street. The alternative is a kind of virtual signpost stuck into the street itself.
You need not choose between the two modes. The NVX200 Navigator will use the one best for the current tilt and zoom level. Zoom in to have only a few streets on the map, and start tilting up and down to see how The NVX200 Navigator switches between the two modes in an instant.
Note: The automatic switching is on even when using Smart Zoom. At first you may find it odd, but later you will discover how it adjusts the displayed information to the current view of the map. It is important, as the driver must be able to read the map at a glance.
Tip: If you do not want to be bothered by street names during navigation, turn them off on the Map Settings screen (5.2.4).
Tip: Major roads usually have alternative names (numbering) besides the primary name. You can choose whether to display these alternative names or not. You can set this in Map settings (5.2.3).
4.4.5 Other objects
To help orientate you, the map also contains objects that have no other navigating function than to help you recognize your location on the map. These are surfacewaters, large buildings, forests, etc.
Tip: These objects are normally displayed using textured polygons that look natural to the eye. Should you have a slow PND, you may wish to switch the textured display off (5.2.5) to free some of the resources of your PND by replacing textures with plain colored surfaces.
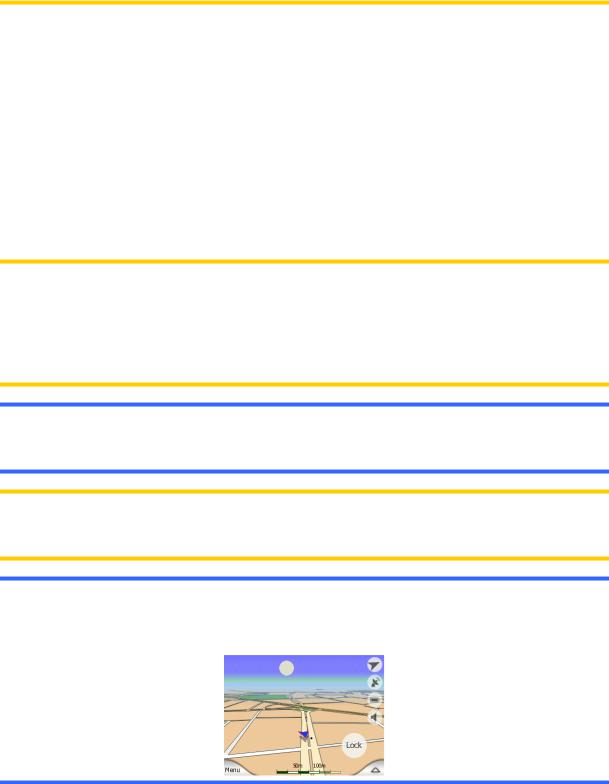
4.4.6 Current position and Lock-on-Road
When your GPS position is available, a blue arrow (yellow when using night colors) shows your location on the map. The direction of the arrow represents your heading.
26
 Loading...