


VM9314
Operating Instructions
CLOSE PIC
VM9314
SRC
MUTE
DISP
PTT
WIDE TILT
EJECT
A / V
INPUT
® |
160 |
watts peak |
|
|
40W x 4 |
|
|
|

VM9314
ii

VM9314
CONTENTS
Thank you for choosing a Jensen product. We hope you will find the instructions in this owner’s manual clear and easy to follow. If you take a few minutes to look through it, you’ll learn how to use all the features of your new Jensen VM9314 Mobile Multimedia Receiver for maximum enjoyment.
Features................................................................................................................................ |
1 |
Optional Equipment .............................................................................................................. |
3 |
Warnings............................................................................................................................... |
4 |
Anti-Theft Feature ................................................................................................................. |
5 |
Controls and Indicators ......................................................................................................... |
7 |
Remote Control.................................................................................................................... |
9 |
Using the TFT Monitor ........................................................................................................ |
11 |
Operating Instructions......................................................................................................... |
14 |
iPod Voice Control .............................................................................................................. |
19 |
Setup Menu......................................................................................................................... |
21 |
Tuner Operation.................................................................................................................. |
28 |
DVD/VCD Video Operation................................................................................................. |
32 |
DVD/CD Audio Operation ................................................................................................... |
41 |
MP3 Operation .................................................................................................................... |
45 |
Viewing JPEG Photos......................................................................................................... |
50 |
MPEG Movie Playback ....................................................................................................... |
51 |
XM® Radio Operation ......................................................................................................... |
53 |
iPod Operation .................................................................................................................... |
58 |
Bluetooth Operation ............................................................................................................ |
62 |
Rear Camera Function........................................................................................................ |
71 |
Troubleshooting .................................................................................................................. |
72 |
Specifications...................................................................................................................... |
76 |
iii

VM9314
iv

VM9314
FEATURES
Congratulations on your purchase of the Jensen VM9314 Mobile Multimedia Receiver.
It’s a good idea to read all of the instructions before beginning the installation. We recommend having your Jensen VM9314 installed by a reputable installation shop.
DVD
•Aspect Ratio - Full and Normal
•Fast Forward - 2X, 4X, 8X and 20X
•Slow Motion - 2X, 4X, 8X and 20X
•Play, Pause, Stop, Next Chapter and Previous Chapter
CD / MP3 / WMA
•CD-Text Compatible
•ID3 Tag Compatible
•Directory Search (MP3 / WMA Only)
•Direct Track Access via Remote Control
•Burn up to 1500 MP3 and WMA Files onto a DVD+R / RW
•Audible Forward / Reverse Track Search (CD-DA Only)
•Random, Repeat and Intro
•Play, Pause, Stop, Next Track and Previous Track
HD RadioTM Tuner
•U.S.A. / Europe Frequency Spacing
•30 Station Presets (18 FM / 12 AM)
•Auto Stereo / Mono
•Local / Distance
•Auto Store / Preview Scan
XM Radio Ready
•Requires XM CNP2000UC and CNPJEN1 (Both Sold Separately)
•XM Channel Name, Artist, Song and Categories Displayed on TFT Screen
iPod
•iPod via USB
•High Speed Direct Connect Interface to Access iPod Playlists, Artists, Albums and Songs. Play music and view video/photo* files from your iPod. *Video/photo playback requires jLink-USB iPod interface cable (sold separately).
•Power Management Charges iPod while Connected
1

VM9314
Chassis
•1.0 DIN (Import / ISO-DIN Mountable)
•Motorized Flip-Out / Flip-Up LCD Screen
•8 Character / Segment Type Secondary LCD Display
•7" TFT Active Matrix LCD
•1,152,000 Sub Pixels (480 x 2400)
•Screen Tilt / Angle Adjustment
•Heat Management System - Forced Air-Cooling to Keep the Chip-Sets Operating at Nominal Temperatures
General
•iPod Voice Control
•Navigation Ready (NAV102)
•Bluetooth Ready (with purchase of BTM15) providing hands-free profile for safety / convenience and A2DP profile for streaming music from a PDA / PMP
•44-Key Infrared Remote Control
•One Composite Video Output for Additional Screens
•Front Panel Audio/Video Input
•Three-Band Tone Control (Bass, Mid and Treble) with Eight Preset EQ Curves
•Front Panel A/V Aux Input for Portable Media Devices
•Front, Rear and Subwoofer Line Output
•Programmable Volume Control
•Rear Camera Input (Normal and Mirror Image View)
•Touch Screen Calibration Mode
•2VRMS Line Output - All Channels
•Rotary Encoder Audio Control
•SWC Interface – Compatible with PAC adapter SWI-PS Steering Wheel Control Interface, sold separately
*HD Radio™ Technology Manufactured Under License From iBiquity Digital Corporation. U.S. and Foreign Patents. HD Radio™ and the HD and HD Radio logos are proprietary trademarks of iBiquity Digital Corporation.
2

VM9314
OPTIONAL EQUIPMENT
•NAV102
The VM9314 is "navigation ready." Before accessing any navigation features, you must purchase and install the navigation module (NAV102). All installation and operating instructions will be included with the navigation module.
Once the navigation module is connected and operating properly, the NAV source mode will become active. While the navigation module is not installed, the NAV option appears gray, indicating the function is not available.
•Satellite Radio Tuner
See “XM® Radio Operation” on page 53.
•BTM15
Before you can connect to a Bluetooth enabled device, you must purchase and install the Jensen BTM15.
•Bluetooth Phone
See “Bluetooth Operation” on page 62.
•Rear Camera
The VM9314 is "camera ready." Before accessing any camera features, you must purchase and install a rear video camera. Once the rear camera is connected and operating properly, the CAMERA source mode will become active. While the camera is not installed, the CAMERA option appears gray, indicating the function is not available.
3
VM9314
WARNINGS
WARNING! Never install this unit where operation and viewing could interfere with safe driving conditions.
WARNING! To reduce the risk of a traffic accident (except when using for rear view video camera) never use the video display function while driving the vehicle. This is a violation of federal law.
WARNING! Never disassemble or adjust the unit.
WARNING! To prevent injury from shock or fire, never expose this unit to moisture or water.
WARNING! Never use irregular discs.
WARNING! To prevent damage to the mechanism inside this unit, avoid impact to the TFT monitor.
WARNING! The monitor employs an automatic motorized mechanism. To prevent damage to the core mechanism, please do not push, pull or swivel the monitor manually.
4
VM9314
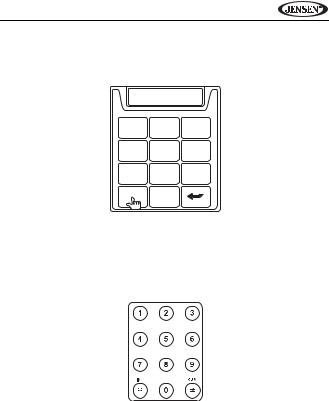
ANTI-THEFT FEATURE
The VM9314 is equipped with an anti-theft feature requiring the user to enter a password upon initial power on.
*
1 2 3
4 5 6
7 8 9
C
Entering the Default Password
The default user password is 012345 (6 digits). Enter the password using the on-screen keypad and then press the arrow (enter) button. You can also use the remote control keypad to enter the password.
Press the >/|| button (30) on the remote control to confirm.
5
VM9314
Changing the Password
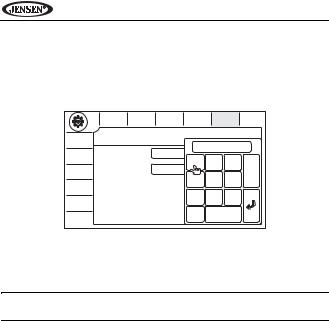
To change the SECURITY password using the touch screen, perform the following steps:
1.Touch the  button to view the “SETUP” menu.
2.Touch SECURITY to view the “SECURITY” sub-menu.
|
TIME |
SCREEN |
THEME |
SWC |
SECURITY VERSION |
|
|
SECURITY |
|
|
|
|
|
P.VOL |
|
|
|
|
|
|
|
|
|
|
Please input password |
||
AUDIO |
Password |
|
**** |
|
|
|
|
|
1 |
2 |
3 |
||
|
|
|
|
|||
VIDEO |
Factory Settings |
Restore |
|
|
Exit |
|
|
|
|
|
|
||
|
|
|
|
|
|
|
|
|
|
|
4 |
5 |
6 |
BT |
|
|
|
|
|
|
|
|
|
|
7 |
8 |
9 |
DVD |
|
|
|
|
|
|
|
|
|
|
0 |
|
Clear |
RADIO |
|
|
|
|
|
|
3.Enter the current password (default is 012345) and touch the arrow (enter) key.
4.Touch the “Password” field to open the on-screen keypad.
5.Enter a new 6-digit password and press the arrow (enter) button.
NOTE: If you forget your password, contact Customer Service at 1-800- 323-4815 for assistance.
6
VM9314
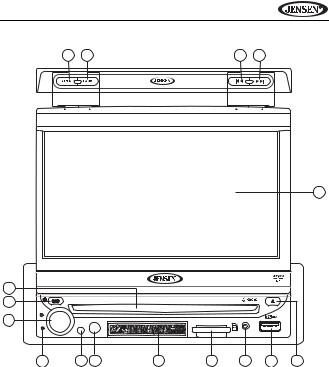
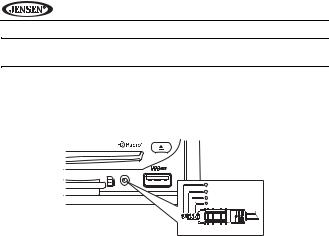
CONTROLS AND INDICATORS
1. Rotary Encoder
Rotate to adjust the volume. While in the audio menu, press and release to enter and/or confirm audio settings.
Press to activate the MUTE function and silence the receiver. Press again to resume sound.
2. SRC
Press to turn the unit on. Press and hold to turn the unit off. When on, press to view the SOURCE menu.
3.IR Remote Control Receiver
4.USB Interface Connector
Connect a USB device for playback of music/video files.
5.TFT Display
6.3.5mm A/V Input
Attach a compatible A/V device.
7.DISC SLOT
8. EJECT
EJECT
Press to eject a disc.
Press and hold to reset core mechanism position.
9. SD Card Slot
Insert an SD/MMC card for playback of music/video files.
10. RESET
Press to reset system settings to factory default (except the password and parental lock setting).
11.LCD Display
12.TILT/ >>|
Press to activate the tilt function. Use the rotary encoder to make adjustments while the yellow tilt icon is flashing.
With the monitor closed, press to seek forward.
7

VM9314
13. WIDE/ |<<
Press to adjust the display aspect of the picture to one of two settings: Full, Normal or STANDBY.
With the monitor closed, press to seek backward.
When the NAV102 is connected to the VM9314, press and hold to display the navigation user interface. The TFT screen must be open for this function to operate.
14. PIC/BAND
Press and hold to view the setup menu. Touch “Screen” to adjust dimmer and backlight picture settings (see “SCREEN Sub-menu Features” on page 22).
With the monitor closed, press BAND to change between AM, FM or three XM bands.
15. CLOSE/OPEN
Press to activate the automatic mechanical system and move the TFT monitor into viewing position. Press again to close the TFT.
16. PTT/DISP
Press to activate the iPod Voice Control Feature.
With the monitor closed, press to view alternate LCD display information.
When the NAV102 is connected to the VM9314, press and hold to display the navigation user interface. The TFT screen must be open for this function to operate.
8
VM9314
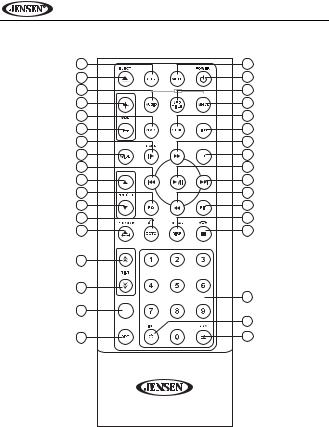
REMOTE CONTROL
15 |
14 |
CLOSE |
PIC |
13 |
12 |
WIDE |
TILT |
5
7
2 |
VM9314 |
|
|
|
|
|
|
|
|
|
|
|
|
|
|
|
|
|
|
|
|
EJECT |
|
MUTE |
|
|
|
|
|
|
|
1 |
DISP |
|
|
|
|
A / V |
|
|
|
|
|
|
|
|
|
|
|
PTT |
|
|
|
INPUT |
|
|
|
|
|
|
|
|
|
10 |
3 |
16 |
11 |
9 |
6 |
4 |
8 |
9
VM9314
See remote control tables in various sections for button functions.
8 |
|
|
3 |
35 |
|
|
4 |
5 |
|
iPod |
9 |
|
MUSIC |
PHOTO |
VIDEO |
16 |
|
|
13 |
23 |
|
|
1 |
15 |
|
|
2 |
30 |
|
|
14 |
28 |
|
|
31 |
17 |
|
|
18 |
11 |
|
|
19 |
32 |
|
|
22 |
12 |
|
|
24 |
21 |
|
|
10 |
25 |
|
|
20 |
27 |
|
|
|
26 |
|
|
|
|
|
|
29 |
6 |
PTT |
|
|
|
|
|
34 |
7 |
|
|
33 |
|
|
10 |
|

VM9314
USING THE TFT MONITOR
Open/Close TFT Monitor
Open TFT Monitor
Press the OPEN button (15) on the front panel or press the (
 ) button (25) on the remote control to activate the mechanism that moves the display panel into the viewing position.
Close TFT Monitor
Press the OPEN button (15) on the front panel or press the (
 ) button (25) on the remote control to load the display panel back into the compartment.
TFT Monitor Auto Open
If “TFT Auto Open” is set to “Auto” when the unit is turned on, the monitor automatically moves to the viewing position.
If “TFT Auto Open” is “Off” when the unit is turned on, press the OPEN button
(15) or (
 ) button (25) on the remote control to move the monitor into the viewing position.
If “TFT Auto Open” is set to “Manual”, the TFT will not close when the key is turned off.
Monitor Tilt Angle Adjustment
A known characteristic of LCD panels is the quality of the display in relationship to the viewing angle. The monitor angle can be adjusted for optimum viewing using one of the following methods:
Step by Step Angle Adjustment
• Press the ( ) or ( ) button on the remote control to adjust the tilt angle of the screen one step at a time.
•Press the TILT button (12) on the unit. While the yellow tilt icon is flashing, turn the rotary encoder to adjust the screen angle.
Continuous Angle Adjustment
Press and hold the ( ) or ( ) button on the remote control to adjust the tilt angle in a continuous motion.
11
VM9314
Aspect Ratio
Press the DISP button (10) on the remote control or WIDE button (13) on the monitor to adjust the aspect ratio as follows:
FULL
The entire screen is extended horizontally to the aspect ratio of 16 to 9. The extension ratio is the same at any point.
NORMAL
The conventional display image has a 4 to 3 ratio of horizontal to vertical, leaving a blank area on the right and left sides of the display.
STANDBY
Screen becomes black. Touch screen to resume.
Parking Brake Inhibit
When the pink "Parking" wire is connected to the vehicle Parking Brake circuit, the front TFT monitor will display video when the Parking Brake is engaged. (When the pink wire is grounded via the Parking Brake circuit, video will be displayed.)
Monitor Movement Mechanism
If an obstruction occurs in the monitor path, the following protective measurements can be executed to prevent damage to the mechanism or monitor:
Table 1: Monitor Protective Measures
Obstruction |
Self Protection |
|
OPEN Button |
Power |
|
Pressed |
Reconnected |
||
|
|
|
||
|
|
|
|
|
|
|
|
|
|
Monitor loading |
Monitor is automati- |
|
Monitor fully |
Monitor is automati- |
out horizontally |
cally loaded into unit |
|
extended horizon- |
cally loaded into unit |
|
|
|
tally |
|
|
|
12 |
|
|

VM9314
Table 1: Monitor Protective Measures
Obstruction |
Self Protection |
OPEN Button |
Power |
|
Pressed |
Reconnected |
|||
|
|
|||
|
|
|
|
|
|
|
|
|
|
Monitor loading in |
Unit stops at |
Monitor fully |
Monitor is automati- |
|
horizontally |
obstruction point |
extended horizon- |
cally loaded into unit |
|
|
|
tally |
|
|
Monitor loading |
Unit stops at |
Monitor swivels |
Monitor swivels |
|
out vertically |
obstruction point |
back to the unit |
back to the unit |
|
Monitor loading in |
Unit stops at |
Monitor swivels |
Monitor swivels |
|
vertically |
obstruction point |
back to the unit |
back to the unit |
After the protective procedure is executed, normal operation is resumed by pressing the OPEN button (15) or disconnecting and reconnecting the power.
13
VM9314
OPERATING INSTRUCTIONS
Power On / Off
Press the  /SRC button (2) on the unit (or the
  button (4) on the remote control) to turn the unit on. The buttons on the front of the unit light up and the current mode status appears in the LCD (11). You can also turn on the unit by pressing the OPEN button (15) and opening the TFT screen.
Press and hold the  button to power off the unit.The monitor is drawn back into the main compartment.
Remote Control Functions
Table 2: Common Remote Control Functions
SRC |
|
|
|
Select playing source |
||||
MUTE |
|
|
|
Toggle audio output on/off |
||||
|
|
|
|
|
|
|
|
|
POWER/ |
|
|
Turns the power on/off |
|||||
|
||||||||
|
|
|||||||
|
||||||||
|
|
|
|
|
|
|
|
|
VOL - |
|
|
|
Decreases volume |
||||
VOL + |
|
|
|
Increases volume |
||||
MENU |
|
|
|
View SOURCE menu |
||||
|
|
|
|
|
|
|
|
|
SETUP |
|
|
|
View the system setup menu |
||||
|
|
|
|
|
|
|
|
|
| |
|
|
|
|
|
|
Screen navigation (does not apply to all screens/menus) |
|
| |
|
|
|
|
||||
|
|
|
|
|
|
|
|
|
/|| |
|
|
|
Enter command during menu navigation or Play/Pause |
||||
|
|
|
|
|
|
|
|
Open/close TFT monitor |
|
|
|
|
|
|
|
|
|
1-9, 0, *, # |
Direct entry |
|||||||
PIC |
|
|
|
View setup menu and touch “SCREEN” to adjust auto dimmer and |
||||
|
|
|
|
|
|
|
|
backlight |
OPEN/CLOSE |
Open/close TFT monitor |
|||||||
|
|
|
|
|
|
|
|
|
EQ |
|
|
|
Access equalizer menu |
||||
/ |
b |
Adjust monitor angle up/down |
||||||
|
|
|
|
|
|
|
|
|
PTT |
|
|
|
Push to talk |
||||
|
|
|
|
|
|
|
|
|
14
VM9314
Mute/Line Mute
Press the rotary encoder button (1) on the front panel or the MUTE button (3) on the remote to mute the volume from the unit. Press the rotary encoder button again to restore the volume. “MUTE” is displayed on the LCD. Adjusting the volume or using any of the audio setup features cancels the mute function.
If the “MUTE” wire is connected, audio output mutes when a telephone call is received by the car phone (using optional BTM15) or when verbal navigation is played (using optional NAV102).
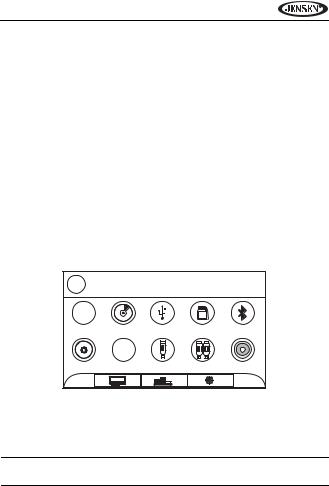
Playing Source Selection
When the monitor is closed, press the SRC button on the front panel (2) or remote control (8) to change between available audio playing sources in the following order: RADIO, DISC, USB/iPod, SD, BT, NAV, SAT, AUX1, AUX2 and CAMERA. The mode is displayed on the LCD screen.
Source Menu
You can also use the touch screen to change the source through the SOURCE MENU. To access the SOURCE MENU, touch the top left corner of the screen or press the SRC button on the front panel (2) or remote control (8).
HD |
SOURCE |
MENU |
|
|
HD |
|
|
8GB |
|
RADIO |
DISC |
USB/iPod |
SD |
BT |
N |
|
|
|
|
W E |
XM |
|
|
|
|
|
|
|
|
S |
|
|
|
|
NAV |
SAT |
AUX1 |
AUX2 |
CAMERA |
|
|
EQ |
|
|
Touch the RADIO, DISC, USB/iPod, SD, BT, NAV, SAT, AUX1, AUX2 or CAMERA button to select the corresponding source.
You can also use voice control to select a source. See “iPod Voice Control” on page 19.
NOTE: When an iPod/iPhone is attached to the USB port, “IPOD” appears instead of the text “USB/iPod.”
15
VM9314
NOTE: You can press and hold to drag the “Source Menu” icons and rearrange them based on your preference
External Devices
External peripheral devices, including a game console, camcorder, navigation unit, iPod, Zune, etc. can be connected to this unit via RCA output using the A/V Media Adapter Cable (included).
EJECT
A / V
1 Right Audio
2 Left Audio
3 Ground
4 Video
3.5mm A/V Cable (not included)
Connect the external device to the A/V Media Adapter Cable and then plug the cable into the A/V INPUT connector (6) on the front of the radio. Select “AUX 1” mode to access the front A/V input or “AUX 2” mode for the rear aux input. You cannot directly control external devices connected to the A/V INPUT. For information regarding the use of USB/SD devices, see “Inserting a USB Device” or “Accessing an SD Card” on page 46.
Micro SD Slots (for service use only)
The micro SD slot, located behind the monitor, cannot be used for file playback. This input is for use by service professionals only for software updates.
Volume Adjustment
Volume Increase/Decrease
To increase or decrease the volume level, turn the rotary encoder (1) on the front panel or press the VOL-/+ buttons (15, 16) on remote control. When the volume level reaches “0” or “40”, a beep sounds, indicating that the adjustment limit has been reached. The LCD or TFT screen displays the volume level for 3 seconds.
16
VM9314
Programmable Turn-On Volume
This feature allows the user to select a turn-on volume setting regardless of the volume setting prior to turning the unit off. To use this feature, the TFT monitor must be displayed.
To program a specific turn-on volume level, turn the rotary encoder (1) to adjust the volume to the desired turn-on volume. Push and hold the rotary encoder while the yellow speaker icon and level indication is displayed on the screen. The unit will beep to confirm your turn-on volume setting.
Audio Control Menu
The Audio Control feature allows you to easily adjust your audio system to meet the acoustical characteristics of your vehicle, which vary depending on the type of vehicle and its measurements. Proper setting of the Fader and Balance boosts the effects of the cabin equalizer.
Touch the  EQ button on the screen or press the EQ button (32) on the remote control to display the audio menu.
 EQ EQ
EQ EQ
EQ |
|
FADER / BALANCE |
|
BASS MID |
TREB |
PRESETS |
|
+12 |
+12 |
Dance |
Acoustic |
|
|
Hip hop |
Rock |
0 |
0 |
|
|
|
|
Rave |
Latin |
-12 |
-12 |
User |
Urban |
 EQ EQ
EQ EQ
EQ |
|
FADER / BALANCE |
LOUD |
SUB.W |
Front |
On |
+7 |
|
Off |
|
|
|
Left |
Right |
SUB.W |
0 |
|
On |
|
|
Off |
-7 |
Rear |
•The EQ menu appears by default. Touch “FADER / BALANCE” to view the second screen and adjust LOUD, SUB.W and FADER settings.
17

VM9314
•Use the touch screen to adjust the settings for an audio feature.
Table 3: Audio Adjustments
Audio Function |
Adjustable Range |
|
|
|
|
EQ |
Dance |
|
|
Hip hop |
|
(NOTE: The “User” |
Rave |
|
setting is automati- |
|
|
User |
||
cally selected when |
||
individual BASS, |
Acoustic |
|
MID and TREB set- |
Rock |
|
tings are modified.) |
|
|
Latin |
||
|
||
|
Urban |
|
BASS |
-12 to +12 |
|
MID |
-12 to +12 |
|
TREB (treble) |
-12 to +12 |
|
SUB.W |
-7 to +7 |
|
FAD |
Grid |
|
BAL |
Grid |
The Audio menu will automatically exit after a few seconds of inactivity. To exit quickly, touch the top left corner of the screen.
System Reset
To correct a system halt or other illegal operation, use the |
[RESET] Button |
tip of a pen to press the reset button (10) located on the |
|
front bottom-right corner of the unit. After a system reset, |
|
the unit restores all factory default settings. |
|
NOTE: If the unit is reset while a DVD is playing, the DVD resumes play once the reset is complete.
18

VM9314
iPod VOICE CONTROL
You can navigate your iPod/iPhone music library and change the source/mode using the latest in voice recognition technology, allowing you to enjoy a more handsfree experience so you can focus on driving.
The VM9314 is provided with a high quality active microphone for voice control. This microphone should be mounted as close to the driver as possible, preferably on the visor directly above the driver, for best voice recognition.
NOTE: Upon initial connection, depending on the number of songs and the size of iPod/iPhone storage, the index time (radio retrieving and storing song information from the iPod/iPhone for voice control access) may require a few minutes to read all the data for a large song collection. Future indexing time will be shorter, as the radio will only add to the information that has changed since the last index.
Along with a predefined set of basic voice commands, the iPod voice control system can also interpret keywords to determine if you’re searching for a particular song or artist.
Acceptable Commands
•iPod Playback Controls
•Play
•Pause
•Stop
•Next
•Previous
•iPod Artist and Song Title
•Plus natural speech keyword recognition
•Source/mode selection
•Radio (HD Radio)
•Satellite (XM Radio)
•USB
•iPod
•SD
•Bluetooth
•DVD
•Navigation
19

VM9314
Basic Voice Operation
1.To activate the voice control function, touch the PTT button on screen or on the remote control (7). The PTT button is located on the left side of most screens, but is not present on all screens.
2.The system displays the voice icon along with the text “Please say your command” at the top of the screen.
3.The system “listens” for a command for 5 seconds.
4.Speak a command into the microphone within 5 seconds.
•If speech is not detected, the system displays “No speech.”
•If the speech is not recognized, the system displays “Not recognized.”
•If the speech is recognized, the system displays the command at the top of the screen and carries out the requested operation.
5.Repeat previous steps, as necessary.
NOTE: While we have a very sophisticated voice recognition algorithm in the VM9314, voice commands must be spoken clearly and distinctly. Outside variables such as wind noise and conversation in the automobile may affect the radio's ability to recognize speech commands. We advise attempting voice commands with the windows closed.
Using Natural Speech to Access your iPod/iPhone Music Library
While in iPod/iPhone mode, you can use natural speech to access the music library. The voice control system can recognize keywords and retrieve and play the desired song or artist.
For example, you can say “I’d like to hear some Nirvana” and the system will search for Nirvana songs and play them in the order retrieved. You can even get more specific and say “How about Smells Like Teen Spirit by Nirvana” and the system will search for and play the specified song, provided the the song is present in the music library.
Steering Wheel Control
The VM9314 offers the option to re-program one of your steering wheel controls to operate as the "PTT" (Push To Talk) control on the VM9314, allowing for a truly hands-free music management experience. See “SWC (Steering Wheel Control) Sub-menu Features” on page 23.
20
VM9314
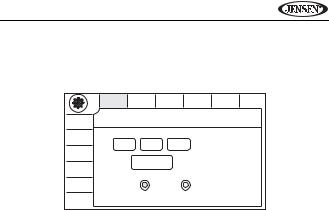
SETUP MENU
To access system settings, touch the  button on the screen to enter the setup menu. The “TIME” sub-menu appears highlighted in yellow.
|
TIME |
SCREEN |
THEME |
SWC |
SECURITY VERSION |
|
|
TIME |
|
|
|
|
|
P.VOL |
|
|
|
|
|
|
AUDIO |
Jan |
01 |
2009 |
|
|
|
|
|
|
||||
VIDEO |
|
|
|
|
|
|
|
|
|
7:46 PM |
|
|
|
BT |
|
|
|
|
|
|
DVD |
Clock Mode |
|
12-hour |
24-hour |
|
|
RADIO |
|
|
|
|
|
|
Accessing Menu Items
Touch to select a sub-menu (Screen, Theme, SWC, etc.).
The features available for adjustment under the highlighted sub-menu option will appear in the center of the screen.
Adjusting a Feature
1.Use the touchscreen to select the feature to be adjusted.
2.Touch to select an option for the feature you want to adjust.
21
 Loading...