


NAVIGATION SYSTEM
Publication Part No. JJM18 05 32 801
This handbook forms part of the Owner literature supplied with your new vehicle. The Quick start section is designed to rapidly familiarise the driver with the initial set up and also explain some of the unique features. Please take the time to study the operating instructions with your vehicle as soon as you can.
Important
The information contained in this handbook describes all software operations. Some of the options may not be supplied with your vehicle unless they formed part of the original vehicle specification. Therefore some parts of this handbook may not apply to your vehicle. Furthermore, due to printing cycles, it may include descriptions of options before they become generally available.
The options, hardware and software in your vehicle are from the available specifications for the market in which the vehicle was intended for sale. If your vehicle is to be used in another geographical area you may have to modify the vehicle specification to suit local conditions. Jaguar Cars Limited is not responsible for the cost of any modifications.
The information contained in this publication was correct when it went to print. Vehicle design changes may have been made after this handbook was printed. When this occurs a handbook supplement is added to the literature pack. Subsequent updates can be viewed on the Jaguar Internet site at; www.ownerinfo.jaguar.com.
In the interest of development, the right is reserved to change specifications, design or equipment at any time without notice and without incurring any obligations. This publication, or part thereof, may not be reproduced nor translated without our approval. Errors and omissions excepted.
© Jaguar Cars Limited 2007
All rights reserved.
Published by Jaguar Technical Communications
2

Handbook Contents
Quick Start
Quick Start . . . . . . . . . . . . . . . . . . . . . . 5
Navigation System
Navigation – Overview. . . . . . . . . . . . . . 7
Basic Screen Displays. . . . . . . . . . . . . 14
Screen Types . . . . . . . . . . . . . . . . . . . 22
Navigation Menu . . . . . . . . . . . . . . . . . 24
Route Setting . . . . . . . . . . . . . . . . . . . 25
Route Options . . . . . . . . . . . . . . . . . . . 30
Set Up Menu . . . . . . . . . . . . . . . . . . . . 34
Destination Entry . . . . . . . . . . . . . . . . . 39
Points of Interest (POI) . . . . . . . . . . . . 47
Stored Locations . . . . . . . . . . . . . . . . . 54
Route Calculation . . . . . . . . . . . . . . . . 62
Storing Way Points . . . . . . . . . . . . . . . 64
Route Guidance . . . . . . . . . . . . . . . . . 66
End User Licence Agreements . . . . . . 69
A comprehensive index is located at the back of this handbook.
3
4
Quick Start
NAVIGATION
Caution: The screen allows touch control of the navigation system. The screen only requires a light touch to operate the function. Excess pressure on the screen could result in damage. On initial activation, make sure that both the correct country and area have been selected.
Route Preferences should be selected prior to setting a destination. Access is via the Nav menu and then
Route Options.
Setting a destination
To set a destination and start using the the navigation system, use the following procedure:
JAG0674
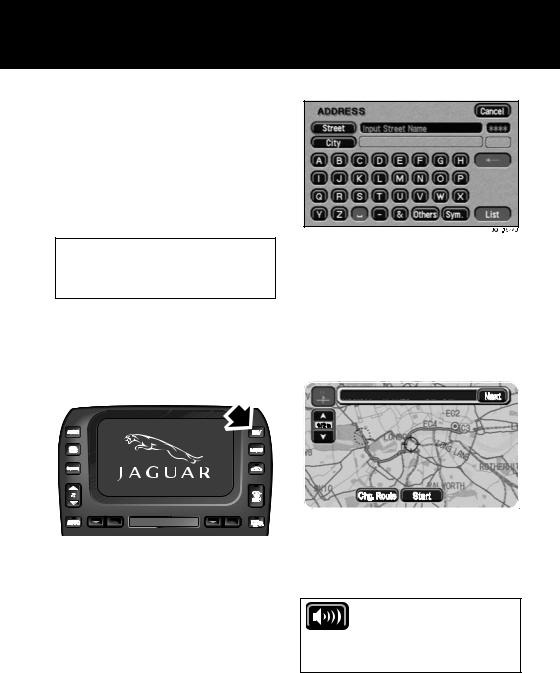
1.Press the NAV button (arrowed in illustration) and, when prompted, touch Agree on the touch-screen to access the initial map screen.
2.Touch Nav menu to access the navigation menu and then touch
Destination Entry.
3.Touch the either Address icon.
4.Enter the address using the on-screen keypad. Touch OK to confirm.
5.Touch Dest to calculate the route.
6.Once the most appropriate route is calculated, the screen will display the route. To scroll through alternative routes, touch Next on the screen.
N |
Route1: |
4.4MLS |
Oh |
6m |
JAG0676 |
|
|
|
|
7.Touch Start to commence navigation. Drive away following the voice guidance.
Press the Audible repeat
button to hear the last voice guidance instruction again.
Voice guidance can be selected or deselected via the Nav menu.
5

Quick Start
8.When your destination is reached, voice and visual confirmation is given.
Cancelling guidance
To cancel guidance during navigation, touch the zoom icon, select Change Route then Cancel Guidance.
6

Navigation – Overview
SAFETY INFORMATION
Do not use the system until you have familiarised yourself with its operation.
The requirements of the Road Traffic Regulations (RTR) apply.
Observation of traffic signs and local traffic regulations always take priority.
Traffic guidance is restricted to passenger vehicles. Special driving recommendations and regulations for other vehicles (e.g. commercial vehicles) are not taken into account. The destination must only be entered when the vehicle is stationary.
The road safety warning is displayed each time the ignition is switched on, and the navigation system is selected.
To use the system, read the warning and touch Agree.
!WARNING:
The navigation Database reflects reality as existing before you receive the Database and it comprises data and information from government and other sources, which may contain errors and omissions. Accordingly, the Database may contain inaccurate or incomplete information due to the passage of time, changing circumstances, and due to the nature of the sources used. The Database does not include or reflect information on - amongst other things - neighbourhood safety, law enforcement, emergency assistance, construction work, road or lane closures, vehicle or speed restrictions, road slope or grade, bridge height, weight or other limits, road or traffic conditions, special events, traffic congestion or travel time.
!WARNING:
Only operate, adjust or view the system when it is safe to do so.
Note: In some countries the front seat passenger may enter data whilst the vehicle is in motion
7
Navigation – Overview
INTRODUCTION
The navigation system will guide the driver to a specific location on a map. The location can be selected in a number of ways, from entering an address to touching the location on the touch-screen map.
The area covered by the navigation system depends on which version of the Navigation System DVD is loaded. The driver is directed to the destination by voice guidance and/or the on-screen instructions.
A navigation system DVD can cover many countries, or for larger countries, contain several search areas. To ensure you are using the correct country or search area, see SEARCH AREA/COUNTRY CHANGE, page 38.
Declaration of Conformity
This navigation system conforms to the standard, Directive 99/5/EC.
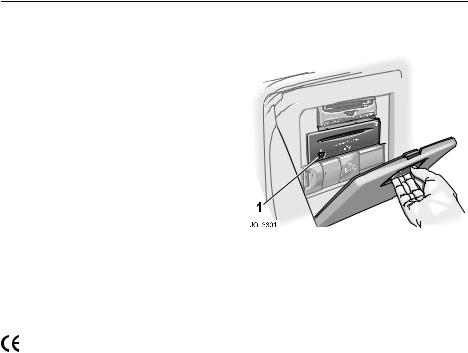
Loading the navigation DVD
Note: The ignition must be switched on (position I).
1.In the luggage compartment, pull the top of the access cover forward and fold it down to the fully open position.
2.Identify the navigation unit (highlighted above) which is positioned above the sound system CD player (where fitted).
3.If a DVD is already loaded, push the eject button (1).
4.Load the Navigation System DVD with the printed side upwards. Do not allow moisture or foreign objects to enter the slot.
5.Fold the access cover to the fully closed position.
8

Navigation – Overview
ERRORS IN VEHICLE POSITION
Under certain driving conditions, it is possible that the vehicle position shown on the map display may be incorrect. Some examples are shown below:
•When the vehicle is transported by ferry or train.
•Driving on steep roads.
•After vehicle battery removal or supply fuse failure.
•When using snow chains.
•After the tyres have been replaced.
•After the vehicle has been rotated on a turntable.
•Where there are two roads parallel to each other.
•Elevated roads in proximity to other roads.
•Driving up or down circular ramps in car parks.
The position will usually be corrected automatically. If the problem persists, see CALIBRATION, page 35, or consult your Jaguar Dealer/Authorised Repairer.
9

Navigation – Overview
HOW THE SYSTEM WORKS
The system uses signals from the Global Positioning System (GPS) satellites, which allow the approximate position of the vehicle to be calculated. This is combined with information from vehicle sensors and data from the Navigation System DVD to establish the true vehicle position.
GPS signals are highly directional and reception may occasionally be interrupted.
Some examples of situations likely to cause problems are shown below:
•Inside tunnels.
•Inside buildings.
•Roads under raised highways.
•Densely tree-lined roads.
•Forest roads between mountains.
•Between tall buildings.
•Roads under cliffs.
•Metal objects placed on the rear parcel shelf.
•Having the vehicle windows tinted using metal oxide tinting. Non-metal tinting should be used.
10
Navigation – Overview
ROUTE GUIDANCE POSITION
Under certain driving conditions, it is possible that the route guidance may be inaccurate. Some examples are shown below:
•Route guidance may occasionally be given where no turn is required.
•Deviation from a route may cause incorrect guidance until the route has been recalculated.
•If there is no road or only a narrow track to the final destination, guidance will be given to the nearest point possible.
•No guidance is given while reversing.
•If driving at high speed or on very dense road networks, it may not be possible to recalculate the route in time for the next instruction.
•On familiar roads, personal route preferences may not always be followed.
USING THE SYSTEM
Caution: If the system is used for an extended period of time with the vehicle stationary, ensure that the engine is running, to avoid draining the battery.
For best results, always use the latest version of the Navigation System DVD (navigable map database).
Map information is regularly updated, but all areas are not necessarily covered to the same level of detail. Some areas, in particular private roads, may not be included on the database (non-digitised roads).
While driving under route guidance, follow an instruction only when it is safe to do so, as the system cannot be aware of changing conditions, for example turn restrictions, roadworks or diversions. Use voice guidance as much as possible, and only view the display when driving conditions permit.
In-car telephone features
In this handbook, some features shown are only available when the vehicle is fitted with the Jaguar in-car telephone installation. These features include the display of the telephone button, the end call button and one-touch dialling of POI (point of interest) numbers or memory points.
11

Navigation – Overview
TIME AND DISTANCE TO DESTINATION
When a route is calculated, the estimated time required to drive the route and the total distance to the destination are determined. The time is based on the vehicle travelling at the current speed settings for each type of road (residential, main road and freeway). The distance is based on the current route preference settings, e.g. Use Toll Roads Yes/No, see ROUTE PREFERENCES, page 31.
While driving under guidance, the estimated time (if selected) and distance remaining to the end of the route are shown on the screen.
ALTERNATIVE ROUTES
During route calculation, up to three possible routes are calculated. The first route is calculated using the current route preference settings. The second route is also calculated using the preference settings, except that for Minimise Time/ Dist., the alternative setting is used. For example, if Minimise Time is currently selected, then the second route will be calculated based on Minimise Distance, with the other settings as selected. For the third route, the system tries to find another alternative using different combinations of the preference settings. If a suitable alternative is not possible, only the first and second routes will be shown.
LANGUAGES AND DISTANCE UNITS
The screen text and voice guidance are available in a number of different languages. For the list of available languages, see CHANGING THE DISPLAY LANGUAGE, page 37.
Distances are shown on the screen and given in voice guidance, either in Metric units (kilometres and metres) or in Imperial units (miles). For information on changing the selection, see the touchscreen section of the owner’s handbook.
CITY NAME LISTS
After entering a street name, the matching city entries found in the database are shown. Each entry includes some or all of the following: district name, city name, and county name.
12

Navigation – Overview
CONTROL PANEL
XJ control panel shown.
1.Touch-screen.
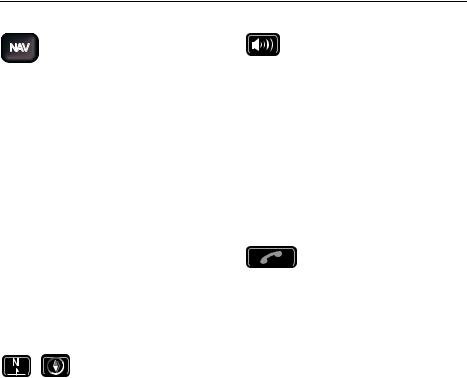
2.NAV (Navigation) button
Navigation forms part of the overall vehicle telematics system, having a combined front panel and LCD screen (1). Navigation is selected by pushing the NAV button (2). The ignition must be switched on (position I).
Note: The navigation system is operated by using the buttons displayed on the screen. For an explanation of the basic navigation buttons, see FUNCTION OF ON-SCREEN CONTROL ICONS,
page 21.
13
Basic Screen Displays
SCREEN DISPLAYS
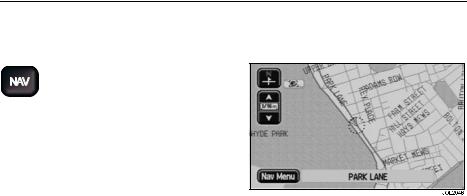
NAV button
Press the NAV button to select the navigation system.
The road safety caution will be displayed. Touch Agree to acknowledge this information (see SAFETY INFORMATION, page 7).
Note: While the navigation system is selected, the NAV button has the following additional functions:
•Selects the initial map display from any other screen.
•After scrolling, returns the map display to show the current vehicle position again.
INITIAL MAP SCREEN
After touching Agree, the initial map screen showing the vehicle location is displayed, with the current road name shown in the text area at the bottom of the screen.
SETTING A ROUTE on page 25 gives an example of how to use the system to navigate to your chosen destination.
14
Basic Screen Displays
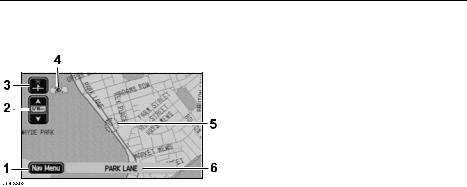
INITIAL MAP DISPLAY
The initial map screen shows the current vehicle position. A key to the main features is given below:
1.Nav Menu button – Touch button to select the Navigation menu.
2.Zoom button – Control and indication of the current map zoom level. The scale length represents a distance of from 50 metres to
256 kilometres (1/32 mile to
128 miles).
3.Map orientation – Touch button to change the map orientation (north or vehicle heading to the top of the screen). Above the 4 kilometres
(2 miles) zoom level, only north orientation is available.
4.GPS icon – Indicates that insufficient GPS satellite signals are being received for accurate map positioning. The icon is not displayed under normal operation.
5.Navigation icon – The map normally indicates the current vehicle position. While the system is in use various icons are displayed, see FUNCTION OF ON-SCREEN CONTROL ICONS, page 21.
6.Lower text area – Shows the current street name (present vehicle location). While operating the system, this text area is replaced by additional buttons. In certain locations (e.g. private roads) no road name will appear.
Note: For an explanation of the basic navigation buttons, see FUNCTION OF ON-SCREEN CONTROL ICONS, page 21.
15

Basic Screen Displays
SCROLLING THE MAP
To scroll the map, use the touch-screen as follows:
•Touch the screen twice within
5 seconds. The cross-wire icon (1) is displayed, and the map scrolls until the point being touched is under the cross-wire icon. The address below the cross-wire is displayed in the upper text area (2).
Continuous scrolling
•Touch and hold at any point on the screen. The map continues to scroll while the screen is being touched.
Zoom button operation
When the zoom button is touched, the scale indicator is shown on the screen. The scale markings
shown on the indicator are: 50 m, 1 km, 8 km, 256 km (1/32, ½, 4,
128 miles).
The zoom button can be used in a number of ways as follows:
•Touch and hold one of the arrow buttons. The map is displayed at each zoom level in turn.
•Touch one of the arrow buttons repeatedly. The map is only displayed at the final zoom level.
•Touch one of the segments of the scale indicator. The map is displayed at the zoom level selected.
FUNCTION OF THE ONSCREEN BUTTONS
This is a summary of the basic navigation buttons. Buttons specific to a particular screen or function are explained in the appropriate chapter of this handbook.
All the navigation buttons, except the NAV button, are touch buttons displayed on the screen.
Note: For information on how to operate the buttons, see the touch-screen section of the owner’s handbook.
Nav Menu button
Displays the Navigation menu, see NAVIGATION MENU, page 24.
Cancel button
Returns to the previous menu, text screen, or to the map display.
16
Basic Screen Displays
NAV button
The NAV button has the following functions:
•Selects the navigation system.
•While the navigation system is selected, selects the initial map display from any other screen.
•After scrolling, returns to the map display of current vehicle position.
Note:
1.If the navigation system was selected when the ignition was switched off, it will be selected automatically when the ignition is switched on again.
2.When switching back to navigation from another touch-screen system, pushing NAV will return to the particular screen being displayed before.
Map orientation buttons
These buttons select the
desired map orientation (north or vehicle heading
to the top of the screen). The current selection is shown on the map.
Note: Above the 4 kilometres (2 miles) zoom level, only north orientation is available.
Audible repeat button
While under guidance, repeats the last audible instruction and shows the relevant junction diagram (if in range).
Note:
1.If the manoeuvre point has been passed, the audible instruction for the next manoeuvre point will be heard.
2.Repeat is also available while one of the other touch-screen systems is selected (but not during a telephone call nor on the TV screen).
Telephone button
Calls the telephone number currently shown on the screen. Only available when a Jaguar telephone is fitted
17
Basic Screen Displays
ADDITIONAL BUTTONS
After touching the screen once, additional buttons are displayed.
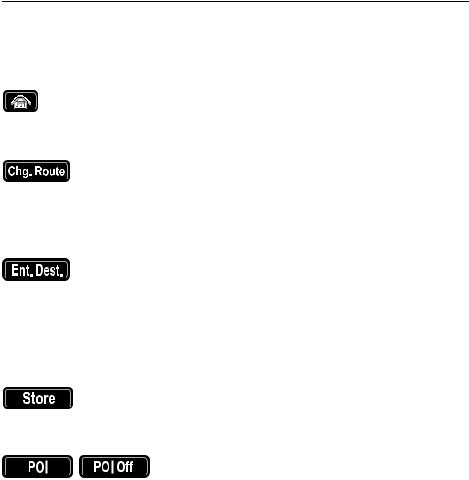
Home button
Sets a route to the home position. (Only displayed when a home position is set.)
Chg. Route button
Displays the Route Options menu for changing the route preference settings. (Only displayed when a route is set.)
Ent. Dest. button
Stores a selected map location as a destination.
see CONFIRM DESTINATION, page 28. (Displayed in place of the Chg. Route button, after touching the screen twice within
5 seconds.)
Store button
Stores a selected map location as a memory point.
POI/POI Off buttons
POI – Selects the quick points of interest function to display POI icons on the map.
POI Off – Deselects the display of icons.
Note: For more information see Points of Interest (POI) on page 47.
VOLUME ADJUSTMENT
The volume level of the audible instructions can be adjusted if required, by rotating the volume control. See the audio section of the owner’s handbook for more information.
Note: The radio must be switched on to adjust the volume of the audio instructions. When the radio is switched off, the volume ‘+’ and ‘–’ buttons are disabled.
18
Basic Screen Displays
MENUS |
NAME LISTS |
|
|||||||||||
|
|
|
|
|
|
|
|
|
|
|
|
|
|
|
|
|
|
|
|
|
|
|
|
|
|
|
|
|
|
|
|
|
|
|
|
|
|
|
|
|
|
|
|
|
|
|
|
|
|
|
|
|
|
|
|
|
|
|
|
|
|
|
|
|
|
|
|
|
|
|
|
|
|
|
|
|
|
|
|
|
|
|
|
|
|
|
|
|
|
|
|
|
|
|
|
|
|
|
|
|
|
|
|
|
|
|
|
|
|
|
|
|
|
|
|
|
|
|
|
|
|
|
|
|
|
|
|
|
|
|
|
|
|
|
|
|
|
|
|
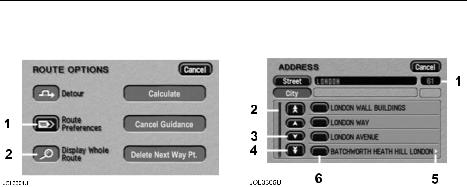
Menu screens are provided to select the various system functions. The Route Options menu is shown above as an example.
•To select a menu item, use the button (1) for the option required.
After selecting a menu item, the next sub-menu or screen will be displayed. If a menu item cannot currently be selected, it will be disabled, as shown (2).
Lists of names (for example streets, citys or points of interest), are displayed as shown in the example above. The number of items in the list is displayed (1), and the indicator (2) shows the current position in the list.
•To scroll through the list, one item at a time, touch one of the single arrow buttons (3). (The double arrow buttons [4] scroll one page at a time.)
•To view the remainder of a long entry, touch anywhere on the text. The symbol (5) at the start or end of the line indicates more text.
•To make a selection from the list, use the button for the item required (6).
19
Basic Screen Displays
CHARACTER INPUT |
|
NUMBER INPUT |
|
||||||||||||||||||||
|
|
|
|
|
|
|
|
|
|
|
|
|
|
|
|
|
|
|
|
|
|
|
|
|
|
|
|
|
|
|
|
|
|
|
|
|
|
|
|
|
|
|
|
|
|
|
|
|
|
|
|
|
|
|
|
|
|
|
|
|
|
|
|
|
|
|
|
|
|
|
|
|
|
|
|
|
|
|
|
|
|
|
|
|
|
|
|
|
|
|
|
|
|
|
|
|
|
|
|
|
|
|
|
|
|
|
|
|
|
|
|
|
|
|
|
|
|
|
|
|
|
|
|
|
|
|
|
|
|
|
|
|
|
|
|
|
|
|
|
|
|
|
|
|
|
|
|
|
|
|
|
|
|
|
|
|
|
|
|
|
|
|
|
|
|
|
|
|
|
|
|
|
|
|
|
|
|
|
|
|
|
|
|
|
|
|
|
|
|
|
|
|
|
|
|
|
|
|
|
|
|
|
|
|
|
|
|
|
|
|
|
|
|
|
|
|
|
|
|
|
|
|
|
|
|
|
|
|
|
|
|
|
|
|
|
|
|
|
|
|
|
|
|
|
|
|
|
|
|
|
|
|
|
|
|
|
|
|
|
|
|
|
|
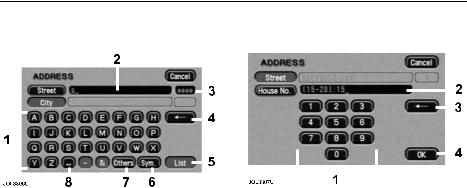
•Enter the desired name by touching each button in turn (1).
The characters entered are displayed on the screen (2). As characters are entered, only the characters available to complete names stored in the database are shown highlighted.
It is not necessary to enter all the characters. The number of possible names from the characters entered is shown (3). When greater than ‘9999’ then ‘****’ is shown.
•To delete the last character, touch Delete (4).
•Touch List (5) (when active) to view the available names.
•To enter special characters, touch
Sym (6).
•To enter accented characters, touch
Others (7).
•To enter a space, touch Space (8).
•Enter the desired number by touching each button in turn (1).
The digits entered are displayed on the screen (2).
•To delete the last digit, touch Delete (3).
•When all the digits have been entered, touch OK (4). The next screen will be displayed.
IMPORTANT: Further information on using these screens for specific functions, e.g. destination entry, is given in the appropriate chapters of this handbook.
20
Basic Screen Displays
FUNCTION OF ON-SCREEN CONTROL ICONS
The screen icons used by the system are explained below:
Navigation icon – Indicates the current vehicle position and heading.
Cross-wire icon – This icon is displayed when the map is scrolled to select a destination or point (map cursor location).
Destination icon – Indicates the current route destination
Next manoeuvre point –
Indicates the location of the next instruction on the route ahead.
Next turn icon – Shows the action to be taken at the next manoeuvre point on the route ahead. (A typical example is shown.)
Roundabout icon – Shows the
direction to be taken at the next roundabout. The number in the
centre of the arrows shows the route direction; a ‘2’ indicates the second exit should be taken, a ‘3’ indicates the third exit, etc.
North up icon – Indicates that the map is displayed with north to the top of the screen.
Heading up icon – Indicates that the map is displayed with the
vehicle heading to the top of the screen. The position of the pointer indicates the direction of north on the map.
Avoid area or point – The left-hand icon indicates an area to be avoided in route
calculations. The right-hand icon indicates an avoid point.
Way point icon – Indicates the location of a way point on the map.
Home position icon – Indicates the location on the map that is currently stored as the home position.
Stored location icon – Indicates the location of a memory point.
This is the default icon used when the point is stored. (If required an icon of your own choice can be selected from the 15 icons available.)
GPS icon – Indicates that
insufficient GPS satellite signals are being received
for accurate map positioning. The icon is not displayed under normal operation.
21

|
|
Screen Types |
|||
MAP SCREEN |
|
GUIDANCE SCREEN (TURN |
|||
|
|
|
ARROWS) |
||
|
|
|
|
|
|
|
|
|
|
|
|
|
|
|
|
|
|
|
|
|
|
|
|
•Choose Display Options from the Navigation menu and select split screen or full screen.
Split screen
When set to split screen, the map display always shows the guidance screen overlay while a route is set.
Full screen
When set to full screen, the screen normally shows the map display, with the next turn icon in the top right-hand corner. Before each manoeuvre point, the guidance screen overlay is displayed automatically. (The overlay can also be displayed manually by touching the Guidance Screen button.)
The guidance screen overlay is always displayed while the Split Screen option is selected, and is also displayed when selected manually while the Full Screen option selected.
Two guidance screen options are available: Turn Arrows and Turn List
•To select an option, choose Display Options from the Navigation menu.
When set to Turn Arrows, before each manoeuvre point, the guidance screen overlay shows the next junction diagram.
22
 Loading...