


X-TYPE
OWNER’S HANDBOOK
Publication Part No. JJM 10 02 20 801
This handbook forms part of the Owner literature supplied with your new vehicle. Left-hand drive and right-hand drive conditions may be shown in the graphics and where information is specific to a particular country, it is indicated as such.
The Quick start section is designed to rapidly familiarise the driver with the initial set up and also explain some of the unique features. Please take the time to study the operating instructions with your vehicle as soon as you can.
Important
The information contained in this handbook covers all vehicle derivatives and optional equipment. Some of the options may not be fitted to your vehicle unless they formed part of the original vehicle specification. Therefore some parts of this handbook may not apply to your vehicle. Furthermore,due to printing cycles, it may include descriptions of options before they become generally available.
The options, hardware and software in your vehicle are from the available specifications for the market in which the vehicle was intended for sale. If your vehicle is to be used in another geographical area you may have to modify the vehicle specification to suit local conditions. Jaguar Cars Limited is not responsible for the cost of any modifications.
The information contained in this publication was correct when it went to print. Vehicle design changes may have been made after this handbook was printed. When this occurs a handbook supplement is added to the literature pack. Subsequent updates can be viewed on the Jaguar Internet site at; www.ownerinfo.jaguar.com.
In the interest of development, the right is reserved to change specifications, design or equipment at any time without notice and without incurring any obligations. This publication, or part thereof, may not be reproduced nor translated without our approval. Errors and omissions excepted.
©Jaguar Cars Limited
All rights reserved.
Published by Jaguar Technical Communications.
2

Contents
Quick Overview
Quick Overview . . . . . . . . . . . . . . . . . . . 7
Filling Station Information . . . . . . . . . . 29
Owner Information
General Information. . . . . . . . . . . . . . . 32
Health and Safety . . . . . . . . . . . . . . . . 40
Security and Locks
Starter Switch . . . . . . . . . . . . . . . . . . . 42
Vehicle Security. . . . . . . . . . . . . . . . . . 43
Door Locks . . . . . . . . . . . . . . . . . . . . . 47
Luggage Compartment Locks . . . . . . 52
Alarm Systems . . . . . . . . . . . . . . . . . . 54
Before Driving
Occupant Protection . . . . . . . . . . . . . . 56
Child Safety . . . . . . . . . . . . . . . . . . . . . 66
Seats . . . . . . . . . . . . . . . . . . . . . . . . . . 76
Clock . . . . . . . . . . . . . . . . . . . . . . . . . . 82
Steering Column . . . . . . . . . . . . . . . . . 84
Door Windows. . . . . . . . . . . . . . . . . . . 85
Mirrors . . . . . . . . . . . . . . . . . . . . . . . . . 88
Luggage Compartment . . . . . . . . . . . . 90
On the Road
Instruments . . . . . . . . . . . . . . . . . . . . . 94
Warning Indicators . . . . . . . . . . . . . . . 96
Audible Warnings . . . . . . . . . . . . . . . 101
Message Centre . . . . . . . . . . . . . . . . 102
Trip Computer . . . . . . . . . . . . . . . . . . 105
Cruise (Speed) Control . . . . . . . . . . . 108
Exterior Lighting . . . . . . . . . . . . . . . . 110
Interior Lighting . . . . . . . . . . . . . . . . . 114
Parking Assist . . . . . . . . . . . . . . . . . . 116
Horn. . . . . . . . . . . . . . . . . . . . . . . . . . 119
Sunroof . . . . . . . . . . . . . . . . . . . . . . . 120
Wipers and Washers . . . . . . . . . . . . . 121
Parkbrake . . . . . . . . . . . . . . . . . . . . . 124
Interior Features . . . . . . . . . . . . . . . . 125
Engine Starting . . . . . . . . . . . . . . . . . 129
Transmission . . . . . . . . . . . . . . . . . . . 131
Braking System . . . . . . . . . . . . . . . . . 134
Stability Control. . . . . . . . . . . . . . . . . 136
Driving Information . . . . . . . . . . . . . . 137
Fuel and Refuelling . . . . . . . . . . . . . 142
Climate Control
Climate Control . . . . . . . . . . . . . . . . 149
Automatic Climate Control . . . . . . . 152
Touch-screen Climate Control . . . . 156
Roadside Emergency
Inertia Switch . . . . . . . . . . . . . . . . . . 165
Emergency Starting . . . . . . . . . . . . . 166
Wheel Changing . . . . . . . . . . . . . . . 169
Vehicle Recovery . . . . . . . . . . . . . . . 175
Bulb Renewal. . . . . . . . . . . . . . . . . . 179
Fuses . . . . . . . . . . . . . . . . . . . . . . . . 185
Fire Extinguisher . . . . . . . . . . . . . . . 193
Maintenance
General Maintenance. . . . . . . . . . . . 194
Bonnet Release . . . . . . . . . . . . . . . . 194
Regular Checks . . . . . . . . . . . . . . . . 196
Checking and Top-up . . . . . . . . . . . 198
Battery . . . . . . . . . . . . . . . . . . . . . . . 205
Wiper Blades . . . . . . . . . . . . . . . . . . 209
Tyres . . . . . . . . . . . . . . . . . . . . . . . . 210
Vehicle Care. . . . . . . . . . . . . . . . . . . 215
Electrical Accessories . . . . . . . . . . . 218
Specifications
Engine Data . . . . . . . . . . . . . . . . . . . 219
Weights . . . . . . . . . . . . . . . . . . . . . . 220
Load Weights. . . . . . . . . . . . . . . . . . 223
Dimensions . . . . . . . . . . . . . . . . . . . 224
Wheels and Tyres . . . . . . . . . . . . . . 225
Fuel Consumption . . . . . . . . . . . . . . 226
Touch-screen
Touch-screen. . . . . . . . . . . . . . . . . . 227
Touch-screen Display . . . . . . . . . . . 229
Audio System
Audio System . . . . . . . . . . . . . . . . . 233
Steering Wheel Controls . . . . . . . . . 235
Radio . . . . . . . . . . . . . . . . . . . . . . . . 236
Single CD Player . . . . . . . . . . . . . . . 250
Compact Disc Changer . . . . . . . . . . 253
3

Contents
Telephone
Telephone Introduction . . . . . . . . . . . 257
Telephone System . . . . . . . . . . . . . . 260
Telephone Operation - Standard . . . 264
Telephone Operation - Touch-screen 268
Phone Book. . . . . . . . . . . . . . . . . . . . 273
Declaration of Conformity . . . . . . . . . 275
Voice Control
JaguarVoice . . . . . . . . . . . . . . . . . . . 276
A comprehensive index is located at the back of this handbook.
4

Quick Overview
Quick Overview
LOCKING AND UNLOCKING . . . . . . . . 7 CENTRAL DOOR LOCKING . . . . . . . . . 8 LUGGAGE COMPARTMENT . . . . . . . . 8 CLOCK AJUSTMENT . . . . . . . . . . . . . . 9 SEATS . . . . . . . . . . . . . . . . . . . . . . . . . 10 WINDOWS/DOOR MIRRORS . . . . . . . 11 AUTO-DIMMING REAR VIEW
MIRROR . . . . . . . . . . . . . . . . . . . . . . . 11 DRIVING POSITION MEMORY . . . . . . 12 STEERING COLUMN LOCK ADJUSTMENT . . . . . . . . . . . . . . . . . . 12 SEAT BELTS/CHILD RESTRAINTS . . 13 OVERHEAD CONSOLE . . . . . . . . . . . 13 CLIMATE CONTROL . . . . . . . . . . . . . 14 FACIA AND CONTROLS . . . . . . . . . . . 16 EXTERIOR LAMPS/TRIP
COMPUTER . . . . . . . . . . . . . . . . . . . . 19 WIPERS AND WASHERS . . . . . . . . . . 20 WARNING INDICATORS . . . . . . . . . . 21 AUTOMATIC TRANSMISSION . . . . . . 22 CRUISE (SPEED) CONTROL . . . . . . . 23 DYNAMIC STABILITY CONTROL
(DSC) . . . . . . . . . . . . . . . . . . . . . . . . . . 23 AUDIO SYSTEM KEY FEATURES . . . 24 RADIO OPERATION . . . . . . . . . . . . . . 25 CD OPERATION . . . . . . . . . . . . . . . . . 25 TELEPHONE - BLUETOOTH
SYSTEM . . . . . . . . . . . . . . . . . . . . . . . 27
Filling Station Information
FUEL TYPE . . . . . . . . . . . . . . . . . . . . . 29 FUEL FILLING . . . . . . . . . . . . . . . . . . . 29 BONNET RELEASE . . . . . . . . . . . . . . 30 UNDERBONNET TOP-UP . . . . . . . . . 30 TYRE PRESSURES . . . . . . . . . . . . . . . 31
5
6
Quick Overview
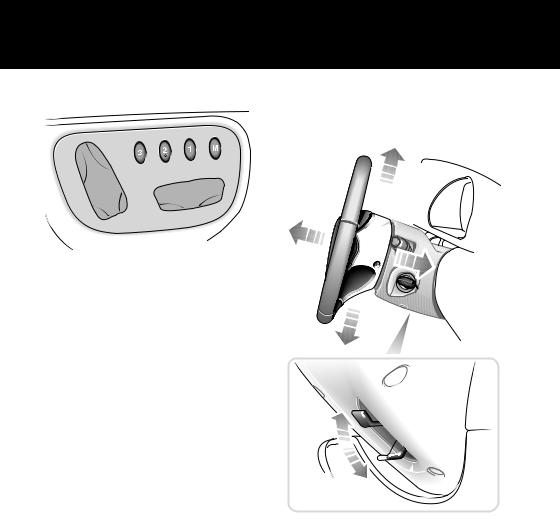
LOCKING AND UNLOCKING
Note: Dependent upon vehicle configuration, the operation of the remote handset may differ from the following.
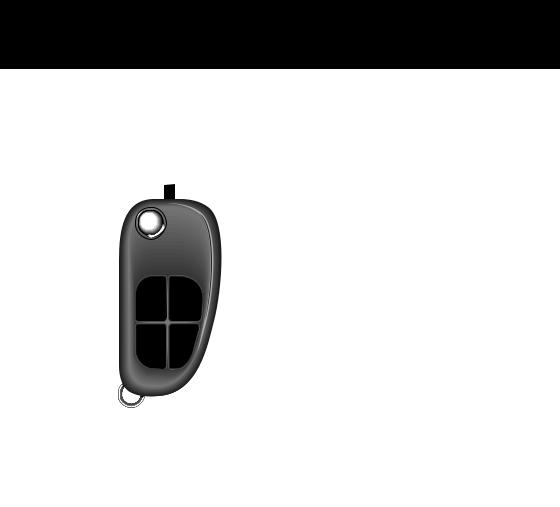
Remote handset
JAG0667 |
Press to release door key.
Press once to lock the vehicle and arm the alarm.
Press twice within three seconds to double-lock the vehicle.
Press and hold to close the sunroof and any open windows (Global closing).
Press once to disarm the alarm, unlock the driver’s door and unlock the luggage compartment.
Press again to unlock remaining doors.
Press and hold to open the sunroof and windows (Global opening).
Press once to switch the headlamps on for 25 seconds.
Press to unlock and open luggage compartment.
Unlocking mode alternatives
Single stage unlocking will unlock the vehicle with a single press. Two stage unlocking will unlock the driver’s door and luggage compartment with a single press and all other doors with a second press.
To change between modes, press and hold the lock and unlock buttons on the remote handset simultaneously for four seconds. The direction indicators will flash twice to confirm the change.
Unlocking with the door key
If the vehicle is unlocked manually via the door lock, the key must be inserted into the starter switch within 15 seconds to prevent the alarm being activated.
7
Quick Overview
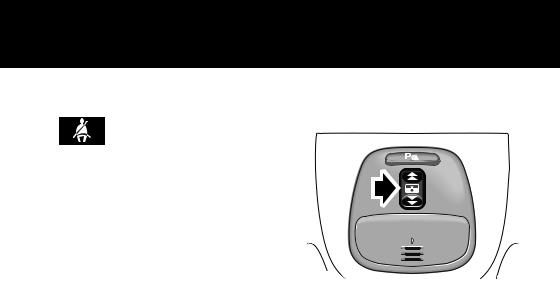
CENTRAL DOOR LOCKING
JAG0668
To lock all the doors, press the lock lever on either of the front doors.
To unlock all doors, pull the lock lever on either of the front doors.
Drive away door locking
The doors and luggage compartment will automatically lock when the vehicle’s forward speed exceeds 7 km/h (5 mph).
This feature can be disabled by your Jaguar Dealer/Authorised Repairer.
LUGGAGE COMPARTMENT
The luggage compartment is electrically locked and unlocked in conjunction with the driver’s door.
To open the luggage compartment with the vehicle locked, press the luggage
compartment button on the remote handset.
1
2
JAG0669
To open the luggage compartment with the vehicle unlocked, press the release button 1 on the luggage compartment lid/tailgate.
Tailgate glass - Estate
To open the tailgate glass, press the release button 2, located on the reverse of the tailgate handle and lift the glass.
Care Point
•The release button on the luggage compartment lid/tailgate is disabled when the vehicle is alarmed.
8
Quick Overview
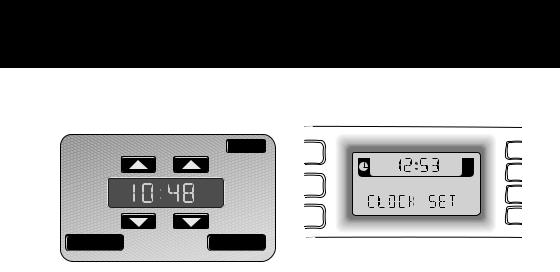
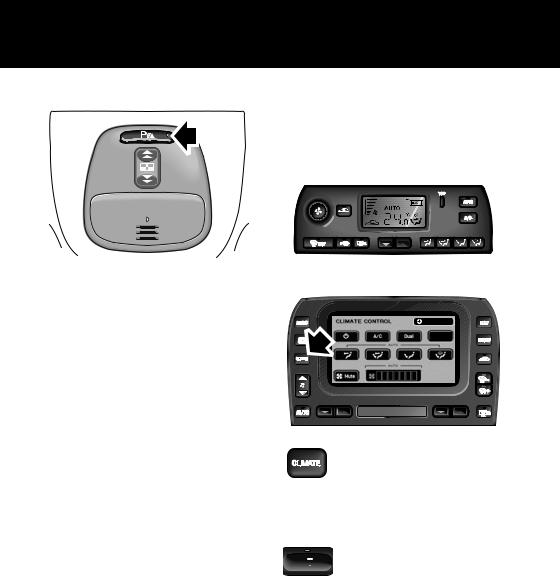
CLOCK AJUSTMENT
Touch-screen
SET CLOCK |
Cancel |
|
PM |
12/24 |
Set |
JAG0804 |
|
1.Press the MENU button on the touch-screen surround to access the MENU screen.
2.Touch System setup to access the
System setup screen.
3.Touch the Set clock icon.
4.Adjust the time by touching the hour and minute up or down arrow icons.
5.Touch the 12/24 icon to select between twelve or twenty-four hour display.
6.Touch Set to confirm.
Non-touch-screen
PM
TP ST
JOL4693
1.Repeatedly press and release the MODE button (on the audio unit) until until ADV MODE N/Y is displayed.
2.Rotate the volume control to select ADV MODE YES and then press
MODE.
3.CLOCK SET will be displayed with the 12/24 hours indicator flashing. Rotate the volume control clockwise for 24-hour display; counterclockwise for 12-hour display.
4.Press MODE to select the hour setting. Rotate the volume control clockwise or counterclockwise to adjust the setting.
5.Press MODE to select the minutes setting. Rotate the volume control clockwise or counterclockwise to adjust the setting.
6.To exit press and hold MODE or wait approximately five seconds until the display reverts to audio mode.
9
Quick Overview
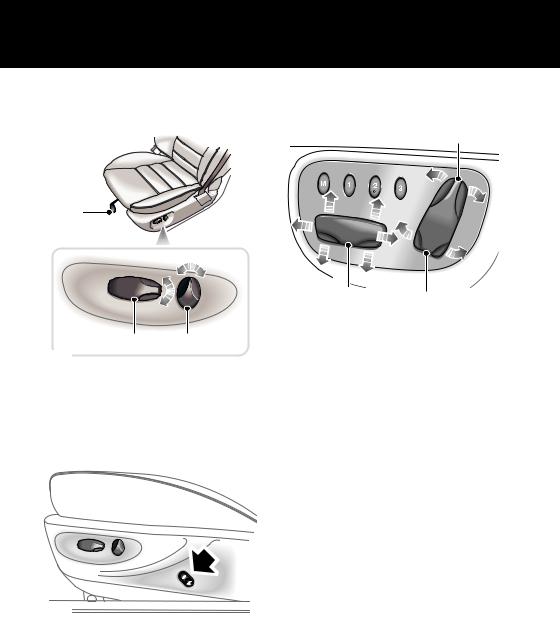
SEATS
4-way electrical seat adjustment
1
2 3
JAG0768
1.Seat fore/aft lever. Lift and slide into position.
2.Seat height switch.
3.Seat back angle switch.
6-way electrical seat adjustment
JAG0769 |
6-way seat adjustment controls are the same as the 4-way, but the occupant benefits from a further switch (arrowed). To increase lumbar support press the top of the switch, to decrease press the bottom.
10-way electrical seat adjustment - memory seats
|
3 |
|
1 |
2 |
|
JAG0770 |
||
|
1.Seat position switch. Controls fore/aft position and front and rear cushion height.
2.Seat back angle switch.
3.Lumbar support switch.
Passenger seat
The 10-way adjustable passenger seat is not fitted with memory buttons.
10
Quick Overview
WINDOWS/DOOR MIRRORS
1 |
JAG0715 |
Windows |
The windows can be fully opened or closed with a single operation of the switch.
•To open the window, fully press the respective switch. Press the switch again to stop the window from fully opening.
•To close the window, pull the switch fully up. Pull the switch again to stop the window from fully closing.
To partially open a window, lightly press the appropriate switch and release when the window reaches the required position.
Press button 1 to inhibit the operation of the rear window switches.
Global closing
If a window has been left open when leaving the vehicle, it can be closed by pressing and holding the lock button on the remote handset (this will also close the sunroof).
Door mirrors
|
3 |
1 |
2 |
|
|
JAG0716 |
|
Select the appropriate mirror using selector switch 2. Use the 4-way switch 1 to adjust the position of the mirror glass.
Power fold mirrors
The mirrors can be folded towards the door for better clearance/protection. With the starter switch in position I or II, press button 3 to fold the mirrors. A second press returns the mirrors to their normal position.
AUTO-DIMMING REAR-VIEW MIRROR
With the starter switch on, the rear-view mirror will automatically darken to counteract glare from the headlamps of a following vehicle.
This feature is automatically switched off when reverse gear is selected.
11
Quick Overview
DRIVING POSITION MEMORY |
STEERING COLUMN LOCK |
|
ADJUSTMENT |
|
Steering column |
JAG0806
Once you have adjusted the driver’s seat and exterior mirrors for your ideal driving position, the vehicle can memorise these settings for future use.
1.With the starter switch in position I or II press the M button on the driver’s seat switch pack. A chime will sound to indicate that the seat is in memory mode.
2.Within five seconds, press button 1, 2 or 3 to memorise the current settings.
A double chime will sound to confirm that the settings are memorised. Any existing settings will be overwritten.
To recall a memorised driving position press button 1, 2 or 3. This feature will only operate if the automatic transmission is in P (Park) or N (Neutral), or the starter switch is off in vehicles with manual transmission.
JAG0712
Push the steering column adjustment lever downwards.
Move the steering wheel to the required position then fully raise the lever to lock the steering column in position.
12
Quick Overview
SEAT BELTS/CHILD
RESTRAINTS
A warning indicator on the
instrument pack will illuminate to alert you that the driver’s
and/or front passenger’s seat belt is unbuckled. Dependent upon specification this may be accompanied by an intermittent chime.
Child Seats
It is important to remember that your child’s weight, rather than age, determines the type of seat that is required.
To determine the correct seat for your child, see ‘CHILD AND INFANT SAFETY’, page 66.
Rear centre seat belt interlock - Estate only
The centre rear seat belt is anchored to the back of the seat. If the seat backrest is not correctly latched the seat belt reel will not extend.
Automatic Locking Reels
Passenger seat belts have ALR fitted for use with child seats.
•To engage: extend the belt to maximum length to enable the locking mechanism.
•To disengage: unbuckle the belt and allow it to fully retract.
With ALR enabled, as the seat belt retracts it will automatically lock, preventing re-extension.
Ensure passengers do not fully extend the restraints and inadvertently engage this feature during normal use.
OVERHEAD CONSOLE
Sunroof
JAG0751
The sunroof is fitted with a facility that allows it to be fully opened or closed with a single operation of the indicated switch.
Closing remotely
•If the sunroof has been left open when leaving the vehicle, it can be closed by pressing and holding the lock button on the remote handset.
13
Quick Overview
Parking assist
JAG0748
Press the indicated button to turn on and off the front and rear parking sensors. An indicator will illuminate in the switch when the system is turned on.
Note: This button is only fitted to vehicles with both front and rear parking assistance.
Care points
•Sensors may activate on detection of water, snow or ice on their surface. This is entirely normal and regular cleaning will aid performance.
•Parking assist may sound if it detects a signal operating at the same frequency to that of the sensors (e.g. motorcycles, airbrakes).
CLIMATE CONTROL
These are the primary functions of the climate control system. For further information, see ‘Climate Control’, page 149.
JOL4740
6 : 46 PM
˚ C / ˚ F
JAG0811
For those vehicles fitted with the touch-screen navigation
system, the advanced climate control functions can be accessed by pressing the CLIMATE button.
AUTO (automatic) mode
Press to select automatic
 operation of the climate control system. The system will
automatically adjust the heat output, blower speed, air intake and airflow distribution to maintain the selected temperature(s) and reduce misting without constant adjustments by the driver or passengers.
14

Quick Overview
Screen heaters and timed air recirculation may be selected whilst in AUTO mode. Selecting any other function will cancel AUTO operation.
Note: Select AUTO as the normal operating mode. This will help prevent window misting.
Air conditioning (A/C)
Air conditioning is an integral
part of the climate control system, providing cooled and
dehumidified air for occupant comfort; the dry airflow is also effective in preventing misting of the windows.
Press the button to switch the air conditioning system on or off.
External water deposits
•The air conditioning system removes moisture from the air and deposits the excess water beneath the vehicle.
Puddles may form, but this is normal and no cause for concern.
Air recirculation
Air recirculation is used to stop outside odours from entering the vehicle or to improve
performance of the air conditioning system in regions of high ambient temperatures.
Press the button to switch timed air recirculation system on or off.
Temperature selection
Press the red buttons to increase temperature and the blue buttons to decrease temperature.
To jump quickly from HI or LO to a midrange temperature setting, press and hold the AUTO button for a few seconds.
Defrost/demist mode
Press the DEF button to
remove frost or heavy misting from the windscreen. The rear
screen and windscreen heaters will be activated.
To de-select defrost mode, press AUTO. The rear screen and windscreen heaters will remain on.
Heated screens and door mirrors
The front and rear screen
heaters can be switched on or off in any mode,
even when the climate control system is off, but will only operate when the engine is running.
Operating the DEF button will automatically activate the front and rear screen heaters.
The door mirror heaters are controlled by the rear screen heater button.
15

Quick Overview
FACIA AND CONTROLS
1 |
2 |
3 |
4 |
|
|
5 6 |
7 |
8 |
9 |
10 |
|
11 |
|
19 |
|
18 |
17 |
|
15 |
|
|
|
|
13 |
12 |
|
20 |
|
|
|
|
|
|
|
|
|
|
|
|
|
|
16 |
|
|
|
|
|
|
|
14 |
|
|
|
|
|
|
|
|
|
|
|
|
|
|
|
|
21 |
|
2 |
3 |
4 |
|
|
5 |
6 |
1 |
|
|
|
|
|
|
|
|
||||||
|
|
|
|
|
|
18 |
17 |
|
|
19 |
|
|
|
|
|
|
|
|
|
|
20 |
|
|||
|
|
|
|
|
|
|
|
|
|
|
|
|
JAG0795 |
|
|
|
|
|
|
|
|
|
|
|
|
|
|
|
|
|
|
16 |
|
|
|
|
|
|

Quick Overview
1.Exterior lighting switch (see
‘EXTERIOR LIGHTING SWITCH’, page 110).
2.Audio switches (see ‘STEERING WHEEL CONTROLS’, page 235).
3.Direction indicators/trip computer switch (see ‘DIRECTION INDICATORS’, page 113).
4.Instrument pack/warning indicators (see ‘INSTRUMENT PACK’, page 94).
5.Cruise control switches (see ‘CRUISE CONTROL SWITCHES’, page 108).
6.Wiper/washer switch (see
‘WINDSCREEN WASH/WIPE’, page 122).
7.Heating and ventilation system (see
‘Climate Control’, page 149).
8.Driver’s seat heater switch (see
‘FRONT SEAT HEATERS’, page 81).
9.Hazard warning switch (see ‘HAZARD WARNING’, page 113).
10.Passenger’s seat heater switch (see
‘FRONT SEAT HEATERS’, page 81).
11.Passenger airbag deactivation status indicator (see ‘AIRBAGS’, page 60).
12.Audio system (see ‘Audio System’, page 233).
13.Automatic gear selector lever (see
‘AUTOMATIC TRANSMISSION’, page 131).
14.Dynamic Stability Control (DSC) switch (see ‘DYNAMIC STABILITY CONTROL (DSC)’, page 136).
15.Sport mode switch (see ‘Sport Mode’, page 132).
16.Gear selector lever (see
‘Transmission’, page 131).
17.Horn (see ‘HORN LOCATION’, page 119).
18.Steering column adjustment release lever (see ‘COLUMN RELEASE LEVER’, page 84).
19.Trip computer reset switch (see ‘TRIP COMPUTER SWITCHPACK’,
page 106).
20.Bonnet release lever (see ‘OPENING THE BONNET’, page 195).
21.Touch-screen control (see ‘GENERAL INFORMATION’, page 227).
17

Quick Overview
Passenger airbag deactivation indicator
The front passenger seat is

 fitted with an occupancy sensor that determines the state of seat occupancy and sets the airbag status to
suit:
•Seat unoccupied - airbag deactivated and status indicator off.
•Seat occupied - airbag activated and status indicator off.
•Seat occupied by a child, child seat or low weight object - airbag deactivated and status indicator on.
•Passenger too close to airbags - airbag deactivated and status indicator on.
For further information refer to
‘OCCUPANT SENSING’, page 63.
Diesel Particulate Filter (DPF)
indicators |
|
|
|
JAG0733 |
1 |
2 |
3 |
If the amber warning indicator 2 is illuminated, accompanied by the message DPF FULL SEE HANDBOOK in the message centre 1, regeneration of the DPF is required.
If the red warning indicator 3 is illuminated, accompanied by the same warning message, seek qualified assistance as soon as possible.
In either case, refer to ‘DIESEL PARTICULATE FILTER’, page 146, for more information.
18
Quick Overview
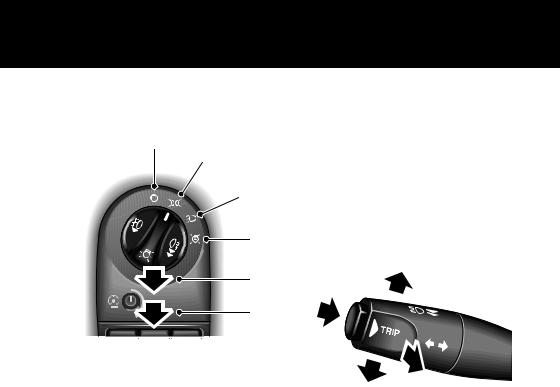
EXTERIOR LAMPS
Lamps master switch
1
2
3
4
A
B
JOL4744
1.Off
2.Side lamps
3.Dipped headlamps
4.Autolamps
A.Front fog lamps
Pull the switch to position A to switch on the front fog lamps.
B.Rear fog lamps
Pull the switch to position B to switch on the front and rear fog lamps.
Note: Fog lamps can only be operated when the master switch is in either position 2 or 3.
Autolamps
If Autolamps is selected, a sensor monitors the exterior light levels and will automatically switch the side lamps and dipped headlamps on and off. With Autolamps selected, if the windscreen wipers are operated continuously for more than 20 seconds, then the exterior lamps will be switched on automatically.
Fog lamps cannot be activated when Autolamps is selected.
JOL4741
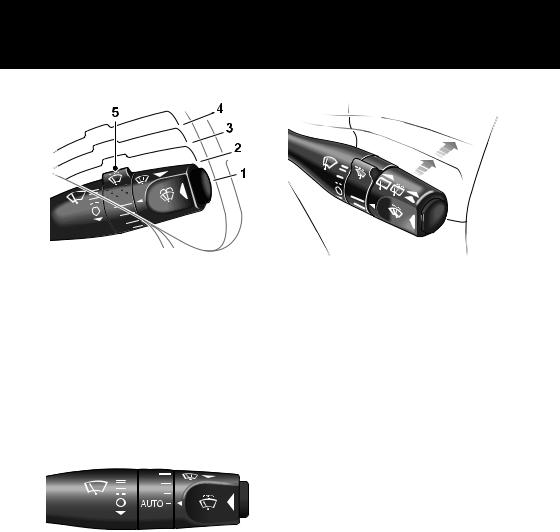
Direction indicators
Move the lever up or down to activate the direction indicators.
Headlamp flash
Pull the lever to the first position and release to flash the headlamps. Pull the lever to the second position and release to switch on the high beam. To switch off the high beam, again pull the lever to the second position and release.
19
Quick Overview
WIPERS AND WASHERS
JAG0687 |
1.Windscreen wipers off and parked.
2.Intermittent wipe.
3.Slow wiper operation.
4.High speed wiper operation.
5.Intermittent wipe delay.
Press the button for windscreen wash/wipe.
Rotate the collar to adjust the speed of the intermittent wipe or to select AUTO for automatic operation of wipers.
Automatic operation
Rear wiper and washer
2 |
1 |
JAG0828 |
Push the lever to position 1 for intermittent operation of the rear wiper. Push and hold the lever in position 2 to operate the rear washer and wiper.
JAG0807
The wiper lever must be in position 1 and AUTO selected on the collar to enable automatic operation of the wipers.
20
Quick Overview
WARNING INDICATORS
Low oil pressure
Battery charge indicator
Seat belt reminder
Park brake on/brake fluid low
Transmission malfunction detected
Anti-lock Braking System
Engine malfunction detected
Dynamic Stability Control (DSC) off
Door/luggage compartment open
Airbag system fault detected
Diesel glow plugs active/malfunction
 Low washer fluid level
Side lamps on
Headlamp high beam on
Front fog lamps on
 Rear fog lamps on
Direction indicators
Cruise control active
 Low outside temperature
21
Quick Overview
AUTOMATIC TRANSMISSION
Gearshift interlock
The starter switch must be in position II and the foot brake applied before the gear selector can be moved from P (Park) to R (Reverse).
The lever can be moved into P with the starter switch off.
Gear selector
The J-gate gear selector lever is designed to accommodate two different driving techniques as follows:
•Automatic selection: the right-hand side of the selector gate.
•Manual selection: the left-hand side of the selector gate to individually select 4th, 3rd or 2nd gear.
After selecting R (Reverse) or D (Drive) from N (Neutral) or P (Park), wait briefly for the transmission to engage before accelerating.
Kickdown mode
Kickdown provides maximum engine performance in circumstances where rapid acceleration is required, such as when overtaking. Kickdown is operated when the accelerator pedal is pressed fully down, beyond the normal operating spring pressure. This causes the transmission to change down to the lowest gear possible to achieve maximum acceleration.
Kickdown mode is in effect for as long as the pedal is fully depressed.
After selecting R (Reverse) or D (Drive) from N (Neutral) or P (Park), wait briefly for the transmission to engage before accelerating.
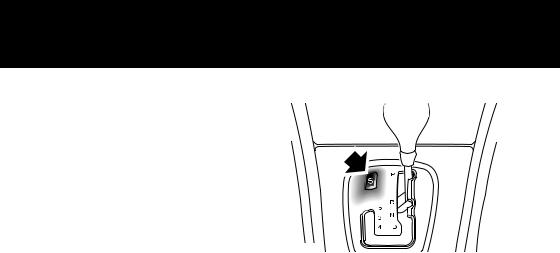
Sport mode
JAG0762
Press the switch (arrowed) to select Sport mode. A red indicator in the switch will illuminate to indicate that Sport mode is active. When Sport mode is selected, the gear change points are modified to make full use of the engine’s power.
Note: With the gear selector in D (Drive) and Sport mode active, the transmission will use 5th gear less at higher cruising speeds.
Fuel consumption will be adversely affected.
22
Quick Overview
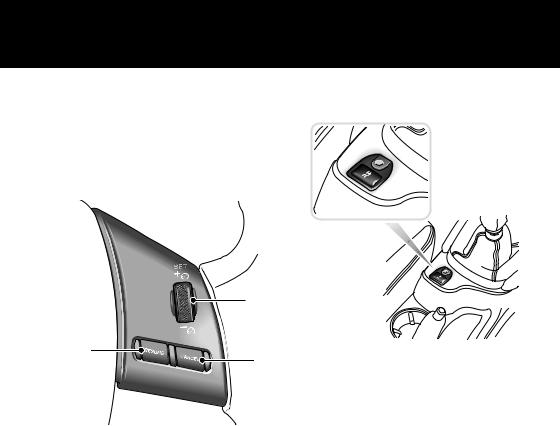
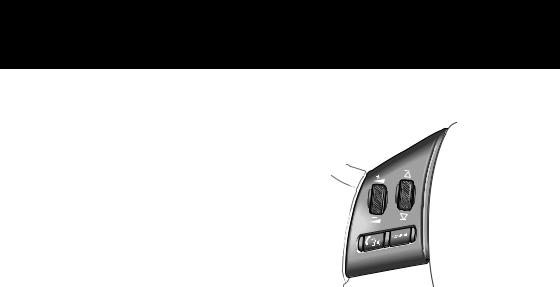
CRUISE (SPEED) CONTROL
The cruise control system will maintain a set road speed until either cruise control is cancelled or the brake or clutch pedal is used.
The system is controlled via switches on the steering wheel:
1 |
3 |
2 |
JAG0736 |
1.SET/Speed adjustment wheel - to engage cruise control initially. Also use to increase/decrease the set speed.
2.CANCEL - cancels cruise control but retains the set speed in memory.
3.RESUME - to resume a set speed retained in memory.
Note: Cruise control will automatically disengage when the vehicle speed falls below 28 km/h (18 mph).
DYNAMIC STABILITY
CONTROL (DSC)
JAG0672
DSC uses traction control and the Anti-lock Braking System to maximise the vehicle’s handling performance and help prevent wheelspin.
DSC is automatically activated when the starter switch is turned to position II, but can be turned off by pressing the button on the centre console. An amber indicator in the instrument pack will permanently illuminate whenever DSC is switched off.
In the event of a system fault, the message DSC SYSTEM FAULT will also be displayed in the message centre.
23
Quick Overview
AUDIO SYSTEM KEY
FEATURES
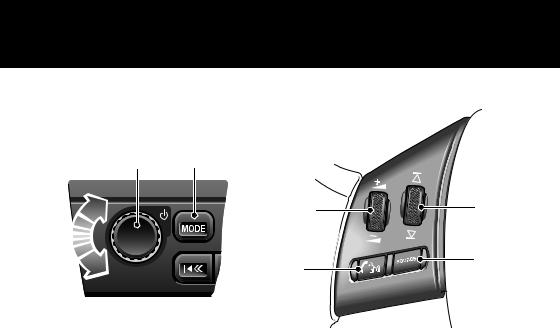
General operation
1 2
JAG0818
Press the control knob 1 to switch on/off and rotate to adjust the volume.
To adjust the sound settings, press the MODE button 2 repeatedly, until the required setting is displayed. Turn the control knob 1 to adjust the level or rating.
After approximately five seconds, the system will return to normal control mode.
Steering wheel controls
2 |
4 |
1 |
3 |
|
|
JAG0673 |
|
1.Press to mute audio unit (non-voice only).
2.Rotate as required to increase or decrease volume.
3.Press and release to cycle through Radio, FM, AM, Cassette, CD, MD and CD multichanger.
4.Rotate and release to cycle through preset radio stations, the next CD/MD track or to use cassette AMS (Automatic Music Search).
Rotate and hold for at least two seconds to cycle to the next strongest station, next CD or change cassette side.
24
Quick Overview
RADIO OPERATION
To switch on the radio


 function, press the AM/FM button. Pressing this button repeatedly scrolls through FM, MW and
LW wavebands.
To search for a radio station, press the seek arrow buttons.
Setting the radio presets
Once a radio station has been tuned,
press and hold the desired preset
button 1 to 9 (or touch a station
position on the touch-screen) until a ‘beep’ is heard. The preset is now stored.
A total of nine presets can be stored for each waveband.
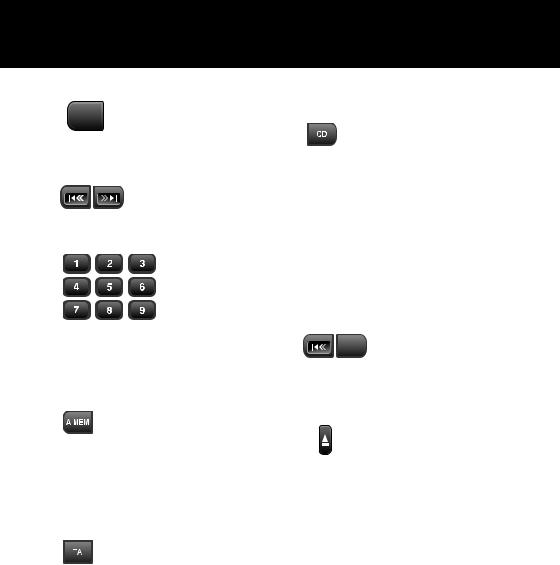
The radio presets can be automatically set by using the ‘Auto Memory’ function. Press
and hold the A MEM button for two seconds. The radio will be briefly muted while it searches the waveband for the nine strongest stations.
Activating TA (Traffic announcements)
To activate this function, press and release the TA button. With
TA activated, traffic announcements will interrupt radio, cassette or CD/MD play. To deactivate this feature, press and release the TA button again.
Press and hold the TA button for two seconds to display the radio station name instead of the frequency.
CD OPERATION
Single CD player
If the radio or CD multichanger is being used, pressing the CD button will resume playing any
CD installed in the player mechanism.
When a CD is loaded into the aperture, it will begin to load and play automatically.
Pressing the CD button whilst in CD play mode will pause the current track. A subsequent press of the CD button will resume play mode.
Six discs can be loaded into the multichanger unit, and a further single disc in the audio console (when fitted).
To skip tracks, continually  press the seek arrow buttons
to move backwards or forwards accordingly. Pressing and holding these buttons will search through the selected track.
When a disc is inserted, the CD icon is displayed. Press the eject
button to eject the CD. The display will show DISC EJECT and the CD icon will be turned off.
25
Quick Overview
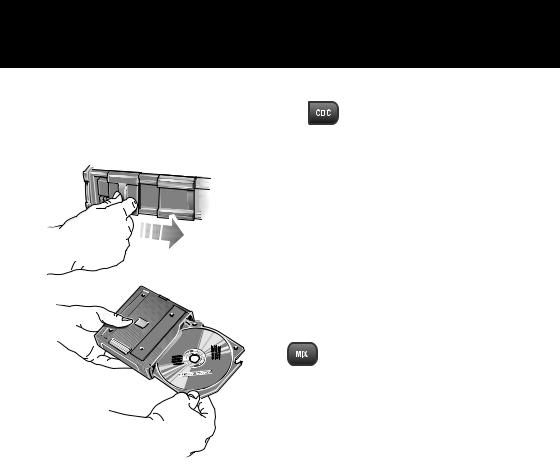
CD Multichanger
Note: Remember to close the multichanger door; this will prevent dirt getting into the unit and help reduce skipping.
JAG0819 |
The CD multichanger is located in the luggage compartment. To load a CD into the multichanger:
1.Slide open the multichanger door, press the Eject button and remove the magazine. Close the door.
2.Pull a tray out from the magazine and insert a CD (label side up). Slide the tray into the magazine until a ‘click’ is heard.
3.Slide open the multichanger door and ensuring correct orientation, replace the magazine. Ensure the magazine clicks firmly into position.
CD selection
1. Press the CDC button (CD button on MiniDisc and cassette player systems) to
select the CD multichanger mode.
2.Press preset buttons 1to 6 to select the appropriate CD loaded in the multichanger.
If a touch-screen is fitted to the vehicle, disc selection can be made by touching the relevant numbered disc icon.
3.When playing a CD, press the CDC button to pause play. Press again to continue play.
Playing random tracks
To play random tracks from the disc, press and release the MIX button. To cancel, press the MIX
button again.
To play random tracks from all discs loaded in the multichanger, press the MIX button for two seconds. To cancel, press and hold the MIX button.
26

Quick Overview
TELEPHONE - BLUETOOTH SYSTEM
Mobile phones with Bluetooth capability can communicate with the vehicle’s inbuilt telephone system.
The following procedure demonstrates how to connect the most popular brands of mobile phone.
Pairing a handset to the vehicle
1.Turn the starter switch to position II.
2.Press the telephone button on the audio panel. The touch-screen will display the message No BT phone. On non touch-screen systems the message SIG will be displayed.
3.Either using the on-screen or the audio panel keyboard, press ##3#*#.
4.Touch the on-screen call icon or press the call button on the audio panel.
5.Prepare the handset for pairing to the system.
See the telephone manufacturer’s instructions for further details, or follow the table below for generic commands.
|
Nokia |
Motorola |
Ericsson |
1. |
Select menu |
Select menu |
Select menu |
|
|
|
|
2. |
Select settings |
Select settings |
Select connectivity |
|
|
|
|
3. |
Select Bluetooth OR |
Select Connection |
Select Bluetooth |
|
Select Connectivity then |
|
|
|
Bluetooth |
|
|
|
|
|
|
4. |
Select On |
Select Bluetooth link |
Select My Devices |
|
|
|
|
5. |
Select Search for Audio |
Select Hands-free |
With New Device highlighted, |
|
devices |
|
select Add. Press OK to |
|
|
|
confirm |
|
|
|
|
6. |
After search select Jaguar |
Select Look for devices |
After search select Jaguar |
|
|
|
|
7. |
Enter pass code 1313. |
After search select |
Select Connect |
|
Press OK to confirm |
Jaguar |
|
|
|
|
|
8. |
No connection? Select |
Permission to bond? |
Enter pass code 1313 after |
|
Bluetooth (Menu) then |
Select Yes and enter |
prompt |
|
Paired devices Jaguar |
pass code 1313 |
|
|
|
|
|
When the handset has been successfully |
Note: For best results when pairing your |
paired to the system, the touch-screen |
handset to the system, ensure the |
message changes to REGISTERED or |
handset is fully charged. |
PHONE CONNECTED. On systems |
|
without a touch-screen the audio system message changes to SIG*.
27
Quick Overview
Mobile phone compatibility
There are a number of mobile phones that have been tested to function correctly with the Jaguar system, however not all mobile phones are compatible. For the latest list of compatible phones and software versions, please refer to www.ownerinfo.jaguar.com.
Alternatively consult your Jaguar Dealer/Authorised Repairer.
Downloading phone book entries
1.Turn the starter switch to position II, and ensure the handset is paired to the vehicle’s system.
2.Press the telephone button on the audio panel.
3.Either using the on-screen keypad or the audio panel keyboard, press
##2#*#.
4.Touch the on-screen call icon or press the call button on the audio panel.
5.Switch off the starter switch for six minutes to allow the system to complete the download process.
Making a call
JOL4746
1.Press and hold the Source switch on the steering wheel control, or press the call button on the audio panel. Phone will be displayed.
2.Key in the phone number required, using the on-screen or audio panel keyboard.
3.Press the call button on the steering wheel control, or on the audio panel. Calling will be displayed.
4.To end the call, press the call button on the steering wheel control, or on the audio panel.
Receiving a call
To answer or end a call, press the call button on the steering wheel control or on the audio panel.
28
Filling Station Information
FUEL TYPE
Petrol models
Caution: Jaguar petrol engines are not fitted with equipment necessary for the use of fuels containing more than 10 per cent ethanol. Do not use E85 fuels (85 per cent ethanol content). If E85 fuels are used serious engine and fuel system damage will occur.
Use an Unleaded fuel with an octane rating of at least 95 RON.
Diesel models
Caution: Do not use RME (bio-diesel) except in the case of proprietary diesel fuels which contain a mix of up to 5%.
Use Diesel fuel meeting specification EN 590 or equivalent.
Note: Fuel consumption will be higher than normal when the engine is new and bedding in. After a period of time, the fuel consumption will gradually improve to expected levels.
Incorrect fuelling
Caution: If the fuel tank is accidentally filled with the wrong type of fuel, it is essential that the engine is not started and you seek qualified assistance.
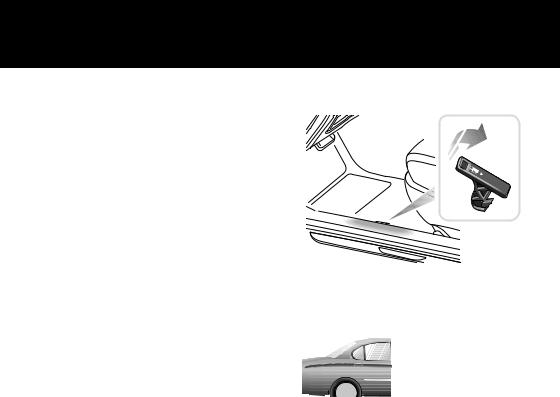
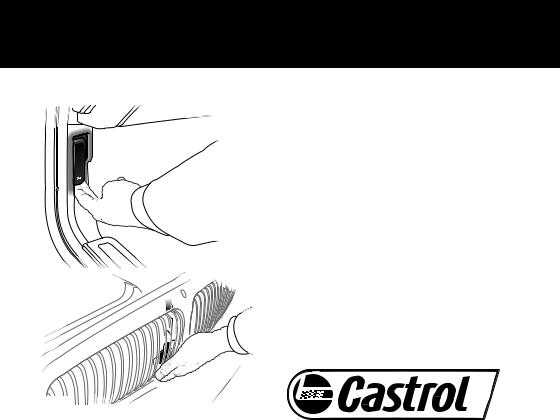
FUEL FILLING
JAG0766 |
Pull the fuel filler flap release. This is located on the floor, outboard of the driver’s seat.
The filler flap is located on the right-hand side of the vehicle.
Note: Vehicles with a diesel engine have a yellow filler cap.
For quickness and to completely fill the tank, ensure that the fuel nozzle rests on the bottom of the filler neck.
After refuelling, refit the filler cap in the filler neck and twist the cap clockwise until it clicks three times. Close the flap, which automatically locks shut.
29
Filling Station Information
BONNET RELEASE
JAG0704 |
Pull the release lever located below the facia on the left-hand side of the vehicle, see ‘OPENING THE BONNET’, page 195.
UNDERBONNET TOP-UP
Engine oil specification
Model |
Specification |
|
|
Petrol models |
SAE 5W-30 to Jaguar |
|
specification WSS |
|
M2C913 - A or B. |
|
|
Diesel models |
SAE5W-30 to Jaguar |
|
specification WSS |
|
M2C913 - B ¹ |
|
|
¹ For top-up purposes only, where oil of specification WSS-M2C-913-B cannot be found, ACEA B1 or ACEA B3 specification oils may be used.
JAGUAR RECOMMENDS
Windscreen/headlamp washer reservoir.
See ‘WINDSCREEN WASHER
RESERVOIR’, page 202.
Cooling system
When the engine is cold, top-up the coolant until the level is between the MIN and MAX marks on the side of the header tank. Use only a 50% mix of water and antifreeze. See ‘COOLANT LEVEL’, page 203.
30
 Loading...