


967/966/962/961
ИНСТРУКЦИЯ ПО ЭКСПЛУАТАЦИИ
BEDIENUNGSANLEITUNG
INSTRUCTION MANUAL

 F-1
F-1
ОСНОВНЫЕ УКАЗАНИЯ ПО ТЕХНИКЕ БЕЗОПАСНОСТИ
При пользовании данным электротехническим устройством следует соблюдать основные меры безопасности, приведенные ниже.
Ознакомьтесь с ними перед работой на швейной машине.
ОПАСНО- Для снижения риска поражения электричеством:
1. Швейную машину никогда не оставляйте без внимания во включенном состоянии. Немедленно вынимайте МЛ04 штепсель машины из электрической розетки после работы на машине и перед чисткой.
ВНИМАНИЕ- Для снижения риска загорания, пожара, поражения электрическим током и травм у работающих:
1.Не позволяйте использовать машину в качестве игрушки. Необходима особая внимательность при работе на швейной машине рядом с детьми.
2.Используйте швейную машину только по ее назначению в соответствии с настоящей Инструкцией. Используйте только те принадлежности, которые рекомендованы изготовителем и приведены в Инструкции.
3.Никогда не работайте на швейной машине при поврежденных шнуре питания или вилке, если машина работает неправильно, если ее роняли и повредили, или же она попала в воду. Возвратите машину ближайшему официальному дилеру или в сервисный центр для обследования, ремонта, электрических или механических регулировок.
4.Никогда не работайте на швейной машине, если у нее засорены какие-либо воздушные отверстия. Содержите вентиляционные отверстия машины и педаль управления свободными от текстильного волокна, пыли и обрезков ткани.
5.Не допускайте попадания посторонних предметов в какое-либо из отверстий машины.
6.Не используйте швейную машину вне помещения.
7.Не работайте там, где применяются вещества в аэрозольной упаковке или чистый кислород.
8.Для отсоединения машины поверните основной выключатель в положение «0» (ОТКЛЮЧЕНО), затем выньте вилку из розетки.
9.Не отключайте машину, выдергивая шнур питания. При отключении держите рукой вилку, а не шнур.
10.Оберегайте пальцы рук от всех подвижных частей. Особая осторожность необходима в зоне движения иглы.
11.Не шейте при поврежденной игольной пластине, так как это может вызвать поломку иглы.
12.Не пользуйтесь гнутыми иглами.
13.Не подтягивайте и не подталкивайте ткань при шитье. Это может отогнуть иглу и вызвать ее поломку.
14.Отключайте швейную машину (положение «0») при выполнении любых регулировок в зоне иглы, таких как заправка иглы нитью, смена иглы, намотка шпульки, замена прижимной лапки и т.д.
15.Всегда вынимайте штепсель швейной машины из электрической розетки при снятии крышек, смазке машины и осуществлении всех регулировок, упомянутых в настоящей Инструкции по эксплуатации.
ОСТОРОЖНО- Движущиеся части - Во избежание получения травм отключайте машину перед обслуживанием. Закройте крышку перед работой на машине.
СОХРАНИТЕ НАСТОЯЩИЕ УКАЗАНИЯ
Эта швейная машина предназначена только для домашней или аналогичной работы.
Данная машина отвечает требованиям Директивы ЕЕС 2004/108/EC в части
электромагнитной совместимости.

 F-2
F-2
WICHTIGE SICHERHEITSHINWEISE
Beim Gebrauch eines Elektrogeräts sind grundlegende Sicherheitsvorkehrungen zu beachten, darunter auch die folgenden. Lesen Sie sämtliche Anweisungen vor dem Gebrauch dieser Nähmaschine.
ACHTUNG - zur Vermeidung von elektrischen Schlägen:
1.Lassen Sie die Nähmaschine nie unbeaufsichtigt, wenn sie mit dem Stromnetz verbunden ist. Ziehen Sie stets den Stecker unmittelbar nach dem Gebrauch sowie vor jeder Reinigung aus der Steckdose aus.
WARNUNG- zur Vermeidung von Brandwunden, Bränden, elektrischen Schlägen oder Personenschäden:
1.Die Maschine darf nicht als Spielzeug verwendet werden. Höchste Aufmerksamkeit ist notwendig, wenn die Nähmaschine von Kindern oder in Anwesenheit von Kindern benutzt wird.
2.Die Maschine darf nur zu den in diesem Handbuch beschriebenen Zwecken verwendet werden. Verwenden Sie nur Zubehör, das vom Hersteller in diesem Handbuch empfohlen wird.
3.Die Nähmaschine darf auf keinen Fall betrieben werden, wenn ein Kabel oder Stecker beschädigt ist, wenn sie nicht ordnungsgemäß arbeitet, wenn die Maschine gefallen ist, beschädigt wurde oder nass geworden ist. Muss die Maschine geprüft oder repariert werden oder sind elektrische oder mechanische Justierungen vorzunehmen, bringen Sie die Nähmaschine zum nächstgelegenen Vertragshändler oder Kundendienst.
4.Die Nähmaschine darf nicht betrieben werden, wenn irgendwelche Luftöffnungen verschlossen sind. Halten Sie die Belüftungsöffnungen der Nähmaschine und des Fußanlassers frei von Flusen, Staub und losem Gewebe.
5.Maschine niemals fallen lassen und keine Gegenstände in die Öffnungen der Maschine stecken.
6.Maschine nicht im Freien verwenden.
7.Die Maschine darf nicht an Orten betrieben werden, an denen Sprays oder reiner Sauerstoff verwendet werden.
8.Zum Trennen der Maschine von der Stromversorgung ist der Netzschalter auszuschalten (d.h. auf „off” zu stellen) und dann der Netzstecker aus der Steckdose zu ziehen.
9.Den Netzstecker nicht am Kabel, sondern am Stecker aus der Steckdose ziehen.
10.Beim Nähen sind die Finger von allen sich bewegenden Teilen fernzuhalten. Besondere Achtung ist im Bereich um die Nähmaschinennadel geboten.
11.Auf keinen Fall eine beschädigte Stichplatte verwenden. Eine beschädigte Stichplatte kann Nadelbruch verursachen.
12.Keine verbogenen Nadeln verwenden.
13.Das Nähgut beim Nähen weder ziehen noch schieben. Dadurch könnte die Nadel abgelenkt werden und brechen.
14.Zur Durchführung von Arbeiten im Nadelbereich, wie Einfädeln der Nadel oder der Spule, Nadelwechsel, Auswechseln des Nähfußes usw., ist die Maschine auszuschalten.
15.Bevor Abdeckungen entfernt werden sowie zum Schmieren oder zum Ausführen von Wartungsarbeiten, die in diesem Handbuch beschrieben sind, ist der Stecker der Nähmaschine aus der Steckdose zu ziehen.
VORSICHT -- Verletzungsgefahr durch bewegliche Teile – zur Vermeidung von Personenschäden, Maschine ausschalten vor Wartungsarbeiten bzw. Abdeckungen schließen vor Gebrauch der Maschine.
DIESE ANLEITUNG BITTE GUT AUFBEWAHREN
Die Nähmaschine ist nur zum Hausgebrauch o. Ä. bestimmt.
Diese Maschine entspricht der europäischen Richtlinie 2004/108/ EC über die elektromagnetische Verträglichkeit.
Dieses Produkt trägt das Recycling-Symbol gemäß der EU-Richtlinie 2002/96/EC. Das bedeutet,dass das Gerät am Ende der Nutzungszeit bei einer kommunalen Sammelstelle zum recycelnabgegeben w e r d e n m u s s . ( k o s t e n l o s ) . E i n e Entsorgung über den Haus-/Restmüll ist nichtgestattet. Dies ist ein aktiver Beitrag zum Umweltschutz. (Nur innerhalb der EU)
1
“IMPORTANT SAFETY INSTRUCTIONS”
“When using an electrical appliance, basic safety precautions should always be followed, including the following.”
“Read all instructions before using this sewing machine.”
“DANGER-- To reduce the risk of electric shock:”
1.“This sewing machine should never be left unattended when plugged in. Always unplug this sewing machine from the electric outlet immediately after using and before cleaning.”
“WARNING- To reduce the risk of burns, fire, electric shock, or injury to persons: ”
1.“Do not allow to be used as a toy. Close attention is necessary when this sewing machine is used by or near children.”
2.“Use this sewing machine only for its intended use as described in this manual. Use only attachments recommended by the manufacturer as contained in this manual.”
3.“Never operate this sewing machine if it has a damaged cord or plug, if it is not working properly, if it has been dropped or damaged, or dropped into water. Return the sewing machine to the nearest authorized dealer or service center for examination, repair, electrical or mechanical adjustment.”
4.“Never operate the sewing machine with any air openings blocked. Keep ventilation openings of the sewing machine and foot control free from the accumulation of lint, dust, and loose cloth.”
5.“Never drop or insert any object into any opening.”
6.“Do not use outdoors.”
7.“Do not operate where aerosol (spray) products are being used or where oxygen is being administered.”
8.“To disconnect, turn switch to the off (“0”) position, then remove plug from outlet.”
9.“Do not unplug by pulling on cord. To unplug, grasp the plug, not the cord.”
10.“Keep fingers away from all moving parts. Special care is required around the sewing machine needle.”
11.“Never sew with a damaged needle plate as this can cause needle to break.”
12.“Do not use bent needles.”
13.“Do not pull or push fabric while stitching. It may deflect the needle causing it to break.”
14.“Switch the sewing machine off (“0”) when making any adjustments in the needle area, such as threading needle, changing needle, threading bobbin, or changing presser foot, etc.”
15.“Always unplug sewing machine from the electrical outlet when removing covers, lubricating, or when making any other user servicing adjustments mentioned in the instruction manual.”
“CAUTION-- Moving parts-To reduce risk of injury, switch off before servicing. Close cover before operating machine.”
“SAVE THESE INSTRUCTIONS”
“This product is for household use, or equivalent.”
This appliance complies with EEC Directive 2004/108/EC covering the electromagnetic compatibility.
This equipment is marked with the recycling symbol. It means that at the end of the life of the equipment you must dispose of it separately at an appropriate collection point and not place it in the normal domestic unsorted waste stream. This will benefit the environment for all.
(European Union only)
2

СОДЕРЖАНИЕ
1. ЗНАКОМСТВО С ВАШЕЙ МАШИНОЙ
Детали машины --------------------------------------------------------------------------------------- |
6 - 7 |
Принадлежности ------------------------------------------------------------------------------------- |
8 - 9 |
Подготовка машины к работе ----------------------------------------------------------------- |
10 - 13 |
Ножная педаль управления, Переключатель питания/освещения, |
|
Катушечные стержни, Рычаг прижимной лапки |
|
Намотка шпульки ---------------------------------------------------------------------------------- |
14 - 15 |
Заправка нижней нитки ------------------------------------------------------------------------- |
16 - 17 |
Таблица игл, ниток и материалов ------------------------------------------------------------ |
18 - 19 |
Заправка верхней нити -------------------------------------------------------------------------- |
20 - 23 |
Подьем нижней нити ----------------------------------------------------------------------------- |
24 - 25 |
Регулировка натяжения верхней нити ----------------------------------------------------- |
26 - 27 |
Смена прижимной лапки, Управление транспортером ------------------------------- |
28 - 29 |
Переключатель - селектор и панель индикации образцов -------------------------- |
30 - 31 |
Регулятор длины стежка эластичной строчки ------------------------------------------- |
30 - 31 |
Переключатель-селектор группы рисунков «Супер» ---------------------------------- |
32 - 33 |
Рычаг реверса строчки, Регулятор давления лапки ----------------------------------- |
32 - 33 |
Регулятор ширины строчки, Свободный пошив рукава ------------------------------- |
34 - 35 |
2. НАЧАЛО ШИТЬЯ
Схема настройки машины -------------------------------------------------------------------- |
36 - 38 |
Прямая строчка ------------------------------------------------------------------------------------ |
40 - 47 |
Начало работы. укрепление шва, Удаление материала, |
|
Поворот под прямым углом, Притачивание молний и окантовывание, Штопка |
|
Шитье на тежелой ткани |
|
Строчка зигзаг -------------------------------------------------------------------------------------- |
48 - 49 |
Обметывание, Атласная строчка |
|
Потайная строчка --------------------------------------------------------------------------------- |
50 - 51 |
Трехшаговый зигзаг, Бельевая строчка, Трикотажная строчка --------------------- |
52 - 53 |
Эластичные строчки ----------------------------------------------------------------------------- |
54 - 61 |
Тройная стачивающая строчка, Усиленный тройной зигзаг, Обметочная строчка, Вязальная строчка, Эластичнаяобметочнаястрочка,Строчка«Рыбьякость», Стачивающе-обметочная строчка, Перьевая строчка, Строчка«Морскойприбой», Строчка«Вилочка»
Фасонные строчки для вышивания --------------------------------------------------------- |
62 - 63 |
Некоторые полезные советы |
|
Обметка пуговичных петель ------------------------------------------------------------------- |
64 - 67 |
Автоматическая петля, Регулировка баланса стежка, |
|
Рубчатые петли для пуговиц |
|
3. КАК ПОЛИЗОВАТЬСЯ КОМПЛЕКТОМ ЛАПОК ----------------------------------- |
68 - 71 |
Лапка для прямой строчки, Лапка для подрупки края, Лапка для атластной строчки, Рубильник для обработки подогнутого среза, Роликовая лапка, Пришивание пуговиц, Лапка для вшивания молний
4. |
УХОД ЗА МАШИНОй ------------------------------------------------------------------------- |
72 - 73 |
|
Чистка транспортера и места установки челнока |
|
5. |
РУКОВОДСТВО ПО РЕШЕНИЮ ПРОБЛЕМ В РАБОТЕ -------------------------- |
74 - 75 |
6. |
ПЕРЕУПАКОВКА МАШИНЫ -------------------------------------------------------------- |
76 - 77 |
Размеры: 433 мм х 199 мм х 307 мм Масса: 7,7 кг Рабочее напряжение: ~220 В Частота: 50 Гц
Потребляемая мощность: 65 Вт Температура окружающей среды: 15 - 35°С Уровень шума: менее 70 дБА
3

INHALTSVERZEICHNIS
1. LERNEN SIE IHRE MASCHINE KENNEN
Die Hauptteile der Maschine ---------------------------------------------------------------------- |
6 - 7 |
Das Zubehör ------------------------------------------------------------------------------------------- |
8 - 9 |
Das Aufstellen der Maschine ------------------------------------------------------------------- |
10 - 13 |
Fußanlasser, Der Hauptschalter, Garnrollenstifte, Der Nähfußhebel |
|
Aufspulen des Unterfadens --------------------------------------------------------------------- |
14 - 15 |
Einlegen der Spule und des Unterfadens --------------------------------------------------- |
16 - 17 |
Die Nadel-und Garntabelle---------------------------------------------------------------------- |
18 - 19 |
Einfädeln des Oberfadens ---------------------------------------------------------------------- |
20 - 23 |
Heraufholen des Unterfadens ------------------------------------------------------------------ |
24 - 25 |
Regulierung der Oberfadenspannung -------------------------------------------------------- |
26 - 27 |
Auswechseln des Nähfußes, Die Transporteur-versenkung --------------------------- |
28 - 29 |
Stichwahlknopf und Stichanzeige, Stichlängen/Super-Nutzstichregler -------------- |
30 - 31 |
Stichgruppen-Auswahl, Die Rückwärtstaste------------------------------------------------ |
32 - 33 |
Regulierung des Füßchendruckes------------------------------------------------------------- |
32 - 33 |
Stichbreitenregler, Freiarm-oder Flachbett-Nähen ---------------------------------------- |
34 - 35 |
2. DER NÄHBEGINN
Nähen mit Ihrer Maschine --------------------------------------------------------------------------- |
36 - 38 |
Geradstich ----------------------------------------------------------------------------------------------- |
40 - 47 |
Der Nähbeginn, Herausnehmen des Materials, Änderung der Nährichtung, |
|
Einnähen von Reißverschlüssen und von Kordel, Stopfen, Nähen auf schwerem Gewebe
Zickzackstich -------------------------------------------------------------------------------------------- |
48 - 49 |
Kantenbefestigung, Satin-Stich |
|
Der Blindstich ------------------------------------------------------------------------------------------- |
50 - 51 |
Elastikstich, Der Treppenstich----------------------------------------------------------------------- |
52 - 53 |
Dessous-Stich ------------------------------------------------------------------------------------------ |
52 - 53 |
Super-Nutzstiche (Stretch-Stiche) ----------------------------------------------------------------- |
54 - 61 |
Stretch-Geradstich, Stretch-Zickzackstich, Overlock-Stich, |
|
Kräuseln Mit Dem Rautenstich, Elastischer Overlock-stich, Pfeil-stich, |
|
Geneigter Kantenstich, Federstich, Wellenstich, Hexenstich |
|
Dekorative Zierstiche---------------------------------------------------------------------------------- |
62 - 63 |
Hinweise zum nähen von zierstichen |
|
Nähen Von Knopflöchern----------------------------------------------------------------------------- |
64 - 67 |
Automatisches Ein-Schritt Knopfloch, Knopfloch-Feineinstellung, |
|
Knopfloch mit Beilauffaden |
|
3. SPEZIELLZUBEHÖR -------------------------------------------------------------------------- |
68 - 71 |
Geradstichfuß, Überwendlingfuß, Der Raupenfuß, Der Säumerfuß, Der Rollenfuß, |
|
Knopfannähfuß, Reißverschlußfuß |
|
4. PFLEGE UND REINIGUNG IHER MASCHINE -------------------------------------- |
72 - 73 |
Reinigung des Transporteurs und Spulenkapsel |
|
5. NÜTZLICHE TIPPS BEI STÖRUNGEN ------------------------------------------------- |
74 - 75 |
6. WIEDERVERPACKEN DER MASCHINE ---------------------------------------------- |
76 - 77 |
Abmessungen: 433 mm ×199 mm × 307 mm
Gewicht: 7,7 kg
Nennspannung: 220 V ~
Netzfrequenz: 50 Hz
Leistungsaufnahme: 65 W
Umgebungstemperatur: 15 - 35°C
Geräuschpegel: weniger als 70 db (A)
4

TABLE OF CONTENTS
1. KNOWING YOUR SEWING MACHINE
Machine identification--------------------------------------------------------------------------------- |
6 - 7 |
Accessories---------------------------------------------------------------------------------------------- |
8 - 9 |
Setting up your machine-------------------------------------------------------------------------- |
10 - 13 |
Foot control, Power/light switch, Spool pin, Presser foot lever |
|
Winding bobbin-------------------------------------------------------------------------------------- |
14 - 15 |
Threading the bobbin thread--------------------------------------------------------------------- |
16 - 17 |
Needle, thread and fabric chart------------------------------------------------------------------ |
18 - 19 |
Threading the top thread-------------------------------------------------------------------------- |
20 - 23 |
Picking up bobbin thread-------------------------------------------------------------------------- |
24 - 25 |
Adjusting top thread tension---------------------------------------------------------------------- |
26 - 27 |
Changing presser feet, Feed dog control----------------------------------------------------- |
28 - 29 |
Stitch selector and indicator, Stitch length/super (stretch) stitch control-------------- |
30 - 31 |
Super(stretch) pattern group selector, Reverse stitch lever, Pressure regulator-------- |
32 - 33 |
Stitch width control, Converting to free-arm sewing---------------------------------------- |
34 - 35 |
2. STARTING TO SEW
Machine setting chart------------------------------------------------------------------------------ |
36 - 38 |
Straight stitch----------------------------------------------------------------------------------------- |
40 - 47 |
Starting to sew, Removing fabric, Turning a square corner, |
|
Inserting zips and piping, Darning, Sewing on heavy fabric |
|
Zigzag stitch------------------------------------------------------------------------------------------ |
48 - 49 |
Overcasting, Satin stitch |
|
Blind stitch-------------------------------------------------------------------------------------------- |
50 - 51 |
Three-step zigzag, Shell stitch, Double-action stitch--------------------------------------- |
52 - 53 |
Stretch stitch------------------------------------------------------------------------------------------ |
54 - 61 |
Triple straight stitch, Ric-rac stitch, Overlock stitch, Smocking stitch, |
|
Elastic overlock stitch, Fishbone stitch, Slant overedge stitch, |
|
Feather stitch, Surf stitch, Wish-bone stitch |
|
Decorative embroidery designs----------------------------------------------------------------- |
62 - 63 |
Tips on design stitching |
|
Buttonhole making---------------------------------------------------------------------------------- |
64 - 67 |
Automatic one-step buttonhole, Adjusting stitch balance, |
|
Corded buttonholes |
|
3. SPECIAL ACCESSORIES ------------------------------------------------------------------- |
68 - 71 |
Straight stitch foot, Overcasting foot, Satin stitch foot, |
|
Rolled hemmer, Roller foot, Button sewing foot, Invisible zipper foot |
|
4. CARING FOR YOUR MACHINE ----------------------------------------------------------- |
72 - 73 |
Cleaning the feed dogs and shuttle area |
|
5. CHECKING PERFORMANCE PROBLEMS ------------------------------------------ |
74 - 75 |
6. REPACKING THE MACHINE --------------------------------------------------------------- |
76 - 77 |
Dimensions: 433 mm × 199 mm × 307 mm
Mass of the equipment: 7.7 kg
Rated Voltage: 220V ~
Rated Frequency: 50Hz
Rated input: 65W
Rated ambient temperature: 15 - 35°C
Acoustic noise level: less than 70db(A)
5
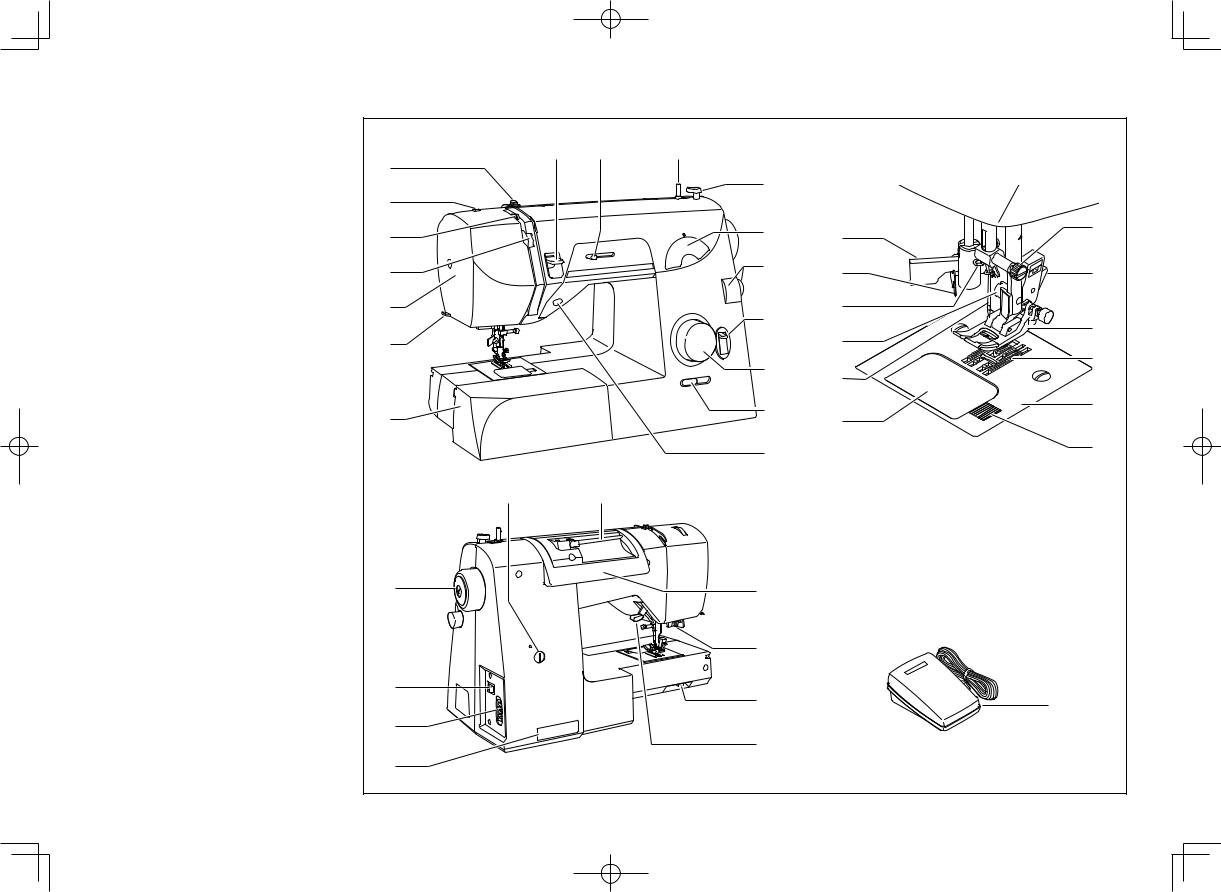
1. ЗНАКОМСТВО С ВАШЕЙ МАШИНОЙ
ДЕТАЛИ МАШИНЫ
1.Шайба натяжения нити шпульки в моталке
2.Регулятор давления лапки
3.Нитепритягиватель
4.Регулятор натяжения верхней нити
5.Лицевая панель
6.Нитеобрезатель
7.Выдвижной столик
8.Рычаг реверса строчки
9.Регулятор ширины строчки
10.Стержень моталки
11.Упор моталки
12.Панель отображения типов строчек
13.Регулятор длины стежка
14.Переключательселектор строчки
(только для электронных Моделей
967,966)
15.Переключатель-селектор строчки
16.Регулятор скорости шитья
(только для электронных Моделей
967)
17. Переключатель иглы вверх/вниз (только для электронных Моделей
967)
18.Маховое колесо
19.Переключатель питания/освещения
20.Гнездо шнура питания
21.Табличка с номером
22.Регулятор обметки пуговичных петель
23.Катушечный стержень
24.Ручка
25.Рычаг обметки пуговичных петель
26.Управление транспортером
27.Рычаг прижимной лапки
28.Устройство вдевания нитки в иглу
29.Нитенаправитель
30.Нитенаправитель
31.Винт прижимной лапки
32.Игла
33.Крышка шпульного отсетка
34.Винт иглодержателя
35.Рычажок фиксатора прижимной лапки
36.Прижимная лапка
37.Паспортная табличка
38.Игольная пластинка
39.Защелка крышки шпульного отсека
40.Ножная педаль управления
8 |
9 |
10 |
|
|
1 |
|
11 |
|
|
2 |
|
|
|
|
|
|
|
|
|
3 |
|
12 |
28 |
34 |
4 |
|
13 |
29 |
35 |
5 |
|
14 |
30 |
36 |
|
|
31 |
||
6 |
|
|
||
|
15 |
37 |
||
|
|
32 |
||
|
|
|
||
|
|
|
|
|
7 |
|
16 |
33 |
38 |
|
|
39 |
||
|
|
17 |
|
|
22 |
23 |
|
|
|
18 |
|
24 |
|
|
|
|
25 |
|
|
19 |
|
26 |
|
40 |
20 |
|
|
||
|
27 |
|
|
|
21 |
|
|
|
|
|
|
|
|
6

1.LERNEN SIE IHRE MASCHINE KENNEN
DIE HAUPTTEILE DER MASCHINE
1. Spulvorspannung
2. Regulierung des füsschendruckes
3. Fadenhebel
4. Oberfadenspannung
5. Kopfdeckel
6. Nähfushebel
7. Anschiebetisch
8. Rückwärtstaste
9. Stichbreitenregler
10. Spulwelle
11. Spulstop
12. Stichanzeige
13. Stichlängenknopf
14. Stichgruppen-Auswahl (Supernutzstiche) (Nur Modell 967, 966)
15.Stichwahlknopf
16.Geschwindigkeits-vorwahl (Nur Modell 967)
17.Nadel auf/ab-taste (Nur Modell 967)
18.Handrad
19.Hauptschalter
20.Steckeranschluss
21.Typenschild
22.Knopfloch-Feineinstellung
23.Horinzontaler Garnrollenstift
24.Tragegriff
25.Knopflochhebel
26.Die transporteur-versenkung
27.Der nähfusshebel
28.Nadeleinfädler
29.Fadenführung
30.Fadenführung
31.Nähfußschraube
32.Nadel
33.Ausiöser for Spulenabdeckung
34.Nadelhalteschraube
35.Nähfuß-Auslöser
36.Nähfuß
37.Transporteur
38.Stichplatte
39.Auslöser für Spulenabdeckung
40.Fußanlasser
1.KNOWING YOUR SEWING MACHINE
MACHINE IDENTIFICATION
1.Bobbin winder tension disc
2.Pressure regulator
3.Thread take-up
4.Thread tension control
5.Face cover
6.Thread cutter
7.Extension table
8.Reverse stitch lever
9.Stitch width control
10.Bobbin winder shaft
11.Bobbin winder stop
12.Stitch indicator
13.Stitch length control
14.Super pattern group selector (Model 967, 966 only)
15.Stitch selector
16.Sewing speed control (Model 967 only)
17.Needle up/down switch (Model 967 only)
18.Hand wheel
19.Power/light switch
20.Plug socket
21.Identification plate
22.Buttonhole stitch adjuster
23.Horizontal spool pin
24.Handle
25.Buttonhole lever
26.Feed dog control
27.Presser foot lever
28.Automatic needle threader
29.Thread guide
30.Thread guide
31.Presser foot screw
32.Needle
33.Bobbin cover plate
34.Needle clamp screw
35.Foot release button
36.Presser foot
37.Feed dogs
38.Needle plate
39.Bobbin cover release button
40.Foot control
7
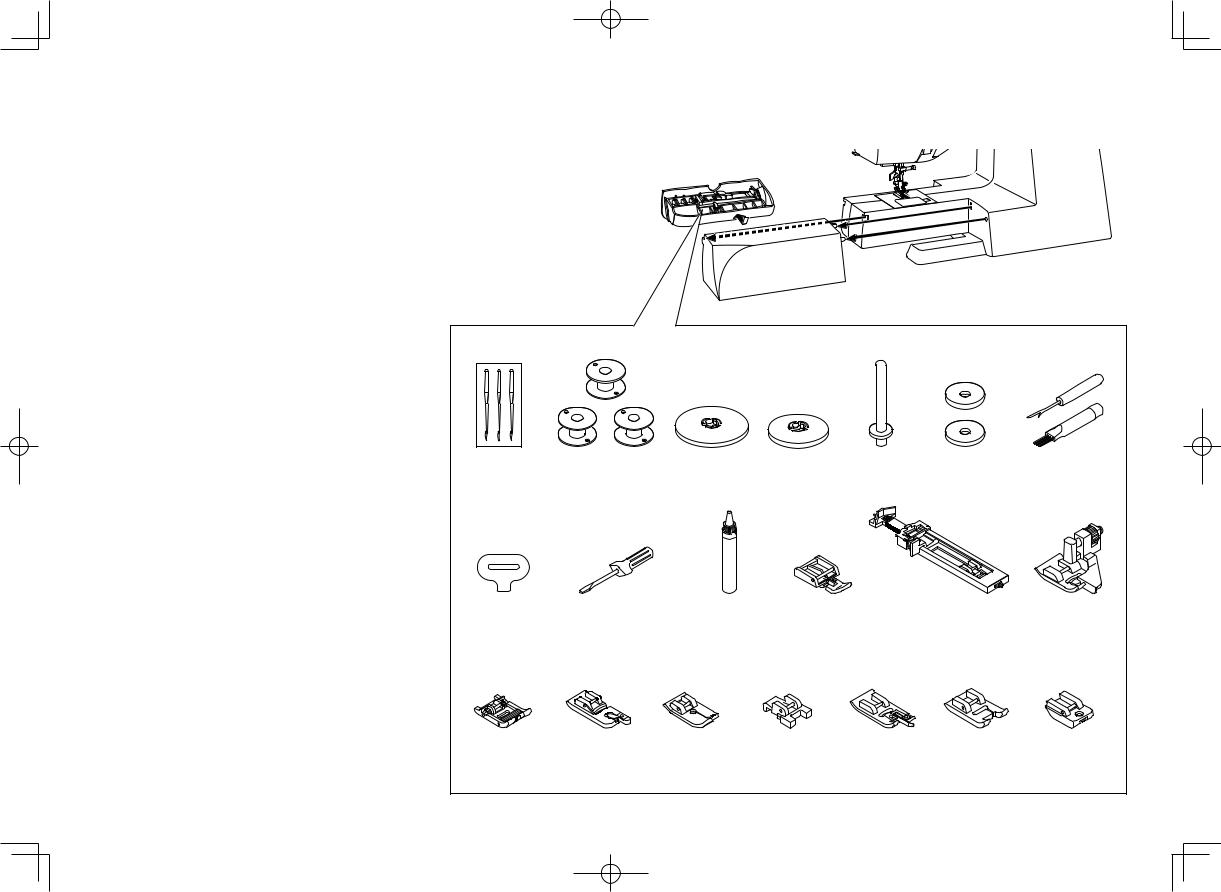
ПРИНАДЛЕЖНОСТИ
1.Набор игл
2.Шпульки
3.Колпачок катушечного стержня (большой)
4.Колпачок катушечного стержня (маленький)
5.Вертикальный стержень
6.Войлочный диск
7.Распорочныйнождляпуговичныхпетель/Щетка
8.Отвертка (большая)
9.Отвертка (маленькая)
10.Масленка
11.Лапка для втачивания молнии
12. Лапка для обметки пуговичных петель в автоматическом режиме
13. Лапка для потайной строчки (Кроме Модели 961)
14. Роликовая лапка
15. Рубильник для обработки подогнутого среза (Кроме Модели 961)
16.Лапка прямой строчки (Кроме Модели 961)
17.Лапка для пришивания пуговиц (Кроме Модели 961)
18.Лапка для подрубки края
19.Лапка для атласной строчки (Кроме Модели 961)
20.Лапка для потайной молнии
1 |
2 |
|
3 |
4 |
5 |
6 |
7 |
8 |
|
9 |
10 |
11 |
|
12 |
13 |
14 |
15 |
16 |
|
17 |
18 |
19 |
20 |
8
DAS ZUBEHÖR |
ACCESSORIES |
||
1. |
Nadeln |
1. |
Needles |
2. |
Spulen |
2. |
Bobbins |
3. |
Garnrollenkappe (groß) |
3. |
Spool pin cap (large) |
4. |
Garnrollenkappe (klein) |
4. |
Spool pin cap (small) |
5. |
Vertikaler Garnrollenhalter |
5. |
Vertical spool pin |
6. |
Unterlegscheibe |
6. |
Felt disc |
7. |
Trennmesser/Pinsel |
7. |
Buttonhole opener/Brush |
8. |
Schraubenzieher(groß) |
8. |
Screwdriver (large) |
9. |
Schraubenzieher(klein) |
9. |
Screwdriver (small) |
10. |
Ölfläschchen |
10. |
Oiler |
11. |
Reisverschlussfus |
11. |
Zipper foot |
12. |
Knopflochfuß |
12. |
Buttonhole foot for automatic system |
13. |
Blindstichfuß (Ausgenommen Modell 961) |
13. |
Blind stitch foot (Except Model 961) |
14. |
Rollenfuß |
14. |
Roller foot |
15. |
Säumerfuß (Ausgenommen Modell 961) |
15. |
Rolled hemmer (Except Model 961) |
16. |
Geradstichfuß (Ausgenommen Modell 961) |
16. |
Straight stitch foot (Except Model 961) |
17. |
Knopfannähfuß (Ausgenommen Modell 961) |
17. |
Button sewing foot (Except Model 961) |
18. |
Überwendlingfuß |
18. |
Overcasting foot |
19. |
Raupenfuß (Ausgenommen Modell 961) |
19. |
Satin stitch foot (Except Model 961) |
20. |
Reißverschlußfuß |
20. |
Invisible zipper foot |
9
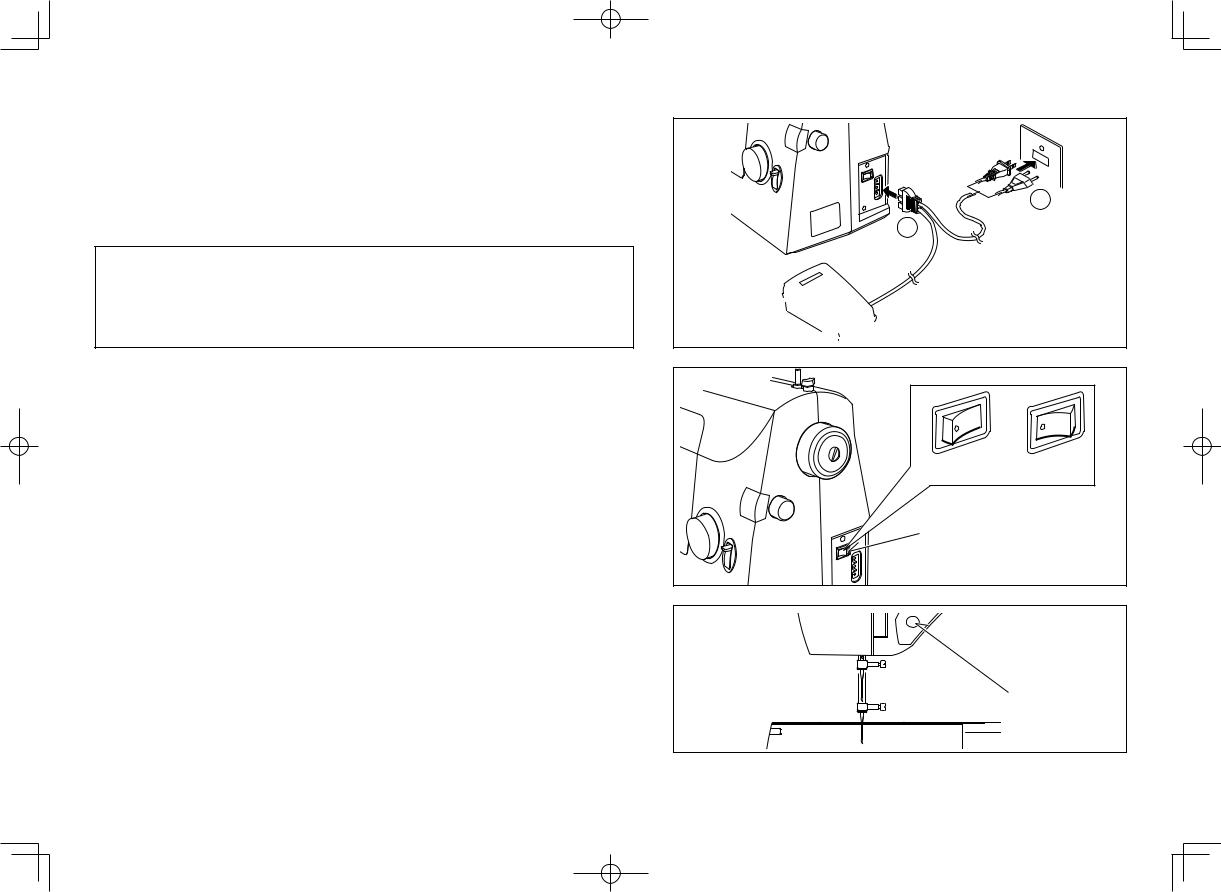
ПОДГОТОВКА МАШИНЫ К РАБОТЕ
Прежде чем приступить к работе, удалите избыточную смазку с игольной пластинки.
НОЖНАЯ ПЕДАЛЬ УПРАВЛЕНИЯ
Вставьте штепсель педали управления в гнездо (1) машины и в розетку (2) в стене, как показано на рисунке.
ТЕХНИКА БЕЗОПАСНОСТИ
(Только для электронных моделей)
Если машину заклинило, она остановится, подав три звуковых сигнала. После устранения причины заклинивания нажмите на педаль управления, и машина продолжит работать в обычном режиме.
ПЕРЕКЛЮЧАТЕЛЬ ПИТАНИЯ/ОСВЕЩЕНИЯ
Для приведения в действие машины включите переключатель питания/освещения. Включение/выключение электропитания и освещения производится одним и тем же переключателем.
Во время профилактического обслуживания, замены иглы или лампы и, если машина остается без надзора, то машина должна быть отсоединена от электросети.
На рисунке I : Ножная педаль управления
II : Переключатель питания/освещения III : Выключено
IV: Включено
ПЕРЕКЛЮЧАТЕЛЬ ИГЛЫ ВВЕРХ ВНИЗ
(ТОЛЬКО ДЛЯ ЭЛЕКТРОННОЙ МОДЕЛИ 967)
Данная машина управляется электроникой, так что игла всегда поднимается в верхнее положение, где бы ни было остановлено шитье. Если нужно опустить иглу, нажмите переключатель, машина подаст звуковой сигнал, и игла переместится в нижнее положение.
Нажмите его снова, или нажмите на педаль управления, и игла возвратится в верхнее положение.
На рисунке V : Переключатель иглы вверх/вниз
10
2
1
I

III |
IV |
II |
|
V
DAS AUFSTELLEN DER MASCHINE
Stellen Sie die Maschine auf eine gerade, feste Unterlage. Bevor Sie die Maschine zum ersten Mal benutzen, wischen Sie bitte überschüssiges Öl ab, das sich während des Transports im Stichplattenbereich ansammeln kann.
FUSSANLASSER
Verbinden Sie das Hauptkabel mit der Maschine (1) und der Steckdose (2) wie abgebildet.
SICHERHEITS-FEATURE BEIM ELEKTRONISCHEN MODELL
Ist die Maschine blockiert, stoppt sie mit dreifachem „Biep“. Ist der Grund der Blockierung beseitigt, treten Sie auf den Fußanlasser und die Maschine näht wieder wie gewohnt.
SETTING UP YOUR MACHINE
Be sure to wipe off any surplus oil from needle plate area before using your machine the first time.
FOOT CONTROL
Connect the plug of the foot control into the machine socket
(1) and your wall outlet (2) as illustrated.
SAFETY FEATURE OF ELECTRONIC MODEL
If the machine is jammed, it will stop with three beep sounds. After the cause of jamming is removed, step on the foot control and it will run in normal condition.
DER HAUPTSCHALTER
Ihre Maschine näht nur, wenn der Schalter für Licht und Maschine eingeschaltet ist.
Bei Wartungsarbeiten oder beim Auswechseln von Nadel oder Glühlampe muss die Maschine durch Ziehen des Netzsteckers aus der Steckdose abgeschaltet werden.
Abbildung I : Fußanlasser
II : Hauptschalter
III : Ein
IV : Aus
POWER/LIGHT SWITCH
Your machine will not operate until the power/light switch is turned on. The same switch controls both the power and the light.
When servicing the machine, or changing needles or Iamps, etc., machine must be disconnected from the mains supply.
Illustration I : Foot control
II : Power/light switch
III: On
IV: Off
NADEL AUF/AB-TASTE
(Nur Modell 967)
Ihre Maschine ist elektronisch so eingestellt, dass die Nadel immer in „Oben“-Stellung bleibt wenn Sie aufhören zu nähen. Wenn Sie die Nadel herunterlassen wollen, drücken Sie die Taste, Sie hören ein „Biep“ und die Nadel bewegt sich in die „Unten“-Stellung.
Drücken Sie noch einmal oder treten Sie auf den Fußanlasser und die Nadel geht wieder in die „Oben“-Stellung.
Abbildung V : Nadel Auf/Ab-Taste
NEEDLE UP/DOWN SWITCH
(Model 967 only)
Your machine is electronically controlled so that the needle will always rise to the ‘up’ position whenever you stop sewing.
IIf you wish to lower the needle, press the switch and a beep sound will be heard and the needle will move to the ‘down’ position. Push it again or activate the foot control and the needle will move back to the ‘up’ position.
Illustration V : Needle up/down switch
11
РЕГУЛЯТОР СКОРОСТИ ШИТЬЯ (ТОЛЬКО ДЛЯ ЭЛЕКТРОННОЙ МОДЕЛИ 967)
Регулировка скорости шитья осуществляется регулятором скорости совместно с педалью управления. Для установки требуемой скорости регулятор скорости шитья передвигают
в горизонтальном направлении.
На рисунке I : Регулятор скорости шитья
КАТУШЕЧНЫЙ СТЕРЖЕНЬ ДЛЯ ВЕРХНЕЙ НИТИ
ГОРИЗОНТАЛЬНЫЙ СТЕРЖЕНЬ для стандартной катушки
Разместите катушку с нитками на катушечном стержне и прижмите колпачком, чтобы обеспечить равномерное разматывание нити. Если на пластиковой основе катушки есть прорезь для удержания нити, то при размещении катушки на стержне, она должна оказаться справа.
Выберите правильный размер колпачака: диаметр колпачка должен быть всегда больше основания катушки.
ВЕРТИКАЛЬНЫЙ СТЕРЖЕНЬ для больших катушек
Установите дополнительный стержень для катушки, затем наденьте войлочный диск. Разместите катушку на вертикальном стержне.
Иллюстрация II : Катушка
III : Войлочный диск
IV:Вертикальный стержень
V :Горизонтальный стержень
VI:Прорезь для удержания нити
VII: Колпачок катушечного стержня
РЫЧАГ ПРИЖИМНОЙ ЛАПКИ
Прижимная лапка может находиться в одном из трех следующих положений:
1.Нижнее положение рычага и лапки - при шитье.
2.Среднее положение рычага - при закладывании материала.
3.Крайнее верхнее положение рычага - при заме неприжимной лапки или удалении толстого материала.
|
|
|
I |
|
|
|
II |
|
|
|
III |
VII |
II |
VI |
IV |
|
|||
|
|
|
V |
12

GESCHWINDIGKEITS-VORWAHL
(Nur Modell 967)
Die Nähgeschwindigkeit wird bestimmt durch die Vorwahl zusammen mit dem Fußanlasser. Die GeschwindigkeitsVorwahl können Sie horizontal verschieben, je nach dem gewünschten Geschwindigkeitsbereich.
Abbildung I : Geschwindigkeits-Vorwahl
GARNROLLENHALTER
HORIZONTALER GARNROLLENHALTER für normale Garnrollen
Stecken Sie die Garnrolle auf den Garnrollenhalter und sichern Sie sie mit einer Fadenablaufscheibe, damit der Faden gut abläuft. Ist die Garnrolle mit einer Fadenvorspannung ausgestattet, sollte diese nach rechts zeigen.
Wählen Sie die richtige Fadenablaufscheibe je nach Garnrollentyp und -durchmesser. Der Durchmesser der Fadenablaufscheibe sollte immer größer sein als der Durchmesser der Garnrolle.
VERTIKALER GARNROLLENHALTER für größere Garnrollen
Garnrollenhalter anbringen und eine Unterlegscheibe darauf setzen. Stecken Sie eine Garnrolle auf den Garnrollenhalter.
Abbildung II : Garnrolle III : Unterlegscheibe
IV : Vertikaler Garnrollenhalter
V : Horizontaler Garnrollenhalter
VI : Fadenvorspannung VII : Fadenablaufscheibe
SEWING SPEED CONTROL
(Model 967 only)
The sewing speed is achieved by using the sewing speed control in conjunction with the foot control. The sewing speed control is moved horizontally to determine the zone of speed required.
Illustration I : Sewing speed control
SPOOL PINS
HORIZONTAL SPOOL PIN for normal thread spool
Place thread spool on the pin and secure with a spool cap to ensure smooth flow of thread. If the thread spool has a thread retaining slit, it should be placed to the right.
Select the correct spool pin cap according to the type and diameter of spool being used. The diameter of the spool pin cap should always be larger than that of the spool itself.
VERTICAL SPOOL PIN for large thread spool
Attach the spool pin. Place the felt disc over it. Place a thread spool on the spool pin.
Illustration II : Spool |
III : Felt disc |
IV : Vertical spool pin |
|
V : Horizontal spool pin |
|
VI : Thread retaining slit |
VII : Spool pin cap |
DER NÄHFUSSHEBEL |
PRESSER FOOT LEVER |
||
Es gibt drei Positionen für den Nähfuß. |
There are three positions for your presser foot. |
||
1. |
Zum Nähen den Nähfuß herunterlassen. |
1. |
Lower the presser foot to sew. |
2. |
Zum Einlegen und Herausnehmen Ihrer Näharbeit: |
2. |
Raise the lifter to the middle position to insert or remove |
|
mittlere Stellung. |
|
fabric. |
3. |
In die höchste Stellung bringen, wenn Sie den |
3. |
Lift it to its highest position to change the presser foot or |
|
Nähfuß auswechseln oder besonders dicken Stoff |
|
to remove thick fabric. |
|
herausnehmen. |
|
|
13
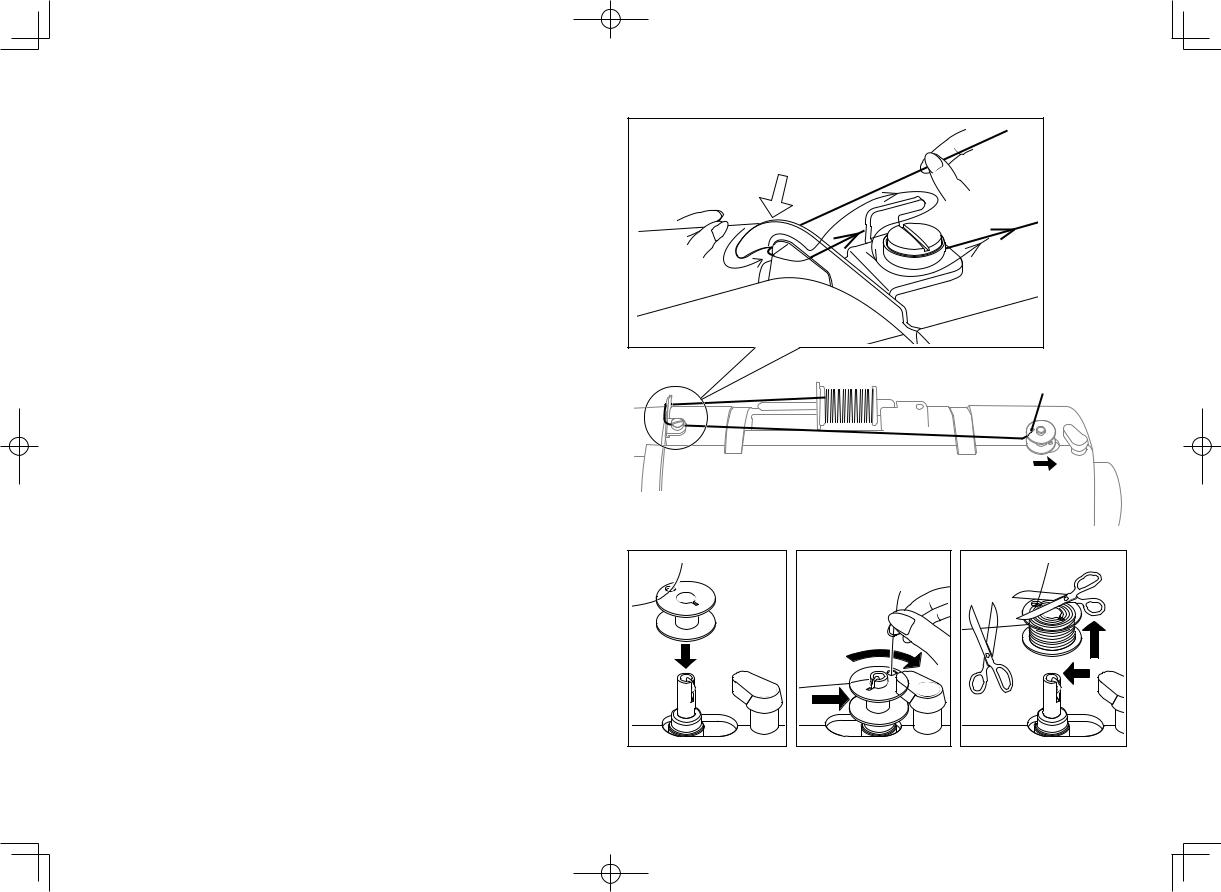
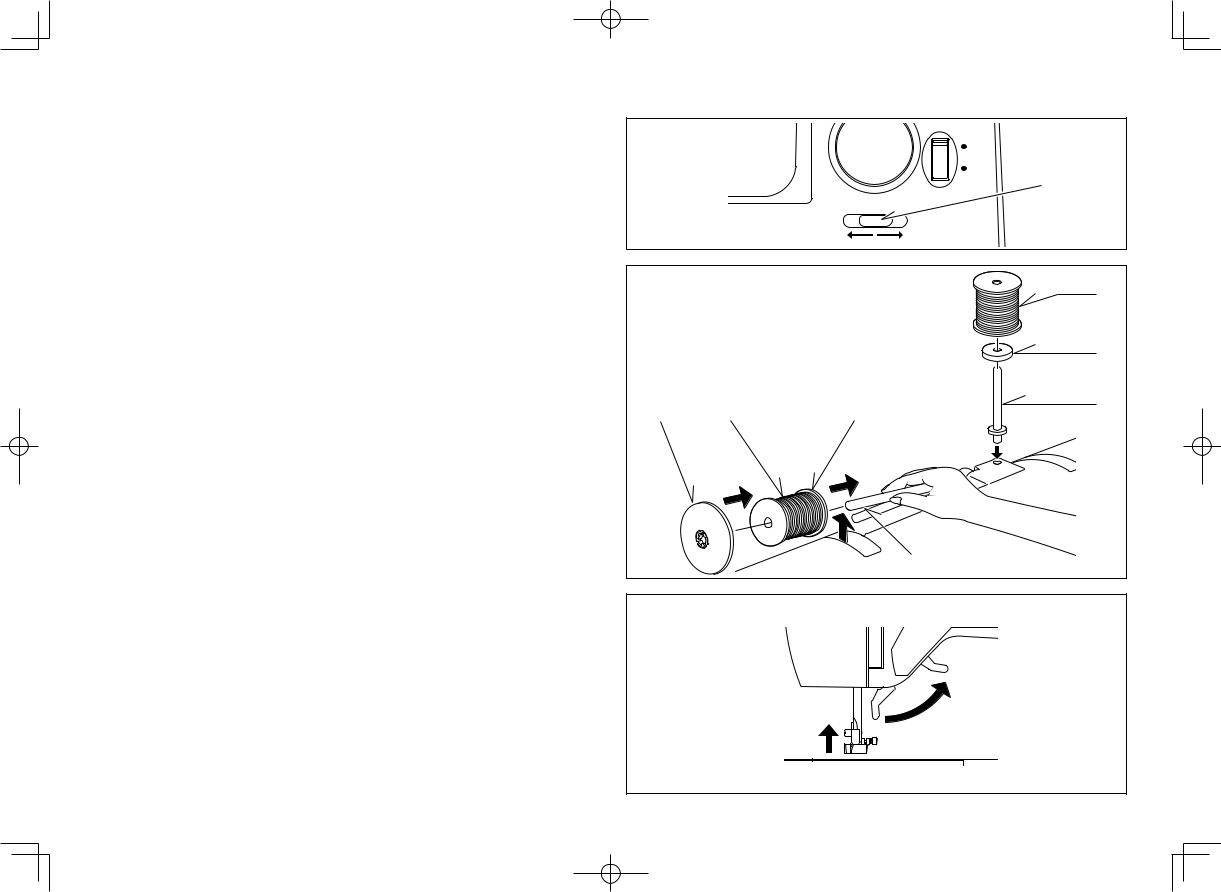
НАМОТКА ШПУЛЬКИ
1.Протяните нитку от катушки через нитенаправитель как показано на рисунке.
2.Проденьте конец нитки через отверстие в шпульке.
3.Переместите стержень моталки в крайнее левое положение, если он был в другом положении.
Наденьте шпульку на стержень таким образом, чтобы нитка выходила из верхнего отверстия шпульки. Сдвиньте стержень моталки вправо до щелчка.
Держите конец нитки.
4.Нажав на педаль, включите машину. Удерживаемая Вами нитка начнет наматываться на шпульку. При наполнении шпульки произойдет автоматическое отключение привода стержня и намотка прекратится.
Для снятия шпульки сместите стержень влево.
1 |
2 |
3 |
4 |
14

AUFSPULEN DES UNTERFADENS
1.Ziehen Sie den Faden von der Garnrolle durch die Fadenführungen, wie die Skizze zeigt.
2.Ziehen Sie das Fadendende durch ein Loch in der Spule (siehe Skizze).
3.Drücken Sie die Spulwelle so weit wie möglich nach links, und stecken Sie die Spule so auf die Welle, dass das Fadenende nach oben verläuft. Drücken Sie nun die Spulwelle nach rechts bis es klickt, und halten Sie das Fadenende fest.
4.Starten Sie die Maschine. Nach ein paar Umdrehungen können Sie das Fadenende loslassen. Wenn die Spule voll ist, schaltet sich der Spuler von selbst ab. Drücken Sie die Spulwelle wieder nach links, nehmen Sie die Spule ab, und schneiden Sie die Fadenenden ab.
WINDING BOBBIN
1.Pass thread from spool through thread guides as shown.
2.Pull end of thread through hole in bobbin as shown.
3.Push bobbin winder shaft to far left position, if it is not already there. Place bobbin onto shaft with end of thread coming from top of bobbin. Push bobbin winder shaft to right until it clicks. Hold onto end of thread.
4.Start machine. The thread that is held will snap. Bobbin will cease turning when completely filled. Push shaft to left to remove bobbin.
15
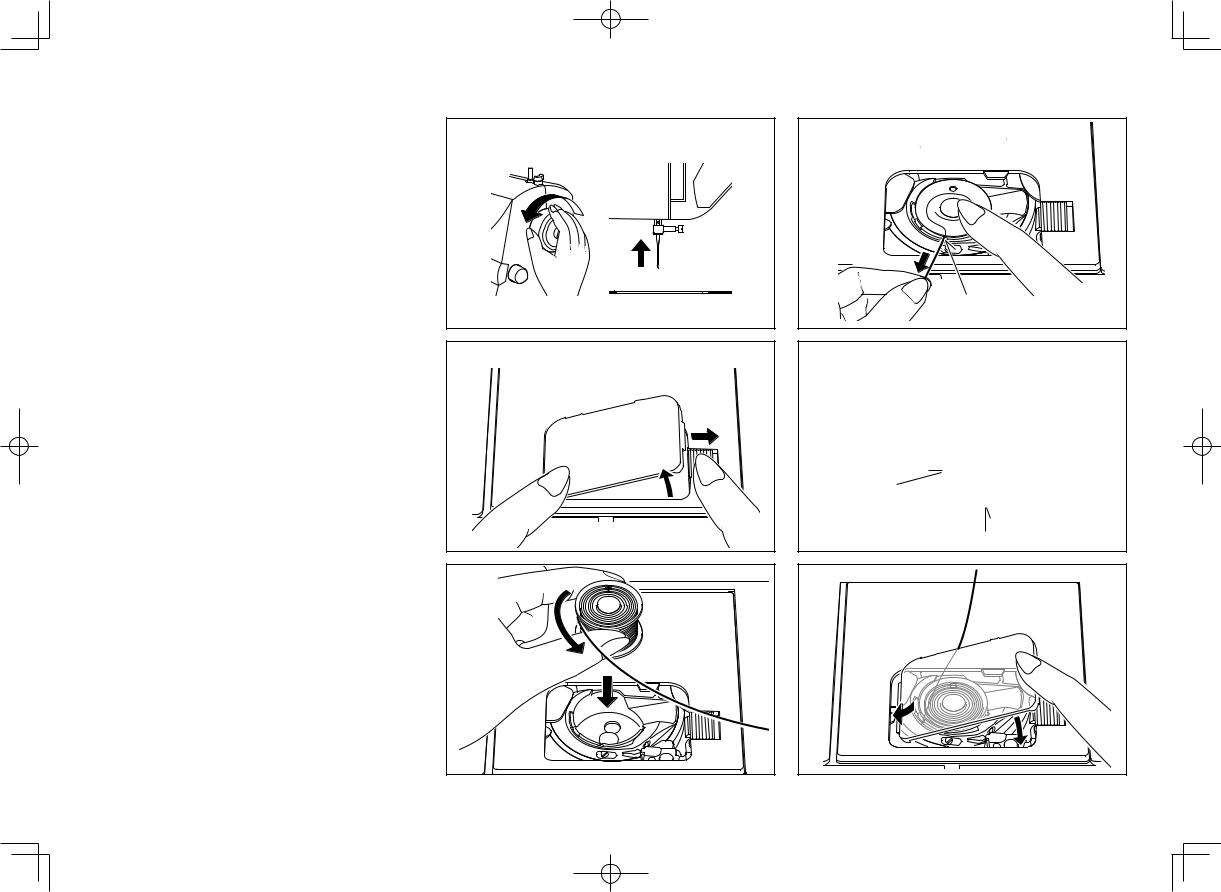
ЗАПРАВКА НИЖНЕЙ НИТКИ
1.Поднимите иглу в крайнее верхнее положение, поворачивая маховое колесо на себя.
2.Для снятия крышки шпульного отсека нажмите на левый угол пластины, одновременно сдвигая вправо клавишу открывания.
3.Вставьте шпульку, убедившись, что шпулька врашается против часовой стрелки.
4.Проденьте нитку через прорезь (А) и заведите её влево.
5.Надавливая на шпульку, проденьте нить через прорезь (В) до щелчка, затем оставьте около 15 см нитки.
6.Установите крышку шпулечного отсека на игольную пластину.
1 |
2 |
3 |
4 |
A |
5 |
B |
A |
6 |
16
EINLEGEN DER SPULE UND DES UNTERFADENS
1.Bringen Sie die Nadel in ihre höchste Stellung, indem Sie das Handrad nach vorn drehen.
2.Entfernen Sie die Spulenabdeckung.
3.Legen Sie die Spule so ein, dass sie sich entgegen dem Uhrzeigersinn dreht.
4.Ziehen Sie den Faden durch den Schlitz (A) und dann nach links.
5.Halten Sie die Spule leicht mit einem Finger fest, und ziehen Sie den Faden zum Schlitz (B) , bis Sie ein leises Klicken hören. Ziehen Sie dann etwa 15cm Faden aus der Spule heraus.
6.Setzen Sie die Spulenabdeckung wieder ein.
THREADING THE BOBBIN THREAD
1.Raise the needle to its highest position by rotating the hand wheel towards you.
2.Remove the bobbin cover plate by pushing the release button to the right while pushing the left corner of plate.
3.Insert the bobbin making sure the bobbin rotates anticlockwise.
4.Pull thread through the slot (A) and then to the left.
5.With a finger held gently on top of the bobbin, pull thread through the slot (B) until you hear a clicking sound, and then leave about 15 cm of thread.
6.Replace the bobbin cover plate onto the needle plate.
17
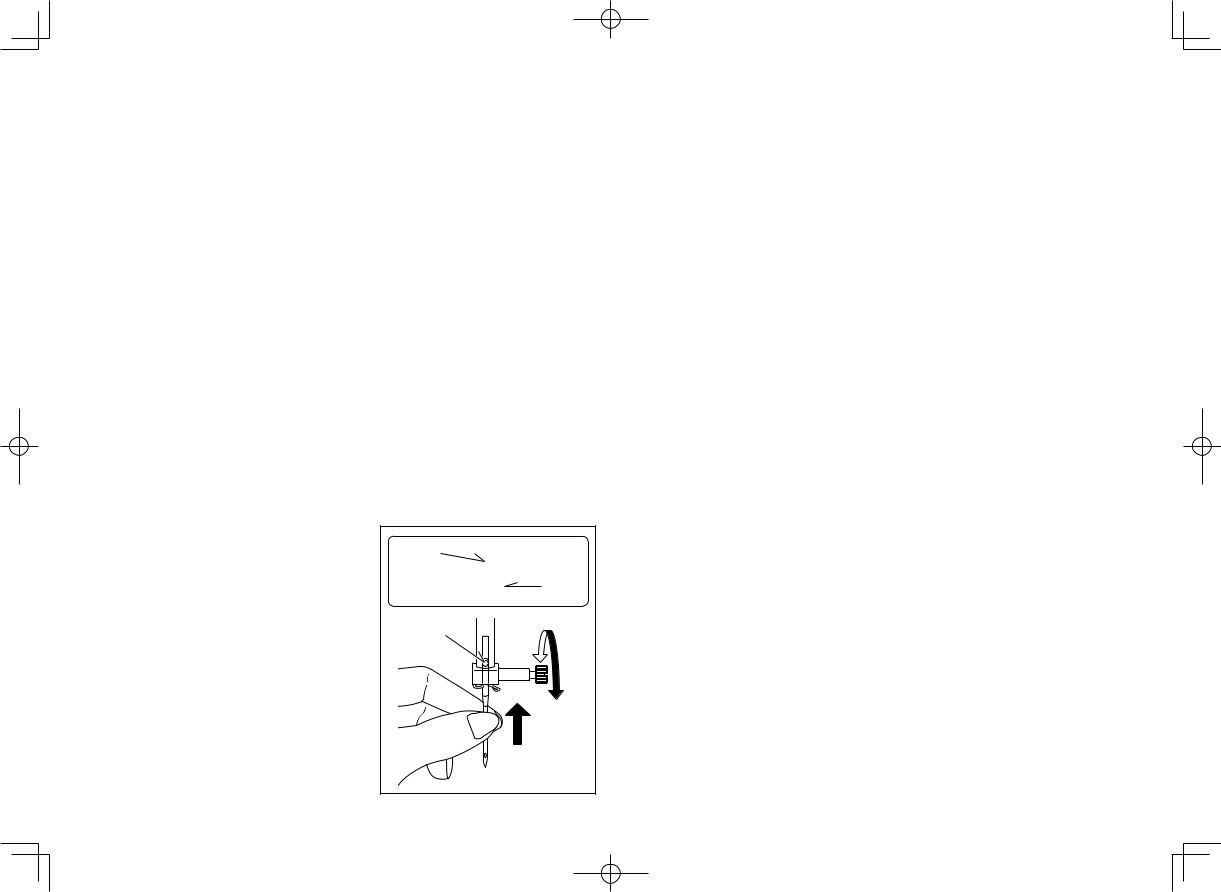
ТАБЛИЦА ИГЛ, НИТОК И МАТЕРИАЛОВ
Используйте стандартные иглы. Номер Вашей иглы должен соответствовать размеру нитки и оба они должны соответствовать типу материала.
Для обеспечения нормального режима работы машины необходимо, чтобы размеры и типы ниток в шпульке и в
катушке в верхней части машины были соответственно одинаковыми. Никогда не пользуйтесь погнутой или тупой иглой.
Для качественной строчки эластичных материалов пользуйтесь иглами эластичной строчки, имеющими синий стержень.
Размер нитки |
Размер иглы |
Ткань |
|
|
|
|
|
Хлопчатобумажная нитка |
Игла с синим |
Все эластичные ткани |
|
60 - 100 |
стержнем |
|
|
Синтетическая нитка |
|
|
|
Нитка для машинной |
|
|
|
вышивки |
|
|
|
Хлопчатобумажная нитка |
70 |
Легкая хлопчатобумажная |
|
Синтетическая нитка |
|||
или |
ткань, шелковая ткань, ткань из |
||
Шелк А |
|||
80 |
синтетической нитки, тонкое |
||
Маханическая вышиваль- |
|||
|
кружево, батист и кисея |
||
ная нитка |
|
||
|
|
||
Хпопчатобумажная нитка |
80 |
Хлопчатобумажная ткань среднего веса, |
|
60 - 80 |
или |
синтетическая ткань среднего веса, |
|
Мерсеризованная нитка |
90 |
поплин, легкая ткань в крепированную |
|
50 - 60 |
|
полоску, пестротканый гринсбон, вельвет, |
|
Синтетическая нитка |
|
шерстяная ткань среднего веса и |
|
|
|
льняная ткань |
|
Хлопчатобумажная нитка |
|
Тяжелая хлопчатобумажная ткань, |
|
30 - 60 |
100 |
шерстяная ткань средне- |
|
Мерсеризованная нитка |
го-тяжелого веса, хлопчатобу- |
||
типа “хеви дьюти” |
|
мажная ткань и “деним”. |
Замена иглы
1.Поднимите иглодержатель в крайнее верхнее положение, вращая на себя маховик.
2.Отверните винт иглодержателя, вращая его на себя.
3.Выньте иглу, потянув ее вниз.
4.Установите в иглодержатель новую иглу плоской стороной от себя.
5.Продвиньте иглу вверх до упора.
6.Туго затяните отверткой винт иглодержателя.
Иллюстрация I:Плоская сторона
II: Игла III :Штифт
IV:Плоская сторона от себя
I |
II |
III |
IV |
DIE NADEL-UND GARNTABELLE
Benutzen Sie Standardnadeln. Die Größe der Nadel sollte zum Faden passen und beide zum Stoff.
Zum normalen Nähen sollte der gleiche Faden für Ober-und Unterfaden verwandt werden. Benutzen Sie nie eine verbogene
oder stumpfe Nadel.
Für ein gutes Nähresultat auf elastischen Stoffen setzen Sie Stretchstich-Nadeln ein.
Garnstärke |
Nadelgröße |
Stoff |
|
|
|
|
|
Baumwolle 60-100 |
|
|
|
Synthetik |
Stretchstich-Nadel |
Alle elastischen Stoffe |
|
Sticken mit der Maschine |
|
|
|
|
|
|
|
Baumwolle |
70 |
Dünne Baumwolle, Seide |
|
Synthetik |
Synthetiks, feine Spitzen |
||
oder |
|||
Seide A |
Batist, Baumw.-Gardinen |
||
80 |
|||
Maschinenstickerei |
|
||
|
|
||
|
|
|
|
Baumwolle 60 – 80 |
80 |
Mittelschwere Baumwollstoffe |
|
mittelschwere Synthetiks |
|||
mercerisiert 50 - 60 |
oder |
Popeline, Seersucker |
|
Synthetik |
90 |
Taft, Samt, leichte Wollstoffe, |
|
|
|
Leinen |
|
|
|
|
|
Baumwolle 30 – 60 |
|
Schwere Baumwollstoffe, |
|
100 |
mittlere und schwere Wollstoffe, |
||
merceriert, fest |
|||
|
Jeans |
||
|
|
||
|
|
|
Auswechseln der Nadel
1.Bringen Sie die Nadel in ihre höchste Stellung, indem Sie das Handrad nach vorn drehen.
2.Lösen Sie die Nadelhalteschraube, indem Sie sie nach vorn drehen.
3.Ziehen Sie die Nadel nach unten heraus.
4.Setzen Sie die neue Nadel in den Nadelhalter ein, mit der flachen Seite nach hinten.
5.Schieben Sie die Nadel bis zum Anschlag ein.
6.Ziehen Sie die Halteschraube wieder fest an.
Abbildung I : Flache Seite
II: Nadel III : Stift
IV : Flache Seite nach hinten
18
NEEDLE, THREAD AND FABRIC CHART
Use the standard needles. The size of your needle should match the size of the thread and both should match the fabric.
For normal sewing, the same size and type of thread should be used in the bobbin as
on the upper part of the machine. Never use a bent or dull needle.
For successful sewing of stretch fabrics use stretch stitch needles.
Thread Size |
Needle Size |
Fabric |
|
|
|
|
|
Cotton 60 - 100 |
Stretch stitch |
|
|
Synthetic |
All stretch fabrics. |
||
needle |
|||
Machine embroidery |
|
||
|
|
||
|
|
|
|
Cotton |
70 |
Sheer cottons, silk |
|
Synthetic |
|||
or |
synthetics, fine laces, |
||
Silk A |
|||
80 |
batiste, dimity. |
||
Machine embroidery |
|||
|
|
||
|
|
|
|
Cotton 60 - 80 |
80 |
Medium weight cottons, |
|
medium weight synthetics, |
|||
Mercerized 50 - 60 |
or |
poplin, seersucker, |
|
Synthetic |
90 |
gingham, velvet, light |
|
|
|
weight woolens, linen. |
|
|
|
|
|
Cotton 30 - 60 |
|
Heavy weight cottons, |
|
Mercerized heavy |
100 |
medium to heavy |
|
duty |
|
weight woollens, denim. |
|
|
|
|
Changing the needle
1.Raise the needle bar to its highest position by turning the hand wheel toward you.
2.Loosen the needle clamp screw by turning it toward you.
3.Remove the needle by pulling it downward.
4.Insert the new needle into the needle clamp with the flat side away from you.
5.Push the needle up as far as it can go.
6.Tighten the needle clamp screw firmly with the screw driver.
Illustration I |
: Flat side |
II |
: Needle |
III |
: Pin |
IV |
: Flat side away from you. |
19

ЗАПРАВКА ВЕРХНЕЙ НИТИ
1.Поднимите рычаг нажимной лапки.
2.Поднимите иглу в крайнее верхнее положение, вращая на себя маховик.
3.Заправьте нить в машину в последовательности, показанной на рисунке.
1 |
2 |
4 |
|
|
|
1 |
|
|
3 |
|
|
|
|
|
1 |
|
5 |
|
4 |
2 |
2 |
|
|
|||
|
|
|
3 |
|
|
6 |
5 |
|
|
|
|
|
|
|
|
|
|
6 |
3 |
|
|
|
|
|
7 |
|
7 |
|
|
|
|
|
|
20

EINFÄDELN DES OBERFADENS
1.Stellen die den Nähfußhebel hoch.
2.Bringen Sie den Fadenhebel in die höchste Stellung, indem Sie das Handrad nach vorn drehen.
3.Fädeln Sie die Maschine entsprechend der Reihenfolge in der Skizze ein.
THREADING THE TOP THREAD
1.Raise the presser foot lever.
2.Raise the needle to its highest position by rotating the hand wheel towards you.
3.Thread the machine in the following order as illustrated.
21
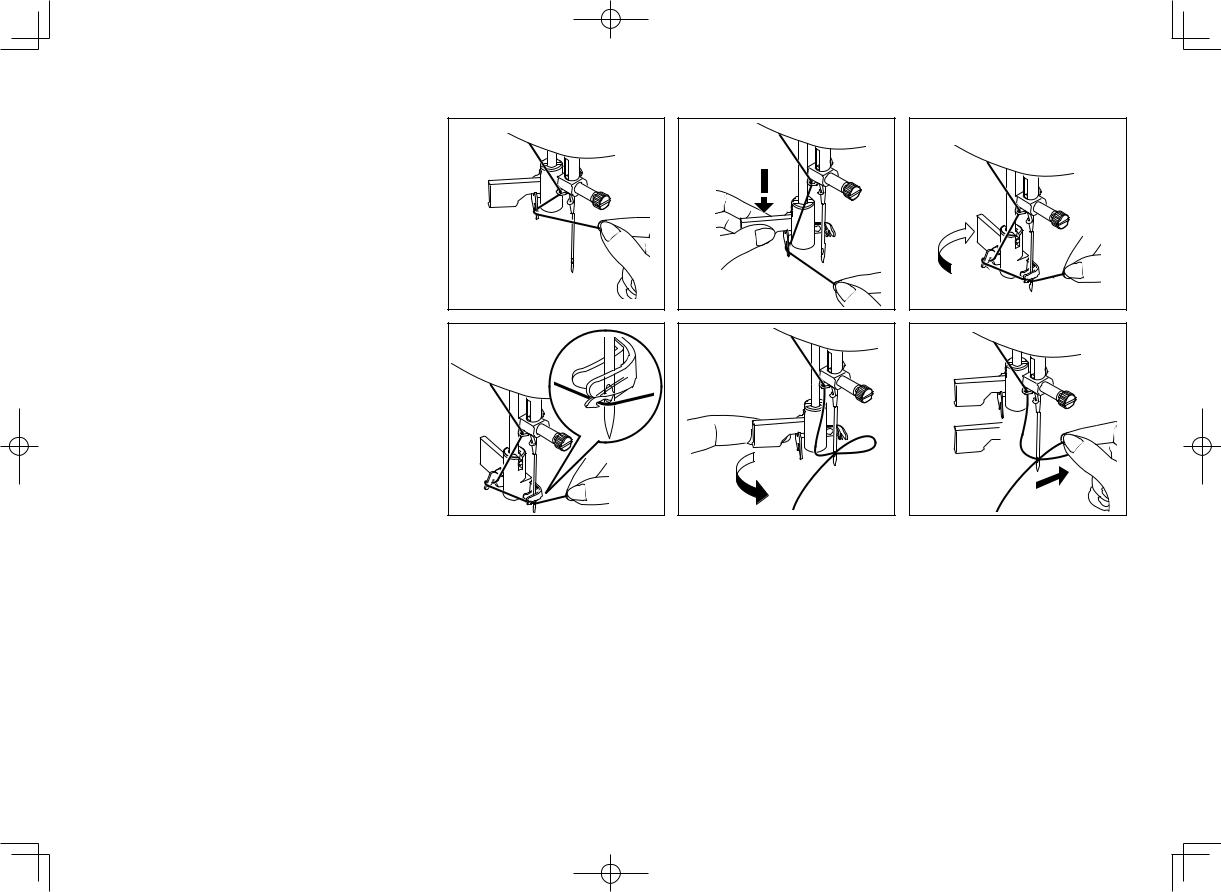
КАК ПОЛЬЗОВАТЬСЯ УСТРОЙСТВОМ ВДЕВАНИЯ НИТКИ В ИГЛУ
Поднимите иглу в крайнее верхнее положение, вращая на себя маховик.
1.Заведите нитку в нитенаправители, как паказано на рисунке.
2.Потяните вниз рычажок, придерживая конец нитки.
3.Поверните рычажок до упора.
4.Заправьте нитку в петлеобразующую вилку и потяните нитку вверх.
5.Поверните рычажок, вернув его в прежнее положение, при этом нитка автоматически вставится в иглу.
6.Верните рычажок в первоначальное положение (вверх) и потяните нитку от себя.
ПРИМЕЧАНИЕ При использовании нитевдевателя для заправки нити
в иглу, рекомендуется установить прямой тип строчки (игла займет центральное положение).
1 |
4 |
2
5 |
3
6 |
22
 Loading...