


VIDEO 2 PC
QUICKSTART GUIDE
::: ENGLISH ( 2 – 8 ) :::
GUÍA DE INICIO RÁPIDO
::: ESPAÑOL ( 9 – 15 ) :::
GUIDE D’UTILISATION RAPIDE
::: FRANÇAIS ( 16 – 22 ) :::
GUIDA RAPIDA
::: ITALIANO ( 23 – 29 ) :::
KURZANLEITUNG
::: DEUTSCH ( 30 – 36 ) :::
SNELSTARGIDS
::: NEDERLANDS ( 37 – 43 ) :::

BOX CONTENTS
•VIDEO 2 PC
•RCA audio/video cable
•Software CD
•Quickstart Guide
•Safety Instructions & Warranty Information Booklet
DRIVER & SOFTWARE INSTALLATION
Before beginning, make sure your computer meets these system requirements:
PC:
•Windows XP, Vista (32or 64-bit), or 7 (32or 64-bit)
•Screen Resolution: 1024 x 768, 16-bit (or above)
•Pentium 2 450 MHz (or comparable) or above
•512 MB RAM (2GB or more recommended)
•10 GB free hard drive space
•Available USB 2.0 port (preferably on rear panel)
•CDor DVD-ROM drive
•Optional: DVD burner
Mac:
•OS X 10.5.6 (or above)
•1.5 GHz Intel Core Solo
•1 GB 667 MHz DDR2 SDRAM
•10 GB free hard drive space
•Available USB 2.0 port (preferably on rear panel)
•CDor DVD-ROM drive
•Optional: DVD burner
THIS DEVICE COMPLIES WITH PART 15 OF THE FCC RULES. OPERATION IS SUBJECT TO THE FOLLOWING TWO CONDITIONS: (1) THIS DEVICE MAY NOT CAUSE HARMFUL INTERFERENCE, AND (2) THIS DEVICE MUST ACCEPT ANY INTERFERENCE RECEIVED, INCLUDING INTERFERENCE THAT MAY CAUSE UNDESIRED OPERATION.
2

WINDOWS
1.Insert the CD into your computer's CD drive.
2.Install the drivers.
On the window that appears after you insert the CD, click "Install f Driver." Follow the on-screen instructions that appear to complete the installation.
If this window does not automatically appear, double-click "My Computer" then double-click the CD. The window should appear. (If the window still does not appear, right-click the CD and select "Explore." Once the CD's contents are shown, double-click the "PC" folder, double-click the "Driver" folder, then double-click "Setup.exe.")
3.Install the software.
On the window that appears after you insert the CD, click "Install f Software." Follow the onscreen instructions that appear to complete the installation.
If this window does not automatically appear, double-click "My Computer" then double-click the CD. The window should appear. If the window still does not appear, right-click the CD and select "Explore." Once the CD's contents are shown, double-click the "PC" folder, double-click the "Software" folder, double-click the "Cyberlink…" folder, then double-click "Setup.exe."
You can eject the CD and begin using VIDEO 2 PC and the software you installed.
4.Connect the device.
Connect VIDEO 2 PC to a free USB2.0 port on your computer. (We recommend connecting it to a port on the rear panel of your computer.)
You may see several dialog boxes in the corner of the screen, indicating the computer has detected VIDEO 2 PC is connected. In some cases, you may see a message resembling an error message – this is normal. Click "OK" (if necessary).
5.Begin!
You can find the software by going to Start Menu f
All Programs f Cyberlink PowerProducer or
PowerDirector. (You may also double-click the shortcut icon on your computer's Desktop.)
Note: Sometimes, the software will ask if you want to upgrade after you open it. This is optional but not required.
The first time you open PowerDirector, you will be
asked to enter a serial number. Find the number on the sleeve of the CD and enter it.
3

MAC
1.Insert the CD into your computer's CD drive.
2.Install the drivers and software.
Double-click the CD on the Desktop. On the window that appears, double-click the "Mac" folder, then double-click "EZCap EN.pkg." Follow the on-screen instructions that appear to complete the installation. You will need to restart your computer afterward to complete this process.
You may now eject the CD.
3.Connect the device.
Connect VIDEO 2 PC to a free USB2.0 port on your computer. (We recommend connecting it to a port on the rear panel of your computer.)
4.Begin!
You can find the software by going to Applications f EzCAP f EzCAP. The first time you open EzCAP, you will be asked to enter a serial number into the "Serial Number" field. Find the number on the sleeve of the EzCAP CD and enter it then click "OK."
After installing EzCAP, you can also use VIDEO 2 PC in any program that uses QuickTime video digitizers, such as Apple QuickTime Player.
4

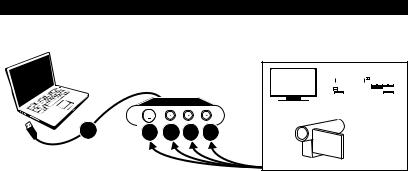
OVERVIEW
COMPUTER |
|
VIDEO PLAYBACK DEVICE |
|
|
|
|
|
VCR |
|
|
TV |
1 |
4 3 2 2 |
Camcorder |
|
|
etc… |
IMPORTANT:
To capture a video's sound, connect the left and right AUDIO INPUTS to the left and right audio outputs of your playback device.
To capture the video image itself, choose either the COMPOSITE VIDEO INPUT or the S-VIDEO INPUT.
1.USB CONNECTOR – Connect this end of VIDEO 2 PC to the included USB extension cable then connect the extension cable to an available USB 2.0 port on your computer (preferably a port on the rear panel).
2.AUDIO INPUTS – Use standard RCA cables to connect these left and right audio inputs to the left and right audio outputs of your playback device. Be sure to match the colors properly – red to red, white to white.
3.COMPOSITE VIDEO INPUT – Use a standard composite video cable to connect this input to the composite video output of your playback device. (If your playback device has an S-Video output, you may connect that to the S-VIDEO INPUT instead.)
Note: Generally, S-Video connections are of a better quality than composite video, so we recommend using this one if your playback device has an S-Video output.
4.S-VIDEO INPUT – Use a standard S-Video cable (not included) to connect this input to the S-Video output of your playback device.
5

GET STARTED!
PowerDirector (PC)
1.Connect VIDEO 2 PC to your playback device and to your computer (as shown in the OVERVIEW).
2.Open PowerDirector. You can find the software by going to
Start Menu f All Programs f Cyberlink PowerDirector. (You may also double-click the shortcut icon on your computer's Desktop.)
Note: Sometimes, the software will ask if you want to upgrade after you open it. This is optional but not required.
3.Click the "Capture" tab in the upper left-hand corner of the screen. The software will automatically detect your video device.
4.Start recording by clicking the red "Record" button. Play your video source (digital camera, TV, DVD player, etc.).
5.When you are done capturing your video, click the "Stop" button.
6.Enter the title of your video in the "Captured File Name" field in the window that appears and click "OK." The video will appear in the "Captured Content" at the bottom of the window.
•If you want to create a CD, click the "Create Disc" tab. Use the buttons underneath the "Content" tab to add the videos you want on your CD, then click "Burn" to burn the disc.
•If you want to save a video in a popular format (such as a portable MPEG-4 for PSP, iPod*, or iPhone*), click the "Edit" tab then click the "Produce" tab and select the proper format.
Note: For more in-depth information about using PowerDirector, press F1 on your keyboard or click the "director's chair" icon button in the upper left-hand corner of the screen, and go to "Help" then "PowerDirector Help" to access the software's help file.
* Note: In some cases, depending on your computer's operating system, your video's picture or sound in PowerDirector may appear "jerky" or "stalled." This will not affect your video, though; it is actually capturing it properly.
•If you want to upload a video to YouTube™ or Facebook™, click the "Edit" tab then click the "Produce" tab then click the "YouTube" or "Facebook" tab near the top of the window.
iPhone and iPod are trademarks of Apple Inc., registered in the U.S. and other countries. YouTube is a trademark of YouTube, LLC.
Facebook is a registered trademark of Facebook, Inc.
6

EzCAP Capture (Mac)
1. Connect VIDEO 2 PC to your playback device and to your computer (as shown in the OVERVIEW). VIDEO 2 PC must be connected to your computer for the software to open properly.
2. Open EzCAP Capture. You can find the software by going to
Applications f EzCAP f EzCAP.
3. The first time you open EzCAP, you will be asked to enter a serial number. Find the number on the sleeve of the EzCAP CD and enter it.
4. EzCAP Capture is now open. (Note: Do not play your video
source (digital camera, TV, DVD player, etc.) yet. You need to set the software's audio first.)
5. Click "Record" in the top menu and select "Sound Settings." In the window that appears, click the "Source" tab and select "ION Audio USB 2861 Device" from the list below it. Also, make sure the menu next to "Speaker" is set to "On." Click "OK" when you are done.
6. Start recording by clicking "Record" in the top menu and selecting "Record." * (You can also press "Command" + "R.") Play your video source (digital camera, TV, DVD player, etc.).
7. When you are done capturing your video, click anywhere inside the box at the center of the screen. To return to the main screen, click "OK."
8. For more information on using EzCAP Capture, please refer to the manual (PDF) in the "Mac" folder on the included CD.
Important note!
To play your captured video on your iPod or iPhone, the video must be in a specific type of MPEG-4 format, even if you already saved your video as an MPEG-4 in the software. To convert your video to be played on your device, follow these steps:
1.Capture your video, save it, then close the software.
2.Open your Applications folder.
3.Open QuickTime, click the "File" menu and select "Open File."
4.Locate and the video you just captured and click "Open." The video will open in QuickTime.
5.Click the "File" menu and select "Save As." (You can rename the movie or save it to a new location, if desired.)
6.Click the "Format" drop-down menu and select your device.
7.Click "Save." This file can now be played on your device.
7

QuickTime (Mac)
1.Connect VIDEO 2 PC to your playback device and to your computer (as shown in the OVERVIEW).
2.In order to use VIDEO 2 PC with QuickTime, you must first
register your EzCAP Capture software. Open EzCAP Capture by going to Applications f EzCAP f EzCAP.
3.You will be asked to enter a serial number into the "Serial Number" field. Find the number on the sleeve of the EzCAP CD and enter it then click "OK."
Note: If your Mac is running an older OS (e.g., 10.4), your version of QuickTime may not have the option to record and save movie files. If this is the case, we recommend upgrading to QuickTime Pro to access these features.
4.After entering the serial number and EzCAP Capture opens successfully, you may close it.
5.If you are using Snow Leopard (Mac OS X 10.6), set QuickTime to open in 32-bit mode before beginning. To do this, go to your Applications folder, right-click "QuickTime" and select "Get Info," check the "Open in 32-bit mode" box in the window that appears, then close the window.
6.Open QuickTime, click the "File" menu and select "New Movie Recording."
7.If you see a downward-pointing triangle to the right of the "record" button, click it to open a drop-down menu. If you do not see the triangle, click the "QuickTime Player" menu at the top of the screen and select "Preferences."
8.In the drop-down menu, make sure that the proper "Camera" setting is selected ("Composite" or "S- Video," depending on which connector you are using) and that "ION Audio USB 2861 Device" is selected as the "Microphone." (Also, make sure the volume slider on the left-hand side of the window is turned up.)
9.Start recording by clicking the red "record" button at the bottom of the screen. Play your video source (digital camera, TV, DVD player, etc.).
10.When you are done capturing your video, click the "stop" button. Your captured video will automatically open in the QuickTime player. To save it, go to "File" and select "Save" (or "Save As" to save it with a different name, but save it as a "self-contained" movie).
11.If you want the captured video to be playable on your iPhone or iPod, click the "Format" drop-down menu and select your device: "iPhone (Cellular)," "iPhone," or "iPod."
12.Click "Save."
8

CONTENIDO DE LA CAJA
•VIDEO 2 PC
•Cable de audio/video RCA
•CD de software
•Guía de inicio rápido
•Folleto de instrucciones de seguridad e información sobre la garantía
INSTALACIÓN DEL DRIVER Y EL SOFTWARE
Antes de comenzar, asegúrese de que su computadora cumpla estos requisitos de sistema:
PC:
•Windows XP, Vista (32 o 64 bits) o 7 (32 o 64 bits)
•Resolución de pantalla: 1024 x 768, 16 bits (o superior)
•Pentium 2 450 MHz (o comparable) o superior
•512 MB de RAM (se recomienda 2GB o más)
•10 GB de espacio libre en disco duro
•Puerto USB 2.0 disponible (preferentemente en el panel trasero)
•Lectora de CD o DVD-ROM
•Opcional: Quemador de DVD
Mac:
•OS X 10.5.6 (o superior)
•Intel Core Solo de 1.5 GHz
•SDRAM DE 1 GB 667 MHz DDR2
•10 GB de espacio libre en disco duro
•Puerto USB 2.0 disponible (preferentemente en el panel trasero)
•Lectora de CD o DVD-ROM
•Opcional: Quemador de DVD
9

WINDOWS
1.Inserte el CD en el lector de CD de la computadora.
2.Instale los drivers.
En la ventana que aparece después de insertar el CD, haga clic en "Install f Drivers." Siga las instrucciones que aparecen en la pantalla para terminar la instalación.
Si esta ventana no aparece automáticamente, haga doble clic en "My Computer" (Mi PC) y luego en el CD. Debe aparecer la ventana. (Si la ventana sigue sin aparecer, haga doble clic en el CD y seleccione "Explore" (Explorar)). Una vez que aparezca el contenido del CD, haga doble clic en la carpeta "PC", en la carpeta "Driver" y finalmente en "Setup.exe.")
3.Instale el software.
En la ventana que aparece después de que insertó el CD, haga clic en "Install f Software".Siga las instrucciones que aparecen en la pantalla para terminar la instalación.
Si esta ventana no aparece automáticamente, haga doble clic en "My Computer" (Mi PC) y luego en el CD. Debe aparecer la ventana. (Si la ventana sigue sin aparecer, haga doble clic en el CD y seleccione "Explore" (Explorar)). Una vez que aparezca el contenido del CD, haga doble clic en la carpeta "PC", en la carpeta "Software", en la carpeta "Cyberlink…" y finalmente en "Setup.exe.")
Puede expulsar el CD y comenzar a usar VIDEO 2 PC y el software que instaló.
4.Conecte el dispositivo.
Conecte el VIDEO 2 PC a un puerto USB2.0 libre de la computadora. (Recomendamos conectarlo a un puerto del panel trasero de la computadora.)
Es posible que vea varios cuadros de diálogo en la esquina de la pantalla, que le indican que la computadora detectó que está conectado el VIDEO 2 PC. En algunos casos, puede ver un mensaje que parece de error – es normal. Haga clic en "OK" (Aceptar) (si fuera necesario).
5.¡Comience!
Puede encontrar el software yendo al menú Start (Inicio) f All Programs (Todos los programas) f
Cyberlink PowerDirector. (También puede hacer doble clic en el icono del acceso directo del escritorio de la computadora.)
Nota: Algunas veces, el software le preguntará si desea actualizarlo después de abrirlo. Esto es opcional pero no obligatorio.
La primera vez que abra PowerDirector, se le solicitará que ingrese un número de serie. Busque el número en la funda del CD y ingréselo.
10
MAC
1.Inserte el CD en el lector de CD de la computadora.
2.Instale primero los drivers y el software
Haga doble clic en el CD del escritorio, en la carpeta "Mac" y en el archivo "EZCap ES.pkg". Siga las instrucciones que aparecen en la pantalla para terminar la instalación. Es necesario que reinicie la computadora después de terminar el proceso.
Puede expulsar el CD.
3.Conecte el dispositivo.
Conecte el VIDEO 2 PC a un puerto USB2.0 libre de la computadora. (Recomendamos conectarlo a un puerto del panel trasero de la computadora.)
4.¡Comience!
Puede encontrar el software yendo a Applications (Aplicaciones) f EzCAP f EzCAP Capture.
La primera vez que abra EzCAP, se le solicitará que ingrese un número de serie en el campo "Serial Number". Busque el número en la funda del CD de EzCAP, ingréselo y haga clic en "OK."
Después de instalar EzCAP, puede usar también VIDEO 2 PC en cualquier programa que use los digitalizadores de video QuickTime, como Apple QuickTime Player.
11
VISTA GENERAL
COMPUTADORA |
DISPOSITIVO DE |
||||||
REPRODUCCIÓN DE VIDEO |
|||||||
|
|||||||
|
|
|
|
|
|
|
|
|
|
|
|
|
|
|
|
|
|
|
|
|
Televisor |
VCR |
|
|
|
|
|
|
|
1 |
4 |
3 |
2 |
2 |
|
Cámara |
|
digital |
|||||
|
|
|
|
|
|
…etc.
IMPORTANTE:
Para capturar el sonido de un video, conecte las ENTRADAS DE AUDIO izquierda y derecha a las salidas de audio izquierda y derecha de su dispositivo de reproducción.
Para capturar la imagen de video propiamente dicha, elija ya sea la ENTRADA DE VIDEO COMPUESTO ola ENTRADA DE S-VIDEO.
1.CONECTOR USB – Conecte este extremo del VIDEO 2 PC al cable de extensión USB incluido y luego conecte dicho cable a un puerto USB 2.0 disponible de la computadora (preferiblemente un puerto del panel trasero).
2.ENTRADAS DE AUDIO – Use cables RCA estándar para conectar estas entradas de audio izquierda y derecha a las salidas de audio izquierda y derecha de su dispositivo de reproducción. Asegúrese de que los colores coincidan correctamente —rojo con rojo y blanco con blanco.
3.ENTRADA DE VIDEO COMPUESTO – Use un cable de video compuesto estándar para conectar esta entrada a la salida de video compuesto de su dispositivo de reproducción. (Si el dispositivo de reproducción tiene una salida de S-Video, puede conectarla en cambio a la ENTRADA S-VIDEO.)
4.ENTRADA DE S-VIDEO – Use un cable de S-Video compuesto estándar (non incluido) para conectar esta entrada a la salida de S-Video de su dispositivo de reproducción. (Generalmente, las conexiones de S- Video son de mejor calidad que las de video compuesto, de modo que recomendamos usarlas si el dispositivo de reproducción cuenta con una salida de S-Video.)
12

PARA COMENZAR
PowerDirector (PC)
1.Conecte el VIDEO 2 PC al dispositivo de reproducción y a la computadora (como se muestra en la VISTA GENERAL).
2.Abra PowerDirector. Puede encontrar el software yendo al menú Start (Inicio) f All Programs (Todos los programas) f Cyberlink PowerDirector. (También puede hacer doble clic en el icono del acceso directo del escritorio de la computadora.)
3.Haga clic en la pestaña “Capture" (Capturar) en la esquina izquierda superior de la pantalla. El software detecta automáticamente su dispositivo de video.
4.Comience a grabar haciendo clic en el botón rojo "Record". Reproduzca con su fuente de video (cámara digital, televisor, reproductor de DVD, etc.).
5.Cuando termine de capturar su video, haga clic en el botón "Stop" (Parar).
6.Ingrese el título de su video en el campo "Captured File Name" (Nombre del archivo capturado) de la ventana que aparece y haga clic en "OK." El video aparece en “Captured Content” (Contenido capturado) al pie de la ventana.
•Si desea crear un CD, haga clic en la pestaña "Create Disc". Use los botones que están debajo de la pestaña "Content" para agregar a su CD los videos que desea y luego haga clic en "Burn" para quemar el disco.
Nota: Algunas veces, el software le preguntará si desea actualizarlo después de abrirlo. Esto es opcional pero no obligatorio.
Nota: Para obtener información más detallada acerca del uso de PowerDirector, pulse F1 en su teclado o haga clic en el botón con el icono de la "silla del director" de la esquina superior izquierda de la pantalla y vaya a "Help" y luego "PowerDirector Help" para acceder al archivo de ayuda del software.
*Nota: En algunos casos, según sea el sistema operativo de su computadora, la imagen de su video en PowerDirector puede aparecer "inestable" o "atascada". Esto no afecta a su video, en realidad se está capturando correctamente.
•Si desea guardar un video en un formato popular
(como MPEG-4 para PSP portátil, iPod™ o iPhone™), haga clic en la pestaña "Edit" (Editar) y luego en la pestaña "Produce" (Producir) y seleccione el formato apropiado.
•Si desea subir un video a YouTube™ o Facebook™, haga clic en la pestaña "Edit" (Editar) y luego en la pestaña "Produce" y luego en la pestaña "YouTube" o "Facebook" cerca de la parte superior de la ventana.
*iTunes e iPod son marcas registradas de Apple, Inc., registradas en EE.UU. y otros países.
YouTube es una marca registrada de YouTube, LLC.
Facebook es una marca registrada de Facebook, Inc.
13

EzCAP Capture (Mac)
1.Conecte el VIDEO 2 PC al dispositivo de reproducción y a la computadora (como se muestra en la VISTA GENERAL). VIDEO 2 PC debe estar conectado a su computadora para que el software se abra correctamente.
2.Abra EzCAP Capture. Puede encontrar el software yendo a
Applications f EzCAP f EzCAP (Aplicaciones > EzCAP > EzCAP.
3.La primera vez que abra EzCAP, se le pedirá que ingrese un número de serie. Busque el número en la funda del CD de EzCAP e ingréselo.
4.De esta forma, se abre EzCAP Capture. (Nota: No reproduzca su fuente de video (cámara digital, TV, reproductor de DVD, etc.) todavía. (Debe configurar primero el audio del software.)
*Nota: En algunos casos, según sea el sistema operativo de su computadora, la imagen de su video en EzCAP puede aparecer "inestable" o "atascada". Esto no afecta a su video, en realidad se está capturando correctamente. Si esto ocurre, no obstante, recomendamos usar QuickTime para un monitoreo más fluido del video. Consulte los detalles más abajo, en las instrucciones de QuickTime.
5.Haga clic en "Record" (Grabar) en el menú superior y seleccione "Sound Settings" (Ajustes de sonido). En la ventana que aparece,haga clic en la pestaña "Source" (Fuente) y seleccione "ION Audio USB 2861 Device" en la lista que está abajo. Asimismo, asegúrese de que el menú que está junto a "Speaker" (Altavoz) está en "On" (Activado). Haga clic en "OK" (Aceptar) cuando termine.
6.Comience a grabar haciendo clic en "Record" (Grabar) en el menú superior y seleccionando "Record". * (También puede pulsar “Command” + “R”). Reproduzca con su fuente de video (cámara digital, televisor, reproductor de DVD, etc.).
7.Cuando termine de capturar su video, haga clic en cualquier parte del cuadro del centro de la pantalla. Para volver a la pantalla principal, haga clic en "OK".
8.Para más información acerca del uso de EzCAP Capture, consulte el manual (PDF) en la carpeta "Mac" del CD incluido.
¡Nota importante!
Para reproducir el video que capturó en su iPod o iPhone, el video debe estar en un formato específico de MPEG-4, incluso si ya lo guardó como MPEG-4 en el software. Para convertir su video a fin de reproducirlo en su dispositivo, siga estos pasos:
1.Capture su video, guárdelo y luego cierre el software.
2.Abra la carpeta Applications (Aplicaciones).
3.Abra QuickTime, haga clic en el menú "File" (Archivo) y seleccione "Open File" (Abrir archivo).
4.Localice el video que acaba de capturar y haga clic en"Open" (Abrir). El video se abrirá en QuickTime.
5.Haga clic en el menú "File" (Archivo) y seleccione "Save As" (Guardar como). (Es posible cambiar el nombre de la película o guardarla en una ubicación nueva, si lo desea.)
6.Haga clic en el menú desplegable "Format" (Formato) y seleccione su dispositivo.
7.Haga clic en "Save" (Guardar). Este archivo se puede reproducir ahora en su dispositivo.
14
 Loading...