


Clipster
QUICKSTART GUIDE
ENGLISH ( 3 – 6 )
GUÍA DE INICIO RÁPIDO
ESPAÑOL ( 7 – 10 )
GUIDE D'UTILISATION RAPIDE
FRANÇAIS ( 11 – 17 )
GUIDA RAPIDA
ITALIANO ( 15 – 18 )
KURZANLEITUNG
DEUTSCH ( 19 – 22 )
SNELSTARTGIDS
NEDERLANDS ( 23 – 26 )

QUICKSTART GUIDE (ENGLISH)
1.Make sure all items listed in the BOX CONTENTS are included in the box.
2.READ SAFETY INSTRUCTION BOOKLET BEFORE USING THE PRODUCT.
3.MAKE SURE THAT YOU HAVE COMPLETELY CHARGED THE BATTERY PRIOR TO FIRST USE FOR MAXIMUM BATTERY LIFE.
Go to www.ionaudio.com for product registration.
BOX CONTENTS
Clipster
Micro USB Cable
Quickstart Guide
Safety Instructions & Warranty Information Booklet
INTRODUCTION
Clipster features a classic style carabiner “hook” that attaches easily to a belt loop, backpack strap, or purse handle. Clipster is equipped with a rechargeable battery and Bluetooth® technology, enabling you to listen to your favorite music wirelessly anywhere. Its full-range speaker provides clear, undistorted audio indoors and outdoors. So go climb that towering, cloud-capped mountain. Go ride that uncharted bike trail. A new journey begins now with Clipster – your soundtrack to adventure!
Bluetooth is a registered trademark owned by Bluetooth SIG, Inc. and any use by ION Audio is under license. Other trademarks and trade names are those of their respective owners.
3
SETUP
1.Connect Clipster’s hook to secure material such as a backpack loop, belt loop or purse handle.
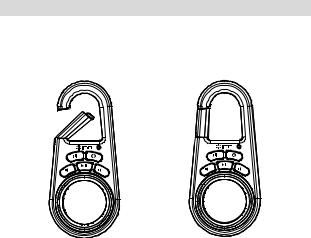
2.Make sure the hook is locked into place (see pictures below).
UNLOCKED |
LOCKED |
4

PARTS DESCRIPTION
1.Power On/Off: Hold this button down for 2 seconds to power Clipster on/off.
2.Pairing button: Hold this button down for 2 seconds to activate pairing mode on Clipster. If you do not unpair your device, Clipster will "remember" your device even if it is powered off then on again.
3.LED: Indicates various states of activity on Clipster. See the Clipster LED activity callout box for more details.
4.Volume Down: Decreases the speaker volume on Clipster.
5.Volume Up: Increases the speaker volume on Clipster.
6.Play/Pause: Press this button to start/pause music playback on a paired music device.
7.Speaker: This full-range speaker plays audio from a paired Bluetooth device.
8.Clip: Use this carabiner style “hook” to clip to a belt loop, backpack, or purse.
9.Micro-USB Port: Use the included micro-USB cable to connect this port to a computer USB port to charge Clipster.
8
 3 1
3 1

 2
2
4 


 6
6


 5
5
7
9
5

PAIRING A BLUETOOTH DEVICE
1. |
Turn on Clipster by pressing the |
|
|
|
power button for 2 seconds. |
Clipster LED activity: |
|
2. |
Hold the Pairing button for two |
||
Blinking Blue LED = Bluetooth |
|||
|
seconds and wait until the blue |
||
|
Pairing LED blinks rapidly. |
pairing mode |
|
3. |
Navigate to your Bluetooth device’s |
Solid Blue LED = Connected to |
|
|
setup screen, find “ION Clipster” and |
a Bluetooth device |
|
|
connect. |
Blinking Red LED = Battery is |
|
4. |
If your device requires a passcode or |
low and needs to be recharged |
PIN, enter the number zero (“0”) four times.
Note: The next time you approach Clipster with your Bluetooth device, it will automatically re-pair.
5.If your Bluetooth device is not able to pair to Clipster, hold the Pairing button for 2 seconds on Clipster to break previous Bluetooth connections and reset the Bluetooth module.
Note: Maximum range will be achieved when using devices with Bluetooth 4.0.
6.To pair a new device, hold the Pairing button for 2 seconds.
7.To connect to another Bluetooth device, hold the Pairing button for 2 seconds. Repeat Step 3.
8.To disconnect a paired Bluetooth device, hold the Pairing button for 2 seconds. Note: If you experience trouble pairing or playing music, update your device's OS.
6

GUÍA DE INICIO RÁPIDO (ESPAÑOL)
1.Asegúrese que todos los artículos incluidos en la CONTENIDO DE LA CAJA estén incluidos en la caja.
2.LEA EL FOLLETO DE INSTRUCCIONES DE SEGURIDAD ANTES DE UTILIZAR EL PRODUCTO.
3.PARA ASEGURAR UNA MÁXIMA VIDA ÚTIL DE LA BATERÍA, CÁRGUELA COMPLETAMENTE ANTES DE USARLA POR PRIMERA VEZ.
CONTENIDO DE LA CAJA
Clipster
Cable Micro USB
Guía de inicio rápido
Folleto de instrucciones de seguridad e información sobre la garantía
Visite www.ionaudio.com para registrar el producto.
INTRODUCCIÓN
Clipster incluye un "gancho" estilo carabinero clásico que puede fijarse fácilmente a un cinturón, correa de mochila o manija de cartera. Clipster está equipado con una batería recargable y tecnología Bluetooth®, que le permite escuchar su música favorita en forma inalámbrica desde cualquier lugar. Su altavoz de rango completo brinda un audio claro y sin distorsiones en ambientes interiores y exteriores. De modo que puede trepar a esa montaña cuya cima la tapan las nubes. Vaya en bicicleta por ese sendero que no figura en los mapas. ¡Comienza un nuevo viaje con Clipster —su pista de sonido que conduce a la aventura!
7

INSTALACIÓN
1.Conecte el gancho del Clipster a un material firme como la correa de una mochila, el cinturón o la manija de la cartera.
2.Asegúrese de que el gancho quede trabajo en su sitio (vea las ilustraciones de abajo).
DESTRABADO |
TRABADO |
8

DESCRIPCIÓN DE LAS PARTES
1.Encendido/apagado: Mantenga pulsado este botón durante 2 segundos para encender y apagar el Clipster.
2.Botón de apareamiento: Mantenga pulsado este botón durante 2 segundos para activar el modo de apareamiento del Clipster. Si no desaparea su dispositivo, el Clipster lo "recordará" aunque lo apague y vuelva a encender.
3.LED: Indica los diversos estados de actividad del Clipster. Para más detalles, vea el recuadro Actividad de los LED del Clipster.
4.Bajar volumen: Disminuye el volumen del altavoz del Clipster.
5.Subir volumen: Aumenta el volumen del altavoz del Clipster.
6.Reproducir/Pausa: Pulse este botón para iniciar o poner en pausa la reproducción de música en un dispositivo musical apareado.
8
 3 1
3 1

 2
2
4 


 6
6


 5
5
7
7.Altavoz: Este altavoz de gama completa reproduce el audio proveniente de un dispositivo Bluetooth.
8.Clip: Use este gancho estilo carabinero para enganchar el equipo a un cinturón, mochila o cartera.
9.Puerto Micro USB: Use el puerto micro-USB cable incluido para conectarlo al puerto USB de una computadora a fin de cargar el Clipster.
9
9
 Loading...