


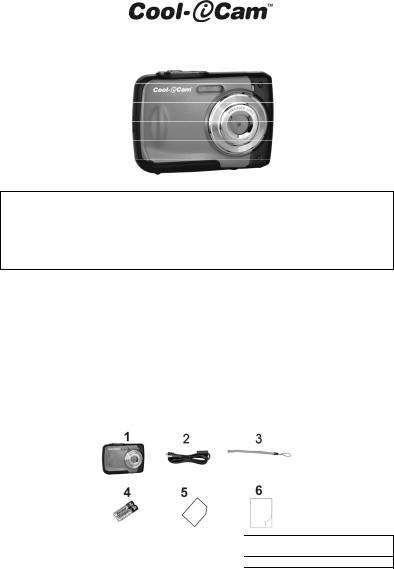
S1000 Quick User Manual
S1000 Quick Start Quide
IMPORTANT
-Do NOT open the battery door under water.
-Close the battery door properly for optimum water sealing. -Rinse with clean water after use and keep it dry for storage.
1.Getting to know your camera
3M waterproof design
8.0 Mega pixel resolution sensor
Digital still camera
Digital video camcorder
Built-in flash Light
4x digital zoom
2.4" TFT color display
MicroSD card support
2x AAA alkaline batteries
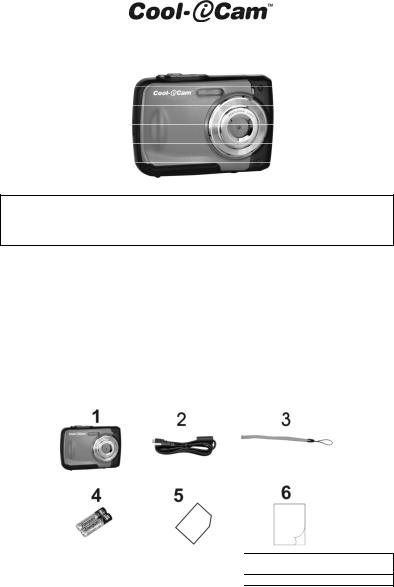
2.Package Contents
Carefully unpack the package and ensure that you have the following items:
1 |
Cool-iCam Camera S1000 |
2 |
USB cable |
3 |
Strap |
4 |
2 x AAA Alkaline Battery |
5 |
Warranty Card |
6 |
Quick User Guide |
EN-1
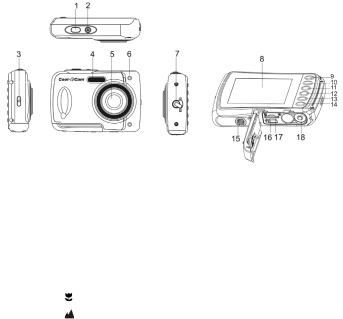
3. Functional parts
|
|
Press this button to: |
||
1 |
Shutter |
1. |
take photographs |
|
2. |
start /stop recording videos |
|||
|
|
|||
|
|
3. |
confirm changes in menu mode |
|
2 |
Power on/off |
Press and hold this button for approx. 2 seconds to turn the camera on or off. |
||
button |
Press to display or hide the status icon on the LCD screen. |
|||
|
||||
3 |
Strap hook |
Hook for attaching the wrist strap to the camera. |
||
4 |
Flash light |
Use the built-in flash to give the subject extra lighting when shooting in the |
||
dark (the best shooting distance is within 1.5m). |
||||
|
|
|||
5 |
Lens |
Capture the image. |
||
Note: Keep the lens clean. Dirt and fingerprints will affect the quality of the |
||||
|
|
picture. |
|
|
6 |
Busy indicator |
When the indicator is blinking, the camera is performing an operation.. |
||
7 |
Macro/normal |
Macro mode: Select this mode to take close-up photographs (distance |
||
11cm - 18cm). |
||||
switch |
||||
|
Normal mode: Select this mode to take photographs from 0.5m - infinity. |
|||
|
|
|||
8 |
LCD screen |
Displays photographs, video clips, camera settings and menu. |
||
|
|
In Preview mode: press this button for zooming in. |
||
9 |
Up/Tele |
In Menu mode: press this button to move up the selection bar. |
||
In Image Playback mode: press this button for enlarging the photo. |
||||
|
|
|||
|
|
In Video Playback mode: press it to start/pause the video. |
||
|
|
In Shooting mode: press this button for zooming out. |
||
10 |
Down/Wide |
In Menu mode: press this button to move down the selection bar. |
||
In Image Playback mode: press this button for reducing the photo size. |
||||
|
|
|||
|
|
In Video Playback mode: press this button to enter the thumbnail mode |
||
|
|
In Menu mode: press this button for the left selection; |
||
|
Left / Flash |
In Playback mode: press this button to go back to the previous one; |
||
11 |
In Photo Infinite Preview mode: press this button to switch Flash modes; |
|||
light |
When zooming in under Image Playback mode: press it to move to the left |
|||
|
||||
|
|
portion of the photo. |
||
|
|
In Video Playback mode: press it for fast rewind. |
||
|
|
Press this button to enter Playback mode; |
||
|
Right / |
In Playback mode: press this button to move to the next one; |
||
12 |
In Menu mode: press this button for the right selection; |
|||
Playback |
When zooming in under Image Playback mode: press to move to the right |
|||
|
||||
|
|
portion of the photo. |
||
|
|
In Video Playback mode: press for fast forward. |
||
|
|
Press this button to switch between movie and still capture mode; |
||
13 |
Mode switch |
In Playback mode: press this button to exit. |
||
When zooming in under Image Playback mode: press to move to the upper |
||||
|
|
|||
|
|
portion of the photo. In Video Playback mode: press to stop the video. |
||
|
|
|
EN-2 |
|
|
|
In Preview mode: press to enter the Settings Menu. |
|
14 |
Quick press |
In Playback mode:Quick press to enter the“Delete single/ all files” mode; |
|
Press and hold to enter the "File compiling and system settings menu". |
|||
|
|
When zooming in under Image Playback mode: press to move to the lower |
|
|
|
portion of the photo. |
|
15 |
Tripod |
For fixing the camera onto tripod. |
|
connector |
|||
|
|
||
16 |
USB interface |
You can download photographs and video clips to a computer when |
|
connecting with a USB cable. |
|||
|
|
||
17 |
MicroSD card |
MicroSD card storage location. |
|
slot |
|||
|
|
||
18 |
Battery |
Compartment for 2 x AAA alkaline batteries |
|
compartment |
|||
|
|
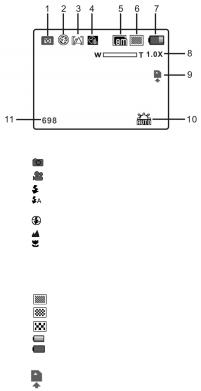
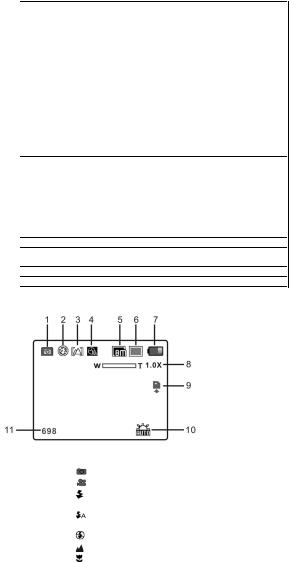
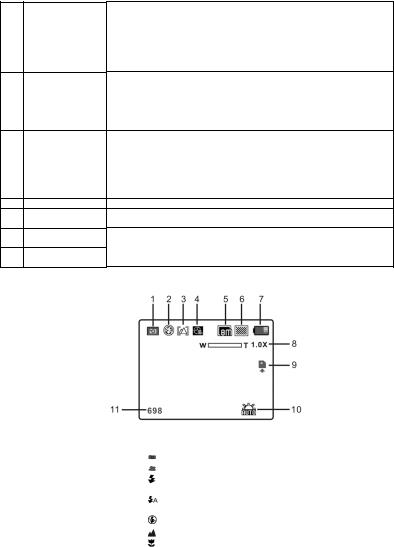
4. Explanation of the status icons
Item |
Function |
|
Description |
|
|
|
Shows the current operating mode: |
||
1 |
Mode selected |
Photo mode. |
|
|
|
|
Video mode. |
|
|
|
|
Force flash: The flash will be on under any environment. |
||
2 |
Flash indicator |
Auto flash: The camera determines if the flash |
||
should be used or not. |
||||
|
|
|||
|
|
No flash: The flash is turned off. |
||
3 |
Normal/Macro mode |
Normal mode (0.5m – infinity). |
||
indicator |
Macro mode (11cm – 18cm). |
|||
|
||||
4 |
Self-timer |
Indicates the Self-timer is set |
||
5 |
|
Shows the selected picture resolution: |
||
Selected resolution |
16M = 4608x3456; |
8M = 3264x2448; |
||
|
|
5M = 2592x1944; |
3M = 2048x1536; VGA = 640x480 |
|
6 |
Picture quality |
Super fine. |
|
|
Fine. |
|
|||
|
|
Normal. |
|
|
7 |
Battery indicator |
The batteries are full. |
||
The batteries are empty. |
||||
|
|
|||
8 |
Zoom indicator |
Shows the zoom ratio during preview mode |
||
9 |
The MicroSD card |
Indicates the MicroSD card is inserted and will be used as |
||
indication |
storage for PHOTO and VIDEO |
|||
|
||||
10 |
White balance |
Shows the selected white balance mode |
||
11 |
Photo/Video counter |
Photo mode: No. of pictures that can be taken. |
||
Video mode: Recording time in seconds. |
||||
|
|
|||
|
|
EN-3 |
|
|

5. Details for camera settings
Settings
Note:
|
|
16M pixel resolution |
|
4608x3456 |
|
|
Resolution |
8.0M pixel resolution |
|
3264x2448 |
|
|
5.0M pixel resolution |
|
2592x1944 |
||
|
|
3.0M pixel resolution |
|
2048 x 1536 |
|
|
|
VGA resolution |
|
640 x 480 |
|
|
Quality |
Super Fine/Fine/Normal |
Picture quality settings |
||
|
Metering |
Center/Multi/Spot |
|
Metering settings |
|
|
|
Auto |
|
|
Automatic white balance |
|
|
Daylight |
|
|
White balance selected for shooting under |
|
|
|
|
fine weather conditions |
|
|
|
|
|
|
|
|
White balance |
Cloudy |
|
|
White balance selected for shooting under |
|
|
|
cloudy conditions |
||
|
|
|
|
||
|
|
Tungsten |
|
|
White balance selected for shooting under |
Photo |
|
|
|
tungsten lighting |
|
|
|
|
|
||
|
Fluorescent |
|
White balance selected for shooting under |
||
|
|
|
|
|
fluorescent lighting |
|
ISO |
Auto/100/200/400/800 |
Sensitivity selection |
||
|
Exposure |
±2.0, ±1.7, ±1.3, ±1.0, ±0.7, |
Exposure setting |
||
|
|
±0.3, 0 |
|
|
|
|
Self Timer |
On/Off |
|
|
Self timer setting |
|
Sharpness |
Hard/ Normal/ Soft |
|
Sharpness setting |
|
|
|
Normal/ |
B&W/ |
Sepia/ |
|
|
Effect (Preview) |
Negative/ |
Lomo/ |
Pencil |
|
|
Sketch/ Red/ Green/ Blue/ |
Effect setting |
|||
|
|
||||
|
|
Vivid |
|
|
|
|
Effect (Playback) |
B&W/Sepia/Negative/Mosa |
|
||
|
ic/Red/Green/Blue |
|
|
||
|
|
|
|
||
|
Date Stamp |
On/ Off |
|
|
Date stamp setting |
|
Quick View |
On/ Off |
|
|
Quick view setting |
|
Movie Size |
VGA 640 x 480 |
|
Video resolution setting |
|
|
QVGA 320 x 240 |
|
|||
|
|
|
|
||
|
|
Auto |
|
|
Automatic white balance |
|
|
Daylight |
|
|
White balance for shooting under fine |
Video |
|
|
|
weather conditions |
|
|
|
|
|
||
White balance |
Cloudy |
|
|
White balance for shooting under cloudy |
|
|
|
|
|
conditions |
|
|
|
Tungsten |
|
|
White balance selected for shooting under |
|
|
|
|
tungsten lighting |
|
|
|
|
|
|
|
|
|
Fluorescent |
|
White balance for shooting under |
|
|
|
|
fluorescent lighting |
||
|
|
|
|
|
|
|
Sounds |
Off/On |
|
|
Sounds setting |
|
Frequency |
50Hz / 60Hz |
|
Select power frequency in your location |
|
|
Power Save |
Off / 1Minute / 3 Minutes |
Auto power off selection |
||
|
Language |
English/German/Italian/ |
Display language selection |
||
Setup |
Portuguese/French/Spanis |
||||
|
h/ Japanese |
|
|
||
|
|
|
|
||
|
Date/Time |
YY/MM/DD;DD/MM/YY |
Date or time setting |
||
|
MM/DD/YY; |
|
|||
|
|
|
|
||
|
Format |
Yes/ No |
|
|
Format the MicroSD card |
|
Reset All |
Yes/ No |
|
|
Reset all settings to factory default options |
|
Version |
Shows the firmware version |
|
||
Turning off power will not erase the settings.
6. Using the camera
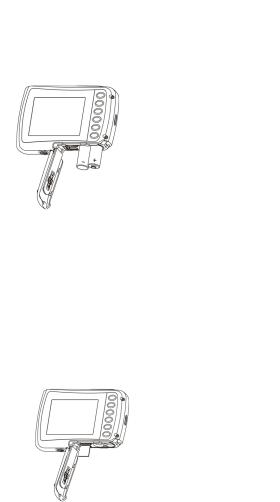
6.1 Installing the batteries
1.Open the battery door.
2.Insert 2x AAA alkaline batteries into the battery compartment.
EN-4

3. Close the battery door.
Note: Make sure that the batteries are in the correct directions (as marked in the diagram above)
6.2 Inserting a memory card (not included)
This camera has no built-in internal memory. Please insert a MicroSD (Class 6 or higher) memory card (not included)
Follow the instructions below to insert the MicroSD memory card into the camera.
1.Turn off the camera.
2.Open the battery door.
3.Insert the MicroSD card (Class 6 or higher) into the camera.
4.Close battery door
Note: There is only one correct direction to insert the MicroSD memory card into the slot. Do not force the card into the memory card-slot, it may damage both the camera and the MicroSD memory card.
Note: The MicroSD memory card must be formatted before taking photographs. See section 5.3 for more information.
6.3 Formatting the MicroSD memory card
1. |
Press the Menu button ( ) in PHOTO or VIDEO mode. |
2. |
Select the setup mode by pressing the right button. |
3. |
Select the format icon by pressing the W( ) button and press the Shutter button to confirm. |
4. |
Press the Shutter button to format the MicroSD memory card. |
6.4 Setting the resolution
The camera can be set to different resolutions.
1.Press the Menu button ( ) in PHOTO mode, select the resolutions icon by the W (
 ) button and press the Shutter to confirm.
Available resolutions: VGA (640 x 480), 3M (2048 x 1536), 5M (2592x1944), 8M (3264x2448), 16M (4608x3456)
2.Five different resolutions will be displayed. Select the desired resolution by using the up or down button and press the Shutter button to confirm the selection.
6.5 Taking photographs
1.Turn on the camera.
2.Depending on the distance to the object being photographed, use macro switch to adjust
EN-5
the distance. Select the flower symbol ( ) if you wish to take a close-up photograph (11cm –18 cm).
If you wish to take a video or a photograph of surroundings or people (0.5m – infinity), set the macro switch to normal mode ( ).
).
3.If you are not sure if there is enough lighting, turn on the automatic flash( ) by pressing the flash button. (If the battery power is too low, the flash will not be activated).
4.Use the LCD screen to aim at the object you wish to take photographs of.
5.Press the Shutter button and wait until the LCD display turns on again.
Caution 1) Taking pictures of fast-moving objects is not recommended.
2)Images may be distorted when taking pictures in a moving vehicle.
6.6Zoom in and out
The camera can zoom in up to 4 times.
Zoom in or out by pressing the up or down button, a number will appear on the display, 4.x is the maximum zoom ratio.
6.7 Self-timer setting
You can use the self-timer function when you take a photograph of yourself or when you take a photograph without flash of an object. To avoid shaking of the camera a tripod is recommended.
1.Set the camera to photo mode.
2.Press the Menu button ( ). The menu will appear.
3.Press the W( ) button to select Self Timer and confirm by pressing the Shutter button.
4.Press the W( ) button to select the “On” option
5.Press the Shutter button to confirm. The self-timer function is now ready for use.
6.Aim at the object you wish to take photos of.
7.Press the Shutter button to take a photograph.
8.The photo will be taken after the timer reaches the delay time of 10 seconds. The camera will beep during the delay time.
6.8 Recording video clips
1.Press the mode button to select the video clip mode ( ).
).
2.For setting the resolution, Press the Menu button ( ) and select Resolution, then press the Shutter button to confirm. Two resolutions will be displayed.
VGA (640 x 480), QVGA (320 x 240).
3.Press the Shutter button to start recording videos, press the right button to pause and press the
Shutter button again to stop recording. The video clip will now be saved as an AVI file in the MicroSD memory card.
6.9 Playing back photographs
1.Press the playback button ( ) to enter the playback mode.
2.The last picture or video clip taken will be displayed. Press the W( ) to enter the thumbnail mode. Press the Left /Right /Up /Down button to select the desired picture, and press the Shutter button to view.
3.In full screen display, press the T ( ) button to zoom into the photo.
4.To shift the image in zoom-in mode, press the Shutter button and then use the mode/menu/left/right buttons.
5.Press the Menu button ( ) in Playback mode, press again and hold the Menu button until the menu options are displayed. Select Slide Show and set up the desired slide show direction. Press the Shutter button to confirm. The pictures saved in the MicroSD card will be displayed in sequence automatically. To stop the slide show, press the Shutter button.
6.Press the Menu button ( ) in Playback mode, press again and hold the Menu button until the menu options are displayed. Select Photo Effect and press the Shutter button. Select the desired effect by pressing the up/down button and press the Shutter button to confirm. The image will be saved as a separate image.
6.10 Protecting photographs/ videos
You can prevent the photographs/videos on the MicroSD card from accidentally being erased. Follow the instructions below to protect photographs/videos.
1.Press the Playback button ( ) to enter the Photo playback mode.
2.Press the left or right button to select the photograph/video clip to be protected.
EN-6

3.Press the Menu button ( ) in Playback mode, press it again and hold the Menu button until the menu options are displayed. Select Protect and press the Shutter button
4.Select “Protect single” or “All” and press the Shutter button to confirm.
6.11 Resizing photographs
A captured image can be resized and saved as a separate image. Follow the instructions below to resize photographs.
1.Press the ( ) button to get into Photo playback mode.
2.Press the left or right button to select the photograph to be resized.
3.Press the Menu button ( ) in Playback mode, press again and hold the Menu button until the menu options are displayed. Select Resize and press the Shutter button to select the new image size.
4.Select the new size and press the Shutter button to confirm. The image will be saved as a separate image.
6.12 Playing back video clips
1. When video clips are displayed, press the up button to start playing the video and press the up button again to pause the playback.
2. Press the right button for fast forward or press the left button for fast rewind. 3. Press the mode button to stop and exit.
6.13 Deleting photographs and video clips
You can delete a single photograph / video clip, or delete all the photographs / video clips on the memory card.
Follow the instructions below to delete photographs.
1.Press the Playback button ( ) to enter the playback mode.
2.Press the Left or Right button to select photograph/video clip to be deleted.
3.Press the Menu/Delete button  and select “Single” or “All” .
4.Press the Shutter button to confirm.
5.Press the Menu button to exit.
NOTE: Select “All” and Press the Shutter button to confirm, all the pictures and videos will be deleted. Photos that are protected from accidental delete cannot be deleted. To delete photos, set
unprotect mode(Section 5.10), you can then delete the photos by following the above 1-5 procedures.
7. Connecting to a PC
The unit can be connected to the computer as mass storage device and transfer photo/video files for storage.
8. Specifications
Sensor |
8.0 Mega pixel CMOS sensor |
|
16.0 Mega pixels: (4608x3456) |
Image resolution |
8.0 Mega pixels: (3264x2448) |
5.0 Mega pixels: (2592x1944) |
|
|
3.0 Mega pixels: (2048x1536) |
|
VGA: (640x480) |
Lens |
F/2.8 f = 4.8mm |
Focus range |
0.5m. ~ Infinity |
Macro mode |
11cm – 18cm |
Digital zoom |
4x |
Flash strobe |
Built-in ( Auto / force / off ) |
LCD display |
2.4" TFT color LCD display |
White balance |
Auto / Daylight / Cloudy / Fluorescent / Tungsten |
Video Frame Rate |
30fps@VGA / 30fps@QVGA |
External Storage Media |
MicroSD card (Class 6 or higher), not included (supports up to 32GB) |
File format |
Picture: JPEG, Video: AVI |
|
EN-7 |

Self timer |
10 seconds |
PC interface |
USB 2.0 |
Power source |
2 x AAA alkaline batteries |
9. System requirement
Operating system |
Win XP (SP3) Vista32/64 Win7 32/64 and Mac OS X 10.6.8 or |
|
above |
||
|
||
CPU |
Pentium 4 / 3.0G or faster recommended |
|
RAM |
1 GB MB RAM (Vista : 2 GB) |
|
Interface |
USB port |
10. Troubleshooting
Problem |
Cause |
Cannot turn on the camera |
Low battery power. |
|
Batteries placed at |
|
incorrect polarities. |
Photos cannot be saved when |
The memory card hasn’t |
taking pictures. |
been formatted properly. |
|
|
Cannot find removable disk |
Connection failure. |
after connecting the camera to |
|
the computer. |
|
|
|
Flash does not work. |
Battery power is too low. |
|
|
Batteries are depleted quickly. |
Incorrect or old, battery |
|
|
The photos are blurry |
1. The camera is not held |
|
steady |
|
2. The lens of the camera |
|
is dirty. |
Solution
Replace or install the batteries correctly.
Format the memory card in setup mode of the camera. Please refer to section 5.3.
Make sure all cable connections are secured and restart the computer if necessary.
Try a different USB port
Replace with new 2 x AAA alkaline batteries
Replace with 2 x AAA alkaline batteries
1.Hold the camera stead until it beeps when taking photos.
2.Clean the lens with a soft dry cloth.
FCC Statement
Warning: Changes or modifications to this unit not expressly approved by the party responsible for compliance could void the user’s authority to operate the equipment.
NOTE: This equipment has been tested and found to comply with the limits for a Class B digital device, pursuant to Part 15 of the FCC Rules. These limits are designed to provide reasonable protection against harmful interference in a residential installation. This equipment generates, uses and can radiate radio frequency energy and, if not installed and used in accordance with the instructions, may cause harmful interference to radio communications.
EN-8
However, there is no guarantee that interference will not occur in a particular installation. If this equipment does cause harmful interference to radio or television reception, which can be determined by turning the equipment off and on, the user is encouraged to try to correct the interference by one or more of the following measures:
Reorient or relocate the receiving antenna.
Increase the separation between the equipment and receiver.
Connect the equipment into an outlet on a circuit different from that to which the receiver is connected.
Consult the dealer or an experienced radio/TV technician for help.
This device complies with Part 15 of the FCC Rules. Operation is subject to the following two conditions:
(1)this device may not cause harmful interference, and
(2)this device must accept any interference received, including interference that may cause undesired operation.
For EU only
TRADEMARK INFORMATION
© 2013 World Wide Licenses Limited.
® The Cool iCam logo is a registered trademark of World Wide Licenses Limited.
Questions?
Need Some Help? This manual should help you understand your new product.
If you still have |
Like Us: |
questions, |
www.facebook.com/ioncamera |
visit our website: |
Tweet Us: |
www.ioncamera.com |
www.twitter.com/ioncamera |
|
|
EN-9
S1000 Kurzanleitung
WICHTIG
-Das Batteriefach darf unter Wasser NICHT geöffnet werden.
-Das Batteriefach muss für eine optimale Wasserdichtigkeit ordnungsgemäß geschlossen sein.
-Die Kamera nach Gebrauch mit klarem Wasser abspülen und vor dem Verstauen trocknen lassen.
1.Ihre Kamera im Überblick
Wasserdicht bis 3 M
Sensor mit 8,0 Megapixel Auflösung
Kamera für digitale Fotos
Camcorder für digitale Videos
Integrierter Blitz
4-facher digitaler Zoom
2,4-Zoll-TFT-Farbdisplay
MicroSD-Kartenunterstützung
2 x AAA-Alkalibatterien
2.Lieferumfang
Entfernen Sie vorsichtig die Verpackung und überprüfen Sie, ob folgende Teile erhalten sind:
1 |
Cool-iCam Kamera S1000 |
2 |
USB-Kabel |
3 |
Riemen |
4 |
2 x AAA-Alkalibatterien |
5 |
Garantiekarte |
6 |
Kurzanleitung |
DE-1

3. Funktionsteile
1Auslöser
2An-/Ausschalter
3Riemenöse
4Blitz
5Objektiv
6Anzeige „Beschäftigt“
7Makro-/Normal-Schalter
8LCD-Bildschirm
9Auf/Tele
10Ab/Breit
11Links/Blitz
Diese Taste drücken und:
1.Fotos aufnehmen
2.Videoaufzeichnungen starten/stoppen
3.Änderungen im Menümodus bestätigen
Diese Taste für ca. 2 Sekunden gedrückt halten, um die Kamera anbzw. auszuschalten. Drücken, um das Statussymbol auf dem LCD-Bildschirm anzuzeigen oder zu verbergen.
Öse zur Befestigung der Handschlaufe an der Kamera.
Verwenden Sie den integrierten Blitz, um Aufnahmen bei Dunkelheit mehr Licht zu verleihen (der optimale Abstand für diese Aufnahmen beträgt maximal 1,5 m).
Nimmt das Bild auf.
Hinweis: Halten Sie das Objektiv sauber. Schmutz und Fingerabdrücke beeinflussen die Bildqualität.
Blinkt diese Anzeige, führt die Kamera einen Vorgang aus.
Makro-Modus: Wählen Sie diesen Modus für Nahaufnahmen aus (Abstand 11 cm – 18 cm).
Normaler Modus: Wählen Sie diesen Modus, um Fotos im Abstand von über 0,5 m aufzunehmen.
Anzeige von Bildern, Videoclips, Kameraeinstellungen und Menüs. Im Vorschaumodus: Diese Taste zum Einzoomen drücken.
Im Menümodus: Drücken Sie diese Taste, um in der Auswahlleiste nach oben zu scrollen.
Im Bildwiedergabemodus: Diese Taste drücken, um das Foto zu vergrößern.
Im Videowiedergabemodus: Drücken, um das Video zu starten/unterbrechen.
Im Aufnahmemodus: Diese Taste zum Auszoomen drücken.
Im Menümodus: Drücken Sie diese Taste, um in der Auswahlleiste nach unten zu scrollen.
Im Bildwiedergabemodus: Diese Taste drücken, um das Foto zu verkleinern.
Im Videowiedergabemodus: Diese Taste drücken, um zur Miniaturansicht zu wechseln.
Im Menümodus: Mithilfe dieser Taste Links auswählen;
Im Wiedergabemodus: Drücken Sie diese Taste, um zum vorherigen Titel zu gehen.
Im Bildervorschaumodus: Diese Taste drücken, um den Blitzmodus zu ändern;
Wenn im Bildwiedergabemodus eingezoomt wurde: Drücken, um
DE-2
|
|
zum linken Bildbereich zu gehen. |
|
|
|
Im Videowiedergabemodus: schneller Vorlauf. |
|
|
|
Rufen Sie mit dieser Taste den Wiedergabemodus auf; |
|
|
|
Im Wiedergabemodus: Drücken Sie diese Taste, um zum nächsten |
|
12 |
Rechts/Wiedergabe |
Titel zu gehen. |
|
Im Menümodus: Mithilfe dieser Taste Rechts auswählen; |
|||
|
|
Wenn im Bildwiedergabemodus eingezoomt wurde: Drücken, um |
|
|
|
zum rechten Bildbereich zu gehen. |
|
|
|
Im Videowiedergabemodus: schneller Vorlauf. |
|
|
|
Drücken Sie diese Taste, um zwischen dem Filmund |
|
|
|
Fotoaufnahmemodus umzuschalten. |
|
13 |
Modusschalter |
Im Wiedergabemodus: Diese Taste zum Verlassen drücken. |
|
|
|
Wenn im Bildwiedergabemodus eingezoomt wurde: Drücken, um |
|
|
|
zum oberen Bildbereich zu gehen. Im Videowiedergabemodus: |
|
|
|
Drücken, um das Video zu stoppen. |
|
|
|
Im Vorschaumodus: Drücken, um das Menü Einstellungen |
|
|
|
aufzurufen. |
|
|
|
Im Wiedergabemodus: Kurz drücken, um „Eins löschen/Alle |
|
14 |
Kurzer Tastendruck |
Dateien“ aufzurufen; |
|
|
|
Gedrückt halten, um das Menü „Dateierstellung und |
|
|
|
Systemeinstellungen“ aufzurufen. |
|
|
|
Wenn im Bildwiedergabemodus eingezoomt wurde: Drücken, um |
|
|
|
zum unteren Bildbereich zu gehen. |
|
15 |
Stativanschluss |
Um die Kamera auf einem Stativ anzubringen. |
|
16 |
USB-Schnittstelle |
Mithilfe des USB-Kabels können Sie Fotos und Videoclips auf einen |
|
Computer herunterladen |
|||
|
|
||
17 |
MicroSD-Karteneinschub |
Steckplatz für MicroSD-Karte |
|
18 |
Batteriefach |
Fach für 2 x AAA-Alkalibatterien. |
4. Beschreibung der Statusanzeigen
Symbol |
Funktion |
Beschreibung |
|
1 |
Modus ausgewählt |
Zeigt den aktuellen Modus an: |
|
Foto-Modus. |
|||
|
|
Video-Modus. |
|
|
|
Blitz: Der Blitz bleibt unter allen Umständen |
|
2 |
Blitzanzeige |
eingeschaltet. |
|
Automatischer Blitz: Die Kamera bestimmt, ob |
|||
|
|
der Blitz verwendet wird oder nicht. |
|
|
|
Kein Blitz: Der Blitz ist ausgeschaltet. |
|
3 |
Normal/Makro-Modusanzeige |
Normal (0,5 m – unendlich). |
|
Makro (11 cm – 18 cm). |
|||
|
|
||
4 |
Selbstauslöser |
Zeigt an, dass der Selbstauslöser eingestellt ist. |
|
5 |
Ausgewählte Auflösung |
Zeigt die ausgewählte Bildauflösung an: |
DE-3

|
|
16 M = 4608 x 3456; 8 M = 3264 x 2448; |
|
|
|
5 M = 2592 x 1944; 3 M = 2048 x 1536; |
|
|
|
VGA = 640 x 480 |
|
6 |
Bildqualität |
Superfein. |
|
Fein. |
|||
|
|
Normal. |
|
7 |
Batterieanzeige |
Die Batterien sind voll. |
|
Die Batterien sind leer. |
|||
|
|
||
8 |
Zoom-Anzeige |
Zeigt im Vorschaumodus das Zoomverhältnis an. |
|
9 |
MicroSD-Kartenanzeige |
Zeigt an, dass die MicroSD-Karte eingeschoben |
|
und für FOTOS und VIDEOS verwendet wird. |
|||
|
|
||
10 |
Weißabgleich |
Zeigt den ausgewählten Weißabgleichmodus an. |
|
11 |
Foto-/Videozähler |
Foto-Modus: Anzahl der aufgenommenen Bilder. |
|
Video-Modus: Aufnahmezeit in Sekunden. |
|||
|
|
5. Kameraeinstellungen im Detail
Einstellungen
Foto
Setup Video
|
16 Megapixel Auflösung |
4608 x 3456 |
|
Auflösung |
8,0 Megapixel Auflösung |
3264 x 2448 |
|
5,0 Megapixel Auflösung |
2592 x 1944 |
||
|
3,0 Megapixel Auflösung |
2048 x 1536 |
|
|
VGA-Auflösung |
640 x 480 |
|
Qualität |
Superfein/Fein/Normal |
Bildqualitätseinstellungen |
|
Messungen |
Mitte/Multi/Punkt |
Messeinstellungen |
|
|
Auto |
Automatischer Weißabgleich |
|
|
Tageslicht |
Weißabgleich unter guten |
|
Weißabgleich |
Wetterbedingungen |
||
|
|||
Bewölkt |
Weißabgleich bei Bewölkung |
||
|
|||
|
Wolfram |
Weißabgleich bei künstlichem Licht |
|
|
Fluoreszierend |
Weißabgleich bei fluoreszierendem Licht |
|
ISO |
Auto/100/200/400/800 |
Empfindlichkeitseinstellung |
|
Belichtung |
±2.0, ±1.7, ±1.3, ±1.0, |
Belichtungseinstellungen |
|
±0.7, ±0.3, 0 |
|||
|
|
||
Selbstauslöser |
An/Aus |
Selbstauslösereinstellung |
|
Schärfe |
Stark/Normal/Leicht |
Schärfeeinstellung |
|
|
Normal/Schwarz-weiß/Se |
|
|
Effekt |
pia/Negativ/Lomo/Bleistifts |
|
|
(Vorschau) |
kizze/Rot/Grün/Blau/Lebe |
Einstellungen der Effekte |
|
|
ndig |
||
|
|
||
Effekt |
Schwarz-weiß/Sepia/Nega |
|
|
(Wiedergabe) |
tiv/Mosaik/Rot/Grün/Blau |
|
|
Datumsstempe |
An/Aus |
Einstellung des Datumsstempels |
|
l |
|
|
|
Schnellansicht |
An/Aus |
Einstellung der Schnellansicht |
|
Filmgröße |
VGA 640 x 480 |
Einstellung der Videoauflösung |
|
QVGA 320 x 240 |
|||
|
|
||
|
Auto |
Automatischer Weißabgleich |
|
|
Tageslicht |
Weißabgleich unter guten |
|
Weißabgleich |
Wetterbedingungen |
||
|
|||
Bewölkt |
Weißabgleich bei Bewölkung |
||
|
|||
|
Wolfram |
Weißabgleich bei künstlichem Licht |
|
|
Fluoreszierend |
Weißabgleich bei fluoreszierendem Licht |
|
Töne |
Aus/Ein |
Toneinstellung |
|
Frequenz |
50 Hz/60 Hz |
Ausgewählte Leistungsfrequenz Ihres |
|
Standorts |
|||
|
|
||
Energiesparm |
Aus/1 Minute/3 Minuten |
Automatische Abschaltfunktion |
|
odus |
|||
|
|
DE-4
|
|
Sprache |
Englisch/Deutsch/Italienis |
Auswahl der Display-Sprache |
|
|
ch/Portugiesisch/Französi |
||
|
|
|
sch/Spanisch/Japanisch |
|
|
|
Datum/Uhrzeit |
JJ/MM/TT; TT/MM/JJ; |
Datumsund Uhrzeiteinstellung |
|
|
MM/TT/JJ; |
||
|
|
|
|
|
|
|
Formatieren |
Ja/Nein |
Die MicroSD-Karte formatieren |
|
|
Alle |
Ja/Nein |
Alle Einstellungen auf die |
|
|
zurücksetzen |
Werkseinstellungen zurücksetzen |
|
|
|
|
||
|
|
Version |
Zeigt die Firmware-Version |
an |
Hinweis: Beim Ausschalten werden keine Einstellungen aufgehoben.
6. Gebrauch der Kamera
6.1 Einsetzen der Batterien
1.Öffnen Sie das Batteriefach.
2.Legen Sie 2 x AAA-Alkalibatterien in das Batteriefach ein.
3.Schließen Sie das Batteriefach.
Hinweis: Achten Sie darauf, dass die Batterien in korrekter Ausrichtung eingelegt werden (wie im obigen Bild dargestellt).
6.2 Die MicroSD-Karte (nicht enthalten) einsetzen
Diese Kamera verfügt nicht über einen internen Speicher. Setzen Sie bitte eine MicroSD-Karte (Klasse 6 oder höher) (nicht enthalten) ein.
Befolgen Sie die untenstehenden Anweisungen, um die MicroSD-Karte in Ihre Kamera einzusetzen.
1.Schalten Sie die Kamera aus.
2.Öffnen Sie das Batteriefach.
3.Setzen Sie die MicroSD-Karte (Klasse 6 oder höher) in die Kamera ein.
4.Schließen Sie das Batteriefach.
Hinweis: Die MicroSD-Karte lässt sich nur in einer Richtung in den Steckplatz einschieben. Wenden Sie beim Einschieben der Karte keine Gewalt an, da dies sowohl die Kamera als auch die MicroSD-Karte beschädigen könnte.
Hinweis: Vor dem Aufnehmen von Fotos muss die MicroSD-Karte formatiert werden. Weitere Einzelheiten siehe Abschnitt 5.3.
DE-5
6.3Die MicroSD-Karte formatieren.
1.Drücken Sie im FOTOoder VIDEO-Modus auf die Menütaste ( ).
).
2.Wählen Sie den Setup-Modus aus, indem Sie auf die rechte Taste drücken.
3.Wählen Sie das Symbol zum Formatieren aus, indem Sie auf die Taste W( ) drücken, und bestätigen Sie Ihre Auswahl über die Auslösertaste.
4.Drücken Sie nun auf die Auslösertaste, um die MicroSD-Karte zu formatieren.
6.4 Die Auflösung einstellen
Für diese Kamera können verschiedene Auflösungen eingestellt werden.
1.Drücken Sie im FOTO-Modus auf die Menütaste ( ), wählen Sie über die Taste W (
 ) das Auflösungssymbol aus und drücken Sie zur Bestätigung auf den Auslöser.
Verfügbare Auflösungen: VGA (640 x 480), 3M (2048 x 1536), 5M (2592 x 1944), 8M (3264 x 2448), 16M (4608 x 3456)
2.Es werden fünf verschiedene Auflösungen angezeigt. Wählen Sie die gewünschte Auflösung mittels der Aufund Ab-Tasten aus und drücken Sie zur Bestätigung der Auswahl auf die Auslösertaste.
6.5 Fotos aufnehmen
1.Schalten Sie die Kamera ein.
2.Passen Sie den Abstand je nach Entfernung zum jeweiligen Objekt, das fotografiert werden soll, mithilfe des Makro-Schalters an. Wählen Sie für eine Nahaufnahme (11 cm – 18 cm) die Blume ( ) aus.
Schalten Sie den Makro-Schalter auf Normal ( ), wenn Sie die Umgebung oder Personen (0,5 m
– unendlich) aufnehmen möchten oder ein Video drehen.
3.Wenn Sie sich nicht sicher sind, ob die Lichtverhältnisse ausreichen, können Sie den automatischen Blitz ( ) einschalten, indem Sie auf die Blitztaste drücken. (Ist die Batterieleistung zu schwach, wird der Blitz nicht aktiviert).
4.Visieren Sie das zu fotografierende Objekt im LCD-Bildschirm an.
5.Drücken Sie auf die Auslösertasten und warten Sie, bis erneut eine Anzeige auf dem LCD-Display
erscheint.
Vorsicht: 1) Es wird nicht empfohlen, Bilder von sich schnell bewegenden Objekten zu machen.
2) Bilder könnten verzerrt werden, wenn sie in einem sich bewegenden Fahrzeug gemacht werden.
6.6 Einund Auszoomen
Die Kamera kann bis zu 4-fach einzoomen.
Zoomen Sie ein oder aus, indem Sie auf die Aufund Ab-Tasten drücken. Auf dem Display erscheint eine Ziffer und das maximale Zoom-Verhältnis beträgt 4-fach.
6.7 Selbstauslösereinstellung
Sie können den Selbstauslöser nutzen, wenn Sie ein Foto von sich selbst oder ein Foto eines Objekts ohne Blitz aufnehmen möchten. Damit die Kamera nicht wackelt, wird ein Stativ empfohlen.
1.Rufen Sie den Fotomodus der Kamera auf.
2.Drücken Sie auf die Menütaste ( ). Das Menü erscheint.
3.Drücken Sie auf die Taste W( ), um den Selbstauslöser auszuwählen und drücken Sie zur Bestätigung auf die Auflösertaste.
4.Drücken Sie auf die Taste W( ), um die Option „An“ auszuwählen.
5.Drücken Sie zur Bestätigung auf die Auflösertaste. Der Selbstauslöser ist nun betriebsbereit.
6.Visieren Sie nun das zu fotografierende Objekt an.
7.Drücken Sie auf die Auslösertaste, um das Foto aufzunehmen.
8.Das Foto wird nach einer Verzögerung von 10 Sekunden aufgenommen. Während die Verzögerung abläuft, gibt die Kamera einen Signalton aus.
6.8 Videos aufzeichnen
1.Wählen Sie mit der Modus-Taste den Videoclip-Modus ( ).
).
2.Drücken Sie zur Einstellung der Auflösung die Menütaste ( ), wählen Sie Auflösung und drücken
Sie zur Bestätigung auf den Auslöser. Es werden zwei Auflösungen angezeigt. VGA (640 x 480), QVGA (320 x 240).
DE-6
3.Starten Sie die Video-Aufnahme mit dem Auslöser, drücken Sie auf die Nach-rechts-Taste, um die Aufzeichnung zu unterbrechen und beenden Sie die Aufnahme durch erneutes Drücken des Auslösers. Der Videoclip wird nun als AVI-Datei auf der MicroSD-Karte gespeichert.
6.9 Fotos wiedergeben
1.Drücken Sie auf die Wiedergabetaste ( ), um den Wiedergabemodus aufzurufen.
2.Es wird das zuletzt aufgenommene Foto oder Video angezeigt. Drücken Sie auf W( ), um die Miniaturansicht aufzurufen. Drücken Sie auf die Tasten Links/Rechts/Auf/Ab, um das gewünschte Bild auszuwählen und drücken Sie zum Ansehen auf den Auslöser.
3.Drücken Sie im Vollbildmodus auf T ( ), um im Foto einzuzoomen.
4.Um das Bild im eingezoomten Modus zu verschieben, drücken Sie den Auslöser und anschließend auf die Tasten Modus/Menü/Links/Rechts.
5.Drücken Sie im Wiedergabemodus auf die Menütaste ( ) und halten Sie diese erneut gedrückt, bis die Menüoptionen angezeigt werden. Wählen Sie Diashow aus und richten Sie die gewünschte Verlaufsrichtung ein. Drücken Sie zur Bestätigung auf die Auflösertaste. Die auf der MicroSD-Karte gespeicherten Bilder werden automatisch in dieser Reihenfolge angezeigt. Drücken Sie auf den Auslöser, um die Diashow zu beenden.
6.Drücken Sie im Wiedergabemodus auf die Menütaste ( ) und halten Sie diese erneut gedrückt, bis die Menüoptionen angezeigt werden. Wählen Sie einen Fotoeffekt aus und drücken Sie auf den Auslöser. Wählen Sie den gewünschten Effekt aus, indem Sie auf die Auf-/Ab-Taste drücken, und bestätigen Sie Ihre Auswahl über die Auslösertaste. Das Bild wird als separates Foto gespeichert.
6.10 Fotos/Videos schützen
Sie können Fotos/Videos auf der MicroSD-Karte vor versehentlichem Löschen schützen. Befolgen Sie zum Schützen von Fotos/Videos die untenstehende Anleitung.
1.Drücken Sie auf die Wiedergabetaste ( ), um den Bildwiedergabemodus aufzurufen.
2.Drücken Sie auf die Nach-links- oder Nach-rechts-Taste, um ein Foto/Video auszuwählen, das geschützt werden soll.
3.Drücken Sie im Wiedergabemodus auf die Menütaste ( ) und halten Sie diese erneut gedrückt, bis die Menüoptionen angezeigt werden. Wählen Sie Schützen aus und drücken Sie auf den Auslöser.
4.Wählen Sie „Eins schützen“ oder „Alle“ aus und drücken Sie zur Bestätigung auf den Auslöser.
6.11 Fotos zuschneiden
Ein aufgenommenes Foto kann zugeschnitten und als separates Foto gespeichert werden. Befolgen Sie zum Zuschneiden von Fotos die untenstehende Anleitung.
1.Drücken Sie auf die Wiedergabetaste ( ), um den Bildwiedergabemodus aufzurufen.
2.Drücken Sie auf die Nach-links- oder Nach-rechts-Taste, um ein Foto auszuwählen, das zugeschnitten werden soll.
3.Drücken Sie im Wiedergabemodus auf die Menütaste ( ) und halten Sie diese erneut gedrückt, bis die Menüoptionen angezeigt werden. Wählen Sie Zuschneiden aus und drücken Sie auf den Auslöser, um die neue Bildgröße auszuwählen.
4.Wählen Sie die neue Größe aus und drücken Sie zur Bestätigung auf den Auslöser. Das Bild wird als separates Foto gespeichert.
6.12 |
Videoclips wiedergeben |
|
1. |
|
Werden Videoclips angezeigt, können Sie diese wiedergeben, indem Sie zum Starten auf die |
|
|
Auf-Taste drücken; ein erneuter Tastendruck unterbricht die Wiedergabe. |
2. |
|
Für den schnellen Vorlauf auf die Nach-rechts-Taste drücken und für den Rücklauf auf die |
|
Nach-links-Taste drücken. |
|
3. |
|
Zum Beenden und Verlassen auf die Modus-Taste drücken. |
6.13 |
Fotos und Videos löschen |
|
Sie können ein einzelnes Foto/Video oder alle Fotos/Videos auf der Speicherkarte löschen. Befolgen Sie zum Löschen von Fotos die untenstehende Anleitung.
1.Drücken Sie auf die Wiedergabetaste ( ), um den Wiedergabemodus aufzurufen.
2.Drücken Sie auf die Nach-links- oder Nach-rechts-Taste, um ein Foto/Video auszuwählen, das gelöscht werden soll.
3.Drücken Sie auf die Menü-/Löschen-Taste  und wählen Sie „Eins“ oder „Alle“ aus.
4.Drücken Sie zur Bestätigung auf die Auflösertaste.
DE-7

5.Zum Verlassen auf die Menütaste drücken.
ANMERKUNG: Wählen Sie „Alle“ und drücken Sie den Auslöser, um zu bestätigen, dass alle Bilder und Videos gelöscht werden sollen. Fotos, die vor versehentlichem Löschen geschützt sind, können nicht gelöscht werden. Um diese Fotos zu löschen, muss der ungeschützte Modus aktiviert werden (Abschnitt 5.10); nun können Sie diese Fotos unter Befolgung der obigen Schritte 1 – 5 löschen.
7. PC-Anschluss
Das Gerät kann als Massespeichergerät an einen Computer angeschlossen werden und zu Speicherzwecken Fotos/Videos übertragen.
8. Technische Daten
Sensor |
CMOS-Sensor mit 8,0 Megapixel |
|
16,0 Megapixel: (4608 x 3456) |
Bildauflösung |
8,0 Megapixel: (3264 x 2448) |
5,0 Megapixel: (2592 x1944) |
|
|
3,0 Megapixel: (2048 x 1536) |
|
VGA: (640 x 480) |
Objektiv |
F/2.8 f = 4,8 mm |
Fokusbereich |
0,5 m unendlich |
Makro-Modus |
11 cm – 18 cm |
Digitaler Zoom |
4-fach |
Blitz |
Integriert (Auto/ein/aus) |
LCD-Anzeige |
2,4-Zoll-TFT-Farbdisplay |
Weißabgleich |
Automatisch/Tageslicht/Bewölkt/Fluoreszierend/Wolfram |
Video-Framerate |
30 fps bei VGA/30 fps bei QVGA |
Externes |
MicroSD-Karte (Klasse 6 oder höher), nicht enthalten (unterstützt werden bis |
Speichermedium |
zu 32 GB) |
Dateiformat |
Bild: JPEG, Video: AVI |
Selbstauslöser |
10 Sekunden |
PC-Schnittstelle |
USB 2.0 |
Energiequelle |
2 x AAA-Alkalibatterien |
9. Systemvoraussetzungen
Betriebssystem |
Win XP (SP3) Vista32/64 Win7 32/64 und Mac OS X 10.6.8 oder höher |
CPU |
Pentium 4 / 3.0G oder schneller empfohlen |
RAM |
1 GB MB RAM (Vista: 2 GB) |
Schnittstelle |
USB-Anschluss |
10. Fehlerbehebung
Problem |
Ursache |
Lösung |
Die Kamera kann nicht |
Niedrige Batterieleistung. |
Batterien austauschen oder korrekt |
eingeschaltet werden. |
Die Batterien wurden unter |
einlegen. |
|
falscher Polaritätsausrichtung |
|
|
eingesetzt. |
|
Aufgenommene Fotos können |
Die Speicherkarte wurde nicht |
Formatieren Sie die Speicherkarte |
nicht gespeichert werden. |
korrekt formatiert. |
im Setup-Modus der Kamera. Siehe |
|
|
bitte Abschnitt 5.3. |
Nach dem Anschluss an den |
Die Verbindung ist |
Vergewissern Sie sich, dass alle |
Computer kann kein |
fehlgeschlagen. |
Kabelanschlüsse fest sitzen, und |
DE-8

Wechseldatenträger gefunden |
|
starten Sie den Computer |
werden. |
|
nötigenfalls erneut. |
|
|
Versuchen Sie einen anderen |
|
|
USB-Port. |
Der Blitz wird nicht aktiviert. |
Zu niedrige Batterieleistung. |
Setzen Sie 2 neue |
|
|
AAA-Alkalibatterien ein. |
Die Batterien sind schnell |
Die Batterien sind falsch |
Setzen Sie 2 neue |
erschöpft. |
eingesetzt oder alt. |
AAA-Alkalibatterien ein. |
Die Fotos sind |
1. Die Kamera wurde nicht |
1. Halten Sie die Kamera beim |
verschwommen. |
ruhig gehalten. |
Aufnehmen von Fotos ruhig, bis |
|
2. Das Kameraobjektiv ist |
ein Signalton ausgegeben wird. |
|
verschmutzt. |
2. Reinigen Sie das Objektiv mit |
|
|
einem weichen, trockenen Tuch. |
Nur für die EU
INFORMATIONEN ZU DEN WARENZEICHEN © 2013 World Wide Licenses Limited.
® The Cool iCam logo ist ein eingetragenes Warenzeichen von World Wide Licenses Limited.
Fragen? |
Wenn Sie noch |
Benötigen Sie Hilfe? |
Fragen haben, |
Dieses Handbuch soll |
besuchen Sie unsere |
Ihnen helfen, Ihr neues |
Website: |
Produkt zu verstehen. |
www.ioncamera.com |
|
|
Gefällt mir: www.facebook.com/ioncamera Twittern Sie uns: www.twitter.com/ioncamera
DE-9
S1000 - Guide de démarrage rapide
IMPORTANT
-N'ouvrez PAS le cache de la batterie sous l'eau.
-Scellez le cache de la batterie correctement pour garantir la meilleure étanchéité possible.
-Rincez la caméra à l'eau claire après utilisation et conservez-la dans un endroit sec.
1.Apprendre à connaître votre caméra
Conception étanche jusqu'à 3 mètres
Capteur 8,0 Méga pixels
Appareil photo numérique
Caméra numérique
Flash intégré
Zoom numérique 4x
Écran couleur TFT 2,4"
Emplacement MicroSD
2 piles alcalines AAA
2.Contenu de la boîte
Déballez le contenu de la boîte avec précautions et vérifiez la présence des éléments suivants :
1 |
Caméra Cool-iCam S1000 |
2 |
Câble USB |
3 |
Dragonne |
4 |
2 piles alcalines AAA 1,5V |
5 |
Carte de garantie |
6 |
Guide de démarrage rapide |
FR-1
3. Composants fonctionnels
1Déclencheur
2Bouton marche/arrêt
3Attache de dragonne
4Flash
5Objectif
6Voyant occupé
7Bouton macro/normal
8Écran à cristaux liquides
9Haut/Agrandir
10Bas/Réduire
11Gauche/Flash
Appuyez sur ce bouton pour :
1.prendre des photos
2.lancer et arrêter l'enregistrement vidéo
3.confirmer les modifications en mode menu
Appuyez pendant environ 2 secondes pour allumer ou éteindre la caméra. Appuyez brièvement pour afficher ou masquer les icônes d'état sur l'écran.
Crochet pour attacher la dragonne de poignet à la caméra.
Utilisez le flash intégré si vous effectuez la prise de vue dans la pénombre (dans ce cas, la distance recommandée entre vous et votre sujet est de 1,5 mètre.)
Effectue la capture de l'image.
Remarque: la lentille doit toujours être aussi propre que possible. La saleté ou traces de doigts affecteront la qualité de l'image.
Le voyant clignote pour indiquer que votre caméra est en train d'effectuer une opération.
Mode macro : sélectionnez ce mode pour prendre des photos rapprochées (de 11 à 18 cm)
Mode normal : sélectionnez ce mode pour prendre des photos d'un sujet situé à une distance de 0,5 mètre à l'infini.
Affiche les photos, clips vidéo, les paramètres de la caméra et les menus.
En mode viseur : appuyez sur ce bouton pour effectuer un zoom avant. Dans le menu : appuyez sur ce bouton pour naviguer vers le haut.
En mode aperçu photo : appuyez sur ce bouton pour agrandir l'image. En mode aperçu vidéo : appuyez sur ce bouton pour lancer ou mettre en pause la vidéo.
En mode viseur : appuyez sur ce bouton pour effectuer un zoom arrière. Dans le menu : appuyez sur ce bouton pour naviguer vers le bas.
En mode aperçu photo : appuyez sur ce bouton pour réduire la taille de l'image.
En mode aperçu vidéo : appuyez sur ce bouton pour afficher le mode miniature.
Dans le menu : appuyez sur ce bouton pour naviguer vers la gauche.
En mode aperçu : appuyez sur ce bouton pour sélectionner le fichier précédent.
En mode aperçu photo infini : appuyez sur ce bouton pour changer de mode flash.
En mode aperçu photo avec agrandissement : appuyez sur ce bouton pour faire défiler l'image vers la gauche.
En mode aperçu vidéo : appuyez sur ce bouton pour retour rapide.
FR-2
12Droite/Aperçu
13Sélection du mode
14Fonctions rapides
15Douille de trépied
16Interface USB
17Emplacement microSD
18Compartiment des piles
Appuyez sur ce bouton pour activer le mode aperçu.
En mode aperçu : appuyez sur ce bouton pour sélectionner le fichier suivant.
Dans le menu : appuyez sur ce bouton pour naviguer vers la droite.
En mode aperçu photo avec agrandissement : appuyez sur ce bouton
pour faire défiler l'image vers la droite.
En mode aperçu vidéo : appuyez sur ce bouton pour avance rapide. Appuyez sur ce bouton pour basculer entre les modes de capture photo et vidéo.
En mode aperçu : appuyez sur ce bouton pour sélectionner quitter. En mode aperçu photo avec agrandissement : appuyez sur ce bouton pour faire défiler l'image vers le haut. En mode aperçu vidéo : appuyez sur ce bouton pour arrêter la vidéo.
En mode viseur : appuyez pour afficher le menu des Paramètres.
En mode aperçu : appuyez brièvement pour entrer en mode « Supprimer
un / tous les fichiers ».
Appuyez longuement pour entrer en mode « Compilation des fichiers et menu des paramètres système ».
En mode aperçu photo avec agrandissement : appuyez sur ce bouton pour faire défiler l'image vers le bas.
Reçoit le trépied, si vous en utilisez un.
Vous pouvez transférer vos photos et vos vidéos sur un PC à l'aide du câble USB.
Emplacement pour insérer une carte MicroSD.
Reçoit les 2 piles alcalines AAA
4. Signification des icônes d’état
Élément |
Fonction |
|
Description |
|
|
|
Indique le mode actuellement sélectionné : |
||
1 |
Mode actuel |
Mode photo. |
|
|
|
|
Mode vidéo. |
|
|
|
|
Forcer flash : le flash sera actif quelle que soit la |
||
2 |
Indicateur de flash |
situation. |
|
|
Auto flash : la caméra détermine si le flash est |
||||
|
|
nécessaire ou non. |
|
|
|
|
Flash désactivé: le flash est désactivé. |
||
3 |
Indicateur |
Mode normal (0,5 m – infini) |
||
normal/macro |
Mode macro (11 cm – 18 cm) |
|||
|
||||
4 |
Retardateur |
Indique si le retardateur est activé ou non |
||
5 |
Résolution |
Affiche la résolution d'image sélectionnée : |
||
16M = 4608x3456; |
8M = 3264x2448; |
|||
sélectionnée |
||||
|
5M = 2592x1944; |
3M = 2048x1536; |
||
|
|
|||
FR-3

|
|
|
VGA = 640x480 |
|
6 |
Qualité d'image |
|
Super fine. |
|
|
Fine. |
|||
|
|
|
Normale. |
|
7 |
Indicateur de pile |
|
Les piles sont pleines. |
|
|
Les piles sont vides. |
|||
|
|
|
||
8 |
Indicateur de zoom |
Affiche le ratio de zoom actuel, le cas échéant. |
||
9 |
Indicateur MicroSD |
Indique la présence ou non d'une carte MicroSD, utilisée |
||
pour l'enregistrement des PHOTOS ou des VIDÉOS. |
||||
|
|
|
||
10 |
Balance des blancs |
Indique le mode de balance des blancs actuellement utilisé. |
||
11 |
Compteur |
de |
Mode photo : Nombre de photos pouvant être prises. |
|
photo/vidéo |
|
Mode vidéo : Durée d'enregistrement en secondes. |
||
|
|
|||
5. Réglages de l'appareil photo
Paramètres
Photo
Vidéo
|
|
Résolution 16 Méga pixels |
4608x3456 |
||
Résolution |
|
Résolution 8,0 Méga pixels |
3264x2448 |
||
|
Résolution 5,0 Méga pixels |
2592x1944 |
|||
|
|
Résolution 3,0 Méga pixels |
2048 x 1536 |
||
|
|
Résolution VGA |
|
640 x 480 |
|
Qualité |
|
Super Fine / Fine / Normale |
Paramètre de qualité d'image |
||
Métrage |
|
Centre / multi / point |
|
Paramètres de métrage |
|
|
|
Auto |
|
|
Définition automatique de la balance des |
|
|
|
|
blancs |
|
|
|
|
|
|
|
|
|
Jour |
|
|
Balance des blancs adaptée à la prise de |
|
|
|
|
photo sous beau temps |
|
Balance |
des |
|
|
|
|
Nuageux |
|
|
Balance des blancs adaptée à la prise de |
||
blancs |
|
|
|
|
photo sous couvert nuageux |
|
|
Tungstène |
|
Balance des blancs adaptée à un |
|
|
|
|
environnement d'éclairage au tungstène |
||
|
|
|
|
|
|
|
|
Fluorescent |
|
Balance des blancs adaptée à un |
|
|
|
|
environnement d'éclairage fluorescent |
||
|
|
|
|
|
|
ISO |
|
Auto/100/200/400/800 |
Sélection de sensibilité |
||
Exposition |
|
±2.0, ±1.7, ±1.3, ±1.0, ±0.7, |
Paramètre d'exposition |
||
|
|
±0.3, 0 |
|
|
|
Retardateur |
|
Activé/désactivé |
|
Paramètres du retardateur |
|
Netteté |
|
Forte/normale/Douce |
Réglage de la netteté |
||
|
|
Normal/ |
Noir et |
blanc/ |
|
Effet (viseur) |
Sépia/ |
Négatif/ |
Lomo/ |
|
|
Croquis/ Rouge/ Vert/ Bleu/ |
|
||||
|
|
Paramètres des effets |
|||
|
|
Vivace |
|
|
|
Effets (Lecture) |
Noir et blanc / Sépia / |
|
|||
Négatif / Mosaique/ Rouge |
|
||||
|
|
/ Vert / Bleu. |
|
|
|
Incrustation |
de |
Activé/désactivé |
|
Réglages de la date |
|
la date |
|
|
|
|
|
Affichage |
|
Activé/désactivé |
|
Paramètres d'affichage rapide |
|
rapide |
|
|
|||
|
VGA 640 x 480 |
|
|
||
Taille de vidéo |
|
Sélecteur de résolution vidéo |
|||
QVGA 320 x 240 |
|
||||
|
|
|
|
||
Balance |
des |
Auto |
|
|
Définition automatique de la balance des |
blancs |
|
|
|
|
blancs |
|
|
Jour |
|
|
Balance des blancs adaptée à la prise de |
|
|
|
|
photo sous beau temps |
|
|
|
|
|
|
|
|
|
Nuageux |
|
|
Balance des blancs adaptée à la prise de |
|
|
|
|
photo sous couvert nuageux |
|
|
|
|
|
|
|
|
|
Tungstène |
|
Balance des blancs adaptée à un |
|
|
|
|
environnement d'éclairage au tungstène |
||
|
|
|
|
|
|
|
|
|
FR-4 |
|
|

Configuration
Remarque :
|
Fluorescent |
Balance des blancs adaptée à un |
|
|
environnement d'éclairage fluorescent |
||
|
|
||
Son |
Activé/désactivé |
Paramètres du son |
|
Fréquence |
50 Hz/60 Hz |
Pour sélectionner le type d'alimentation |
|
de votre région |
|||
Économie |
|
||
Désactivé/1/3 Minutes |
Réglage de mise hors tension auto |
||
d'énergie |
|||
Anglais/Allemand/Italien |
|
||
|
|
||
Langage |
Portugais/Français/Espagn |
Sélection du langage d'affichage |
|
|
ol/Japonais |
|
|
Date/Heure |
AA/MM/JJ ; JJ/MM/AA |
Réglage de la date et de l'heure |
|
MM/JJ/AA; |
|||
|
|
||
Formatage |
Oui/Non |
Formater la carte MicroSD. |
|
Tout réinitialiser |
Oui/Non |
Pour réinitialiser tous les réglages tels |
|
quels en sortie d'usine |
|||
Version |
|
||
Affiche la version du micrologiciel |
|||
L'appareil conservera les paramètres même si vous l'éteignez.
6. Utilisation de la caméra
6.1 Installer les piles
1.Ouvrez le compartiment des piles.
2.Installez 2 piles alcalines AAA dans le compartiment des piles.
3.Fermez le compartiment des piles.
Remarque : Vérifiez que les piles sont installées dans la bonne direction (comme indiqué ci-dessus).
6.2 Installer la carte mémoire microSD (non fournie)
L'appareil photo ne comporte aucune mémoire interne. Installez-y une carte mémoire MicroSD (classe 6 ou plus, non fournie)
Installez la carte MicroSD dans l'appareil photo comme indiqué ci-dessous.
1.Éteignez la caméra.
2.Ouvrez le compartiment de batterie.
3.Insérez la carte MicroSD dans la caméra.
4.Fermez le compartiment de batterie.
Remarque : la carte ne peut être insérée que dans un sens dans la fente pour MicroSD. N'utilisez pas de force excessive pour insérer la carte, car cela pourrait endommager la carte MicroSD ainsi que la caméra.
Remarque : la carte SD doit être formatée avant de pouvoir prendre des photos. Reportez-vous à la section 5.3 pour en savoir plus sur ce point.
FR-5

6.3 Formater la carte MicroSD
1. |
Appuyez sur ( |
) en mode PHOTO ou VIDÉO. |
2. |
Sélectionnez le mode de configuration à l'aide du bouton droite |
|
3. |
Sélectionnez l'icône de formatage en appuyant sur W( ) puis en appuyant sur le déclencheur |
|
|
pour confirmer. |
|
4. |
Appuyez alors sur le déclencheur pour formater la carte mémoire. |
|
6.4 Définir la résolution
L'appareil photo peut fonctionner avec différentes résolutions.
1.Appuyez sur Menu ( ) en mode PHOTO, puis sélectionnez l'icône de résolution en appuyant sur W (
 ) puis en appuyant sur le retardateur pour confirmer.
Résolutions disponibles : VGA (640 x 480), 3M (2048 x 1536), 5M (2592x1944), 8M (3264x2448), 16M (4608x3456)
2.Cinq résolutions seront affichées. Sélectionnez la résolution désirée à l'aide des touches haut et bas et appuyez sur le déclencheur pour confirmer.
6.5 Prise de photos
1.Allumez l'appareil photo.
2.Selon la distance avec le sujet, utilisez le bouton de macro pour régler la distance. Sélectionnez le symbole de fleur ( ) si vous désirez prendre une photo en gros plan (11 - 18 cm).
Pour prendre une vidéo ou photo de paysages ou personnes (0,5 m - infini), sélectionnez le mode normal ( ).
).
3.Si vous n'êtes pas sûr de l'éclairage, sélectionnez le mode de flash auto ( ) ou en appuyant sur le bouton flash. (Si le niveau de batterie est trop faible, le flash sera désactivé).
4.Utilisez l'écran LCD pour viser l'objet de votre photo.
5.Appuyez sur le déclencheur et attendez que l'écran LCD s'allume de nouveau.
Attention : 1) Il n'est pas recommandé de prendre des photos d'objets en mouvement rapide.
2)Les images prises depuis un véhicule en mouvement pourraient apparaître déformées.
6.6Zoom avant et arrière
L'appareil photo peut zoomer jusqu'à 4 fois.
Agrandissez ou réduisez la vue en appuyant sur les boutons haut ou bas. Un chiffre apparaît alors pour indiquer le niveau de zoom, et 4x est le maximum.
6.7 Retardateur
Vous pouvez utiliser le retardateur pour prendre des photos de vous-même ou si vous souhaitez effectuer une prise de vue sans flash. Pour limiter les risques de tremblement, il est recommandé d'utiliser un trépied.
1.Sélectionnez le mode photo.
2.Appuyez sur Menu (  ). Le menu apparaît.
3.Appuyez sur W ( ) pour sélectionner le mode retardateur et confirmez en appuyant sur le déclencheur.
4.Appuyez sur W ( ) pour sélectionner l'option « Activé ».
5.Appuyez sur le retardateur pour confirmer. La fonction de retardateur est maintenant prête à être utilisé.
6.Visez le sujet à prendre en photo.
7.Appuyez sur le déclencheur pour prendre la photo.
FR-6
 Loading...