


Quick Start Guide
Model:#1023,1026,1027
FCC ID:NW71023
2. Functional Parts of Air Pro 2
1. Package Contents of Air Pro 2
Carefully unpack the package and ensure that you have the following items:
Thank you for purchasing the iON Air Pro 2 HD sports video camera.
This QSG contains the common functions and features of Air Pro 2 and Air Pro 2 Wi-Fi. For additional features and functions of Air Pro 2 Wi-Fi, please refer to the back part of the manual.
The iON Air Pro 2 can be mounted with the Bike & Helmet Kit or the Board Kit for the ultimate adventure HD recording experience.
Getting to know your camera
Common features:
9iON Air Pro 2 is a Professional, High Quality Digital Video Recorder that records Full HD videos with the flip of an an easy slide switch
9It has the latest 14 Mega Pixel Sensor for you to take great digital photographs
9A 180 degree high quality lens provides a super wide angle field of view
9Your camera supports a MicroSD card up to 32GB, allowing you to take videos in 1080p with 30 frames per second for approximately 4 Hours.
9Equipped with the microphone jack for connection with an external microphone.*
9The Waterproof Housing enables you to operate the camera up to 10 meters under water.
9iON Air Pro 2 is about 4.51 ounces or 128g.
*When an external microphone (not included) is connected, audio cannot be recorded through the built-in microphone.
1 |
USB Cable |
|
|
|
|
2 |
Universal Power Adapter |
|
|
|
|
3 |
Tripod |
|
|
|
|
4 |
Secure Strap |
|
|
|
|
5 |
CamLOCK Key |
|
|
|
|
6 |
Short Ball Joint with |
|
CamLOCK socket on top |
||
|
||
|
|
|
7 |
Double Faced Adhesive - |
|
Helmet |
||
|
8Helmet Mount with removable ball join nut
9CamLOCK
10Quick User Guide
11Warranty Card
12Pouch
13Mi-media Card
1.Connect the camera to a computer for data transfer or camera setup.
2.Charge your camera.
Attach the correct international wall plug to the adapter block and connect to the camera with the USB cable
For mounting the camera without using the camLOCK system
Secures the camera to the mount to provide additional security.
Tightens and loosens the CamLOCK screw.
1.Short Ball Joint - to be installed into the Helmet Mount
2.CamLOCK socket - for attaching the CamLOCK and the camera
Adhere to the helmet mount and/or helmet.
Enables you to mount the camera on different types of helmets by tightening and loosening the ball joint nut
Mount or remove the camera quickly from the CamLOCK socket.
Provides quick information for easy camera operation
Please retain for manufacturers warranty period which is limited to 1 year.
For storing your camera or accessories.
Provides guidance on how to sign up for your free iON cloud storage.
1 |
Power |
1. Turns the camera on or off |
|
2. Takes a single photograph |
|||
|
|
||
2 |
LED Indicator |
Shows the camera status |
|
|
|
|
|
3 |
Recording Slide Switch |
Slide to start or stop video recording |
|
|
|
|
|
4 |
Lens |
High quality lens |
|
|
|
|
|
5 |
MicroSD Card Slot |
MicroSD card storage location. |
|
|
|
|
|
6 |
Mic Jack |
To enable you to connect to an external |
|
microphone (not included) |
|||
|
|
||
7 |
Mini HDMI Jack |
To enable you to connect the camera to an HDTV |
|
with an HDMI cable (not included) |
|||
|
|
||
8 |
Video Resolution Switch |
Select video resolution: FHD (Full HD) or HD. |
|
|
|
|
|
|
|
1. Connect to your computer for data transfer or |
|
9 |
USB Port |
camera setup |
|
|
|
2. Charge your camera |
|
10 |
Reset Button |
Reset the camera |
|
|
|
|
|
11 |
PODZ Socket |
Connect the PODZ to the camera to perform |
|
additional functions |
|||
|
|
3. Using Your Camera
3.1 Charging up Your Camera
Charge your camera with either the USB cable or AC/DC adapter. The red LED will light up to indicate the camera is charging and it will turn off once the camera has been fully charged. It takes about 3 hours to fully charge the camera.
3.2 Inserting a Memory Card
Insert a MicroSD card up to 32GB (not included) before using your camera. Ensure that the camera power is turned OFF before inserting the card into the slot.
Notes:
1.There is only one correct direction to insert the MicroSD card into the slot. Do not force the card into the card slot as it may damage both the camera and the MicroSD card.
2.A new MicroSD card should be formatted before using. For more information, please see section 4.2.
3.We recommend a class 10 SDHC card.
3.3 Setting up Date and Time
Connect your camera to a computer and run the iON software from the MicroSD card folder. You can set the date and time on the camera via the settings page. Please see section 4.1 to open iON software
3.4 Installing the PODZ
1.Attach the PODZ to the back of the camera and rotate clockwise until the two dots are aligned.
2.Slide the latch on the PODZ to lock it.
WARNING: The latch must be locked in place to
ensure the waterproof seal is activated – failure to do so may cause water leakage.
3.5 Recording Videos
Before starting to record, select the video resolution using the Video Resolution Switch.
There are two methods for starting the video recording function. When the camera starts recording, there will be a short vibration indicating recording has started. The LED indicator illuminates RED throughout recording.
1.Whether the camera power is ON or OFF, simply slide the Recording Slide Switch  from STOP to REC to start recording.
2.When your camera is OFF and the Recording Slide Switch  is at REC
location, press and hold the Power  button to turn the camera ON and it will start recording.
To stop Recording, move the Recording Slide Switch  from REC to STOP .The camera will vibrate and the LED indicator will illuminate GREEN to indicate the recording has stopped. The camera will then enter the Standby mode.
An additional option is to hold the Power  button to stop the recording and turn the camera off. The camera will vibrate for two seconds and the Red LED light will turn off.
Notes:
1.An additional 432x240 (w/ 1080p/720p) or 320x240 (w/ 960p) video file will be created simultaneously with the recording of an HD/FHD video file. The smaller video file size allows for more efficient uploading of content to social media platforms and email.
2.Changing video resolution is disabled during video recording.
3.There will be around 1-2 seconds delay before the camera starts recording.
4.The various video resolution options for HD and FHD can be changed under the “Settings” selection in the iON software. (see 4.1)
3.6 Taking Photos
1.Turn on the camera by pressing the Power  button.
2.After the camera power has been turned on, press the Power  button very briefly to take a photo. A short vibration and a flash of the green LED indicates that the action was successful.
Notes:
1.The Still Photo function is disabled during video recording.
2.Change photo resolutions and shooting mode (Single Shot, Burst Mode and Time Lapse) through the “Settings” section on the iON software.
4. Mounting Your Camera
4.1 Secure Strap
1.Loop one end of the secure strap through the strap hole of the camera. You may use a pin to help thread it through the hole.
2.Attach the other half to the mount.
3.Clip both ends together when camera is mounted.
4.2 CamLOCK
iON’s versatile CamLOCK Mount System allows you to attach the camera to any type of helmet (bike, motorcycle, ski, skydive etc.), pole,
board (surf, skate, ski etc) and handlebar (bike and motorcycle).
Please refer to the specific mounting guides for instructions on how to install your mounts with your camera for particular activities.
1.Fit the screw of the CamLOCK to the tripod socket of the camera.
2.Screw the CamLOCK until it is tight on the camera.
4.3 Mounting on Your Helmet
Before mounting, make sure the surface of the helmet on which the double faced adhesive will be adhered is clean so that the helmet mount can be affixed strongly on the helmet.
1.Loosen the ball joint nut from the helmet mount.
2.Install the ball joint to the helmet mount and tighten the nut.
3.Adhere one side of the double faced adhesive to the base of the helmet mount, then peel and stick the other side to the helmet to permanently secure the mount to the helmet.
4.Attach the CamLOCK and camera into the CamLOCK socket. Ensure that the ball joint nut is tightened securely.
Notes:
1.The CamLOCK system allows you to change the angle of the camera. Simply loosen the nut, adjust the camera angle and retighten the nut.
2.You can use the same helmet mount to mount the camera on a motorcycle helmet by purchasing the other optional mounting kit.
5. iON Software Application
The iON Software Application for Windows or Mac lets you connect to a computer by USB to:
1.View and copy the files stored on the camera
2.Change the camera settings
3.Set the Date & Time
4.Format the camera's card
5.Link to the iON website and cloud service
6. Check the firmware update
5.1 Windows Software Application
The Windows iON.exe Software Application comes installed on the camera. To run the application:
1.Insert a MicroSD card with at least 2MB free space into the camera.
2.Press the Power button to turn the camera on.
3.Connect your camera to the PC via the camera’s USB cable.
4.Open the MicroSD folder and you will find the file “iON.exe”.
5.Double click the file to open
5.2 Mac Software Application
1.Visit the ion website (www.iontheaction.com) to download the latest Mac software application version.
2.Insert a MicroSD card with at least 2MB free space into the camera.
3.Press the Power button to turn the camera on.
4.Connect your camera to the Mac via the camera’s USB cable.
4. Use Finder to locate and open the camera as a new device usually called “No Name”. You should see a folder “DCIM” and the file iON.exe when you open it.
6.Drag the downloaded file to the new device and put it with DCIM and iON.exe.
7.Double click the newly loaded file to run the Mac Application. The application will not run if it is not in on the camera’s card.
Notes:
The camera can be connected to any plug & play Windows or Mac system and accessed as a removable disk drive. Files can be viewed and copied without the use of the application.
6. Signing Up for Free iON Cloud Storage
You can sign up for your 8GB of free Cloud storage simply go to www.iontheaction.com/ioncloud and follow the steps. The iON Cloud is a great way to store and share your photos and video footage for free.
7. Connecting Your Camera to a HDTV
You can connect your camera to a HDTV with an HDMI cable (not included). Once it is connected you can:
1.Take photos or videos by using your HDTV as a viewfinder
2.Playback any photo or video files saved in your camera
3.Delete any files saved on the camera
4.Format the MicroSD Card
8. Air Pro 2 Wi-Fi (this section applies to Air Pro 2 WiFi model or optional WiFi PODZ accessory ONLY)
A Wi-Fi PODZ turns your iON Air Pro 2 into a Wi-Fi access point. View the camera’s videos/photos and change camera settings from your mobile phone, tablet or computer. Transfer files back to your computer or mobile device. You can also live-stream the camera view, start/stop recording or take a photo.
8.1 Air Pro 2 WiFi Package Content
In addition to the package contents of Air Pro 2 (Refer to section 1), the Air Pro 2 Wi-Fi has included a Wi-Fi PODZ for performing the Wi-Fi functionality.
Wi-Fi PODZ |
Rotate to seal the camera. |
|
|
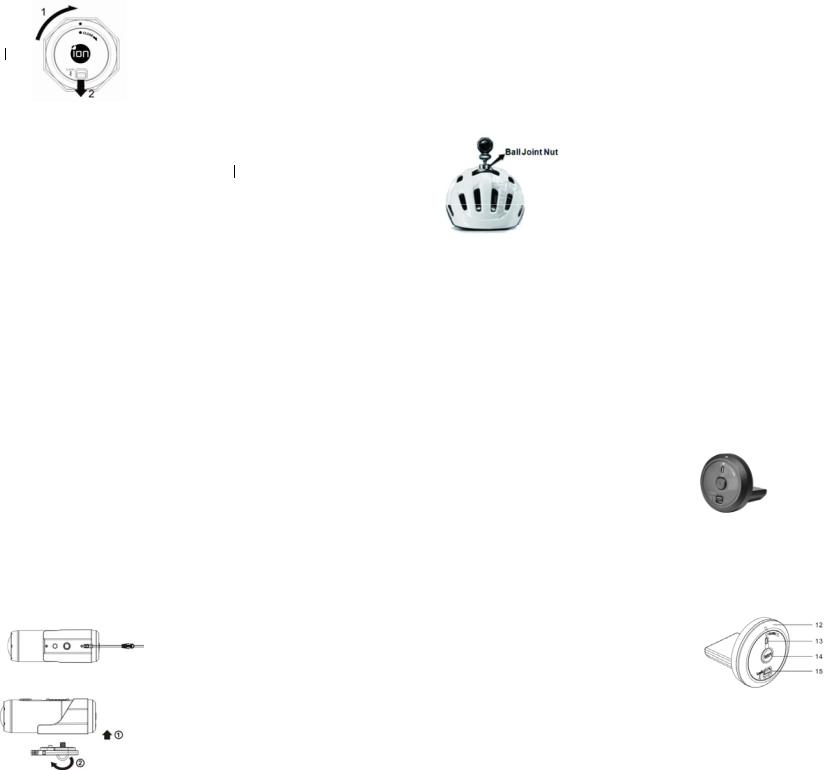
8.2 Wi-Fi PODZ Functional Parts
In addition to the functional parts of Air Pro 2(Refer to items 1 to11 in section 2), Air Pro 2 Wi-Fi has additional functional parts on the Wi-Fi PODZ.
12 |
Wi-Fi PODZ |
Rotate to seal the camera |
|
|
|
13 |
Wi-Fi LED indicator |
Shows the Wi-Fi status |
|
|
|
14 |
Wi-Fi Power button |
Turns the Wi-Fi on or off |
|
|
|
15 |
PODZ Latch |
Locks the PODZ |
|
|
|
 Loading...