


PICS 2 SD
USER GUIDE
ENGLISH ( 1 – 5 )
GUÍA DEL USUARIO
ESPAÑOL ( 6 – 10 )
GUIDE D’UTILISATION
FRANÇAIS ( 11 – 15 )
GUIDA UTENTE
ITALIANO (16 – 20 )
BEDIENUNGSANLEITUNG
DEUTSCH ( 21 – 25 )
GEBRUIKERSHANDLEIDING
NEDERLANDS ( 26 – 30 )

WELCOME
Thank you for purchasing a PICS 2 SD film, slide and photo scanner. Please take a moment to read through this manual in order to get the most out of your PICS 2 SD.
PRECAUTIONS
Before using PICS 2 SD, please ensure that you read and understand the safety precautions described below. Always ensure that the PICS 2 SD is operated correctly:
Never operate PICS 2 SD inside of an aircraft or anywhere else where operation of such devices is restricted. Improper use creates the risk of serious accident.
Do not try to open the case of PICS 2 SD or attempt to modify PICS 2 SD in any way. High-voltage internal components create the risk of electric shock when exposed. Maintenance and repairs should be performed only by authorized service providers.
Keep PICS 2 SD away from water and other liquids. Do not use PICS 2 SD with wet hands. Never use PICS 2 SD in the rain or snow. Moisture creates the danger of fire and electric shock.
Keep PICS 2 SD and its accessories out of the reach of children and animals to prevent accidents or damage to the image copier.
If you notice smoke or a strange odor coming from PICS 2 SD, turn the power off immediately. Take PICS 2 SD to the nearest authorized service center for repair. Never attempt to repair PICS 2 SD on your own.
Use only the recommended power accessories. Use of power sources not expressly recommended for PICS 2 SD may lead to overheating, distortion of the equipment, fire, electrical shock or other hazards.
PICS 2 SD may become slightly warm during use. This does not indicate malfunction.
If the exterior of PICS 2 SD needs cleaning, wipe it with a soft, dry cloth.
FCC NOTICE
This equipment has been tested and found to comply with the limits for a Class B digital device, pursuant to Part 15 of the FCC Rules. These limits are designed to provide reasonable protection against harmful interference in a residential installation. This equipment generates, uses and can radiate radio frequency energy. If not installed and used in accordance with the instruction, it may cause harmful interference to radio communication. However, there is no guarantee that interference will not occur in a particular installation. If this equipment does cause harmful interference to radio or television reception, which can be determined by turning the equipment on the off, the user is encouraged to try to correct the interference by one or more the following suggestion:
Reorient or relocate the receiving antenna.
Increase the distance between the equipment and the receiver.
Connect the equipment to a different power outlet other than the one where the receiver is connected.
Consult an experienced television or radio technician for help.
CAUTION: To comply with the limits for a Class B digital device, pursuant to Part 15 of the FCC Rules, this device must only be installed on computer equipment certified to comply with the Class B limits.
1
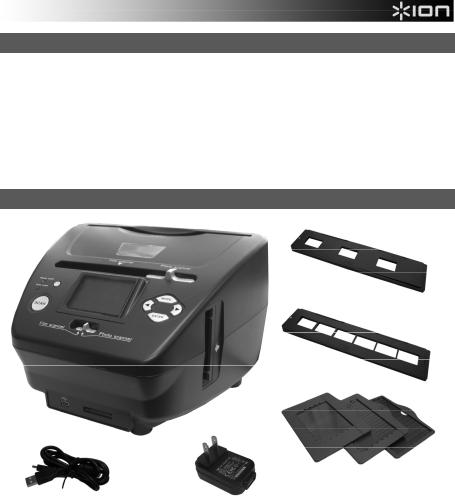
BOX CONTENTS
PICS 2 SD
USB cable
USB power adapter
Slide holder
Film holder
Photo holders (3)
Quickstart Guide
Safety Instructions & Warranty Information Booklet
PICS 2 SD FEATURES
|
|
|
|
|
9 |
|
1 |
|
|
|
4 |
|
2 |
5 |
6 |
||
|
|
||||
|
3 |
|
|
5 |
|
|
4 |
|
7 |
||
|
|
|
|
|
8 |
|
10 |
11 |
|
|
|
12 |
|
|
|
13 |
|
1. |
POWER BUTTON |
|
6. |
MODE BUTTON |
|
2. |
DISPLAY |
|
|
7. |
ENTER BUTTON |
3. |
SCAN BUTTON |
|
8. |
FILM / SLIDE HOLDER SLOT |
|
4. |
SCANNER MODE |
|
9. |
PHOTO HOLDER SLOT |
|
|
SWITCH |
|
|
10. |
USB PORT |
|
|
|
|
||
5.LEFT / RIGHT
BUTTONS |
11. |
SD CARD SLOT |
|
|
|
|
12. |
USB CABLE |
14
15
16
13.USB POWER ADAPTER
14.SLIDE HOLDER
15.FILM HOLDER
16.PHOTO HOLDERS
3" x 5" 4" x 6" 5" x 7"
Note: Please make sure your film negatives/ mounted slides and cover trays are clean before inserting into the copier. Dust or dirt will affect the quality of your scanned images.
2
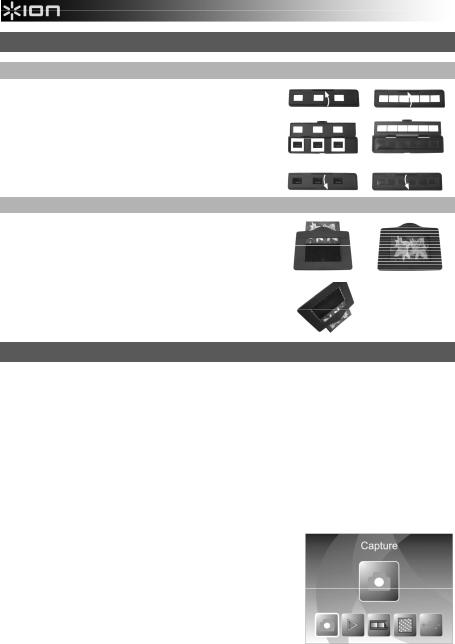
USING THE INCLUDED HOLDERS
SLIDE & NEGATIVE HOLDERS
1.Open the holder.
2.Put the slides / film into the holder.
3.Close the holder and please make sure the holder closes properly.
PHOTO HOLDERS
1.Slide your photo into the top slot of the appropriate holder (3" x 5", 4" x 6" or 5" x 7").
2.To remove the photo, simply turn the holder upside-down and let it slide out.
SCANNING IMAGES WITH PICS 2 SD
When scanning your slides, negatives or photos with PICS 2 SD, you can save your scanned images to an optional SD card or you can save it to PICS 2 SD's internal memory (up to 14MB). To scan and save your images, follow these steps:
1.With the included USB cable, connect PICS 2 SD either to your computer (if it is on) or to wall power using the included USB power adapter.
2.Press the POWER BUTTON to turn PICS 2 SD on.
3.Insert your slide, negative, or photo into the appropriate holder. (See USING THE INCLUDED HOLDERS for more information.)
4.Insert the holder into PICS 2 SD. If using a slide or negative holder, insert it into the slot on the right side. If using a photo holder, insert it into the slot on the top.
5.Move the two switches to the appropriate position: "Film Scanner" (for slides and negatives) or "Photo Scanner" (for photos).
6.Before scanning, you will see the main menu. You can adjust your settings here.
Use the LEFT / RIGHT BUTTONS to navigate the available options and the press the ENTER BUTTON to select one. You can also press the MODE BUTTON to return to the main menu:
•If you are scanning a slide or negative, select "Film" to choose between "Negatives," "Slides," or "B&W" (black and white negatives).
•If you are scanning a photo, select "Effect" to choose between "Multicolor" (color photos) and "B&W" (black and white photos).
•If you are scanning a photo, select "Crop" and select the measurements of your photo: 5" x 7", 4" x 6" and 3" x 5".
•Select "Resolution" to choose between 5M and 10M (megapixels). The larger the resolution, the better quality your scanned image will be.
3

7.When you have adjusted your settings and are ready to scan your image(s), select "Capture" on the main screen. The image you are about to scan will appear in the DISPLAY. You can adjust the image in the following ways:
•You can adjust the exposure by pressing the ENTER BUTTON when your image is shown on the DISPLAY. Use the LEFT / RIGHT BUTTONS to adjust the EV (exposure value) and press the ENTER BUTTON to select it.
•You can change the orientation of the image by pressing the LEFT / RIGHT BUTTONS. The RIGHT BUTTON will flip the image vertically, and the LEFT BUTTON will flip the image horizontally.
Note: When scanning photos, if you selected 3" x 5" or 4" x 6", you will see the border of the photo holder, but the software will automatically crop this out when you scan it (if you selected the proper Crop settings as described above).
8.To scan the image, press PICS 2 SD's SCAN BUTTON.
9.After the scan is complete, use the LEFT / RIGHT BUTTONS to select "Save" to save your scan, "Cancel" to delete your scan and try again or "Home" to return to the main menu.
10.When you are done scanning your image(s), you can transfer your images to your computer. See TRANSFERRING IMAGES FROM PICS 2 SD for more information.
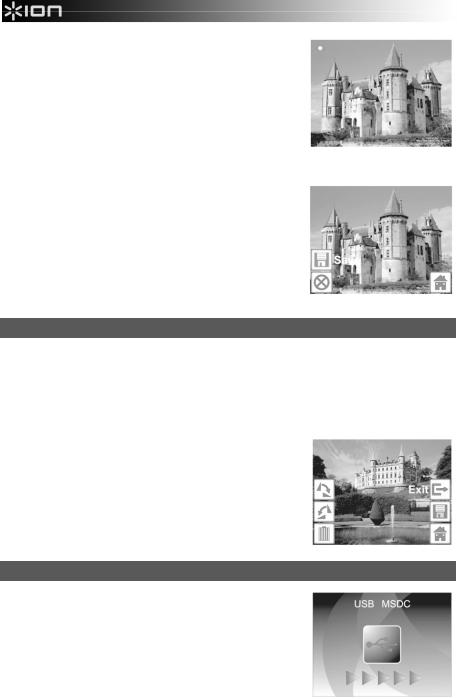
VIEWING & EDITING IMAGES
1.Press the MODE BUTTON to enter the main menu.
2.Use the LEFT / RIGHT BUTTONS to select "Playback" and press the ENTER BUTTON. You will see a slideshow of the images you have scanned.
3.When you see an image you want to edit, press the ENTER BUTTON. The slideshow will pause.
4.Press the ENTER BUTTON again. You will see several icons on the sides of the DISPLAY. Use the LEFT / RIGHT BUTTONS to navigate these and press the ENTER BUTTON to select it, if desired.
•Rotate +90°: Rotates the image 90 degrees clockwise.
•Rotate -90°: Rotates the image 90 degrees counterclockwise.
•Delete: Deletes the image.
•Exit: Returns to the slideshow.
•Save: Saves the image after you make any changes. (If you do not save the image, your changes will be lost if you return to the slideshow.)
•Home: Returns to the main menu.
TRANSFERRING IMAGES FROM PICS 2 SD
1.Connect PICS 2 SD to your computer with the included USB cable.
2.Press the MODE BUTTON to enter the main menu.
3.Use the LEFT / RIGHT BUTTONS to select "USB MSDC" and press the ENTER BUTTON. A USB symbol will appear on the DISPLAY, meaning PICS 2 SD is functioning as a remote USB device to be read by your computer.
4.You can now view or transfer your scanned images to your computer (just as you would from a remote USB drive or an SD card reader).
5.Press the MODE BUTTON to return to the main menu.
4

SPECIFICATIONS
Image Sensor |
5.1 megapixel CMOS sensor |
Lens Specification |
F= 4.83 |
Color Balance |
Automatic |
Exposure Control |
Automatic |
PC interface |
USB 2.0 |
Scan High Resolution |
3,600 DPI interpolation resolution |
Light Source Back Light |
3 white LED |
System Requirements |
Windows® XP / Windows Vista™ (32-bit or 64-bit) / Windows 7 |
Power |
From USB port |
Dimensions |
220 x 208 x 147 mm |
Specifications are subject to change without prior notice.
TROUBLESHOOTING
|
ISSUE |
|
POSSIBLE CAUSE |
|
RESOLUTION |
|
|
|
|||
|
My computer does not |
|
PICS 2 SD not plugged |
|
Your computer must have a USB 2.0 to |
|
recognize the PICS 2 SD. |
|
into a high-speed USB |
|
communicate with your PICS 2 SD. Check to |
|
|
|
port. |
|
see if USB 2.0 is installed on your computer. If |
|
I get a Windows message |
|
|
|
you do not have a USB 2.0 installed on your |
|
that reads "device not |
|
|
|
computer you can upgrade your USB ports. |
|
recognized" |
|
|
|
This hardware is available at most electronic |
|
|
|
|
|
stores. |
|
|
|
|
|
|
|
I have a USB 2.0 port on my |
|
All ports on your computer |
|
Even though you may have USB 2.0 installed, |
|
computer, but my computer |
|
may not be high speed. |
|
all of your USB ports may not be USB 2.0 |
|
still won't recognize PICS 2 |
|
|
|
compatible. Check all your USB ports to find |
|
SD. |
|
|
|
the 2.0 compatible ports. |
|
|
|
|
|
|
|
Warning from Windows that |
|
This is normal. OK to |
|
Choose “Continue anyway”. |
|
device “has not passed |
|
continue. |
|
PICS 2 SD will not harm your computer. |
|
Microsoft logo testing”. |
|
|
|
(Windows certification is in process for this |
|
|
|
|
|
software) |
|
|
|
|
|
|
|
My PICS 2 SD is working but |
|
Time for auto exposure |
|
The image copier self adjusts to your slide, |
|
some of my slides, negatives |
|
varies according to your |
|
negative or photo exposure. Wait for the live |
|
or photos look overexposed. |
|
computer configuration. |
|
view window to stop adjusting for exposure |
|
|
|
|
|
and then press the Scan button. |
|
|
|
|
|
Check your slides, negatives or photos to see |
|
|
|
|
|
if they may have been overexposed when |
|
|
|
|
|
originally developed. Several photo adjusting |
|
|
|
|
|
software applications are available to “clean- |
|
|
|
|
|
up” your newly digitized picture. |
|
|
|
|
|
|
This symbol on the product or in the instructions means that your electrical and electronic equipment should be disposed at the end of its life separately from your household waste. There are separate collection systems for recycling in the EU. For more information, please contact the local authority or your retailer where you purchased the product.
5

BIENVENIDO
Gracias por adquirir un escáner de películas y diapositivas PICS 2 SD. Tómese un momento para leer este manual a fin de obtener lo máximo de su PICS 2 SD.
PRECAUCIONES
Antes de usar el PICS 2 SD, asegúrese de leer y entender las precauciones de seguridad descritas a continuación. Asegúrese siempre de operar correctamente el PICS 2 SD:
Nunca opere el PICS 2 SD dentro de una aeronave ni en ningún otro lugar donde la operación de tales dispositivos esté restringida. El uso incorrecto crea el riesgo de graves accidentes.
No trate de abrir la cubierta del PICS 2 SD ni intente modificarlo de ninguna manera. Los componentes internos de alta tensión crean el riesgo de electrocución cuando están expuestos. El mantenimiento y las reparaciones deben realizarlos únicamente proveedores de servicio autorizados.
Mantenga el PICS 2 SD lejos del agua y de otros líquidos. No use el PICS 2 SD con las manos mojadas. Nunca use PICS 2 SD en la lluvia o la nieve. La humedad crea el peligro de incendio y electrocución.
Mantenga el PICS 2 SD y sus accesorios fuera del alcance de los niños y los animales, a fin de prevenir accidentes o daños a la copiadora de imágenes.
Si nota que sale humo o un olor extraño del PICS 2 SD, apáguelo inmediatamente. Lleve el PICS 2 SD a centro de servicio autorizado más cercano para que lo reparen. Nunca intente reparar el PICS 2 SD usted mismo.
Use únicamente los accesorios de alimentación recomendados. El uso de fuentes de alimentación no recomendadas expresamente para el PICS 2 SD puede causar recalentamiento, deformación del equipo, incendio, electrocución u otros riesgos.
El PICS 2 SD puede calentarse ligeramente durante el uso. Esto no indica falla
Si el exterior del PICS 2 SD necesita limpieza, pásele un paño blando y seco.
AVISO DE LA FCC
Este equipo fue probado y se comprobó que cumple los límites correspondientes a un dispositivo digital clase B, según la Parte 15 de las reglamentaciones de la FCC. Estos límites están diseñados para proporcionar una razonable protección contra las interferencias perjudiciales en una instalación residencial. Este equipo genera, usa y puede irradiar energía de radiofrecuencia. Si no se instala y usa de acuerdo con las instrucciones, puede causar interferencias perjudiciales a las radiocomunicaciones. No obstante, no existe garantía de que no se produzcan interferencias en una instalación particular. Si este equipo causa interferencias perjudiciales a la recepción de radio o televisión, lo que puede comprobarse encendiendo y apagando el equipo, se recomienda al usuario intentar corregir la interferencia mediante una o más de las siguientes medidas:
Reorientar o cambiar de posición la antena receptora.
Aumentar la separación entre el equipo y el receptor.
Conectar el equipo a un tomacorriente diferente al que está conectado el receptor.
Consultar a un técnico experimentado de televisión o radio para solicitar asistencia.
PRECAUCIÓN: Para cumplir con los límites correspondientes a un dispositivo digital clase B, de acuerdo a la Parte 15 de las Reglas de la FCC, este dispositivo debe instalarse sólo en equipos de computación certificados en cuanto al cumplimiento de los límites de la clase B.
6
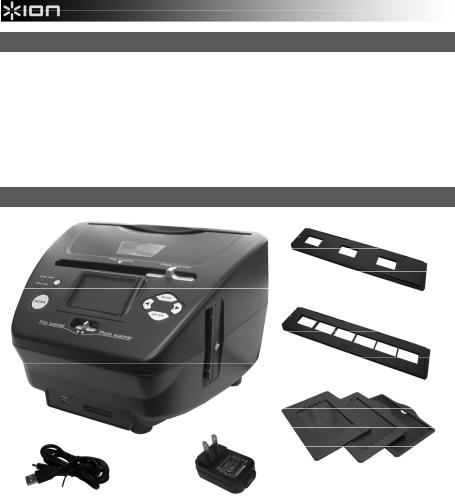
CONTENIDO DE LA CAJA
PICS 2 SD
Cable USB
Adaptador de alimentación USB
Soporte de diapositivas
Soporte de película
Soportes de fotografías (3)
Guía de inicio rápido
Folleto de instrucciones de seguridad e información sobre la garantía
CARACTERÍSTICAS DEL PICS 2 SD
|
|
|
9 |
14 |
1 |
|
|
4 |
|
2 |
5 |
6 |
|
|
|
|
|||
3 |
|
5 |
15 |
|
4 |
7 |
|||
|
|
|
8 |
|
10 |
11 |
|
|
16 |
|
|
|
|
|
12 |
|
|
13 |
|
1.BOTÓN DE ENCENDIDO
2.PANTALLA
3.BOTÓN DE ESCANEADO
4.CONMUTADOR DE MODO DEL ESCÁNER
5.BOTONES IZQUIERDA / DERECHA
6.BOTÓN DE MODO
7.BOTÓN ENTER
8.RANURA PARA EL SOPORTE DE PELÍCULA O DIAPOSITIVAS
9.RANURA PARA EL SOPORTE DE FOTOGRAFÍAS
10.PUERTO USB
11.RANURA PARA TARJETA SD
12.CABLE USB
13.ADAPTADOR DE ALIMENTACIÓN USB
14.SOPORTE DE DIAPOSITIVAS
15.SOPORTE DE PELÍCULA
16.SOPORTES DE FOTOGRAFÍAS
3” x 5” (7.5 x 13 cm) 4” x 6” (10 x 15 cm) 5” x 7” (13 x 17 cm)
Nota: Asegúrese de que sus negativos y diapositivas montadas y las bandejas estén limpias antes de insertarlas en la copiadora. El polvo o la suciedad afectan a la calidad de las imágenes escaneadas.
7
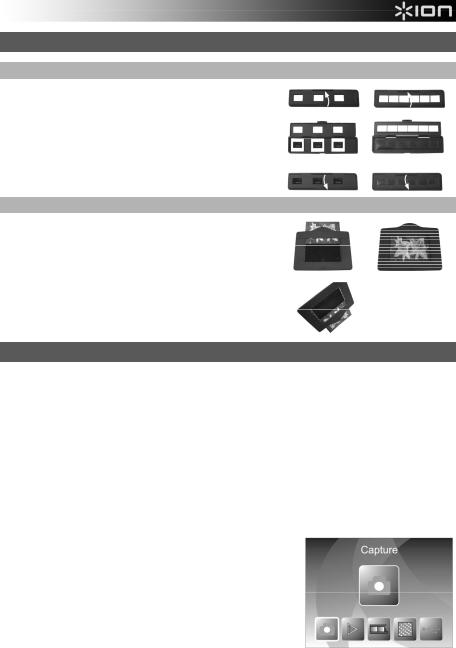
CÓMO USAR LOS SOPORTES INCLUIDOS
SOPORTES DE DIAPOSITIVAS Y NEGATIVOS
1.Abra el soporte.
2.Coloque las diapositivas o la película en el soporte.
3.Cierre el soporte asegurándose de que cierre correctamente.
SOPORTES DE FOTOGRAFÍAS
1.Deslice su fotografía en la ranura superior del soporte apropiado (3" x 5", 4" x 6" o 5" x 7").
2.Para retirar la foto, invierta simplemente el soporte y deje que se deslice hacia afuera.
CÓMO ESCANEAR IMÁGENES CON EL PICS 2 SD
Cuando escanea diapositivas, negativos o fotos con el PICS 2 SD, debe guardar las imágenes escaneadas en una tarjeta SD opcional o en la memoria interna del PICS 2 SD (hasta 14 MB). Para escanear y guardar sus imágenes, siga estos pasos:
1.Con el cable USB incluido, conecte el PICS 2 SD ya sea a su computadora (si está encendida) o al tomacorriente de pared usando el adaptador de alimentación USB incluido.
2.Pulse el BOTÓN DE ENCENDIDO para encender el PICS 2 SD.
3.Introduzca la diapositiva, el negativo o la foto en el soporte apropiado. (Para más información, consulte CÓMO USAR LOS SOPORTES INCLUIDOS.)
4.Inserte el soporte en el PICS 2 SD. Si está usando el soporte de diapositivas o negativos, introdúzcalo en la ranura del lado derecho. Si está usando el soporte de fotografías, introdúzcalo en la ranura de la parte superior.
5.Mueva los dos conmutadores a la posición apropiada: "Film Scanner" (para diapositivas y negativos) o "Photo Scanner" (para fotos).
6.Antes de escanear, verá el menú principal. Puede ajustar aquí sus parámetros.
Use los BOTONES IZQUIERDA / DERECHA para navegar por las opciones disponibles y pulse el BOTÓN ENTER para seleccionar una. Puede pulsar también el BOTÓN DE MODO para volver al menú principal:
•Si va a escanear una diapositiva o negativo, seleccione "Film" para elegir entre "Negatives" (Negativos), "Slides" (Diapositivas) o "B&W" (Negativos blanco y negro).
•Si va a escanear una foto, seleccione "Effect" (Efecto) para
elegir entre "Multicolor" (Fotografías color) y "B&W" (Fotografías blanco y negro).
•Si va a escanear una foto, seleccione "Crop" (Recortar) y elija las dimensiones de la misma: 5" x 7" (13 x 18 cm) , 4" x 6" (10 x 15 cm) o 3" x 5" (7.5 x 13 cm).
•Seleccione "Resolution" (Resolución) para elegir entre 5M y 10M (megapíxeles). Cuanto mayor es la resolución, mejor es la calidad de la imagen escaneada.
8
7.Cuando haya ajustado sus parámetros y esté listo para escanear sus imágenes, seleccione "Capture" (Capturar) en la pantalla principal. La imagen que va a escanear aparece en la PANTALLA. Puede ajustar la imagen de las siguientes maneras:
•Puede ajustar la exposición pulsando el BOTÓN ENTER cuando la imagen aparece en la PANTALLA. Use los BOTONES IZQUIERDA / DERECHA para ajustar el EV (Valor de exposición) y pulse el BOTÓN ENTER para seleccionarlo.
•Puede cambiar la orientación de la imagen pulsando los BOTONES IZQUIERDA / DERECHA. El BOTÓN DERECHA
invierte verticalmente la imagen y el BOTÓN IZQUIERDA horizontalmente.
Nota: Cuando escanea fotos, si seleccionó 3" x 5" o 4" x 6", verá el borde del soporte de fotografías, pero el software lo recorta automáticamente cuando escanea (si seleccionó
los parámetros Crop (Recorte) correctos como se explicó más arriba).Para escanear la imagen, pulse el BOTÓN SCAN del PICS 2 SD.
8.Después de terminar el escaneado, use los BOTONES IZQUIERDA / DERECHA para seleccionar "Save" a fin de guardar las imágenes, "Cancel" para cancelar lo que escaneó e intentar nuevamente o "Home" para volver al menú principal.
9.Cuando termine de escanear sus imágenes, puede transferirlas a la computadora. Para más información, consulte CÓMO TRANSFERIR IMÁGENES DESDE EL PICS 2 SD.
CÓMO VER Y EDITAR LAS IMÁGENES
1.Pulse el BOTÓN DE MODO para abrir el menú principal.
2.Use los BOTONES IZQUIERDA / DERECHA para seleccionar "Playback" (Reproducción) y pulse el BOTÓN ENTER. Aparece una presentación de diapositivas de las imágenes que escaneó.
3.Cuando vea la imagen que quiere editar, pulse el BOTÓN ENTER. La presentación se detiene.
4.Pulse el BOTÓN ENTER otra vez. Aparecen varios iconos a los costados de la PANTALLA. Use los BOTONES IZQUIERDA / DERECHA para navegar por los iconos y pulse el BOTÓN ENTER para seleccionarlo, si lo desea.
•Girar +90°: Gira la imagen 90 grados en sentido horario.
•Girar -90°: Gira la imagen 90 grados en sentido antihorario.
•Eliminar: Elimina la imagen.
•Salir: Vuelve a la presentación de diapositivas.
•Guardar: Guarda la imagen después de que haga los cambios. (Si no guarda la imagen, perderá los cambios cuando vuelva a la presentación de diapositivas.)
•Inicio: Vuelve al menú principal.
CÓMO TRANSFERIR IMÁGENES DESDE EL PIC 2 SD
1.Conecte el PICS 2 SD a su computadora con el cable USB incluido.
2.Pulse el BOTÓN DE MODO para abrir el menú principal.
3.Use los BOTONES IZQUIERDA / DERECHA para seleccionar "USB MSDC" y pulse el BOTÓN ENTER. Aparece en la PANTALLA el símbolo del USB, que significa que el PICS 2 SD está funcionando como dispositivo USB remoto a ser leído por la computadora.
4.Ahora puede ver o transferir las imágenes escaneadas a la computadora (tal como haría desde una unidad USB remota o un lector de tarjetas SD).
Pulse el BOTÓN DE MODO para volver al menú principal.
9
 Loading...