


EXPLORER BLUETOOTH®
QUICKSTART GUIDE
ENGLISH ( 3 - 5 )
GUÍA DE INICIO RÁPIDO
ESPAÑOL ( 6 - 8 )
GUIDE D'UTILISATION RAPIDE
FRANÇAIS ( 9 - 11 )
GUIDA RAPIDA
ITALIANO ( 12 - 14 )
KURZANLEITUNG
DEUTSCH ( 15 - 17 )
SNELSTARTGIDS
NEDERLANDS ( 18 - 21 )
QUICKSTART GUIDE (ENGLISH)
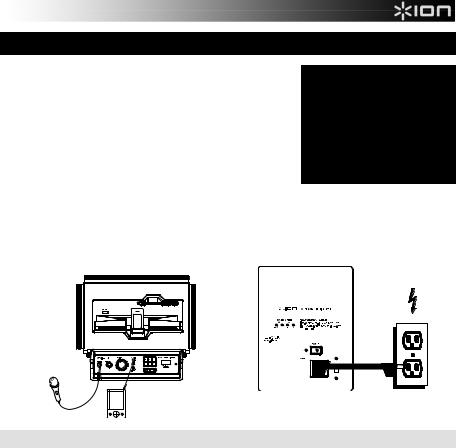
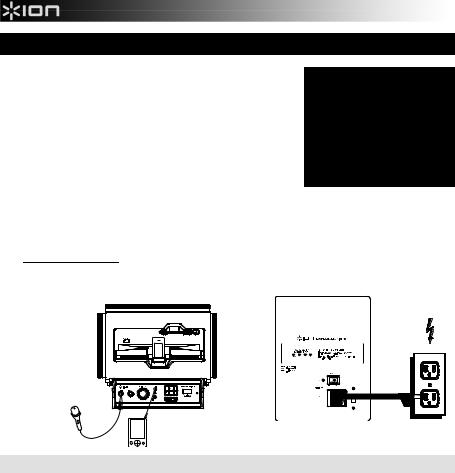
1.Make sure all items listed on the front of this guide are included in the box.
2.READ SAFETY INSTRUCTION BOOKLET BEFORE USING THE PRODUCT.
3.MAKE SURE THAT YOU HAVE COMPLETELY CHARGED THE BATTERY PRIOR TO FIRST USE FOR MAXIMUM BATTERY LIFE.
4.Study this setup diagram.
5.Make sure all input devices such as microphones, CD players, or mp3 players are turned off and volume settings are set at "zero."
6.Connect all devices as shown.
7.Switch everything on in the following order:
•audio input sources (i.e. microphones, instruments, CD/MP3 Players)
•EXPLORER BLUETOOTH®
8.When turning off, always reverse this operation:
•EXPLORER BLUETOOTH
•last, any input devices
Go to http://www.ionaudio.com for product registration.
BOX CONTENTS
EXPLORER BLUETOOTH
Microphone with mic cable
3,5mm (1/8”) to 3,5mm (1/8”) cable
Power Cable (standard IEC)
Quickstart Guide
Safety Instructions & Warranty Information Booklet
TOP PANEL |
REAR PANEL |
iPhone® (not included)
POWER
MICROPHONE (not included)
MP3 PLAYER (not included)
RECHARGEABLE BATTERIES
Rechargeable lead-acid batteries are the same type used in automobiles. As with your car battery, how you use this battery has a significant impact on its lifespan. With proper use and treatment, a lead-acid battery can last for years. Here are some recommendations for getting the longest life from the internal battery.
GENERAL USAGE
•FULLY CHARGE THE BATTERY BEFORE USING IT.
•CHARGE THE BATTERY COMPLETELY AFTER EACH USE.
•AVOID COMPLETELY DRAINING THE BATTERY.
•You may leave the unit plugged in for up to two weeks.
•For maximum life, drain the battery 80% once a month.
STORAGE
•Avoid storing in high temperatures and moist places.
•For long-term storage, periodically recharge the battery.
•If you do not charge the battery for six months, it may not charge.
REPAIR
•As the battery nears the end of its life, it may lose its ability to recharge. If this occurs, contact ION Audio technical support at www.ionaudio.com/support.
DISPOSAL
•Bring the unit to a recycling center or dispose of in accordance with local ordinances.
iPhone is a trademark of Apple Inc., registered in the U.S. and other countries.
Bluetooth is a registered trademark owned by Bluetooth SIG, Inc. and any use by ION Audio is under license. Other trademarks and trade names are those of their respective owners.
3
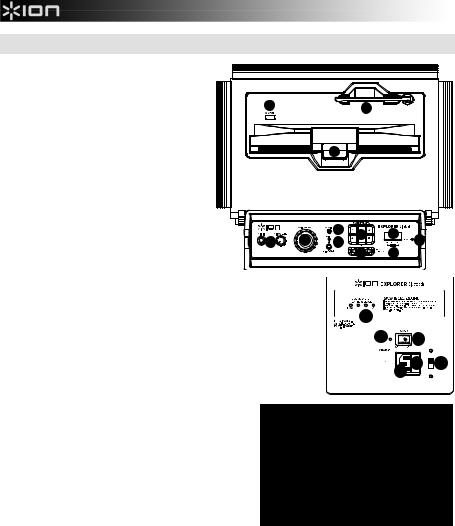
DIAGRAM AND PARTS DESCRIPTION
1.Microphone Input with Volume Control (1/4"):
This mono input accepts a 1/4" input such as a microphone, guitar, or other musical instrument.
2.Auxiliary input: This stereo 3,5mm (1/8”) input
can be used to connect a CD player, MP3 player, |
1010 |
1212 |
or other audio source. |
|
|
3.Bluetooth: The Paired LED will be lit when a device is paired to EXPLORER BLUETOOTH. This LED will not be lit when EXPLORER
BLUETOOTH is first powered on (unless it was previously paired with a device). Press the Disconnect button to disconnect a paired Bluetooth device.
4.Master Volume Control: This adjusts the speaker’s main mix volume, which includes the
|
Microphone Input, Auxiliary Input, Tuner, and the |
|
|
|
|
|
|
|
audio of a paired Bluetooth device. |
|
|
|
|
|
|
5. |
AM/FM Presets: Store a favorite radio station |
|
|
2 |
|
7 |
|
|
and quickly tune to a preset radio station. There |
|
4 |
5 |
9 |
||
|
are 6 numeric positions for AM stations and 6 |
1 |
3 |
8 |
6 |
||
|
numeric positions for FM stations. To add a |
|
|
|
|
||
|
preset: |
|
|
|
|
|
|
A.Select either the AM or FM band and then
use the Tuner buttons to select the desired radio station.
B. Press and hold a numeric preset button to assign the current station to that preset number. To use an added preset, tap a preset number once lightly to go to the stored radio station.
6. Radio Selector: This switch sets the tuner to AM or FM or turns the tuner off.
(Note: This switch does not turn the unit's power off – just the tuner.)
7. LCD: Displays the current radio station.
8. Tuner: Use these buttons to search for a radio station. To "seek" (jump to the next available station), hold this down for a few seconds until it starts to seek a station. The unit will remember the last station you were on and start at that station when you power off and power on again.
9.Power LED: Indicates whether EXPLORER BLUETOOTH is on or off.
10.USB Charge: Connect your device’s charge cable here to charge it. USB
charging only functions when the unit’s power is turned on. Note: Users with iPad (3rd generation or higher) may
experience slower charging. We recommend charging with the screen locked when using iPad (3rd generation or higher).
11. Device Cradle: Place your iPad/iPod touch®/iPhone®, Android® or other device here to be held. These can be connected via Bluetooth or to the aux input using the included 3,5mm (1/8”) to 3,5mm (1/8”) cable.
Note: It is recommended to remove your iPad or other device from the cradle before transporting or traveling with EXPLORER.
12. Antenna: Adjust this FM antenna to get the best radio reception.
Note: To prevent accidental damage, we recommend rotating the antenna only when it is positioned horizontally. Also,
retract the antenna when the Tuner is not in use. Note: When using AM radio if you have a Bluetooth device that is paired, this will cause poor AM reception. Unpair your Bluetooth device in order to listen to AM radio.
13.Power Cable Input (IEC): Insert the included power cable here to charge the unit. Note that the EXPLORER BLUETOOTH can run off the power adapter while it simultaneously charges the battery. The charge indicator illuminates when the battery is charging.
14.Voltage Selector*: If your unit has a voltage selector switch, change its setting only when necessary (e.g., when traveling to a country or region with a different voltage), and replace the fuse with one with an appropriate rating (printed under the unit’s power cable input, next to the desired voltage). Selecting an improper voltage setting or using a fuse with an incorrect rating can damage the unit and/or fuse. If the voltage selector is covered, only remove *one* screw of the cover and slide it aside to expose the selector.
15.Fuse Cover: If the unit’s fuse is broken or if you are changing the setting of the voltage selector switch, use a screwdriver or other tool to lift this tab to replace the fuse. Replace it with a fuse with an appropriate rating (printed under the unit’s power cable input, next to the desired voltage). Using a fuse with an incorrect rating can damage the unit and/or fuse.
16.Power ON/OFF Switch: Turns EXPLORER BLUETOOTH on or off. Please note that while EXPLORER BLUETOOTH is connected to a power source, it does not need to be powered on to charge the battery.
17.Battery Level Indicator: While the unit is powered ON and unit is not plugged in, these four lights indicate the power left in the battery. Battery life varies based on volume and usage.
18.Charging LED: This illuminates when the unit is attached to wall power and is in the process of charging.
Android is a trademark of Google Inc.
iPhone and iPod touch are trademarks of Apple Inc., registered in the U.S. and other countries.
4

TROUBLESHOOTING
If the sound is distorted: Try lowering the volume control of your sound source or musical instrument. Also, try to reduce the overall volume of EXPLORER BLUETOOTH.
If there is too much bass: Try adjusting the tone or EQ control on your sound source to lower the bass level. This will allow you to play the music louder before clipping (distortion) occurs.
If there is a high-pitched whistling noise when using microphones: This is probably feedback. Point the microphone away from the speaker.
If there is poor AM reception: When you have a Bluetooth device that is paired, unpair your Bluetooth device in order to listen to AM radio. To adjust AM reception, move entire unit.
If you can’t hear the microphone over the music volume: Turn down the music volume from your source.
PAIRING A BLUETOOTH DEVICE
1.Turn on your Bluetooth device.
2.Power on EXPLORER BLUETOOTH and it will automatically go into pairing mode to search for Bluetooth devices. You will know you are in pairing mode when the LED is blank.
3.If your Bluetooth device is not able to pair to the amp, press the disconnect button on the amp to break previous Bluetooth connections and reset the Bluetooth module.
4.Navigate to your Bluetooth device’s setup screen, find “ION Speaker” and connect. Note: If your Bluetooth device prompts for a pairing code, enter ‘0000’.
5.EXPLORER BLUETOOTH LED will light up solid when it is 'paired'.
Note: If you experience trouble pairing or playing music, update your device's OS.
6.To disconnect pairing, press the ‘Disconnect’ button on EXPLORER BLUETOOTH.
7.To connect to another Bluetooth device, repeat steps 3-4.
Note: Maximum range will be achieved when using devices with Bluetooth 4.0.
5
GUÍA DE INICIO RÁPIDO (ESPAÑOL)
1.Asegúrese que todos los artículos incluidos al inicio de este manual estén incluidos en la caja.
2.LEA LAS INSTRUCCIONES DEL FOLLETO DE SEGURIDAD ANTES DE UTILIZAR EL PRODUCTO.
3.ASEGÚRESE DE QUE HA CARGADO COMPLETAMENTE LA BATERÍA. PARA LOGRAR LA MÁXIMA VIDA ÚTIL DE LA BATERÍA, CÁRGUELA TOTALMENTE ANTES DEL PRIMER USO.
4.Estudie este diagrama de instalación.
5.Asegúrese de que todos los dispositivos de entrada tales como micrófonos, reproductores de CD, o reproductores MP3 estén apagados y con el control de volumen en "cero".
6.Conecte todos los dispositivos como se muestra.
7.Encienda todo en el siguiente orden:
•fuentes de entrada de audio (por ejemplo, micrófonos, instrumentos, reproductores de CD/MP3)
•EXPLORER BLUETOOTH
8.Al apagar, realice siempre esta operación en sentido inverso:
•EXPLORER BLUETOOTH
•por último, cualquier dispositivo de entrada
CONTENIDO DE LA CAJA
EXPLORER BLUETOOTH
Micrófono y mic cable
3,5mm (1/8”) - 3,5mm (1/8”) cable
Cable de alimentación
Guía de inicio rápido
Folleto de información sobre la seguridad y la garantía
Visite http://www.ionaudio.com para registrar el producto. |
|
|
|
PANEL SUPERIOR |
PANEL LATERAL |
SUMINISTRO |
|
iPhone (no incluido) |
|||
|
|||
|
ELÉCTRICO |
||
|
|
MICRÓFONO (no incluido)
REPRODUCTOR
DE MP3 (no incluido)
BATERÍAS RECARGABLES
Las baterías de plomo-ácido recargables son del mismo tipo que se usa en los automóviles. Al igual que con la batería del vehículo, la forma en que se usa tiene una influencia significativa en la duración de su vida útil. Con un uso y tratamiento correctos, una batería de plomo-ácido puede durar varios años. He aquí algunas recomendaciones para prolongar la vida útil de la batería interna.
USO GENERAL
•CARGUE COMPLETAMENTE LA BATERÍA ANTES DE USARLA
•CARGUE LA BATERÍA COMPLETAMENTE DESPUÉS DE CADA USO
•EVITE AGOTARLA COMPLETAMENTE
•Puede dejar la unidad enchufada durante hasta dos semanas
•Para obtener máxima vida, descargue la batería el 80% una vez por mes
ALMACENAMIENTO
•Evite almacenar la batería en lugares húmedos y de alta temperatura
•Si la almacena durante períodos prolongados, recárguela periódicamente
•Si no carga la batería durante seis meses, es posible que luego no pueda cargarse
REPARACIÓN
•Cuando la batería se acerca al final de su vida útil, puede perder su capacidad de recarga. Si esto ocurre, comuníquese con el soporte técnico de ION Audio al www.ionaudio.com/support.
DISPOSICIÓN FINAL
•Lleve la unidad a un centro de reciclaje o deséchela de acuerdo a las ordenanzas locales
6

DIAGRAMA Y DESCRIPCIÓN
1.Micrófono con control de volumen (1/4"): Esta entrada mono admite una
entrada de 1/4" tal como un micrófono,
una guitarra u otro instrumento 10 musical.
2.Entrada auxiliar: Esta entrada de 3,5mm (1/8”) estéreo se puede usar para conectar un reproductor de CD, MP3 u otra fuente de audio.
3.Bluetooth: El LED Paired (Apareado) se enciende cuando se aparea un dispositivo al EXPLORER BLUETOOTH. Este LED no se enciende cuando el EXPLORER BLUETOOTH se enciende por primera vez (a menos que hubiera sido
apareado |
previamente |
|
con |
un |
|
|
dispositivo). |
Pulse |
el |
|
botón |
|
|
Disconnect |
(Desconectar) |
para |
1 |
4 |
||
desconectar |
un dispositivo |
Bluetooth |
||||
apareado.
4.Control de volumen maestro: Este control ajusta el volumen de la mezcla
principal del altavoz, que incluye la entrada de micrófono, la entrada auxiliar, el sintonizador y el audio de un dispositivo Bluetooth apareado.
5.Preprogramaciones de AM/FM: Memorice una emisora de radio favorita y sintonice rápidamente una emisora preprogramada. Se dispone de 6 posiciones numéricas para emisoras de AM y 6 para emisoras de FM. Para agregar una emisora preprogramada:
A.Seleccione ya sea la banda de AM o FM y use luego los botones del sintonizador para seleccionar la emisora de radio deseada.
B.Pulse y retenga un botón numérico de preprogramación para asignar la estación que está escuchando a ese número. Para usar una emisora agregada, toque ligeramente una vez un número de preprogramación para ir a la emisora de radio memorizada.
6.Selector de radio: Este interruptor ajusta la radio a AM o FM o la apaga. (Nota: Este interruptor no desconecta el suministro eléctrico de la unidad —sólo el de la radio.)
7.LCD: Muestra la estación de radio actual.
8.Sintonizador: Use estos botones para buscar las emisoras de radio. Para "explorar" (saltar a la siguiente emisora disponible), manténgalo pulsado unos segundos hasta que empieza a buscar la emisora. La unidad recuerda la última emisora que estaba sintonizada y comienza en esa emisora cuando la apaga y enciende nuevamente.
9.LED de encendido: Indica cuando el EXPLORER BLUETOOTH está encendido o apagado.
10.USB estación: Conecte aquí el cable de carga de su dispositivo para cargarlo. La carga por USB funciona
solamente cuando la unidad está encendida.
Nota: Los usuarios de iPad (3ra generación o superior) pueden experimentar una carga más lenta.
Recomendamos cargar con la pantalla bloqueada cuando se usa iPad (3ra generación o superior).
1212
1111
2 |
5 |
7 |
9 |
|
3 |
||||
8 |
6 |
|||
|
|
1717
1818 1616
1313 1515 1414
11.Base del dispositivo: Coloque aquí su iPad/iPod touch/iPhone, Android u otro dispositivo a sostener.
Se pueden conectar vía Bluetooth o a la entrada auxiliar usando el cable de 3,5mm (1/8”) a 3,5mm (1/8”) incluido.
Nota: Se recomienda extraer su iPad u otro dispositivo de la base antes de transportarlo o viajar con el EXPLORER.
12.Antena: Ajuste esta antena de FM para obtener la mejor recepción de las emisoras de radio.
Nota: Para evitar daños accidentales, recomendamos girar la antena solo cuando está posicionada horizontalmente.
Asimismo, retraiga la antena cuando no está usando el sintonizador. Nota: Cuando usa la radio de AM, si tiene un dispositivo Bluetooth que está apareado, puede causar problemas en la recepción. Desaparee su dispositivo Bluetooth a fin de escuchar la radio de AM. Para ajustar la recepción de AM, mueva la unidad completa.
7

13.Entrada del cavo de alimentación (IEC): Inserte aquí el cable de alimentación incluido para cargar la unidad. Tenga en cuenta que el amplificador portátil para altavoces puede funcionar con el adaptador de potencia mientras se carga simultáneamente la batería. El indicador de carga se enciende cuando se está cargando la batería.
14.Selector de voltaje*: Si su unidad cuenta con un conmutador selector de voltaje, cambie su posición solo cuando sea necesario (por ej. cuando viaja a un país o región con voltaje diferente) y cambie el fusible por uno de la especificación apropiada (impresa debajo de la entrada del cable de alimentación de la unidad, junto al voltaje deseado). Si selecciona un valor de voltaje inadecuado o usa un fusible de especificación incorrecta, puede dañarse la unidad y/o el fusible. Si el selector de voltaje está cubierto, solo retire *un* tornillo de la cubierta y deslícela a un lado para exponer el selector.
15.Tapa de fusibles: Si se rompe el fusible de la unidad o usted va a cambiar el ajuste del conmutador selector de voltaje, use un destornillador u otra herramienta para levantar esta lengüeta y reemplazar el fusible. Reemplácelo por un fusible con especificación apropiada (impresa debajo de la entrada del cable de alimentación de la unidad, junto al voltaje deseado). Si utiliza un fusible de especificación incorrecta, puede dañarse la unidad y/o el fusible.
16.Interruptor de encendido/apagado: Enciende y apaga el EXPLORER BLUETOOTH. Tenga en cuenta que mientras el EXPLORER BLUETOOTH está conectado a un suministro eléctrico, no es necesario encenderlo para que cargue la batería.
17.Indicador de nivel de la pila: Mientras la unidad está encendida y no está enchufada, estas cuatro luces indican la energía remanente en la pila. La vida útil de la pila varía en función del volumen y el consumo.
18.LED de carga – se enciende cuando la unidad está enchufada al tomacorriente de pared y está en proceso de carga.
SOLUCIÓN DE PROBLEMAS
Si el sonido está distorsionado: Pruebe bajando el control de volumen de su fuente de sonido o instrumento musical. Pruebe también reduciendo el volumen general del EXPLORER BLUETOOTH.
Si hay demasiados graves: Intente ajustando el control de tono o ecualización de su fuente de sonido para reducir el nivel de graves. De esta forma podrá reproducir la música con más volumen antes de que se produzca el recorte (distorsión).
Si hay un silbido agudo cuando se usan micrófonos: Probablemente sea realimentación. Apunte los micrófono apartándolos del altavoz.
Si hay recepción pobre de AM: Cuando tiene un dispositivo Bluetooth que está apareado, desaparee ese dispositivo Bluetooth a fin de escuchar la radio de AM. Para ajustar la recepción de AM, mueva la unidad completa.
Si no puede oír el micrófono por arriba del volumen de la música: Disminuya el volumen de la música en su fuente.
CÓMO APAREAR UN DISPOSITIVO BLUETOOTH
1.Encienda su dispositivo Bluetooth.
2.Encienda el EXPLORER BLUETOOTH, que pasará automáticamente al modo de apareamiento para buscar dispositivos Bluetooth. Se dará cuenta de que está en modo de apareamiento cuando el LED está apagado.
3.Si su dispositivo Bluetooth no es capaz de aparearse con el amplificador, pulse el botón de desconexión del amplificador para romper las conexiones Bluetooth anteriores y reinicie el módulo Bluetooth.
4.Navegue a la pantalla de configuración de su dispositivo Bluetooth, busque “ION Speaker” y conecte. Nota: Si su dispositivo Bluetooth solicita un código de apareamiento, ingrese ‘0000’.
5.El LED EXPLORER BLUETOOTH se enciende con luz permanente cuando está 'apareado'.
Nota: Si tiene problemas para aparear su dispositivo o reproducir música, actualice el programa operativo de su dispositivo.
6.Para desconectar el apareamiento, pulse el botón ‘Disconnect’ del EXPLORER BLUETOOTH.
7.Para conectarse a otro dispositivo Bluetooth, repita los pasos 3 y 4.
Nota: El alcance máximo se logra cuando se utilizan dispositivos con Bluetooth 4.0.
8
 Loading...