


35MM FILM AND SLIDE SCANNER
QUICKSTART GUIDE
ENGLISH ( 1 – 6 )
GUÍA DE INICIO RÁPIDO
ESPAÑOL ( 7 – 12 )
GUIDE D’UTILISATION SIMPLIFIÉ
FRANÇAIS ( 13 – 18 )
GUIDA RAPIDA
ITALIANO ( 19 – 24 )
KURZANLEITUNG
DEUTSCH ( 25 – 30 )
SNELSTARTGIDS
NEDERLANDS ( 31 – 36 )
BOX CONTENTS:
FILM2SD
Negative Film Holder
Slide Film Holder
USB Cable
Cleaning Brush
User Manual
Safety Information & Warranty Booklet
MAINTENANCE & CARE
Periodically clean FILM2SD’s glass surface with a dry cotton swab to ensure it produces a clear image during operation.
Use the included cleaning brush to remove dust from FILM2SD’s backlight.
We recommend cleaning your film (and FILM2SD’s trays) before inserting it into the scanner so dust or dirt does not mar the image. If you do not have the materials to do this properly, consult a professional film store.
9
|
8 |
|
|
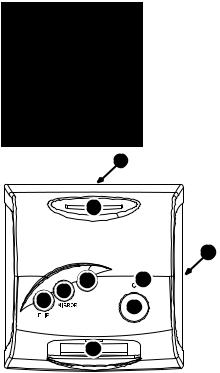
OVERVIEW |
|
|
|
|
1. |
Power Button |
|
|
|
|
|
||
|
|
|
|
2. |
Power LED |
|
|
|
|
3. |
OK Button |
|
|
|
7 |
4. |
Up / Mirror Button |
|
|
|
|
||
|
|
|
|
5. |
Down / Flip Button |
|
1 |
2 |
|
6. |
Display |
|
|
|
|||
|
4 |
|
|
7. |
Film Holder Slot |
5 |
|
|
|
||
3 |
|
|
8. |
SD Card Slot |
|
|
|
|
|||
|
|
|
|
9. |
USB Port |
6
1

PLACING SLIDES & NEGATIVES IN THE HOLDERS
Slides |
Negatives |
1.Open the film holder by lifting the tab on the bottom.
2.Insert the slide(s) into the slide slot(s) or lay the negative over the negative slot.
3.Close the film holder.
Note: If the image is scanned upside down or mirrored, you can also correct this by using the FLIP or MIRROR buttons later.
Tip: To avoid laying a negative in the wrong direction (which will produce a mirror image), be sure you can correctly read the serial numbers at the top of the negative when placing it in the holder.
2
QUICKSTART
1.Connect FILM2SD to a power outlet with the included power adapter.
2.Turn on the FILM2SD with the POWER button.
3.Place your slide(s) or negative into the appropriate holder.
4.Insert the holder into the FILM HOLDER SLOT.
5.Insert your SD card into the SD CARD SLOT. When you save your scanned images, they will be stored on the SD card.
6.Capture your image by pressing the OK button.
7.Press the OK button again to save the image.
8.Now you can remove the SD card and insert it into an SD-compatible device, such as a digital picture frame, computer or television, to view your pictures.
If you want to transfer your image(s) directly to your computer from FILM2SD, connect FILM2SD to your computer with the included USB cable and select the USB icon (USB Mode) from the Main Menu to establish the connection. Once the connection has been established, you can copy the images to your computer by dragging the image files to your hard drive.
Note: While FILM2SD is in USB Mode, you will not be able to scan other pictures. To enable scanning again, remove the USB cable, turn off FILM2SD, then turn it on again.
3
OPERATION & FEATURES
When viewing any menus with multiple options, you can use the UP / MIRROR and DOWN / FLIP buttons to move through them and press the OK button to select one.
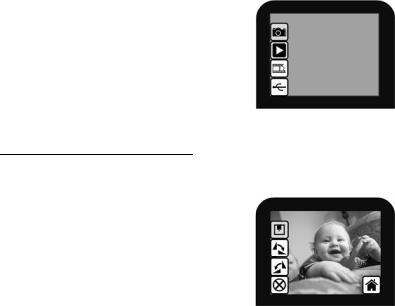
MAIN MENU
1.Capture Mode: Allows you to capture images. FILM2SD will enter Capture Mode automatically if no buttons are pressed for five seconds.
2.Playback Mode: Allows you to view your images.
3.Film Type: Select the kind of film you are using.
4.USB Mode: Allows you to transfer your images to a connected computer via USB. Once your images are on your computer, you can view and edit them as you wish.
1
2
3
4
If there is no SD card in the SD Card Slot, a “?” icon will appear on the screen.
Capture Mode
When in Capture Mode, a red indicator in the upper left-hand corner will indicate FILM2SD is viewing the image in the film holder. Press OK to capture the image.
Once an image is captured, you will see the following menu options:
1.Save: Saves the captured image.
2.Rotate Right: Rotates the image clockwise by 90°.
3.Rotate Left: Rotates the image counterclockwise by 90°.
4.Cancel: Cancels editing without saving the image to the SD card.
5.Home: Returns to the Main Menu.
1
2
3
4 |
5 |
After selecting Save or Cancel, you can move the film holder to the next image you want to capture. Once the SD card is full, a “FULL” icon will appear on the screen. Either transfer the contents of the SD card to your computer or insert an SD card with available memory.
4

Playback / Edit Mode
When you enter Playback/Edit Mode, your captured images will be displayed in a slideshow, allowing you to preview and/or edit them. To stop the slideshow, press the OK button.
With the slideshow stopped, you can use the UP / MIRROR and DOWN / FLIP buttons to move through your saved images one by one. Press the OK button to select one to edit.
In Playback/Edit Mode, you will see the following menu options.
1.Rotate Right: Rotates the image clockwise by 90°.
2.Rotate Left: Rotates the image counterclockwise by 90°.
3.Mirror: Flips the image left to right.
4.Flip: Flips the image upside-down.
5.Exit: Returns to the slideshow.
6.Delete: Deletes the image from the SD card.
7.Save: Saves the captured image.
8.Home: Returns to the Main Menu.
1
2
3
4
5
6
7
8
If there are no images saved to the SD card while in Playback Mode, a “?” icon will appear on the screen.
5

Film Type
Here, select the type of film you have placed in the film holder.
1.Color Negative
2.Slide
1
3. Black & White Negative
2
3
USB Mode
USB Mode allows you to transfer images from your SD card directly to your computer. While in USB Mode, FILM2SD becomes an SD card reader for your computer. To enter USB mode, you can either:
Leave the power adapter unplugged and connect the FILM2SD to a USB port via the included USB cable.
If the power adapter is plugged in and the FILM2SD is powered on, connect the USB cable to your computer, then select the USB icon; a USB symbol should appear on the DISPLAY, signifying that the connection has been established.
Note: While FILM2SD is in USB Mode, you will not be able to scan other pictures. To enable scanning again, remove the USB cable, turn off FILM2SD, then turn it on again.
6
CONTENIDO DE LA CAJA
Film 2 SD
Soporte de negativos
Soporte de diapositivas
Cable USB
Cepillo de limpieza
Manual del usuario
Folleto de información sobre la seguridad y la garantía
9
8
1 |
2 |

 4
4
5
3
6
MANTENIMIENTO Y CUIDADO
Limpie periódicamente la superficie de vidrio del FILM2SD con un hisopo de algodón seco para asegurar que produzca una imagen clara durante el funcionamiento.
Use el cepillo de limpieza incluido para limpiar el polvo de la luz de retroiluminación del FILM2SD.
Recomendamos que limpie su película (y las bandejas del FILM2SD) antes de insertarlas en el escáner, de modo que el polvo o la suciedad no arruinen la imagen. Si no cuenta con los materiales para hacerlo correctamente, consulte en una tienda profesional de fotografía.
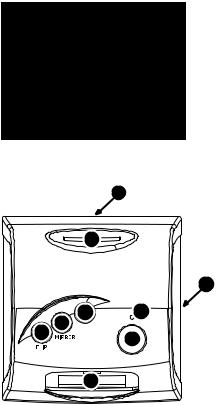
DESCRIPCIÓN GENERAL
|
1. |
Botón de alimentación |
|
|
2. |
LED de encendido |
|
7 |
3. |
Botón Aceptar |
|
4. |
Botón Arriba / Espejo |
||
|
|||
|
5. |
Botón Abajo / Invertir |
|
|
6. |
Pantalla |
|
|
7. |
Ranura para soporte de la |
|
|
|
película |
|
|
8. |
Ranura para tarjeta SD |
|
|
9. |
Puerto USB |
7

CÓMO COLOCAR LAS DIAPOSITIVAS Y LOS NEGATIVOS EN LOS
SOPORTES |
Diapositivas |
Negativos |
|
1.Abra el soporte de la película levantando la lengüeta de la parte inferior.
2.Deslice la o las diapositivas en las ranuras para las mismas o extienda el negativo sobre la ranura para negativos.
3.Cierre el soporte de la película.
Nota: Si la imagen se escanea en forma invertida o espejada, puede corregirlo usando los botones FLIP (Invertir) o MIRROR (Espejo) más adelante.
Consejo: Para evitar colocar el negativo en sentido incorrecto (lo que produciría una imagen espejada), asegúrese de que pueda leer correctamente los números de serie de la parte superior del mismo cuando lo coloca en el soporte.
8
INICIO RÁPIDO
1.Conecte el FILM2SD a un tomacorriente con el adaptador de alimentación incluido.
2.Encienda el FILM2SD con el botón POWER (Encendido).
3.Coloque la o las diapositivas o el negativo en el soporte apropiado.
4.Inserte el soporte en la RANURA PARA SOPORTE DE LA PELÍCULA.
5.Inserte la tarjeta SD en la RANURA PARA TARJETA SD.
6.Capture la imagen pulsando el botón OK (Aceptar).
7.Pulse nuevamente este botón para guardar la imagen.
8.Ahora puede retirar la tarjeta SD e insertarla en un dispositivo compatible, como un marco de imágenes digitales, computadora o televisión, para ver sus fotografías o imágenes. Si desea transferir sus imágenes directamente a su computadora desde el FILM2SD, conecte el FILM2SD a la computadora con el cable USB incluido y seleccione el icono de USB (Modo USB) en el Menú principal para establecer la conexión. Una vez establecida la conexión, puede copiar las imágenes a su computadora arrastrándolas al disco duro de la misma.
Nota: Mientras el FILM2SD está en modo USB, no puede escanear otras fotografías. Para habilitar el escaneo nuevamente, retire el cable USB, apague el FILM2SD y luego enciéndalo de nuevo.
9
FUNCIONAMIENTO Y CARACTERÍSTICAS
Cuando vea menús con varias opciones, puede usar los botones UP / MIRROR (Arriba / Espejo) y DOWN / FLIP (Abajo / Invertir) para recorrerlas y pulse el botón OK (Aceptar) para seleccionar una.
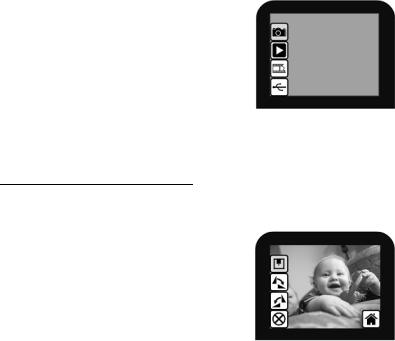
MAIN MENU (Menú principal)
1.Capture Mode (Modo de captura): Permite capturar
|
imágenes. FILM2SD entra automáticamente al |
1 |
|
modo de captura si no se pulsa ningún botón |
2 |
|
durante cinco segundos. |
|
2. |
Playback Mode (Modo de reproducción): Permite |
3 |
|
ver las imágenes. |
|
|
|
|
3. |
Film Type (Tipo de película): Para seleccionar el |
4 |
|
tipo de película que va a usar. |
|
4.USB Mode (Modo USB): Permite transferir sus
imágenes a una computadora conectada vía USB. Una vez que sus imágenes estén en la computadora, puede verlas y editarlas como desee.
Si no hay una tarjeta SD conectada en la ranura para dicha tarjeta, aparece en la pantalla un icono “?”.
Modo de Captura
En modo de captura, un indicador rojo de la esquina superior izquierda indica que el FILM2SD está viendo la imagen colocada en el soporte para la película. Pulse OK para capturar la imagen.
Una vez capturada una imagen, vera las siguientes opciones del menú:
1.Save (Guardar): Permite guardar la imagen capturada.
2.Rotate Right (Girar a la derecha): Gira la imagen 90° en sentido horario.
3.Rotate Left (Girar a la izquierda): Gira la imagen 90° en sentido antihorario.
1
2
3
4 |
5 |
10
 Loading...