


Quick Start Guide
Quick Start Guide
Thank you for purchasing the iON CAMOCAM HD sports video camera. This QSG contains the common functions and features of CAMOCAM. For additional features and functions of CAMOCAM, please refer to the back of the manual.
The iON CAMOCAM can be mounted with the Bike & Helmet Kit or the Board Kit for the ultimate adventure HD recording experience (sold separately).
EN-1
Getting to know your camera
Common features:
iON CAMOCAM is a Professional, High Quality Digital Video Recorder that records Full HD videos with the push of an slide switch
It has the latest 14 Mega Pixel Sensor for you to take great digital photographs
A 180 degree high quality lens provides a super wide angle field of view
Your camera supports a MicroSD card up to 32GB, allowing you to record videos in 1080p with 30 frames per second for approximately 4 Hours.
Equipped with the microphone jack for connection with an external microphone.*
Waterproof Housing enables you to operate the camera up to 10 meters under water.
iON CAMOCAM is approximately 4.51 ounces or 128g.
*When an external microphone (not included) is connected, audio cannot be recorded through the built-in microphone. Please note when external mic is connected the camera is no longer waterproof.
1.Package Contents of CAMOCAM
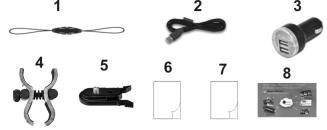
Carefully unpack the package and ensure that you have the following items:
EN-2
1 |
Secure Strap |
Secures the camera to the mount to provide additional security. |
|
2 |
USB Cable |
1. Connect the camera to a computer for data transfer or |
|
camera setup. |
|||
|
|
2. Charge your camera. |
|
3 |
Dual USB Car |
Plug into the car cigarette lighter socket and charge your |
|
Adapter |
camera simultaneously by using the included USB cable. |
||
|
|||
4 |
Fish & Hunting |
Please refer to the Fish & Hunting pictorial guide for mounting |
|
Mount |
instructions. |
||
|
|||
5 |
CamLOCK |
Mount or remove the camera quickly from the CamLOCK |
|
socket. |
|||
|
|
||
6 |
Warranty Card |
Please retain for manufacturers warranty period which is |
|
limited to 1 year. |
|||
|
|
||
7 |
Quick User Guide |
Provide quick information for easy camera operation. |
|
8 |
Mi-media Card |
Provides guidance on how to sign up for your free iON cloud |
|
storage |
|||
|
|
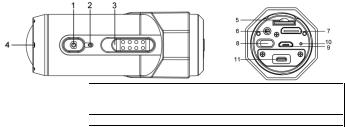
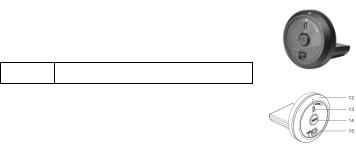
2. Functional Parts of CAMOCAM
1 |
Power |
1. Turns the camera on or off |
|
2. Takes a single photograph |
|||
|
|
||
2 |
LED Indicator |
Shows the camera status |
|
3 |
Recording Switch |
Slide to start or stop video recording |
EN-3

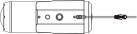
4Lens
5MicroSD Card Slot
6Mic Jack
7Mini HDMI Jack
8Video Resolution Switch
9USB Port
10Reset Button
11PODZ Socket
High quality lens
MicroSD card storage location.
To enable you to connect to an external microphone (not included). Please note when an external microphone is being used the camera is no longer waterproof.
To enable you to connect the camera to an HDTV with an HDMI cable (not included)
Select video resolution: FHD (Full HD) or HD.
1.Connect to your computer for data transfer or camera setup
2.Charge your camera
Reset the camera
Connect any PODZ to the camera to perform additional functions. Also acts are waterproof barrier.
3. Using Your Camera
3.1 Charging up Your Camera
Charge your camera with either the USB cable or Dual USB car adapter. The red LED will light up to indicate the camera is charging and it will turn off once the camera has been fully charged. It takes approximately 3 hours to fully charge the camera.
3.2 Inserting a Memory Card
Insert a MicroSD card up to 32GB (not included) before using your camera. Ensure that the camera power is turned OFF before inserting the card into the slot.
Notes:
1.There is only one correct direction to insert the MicroSD card into the slot. Do not force the card into the card slot as it may damage both the camera and the MicroSD card.
2.A new MicroSD card should be formatted before using. For more information, please see section 7.2.
EN-4

3.We recommend a class 10 SDHC card.
3.3 Setting up Date and Time
Connect your camera to a computer and run the iON software from the MicroSD card folder. You can set the date and time on the camera via the settings page. Please see section 4.1 to open iON software
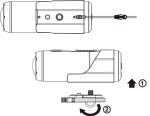
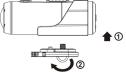
3.4 Installing the PODZ
1.Attach the PODZ to the back of the camera and rotate clockwise until the two dots are aligned.
2.Slide the latch on the PODZ down to lock it. WARNING: The latch must be locked in place to ensure the
waterproof seal is activated – failure to do so may cause water leakage.
3.5 Recording Videos
Before starting to record, select the video resolution using the Video Resolution Switch.
There are two methods for starting the video recording function. When the camera starts recording, there will be a short vibration indicating recording has started. The LED indicator illuminates RED throughout recording.
1.Whether the camera power is ON or OFF, simply slide the Recording Slide Switch
 from STOP to REC to start recording.
2.When your camera is OFF and the Recording Slide Switch  is at REC
location, press and hold the Power  button to turn the camera ON and it will start recording.
To stop Recording, move the Recording Slide Switch  from REC to STOP .The camera will vibrate and the LED indicator will illuminate GREEN to indicate the recording has stopped. The camera will then enter Standby mode.
An additional option is to hold the Power  button to stop the recording and turn the camera off. The camera will vibrate for two seconds and the Red LED light will turn off.
EN-5
Notes:
1.An additional 432x240 (w/ 1080p/720p) or 320x240 (w/ 960p) video file will be created simultaneously with the recording of an HD/FHD video file. The smaller video file size allows for more efficient uploading of content to social media platforms and email.
2.Changing video resolution is disabled during video recording.
3.There will be around 1-2 seconds delay before the camera starts recording.
4.The various video resolution options for HD and FHD can be changed under the “Settings” section in the iON software. (see section 5)
3.6 Taking Photos
1.Turn on the camera by pressing the Power  button.
2.After the camera power has been turned on, press the Power  button very briefly to take a photo. A short vibration and a flash of the green LED indicates that the action was successful.
Notes:
1.The Still Photo function is disabled during video recording.
2.Change photo resolutions and shooting mode (Single Shot, Burst Mode and Time Lapse) through the “Settings” section on the iON software.
4. Mounting Your Camera
4.1 Secure Strap
1.Loop one end of the secure strap through the strap hole of the camera. You may use a pin to help thread it through the hole.
2.Attach the other half to the mount.
3.Clip both ends together when camera is mounted.
4.2 CamLOCK
iON’s versatile CamLOCK Mount System allows you to attach the camera to any type of helmet (bike, motorcycle, ski, skydive etc.), pole, board (surf, skate, ski etc) and
EN-6
handlebar (bike and motorcycle).
Please refer to the specific mounting guides for instructions on how to install your mounts with your camera for particular activities.
1.Fit the screw of the CamLOCK to the tripod socket of the camera.
2.Screw the CamLOCK until it is tight on the camera.
5. iON Software Application
The iON Software Application for Windows or Mac lets you connect to a computer by USB to:
1.View, delete, and copy the files stored on the camera
2.Change the camera settings
3.Set the Date & Time
4.Link to the iON website and cloud service
5.Check the firmware update
5.1 Windows Software Application
The Windows iON.exe Software Application comes installed on the camera. To run the application:
1.Insert a MicroSD card with at least 2MB free space into the camera.
2.Press the Power button to turn the camera on.
3.Connect your camera to the PC via the camera’s USB cable.
4.Open the MicroSD folder and you will find the file “iON.exe”.
5.Double click the file to open
5.2 Mac Software Application
1.Visit the iON website (www.ioncamera.com/ion/Firmware-Updates.html) to download the latest Mac software application version.
2.Insert a MicroSD card with at least 2MB free space into the camera.
3.Press the Power button to turn the camera on.
4.Connect your camera to the Mac via the camera’s USB cable.
4. Use Finder to locate and open the camera as a new device usually called “No Name”. You should see a folder “DCIM” and the file iON.exe when you open it.
6. Drag the downloaded file to the new device and put it with DCIM and iON.exe.
EN-7
7. Double click the newly loaded file to run the Mac Application. The application will not run if it is not on the camera’s card.
Notes:
The camera can be connected to any plug & play Windows or Mac system and accessed as a removable disk drive. Files can be viewed and copied without the use of the application.
6. Signing Up for Free iON Cloud Storage
You can sign up for your 8GB of free Cloud storage simply go to www.ioncamera.com/ioncloud and follow the steps. The iON Cloud is a great way to store and share your photos and video footage for free.
7. Connecting Your Camera
7.1 Connecting Your Camera to a PC
To open the iON software,
1.Insert a MicroSD card into your camera and make sure there is at least 2MB free space.
2.Press the Power  button to turn the camera on.
3.Connect your camera to a PC via the USB cable included.
4.Open the MicroSD folder and you will find the file “ion.exe”.
5.Double click the file to open
Once you open the software you can:
1.Browse the files saved in the camera
2.Change the camera settings
3.Link to the iON website and cloud service
4.Check for the firmware updates
Notes
1.If you cannot find ion.exe in your MicroSD folder, unplug the cable from the PC, turn the camera on and off once then reconnect to the PC.
EN-8
2.If you are a Mac user, visit the iON Website (www.ioncamera.com/ion/Firmware-Updates.html) to download the software in Mac Version.
7.2 Connecting Your Camera to a TV/HDTV
You can connect your camera to a TV or HDTV via a Composite RGB (not included) or an HDMI cable (not included). Once you are connected you can:
1.Take photos or videos by using your TV as a viewfinder
2.Playback any photo or video files saved in the camera
3.Delete any files saved in the camera
4.Format the MicroSD Card
8. CAMOCAM Package Content
In addition to the package contents of CAMOCAM (Refer to section 1), the CAMOCAM has a Wi-Fi PODZ included for performing the Wi-Fi functionality.
1. Enables use of smart device with your camera.
2. Acts as waterproofing (see section 3.4)
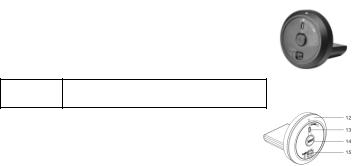
8.1 Wi-Fi PODZ Functional Parts
In addition to the functional parts of CAMOCAM (Refer to items 1 to11 in section 2), CAMOCAM has additional functional parts on the Wi-Fi PODZ.
12 |
Wi-Fi PODZ |
Rotate to seal to ensure waterproof seal is |
|
activated. |
|||
|
|
||
13 |
Wi-Fi LED indicator |
Shows the Wi-Fi status |
|
14 |
Wi-Fi Power button |
Turns the Wi-Fi on or off |
EN-9
15 |
PODZ Latch |
Locks the PODZ |
WARNING: The latch must be locked in place to ensure the waterproof seal is activated – failure to do so may cause water leakage.
8.2. Using the Wi-Fi PODZ
8.2.1 Installing and turning on the Wi-Fi PODZ
1.Remove your standard PODZ from the back of the camera and place your Wi-Fi PODZ into the camera PODZ socket. (follow steps 1 and 2 under section 3.4)
2.Press and hold the Power  button to turn on your camera.
3.Press the Wi-Fi power button on the Wi-Fi PODZ to turn on your Wi-Fi. The blue LED lights up to indicate the Wi-Fi is
warming up. It will take approximately 15-20 seconds for the Wi-Fi to warm up and become connectable. The LED will flash when the Wi-Fi function is active or connected.
4.Press the Wi-Fi power button to turn off the Wi-Fi anytime.
Note: Wi-Fi will drain your camera battery more rapidly when activated. Turn the Wi-Fi off if you are not using it to change settings or upload content.
8.2.2 Connecting the Camera to a PC using Wi-Fi PODZ
1. Turn on your camera and Wi-Fi PODZ.
2. Go to the network settings of your PC and choose Wi-Fi settings. Search the network, find and click “WIFIPODZ”.
3. Enter password “123456789” and to connect to your camera.
4. Open your Internet browser and input “192.168.1.2”. You will then be able to view the files stored in your camera.
8.2.3 Connecting the Camera to Your Smart Device (Browser)
1.Turn on your camera and Wi-Fi PODZ.
EN-10
2.Go to the network setting of your mobile device and choose Wi-Fi settings. Search the network, find and click “WIFIPODZ”.
3.Enter password “123456789” to connect to your camera.
4.Open your Internet browser and input “192.168.1.2” or “wifi.podz”. You can now view the photos and videos stored in your camera.
8.2.4 Connecting the Camera to Your Smart Device (App)
1.Search "ioncamera" app in your devices app store.
2.Download and install the app to your smart device.
3.Turn on your Wi-Fi PODZ.
4.Go to the network settings of your device and choose Wi-Fi settings. Search the network, find and click “WIFIPODZ”.
5.Enter password “123456789” to connect to your camera.
6.Open your app.
7.Please refer to the app page for detailed operating instructions.
9. Sealing Your Camera to prevent water damage
The Waterproof Housing (standard PODZ on iON CAMOCAM camera and Wi-Fi PODZ in CAMOCAM ) allows you to operate the camera up to 10 meters or 30 feet under water. You must seal the camera with the PODZ in order to protect the camera when using it in wet or moist conditions.
Notes:
1.The rubber seal on the PODZ forms the waterproof barrier to protect the camera in wet and underwater conditions. You must keep this seal clean as a single strain of hair or grain of sand can cause leakage into the product.
2.After every use in salt water, you will need to rinse the outside of the product and the seal with non-salt water and dry. Not doing this can cause corrosion in the product or failure in the seal, in turn, damaging the product.
Warning:
Please ensure you install and lock the PODZ correctly before using the camera to avoid water damage. Failure to properly seal your
EN-11

camera can result in leaks that damage or destroy your camera. Your warranty does not cover water damage resulting from user error.
10. Troubleshooting
Problems |
Causes |
|
1. LED flashes and the |
|
|
camera turns off |
Battery is depleted |
|
2. The iON camera will not |
||
turn on. |
|
|
Red LED flashes during |
Low battery |
|
recording |
||
|
||
Cannot take photos or |
Memory full |
|
video (Green LED flashes) |
||
Cannot take photos or |
1. MicroSD card is not |
|
inserted |
||
video (Green and Red LED |
||
2. MicroSD card has not |
||
flashes alternatively) |
been formatted properly. |
|
|
Cannot find removable disk
after connecting the camera Connection failure. to the computer.
Solutions
Recharge the camera
Recharge the camera
Replace with a memory card with space available.
1.Insert a MicroSD card
2.Format the MicroSD card on a PC
1.Make sure all cable connections are secured and restart the computer if necessary.
2.Try a different USB port.
11. Specifications
Sensor |
14 Mega pixel sensor |
Lens |
180º super wide angle field of view |
Focus range |
0.4m - ∞ |
Video |
1080p: 1920x1080 pixels (16:9), 30 fps |
|
960P*: 1280x960 pixels (4:3), 30 fps |
|
EN-12 |

|
720p: 1280x720 pixels (16:9), 60 fps |
|
|
720p *: 1280x720 pixels (16:9), 30 fps |
|
|
Format: H.264 compression, saved as MPEG4 (.mp4) file |
|
|
Dual video files for easy sharing |
|
|
16.0 Mega Pixels:(4608x3456) |
|
|
14.0 Mega Pixels(4384 x3288) |
|
Photo |
5.0 Mega Pixels: (2592x1944) |
|
VGA:(640 x480) |
||
|
||
|
Format: JPEG |
|
|
Capture Modes: Single, Burst-shot*, Time lapse* |
|
|
Built-in high quality microphone |
|
Audio |
2.5mm External microphone (not included) |
|
|
AAC Compression, Automatic Gain Control |
|
Storage |
MicroSD/MicroSDHC with minimum Class 6 up to 32GB (not included) |
|
Average Recording Times: about 4 hours (using 32GB mSD card in |
||
|
1080p30/720p60) |
|
|
USB2.0 (for data connection and battery charging) |
|
Connection |
HDMI |
|
|
External Microphone |
|
Power |
Built-in 1200 mAH Rechargeable Li-Polymer Battery |
|
Battery Life: Approx. 2 hrs/( 1 hr when operating with Wi-Fi PODZ in |
||
|
CAMOCAM) |
|
Housing |
High quality Aluminum barrel and rubberized finishing |
|
Depth up to 30 feet / 10 meters |
||
|
||
Dimension |
40 x 40 x 108 mm |
|
Weight |
~127.8(w/ PODZ), ~133.2g (w/ Wi-Fi PODZ) |
* Settings can be changed through iON software or Mobile (with Wi-Fi PODZ) EN-13

12. System Requirements
Operating system |
Windows® 7/XP SP3 /Vista and Mac 10.5 or above |
CPU |
Pentium III or above |
RAM |
At least 64MB |
Interface |
USB 2.0 port |
IMPORTANT
Keep the lens clean. Dirt and fingerprints will affect the quality of the picture.
Close the PODZ properly for optimum water sealing. Do not open under water.
Rinse the camera with clean water after use and keep it dry for storage.
Please refer to the detailed operation instructions in the user manual
TRADEMARK INFORMATION
© 2014 World Wide Licenses Limited.
® The iON logo is a registered trademark of World Wide Licenses Limited. CamLOCK, PODZ, Shoot/Share and CAMOCAM and their respective logos are trademarks or registered trademarks of World Wide Licenses Limited in the United States and other countries. Copyright © 2014. All Rights Reserved.
EN-14

FCC Statement Caution Statement
“Modifications not approved by the party responsible for compliance could void the user’s authority to operate the equipment.”
This device complies with Part 15 of the FCC Rules. Operation is subject to the following two conditions:
(1)this device may not cause harmful interference, and
(2)this device must accept any interference received, including interference that may cause undesired operation.
Instruction Statement
NOTE: This equipment has been tested and found to comply with the limits for a Class B digital device, pursuant to Part 15 of the FCC Rules. These limits are designed to provide reasonable protection against harmful interference in a residential installation. This equipment generates, uses and can radiate radio frequency energy and, if not installed and used in accordance with the instructions, may cause harmful interference to radio or television reception, which can be determined by turning the equipment off and on, the user is encouraged to try to correct the interference by one or more of the following measures:
• Reorient or relocate the receiving antenna.
EN-15

•Increase the separation between the equipment and receiver.
•Connect the equipment into an outlet on a circuit different from that to which the receiver is connected.
•Consult the dealer or an experienced radio/ TV technician for help. WARNING: THE MANUFACTURER IS NOT RESPONSIBLE FOR ANY RADIO OR TV INTERFERENCE CAUSED BY UNAUTHORIZED MODIFICATIONS TO THE DEVICE. ANY SUCH MODIFICATIONS COULD VOID THE USER’S AUTHORITY TO OPERATE THE EQUIPMENT.
Questions?
Need Some Help? This manual should help you understand your new product.
If you still have |
Like Us: |
questions, |
www.facebook.com/ioncamera |
visit our website: |
Tweet Us: |
www.ioncamera.com |
www.twitter.com/ioncamera |
|
|
EN-16

Schnellstartanleitung
Vielen Dank für den Kauf der iON CAMOCAM HD Sportvideokamera.
Diese Kurzanleitung enthält die gemeinsamen Funktionen und Features der CAMOCAM und CAMOCAM Wi-Fi. Die zusätzlichen Features und Funktionen der CAMOCAM Wi-Fi finden Sie auf der Rückseite des Handbuchs.
Die iON CAMOCAM kann für das ultimative HD-Aufnahmeabenteuer am Fahrrad und Helm-Kit oder Board-Kit befestigt werden.
DE-1
Aufbau Ihrer Kamera
Gemeinsame Funktionen:
Die iON CAMOCAM ist ein professioneller, qualitativ hochwertiger Digital-Videorecorder, der Videos durch einfaches Betätigen eines Schiebeschalter im vollen HD-Videoformat aufzeichnet.
Er besitzt den neuesten 14 Megapixel-Sensor für großartige digitale Bilder.
Ein hochwertiges 180 Grad-Objektiv liefert ein Superweitwinkel-Gesichtsfeld.
Ihre Kamera unterstützt eine MicroSD-Karte nit bis zu 32GB, was Ihnen die Aufzeichnung von Videos für ca. 4 Stunden bei 1080p und 30 Frames pro Sekunde ermöglicht.
Sie ist mit einer Mikrofonbuchse für den Anschluss eines externen Mikrofons ausgestattet.*
Dank des wasserdichten Gehäuses funktioniert die Kamera in einer Wassertiefe von bis zu 10 Metern.
Die iON CAMOCAM wiegt ca. 128g.
* Wenn ein externes Mikrofon (nicht im Lieferumfang enthalten) angeschlossen wurde, kann über das integrierte Mikrofon kein Audio aufgezeichnet werden. Bitte beachten Sie, dass die Kamera nicht mehr wasserdicht ist, sobald ein externes Mikrofon angeschlossen wird.
1. Verpackungsinhalt der CAMOCAM
Entfernen Sie vorsichtig die Verpackung und kontrollieren Sie, ob Sie folgendes Zubehör erhalten haben:
DE-2

1Sicherheitsriemen
2USB-Kabel
3Dualer USB-Autoadapter
4Fischereiund Jagd-Montierung
5CamLOCK
6Garantiekarte
7Schnellstartanleitung
Sichert die Kamera an der Halterung und bietet zusätzliche Sicherheit.
1.Anschluss der Kamera an einen Computer für die Datenübertragung oder den Kamera-Setup.
2.Aufladen der Kamera.
An den Zigarettenanzünder des Autos anschließen und Ihre Kamera simultan über das enthaltene USB-Kabel aufladen.
Siehe bitte Fischereiund Jagd-Bildanleitung zur Montage an Gewehr und Kamera.
Befestigt die Kamera schnell am CamLOCK-Sockel oder entfernt sie von diesem.
Bitte für die auf 1 Jahr beschränkte Herstellergarantie aufbewahren.
Bietet schnelle Informationen für die einfache Bedienung der Kamera
DE-3
8 |
Mi-Media-Karte |
Bietet eine Anleitung zum Anmelden bei Ihrem kostenlosen |
|
iON Cloud-Speicher. |
|||
|
|
2. Aufbau der CAMOCAM
1 |
Ein-/Ausschalter |
1. Schaltet die Kamera an und aus. |
|
2. Nimmt ein Einzelfoto auf. |
|||
|
|
||
2 |
LED-Anzeige |
Zeigt den Kamerastatus an. |
|
3 |
Aufzeichnungs-Schiebeschalter |
Schieben, um eine Videoaufzeichnung zu starten |
|
|
|
oder zu beenden. |
|
4 |
Objektiv |
Hochwertiges Objektiv |
|
5 |
MicroSD-Kartensteckplatz |
Steckplatz für die MicroSD-Speicherkarte. |
|
|
|
Anschluss für ein externes Mikrofon (nicht im |
|
6 |
Mikrofonbuchse |
Lieferumfang enthalten) Bitte beachten Sie, dass |
|
die Kamera nicht mehr wasserdicht ist, sobald ein |
|||
|
|
||
|
|
externes Mikrofon angeschlossen wird. |
|
|
|
Anschluss der Kamera an einen HD-Fernseher |
|
7 |
Mini-HDMI-Buchse |
über ein HDMI-Kabel (nicht im Lieferumfang |
|
|
|
enthalten). |
|
8 |
Videoauflösungsschalter |
Auswahl der Videoauflösung: FHD (Vollbild-HD) |
|
oder HD. |
|||
|
|
||
9 |
USB-Port |
1. Anschluss an Ihren Computers zur |
DE-4
|
|
Datenübertragung oder für den Kamerasetup. |
|
|
|
2. Aufladen der Kamera. |
|
10 |
Reset-Taste |
Zurücksetzen der Kamera. |
|
11 |
PODZ-Buchse |
Schließt PODZ für Zusatzfunktionen an die |
|
Kamera an. |
|||
|
|
3. Gebrauch der Kamera
3.1 Aufladen der Kamera
Laden Sie Ihre Kamera entweder mit dem USB-Kabel oder einem AC/DC-Netzteil auf. Die rote LED leuchtet, um den Ladevorgang der Kamera anzuzeigen und erlischt, sobald die Kamera vollständig aufgeladen wurde. Das vollständig Aufladen der Kamera dauert ca. 3 Stunden.
3.2 Einsetzen einer Speicherkarte
Setzen Sie vor Sie dem Gebrauch der Kamera eine MicroSD-Karte (nicht im Lieferumfang enthalten) ein. Vergewissern Sie sich, dass die Kamera ausgeschaltet (OFF) wurde, bevor Sie die Karte in den Steckplatz einsetzen.
Hinweis:
1.Die MicroSD-Karte kann nur in einer Richtung in den Steckplatz eingesetzt werden. Wenden Sie beim Einführen der Karte keine Gewalt an, da dies sowohl die Kamera als auch die MicroSD-Karte beschädigen kann.
2.Eine neue MicroSD-Karte muss vor der Verwendung formatiert werden. Für weitere Informationen siehe Abschnitt 7.2.
3.Wir empfehlen eine Klasse 10 SDHC-Karte.
3.3 Datum und Uhrzeit einstellen
Schließen Sie Ihre Kamera an einen Computer an und führen Sie die iON-Software im Ordner der MicroSD-Karte aus. Auf der Seite „Einstellungen“ können Sie Datum und Uhrzeit der Kamera einstellen. Zum Öffnen der iON-Software siehe Abschnitt 4.1
DE-5

3.4 Installation des PODZ
1.Bringen Sie das PODZ auf der Rückseite der Kamera an und drehen Sie es im Uhrzeigersinn, bis sich die zwei Punkte auf einer Linie befinden.
2.Schieben Sie die Lasche am PODZ, um es zu verriegeln.
WARNUNG: Die Lasche muss verriegelt sein, damit die wasserdichte Dichtung versiegelt ist, andernfalls kann Wasser eindringen.
3.5 Aufnahme von Videos
Wählen Sie vor dem Start der Aufzeichnung mit dem Videoauflösungsschalter die Videoauflösung.
Zum Starten der Videoaufzeichnungsfunktion stehen zwei Vorgehensweisen zur Verfügung. Wenn die Kamera mit der Aufzeichnung beginnt, erfolgt als Hinweis eine kurze Vibration, dass die Aufnahme begonnen hat. Während der Aufzeichnung leuchtet die LED-Anzeige ROT.
1.Schieben sie unabhängig davon, ob die Kamera ein oder ausgeschaltet ist, einfach den Aufzeichnungs-Schiebeschalter  von STOP auf REC, um die Aufzeichnung zu beginnen.
2.Wenn Ihre Kamera ausgeschaltet ist und der Aufzeichnungs-Schiebeschalter
 auf REC steht, halten Sie zum Einschalten der Kamera die Taste Power
 gedrückt. Die Aufzeichnung beginnt.
Um die Aufzeichnung zu beenden, bewegen Sie den Aufzeichnungs-Schiebeschalter
 von REC zu STOP. Die Kamera vibriert und die LED-Anzeige leuchtet GRÜN und zeigt damit an, dass die Aufnahme beendet wurde. Die Kamera befindet sich nun im Standby-Modus.
Als eine zusätzliche Option können Sie die Taste Power  gedrückt zu halten, um
DE-6
die Aufzeichnung zu beenden und die Kamera auszuschalten. Die Kamera vibriert für zwei Sekunden und die rote LED erlischt.
Hinweis:
1.Eine zusätzliche 432x240 (w/ 1080p/720p) oder 320x240 (w/ 960p) Videodatei wird simultan zur Aufzeichnung einer HD/FHD-Videodatei erstellt. Die kleinere Videodateigröße ermöglicht das effizientere Hochladen von Inhalten auf Social-Media-Plattformen oder über E-Mail.
2.Während der Videoaufzeichnung ist das Ändern der Videoauflösung deaktiviert.
3.Es kommt zu einer etwa 1 – 2 Sekunden langen Verzögerung, bevor die Kamera mit der Aufzeichnung beginnt.
4.Die verschiedenen Videoauflösungsoptionen für HD und FHD können mittels der iON-Software im Abschnitt „Einstellungen“ geändert werden. (siehe 5)
3.6 Fotos aufnehmen
1.Schalten Sie die Kamera ein, indem Sie die Taste Power  drücken.
2.Nach dem Einschalten der Kamera drücken Sie zum Aufnehmen eines Fotos kurz die
Taste Power  . Ein kurzes Vibrieren und ein Aufblitzen der grünen LED zeigt den erfolgreichen Vorgang an.
Hinweis:
1.Während einer Videoaufzeichnung ist die Foto-Aufnahmefunktion deaktiviert.
2.Die Fotoauflösung und der Aufnahmemodus (Einzelaufnahme, Burst-Modus und Zeitraffer) können mittels der iON-Software im Abschnitt „Einstellungen“ geändert werden.
4. Kameramontage
4.1 Sicherheitsriemen
1.Führen Sie ein Ende des Sicherheitsriemens
durch die Riemen-Öse der Kamera. Sie können zum Einfädeln durch die Öse eine Nadel zu Hilfe nehmen.
2.Befestigen Sie das andere Ende an der Halterung.
DE-7
3.Drücken Sie beide Enden zusammen, wenn die Kamera montiert ist.
4.2 CamLOCK
Dank des vielseitigen CamLOCK-Montagesystems der iON, kann die Kamera an jedem Helmtyp (Fahrrad, Motorrad, Ski, Fallschirm usw.), Skistock, Board (Surfen, Skaten, Ski usw.) und Lenker (Fahrrad und Motorrad) angebracht werden.
Bitte schlagen Sie für Anweisungen, wie Ihr Montagezubehör für spezielle Aktivitäten an Ihre
Kamera montiert wird, in den entsprechenden Montageanleitungen nach.
1.Befestigen Sie die CamLOCK-Schraube am Stativ-Sockel der Kamera.
2.Drehen Sie das CamLOCK solange, bis es fest auf der Kamera sitzt.
5. iON Software-Anwendung
Mit der iON Software-Anwendung für Windows oder Mac können Sie über USB eine Verbindung mit einem Computer herstellen, um
1.Dateien auf der Kamera anzuzeigen und diese zu kopieren.
2.Die Kameraeinstellungen zu ändern.
3.Datum und Uhrzeit einzustellen.
4.Die Speicherkarte der Kamera zu formatieren.
5.Eine Verbindung mit der iON-Webseite und dem Cloud-Dienst herzustellen.
6.Auf Firmware-Aktualisierungen überprüfen.
5.1 Software-Anwendung für Windows
Die Windows Software-Anwendung iON.exe ist auf der Kamera installiert. Ausführen der Anwendung:
1.Setzen Sie eine MicroSD-Karte mit mindestens 2MB freiem Speicherplatz in die Kamera ein.
2.Drücken Sie die Taste Power, um die Kamera einzuschalten.
DE-8
3.Schließen Sie Ihre Kamera über das mitgelieferte USB-Kabel an einen PC an.
4.Öffnen Sie den MicroSD-Ordner und suchen Sie dort die Datei „iON.exe“.
5.Doppelklicken Sie zum Öffnen auf die Datei.
5.2 Software-Anwendung für Mac
1.Besuchen Sie die iON-Webseite (www.ioncamera.com/ion/Firmware-Updates.html), um die neuste Version der Mac-Software-Anwendung herunterzuladen.
2.Setzen Sie eine MicroSD-Karte mit mindestens 2 MB freiem Speicherplatz in die Kamera ein.
3.Drücken Sie die Taste Power, um die Kamera einzuschalten.
4.Schließen Sie Ihre Kamera über das mitgelieferte USB-Kabel an einem Mac an.
5.Verwenden Sie zum Suchen den Finder und öffnen Sie die Kamera als ein neues Gerät, das normalerweise den Namen „No Name“ hat. Nach dem Öffnen des Geräts sollten Sie einen Ordner „DCIM“ und die Datei iON.exe sehen.
6.Ziehen Sie die heruntergeladene Datei auf das neue Gerät und legen Sie es mit DCIM und iON.exe ab.
7.Doppelklicken Sie auf die neu geladene Datei, um die Mac-Anwendung aufzurufen. Die Anwendung wird nicht ausgeführt, wenn sie sich nicht auf der Karte in der Kamera befindet.
Hinweise:
Die Kamera kann an einem beliebigen Windowsoder Mac-Plug & Play-System angeschlossen und auf sie als Wechselmedium zugegriffen werden. Dateien können ohne Gebrauch der Anwendung angezeigt und kopiert werden.
6. Anmeldung am kostenlosen iON-Cloudspeicher
Sie können sich an Ihrem kostenlosen 8GB iON-Cloudspeicher anmelden. Besuchen Sie einfach www.ioncamera.com/ioncloud und befolgen Sie die Schritte. Die iON-Cloud ist eine großartige Möglichkeit, Ihre Fotos und Videomaterial kostenlos zu speichern und freizugeben.
DE-9

7. Verbinden Ihrer Kamera
7.1 Verbinden Sie Ihre Kamera mit einem PC
Um die ion software zu öffnen
1.Fügen Sie die MicroSD Karte in den entsprechenden Speicherkarten-Schlitz Ihrer Kamera ein, und stellen Sie sicher dass auf der Karte mindestens 2MB freier Speicherplatz vorhanden ist.
2. |
Drücken Sie die Ein/Aus |
Taste um die Kamera einzuschalten. |
3.Verbinden Sie Ihre Kamera mit dem PC unter Verwendung des mitgelieferten USB Kabels.
4.Rufen Sie den MicroSD Ordner auf und suchen Sie die Datei “ion.exe”.
5.Doppelklick auf die Datei “ion.exe” um das Program zu starten
Sobald das Program gestartet wurde können Sie:
1.Die Dateien die auf der Kamera gespeichert wurden durchsuchen
2.Die Kamera-Einstellungen ändern
3.Den Internet-Link zur ion-Homepage und dem Cloud Service nutzen
4.Den Firmware-Status der Kamera überprüfen
Hinweise
1.Wenn Sie die iON.exe in Ihrem MicroSD-Ordner nicht finden, müssen Sie das Kabel vom PC trennen, die Kamera einmal einund wieder ausschalten und den PC erneut verbinden.
2.Wenn Sie einen Mac verwenden, besuchen Sie bitte die iON-Website (www.ioncamera.com/ion/Firmware-Updates.html), um die Software in der Mac-Version herunterzuladen.
7.2 Verbinden Sie Ihre Kamera mit einen TVoder HDTV-Gerät
Sie können Ihre Kamera mit einem TV -or HDTV via the Composite RGB (not included) or an HDMI cable (not included). Once you are connected you can:
1.Schießen Sie Fotos oder Videos indem Sie ihr TV-Gerät als Sucher verwenden
2.Spielen Sie sämtliche Fotos oder Videos die auf der Kamera gespeichert sind einfach ab
DE-10
3.Löschen oder Speichern Sie ihre Dateien/Files der Kamera
4.Formatieren Sie ihre MicroSD Karte
8 Verpackungsinhalt CAMOCAM WiFi
Neben dem Verpackungsinhalt der CAMOCAM (siehe Abschnitt 1) enthält die CAMOCAM Wi-Fi für die WLAN-Funktionen einen Wi-Fi-PODZ.
1. Hiermit können Sie für Ihre Kamera ein Wi-Fi-PODZ Smartgerät nutzen.
2.Wasserdicht (siehe Abschnitt 3.4)
8.1Aufbau des Wi-Fi-PODZ
Zusätzlich zu den Bedienelementen der CAMOCAM (siehe Punkte 1 bis11 in Abschnitt 2) besitzt die CAMOCAM Wi-Fi auf dem Wi-Fi-PODZ zusätzliche Bedienelemente.
12 |
Wi-Fi-PODZ |
Zum Abdichten der Kamera drehen. |
13 |
WLAN-LED-Anzeige |
Zeigt den WLAN-Status an. |
14 |
WLAN-Einschalttaste |
Schaltet das WLAN ein oder aus. |
15 |
PODZ-Verriegelung |
Verriegelt das PODZ. |
WARNUNG: Die Lasche muss verriegelt sein, damit die wasserdichte Dichtung versiegelt ist, andernfalls kann Wasser eindringen.
8.2. Gebrauch des Wi-Fi-PODZ
8.2.1 Installieren und Einschalten des Wi-Fi-PODZ
1.Entfernen Sie den Standard-PODZ auf der Rückseite der Kamera und setzen Sie
DE-11

Ihren Wi-Fi-PODZ in die PODZ-Buchse der Kamera ein. (Befolgen Sie die Schritte 1 und 2 in Abschnitt 3.4)
2.Halten Sie zum Einschalten Ihrer Kamera die Taste Power  gedrückt.
3.Schalten Sie Ihr WLAN mit der Taste Wi-Fi-Power auf dem Wi-Fi-PODZ ein. Die blaue LED leuchtet auf, um anzuzeigen, dass das WLAN startet. Es dauert ungefähr 15–20 Sekunden, bis das WLAN bereit ist und die Verbindung herstellt werden kann. Die LED blinkt, wenn die WLAN-Funktion aktiv oder verbunden ist.
4.Mit der Taste Wi-Fi-Power können Sie das WLAN jederzeit ausschalten.
Hinweis: Aktiviertes WLAN entleert Ihren Kameraakku schneller. Schalten Sie WLAN aus, wenn es nicht verwendet wird, um Einstellungen zu ändern oder Inhalte hochzuladen.
8.2.2 Anschluss der Kamera an Ihren Computer
1. Schalten Sie Ihre Kamera und den Wi-Fi-PODZ ein.
2. Rufen Sie die Netzwerkeinstellung Ihres PCs auf und wählen Sie die WLAN-Einstellung. Suchen Sie auf dem Netzwerk nach „WIFIPODZ“ und klicken Sie es an.
3. Geben Sie das Passwort „123456789“ ein und stellen Sie die Verbindung mit Ihrer Kamera her.
4. Öffnen Sie Ihren Internet-Browser und geben Sie „192.168.1.2“ ein. Sie können dann die in der Kamera gespeicherten Dateien anzeigen.
8.2.3 Verbindung der Kamera mit Ihrem Smartphone (Browser)
1.Schalten Sie Ihre Kamera und den Wi-Fi-PODZ ein.
2.Rufen Sie die Netzwerkeinstellung Ihres mobilen Geräts auf und wählen Sie die WLAN-Einstellungen. Suchen Sie auf dem Netzwerk nach „WIFIPODZ“ und klicken Sie es an.
3.Geben Sie das Passwort „123456789“ ein und stellen Sie die Verbindung mit Ihrer Kamera her.
DE-12
4.Öffnen Sie Ihren Internet-Browser und geben Sie „192.168.1.2“ oder „wifi.podz“ ein. Sie können jetzt die in Ihrer Kamera gespeicherten Fotos und Videos anzeigen.
8.2.4 Verbindung der Kamera mit Ihrem Smartphone (App)
1.Suchen Sie die App „ioncamera“ im App-Store Ihres Geräts.
2.Laden Sie die App auf Ihr Smartphone herunter und installieren Sie sie.
3.Schalten Sie Ihr Wi-Fi-PODZ ein.
4.Rufen Sie die Netzwerkeinstellung Ihres Geräts auf und wählen Sie die WLAN-Einstellungen. Suchen Sie auf dem Netzwerk nach „WIFIPODZ“ und klicken Sie es an.
5.Geben Sie das Passwort „123456789“ ein und stellen Sie die Verbindung mit Ihrer Kamera her.
6.Öffnen Sie Ihre App.
7.Bitte schlagen Sie für detaillierte Anweisungen auf der App-Seite nach.
9. Abdichtung Ihrer Kamera, um Wasserschäden zu vermeiden
Das wasserdichte Gehäuse (Standard-PODZ bei der iON CAMOCAM-Kamera und Wi-Fi-PODZ bei der CAMOCAM Wi-Fi) ermöglicht den Betrieb der Kamera in einer Wassertiefe von bis zu 10 Metern. Sie müssen die Kamera mit dem PODZ abdichten, um die Kamera bei nassen oder feuchten Bedingungen zu schützen.
Hinweise:
1.Die Gummidichtung am PODZ bildet eine wasserdichte Barriere, um die Kamera unter nassen Bedingungen und unter Wasser zu schützen. Sie müssen diese Dichtung sauber halten, da bereits ein einzelnes Haar oder Sandkorn das Eindringen von Wasser in das Gerät ermöglichen kann.
2.Nach jeder Verwendung in Salzwasser muss das Gerätegehäuse sowie die Dichtung mit Süßwasser abgespült und abgetrocknet werden. Versäumen Sie dies, kann das Gerät korrodieren oder die Dichtung versagen, was im Gegenzug zur Beschädigung des Geräts führt.
Warnung:
DE-13
 Loading...