


Quick Start Guide
1.Introduction
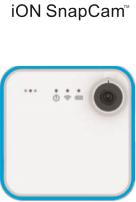
SnapCam is a HD wearable camera. It allows users to take and share photos and videos on social media.
2.Key Features
zUltra Slim and Light-weight
zHD Video (720p @ 30fps)
z8mp Photos
zAuto rotate.
zUpload and Share Photos and Videos using built-in Wi-Fi
zMagnetic Clip included to wear on clothes, bags, hats etc.
EN-2
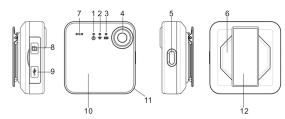
3.Function
1. |
Camera LED (Red) |
Indicate the cameras reaction |
|
2. |
Wi-Fi LED (Blue) |
Indicate Wi-Fi status |
|
3. |
Battery LED (Green) |
Indicate the camera battery |
|
status |
|||
|
|
||
4. |
Lens |
Wide angle lens |
|
|
|
Turn on and off the camera |
|
5. |
Power Button |
Turn on and off the Wi-Fi |
|
|
|
Reset the camera |
|
6. |
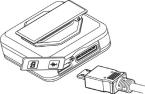
Magnet |
For attaching your SnapCam to |
|
clothing etc. |
|||
|
|
||
7. |
Microphone |
|
EN-3

8. |
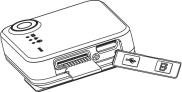
MicroSD Card Slot |
For MicroSD card |
|
9. |
Micro USB Port |
Connection for charging and |
|
mass storage |
|||
|
|
||
10. |
Touch Panel |
activate video, photo and live |
|
streaming. |
|||
|
|
||
11. |
Silicon Bumper |
Protect the camera and |
|
decoration |
|||
|
|
||
12. |
Back Clip Mount |
To clip to clothing and |
|
accessories to make SnapCam |
|||
|
|
wearable. |
4.First Time Use
4.1Charging your SnapCam
EN-4

Charge the built-in battery before starting to use your SnapCam. When the SnapCam is off, the charging time from empty to full is approximately 1.5 hours.
The LED will turn solid GREEN once the SnapCam is fully charged.
4.2Inserting a MicroSD Memory Card
You must insert a MicroSD Card (required, not included) before using the SnapCam. The SnapCam supports MicroSD Card from 2GB to 32GB Class 6 or higher is recommended.
Note:
There is only one direction to insert the MicroSD Card into the slot. Do not force the MicroSD Card into the slot as this may damage both the
EN-5
scanner and the MicroSD Card.
The MicroSD Card must be formatted before first time use.
4.3Setting Date & Time
When the SnapCam is used for the first time, or it has been restored to default settings, it is necessary to set the SnapCam’s clock to ensure the captured photo and video files are saved with correct date and time information.
To set-up the SnapCam’s clock:
1.Insert a formatted MicroSD Card into the SnapCam.
2.Connect the SnapCam to a PC as mass storage device (please refer to Section 5.9).
3.Open the MicroSD file folder, create a file in any format (eg. txt file) and name it with the format “set-YYYYMMDD-HHMM”, YYYY, MM, DD, HH, MM represent the year, month and day, hour, minute of existing time. (eg : set-20150618-1100.txt)
4.Disconnect the SnapCam from the PC, and tap once on SnapCam touch panel, the SnapCam will scan the file and write it to system clock.
5.Using the SnapCam
Please ensure you are running the latest firmware to get the best from
EN-6

your SnapCam, visit www.ioncamera.com for firmware updates.
5.1 Wearing your SnapCam
This method is suitable for wearing your SnapCam on a jacket or relatively thick clothes.
EN-7
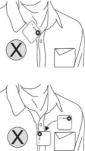
Note: Wear your SnapCam vertically, otherwise, the SnapCam may slip and produce a tilted view.
Disclaimer: Please do not put the magnet clip too close to magnetic card strips (credit/debit cards) or smartphones to avoid malfunctions.
EN-8
Note: Please remove the sticker on the surface of your SnapCam before use.
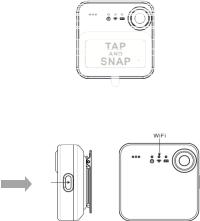
5.2 Power On your SnapCam.
Press the Power On button for 3-4 seconds, the SnapCam will automatically search for a Wi-Fi network.
EN-9

5.3 Take a Single Photo
Simply tap the touch panel of your SnapCam to take a photo. The red LED will flash once to indicate the photo was taken. You may also take a single photo using iON SnapCam App by clicking “Take Photo” icon.
EN-10
5.4 Use Time Lapse to take Photos
1.Set your SnapCam to Time Lapse Photo function using the iON SnapCam App and smart device.
2.Simply click “Start Time Lapse Photo” on the iON SnapCam App, then your SnapCam will start to take photos at the set time intervals.
3.You may cancel the Time Lapse Photo function using the iON SnapCam App
EN-11

5.5 Video Recording
1.Simply tap the touch panel of your SnapCam twice to start video recording. The red LED will stay solid for the duration of recording. You may also start video recording through iON SnapCam App by clicking “Start Video” icon.
2.Tap the touch panel of your SnapCam twice to stop video recording, or click “Stop Video” icon on iON SnapCam App.
Note: Please note changing video or photo resolution will decrease battery life.
EN-12

5.6 Short Video Recording
1.Set the duration of Short Video Recording using iON SnapCam App and a smart device. (Default is 15 seconds)
2.Simply touch and hold the touch panel of your SnapCam to start short video recording. You may also start/stop short video recording through iON SnapCam App by clicking “Start Short Video” icon.
EN-13

5.7 Live Streaming
Your SnapCam is capable of live streaming.
1.Make sure your SnapCam is connected to a Wi-Fi network
2.Open the iON SnapCam App and select your SnapCam in the Device Page.
3.Swipe the touch panel of your SnapCam from left to right to start live streaming.
4.To stop live streaming, swipe the touch panel of your SnapCam from right to left.
EN-14

5.8 Connecting your SnapCam to a smart device.
You may control your SnapCam using the iON SnapCam App and a smart device.
1.Open the iON SnapCam App and select Device Icon to enter to the Device Page.
2.Click “Device\Add New”. Automatic device search will begin.
3.Select your SnapCam from the list of available devices.
EN-15
Note : Minimum operating system requirement for iON SnapCam App: Android 4.3, iOS 4.0
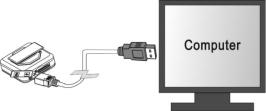
5.9 Connecting your SnapCam to PC
The SnapCam can be connected to computer as mass storage device (MS Mode) and transfer the photos and video files for storage, if it is not under recording. If the SnapCam is recording when connected to a PC, it will not enter to the mass storage mode but will begin charging.
EN-16
6. Specifications
Lens |
Wide angle lens |
|
Water Resistance |
IPX4 |
|
Still Image |
8MP (Default), 2MP |
|
resolution |
||
|
||
Video Resolution |
720p 30fps , WVGA : 848 x 480 |
|
Video Format |
MPEG4 (H.264) .MP4 File |
|
Photo Format |
JPG |
|
Memory Slot |
MicroSD card |
|
Support System |
Windows XP, Vista, 7, and 8 ; |
|
Mac OS X 10.6 or later |
||
|
||
Microphone |
Built-in |
|
Battery Life |
2 hours continuous recording |
|
Dimension (L x H x |
40 x 40 x 12.5 mm |
|
W) |
||
|
||
Weight |
32g |
|
Operation |
-10°C - 45°C |
|
Temperature |
||
|
||
Storage |
-20°C - 70°C |
|
Temperature |
||
|
||
|
EN-17 |
7. Troubleshooting
Problem |
Cause |
Solution |
||
|
|
|
|
|
|
|
1. |
Insert a MicroSD |
|
|
|
|
card. Supports |
|
|
|
|
2GB – 32GB |
|
|
1. MicroSD card is |
|
class 6 or higher. |
|
Unable to record |
not inserted. |
2. |
Replace a |
|
videos or photos |
2. Memory is full. |
|
memory card |
|
|
Camera |
|
with space |
|
|
malfunction. |
|
available for |
|
|
|
|
content. |
|
|
|
3. |
Reset the |
|
|
|
|
camera. |
|
Cannot find |
|
1. |
Check all cable |
|
removable disk |
Connection failure. |
|
connections. |
|
after connecting the |
2. |
Restart the |
||
camera to the |
|
|
computer if |
|
computer |
|
|
necessary. |
|
|
|
|
||
Blurry images |
The lens of camera |
Clean the lens with |
||
is dirty |
soft and dry cloth |
|||
|
||||
|
|
|
|
|
|
EN-18 |
|
|
|

FCC Statement
Warning: Changes or modifications to this unit not expressly approved by the party responsible for compliance could void the user’s authority to operate the equipment.
NOTE: This equipment has been tested and found to comply with the limits for a Class B digital device, pursuant to Part 15 of the FCC Rules. These limits are designed to provide reasonable protection against harmful interference in a residential installation. This equipment generates, uses and can radiate radio frequency energy and, if not installed and used in accordance with the instructions, may cause harmful interference to radio communications.
However, there is no guarantee that interference will not occur in a particular installation. If this equipment does cause harmful interference to radio or television reception, which can be determined by turning the equipment off and on, the user is encouraged to try to correct the interference by one or more of the following measures:
•Reorient or relocate the receiving antenna.
•Increase the separation between the equipment and receiver.
•Connect the equipment into an outlet on a circuit different from that to which the receiver is connected.
•Consult the dealer or an experienced radio/ TV technician for help.
This device complies with Part 15 of the FCC Rules. Operation is subject to the following two conditions:
(1)This device may not cause harmful interference.
(2)This device must accept any interference received, including interference that may cause undesired operation.
EN-19

Specific Absorption Rate (SAR) information:
This equipment meets the government's requirements for exposure to radio waves. The guidelines are based on standards that were developed by independent scientific organizations through periodic and thorough evaluation of scientific studies. The standards include a substantial safety margin designed to assure the safety of all persons regardless of age or health.
FCC RF Exposure Information and Statement The SAR limit of USA (FCC) is 1.6 W/kg averaged over one gram of tissue. Device types: FCC ID: NW71045 has also been tested against this SAR limit. The highest SAR value reported under this standard during product certification for use when properly worn on the body is 1.288 W/kg or head is 1.478 W/kg. This device was tested for typical body-worn operations with the back of the handset kept 0 cm from the body or head. The use of accessories that do not satisfy these requirements may not comply with FCC RF exposure requirements, and should be avoided.
EN-20
TRADEMARK INFORMATION
© 2015 World Wide Licenses Limited.
® The iON logo is a registered trademark of World Wide Licenses Limited
Questions?
Need Some Help? This manual should help you understand your new product.
If you still have |
Like Us: |
questions, |
www.facebook.com/ioncamera |
visit our website: |
Tweet Us: |
www.ioncamera.com |
www.twitter.com/ioncamera |
|
|
EN-21
Learn more.
Learn more about iON camera features at http://www.ioncamera.com
For instructions and safety information, see the iON User Guide. Download the PDF at http://www.ioncamera.com/user-manuals/
Get support. (i.e. Warranty)
Visit https://www.ioncamera.com/support/ for all iON camera support. If you are located in the United States of America, please contact Customer Service at 855-411- 4466. If you are located in Canada, please contact Customer Service at 905-513-7733. If you are located outside of the United States of America or Canada please visit www.ioncamera.com for your local support service
EN-22
Schnellstartanleitung
1.Einleitung
SnapCam ist ein tragbare HD Kamera.Sie erlaubt dem Benutzer Fotos und Videos über Sozial Media zu teilen.
2.Hauptmerkmale
zUltra dünn und leicht
zHD Video (720p @ 30fps)
z8mp Fotos
zAutomatisches drehen
zHochladen und teilen von Fotos und Videos mit integrierten Wi-Fi
zMagnetik Clip mit im Lieferumfang, um an der Kleidung, Taschen, Hüten etc zu tragen.
DE-2

3.Funktion
1. |
Kamera-LED (rot) |
Kameras Modus an |
|
2. |
Wi-Fi-LED (blau) |
Wi-Fi-Status |
|
3. |
Batterie-LED (grün) |
Kamera-Akku-Status |
|
4. |
Objektiv |
Weitwinkelobjektiv |
|
|
|
Einund Ausschalten der |
|
5. |
Netzschalter |
Kamera. |
|
Einund Ausschalten des Wi-Fi. |
|||
|
|
||
|
|
Kamera zurücksetzen |
|
6. |
Magnet |
Befestigen Sie Ihrer SnapCam |
|
an Kleidung usw. |
|||
|
|
||
7. |
Mikrofon |
|
DE-3
8. |
MicroSD- |
Für eine MicroSD-Karten. |
|
Kartensteckplatz. |
|||
|
|
||
9. |
Micro USB |
Anschluss zum Aufladen und |
|
Anschluss. |
Massenspeicher |
||
|
|||
10. |
Touch-Panel |
aktivieren von Videos, Fotos und |
|
Live-Streaming. |
|||
|
|
||
11. |
Silicon Bumper |
Schützt die Kamera und dient |
|
als Dekoration |
|||
|
|
||
|
Rückseite Klip |
Um an Kleidung und Zubehör zu |
|
12. |
befestigen, um SnapCam zu |
||
halterung |
|||
|
tragen. |
||
|
|
DE-4
4.Erstbenutzer
4.1Laden Sie Ihre SnapCam auf.
Laden Sie den eingebauten Akku auf, bevor Sie Ihre SnapCam benutzen. Wenn die SnapCam ausgeschaltet ist benötigt Die Kamera ca. 1.5 Stunden um voll aufzuladen.
Die LED leichtet GRÜN sobald die Kamera voll aufgeladen ist.
DE-5
4.2Einlegen einer microSD-Speicherkarte
Sie müssen eine MicroSD-Karte (nicht mitgeliefert), vor Benutzung der Kamera einsetzen. Die Kamera unterstützt MicroSD-Karten von 2GB bis 32GB (Klasse 6 oder höher wird empfohlen).
Hinweis:
Es gibt nur eine richtige Richtung, um die microSD-Speicherkarte in den Steckplatz zu stecken. Stecken Sie die MicroSD-Karte nicht mit Gewalt in den Steckplatz, da dies sowohl den Scanner und die microSDSpeicherkarte beschädigen kann.
Die MicroSD-Speicherkarte muss vor dem Gebrauch formatiert werden.
DE-6
4.3Einstellen von Datum und Uhrzeit.
Wenn die SnapCam zum ersten Mal verwendet wird, oder zurückgesetzt wurde, müssen Sie die Uhr der SnapCam einstellen, um sicherzustellen, dass Ihre Videound Foto-Dateien mit der richtigen Datum / ZeitInformationen gespeichert werden.
So richten Sie die Uhr der Kamera ein:
1.Legen Sie eine formatierte microSD-Karte in die SnapCam.
2.Schließen Sie die Kamera an einen PC an, um in den USB Modus zu gelangen (siehe Abschnitt 5.9).
3.Öffnen Sie den MicroSD-Datei Ordner, erstellen Sie eine Datei in einem beliebigen Format (z.B. txt-Datei) und benennen Sie es mit dem Format "Set-JJJJMMTT-SSMM" Mit JJJJ, MM, TT, SS, MM stellen Sie Jahr, Monat und Tag, Stunde, Minute der vorhandenen Zeit ein. (z.B. : set-20150618-1100.txt)
4.Trennen Sie die SnapCam von Ihrem PC und tippen Sie einmal auf SnapCam Touch-Panel.Dadurch scannt die SnapCam die Datei und schreibt Sie auf den Systemtakt.
DE-7

5.Verwendung der Kamera
Stellen Sie sicher dass Sie die neueste Firmware verwenden, um das Beste aus Ihrer SnapCam zu erhalten, besuchen Sie www.ioncamera.com für Firmware-Updates.
5.1Tragen Sie Ihrer SnapCam
Diese Methode ist geeignet für das Tragen Ihrer Kamera an einer Jacke oder relativ dicker Kleidung.
DE-8
 Loading...