


Quick Start Guide
DashCam IN-CAR CAMERA

Quick Start Guide
DashCam IN-CAR CAMERA
EN-2
1. Key Features
yCar DashCam with 135o Wide Angle Lens.
y2.7" Color LCD for real-time monitoring and video playback.
yAutomatic Event Video Recording for sudden external impact.
yContinuous loop recording of scenery capture for unexpected incidents.
yGeo-information capture in photo or video files with the built-in GPS sensor.
yHigh quality video recording up to 1296p high quality videos in extreme low light environment.
yPhoto capture during recording.
EN-3
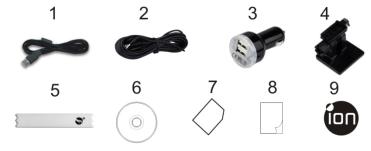
2. Package Contents
1 |
USB Cable |
2 |
5M Power Cable |
3 |
USB Car Adapter |
4 |
Windshield Mount |
5 |
Sensormatic Tag |
6 |
DashCam Software CD |
7 |
Warranty Card |
8 |
QSG |
9 |
iON label |
|
|
EN-4
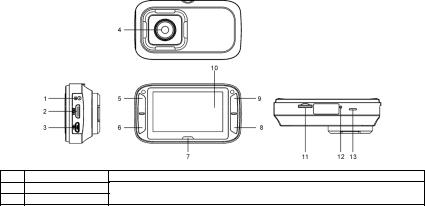
3. Functional Parts
1DC in Port
2Mini HDMI Port
3Micro USB Port
Connect to the provided DC in to USB cable for charging. Connect to the TV through mini HDMI cable (not supplied). Connect to PC for file browsing and file transfer.
EN-5

4 |
Wide Angle Lens |
Capture a wide angle view. |
|
|
|
1. |
Select the top-left on-screen command. |
5 |
|
2. |
Enter the playback mode. |
|
|
3. |
Move up the selection bar or move to former file. |
|
|
1. |
Select the bottom-left on-screen command. |
6 |
|
2. |
Move down the selection bar or move to next file. |
|
|
3. |
Take a photo. |
7 |
LED Indicator |
Operation status indication. |
|
|
|
1. |
Confirm your selection. |
8 |
|
2. |
Manually trigger an Event Protection Video Recording. |
|
|
3. |
Select the bottom-right on-screen command. |
|
|
1. |
Turn on or off the DashCam by pressing and holding the button. |
9 |
|
2. |
Select the top-right on-screen command. |
|
3. |
Enter the setup menu. |
|
|
|
||
|
|
4. |
Go back to previous interface. |
10 |
Display |
Sharp panel for live view, playback and function indications. |
|
11 |
MicroSD Slot |
MicroSD card storage location. |
|
12 |
Reset Button |
Reset the DashCam. |
|
13 |
Speaker Vent |
Output the sound. |
|
EN-6
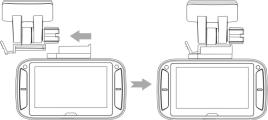
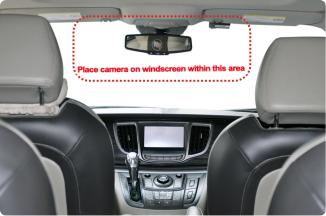
4. Installing the Windshield Mount & DashCam in a Vehicle
1. Clean the area on the windshield.
2. Peel off the protective membrane of the 3M adhesive and stick the Windshield Mount to the front windshield inside the car.
3. Slip the socket on the top of the DashCam into Windshield Mount until it is latched.
4. The lens of DashCam should be at the center of the front windshield and be aware not to block the driver’s visibility.
EN-7
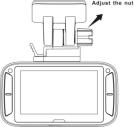
5. Adjust the nut on the Windshield Mount for suitable direction and orientation.
EN-8
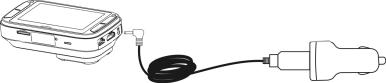
6.Connect the DashCam to the DC Power jack with included DC in to USB cable and the Dual USB CLA. Secure the cable with the cable holder to avoid interference of driver's motion.
EN-9
Press the Windshield Mount side to release and slide the DashCam off the mount.
EN-10
5. LED and Sound Indication
Red LED
Red LED flashes continuously
Purple LED
DashCam is under Normal Loop Recording 2 chimes sound indicates the recording starts
Counting down to DashCam shut down due to the power source being removed. Periodic sound indicates the counting down status
DashCam is under Event Protection Recording 1 chime sound indicates the recording starts
EN-11
Blue LED |
DashCam is not recording but other status (e.g. setting or playback) |
|
|
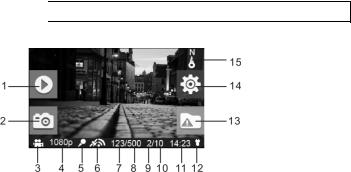
6. Explanation of Status Icons
Item |
Function |
Description |
|
1 |
Playback Indicator |
Enter playback mode. |
|
(Normal Loop Recording only.) |
|||
|
|
||
2 |
Screenshot Indicator |
Capture and save a screenshot of the video. |
EN-12

3 |
Mode Selected |
Normal Loop Recording mode. |
|
Event Protection Recording mode. |
|||
|
|
||
|
|
Show the selected video resolution setting. |
|
4 |
Video Resolution |
1296p (2304x1296 P30) |
|
1080p ( 1920x1080 P30) |
|||
|
|
||
|
|
720p (1280x720 P30) |
|
5 |
Microphone Status |
Show the Microphone if it is on. |
|
(Icon hidden if the Microphone is “off”.) |
|||
|
|
||
|
|
Show the intensity of GPS signal. |
|
|
|
No GPS reception |
|
6 |
GPS Strength |
Weak GPS reception |
|
|
|
Fair GPS reception |
|
|
|
Strong GPS reception |
|
7 |
Photo Counter |
Shows the number of photos that have been taken. |
|
8 |
Total Photo Counter |
Shows the maximum number of photos that can be taken. |
|
9 |
Event Protection Video |
Show the number of Event Protection Videos that have been recorded. |
|
Counter |
|||
|
|
||
10 |
Total Event Protection Video |
Show the maximum number of Event Protection Videos that can be |
|
Counter |
taken. |
||
|
EN-13

11 |
System Time |
Show current system time in Hour and Minute. |
|
|
|
|
|
12 |
Power Status |
An external power supply is connected. |
|
External power supply not connected. |
|||
|
|
||
13 |
Event Protection Indicator |
Start Event Protection Recording. |
|
Stop Event Protection Recording. |
|||
|
|
||
14 |
Setup Indicator |
Enter the Setup menu. |
|
(Normal Loop Recording only.) |
|||
|
|
||
15 |
Compass Indicator |
Show the direction going ahead. |
|
(Icon hidden if no GPS signal is received.) |
|||
|
|
7. Using Your Car DashCam
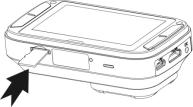
7.1 Inserting a MicroSD Memory Card (required but not included)
Insert a MicroSD card (not included) to the slot before using the DashCam. Assure that the DashCam power is turned OFF before inserting the card. Make sure a MicroSD card with minimum 8GB free space has been installed into the card slot. A 32GB or above Class 6 card is recommended for recording features.
EN-14
Notes:
1.The correct direction should be followed to insert the MicroSD card into the slot.
2.A new MicroSD card should be formatted before using. For more information, refer to section 7.6.
7.2 Turning on/off the DashCam
The DashCam will detect car ignition vibration and automatically turn on and start Normal Loop Recording.. Or, pressing and hold  to turn on the DashCam if a power source is absent.
If the DashCam is turned on for the first time, you will need to set up Date & Time/Language first.
EN-15
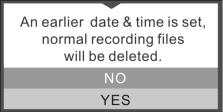
In Date & Time setup, if you have set an earlier Date & Time, the below message pops up:
Select “Yes”, all normal recording files will be deleted. Select “No” to keep these files.
7.3 Video Recording and Photo Taking Normal Loop Recording
The DashCam will start Normal Loop Recording once turned on. Video recording is continuously creating successive files of 3 / 5 / 10 min. The most outdated file will be replaced if the memory is full for continuous recording.
Event Protection Recording
EN-16
Files will be protected from the auto deletion if an impact is detected. The sensitivity of impact detection can be adjusted through the setup menu (refer to section 7.6).
By pressing during normal recording can also enter the Event Protection Recording mode to protect your video files. You can store up to 10 Event protection videos to the DashCam.
Photo Taking
Press  once during recording for taking a photo. You can store up to 500 photos to the DashCam.
7.4 Playing Back Files
During Normal Loop Recording, press  to enter the playback mode. You can choose to view the files in specific folders on separate pages.
EN-17

1Event Protection Videos
2Normal Loop Videos
3Photos
General operation of playback:
EN-18
Press |
and |
once to select the folder/file you want to view. |
||
Press |
to confirm and enter the thumbnail mode of the selected folder. |
|||
Press |
to open a single Video or Photo file |
|
|
|
During the thumbnail mode, long press the |
or |
to switch to previous or next thumbnail page. |
||
Press  to start playing back a video, during video playback:
Press to pause and press it again to continue.
Press  to fast forward the video and press it again to change the speed. Press
  to fast rewind the video and press it again to change the speed.
Note:
The file currently being recorded will be saved before entering the Playback mode.
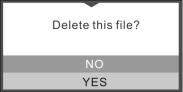
7.5 Deleting a Video/Photo File
You can delete a single file (photo or video) from the memory card in single photo or video playback mode.
In single photo or video playback mode, press and hold  to enter the single photo or video delete interface. Press
  or
or  to select “Yes”;
Press  to confirm.
EN-19
7.6 Setup Menu
During Normal Loop Recording, press to enter the setup mode.
Follow the below three steps to enter setup screen for each Menu item:
1.Press  or
or  to select the Menu/Submenu item you want to set.
(In “Date/Time set” item, press  to increase the number or press
  to decrease the number.)
2.Press  to confirm your selection.
3.Press to return to previous interface.
EN-20
|
Video Resolution |
Set the video resolution of |
y |
1296p: 2304x1296 P30 |
Camera |
Normal Loop Video and Event |
y |
1080p: 1920x1080 P30 |
|
|
Protection Video |
y |
720P: 1280x720 P30 |
|
Recording Duration |
Set the duration of each Normal |
y |
3 min |
|
|
Loop Video |
y |
5 min |
|
|
|
y |
10 min (Disabled in 1296p) |
|
|
|
|
||
|
|
Set the amount of time you |
y |
30 sec |
|
Screen Saver Duration |
would like the screen saver to |
y |
1 min |
|
activate or turn off the screen |
y |
3 min |
|
|
|
|||
|
|
saver function |
y |
Off |
Driving |
|
|
y |
Display off |
Screen Saver Type |
Set the Screen saver type |
y |
Time |
|
|
|
y |
Direction |
|
|
|
|
|
|
|
Microphone |
Turn on/ off the microphone |
y |
On |
|
during recording |
y |
Off |
|
|
|
|||
|
|
|
|
|
|
Volume |
Adjust the Speaker volume of |
y |
0-5 |
|
Voice/Sound/Playback |
|||
|
|
|
|
EN-21

General
|
Set the sensitivity of the G- |
y |
High |
|
Sensitivity |
sensor to activate the Event |
y |
Mid |
|
Protection Recording or turn off |
y |
Low |
||
|
||||
|
this function |
y |
Off |
|
|
|
y |
English |
|
|
|
y |
German |
|
|
|
y |
Spanish |
|
|
|
y |
French |
|
Language |
Set the device language |
y |
Italian |
|
y |
Russian |
|||
|
|
|||
|
|
y |
Japanese |
|
|
|
y |
Korean |
|
|
|
y |
S. Chinese |
|
|
|
y |
T. Chinese |
|
Date/Time Set |
Set the date and time of the |
YYYY/MM/DD/HH/MM |
||
device |
||||
|
|
|
||
Format |
Format the MicroSD card |
y |
No |
|
y |
Yes |
|||
|
|
|||
Default Setting |
Restore all settings to default |
y |
No |
|
factory positions |
y |
Yes |
||
|
||||
Device Information |
Display the model number, firmware version and GPS information |
|||
|
EN-22 |
|
|
|
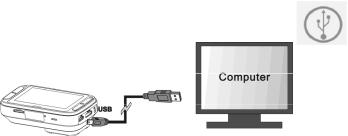
8. Connecting Your DashCam to a Computer
You may also connect your DashCam to your computer and view videos and pictures on the computer monitor.
1.Connect your DashCam to your computer with a USB cable included .
2.Your computer will recognize the DashCam as a “Removable Disk”. The USB icon will be displayed on the LCD screen of your camera. Open the disk and go to relevant file folder to view, import, copy, transfer or delete the videos or photos.
Note:
If the Removable Device Window did not launch automatically, go to your “My Computer/Computer” and find the device under Removable Disk.
EN-23
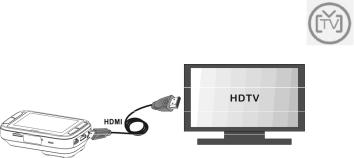
9. Connecting Your DashCam to an HDTV
You can connect your DashCam to an HDTV via the HDMI cable (not included). Once it is connected you can:
1.View the live view of the camera.
2.View/Playback any photo/video files saved in the camera.
EN-24

10. Specifications
Sensor
Lens
Still Image Resolution on Recording
Video Resolution
Video Format
Photo Format
Display Panel
Indicator LED
GPS Sensor
G Sensor
TV Out
3MP CMOS
135 o Wide Angle Lens
3MP on 1296p 2MP on 1080p 1MP on 720p
1296P: 2304x1296 P30 1080P: 1920x1080 P30 720P: 1280x720 P30
MPEG4 (H.264) .MOV File
JPG
2.7" Color Display 16:9
1 pc, 3 colors
Yes
Yes
Mini HDMI
EN-25

USB Port
Power
Microphone
Speaker
Operation
Temperature
Storage Temperature
Dimension (L x W x H)
Weight
Micro USB
DC in
Yes
Yes
-20 to 70 degree
-40 to 80 degree
92 x 51 x 29.3mm
104g
11. Computer System Minimum Requirements
Operating System |
Windows 7&8 / Vista / XP and Mac OS 10.5 or above |
CPU |
Pentium or above4 / 3.0G or faster recommended |
RAM |
At least 256MB |
Interface |
USB port |
CD |
4x speed CD ROM or above |
EN-26
12. Troubleshooting
Problem |
Cause |
|
|
Solution |
|
|
|
|
|
Cannot turn on the |
Low battery power |
|
Connect the DashCam with power source by DC or |
|
DashCam |
|
USB cable |
||
|
|
|||
|
|
|
|
|
Cannot find |
|
|
|
|
removable disk after |
|
|
1. |
Make sure all cable connections |
connecting the |
Connection failure |
|
|
are secured |
DashCam to the |
|
|
2. |
Restart the computer if necessary |
computer |
|
|
|
|
|
|
|
|
|
|
1. The DashCam has |
|
|
|
|
not been installed |
|
1. |
Reinstall the DashCam |
Blurry images |
steadily |
|
||
|
2. |
Clean the lens with soft dry cloth |
||
|
2. The lens of |
|
||
|
|
|
|
|
|
DashCam is dirty |
|
|
|
|
|
|
|
|
|
|
EN-27 |
||

FCC Statement Caution Statement
“Modifications not approved by the party responsible for compliance could void the user’s authority to operate the equipment.”
This device complies with Part 15 of the FCC Rules. Operation is subject to the following two conditions:
(1)this device may not cause harmful interference, and
(2)this device must accept any interference received, including interference that may cause undesired operation.
Instruction Statement
NOTE: This equipment has been tested and found to comply with the limits for a Class B digital device, pursuant to Part 15 of the FCC Rules. These limits are designed to provide reasonable protection against harmful interference in a residential installation. This equipment generates, uses and can radiate radio frequency energy and, if not installed and used in accordance with the instructions, may cause harmful interference to radio or television reception, which can be determined by turning the equipment off and on, the user is encouraged to try to correct the interference by one or more of the following measures:
•Reorient or relocate the receiving antenna.
•Increase the separation between the equipment and receiver.
•Connect the equipment into an outlet on a circuit different from that to which the receiver is connected.
•Consult the dealer or an experienced radio/ TV technician for help.
WARNING: THE MANUFACTURER IS NOT RESPONSIBLE FOR ANY RADIO OR TV INTERFERENCE CAUSED BY UNAUTHORIZED MODIFICATIONS TO THE DEVICE. ANY SUCH MODIFICATIONS COULD VOID THE USER’S AUTHORITY TO OPERATE THE EQUIPMENT.
EN-28

TRADEMARK INFORMATION
© 2015 World Wide Licenses Limited.
® The iON logo is a registered trademark of World Wide Licenses Limited.
Questions?
Need Some Help?
This manual should help you understand your new product.
If you still have |
Like Us: |
questions, |
www.facebook.com/ioncamera |
visit our website: |
Tweet Us: |
www.ioncamera.com |
www.twitter.com/ioncamera |
|
|
EN-29

Kurzanleitung
DashCam AUTOKAMERA
DE-1
 Loading...