


LC 247iX, LC 347iVX, LC 353iVX
EN |
Operator's manual |
7-24 |
BG |
Ръководство за експлоатация |
25-46 |
CS |
Návod k použití |
47-65 |
DA |
Brugsanvisning |
66-84 |
DE |
Bedienungsanweisung |
85-105 |
EL |
Οδηγίες χρήσης |
106-127 |
ES |
Manual de usuario |
128-147 |
ET |
Kasutusjuhend |
148-165 |
FI |
Käyttöohje |
166-183 |
FR |
Manuel d'utilisation |
184-204 |
HR |
Priručnik za korištenje |
205-223 |
HU |
Használati utasítás |
224-243 |
IT |
Manuale dell'operatore |
244-262 |
JA |
|
263-280 |
LT |
Operatoriaus vadovas |
281-299 |
LV |
Lietošanas pamācība |
300-319 |
NL |
Gebruiksaanwijzing |
320-339 |
NO |
Bruksanvisning |
340-357 |
PL |
Instrukcja obsługi |
358-379 |
PT |
Manual do utilizador |
380-399 |
RO |
Instrucţiuni de utilizare |
400-419 |
RU |
Руководство по эксплуатации |
420-442 |
SK |
Návod na obsluhu |
443-461 |
SL |
Navodila za uporabo |
462-480 |
SR |
Priručnik za rukovaoca |
481-500 |
SV |
Bruksanvisning |
501-518 |
TR |
Kullanım kılavuzu |
519-536 |
UK |
Посібник користувача |
537-558 |
ZH |
|
559-573 |

1
1 |
3 |
LC 347IVX |
|
|
|
||
2 |
|
LC 353IVX |
|
|
|
|
|
|
|
|
22 |
|
4 |
|
|
|
5 |
24 |
|
|
|
9 |
|
|
|
6 |
|
|
7 |
|
|
|
|
8 |
23 |
1
15
14
13
11
18 20
21
19
16 10 12 17
2 |
3 |
8 |
9 |
14 |
15 |
20 |
|
4 |
10 |
16 |
5 |
6 |
7 |
11 |
12 |
13 |
17 |
18 |
19 |

21 |
22 |
23 |
24 |
25 |
26 |
27 |
28 |

29 |
31 |
33 |
35 |
30 |
32 |
34 |
36 |
37 |
38 |
B |
A
39 |
40 |
41 |
42 |
|
B |
|
A |
43 |
44 |
45
47
49
46
48

Contents
Introduction................................................................... |
7 |
Safety............................................................................. |
9 |
Assembly..................................................................... |
16 |
Operation..................................................................... |
16 |
Maintenance................................................................ |
18 |
Troubleshooting......................................................... |
20 |
Transportation, storage and disposal...................... |
21 |
Technical data............................................................. |
21 |
EC Declaration of Conformity.................................... |
24 |
Registered trademarks............................................... |
24 |
Introduction
Product description
The product is a pedestrian-controlled rotary lawn mower. The grass is collected in a grass catcher. Remove the grass catcher to get rear discharge of the grass. Attach a mulch kit (accessory) to cut the grass into fertilizer.
Intended use
Use the product to cut grass in private gardens. Do not use the product for other tasks.
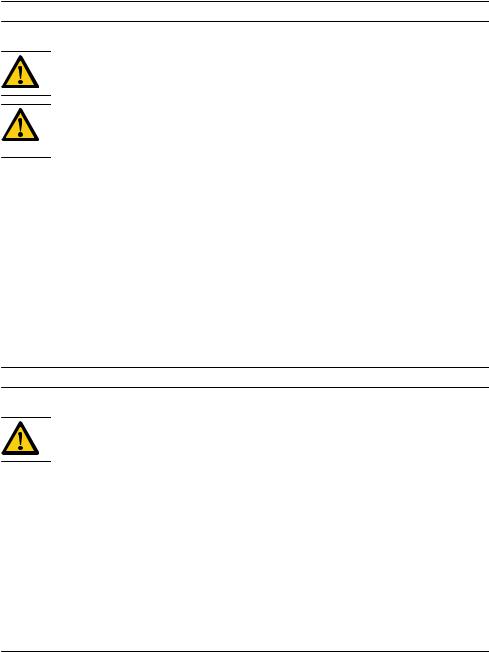
Product overview
(Fig. 1)
1.Control panel
2.Motor brake handle
3.Start inhibitor
4.Grass catcher
5.Rear cover
6.Safety key
7.Handle knob
8.Battery cover
9.Cutting height control
10.ON/OFF button
11.Indicator for Bluetooth® wireless technology
12.SavE button
13.SavE indicator
14.Battery indicator
15.Speed level indicator (LC 347iVX, LC 353iVX)
16.Decrease speed button (LC 347iVX, LC 353iVX)
17.Increase speed button (LC 347iVX, LC 353iVX)
18.Error LED
19.Cutting cover
20.Operator's manual
21.Rating plate
22.Drive bail (LC 347iVX, LC 353iVX)
23.Battery charger (Accessory)
24.Battery (Accessory)
Symbols on the product
(Fig. 2) Warning: Not careful or incorrect use can result in
(Fig. 3)
(Fig. 4)
(Fig. 5)
(Fig. 6)
(Fig. 7)
injury or death for the operator or others.
Read the operator's manual carefully and make sure that you understand the instructions before use.
Keep persons and animals at a safe distance from the work area.
Look out for thrown objects and ricochets.
Warning: Keep hands and feet away from the rotating blade.
Warning: Keep hands and feet away from rotating parts.
890 - 002 - 21.12.2018 |
7 |

(Fig. 8)
(Fig. 9) (Fig. 10)
(Fig. 11)
(Fig. 12)
(Fig. 13)
(Fig. 14)
(Fig. 15)
Remove the safety key before you do repair work or maintenance.
Do not expose to rain.
The product or package of the product is not domestic waste. Recycle it at a recycling station for electrical and electronic equipment.
The product agrees with applicable EC directives.
The product agrees with applicable Eurasian Customs Union directives.
The product agrees with applicable UkrSEPRO directives.
The product agrees with applicable RCM directives. Applies to AU/NZ only
Noise emission to the environment according to the European Community’s Directive. The product’s emission is specified in the Technical
|
data chapter and on the |
|
label. |
(Fig. 16) |
The product is drip |
|
protected. |
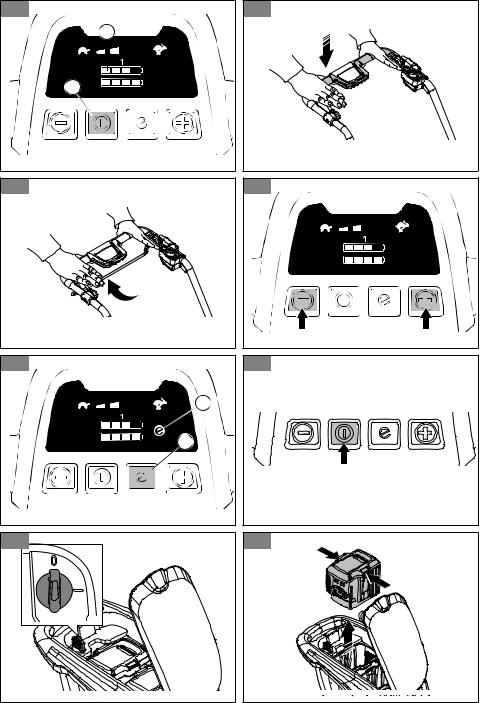
(Fig. 20) |
Start procedure: push the |
|
ON/OFF button, loosen |
|
the start inhibitor, push |
|
the motor brake handle |
|
down. |
(Fig. 17) |
Release the motor brake |
|
handle to stop. |
(Fig. 18) |
Slow |
(Fig. 19) |
Fast |
Note: Other symbols/decals on the product refer to certification requirements for some markets.
Label on the product
(Fig. 21)
Keep hands and feet away from the rotating blades.
Product liability
As referred to in the product liability laws, we are not liable for damages that our product causes if:
•the product is incorrectly repaired.
•the product is repaired with parts that are not from the manufacturer or not approved by the manufacturer.
•the product has an accessory that is not from the manufacturer or not approved by the manufacturer.
•the product is not repaired at an approved service center or by an approved authority.
8 |
890 - 002 - 21.12.2018 |

Safety
Safety definitions
Warnings, cautions and notes are used to point out specially important parts of the manual.
WARNING: Used if there is a risk of injury or death for the operator or bystanders if the instructions in the manual are not obeyed.
CAUTION: Used if there is a risk of damage to the product, other materials or the adjacent area if the instructions in the manual are not obeyed.
Note: Used to give more information that is necessary in a given situation.
General safety instructions
WARNING: Read the warning instructions that follow before you use the product.
•This product is dangerous if used incorrectly or if you are not careful. Injury or death can
occur if you do not obey the safety instructions.
•This product produces an electromagnetic field during operation. This field may under some circumstances interfere with active or passive medical implants. To reduce the risk of serious or fatal injury we recommend persons with medical implants to consult their physician and the medical implant manufacturer before operating this product.
•Always be careful and use your common sense. If you are not sure how to operate the product in a special situation, stop and speak to your Husqvarna dealer before you continue.
•Keep in mind that the operator will be held responsible for accidents that involve other persons or their property.
•Keep the product clean. Make sure that you can clearly read signs and decals.
•Do not let a person use the product unless you make sure that they read and understand the contents of the operator's manual.
890 - 002 - 21.12.2018 |
9 |
•Do not let a child operate the product.
•Do not let a person, without knowledge of the instructions, operate the product.
•Always monitor a person, with decreased physical capacity or mental capacity, that uses the product. A responsible adult must be there at all times.
•Do not use the product if you are tired, ill, or under the influence of alcohol, drugs or medicine. This has a negative effect on your vision, alertness, coordination and judgment.
•Do not use the product if it is defective.
•Do not change this product or use it if it is possible that it has been changed by others.
Work area safety
WARNING: Read the warning instructions that follow before you use the product.
•Remove objects such as branches, twigs and stones from the work area before you use the product.
•Objects that hit against the cutting equipment can eject and cause damage to persons
and objects. Keep bystanders and animals at a safe distance from the product.
•Never use the product in bad weather such as fog, rain, strong winds, intense cold and risk of lightning. To use the product in bad weather or in moist or wet locations is tiring. Bad weather can cause dangerous conditions, such as slippery surfaces.
•Look out for persons, objects and situations that can prevent safe operation of the product.
•Look out for obstacles, such as roots, stones, twigs, pits and ditches. Long grass can hide obstacles.
•To cut grass on slopes can be dangerous. Do not use the product on ground that slopes more than 15°.
•Operate the product across the face of slopes. Do not move up and down.
•Be careful when you go near hidden corners and objects that prevent a clear view.
Work safety
WARNING: Read the warning instructions that follow before you use the product.
10 |
890 - 002 - 21.12.2018 |
•Use this product to cut grass lawns only. It is not permitted to use it for other tasks.
•Use personal protective equipment. Refer to Personal protective equipment on page 12.
•Make sure that you know how to stop the motor quickly in an emergency.
•Do not operate the product in rain or wet conditions. The risk of electrical shock increases if water enters the product.
•Do not operate the product unless the blade and all covers are attached correctly. An incorrectly attached blade can come loose and cause personal injury.
•Make sure that the blade does not hit objects such as stones and roots. This can do damage to the blade and bend the motor shaft. A bent axle causes heavy vibration and a very high risk that the blade becomes loose.
•If the blade hits an object or if vibrations occur, stop the product immediately. Stop the motor, turn the safety key to 0 and remove the battery. Examine the product for damages. Repair damages or
let an authorised service agent do the repair.
•Never attach the motor brake handle permanently to the handle when the motor is started.
•Put the product on a stable, flat surface and start it. Make sure that the blade does not hit the ground or other objects.
•Always stay behind the product when you operate it.
•Let all the wheels stay on the ground and keep 2 hands on the handle when you operate the product. Keep your hands and feet away from the rotating blades.
•Do not tilt the product when the motor is started.
•Be careful when you pull the product rearward.
•Never lift up the product when the motor is started. If you must lift the product, first stop the motor, turn the safety key to 0 and remove the battery.
•Do not walk rearward when you operate the product.
•Stop the motor when you move across areas without grass, for example paths made of gravel, stone and asphalt.
•Do not run with the product when the motor is started.
890 - 002 - 21.12.2018 |
11 |
Always walk when you operate the product.
•Stop the motor before you change the cutting height. Never make adjustments with the motor started.
•Never let the product stay out of view with the motor started. Stop the motor and make sure that the cutting equipment does not rotate.
Safety instructions for operation
Personal protective equipment
WARNING: Read the warning instructions that follow before you use the product.
•Personal protective equipment cannot fully prevent injury but it decreases the degree of injury if an accident does occur. Let your dealer help you select the right equipment.
•Use heavy-duty slip-resistant boots or shoes. Do not use open shoes or go with bare feet.
•Use heavy, long pants.
•Use protective gloves when necessary, for example when you attach, examine or clean the cutting equipment.
Safety devices on the product
WARNING: Read the warning instructions that follow before you use the product.
•Do not use a product with defective safety devices.
•Do a check of the safety devices regularly. If the safety devices are defective, speak to your Husqvarna service agent.
To do a check of the cutting cover
The cutting cover decreases vibrations in the product and decreases the risk of injury from the blade.
•Examine the cutting cover to make sure that there are no damages such as cracks.
Safety key
The safety key is below the battery lid. The safety key connects the battery that supplies the motor with power.
•Start and stop the motor to do a check of the safety key.
•If the safety key operates correctly, the motor can only start when the safety key is in position 1.
12 |
890 - 002 - 21.12.2018 |

(Fig. 22)
Motor brake handle
The motor brake handle stops the motor. When the motor brake handle is released, the motor stops.
To do a check of the motor brake, start the motor and then release the motor brake handle. If the motor does not stop in 3 seconds, let an approved Husqvarna service agent adjust the motor brake.
(Fig. 23)
To examine the start inhibitor
Do a check of the start inhibitor to make sure that it prevents operation of the motor.
1.Push the motor brake handle in the direction of the handlebar. The start inhibitor stops the movement.
2.Push the start inhibitor out. (Fig. 24)
3.Release the start inhibitor and make sure that it goes back to its initial position.
Battery safety
WARNING: Read the warning instructions that
follow before you use the product.
•Use Husqvarna rechargeable batteries as a power supply for related Husqvarna products only. To prevent injury, do not use the battery as a power supply for other devices.
•Do not use non-rechargeable batteries.
•Risk of electrical shock. Do not connect the battery terminals to keys, coins, screws or other metal. This can cause a short circuit of the battery.
•Do not put objects into the air slots of the battery.
•Keep the battery away from sunlight, heat or open flame. The battery can explode and cause burns and/or chemical burns.
•Keep the battery away from rain and wet conditions.
•Keep the battery away from microwaves and high pressure.
•Do not try to disassemble or break the battery.
•If the battery leaks, do not let the liquid touch your body or eyes. If you have touched the liquid, clean the area with a large quantity of water and get medical aid.
890 - 002 - 21.12.2018 |
13 |

•Use the battery in temperatures between -10°C and 40°C.
•Do not clean the battery or the battery charger with water. See To clean the battery and the battery charger on page 19.
•Do not use a defective or damaged battery.
•Keep batteries in storage away from metal objects such as nails, coins, jewellery.
Battery charger safety
WARNING: Read the warning instructions that follow before you use the product.
•Use the QC battery chargers to charge Husqvarna replacement batteries only.
•Risk of electrical shock or short circuit. Do not put objects into the air slots of the charger. Do not try to disassemble the battery charger. Do not connect the charger terminals to metal objects. Use an approved mains socket.
•This product produces an electromagnetic field during operation. This field may under some circumstances
interfere with active or passive medical implants. To reduce the risk of serious or fatal injury, we recommend persons with medical implants to consult their physician and the medical implant manufacturer before operating this product.
•Regularly make sure that the power cord of the battery charger is not damaged and that there are no cracks in it.
•Do not lift the battery charger by the power cord. To disconnect the battery charger from a mains socket, pull out the plug. Do not pull the power cord.
•Keep the power cord and extension cables away from water, oil and sharp edges. Make sure that the cable is not pinched in doors, fences or equivalent. It can cause the charger to become energized.
•Do not clean the battery charger with water.
•The battery charger can be used by children aged from 8 years and above and persons with reduced physical, sensory, or mental capabilities or lack of experience and knowledge if they have been given supervision or instruction concerning use of
14 |
890 - 002 - 21.12.2018 |

the battery charger in a safe way and understand the hazards involved. Children shall not play with the battery charger. Cleaning and user maintenance shall not be made by children without supervision.
•Do not charge nonrechargeable batteries in the battery charger.
•Do not use the battery charger near flammable materials or materials that can cause corrosion. Do not cover the battery charger. Pull out the plug to the battery charger if there is smoke or fire.
•Do not use a defective or damaged battery charger.
•Only charge the battery indoors in a room with good airflow and away from sunlight. Do not charge the battery in wet conditions.
Safety instructions for maintenance
WARNING: Read the warning instructions that follow before you use the product.
•To prevent accidental start during maintenance, turn the safety key to 0 and remove the
battery. Wait at minimum 5 seconds before you start the maintenance.
•Do the maintenance work correctly to increase the lifetime of the product and decrease the risk of accidents. Let an approved service agent do the professional repairs. Speak to your nearest service agent for more information.
•Only do the maintenance work written in this operator's manual. More extensive work must be done by an approved service agent.
•Put on heavy duty gloves when you use the cutting equipment. The blade is very sharp and cuts can easily occur.
•Keep the cutting edges sharp and clean for the best and safest performance.
•Let your service agent regularly examine the product and make necessary adjustments and repairs.
•Replace damaged, worn or broken parts.
•Obey the instructions for how to change accessories. Only use accessories from the manufacturer.
•When not in operation, keep the product, battery and
890 - 002 - 21.12.2018 |
15 |
battery charger apart in a dry, indoor and locked area. Make sure that children and persons
that are not approved cannot get access to the product, battery or battery charger.
Assembly
Introduction
WARNING: Before you assemble the product, read the safety chapter.
WARNING: To prevent accidental start during assembly, turn the safety key to 0, remove the battery and wait at minimum 5 seconds.
To assemble the handle
1.Loosen the lower knobs.
2.Move the knobs to the lower end of the grooves on the left and the right side of the product. (Fig. 25)
3.Set the handle height in one of the 2 available positions.
4.Move the knobs up in the direction of the handle until they stop and you hear a click. (Fig. 26)
5.Tighten the knobs fully.
To assemble the grass catcher
1.Attach the grass catcher frame to the grass bag with the rigid part of the bag on the bottom. Keep the handle of the frame on top of the grass bag. (Fig. 27)
2.Attach the bottom section of the grass catcher frame in the groove on the bottom of the grass catcher.
3.Attach the grass bag to the grass catcher frame with the clips. (Fig. 28)
4.Lift the rear cover.
5.Attach the grass catcher to the top edge of the chassis.
6.Put the lower part of the grass catcher into the grass discharge channel. (Fig. 29)
To assemble the mulch plug (accessory)
1.Lift up the rear cover and remove the grass catcher.
2.Put the mulch plug into the discharge channel. (Fig. 30)
3.Replace the blade with the mulch blade that is supplied in the mulch kit. Refer to To remove and replace the blade on page 19.
Operation
Introduction
WARNING: Before you operate the product, you must read and understand the safety chapter.
Husqvarna Connect
The product has Bluetooth® wireless technology and can connect to mobile devices that have the Husqvarna Connect app installed. Husqvarna Connect is a free app for your mobile device. The Husqvarna Connect app gives extended functions for your Husqvarna product.
To start to use Husqvarna Connect
1.Download the Husqvarna Connect app on your mobile device.
2.Register in the Husqvarna Connect app.
3.Do the instruction steps in the Husqvarna Connect app to connect and register the product.
Bluetooth® wireless technology
The symbol for Bluetooth® wireless technology comes on when your mobile device is connected to the product.
(Fig. 31)
To set the product in operation position
1.Fold the handle to upright position. (Fig. 32)
2.Move the knobs up in the direction of the handle until they stop and you hear a click. (Fig. 26)
3.Tighten the knobs fully.
To set the cutting height
The cutting height can be adjusted in 6 levels.
16 |
890 - 002 - 21.12.2018 |

1.Move the cutting height lever down to decrease the cutting height.
2.Move the cutting height lever up to increase the cutting height. (Fig. 33)
CAUTION: Do not set the cutting height too low. The blades can hit the ground if the surface of the lawn is not level.
Battery
WARNING: Before you use the battery, you must read and understand the safety chapter. You must also read and understand the operator's manual for the battery and the battery charger.
Battery status
The display shows the remaining battery capacity and if there are problems with the battery. The battery capacity is shown for 5 seconds after the product is switched off or the battery indicator button is pressed. The warning symbol on the battery is on when an error has occurred. See Battery on page 20.
(Fig. 34)
LED lights |
Battery status |
|
|
All LEDs are lit |
Fully charged (75-100%) |
|
|
LED 1, LED 2, LED 3 are |
The battery is 50%-75% |
lit |
charged |
|
|
LED 1, LED 2 are lit |
The battery is 25%-50% |
|
charged |
|
|
LED 1 is lit |
The battery is 0%-25% |
|
charged. |
|
|
LED 1 flashes |
The battery is empty. |
|
Charge the battery. |
|
|
To charge the battery
Charge the battery before the first use. The battery is only 30% charged when supplied to the customer.
Note: The battery charger must be connected to the voltage and frequency specified on the rating plate.
The battery does not charge if the battery temperature is above 50°C. The battery charger decreases the temperature of the battery before it starts to charge.
1.Connect one end of the power cord for the battery charger into the socket of the battery charger.
2.Connect the other end of the power cord for the battery charger in an grounded mains socket. The LED on the battery charger flashes green one time. (Fig. 35)
3.Put the battery in the battery charger. The green light on the charger comes on when the battery is correctly connected to the battery charger. (Fig. 36)
4.When all LEDs on the battery have come on the battery is fully charged. Charge the battery for maximum 24 hours.
5.To disconnect the battery charger from the mains socket, pull the plug, not the power cord.
6.Remove the battery from the battery charger.
Battery charging status
A Husqvarna Li-ion battery can be charged or used at all charging levels. The battery is not damaged. A fully charged battery will not decrease its charge when the battery is left in the charger.
LED display |
Charging status |
|
|
LED 1 flashes |
0%-25% |
|
|
LED 1 is lit, LED 2 flashes |
25%-50% |
|
|
LED 1, LED 2 are lit, LED |
50%-75% |
3 flashes |
|
|
|
LED 1, LED 2, LED 3 are |
75%-100% |
lit, LED 4 flashes |
|
|
|
LED 1, LED 2, LED 3, |
Fully charged |
LED 4 are lit |
|
|
|
To start the product
1.Open the battery lid.
2.Put a charged battery in 1 of the battery holders. For longer operation time, put a second charged battery in the other battery holder.
3.Turn the safety key to 1. (Fig. 22)
4.Stay behind the product.
5.Push the ON/OFF button (A) on the control panel. The display comes on. The battery indicator (B) shows the battery charge of the 2 batteries. The number of the battery that operates is shown adjacent to the battery indicator. For models
LC 347iVX, LC 353iVX, the display also shows the set speed. (Fig. 37)
6.Loosen the start inhibitor. (Fig. 24)
7.Push the motor brake handle in the direction of the handlebar. (Fig. 38)
To use the drive on the wheels (LC 347iVX, LC 353iVX)
•Pull the drive bail in the direction of the handlebar to start the drive. (Fig. 39)
•Push + and - on the control panel to set the drive speed in 4 steps. (Fig. 40)
•Release the drive bail to disengage the drive, for example when you go near an obstacle.
890 - 002 - 21.12.2018 |
17 |

To use the SavE function
The product has a battery saving function (SavE) that gives longer operation time.
1.Push the SavE button (A) to start the function. The SavE symbol (B) on the display comes on.
2.Push the SavE button again to stop the function. The SavE symbol (B) on the display goes out. (Fig. 41)
The SavE function stops automatically if the ground conditions make it necessary to have a higher output. The SavE function starts automatically again when the ground conditions let it.
High load function
When the product cuts long or wet grass, the motor automatically increases rpm. The motor goes back to standard mode when high load is not necessary.
To stop the product
The product stops automatically if you do not operate it for 10 minutes. Always turn the safety key to 0 before you let the product out of view.
1.Release the motor brake handle to stop the motor. (Fig. 23)
2.Push the ON/OFF button on the control panel. All LED lights and symbols on the display go out. (Fig. 42)
3.Open the battery lid and turn the safety key to 0. (Fig. 43)
4.To remove the battery, push the 2 release buttons and pull out the battery. (Fig. 44)
5.Charge the battery if it is weak. For more information, refer to To charge the battery on page 17.
To get a good result
•Always use a sharp blade. A blunt blade gives an irregular result and the cut surface of the grass becomes yellow. A sharp blade also uses less energy than a blunt blade.
•Do not cut more than ⅓ of the length of the grass. Cut first with the cutting height set high. Examine the result and lower the cutting height to an applicable level. If the grass is very long, drive slowly and cut 2 times if necessary.
•Cut in different directions each time to prevent stripes in the lawn.
To cut grass without a grass catcher or mulch plug attached
•Lift up the rear cover and remove the grass catcher.
•If a mulch plug and a mulch blade are attached, remove them.
•Close the rear cover before you operate the product.
When you operate the product, the cut grass discharges below the rear cover.
Maintenance
Introduction
WARNING: Before you do maintenance, you must read and understand the safety chapter.
For all servicing and repair work on the product, special training is necessary. We guarantee the availability of professional repairs and servicing. If your dealer is not a service agent, speak to them for information about the nearest service agent.
Maintenance schedule
The maintenance intervals are calculated from daily use of the product. The intervals change if the product is not used daily.
For maintenance identified with * see instructions in
Safety instructions for operation on page 12.
|
Each |
Monthly |
Each |
|
use |
season |
|
|
|
|
|
Do a general inspection |
X |
|
|
|
|
|
|
Clean the product |
X |
|
|
|
|
|
|
Do a check of the start inhibitor * |
X |
|
|
|
|
|
|
Make sure that the safety devices on the product are not defective * |
X |
|
|
|
|
|
|
Examine the cutting equipment |
X |
|
|
|
|
|
|
Examine the cutting cover * |
X |
|
|
|
|
|
|
18 |
890 - 002 - 21.12.2018 |
|
Each |
Monthly |
Each |
|
use |
season |
|
|
|
|
|
Do a check of the motor brake handle * |
X |
|
|
|
|
|
|
Make sure that the ON/OFF button operates correctly and is not defective |
X |
|
|
|
|
|
|
Examine the battery for damage |
X |
|
|
|
|
|
|
Do a check of the battery charge |
X |
|
|
|
|
|
|
Make sure that the release buttons on the battery operates correctly and that the |
X |
|
|
battery locks into the product |
|
|
|
|
|
|
|
|
|
|
|
Examine the battery charger for damage and make sure that it operates correct- |
|
X |
|
ly. |
|
|
|
|
|
|
|
|
|
|
|
Examine the connections between the battery and the product. Also examine the |
|
|
X |
connection between the battery and the battery charger. |
|
|
|
|
|
|
|
|
|
|
|
To do a general inspection
•Make sure that the nuts and screws on the product are tightened.
•Make sure that the cables on the product are not in a position where they can get damaged.
To clean the product
•Clean plastic parts with a clean and dry cloth.
•Do not use water to clean the product. Water can enter the battery or the motor and cause short circuit or damage to the product.
•Do not use a high pressure washer to clean the product.
•Do not flush water directly on the motor.
•Use a brush to remove leaves, grass and dirt.
WARNING: Use protective gloves when you do maintenance on the cutting equipment. The blade is very sharp and cuts can easily occur.
1.Examine the cutting equipment for damage or cracks. Always replace a damaged cutting equipment.
2.Look at the blade to see if it is damaged or blunt.
Note: It is necessary to balance the blade after it is sharpened. Let a service center sharpen, replace and balance the blade. If you hit an obstacle that causes the product to stop, replace the damaged blade. Let the service center estimate if the blade can be sharpened or must be replaced.
To clean the battery and the battery charger
CAUTION: Do not clean the battery or the battery charger with water.
•Make sure that the battery and the battery charger are clean and dry before you put the battery into the battery charger.
•Clean the battery terminals with compressed air or use a soft and dry cloth.
•Clean the surfaces of the battery and the battery charger with a soft and dry cloth.
To examine the cutting equipment
WARNING: To prevent accidental start, turn the safety key to 0, remove the battery and wait a minimum 5 seconds.
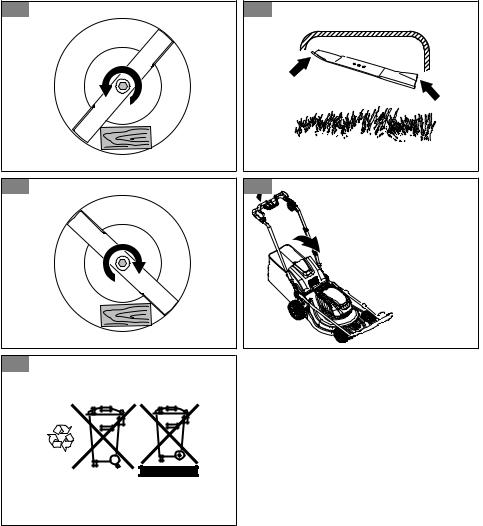
To remove and replace the blade
1.Lock the blade with a block of wood. (Fig. 45)
2.Remove the blade bolt.
3.Remove the blade.
4.Examine the blade support and blade bolt to see if there are damages.
5.Examine the motor shaft to make sure that it is not bent.
6.When you attach the new blade, point the angled ends of the blade in the direction of the cutting cover. (Fig. 46)
7.Make sure that the blade is aligned with the center of the motor shaft.
8.Lock the blade with a block of wood. Attach the spring washer and tighten the bolt and washer with a torque of 23–28 Nm. (Fig. 47)
9.Pull the blade around by hand and make sure that it turns freely.
890 - 002 - 21.12.2018 |
19 |

WARNING: Use heavy duty gloves. The blade is very sharp and cuts can easily occur.
10.Start the product to do a test of the blade. If the blade is not correctly attached, there is vibration in the product or the cutting result is unsatisfactory.
Troubleshooting
Battery
LED on the battery |
Possible faults |
Possible procedure |
|
|
|
The green LED is flash- |
The battery voltage is low |
Charge the battery. See To charge the battery on |
ing |
|
page 17. |
|
|
|
The error LED flashes |
The battery is weak |
Charge the battery. See Battery on page 20. |
|
|
|
|
The temperature in the work environ- |
Use the battery in temperatures between -10°C |
|
ment is too high or too low |
and 40°C. |
|
|
|
|
Overvoltage |
Check that the mains voltage is the same as on |
|
|
the rating plate on the product. |
|
|
|
|
|
Remove the battery from the battery charger. Wait |
|
|
5 seconds and try again to charge the battery. If |
|
|
the problem continues, speak to an authorised |
|
|
service agent. |
|
|
|
The error LED is on |
Cell difference too much (1V) |
Speak to an approved service agent. |
|
|
|
Battery charger
LED on the battery |
Possible faults |
Possible procedure |
charger |
|
|
|
|
|
The error LED flash- |
The temperature in the work en- |
Use the battery charger in temperatures between 5°C |
es |
vironment is too high or too low |
and 40°C. |
|
|
|
The error LED is on |
|
Speak to an approved service agent |
|
|
|
Control panel
Keypad |
Error code (Num- |
Possible faults |
Possible action |
|
ber of flashes) |
|
|
|
|
|
|
Error LED flashes |
3 |
The motor is overloaded |
Increase the cutting height. Refer to To |
|
|
|
set the cutting height on page 16. |
|
5 |
The motor speed drops too |
|
|
|
||
|
|
much, and the motor stops |
|
|
|
|
|
|
10 |
The motor control is too hot |
Stop the motor and wait until it has be- |
|
|
|
come cool |
|
|
|
|
|
2 |
The blade is blocked |
To prevent accidental start turn the safe- |
|
|
|
ty key to 0, remove the battery and wait |
|
|
|
a minimum 5 seconds. Make sure that |
|
|
|
the blade can rotate freely. If the prob- |
|
|
|
lem continues, speak to an authorised |
|
|
|
service agent |
|
|
|
|
|
9 |
Battery error or no signal from |
Put the battery in the product correctly |
|
|
battery |
and examine the battery connector. If the |
|
|
|
error LED on the battery flashes. Refer |
|
|
|
to Battery on page 17. |
|
|
|
|
20 |
890 - 002 - 21.12.2018 |
Keypad |
Error code (Num- |
Possible faults |
Possible action |
|
ber of flashes) |
|
|
|
|
|
|
The product stops |
8 |
The battery is weak |
Charge the battery. Refer to To charge |
|
|
|
the battery on page 17. |
|
|
|
|
|
0 |
Battery connector failure |
Examine the battery connector |
|
|
|
|
Other errors |
If other errors occur, turn the safety key to 0, remove the battery and speak to an approved |
||
|
service agent. |
|
|
|
|
|
|
Transportation, storage and disposal
Introduction
WARNING: To prevent unintentional start during transport turn the safety key to ”0”, remove the battery and wait at least 5 seconds.
To set the product in transport position
1.Loosen the lower knobs.
2.Move the knobs to the lower end of the grooves on the left and the right side of the product. (Fig. 25)
3.Fold the handle forward. (Fig. 48)
4.Remove the grass catcher.
Transportation
•The Dangerous Goods Legislation requirements apply to the contained Li-ion batteries.
•For commercial transports special requirements on package and labels must be obeyed.
•Make sure that you obey the regulations for dangerous material when you prepare the product for transport. Local regulations can apply.
•Always remove the battery for transport.
•Put tape on the battery connectors and make sure that the battery cannot move around during transport.
•Attach the product during transport.
Storage
•Always remove the battery for storage.
•To prevent accidents, make sure that the battery is not connected to the product during storage.
•Keep the battery charger in a closed and dry space.
•Keep the battery and the battery charger in a dry space where there is no moisture or frost.
•Disconnect the battery from the battery charger during storage.
•Do not keep the battery where static electricity can occur. Do not keep the battery in a metal box.
•Keep the battery where the temperature is between 5°C and 25°C and out of sunlight.
•Keep the battery charger where the temperature is between 5°C and 45°C and out of sunlight.
•Make sure that the battery is charged to 30% - 50% before you put it in storage for long periods.
•Keep the product, battery and battery charger in a locked area out of reach for children and not approved persons.
•Clean the product and do a complete servicing before you put the product in storage for a long time.
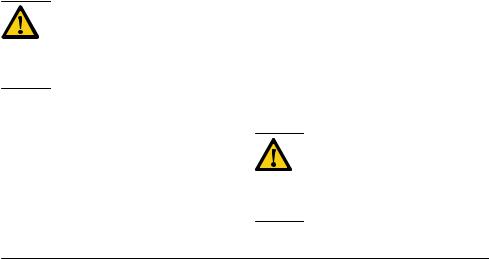
Disposal
Symbols on the product or the packaging of the product indicate that this product cannot be handled as domestic waste. It must be submitted to an appropriate recycling station for the recovery of electrical and electronic equipment.
By ensuring that this product is taken care of correctly, you can help to counteract the potential negative impact on the environment and people that can otherwise result through the incorrect waste management of this product. For more detailed information about recycling this product, contact your municipality, your domestic waste service or the shop from where you purchased the product.
(Fig. 49)
Technical data
Technical data
|
LC 247iX |
LC 347iVX |
LC 353iVX |
|
|
|
|
Cutting motor
890 - 002 - 21.12.2018 |
21 |

|
LC 247iX |
LC 347iVX |
LC 353iVX |
|
|
|
|
Motor type |
BLDC (brushless) |
BLDC (brushless) |
BLDC (brushless) |
|
36V |
36V |
36V |
|
|
|
|
Motor speed – SavE, rpm |
2600 |
2600 |
2600 |
|
|
|
|
Motor speed – Nominal, rpm |
3000 |
3000 |
3000 |
|
|
|
|
Motor speed – High load, rpm |
3500 |
3500 |
3500 |
|
|
|
|
Motor output – max. kW |
0.96 |
0.96 |
1.05 |
|
|
|
|
Motor output – Nominal, kW |
0.75 |
0.75 |
0.9 |
|
|
|
|
Drive motor |
|
|
|
|
|
|
|
Motor output – Nominal, kW |
N/A |
0.25 |
0.25 |
|
|
|
|
Self walk speed, km/h |
N/A |
3.0–4.5 |
3.0–4.5 |
|
|
|
|
Speed adjustment levels |
N/A |
4 |
4 |
|
|
|
|
Weight |
|
|
|
|
|
|
|
Weight without battery, kg |
24 |
26 |
28 |
|
|
|
|
Battery |
|
|
|
|
|
|
|
Type of battery |
Husqvarna Battery |
Husqvarna Battery |
Husqvarna Battery |
|
Series |
Series |
Series |
|
|
|
|
Battery runtime |
|
|
|
|
|
|
|
Battery runtime, min, (free run) with SavE ac- |
43 |
43 |
32 |
tivated, with one Husqvarna 5.2 Ah battery |
|
|
|
(Bli200). |
|
|
|
|
|
|
|
Battery runtime, min, (free run) with standard |
30 |
30 |
20 |
mode activated, with one Husqvarna 5.2 Ah |
|
|
|
battery (Bli200). |
|
|
|
|
|
|
|
Noise emissions 1 |
|
|
|
Sound power level, measured dB (A) |
92 |
92 |
94 |
|
|
|
|
Sound power level, guaranteed LWA dB (A) |
93 |
93 |
95 |
Sound levels 2 |
|
|
|
Sound pressure level at the operator's ear, |
79 |
79 |
82 |
dB (A) |
|
|
|
|
|
|
|
Vibration levels 3 |
|
|
|
Handle, m/s2 |
0.42 |
0.42 |
2.64 |
Radio frequency data for Bluetooth® |
|
|
|
Frequency band, GHz |
2.4-2.4835 |
2.4-2.4835 |
2.4-2.4835 |
|
|
|
|
Output power, max. dBm |
4 |
4 |
4 |
|
|
|
|
1Noise emissions in the environment measured as sound power (LWA) in conformity with EC directive 2000/14/EC.
2 Reported data for noise pressure level has a typical statistical dispersion (standard deviation) of 1.2 dB (A).
3Reported data for vibration level has a typical statistical dispersion (standard deviation) of 0.2 m/s2. Vibration standard EN 60335-2-77:2017 chapter 20.105
22 |
890 - 002 - 21.12.2018 |

|
LC 247iX |
LC 347iVX |
LC 353iVX |
|
|
|
|
Cutting equipment |
|
|
|
|
|
|
|
Cutting height, mm |
20-75 mm |
20-75 mm |
20-75 mm |
|
|
|
|
Cutting width, cm |
47 |
47 |
53 |
|
|
|
|
Blade Standard |
Collect 5905934-10 |
Collect 5905934-10 |
Collect 5940757-10 |
|
|
|
|
Blade accessory |
Mulch 5907010-10 |
Mulch 5907010-10 |
Mulch 5950072-10 |
|
|
|
|
Grass catcher capacity, liters |
55 |
55 |
60 |
|
|
|
|
Approved batteries |
Type |
Battery capacity, |
Voltage, V |
Weight, lb/kg |
|
|
Ah |
|
|
|
|
|
|
|
BLi20 |
Lithium-ion |
4.0 |
36 |
2.6/1.2 |
|
|
|
|
|
BLi200 |
Lithium-ion |
5.2 |
36 |
2.8/1.3 |
|
|
|
|
|
BLi300 |
Lithium-ion |
9.4 |
36 |
4.1/1.9 |
|
|
|
|
|
Approved chargers for the specified batteries, BLi |
Input voltage, V |
Frequency, Hz |
Power, W |
|
|
|
|
QC80 |
100–240 |
50–60 |
80 |
|
|
|
|
QC80F |
12 |
0 |
80 |
|
|
|
|
QC330 |
100–240 |
50–60 |
330 |
|
|
|
|
QC500 |
100–240 |
50–60 |
500 |
|
|
|
|
890 - 002 - 21.12.2018 |
23 |

EC Declaration of Conformity
EC Declaration of Conformity
Husqvarna AB, SE-561 82 Huskvarna, Sweden, tel: +46-36-146500, declares that the lawn mower Husqvarna LC 247iX, LC 347iVX, LC 353iVX from the year 2018 and onwards, complies with the requirements of the COUNCIL’S DIRECTIVE:
•of June 8, 2011 on the “restriction of use of certain hazardous substances” 2011/65/EU
•of May 17, 2006 ”relating to machinery” 2006/42/EC
•of February 26, 2014 ”relating to electromagnetic compatibility” 2014/30/EU
•of May 8, 2000 ”relating to the noise emissions in the environment” 2000/14/EC
Information relating to noise emissions, see Technical data.
The following standards have been applied:
EN/IEC 60335-1, EN/IEC 60335-2-77, EN/IEC 62233, EN 55014-1, EN ETSI 301 489-7 v1.3.1, EN 61000-6, ETSI EN 61000-6-1, EN 300 328 BT low energy Tx/Rx, EN 50581
If not otherwise stated, the above listed standards are the latest published versions.
Notified body: 0359, Intertek Testing and Certification
Ltd. Davy Avenue, Knowlhill, Milton Keynes, MK5 8NL, United Kingdom has performed conformity assessment according to Annex VI of directive 2000/14/EC and issued a certificate with the number:71590 (LC 247iX, LC 347iVX), 71591 (LC 353iVX)
Huskvarna, 2018-12-20
Claes Losdal, Development Manager/Garden Products (Authorized representative for Husqvarna AB and responsible for technical documentation)
Registered trademarks
The Bluetooth® word mark and logos are registered trademarks owned by Bluetooth SIG, inc.and any use of such marks by Husqvarna is under license.
24 |
890 - 002 - 21.12.2018 |

Содержание
Въведение.................................................................. |
25 |
Отстраняване на проблеми..................................... |
41 |
Безопасност............................................................... |
27 |
Транспортиране, съхранение и изхвърляне....... |
42 |
Монтаж........................................................................ |
36 |
Технически данни..................................................... |
43 |
Операция.................................................................... |
37 |
Декларация за съответствие на ЕО....................... |
46 |
Поддръжка................................................................. |
39 |
Регистрирани търговски марки.............................. |
46 |
Въведение
Описание на продукта |
Предназначение |
Продуктът е пешеходна ротационна косачка. |
Използвайте продукта, за да косите трева в частни |
Тревата се събира в кош за трева. Свалете коша за |
градини. Не използвайте продукта за други задачи. |
трева, за да се получи задно разтоварване на |
|
тревата. Поставете комплект за мулчиране |
|
(допълнителна принадлежност), за да нарежете |
|
тревата в тора. |
|
Общ преглед на продукта
(Фиг. 1)
1.Пулт за управление
2.Ръкохватка за спирачката на двигателя
3.Инхибитор за стартиране
4.Кош за трева
5.Заден капак
6.Ключ за безопасност
7.Въртяща се ръкохватка
8.Капак на батерията
9.Управление на височината на рязане
10.Бутон за ВКЛ./ИЗКЛ.
11.Индикатор за Bluetooth® безжична технология
12.Бутон SavE
13.Индикатор за SavE
14.Индикатор за акумулатора
15.Индикатор за изравняване на скоростта
(LC 347iVX, LC 353iVX)
16.Бутон за намаляване на скоростта (LC 347iVX, LC 353iVX)
17.Бутон за увеличаване на скоростта (LC 347iVX, LC 353iVX)
18.Светодиод за грешка
19.Капак срещу порязване
20.Инструкция за експлоатация
21.Типова табелка
22.Дръжка за задвижване (LC 347iVX, LC 353iVX)
23.Зарядно устройство за акумулатор (Принадлежност)
24.Акумулатор (Принадлежност)
Символи върху машината
(Фиг. 2) Предупреждение: Непредпазливото или неправилното използване може да доведе до нараняване или смърт на оператора или други хора.
(Фиг. 3) Прочетете внимателно ръководството за оператора и се уверете, че разбирате инструкциите, преди да използвате машината.
(Фиг. 4) Дръжте хората и животните на безопасно разстояние от работната зона.
890 - 002 - 21.12.2018 |
25 |

(Фиг. 5)
(Фиг. 6)
(Фиг. 7)
(Фиг. 8)
(Фиг. 9) (Фиг. 10)
(Фиг. 1)
(Фиг. 12)
(Фиг. 13)
Пазете се от отскачащи предмети и рикошети.
Предупреждение: Дръжте ръцете и краката си далеч от въртящия се нож.
Предупреждение: Дръжте ръцете и краката си далеч от въртящи се части.
Отстранете ключа за безопасност преди извършването на поправка или поддръжка.
Не излагайте на дъжд.
Продуктът или опаковката на продукта не е битов отпадък. Рециклирайте го в пункт за рециклиране за електрическо и електронно оборудване.
Този продукт е в съответствие с приложимите директиви на EO.
Този продукт е в съответствие с приложимите директиви на Евразийския икономически съюз.
Този продукт е в съответствие с
приложимите директиви на UkrSEPRO.
(Фиг. 14) Този продукт е в съответствие с приложимите директиви на Устройства за наблюдение и контрол на остатъчен ток за битова и подобна употреба (RCM). Важи само за AU/NZ
(Фиг. 15) Шумови емисии в околната среда в съответствие с Директивата на Европейската общност Емисиите на продукта са посочени в раздела за технически характеристики и на табелката.
(Фиг. 16) Този продукт е защитен от капки.
(Фиг. 20) Процедура за пускане: натиснете бутона
ON/OFF (ВКЛ./ИЗКЛ.),
разхлабете инхибитора за стартиране, натиснете ръкохватката за спирачката на двигателя надолу.
(Фиг. 17) Освободете ръкохватката на
26 |
890 - 002 - 21.12.2018 |
спирачката на двигателя, за да спрете.
(Фиг. 18) Бавно (Фиг. 19) Бързо
Забележка: Останалите символи/стикери на продукта се отнасят до изисквания по отношение на сертификати за определени пазари.
Етикет върху продукта
(Фиг. 21)
Дръжте ръцете и краката си далеч от въртящите се ножове.
Отговорност за вреди, причинени от стоки
Както е посочено в законите за отговорност за вреди, причинени от стоки, ние не носим отговорност за щети, причинени от нашия продукт, ако:
•продуктът е неправилно ремонтиран.
•продуктът е ремонтиран с части, които не са от производителя или не са одобрени от производителя.
•продуктът има принадлежност, която не е от производителя или не е одобрена от производителя.
•продуктът не е ремонтиран в одобрен сервизен център или от одобрен орган.
Безопасност
Дефиниции за безопасност
Предупреждения, знаци за внимание и бележки се използват за указване на особено важни части на инструкцията.
ПРЕДУПРЕЖДЕНИЕ:
Използва се, ако има опасност от нараняване или смърт за оператора или за околните, ако не се спазват инструкциите в ръководството.
ВНИМАНИЕ: Използва се, ако има опасност от повреждане на машината, други материали или
съседната зона, ако не се спазват инструкциите в ръководството.
Забележка: Използва се за предоставяне на повече информация, която е необходима в дадена ситуация.
Общи инструкции за безопасност
ПРЕДУПРЕЖДЕНИЕ:
Прочетете следващите предупредителни указания, преди да използвате машината.
890 - 002 - 21.12.2018 |
27 |

•Този продукт е опасен, ако се използва неправилно или ако не сте внимателни.
Неспазването на инструкциите за безопасност може да доведе до нараняване или смърт.
•Тази машина създава електромагнитно поле по време на работа. При някои условия това поле може да интерферира с активни или пасивни медицински имплантанти. За да намалите риска от тежко или смъртоносно нараняване, ние препоръчваме лицата с медицински импланти да говорят с лекаря си и производителя на медицинския имплант, преди да започнат да работят с тази машина.
•Винаги бъдете внимателни и подхождайте разумно. Ако не сте сигурни как да работите с продукта при специална ситуация, спрете и се обърнете към Вашия дилър на Husqvarna,преди да продължите.
•Имайте предвид, че операторът носи отговорност за нещастни случаи, включващи други хора или тяхното имущество.
•Поддържайте продукта чист. Уверете се, че разчитате ясно знаците и стикерите.
•Не позволявайте на когото и да е да работи с продукта, докато не се уверите, че е прочел и разбрал съдържанието на инструкцията за експлоатация.
•Не позволявайте на деца да работят с продукта.
•Не позволявайте на лица, които не са запознати с инструкциите, да работят с продукта.
•Винаги наблюдавайте лица с намален физически или умствен капацитет, които използват продукта. През цялото време трябва да присъства отговорен възрастен.
•Не използвайте продукта, ако сте уморени, болни или под въздействието на алкохол, наркотици или лекарства. Това състояние оказва отрицателно въздействие върху Вашето зрение, бдителност, координация и преценка.
•Не използвайте продукта, ако е неизправен.
•Не променяйте този продукт или не го използвайте, ако
28 |
890 - 002 - 21.12.2018 |
има вероятност той да е бил променен от друг.
Безопасност на работната област
ПРЕДУПРЕЖДЕНИЕ:
Прочетете следващите предупредителни указания, преди да използвате машината.
•Отстранете препятствия като клони, пръчки и камъни от работната зона, преди да използвате продукта.
•Обектите, които се удрят в режещото оборудване, могат да бъдат изхвърлени и да причинят нараняване на лицата и щети на предметите. Дръжте страничните наблюдатели и животните на безопасно разстояние от продукта.
•Никога не използвайте продукта в лошо време – например при мъгла, дъжд, силни ветрове, много силен студ и риск от мълнии. Използването на продукта в лошо време или върху влажни или мокри терени е изморително. Лошото време може да създаде опасни условия, като например хлъзгави повърхности.
•Внимавайте за лица, предмети и ситуации, които могат да са причина за намаляване на безопасната работа на продукта.
•Внимавайте за препятствия като корени, камъни, клони, ями и канавки. Дългата трева може да крие препятствия.
•Косенето на трева на склон може да бъде опасно. Не работете с продукта, когато наклонът на повърхността е повече от 15°.
•Използвайте продукта напречно на склона. Не се движете нагоре и надолу.
•Внимавайте, когато преминавате покрай закриват ъгли и предмети, които скриват зрителното Ви поле.
Безопасност при работа
ПРЕДУПРЕЖДЕНИЕ:
Прочетете следващите предупредителни указания, преди да използвате машината.
•Използвайте този продукт само за косене на морави. Не се допуска използването му за други цели.
890 - 002 - 21.12.2018 |
29 |

•Използвайте лични предпазни средства. Вижте
Лични предпазни средства на страница 31.
•Уверете се, че знаете как бързо да спрете двигателя при аварийна ситуация.
•Не използвайте продукта при дъжд или влага. Опасността от токов удар се повишава при навлизане на вода в продукта.
•Не работете с продукта, докато ножът и всички капаци не се монтират правилно. Неправилно монтираният нож може да се разхлаби и да причини телесна повреда.
•Уверете се, че ножът няма да се удря в обекти, като например камъни и корени. Това може да доведе до повреда на ножа и до огъване на двусекционния вал на двигателя. Огънатата ос предизвиква силни вибрации и има много голяма опасност ножът да се разхлаби.
•Ако ножът се удари в някакъв обект или се получат вибрации, спрете веднага продукта. Спрете двигателят, завъртете ключа за безопасност на 0 и отстранете акумулатора.
Проверете продукта за повреди. Ремонтирайте повредите или потърсете оторизиран сервиз за това.
•Никога не прикрепяйте ръкохватката за спирачката на двигателя за постоянно върху дръжката, когато двигателят е стартиран.
•Поставете продукта върху стабилна, равна повърхност и го стартирайте. Уверете се, че ножът не се допира в земята или в други предмети.
•Винаги стойте зад продукта, когато го използвате.
•Всички колела трябва да бъдат на земята и да държите дръжката с 2 ръце, когато работите с продукта. Дръжте ръцете и краката си далеч от въртящите се остриета.
•Не накланяйте продукта при стартиран двигател.
•Бъдете внимателни, когато дърпате продукта назад.
•Никога не повдигайте продукта при стартиран двигател. Ако се наложи да вдигате продукта, първо спрете двигателя, завъртете ключа за безопасност на 0 и отстранете акумулатора.
30 |
890 - 002 - 21.12.2018 |
 Loading...