


hp officejet 6100 series all-in-one
reference guide
© Copyright Hewlett-Packard Company 2002
All rights are reserved. No part of the document may be photocopied, reproduced, or translated to another language without the prior written consent of Hewlett-Packard Company.
Adobe and the Acrobat logo are either registered trademarks or trademarks of Adobe Systems Incorporated in the United States and/or other countries.
Portions Copyright © 1989-2002 Palomar Software Inc. The HP OfficeJet 6100 Series includes printer driver technology licensed from Palomar Software, Inc. www.palomar.com
Copyright © 1999-2001 Apple Computer, Inc.
Apple, the Apple logo, Mac, Mac logo, Macintosh, and Mac OS are trademarks of Apple Computer, Inc., registered in the U.S. and other countries.
Publication number: Q1636-90205 Second edition: December 2002
Printed in U.S.A., Mexico, Germany, Singapore, or China
Windows®, Windows NT®, Windows ME®, Windows XP®, and
Windows 2000® are U.S.-registered trademarks of Microsoft Corporation.
Intel® and Pentium® are registered trademarks of Intel Corporation.
notice
The information contained in this document is subject to change without notice and should not be construed as a commitment by the Hewlett-Packard Company.
Hewlett-Packard assumes no responsibility for any errors that may appear in this document, nor does it make expressed or implied warranty of any kind with regard to this material, including, but not limited to, the implied warranties of merchantability and fitness for a particular purpose.
The Hewlett-Packard Company shall not be liable for incidental or consequential damages in connection with, or arising out of the furnishing, performance, or use of this document and the program material which it describes.
Note: Regulatory information can be found in the “Technical information” section of the Support and Specifications Booklet.
It is not lawful in many places to make copies of the following items. When in doubt, check with a legal representative first.
•Governmental paper or documents:
-Passports
-Immigration papers
-Selective service papers
-Identification badges, cards, or insignias
•Governmental stamps:
-Postage stamps
-Food stamps
•Checks or drafts drawn on Governmental agencies
•Paper currency, traveler’s checks, or money orders
•Certificates of deposit
•Copyrighted works
safety information
Warning! To prevent fire or shock hazard, do not expose this product to rain or any type of moisture.
Always follow basic safety precautions when using this product to reduce risk of injury from fire or electric shock.
WARNING: potential shock hazard
1Read and understand all instructions in the setup poster.
2Use only a grounded electrical outlet when connecting the unit to a power source. If you do not know whether the outlet is grounded, check with a qualified electrician.
3Observe all warnings and instructions marked on the product.
4Unplug this product from wall outlets before cleaning.
5Do not install or use this product near water or when you are wet.
6Install the product securely on a stable surface.
7Install the product in a protected location where no one can step on or trip over the line cord, and where the line cord will not be damaged.
8If the product does not operate normally, see the online Troubleshooting help.
9No operator-serviceable parts inside. Refer servicing to qualified service personnel.
10 Use in a well-ventilated area.

contents
1 get help . . . . . . . . . . . . . . . . . . . . . . . . . . . . . . . . . . . . . . . . . . . 1
2 quick start . . . . . . . . . . . . . . . . . . . . . . . . . . . . . . . . . . . . . . . . . 3 use your hp officejet with a computer . . . . . . . . . . . . . . . . . . . . . . . . . 5 hp officejet menu functions . . . . . . . . . . . . . . . . . . . . . . . . . . . . . . . . 7
3 load originals and load paper . . . . . . . . . . . . . . . . . . . . . . . . . . . 9 load originals . . . . . . . . . . . . . . . . . . . . . . . . . . . . . . . . . . . . . . . . . 9 load paper . . . . . . . . . . . . . . . . . . . . . . . . . . . . . . . . . . . . . . . . . . 10 load envelopes . . . . . . . . . . . . . . . . . . . . . . . . . . . . . . . . . . . . . . . 12 load postcards or hagaki cards . . . . . . . . . . . . . . . . . . . . . . . . . . . . 13 load photo paper . . . . . . . . . . . . . . . . . . . . . . . . . . . . . . . . . . . . . 13 tips for loading other types of paper. . . . . . . . . . . . . . . . . . . . . . . . . 14 set the paper type . . . . . . . . . . . . . . . . . . . . . . . . . . . . . . . . . . . . . 15 set the paper size. . . . . . . . . . . . . . . . . . . . . . . . . . . . . . . . . . . . . . 15
4 use the copy features . . . . . . . . . . . . . . . . . . . . . . . . . . . . . . . . 17 make copies . . . . . . . . . . . . . . . . . . . . . . . . . . . . . . . . . . . . . . . . . 17 perform special copy jobs . . . . . . . . . . . . . . . . . . . . . . . . . . . . . . . . 20 stop copying . . . . . . . . . . . . . . . . . . . . . . . . . . . . . . . . . . . . . . . . . 24 copy setup menu options. . . . . . . . . . . . . . . . . . . . . . . . . . . . . . . . . 24
5 use the scan features. . . . . . . . . . . . . . . . . . . . . . . . . . . . . . . . . 25 scan an original . . . . . . . . . . . . . . . . . . . . . . . . . . . . . . . . . . . . . . 25 stop scanning . . . . . . . . . . . . . . . . . . . . . . . . . . . . . . . . . . . . . . . . 26 learn more . . . . . . . . . . . . . . . . . . . . . . . . . . . . . . . . . . . . . . . . . . 26
6 use the fax features . . . . . . . . . . . . . . . . . . . . . . . . . . . . . . . . . |
29 |
send a fax . . . . . . . . . . . . . . . . . . . . . . . . . . . . . . . . . . . . . . . . . . 29 receive a fax . . . . . . . . . . . . . . . . . . . . . . . . . . . . . . . . . . . . . . . . . 32 print reports . . . . . . . . . . . . . . . . . . . . . . . . . . . . . . . . . . . . . . . . . 33 control resolution and contrast . . . . . . . . . . . . . . . . . . . . . . . . . . . . . 34 redial a number automatically . . . . . . . . . . . . . . . . . . . . . . . . . . . . . 34 use Error Correction Mode (ECM) . . . . . . . . . . . . . . . . . . . . . . . . . . 35 set automatic reduction . . . . . . . . . . . . . . . . . . . . . . . . . . . . . . . . . . 35 adjust the volume . . . . . . . . . . . . . . . . . . . . . . . . . . . . . . . . . . . . . . 35 change the Answer Ring Pattern (distinctive ringing) . . . . . . . . . . . . . . 36 set up speed dialing. . . . . . . . . . . . . . . . . . . . . . . . . . . . . . . . . . . . 36 set the paper size. . . . . . . . . . . . . . . . . . . . . . . . . . . . . . . . . . . . . . 37 set the date and time . . . . . . . . . . . . . . . . . . . . . . . . . . . . . . . . . . . 37 set the fax header . . . . . . . . . . . . . . . . . . . . . . . . . . . . . . . . . . . . . 38 enter text . . . . . . . . . . . . . . . . . . . . . . . . . . . . . . . . . . . . . . . . . . . 38 reprint the faxes in memory . . . . . . . . . . . . . . . . . . . . . . . . . . . . . . . 39 fax feature menu options. . . . . . . . . . . . . . . . . . . . . . . . . . . . . . . . . 40
iii

contents
7 maintain your hp officejet . . . . . . . . . . . . . . . . . . . . . . . . . . . . . .41 clean the glass . . . . . . . . . . . . . . . . . . . . . . . . . . . . . . . . . . . . . . . .41 clean the adf glass . . . . . . . . . . . . . . . . . . . . . . . . . . . . . . . . . . . . .41 clean the lid backing . . . . . . . . . . . . . . . . . . . . . . . . . . . . . . . . . . . .41 clean the exterior. . . . . . . . . . . . . . . . . . . . . . . . . . . . . . . . . . . . . . .42 work with print cartridges . . . . . . . . . . . . . . . . . . . . . . . . . . . . . . . . .42 restore factory defaults . . . . . . . . . . . . . . . . . . . . . . . . . . . . . . . . . . .46 set the power save time . . . . . . . . . . . . . . . . . . . . . . . . . . . . . . . . . .46 set scroll speed . . . . . . . . . . . . . . . . . . . . . . . . . . . . . . . . . . . . . . . .46 set the front-panel view angle . . . . . . . . . . . . . . . . . . . . . . . . . . . . . .47
8 additional setup information . . . . . . . . . . . . . . . . . . . . . . . . . . . . 49 possible installation problems . . . . . . . . . . . . . . . . . . . . . . . . . . . . . .49 set the language and country/region . . . . . . . . . . . . . . . . . . . . . . . . .51 connect your hp officejet to your computer . . . . . . . . . . . . . . . . . . . . .51 remove and reinstall your hp officejet software . . . . . . . . . . . . . . . . . .53
9 technical information . . . . . . . . . . . . . . . . . . . . . . . . . . . . . . . . . 55 system requirements . . . . . . . . . . . . . . . . . . . . . . . . . . . . . . . . . . . . .55 paper specifications. . . . . . . . . . . . . . . . . . . . . . . . . . . . . . . . . . . . .56 print specifications. . . . . . . . . . . . . . . . . . . . . . . . . . . . . . . . . . . . . .58 print margin specifications . . . . . . . . . . . . . . . . . . . . . . . . . . . . . . . .58 copy specifications . . . . . . . . . . . . . . . . . . . . . . . . . . . . . . . . . . . . .60 fax specifications. . . . . . . . . . . . . . . . . . . . . . . . . . . . . . . . . . . . . . .60 scan specifications. . . . . . . . . . . . . . . . . . . . . . . . . . . . . . . . . . . . . .61 physical specifications . . . . . . . . . . . . . . . . . . . . . . . . . . . . . . . . . . .61 power specifications . . . . . . . . . . . . . . . . . . . . . . . . . . . . . . . . . . . .61 environmental specifications . . . . . . . . . . . . . . . . . . . . . . . . . . . . . . .61 additional specifications. . . . . . . . . . . . . . . . . . . . . . . . . . . . . . . . . .62 environmental product stewardship program . . . . . . . . . . . . . . . . . . . .62 regulatory information . . . . . . . . . . . . . . . . . . . . . . . . . . . . . . . . . . .63 declaration of conformity . . . . . . . . . . . . . . . . . . . . . . . . . . . . . . . . .68
10 get hp officejet 6100 support . . . . . . . . . . . . . . . . . . . . . . . . . . . 69 get support and other information from the internet . . . . . . . . . . . . . . .69 hp customer support . . . . . . . . . . . . . . . . . . . . . . . . . . . . . . . . . . . .69 prepare your unit for shipment . . . . . . . . . . . . . . . . . . . . . . . . . . . . .72 hp distribution center . . . . . . . . . . . . . . . . . . . . . . . . . . . . . . . . . . . . 74
11 warranty information . . . . . . . . . . . . . . . . . . . . . . . . . . . . . . . . . 75 warranty service . . . . . . . . . . . . . . . . . . . . . . . . . . . . . . . . . . . . . . .75 warranty upgrades . . . . . . . . . . . . . . . . . . . . . . . . . . . . . . . . . . . . .75 returning your hp officejet 6100 series for service . . . . . . . . . . . . . . . . 76 hewlett-packard limited global warranty statement . . . . . . . . . . . . . . . . 76
index. . . . . . . . . . . . . . . . . . . . . . . . . . . . . . . . . . . . . . . . .79
iv |
hp officejet 6100 series |

1get help
help |
description |
|
|
Setup Poster |
The Setup Poster provides instructions for setting up and configuring your |
|
HP OfficeJet. Make sure you use the correct poster for your operating |
|
system (Windows or Macintosh). |
|
|
Product Tour |
The tour provides a brief introduction to the HP OfficeJet and its |
|
capabilities, so you can start using it immediately. You can access the tour |
|
through the Start button immediately after installing the HP OfficeJet |
|
software. |
|
|
HP Photo & Imaging |
The HP Photo & Imaging Help provides detailed information on using the |
Help |
software for your HP OfficeJet. |
|
For Windows users: Go to the HP Director, and click Help. |
|
For Macintosh users: Go to the HP Director, and click Help, then click |
|
hp photo & imaging help. |
|
|
Reference Guide |
The Reference Guide contains information on using your HP OfficeJet and |
|
provides additional troubleshooting assistance for the installation process. |
|
The Reference Guide also contains information on how to order supplies |
|
and accessories, technical specifications, support, and warranty |
|
information. |
|
|
Troubleshooting help |
To access troubleshooting information, go to the HP Director, then click |
(Windows only) |
Help. Open the Troubleshooting book in the HP Photo & Imaging Help, |
|
then follow the links to general troubleshooting as well as links to |
|
Troubleshooting help that is specific to your HP OfficeJet. Troubleshooting |
|
is also available from the Help button that appears on some error |
|
messages. |
|
|
Internet help and |
If you have Internet access, you can get more information from the |
technical support |
HP website at: |
|
http://www.hp.com/support |
|
The website also provides answers to frequently-asked questions. |
|
|
Readme file |
After you install your software, you can access the Readme file from either |
|
the HP OfficeJet 6100 Series CD-ROM or the HP OfficeJet 6100 Series |
|
program folder. The Readme file contains late-breaking information that |
|
does not appear in the Reference Guide or the online help. To access the |
|
Readme file, do the following: |
|
For Windows: go to the Windows taskbar, click Start, point to Programs |
|
or All Programs (XP), point to Hewlett-Packard, point to HP OfficeJet |
|
6100 Series, and then choose View the Readme File. |
|
For Macintosh: go to the |
|
HD:Applications:HP OfficeJet Software folder. |
1

chapter 1
help |
description |
Dialog-box help |
For Windows: Clicking Help in a dialog box displays information about |
(Windows only) |
options and settings within the dialog box. |
To get help while working in a dialog box, click Help.
2 |
hp officejet 6100 series |
2quick start
You can perform many functions using either the front panel or the HP OfficeJet software.
Even if you do not connect your HP OfficeJet to a computer, you can use the front panel to copy, print photos, or fax documents. You can change a wide variety of settings using the front-panel buttons and menu system.
front panel features
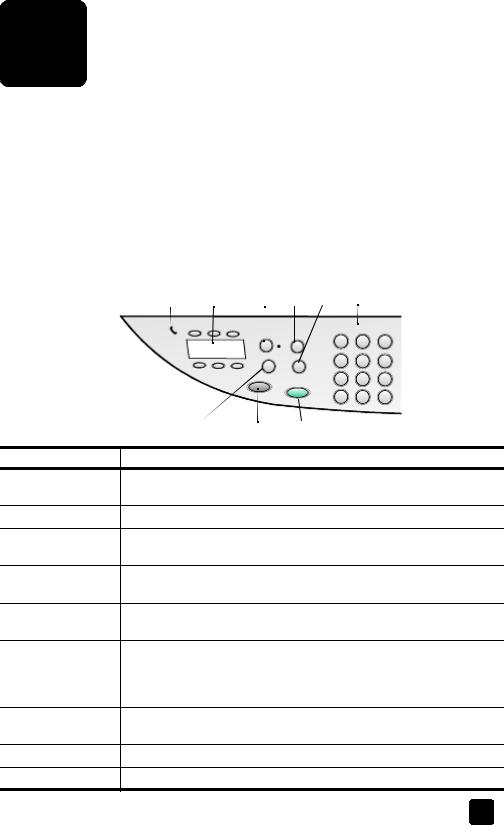
Review the illustrations below and identify the location of the buttons on the front panel.
Left side of the front panel
1 |
2 |
3 |
4 |
5 |
6 |
7 |
8 |
9 |
feature |
purpose |
1Phone Hook: the green LED in the shape of a phone indicates that the fax line is in use when lit.
2One-Touch Speed-Dial Buttons: use to access the first 6 speed-dial entries.
3Auto Answer: when the green light is on, fax transmissions will automatically be accepted.
4Speed Dial: use to access speed-dial numbers that have been set up from the front panel or with the HP Director software.
5Redial/Pause: redials the most recently dialed number when in the ready state. Inserts a pause (hyphen) when in the dialing state.
6Keypad: use to dial fax numbers, and enter numbers such as the quantity of copies or percentages when reducing or enlarging. You can also enter text using the keypad for fax header, use speed dial entries, and specify menu items.
7Fax Resolution: use to set the fax resolution to Fine, Standard, 300 dpi, or Photo. It will remain at the most recent setting until changed.
8Start Fax - Black: starts a black and white fax.
9Start Fax - Color: starts a color fax.
3

chapter 2
Right side of the front panel
10 |
11 |
12 |
13 |
14 |
15 |
16 |
17 |
18 |
|
|
|
|
|
|
|
|
|
|
|
|
|
|
|
|
|
|
|
|
|
|
|
|
|
|
|
|
|
|
|
|
|
|
|
|
|
|
|
|
|
|
|
|
|
|
|
|
|
|
|
|
|
|
|
|
|
|
|
|
|
|
|
|
|
|
|
|
|
|
|
|
|
|
|
|
|
19 |
20 |
21 |
22 |
23 |
24 |
25 |
||||
feature |
purpose |
10Menu: use to access the menu system. Menu options include; Copy Setup, Fax Functions, Print Report, Speed Dial Setup, Basic Fax Setup, Advanced Fax Setup, and Maintenance.
11Arrows: use to scroll through menu settings, through options within settings, or to move forward or backward to erase a text entry.
12 |
Enter: use to select or save the displayed setting. |
13 |
Quality: use to select the quality of the copy from Best, Normal, or Fast. |
14Paper Type: (for Copy only) use to select the paper type. The paper tray supports plain paper and specialty papers.
15Reduce/Enlarge: use to reduce or enlarge an original to a specified image size on paper loaded in the tray. The original may be fed from the automatic document feeder (ADF) or placed on the glass.
16Special Features: use to access options that let you reduce or enlarge to a specified copy image size on paper loaded in the tray. The options are Normal, Fit to Page, Image Size, Poster, 2 on 1, and MarginShift.
17Scan To: use to access a list of software programs that an image can be scanned to. You must configure the Scan To list using the HP OfficeJet software on the PC prior to using this feature.
18On: turns the HP OfficeJet on and off.
19Lighter/Darker: use to adjust the lightness and darkness of the copies you make and the faxes you send.
20Needs Attention: the amber LED in the shape of an exclamation point indicates that the device needs attention.
21 |
Cancel: use to stop a job, exit a menu, or exit button settings. |
22 |
Start Copy - Black: use to start a black and white copy. |
23Number of Copies: use to change the number of copies for this copy job. This button can be used in conjunction with the arrow keys or the keypad to make additional copies.
24Start Copy - Color: use to start a color copy.
4 |
hp officejet 6100 series |
quick start
feature |
purpose |
25Start Scan: use to start the scan of an original from the glass to the designated Scan To destination. If no change was made to the Scan To destination, the image will be scanned to the HP Gallery (Windows or Macintosh) if the HP OfficeJet software is installed.
use your hp officejet with a computer
If you installed the HP OfficeJet software on your computer according to the Setup Poster, you can access all the features of the HP OfficeJet using the HP Director.
review the hp photo & imaging director
The HP Director is available through the desktop shortcut.
for windows users
1Do one of the following:
–Double-click the hp director icon on the desktop.
–In the Windows taskbar, click Start, point to Programs or All Programs
(XP), point to Hewlett-Packard, point to hp officejet 6100 series, then choose hp photo & imaging director.
2In the Select Device box, click to see a list of installed HP devices.
3 Select hp officejet 6100.
The Director displays only the buttons that are appropriate for the selected device.
1 |
2 |
8
3 4 5 6 7
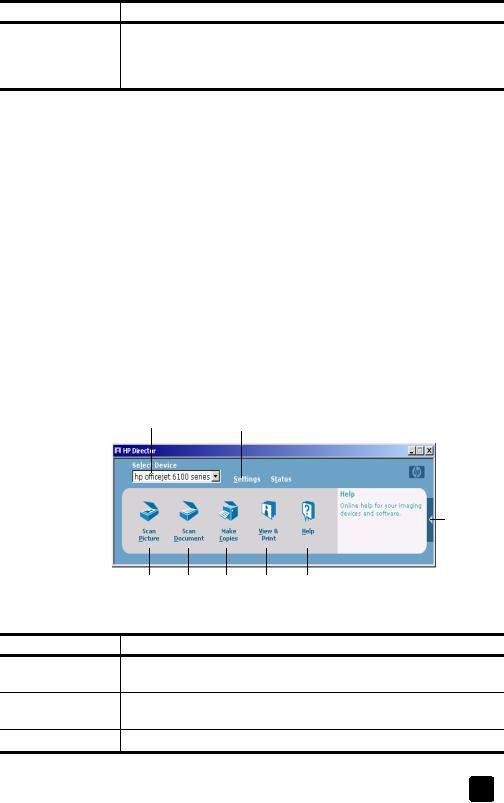
the hp photo & imaging director
feature |
purpose |
1Select Device: Use this feature to select the product you want to use from the list of installed HP products.
2Settings: Use this feature to view or change various settings for your HP device, such as print, scan and copy.
3Scan Picture: Scans an image and displays it in the HP Gallery.
reference guide |
5 |
chapter 2
feature |
purpose |
4Scan Document: Scans text and displays it in the selected destination text editing software program.
5Make Copies: Displays the Copy dialog box where you can select the copy quality, the number of copies, the color, the size, and can start a copy.
6View & Print: Displays the HP Gallery, where you can view and edit images, use HP Creative Printing, make and print a photo album, e-mail an image, and upload an image to the Web.
7Help: Provides access to HP Photo & Imaging Help, which provides software help and troubleshooting information.
8Click this arrow to access tool tips, which explain each of the Director options.
for macintosh users
!Do one for the following:
–For OS 9, double-click the HP Director icon on the desktop.
–For OS X, double-click the HP Director icon on the dock.
The following figure shows some of the features available through the
HP Director for Macintosh. Consult the legend for a brief explanation of a specific feature.
3 |
6 |
|
|
|
|
|
|
|
|
|
|
1 |
2 |
4 |
5 |
7 |
|||||
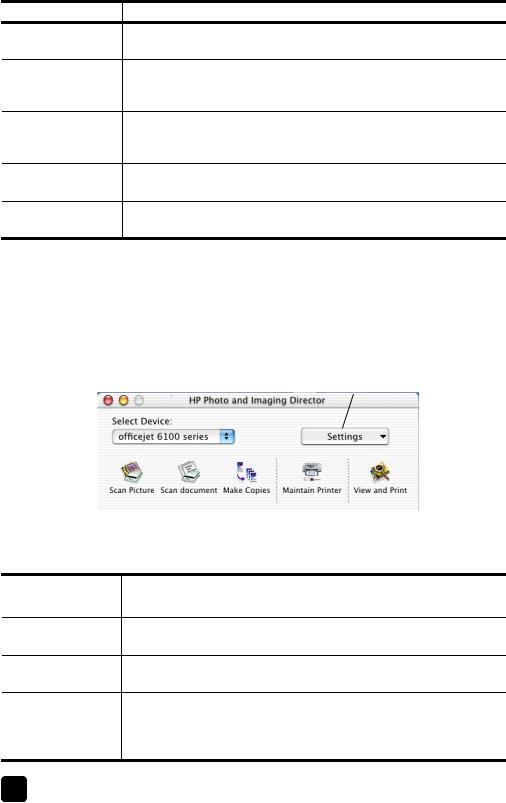
The Director for Macintosh, in OS9 and OS X |
|
|
|
|
|||||
feature |
purpose |
1 |
Scan Picture: Scans an image and displays it in the HP Imaging Center. |
2Scan Document: Scans text and displays it in the selected destination text editing software program.
3Use this pull-down list to select the product you want to use from the list of installed HP products.
4 |
Make Copies: Copies in black and white or color. |
5 |
Maintain Printer: Opens the printer utility. |
|
|
6 |
Settings: Accesses the device settings. |
6 |
hp officejet 6100 series |
quick start
feature purpose
7View and Print: Displays the HP Imaging Center, where you can view and print images.
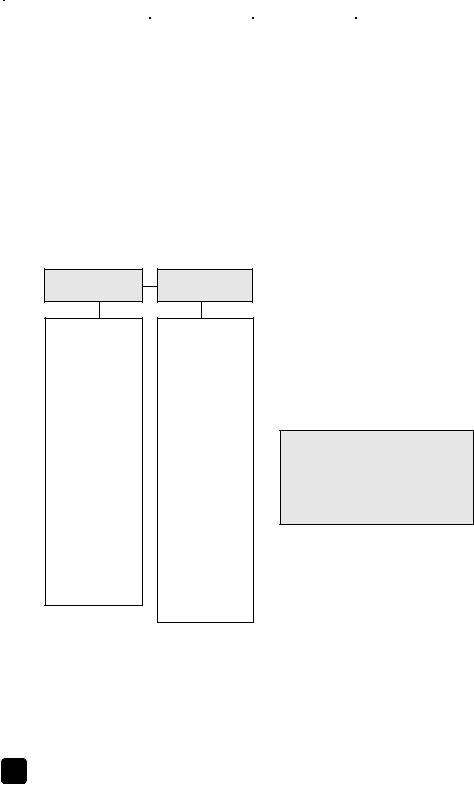
hp officejet menu functions
Access Menu functions by pressing the corresponding numbers for each menu option. For example: to set the language and country/region, press Menu, then press 7 and 4. This automatically selects the Maintenance menu, then selects the
Set Language and Country/Region option.
reference guide |
7 |
chapter 2 |
|
|
|
|
|
|
|
|
|
|
|
|
||
|
|
|
|
|
|
|
|
|
|
|
|
|
|
|
|
1:Copy Setup |
|
2:Fax |
|
3:Print Report |
|
4:Speed Dial |
|
5:Basic Fax |
|||||
|
|
|
|
Functions |
|
|
|
|
Setup |
|
Setup |
|||
|
|
|
|
|
|
|
|
|
|
|
|
|
|
|
|
1:Enhancements |
|
1:Scan and Fax |
|
1:Last |
|
1:Individual |
|
1:Date and Time |
|||||
|
2:Paper Size |
|
Black Only |
|
Transaction |
|
Speed Dial |
|
2:Fax Header |
|||||
|
|
2:Send Fax Later |
|
2:Fax Log |
|
2:Group Speed |
|
|||||||
|
|
|
|
|
|
|
3:Rings to |
|||||||
|
3:Color Intensity |
|
Black Only |
|
|
|
|
Dial |
|
|||||
|
4:Set Copy |
|
3:Reprint Faxes |
|
3:Speed Dial List |
|
3:Delete Speed |
|
Answer |
|||||
|
|
|
|
|
|
|
4:Paper Size |
|||||||
|
Defaults |
|
in Memory |
|
4:Menu Settings |
|
Dial |
|
||||||
|
5:Restore Copy |
|
|
|
|
5:Self-Test Report |
|
4:Print Speed |
|
5:Tone or Pulse |
||||
|
|
|
|
|
|
|
||||||||
|
Factory Settings |
|
|
|
|
6:Automatic |
|
Dial List |
|
Dialing |
||||
|
|
|
|
|
|
|
|
|
|
|
|
|
||
|
|
|
|
|
|
|
|
|
|
|
|
|
||
|
|
|
|
|
|
|
Reports Setup |
|
|
|
|
|
|
|
|
|
|
|
|
|
|
|
|
|
|
|
|
||
|
|
|
|
|
|
|
|
|
|
|
|
|
|
|
6:Advanced Fax Setup
1:Automatic Reports Setup
2:Answer Ring Pattern
3:Busy Redial
4:No Answer Redial
5:Automatic Reduction
6:Backup Fax Reception
7:Error Correction Mode
8:Silent Detect
7:Maintenance
1:Clean Print Cartridges
2:Align Print Cartridges
3:Restore Factory Defaults
4:Set Language and Country/ Region
5:Ring and Beep Volume
6:Set Power Save Mode Time
7:Set Scroll Speed
8: Set View Angle
Press Menu to display the menu functions.
Press  or
or  to move to the setting
you want.
Press Enter to select the displayed setting.
8 |
hp officejet 6100 series |
3load originals and load paper
You can copy from originals loaded on the glass or in the automatic document feeder. You can also print and copy onto a variety of paper types, weights, sizes, and transparency films. It is important, however, that you choose the right paper and make sure that it is loaded correctly and not damaged.
load originals
Your HP OfficeJet provides two ways to load originals.
•load originals on the glass
•load originals in the automatic document feeder
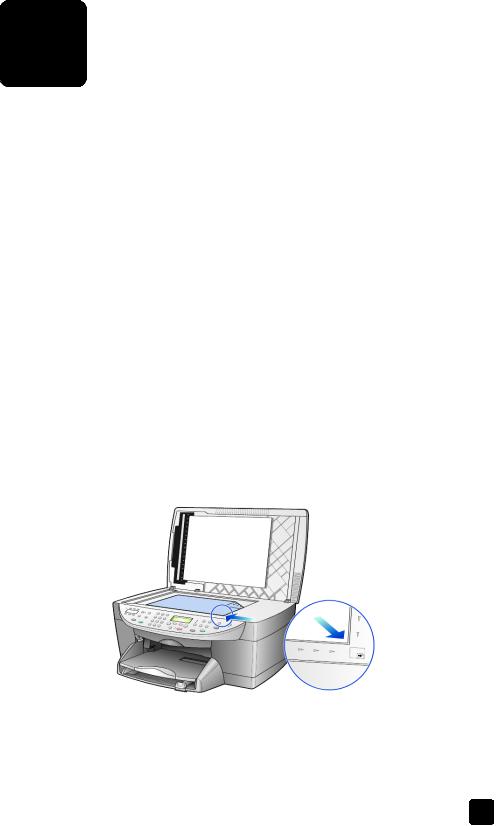
load originals on the glass
You can copy, fax, or scan any original by placing it on the glass.
Note: Many of the Special Features options, such as Image Size or Poster, will not work correctly if the glass and lid backing are not clean. For more information, see clean the glass and clean the lid backing on page 41.
1Lift the lid and place the original face down on the glass in the front-right corner with the sides of the originals touching the right and bottom edges.
It is important to use the front-right corner when using the copy, fax, or scan feature.
Tip: If you are copying from a transparency (that is, your original is printed on transparency film), place a blank piece of paper on top of the transparency.
Top edge of original
2Close the lid by pushing down on the lever below the front panel.
9
chapter 3
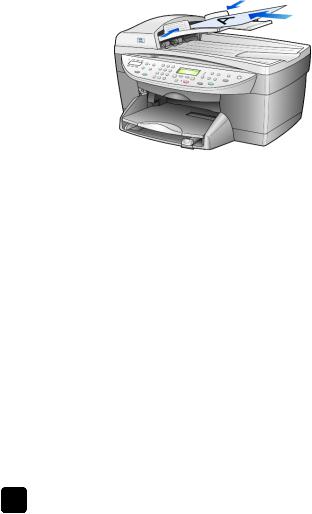
load originals in the automatic document feeder
Your HP OfficeJet has an automatic document feeder (ADF), which you can use to load up to 35 originals of the following paper types:
•Plain Paper
16 lb (60 gsm) to 24 lb (90 gsm) long-grain paper only
•Specialty Paper
–HP Premium Inkjet Paper
–HP Bright White Inkjet Paper
Single sheet only:
•Real Estate paper
to scan, copy, or fax from the ADF
1Place all originals in the ADF print side up.
2Adjust the paper-width guide to fit the size of your original.
A message appears on the display indicating that the originals are loaded.
load paper
Following is the basic procedure for loading blank paper. There are specific considerations for loading certain types of paper, transparency film, and envelopes. After you review this procedure, see tips for loading other types of paper on page 14 and load envelopes on page 12.
For best results, adjust the paper settings each time you change paper types or paper sizes. For more information, see set the paper type on page 15.
10 |
hp officejet 6100 series |
load originals and load paper
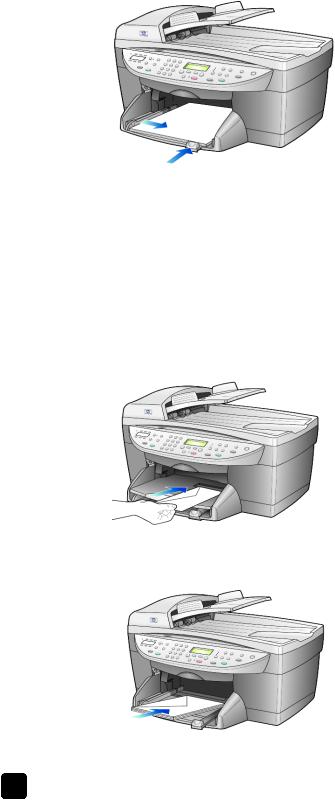
to load the paper tray
1Remove (pull out) the output tray and slide the paper-width and paperlength guides to their outermost positions.
2Tap the stack on a flat surface to align the edges of the paper, and then check the paper for the following:
–Make sure it is free of rips, dust, wrinkles, and curled or bent edges.
–Make sure all the paper in the stack is the same size and type, unless you are working with photo paper.
3Insert paper into the input tray print-side down until it stops. If you are using letterhead, insert the top of the page first.
Check that the stack of paper contains several sheets but is no higher than the top of the paper-length guide.
4Slide the paper-width and paper-length guides in until they stop at the edges of the paper. Make sure that the paper stack lies flat in the input tray and fits under the tab of the paper-length guide.
reference guide |
11 |
chapter 3
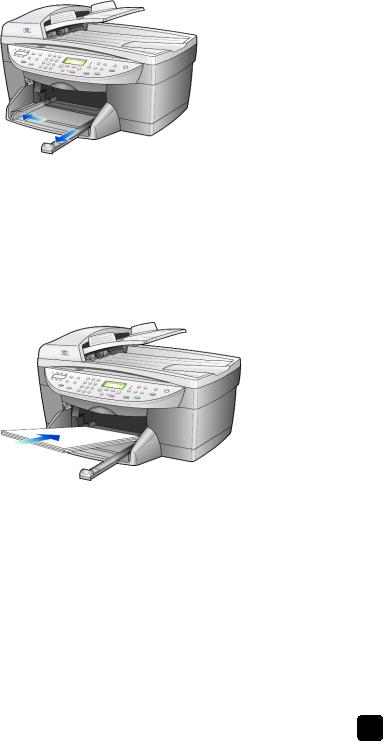
5Put the output tray back into position.
6To prevent printed paper from falling off the tray, fully extend the outputtray extender.
load envelopes
Your HP OfficeJet provides two methods for working with envelopes. Do not use shiny or embossed envelopes, or envelopes that have clasps or windows.
•If you are printing one envelope, slide the envelope into the envelope slot, which is located on the right side toward the back of the output tray. Insert the envelope with the flap up and on the left, as shown in the illustration.
Slide the envelope on the top until it stops.
•If you are printing multiple envelopes, remove all paper from the main tray, and then slide a stack of envelopes into the tray, with the envelope flaps up and to the left (print-side down), until they stop.
12 |
hp officejet 6100 series |

load originals and load paper
Adjust the paper-width guide against the envelopes (be careful not to bend the envelopes). Make sure the envelopes fit within the tray (do not overload it).
Consult the help files in your word processing software for details on how to format text for printing on envelopes.
load postcards or hagaki cards
Following is the procedure for loading postcards or hagaki cards.
1Remove all paper from the paper tray, and then slide a stack of cards into the tray until they stop.
Make sure the print side faces down.
2Adjust the paper-width guide against the cards, and then slide the paper-length guide in until it stops.
Make sure the cards fit within the tray (do not overload it).
load photo paper
Following is the procedure for loading 4-by-6 inch photo paper.
1Remove all paper from the paper tray, and then slide a stack of cards into the tray until they stop.
Make sure the print side faces down.
If the photo paper you are using has perforated tabs, load the photo paper so that the tabs are closest to you.
2Adjust the paper-width guide against the cards, and then slide the paper-length guide in until it stops.
Make sure the cards fit within the tray (do not overload it).
reference guide |
13 |

chapter 3
tips for loading other types of paper
The following table provides guidelines for loading certain types of paper and transparency film. For best results, adjust the paper settings each time you change paper types and paper sizes. For more information, see set the paper type on page 15.
paper |
tips |
|
|
|
|
HP papers |
• |
HP Premium Inkjet Paper: Locate the gray arrow on the nonprinting |
|
|
side of the paper, and then insert paper with the arrow side facing up. |
|
• |
HP Premium or Premium Plus Photo Paper: Load the glossy (print) side |
|
|
down. Always load at least five sheets of regular paper in the paper |
|
|
tray first, and then place the photo paper on top of the regular paper. |
|
• |
HP Premium or Premium Plus Inkjet Transparency Film: Insert the film so |
|
|
that the white transparency strip (with arrows and the HP logo) is on |
|
|
top and is going into the tray first. |
|
• |
HP Inkjet T-Shirt Transfer Iron-On: Flatten the transfer sheet completely |
|
|
before using it; do not load curled sheets. (To prevent curling, keep |
|
|
transfer sheets sealed in the original package until you are ready to |
|
|
use them.) Manually feed one sheet at a time, with the unprinted side |
|
|
facing down (the blue stripe faces up). |
|
• |
HP Greeting Cards, HP Linen Greeting Cards, or HP Felt-Textured |
|
|
Greeting Cards: Insert a small stack of HP greeting-card paper, with |
|
|
the print-side down into the paper tray until it stops. |
|
|
|
Labels |
• |
Always use letter-size or A4-size label sheets designed for use with |
(works only with |
|
HP inkjet products (like Avery Inkjet Labels), and make sure that the |
printing) |
|
labels are not over two years old. |
|
• |
Fan the stack of labels to make sure none of the pages are sticking |
|
|
together. |
|
• |
Place a stack of label sheets on top of standard paper in the paper |
|
|
tray, print-side down. Do not insert labels one sheet at a time. |
|
|
|
Postcards or Hagaki |
Insert a stack of postcards or hagaki cards with the print-side down into |
|
cards (only works |
the paper tray until it stops. Line the postcards up on the right side of the |
|
with printing) |
paper tray, slide the paper-width guide up against the left side of the |
|
|
cards, and then slide the paper-length guide in until it stops. |
|
|
|
|
4-by-6 inch photo |
Insert the photo paper with the print-side down into the paper tray until it |
|
paper (works only |
stops. Place the long edge of the photo paper against the right side of the |
|
with printing) |
paper tray, slide the paper-width guide up against the long edge of the |
|
|
photo paper, and slide the paper-length guide in until it stops. If the photo |
|
|
paper you are using has perforated tabs, load the photo paper so that the |
|
|
tabs are closest to you. |
|
|
|
|
14 |
hp officejet 6100 series |
|
|
load originals and load paper |
|
|
|
paper |
tips |
|
|
|
|
Continuous (banner) |
Continuous banner paper is also known as computer or z-fold paper. |
|
paper |
• |
Before loading banner paper, remove all other paper from the paper |
(works only with |
|
tray, then remove the output tray. |
printing) |
|
|
|
|
Remove the output |
|
|
tray. |
|
|
Insert the unattached |
|
|
edge of the paper into |
|
|
the paper tray. |
|
• |
If you use non-HP banner paper, use 20-lb. paper and fan the paper |
|
|
before loading it. |
|
• |
Verify that the stack of banner paper contains at least five pages in |
|
|
the stack. |
|
• |
Carefully tear off the perforated edge strips from both sides of the |
|
|
paper stack, if any, and unfold and refold the paper to make sure the |
|
|
pages do not stick together. |
|
• |
Put the paper in the paper tray so that the unattached edge is at the |
|
|
top of the stack. Insert the first edge into the paper tray until it stops, |
|
|
as shown in the illustration above. |
set the paper type
If you want to use a different type of paper, such as photo paper, transparency film, banner paper, or envelopes, simply load that paper in the main tray. You should then change the paper type settings to ensure the best print quality.
You can change copy settings from the front panel or from the HP Director. When you change settings using the front panel, the copy settings are reset two minutes after the unit completes the copy.
1Press Paper Type.
2Press  until the appropriate paper type appears.
3Press Enter to choose the displayed paper type.
set the paper size
For more information, see recommended paper-size settings for printing in the HP Photo & Imaging Help
For Copying:
1Press Menu.
2Press 1, then press 2.
This selects Copy Setup, then selects Paper Size.
3 Press  until the desired size appears, then press Enter to select it.
reference guide |
15 |

chapter 3
For Faxing:
1Press Menu.
2Press 5, then press 4.
This selects the Basic Fax Setup menu, then selects Paper Size.
3Press  until the desired size appears, then press Enter to select it.
16 |
hp officejet 6100 series |
4use the copy features
The copy features let you do the following:
•Produce high-quality color and black-and-white copies using a variety of paper types and sizes, including iron-on transfers.
•Reduce or enlarge the size of the copies you make from 25% to 400% of the copy’s original size. (Percentages may vary between models.)
•Make the copy lighter or darker, adjust the color intensity, select the number of copies, and specify the quality of the copies you make.
•Use special copying features to create a poster, make many sizes of photos, make high-quality copies of photos using special photo paper, or to create transparencies.
Note: When copying a photo, you must select options for the correct paper type and photo enhancement. You may also want to use the photo print cartridge for superior print quality. With the color and photo print cartridges installed, you have a six-ink system. See work with print cartridges on page 42 for more information.
make copies
You can make copies using the front panel of your HP OfficeJet or by using the HP OfficeJet software on your computer. Many copy features are available using either method. However, you may find that the software offers easier access to special copy features.
All copy settings that you select on the front panel are reset two minutes after the HP OfficeJet completes the copy, unless you save the settings as the default settings. For more information, see change settings for all copy tasks on
page 19.
make a copy
1Load your original on the glass or in the automatic document feeder (ADF).
2Press Start Copy, Black or Start Copy, Color.
17

chapter 4
increase copy speed or quality
The HP OfficeJet provides three options that affect copy speed and quality.
•Best produces the highest quality for all paper and eliminates the banding (striping) effect that sometimes occurs in solid areas. Best copies more slowly than the other quality settings.
•Normal delivers high-quality output and is the recommended setting for most of your copying. Normal copies faster than Best.
•Fast copies faster than the Normal setting. The text is of comparable quality to the Normal setting, but the graphics may be of lower quality. Using Fast also cuts down on the frequency of replacing your print cartridges, because it uses less ink.
1Load your original on the glass or in the ADF.
2 Press Quality until the green light in front of the desired quality is lit.
3Press Start Copy, Black or Start Copy, Color.
set the number of copies
You can set the number of copies using the front panel.
1Press Number of Copies to enter the number of copies mode. There are three ways to set the desired number of copies:
–Press Number of Copies again (or repeatedly) to increment the displayed number.
–Press  to increment, or
  to decrement, the displayed number.
–Use the keypad to enter the desired number of copies.
2Press Start Copy, Black or Start Copy, Color.
reduce or enlarge a copy
You can reduce or enlarge a copy of an original using either the Reduce/ Enlarge button or the Special Features buttons. This section explains the Reduce/ Enlarge features only.
For more information about Special Features options, see perform special copy jobs on page 20 for information about using Fit to Page, Image Size, Poster, 2 on 1, or Margin Shift.
1Press Reduce/Enlarge to choose one of the following:
–Custom 100%— lets you enter the percentage to reduce or enlarge your copy.
–Full Page 91% — lets you reduce an original to 91% of its original size, which prevents cropping that may occur if you make a full-size (100%) copy.
–Legal/Letter 72% — reduces an original to 72% of its original size, which lets you copy a legal-sized original to letter-sized paper.
2If you are using the Custom option, press  or
or  to reduce or enlarge the copy.
You can also enter a number using the keypad.
3Press Start Copy, Black or Start Copy, Color.
18 |
hp officejet 6100 series |

use the copy features
make copies lighter or darker
Use Lighter/Darker to adjust the lightness and darkness of the copies you make.
1Press Lighter/Darker.
2Press  to lighten the copy or
  to darken it.
The circle moves to the left or right, depending on the button you press.
3Press Start Copy, Black or Start Copy, Color.
change color intensity
You can adjust color intensity to make colors on your copy more vivid or more subtle.
1Press Menu.
2Press 1 and then press 3.
This selects Copy Setup, and then selects Color Intensity.
3Press  to make the image more pale or
  to make the image more vivid.
The range of color intensity values appears as a circle on a scale on the front-panel display.
4Press Start Copy, Black or Start Copy, Color.
enhance text sharpness and photo colors
Use Text enhancements to sharpen edges of black text. Use Photo for photographs or pictures to enhance light colors that may otherwise appear white.
Text enhancement is the default option. You can turn off Text enhancement by selecting Photo or None if the following occur:
•Stray dots of color surround some text on your copies.
•Large, black typefaces look splotchy (not smooth).
•Thin, colored objects or lines contain black sections.
•Horizontal grainy or white bands appear in lightto medium-gray areas.
1Press Menu, press 1, then press 1 again.
This selects Copy Setup, and then selects Enhancements.
2Press  until the desired enhancement (Text, Photo, Mixed, or None) appears.
3Press Start Copy, Black or Start Copy, Color.
change settings for all copy tasks
Save the copy settings you use most often by setting them as the default. This includes changes to Copy Setup options in the menu system, as well as other front panel Copy area settings.
1Make any desired changes to the Copy Setup options.
2 Make any desired changes to the button settings in the Copy Area.
3Press Menu.
4Press 1, then press 4.
reference guide |
19 |

chapter 4
This selects Copy Setup, and then selects Set Copy Defaults.
Your settings are saved.
perform special copy jobs
In addition to supporting standard copying, your HP OfficeJet can also do the following:
•copy a photo
•fit a copy to the page
•print several copies on one page
•print two originals on one page
•shift image to increase the margin
•make a poster
•prepare a color T-shirt transfer
copy a photo
1Load the photo on the glass.
2If you are using photo paper, you must load it in the main paper tray.
3Press Paper Type, then press  until the desired photo paper option appears, then press Enter to select it.
The default paper type is Automatic, which means the HP OfficeJet will automatically detect and determine the paper type. You can choose the specific paper type by pressing  until the desired paper type appears. For more information, see recommended paper-type settings for copying in the HP Photo & Imaging Help.
Tip: To enlarge a photo automatically to a full page, press Special Features until Fit to Page appears, then press Enter. For more information, see below.
4Press Menu, press 1, then press 1 again.
This selects Copy Setup, and then Enhancements. Press Enter to select it.
5 Press  until Photo appears, then press Enter to select it.
6Press Start Copy, Black or Start Copy, Color.
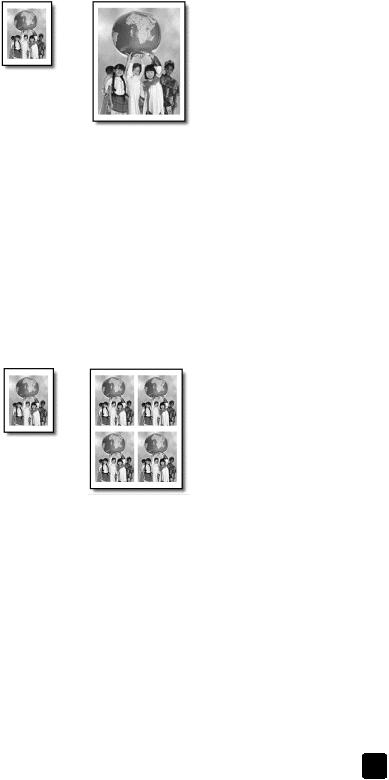
fit a copy to the page
Use Fit to Page when you want to automatically enlarge or reduce your original to fit the paper size you have loaded. You can enlarge a small photo to fit a fullsize page, as shown below. Using Fit to Page may also prevent unwanted cropping of text or images around the margins.
Tip: Make sure that the glass is clean and the original has been placed in the bottom-right corner of the glass. You cannot use the automatic document feeder (ADF) for this feature.
20 |
hp officejet 6100 series |
use the copy features
Original |
Fit to Page |
1Load the original on the glass.
2Load the appropriate paper.
3 Press Special Features until Fit to Page appears.
4Press Enter.
5Press Start Copy, Black or Start Copy, Color.
print several copies on one page
You can place multiple copies of an original on one page by selecting a photo size and then selecting the number of copies you want.
There are several common photo sizes available from the Image Size option, which you access from the Special Features button.
Original |
Copy |
1Load the original on the glass.
2Load the appropriate paper in the main tray.
3Press Special Features until Image Size appears.
4Press  until the desired photo size appears, then press Enter.
5When How Many? appears, press  to select the number of images that will fit on a page.
You will have a choice of 1 on a page, or the maximum number that will fit. Some larger sizes do not prompt you for a number of images.
6 Press Enter to select the number of photos you want to appear on a page.
7Press Start Copy, Black or Start Copy, Color.
Tip: If the number of copies of the photo on a single page does not come out as expected, try turning the original on the glass 90 degrees and start the copy again.
reference guide |
21 |
chapter 4
print two originals on one page
You can print two different letteror A4-sized originals on one page using the 2 on 1 feature. The copied images will appear side by side on the page in a landscape format. You can use the automatic document feeder (ADF) to load the originals or place them directly on the glass.
1Place the first original on the glass. If you are using the ADF, load both originals there.
2 Press Special Features until 2 on 1 59% appears, then press Enter.
3Press Start Copy, Black or Start Copy, Color.
4If you placed your first original on the glass you will be prompted to Place 2nd original on glass, then press Enter.
shift image to increase the margin
The MarginShift feature lets you shift the image to the left or right to increase the margin for binding. You can also adjust the reduction/enlargement percentage in this mode by entering a number on the numeric keypad.
Original |
MarginShift |
1Load the original on the glass or in the ADF.
2Press Special Features until MarginShift 100% appears.
3Press  or
or  to shift the margin to the left or to the right. Each step is a ¼-inch (6.35 mm) shift.
4If you wish to change the reduction/enlargement percentage as well, enter a number using the keypad, then press Enter.
Tip: If you do not wish to change the reduction/enlargement percentage, press Enter after you have selected the amount of MarginShift you want.
5Press Start Copy, Black or Start Copy, Color.
22 |
hp officejet 6100 series |
use the copy features
make a poster
When you use the Poster feature you divide your original into sections, then enlarge the sections so you can assemble them into a poster.
Original |
Poster |
Tip: You can print a poster from a file on your computer.
For more information, see print a poster in the HP Photo & Imaging Help.
1Load the original on the glass.
Tip: You cannot use the automatic document feeder (ADF) when making a poster.
2Load the appropriate paper in the main tray.
3Press Special Features until Poster appears.
The option Poster 2 pages Wide appears by default.
4Press  to select how wide you want the poster to be.
5Press Enter to confirm your selection.
6Press Start Copy, Black or Start Copy, Color.
Tip: After you select the poster width, the HP OfficeJet adjusts the length automatically to maintain the proportions of the original. If the original cannot be enlarged to the selected poster size, an error message appears that tells you the number of pages wide that are possible. Select a smaller poster size and make the copy again.
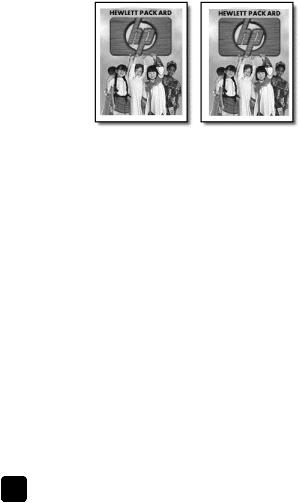
prepare a color T-shirt transfer
You can copy an image or text onto a T-shirt transfer, then iron it onto a T-shirt.
Original |
Iron-On |
reference guide |
23 |
 Loading...