


 Loading...
HP Notebook
Reference Guide
© Copyright 2011 Hewlett-Packard
Development Company, L.P.
Bluetooth is a trademark owned by its proprietor and used by Hewlett-Packard Company under license. Intel is a trademark of Intel Corporation in the U.S. and other countries. Java is a U.S. trademark of Sun Microsystems, Inc. Microsoft and Windows are U.S. registered trademarks of Microsoft Corporation.
The information contained herein is subject to change without notice. The only warranties for HP products and services are set forth in the express warranty statements accompanying such products and services. Nothing herein should be construed as constituting an additional warranty. HP shall not be liable for technical or editorial errors or omissions contained herein.
Second Edition: March 2011
First Edition: June 2010
Document Part Number: 607195-002
Product notice
This reference guide describes features that are common to most models. Some features may not be available on your computer.

Safety warning notice
WARNING! To reduce the possibility of heat-related injuries or of overheating the computer, do not place the computer directly on your lap or obstruct the computer air vents. Use the computer only on a hard, flat surface. Do not allow another hard surface, such as an adjoining optional printer, or a soft surface, such as pillows or rugs or clothing, to block airflow. Also, do not allow the AC adapter to contact the skin or a soft surface, such as pillows or rugs or clothing, during operation. The computer and the AC adapter comply with the user-accessible surface temperature limits defined by the International Standard for Safety of Information Technology Equipment (IEC 60950).
iii
iv Safety warning notice

Table of contents
1 Introduction ..................................................................................................................................................... |
1 |
Finding more information about your new computer ............................................................................ |
1 |
2 Networking (select models only) ................................................................................................................... |
2 |
Creating a wireless connection ............................................................................................................ |
2 |
Identifying wireless and network status icons ...................................................................... |
2 |
Turning wireless devices on or off ....................................................................................... |
4 |
Using HP Connection Manager (select models only) .......................................................... |
4 |
Using operating system controls .......................................................................................... |
4 |
Using a WLAN ...................................................................................................................................... |
5 |
Connecting to an existing WLAN ......................................................................................... |
5 |
Setting up a new WLAN ....................................................................................................... |
6 |
Protecting your WLAN ......................................................................................................... |
6 |
Roaming to another network ................................................................................................ |
6 |
Using HP Mobile Broadband (select models only) ............................................................................... |
7 |
Inserting a SIM ..................................................................................................................... |
7 |
Removing a SIM .................................................................................................................. |
8 |
Using GPS (select models only) ........................................................................................................... |
8 |
Using Bluetooth wireless devices ......................................................................................................... |
8 |
Bluetooth and Internet Connection Sharing (ICS) ............................................................... |
8 |
Connecting to a wired network ............................................................................................................. |
9 |
Using a modem (select models only) ................................................................................... |
9 |
Connecting a modem cable ................................................................................ |
9 |
Connecting a countryor region-specific modem cable adapter ....................... |
11 |
Selecting a location setting ............................................................................... |
11 |
Viewing the current location selection .............................................. |
11 |
Adding new locations when traveling ............................................... |
12 |
Connecting to a local area network (LAN) (select models only) ........................................ |
13 |
3 Multimedia ..................................................................................................................................................... |
15 |
Using the media activity controls ........................................................................................................ |
15 |
v
Audio .................................................................................................................................................. |
15 |
Adjusting the volume ......................................................................................................... |
16 |
Checking audio functions on the computer ........................................................................ |
16 |
Webcam (select models only) ............................................................................................................ |
18 |
Video .................................................................................................................................................. |
19 |
VGA ................................................................................................................................... |
19 |
HDMI .................................................................................................................................. |
20 |
Configuring audio for HDMI ............................................................................... |
20 |
Intel Wireless Display (select models only) ....................................................... |
21 |
4 Power management ...................................................................................................................................... |
22 |
Shutting down the computer ............................................................................................................... |
22 |
Setting power options ......................................................................................................................... |
23 |
Using power-saving states ................................................................................................. |
23 |
Initiating and exiting Sleep ................................................................................ |
23 |
Initiating and exiting Hibernation ....................................................................... |
23 |
Using the power meter ....................................................................................................... |
24 |
Using power plans ............................................................................................................. |
24 |
Viewing the current power plan ......................................................................... |
24 |
Selecting a different power plan ........................................................................ |
24 |
Customizing power plans .................................................................................. |
25 |
Setting password protection on wakeup ............................................................................ |
25 |
Using Power Assistant (select models only) ...................................................................................... |
27 |
Using battery power ........................................................................................................................... |
27 |
Finding additional battery information ................................................................................ |
27 |
Using Battery Check .......................................................................................................... |
28 |
Displaying the remaining battery charge ........................................................................... |
28 |
Maximizing battery discharge time .................................................................................... |
28 |
Managing low battery levels .............................................................................................. |
28 |
Identifying low battery levels ............................................................................. |
28 |
Resolving a low battery level ............................................................................. |
29 |
Resolving a low battery level when external power is available ....... |
29 |
Resolving a low battery level when a charged battery is available ... |
29 |
Resolving a low battery level when no power source is available .... |
29 |
Resolving a low battery level when the computer cannot exit |
|
Hibernation ....................................................................................... |
29 |
Conserving battery power .................................................................................................. |
29 |
Storing a battery ................................................................................................................ |
30 |
Disposing of a used battery ............................................................................................... |
30 |
Replacing the battery ......................................................................................................... |
30 |
Using external AC power .................................................................................................................... |
30 |
vi
Testing an AC adapter ....................................................................................................... |
32 |
Switching between graphics modes (select models only) .................................................................. |
32 |
5 External cards and devices .......................................................................................................................... |
33 |
Using Media Card Reader cards (select models only) ....................................................................... |
33 |
Inserting a digital card ........................................................................................................ |
33 |
Removing a digital card ..................................................................................................... |
34 |
Using PC Cards (select models only) ................................................................................................. |
34 |
Configuring a PC Card ....................................................................................................... |
35 |
Inserting a PC Card ........................................................................................................... |
36 |
Removing a PC Card ......................................................................................................... |
37 |
Using ExpressCards (select models only) .......................................................................................... |
37 |
Configuring an ExpressCard .............................................................................................. |
37 |
Inserting an ExpressCard .................................................................................................. |
38 |
Removing an ExpressCard ................................................................................................ |
39 |
Using smart cards (select models only) ............................................................................................. |
39 |
Inserting a smart card ........................................................................................................ |
40 |
Removing a smart card ...................................................................................................... |
40 |
Using a USB device ........................................................................................................................... |
40 |
Connecting a USB device .................................................................................................. |
41 |
Removing a USB device .................................................................................................... |
41 |
Using 1394 devices (select models only) ........................................................................................... |
41 |
Connecting a 1394 device ................................................................................................. |
42 |
Removing a 1394 device ................................................................................................... |
42 |
Using an eSATA device (select models only) .................................................................................... |
42 |
Connecting an eSATA device ............................................................................................ |
43 |
Removing an eSATA device .............................................................................................. |
43 |
Using a serial device (select models only) ......................................................................................... |
44 |
Using optional external devices .......................................................................................................... |
44 |
Using optional external drives ............................................................................................ |
44 |
Using the expansion port (select models only) .................................................................. |
45 |
Using the docking connector (select models only) ............................................................ |
45 |
6 Drives ............................................................................................................................................................. |
47 |
Handling drives ................................................................................................................................... |
47 |
Using hard drives ............................................................................................................................... |
48 |
Improving hard drive performance ..................................................................................... |
48 |
Using Disk Defragmenter .................................................................................. |
48 |
Using Disk Cleanup ........................................................................................... |
48 |
Using HP 3D DriveGuard (select models only) .................................................................. |
49 |
Identifying HP 3D DriveGuard status ................................................................ |
49 |
vii
Managing power with a parked hard drive ........................................................ |
49 |
Using HP 3D DriveGuard software ................................................................... |
50 |
Using optical drives (select models only) ........................................................................................... |
50 |
Identifying the installed optical drive .................................................................................. |
50 |
Inserting an optical disc ..................................................................................................... |
50 |
Tray load ........................................................................................................... |
50 |
Slot load ............................................................................................................ |
51 |
Removing an optical disc ................................................................................................... |
51 |
Tray load ........................................................................................................... |
51 |
When the disc tray opens normally .................................................. |
52 |
When the disc tray fails to open normally ......................................... |
52 |
Slot load ............................................................................................................ |
53 |
Sharing optical drives ........................................................................................................ |
54 |
Using RAID (select models only) ........................................................................................................ |
54 |
7 Security .......................................................................................................................................................... |
55 |
Protecting the computer ..................................................................................................................... |
55 |
Using passwords ................................................................................................................................ |
56 |
Setting passwords in Windows .......................................................................................... |
56 |
Setting passwords in Computer Setup .............................................................................. |
57 |
Managing a BIOS administrator password ........................................................................ |
57 |
Entering a BIOS administrator password .......................................................... |
58 |
Managing a Computer Setup DriveLock password ........................................................... |
58 |
Setting a DriveLock password ........................................................................... |
59 |
Entering a DriveLock password ........................................................................ |
60 |
Changing a DriveLock password ...................................................................... |
60 |
Removing DriveLock protection ........................................................................ |
60 |
Using Computer Setup Auto DriveLock ............................................................................. |
61 |
Entering an Automatic DriveLock password ..................................................... |
61 |
Removing Automatic DriveLock protection ....................................................... |
61 |
Using antivirus software ..................................................................................................................... |
63 |
Using firewall software ....................................................................................................................... |
64 |
Installing critical security updates ....................................................................................................... |
65 |
Using HP ProtectTools Security Manager (select models only) ......................................................... |
66 |
Installing an optional security cable .................................................................................................... |
67 |
Using the fingerprint reader (select models only) ............................................................................... |
68 |
Locating the fingerprint reader ........................................................................................... |
68 |
8 Maintenance .................................................................................................................................................. |
69 |
Cleaning your computer ..................................................................................................................... |
70 |
Cleaning products .............................................................................................................. |
70 |
viii
Cleaning procedures .......................................................................................................... |
70 |
Cleaning the display .......................................................................................... |
70 |
Cleaning the sides and cover ............................................................................ |
70 |
Cleaning the TouchPad and keyboard .............................................................. |
71 |
Cleaning a tablet PC pen and pen holder ......................................................... |
71 |
Updating programs and drivers .......................................................................................................... |
71 |
Using SoftPaq Download Manager .................................................................................................... |
72 |
9 Computer Setup (BIOS) and System Diagnostics ..................................................................................... |
73 |
Using Computer Setup ....................................................................................................................... |
73 |
Starting Computer Setup ................................................................................................... |
73 |
Navigating and selecting in Computer Setup ..................................................................... |
73 |
Restoring factory settings in Computer Setup ................................................................... |
74 |
Updating the BIOS ............................................................................................................. |
75 |
Determining the BIOS version ........................................................................... |
75 |
Downloading a BIOS update ............................................................................. |
75 |
Using System Diagnostics .................................................................................................................. |
76 |
10 MultiBoot ..................................................................................................................................................... |
77 |
About the boot device order ............................................................................................................... |
77 |
Enabling boot devices in Computer Setup ......................................................................................... |
78 |
Considering boot order changes ........................................................................................................ |
79 |
Choosing MultiBoot preferences ........................................................................................................ |
80 |
Setting a new boot order in Computer Setup ..................................................................... |
80 |
Dynamically choosing a boot device using the F9 prompt ................................................. |
80 |
Setting a MultiBoot Express prompt .................................................................................. |
81 |
Entering MultiBoot Express preferences ........................................................................... |
81 |
11 Management ................................................................................................................................................ |
82 |
Using Client Management Solutions .................................................................................................. |
82 |
Configuring and deploying a software image ..................................................................... |
82 |
Managing and updating software ....................................................................................... |
83 |
HP Client Manager for Altiris (select models only) ............................................ |
83 |
HP CCM (Client Configuration Manager) (select models only) ......................... |
85 |
HP SSM (System Software Manager) ............................................................... |
85 |
Using Intel Active Management Technology (select models only) ..................................................... |
86 |
Enabling the iAMT solution ................................................................................................ |
87 |
Using the MEBx setup utility menus .................................................................................. |
87 |
Appendix A Traveling with the computer ...................................................................................................... |
89 |
ix
Appendix B Troubleshooting resources ....................................................................................................... |
91 |
Appendix C Electrostatic Discharge .............................................................................................................. |
92 |
Index ................................................................................................................................................................... |
93 |
x
1 Introduction
This guide contains general information about HP notebook computers.

 NOTE: Some of the features described in this guide may not be available on your computer.
Finding more information about your new computer
The following user guides and reference material are provided with your computer, either in print, on the computer hard drive, or on an optical disc or SD Card:
●Setup Instructions poster—Guides you through setting up your computer and turning it on. The poster is included in the box with the computer.

 NOTE: Refer to the poster for the location of your user guides and reference material.
●Getting Started—Contains information about your computer, including product-specific features, backup and recovery, maintenance, and specifications.
●Help and Support—Contains information about the operating system, drivers, troubleshooting tools, and technical support. To access Help and Support, select Start > Help and Support. For countryor region-specific support, go to http://www.hp.com/support, select your country or region, and follow the on-screen instructions.
●Safety & Comfort Guide—Describes proper workstation setup and proper posture, health, and work habits for computer users. It also provides important electrical and mechanical safety information. To access this guide, select Start > Help and Support > User Guides. This guide is also available on the Web at http://www.hp.com/ergo.
●Regulatory, Safety and Environmental Notices—Contains safety and regulatory information, and battery disposal information. To access the notices, select Start > Help and Support > User Guides.
Finding more information about your new computer |
1 |

2 Networking (select models only)
Your computer supports two types of Internet access:
●Wireless—Refer to Creating a wireless connection on page 2.
●Wired—Refer to Connecting to a wired network on page 9.

 NOTE: You must set up Internet service before you can connect to the Internet.
Creating a wireless connection
Your computer may be equipped with one or more of the following wireless devices:
●Wireless local area network (WLAN) device
●HP Mobile Broadband Module (wireless wide area network (WWAN) device)
●Bluetooth® device
For more information on wireless technology, refer to the information and Web site links provided in Help and Support.
Identifying wireless and network status icons
Windows® 7
Icon |
Name |
Description |
|
|
|
|
Wireless (connected) |
Indicates that one or more wireless devices are on. |
|
|
|
|
Wireless (disconnected) |
Indicates that all wireless devices are off. |
|
|
|
|
HP Connection Manager |
Opens HP Connection Manager, which enables you to create and manage |
|
(select models only) |
WWAN connections (select models only), and monitor the status of WLAN |
|
|
and Bluetooth connections. |
|
|
|
|
Wired network (connected) |
Indicates that one or more network devices are connected to the network. |
|
|
|
2 |
Chapter 2 Networking (select models only) |
 A7K09UT, LQ589AW, LQ322AV, XU053UT, XU016UT User Manual")
Network (disabled/ |
Indicates that all network devices are disabled in Windows Control Panel. |
disconnected) |
|
|
|
Network (connected) |
Indicates that one or more network devices are connected to a network. |
|
|
Network (disconnected) |
Indicates that network devices are not connected to a network. |
|
|
Network (disabled/ |
Indicates that no wireless connections are available. |
disconnected) |
|
|
|
Windows Vista®
Icon |
Name |
Description |
|
|
|
|
Wireless (connected) |
Indicates that one or more wireless devices are on. |
|
|
|
|
Wireless (disconnected) |
Indicates that all wireless devices are off. |
|
|
|
|
HP Connection Manager (select models only) |
Opens HP Connection Manager, which enables you to |
|
|
create and manage WWAN connections (select models |
|
|
only), and monitor the status of WLAN and Bluetooth |
|
|
connections. |
|
|
|
|
Wireless network connection (connected) |
Indicates that one or more WLAN devices are connected to |
|
|
a network. |
|
|
|
|
Wireless network connection (disconnected) |
Indicates that one or more WLAN devices are not |
|
|
connected to a network. |
|
|
|
|
Network status (connected) |
Connected to the wired network. |
|
|
|
|
Network status (disconnected) |
Not connected to the wired network. |
|
|
|
Creating a wireless connection |
3 |

Turning wireless devices on or off
You can use the wireless button or HP Connection Manager (select models only) to turn on and turn off wireless devices.

 NOTE: A computer may have a wireless button, a wireless switch, or a wireless key on the keyboard. The term wireless button is used throughout this guide to refer to all types of wireless controls. Refer to the Getting Started guide for information on identifying the location of the wireless button on your computer.
To turn off wireless devices using HP Connection Manager:
▲Right-click the HP Connection Manager icon in the notification area, at the far right of the taskbar, and then click the power button next to the desired device.
– or –
Select Start > All Programs > HP > HP Connection Manager, and then click the power button next to the desired device.
Using HP Connection Manager (select models only)
HP Connection Manager provides a central location for managing your wireless devices, an interface for connecting to the Internet using HP Mobile Broadband, and an interface for sending and receiving SMS (text) messages. HP Connection Manager allows you to manage the following devices:
●Wireless local area network (WLAN)/WiFi
●Wireless wide area network (WWAN)/HP Mobile Broadband
●Bluetooth®
HP Connection Manager provides information and notifications on connection status, power status, SIM details, and SMS messages. Status information and notifications are provided in the notification area, at the far right of the task bar.
To open HP Connection Manager:
▲Click the HP Connection Manager icon in the task bar.
– or –
Click Start > All Programs > HP > HP Connection Manager.
For more information, refer to the HP Connection Manager software Help.
Using operating system controls
The Network and Sharing Center allows you to set up a connection or network, connect to a network, manage wireless networks, and diagnose and repair network problems.
To use operating system controls:
▲ Select Start > Control Panel > Network and Internet > Network and Sharing Center.
For more information, select Start > Help and Support.
4 |
Chapter 2 Networking (select models only) |

Using a WLAN
A wireless connection connects the computer to Wi-Fi networks, or WLANs. A WLAN is composed of other computers and accessories that are linked by a wireless router or a wireless access point.
Connecting to an existing WLAN
Windows 7
1.Be sure that the WLAN device is on. (Refer to Turning wireless devices on or off on page 4).
2.Click the network icon in the notification area, at the far right of the taskbar.
3.Select your WLAN from the list.
4.Click Connect.
If the network is a security-enabled WLAN, you are prompted to enter a network security code. Type the code, and then click OK to complete the connection.

 NOTE: If no WLANs are listed, you may be out of range of a wireless router or access point.
NOTE: If you do not see the WLAN you want to connect to, click Open Network and Sharing Center, and then click Set up a new connection or network. A list of options is displayed. You can choose to manually search for and connect to a network or to create a new network connection.
Windows Vista
1.Be sure that the WLAN device is on. (Refer to Turning wireless devices on or off on page 4.)
2.Select Start > Connect to.
3.Select your WLAN from the list.
●If the network is unsecured, a warning is displayed. Click Connect Anyway to accept the warning and complete the connection.
●If the network is a security-enabled WLAN, you are prompted to enter a network security code. Type the code, and then click Connect to complete the connection.

 NOTE: If no WLANs are listed, you may be out of range of a wireless router or access point.
NOTE: If you do not see the WLAN you want to connect to, click Show all connections. A list of available networks is displayed. You can choose to connect to an existing network or you can create a new network connection.
After the connection is made, you can place the mouse pointer over the network icon in the notification area, at the far right of the taskbar, to verify the name and status of the connection.

 NOTE: The functional range (how far your wireless signals travel) depends on WLAN implementation, router manufacturer, and interference from other electronic devices or structural barriers such as walls and floors.
Using a WLAN 5
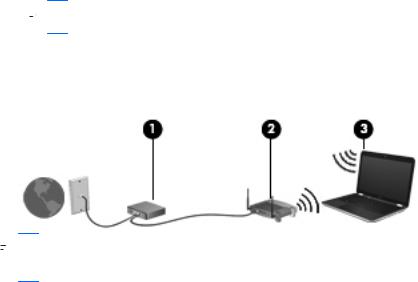
Setting up a new WLAN
Required equipment:
●A broadband modem (either DSL or cable) (purchased separately) (1) and high-speed Internet service purchased from an Internet service provider (ISP)
●A wireless router (purchased separately) (2)

 NOTE: Some cable modems include a built-in router. Check with your ISP to see if you need a separate router.
●The wireless computer (3)
The illustration below shows an example of a wireless network installation that is connected to the Internet.

 NOTE: When setting up a wireless connection, be sure that your computer and wireless router are synchronized. To synchronize your computer and wireless router, turn your computer and wireless router off and then back on.
As your network grows, additional wireless and wired computers can be connected to the network to access the Internet.
For help in setting up your WLAN, refer to the information provided by your router manufacturer or your ISP.
Protecting your WLAN
When you set up a WLAN or access an existing WLAN, always enable security features to protect your network from unauthorized access. WLANs in public areas (hotspots) like coffee shops and airports may not provide any security. If you are concerned about the security of your computer in a hotspot, limit your network activities to e-mail that is not confidential and basic Internet surfing.
Wireless radio signals travel outside the network, so other WLAN devices can pick up unprotected signals. You can take the following precautions to protect your WLAN:
●Firewall—A firewall checks both data and requests for data that are sent to your network, and discards any suspicious items. Firewalls are available in both software and hardware. Some networks use a combination of both types.
●Wireless encryption—Wi-Fi Protected Access (WPA) uses security settings to encrypt and decrypt data transmitted over the network. WPA uses Temporal Key Integrity Protocol (TKIP) to dynamically generate a new key for every packet. It also generates different sets of keys for each computer on the network.
Roaming to another network
When you move your computer within range of another WLAN, Windows attempts to connect to that network. If the attempt is successful, your computer is automatically connected to the new network. If
6 |
Chapter 2 Networking (select models only) |

Windows does not recognize the new network, follow the same procedure you used initially to connect to your WLAN.
Using HP Mobile Broadband (select models only)
HP Mobile Broadband enables your computer to use wireless wide area networks (WWANs) to access the Internet from more places and over larger areas than it can by using WLANs. Using HP Mobile Broadband requires a network service provider, which in most cases is a mobile phone network provider.
When used with mobile network provider service, HP Mobile Broadband gives you the freedom to stay connected to the Internet, send e-mail, or connect to your corporate network whether you are on the road or outside the range of Wi-Fi hotspots.

 NOTE: You may need the HP Mobile Broadband Module serial number to activate mobile broadband service. Refer to the Getting Started guide for the location of the serial number.
Some mobile network service providers require the use of a subscriber identity module (SIM). A SIM contains basic information about you or your computer, such as a personal identification number (PIN), as well as network information. Some computers include a preinstalled SIM. If the SIM is not preinstalled, it may be included with the HP Mobile Broadband information provided with your computer, or it may be provided separately by the mobile network service provider.
For information on inserting and removing the SIM, refer to Inserting a SIM on page 7 and Removing a SIM on page 8.
For information on HP Mobile Broadband and how to activate service with a preferred mobile network service provider, refer to the HP Mobile Broadband information included with your computer. For additional information, see the HP Web site at http://www.hp.com/go/mobilebroadband (U.S. only).
Inserting a SIM

 NOTE: To identify the SIM slot location, refer to the Getting Started guide.
1.Shut down the computer. If you are not sure whether the computer is off or in Hibernation, turn the computer on by pressing the power button. Then shut down the computer through the operating system.
2.Close the display.
3.Disconnect all external devices connected to the computer.
4.Unplug the power cord from the AC outlet.
5.Remove the battery.
6.Insert the SIM into the SIM slot, and gently press the SIM into the slot until it is firmly seated.
 CAUTION: When inserting a SIM, position the card to match the icon next to the SIM slot on the computer. If a SIM is inserted incorrectly, it could damage the SIM and the SIM connector.
To reduce the risk of damage to the connector, use minimal force when inserting a SIM.
7.Replace the battery.

 NOTE: HP Mobile Broadband is disabled if the battery is not replaced.
Using HP Mobile Broadband (select models only) |
7 |

8.Reconnect external power and external devices.
9.Turn on the computer.
Removing a SIM

 NOTE: To identify the SIM slot location, refer to the Getting Started guide.
1.Shut down the computer. If you are not sure whether the computer is off or in Hibernation, turn the computer on by pressing the power button. Then shut down the computer through the operating system.
2.Close the display.
3.Disconnect all external devices connected to the computer.
4.Unplug the power cord from the AC outlet.
5.Remove the battery.
6.Press in on the SIM, and then remove it from the slot.
7.Replace the battery.
8.Reconnect external power and external devices.
9.Turn on the computer.
Using GPS (select models only)
Your computer may be equipped with a Global Positioning System (GPS). GPS satellites deliver location, speed, and direction information to GPS-equipped systems.
For more information, refer to the HP GPS and Location software Help.
Using Bluetooth wireless devices
A Bluetooth device provides short-range wireless communications that replace the physical cable connections that traditionally link electronic devices such as the following:
●Computers
●Phones
●Imaging devices (cameras and printers)
●Audio devices
Bluetooth devices provide peer-to-peer capability that allows you to set up a personal area network (PAN) of Bluetooth devices. For information on configuring and using Bluetooth devices, refer to the Bluetooth software Help.
Bluetooth and Internet Connection Sharing (ICS)
HP does not recommend setting up one computer with Bluetooth as a host and using it as a gateway through which other computers may connect to the Internet. When two or more computers are
8 |
Chapter 2 Networking (select models only) |
connected using Bluetooth, and Internet Connection Sharing (ICS) is enabled on one of the computers, the other computers may not be able to connect to the Internet using the Bluetooth network.
The strength of Bluetooth is in synchronizing information transfers between your computer and wireless devices including cellular phones, printers, cameras, and PDAs. The inability to consistently connect two or more computers to share the Internet through Bluetooth is a limitation of Bluetooth and the Windows operating system.
Connecting to a wired network
Using a modem (select models only)
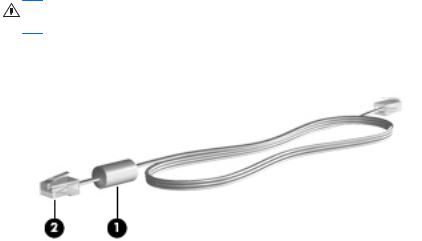
A modem must be connected to an analog telephone line using a 6-pin, RJ-11 modem cable (purchased separately). In some countries or regions, a specific modem cable adapter is also required. Jacks for digital PBX systems may resemble analog telephone jacks, but they are not compatible with the modem.
WARNING! To reduce the risk of electric shock, fire, or damage to the equipment, do not plug a modem or telephone cable into the RJ-45 (network) jack.
If the modem cable contains noise suppression circuitry (1), which prevents interference from TV and radio reception, orient the circuitry end of the cable (2) toward the computer.
Connecting a modem cable
1.Plug the modem cable into the modem jack (1) on the computer.
Connecting to a wired network |
9 |
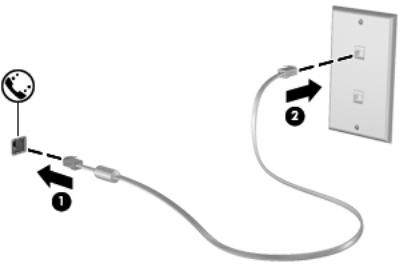
2.Plug the modem cable into the RJ-11 telephone wall jack (2).
10 Chapter 2 Networking (select models only)
Connecting a countryor region-specific modem cable adapter
Telephone jacks vary by country or region. To use the modem and the modem cable outside the country or region in which you purchased the computer, you must obtain a countryor region-specific modem cable adapter.
To connect the modem to an analog telephone line that does not have an RJ-11 telephone jack, follow these steps:
1.Plug the modem cable into the modem jack (1) on the computer.
2.Plug the modem cable into the modem cable adapter (2).
3.Plug the modem cable adapter (3) into the telephone wall jack.
Selecting a location setting
Viewing the current location selection
Windows 7
1.Select Start > Control Panel.
2.Click Clock, Language, and Region.
3.Click Region and Language.
4.Click the Location tab to display your location.
Windows Vista
1.Select Start > Control Panel.
2.Click Clock, Language, and Region.
3.Click Regional and Language Options. Your location is displayed under Location.
Connecting to a wired network 11

Adding new locations when traveling
On a new computer, the only location setting available to the modem is a location setting for the country or region in which you purchased the computer. As you travel to different countries or regions, set the internal modem to a location setting that meets the operating standards of the country or region in which you are using the modem.
As you add new location settings, they are saved by the computer so that you can switch among settings at any time. You can add multiple location settings for any country or region.
CAUTION: To reduce the risk of losing your home country or region settings, do not delete your current modem country or region settings. To enable modem use in other countries or regions while preserving your home country or region configuration, add a new configuration for each location in which you will use the modem.
CAUTION: To reduce the risk of configuring the modem in a way that violates the telecommunications regulations and laws of the country or region you are visiting, select the country or region in which the computer is located. The modem may not function properly if the correct country or region selection is not made.
Windows 7
1.Select Start > Device and Printers.
2.Right-click the device that represents your computer, and click Modem settings.

 NOTE: You must set up an initial (current) location area code before you can view the Dialing Rules tab. If you do not have a location already set up, you are prompted to enter the location when you click Modem settings.
3.Click the Dialing Rules tab.
4.Click New. The New Location window opens.
5.In the Location name box, type a name (such as home or work) for the new location setting.
6.Select a country or region from the Country/region list. (If you select a country or region that is not supported by the modem, the country/region selection for USA or UK is displayed.)
7.Enter the area code, a carrier code (if necessary), and the number for an outside line (if necessary).
8.Next to Dial using, click Tone or Pulse.
9.Click OK to save your new location setting.
10.Do one of the following:
●To set your new location setting as the current location, click OK.
●To select another location setting as the current location setting, select your preference from the settings in the Location list, and then click OK.

 NOTE: You can use the preceding procedure to add location settings for places within your own country or region as well as in other countries or regions. For example, you could add a setting named Work that includes dialing rules for accessing an outside line.
12 Chapter 2 Networking (select models only)
Windows Vista
1.Select Start > Control Panel.
2.Click Hardware and Sound.
3.Click Phone and Modem Options.
4.Click the Dialing Rules tab.
5.Click New. The New Location window opens.
6.In the Location name box, type a name (such as home or work) for the new location setting.
7.Select a country or region from the Country/region list. (If you select a country or region that is not supported by the modem, the country/region selection for USA or UK is displayed.)
8.Enter the area code, a carrier code (if necessary), and the number for an outside line (if necessary).
9.Next to Dial using, click Tone or Pulse.
10.Click OK to save your new location setting.
11.Do one of the following:
●To set your new location setting as the current location, click OK.
●To select another location setting as the current location setting, select your preference from the settings in the Location list, and then click OK.

 NOTE: You can use the preceding procedure to add location settings for places within your own country or region as well as in other countries or regions. For example, you could add a setting named Work that includes dialing rules for accessing an outside line.
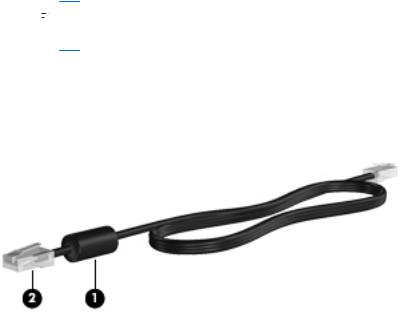
Connecting to a local area network (LAN) (select models only)
Connecting to a LAN requires an 8-pin, RJ-45 network cable (purchased separately). If the network cable contains noise suppression circuitry (1), which prevents interference from TV and radio reception, orient the circuitry end of the cable (2) toward the computer.
To connect the network cable:
1.Plug the network cable into the network jack (1) on the computer.
Connecting to a wired network 13

2.Plug the other end of the network cable into a network wall jack (2).
WARNING! To reduce the risk of electric shock, fire, or damage to the equipment, do not plug a modem cable or telephone cable into an RJ-45 (network) jack.
14 Chapter 2 Networking (select models only)

3 Multimedia
Your computer may include the following:
●Integrated speaker(s)
●Integrated microphone(s)
●Integrated webcam
●Preinstalled multimedia software
●Multimedia buttons or keys
Using the media activity controls
Depending on your computer model, you may have the following media activity controls that allow you to play, pause, fast forward, or rewind a media file:
●Media buttons
●Media hotkeys (specific keys pressed in combination with the fn key)
●Media keys
Refer to the Getting Started guide for information about your computer's media activity controls.
Audio
Your computer provides a variety of audio-related functions:
●Play music.
●Record sound.
●Download music from the Internet.
●Create multimedia presentations.
●Transmit sound and images with instant messaging programs.
●Stream radio programs.
●Create (burn) audio CDs using the installed optical drive (select models only) or on an optional external optical drive (purchased separately).
Using the media activity controls 15

Adjusting the volume
Depending on your computer model, you can adjust the volume using the following:
●Volume buttons
●Volume hotkeys (specific keys pressed in combination with the fn key)
●Volume keys
WARNING! To reduce the risk of personal injury, adjust the volume before putting on headphones, earbuds, or a headset. For additional safety information, refer to the Regulatory, Safety and Environmental Notices.

 NOTE: Volume can also be controlled through the operating system and some programs.
NOTE: Refer to the Getting Started guide for information on what type of volume controls your computer has.
Checking audio functions on the computer

 NOTE: For best results when recording, speak directly into the microphone and record sound in a setting free of background noise.
Windows 7
To check the audio functions on your computer, follow these steps:
1.Select Start > Control Panel > Hardware and Sound > Sound.
2.When the Sound window opens, click the Sounds tab. Under Program Events, select any sound event, such as a beep or alarm, and click the Test button.
You should hear sound through the speakers or through connected headphones.
To check the recording functions on your computer, follow these steps:
1.Select Start > All Programs > Accessories > Sound Recorder.
2.Click Start Recording and speak into the microphone. Save the file to your desktop.
3.Open a multimedia program and play back the sound.
To confirm or change the audio settings on your computer, select Start > Control Panel > Hardware and Sound > Sound.
Windows Vista
To check the audio functions on your computer, follow these steps:
1.Select Start > Control Panel > Hardware and Sound > Sound.
2.When the Sound window opens, click the Sounds tab. Under Program, select any sound event, such as a beep or alarm, and click the Test button.
You should hear sound through the speakers or through connected headphones.
16 Chapter 3 Multimedia
To check the recording functions on your computer, follow these steps:
1.Select Start > All Programs > Accessories > Sound Recorder.
2.Click Start Recording and speak into the microphone. Save the file to your desktop.
3.Open a multimedia program and play back the sound.
To confirm or change the audio settings on your computer, select Start > Control Panel > Audio.
Audio 17
Webcam (select models only)
Some computers include an integrated webcam. With the preinstalled software, you can use the webcam to take a photo or record a video. You can preview and save the photo or video recording.
The webcam software enables you to experiment with the following features:
●Capturing and sharing video
●Streaming video with instant message software
●Taking still photos
For information on how to access the webcam, refer to the Getting Started guide. For information on using the webcam, select Start > Help and Support.
18 Chapter 3 Multimedia
Video
Your computer may have one or more of the following external video ports:
●VGA
●HDMI (High Definition Multimedia Interface)

 NOTE: Refer to the Getting Started guide for information about your computer's video ports.
VGA
The external monitor port, or VGA port, is an analog display interface that connects an external VGA display device such as an external VGA monitor or a VGA projector to the computer.
▲To connect a VGA display device, connect the device cable to the external monitor port.

 NOTE: For product-specific instructions on switching the screen image, refer to your Getting Started guide.
Video 19
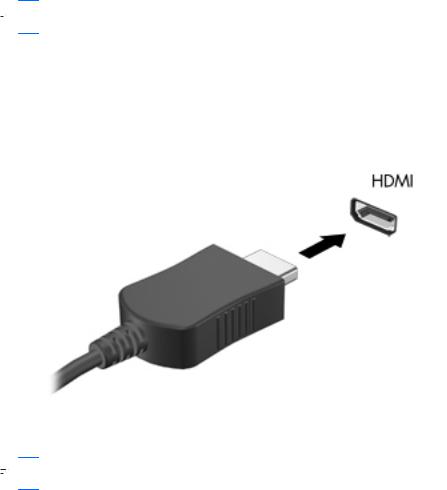
HDMI
The HDMI port connects the computer to an optional video or audio device, such as a high-definition television, or to any compatible digital or audio component.

 NOTE: To transmit video signals through the HDMI port, you need an HDMI cable (purchased separately).
One HDMI device can be connected to the HDMI port on the computer. The information displayed on the computer screen can be simultaneously displayed on the HDMI device.
To connect a video or audio device to the HDMI port:
1.Connect one end of the HDMI cable to the HDMI port on the computer.
2.Connect the other end of the cable to the video device, and then refer to the device manufacturer’s instructions for additional information.

 NOTE: For product-specific instructions on switching the screen image, refer to your Getting Started guide.
Configuring audio for HDMI
To configure HDMI audio, first connect an audio or video device, such as a high-definition TV, to the HDMI port on your computer. Then configure the default audio playback device as follows:
1.Right-click the Speakers icon in the notification area, at the far right of the taskbar, and then click Playback devices.
2.On the Playback tab, click either Digital Output or Digital Output Device (HDMI).
3.Click Set Default, and then click OK.
To return audio to the computer speakers, follow these steps:
1.Right-click the Speakers icon in the notification area, at the far right of the taskbar, and then click Playback devices.
2.On the Playback tab, click Speakers.
3.Click Set Default, and then click OK.
20 Chapter 3 Multimedia
Loading...