


 Loading...
HP Access Control (HP AC) Job Accounting
User Guide
© Copyright 2013 Hewlett-Packard
Development Company, L.P.
Microsoft, Windows, and Windows NT are U.S. registered trademarks of Microsoft Corporation.
September 2013
Confidential computer software. Valid license from HP required for possession, use or copying. Consistent with FAR 12.211 and 12.212, Commercial Computer Software, Computer Software Documentation, and Technical Data for Commercial Items are licensed to the U.S. Government under vendor’s standard commercial license.
The information contained herein is subject to change without notice. The only warranties for HP products and services are set forth in the express warranty statements accompanying such products and services. Nothing herein should be construed as constituting an additional warranty. HP shall not be liable for technical or editorial errors or omissions contained herein.

Table of contents
1 HP Access Control (HP AC) Job Accounting ........................................................................................................ |
1 |
1.1 Overview .......................................................................................................................................................... |
1 |
2 HP Access Control (HP AC) Job Accounting Architecture .................................................................................... |
2 |
2.1 Windows print system ..................................................................................................................................... |
2 |
2.2 HP Access Control (HP AC) Job Accounting print system integration ............................................................. |
3 |
3 Information flow ........................................................................................................................................... |
5 |
3.1 HP Access Control (HP AC) Job Accounting print server ................................................................................. |
5 |
4 Getting started ............................................................................................................................................. |
7 |
4.1 Login page ........................................................................................................................................................ |
7 |
4.2 Information page ............................................................................................................................................. |
8 |
4.3 Remote control panel ...................................................................................................................................... |
8 |
4.4 General display window ................................................................................................................................... |
9 |
4.5 License ........................................................................................................................................................... |
10 |
4.5.1 Licensing details ...................................................................................................................... |
10 |
4.6 User ................................................................................................................................................................ |
10 |
4.7 Missing information ....................................................................................................................................... |
11 |
4.8 Miscellaneous ................................................................................................................................................ |
11 |
4.9 HP Access Control (HP AC) Job Accounting interface .................................................................................... |
12 |
4.9.1 Information .............................................................................................................................. |
12 |
4.9.2 Functionalities .......................................................................................................................... |
12 |
4.9.3 Managing HP Access Control (HP AC) Job Accounting lists ..................................................... |
13 |
4.10 Database Manager ...................................................................................................................................... |
13 |
5 HP Access Control (HP AC) Job Accounting administration ............................................................................... |
15 |
5.1 Accounts options ........................................................................................................................................... |
16 |
5.2 Create an account .......................................................................................................................................... |
16 |
5.3 Modify an account ......................................................................................................................................... |
17 |
5.4 Delete an account .......................................................................................................................................... |
17 |
5.5 Currencies ...................................................................................................................................................... |
17 |
5.5.1 Add a currency .......................................................................................................................... |
18 |
5.5.2 Define an exchange rate .......................................................................................................... |
19 |
5.6 Delete an exchange rate ............................................................................................................................... |
20 |
5.7 Modify a currency .......................................................................................................................................... |
20 |
iii
5.8 Delete a currency ........................................................................................................................................... |
20 |
5.9 Active Directory ............................................................................................................................................. |
21 |
5.10 Retrieving user data .................................................................................................................................... |
22 |
5.11 Group Organization ..................................................................................................................................... |
24 |
5.12 Group management .................................................................................................................................... |
24 |
5.13 Group management functions .................................................................................................................... |
25 |
5.14 Manual Scan ................................................................................................................................................. |
27 |
5.15 Customize reports ....................................................................................................................................... |
28 |
5.16 Email ............................................................................................................................................................ |
29 |
5.17 Create an email address .............................................................................................................................. |
30 |
5.18 Modify an email address ............................................................................................................................. |
31 |
5.19 Delete an email address .............................................................................................................................. |
31 |
5.20 Distribution lists .......................................................................................................................................... |
32 |
5.20.1 Create a distribution list ........................................................................................................ |
32 |
5.20.2 Modify a list ............................................................................................................................ |
33 |
5.20.3 Delete a list ............................................................................................................................ |
34 |
5.21 Configuring the email server ....................................................................................................................... |
34 |
5.21.1 Configure the server .............................................................................................................. |
35 |
5.21.2 Modify the server configuration ............................................................................................ |
35 |
5.21.3 Delete the server configuration ............................................................................................ |
36 |
5.22 Printer templates ........................................................................................................................................ |
36 |
5.22.1 Create a printer template ...................................................................................................... |
37 |
5.22.2 Assign a printer template ...................................................................................................... |
38 |
5.22.3 Modify a printer template ...................................................................................................... |
39 |
5.22.4 Delete a template .................................................................................................................. |
39 |
6 Configuring data collectors .......................................................................................................................... |
41 |
6.1 HP Access Control (HP AC) Agent .................................................................................................................. |
41 |
6.2 HP Statistics ................................................................................................................................................... |
41 |
6.3 HP Access Control (HP AC) Job Accounting print server ............................................................................... |
42 |
6.4 DesignJet configuration ................................................................................................................................ |
45 |
6.5 Schedule job retrieval .................................................................................................................................... |
46 |
6.6 Schedule DesignJet retrieval ......................................................................................................................... |
47 |
6.7 SAP tracking ................................................................................................................................................... |
48 |
6.8 Direct Tracking Module (DTM) ....................................................................................................................... |
48 |
6.8.1 DTM options ............................................................................................................................. |
49 |
7 Viewing the print server ............................................................................................................................... |
51 |
7.1 Print servers .................................................................................................................................................. |
51 |
7.1.1 Printers ..................................................................................................................................... |
52 |
iv
8 Manage print costs ...................................................................................................................................... |
54 |
8.1 Cost control overview .................................................................................................................................... |
54 |
8.2 Cost management page ................................................................................................................................ |
55 |
8.3 Actual costs: printers ..................................................................................................................................... |
55 |
8.3.1 Manual actual costs ................................................................................................................. |
55 |
8.3.2 Create actual printer costs ...................................................................................................... |
56 |
8.3.3 Modify a printer actual cost ..................................................................................................... |
58 |
8.3.4 Delete a printer actual cost ..................................................................................................... |
58 |
8.3.5 Actual costs: media .................................................................................................................. |
58 |
8.4 Define fixed costs .......................................................................................................................................... |
60 |
8.4.1 Fixed costs ............................................................................................................................... |
60 |
8.4.2 Modify a fixed cost ................................................................................................................... |
63 |
8.4.3 Delete a fixed cost ................................................................................................................... |
64 |
8.4.4 Lease costs ............................................................................................................................... |
64 |
8.4.5 Schedule: Costs calculation ..................................................................................................... |
66 |
9 Cost center .................................................................................................................................................. |
67 |
9.1 Managing or creating ..................................................................................................................................... |
67 |
9.1.1 Manage a cost center ............................................................................................................... |
67 |
9.1.1.1 Add a cost center ................................................................................................ |
67 |
9.1.1.2 Import a cost center ........................................................................................... |
68 |
9.1.1.3 Delete a cost center ............................................................................................ |
68 |
9.1.2 Assign users to a cost center ................................................................................................... |
69 |
9.1.3 Assign printers ......................................................................................................................... |
70 |
10 HP Access Control (HP AC) Job Accounting user options ................................................................................. |
71 |
10.1 Options ........................................................................................................................................................ |
71 |
10.1.1 User options ........................................................................................................................... |
72 |
10.1.1.1 Language/currency .......................................................................................... |
72 |
10.1.1.2 Number of lines in lists ..................................................................................... |
73 |
10.1.1.3 Email address ................................................................................................... |
73 |
10.1.1.4 Data format ...................................................................................................... |
74 |
10.1.2 Set passwords ........................................................................................................................ |
74 |
10.1.3 Queries in progress ................................................................................................................ |
74 |
10.1.4 Print organization .................................................................................................................. |
75 |
11 Perform a query ......................................................................................................................................... |
77 |
11.1 Queries ......................................................................................................................................................... |
77 |
11.1.1 Initiate a query ....................................................................................................................... |
77 |
11.2 HP Access Control (HP AC) Job Accounting queries .................................................................................... |
78 |
v
11.2.1 Query types ............................................................................................................................ |
79 |
11.2.1.1 Users ................................................................................................................. |
79 |
11.2.1.2 Printers ............................................................................................................. |
82 |
11.2.1.3 Cost centers ...................................................................................................... |
86 |
11.2.1.4 Costs ................................................................................................................. |
87 |
11.2.1.5 Printer options ................................................................................................. |
89 |
11.2.1.6 Allocation .......................................................................................................... |
90 |
11.2.1.7 Quota ................................................................................................................ |
92 |
11.2.2 Launch a query ....................................................................................................................... |
93 |
11.2.3 Default mode ......................................................................................................................... |
93 |
11.2.4 Parameterized mode ............................................................................................................. |
93 |
11.2.5 Edit results ............................................................................................................................. |
94 |
11.3 Parameterize queries .................................................................................................................................. |
94 |
11.3.1 Name a query ......................................................................................................................... |
95 |
11.3.2 Recipient email addresses ..................................................................................................... |
95 |
11.3.3 Select the domain .................................................................................................................. |
95 |
11.3.4 Group ...................................................................................................................................... |
95 |
11.3.5 End user ................................................................................................................................. |
95 |
11.3.6 Document titles starting with... ............................................................................................. |
96 |
11.3.7 Print server ............................................................................................................................ |
96 |
11.3.8 Printer queue ......................................................................................................................... |
96 |
11.3.9 Set printer models ................................................................................................................. |
96 |
11.3.10 Printer .................................................................................................................................. |
96 |
11.3.11 Date ...................................................................................................................................... |
96 |
11.3.12 Printing date from ............................................................................................................... |
96 |
11.3.13 To ......................................................................................................................................... |
96 |
11.3.14 Time lapse ............................................................................................................................ |
96 |
11.3.15 Printing for the last... .......................................................................................................... |
97 |
11.3.16 First n... ................................................................................................................................ |
97 |
11.3.17 Number of printed pages ..................................................................................................... |
97 |
11.3.18 Printing cost ......................................................................................................................... |
97 |
11.3.19 Currency ............................................................................................................................... |
97 |
11.4 Schedule queries ......................................................................................................................................... |
97 |
11.4.1 Once ....................................................................................................................................... |
98 |
11.4.2 Daily ....................................................................................................................................... |
99 |
11.4.3 Weekly ................................................................................................................................. |
100 |
11.4.4 Monthly ................................................................................................................................ |
101 |
11.4.5 Monthly with relative interval ............................................................................................. |
102 |
11.4.6 Run when idle ...................................................................................................................... |
103 |
11.4.7 Modify display parameters .................................................................................................. |
103 |
vi
12 Query results ........................................................................................................................................... |
104 |
12.1 Query table ................................................................................................................................................ |
104 |
12.2 Query status .............................................................................................................................................. |
105 |
12.3 Viewing schedule parameters ................................................................................................................... |
105 |
12.4 Display results ........................................................................................................................................... |
105 |
12.4.1 Information provided ........................................................................................................... |
105 |
12.5 Display types ............................................................................................................................................. |
106 |
12.5.1 Manage results .................................................................................................................... |
111 |
12.5.2 Modify parameters .............................................................................................................. |
111 |
12.5.3 Modify the display ............................................................................................................... |
112 |
13 Report management ................................................................................................................................ |
113 |
13.1 Report management page ........................................................................................................................ |
113 |
13.1.1 Create a report ..................................................................................................................... |
113 |
14 Allocation ............................................................................................................................................... |
116 |
14.1 Create allocation profiles .......................................................................................................................... |
116 |
14.2 Modify profile structure ............................................................................................................................ |
117 |
14.3 Modify field values .................................................................................................................................... |
118 |
14.4 Modify default value ................................................................................................................................. |
119 |
14.5 Modify list .................................................................................................................................................. |
119 |
14.6 Delete allocation profiles .......................................................................................................................... |
120 |
14.7 Link a job to an allocation profile ............................................................................................................. |
121 |
14.8 Modify allocation information .................................................................................................................. |
123 |
15 Quota module .......................................................................................................................................... |
125 |
15.1 Quota defaults ........................................................................................................................................... |
126 |
15.2 Quota user ................................................................................................................................................. |
128 |
15.3 Quota cost center ...................................................................................................................................... |
129 |
15.4 Quota printers ........................................................................................................................................... |
130 |
15.5 Assign quota printers to cost center ........................................................................................................ |
131 |
15.6 Import quota ............................................................................................................................................. |
132 |
15.7 Assign cost centers to quota account ....................................................................................................... |
133 |
15.8 Configure quota for printing using print server ....................................................................................... |
134 |
15.9 Adding new users to the quota control .................................................................................................... |
135 |
15.9.1 First print ............................................................................................................................. |
136 |
15.9.2 First access to the MyQuota ................................................................................................ |
136 |
15.9.3 First install of Quota Client .................................................................................................. |
137 |
15.9.4 Import quota ........................................................................................................................ |
137 |
15.10 End user notification ............................................................................................................................... |
138 |
vii
15.10.1 Messenger Service ............................................................................................................. |
138 |
16 Quota Client ............................................................................................................................................ |
140 |
17 MyQuota website ..................................................................................................................................... |
141 |
18 Job Accounting Print Client ....................................................................................................................... |
142 |
19 External reports ...................................................................................................................................... |
144 |
19.1 Report activities ........................................................................................................................................ |
144 |
19.2 External report management ................................................................................................................... |
144 |
19.3 Manage folders .......................................................................................................................................... |
145 |
19.4 Manage data sources ................................................................................................................................ |
145 |
19.5 Add a data source ...................................................................................................................................... |
146 |
19.6 Manage models ......................................................................................................................................... |
147 |
19.6.1 Add a model ......................................................................................................................... |
147 |
19.6.2 Delete a model ..................................................................................................................... |
147 |
19.6.3 Assign data source to model ............................................................................................... |
147 |
19.7 Manage reports ......................................................................................................................................... |
148 |
19.7.1 Add a report ......................................................................................................................... |
149 |
19.7.2 Assign model to report ........................................................................................................ |
150 |
19.7.3 Assign data source to report ............................................................................................... |
151 |
19.7.4 Delete a report ..................................................................................................................... |
151 |
19.8 Launch external report ............................................................................................................................. |
152 |
Glossary ....................................................................................................................................................... |
153 |
viii

List of tables
Table 8-1 |
Media priority ..................................................................................................................................................... |
63 |
Table 10-1 |
Language/currency .......................................................................................................................................... |
72 |
ix

List of figures
Figure 2-1 Windows print system ........................................................................................................................................ |
2 |
|
Figure 2-2 HP Access Control (HP AC) Job Accounting architecture .................................................................................... |
4 |
|
Figure 3-1 |
Data flow ............................................................................................................................................................. |
6 |
Figure 4-1 HP Access Control (HP AC) Job Accounting user login ........................................................................................ |
7 |
|
Figure 4-2 HP Access Control (HP AC) Job Accounting Information Page ........................................................................... |
8 |
|
Figure 4-3 HP Access Control (HP AC) Job Accounting remote control panel ..................................................................... |
9 |
|
Figure 4-4 General display window ...................................................................................................................................... |
9 |
|
Figure 4-5 View license information .................................................................................................................................. |
10 |
|
Figure 4-6 Element summary table ................................................................................................................................... |
11 |
|
Figure 4-7 Browser warning message ............................................................................................................................... |
11 |
|
Figure 4-8 New data is loading ........................................................................................................................................... |
12 |
|
Figure 4-9 Page navigation bar .......................................................................................................................................... |
12 |
|
Figure 4-10 Navigate to specific page ................................................................................................................................ |
13 |
|
Figure 4-11 |
Delete icon ...................................................................................................................................................... |
13 |
Figure 4-12 |
Modify icon ...................................................................................................................................................... |
13 |
Figure 4-13 Database Manager login ................................................................................................................................. |
14 |
|
Figure 5-1 |
Administration page ......................................................................................................................................... |
15 |
Figure 5-2 Accounts page ................................................................................................................................................... |
16 |
|
Figure 5-3 Go and Cancel icons .......................................................................................................................................... |
17 |
|
Figure 5-4 Administration page: Currencies button .......................................................................................................... |
18 |
|
Figure 5-5 Add a currency ................................................................................................................................................... |
19 |
|
Figure 5-6 Define exchange rate ........................................................................................................................................ |
19 |
|
Figure 5-7 Modify a currency .............................................................................................................................................. |
20 |
|
Figure 5-8 Delete a currency .............................................................................................................................................. |
21 |
|
Figure 5-9 |
Active Directory ................................................................................................................................................. |
21 |
Figure 5-10 Retrieve user data ........................................................................................................................................... |
23 |
|
Figure 5-11 |
Group Organization ......................................................................................................................................... |
24 |
Figure 5-12 |
Group selection ............................................................................................................................................... |
25 |
Figure 5-13 Group management icons .............................................................................................................................. |
26 |
|
Figure 5-14 Manual assignment ......................................................................................................................................... |
27 |
|
Figure 5-15 |
Manual scan .................................................................................................................................................... |
28 |
Figure 5-16 |
Customize report ............................................................................................................................................ |
28 |
Figure 5-17 Customize report columns option .................................................................................................................. |
29 |
|
Figure 5-18 |
Email configuration ........................................................................................................................................ |
30 |
Figure 5-19 Create an address ........................................................................................................................................... |
31 |
|
Figure 5-20 Modify an address ........................................................................................................................................... |
31 |
|
x
Figure 5-21 Confirm deleted address ................................................................................................................................ |
32 |
|
Figure 5-22 Create distribution list .................................................................................................................................... |
33 |
|
Figure 5-23 Modify Distribution list ................................................................................................................................... |
33 |
|
Figure 5-24 Modify distribution list content ...................................................................................................................... |
34 |
|
Figure 5-25 Verify distribution list deletion ....................................................................................................................... |
34 |
|
Figure 5-26 Modify server configuration ........................................................................................................................... |
35 |
|
Figure 5-27 Configure email server ................................................................................................................................... |
36 |
|
Figure 5-28 Printer template selections ............................................................................................................................ |
37 |
|
Figure 5-29 Create a template ........................................................................................................................................... |
38 |
|
Figure 5-30 Assign a template ........................................................................................................................................... |
39 |
|
Figure 5-31 Select templates to delete ............................................................................................................................. |
40 |
|
Figure 5-32 Verify template selection ............................................................................................................................... |
40 |
|
Figure 6-1 Device Host Name ............................................................................................................................................. |
41 |
|
Figure 6-2 Device Name ...................................................................................................................................................... |
42 |
|
Figure 6-3 Administration / Print server status ................................................................................................................. |
42 |
|
Figure 6-4 |
Printers list ........................................................................................................................................................ |
43 |
Figure 6-5 Print server tile ................................................................................................................................................. |
43 |
|
Figure 6-6 Print server settings ......................................................................................................................................... |
44 |
|
Figure 6-7 |
Device folder ..................................................................................................................................................... |
45 |
Figure 6-8 |
DesignJet configuration .................................................................................................................................... |
46 |
Figure 6-9 Add or remove DesignJet printers .................................................................................................................... |
46 |
|
Figure 6-10 Schedule job retrieval ..................................................................................................................................... |
47 |
|
Figure 6-11 Schedule DesignJet retrieval .......................................................................................................................... |
47 |
|
Figure 6-12 |
SAP tracking .................................................................................................................................................... |
48 |
Figure 6-13 |
DTM Trap ......................................................................................................................................................... |
49 |
Figure 6-14 |
DTM options .................................................................................................................................................... |
49 |
Figure 6-15 |
Snmp options .................................................................................................................................................. |
50 |
Figure 7-1 |
Print organization ............................................................................................................................................. |
51 |
Figure 7-2 Print server column ........................................................................................................................................... |
52 |
|
Figure 7-3 Printer internal website .................................................................................................................................... |
52 |
|
Figure 7-4 Manually define printer .................................................................................................................................... |
53 |
|
Figure 8-1 Page cost management .................................................................................................................................... |
55 |
|
Figure 8-2 |
Processing icon ................................................................................................................................................. |
55 |
Figure 8-3 Actual printer costs ........................................................................................................................................... |
56 |
|
Figure 8-4 Create a cost ...................................................................................................................................................... |
57 |
|
Figure 8-5 Delete printer cost ............................................................................................................................................ |
58 |
|
Figure 8-6 Actual costs: media ........................................................................................................................................... |
59 |
|
Figure 8-7 |
Media costs ....................................................................................................................................................... |
59 |
Figure 8-8 Fixed costs management .................................................................................................................................. |
60 |
|
Figure 8-9 Create a fixed cost ............................................................................................................................................ |
61 |
|
Figure 8-10 Costs priority rules .......................................................................................................................................... |
62 |
|
xi
Figure 8-11 Costs priority rules defined ...................................................................................... |
...................................... 62 |
|
Figure 8-12 Modify a fixed cost .......................................................................................................................................... |
63 |
|
Figure 8-13 Delete a fixed cost .......................................................................................................................................... |
64 |
|
Figure 8-14 |
Leasing costs .................................................................................................................................................. |
64 |
Figure 8-15 Modify leasing costs ....................................................................................................................................... |
65 |
|
Figure 8-16 |
Modify a cost ................................................................................................................................................... |
65 |
Figure 8-17 Schedule: Costs calculation ............................................................................................................................ |
66 |
|
Figure 9-1 Cost center — manage or create ...................................................................................................................... |
67 |
|
Figure 9-2 Import cost center data .................................................................................................................................... |
68 |
|
Figure 9-3 Delete a cost center .......................................................................................................................................... |
69 |
|
Figure 9-4 Assign users to cost center ............................................................................................................................... |
69 |
|
Figure 9-5 Assign printers to cost center ........................................................................................................................... |
70 |
|
Figure 10-1 |
User options .................................................................................................................................................... |
71 |
Figure 10-2 Define user options ......................................................................................................................................... |
72 |
|
Figure 10-3 Query table with 10 lines ................................................................................................................................ |
73 |
|
Figure 10-4 Query table with 5 lines .................................................................................................................................. |
73 |
|
Figure 10-5 Change password ............................................................................................................................................ |
74 |
|
Figure 10-6 |
Query columns ................................................................................................................................................ |
75 |
Figure 10-7 Print organization columns ............................................................................................................................ |
76 |
|
Figure 11-1 |
New query ....................................................................................................................................................... |
78 |
Figure 11-2 New query — users ......................................................................................................................................... |
79 |
|
Figure 11-3 |
Query printers ................................................................................................................................................. |
82 |
Figure 11-4 Query cost centers .......................................................................................................................................... |
86 |
|
Figure 11-5 |
Query costs ..................................................................................................................................................... |
88 |
Figure 11-6 Query printer options ..................................................................................................................................... |
89 |
|
Figure 11-7 |
Query allocation .............................................................................................................................................. |
90 |
Figure 11-8 |
Query quota .................................................................................................................................................... |
92 |
Figure 11-9 New Query page .............................................................................................................................................. |
93 |
|
Figure 11-10 |
Parameterized mode .................................................................................................................................... |
94 |
Figure 11-11 |
Schedule queries .......................................................................................................................................... |
98 |
Figure 11-12 |
Query frequencies ......................................................................................................................................... |
98 |
Figure 11-13 Query frequency: daily ................................................................................................................................. |
99 |
|
Figure 11-14 Query frequency: weekly ............................................................................................................................ |
100 |
|
Figure 11-15 Query frequency: monthly ......................................................................................................................... |
101 |
|
Figure 11-16 Query frequency: monthly, with relative interval ..................................................................................... |
102 |
|
Figure 11-17 Query frequency: run when computer dies ................................................................................................ |
103 |
|
Figure 11-18 Edit query table .......................................................................................................................................... |
103 |
|
Figure 12-1 Queries in progress ....................................................................................................................................... |
104 |
|
Figure 12-2 Query status — possible results .................................................................................................................. |
105 |
|
Figure 12-3 |
Query information ........................................................................................................................................ |
106 |
Figure 12-4 |
Chart display ................................................................................................................................................. |
107 |
xii
Figure 12-5 Chart display task bar ................................................................................................................................... |
107 |
|
Figure 12-6 |
Pie chart ........................................................................................................................................................ |
108 |
Figure 12-7 Pie chart task bar .......................................................................................................................................... |
108 |
|
Figure 12-8 |
Table chart .................................................................................................................................................... |
108 |
Figure 12-9 |
Result display ............................................................................................................................................... |
109 |
Figure 12-10 |
Excel spreadsheet ...................................................................................................................................... |
110 |
Figure 12-11 |
Query results .............................................................................................................................................. |
110 |
Figure 12-12 |
Manage results ........................................................................................................................................... |
111 |
Figure 12-13 Modify query parameters ........................................................................................................................... |
111 |
|
Figure 13-1 Report management screen ......................................................................................................................... |
113 |
|
Figure 13-2 |
Customize report .......................................................................................................................................... |
114 |
Figure 13-3 View report link ............................................................................................................................................. |
115 |
|
Figure 14-1 |
Allocation screen .......................................................................................................................................... |
116 |
Figure 14-2 Create allocation profile ............................................................................................................................... |
116 |
|
Figure 14-3 Allocation profile information ...................................................................................................................... |
117 |
|
Figure 14-4 Change profile structure ............................................................................................................................... |
118 |
|
Figure 14-5 Verify delete fields ........................................................................................................................................ |
118 |
|
Figure 14-6 Modify field value ......................................................................................................................................... |
118 |
|
Figure 14-7 Modify default value ..................................................................................................................................... |
119 |
|
Figure 14-8 |
Modify list ..................................................................................................................................................... |
120 |
Figure 14-9 Select Allocation to delete ........................................................................................................................... |
121 |
|
Figure 14-10 Verify delete allocation .............................................................................................................................. |
121 |
|
Figure 14-11 |
Job allocation .............................................................................................................................................. |
122 |
Figure 14-12 Result display, allocation ........................................................................................................................... |
122 |
|
Figure 14-13 Add allocation profile parameters ............................................................................................................. |
123 |
|
Figure 14-14 |
Allocation profile ........................................................................................................................................ |
123 |
Figure 14-15 Modify allocation information .................................................................................................................... |
124 |
|
Figure 15-1 |
Quota module ............................................................................................................................................... |
125 |
Figure 15-2 |
Quota defaults .............................................................................................................................................. |
126 |
Figure 15-3 |
Quota user .................................................................................................................................................... |
128 |
Figure 15-4 Quota cost center ......................................................................................................................................... |
129 |
|
Figure 15-5 |
Quota printers ............................................................................................................................................... |
130 |
Figure 15-6 Assign to cost center .................................................................................................................................... |
131 |
|
Figure 15-7 |
Import quota ................................................................................................................................................. |
132 |
Figure 15-8 Create an account ......................................................................................................................................... |
133 |
|
Figure 15-9 Assign cost center ......................................................................................................................................... |
133 |
|
Figure 15-10 Manage cost center quotas ........................................................................................................................ |
134 |
|
Figure 15-11 Enable quota for print ................................................................................................................................ |
135 |
|
Figure 15-12 Print server quota ....................................................................................................................................... |
135 |
|
Figure 15-13 |
User button ................................................................................................................................................. |
136 |
Figure 15-14 Welcome screen ......................................................................................................................................... |
137 |
|
xiii
Figure 15-15 |
Import Quota .............................................................................................................................................. |
138 |
Figure 15-16 |
Quota notification ....................................................................................................................................... |
139 |
Figure 15-17 |
Messenger notification ............................................................................................................................... |
139 |
Figure 16-1 User quota limit ............................................................................................................................................ |
140 |
|
Figure 17-1 MyQuota web interface ................................................................................................................................ |
141 |
|
Figure 18-1 Job Accounting client — Printer configuration ............................................................................................ |
143 |
|
Figure 19-1 External report management ....................................................................................................................... |
145 |
|
Figure 19-2 Manage folders button ................................................................................................................................. |
145 |
|
Figure 19-3 Manage data sources .................................................................................................................................... |
145 |
|
Figure 19-4 Add a data source ......................................................................................................................................... |
146 |
|
Figure 19-5 Manage models page .................................................................................................................................... |
147 |
|
Figure 19-6 |
Add a model .................................................................................................................................................. |
147 |
Figure 19-7 |
Assign data source to model ........................................................................................................................ |
148 |
Figure 19-8 |
Manage reports page .................................................................................................................................... |
148 |
Figure 19-9 |
Add a report .................................................................................................................................................. |
149 |
Figure 19-10 Add model to report ................................................................................................................................... |
150 |
|
Figure 19-11 Assign data source to report page ............................................................................................................. |
151 |
|
Figure 19-12 External report button ............................................................................................................................... |
152 |
|
Figure 19-13 |
Parameterized query .................................................................................................................................. |
152 |
xiv

1 HP Access Control (HP AC) Job Accounting
1.1 Overview
It is now easier than ever to access information. Whether you access data using the Internet or a company intranet, it is often necessary to print some of this information for archival purposes. This has resulted in rising expenses for many companies, due to increased printing costs.
HP Access Control (HP AC) Job Accounting:
●Is an easy-to-use software package that meets and exceeds the need for managed printing solutions in business. It helps manage your print system by tracking all copy originating from workstations within your local area network and print jobs processed through a central print server.
●Assists companies with an extended print system or a large print volume. For instance, large companies, universities, and organizations may want to allocate their printing costs directly to the responsible departments. HP Access Control (HP AC) Job Accounting also assists smaller companies, such as consulting firms or law offices, which handle a large number of certificates, contracts, and other documents.
●Enables you to analyze individual user printing habits and the average usage of your printers. You will then be able to optimize the management and sharing of your printers according to their use.
●Improves the cost management and organization of print tasks. The cost of every document printed or copied (when using HP Access Control (HP AC) Secure Pull Print) on every print server is accounted for and consolidated.


 NOTE: Quota is only available if the HP Access Control (HP AC) Professional installation bundle is installed. If the HP Access Control (HP AC) Express installation bundle is installed, the Quota menu does not display.
Section 1.1 Overview |
1 |
2HP Access Control (HP AC) Job Accounting Architecture
2.1 Windows print system
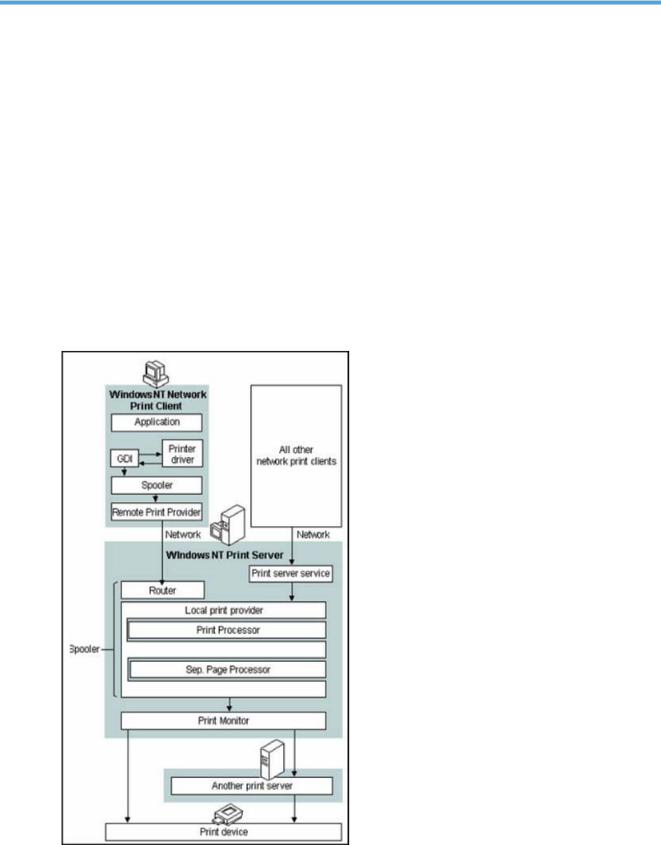
To better illustrate HP Access Control (HP AC) Job Accounting print system integration, it is helpful to understand the Windows print system.
The Windows print system consists of the following three basic components:
●An end user initiating the print spool
●The print server processing the job
●The printer
Figure 2-1 Windows print system
2 Chapter 2 HP Access Control (HP AC) Job Accounting Architecture

All printers are locally declared and shared among a user group from the print server. The spooler of a Windows print server manages your printing. The process for printing a document in Windows is as follows:
1.User chooses to print a document on a shared printer. The print job is rendered in the printer language of the print device. This happens at the client level, on a node/client PC on the network.
2.User’s computer delivers the print job to the print server. The print job is sent over the network to the print server.
3.Print server receives the print job and assigns a data type according to the printer language.
4.Router or print server passes the print job to the local print provider on the server (a component of the spooler), which spools the print job (writes it to disk).
5.Local print provider polls the print processors declared on the server. When a print processor recognizes the job’s data type (step 4), this print processor receives the print job and alters it if necessary according to the data type to ensure that the job prints correctly.
6.Job is sent to the print monitor.
7.Print device receives the print job, translates each page into a bitmap, and sends it to the printer.
2.2HP Access Control (HP AC) Job Accounting print system integration
Like the Windows print system, the HP Access Control (HP AC) Job Accounting Print System Job Accounting print server consists of three basic software components:
●HP Access Control (HP AC) Job Accounting DS (HP AC Job Accounting Database Server)
●HP Access Control (HP AC) Job Accounting WS (HP AC Job Accounting Web Server, the interface)
●HP Access Control (HP AC) Job Accounting print server (HP AC Job Accounting Print Server) These modules can be installed on either one or several machines.
CAUTION: HP Access Control (HP AC) Job Accounting does not take into account either the printers connected to a local port (such as LPT or COM) or the printers declared on the network, for instance those machines managed by another print server. In this last case, you will have to install an HP Access Control (HP AC) Job Accounting print server module on the second print server.
The same is true for all copiers (HP MFP), which should be declared on the machine where the HP Access Control (HP AC) Job Accounting print server is installed.
The following diagram provides an example of the overall HP Access Control (HP AC) Job Accounting architecture:
Section 2.2 HP Access Control (HP AC) Job Accounting print system integration |
3 |
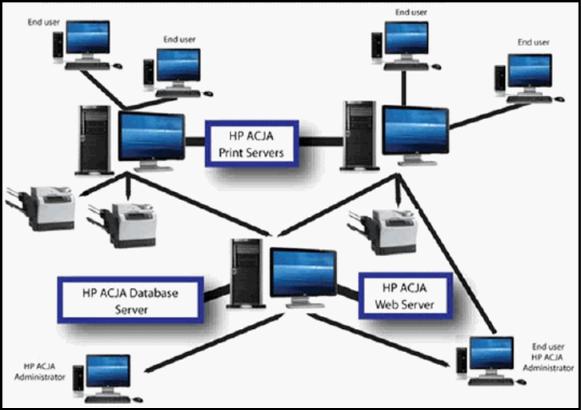
Figure 2-2 HP Access Control (HP AC) Job Accounting architecture
For more information on the HP Access Control (HP AC) Job Accounting database server and HP Access Control (HP AC) Job Accounting web server, see the Information flow section of this guide.
4 Chapter 2 HP Access Control (HP AC) Job Accounting Architecture

3 Information flow
3.1 HP Access Control (HP AC) Job Accounting print server
The HP Access Control (HP AC) Job Accounting Print Server is included with the spooler of your print system. This allows HP Access Control (HP AC) Job Accounting to detect every print job sent to any of these printers. HP Access Control (HP AC) Job Accounting keeps track of all printed documents, as well as their characteristics, some of which are listed below:
●Document name
●Printer (local and shared name) and its properties (such as color or black and white, or duplex unit)
●Job owner: name, machine name
●Number of sent pages and printed pages for HP devices configured to send printer confirmation using SNMP
●The printing mode (Economode, duplex, color)
●The date and time when the print job was sent
●The media used (such as transparency or paper) and its size (A3, A4, letter)


 NOTE: In HP Access Control (HP AC) Job Accounting, the highest level of tracking is by pages. HP Access Control (HP AC) Job Accounting can intercept and manage job cancellations from the spooler or from the printer (for an HP printer equipped with HP JetDirect card, using SNMP protocol).
The HP Access Control (HP AC) Job Accounting Web Server enables you to query the HP Access Control (HP AC) Job Accounting Database Server and to access the data from the HP Access Control (HP AC) Job Accounting Database Server. The HP Access Control (HP AC) Job Accounting Web Server also enables navigation through the application using a Web browser. A Web browser is required to display the HP Access Control (HP AC) Job Accounting interface.
The following diagram illustrates the data flow within your print system.
Section 3.1 HP Access Control (HP AC) Job Accounting print server |
5 |
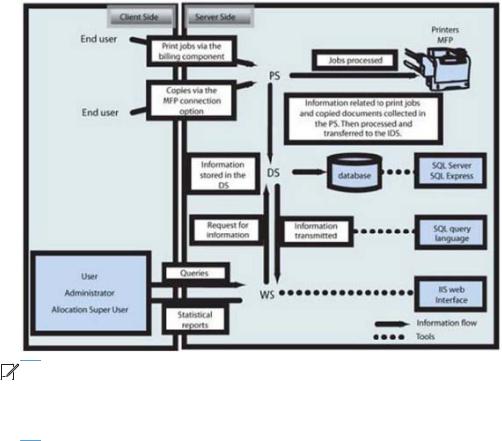
Figure 3-1 Data flow


 NOTE: This window presents all modules necessary to create a functional and correctly configured HP Access Control (HP AC) Job Accounting installation— HP Access Control (HP AC) Job Accounting Print Server, HP Access Control (HP AC) Job Accounting Database Server, HP Access Control (HP AC) Job Accounting Web Server, the HP Access Control (HP AC) Job Accounting interface, and the HP Access Control (HP AC) Job Accounting In Printer component.
6 Chapter 3 Information flow
4 Getting started
4.1 Login page
After installing HP Access Control (HP AC), open the HP Access Control (HP AC) Job Accounting configuration utility and click the HP ACJA tab. The HP Access Control (HP AC) Job Accounting login screen opens:
Figure 4-1 HP Access Control (HP AC) Job Accounting user login
 NOTE: Both the default login and password are Admin. The password field is case-sensitive.
The following rules apply to the login page:
●Entering user information on this page allows access to HP Access Control (HP AC) Job Accounting.
●When creating an account, enter your HP Access Control (HP AC) Job Accounting user name and password as defined by the HP Access Control (HP AC) Job Accounting administrator.
●If the user name or password is invalid, an error message appears. Try entering them again or contact your HP Access Control (HP AC) Job Accounting administrator.


 NOTE: For the HP Access Control (HP AC) Job Accounting Administrator: A default account is created when installing HP Access Control (HP AC) Job Accounting, to allow you to access the application for the first time. When you are connected, it is highly recommended that you change the password of the Admin account. For more information, see the HP Access Control (HP AC) Job Accounting user options section of this guide.


 NOTE: For the HP Access Control (HP AC) Job Accounting User: The HP Access Control (HP AC) Job Accounting administrator created your account with a user name and a password. Only your HP AC Job Accounting administrator can provide you with this information. After accessing your account for the first time, you can modify your password. For more information about modifying your password, see the HP Access Control (HP AC) Job Accounting user options section of this guide.
Section 4.1 Login page |
7 |
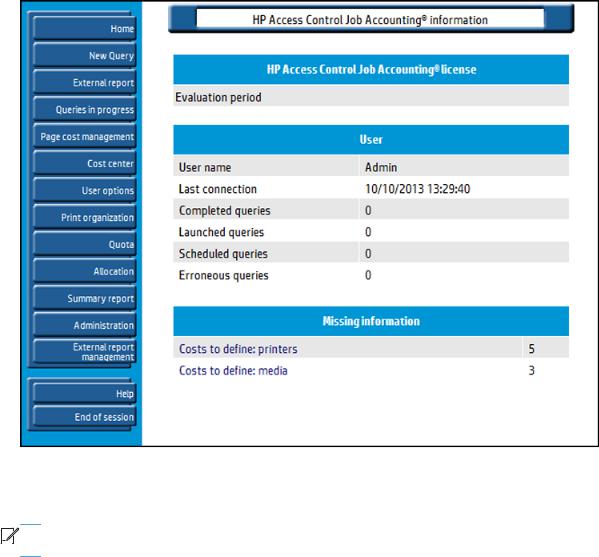
4.2 Information page
When you have successfully logged into HP Access Control (HP AC) Job Accounting, the HP Access Control (HP AC) Job Accounting Information page appears:
Figure 4-2 HP Access Control (HP AC) Job Accounting Information Page
The information page consists of two parts: the HP Access Control (HP AC) Job Accounting Remote Control panel on the left, and the larger General Display window on the right. The HP Access Control (HP AC) Job Accounting Remote Control panel will always be displayed and does not change appearance. The General Display will change depending on the selection made in the Remote Control panel.


 NOTE: The screen in the figure below shows what an administrator might see. End-users who have not logged in as administrator will see fewer buttons in the Remote Control panel.
4.3 Remote control panel
The HP Access Control (HP AC) Job Accounting Remote Control panel and its functions are illustrated in the figure below:
8 Chapter 4 Getting started

Figure 4-3 HP Access Control (HP AC) Job Accounting remote control panel
4.4 General display window
The general display window can always be updated and accessed by clicking Home at the top of the Remote Control panel. (See Figure 4–3, above).
Figure 4-4 General display window
Section 4.4 General display window |
9 |
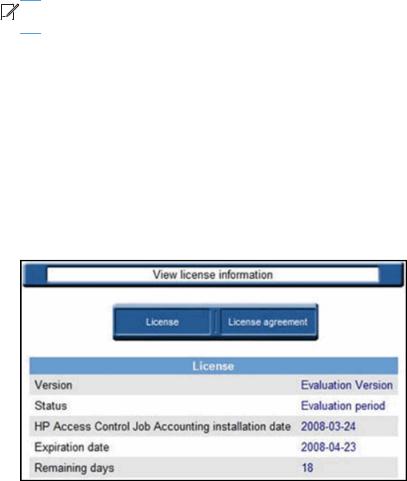
The general display window is divided into the following sections:
●The information about your license status. If HP Access Control (HP AC) Job Accounting is registered, nothing is displayed.
●Information about the current user.
●Information about costs and exchange rates. (This information only appears for an HP Access Control (HP AC) Job Accounting administrator.)
●Other miscellaneous types of information.


 NOTE: For the HP Access Control (HP AC) Job Accounting administrator: Read the information presented on this page carefully. Only the proper system configuration will produce accurate query results.
4.5 License
This section provides information about HP Access Control (HP AC) Job Accounting license status.
4.5.1 Licensing details
The first 30 days of an installation can be used for evaluation purposes. This field also allows you to check your license status with Hewlett-Packard. Currently, there are three possible licensing options, determined by the number of users. For specific information regarding HP Access Control (HP AC) Job Accounting licensing, contact Hewlett-Packard Company.
Figure 4-5 View license information
4.6 User
This section provides information about individual accounts, such as user name, the date of last connection, and the number of jobs:
●Completed queries (queries for which a result is available)
●Launched queries (queries running and for which a result is expected)
●Scheduled queries (queries planned but not yet run)
●Errors in queries (queries aborted due to error)
10 Chapter 4 Getting started
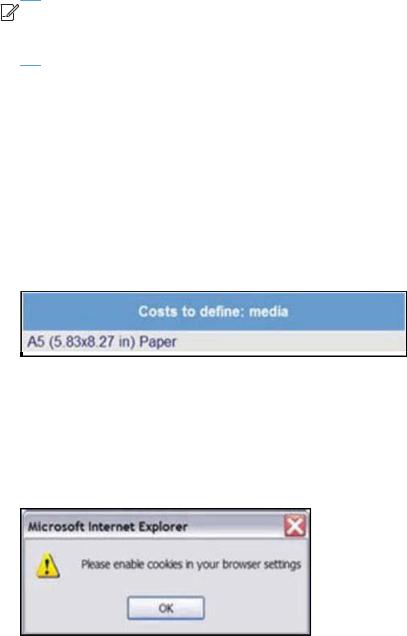
4.7 Missing information
HP Access Control (HP AC) Job Accounting automatically detects any new elements added to the print system, whether it is a printer, media, a user, or another element. However, some information regarding these new elements (for example, the cost of the new printer) must be defined by the administrator in order to ensure the accuracy of query results.


 NOTE: It is the HP Access Control (HP AC) Job Accounting administrator’s responsibility to view this page to update the HP Access Control (HP AC) Job Accounting configuration on a regular basis. HP Access Control (HP AC) Job Accounting users are not notified to update parameters surrounding elements added to the print system.
The fields in the Missing Information section are:
●Costs to define printers: list the printers with undefined costs. This applies to any new printer added to a print server.
●Costs to define media: list the media with undefined cost. This applies to any printed document, initiated by any user, regarding a media that is not registered in HP AC Job Accounting.
●Exchange rates to define: list the currencies with no exchange rate regarding the reference currency (the currency set as default while installing HP AC Job Accounting).
The number of data to enter is specified in front of each field. Each line in these fields is active—click on any of them to reach an element summary table for the missing information:
Figure 4-6 Element summary table
The elements of each line are also active. Clicking on an element allows direct access to costs and exchange rates associated with the installation.
4.8 Miscellaneous
A warning similar to the figure below appears when cookies or JavaScript are disabled.
Figure 4-7 Browser warning message
When this occurs, HP Access Control (HP AC) Job Accounting may close abruptly or display false or out-of- date data. To prevent this from occurring, simply enable cookies and JavaScript in your browser.
The message shown in the figure below may appear at the top of your screen:
Section 4.7 Missing information 11
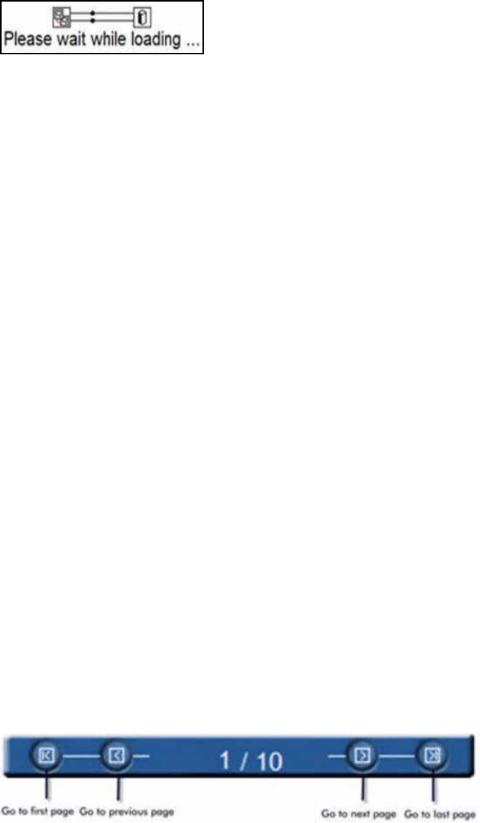
Figure 4-8 New data is loading
This message indicates that print job costs are being updated after cost parameters were modified. As soon as the calculations are performed, this message disappears.
HP Access Control (HP AC) Job Accounting has three distinct user categories:
●HP Access Control (HP AC) Job Accounting users
These users have an HP Access Control (HP AC) Job Accounting account. They can launch queries and get query results (on costs, printed documents) and be informed on the print system.
●HP Access Control (HP AC) Job Accounting administrators
These users have an HP Access Control (HP AC) Job Accounting account and the ability to launch queries or gather statistics about the print system. Furthermore, HP AC Job Accounting administrators are able to manage other HP AC Job Accounting accounts, currencies, exchange rates, user permissions, etc.
●HP Access Control (HP AC) Job Accounting allocation super user
These users have an HP Access Control (HP AC) Job Accounting account. They can launch queries and obtain query results (on costs, printed documents) and be informed on the print system. They can also view and modify allocation information stored in the database.
4.9HP Access Control (HP AC) Job Accounting interface
The HP Access Control (HP AC) Job Accounting interface is easy to use, with its Remote Control panel and user-friendly buttons and icons for fast navigation through various functions.
4.9.1 Information
Every HP Access Control (HP AC) Job Accounting icon is context-sensitive. When the cursor is positioned for several seconds on an icon, a description of the action associated with the icon will appear.
Lists and pull-down menus are built dynamically, according to what is declared/registered in HP Access Control (HP AC) Job Accounting. For instance the printers, print servers, media, and currencies are all updated based on information contained in other tables. You can use the Ctrl and Shift keys to choose multiple entries in a list.
4.9.2 Functionalities
Specific icons allow you to reach a certain page or service. By clicking on any button in the HP Access Control (HP AC) Job Accounting Remote Control panel, you will be able to access information and to launch certain tasks. When more than one page of information is generated, the page navigation bar illustrated in the figure below appears at the bottom of each page:
Figure 4-9 Page navigation bar
12 Chapter 4 Getting started
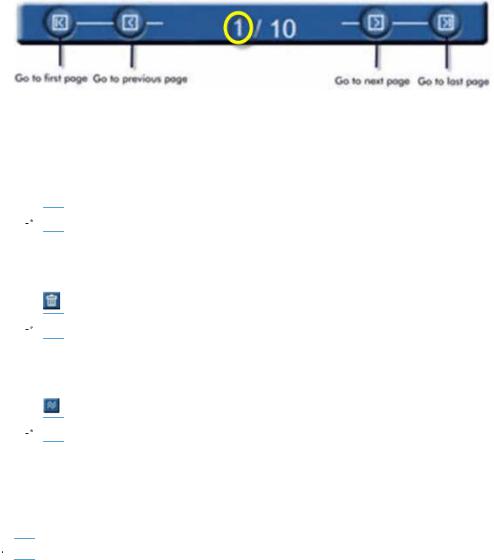
To reach a specific page, click the first page number in the bar and type the number of the page you want to reach:
Figure 4-10 Navigate to specific page
4.9.3 Managing HP Access Control (HP AC) Job Accounting lists
HP Access Control (HP AC) Job Accounting lists can be managed in any of the following ways:
●To select one or several elements of a list, check the box on the left of the element (such as account or query).
 NOTE: The box in the title bar selects all elements of the list.
●To delete an item, select one or more from the list and then click the Delete icon located in the title bar.
Figure 4-11 Delete icon
 NOTE: Be sure to select the elements before deleting.
●To modify the parameters of an element in the list, click the Modify icon.
Figure 4-12 Modify icon
 NOTE: It is only possible to modify one element at a time.
4.10 Database Manager
The Job Accounting Database Manager is a simple tool for managing the Job Accounting database. It is not intended to replace any SQL Management Tools that are included with SQL Server.
 WARNING! Please make sure the database is backed up prior to applying any changes to the database.
Go to the Job Accounting tile > Database Manager tab.
Section 4.10 Database Manager 13
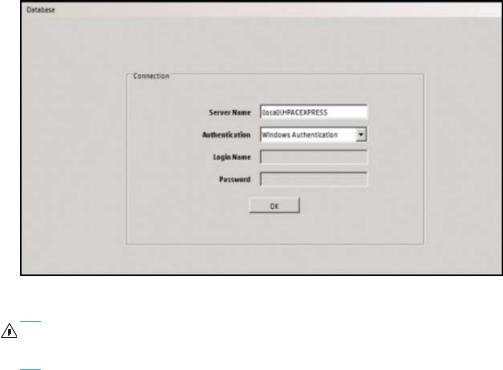
Figure 4-13 Database Manager login
In the Server Name field, make sure to include the instance name if you used a named instance of SQL. Enter the correct logins credentials. Click OK.
WARNING! If you delete any item in the database, any record relating to the deleted item is also deleted. For example, if you delete a print server from the database, all printers and jobs from the print server are deleted.
To view SQL queries, go to the Database menu and select SQL Query.
In the Database Manager, select items you want to delete:
●Select Print servers to delete a selected print server, including all printers and jobs assigned to it.
●Select Printers to delete a selected printer and all jobs assigned to it.
●Select Domains to delete a selected domain, including all users and jobs assigned to it.
●Select Users to delete a selected user and all jobs assigned to the user.
●Select Allocation to delete a selected allocation profile and jobs assigned to it.
●Select Jobs to delete jobs within a selected date range.
14 Chapter 4 Getting started
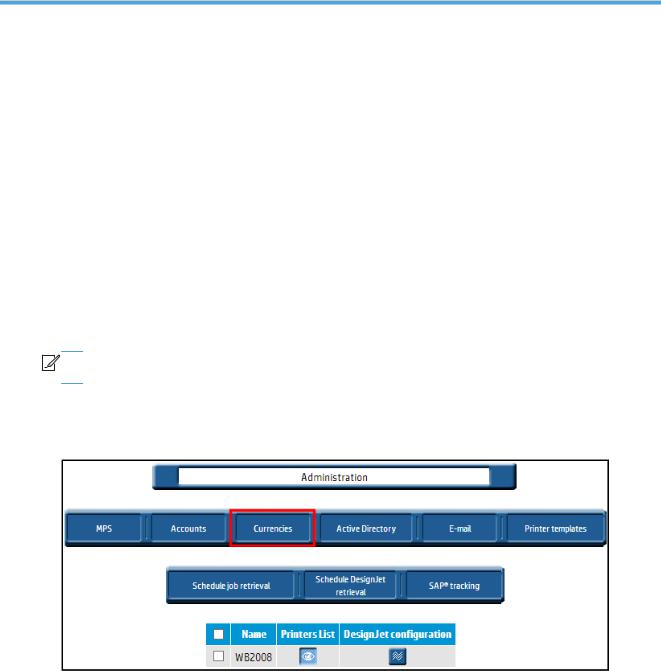
5HP Access Control (HP AC) Job Accounting administration
Use the HP Access Control (HP AC) Job Accounting Administration page to add, delete, or modify HP Access Control (HP AC) Job Accounting functions and parameters. HP Access Control (HP AC) Job Accounting administration is divided into two parts:
●The HP Access Control (HP AC) Job Accounting administrator assigns and configures individual accounts; including HP Access Control (HP AC) Job Accounting accounts, currencies used in the application, and email system.
●The HP Access Control (HP AC) Job Accounting administrator defines the costs and prices (such as printers and media), which will affect query results.
This chapter focuses on all issues regarding HP Access Control (HP AC) Job Accounting print server, accounts, currencies, active directory, the email system, and printer templates. All administration operations will be performed from this menu.


 NOTE: The Administration menu only appears in the HP Access Control (HP AC) Job Accounting remote control if you have Administrator rights.
Access the Administration screen by clicking Administration on the HP Access Control (HP AC) Job Accounting remote control, as shown in the figure below:
Figure 5-1 Administration page
15
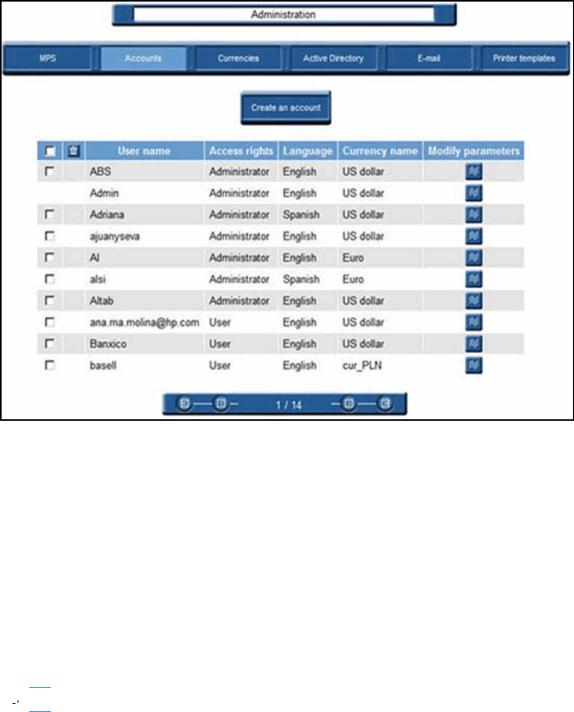
5.1 Accounts options
To access the HP Access Control (HP AC) Job Accounting Accounts options, click Accounts on the Administration screen.
Figure 5-2 Accounts page
This page provides information on the various accounts in the system, and allows the administrator to create new accounts or modify existing ones.
The first time you access HP Access Control (HP AC) Job Accounting, one of your initial tasks will be to define HP Access Control (HP AC) Job Accounting access accounts so that HP Access Control (HP AC) Job Accounting users and administrators can use the Web interface.
5.2 Create an account
When creating a new account, determine whether the account owner will be granted administrator privileges.
1.Click Create an account.
2.Enter a unique user name.
3.Enter your password and then confirm it by entering it again. For security reasons, passwords are masked.
 NOTE: Passwords are case sensitive
4.To give administrator rights to the account owner, check the Administrator box.
16 Chapter 5 HP Access Control (HP AC) Job Accounting administration
Loading...