


 Loading...
HP COLOR LASERJET CM6030, LASERJET M5035, LASERJET M5025, LASERJET M3027, COLOR LASERJET CM4730 Manual
...

English

English
Digital Send
Setup and Problem Solving Guide

English
Copyright and License
© 2007 Copyright Hewlett-Packard
Development Company, L.P.
Reproduction, adaptation, or translation without prior written permission is prohibited, except as allowed under the copyright laws.
Edition 1, 10/2007
Part number: 5851-3398
The information contained herein is subject to change without notice.
The only warranties for HP products and services are set forth in the express warranty statements accompanying such products and services. Nothing herein should be construed as constituting an additional warranty. HP shall not be liable for technical or editorial errors or omissions contained herein.
Trademark Credits
Microsoft®, Windows®, and Windows NT® are U.S. registered trademarks of Microsoft Corporation.

Table of contents
English
1 |
Advantages of digital sending technology |
|
2 |
Set up Send to Folder using Scan Setup Wizard |
|
3 |
Set up Digital Sending using Embedded Web Server |
|
4 |
Configure Send-to-Folder |
|
|
Set up a shared folder .......................................................................................................................... |
7 |
|
Configure Send-to-Folder destinations ............................................................................................... |
11 |
|
Configuration for sending a file to a folder on your PC ...................................................... |
11 |
|
Configuration for sending a file to a network folder ........................................................... |
12 |
|
Configuration for sending a file to an FTP site ................................................................... |
12 |
5 |
Configure Send-to-Email |
|
|
Configure Send-to-Email in the EWS ................................................................................................. |
15 |
|
Configure the address book ............................................................................................................... |
16 |
|
Use Import/Export to Establish an Address Book .............................................................................. |
16 |
6 |
Work with scanned documents |
|
|
Control image quality and file size ...................................................................................................... |
17 |
|
Settings for the smallest possible file size ......................................................................... |
18 |
|
Setting for the best possible image quality ........................................................................ |
18 |
|
General purpose settings ................................................................................................... |
20 |
|
Edit the text in a scanned document .................................................................................................. |
21 |
|
Use the digital-send log ...................................................................................................................... |
21 |
|
Send a 2-sided paper document ........................................................................................................ |
21 |
7 |
Problem Solving |
|
ENWW |
iii |

English
iv |
ENWW |

1Advantages of digital sending technology
English
Digital sending technology offers a fast, simple, and reliable way to capture valuable information from paper-based documents and convert it to a digital format that can be processed and routed.
Using digital sending to scan and convert documents, you can do the following:
●Send files directly to e-mail destinations
●Fax files from existing local area networks (LAN), Internet, Microsoft® Windows®, or other network fax solutions
●Archive files on a local computer or network storage by using Send-to-Folder technology
With the correct digital sending solution in place, an organization can expect to:
●Improve productivity and be more competitive
●Merge paper and electronic data so both are easier to share, edit, print, store, and retrieve
●Streamline business processes to reduce costs
ENWW |
1 |

English
2 |
Chapter 1 Advantages of digital sending technology |
ENWW |
|
|
|
|
2 Set up Send to Folder using Scan Setup |
English |
||
Wizard |
|||
|
|||
|
|
|
|
If you want to quickly set up a desktop folder to scan document to, you should use Scan Setup Wizard software. This tool is designed for our customers who do not have IT administrators and would like to set up Send to Folder feature quickly.
The following are the steps to run Scan Setup Wizard:
1.Open the Embedded Web Server by opening a Web browser and typing the product IP address or hostname in the URL window. The IP address can be found on the Configuration Page.
2.Click the Digital Sending tab.
3.In the left column, click Send to Folder.
4.On the Send to Folder page, click the Enable Scan Setup Wizard checkbox.
5.Click the Apply button.
6.Insert the Printing System CD into your computer.
7.At the Welcome screen, click Scan Setup Wizard.
8.Follow the steps in the setup tool. A network folder connected to your device will be created. You are now ready to scan documents to the folder you created.
If you have completed the above steps, you do not have to use Embedded Web Server to set up folders, unless you desire some advanced features. However, for Email setup, you will still need to use Embedded Web Server.
ENWW |
3 |

English
4 |
Chapter 2 Set up Send to Folder using Scan Setup Wizard |
ENWW |
|
|
|
|
3 Set up Digital Sending using Embedded |
English |
||
Web Server |
|||
|
|||
|
|
|
|
Although most digital sending activities can be carried out using the device control panel, some critical digital sending settings must be set up initially using the Embedded Web Server (EWS). The EWS is a set of device features and tools embedded in the device that can be accessed by using a Web browser (for example, Internet Explorer) as long as the device is turned on.
In order to set up the digital sending configurations, you will need to get the following information:
1.Device IP address: Go to the device control panel, and touch Network address on the control panel screen. An example of the IP address is: 16.88.158.182.
2.Your SMTP Server name or IP address: SMTP server is your email server. All your e-mails pass through your SMTP server on the network and then are delivered to your email box by identifying your email address. If you don’t have an in-house SMTP server, your Internet Service Provider (ISP) should be able to provide you with the SMTP server name or SMTP server IP address. An example of the SMTP server name is: smtp.msn.net. It could also be an IP address.
3.SMTP server Authentication: Authentication is typically carried out by specifying the user name and password. Only your Internet Service Provider knows your SMTP server needs user name/ password authentication or not. If it does, get your SMTP server’s user name and password for later use.
4.Your Windows domain, user name, password and your computer name. Right click My Computer on the desktop, then click Properties. Click My Computer tab. You will find your computer name and the domain on that page. Please make sure to write down the Full Computer Name in the format of JoesComputer.USA.msn.net. Your windows user name and password are those that you use to log into your computer.
When you collect the above information, you are ready to go into the Embedded Web Server to set up the Digital Sending features.
The following instructions will show you how to access the device Embedded Web Server:
1.Open a Web browser (for example, Internet Explorer)
2.Type in the Device IP address you collected earlier in the Web browser’s address bar and press Enter. The device embedded Web page will open up.
3.Click Digital Sending tab. The left column of the Digital Sending page contains the links for Send to Folder, Send to Email and other setup information.
Now you are ready to perform the Digital Sending tasks in the Embedded Web Server.
ENWW |
5 |

English
6 Chapter 3 Set up Digital Sending using Embedded Web Server |
ENWW |

4 Configure Send-to-Folder
Set up a shared folder
Before you can use the scan-to-folder feature you must share the folder to which you want to send the scanned documents. Use the following instructions to set up a shared folder in Windows XP.
 NOTE: To learn how to share a folder in other Windows operating systems, open the Help documentation and search for the term “share a folder”.
Share a folder in Windows XP
1.In Windows Explorer or My Computer, right-click the folder to be shared and choose Sharing and Security.
 NOTE: If you do not see Sharing and Security when right-clicking the folder, you might not have installed the Microsoft File and printer Sharing for Microsoft Networks component. To check, right-click My Network Places, select Properties, right-click Local Area Connection, and select Properties. File and printer Sharing for Microsoft Networks should appear in the dialog box. If it does not, install the component. Either search Microsoft Help for information about folder sharing and security, or contact Microsoft directly.
NOTE: For network folders, a network administrator usually must give folder permissions to the necessary users.
English
ENWW |
Set up a shared folder 7 |
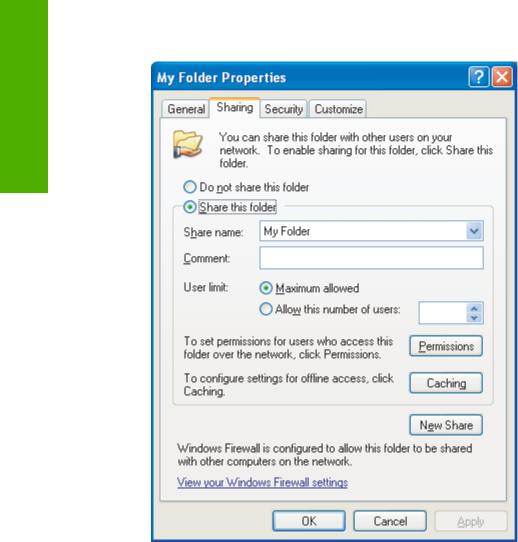
2.Click the Sharing tab.
English
3.Select Share this folder. If necessary, type a the new name in the Share name field. The share name is the name that appears on the network.
4.Click Permissions.
8 Chapter 4 Configure Send-to-Folder |
ENWW |

English
●To allow anyone on the network to access the folder, click Everyone, select Full Control in the Allow column, and click OK. Then proceed with step 5.
●To give only certain users access to the folder:
a.Select Everyone and click Remove.
b.Click Add.
c.In the Enter the object names to select field, type the name of the first user account that will have access to the folder and then click Check Names to verify the name is valid. To add multiple user accounts, type a semicolon after the first account name and then repeat from step b for each account that is added. Each user account appears and is separated from others by a semicolon.
d.Click OK when the account list is complete.
e.Change the permissions for each user account that has access to this folder. Click once on the name of the user account. While it is selected, allow or deny privileges according to the available options by selecting or clicking to clear the check boxes next to the permissions. Read allows the user to read the files in the folder. Change allows the user to add, alter, or delete files in the folder. Full Control allows the user to read, add, alter, and delete files in the folder as well as to adjust these permissions or take ownership of the folder.
5.When the permissions for all users have been set, click OK.
ENWW |
Set up a shared folder 9 |

English
6.Click the Security tab and click Add.
 NOTE: If you do not see a Security tab, the task is complete. Proceed with the job.
7.On the Security tab, add all of the user accounts added in step 4.
a.In the Enter the object names to select field, type the name of each user account that will have access to the folder and click Check Names. Each account appears in the format of ComputerName\UserName, and the accounts are separated by a semicolon.
b.Click OK when finished.
8.Click Apply, and then click OK. The folder icon changes to look like a folder resting in a hand:
Any user who was given permissions to access the folder can now use the Scan-to-Folder feature to scan to the shared folder.
10 Chapter 4 Configure Send-to-Folder |
ENWW |

Configure Send-to-Folder destinations
After setting up a shared folder, you need to configure the Send-to-Folder settings in the EWS. The exact settings depend on where you intend to send a scanned document.
Configuration for sending a file to a folder on your PC
1.Verify that you have properly set up a shared folder. See Set up a shared folder on page 7 for instructions.
2.Open the EWS for the desired product.
3.Click the Digital Sending tab.
4.Click Send to Folder.
5.In the Predefined Folder section of the page, click Add.
6.Select Shared Folder, and then click OK.
7.In the Folder Path field, provide the path the shared folder you have already created. The path must be in one of the following formats:
\\MyComputerName\SharedFolderName
\\MyComputerIPAddress\SharedFolderName
TIP: To find your computer name, right-click My Computer on the Desktop, click Properties, and then click Computer Name. Be sure to use the name displayed in the Full computer name field.
TIP: To find your computer IP address, open a Windows Command prompt, type ipconfig / all, and press Enter.
8.In the Access Credentials list box, select Use Public Credentials. Type your Windows domain, user name, and password to access the shared folder.
 TIP: To discover your Windows domain, right-click on My Computer and look on the Computer Name tab.
9.Click Test Folder Access to verify that the settings are correct.
You can now send a file to a folder on your PC. Other settings on the screen are optional.
English
ENWW |
Configure Send-to-Folder destinations 11 |

English
Configuration for sending a file to a network folder
1.Verify that the network folder gives intended users full permissions. If not, right-click the folder and set the permissions on the Security tab.
 NOTE: In most cases the network administrator must perform this task.
2.Find the IP address of the network location:
a.First find out the network drive name by opening My Computer and looking at the list of drives. Network drive names are displayed in single quotation marks, such as
'NetworkDriveName'.
b.After discovering the network-drive name, open a Windows Command Prompt, type nslookup [NetworkDriveName], and press Enter. The IP address of the network drive is displayed.
3.Open the EWS for the desired product.
4.Click the Digital Sending tab.
5.Click Send to Folder.
6.In the Predefined Folder section of the page, click Add.
7.Select Shared Folder, and then click OK.
8.In the Folder Path field, type the network drive IP address followed by the full network path to the shared folder, using the following format: \\NetworkIPaddress\MySharedFolderPath.
 NOTE: MySharedFolderPath has to include the full network path to the network folder. For example, assume that you intend to scan a file to the network folder Archive. From My Computer, you can see the network path to that folder is MyPath\Archive on 'MyNetworkName' If the IP address of MyNetworkName is 0.0.0.0, then you will need to type \ \0.0.0.0\MyPath\Archive in the Folder Path field.
9.Choose Use Public Credentials in the Access Credentials box. Specify your Windows domain, user name, and password to access the shared folder.
TIP: To discover your Windows domain, right-click on My Computer and look on the Computer Name tab.
10. Click Test Folder Access to verify that the settings are correct.
You can now send a file to the network folder. Other settings on the screen are optional.
Configuration for sending a file to an FTP site
1.Open the EWS for the desired product.
2.Click the Digital Sending tab.
3.Click Send to Folder.
4.Select the Enable Send to Folder check box.
5.Click Add.
6.Select FTP Site, and then click OK.
12 Chapter 4 Configure Send-to-Folder |
ENWW |

7.Provide the FTP connection settings.
8.Click Test FTP Credentials to verify that the settings are correct.
English
ENWW |
Configure Send-to-Folder destinations 13 |

English
14 Chapter 4 Configure Send-to-Folder |
ENWW |
5 Configure Send-to-Email
Configure Send-to-Email in the EWS
To configure Send To Email, you must provide an SMTP gateway. When the gateway address is set up correctly, any document can be sent from the product directly to an e-mail address.
Specify an SMTP gateway
1.Open the EWS for the desired product.
2.Click the Digital Sending tab.
3.Click E-mail Settings.
4.Click Find Gateways. A dialog with the available gateway IP addresses opens.
5.Select an IP address and click OK.
 NOTE: If the Find Gateways command does not provide a valid IP address, call your Internet service provider (ISP) to get the SMTP gateway server host name or IP address, and then type it in the SMTP Gateway field. A sample host name is smtp.msn.net. A sample IP address is
16.88.158.182.
6.Click Test to test and validate the SMTP setting.
7.Click Apply.
This page also allows you to configure the following optional settings:
Maximum attachment size: A drop-down list specifies the maximum size of the e-mail attachments. If the document size is larger than the maximum file size, the attachment is broken into smaller files and sent in multiple e-mails. Your e-mail server administrator or ISP can tell you the maximum size that your system supports, and you can use that information to configure this setting. If no maximum size exists, this can be set to the default.
SMTP authentication: Most of the SMTP servers in corporate environments do not require SMTP authentication, so this check box is usually not selected.
If the ISP SMTP server does require authentication, make sure you select Use Public Credentials. If you choose Use Device Credentials, configure the settings on the Settings tab on the E-mail Server page.
 NOTE: The user name and password are typically set by an ISP or system administrator on the SMPT server, and these credentials might not correspond to your Windows logon credentials. Contact an administrator to get the user name and password for the SMTP server.
English
ENWW |
Configure Send-to-Email in the EWS 15 |

English
Configure the address book
An e-mail address book contains the e-mail addresses that are stored on the product. The address book can store frequently-used e-mail addresses that can be selected on the product control panel. Use the E-mail Address Book page to add e-mail addresses into the product one at a time, and to edit e-mail addresses that have been saved in the product.
The product Import/Export feature can also be used to save a large list of frequently used e-mail addresses all at once, rather than adding them one at a time.
To add e-mail addresses to more than one product, HP recommends saving them on one product, making any necessary edits to the list, and then using the Import/Export feature to transfer the addresses to other products.
Use Import/Export to Establish an Address Book
To import an address book to the product using the EWS, click the Digital Sending tab, click Import/ Export, click the Help link at the upper-right corner, and follow the onscreen instructions.
16 Chapter 5 Configure Send-to-Email |
ENWW |
6 Work with scanned documents
Control image quality and file size
Several settings affect the file size and image quality of a scanned document. These settings can be changed at the product control panel or through the EWS.
 NOTE: When a digital-send setting is changed in the EWS, the new setting applies to all future digitalsend jobs. When a digital-send setting is changed at the product control panel, the setting applies to the current job only.
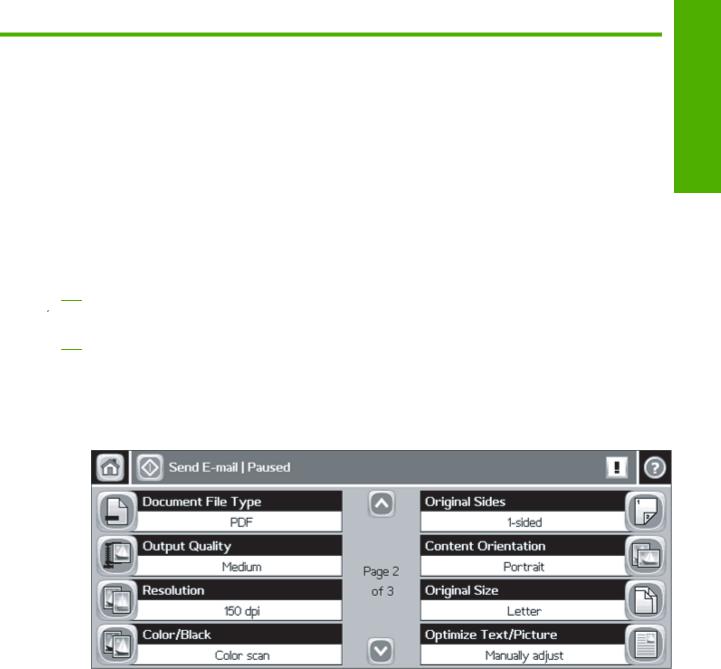
Change scan settings from the product control panel
1.Touch E-mail or Network Folder.
2.Touch More Options. A set of scan-related menus is displayed.
3.Change the following settings as needed:
●Document File Type
●Output Quality
●Resolution
●Color/Black
●Optimize Text/Picture
English
ENWW |
Control image quality and file size 17 |

|
Change scan settings through the EWS |
|||
English |
1. |
Open the EWS for the desired product. |
||
2. |
Click the Digital Sending tab. |
|||
|
||||
|
3. |
Click Send to Folder. |
||
|
4. |
In the Predefined Folder section of the page, click a destination folder and then click Edit. |
||
|
5. |
Scroll down to the Edit Default Document Settings section and change the following settings as |
||
|
|
needed: |
||
|
|
● |
Color Preference |
|
|
|
● |
File Format |
|
|
|
● |
Resolution |
|
|
|
● |
Default File Size |
|
 NOTE: In the EWS you cannot configure the “Optimize Text/Picture” setting because this setting always differs from job to job and should be set at the control panel.
6.Click OK.
In general, high quality images require larger file sizes. Likewise, smaller file sizes result in a decrease in image quality. The default settings of Color, 150 dpi, and Standard file size typically provide acceptable quality with reasonable file sizes.
Settings for the smallest possible file size
The smallest possible file size for a scanned document is generated by using the following settings:
File type: |
PDF or TIFF/MTIFF |
Color mode: |
B&W |
Optimize text/ |
Text |
picture: |
|
Resolution: |
75 dpi |
Output quality: |
Low |
Be aware that the smallest possible file size results in fairly poor image quality.
Setting for the best possible image quality
Best image quality typically results in large file sizes. A single page can be as large as 5 MB.
The best possible image quality for a scanned document is generated by using the following settings:
File type: |
JPEG or PDF |
Color mode: |
Color |
Optimize text/ |
Printed picture |
picture: |
|
18 Chapter 6 Work with scanned documents |
ENWW |

Resolution: |
300 dpi |
Output quality: |
High |
If you only need the best-possible quality once in a while, be sure to change these settings on the product control panel so that they apply only to the current scan. If you change these settings in the EWS, they will apply to all future scan jobs.
English
ENWW |
Control image quality and file size 19 |

English
General purpose settings
The following general purpose settings allow you to achieve acceptable quality with reasonable file size for textual documents, pictorial documents, and mixed-content documents.
Table 6-1 Settings for textual documents
Source1 |
Example |
Settings2 |
|||
● |
All text. |
● |
Contract |
● File type: PDF or TIFF |
|
● |
Text is of primary interest; non-text |
● Letter or memo on letterhead |
● |
Color mode: B&W |
|
|
elements are not important. |
● |
Document containing line charts |
● |
Content mode: Text |
|
|
||||
●Text is of primary interest; important
non-text elements are simple and |
● |
Invoice |
● Resolution: 150 dpi |
do not use shades or grey or color |
● |
Map |
|
to convey information. |
|
1Important text and graphical elements must not be light in color. The color of text does not convey information that needs to be captured. No text is smaller than 8 points.
2These settings generate a 1-bit, text-enhanced image.
Table 6-2 Settings for pictorial documents
Source |
Example |
Settings1 |
||
Pictures, shaded diagrams, and other |
● |
Advertisements |
● |
File type: JPEG or PDF |
non-text elements are the most important |
● |
Photographs |
● |
Color mode: B&W or Color2 |
content. |
||||
|
|
|
● |
Content mode: Picture/Photo |
|
|
|
● Output quality: Low |
|
|
|
|
● |
Resolution: 150 dpi |
1These settings are intended for capturing an image that conveys the general feel of the document and allows for information transmittal. For high-fidelity reproduction of pictorial content, a higher resolution and/or output quality should be used.
2Black-and-white PDF and JPEG images will be 8-bit grayscale. All color images will be 24 bit. Color images will be larger than grayscale images.
Table 6-3 Settings for mixed documents
Source |
Example |
Settings1 |
Any document for which text and |
Report with diagrams and photographs |
● File type: JPEG or PDF |
graphical elements are of equal |
|
● Color mode: B&W or Color2 |
importance. |
|
|
|
|
● Content mode: Mixed |
|
|
● Output quality: Low |
|
|
● Resolution: 150 dpi |
1These settings are intended for capturing an image that conveys the general feel of the document and allows for information transmittal. For high-fidelity reproduction, a higher resolution and/or output quality should be used.
2Black-and-white PDF and JPEG images will be 8-bit grayscale. All color images will be 24 bit. Color images will be larger than grayscale images.
20 Chapter 6 Work with scanned documents |
ENWW |

Edit the text in a scanned document
This editing feature is typically referred to as Optical Character Recognition (OCR). Use this feature to convert all the text in the scanned in documents so that it can be edited. Use the HP Digital Send Service Windows Utility for this task. A trial version of that software is in the box with this software. After the trial period, purchase a license to continue to use it.
Use the digital-send log
Use the Log page of the EWS to view digital-send job information and error events that are associated with the product.
1.Open the EWS for the desired product.
2.Click the Digital Sending tab.
3.Click Log. The digital-send log is displayed. The following options are available:
●In the Maximum Entries drop-down list, select the number of product log entries to be displayed at any one time. Selecting 0 (zero) disables the product logging.
 NOTE: This setting is not available on all products.
●Click the Save button to save the log information to a file.
●Click the Clear button to clear the information from the log.
 NOTE: This function only clears the log display. Log entries remain intact on the product for job-accounting purposes.
●Click the Refresh button to update the view with the latest log information.
●Click the Details button to view the log entry details.
Send a 2-sided paper document
1.To send a file to e-mail, touch E-mail on the product control panel home screen.
To send a file to a folder, touch Network Folder on the product control panel home screen.
2.Touch More Options.
3.Touch Original Sides.
4.Select 2-sided.
 NOTE: It is possible to set 2-sided scanning as the default by setting it in the EWS (click the Digital Sending tab, click Preferences, and select the 2 Sided Document option). However, because using 2-sided scanning slows down the scanning process significantly, HP recommends that you change the setting on a job-by-job basis at the product control panel.
English
ENWW |
Edit the text in a scanned document 21 |

English
22 Chapter 6 Work with scanned documents |
ENWW |

7 Problem Solving
English
The Digital Sending tab in the EWS does not appear
Cause |
Solution |
|
|
An administrative logon and password might be configured. |
Open the EWS and click Log On in the upper-right corner of |
|
the screen. |
|
|
The message Not a valid SMTP gateway server appears in the EWS.
The message Email Gateway Not Responding appears on the front panel display when attempting to send an e-mail.
Cause Solution
The SMTP setting might be incorrect.
1.Open the EWS for the desired product.
2.Click the Digital Sending tab.
3.Click E-mail Settings.
4.Click Find Gateways. A dialog box opens that contains the available gateway IP addresses. Select an address and click OK.
NOTE: If the Find Gateways command does not provide the necessary information, call your Internet service provider (ISP) to get the SMTP gateway server host name or IP address and type it in the SMTP Gateway box. The SMTP server authentication username and password should be acquired from the ISP.
5.Click Test to test and validate the SMTP setting.
The From address cannot be changed on the printer front panel.
Cause |
Solution |
|
|
|
|
The user is prevented from changing the default From address |
1. |
Open the EWS for the desired product. |
|
2. |
Click the Digital Sending tab. |
|
3. |
Click E-mail Settings. |
|
4. |
Uncheck the Prevent Device user from changing the |
|
|
Default From: Address checkbox. |
|
5. |
Click Apply. |
|
|
|
ENWW |
23 |

English
The DSS has been uninstalled, but the message DSS has ownership over the printer appears.
Cause |
Solution |
|
|
|
|
Communication error |
1. |
Turn off and then turn on the product. |
|
2. |
Restart the EWS. |
|
|
|
The Network Folder icon does not appear on the product control-panel home screen even when Send to Email is configured.
Cause
Send to Folder is not enabled in the EWS.
Cannot type a new e-mail address at the control panel.
Cause
Digital Send is set to use address book entries only
Cannot send to E-mail.
Cause
Authentication error, or the SMTP gateway is not correct.
24 Chapter 7 Problem Solving |
ENWW |
Loading...