


 Loading...
8500, 8500 N, 8500 DN Printer
English

Take a look at all HP Support has to offer!
Thank you for your purchase. Along with your product, you receive a variety of support services from Hewlett-Packard and our support partners designed to give you the results you need, quickly and professionally.
Online Services: for 24-hour |
World Wide Web URL—Printer drivers, updated HP printer software, plus product and support |
||||
access to information over your |
information can be obtained from the following URLs: |
|
|
|
|
modem, we suggest these services. |
in the U.S.: |
http://www.hp.com |
in Europe: |
http://www2.hp.com |
|
|
Printer drivers can be obtained from the following sites: |
|
|
||
|
in Japan: |
ftp://www.jpn.hp.com/drivers/ |
in Korea: |
|
http://www.hp.co.kr |
|
in Taiwan: |
http://www.hp.com.tw or from a local driver website of http://www.dds.com.tw |
|||
|
|
||||
|
HP Bulletin Board Service—Our electronic download service provides convenient access to HP |
||||
|
printer drivers, updated HP printer software, product information, and troubleshooting hints. Set your |
||||
|
communication software to N,8,1 and dial or use: |
|
|
|
|
|
in the U.S. and Canada: (1) (208) 344-1691 |
in Taiwan: |
(886) (2) 923-3233 |
||
|
in Korea: |
HITEL or CHOLIAN (Go HPK) |
in Australia: |
(61) (3) 9890-0276 |
|
|
in New Zealand: |
(64) (9) 356-3660 |
in China: |
|
(86) (10) 6261-4172 |
|
European Bulletin Board Service numbers are listed at http://www2.hp.com. |
||||
|
|
||||
|
America OnLine—(America OnLine/Bertelsmann is available in France, Germany, and the |
||||
|
UK)—Printer drivers, updated HP printer software, and support documentation are available to help |
||||
|
answer questions on HP products. Use Keyword HP to start your tour or call (1) (800) 827-6364 and ask |
||||
|
for representative #1118 to subscribe. |
|
|
|
|
|
|
||||
|
CompuServe—Printer drivers, updated HP printer software, and interactive sharing of technical |
||||
|
information with other members are available on CompuServe’s HP User’s forums (GO HP), or call (1) |
||||
|
(800) 524-3388 and ask for representative #51 to subscribe. (CompuServe is also available in the UK, |
||||
|
France, Belgium, Switzerland, Germany, and Austria.) |
|
|
|
|
|
|
|
|
|
|
Obtaining Software: |
Phone: |
(1) (970) 339-7009 |
Mail: |
Hewlett-Packard Company |
|
For U.S. and Canada: |
Fax: |
(1) (970) 330-7655 |
|
P.O. Box 1754 |
|
|
|
|
|
Greeley, CO 80632 USA |
|
For Asia-Pacific Countries: |
Contact Fulfill Plus at (65) 740-4477 (Hong Kong, Indonesia, Malaysia, Philippines, or Singapore). For |
||||
For Australia, New Zealand, and |
Korea, call (82) (2) 3270-0805 or (82) (2) 3270-0893. |
|
|
|
|
|
|
|
|
|
|
India: |
For Australia and New Zealand, call (61) (2) 565-6099. For India, call (91) (11) 682-6035. |
||||
For European English: |
Call (44) (142) 986-5511. |
|
|
|
|
|
|
|
|
||
HP Direct Ordering for |
Call (1) (800) 538-8787 (U.S.) or (1) (800) 387-8164 (Canada). |
|
|
||
Accessories and Supplies |
|
|
|
|
|
|
|
||||
HP Support Assistant CD-ROM: |
This support tool offers a comprehensive online information system designed to provide technical and |
||||
|
product information on HP products. To subscribe to this quarterly service in the U.S. or Canada, call (1) |
||||
|
(800) 457-1762. In Hong Kong, Indonesia, Malaysia, or Singapore, call Fulfill Plus at (65) 740-4477. |
||||
|
|
||||
HP Service Information: |
To locate HP-authorized dealers, call (1) (800) 243-9816 (U.S.) or (1) (800) 387-3867 (Canada). |
||||
|
|
|
|
||
HP Service Agreements: |
Call (1) (800) 835-4747 (U.S.) or (1) (800) 268-1221 (Canada). |
|
|
||
|
|
|
|
|
|
HP FIRST: HP FIRST Fax will deliver detailed troubleshooting information on common software and troubleshooting tips for your HP product. Call from any touch-tone phone and request up to three documents per call. These documents will be sent to the fax of your choice.
Australia |
(61) |
(3) |
9272-2627 |
Korea |
(82) |
(2) |
769-0543 |
||
Austria |
(43) |
(1) |
0660-8128 |
Malaysia |
(60) |
(3) |
298-2478 |
||
Belgium (Dutch) |
(32) |
(2) |
0800-11906 |
Netherlands |
(31) |
(20) |
0800-222420 |
||
Belgium (French) |
(32) |
(2) |
0800-17043 |
New Zealand |
(64) |
(9) |
356-6642 |
||
Canada |
(1) (800) |
333-1917 |
Norway |
(47) |
800-11319 |
||||
China |
(86) |
(10) |
6505-5280 |
Philippines |
(65) |
291-7951 |
|||
Denmark |
(45) |
8001-0453 |
Portugal |
(351) (1) |
0505-313342 |
||||
English (outside of UK) |
(31) |
(20) |
681-5792 |
Singapore |
(65) |
275-7251 |
|||
Finland |
(358) (9) |
0800-13134 |
Spain |
(34) |
(90) |
099-3123 |
|||
France |
(01) |
(43) |
623-444 |
Sweden |
(46) |
(2) |
079-5743 |
||
Germany |
(49) |
(13) |
081-0061 |
Switzerland (French) |
(41) |
(1) |
0800-551526 |
||
Hong Kong |
(852) 2506-2422 |
Switzerland (German) |
(41) |
(1) |
0800-551527 |
||||
Hungary |
(36) |
(1) |
252-4647 |
Taiwan |
(886) (2) |
719-5589 |
|||
India |
(91) |
(11) |
682-6035 |
Thailand |
(66) |
(2) |
661-3511 |
||
Indonesia |
(62) |
(21) |
352-2044 |
United Kingdom |
(44) |
(134) 0800-960271 |
|||
Italy |
(39) |
(2) |
1678-59020 |
United States |
(1) (800) |
333-1917 |
|||
Japan |
(81) |
(3) |
3335-8622 |
|
|
|
|
|
|
|
|
|
|
|
|
|
|
|
|

Customer Support Options Worldwide
In addition to the phone numbers listed below, appendix E, “Warranty and Support Information,” contains worldwide sales and service addresses and phone numbers for countries not listed here.
Customer Support & Product Repair Assistance for the U.S. and Canada:
(See the warranty in appendix E for additional product repair information.)
Call (1) (208) 323-2551 Monday through Friday from 6 am to 6 pm (Mountain Time) free of charge during the Warranty Period. However, your standard long-distance phone charges still apply. Have your serial number ready when calling.
Post-warranty telephone assistance is available to answer your product questions. Call (1) (900) 555-1500 ($2.50* per minute, U.S. only) or call (1) (800) 999-1148 ($25* per call, Visa or MasterCard, U.S. and Canada). Charges begin only when you connect with a support technician. *Prices subject to change.
European Customer Support Center Language and In-Country Options Available
Open Monday through Friday 8:30 to 18:00 CET
HP provides a free telephone support service during the warranty period. By calling a telephone number listed below, you will be connected to a responsive team waiting to help you. If you require support after your warranty has expired, you can receive support for a fee through the same telephone number. The fee is charged on a per-incident basis. When calling HP, please have the following information ready: product name and serial number, date of purchase, and description of the problem.
Danish: |
Denmark |
(45) |
3929-4099 |
German: |
Austria |
(43) |
(1) 0660-6386 |
|
Dutch: |
Belgium |
(32) |
(2) 626-8806 |
Italian: |
Germany |
(49) |
(180) 525-8143 |
|
English: |
Netherlands |
(31) |
(20) |
606-8751 |
Italy |
(39) |
(2) 264-10350 |
|
Ireland |
(353) (1) |
662-5525 |
Norwegian: |
Norway |
(47) |
2211-6299 |
||
|
UK |
(44) |
(171) 512-5202 |
Portuguese: |
Portugal |
(351) (1) 441-7199 |
||
|
International |
(44) |
(171) 512-5202 |
Spanish: |
Spain |
(34) |
(90) 232-1123 |
|
Finnish: |
Finland |
(358) (9) |
0203-47288 |
Swedish: |
Sweden |
(46) |
(8) 619-2170 |
|
French: |
Belgium |
(32) |
(2) 626-8807 |
|
|
|
|
|
|
France |
(01) |
(43) |
623-434 |
|
|
|
|
|
Switzerland |
(41) |
(84) |
880-1111 |
|
|
|
|
In-country Support Numbers
If you require support after your warranty has expired or additional product repair services, or if your country is not listed below, see “Worldwide HP Sales and Service Offices” in appendix E.
Argentina |
(54) |
(1) |
781-4059 |
Malaysia |
(60) |
(3) |
295-2566 |
||
|
(54) |
(1) |
781-4069 |
México D.F. |
(52) |
(5) |
326-4600 |
||
Australia |
(61) |
(3) |
272-8000 |
México Guadalajara |
(52) |
(3) |
669-9500 |
||
Brazil |
(55) |
(11) |
709-1444 |
México Monterey |
(52) |
(83) |
378-4240 |
||
Canada |
(1) (208) |
323-2551 |
Middle East/Africa |
(41) |
(22) |
780-7111 |
|||
China |
(86) |
(10) |
6261-4174 |
New Zealand |
(64) |
(9) |
356-6640 |
||
|
(86) |
(10) |
6261-4175 |
Philippines |
(63) |
(2) |
894-1451 |
||
|
(86) |
(10) |
6261-4176 |
Poland |
(48) |
(22) |
37-5065 |
||
|
(86) |
(10) |
6262-5666 |
Portugal |
(351) (1) |
301-7330 |
|||
Czech Republic |
(42) |
(2) |
471-7321 |
Russia |
(7) (95) |
923-5001 |
|||
Greece |
(30) |
(1) |
689-6411 |
Singapore |
(65) |
272-5300 |
|||
Hong Kong |
(852) 800-7729 |
Switzerland |
(41) |
(1) |
753-7111 |
||||
Hungary |
(36) |
(1) |
343-0310 |
Taiwan |
(886) (2) |
717-0055 |
|||
India |
(91) |
(11) |
682-6035 |
Thailand |
(66) |
(2) |
661-4011 |
||
|
(91) |
(11) |
682-6069 |
|
(66) |
(2) |
661-4012 |
||
Indonesia |
(62) |
(21) |
350-3408 |
Turkey |
(90) |
(1) |
224-5925 |
||
Japan |
(81) |
(3) |
3335-8333 |
|
|
|
|
|
|
Korea |
(82) |
(2) |
3270-0700; outside Seoul, |
|
|
|
|
|
|
|
call (82) (80) 999-0700 |
|
|
|
|
|
|||
|
|
|
|
|
|
|
|
|
|

HP Color LaserJet 8500,
8500 N, 8500 DN Printer
User’s Guide
Copyright Information
©1997 Hewlett-Packard
Company
All Rights Reserved. Reproduction, adaptation, or translation without prior written permission is prohibited, except as allowed under the copyright laws.
Part number: C3983-90937 First Edition, October 1997
Warranty
The information contained in this document is subject to change without notice.
Hewlett-Packard makes no warranty of any kind with respect to this information. HEWLETT-PACKARD SPECIFICALLY DISCLAIMS THE IMPLIED WARRANTY OF MERCHANTABILITY AND FITNESS FOR A PARTICULAR PURPOSE.
Hewlett-Packard shall not be liable for any direct, indirect, incidental, consequential, or other damage alleged in connection with the furnishing or use of this information.
Trademark Credits
Adobe™ and PostScript™ are trademarks of Adobe Systems Incorporated which may be registered in certain jurisdictions.
Arial® and Times New Roman® are U.S. registered trademarks of the Monotype Corporation.
CompuServe™ is a U.S. trademark of CompuServe, Inc.
dBASE® is a U.S. registered trademark of Borland International, Inc.
ENERGY STAR® is a U.S. registered service mark of the United States Environmental Protection Agency.
HP-UX 9.* and 10.0 for HP 9000 Series 700 and 800 computers are X/Open Company UNIX 93 branded products.
Lotus® 1-2-3 ® and Lotus® Symphony® are U.S. registered trademarks of Lotus Development Corporation.
Microsoft® , Windows® , MS Windows® , Windows NT® , and
MS-DOS® are U.S. registered trademarks of Microsoft Corporation.
PANTONE® * is Pantone, Inc.’s check-standard trademark for color.
TrueType™ is a U.S. trademark of Apple Computer, Inc.
UNIX® is a registered trademark in the United States and other countries, licensed exclusively through X/Open Company Limited.
All other products mentioned herein may be trademarks of their respective companies.

Contents
Take a look at all HP Support has to offer! . . . . . . . . . . . . . . 3 Customer Support Options Worldwide . . . . . . . . . . . . . . . . 4
Chapter 1 The HP Color LaserJet 8500 Printer
Features . . . . . . . . . . . . . . . . . . . . . . . . . . . . . . . . |
13 |
Locating the Printer’s Parts . . . . . . . . . . . . . . . . . . . . . . |
16 |
Optional Paper Handling Accessories and Status Lights . . . . . . 18 |
|
Finding Information About the Printer . . . . . . . . . . . . . . . . |
20 |
Chapter 2 Using the Printer Control Panel
Overview . . . . . . . . . . . . . . . . . . . . . . . . . . . . . . . . |
21 |
Printer Control Panel Keys and Indicator Lights . . . . . . . . . . |
22 |
When to Use the Printer Control Panel Menus . . . . . . . . . . . . |
24 |
Using the Printer Control Panel in Shared Environments . . . . . |
24 |
Resetting the Printer . . . . . . . . . . . . . . . . . . . . . . . . |
25 |
Factory Defaults . . . . . . . . . . . . . . . . . . . . . . . . . . |
25 |
Printing Menu Maps . . . . . . . . . . . . . . . . . . . . . . . . |
26 |
Changing Settings in the Printer Control Panel . . . . . . . . . . . . |
27 |
Configuring Menu Selections . . . . . . . . . . . . . . . . . . . . |
27 |
Auto Continue . . . . . . . . . . . . . . . . . . . . . . . . . . . |
27 |
Selecting the Mode for Tray 1 . . . . . . . . . . . . . . . . . . . |
28 |
Configuring Media Type and Size . . . . . . . . . . . . . . . . . |
29 |
Selecting an Output Bin . . . . . . . . . . . . . . . . . . . . . . |
30 |
Setting Media Type and Size Overrides . . . . . . . . . . . . . . |
31 |
Selecting the A4 Override . . . . . . . . . . . . . . . . . . . . . |
32 |
Controlling a Proof and Print Job . . . . . . . . . . . . . . . . . . |
32 |
Selecting Toner Low Response . . . . . . . . . . . . . . . . . . . |
33 |
Setting the Power Save Mode . . . . . . . . . . . . . . . . . . . . |
34 |
Selecting Parallel Advanced Function . . . . . . . . . . . . . . . |
35 |
Selecting the Default Printer Personality . . . . . . . . . . . . . . |
36 |
Setting the I/O Timeout . . . . . . . . . . . . . . . . . . . . . . . |
36 |
Locking the Printer Control Panel . . . . . . . . . . . . . . . . . |
37 |
Selecting the Display Language . . . . . . . . . . . . . . . . . . |
38 |
Printing Internal Pages . . . . . . . . . . . . . . . . . . . . . . . . . |
39 |
Interpreting the Configuration Page . . . . . . . . . . . . . . . . |
40 |
Managing Memory . . . . . . . . . . . . . . . . . . . . . . . . . . |
41 |
Downloading Fonts . . . . . . . . . . . . . . . . . . . . . . . . . |
41 |
Resource Saving . . . . . . . . . . . . . . . . . . . . . . . . . . |
41 |
Configuring the Printer for a Network . . . . . . . . . . . . . . . . . |
42 |
Configuring Novell NetWare Parameters . . . . . . . . . . . . . . |
42 |
Configuring TCP/IP . . . . . . . . . . . . . . . . . . . . . . . . |
43 |
Configuring Apple EtherTalk Phase Parameter . . . . . . . . . . |
45 |
EN
Contents 7

Disabling Network Protocols . . . . . . . . . . . . . . . . . . . 46
Chapter 3 Common Printing Tasks
Selecting Media . . . . . . . . . . . . . . . . . . . . . . . . . . . . |
49 |
Supported Media Weights and Sizes for Input Trays . . . . . . . |
50 |
Supported Media Weights and Sizes for the Optional Multi-bin |
|
Mailbox . . . . . . . . . . . . . . . . . . . . . . . . . . . . . |
52 |
Preprinted Forms and Letterhead . . . . . . . . . . . . . . . . . |
53 |
Recycled Media . . . . . . . . . . . . . . . . . . . . . . . . . . |
53 |
Envelopes . . . . . . . . . . . . . . . . . . . . . . . . . . . . . . |
53 |
Transparencies . . . . . . . . . . . . . . . . . . . . . . . . . . . |
54 |
Heavy Paper Stock . . . . . . . . . . . . . . . . . . . . . . . . . |
54 |
Labels . . . . . . . . . . . . . . . . . . . . . . . . . . . . . . . . |
55 |
Colored Media . . . . . . . . . . . . . . . . . . . . . . . . . . . |
55 |
Media to Avoid . . . . . . . . . . . . . . . . . . . . . . . . . . . |
56 |
Controlling Your Print Job . . . . . . . . . . . . . . . . . . . . . . . |
57 |
Changing Page Orientation . . . . . . . . . . . . . . . . . . . . . |
57 |
Printing from Tray 1 . . . . . . . . . . . . . . . . . . . . . . . . . . |
58 |
Printing Envelopes from Tray 1 . . . . . . . . . . . . . . . . . . |
60 |
Printing Tips for Tray 1 . . . . . . . . . . . . . . . . . . . . . . |
61 |
Orienting Media in Tray 1 . . . . . . . . . . . . . . . . . . . . . |
62 |
Printing from Trays 2 and 3 . . . . . . . . . . . . . . . . . . . . . . |
63 |
Printing Tips for Trays 2 and 3 . . . . . . . . . . . . . . . . . . . |
66 |
Orienting Media in Trays 2 and 3 . . . . . . . . . . . . . . . . . |
67 |
Printing from the Optional Tray 4 . . . . . . . . . . . . . . . . . . . |
68 |
Printing Tips for Tray 4 . . . . . . . . . . . . . . . . . . . . . . |
70 |
Orienting Media in Tray 4 . . . . . . . . . . . . . . . . . . . . . |
71 |
Chapter 4 Using Color
Controlling Color Output with Printer Drivers . . . . . . . . . . . . |
73 |
HP ColorSmart II Utility . . . . . . . . . . . . . . . . . . . . . . |
74 |
Manual Mode . . . . . . . . . . . . . . . . . . . . . . . . . . . . |
74 |
ICC/CMS . . . . . . . . . . . . . . . . . . . . . . . . . . . . . . |
75 |
Black and White . . . . . . . . . . . . . . . . . . . . . . . . . . |
75 |
Adjusting the Print Color and Quality Settings . . . . . . . . . . |
76 |
Selecting Colors . . . . . . . . . . . . . . . . . . . . . . . . . . . . |
77 |
PANTONE Colors . . . . . . . . . . . . . . . . . . . . . . . . . |
77 |
Color Swatch . . . . . . . . . . . . . . . . . . . . . . . . . . . . |
77 |
Resolution Considerations for Graphics . . . . . . . . . . . . . . . |
78 |
Using Digital Cameras . . . . . . . . . . . . . . . . . . . . . . . |
78 |
Using Scanners . . . . . . . . . . . . . . . . . . . . . . . . . . . |
79 |
Adjusting the Color Balance . . . . . . . . . . . . . . . . . . . . . |
80 |
Chapter 5 Using Fonts
Installing Fonts . . . . . . . . . . . . . . . . . . . . . . . . . . . . |
85 |
Using Internal TrueType Fonts . . . . . . . . . . . . . . . . . . . |
86 |
Understanding the Printer Font Defaults . . . . . . . . . . . . . . . |
87 |
8 Contents
EN

Font Selection Priority . . . . . . . . . . . . . . . . . . . . . . . |
87 |
Selecting Fonts . . . . . . . . . . . . . . . . . . . . . . . . . . . . . |
88 |
Selecting Fonts Through Software . . . . . . . . . . . . . . . . . |
88 |
Selecting PCL Fonts Through the Printer Control Panel . . . . . . 88 |
|
Printing a List of Available Printer Fonts . . . . . . . . . . . . . . . |
90 |
Interpreting the PCL Font List . . . . . . . . . . . . . . . . . . . |
90 |
Using PostScript Fonts . . . . . . . . . . . . . . . . . . . . . . . |
91 |
Using Fonts on a Network . . . . . . . . . . . . . . . . . . . . . . . |
92 |
Adding Support for Fonts to an Optional Printer Hard Disk or |
|
Flash DIMM . . . . . . . . . . . . . . . . . . . . . . . . . . . . |
93 |
Installing Fonts on Your Computer . . . . . . . . . . . . . . . . . |
93 |
Install Fonts to Printer Hard Disk or Flash DIMM . . . . . . . . . |
93 |
Using Special Effects with Type . . . . . . . . . . . . . . . . . . . . |
94 |
HP Custom Font Services for Microsoft Windows . . . . . . . . . |
94 |
Chapter 6 Printer Interfaces
Parallel Configuration . . . . . . . . . . . . . |
. . . . . . . . . . . . |
95 |
Network Connections . . . . . . . . . . . . . |
. . . . . . . . . . . . |
96 |
Available Networking Software Solutions . |
. . . . . . . . . . . . |
97 |
LocalTalk Configuration . . . . . . . . . . . . |
. . . . . . . . . . . . |
98 |
Macintosh DIN-8 Cable . . . . . . . . . . |
. . . . . . . . . . . . |
98 |
LocalTalk Network Configuration . . . . . |
. . . . . . . . . . . . |
98 |
Enhancing Network Performance . . . . . . . |
. . . . . . . . . . . . |
99 |
Novell NetWare 3.x and 4.x Based Products |
. . . . . . . . . . . . |
99 |
IBM OS/2 Warp Server Networks . . . . . . . . . . . . . . . . . |
99 |
|
Microsoft Windows 3.1, Windows 3.11, |
|
|
Windows 95, and Windows NT 3.51 and 4.0 |
|
|
Networks . . . . . . . . . . . . . . . . . |
. . . . . . . . . . . . 100 |
|
UNIX Networks . . . . . . . . . . . . . . . |
. . . . . . . . . . . . 100 |
|
Chapter 7 Maintaining the Printer
Making Room for Printer Maintenance . . . . . . . . . . . . . . . . 101 Locating Printer Consumables . . . . . . . . . . . . . . . . . . . 102 Frequency for Replacing Printer Consumables . . . . . . . . . . 103
Chapter 8 Printer Control Panel Messages
Printer Messages . . . . . . . . . . . . . . . . . . . . . . . . . . . . 105
Chapter 9 Solving Printer Problems
Performing Basic Troubleshooting Steps . . . |
. . . . . . |
. . |
. . |
. |
. 129 |
Working with Toner . . . . . . . . . . . . . |
. . . . . . |
. . |
. . |
. |
. 129 |
Media Jam Locations |
. . . . . . . . . . . . . . . . . . . . . . . . . 130 |
Media Handling Problems . . . . . . . . . . . . . . . . . . . . . . . 132 |
|
Printer Response Problems . . . . . . . . . . . . . . . . . . . . . . 138 |
|
Printer Control Panel and Configuration Problems . . . . . . . . . . 142 |
|
Application Problems |
. . . . . . . . . . . . . . . . . . . . . . . . . 143 |
EN
Contents 9

Incorrect Printer Output . . . . . . . . . . . . . . . . . . . . . . . . 144 Color Printing Problems . . . . . . . . . . . . . . . . . . . . . . . . 146
Print Quality Problems . . . . . . . . . . . . . . . . . . . . . . . . |
148 |
|
Cleaning the Density Sensor . . . . . . . . . . . . . . . . . . . . 155 |
||
Troubleshooting with Print Quality Test Pages |
. . . . . . . . . . 156 |
|
Cleaning the Transfer Drum . . . . . . . . . |
. . . . . . . . . . . 157 |
|
Accessories, Options, and Related Products . . |
. . . . . . . . . . . |
161 |
Appendix A DIMM Installation
Supported DIMMs . . . . . . . . . . . . . . . . . . . . . . . . . . . 163 Installing DIMMs . . . . . . . . . . . . . . . . . . . . . . . . . 163
Appendix B PCL Commands
Overview . . . . . . . . . . . . . . . . . . . . . . . . . . . . . . . . 167 |
||
Understanding PCL Printer Command Syntax |
. . . . . . . . . . |
168 |
Combining Escape Sequences . . . . . . . . |
. . . . . . . . . . . |
169 |
Entering Escape Characters |
. . . . . . . . . . . . . . . . . . . . 169 |
Selecting PCL Fonts . . . |
. . . . . . . . . . . . . . . . . . . . . 170 |
Common PCL Commands |
. . . . . . . . . . . . . . . . . . . . . 171 |
Appendix C PJL Commands
Overview . . . . . . . . . . . . . . . . . . . . . . . . . . . . . . . . 175
Printer and Network Security Commands . . . . . . . . . . . . . 175 |
|
File System Commands |
. . . . . . . . . . . . . . . . . . . . . . 180 |
Multi-bin Mailbox Commands . . . . . . . . . . . . . . . . . . . 187 |
|
Proof and Print . . . . |
. . . . . . . . . . . . . . . . . . . . . . . 190 |
Appendix D Specifications
Electrical Specifications . . . . . . . . . . . . . . . . . . . . . . . . 193 |
|
Operating Environment Specifications . . . . . . . . . . . . . . . 193 |
|
Acoustic Emissions . . . . . . . . . . . . . . . . . . . . . . . . . 194 |
|
Environmental Product Stewardship Program . . . . . . . . . . . . 195 |
|
Regulatory Statements . . . . . . . . . . . . . . . . . . . . . . . . . 198 |
|
FCC Regulations . . . . . . . . . . . . . . . . . . . . . . . . . . |
198 |
Canadian DOC Regulations . . . . . . . . . . . . . . . . . . . . |
198 |
Declarations of Conformity . . . . . . . . . . . . . . . . . . . . |
199 |
VCCI Statement (Japan) . . . . . . . . . . . . . . . . . . . . . . |
202 |
Korean EMI Statement . . . . . . . . . . . . . . . . . . . . . . . 202 |
|
Safety Information . . . . . . . . . . . . . . . . . . . . . . . . . . . 203 |
|
Laser Safety . . . . . . . . . . . . . . . . . . . . . . . . . . . . |
203 |
Product Information Sheet . . . . . . . . . . . . . . . . . . . . . 203 Material Safety Data Sheet (MSDS) . . . . . . . . . . . . . . . . 203 Laser Statement for Finland . . . . . . . . . . . . . . . . . . . . 204
Appendix E Warranty and Support Information
Hewlett-Packard Warranty Statement . . . . . . . . . . . . . . . . . 205
10 Contents
EN
Worldwide HP Sales and Service Offices . . . . . . . . . . . . . . . 206
Index
EN
Contents 11

12 Contents
EN

Chapter 1
The HP Color LaserJet 8500 Printer
Features
Congratulations on your purchase of the HP Color LaserJet 8500, 8500 N, or 8500 DN printer. This printer is designed to produce high-quality, high-speed color printouts for business environments.
This printer provides the quality and reliability of Hewlett-Packard printers as well as these specific features:
Performance |
∙ 24 pages per minute (ppm) black and white printing |
|
|
||
|
∙ 6 ppm color printing |
|
Approximate |
∙ Letter-, A4-sized media: 24 ppm black and white; 6 ppm color |
|
Print Speeds |
||
∙ Legal-, Executive-, 11-by-17 inch sized media: 12 ppm black and white; |
||
|
||
|
3 ppm color |
|
|
∙ Glossy Finish: 3.4 ppm black and white; 2.4 ppm color |
|
|
∙ Transparencies: 2.8 ppm black and white; 2.1 ppm color |
|
|
∙ Labels: 12 ppm black and white; 3 ppm color |
|
Paper |
∙ Printing on 12-by-18.50 inch (304.80-by-469.90 mm) sized media |
|
Handling |
||
∙ Printing on heavy media up to 58 lb (216 g/m²) bond |
||
|
||
|
∙ Two 500-sheet input trays (trays 2 and 3) that support letter-, legal-, and |
|
|
A4-sized media; 11-by-17 inch and A3-sized media supported by tray 3 |
|
|
only |
|
|
∙ A 100-sheet multipurpose tray that supports letter-, legal-, executive-, A3-, |
|
|
A4-, B4-, 11-by-17 inch, B5-, and custom-sized media, as well as |
|
|
envelopes, labels, and card stock |
|
|
∙ Face-down (top) output bin |
|
|
∙ Printer driver selectable face-up (left) output bin with straight-through |
|
|
paper path |
EN
Chapter 1 – The HP Color LaserJet 8500 Printer 13

Font and
Memory
Printer
Personality
Support
User Interface
and EIO
Accessories
∙24 MB standard DIMM (dual inline memory module) memory, expandable to 128 MB DIMM*
∙HP LaserJet 45 TrueType font set
∙HP FontSmart utility, which provides 65 additional TrueType fonts for Microsoft®Windows 3.1, Windows 95, and Windows NT 4.0
∙Supports forms and fonts
∙PCL5 color extension support in the printer
∙Automatic printer personality switching
∙PostScript™ support
∙Standard ECP or bidirectional parallel cable interface (IEEE-1284 compliant)
∙2 enhanced input/output (EIO) slots
∙Automatic I/O (input/output) switching
∙HP JetAdmin software for Windows NT 4.0, Windows NT 5.0, Novell NetWare, and OS/2 Warp Server
∙Optional printer hard disk*, which provides storage for fonts and macros as well as proof and print and and mopying capabilities (multiple original prints)
∙Optional flash**, ROM (read-only memory), or synchronous DRAM (dynamic random-access memory) DIMM device memory
∙Optional multi-bin mailbox, which provides multiple output destinations
∙Optional 2,000-sheet input tray (tray 4)
∙Optional duplexer, which provides two-sided printing
∙Optional HP JetDirect 600N internal print server for network connections
*To expand the DIMM memory to 128 MB, install 16 MB DIMMs in all eight DIMM slots.
**Either an optional printer hard disk or optional flash DIMMs can be installed. You cannot install both on the printer.
For more information on supported media, see “Selecting Media” in chapter 3.
14 Chapter 1 – The HP Color LaserJet 8500 Printer
EN

The approximate print speeds offered by this printer might vary from those listed above because the following factors affect processing time:
∙Complex graphics or large graphics
∙I/O configuration
∙Type of computer
∙Computer configuration
∙Amount of printer memory
∙Network operating system
∙Network configuration
Color HP The 1 8500 LaserJet
EN
Chapter 1 – The HP Color LaserJet 8500 Printer 15

Locating the Printer’s Parts
The following figures show the locations of the printer’s parts.
Figure 1
APrinter Control Panel
BLeft Output Bin (face up)
CFront Door
DInput Tray 2
EPower Button
FInput Tray 3
GTop Output Bin (face down)
HFlip-Up Media Stop
IUpper Right Door
JInput Tray 1
KLower Right Door
LPrinter Stand
16 Chapter 1 – The HP Color LaserJet 8500 Printer
EN
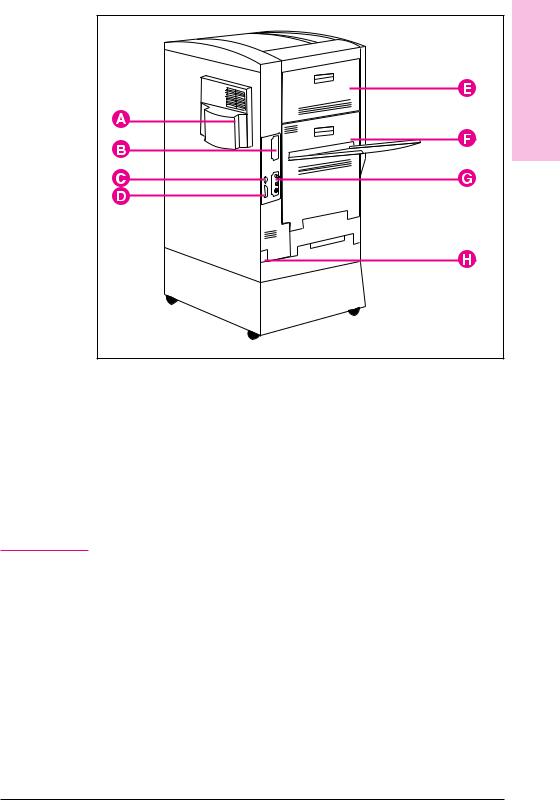
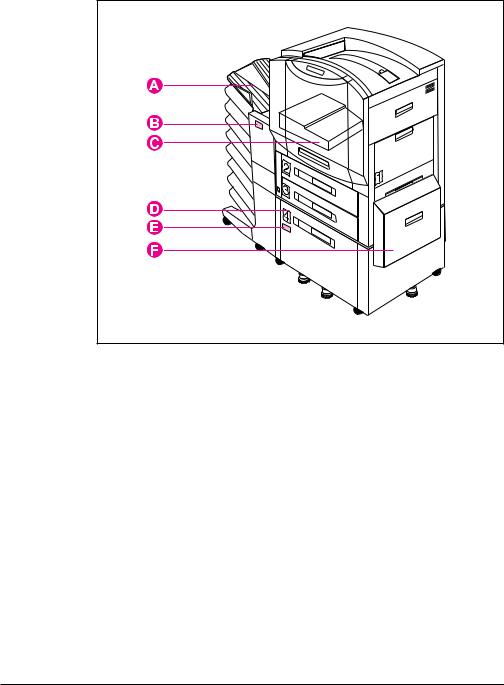
Figure 2 |
Color HP The 1 8500 LaserJet |
|
AAir Filter Door
BEIO Slot 2
CTray 4 Connector (C-Link Connector)
DParallel Connector
EUpper Left Door
FLower Left Door
GEIO Slot 1 (shown with optional HP JetDirect internal print server)
HPower Connector
N o t e |
For information on the locations of printer consumables, see “Locating |
|
Printer Consumables” in chapter 7. |
|
|
EN
Chapter 1 – The HP Color LaserJet 8500 Printer 17
Optional Paper Handling Accessories and Status
Lights
The following figure shows the locations of optional or packaged accessories and their status lights (if applicable).
Figure 3
AMulti-bin Mailbox
BMulti-bin Mailbox Status Light
CDuplexer (internal)
DOptional Tray 4 (2,000-Sheet Input Tray)
ETray 4 Status Light
FMedia Transfer Door
18 Chapter 1 – The HP Color LaserJet 8500 Printer
EN

Use the following table to interpret the status lights on tray 4 and the multi-bin mailbox.
Light |
Tray 4 |
Multi-Bin Mailbox |
|
|
|
Solid Green |
The accessory is on and ready. |
The accessory is on and ready. |
|
|
|
Solid Amber |
The accessory is experiencing a |
The accessory is experiencing a |
|
hardware malfunction. |
hardware malfunction. |
|
|
|
Flashing Amber |
The accessory has a media jam or |
The accessory has a media jam or |
|
a page needs to be removed from |
a page needs to be removed from |
|
tray 4, even if the page is not |
the multi-bin mailbox, even if the |
|
jammed. |
page is not jammed. |
|
The lower right door might be open. |
The accessory is not correctly |
|
|
attached to the printer. |
|
|
|
Off |
The printer might be in Power Save |
The printer might be in Power Save |
|
mode. Press [Go]. |
mode. Press [Go]. |
|
The accessory is not receiving |
The accessory is not receiving |
|
power. Check both the power |
power. Check both the power |
|
supply and the power cables. |
supply and the power cables. |
|
|
|
Color HP The 1 8500 LaserJet
EN
Chapter 1 – The HP Color LaserJet 8500 Printer 19
Finding Information About the Printer
Getting Started Guide provides information on installing the hardware and software for the printer.
Quick Reference Guide provides information at the printer on media jams, loading media, and common printer control panel messages.
Online Help provides information at your computer about the printer software and printer drivers.
Online User’s Guide provides information at your computer on the printer hardware, troubleshooting, and customer service.
20 Chapter 1 – The HP Color LaserJet 8500 Printer
EN
Chapter 2
Using the Printer Control Panel
N o t e
N o t e
Overview
The most convenient way to control the printer is through your application or the printer driver. The commands in your application override the printer control panel settings. For more information on changing the printer settings from within an application or printer driver, see the associated online help files.
Use the printer control panel to configure the default settings for the printer or to obtain printer status information. Also, use the printer control panel to access printer features not supported by the application.
Unless otherwise specified, control panel refers to the control panel on the printer. Keys on the printer control panel are indicated by the [Key] font.
For more information on controlling the printer in a network environment, see the HP JetDirect software installation guide and the HP JetAdmin online help.
EN
Chapter 2 – Using the Printer Control Panel 21
Printer Control Panel Keys and Indicator Lights
The following figure shows the locations of printer control panel features.
Figure 4
AGo
Brings the printer online or offline, and exits menus.
BMenu
Accesses the printer control panel menus to set the printer defaults. This key permits both forward and backward movement through the list of available menus.
CDisplay
Presents data about the printer (such as printer status, required actions, or data and print errors) in one or two lines of characters.
D– Value +
Steps through the value choices for a particular menu item using –/+. This key permits both forward and backward movement through the values.
ECancel Job
Stops the currently printing job from printing. If no job is printing and the display indicates that a job is processing, [Cancel[Job] cancels the currently processing job and the next job begins printing. While the job is being canceled, CANCELING JOB is displayed.
22 Chapter 2 – Using the Printer Control Panel
EN

FItem
Steps through the items in a particular menu. This key permits both forward and backward movement through the available items.
GReady Indicator (green)
∙On—The printer is online and able to accept and process data.
∙Off—The printer is offline and unable to accept or process data.
∙Flashing—The printer is going from online to offline, or from offline to online.
HData Indicator (green)
∙On—Data is in the printer buffer, or the printer is processing data.
∙Off—The printer buffer is empty.
∙Flashing—The printer is receiving or processing data.
IAttention Indicator (amber)
∙On—An error has occurred in the printer.
∙Off—The printer does not require attention.
∙Flashing—The printer requires attention.
JSelect
Selects the item or value currently shown on the printer control panel display. An asterisk (*) is displayed when an item has been selected.
For information on the status lights for the optional multi-bin mailbox and the optional tray 4, see “Optional Paper Handling Accessories and Status Lights” in chapter 1.
Panel Control 2
EN
Chapter 2 – Using the Printer Control Panel 23

When to Use the Printer Control Panel Menus
The printer control panel menus allow you to select items such as the number of copies and test pages. Use the printer control panel to perform the following tasks:
∙Set the media type for each input tray
∙Continue a proof and print job
∙Switch between online and offline status
∙Print configuration pages
∙Set the printer defaults when the application does not support the option
∙Change the printer’s EIO configuration
∙Make a selection that your application does not allow you to make
∙Print a file directory page to identify the fonts and macros available on the printer hard disk or the flash DIMM
Using the Printer Control Panel in Shared
Environments
The printer control panel functions in a network or other shared-printer environment in the same way as it does when it is connected to a standalone computer. Follow these guidelines before you change printer control panel settings:
∙Set the paper type (and size for tray 1 in Cassette mode) in the printer control panel whenever changing or loading media in the input trays. Configuring the media type (and size for tray 1 in Cassette mode) will help ensure high-quality printouts on the correct media. For more information on configuring the media type (and size for tray 1 in Cassette mode), see “Configuring Media Type and Size” later in this chapter.
∙See the system administrator before making printer control panel changes. Any printer control panel changes could affect other print jobs.
∙Coordinate setting the default printer font and downloading fonts with other users. Coordinating these operations conserves memory and reduces the chances of unexpected printer output.
24 Chapter 2 – Using the Printer Control Panel
EN

Resetting the Printer
Use the procedures below to reset the printer to the factory defaults listed in the table following this section.
To reset the printer to factory defaults
1Press [Menu] until INFORMATION MENU appears on the printer control panel display.
2Press [Item] until PRINT CONFIG PAGE appears on the display.
3Press [Select] to print the page.
4Press [Menu] until RESETS MENU appears on the display.
5Press [Item] until FACTORY DEFAULT RESET appears on the display.
6Press [Select]. The printer will reset all factory defaults.
N o t e |
Resetting the printer to factory defaults clears all print jobs from the |
|
print buffer. After resetting the defaults, reprint any lost print jobs. |
|
|
7Reset the EIO type and configure the printer, if necessary.
8Press [Go] to bring the printer online.
9Use the printer configuration page to reconfigure the printer.
Factory Defaults
The following table lists factory defaults for printer settings.
Panel Control 2
Menu |
Item |
Factory Default |
|
|
|
PAPER HANDLING MENU |
TRAY 1 MODE = |
FIRST |
|
|
|
|
TRAY 1 TYPE =1 |
PLAIN |
|
TRAY 1 SIZE =1 |
LETTER (8.5-by-11 inch)2 |
|
TRAY 2 TYPE = |
PLAIN |
|
|
|
|
TRAY 3 TYPE = |
PLAIN |
|
|
|
|
TRAY 4 TYPE =3 |
PLAIN |
|
PAPER DEST = |
TOP OUTPUT BIN |
|
|
|
|
DUPLEX =4 |
OFF |
|
BINDING5 |
LONG EDGE |
|
MANUAL FEED |
OFF |
|
|
|
|
OVERRIDE A4 WITH LETTER |
NO |
|
|
|
|
AUTO PAPER OVERRIDE |
OFF |
|
|
|
EN |
Chapter 2 – Using the Printer Control Panel 25 |

Menu |
Item |
Factory Default |
|
|
|
CONFIGURATION MENU |
POWERSAVE = |
30 MIN |
|
|
|
|
PERSONALITY |
AUTO |
|
|
|
|
CLEARABLE WARNINGS |
ON |
|
|
|
|
TONER LOW |
CONTINUE |
|
|
|
|
PRINT PS ERRORS |
OFF |
|
|
|
PRINTING MENU |
COPIES = |
1 |
|
|
|
|
PAPER |
LETTER2 |
|
ORIENTATION |
PORTRAIT |
|
|
|
|
FORM LENGTH |
60 LINES |
|
|
|
|
PCL FONT SOURCE |
INTERNAL |
|
|
|
|
PCL FONT NUMBER |
0 (Courier) |
|
|
|
|
PCL PITCH |
10.00 |
|
|
|
|
PCL POINT SIZE |
12.00 |
|
|
|
|
PCL SYMBOL SET |
PC-8 |
|
|
|
|
COURIER |
REGULAR |
|
|
|
|
WIDE A4 |
NO |
|
|
|
|
APPEND CR TO LF |
NO |
|
|
|
I/O MENU |
I/O TIMEOUT |
30 (seconds) |
|
|
|
|
PARALLEL ADV FUNCTIONS = |
ON |
|
|
|
1Appears only if CASSETTE MODE mode is selected.
2This setting will default to A4 in some countries.
3Appears only if the optional tray 4 is properly installed.
4Appears only if the optional duplexer is installed.
5Appears only if the optional duplexer is installed and DUPLEX is set to ON.
Printing Menu Maps
Print menu maps from the printer control panel, and then use the menu maps to view printer settings and to help navigate the printer control panel menus.
To print menu maps
1Press [Menu] until INFORMATION MENU appears on the printer control panel display.
2Press [Item] until PRINT MENU MAP appears on the display.
3Press [Select] to print. The printer will automatically bring itself online.
26 Chapter 2 – Using the Printer Control Panel
EN

Changing Settings in the Printer Control
Panel
Use the printer control panel to configure the default printer selections and to obtain printer status information. Also, use the printer control panel to access printer features not supported by your application. For more information on navigating the printer control panel, see “Printing Menu Maps” on the previous page.
Configuring Menu Selections
Use the following instructions to configure all printer control panel settings, including the default printer settings.
To configure menu selections in the printer control panel
1Press [Menu] until the menu you want appears on the printer control panel display.
2Press [Item] until the item you want appears on the display.
3Press [–[Value[+] until the value you want appears on the display.
4Press [Select] to save the selection. An asterisk (*) appears to the right of the selection.
5Repeat steps 1 through 4 until all of your changes are complete.
6Press [Go] to bring the printer online.
N o t e |
Changes to the printer control panel will not take effect until all current |
|
data in the print buffer prints or until the next print job. |
|
|
Auto Continue
The Auto Continue feature allows the printer to continue printing when certain warnings or conditions occur (such as TONER LOW). The printer message will be displayed on the printer control panel, but the printer will continue printing. Auto Continue is always on, and most printer control panel messages that do not disable the printer will not stop subsequent jobs from printing. However, the job where the error occurred might not print correctly.
If in the Configuration Menu CLEARABLE WARNINGS is set to ON, many printer control panel messages can be cleared by pressing [Go]. If CLEARABLE WARNINGS is set to JOB, the clearable messages will be cleared from the display automatically when the job where the error occurred finishes printing.
Panel Control 2
EN
Chapter 2 – Using the Printer Control Panel 27

|
Selecting the Mode for Tray 1 |
|
Tray 1 has two modes, First mode and Cassette mode. First mode is the |
|
default mode for tray 1. In First mode, tray 1 functions as a |
|
multipurpose tray. When tray 1 is in First mode, the printer will look |
|
first for media loaded in tray 1. If there is media loaded in tray 1, the |
|
printer will print from tray 1 regardless of media type and size, or media |
|
source information sent with the print job. |
|
In Cassette mode, tray 1 functions as a regular input tray. When tray 1 is |
|
in Cassette mode, you load media in the input tray and configure the |
|
media type and size on the printer control panel. |
|
When using First mode, specify the media type and size in the printer |
N o t e |
|
|
driver. If the printer senses that the media in tray 1 is a different size |
|
from what you specified in the printer driver, then the printer either will |
|
not feed the media or will only feed one page of the media and then stop |
|
printing to prevent damage to the printer. |
|
|
To select the mode for tray 1
1Press [Menu] until PAPER HANDLING MENU appears on the printer control panel display.
2Press [Item] until TRAY 1 MODE = appears on the display.
3Press [–[Value[+] until the correct mode appears on the display.
4Press [Select] to save the selection. An asterisk (*) appears to the right of the selection.
5Press [Go] to bring the printer online.
28 Chapter 2 – Using the Printer Control Panel
EN

Configuring Media Type and Size
Configure the media type (such as plain paper, letterhead, or transparencies) for each of the input trays. Also configure the media size (such as letter, A4, or legal) if the printer is configured for Cassette mode in tray 1. If the media type and size have been correctly configured for the input trays, the printer will print based on the type and size of media and will automatically use the correct input tray. Configuring the media type is beneficial for several reasons:
∙Setting the media type prevents printing on the wrong, possibly expensive, media.
∙The printer will automatically adjust its print speed to accommodate special media (such as card stock, labels, and transparencies). These adjustments will give the best quality output, saving time and resources.
N o t e |
If the media type is not set properly, the printer might not print on the |
|
correct media or at the correct speed for the media type, which can |
|
result in poor print quality. |
|
|
To configure the input trays
1Press [Menu] until PAPER HANDLING MENU appears on the printer control panel display.
2Press [Item] until TRAY [number] TYPE = appears on the display.
3Press [–[Value[+] until the correct media type appears on the display.
4Press [Select] to save the selection. An asterisk (*) appears to the right of the selection.
N o t e |
Trays 2, 3, and the optional tray 4 will automatically sense the media |
|
size. To configure the media size for tray 1 in Cassette mode, continue |
|
with step 5. Otherwise, proceed to step 8. |
|
|
5To configure tray 1 in Cassette mode, press [Item] until TRAY 1 SIZE= appears on the display.
6Press [–[Value[+] until the correct media size appears on the display.
7Press [Select] to save the selection. An asterisk (*) appears to the right of the selection.
8Repeat steps 2 through 4 to configure the media type in another input tray.
- Or -
Press [Go] to bring the printer online.
For more information on First and Cassette modes, see “Selecting the Mode for Tray 1” later in this chapter.
Panel Control 2
EN
Chapter 2 – Using the Printer Control Panel 29

Selecting an Output Bin
Select the top output bin (face down) or the left output bin (face up) in the printer control panel. The top output bin stacks the pages in sequential order, so that the first page is on top and the last page is on bottom. The left output bin provides a straight paper path which is useful to prevent curling when printing on card stock, labels, or other special media.
If you have an optional multi-bin mailbox, the system administrator must select the mode for the multi-bin mailbox through the HP JetAdmin software or with a PJL (printer job language) command. Three modes are available:
∙mailbox—a mailbox name or user name can be assigned to each mailbox bin
∙job separator—each print job is delivered to a separate mailbox bin, beginning with the lowest bin
∙stacker—print jobs are delivered to mailbox bins, beginning with the lowest bin, until bins are full
Select the default destination for print jobs in the printer control panel. The printer will send print jobs to the default destination if a destination is not selected in the printer driver, or if your printing environment does not use printer drivers. For more information on using the HP JetAdmin software, see the online help. For more information on using PJL commands to set the multi-bin mailbox mode, see appendix C, “PJL Commands.”
N o t e |
Changes made to the multi-bin mailbox mode settings in the printer |
|
driver will not override the multi-bin mailbox mode set in the HP |
|
JetAdmin software or through PJL commands. |
|
|
To select an output bin
1Press [Menu] until PAPER HANDLING MENU appears on the printer control panel display.
2Press [Item] until PAPER DEST = appears on the display.
3Press [–[Value[+] until the correct destination appears on the display.
4Press [Select] to save the selection. An asterisk (*) appears to the right of the selection.
5Press [Go] to bring the printer online.
30 Chapter 2 – Using the Printer Control Panel
EN
Loading...