


Jetdirect 280m
HP Jetdirect 280m, Jetdirect 250m, 310x, Jetdirect 380x, Jetdirect 610n White Paper
...
J
p
p
HP Jetdirect and SSL/TLS
er
une 2008
a
Table of Contents:
Introduction ..................................................................................................................................... 1
What is SSL/TLS? ............................................................................................................................ 2
HTTPS Decoded............................................................................................................................... 3
Digital Certificates ........................................................................................................................... 9
Public Key Infrastructure and Public Key Certificate Basics .................................................................. 12
SSL/TLS Protocol Basics .................................................................................................................. 20
Using HTTPS with HP Jetdirect ......................................................................................................... 26
A Detailed Look at the SSL/TLS Connection.......................................................................................52
SSL/TLS Server Settings .................................................................................................................. 60
HP Jetdirect as an SSL/TLS Client..................................................................................................... 61
SSL/TLS Client: Understanding Certificate Chains .............................................................................. 77
SSL/TLS Client: Certificates and Name Verification ............................................................................ 83
IPP over SSL/TLS ............................................................................................................................ 89
HP Jetdirect Certificate Guidelines.................................................................................................... 94
Embedded Devices and Digital Certificates .......................................................................................94
Which HP Jetdirect Products Support SSL/TLS? .................................................................................. 95
Summary ...................................................................................................................................... 95
Introduction
white
HP Jetdirect introduced SSL/TLS support in early 2002 with the 615n EIO Print Server. A free
firmware upgrade allowed the 610n EIO print server, shipped in 2000, the same capability.
Suddenly, a few million HP Jetdirect EIO cards had SSL/TLS capability. Why?
The answer was secure management. HP printing and imaging devices were becoming more
complex and more feature oriented. They were becoming valuable assets to a company’s
infrastructure. Having the ability to use a browser to manage a device using HTTP was one thing,
using the same browser and using HTTPS to manage it securely was a great benefit. Unfortunately,
many users of HTTPS are under a false sense of security because they have not deployed SSL/TLS
1
correctly. One of the purposes of this whitepaper is to show administrators how to properly deploy
SSL/TLS so that it can be used securely.
SSL/TLS is also used in other applications, such as LDAPS and 802.1X. This whitepaper will discuss
how SSL/TLS works when Jetdirect is operating as a client (e.g., LDAPS, IPPS). 802.1X is covered
extensively in a separate whitepaper. See http://www.hp.com/go/secureprinting
information regarding HP’s printing and imaging products.
for the latest
What is SSL/TLS?
SSL/TLS is a security protocol. It has a purpose: To provide authentication, integrity, and
confidentiality to the data it encapsulates. While SSL/TLS is commonly associated with the TCP/IP
protocol suite, it can be used within other frameworks as well. The most common protocol that uses
SSL/TLS functionality is HTTPS. In this section, for the sake of familiarity and clarity, we’ll discuss
SSL/TLS within the context of TCP/IP, primarily with HTTP and HTTPS.
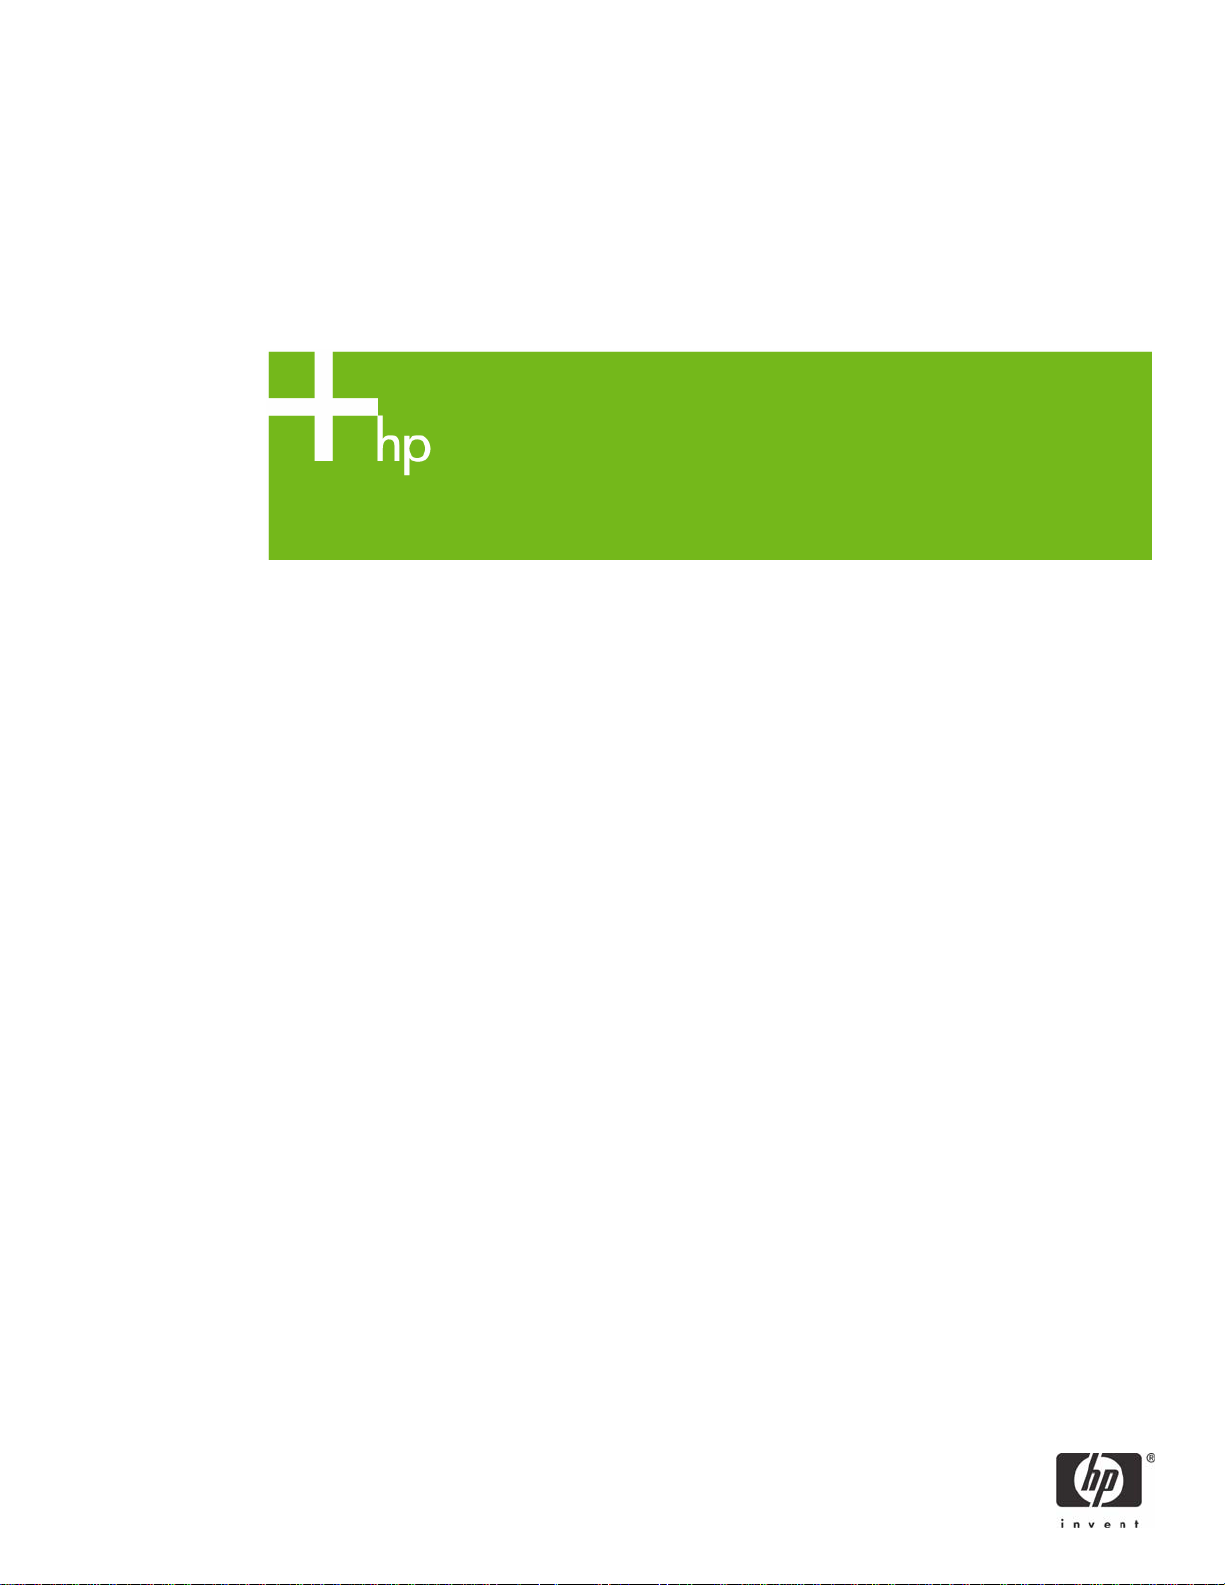
Refer to Figure 1: HTTP Application. Here is the normal view of an HTTP session from a web
browser to a Jetdirect device.
Figure 1 - HTTP Application
In Figure 2 – HTTPS Application, we can see how SSL/TLS is deployed. This would be done by using
“HTTPS” in the URL of the browser.
Figure 2 - HTTPS Application
We can see that HTTPS is really just running HTTP over SSL/TLS which runs over TCP. How does the
browser know when to use SSL/TLS? Well, the URL of “https://” indicates to the browser that it
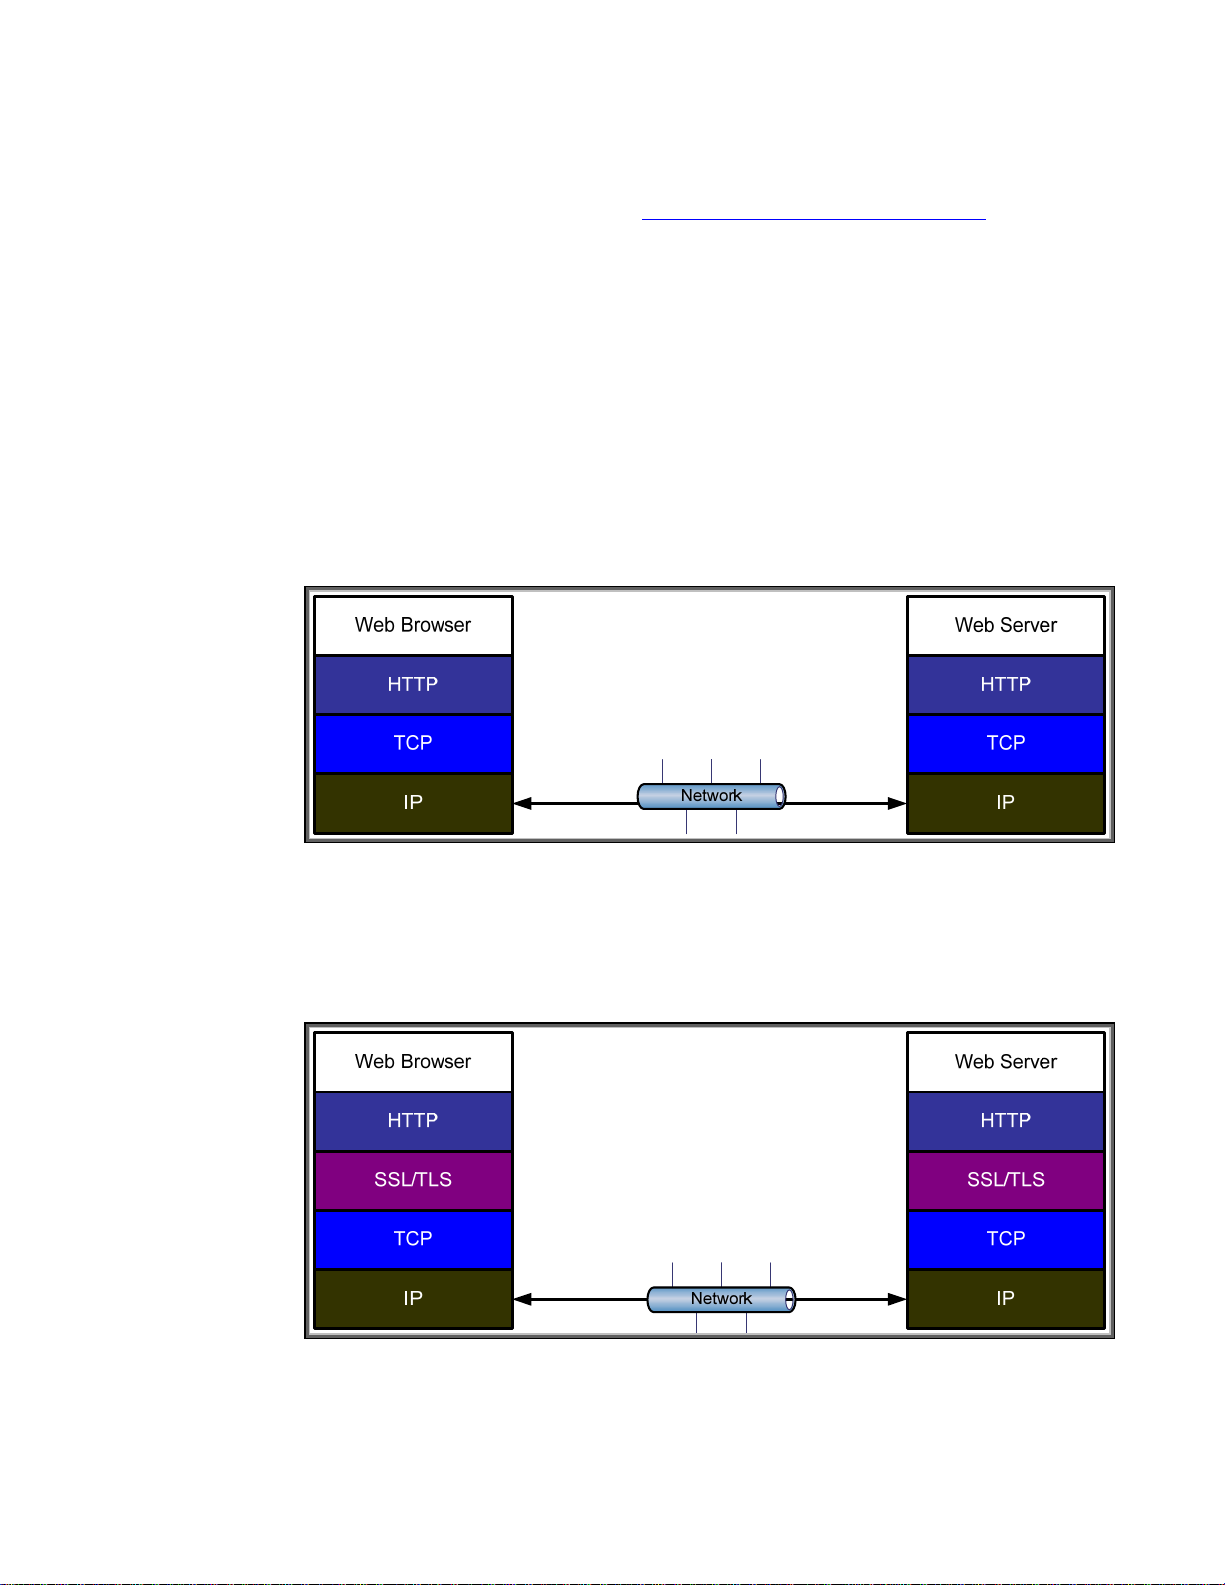
needs to change its behavior and invoke SSL/TLS. Refer to Figure 3 – Application Changes. We can
2
see that SSL/TLS requires application changes in order to be utilized. These changes have to be
made by every application that wishes to utilize SSL/TLS. In other words, SSL/TLS is not application
transparent.
Web Browser
HTTP://
Web Browser Application Code
API: Socket(…)
TCP
IP
Web Browser
HTTPS://
Web Browser Application Code
API: SSLSocket(…)
SSL/TLS
TCP
IP
Figure 3 - Application Changes
Now, let’s have a closer look at HTTPS.
HTTPS Decoded
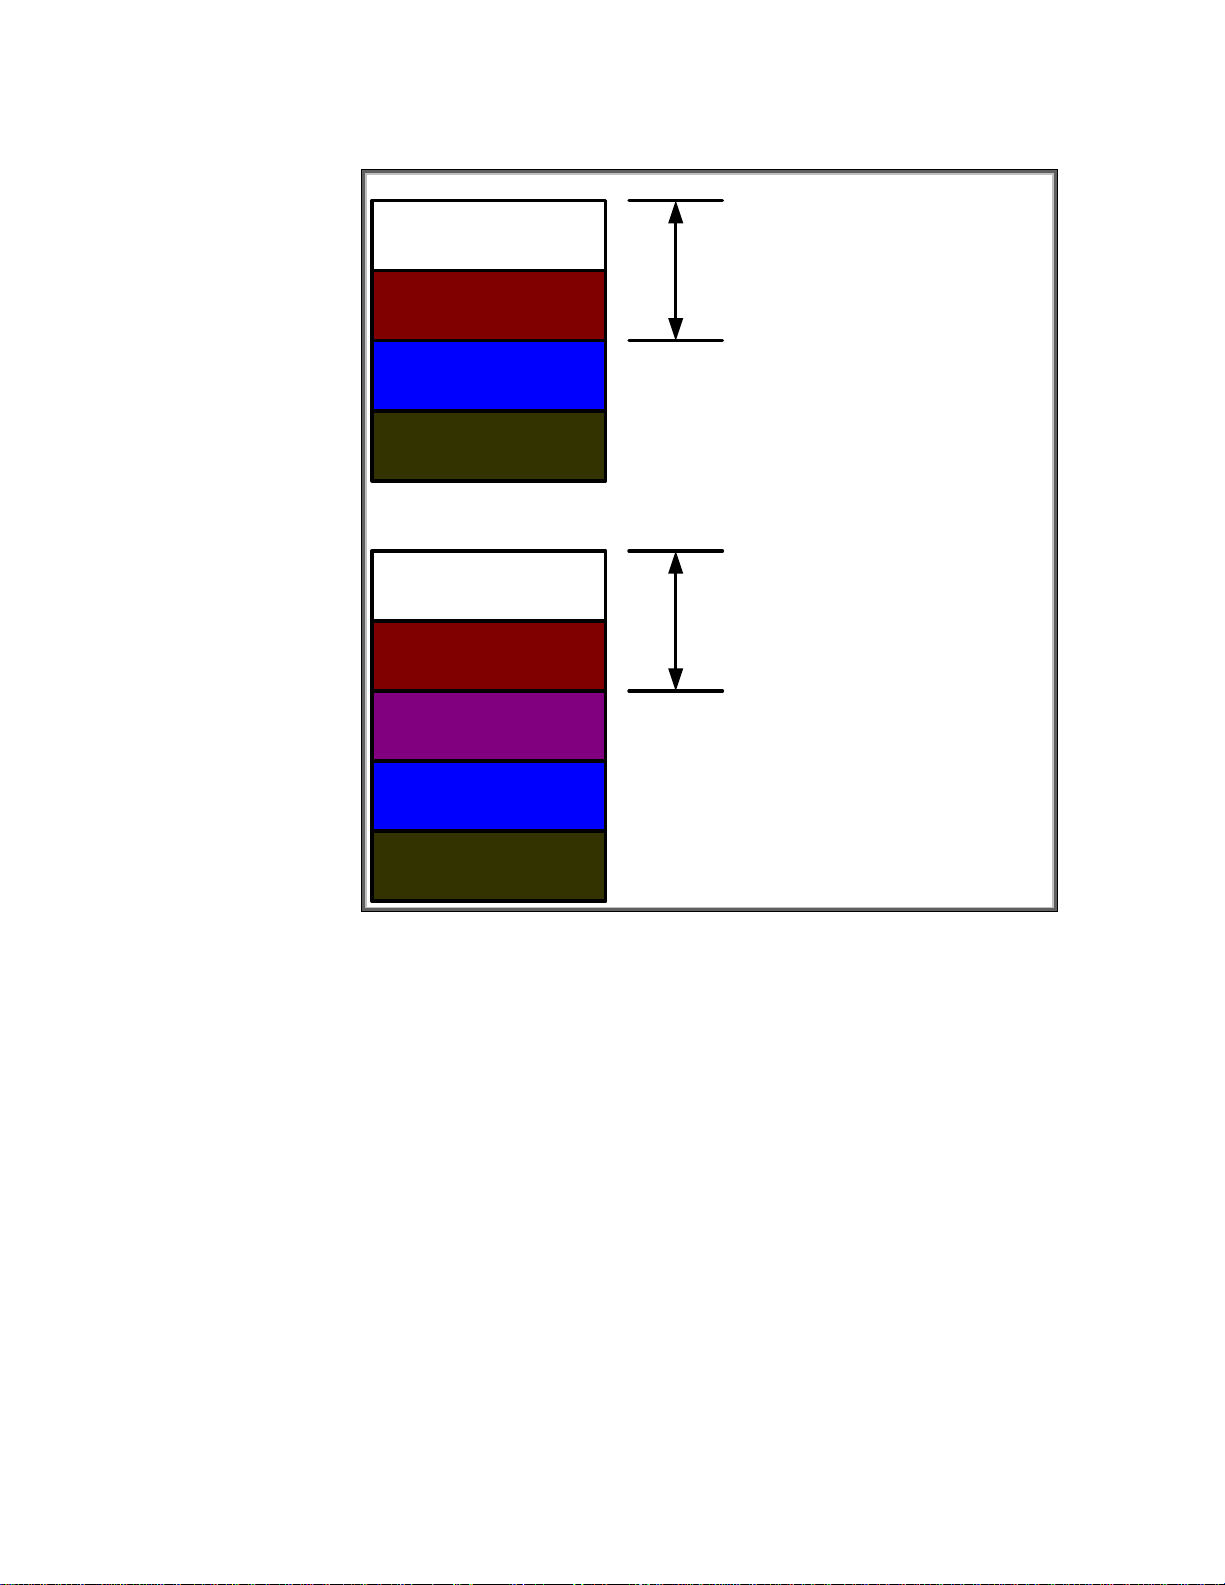
In Figure 4 – HTTP Session, we bring up a normal HTTP session with an HP MFP.
3
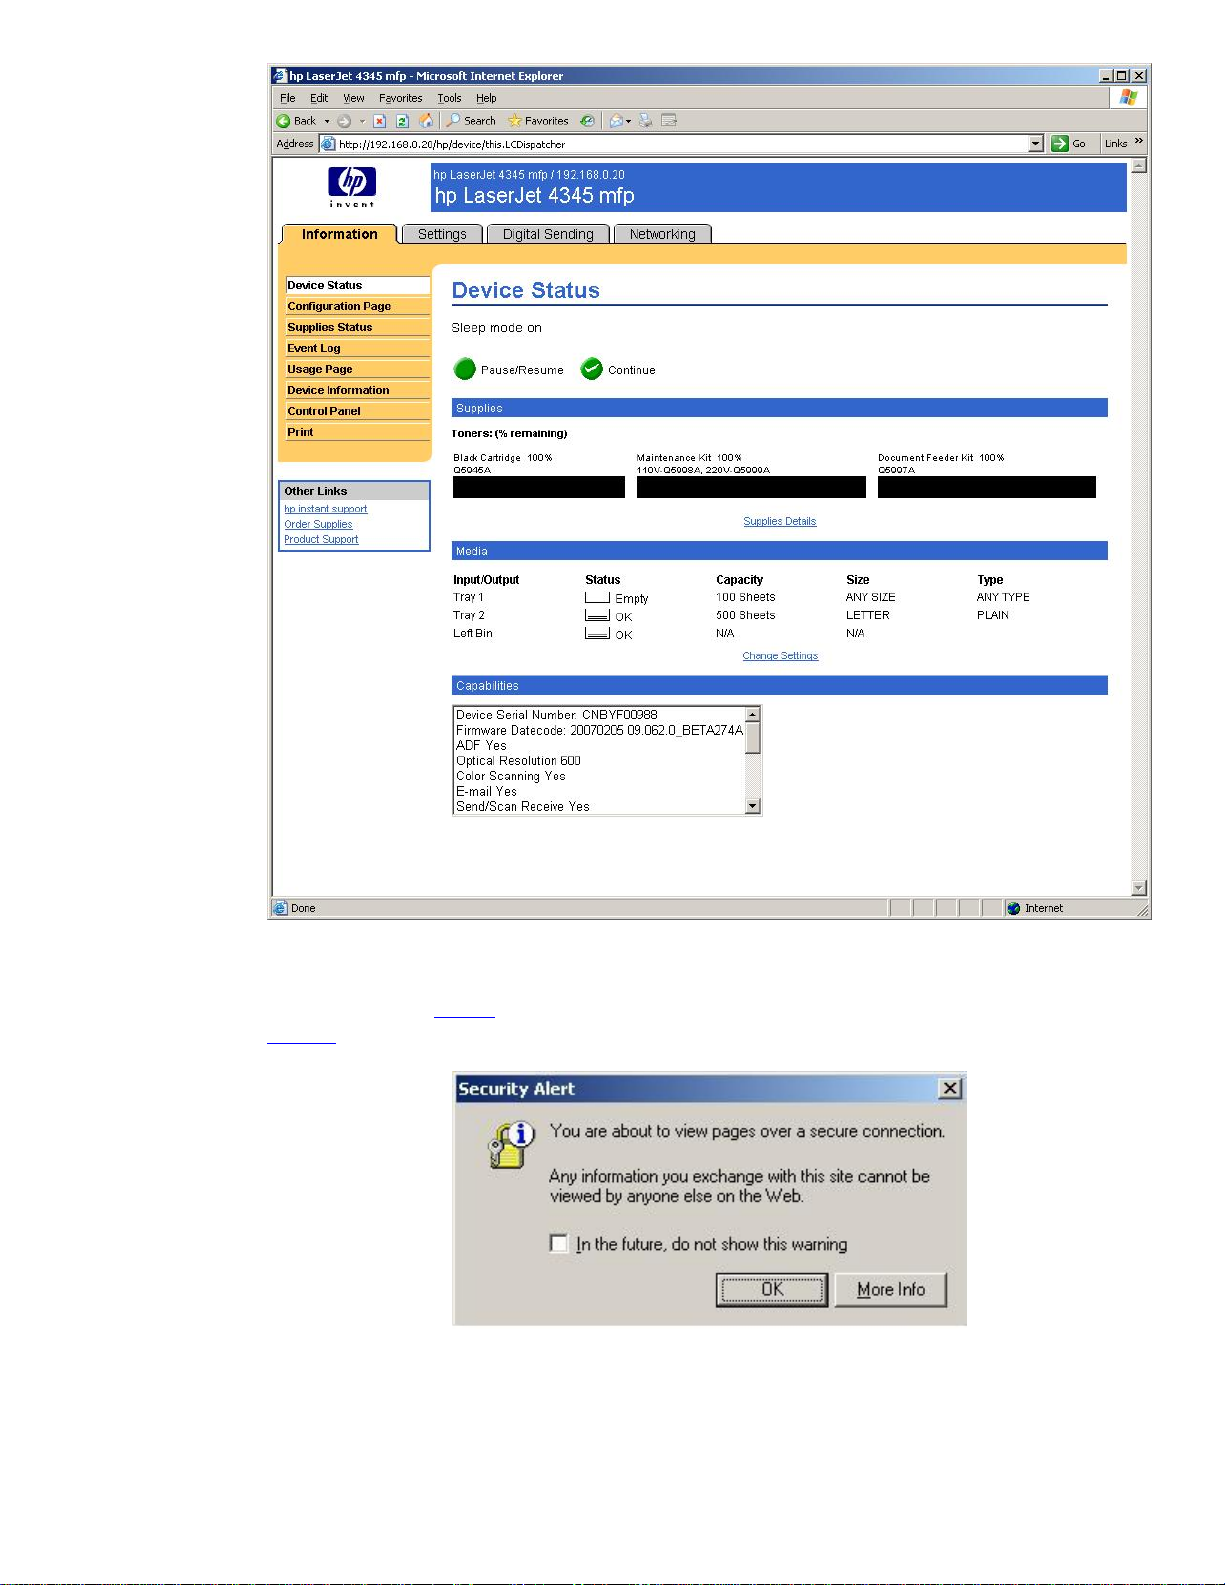
Figure 4 - HTTP Session
The URL starts with http://
https://
Clicking “More Info”, we get the dialog in Figure 6.
and hit the [Enter] key. We are now presented with the dialog in Figure 5.
and tells the browser that SSL/TLS is not required. Let’s change it to
Figure 5 - Secure Connection
4
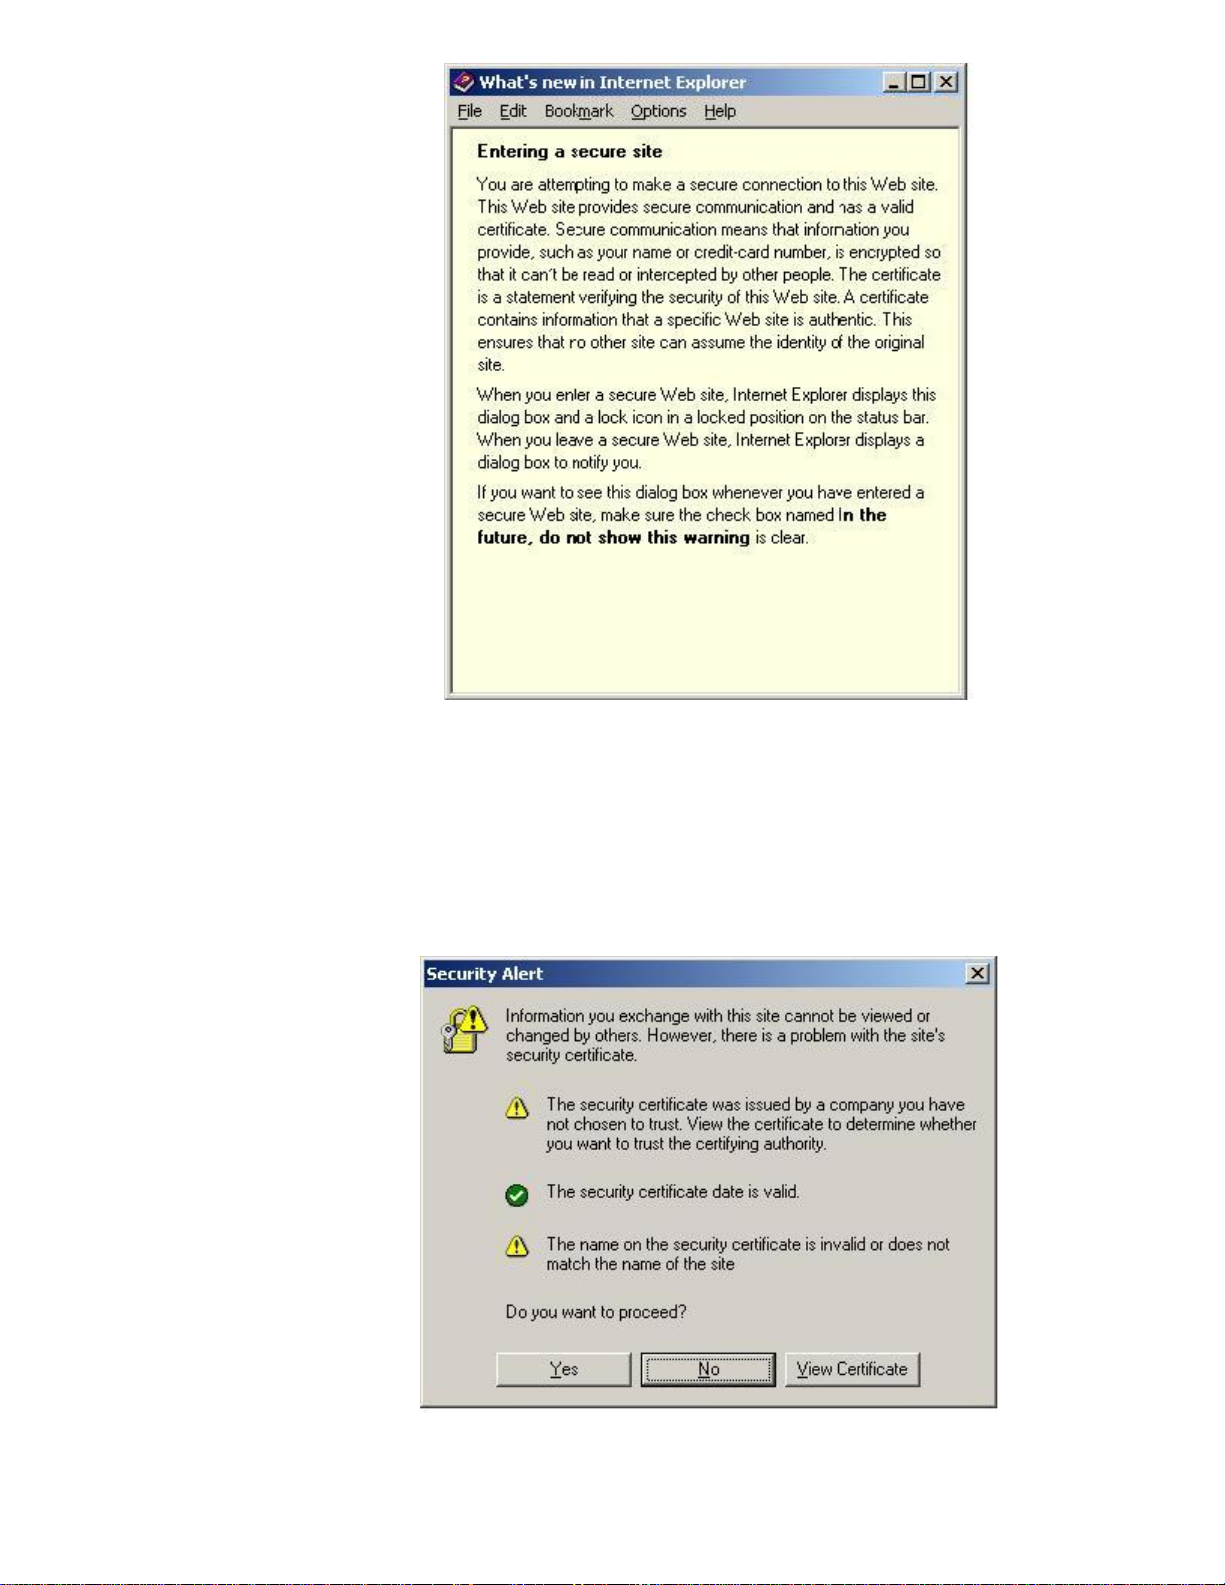
Figure 6 - More Info
Notice the sentence: “This Web site provides secure communication and has a valid certificate.”
After reading this whitepaper, you’ll know whether that sentence is correct or not. Now that we have
read the “More Info” text, let’s go back to the dialog in Figure 5 and click “OK”. Now we get a
security alert dialog shown in Figure 7.
Figure 7 - Security Alert
5
Well, we’ve got one green checkmark and two yellow warnings. Good enough for us! Let’s click
“Yes” and establish the HTTPS session with the MFP.
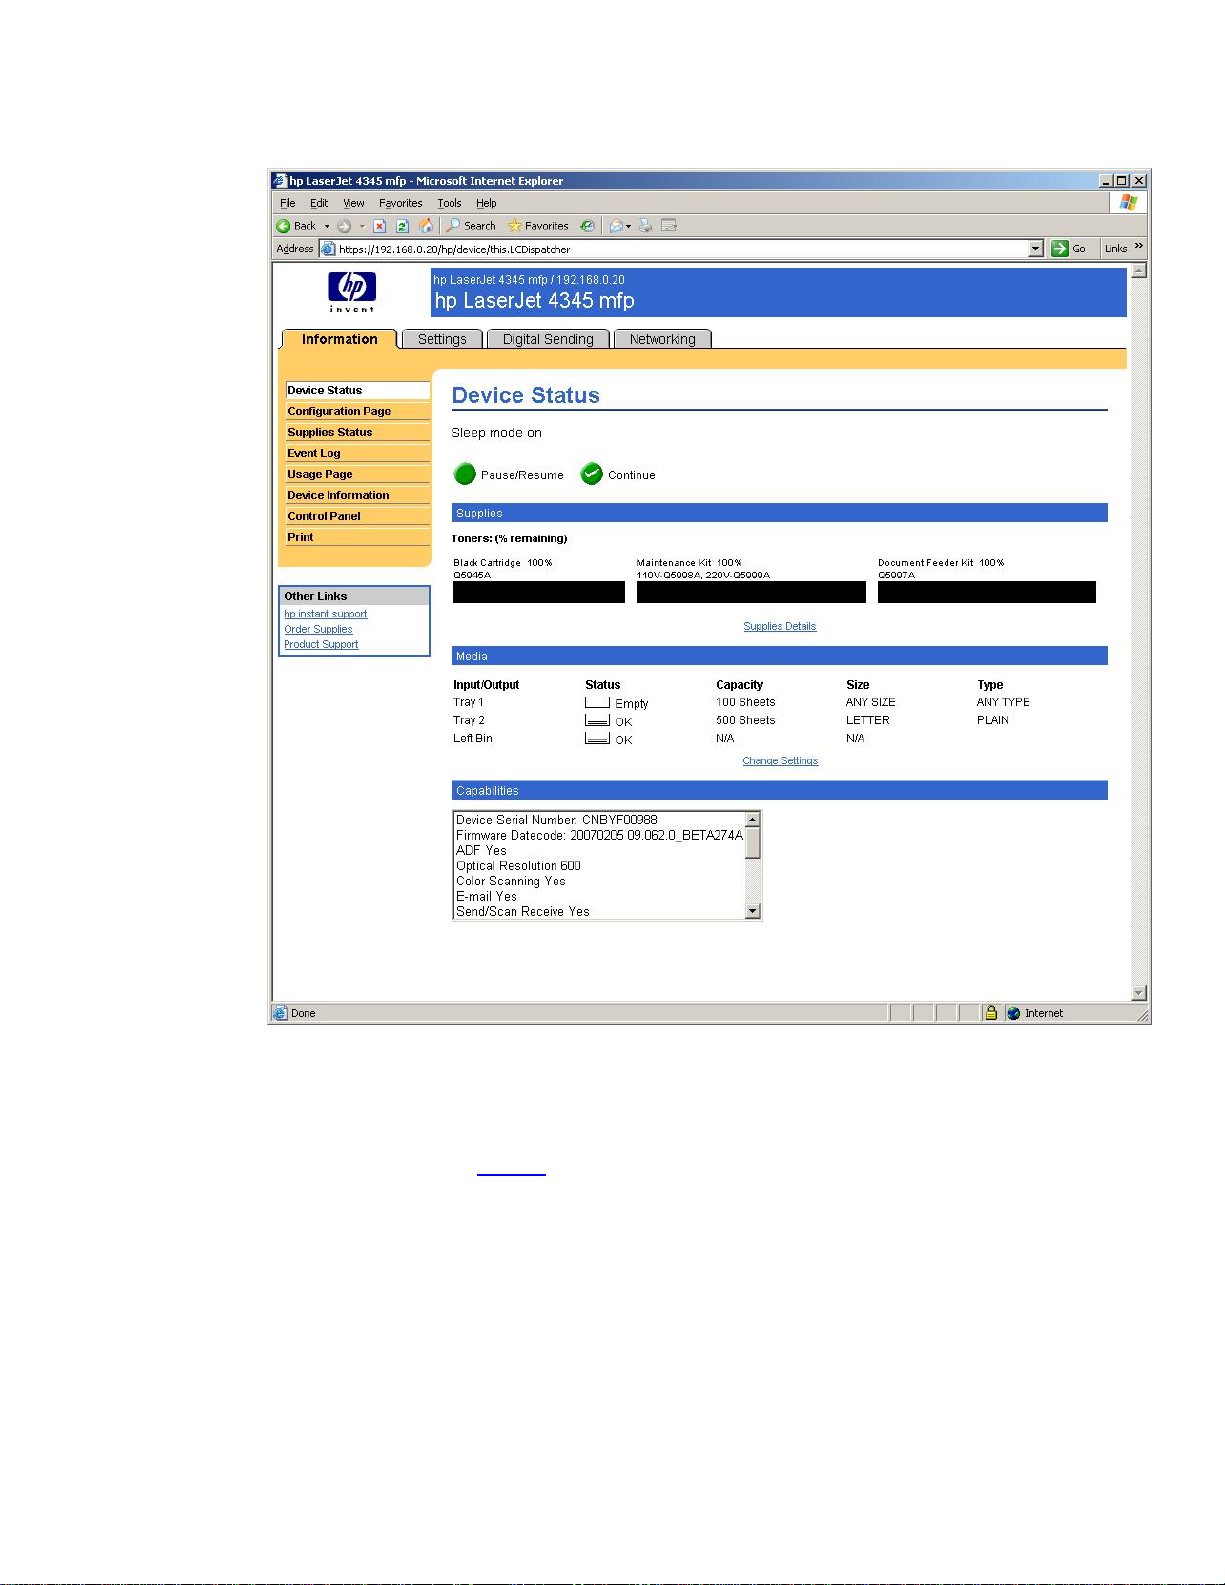
Figure 8 - HTTPS Session
We have now “secured” our web browser session with the HP MFP. How can we tell? Well, we can
look at the URL and see https://
, but we can also look at the bottom right of Figure 9 – Lock Icon.
6
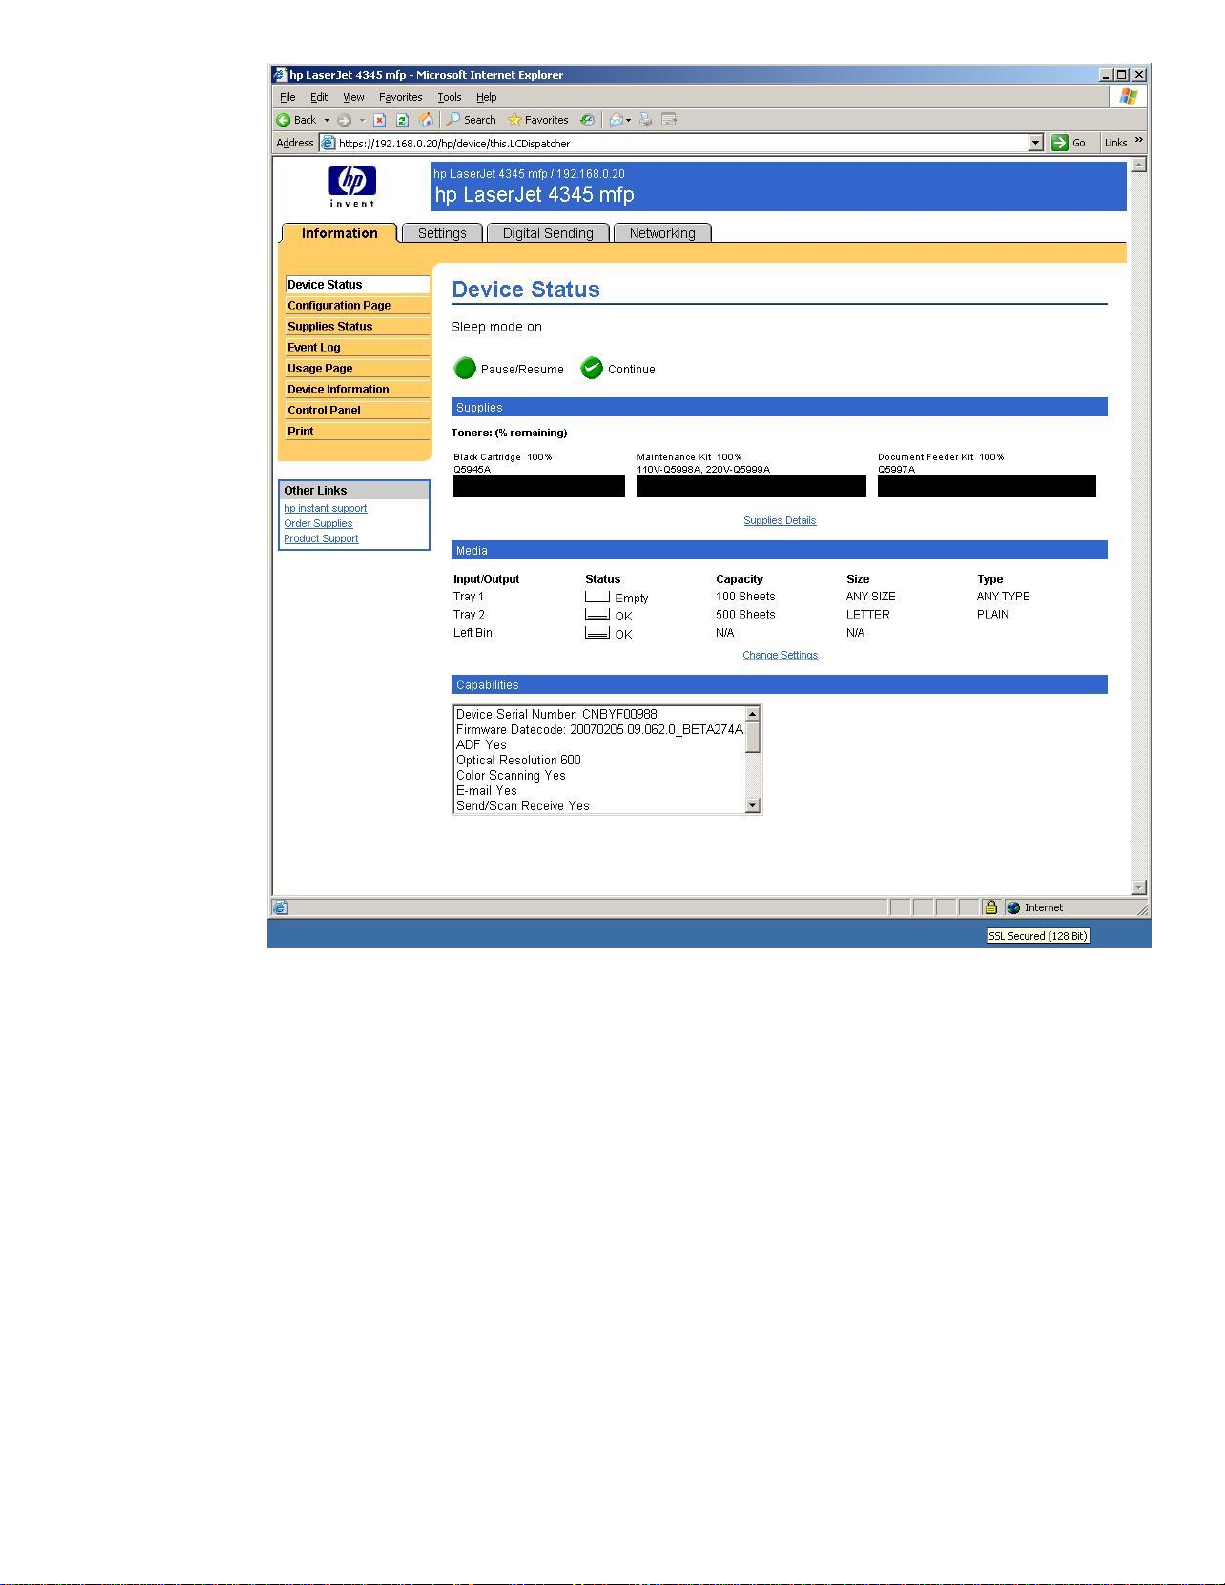
Figure 9 - Lock Icon
The mouse pointer was placed on the lock icon. Notice the “SSL Secured (128 bit)” shown in the
bottom right. If we double-click on the lock icon, we get a dialog box similar to the one in Figure 10
– Certificate Details.
7
Figure 10 - Certificate Details
Something is very wrong here. We went from yellow warning symbols and green checkmark to a big
red X symbol. We have a 128 bit SSL secured session with the HP MFP but we now have a big red X
indicating a trust problem.
This problem is best explained through an example. Let’s assume that you are a famous celebrity and
that you are having an electrical contractor work on your mansion. The contractor completed the
work but will only accept cash as payment and you don’t have any cash on you. You have to go to
the Automated Teller Machine (ATM). You summon 10 bodyguards and get into your armor plated
limousine and go to the shopping mall. The bodyguards surround you and you go to the first ATM
you see and put in your card and punch in your PIN#. The ATM returns the message: “Temporarily
out of service” and gives you your card back. You then go to another ATM and get the money and
return home. The next day, your bank account is cleaned out. You assume that one of your body
guards saw your PIN # and “borrowed” your card while you were sleeping. You fire all your
bodyguards. Was that the correct thing to do?
Probably not. You were most likely a victim of a fake ATM machine. You went to the ATM machine
in a secure fashion. You left the ATM machine in a secure fashion. You just went to a non-trusted
ATM machine! The same type of attack exists with SSL/TLS. To avoid being a victim of this attack,
we need to pay attention to the digital certificate and to the dialog boxes associated with the SSL/TLS
connection. In short, although we used HTTPS in this example to “secure” our session with the HP
MFP, we actually are not secure and what is worse, we probably have a false sense of security. In
order to utilize SSL/TLS securely, we need to learn more about digital certificates.
8

Digital Certificates
Much like a fake ATM machine, an unethical hacker could use technology to direct a user to a false
web site when they are thinking they are going to a trusted website, even if they are using SSL.
When typing in https://
certificate that it doesn’t trust (i.e., a potential fake ATM machine) as shown in Figure 11:
, Internet Explorer 6 (IE6) will pop-up a dialog when it encounters a digital
Figure 11 - IE6 Security Alert
In many cases, a user may just click “Yes” without realizing what they are doing (as we did before)
and then provide the unethical hacker with a lot of information – like their credit card number and
billing address. After all, it really seems like just an annoying dialog. Luckily, the Internet Explorer 7
(IE7) experience is different in a profound way. Here is an example of IE7:
9
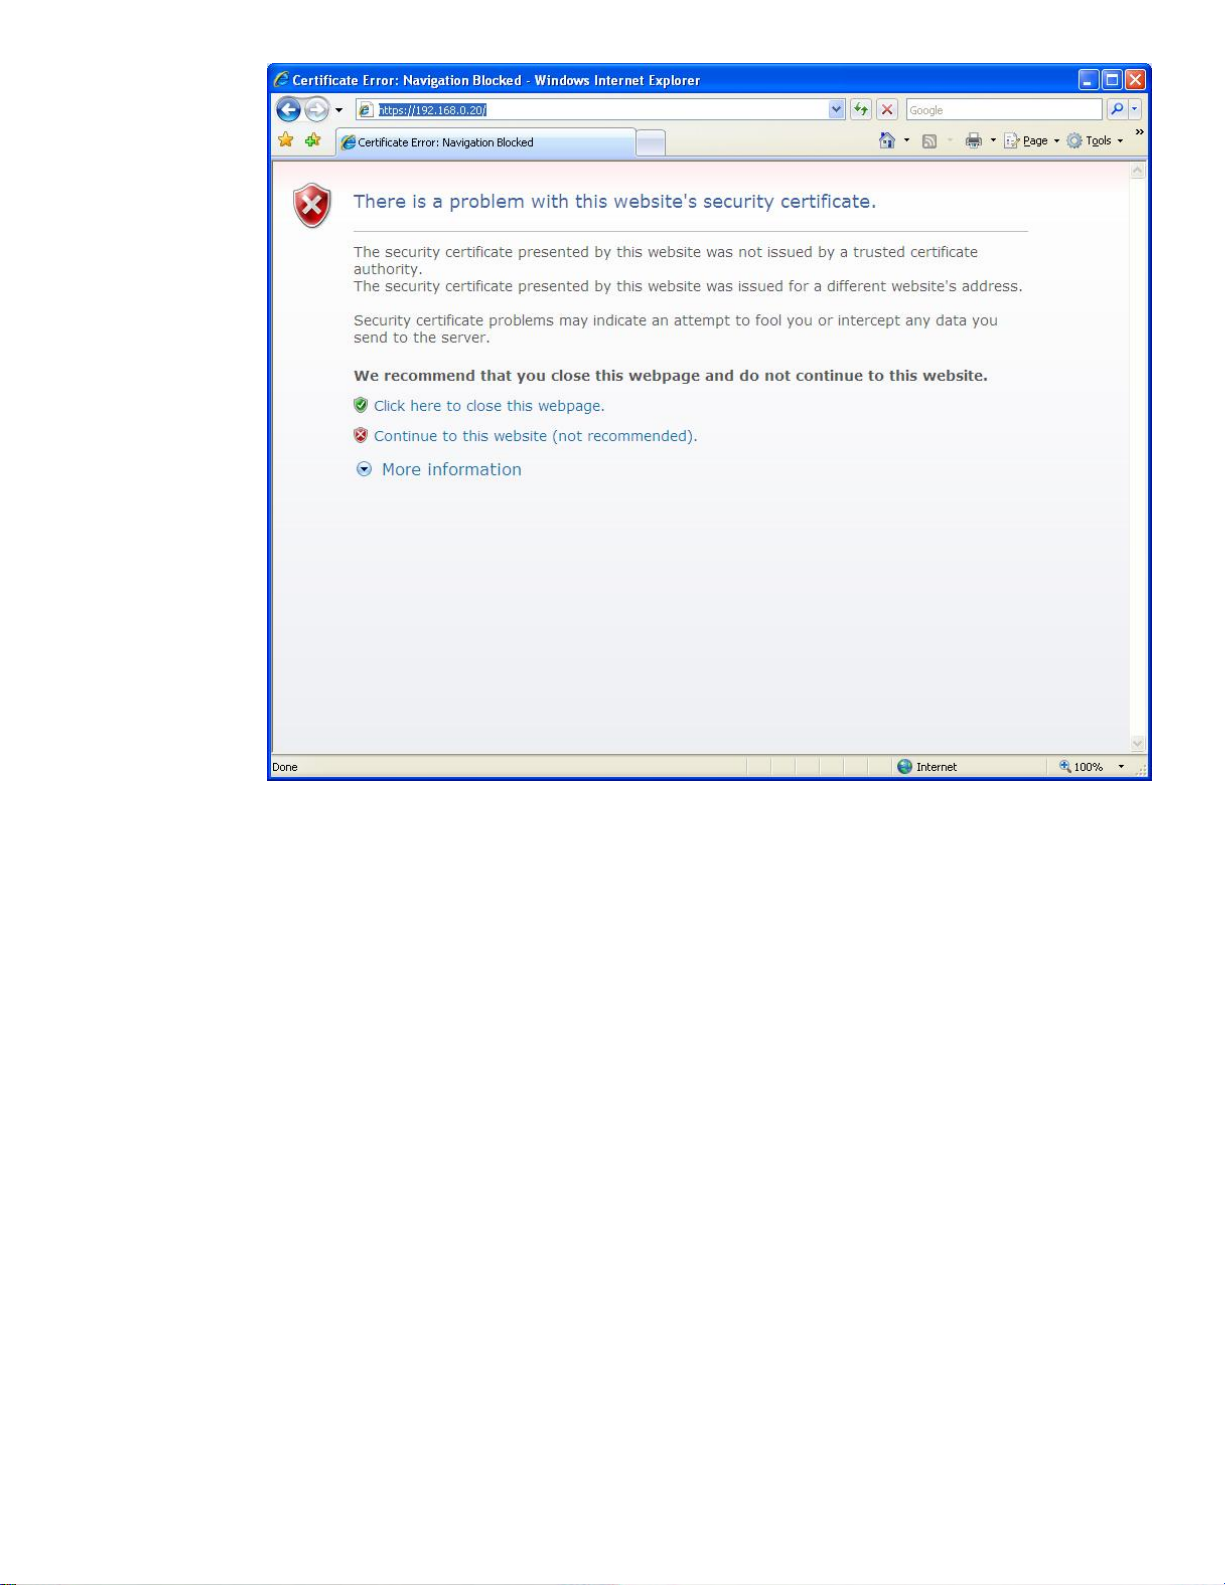
Figure 12 - IE7 Certificate Error 1
This screen is a lot different from IE6 – notice the red X symbols and explanatory text. The way the
information is now presented, it will grab your attention. If we click the “Continue to this website (not
recommended)” link, we get this screen shown in Figure 13:
10

Figure 13 – IE7 Certificate Error 2
Notice the red URL and the “Certificate Error” message. Essentially, to go back to our story, Internet
Explorer 7 is effectively saying “You may be at a fake ATM machine!”
The big question is “How can digital certificates help me determine that I’m going to the right
website?” Well, there are two main components around digital certificates – the digital certificate
issuer (Issued by:) and the holder of the digital certificate (Issued to:). A useful analogy is to think of
the certificate issuer like a Department of Motor Vehicles (DMV). Each state in the United States has a
DMV run by the state’s government. The DMV issues driver’s licenses which grant the privilege to
drive in a given state. A person that goes to the DMV to get a driver’s license must pass a series of
tests that helps the DMV determine if they are fit to drive on the state’s roads. The state’s Highway
Patrol, a group which enforces the rules of the road, recognizes the validity of the DMV to issue
driver’s licenses. Therefore, if one violates one of the rules of the road and is pulled over by a
Highway Patrol officer, showing a driver’s license issued by the DMV is a requirement. The Highway
Patrol will not recognize a driver’s license issued by an institution other than the DMV as being valid.
In short, the DMV is a trusted third party that issues “certificates” (driver’s licenses) to individuals.
These “certificates”, issued by the DMV, are trusted by the Highway Patrol. Essentially, the Highway
Patrol, the DMV, and the licensed driver are the participants in a Driver’s License Infrastructure or DLI.
Let’s move back to digital certificates and talk about a Public Key Infrastructure.
11

Public Key Infrastructure and Public Key Certificate Basics
Let’s go back to the certificate information dialog, shown in Figure 14:
Figure 14 - Certificate Information
Here is the message: “This CA Root certificate is not trusted.” To enable trust, install this certificate in
the Trusted Root Certification Authorities store”. What the message is trying to say is that “HP
Jetdirect 85C1F319”, who issued the certificate “HP Jetdirect 85C1F319”, is not trusted. Because
the “Issued by:” name is the same as the “Issued to:” name, this is a self-signed certificate.
The Security Alert dialog is troubling because it is indicative of a trust problem. In the terms of our
analogy, it would be like a driver, who has been pulled over by the Highway Patrol, handing the
officer a driver’s license that the driver has created for himself indicating that he has the privilege to
drive in the state. The Highway Patrol would obviously not trust it and unfortunately may not consider
it a laughing matter.
In essence, a digital certificate, one used by computers, binds an identity to a key and needs to be
issued by a trusted third party. What is a key? A key is a secret that is used in cryptographic
algorithms. There are public keys and private keys used for asymmetric cryptography and symmetric
keys used for symmetric cryptography. Let’s look at symmetric cryptography first.
12

Unencrypted Message
User
Encryption Performed
Message Delivery
Decryption Performed
User
Unencrypted Message
Figure 15 - Symmetric Cryptography
In Figure 15, the confidentiality provided to the message is done via a single key. Because the same
key is used for encryption and decryption, this process is known as symmetric cryptography.
Symmetric cryptography commonly has two attributes associated with it:
• It performs well – it is fast and easy to implement
• It has a key distribution problem – how do you get the symmetric key to everyone that needs
it in a secure way?
Asymmetric cryptography is also available and functions very different than symmetric cryptography.
It has two keys – one Public and one Private. The private key is not shared with anyone. The Public
key is like a public telephone number. You can share it with everyone. Let’s look at Figure 16 –
Asymmetric Cryptography.
13
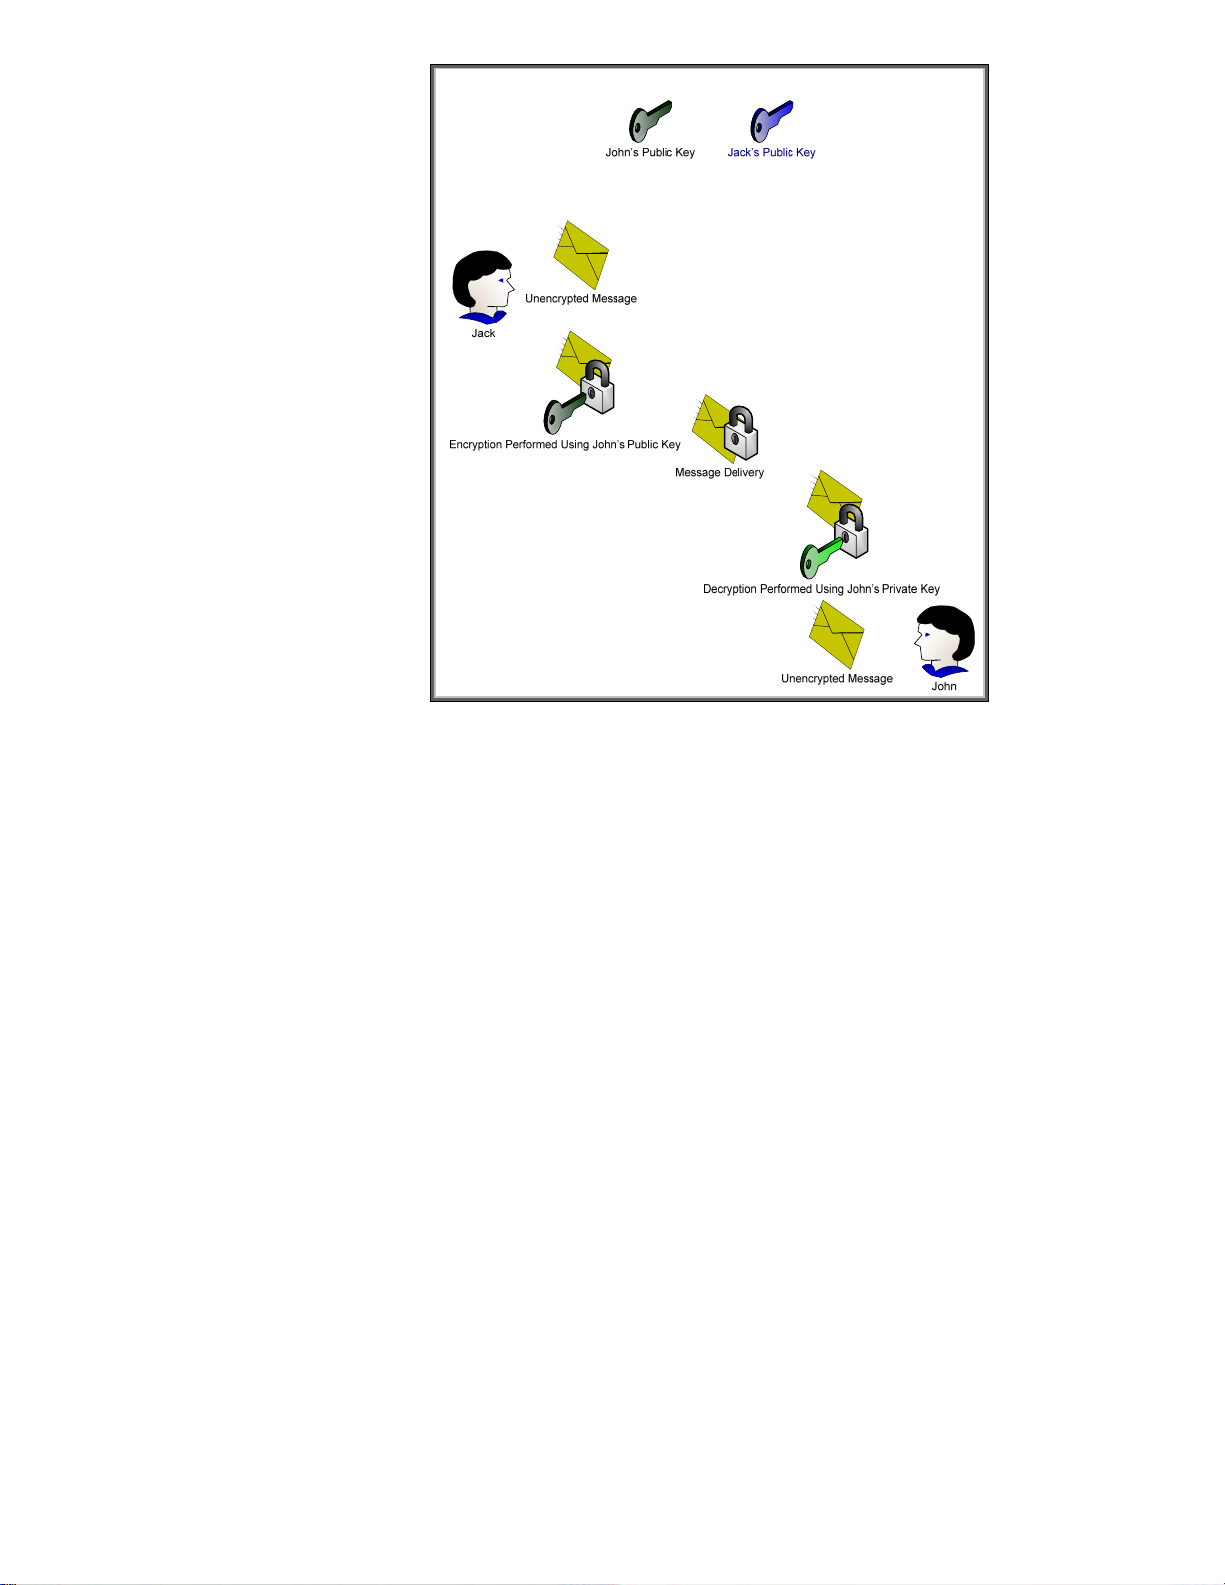
Figure 16 - Asymmetric Cryptography
Here we can see the difference between asymmetric and symmetric cryptography. One key can be
used for encryption and then the corresponding key can be used for decryption. It appears that
asymmetric cryptography has solved the key distribution issue; however there are two new attributes
usually associated with asymmetric cryptography
• It is slow
• It has a trust problem. How do I know that this is John’s public key and not someone
pretending to be John?
To solve the first problem, asymmetric cryptography is usually used to securely distribute symmetric
keys and sign hash codes. In short, what is actually being encrypted and decrypted is usually much
smaller than actual messages. This has the nice benefit of solving the key distribution issue with
symmetrical cryptography. So, in essence, symmetric keys are sent securely using asymmetric
cryptography and the actual messages themselves are protected using symmetric cryptography.
Cool! We get the flexibility of asymmetric cryptography and the speed of symmetric cryptography.
Now we only have to solve the trust problem.
In order to solve the trust problem, five things will need to be discussed:
• A certificate authority – a trusted third party that creates digital certificates from certificate
requests
• A certificate request – a public key associated with identity information that will serve as the
basic building block for a digital certificate that the certificate authority will create and sign.
• A digital certificate – a public key associated with identity information that is digitally signed
by the certificate authority.
• A digital signature – the hash of the digital certificate encrypted by the private key of the
certificate authority.
14
• A hash – also known as a message digest. A hash is the output of a one way function that
attempts to ensure the integrity of the message (i.e., that the message has not been altered).
It is usually combined with authentication information to ensure that the message originator
can be authenticated and that the integrity of the message has not been disrupted. You can
think of a hash like an advanced checksum or an advanced cyclic redundancy check (CRC).
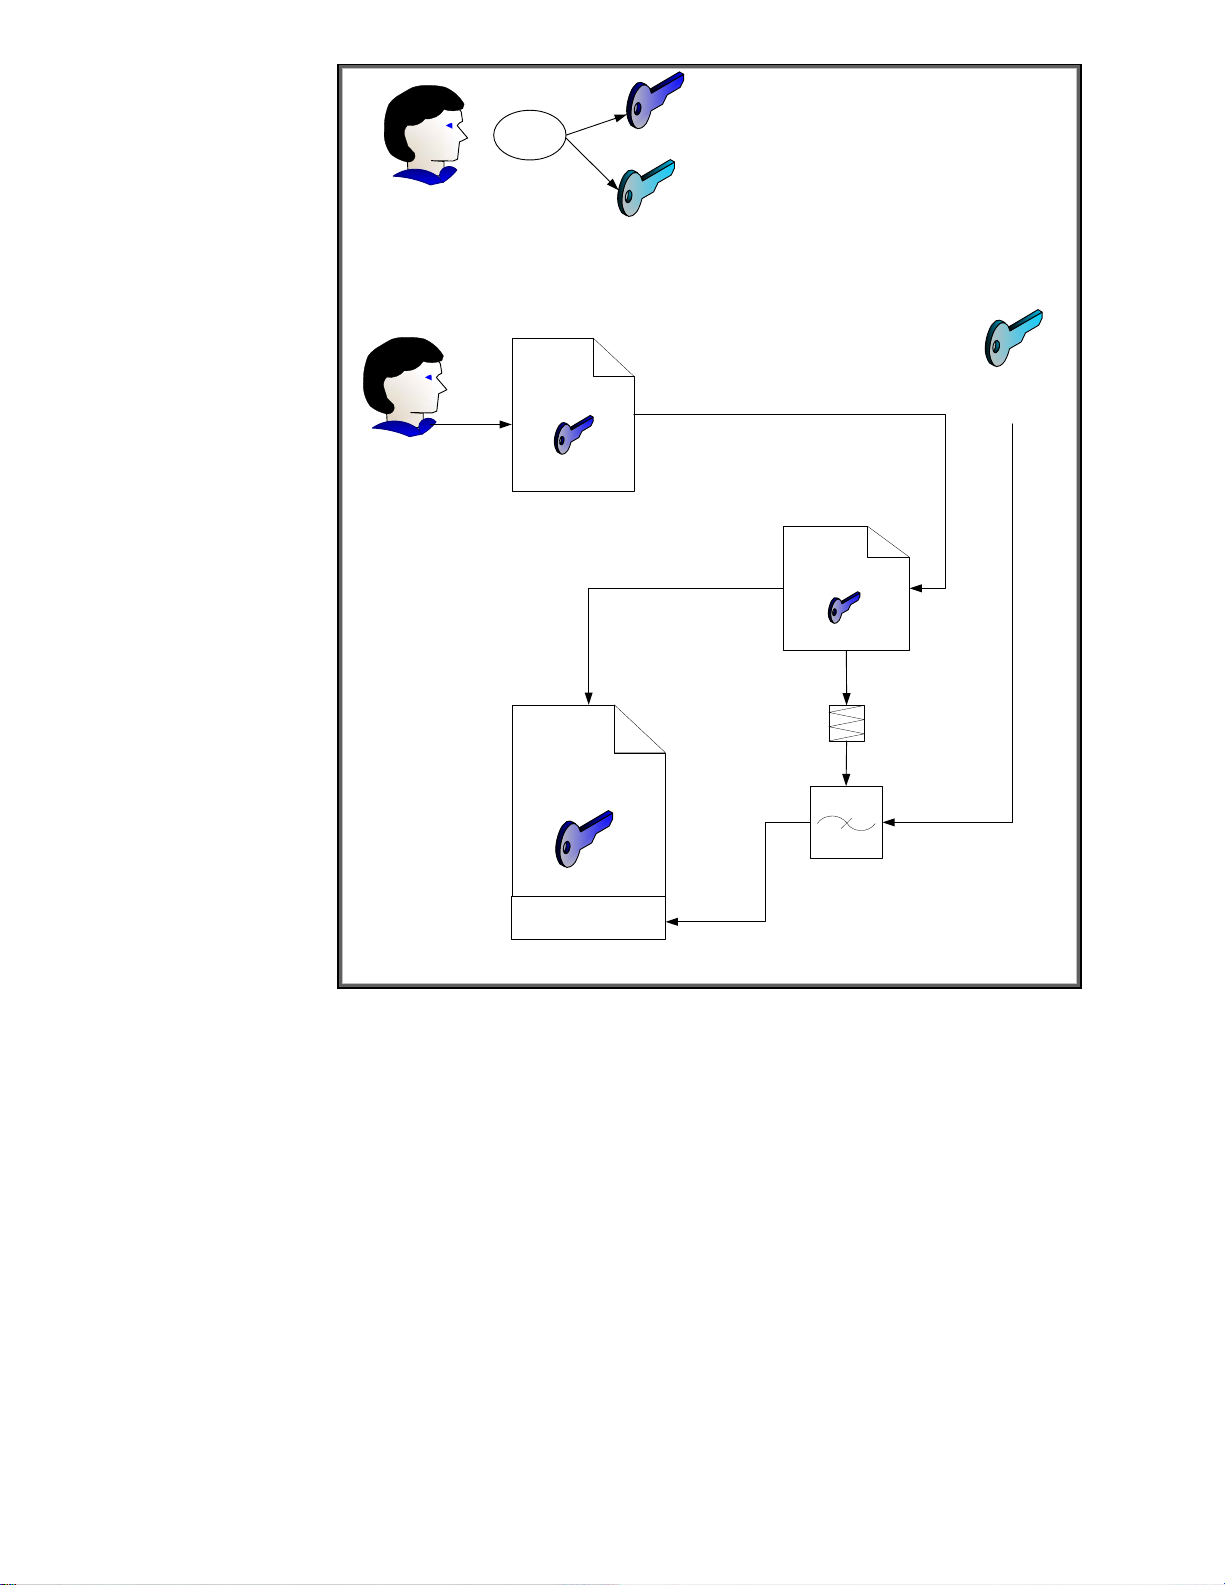
Let’s cover hashes and digital signatures first. We’ll assume that Jack wants to send John a message.
Jack wants to make sure that John knows the message came from him and that the message was not
altered in transit. However, Jack doesn’t care about confidentiality – in other words, the actual
message can be sent “in the clear” – but does care about authentication and integrity. We can
accomplish this through hashes and digital signatures as shown in Figure 17.
Figure 17 - Digital Signature
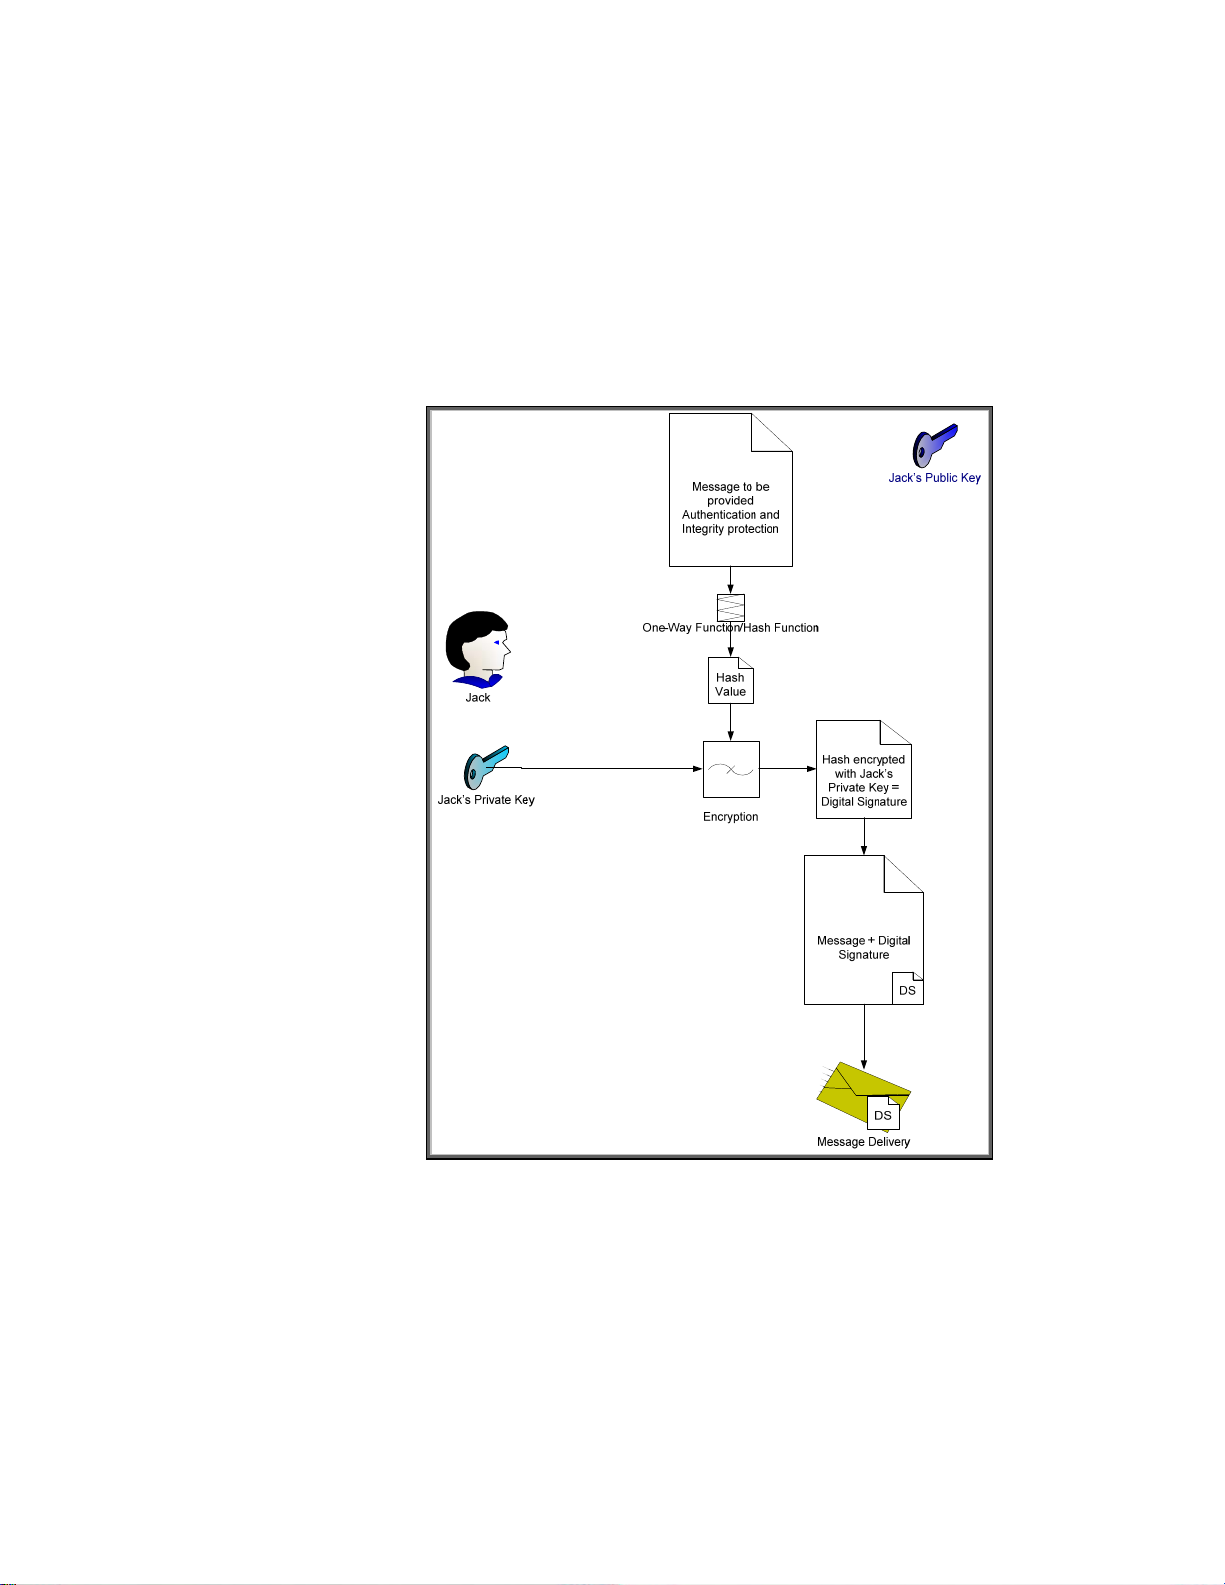
In Figure 17, Jack has sent John a message with a digital signature. Let’s see how John would
validate this message to make sure it came from Jack and was not altered. Refer to Figure 18.
15

Figure 18 - Digital Signature Verification
Here we see how John uses Jack’s public key to verify the message. Jack’s public key is the only key
that can decrypt the digital signature and obtain the hash value of the message that Jack calculated
before sending the message. Because the hash was encrypted with Jack’s private key, which no one
should know but Jack, John can be sure that Jack was the one that sent it.
We still have a problem – How does John know that Jack’s public key really belongs to the person
that he knows as “Jack”? There are many people in the world named “Jack” – how does John know
it isn’t one of them? We still need a trusted third party to provide Jack’s public key in a format John
can trust and we probably need Jack to provide a little more identity information too. Here is where
the Certificate Authority comes into play. Refer to Figure 19 – Certificate Authority.
16
Jack
Create
Key Pair
Identity Info +
Jack’s Public Key
Jack’s Private Key
CA’s Public Key
Jack
Jack’s Private Key
(Stays Private)
Jack’s Public Key
Certificate Request
Identity Info +
CA Info +
Jack’s Public Key
CA’s Digital
Signature
Jack’s Public Key
Certificate
(Also performs Identity Verification on Jack)
Figure 19 - Certificate Authority
Certificate Authority
Identity Info +
CA Info +
Jack’s Public Key
Preliminary Certificate
One-Way Function/Hash Function
Encryption
CA’s Private Key
Jack goes through a key pair generation process and creates a public and private key pair. The
private key is kept secret. The public key is associated with some identity information and is given to
a Certificate Authority. The certificate authority generates a certificate, usually specific to a purpose
such as email, and signs the certificate with its digital signature. Assuming there is a place where
these digital certificates are publicly available, as long as Jack and John can agree to trust a specific
certificate authority, they’ll be fine trusting certificates signed by that authority. Refer to Figure 20.
17
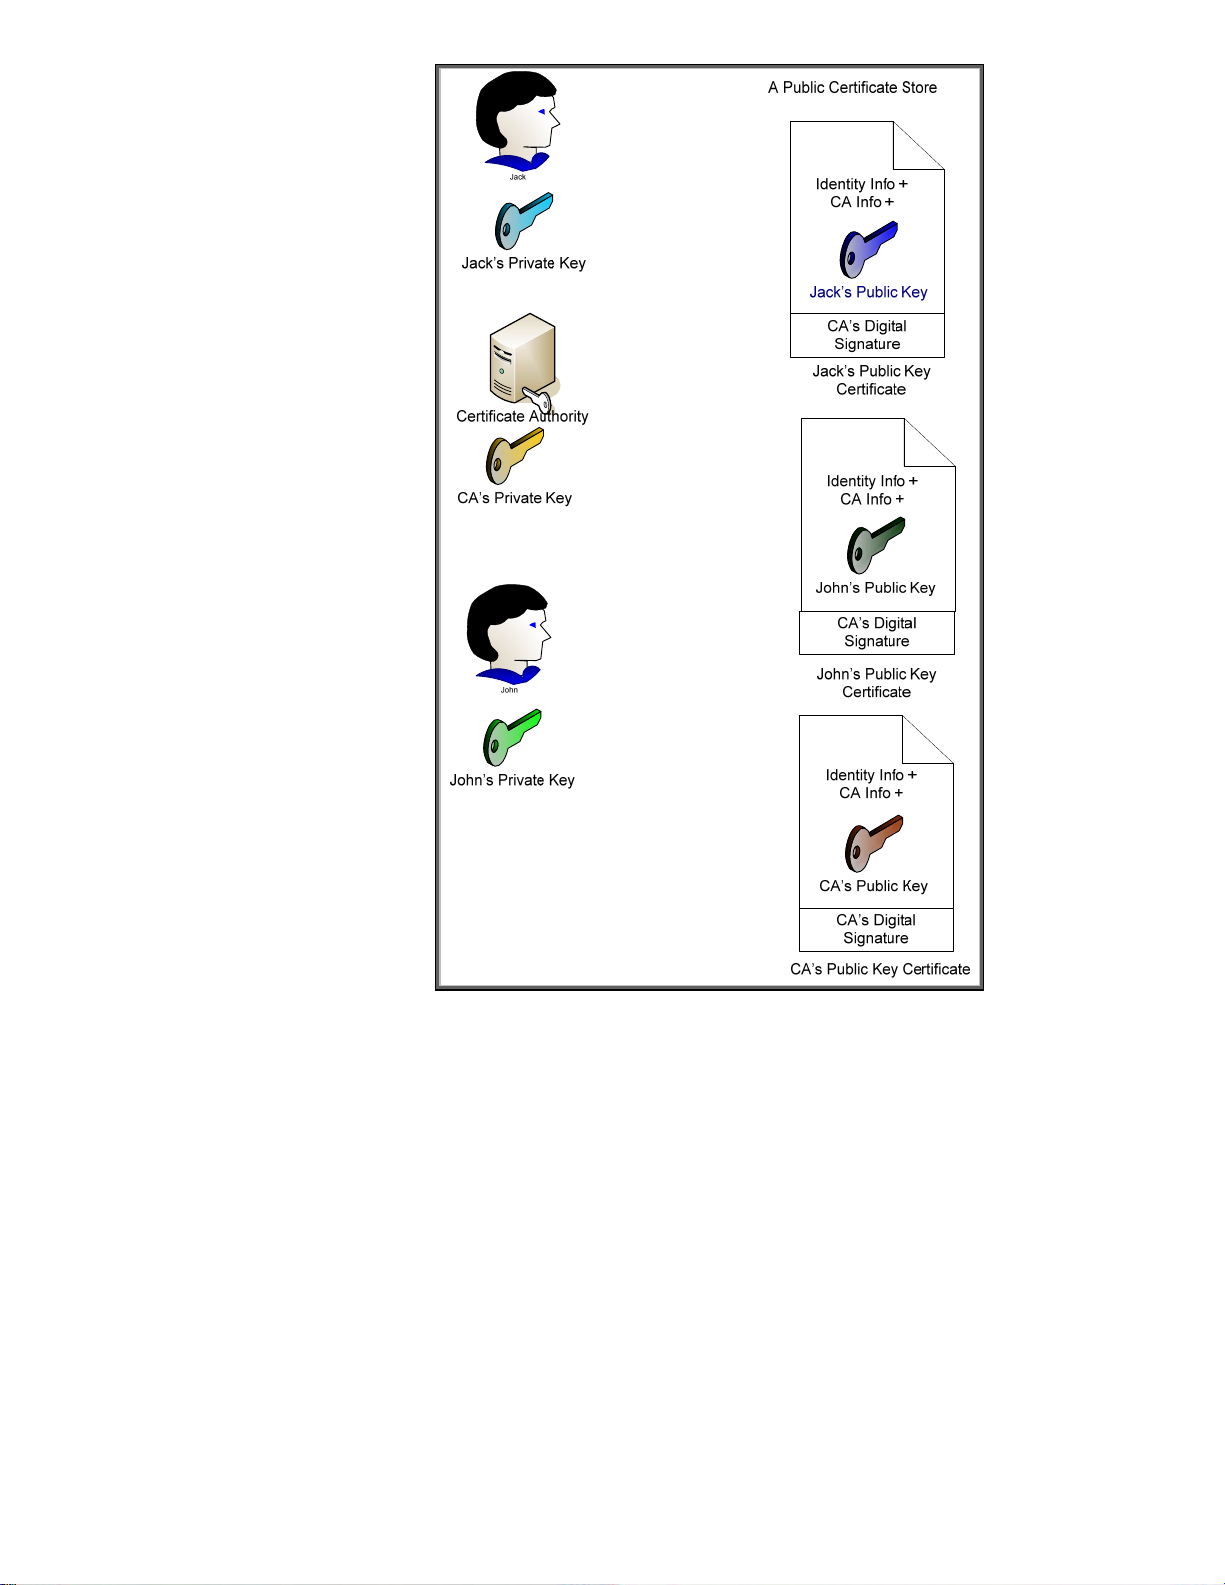
Figure 20 - Public Key Certificates
Here we can see that everyone’s public key certificate is, well – um, public. The important thing to
note is that the certificate authority also has a public key certificate that identifies itself. This certificate
is signed with its own private key and is a “self-signed” certificate. As you may remember, Jetdirect
also creates a self-signed certificate. What is the difference between a certificate authority’s selfsigned certificate and Jetdirect’s self-signed certificate? Good Question! First let’s describe what a
self-signed certificate actually is. Let’s assume Jack realizes that he doesn’t have a CA but he needs a
certificate. Here is what he does
18
Jack
Create
Key Pair
Jack’s Public Key
Jack’s Private Key
Jack
Identity Info +
Jack’s Public Key
One-Way Function/Hash Function
Identity Info +
Jack’s Public Key
Digital Signature
Jack’s self-signed
Certificate
Figure 21 - Self-Signed Certificate
Jack’s Private Key
(Stays Private)
Identity Info +
Jack’s Public Key
Preliminary Certificate
Encryption
Basically, Jack’s private key does the signing on his public key certificate. A root (top of the chain)
certificate authority is going to go through the same process. So why is it okay for a Root CA to have
a self-signed certificate but no one else to have one? Well, it is all about trust. There is no “higher”
level of trust then the top level certificate authority. Therefore, in our previous examples, John and
Jack must choose a particular certificate authority that they both trust. In most cases, there is a
hierarchy of certificate authorities at customer sites. This forms what is known as a certificate chain
and there is a top level CA or Root CA where the ultimate trust resides.
Also, we should take care to point out that there is usually a difference between Internet trust using
certificates and Intranet trust using certificates. Internet trust will involve well-known certificate
authorities like Verisign and Entrust. However, Intranet models usually revolve around Microsoft’s
certificate authority that comes with Windows 2003 server. Each company establishes their own
Public Key Infrastructure (PKI) that includes an entire policy around certificates.
There is one other important thing to cover about certificates. Each certificate has a one or more
“certificate purposes” that the certificate can be used for. For example, a Jetdirect self-signed
certificate will have two purposes: client authentication and server authentication. A root certificate
19
authority’s self-signed certificate will have a purpose to create certificates for other entities, usually
subordinate certificate authorities. It may be of help to go back to our driver’s license example to
explain certificate purposes. A driver’s license purpose is to clearly identify the person it has been
issued to and to show that that person has the right to drive in a given state. Because a driver’s
license also lists the date of birth, it is often used to determine age and whether the holder is able to
purchase various products that have age limitations. This purpose is actually above and beyond the
original purpose of a driver’s license. In the digital certificate world, this additional purpose would
more than likely not be allowed.
So, can’t someone who is not a CA create a self-signed certificate with the ability to create other
certificates for entities? Sure they can! Will this be trusted? Probably not. However, if an unethical
hacker can somehow install a CA certificate of their own choosing into your trusted certificate store,
you will be in for a lot of problems. They will now have the ability to fool the browser and other
applications into connecting to malicious sites that are now “trusted” and the browser or other
application will not be able to detect it. Keep that certificate store protected!
SSL/TLS Protocol Basics
Okay, now that we know something about SSL/TLS basics and a PKI, we can talk about how the
SSL/TLS protocol goes about its business. While there are many interesting protocol specifics, we are
only going to talk about common situations with HP Jetdirect and “normal” SSL/TLS protocol
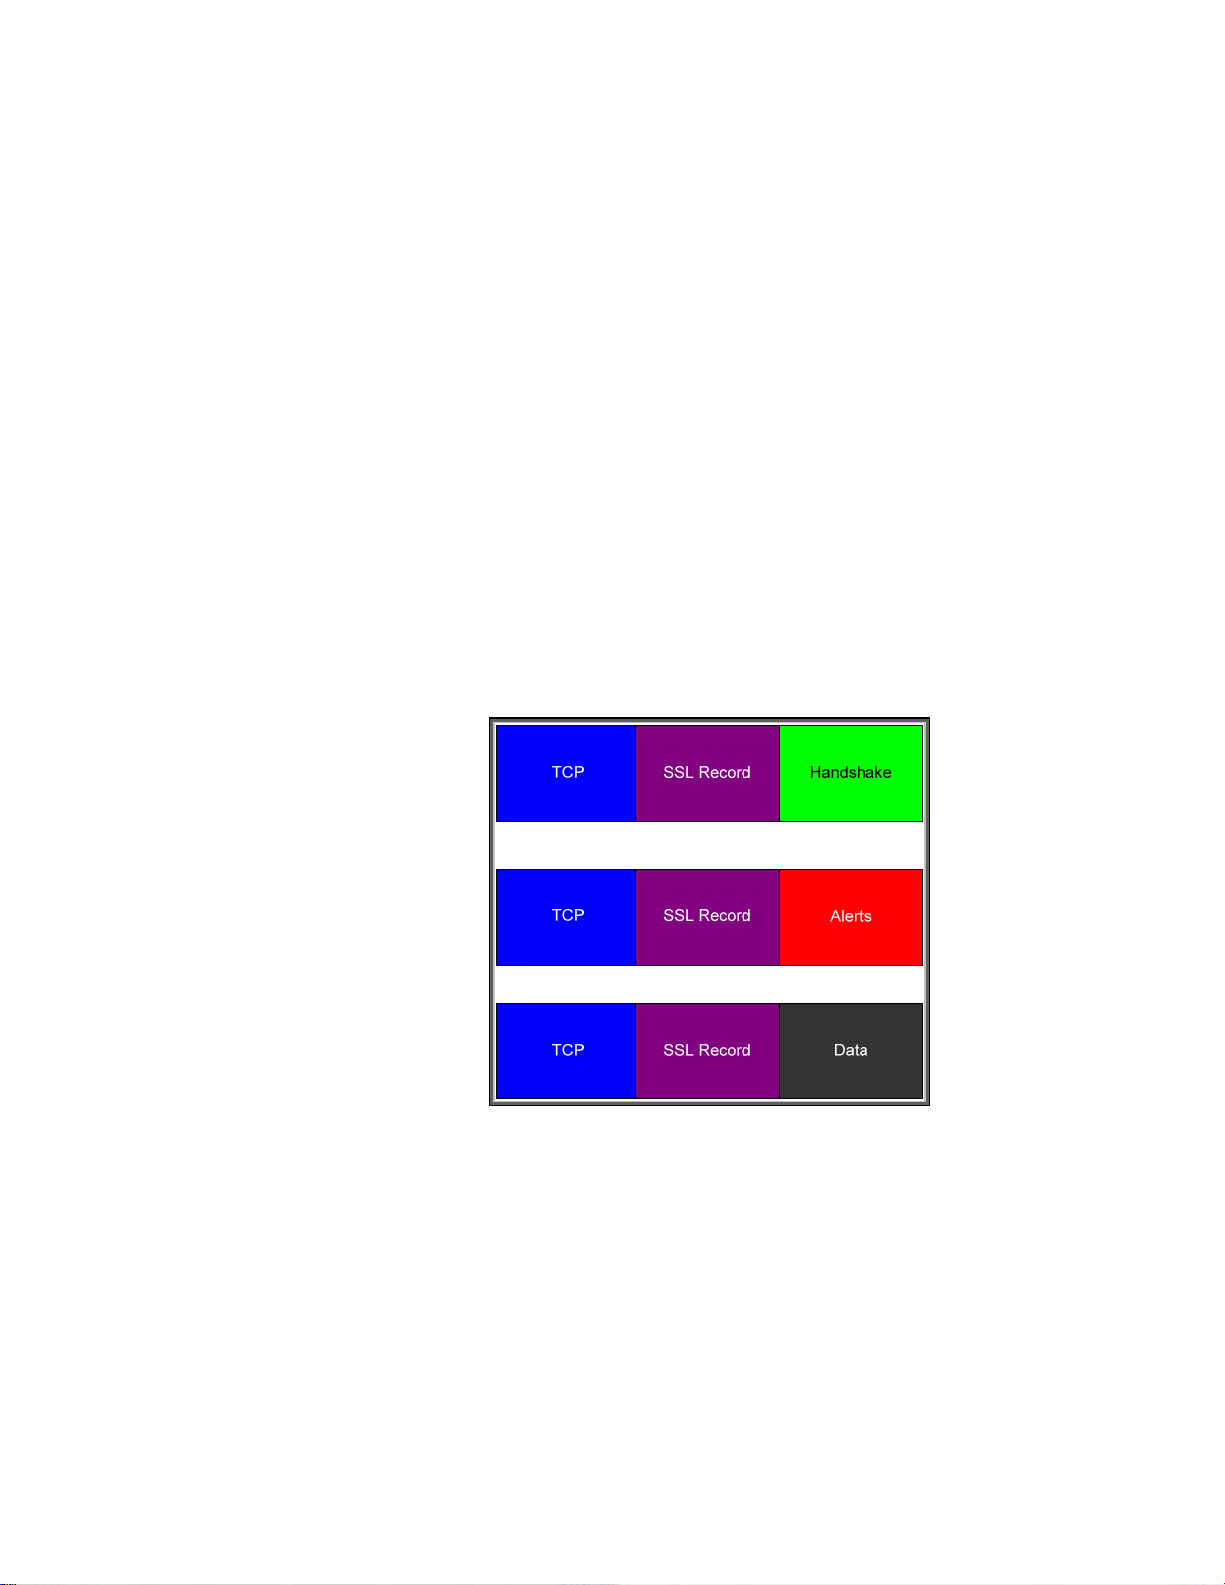
interactions. A basic breakdown of SSL/TLS protocol structures is shown in Figure 22:
Figure 22 - SSL/TLS Protocol Structures
(Note: In order to enhance understanding, this diagram was simplified. Please refer to the many
excellent SSL/TLS references for a more complete and more accurate protocol description). SSL/TLS
makes a strong distinction between a Client and a Server. Unlike a protocol like IPsec where each
endpoint is a peer, SSL/TLS has specific roles for each endpoint. The endpoint initiating the SSL/TLS
connection, like a web browser to a secure shopping site, is the client. The endpoint responding to
the connection request is the server. There are two primary phases in an SSL/TLS connection: The
handshake and then the data transfer. The handshake messages get everything started. We can see
the start of them if Figure 23.
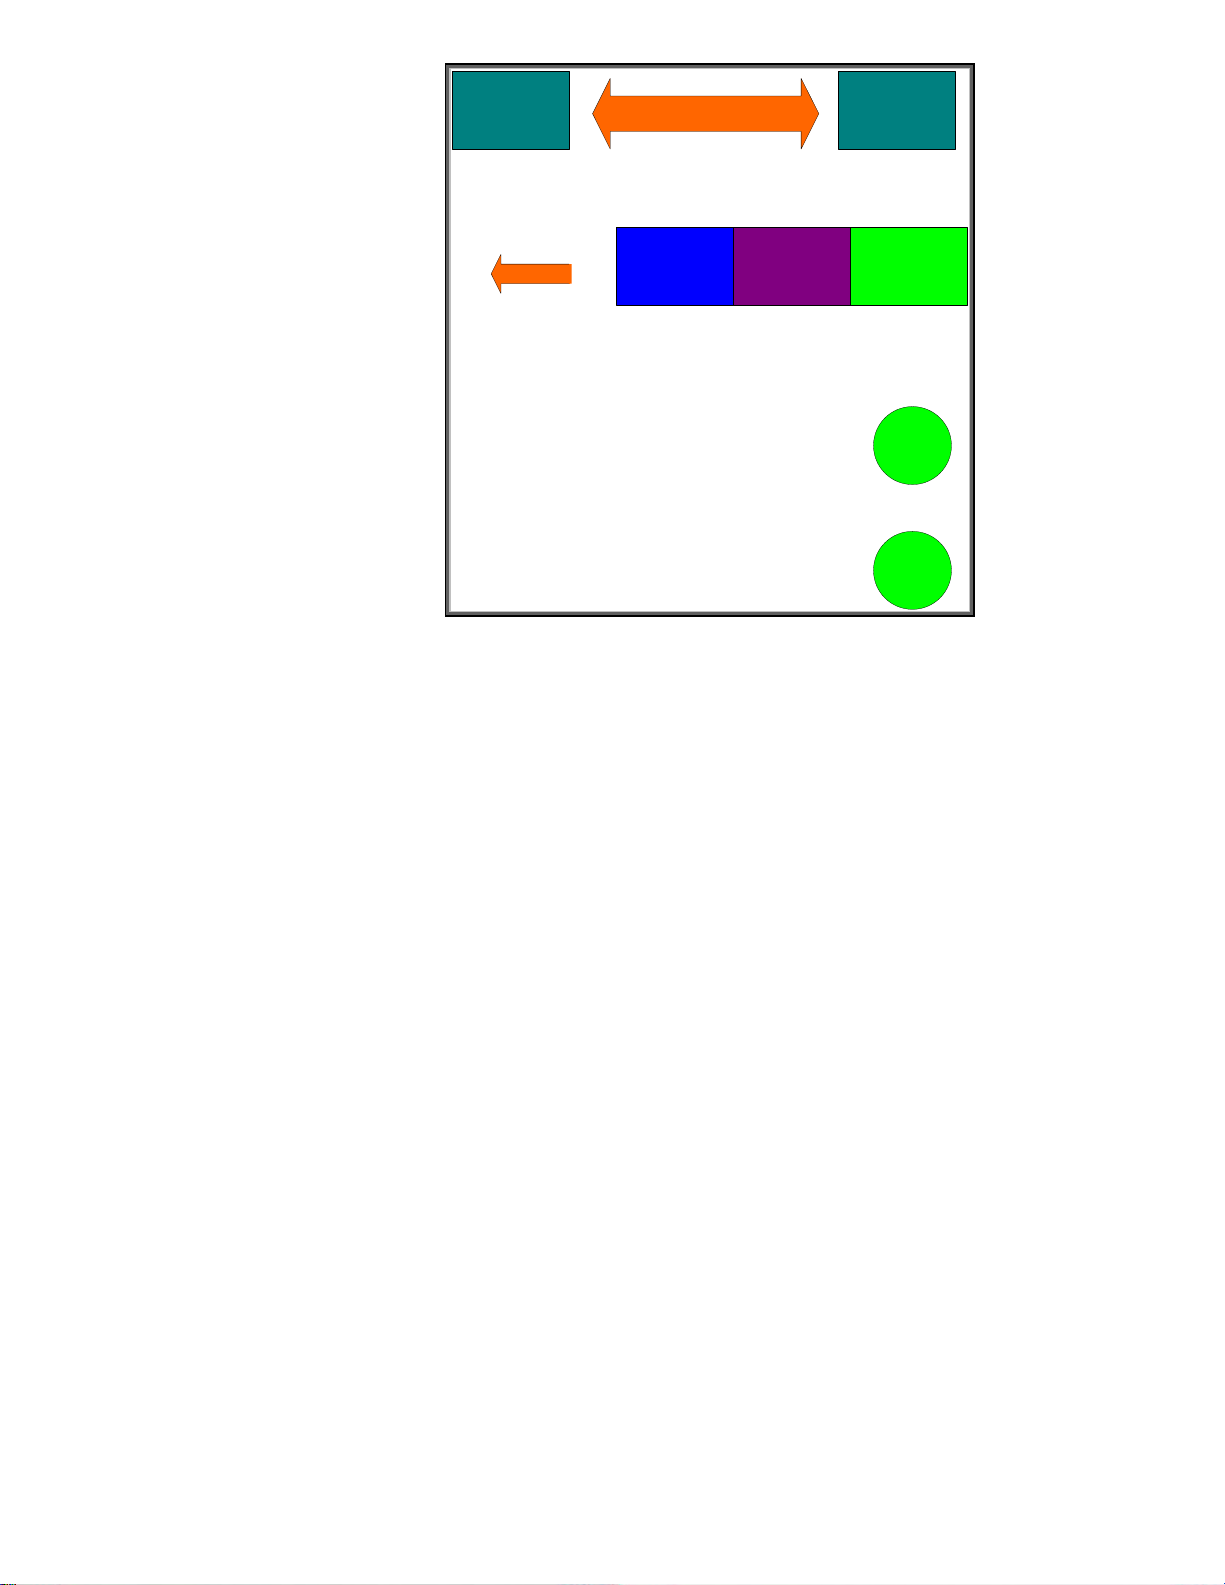
20
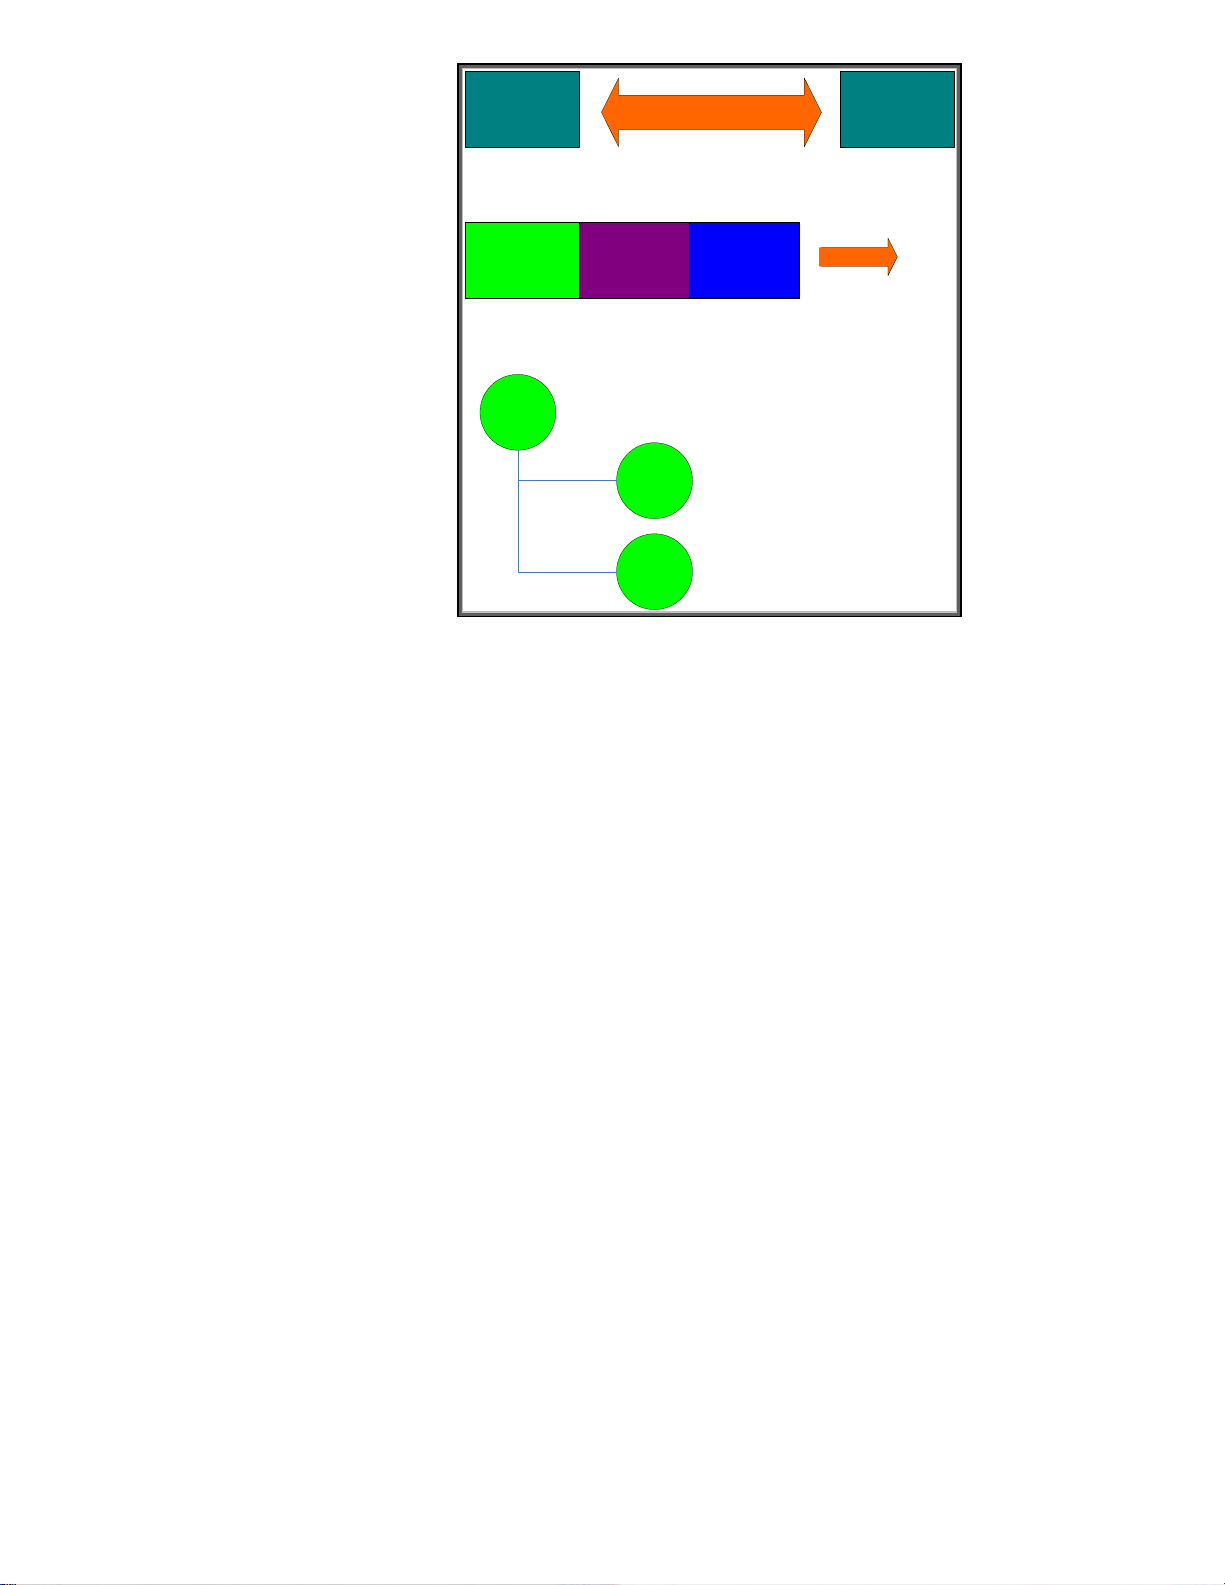
Client Server
Client Hello
TCP Connection Established
TCPSSL RecordHandshake
Supported
Ciphers
Random #
Figure 23 -Client Hello
Here we already have a TCP connection in place. The TCP connection was initiated by the client.
Once we have this reliability, the client now sends the SSL Client Hello message to the server. This
message has a random number and a list of cipher suites the client supports. Now it is the server’s
turn in Figure 24 – Server Hello.
21
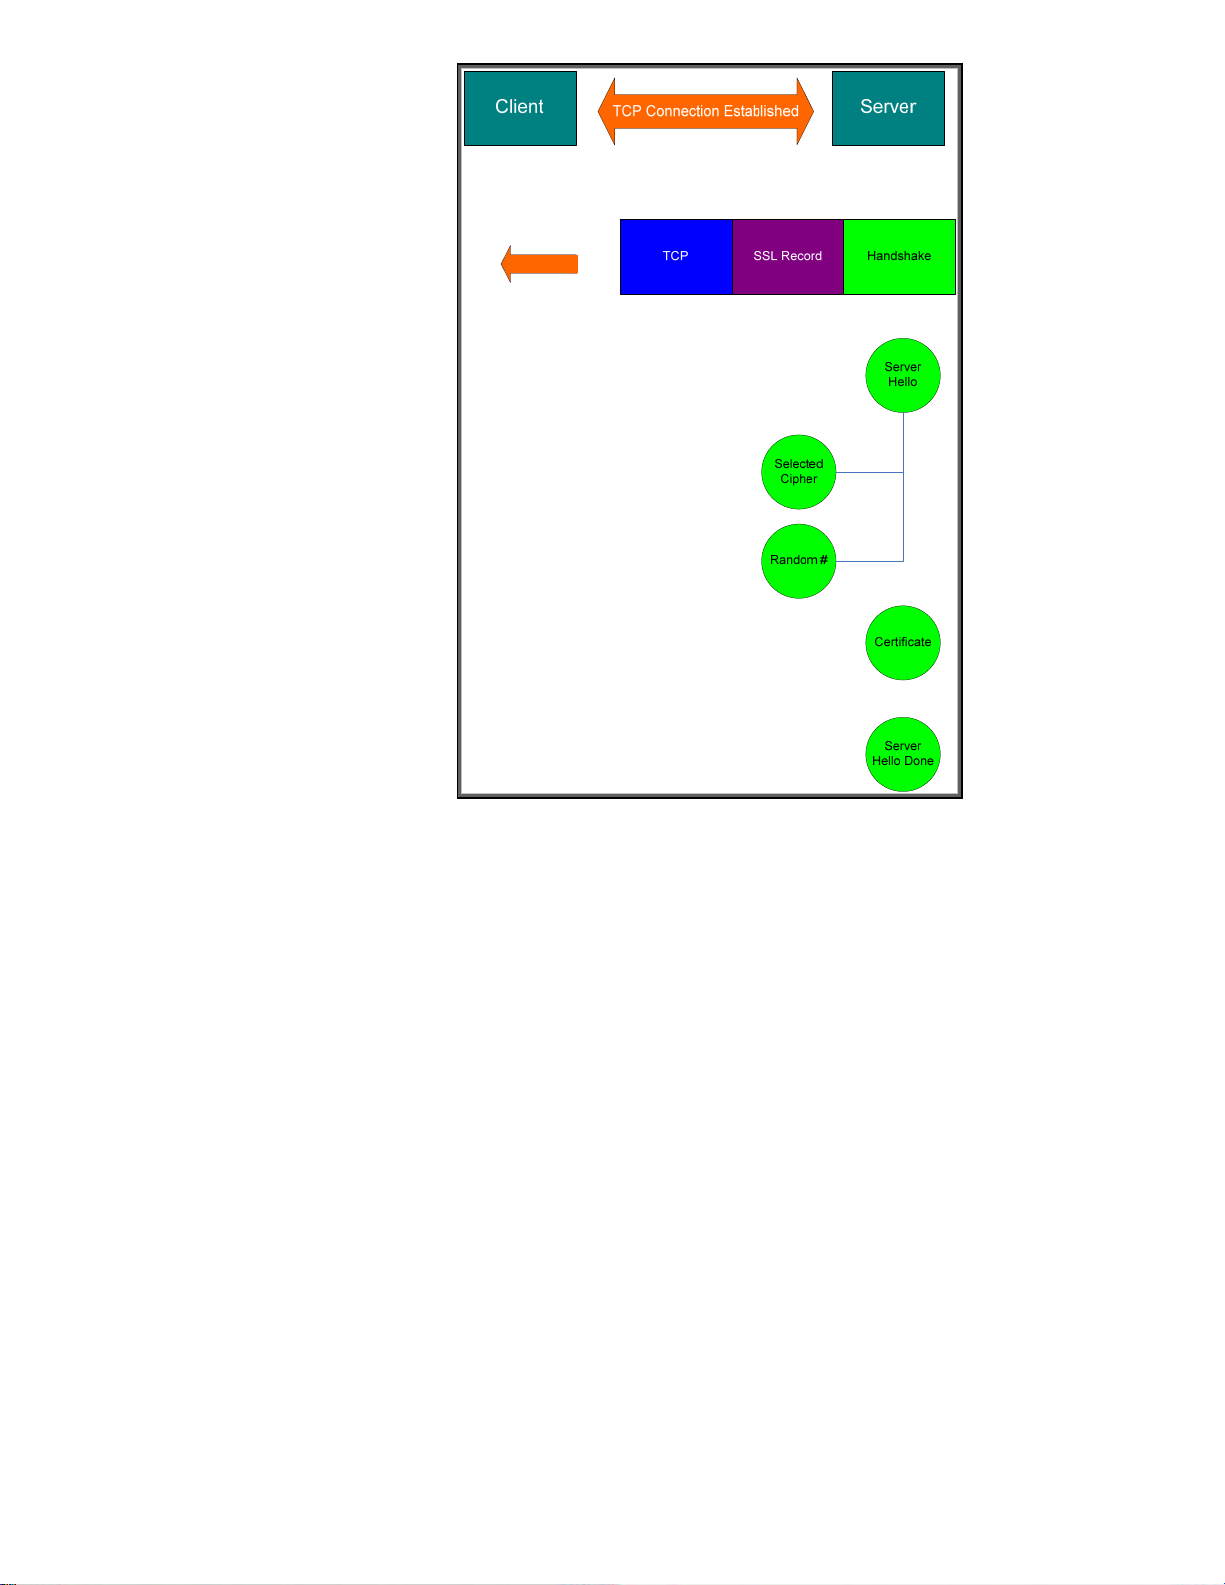
Figure 24 - Server Hello
The server responds with a Server Hello message which includes another random number and the
server selected cipher. It also sends back its public key certificate along with a message indicating
that it is done with this part of the handshake. Now, the client has some work to do.
22
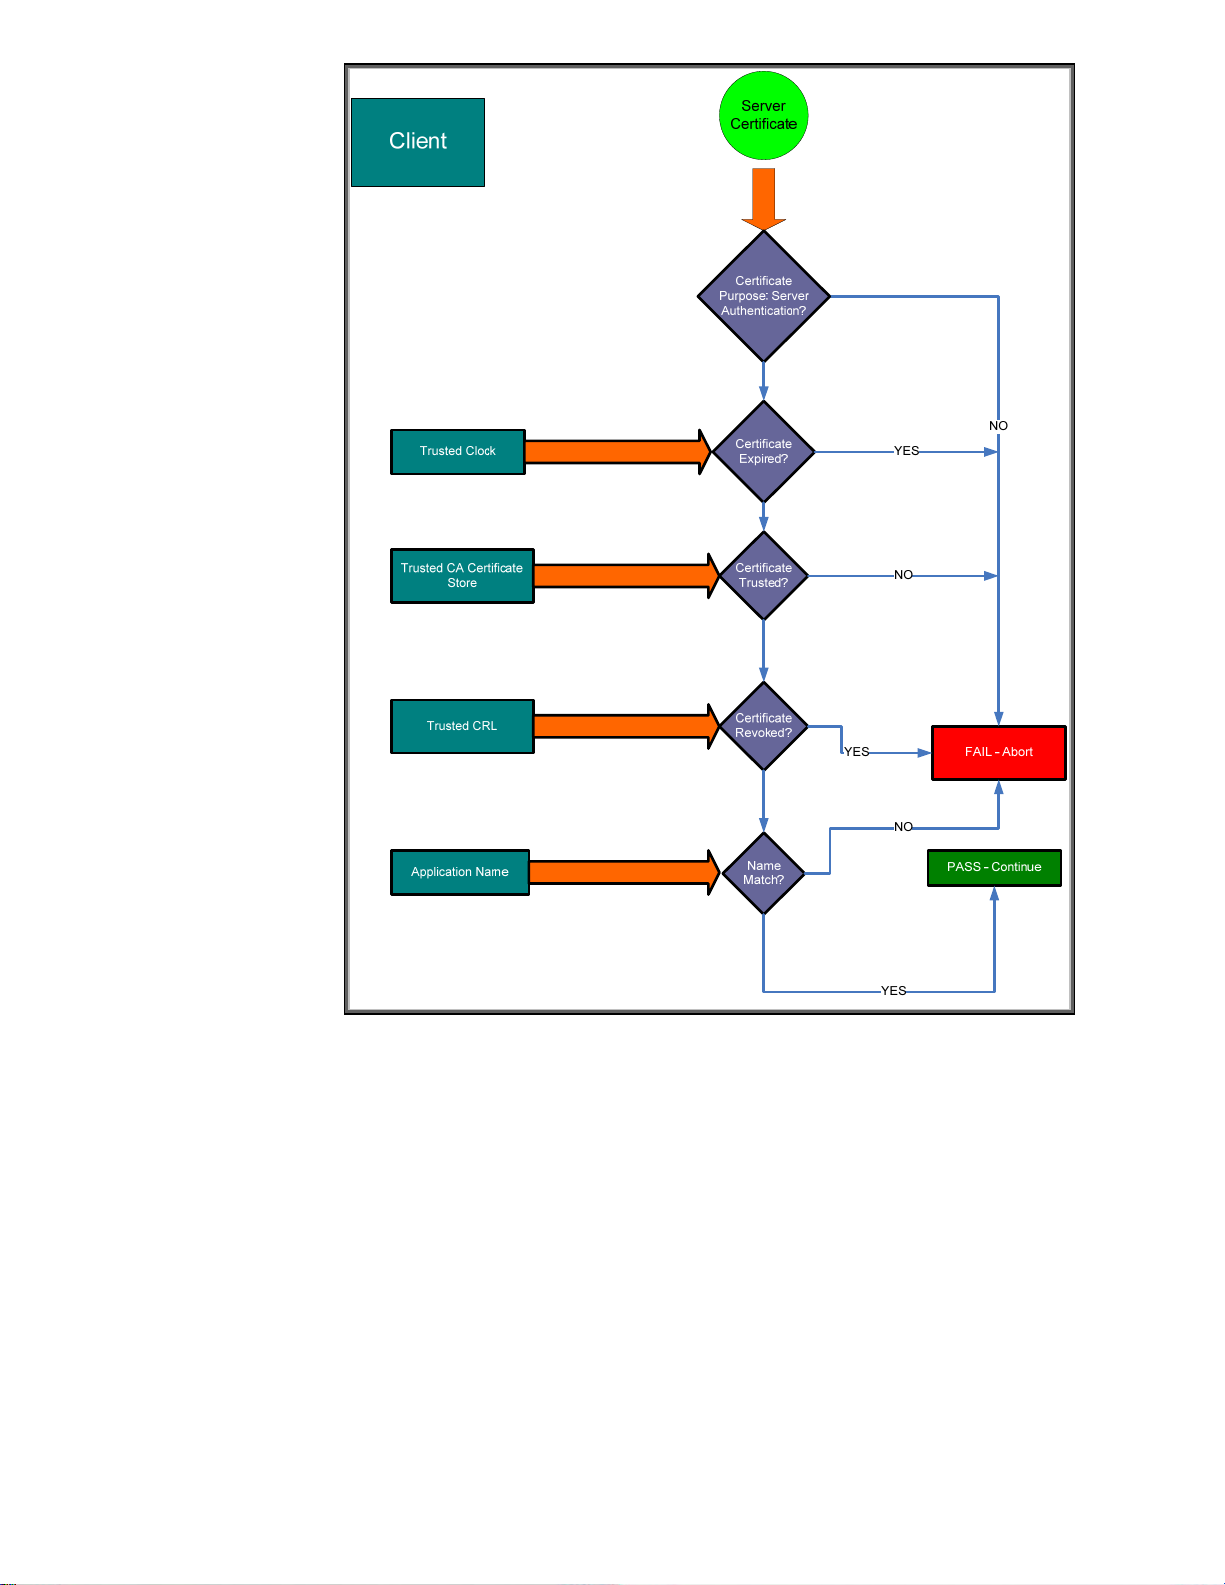
Figure 25 - Server Certificate Verification
Here the client needs to verify the server is really who they say they are. There are a lot of checks
against the certificate. If any of these checks fail, there is a good chance the client is not talking to
the “real” server.
Assuming that everything is fine, the client still has more work to do. It needs to come up with some
keying material.
23
Client
Client
Random #
Server
Random #
Cryptographic
Key Generation:
PreMasterSecret
Server
Public Key
Encryption
E(PreMasterSecret)
Figure 26 - Keying Material
The client generates what is called a “pre_master_secret” using the random numbers as well as a
function called the key derivation function. This is encrypted with the server’s public key. Only a
server with knowledge of the private key would be able to decrypt it. The ability to decrypt the
pre_master_secret proves that the server is in possession of the private key – the final proof for the
server’s identity.
24

Figure 27 – Client Finished
The client goes ahead and sends over the encrypted pre_master_secret and let’s the server know that
it is changing over to use the master_secret and proves that it knows the master secret by providing a
cryptographic hash of all data sent over to the server.
25
Client Server
TCP Connection Established
TCP SSL Record Handshake
Change
Cipher
Spec
Finished
Figure 28 - Server Finished
The server decrypts the pre_master_secret and generates the master_secret. It goes ahead and let’s
the client know that it is changing over to use the master_secret and proves that it knows the master
secret by providing a cryptographic hash of all data sent over to the client.
Once the client and server both verify the cryptographic hashes, the handshake process is done and
actual client data can be sent over the SSL/TLS connection.
Let’s see how SSL/TLS works in its most popular form: HTTPS.
Using HTTPS with HP Jetdirect
Before we begin, we need a little info on the setup. We have a RootCA with a subordinate CA
called R2. The subordinate CA issues certificates to clients on the network. Refer to Figure 29 – CA
Hierarchy.
26

Figure 29 - CA Heirarchy
The network is really simple and is composed of these CAs, a DNS server, a client, and an HP
LaserJet MFP. Refer to Figure 30 – Network Diagram.
27
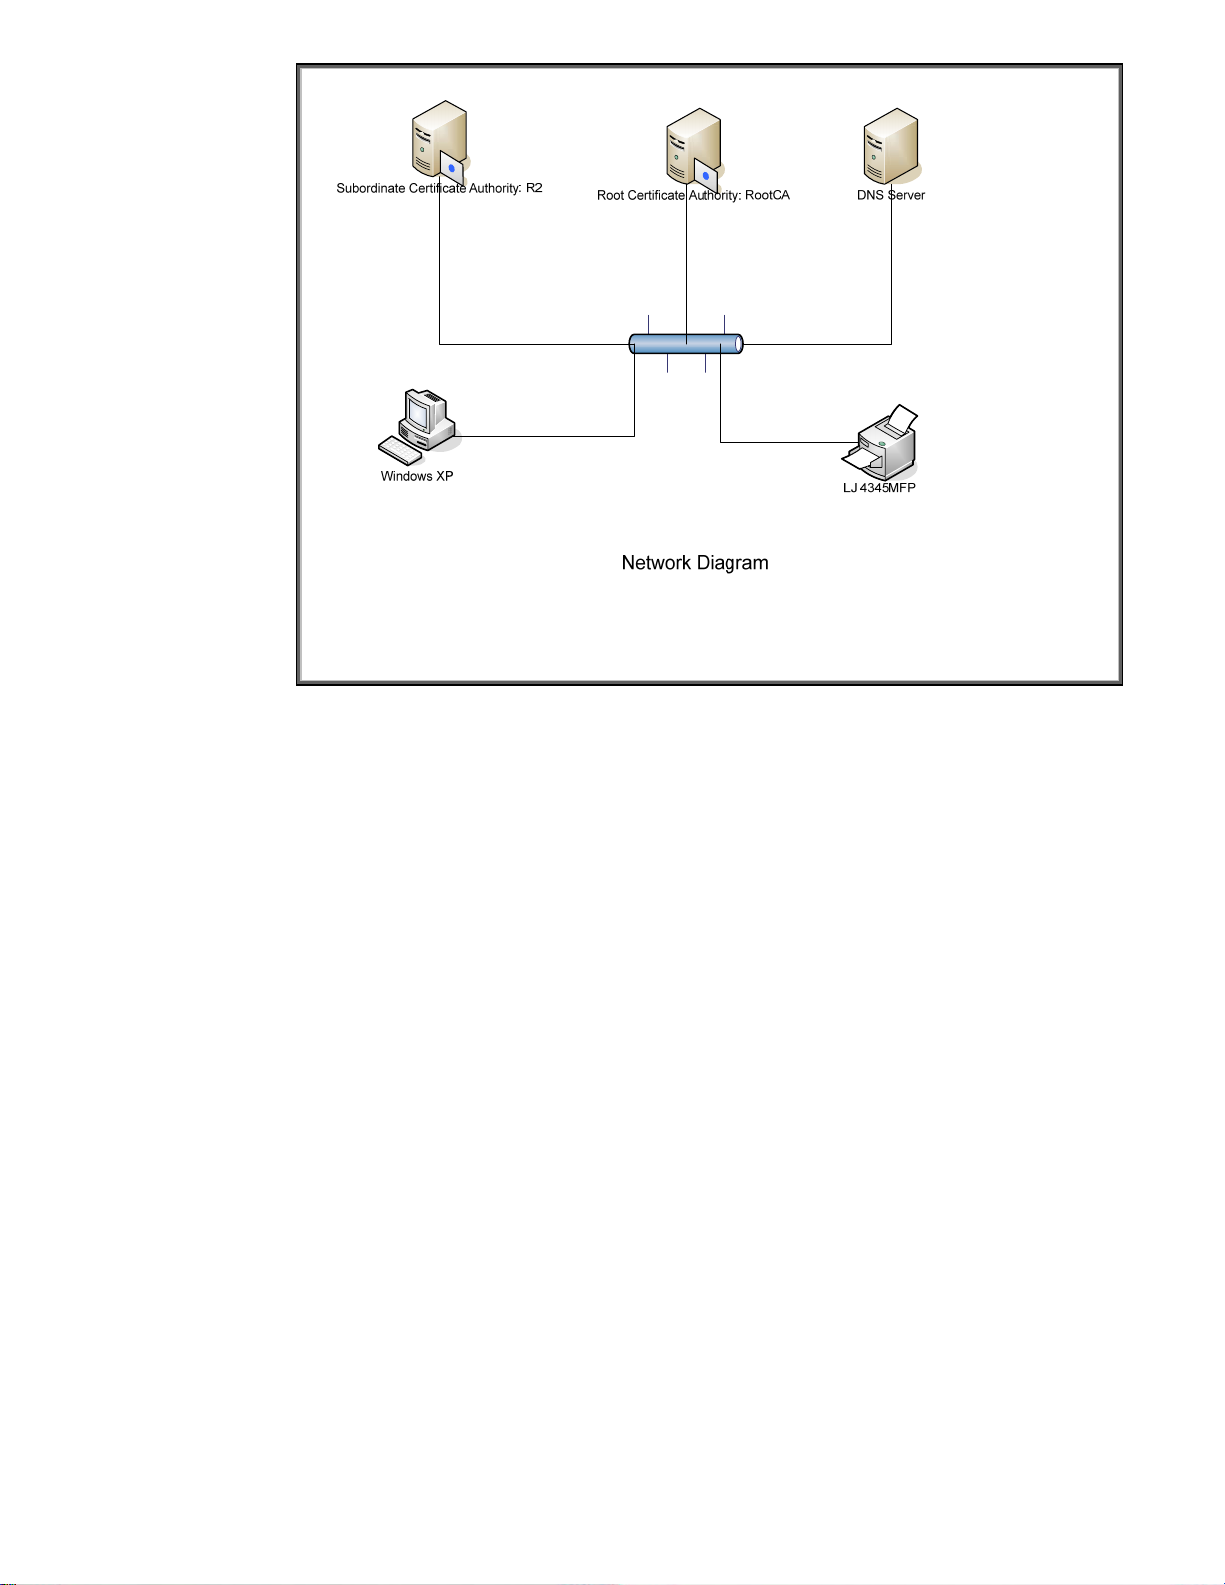
Figure 30 - Network Diagram
A pretty basic setup! The XP client is going to open a browser and talk to the 4345MFP. In short, the
XP machine will be an SSL client and the 4345MFP will be an SSL server. In order to get SSL working
properly, we are going to need to assign a certificate to the 4345MFP so that it can verify its identity
correctly and pass all those checks that the client has to do. We’ll use regular HTTP and go to the
Jetdirect page where we can perform our certificate operations.
28

Every Jetdirect will
create a self-signed
certificate the first
time it is powered
on. Each Jetdirect
has a unique selfsigned certificate.
For small
environments,
trusting the selfsigned certificate
(by storing the
certificate on the
client) may be all
that is needed for
security. We can
take a look at this
certificate by
pressing “View…”
under the heading
“Jetdirect
Certificate”
The subject and
issuer names are
the same – that is
the first clue that it
is a self-signed
certificate.
Because the selfsigned is generated
at first time power
up, there are no
DNS names or IP
addresses
associated with it.
29
 Loading...