


HP KVM Server Console Switch
User Guide
October 2003
Part Number 339674-001

© 2003 Hewlett-Packard Development Company, L.P.
Microsoft®, Windows®, and Windows NT® are US registered trademarks of Microsoft Corporation.
Energy Star® is a US registered mark of the United States Environmental Protection Agency.
Hewlett-Packard Company shall not be liable for technical or editorial errors or omissions contained herein. The information in this document is provided “as is” without warranty of any kind and is subject to change without notice. The warranties for HP products are set forth in the express limited warranty statements accompanying such products. Nothing herein should be construed as constituting an additional warranty.
HP KVM Server Console Switch User Guide
October 2003
Part Number 339674-001
Audience Assumptions
This guide is for the person who installs, administers, and troubleshoots servers. HP assumes you are qualified in the servicing of computer equipment and trained in recognizing hazards in products with hazardous energy levels.
Important Safety Information
Before installing this product, read the Important Safety Information document provided.

|
3 |
Contents |
|
Installing the HP KVM Server Console Switch |
7 |
Overview.............................................................................................................................................. |
7 |
Installation Checklist............................................................................................................................ |
7 |
Kit Contents.............................................................................................................................. |
7 |
Required Items Not Included.................................................................................................... |
8 |
Optional Items .......................................................................................................................... |
8 |
Required Tools ......................................................................................................................... |
8 |
Rack Mounting the HP KVM Server Console Switch ......................................................................... |
8 |
Performing a Side-Mount Type A Installation ......................................................................... |
9 |
Performing a Side-Mount Type B Installation........................................................................ |
10 |
Performing a Standard-Mount Installation ............................................................................. |
12 |
Performing a Cantilever-Mount Type A Installation.............................................................. |
13 |
Performing a Cantilever-Mount Type B Installation .............................................................. |
15 |
Components ....................................................................................................................................... |
17 |
Configuring the KVM Server Console Switch System...................................................................... |
17 |
Adding Server Names ........................................................................................................................ |
19 |
Installing the Interface Adapter |
21 |
Overview............................................................................................................................................ |
21 |
Configuring the Interface Adapter ..................................................................................................... |
21 |
Installing the Expansion Module |
23 |
Overview............................................................................................................................................ |
23 |
Installation Checklist.......................................................................................................................... |
23 |
Kit Contents............................................................................................................................ |
23 |
Installing the Expansion Module Hardware....................................................................................... |
23 |
Performing a Side-Mount Installation .................................................................................... |
24 |
Performing a Rail-Mount Installation..................................................................................... |
25 |
Performing a Velcro-Mount Installation................................................................................. |
26 |
Configuring the Expansion Module ................................................................................................... |
26 |
Cascading Console Switches |
27 |
Compatible Console Switch Models.................................................................................................. |
27 |
Compaq Server Console Switch ............................................................................................. |
28 |
HP IP Console Switch ............................................................................................................ |
29 |
Cascading an HP KVM Server Console Switch with another HP KVM Server Console Switch...... |
29 |
Example of an HP KVM Server Console Switch Cascade Configuration.............................. |
32 |

4 HP KVM Server Console Switch User Guide
Cascading a Compaq Server Console Switch with an HP KVM Server Console Switch |
..................33 |
Example of a Compaq Server Console Switch Cascade Configuration.................................. |
35 |
Cascading an HP KVM Server Console Switch with an HP IP Console Switch ............................... |
36 |
Example of an HP IP Console Switch Cascade Configuration............................................... |
39 |
Local Port Operation |
41 |
Local Port Operation Overview ......................................................................................................... |
41 |
Accessing the Main Dialog Box ............................................................................................. |
41 |
Viewing and Selecting Ports and Servers ............................................................................... |
42 |
Soft Switching.................................................................................................................................... |
46 |
Configuring Servers for Soft Switching ................................................................................. |
46 |
Soft Switching to a Server ...................................................................................................... |
47 |
Soft Switching to a Previous Server ....................................................................................... |
47 |
Using Basic OSD Navigation Keys ................................................................................................... |
48 |
Configuring the Setup Dialog Box..................................................................................................... |
49 |
Accessing the Setup Dialog Box ............................................................................................ |
49 |
Managing Routine Tasks for Servers...................................................................................... |
50 |
Assigning Server Names.................................................................................................................... |
50 |
Accessing the Names Dialog Box .......................................................................................... |
50 |
Assigning Device Types .................................................................................................................... |
51 |
Accessing the Devices Dialog Box......................................................................................... |
51 |
Modifying Device Types ........................................................................................................ |
52 |
Assigning Names to Servers................................................................................................... |
54 |
Changing the Display Behavior ......................................................................................................... |
55 |
Accessing the Menu Dialog Box ............................................................................................ |
55 |
Selecting the Display Order of Servers................................................................................... |
55 |
Setting a Screen Delay Time .................................................................................................. |
56 |
Controlling the Status Flag ................................................................................................................ |
56 |
Accessing the Flag Dialog Box .............................................................................................. |
57 |
Displaying the Status Flag ...................................................................................................... |
57 |
Broadcasting to Servers ..................................................................................................................... |
58 |
Broadcasting Keystrokes ........................................................................................................ |
58 |
Broadcasting Mouse Movements............................................................................................ |
59 |
Accessing the Broadcast Dialog Box...................................................................................... |
59 |
Broadcasting Selected Servers................................................................................................ |
59 |
Activating the Broadcast Dialog Box ..................................................................................... |
60 |
Setting Up a Scan Pattern................................................................................................................... |
60 |
Accessing the Scan Dialog Box.............................................................................................. |
60 |
Adding Servers to the Scan List ............................................................................................. |
61 |
Removing Servers from the Scan List .................................................................................... |
62 |
Activating Scan Mode ............................................................................................................ |
62 |
Deactivating Scan Mode......................................................................................................... |
62 |
Setting Local Console Switch Security.............................................................................................. |
63 |
Accessing the Security Dialog Box ........................................................................................ |
64 |

Contents |
5 |
Changing the Password........................................................................................................... |
64 |
Setting Password Protection ................................................................................................... |
64 |
Logging On to the KVM Server Console Switch ................................................................... |
65 |
Removing the Password Protection ........................................................................................ |
65 |
Exiting Screen Saver Mode .................................................................................................... |
66 |
Activating Screen Saver Mode without Password Protection................................................. |
66 |
Deactivating the Screen Saver ................................................................................................ |
66 |
Changing the Switch Mode................................................................................................................ |
67 |
Accessing the Switch Dialog Box .......................................................................................... |
67 |
Managing Server Tasks Using the OSD ............................................................................................ |
68 |
Accessing the Commands Dialog Box ................................................................................... |
68 |
Running System Diagnostics ............................................................................................................. |
69 |
Activating Run Diagnostics.................................................................................................... |
71 |
Displaying Version Information ........................................................................................................ |
72 |
Accessing the Version Dialog Box......................................................................................... |
73 |
Updating the Firmware |
75 |
Updating the Console Switch Firmware ............................................................................................ |
75 |
Updating the Interface Adapter Firmware Simultaneously................................................................ |
76 |
Updating the Interface Adapter Firmware Individually ..................................................................... |
76 |
Troubleshooting |
79 |
Troubleshooting Table ....................................................................................................................... |
80 |
Connection Length Table................................................................................................................... |
81 |
Technical Support |
83 |
HP Contact Information ..................................................................................................................... |
83 |
Before You Contact HP ..................................................................................................................... |
83 |
Regulatory Compliance Notices |
85 |
Regulatory Compliance Identification Numbers................................................................................ |
85 |
Federal Communications Commission Notice................................................................................... |
86 |
FCC Rating Label................................................................................................................... |
86 |
Class A Equipment ................................................................................................................. |
86 |
Class B Equipment ................................................................................................................. |
87 |
Declaration of Conformity for Products Marked with the FCC Logo, United States Only ............... |
87 |
Modifications ..................................................................................................................................... |
88 |
Cables................................................................................................................................................. |
88 |
Canadian Notice (Avis Canadien)...................................................................................................... |
88 |
European Union Notice...................................................................................................................... |
89 |
Japanese Notice.................................................................................................................................. |
89 |
BSMI Notice ...................................................................................................................................... |
90 |
Korean Notices................................................................................................................................... |
90 |

6 HP KVM Server Console Switch User Guide
Acronyms and Abbreviations |
91 |
Index |
93 |

7
Installing the HP KVM Server Console Switch
In This Section |
|
Overview .................................................................................................................................. |
7 |
Installation Checklist ................................................................................................................ |
7 |
Rack Mounting the HP KVM Server Console Switch ............................................................. |
8 |
Components............................................................................................................................ |
17 |
Configuring the KVM Server Console Switch System .......................................................... |
17 |
Adding Server Names............................................................................................................. |
19 |
Overview
The HP KVM Server Console Switch ships with rack mounting brackets for easy integration into your rack. Before installing the HP KVM Server Console Switch and other components in the rack cabinet (if not already installed), stabilize the rack in a permanent location. Begin installing your equipment at the bottom of the rack cabinet, then work to the top. Avoid uneven loading or overloading of the rack cabinets.
Installation Checklist
Before installation, refer to the following lists to be sure that all of the listed components were received.
Kit Contents
•KVM Server Console Switch
•Power cords
•Rack mounting kit
•Serial download cable
•Documentation kit

8 HP KVM Server Console Switch User Guide
•Firmware CD kit
This kit might contain extra hardware for your convenience.
Required Items Not Included
•PS/2 Interface Adapter or USB Interface Adapter
•UTP CAT5 cable (CAT6 and CAT7 may be also used)
Optional Items
Expansion Module ("Installing the Expansion Module" on page 23)
Required Tools
•Phillips screwdriver
•T-25 Torx driver
Rack Mounting the HP KVM Server Console Switch
NOTE: Before installing the HP KVM Server Console Switch into the rack, connect the HP KVM Server Console Switch to a power source, using the power cords provided, and power on the unit. An activity indicator light ("Components" on page 17) is displayed after a few seconds. If the activity indicator light does not display, be sure that the power is on, the power cord is connected, and the power source is valid.
Several rack mounting configurations include:
•Side-mount
−Type A—Square- and round-hole rails
−Type B—Square-hole rails
NOTE: The HP KVM Server Console Switch cannot be side-mounted into a rack with round-hole rails.
•Standard-mount

Installing the HP KVM Server Console Switch |
9 |
•Cantilever-mount
−Type A—Round-hole rails
−Type B—Square-hole rails
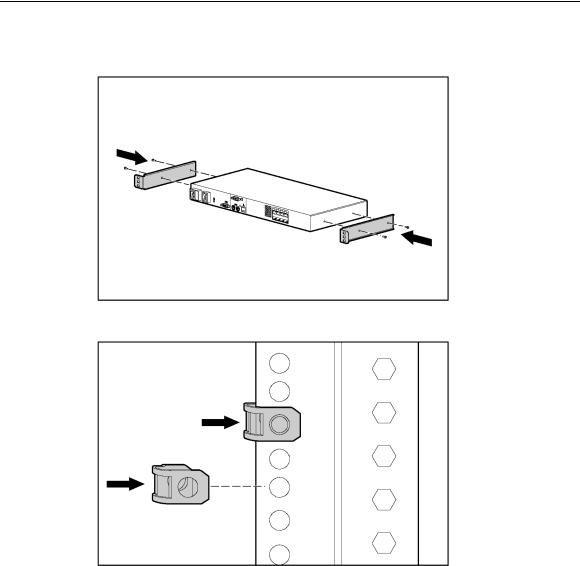
Performing a Side-Mount Type A Installation
1.Remove the four screws, two on each side, from the console switch.
2.Attach the side-mounting brackets to the console switch using the four screws you removed.
 KVM User Manual")
10HP KVM Server Console Switch User Guide
3.Slide the side-mounting bracket tabs into the U locations on each side of the rack.
4.Secure the console switch to the rails using four self-tapping screws, two on each side.
Performing a Side-Mount Type B Installation
1. Remove the four screws, two on each side, from the console switch.
Installing the HP KVM Server Console Switch |
11 |
2.Attach the side-mounting brackets to the console switch using the four screws you removed.
3.Slide the side-mounting bracket tabs into the U locations on each side of the rack.

12HP KVM Server Console Switch User Guide
4.Install four cage nuts into the side-mounting bracket U locations.
5.Secure the console switch to the rails, using four M-6 screws, two on each side.
Performing a Standard-Mount Installation
1.Remove the four screws, two on each side, from the console switch.
2.Attach the 1U brackets to the console switch using the four screws you removed.

Installing the HP KVM Server Console Switch |
13 |
3.Install a cage nut behind each rear rail if they have not already been installed.
4.Slide the console switch into the rear of the 1U product.
5.Secure the console switch to the rails using two M-6 screws, one on each side.
Performing a Cantilever-Mount Type A Installation
1. Remove the four screws, two on each side, from the console switch.
14HP KVM Server Console Switch User Guide
2.Attach the 1U brackets to the console switch using the four screws you removed.
3. Install up to six clip nuts.

Installing the HP KVM Server Console Switch |
15 |
4.Secure the console switch to the rails, using the appropriate number of T-25 Torx screws.
Performing a Cantilever-Mount Type B Installation
1.Remove the four screws, two on each side, from the console switch.
2.Attach the 1U brackets to the console switch using the four screws you removed.

16 HP KVM Server Console Switch User Guide
3. Install up to six cage nuts.
4.Secure the console switch to the rails using the appropriate number of M-6 screws.

Installing the HP KVM Server Console Switch |
17 |
Components
Item |
Description |
|
|
1 |
Power connector |
|
|
2 |
Power switch |
|
|
3 |
Activity indicator light |
|
|
4 |
Serial download connector |
|
|
5 |
Keyboard connector |
|
|
6 |
Monitor connector |
|
|
7 |
Mouse connector |
|
|
8 |
RJ-45 Interface port (designated by the letter A) |
|
|
9 |
Server connection ports |
|
|
Configuring the KVM Server Console Switch System
1.Connect the Expansion Module ("Installing the Expansion Module" on page 23).
2.Connect the Interface Adapter ("Installing the Interface Adapter" on page 21).

18HP KVM Server Console Switch User Guide
3.Power on the HP KVM Server Console Switch. The activity indicator light ("Components" on page 17) powers on.
4.Power on the monitor.
5.Power up the server.
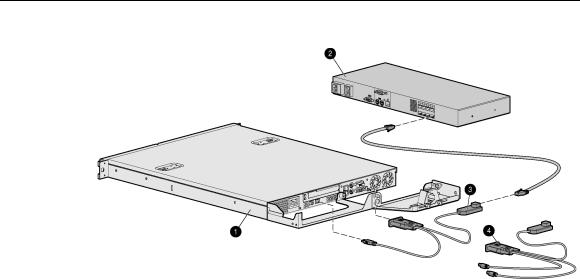
The following figure shows one possible configuration for your HP KVM Server Console Switch system.
Item |
Description |
|
|
1 |
Server |
|
|
2 |
Expansion Module |
|
|
3 |
HP KVM Server Console Switch |
|
|
4 |
USB Interface Adapter |
|
|
5 |
PS/2 Interface Adapter |
|
|
Installing the HP KVM Server Console Switch |
19 |
Adding Server Names
You can configure the HP KVM Server Console Switch system through the OSD. When tiered with the IP Console Switch, HP recommends adding server names to the OSD at the local analog station before adding or discovering console switches through the IP Console Viewer.
To add server names, refer to the Assigning Server Names (on page 50) section.
21
Installing the Interface Adapter |
|
In This Section |
|
Overview ................................................................................................................................ |
21 |
Configuring the Interface Adapter.......................................................................................... |
21 |
Overview
An Interface Adapter is required for the HP KVM Server Console Switch system to function properly. However, it is not included in the HP KVM Server Console Switch kit. An Interface Adapter connects UTP CAT5 cables to PS/2 or USB connections, establishing a KVM session to a server.
NOTE: UTP CAT5 cables are used throughout the examples in this guide. However, UTP CAT6 and UTP CAT7 cables may also be used.
Configuring the Interface Adapter
1.Connect a UTP CAT5 cable to the server connection port ("Components" on page 17) on the HP KVM Server Console Switch.
2.Connect the other end of that same UTP CAT5 cable to the RJ-45 port on the Interface Adapter.
3.Connect the Interface Adapter to the appropriate ports on the server.
4.Repeat the preceding steps to connect any other servers to this system.
The following figure shows one possible configuration for your HP KVM Server Console Switch system with an Interface Adapter.
22 HP KVM Server Console Switch User Guide
Item |
Description |
|
|
1 |
Server |
|
|
2 |
HP KVM Server Console Switch |
|
|
3 |
USB Interface Adapter |
|
|
4 |
PS/2 Interface Adapter |
|
|

23
Installing the Expansion Module |
|
In This Section |
|
Overview ................................................................................................................................ |
23 |
Installation Checklist .............................................................................................................. |
23 |
Installing the Expansion Module Hardware ........................................................................... |
23 |
Configuring the Expansion Module ....................................................................................... |
26 |
Overview
An optional Expansion Module can be added to the HP KVM Server Console Switch system, increasing the total number of accessible servers. The Expansion Module ships with rack-mounting hardware for easy integration into your rack.
Installation Checklist
Before installation, refer to the following lists to be sure that all of the listed components were received.
Kit Contents
•Expansion Module
•Screws
•Velcro
This kit might contain extra hardware for your convenience.
Installing the Expansion Module Hardware
Several rack mounting configurations include:
•Side-mount

24 HP KVM Server Console Switch User Guide
•Rail-mount
•Velcro-mount
Performing a Side-Mount Installation
1. Slide the tabs on the side-mounting brackets into the rack frame.
2.Secure the Expansion Module to the rack frame, using one self-tapping screw for the bottom side-mounting bracket.

Installing the Expansion Module |
25 |
Performing a Rail-Mount Installation
1.Remove the screws securing the side-mounting brackets to the Expansion Module.
2.Insert two cage nuts into the rack frame where the side-mounting bracket holes are located and secure the Expansion Module to the rack frame, using two M-6 screws.

26 HP KVM Server Console Switch User Guide
Performing a Velcro-Mount Installation
1.Determine the location for the Expansion Module.
2.Remove the protective strip from one side of the Velcro and attach that side to the Expansion Module.
3.Remove the protective strip from the other side of the Velcro and attach the Expansion Module to the rack frame.
Configuring the Expansion Module
1.Mount the Expansion Module into the rack.
2.Locate up to nine UTP CAT5 cables.
3.Connect a UTP CAT5 cable to the server connection port ("Components" on page 17) on the HP KVM Server Console Switch.
4.Connect the other end of that same UTP CAT5 cable to the IN port on the Expansion Module.
5.Connect one end of another UTP CAT5 cable to the OUT port on the Expansion Module.
6.Connect the other end of the second UTP CAT5 cable to the Interface Adapter ("Installing the Interface Adapter" on page 21).
7.Repeat steps 5 and 6 to connect any other servers to this system.

27
Cascading Console Switches |
|
In This Section |
|
Compatible Console Switch Models ...................................................................................... |
27 |
Cascading an HP KVM Server Console Switch with another HP KVM Server Console Switch |
|
................................................................................................................................................ |
29 |
Cascading a Compaq Server Console Switch with an HP KVM Server Console Switch...... |
33 |
Cascading an HP KVM Server Console Switch with an HP IP Console Switch ................... |
36 |
Compatible Console Switch Models
Review the following information before cascading console switches with this product.
This product supports only one level of cascading. An Expansion Module is considered a level of cascading and therefore cannot be used in combination with cascaded console switches.
To ensure optimum equipment performance while cascading console switches, follow the proper powering-on sequence—power on the console switches, monitor, and then servers.
 CAUTION: Do not use Interface Adapters to cascade HP KVM Server Console Switches with HP KVM Server Console Switches. If Interface Adapters are used to cascade these products, undesirable operations might occur.
NOTE: The HP KVM Server Console Switch does not support Compaq
KVM PCI Cards or HP legacy console switches.
NOTE: To perform a firmware upgrade for a cascaded HP KVM Server Console Switch and all attached Interface Adapters, you must locally connect the keyboard, monitor, and mouse to the cascaded HP KVM Server Console Switch to access the local OSD.

28 HP KVM Server Console Switch User Guide
Compaq Server Console Switch
 CAUTION: While cascading a 2 x 8 Compaq Server Console Switch, connect only one Interface Adapter at any given time. Undesirable operations might occur if multiple Interface Adapters are attached.
 CAUTION: While cascading console switches, be sure that the Compaq Server Console Switch is cascaded below the HP KVM Server Console Switch. Undesirable operations might occur if these specific cascading sequences are not followed.
The following Compaq Server Console Switches can be integrated into the HP KVM Server Console Switch system. Compatible Compaq Server Console Switch models include:
•1 x 4 [PN: 400336 (-001)(-291)(B-31)]
•1 x 8 [PN: 400337 (-001)(-291)(B-31)]
•2 x 8 [PN: 400338 (-001)(-291)(B-31)]
•2 x 8 48 VDC [PN: 400542 B-21]
All Compaq Server Console Switches must be upgraded with SoftPaq firmware, version 2.1.0 or later, when cascaded with this product.
Cascading Console Switches |
29 |
HP IP Console Switch
 CAUTION: Do not use Interface Adapters to cascade HP IP Console Switches with HP KVM Server Console Switches. If Interface Adapters are used to cascade these products, undesirable operations might occur.
 CAUTION: While cascading console switches, be sure that the HP KVM Server Console Switch is cascaded below the HP IP Console Switch. Undesirable operations might occur if these specific cascading sequences are not followed.
The following HP IP Console Switches can be integrated into the HP KVM Server Console Switch system. Compatible HP IP Console Switch models include:
•1 x 1 x 16 [PN: 262585 (B-21)]
•3 x 1 x 16 [PN: 262586 (B-21)]
All HP IP Console Switches must be upgraded with SoftPaq firmware, version 2.1.1 or later, when cascaded with this product.
Cascading an HP KVM Server Console Switch with another HP KVM Server Console Switch
NOTE: To perform a firmware upgrade for a cascaded HP KVM Server Console Switch and all attached Interface Adapters, you must locally connect the keyboard, monitor, and mouse to the cascaded HP KVM Server Console Switch to access the local OSD.
1.Mount the console switches in the rack.
2.Locate a UTP CAT5 cable and connect one end to the server connection port ("Components" on page 17) on the cascaded HP KVM Server Console Switch.
3.Connect the other end of that same UTP CAT5 cable to the RJ-45 port on the Interface Adapter.
4.Connect the Interface Adapter to the appropriate ports on the server.
 Loading...