


 Loading...
HP Integrity Servers with Microsoft® Windows Server™ 2003
Smart Setup Guide
HP Part Number: 5992-0964
Published: October 2007
© Copyright 2007 Hewlett-Packard Development Company, L.P.
Legal Notices
Confidentialcomputersoftware.ValidlicensefromHPrequiredforpossession,useorcopying.ConsistentwithFAR12.211and12.212,Commercial Computer Software, Computer Software Documentation, and Technical Data for Commercial Items are licensed to the U.S. Government under vendor's standard commercial license.
Theinformationcontainedhereinissubjecttochangewithoutnotice.TheonlywarrantiesforHPproductsandservicesaresetforthintheexpress warrantystatementsaccompanyingsuchproductsandservices. Nothinghereinshouldbeconstruedasconstitutinganadditionalwarranty. HP shall not be liable for technical or editorial errors or omissions contained herein.
Microsoft and Windows are U.S. registered trademarks of Microsoft Corporation.
Intel and Itanium are registered trademarks of Intel Corporation or its subsidiaries in the United States and other countries.
Java is a U.S. trademark of Sun Microsystems, Inc.
UNIX is a registered trademark of The Open Group.

Table of Contents |
|
About This Document....................................................................................................... |
11 |
Intended Audience................................................................................................................................ |
11 |
New and Changed Information in This Edition................................................................................... |
11 |
Document Organization....................................................................................................................... |
11 |
Typographic Conventions..................................................................................................................... |
11 |
Related Information.............................................................................................................................. |
12 |
Publishing History................................................................................................................................ |
13 |
HP Encourages Your Comments.......................................................................................................... |
13 |
1 Preparing for the installation....................................................................................... |
15 |
Choosing an installation method.......................................................................................................... |
15 |
Ensuring platform compatibility.......................................................................................................... |
16 |
Check hardware compatibility........................................................................................................ |
16 |
Back up existing data....................................................................................................................... |
17 |
Choosing an installation environment................................................................................................. |
17 |
Choosing the Installation media...................................................................................................... |
18 |
Using the Microsoft OS media......................................................................................................... |
18 |
Using the HP Reinstallation media................................................................................................. |
18 |
Locating the Microsoft Certificate of Authenticity............................................................................... |
18 |
Setting up a console.............................................................................................................................. |
22 |
Set up a headless console................................................................................................................. |
22 |
Set up the headless console using a null modem cable............................................................. |
22 |
Set up the headless console using a LAN.................................................................................. |
23 |
Set up the headless console using a Remote Serial Console (rx2660, rx3600, rx6600, BL860c, |
|
and BL870c only)........................................................................................................................ |
23 |
Set up a GUI console........................................................................................................................ |
23 |
Set up an Integrated Remote Console (rx2660, rx3600, rx6600, BL860c, and BL870c only)............ |
25 |
Set up a Virtual Media (vMedia) drive...................................................................................... |
25 |
Setting up PXE/RIS................................................................................................................................ |
26 |
Set up a RIS server........................................................................................................................... |
27 |
Install RIS................................................................................................................................... |
28 |
Configure RIS............................................................................................................................. |
28 |
Authorize a RIS server in Active Directory................................................................................ |
29 |
Use the Client Installation Wizard............................................................................................. |
29 |
Preparing the server hardware............................................................................................................. |
30 |
Set up the boot drive........................................................................................................................ |
30 |
Boot to EFI....................................................................................................................................... |
30 |
Locate the DVD/CD drive............................................................................................................... |
31 |
Set ACPI flag to windows (cell-based servers only)....................................................................... |
32 |
Set cell local memory to 100% (cell-based servers only)................................................................. |
32 |
Specify NIC for a network boot....................................................................................................... |
32 |
2 Installing the OS........................................................................................................... |
35 |
Installing from a headless console........................................................................................................ |
35 |
Run EBSU........................................................................................................................................ |
36 |
Run Windows Setup........................................................................................................................ |
38 |
Enter the product key...................................................................................................................... |
39 |
Installing from a GUI console............................................................................................................... |
39 |
Run EBSU........................................................................................................................................ |
39 |
Table of Contents |
3 |
Run Windows Setup........................................................................................................................ |
42 |
Specify server settings..................................................................................................................... |
42 |
Installing from PXE............................................................................................................................... |
43 |
Reinstalling from a headless console.................................................................................................... |
43 |
Load the system image.................................................................................................................... |
44 |
Specify server settings..................................................................................................................... |
45 |
Reinstalling from a GUI console........................................................................................................... |
46 |
Load the system image.................................................................................................................... |
46 |
Specify server settings..................................................................................................................... |
47 |
Applying OS updates............................................................................................................................ |
47 |
Enabling Windows components........................................................................................................... |
48 |
Install TCP/IP................................................................................................................................... |
48 |
Install SNMP.................................................................................................................................... |
48 |
Configure SNMP............................................................................................................................. |
49 |
Set IP addresses from a headless console........................................................................................ |
49 |
Set up and run a Remote Desktop Connection............................................................................... |
49 |
Updating firmware, drivers, and software........................................................................................... |
50 |
Enable greater than 256 interrupts (cell-based servers only).......................................................... |
50 |
Update firmware............................................................................................................................. |
51 |
Update device drivers..................................................................................................................... |
51 |
Install the Integrity Support Pack (ISP)........................................................................................... |
52 |
Install updates from the web........................................................................................................... |
53 |
Register for HP support notifications.............................................................................................. |
53 |
Register for Microsoft security notifications................................................................................... |
53 |
Register for Microsoft Windows Update......................................................................................... |
53 |
Miscellaneous installation issues.......................................................................................................... |
53 |
Using Integrated Remote Console to install Windows on rx2660, rx3600, rx6600, BL860c, and |
|
BL870c servers................................................................................................................................. |
53 |
Installing a Windows guest on an HP Integrity Virtual Machine host........................................... |
54 |
Enabling hyperthreading on HP Integrity servers.......................................................................... |
55 |
Enable hyperthreading using EFI.............................................................................................. |
55 |
Enable hyperthreading using Partition Manager...................................................................... |
56 |
3 Installing the Management Tools................................................................................ |
57 |
Installing System Management Homepage.......................................................................................... |
57 |
Configure SMH after Support Pack installation.............................................................................. |
57 |
Install SMH separately.................................................................................................................... |
57 |
Initializing SMH ............................................................................................................................. |
59 |
Installing the management agents........................................................................................................ |
59 |
Configure management agents after Support Pack installation..................................................... |
60 |
Install management agents from Smart Setup media..................................................................... |
60 |
Activating and configuring agents.................................................................................................. |
60 |
Activating agents........................................................................................................................ |
60 |
Configuring the event notifier.................................................................................................... |
61 |
Setting the agent SNMP data collection interval....................................................................... |
63 |
Monitoring server processes...................................................................................................... |
64 |
Sending SNMP traps to management applications via IP......................................................... |
65 |
Installing partition management tools.................................................................................................. |
66 |
Install nPartition Commands Bundle from the Smart Setup media............................................... |
67 |
Install Partition Manager Bundle from the Smart Setup media...................................................... |
67 |
Verifying the installation................................................................................................................. |
68 |
Verify nPartition commands...................................................................................................... |
68 |
Verify Partition Manager installation......................................................................................... |
68 |
4Table of Contents
4 Performing hot-plug operations................................................................................... |
71 |
Before you begin................................................................................................................................... |
71 |
Adding a PCI card................................................................................................................................ |
72 |
Hardware interface for all HP Integrity servers except Superdome............................................... |
72 |
Hardware interface for Superdome servers.................................................................................... |
73 |
Software interface............................................................................................................................ |
74 |
Removing a PCI card............................................................................................................................ |
74 |
Software interface for all HP Integrity servers except Superdome................................................. |
74 |
Software interface for Superdome servers...................................................................................... |
74 |
Hardware interface for all HP Integrity servers except Superdome............................................... |
74 |
Hardware interface for Superdome servers.................................................................................... |
75 |
A Preparing the server for Microsoft SQL Server 2005.............................................. |
77 |
SQL Server 2005 installation................................................................................................................. |
77 |
Installing SQL Server from the command prompt.......................................................................... |
77 |
Installing SQL Server from the GUI................................................................................................ |
78 |
B EFI Utilities..................................................................................................................... |
81 |
Introduction to EFI................................................................................................................................ |
81 |
EFI Boot Manager............................................................................................................................ |
81 |
EFI Shell........................................................................................................................................... |
81 |
Common EFI Shell commands........................................................................................................ |
82 |
EFI-Based Setup Utility................................................................................................................... |
85 |
Creating a new boot file using the EFI Shell......................................................................................... |
86 |
Verify successful boot file creation.................................................................................................. |
87 |
C Management processor and Special Administration Console............................... |
89 |
Management processor......................................................................................................................... |
89 |
Accessing the MP............................................................................................................................. |
89 |
MP Commands................................................................................................................................ |
89 |
Special Administration Console........................................................................................................... |
94 |
SAC Channel Management Commands......................................................................................... |
96 |
Table of Contents |
5 |
6

List of Figures
1-1 |
Headless console configurations................................................................................................... |
22 |
1-2 |
GUI console configuration............................................................................................................ |
24 |
1-3 |
PXE/RIS configuration................................................................................................................... |
27 |
2-1 |
Enter EBSU.................................................................................................................................... |
36 |
2-2 |
Select Express Setup...................................................................................................................... |
36 |
2-3 |
Update firmware........................................................................................................................... |
37 |
2-4 |
Partition disk................................................................................................................................. |
37 |
2-5 |
Install diagnostic tools................................................................................................................... |
38 |
2-6 |
Insert the Microsoft Windows Server 2003 CD............................................................................. |
38 |
2-7 |
Enter EBSU.................................................................................................................................... |
39 |
2-8 |
Select Express Setup...................................................................................................................... |
40 |
2-9 |
Update firmware........................................................................................................................... |
40 |
2-10 |
Partition disk................................................................................................................................. |
41 |
2-11 |
Install diagnostic tools................................................................................................................... |
41 |
2-12 |
Insert the Microsoft Windows Server 2003 CD............................................................................. |
42 |
2-13 |
Enabling hyperthreading in the Partition Manager...................................................................... |
56 |
3-1 |
HP System Management Homepage for Windows ..................................................................... |
57 |
3-2 |
HP Insight Management Agents for Windows Server 2003 on Itanium-based systems.............. |
60 |
3-3 |
Services tab screen......................................................................................................................... |
61 |
3-4 |
Welcome message.......................................................................................................................... |
61 |
3-5 |
Mail (SMTP) server information................................................................................................... |
62 |
3-6 |
Event recipients information......................................................................................................... |
62 |
3-7 |
Adding a new user........................................................................................................................ |
62 |
3-8 |
Event selection window................................................................................................................ |
63 |
3-9 |
SNMP Settings tab......................................................................................................................... |
64 |
3-10 |
Process Monitor tab....................................................................................................................... |
64 |
3-11 |
Component Services window....................................................................................................... |
65 |
3-12 |
SNMP traps tab............................................................................................................................. |
66 |
3-13 |
SNMP service configuration.......................................................................................................... |
66 |
B-1 |
EFI Boot Manager.......................................................................................................................... |
81 |
7
8

List of Tables
1-1 |
Installation matrix......................................................................................................................... |
17 |
1-2 |
Locating the Microsoft COA......................................................................................................... |
19 |
1-3 |
Graphics support on server models.............................................................................................. |
24 |
1-4 |
EFI device mapping fields............................................................................................................. |
31 |
2-1 |
Integrity servers supporting PXE/RIS installations....................................................................... |
43 |
4-1 |
PCI cards that do not support hot-plug addition.......................................................................... |
72 |
B-1 |
EFI Shell Commands and Descriptions......................................................................................... |
82 |
C-1 |
Channel Management commands................................................................................................. |
96 |
9
10
About This Document
ThisdocumentdescribeshowtoinstallandconfiguretheoperatingsystemandHPsoftwareon HP Integrity servers running Windows Server 2003.
The document printing date and part number indicate the document’s current edition. The printing date changes when a new edition is printed. Minor changes may be made at reprint withoutchangingtheprintingdate.Thedocumentpartnumberchangeswhenextensivechanges are made.
Documentupdatesmaybeissuedbetweeneditionstocorrecterrorsordocumentproductchanges.
Toensurethatyoureceivetheupdatedorneweditions,youshouldsubscribetotheappropriate product support service. See your HP sales representative for details.
The latest version of this document can be found online at http://www.docs.hp.com.
Intended Audience
ThisdocumentisintendedforsystemadministratorsandHPsupportpersonnelresponsiblefor installing, configuring, and managing HP Integrity servers.
This document is not a tutorial.
New and Changed Information in This Edition
This document includes the following changes since its last release:
•Added “About This Document” section
•Added introductory/overview content at the beginning of Chapters 1 and 2
•Added additional steps to “Specify server settings” procedures in Chapter 2
•Removed references to Intelligent Networking Pack licensing (INP functionality was integrated into the core product)
Document Organization
This document is organized as follows:
Chapter 1 |
Chapter 1 |
“Preparing for the installation”. Describes the steps to prepare the server for |
|
installation of the operating system, SmartSetup, and management software. |
|
Chapter 2 |
Chapter 2 |
“Installing the OS”. Describes how to install the operating system software. |
Chapter 3 |
Chapter 3 |
“Installing the Management Tools”. Describes how to install the server |
|
management software. |
|
Chapter 4 |
Chapter 4 |
“Performing hot-plug operations”. Describes how to add and remove server |
|
hardware such as network interface cards (NICs) or RAID cards. |
|
Appendix A |
Appendix A “Preparing the server for Microsoft SQL Server 2005”. Describes how to |
|
|
configure and install Microsoft SQL Server 2005. |
|
Appendix B |
AppendixB“EFIUtilities”.Describestheserver'sExtensibleFirmwareInterface(EFI)and |
|
|
EFI-Based Setup Utility (EBSU). |
|
Appendix C |
Appendix C “Management processor and Special Administration Console”. Describes |
|
|
the server's management processor (MP) and Special Administration Console (SAC). |
|
|
These are tools for monitoring the operating system installation and administering the |
|
|
server from a headless console. |
|
Typographic Conventions
This document uses the following typographical conventions:
Intended Audience |
11 |
WARNING |
Awarningcallsattentiontoimportantinformationthatifnotunderstood |
|
or followed will result in personal injury or nonrecoverable system |
|
problems. |
CAUTION |
Acautioncallsattentiontoimportantinformationthatifnotunderstood |
|
or followed will result in data loss, data corruption, or damage to |
|
hardware or software. |
IMPORTANT |
This alert provides essential information to explain a concept or to |
|
complete a task |
NOTE |
A note contains additional information to emphasize or supplement |
|
important points of the main text. |
KeyCap |
Thenameofakeyboardkeyorgraphicalinterfaceitem(suchasbuttons, |
|
tabs, and menu items). Note that Return and Enter both refer to the |
|
same key. |
Computer output |
Text displayed by the computer. |
User input |
Commands and other text that you type. |
Command |
A command name or qualified command phrase. |
Ctrl+x |
Akeysequence.Asequencesuchas Ctrl+x indicatesthatyoumusthold |
|
downthekeylabeledCtrl whileyoupressanotherkeyormousebutton. |
[] |
The contents are optional in command line syntax. If the contents are a |
|
list separated by |, you must choose one of the items. |
{} |
The contents are required in command line syntax. If the contents are a |
|
list separated by |, you must choose one of the items. |
... |
The preceding element can be repeated an arbitrary number of times. |
|
Indicates the continuation of a code example. |
|Separates items in a list of choices.
Related Information
You can find more information about HP Integrity servers, server management, and software in the following locations:
•For an overview of the HP Integrity server family: http://www.hp.com/go/integrity
•For other documents supporting Windows Server 2003 on HP Integrity Servers (see the section titled “Windows 64–bit on HP Integrity Servers”): http://docs.hp.com/en/windows.html
•Fortechnicalsupportresources(drivers,patches,upgrades,migrationissues,tosignupfor alerts, etc.): http://h20000.www2.hp.com/bizsupport/TechSupport/Product.jsp?prodTypeId=15351&prodCatId=321933
•For information about HP Integrity Virtual Machines (Integrity VM): http://h71028.www7.hp.com/enterprise/cache/262803-0-0-0-121.html
12

Publishing History
The publishing history below identifies the edition dates of this manual. Updates are made to this publication on an unscheduled, as needed, basis. The updates will consist of a complete replacement manual and pertinent online or CD documentation.
Manufacturing Part |
Supported Operating |
Supported SmartSetup |
Supported Products |
Publication Date |
Number |
Systems |
Version |
(Servers) |
|
5992-0926 |
Microsoft Windows |
Version 5.2 |
BL860c, BL870c, |
September, 2007 |
|
Server 2003 for |
|
rx1620, rx2620, |
|
|
Itanium-based |
|
rx2660, rx3600, |
|
|
Systems, 64–bit |
|
rx4640, rx6600, |
|
|
|
|
rx7620, rx7640, |
|
|
|
|
rx8620, rx8640, |
|
|
|
|
Superdome, |
|
|
|
|
Superdome/sx2000 |
|
HP Encourages Your Comments
HP encourages your comments concerning this document. We are committed to providing documentation that meets your needs. Send any errors found, suggestions for improvement, or compliments to:
feedback@fc.hp.com
Please include the document title, manufacturing part number, and any comment, error found, or suggestion for improvement you have concerning this document.
Publishing History |
13 |
14

1 Preparing for the installation
Installing Microsoft® Windows® Server 2003 for Itanium®-based systems on an HP Integrity server involves preparing the hardware for operating system (OS) installation, loading the OS, andupdatingthesystemwiththelatestOSpatches. Thischapterhelpsyouplantheinstallation based on the server model, the OS edition, the source of the OS media, and your network environment. Subsequent chapters guide you through the installation process.
NOTE: HP Integrity servers must run Windows Server 2003 with either Service Pack 1 (SP1) or Service Pack 2 (SP2). If your operating system is already installed and you are running an earlierversionofWindowsServer2003,youmustupgradeyouroperatingsystemtoSP1orSP2. When updating to SP1 or SP2, perform the update in the following order:
1.Install the latest HP Integrity Support Pack.
2.Reboot the machine.
3.Install the desired Service Pack.
4.Reboot the machine again.
5.Use the Windows Update Service to ensure that you have the latest Microsoft updates.
If the Windows Server 2003 operating system has already been installed on your system, or if it was pre-installed by HP before your system was delivered, you do not have to perform any of the steps described in this chapter (Chapter 1 “Preparing for the installation”) or in Chapter 2 (Chapter2“InstallingtheOS”). YoucanproceeddirectlytoChapter3(Chapter3“Installingthe Management Tools”) and begin the installation of your management tools software.
IfyourWindowsServer2003operatingsystemisnotalreadyinstalled,orifyouwishtoreinstall it for some reason, or if you wish to migrate to Windows Server 2003 from another operating system, you will need to perform one or more of the following steps described in this chapter, in the following order:
•Choose an installation method
•Check hardware compatibility
•Back up your existing data
•Choose your installation environment and media
•Locate your Microsoft Certificate of Authenticity
•Choose an installation option:
—Local installation choices (pick one):
◦Headless console (terminal emulator)
◦GUI console
—Remote installation choices (pick one):
◦Integrated Remote Console, or IRC (available on rx2660, rx3600, rx6600, BL860c, and BL870c servers only)
◦Preboot execution environment (PXE) + Remote Installation Server (RIS)
Choosing an installation method
WhenyoupurchaseanHPIntegrityserver,youcanorderadditionalhardware,supportoptions, and an OS enablement kit (such as the HP Integrity Essentials Foundation Pack for Windows). You can also order factory installation of the OS. Depending on your order (or subsequent use), your system is in one of the following states:
•Factory-installed Windows Server 2003
WindowsServer2003,DatacenterEdition,isusuallyfactory-installed. Togetthesystemup andrunning,verifythattheOSwasinstalledcorrectly,setupthesystem,andupdateitwith
Choosing an installation method 15
the latest firmware, drivers, and Microsoft patches and fixes (QFEs) available in the latest HP Integrity Essentials Foundation Pack or from the HP Integrity servers support website:
http://www.hp.com/support/itaniumservers/
•Factory-installed OS other than Windows Server 2003
If you choose to run Windows Server 2003 instead of the factory-installed OS, you can performthemigrationyourselfonanentry-levelserverorengageanHPCustomerEngineer (CE) to perform the migration on a mid-range or high-end server. Contact HP support or sales to engage the CE.
When you migrate to Windows Server 2003 from another OS, pay close attention to the differences in supported hardware I/O, in particular, between the two operating systems. YoumustreplaceincompatiblecomponentswiththosesupportedonWindowsServer2003. If you want to keep the data residing on the server hard disk, you must back up the data andverifythatyoucanrestoreitelsewhere.Thenpreparetheserverhardwareforinstallation.
Use the HP Smart Setup media and the Microsoft Windows Server 2003 media to load the OS and HP value-added software (drivers, tools, utilities, and agents) on the server. After installation,setupthesystem,andupdateitwiththelatestfirmware,drivers,andMicrosoft patchesandfixes(QFEs)ontheHPSmartUpdatemediaincludedinthelatestHPIntegrity Essentials Foundation Pack or from the HP Integrity servers support website:
http://www.hp.com/support/itaniumservers/
•No operating system installed
Preparetheserverhardwareforinstallation.UsetheHPSmartSetupmediaandtheMicrosoft Windows Server 2003 media to load the OS on the server. After installation, verify that the OS was installed correctly, configure the system, and update it with the latest drivers and Microsoft patches and fixes (QFEs) on the HP Smart Update media included in the latest HP Integrity Essentials Foundation Pack or from the HP Integrity servers support website:
http://www.hp.com/support/itaniumservers/
•Installed Windows Server 2003 incorrect or inoperable
Preparetheserverhardwareforinstallation. UsetheHPReinstallationmediatorestorethe OSfiles.Afterreinstallation,verifythattheOSwasinstalledcorrectly,configurethesystem, and update it with the latest firmware, drivers, and Microsoft patches and fixes (QFEs) on the HP Smart Update media included in the latest HP Integrity Essentials Foundation Pack or from the HP Integrity servers support website:
http://www.hp.com/support/itaniumservers/
Ensuring platform compatibility
If you are migrating from another operating system to Windows Server 2003, ensure that the hardwareiscompatiblewithWindowsServer2003andthatanydataontheserverdiskisbacked up..
Check hardware compatibility
To verify that your existing hardware is compatible with Windows Server 2003, complete the following steps:
1.See the Options & Accessories page for each server to check supported hardware configurations. Forexample,theOptions&Accessoriespagefortherx8620serverfoundat http://h20341.www2.hp.com/integrity/cache/342107-0-0-0-121.html lists the processors, memory, adapters, cards, and controllers that are available for that server.
2.Verify existing device compatibility at the HP Integrity server connectivity website: http://www.hp.com/products1/serverconnectivity/index.html
16 Preparing for the installation

3.VerifystoragecompatibilitybyreviewingtheHPIntegrityServer-Storagesupportmatrices at http://www.hp.com/products1/serverconnectivity/support_matrices.html. Thislistisnot exhaustive because storage vendors can support more configurations than those indicated atthesite.Asageneralrule,checkwithyourstoragevendorandanHPsalesrepresentative for a definitive statement on server and storage compatibility.
Back up existing data
To restore the data on the hard disk of the server after migrating to Windows, you must first back up the data and verify that you are able to restore it:
1.Perform a complete server backup using your existing backup utilities.
2.Verify the integrity of the backup by restoring samples of data to another server.
3.Store the backup in a safe place.
Choosing an installation environment
The installation environment consists of the server model, the OS edition, a GUI console or a headless console, and the media you need to perform the installation. In addition to installing fromSmartSetupandMicrosoftmediaorreinstallationmedia,youcanautomatetheinstallation of Windows Server 2003 using a Remote Installation Service (RIS) server on the network and a preboot execution environment (PXE) client on the HP Integrity server.
Table 1-1 lists the HP Integrity server models, the console options, and relevant media choices.
Table 1-1 |
Installation matrix |
|
|
Server |
Console |
Media |
|
rx1620 |
GUI console |
HP Smart Setup, HP Smart Update, and Microsoft Windows |
|
rx2620 |
|
Server 2003 with SP2 |
|
|
|
||
rx2660 |
|
HP Reinstallation |
|
rx3600 |
Headless console |
HP Smart Setup, HP Smart Update, and Microsoft Windows |
|
rx4640 |
|||
|
Server 2003 with SP2 |
||
rx6600 |
|
HP Reinstallation |
|
BL860c |
|
||
Integrated Remote Console |
Virtual Media (vMedia) + HP Smart Setup, Smart Update, |
||
BL870c |
|||
(rx2660, rx3600, rx6600, BL860c, |
Windows Server 2003 with SP2, |
||
|
|||
|
and BL870c only) |
or HP Reinstallation |
|
|
PXE/RIS |
|
|
Cell-based servers |
|
||
rx7620 |
GUI console |
HP Smart Setup, HP Smart Update, and Microsoft Windows |
|
rx8620 |
|
Server 2003 with SP2 |
|
|
|
||
rx8640 |
|
HP Reinstallation |
|
rx7640 |
Headless console |
HP Smart Setup, HP Smart Update, and Microsoft Windows |
|
Superdome |
|||
|
Server 2003 with SP2 |
||
(sx1000 and |
|
HP Reinstallation |
|
sx2000) |
|
||
|
|
||
|
PXE/RIS |
|
|
|
GUI console |
HP Reinstallation |
|
|
Headless console |
HP Reinstallation |
|
Choosing an installation environment |
17 |
Choosing the Installation media
The HP Integrity Essentials Foundation Pack for Windows includes the HP Smart Setup media. You can use the HP Smart Setup media both before and after you install the OS.
•BeforeinstallingtheOS,boottheserverwiththeSmartSetupmediaintheCD/DVDdrive. The server boots to the EFI-Based Setup Utility (EBSU). EBSU provides an easy-to-use interfaceforofflinesetupandconfigurationtasks,suchascreatingharddiskpartitionsand updating the firmware. Moreover, EBSU provides a utility called Express Setup, which guides you through the process of installing the OS. EBSU works in conjunction with the Microsoft media, which holds the OS image. HP strongly recommends that you use EBSU to install the OS. For more information about EBSU, see Appendix B.
•AfterinstallingtheOS,usetheSmartSetupmediatoinstalldrivers,utilities,andimportant fixes to ensure the stability and performance of the system. You can also use Smart Setup tobrowsethedocumentationfortheserver,includinganelectronicversionofthisdocument. Then use the Smart Update media to update the server with critical operating system and security QFEs from Microsoft.
Using the Microsoft OS media
You can purchase the Microsoft OS media either with the HP Integrity Essentials Foundation Pack for Windows from HP or separately from a Windows reseller. Possibly your organization already has a volume license for Windows Server 2003, Enterprise Edition with SP2 for Itanium-based servers. You need this media and the license key to install Windows Server 2003 (if Windows is not factory-installed) on HP Integrity servers.
Using the HP Reinstallation media
HP Integrity servers factory-installed with Windows Server 2003 provide the HP Reinstallation media, which you can use to restore the server to its factory condition if necessary. You must have the corresponding license key to reinstall Windows Server 2003. The license key is found on your server’s Certificate of Authenticity (COA).
Locating the Microsoft Certificate of Authenticity
The certificate contains the CD key for Microsoft Windows Server 2003. You must enter this key as part of the installation procedure. The physical location of the Certificate of Authenticity (COA) depends on the server model. Table 1–2 identifies the locations of COAs for supported HP Integrity servers.
18 Preparing for the installation

Table 1-2 Locating the Microsoft COA
Integrity Server |
Location |
rx1620 |
The COA is on the underside of the pullout strip located near the power switch, as shown |
|
here (server is upside down in the image): |
rx2620 |
TheCOAisonapulloutstriplocatedonthefrontofthesystem,adjacenttotheharddrives, |
|
as shown here: |
rx2660 |
The COA is located on the left side panel, in the middle, as shown here: |
Locating the Microsoft Certificate of Authenticity |
19 |

 Table 1-2 Locating the Microsoft COA (continued)
Integrity Server |
Location |
rx3600 |
The COA is located on the left side panel, as shown here: |
rx4640 |
The COA is located on the left side panel, as shown here: |
rx6600 |
The COA is located on the left side panel. It as shown here: |
BL860c and BL870c The COA is located on the left side panel. If there is more than one label on the side panel, the COA is the one farthest left, as shown here:
20 Preparing for the installation

 Table 1-2 Locating the Microsoft COA (continued)
Integrity Server |
Location |
rx7620 and rx7640 TheCOAislocatedonthefrontofthesystem,abovethelightpanel,nexttotheUUIDlabel, as shown in the first illustration that follows. Additional COAs are shown in the second illustration.
rx8620 and rx8640 TheCOAislocatedinthefrontofthesystem,atthebottom,nearthepowersupplyasshown inthefirstillustrationthatfollows.IfadditionalCOAsarerequired,theyarelocatedasshown in the second illustration.
Superdome (sx1000 The COA is located inside the unit, on the left, in the open space between the cells and the and sx2000) extended I/O cabinet (IOX), as shown here:
Locating the Microsoft Certificate of Authenticity |
21 |
Setting up a console
If you are installing locally, you must set up your server with either a headless console or a GUI console.
Set up a headless console
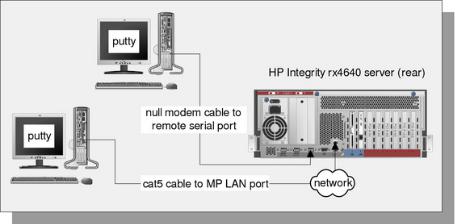
A headless console is a PC running terminal emulation software such as PuTTY (available on the Smart Setup media or from the web) or HyperTerminal, that connects to the server through itsmanagementprocessor(MP)serialportorLANport.Theheadlessconsoleprovidesamethod for connecting to servers that do not have legacy VGA graphics or PS/2 keyboard and mouse hardware installed on them. It is good practice to configure servers this way (without legacy VGA or keyboard/mouse hardware) because they are easier to setup, maintain, and operate.
Figure 1-1 shows headless consoles connected to an HP Integrity rx4640 server.
Figure 1-1 Headless console configurations
When you use a headless console to install Windows, you can view detailed installation informationforeachcomponentbymonitoringthesetuplogchannels.See“SpecialAdministration Console” (page 94) for more information.
From the headless console, you can access the EFI Shell, the management processor (MP), and the Microsoft Special Administration Console (SAC). You can use these utilities while installing and administering Windows Server 2003 on HP Integrity servers. For more information about the MP and SAC, see “Special Administration Console” (page 94).
You can configure a headless console in one of the following ways:
•Using a null modem cable
•Using a cat5 LAN cable
•UsingaRemoteSerialConsole(appliestorx2660,rx3600,rx6600,BL860c,andBL870cservers
only)
ThefirsttwomethodsrequireaterminalemulationapplicationsuchasHyperTerminalorPuTTY. PuTTYisafreeimplementationoftelnetandSSHfor32-bitWindowsandUNIX.PuTTYprovides an X terminal. You must use PuTTY Version 0.59 or higher, available on the Smart Setup media or from the PuTTY website at:
http://www.chiark.greenend.org.uk/~sgtatham/putty/download.html
Set up the headless console using a null modem cable
To set up the headless console using a null modem cable, complete the following steps:
1.Connect the PC to the server MP serial port with a null modem cable.
22 Preparing for the installation

2.Install PuTTY on the client PC and specify these port settings:
•Bits per second: 9600
•Data bits: 8
•Parity: none
•Stop bits: 1
•Flow control: Xon/Xoff
3.Use the Keyboard Configuration Panel to map the backspace key to Control + H.
4.Boot the server.
5.Run PuTTY and press Enter. The MP login prompt appears.
6.Enter your user name and password, and the MP command prompt appears.
7.Enter the CO command to access the headless console.
Set up the headless console using a LAN
To set up the headless console over a LAN, complete the following steps:
1.Connect the PC to the server LAN port with a cat5 cable.
2.Use telnet to access the MP. The MP login prompt appears.
3.Enter your user name and password, and the MP command prompt appears.
4.Enter the CO command to access the headless console.
Set up the headless console using a Remote Serial Console (rx2660, rx3600, rx6600, BL860c, and BL870c only)
Tosetuptheheadlessconsole(onrx2660,rx3600,rx6600,BL860c,andBL870cserversonly)using Remote Serial Console, complete the following steps:
1.Point a secure web browser at the name or IP address of the server MP.
2.Enter your user name and password to log in to the System Management Homepage.
3.On the Remote Console tab, and select Remote Serial Console in the left panel.
4.Click the Launch button and a new window appears, providing access to the headless console.
Set up a GUI console
AGUIconsoleisaVGAmonitor,aUSBHPkeyboard,andaUSBmouseconnectedtotheserver. (You can use a USB-to-PS2 converter to connect to a console switch).
NOTE: IfaVGAcardisnotalreadyinstalled,youmustinstalltheHPGraphicsandUSBCombo Card to use a GUI console. No other graphics card is supported by HP Integrity servers. Also, only HP keyboards are supported with this card.
Figure 1-2 shows a GUI console connected to an HP Integrity rx4640 server.
Setting up a console 23

Figure 1-2 GUI console configuration
AGUIconsoleprovidescompleteaccesstoalltheinstallationandadministrationtasksthatyou can perform on the server. You can use the GUI console to prepare the server for installation, install the OS, and check server status after installation.
Onserversconfiguredwithaninternalgraphicscard,youcanconnectamonitor,keyboard,and mousedirectlytotheappropriateports. Onserverswithoutaninternalgraphicscard,youmust first install an HP Graphics and USB Combo Card and connect the console to the appropriate ports.Then,fromanexistingheadlessconsole,modifysystemconfigurationtoredirecttheoutput to the GUI console.
Table 1-3 Graphics support on server models
Server Model |
Graphics Card |
rx1620, rx2660, rx3600, rx4640, rx6600, |
Built-in video graphics |
BL860c, BL870c |
|
rx7620, rx8620, Superdome/sx1000 |
Optional HP Graphics and USB Combo Card (HP part number A6968A) |
rx7640, rx8640, Superdome/sx2000 |
Optional HP Graphics and US Combo Card (HP part number A6968B) |
ToinstalltheHPGraphicsandUSBComboCardusingtheLegacyinterface(blackbackground), complete the following steps:
1.Install the HP Graphics and USB Combo Card in an open PCI slot in the server.
2.Connect a VGA monitor, USB HP keyboard, and USB mouse to the appropriate ports.
3.Boot the server to EFI.
4.Attheheadlessconsole,fromtheEFIBootManager,selectBoot Option Maintenance Menu.
5.Select Select Active Console Output Devices.
6.Highlight the line with the graphics card PCI device.
Ifthelinedoesnotbeginwithanasterisk,thedeviceisdisabled. Usethespacebartotoggle the state of the card from disabled to enabled (as indicated by the asterisk).
7.Select Save Settings to NVRAM and then Exit. The video display is now directed to the GUI console.
ToinstalltheHPGraphicsandUSBComboCardusingtheEnhancedinterface(greybackground), complete the following steps:
1.Install the HP Graphics and USB Combo Card in an open PCI slot of the server.
2.Connect a VGA monitor, USB HP keyboard, and USB mouse to the appropriate ports.
3.Boot the server to EFI.
4.From the EFI Boot Manager, select Boot Configuration.
5.Select Console Configuration.
24 Preparing for the installation

6.Select Select Output Console.
7.Select the graphics card PCI device and press Enter. The video display is now directed to the GUI console.
Set up an Integrated Remote Console (rx2660, rx3600, rx6600, BL860c, and BL870c only)
The Integrated Remote Console (IRC) lets you use Windows clients running Internet Explorer to remotely view and manage HP Integrity servers featuring the iLO 2 management processor. This functionality is supported on rx2660, rx3600, rx6600, BL860c, and BL870c servers only.
The IRC combines keyboard, video, and mouse into a remote, virtual interface. Use it to view theserver’sdisplayanddirectlyinteractwithit. WhenyouuseIRCincombinationwithVirtual Media (See “Set up a Virtual Media (vMedia) drive” (page 25)), you can perform remote GUI installationsofserveroperatingsystemsandsoftware.YoucanalsousetheIRCtoperformserver maintenance tasks and run applications remotely that require keyboard and mouse input.
NOTE: You can use the Integrated Remote Console in place of the GUI Console method of installation anywhere the GUI method is described in this document.
The IRC and vMedia features are enabled only after you have obtained and installed an iLO 2 MP Advanced Pack license (part number AB500A). If you are not licensed and try to use these features,youseethemessage:iLO 2 feature not licensed.Freelimited-termtriallicenses are also available.
FormoreinformationabouttheiLO2MPAdvancedPacklicensing,ortoobtainafreelimited-term license, go to:
http://h71028.www7.hp.com/enterprise/cache/279991-0-0-0-121.html.
Follow the factory installation or manual installation instructions located on the Integrated Lights-Out Advanced Pack for HP Integrity Servers; Certificate of License to Use; License Installation Card to activate your license.
This document is not intended to be a complete description of IRC or vMedia. For more information about these powerful features, see the HP Integrity rx3600 and HP Integrity rx6600: Integrated Lights-Out 2 Management Processor Operations Guide at:
http://docs.hp.com/en/AD217-9001A/index.html or
http://docs.hp.com/en/AD217-9001A/AD217-9001A.pdf
To set up an Integrated Remote Console (on rx2660, rx3600, rx6600, BL860c, and BL870c servers only), complete the following steps:
1.Point a secure web browser at the name or IP address of the server MP.
2.Enter your user name and password to log in to the System Management Homepage.
3.On the Administration tab, select Licensing in the left panel.
4.Enter the license number.
5.On the Remote Console tab, select Integrated Remote Console in the left panel.
6.Click the Launch button. If Launch is greyed out, the license might be invalid or expired. A new window appears, providing access to the IRC.
Set up a Virtual Media (vMedia) drive
VirtualMedia(vMedia)providesyouwithvirtualdevicesthatmimicphysicalhardwaredevices
justasiftheywerephysicallyconnected,suchasavirtualCD/DVDdrivethatcanconnectthrough a network to the managed server. The vMedia device can be a physical CD/DVD drive on the managementworkstation,oritcanbeanimagefilestoredonalocaldiskdriveornetworkdrive. Floppy disk or USB memory devices are not supported.
Setting up a console 25

Booting from the iLO 2 MP CD/DVD enables you to upgrade the host system ROM, upgrade device drivers, deploy an OS from network drives, and perform disaster recovery of failed operating systems, among other tasks.
TheiLO2MPdeviceusesaclient/servermodeltoperformthevMediafunctions. TheiLO2MP devicestreamsthevMediadataacrossalivenetworkconnectionbetweentheremotemanagement consoleandthehostserver.ThevMediaJava™appletprovidesdatatotheiLO2MPasrequired.
NOTE: You can use a vMedia drive in place of a local CD or DVD drive anywhere that a local CD/DVD drive is described in this document.
TosetupavMediadrive(onrx2660,rx3600,rx6600,BL860c,andBL870cserversonly),complete the following steps:
1.Point a secure web browser at the name or IP address of the server MP.
2.Enter your user name and password to log in to the System Management Homepage.
3.On the Administration tab, select Licensing in the left panel.
4.Enter the license number.
5.On the Virtual Devices tab, select Virtual Media in the left panel.
6.Click the Launch button. If Launch is greyed out, the license might be invalid or expired. A new window appears, providing access to Virtual Media. Do on of the following actions:
•Select Local Media Drive, specify the CD or DVD drive on your client machine, and insert the CD or DVD into that drive.
•Select Local Image File, and specify the ISO image of the desired CD or DVD.
7.Click Connect. The server now detects a new USB drive attached to it. This is the vMedia drive.
Setting up PXE/RIS
ARemoteInstallServer(RIS)isaspecializedWindowsserverusedtoperformmultiplesoftware installations across a network. The RIS server, working in conjunction with an agent (the PXE client)residingontargetsystems,performsautomatedinstallations. Thismethodofinstallation offers the following advantages:
•Installations are automated; no user intervention is needed
•You can install multiple servers in one batch job
•Each server receives a standardized image
•You can perform an installation from anywhere on the intranet
Figure 1-3 shows a sample PXE/RIS setup.
26 Preparing for the installation
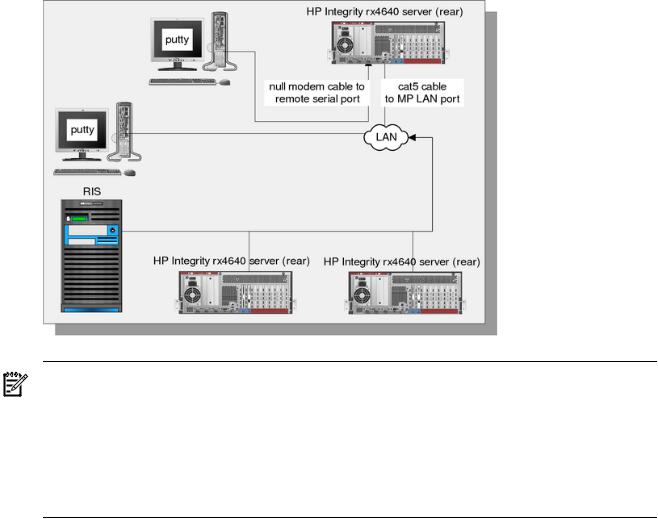
Figure 1-3 PXE/RIS configuration
NOTE: When you perform a PXE/RIS headless installation, note the following:
•Headless installations using PXE/RIS are not supported with Windows Server 2003, Datacenter Edition. Use the HP Reinstallation media instead.
•Do not connect the RIS server to the Integrity server using your intranet during initial Windows OS installation. Set up a small private network, populated with the RIS server, a hub, and the system LAN NIC of the HP Integrity server. This protects the intranet from errors that might occur during the Windows installation process. When the Windows OS installationhascompleted,connecttheRIStothetargetIntegrityserversusingyourintranet.
Remote Installation Services (RIS) enables you to create, maintain, and quickly install identical OS and software configurations on multiple headless systems with a predefined level of user interaction.RISusestheprebootexecutionenvironment(PXE)toenableclientcomputerswithout an operating system to boot remotely to a RIS server. The RIS server then installs the operating systemoveraTCP/IPnetworkconnection.YoucancreatedifferentsetsofRISimagesfordifferent groupsofclientcomputers.YoucanalsouseGroupPolicysettingstolimittheinstallationoptions that RIS presents to clients. In addition, you can configure RIS for either interactive or fully automated installations.
Set up a RIS server
Setting up one or more RIS servers in your network requires careful planning, design, and implementation. The following checklist provides an overview of the tasks involved in setting up a RIS server:
•Ensure that both your RIS server and client (Integrity server) hardware meet the Remote Installation Services (RIS) hardware requirements. The server hardware must meet the minimum requirements for the version of Windows Server 2003 that you are installing.
•EnsurethatyournetworkisbasedonTCP/IP,andthataDomainNameSystem(DNS)server exists on the network. You do not need to use the Microsoft version of DNS.
•Ensure that a Dynamic Host Configuration Protocol (DHCP) server exists on the network. You do not need to use the Microsoft version of DHCP.
•Ensure that Active Directory exists on the network.
Setting up PXE/RIS 27
•Install the RIS component on the RIS server.
•Run the RIS Setup Wizard.
See Also
Fordetaileddescriptionsoftheconcepts,tasks,bestpractices,andtroubleshootingtipsforsetting up a RIS server, see the Microsoft Windows Server 2003 Technical Reference website:
http://www.microsoft.com/windowsserver2003/proddoc/default.mspx.
Install RIS
You can install RIS either using the Control Panel or through an unattended Setup answer file. To install using Add or Remove Programs, complete the following steps:
1.Goto Start > Settings > Control Panel,thendouble-click Add or Remove Programs and select Add/Remove Windows Components to install the RIS component.
2.Open the RIS Setup Wizard and click Next. The RIS Setup wizard prompts you for information about specific settings used in the RIS installation. The wizard prompts you to do the following:
1.a. Enter the disk drive and directory to install RIS. The disk must be dedicated to the RIS server with a recommended minimum 4 GB of space.
2.b. Select Respond to client computer requesting service. The RIS server begins responding to client computers when the wizard is complete. Select Do not respond to unknown client computers if you want the RIS server to respond only to prestaged client computers in Active Directory.
3.c. Enter the location of the client images. This can be either the Windows Server 2003 Enterprise Edition with SP2 CD or a shared folder on the network that contains the installation files.
4.d. Enter help text that describes the operating system installation choices to users or clients of RIS.
Configure RIS
AftertheRemoteInstallationServicesSetupWizardcompletes,dependingonthesettingschosen, the RIS server either services client computers or pauses while you configure advanced settings using the RIS administration settings. The following list describes the available configuration options.
•Specify which RIS servers are allowed to run on your network. This option prevents unauthorized (often referred to as rogue) RIS servers, ensuring that only those RIS servers authorized by administrators can service clients. If an attempt is made to start an unauthorizedRISserveronthenetwork,itwillbeshutdownautomaticallyandthusunable to service client computers. A RIS server must be authorized before it can service client computers.
•Use the Active Directory Users and Computers snap-in to set properties on individual RIS servers that control how the server supplies RIS to requesting clients. To access the snap-in gotoStart > Programs > Administrative Tools,andthenclickingActive Directory Users and Computers.
•Use Group Policy to specify which installation options are presented to different groups of usersbytheClientInstallationwizard(CIW).Forexample,youcanchoosetoallowagroup of users access only to the automatic setup option, and restrict access to all other options to administrators.
•Use security descriptors or discretionary access control lists (ACLs) to specify which users orgroupofuserscanhaveaccesstotheoperatingsystemimagesavailableontheRISserver. YoucanusethismethodtoguideusersthroughtheselectionoftheunattendedOSinstallation
28 Preparing for the installation
appropriate for their account privileges. By default, when an operating system image is added to a RIS server, the image is available to all users serviced by that RIS server.
To configure settings for new clients for RIS, complete the following steps:
1.Open Active Directory Users and Computers.
2.In the console tree, go to Active Directory Users and Computers > Applicable domain > Applicable organizational unit (suchasComputers/ApplicableRISserver)andright-click the applicable RIS server.
3.Click Properties. In the Properties dialog box, go to the Remote Install tab and click
Advanced Settings.
4.In the Advanced Settings dialog box, go to the New Clients tab.
5.Select the client computer naming format you want to use, or click Customize to create a client computer naming format.
6.To specify where to create the client computer account, click one of the following options:
• Default directory service location
• Same location as the user setting up the client computer
• The following directory service location
7.Ifyouchoosethelastoption,clickBrowse andspecifywheretocreatethecomputeraccounts.
Authorize a RIS server in Active Directory
A RIS server must be authorized in Active Directory to be able to respond to clients requesting service.IfRISisinstalledonaserverthatisnotanauthorizedDHCPserver,oraddedtoaDHCP server that is not authorized in Active Directory, you must complete the following steps:
1.LogintothedomaininwhichtheRISserverresides.(Theaccountyouusemustbeamember of the Enterprise Admins group.)
2.From the Start menu, point to Programs and Administrative Tools and click DHCP from the list. This starts the DHCP Management snap-in.
3.Right-click the DHCP root node in the scope pane, and then click Manage Authorized Servers.
4.Click Authorize, enter the IP address or name of the RIS server, and then click OK. When prompted to ensure that this is the correct RIS server to authorize, click Yes.
The server will not respond to client requests until the changes to Active Directory have taken effect.Fortheserightstoapplyimmediately,onthedomaincontrolleronwhichyourrightshave been set, complete the following steps:
1.On the Start menu, click Run.
2.Enter the cmd command.
3.At the command prompt, enter:
secedit /refreshpolicy /MACHINE_POLICY
Use the Client Installation Wizard
ThefollowinginstallationoptionsareincludedintheClientInstallationWizard(CIW).Automatic setup is available by default. RIS uses Group Policy settings to allow access to the automatic setup option only, and to restrict all users and administrators from the rest of the installation options described in the following list:
•AutomaticSetup—Thisoptionallowsyoutoselectwhichoperatingsystemtoinstall,butit doesnotpromptyouforspecificconfigurationsettings.Ifonlyoneoperatingsystemoption is offered, you are not prompted, and an unattended installation of the operating system image starts automatically.
•CustomSetup—Thisoptionallowsyoutooverridetheautomaticcomputernamingprocess and the default location within the Active Directory where client computer accounts will
Setting up PXE/RIS 29
Loading...