


 Loading...
HP Designjet Entry-Level Printers Service
Manual
Version: September 2010
For HP Internal Use Only
©Copyright Hewlett-Packard Company 2010
This document contains proprietary information that is protected by copyright. All rights are reserved. No part of this document may be photocopied, reproduced, or translated to another language without the prior written consent of Hewlett-Packard Company.
Edition, September 2010.

Notices
Warranty |
WARNING |
WARNING |
The information contained in this |
The procedures described in this manual are |
document is subject to change without |
to be performed by HP-qualified service |
notice. |
personnel only. |
Hewlett-Packard makes no warranty of any kind with regard to this material, including, but not limited to, the implied warranties of merchantability and fitness for a particular purpose.
Hewlett-Packard shall not be liable for errors contained herein or for incidental or consequential damages in connection with the furnishing, performance, or use of this material.
Electrical Shock Hazard
Serious shock hazard leading to death or injury may result if you do not take the following precautions:
●Ensure that the ac power outlet (mains) has a protective earth (ground) terminal.
●Disconnect the Printer from the power source prior to performing any maintenance.
●Prevent water or any other liquids from running onto electrical components or circuits, or through openings in the enclosure.
Electrostatic Discharge
Refer to the beginning of Chapter 4 
Utilities on page 53 of this manual, for precautions you should take to prevent damage to the Printer circuits from electrostatic discharge.
Safety Symbols
General definitions of safety symbols are given immediately after the table of contents.
The Warning symbol calls attention to a procedure, practice, or the like, which, if not correctly performed or adhered to, could result in personal injury. Do not proceed beyond a Warning symbol until the indicated conditions are fully understood and met.
CAUTION
The Caution symbol calls attention to an operating procedure, practice, or the like, which, if not correctly performed or adhered to, could result in damage to or destruction of part or all of the product. Do not proceed beyond a Caution symbol until the indicated conditions are fully understood and met.
Content Management Department,
Barcelona Division,
Hewlett-Packard Espanola, S.A.
Avda. Graells, 501
08190 Sant Cugat del Valles
Spain
ENWW |
iii |
Using this Manual
Purpose
This Service Manual contains information necessary to test, calibrate and service:
●HP Designjet 30 Printer (Model C7790D)
●HP Designjet 30n Printer (Model C7790E)
●HP Designjet 70 Printer (Model Q6655A)
●HP Designjet 90 Printer (Model Q6656A)
●HP Designjet 90r Printer (Model Q6656B)
●HP Designjet 100+ Printer (Model C7796C)
●HP Designjet 110+ Printer (Model C7796D)
●HP Designjet 110+nr Printer (Model C7796E)
●HP Designjet 130 Printer (Model C7791C)
●HP Designjet 130nr Printer (Model C7791D)
●HP Designjet 110+r Printer (Model C7796H)
●HP Designjet 130r Printer (Model C7791H)
●HP Designjet 111 Printer with Roll (Model CQ532A)
●HP Designjet 111 Printer with tray (Model CQ533A)
For information about using these printers, refer to the corresponding User and Quick Reference Guides.
Readership
The procedures described in this Service Manual are to be performed by HP Certified service personnel only.
Part Numbers
Part Numbers for Printer options, accessories and service parts are located in Chapter 7  Removal and Installation on page 95.
Conventions
A small arrow  is used to indicate other parts of the Service Manual where you can find information related to the topic you are consulting.
ENWW |
v |

Table of contents
1 |
Test Prints |
|
|
Usage Report Page .............................................................................................................................. |
2 |
|
Information Page .................................................................................................................................. |
3 |
|
NVM Contents Page ............................................................................................................................. |
5 |
2 System Error Codes |
|
|
|
Introduction ........................................................................................................................................... |
8 |
|
Errors and Warnings ............................................................................................................................ |
9 |
|
System Error Codes ........................................................................................................................... |
10 |
|
Warnings ............................................................................................................................................ |
17 |
|
Startup track mode ............................................................................................................................. |
25 |
|
Emergency Firmware Upgrade .......................................................................................................... |
33 |
|
System Error Codes - Explanation ..................................................................................................... |
34 |
3 System Maintenance Utility |
|
|
|
Introduction ......................................................................................................................................... |
38 |
|
Launching the System Maintenance Utility ........................................................................................ |
38 |
|
System Maintenance Utility (Designjet 30, 30n, 70, 90, 90r, 110plus, 111, 130, 130nr) .................... |
40 |
|
Main Menu - Printer Front Panel Replication ..................................................................... |
40 |
|
Color Calibration ................................................................................................................ |
40 |
|
Align Printheads ................................................................................................................. |
45 |
|
Clean Printheads ............................................................................................................... |
46 |
|
Check Image Quality ......................................................................................................... |
47 |
|
Calibrate Paper Feed ......................................................................................................... |
48 |
|
Get Printer Information ...................................................................................................... |
50 |
|
Update Firmware ............................................................................................................... |
51 |
|
Reset Jetdirect Network Card ............................................................................................ |
52 |
4 |
Utilities |
|
|
Utilities ................................................................................................................................................ |
53 |
|
How to Access Restricted Access Utilities ......................................................................... |
54 |
|
Enable/Disable Buzzer ...................................................................................................... |
54 |
|
Transport Position .............................................................................................................. |
54 |
|
Printhead Recovery ........................................................................................................... |
55 |
|
Network Card Reset .......................................................................................................... |
56 |
|
Set to Factory Defaults ...................................................................................................... |
56 |
|
Hard EEPROM reset ......................................................................................................... |
57 |
ENWW |
vii |
Set Flag to Prime Tubes .................................................................................................... |
57 |
5 Calibrations |
|
PRS Adjustment ................................................................................................................................. |
60 |
When Required .................................................................................................................. |
60 |
Manual PRS Adjustment .................................................................................................................... |
60 |
Factory Accuracy Calibration ............................................................................................................. |
70 |
Parts replacement and associated calibrations .................................................................................. |
72 |
6 Parts and Diagrams |
|
Cover Assemblies .............................................................................................................................. |
75 |
Cover Assemblies .............................................................................................................................. |
76 |
Printer Labels ..................................................................................................................................... |
78 |
Right Hand Assemblies ...................................................................................................................... |
79 |
Left Hand Assemblies ........................................................................................................................ |
81 |
Scan-Axis Assemblies ........................................................................................................................ |
82 |
Top Paper Path Assemblies (1 of 2) .................................................................................................. |
84 |
Top Paper Path Assemblies (2 of 2) .................................................................................................. |
85 |
Rear Paper Path Assemblies ............................................................................................................. |
87 |
Paper Feed Assemblies ..................................................................................................................... |
88 |
Cable Harnesses ................................................................................................................................ |
90 |
Ink Supplies and Accessories (1 of 2) ................................................................................................ |
91 |
Ink Supplies & Accessories (2 of 2) .................................................................................................... |
92 |
Rollfeed Components ......................................................................................................................... |
93 |
Printer Stand and Basket ................................................................................................................... |
94 |
7 Removal and Installation |
|
Introduction ......................................................................................................................................... |
96 |
Top Cover ........................................................................................................................................... |
98 |
Front Cover (Applicability: 30, 30n, 50ps) .......................................................................................... |
98 |
Center Cover ...................................................................................................................................... |
99 |
Right End Cover ............................................................................................................................... |
101 |
Left End Cover ................................................................................................................................. |
103 |
Ink Supply Station Cover (Applicability: 70, 100, 100plus, 110plus, 111) ........................................ |
105 |
Ink Supply Station ............................................................................................................................ |
106 |
Electronics Module ........................................................................................................................... |
109 |
Power Supply Unit ............................................................................................................................ |
112 |
Service Station ................................................................................................................................. |
114 |
Front Panel ....................................................................................................................................... |
117 |
Encoder Strip .................................................................................................................................... |
118 |
Carriage Motor ................................................................................................................................. |
119 |
Cleanout Assembly .......................................................................................................................... |
120 |
Ink Supply Tubes .............................................................................................................................. |
121 |
Carriage Assembly (Applicability: 70, 100+, 110+, 111) .................................................................. |
123 |
Carriage Assembly (Applicability: 30, 30nr, 90, 90r, 130, 130nr) ..................................................... |
125 |
Carriage Belt .................................................................................................................................... |
128 |
viii |
ENWW |
Starwheel Assembly (Applicability: 30, 30n) .................................................................................... |
129 |
Starwheel Assembly ......................................................................................................................... |
130 |
Print Platen Assembly ...................................................................................................................... |
131 |
Output Separator (Applicability: 30, 30n) ......................................................................................... |
133 |
Ramp Motor Assembly ..................................................................................................................... |
134 |
Output Mechanism Assembly (Applicability: 30, 30n) ...................................................................... |
135 |
Spittoon (If Installed in the Printer) ................................................................................................... |
137 |
Pivot Assembly ................................................................................................................................. |
138 |
Feed Roller Assembly (Applicability: 30, 30n) .................................................................................. |
139 |
Feed Roller Assembly ...................................................................................................................... |
141 |
Pick Assembly (Applicability: 30, 30n) .............................................................................................. |
145 |
Pick Assembly .................................................................................................................................. |
146 |
Pinch Assembly (Applicability: 30, 30n) ........................................................................................... |
152 |
Lower Paper Guide (Applicability: 30, 30n) ...................................................................................... |
153 |
Inner Paper Guide (Applicability: 30, 30n) ........................................................................................ |
154 |
Inner Paper Guide ............................................................................................................................ |
155 |
OOPS Sensor ................................................................................................................................... |
156 |
Paper-Axis Motor Drive Assembly (Applicable only to 30, 30n) ....................................................... |
158 |
Paper-Axis Motor Assembly (Applicability: 90, 90r, 130, 130nr) ...................................................... |
159 |
Bypass Platen (Applicability: 90, 90r, 130, 130nr) ............................................................................ |
160 |
Bypass Platen Actuator (Applicability: 90, 90r, 130, 130nr) ............................................................. |
163 |
Output Platen (HP Designjet 111 with Roll) ..................................................................................... |
165 |
8 Maintenance |
|
Maintenance ..................................................................................................................................... |
168 |
Cleaning Information ........................................................................................................ |
168 |
Lubrication Information .................................................................................................... |
170 |
About this Edition ............................................................................................................. |
170 |
What’s in this Service Manual .......................................................................................... |
170 |
ENWW |
ix |

1 Test Prints
●Usage Report Page
●Information Page
●NVM Contents Page
ENWW |
1 |
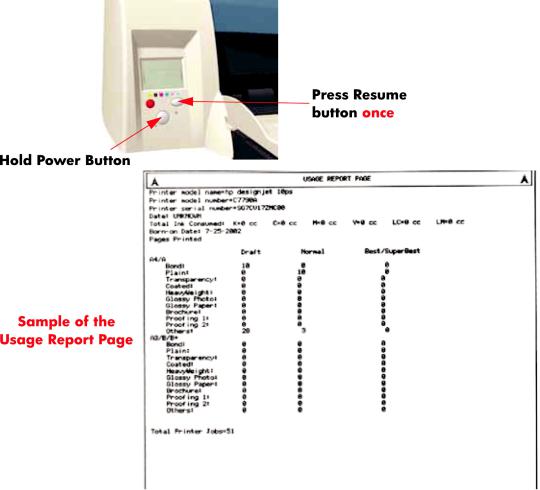
Usage Report Page
The Usage Report Page contains the following information:
●Printer Model Name.
●Printer Model Number.
●Printer Serial Number.
●Date of last print job received.
●Total ink consumed.
●Date of first print job received.
●Number of pages printer (media size/media type/print quality setting).
To print the Usage Report Page, hold the power button down and press the resume button once.
2 Chapter 1 Test Prints |
ENWW |

Information Page
The Information Page contains the following information:
●Printer Identification.
●Printer Status.
●Printer Usage.
●Ink Consumable Identification.
●Ink Consumable Status.
●Ink Consumable Usage.
●Network Card Information.
To print the Information Page, hold the power button down and press the resume button four times.
ENWW |
Information Page 3 |

4 Chapter 1 Test Prints |
ENWW |
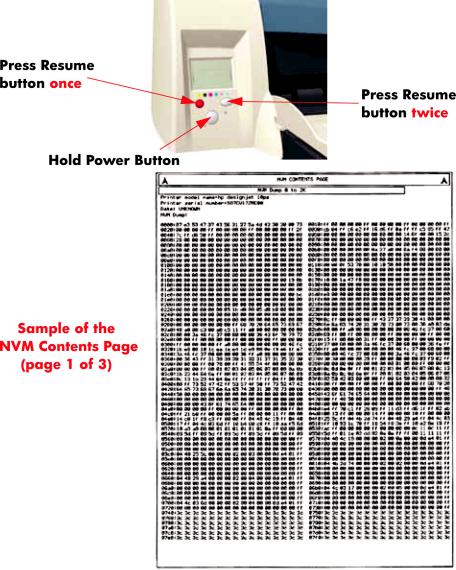
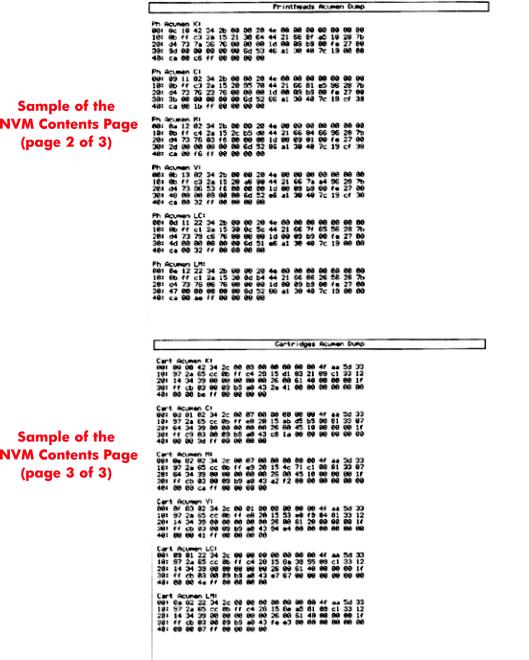
NVM Contents Page
The NVM Contents Page contains the following information:
●EEROM values dump containing all the values stored in the EEROM (Calibration, etc.)
●Printheads Acumen dump
●Cartridges Acumen dump.
To print the NVM Contents Page, hold the power button down and press the cancel button once and the resume button twice.
ENWW |
NVM Contents Page 5 |
6 Chapter 1 Test Prints |
ENWW |

2 System Error Codes
●Introduction
●Errors and Warnings
●System Error Codes
●Warnings
●Startup track mode
●Emergency Firmware Upgrade
●System Error Codes - Explanation
ENWW |
7 |

Introduction
The following pages contain a list of system error codes and their respective descriptions and recommended corrective actions. Only try one recommended action at a time and check if the error code has disappeared. Since the front panel can only display graphics, the error code needs to be determined by counting the bars on the front panel (as shown below).
 NOTE: Refer to System Error Codes - Explanation on page 34 for an explanation on the construction of the Error Codes and Warnings.
8 Chapter 2 System Error Codes |
ENWW |
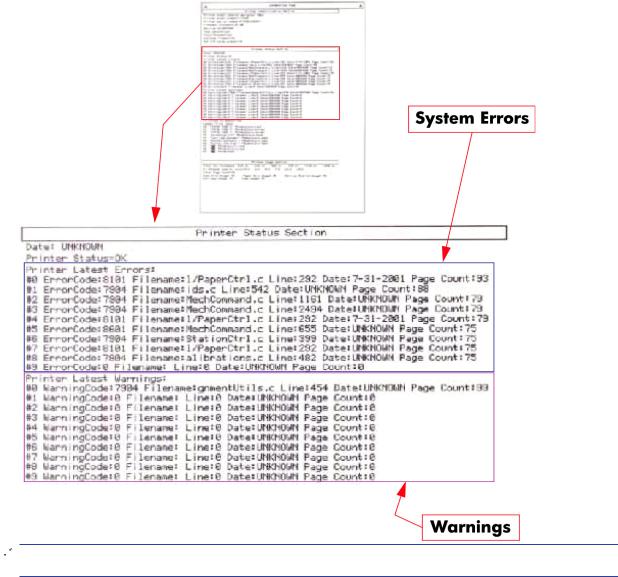
Errors and Warnings
Error Codes will normally be displayed directly on the front panel (but can also be seen on the Information Page) and will require some kind of intervention to resolve the problem. Warnings will not be displayed on the front panel, but will instead only appear on the Information Page, therefore allowing the user to continue operating the printer without the need of an intervention.
 NOTE: You can also obtain report of the System Error and Warnings through the DesignJet System Maintenance Tool.
ENWW |
Errors and Warnings 9 |

System Error Codes
 NOTE: Applicable for 111 only: The printer has a MROM module and it is not possible to perform a firmware upgrade, and in fact not required as the printer already has the latest version.
01:10
Cause |
Solution |
|
|
|
|
Electronics Module failure. |
Replace the Electronics Module |
Electronics Module |
|
on page 109. |
|
|
|
|
01:12 |
|
|
|
|
|
Cause |
Solution |
|
Electronics Module failed during the firmware upgrade OR the Electronics Module failed during initialization.
Try the following:
●If the Electronics Module failed during the firmware upgrade, first perform an emergency firmware upgrade ( Emergency Firmware Upgrade on page 33).
●If an emergency firmware upgrade is NOT possible or it
didn’t work, replace the Electronics Module  Electronics Module on page 109.
02:10
Cause |
Solution |
|
|
|
|
|
|
Carriage failure. |
Replace the Carriage Assembly |
Carriage Assembly |
|
|
(Applicability: 70, 100+, 110+, 111) on page 123. |
|
|
|
|
|
|
04:13 |
|
|
|
|
|
|
|
Cause |
Solution |
|
|
|
|
|
|
Generic Firmware Error (Network Card). |
Unplug the power cable from the printer and wait a few |
|
|
|
seconds. Plug in the power cable again and check if the Error |
||
|
Code has disappeared. If the error code continues, refer to the |
||
|
Jetdirect Card Service Manual and Service Notes. |
|
|
|
|
|
|
08:11 |
|
|
|
|
|
|
|
Cause |
Solution |
|
|
|
|
|
|
Front Panel cannot be detected. |
Try the following: |
|
|
|
● Check the connections and cables of the Font Panel, |
||
|
check they have not been damaged and are correctly |
||
|
connected, disconnect and reconnect the front panel. |
||
|
● Replace the Front Panel if the problem persists |
Front |
|
|
Panel on page 117. |
|
|
|
|
|
|
10 Chapter 2 System Error Codes |
ENWW |
11:10
Cause |
Solution |
|
|
|
|
|
|
Trailing Cable Failure. |
Try the following: |
|
|
|
● |
Replace the Carriage Assembly |
Carriage Assembly |
(Applicability: 70, 100+, 110+, 111) on page 123.
● If the Error Code continues, replace the Electronics Module  Electronics Module on page 109.
NOTE: Only replace one component at a time and check if the error has gone before replacing another component. Using this procedure you will be able to determine exactly which component failed.
11:11
Cause |
Solution |
Trailing Cable is badly connected.
Try the following:
●Reconnect the Trailing Cable correctly to the Electronics Module.
●If the Error Code continues, replace the Carriage
Assembly  Carriage Assembly (Applicability: 70, 100 +, 110+, 111) on page 123.
21:10
Cause |
Solution |
|
|
|
|
|
|
Service Station failure. |
Replace the Service Station Assembly |
Service Station |
|
|
on page 114. |
|
|
|
|
|
|
22:10 |
|
|
|
|
|
|
|
Cause |
Solution |
|
|
|
|
|
|
Ink Supply Station failure. |
Replace the Ink Supply Station |
Ink Supply Station |
|
|
on page 106. |
|
|
|
|
|
|
ENWW |
System Error Codes 11 |
35:01
Cause |
Solution |
No Cleanout Assembly detected while loading media.
Try the following:
●Remove the Cleanout Assembly and install it again correctly.
●Replace the Cleanout Interconnect PCA.
●If the Error Code continues, replace the Cleanout Assembly.
NOTE: Only replace one component at a time and check if the error has gone before replacing another component. Using this procedure you will be able to determine exactly which component failed.
37:01
Cause |
Solution |
|
|
|
|
Automatic roll motor shutdown. |
Try the following: |
|
|
● |
If this error code was caused by a paper jam, unplug the |
|
|
power cable from the printer and clear the blockage. Plug |
|
|
in the power cable again and check if the Error Code has |
|
|
disappeared. |
|
● |
If there is no paper jam or if recovering the paper jam does |
|
|
not resolve the problem, then replace the Automatic Roll |
System (the error could be caused by anything that stalls the motor).
37:10
Cause |
Solution |
Automatic roll home position error.
Replace the Automatic Roll System (the error could be caused by anything that causes the home position not to be detected or not to be the correct one - electrical sensors, internal mechanical problems, etc.).
42:10
Cause |
Solution |
|
|
|
|
Carriage Motor failure (short-circuit). |
Replace the Carriage Motor Assembly |
Carriage Motor |
|
on page 119. |
|
|
|
|
12 Chapter 2 System Error Codes |
ENWW |
56:10
Cause |
Solution |
Error during the calibration of the motor encoder system or a problem finding the zero position on the Encoder Disc.
Try the following:
●Replace the Paper-Axis Motor Drive Assembly  PaperAxis Motor Drive Assembly (Applicable only to 30, 30n) on page 158.
●Replace the Encoder Disc.
NOTE: Make sure you recalibrate the Paper-Axis after replacing the Paper-Axis Motor Drive Assembly or the Encoder Disc.
Only replace one component at a time and check if the error has gone before replacing another component. Using this procedure you will be able to determine exactly which component failed.
56:13
Cause |
Solution |
Error during the calibration of the Line-feed Motor/Encoder system.
Unplug the power cable from the printer and wait a few seconds. Plug in the power cable again.
61:05
Cause |
Solution |
Firmware Upgrade or Color Calibration was rejected because the file was sent in the wrong format.
Upgrade the RIP software or the Designjet System Maintenance Tool.
62:04, 63:04, 64:04 and 65:04
Cause |
Solution |
|
|
I/O module error (62 = parallel; 63 = Network; 64 = USB). |
Try the following: |
|
● Unplug the power cable from the printer and wait a few |
|
seconds. Plug in the power cable again and check if the |
|
Error Code has disappeared. |
|
● If the Error Code reappears, upgrade the firmware. |
|
|
71:03
Cause |
Solution |
Generic Firmware Error (Out of memory).
Try the following:
●Unplug the power cable from the printer and wait a few seconds. Plug in the power cable again and check if the Error Code has disappeared.
●If the Error Code reappears, check for a new Firmware release.
ENWW |
System Error Codes 13 |
71:14
Cause |
Solution |
Memory Management Error (Out of memory during firmware upgrade).
Try the following:
●Unplug the power cable from the printer and wait a few seconds. Plug in the power cable again and check if the Error Code has disappeared.
●If the Error Code reappears, perform an emergency
firmware upgrade ( Emergency Firmware Upgrade on page 33).
72:04
Cause |
Solution |
|
|
|
|
||
Generic Firmware Error (expected). |
Try the following: |
||
|
● |
Unplug the power cable from the printer and wait a few |
|
|
|
seconds. Plug in the power cable again and check if the |
|
|
|
Error Code has disappeared. |
|
|
● |
If the Error Code reappears, check for a new Firmware |
|
|
|
release. |
|
|
● |
If possible, request the user to provide the following |
|
|
|
information which can be found on the information |
|
|
|
page: |
|
|
|
◦ |
Firmware Release. |
|
|
◦ |
Filename. |
|
|
◦ |
Line. |
|
|
|
|
74:12
Cause |
Solution |
Firmware Upgrade Error (Memory size check failed during firmware upgrade).
Try the following:
●Perform the automatic troubleshooting procedure (requires a special firmware upgrade file that must be provided by the manufacturing division).
74:14
Cause |
Solution |
|
|
|
|
The printer is unavailable to upgrade the firmware.. |
Try the following: |
|
|
● Turn off and on the printer. |
|
|
● Print the Service Page |
|
|
● Check that the firmware is the latest available.: |
|
|
◦ |
Applicable for 110+,110+r,130,130r: If the |
|
|
firmware version is D.05.04, this would indicate that |
|
|
the printer has a MROM module and it is not possible |
to perform a firmware upgrade, and in fact not required as the printer already has the latest version.
14 Chapter 2 System Error Codes |
ENWW |

74:14
Cause |
Solution |
◦ Applicable for 111 only: The printer has a MROM module and it is not possible to perform a firmware upgrade, and in fact not required as the printer already has the latest version.
79:04
Cause |
Solution |
|
|
|
|
Generic Firmware Error (unexpected). |
Try the following: |
|
|
● Unplug the power cable from the printer and wait a few |
|
|
seconds. Plug in the power cable again and check if the |
|
|
Error Code has disappeared. |
|
|
● If the Error Code reappears, check for a new Firmware |
|
|
release. |
|
|
● If possible, request the user to provide the following |
|
|
information which can be found on the information |
|
|
page: |
|
|
◦ |
Firmware Release. |
|
◦ |
Filename. |
|
◦ |
Line. |
|
|
|
81:01 
Cause |
Solution |
Paper-Axis shutdown - usually a paper-jam caused by a blockage of the Paper-axis System.
Try the following:
●If this error code was caused by a paper-jam, unplug the power cable from the printer and clear the blockage. Plug in the power cable again and check if the Error Code has disappeared
●If this error code appeared but was NOT caused by a paper jam, replace the Paper-Axis Motor Drive Assembly
 Paper-Axis Motor Drive Assembly (Applicable only to 30, 30n) on page 158.
81:12
Cause |
Solution |
|
|
Media Advance error. |
This error usually appears during the paper-advance |
|
calibration - Retry the paper-advance calibration. |
|
|
ENWW |
System Error Codes 15 |

83:10
Cause |
Solution |
|
|
|
|
|
|
|
|
Sheet feeding failure. |
Try the following: |
|
|
|
|
● Replace the Out-Of-paper Sensor. |
|
|
|
|
● |
Replace the Electronics Module |
Electronics Module |
|
|
|
on page 109. |
|
|
|
|
|
|
|
85:10 |
|
|
|
|
|
|
|
|
|
Cause |
Solution |
|
|
|
|
|
|
|
|
Paper-Axis Encoder error. |
Try the following: |
|
|
|
|
● Make sure that the Encoder Sensor cable is connected |
|||
|
|
correctly. |
|
|
|
● |
Replace the Paper-Axis Motor Drive Assembly |
Paper- |
|
|
|
Axis Motor Drive Assembly (Applicable only to 30, 30n) |
||
|
|
on page 158. |
|
|
|
● |
Replace the Electronics Module |
Electronics Module |
|
|
|
on page 109. |
|
|
|
|
|
|
|
86:01 
Cause |
Solution |
Scan-axis shutdown - usually a paper-jam caused by a blockage of the Scan-axis System.
Try the following:
●Check that there are no obstacles in the Scan-Axis which stops the Carriage from moving freely.
●Too much friction in the Slider Rod, try lubricating the Slider Rod.
●The Carriage is bumping into the Service Station. If the Carriage is stuck at the right hand side of the Printer and cannot be moved out to the center of the Print Platen it is because the Service Station cannot uncap the printheads. In this case replace the Service Station Assembly  Service Station on page 114.
●Check that the belt is correctly installed and not damaged.
●Check that the Turnaround Pulley is correctly installed.
●Replace the Carriage Motor Assembly  Carriage Motor on page 119.
16 Chapter 2 System Error Codes |
ENWW |
86:11
Cause |
Solution |
Scan-axis shutdown during initialization. Typically, this error occurs when the printer detects an incorrect length.
Try the following:
●Unplug the power cable from the printer and wait a few seconds. Plug in the power cable again and check if the Error Code has disappeared.
●Check that the Paper-Axis Drive Motor Assembly is correctly installed and that the bushing is correctly locked into position.
●Check that the Carriage moves freely and DOES NOT bump into the Service Station.
●If the Printheads are not installed, maybe the carriage cover is not closed completely.
●If the Error Code continues, replace the Carriage
Assembly  Carriage Assembly (Applicability: 70, 100+, 110+, 111) on page 123.
Warnings
01:11
Cause |
Solution |
|
|
|
|
The Electronics Module is incorrectly positioned. |
Reseat the Electronics Module by Removing it from the Printer |
|
|
Electronics Module on page 109 and installing it again in |
|
|
the correct position. |
|
|
|
|
01:12 |
|
|
|
|
|
Cause |
Solution |
|
|
|
|
Electronics Module Error. |
The Electronics Module EEPROM is flagged as empty and |
|
|
must be upgraded with the contents of the Carriage EEPROM, |
|
|
but the Carriage is also flagged as empty. The backup is not |
|
|
performed. This is the result of an error during the |
|
|
manufacturing or the repair process. Therefore the Electronics |
|
|
Module must be reconfigured. |
|
|
|
|
02:10 |
|
|
|
|
|
Cause |
Solution |
|
|
|
|
Carriage failure. |
Replace the Carriage Assembly |
Carriage Assembly |
|
(Applicability: 70, 100+, 110+, 111) on page 123. |
|
|
|
|
ENWW |
Warnings 17 |

270:00
Cause |
Solution |
Black Color Calibration Failure - Black Color Calibration cancelled.
Try the following:
●Clean the electrical contacts on the black printhead.
●If the error code continues, replace the black printhead.
271:00
Cause |
Solution |
Cyan Color Calibration Failure - Cyan Color Calibration cancelled.
Try the following:
●Clean the electrical contacts on the cyan printhead.
●If the error code continues, replace the cyan printhead.
272:00
Cause |
Solution |
|
|
Magenta Color Calibration Failure - Magenta Color Calibration |
Try the following: |
cancelled. |
● Clean the electrical contacts on the magenta printhead. |
|
|
|
● If the error code continues, replace the magenta |
|
printhead. |
|
|
273:00
Cause |
Solution |
Yellow Color Calibration Failure - Yellow Color Calibration cancelled.
Try the following:
●Clean the electrical contacts on the yellow printhead.
●If the error code continues, replace the yellow printhead.
274:00 (Not applicable to HP DesignJet 70, 100, 100+, 110+)
Cause |
Solution |
Light Cyan Color Calibration Failure - Light Cayan Color Calibration cancelled.
Try the following:
●Clean the electrical contacts on the light cyan printhead.
●If the error code continues, replace the light cyan printhead.
18 Chapter 2 System Error Codes |
ENWW |
275:00 (Not applicable to HP DesignJet 70, 100, 100+, 110+)
Cause |
Solution |
Light Magenta Color Calibration Failure - Light Magenta Color Calibration cancelled.
Try the following:
●Clean the electrical contacts on the light magenta printhead.
●If the error code continues, replace the light magenta printhead.
35:01
Cause |
Solution |
|
|
|
|
|
|
No Cleanout Assembly (or Duplexer, if installed) detected |
Try the following: |
|
|
while loading media. |
● Remove the Cleanout Assembly ( Cleanout |
||
|
|||
|
Assembly on page 120) (or Duplexer, if installed) and |
||
|
install it again correctly. |
|
|
|
● Replace the Duplexer Interconnect PCA. |
||
|
● If the Error Code continues, replace the Cleanout |
||
|
Assembly |
Cleanout Assembly on page 120. |
|
|
|
|
|
58:10 |
|
|
|
|
|
|
|
Cause |
Solution |
|
|
|
|
|
|
Problem detected in the color sensor system. |
Replace the Carriage Assembly |
Carriage Assembly |
|
|
(Applicability: 70, 100+, 110+, 111) on page 123. |
||
|
|
|
|
61:05 |
|
|
|
|
|
|
|
Cause |
Solution |
|
|
Language interpreting error. This is usually and error produced while parsing a file. There is probably an incompatibility between the driver and the firmware.
Upgrade the RIP software or the Designjet System Maintenance Tool.
65:01
Cause |
Solution |
|
|
Communication Failure. |
Try the following: |
|
● Unplug the power cable from the printer and check the |
|
cable connections (Parallel, USB and Network cables). |
|
Plug in the power cable again and check if the Error Code |
|
has disappeared. |
|
|
ENWW |
Warnings 19 |

66:02:1 (Only applicable to HP DesignJet 30, 30n, 90, 90r, 130, 130nr)
Cause |
Solution |
Horizontal clipping. May happen when the roll ends in the middle of printing an image. Could also happen when multipick occurs and two sheets are loaded together and they do not completely overlap.
Make sure the image size is within the selected WIDTH of the sheet.
66:02:2 (Only applicable to HP DesignJet 30, 30n, 90, 90r, 130, 130nr)
Cause |
Solution |
Vertical clipping. May happen when the roll ends in the middle of printing an image. Could also happen when multi-pick occurs and two sheets are loaded together and they do not completely overlap.
Make sure the image size is within the selected LENGTH of the sheet.
71:14
Cause |
Solution |
Out-of-memory while trying to process the firmware upgrade file. Probably this is a firmware bug, because the firmware should free up enough memory to perform the firmware upgrade process correctly.
Perform an emergency firmware upgrade ( Emergency Firmware Upgrade on page 33) .
74:12
Cause |
Solution |
|
|
|
|
Firmware bug in the firmware upgrade process |
Try the following: |
|
|
● Download the special file in order to update the bootlog. |
|
|
● If possible, request the user to provide the following |
|
|
information which can be found on the information |
|
|
page: |
|
|
◦ |
Firmware Release. |
|
◦ |
Printer Serial Number. |
|
|
|
74:14 |
|
|
|
|
|
Cause |
Solution |
|
|
|
|
The printer is unavailable to upgrade the firmware.. |
Try the following: |
|
|
● Turn off and on the printer. |
|
|
● Print the Service Page |
|
|
● Check that the firmware is the latest available.: |
|
|
◦ |
Applicable for 110+,110+r,130,130r: If the |
|
|
firmware version is D.05.04, this would indicate that |
|
|
the printer has a MROM module and it is not possible |
|
|
|
20 Chapter 2 System Error Codes |
ENWW |

74:14
Cause |
Solution |
to perform a firmware upgrade, and in fact not required as the printer already has the latest version.
◦ Applicable for 111 only: The printer has a MROM module and it is not possible to perform a firmware upgrade, and in fact not required as the printer already has the latest version.
81:01 
Cause |
Solution |
Paper-Axis shutdown - usually a paper-jam caused by a blockage of the Paper-axis System.
Try the following:
●If this error code was caused by a paper-jam, unplug the power cable from the printer and clear the blockage. Plug in the power cable again and check if the Error Code has disappeared.
●If this error code appeared but was NOT caused by a paper jam, replace the Paper-Axis Motor Drive Assembly
 Paper-Axis Motor Drive Assembly (Applicable only to 30, 30n) on page 158.
83:01:1 (Only applicable to HP DesignJet 30, 30n, 70, 100+, 110+, 111, 90, 90r,, 130, 130nr)
Cause |
Solution |
The paper is rejected from the Bypass due to skew.
When manually loading paper from the front of the paper, make sure that it is loaded straight.
83:01:3 (Only applicable to HP DesignJet 70/100plus/110plus, 111 with Roll)
Cause |
Solution |
The paper is rejected from the roll due to skew.
When loading paper from the roll, make sure that it is loaded straight.
94:02:1 (Only applicable to HP DesignJet 30, 30n, 90, 90r, 130, 130nr, 111)
Cause |
Solution |
User selected Coated Paper and Best mode, but the Color Calibration profile was obsolete or missing for Coated Paper and the selected print quality setting.
Using the System Maintenance Tool, perform Color Calibration for Coated Paper and the selected print quality setting.
94:02:3 (Only applicable to HP DesignJet 30, 30n, 90, 90r, 130, 130nr, 111)
Cause |
Solution |
User selected Photo Paper and Best mode, but the Color Calibration profile was obsolete or missing for Photo Paper and the selected print quality setting.
Using the System Maintenance Tool, perform Color Calibration for Photo Paper and the selected print quality setting.
ENWW |
Warnings 21 |

94:02:4 (Only applicable to HP DesignJet 30, 30n, 90, 90r, 130, 130nr)
Cause |
Solution |
User selected Heavy-Weight Coated Paper and Best mode, but the Color Calibration profile was obsolete or missing for Heavy-Weight Coated Paper and the selected print quality setting.
Using the System Maintenance Tool, perform Color Calibration for HeavyWeight Coated Paper and the selected print quality setting.
94:02:5 (Only applicable to HP DesignJet 30, 30n, 90, 90r, 130, 130nr)
Cause |
Solution |
User selected Proofing Semi-Gloss Paper and Best mode, but the Color Calibration profile was obsolete or missing for Proofing Semi-Gloss Paper and the selected print quality setting
Using the System Maintenance Tool, perform Color Calibration for Proofing Semi-Gloss Paper and the selected print quality setting.
94:02:6 (Only applicable to HP DesignJet 30, 30n, 90, 90r, 130, 130nr)
Cause |
Solution |
User selected Photo Matte Paper and Best mode, but the Color Calibration profile was obsolete or missing for Photo Matte Paper and the selected print quality setting.
Using the System Maintenance Tool, perform Color Calibration for Photo Matte Paper and the selected print quality setting.
94:02:7 (Only applicable to HP DesignJet 30, 30n, 90, 90r, 130, 130nr)
Cause |
Solution |
User selected Photo Satin Paper and Best mode, but the Color Calibration profile was obsolete or missing for Photo Satin Paper and the selected print quality setting.
Using the System Maintenance Tool, perform Color Calibration for Photo Satin Paper and the selected print quality setting.
94:02:8 (Only applicable to HP DesignJet 30, 30n, 90, 90r, 130, 130nr)
Cause |
Solution |
User selected Coated Paper and Max dpi, but the Color Calibration profile was obsolete or missing for Coated Paper and the selected print quality setting.
Using the System Maintenance Tool, perform Color Calibration for Coated Paper and the selected print quality setting.
941:02:1 (Only applicable to HP DesignJet 30, 30n, 90, 90r, 130, 130nr)
Cause |
Solution |
User selected Photo Paper and Max dpi, but the Color Calibration profile was obsolete or missing for Photo Paper and the selected print quality setting.
Using the System Maintenance Tool, perform Color Calibration for Photo Paper and the selected print quality setting.
22 Chapter 2 System Error Codes |
ENWW |

941:02:2 (Only applicable to HP DesignJet 30, 30n, 90, 90r, 130, 130nr)
Cause |
Solution |
User selected Heavy-Weight Coated Paper and Max dpi, but the Color Calibration profile was obsolete or missing for HeavyWeight Coated Paper and the selected print quality setting.
Using the System Maintenance Tool, perform Color Calibration for HeavyWeight Coated Paper and the selected print quality setting.
941:02:3 (Only applicable to HP DesignJet 30, 30n, 90, 90r, 130, 130nr)
Cause |
Solution |
User selected Proofing Semi-Gloss Paper and Max dpi mode, but the Color Calibration profile was obsolete or missing for Proofing Semi-Gloss Paper and the selected print quality setting.
Using the System Maintenance Tool, perform Color Calibration for Proofing Semi-Gloss Paper and the selected print quality setting.
941:02:4 (Only applicable to HP DesignJet 30, 30n, 90, 90r, 130, 130nr)
Cause |
Solution |
User selected Photo Matte Paper and Max dpi mode, but the Color Calibration profile was obsolete or missing for Photo Matte Paper and the selected print quality setting.
Using the System Maintenance Tool, perform Color Calibration for Photo Matte Paper and the selected print quality setting.
941:02:5 (Only applicable to HP DesignJet 30, 30n, 90, 90r, 130, 130nr)
Cause |
Solution |
User selected Photo Satin Paper and Max dpi mode, but the Color Calibration profile was obsolete or missing for Photo Satin Paper and the selected print quality setting.
Using the System Maintenance Tool, perform Color Calibration for Photo Satin Paper and the selected print quality setting.
94:04
Cause |
Solution |
Firmware Error (during color calibration).
Try the following:
●Unplug the power cable from the printer and wait a few seconds. Plug in the power cable again and check if the Error Code has disappeared.
●If the Error Code reappears, check for a new Firmware release.
94:08
Cause |
Solution |
Color Calibration Warning - Color Calibration not cancelled but Color Calibration values are likely to be incorrect.
Try the Color Calibration again, but this time using a different type of media (preferably HP media).
ENWW |
Warnings 23 |
Loading...