


HP Deskjet D4300 series
Reference Guide
Guía de referencia
Guide de référence
For information on setting up the printer, see the Setup Guide. For information on using the printer, see the electronic Help.
Windows: To access the electronic Help, click Start >
All Programs > HP >
HP Solution Center.
Macintosh: To access the electronic Help, click Help >
Mac Help. Then click Library > HP Product Help.
Need more help?
Para obtener información acerca de la instalación de la impresora, consulte la guía de instalación. Para obtener información acerca de la impresora, consulte la ayuda electrónica.
Windows: Para acceder a la ayuda electrónica, haga clic en Inicio > Todos los programas > HP > Centro de soluciones HP.
Macintosh: Para acceder
a la ayuda electrónica, haga clic en Ayuda Mac. Después, haga clic en Biblioteca >
Producto HP Ayuda.
¿Necesita más ayuda?
www.hp.com/support
Pour plus d’informations sur la configuration de l’imprimante, reportez-vous au guide d’installation. Pour plus d’informations sur l’installation de l’imprimante, reportez-vous à l’aide en ligne.
Windows : pour accéder à l’aide du logiciel, cliquez sur Démarrer > Tous les programmes > HP > Centre de solutions HP.
Macintosh : pour accéder à l’aide du logiciel, cliquez sur Aide > Aide Mac. Cliquez ensuite sur
Bibliothèque > Produit HP Aide.
Plus d’informations ?

HP worldwide support
Notice
The information contained in this document is subject to change without notice. All rights reserved. Reproduction, adaptation, or translation of this material is prohibited without prior written permission of Hewlett-Packard, except as allowed under copyright laws. The only warranties for HP products and services are set forth in the express warranty statements accompanying such products and services. Nothing herein should be construed as constituting an additional warranty. HP shall not be liable for technical or editorial errors or omissions contained herein.
Remarques
Les informations contenues dans ce document sont sujettes à modification sans préavis. Tous droits réservés.
La reproduction, l’adaptation ou la traduction de ce document est interdite sans l’accord écrit préalable de Hewlett-Packard, sauf dans les cas permis par la législation relative aux droits d’auteur. Les seules garanties applicables aux produits
et services HP sont décrites dans les déclarations de garantie expresse accompagnant ces produits et services. Aucun élément de ce document ne saurait être considéré comme constituant une garantie supplémentaire. HP ne peut être tenue responsable d’aucune erreur technique, erreur de rédaction ou omission susceptible de figurer dans le présent document.
Aviso
La información que aparece en este documento puede estar sujeta a cambios sin previo aviso. Reservados todos los derechos. Quedan prohibidas la reproducción, adaptación o traducción de este material sin el permiso previo por escrito de Hewlett-Packard, excepto en los casos permitidos por las leyes de propiedad intelectual. Las únicas garantías para los
productos y servicios HP son las descritas en las declaraciones expresas de garantía que acompañan a tales productos
y servicios. Nada de lo aquí indicado debe interpretarse como una garantía adicional. HP no se responsabiliza de los posibles errores técnicos o editoriales ni de las omisiones que puedan existir en este documento.

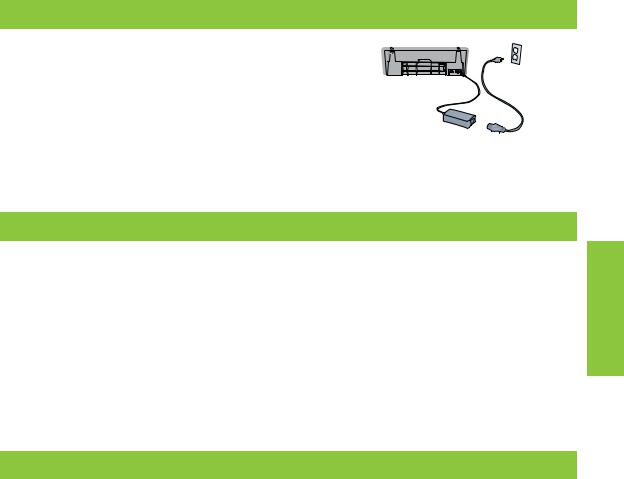
Installation help
No power?
Verify the following:
•The printer power cord is connected to an electrical outlet.
•The power cord is firmly connected to the power supply or adapter.
•The power supply is firmly connected to the printer.
Windows installation help
No plug and play?
•Make sure the printer is connected and is turned on.
•Make sure the USB cable is firmly attached from your computer to the printer directly, without using a USB hub.
•If the none of the above steps work, unplug the USB cable, re-insert the software CD and follow the onscreen instructions.
•Temporarily disable any software firewall and close any anti-virus programs. Re-start these programs after the printer software is installed.
Printer help
Printer prints on multiple sheets at once
If this happens, check the following:
•Paper weight: Use paper that is within the recommended specifications.
Letter Paper: 65 to 90 g/m² (16 to 24 lb) Legal Paper: 70 to 90 g/m² (20 to 24 lb) Envelopes: 70 to 90 g/m² (20 to 24 lb)
Cards: Up to 200 g/m² (110-lb index maximum) Photo Paper: Up to 280 g/m² (75-lb index maximum)
•Paper tray: Reload the paper into the paper tray, pushing the paper until you feel resistance, and then slide the paper guide firmly against the edge of the paper stack.
Printer does not feed paper
Try one or more of the following solutions:
•Reduce the number of sheets in the input tray.
•Remove paper from the input tray, and reload it.
•Use only one type of paper at a time.
•Use a different type of paper.
English

English
Paper jam |
Print job stuck in queue (Windows) |
|
1. |
Remove the paper from the paper tray. |
If the printer stops printing before the job is complete, the print |
2. |
If you are printing labels, verify that a label did not |
job might be stalled in the print queue. |
|
become detached from the label sheet while passing |
• Verify that you are using the default printer to print your |
|
through the printer. |
documents. Check the Printers or Printers and Faxes folder |
3. |
Turn off the printer. |
on your computer and make sure your printer icon has |
4. |
Disconnect the printer power cord from the electrical |
a check mark next to it. If you have multiple icons of the |
|
outlet. |
same printer, delete the extra icons. |
5. |
Remove the rear access door. Press the handle to the |
• Make sure that your printer is not set to pause printing. |
|
right, and then pull out the door. |
Right-click the printer icon and check the shortcut menu. |
|
|
• If the print service has stopped responding, locate the |
|
|
Administrative Tools folder on your computer, double-click |
|
|
Services, and then double-click Print Spooler. Click Stop, |
|
|
and then click Start to restart the print service. |
6.Remove the paper jam from the back of the printer, and then replace the rear access door securely.
7.If the paper jam cannot be removed from the back of the printer, raise the printer cover, remove the paper jam from the front of the printer, and then lower the cover.
8.Reload paper in the paper tray.
9.Reconnect the printer power cord to the electrical outlet.
10.Turn on the printer.
11.Reprint the document.
Ink usage
Note: Ink from the cartridges is used in the printing process in a number of different ways, including in the initialization process, which prepares the device and cartridges for printing, and in printhead servicing, which keeps print nozzles clear and ink flowing smoothly. In addition, some residual ink is left in the cartridge after it is used. For more information see www.hp.com/go/inkusage.
Minimum system requirements
For information on minimum system requirements,
see the Readme. To access the Readme file, click Start > All Programs > HP > Deskjet D4300 series > Readme.
Ayuda de instalación
¿No tiene alimentación eléctrica?
Compruebe lo siguiente:
•El cable de alimentación de la impresora está conectado a una toma de corriente eléctrica.
•El cable de alimentación está conectado adecuadamente a la fuente de alimentación o a un adaptador.
•La fuente de alimentación está conectada adecuadamente a la impresora.
Ayuda de instalación para Windows
¿No tiene dispositivo plug and play?
•Asegúrese de que la impresora está conectada y encendida.
•Asegúrese de que el cable USB está enchufado adecuadamente al equipo y a la impresora, sin utilizar un concentrador USB.
•Si no funciona ninguno de los pasos que se indican arriba, desconecte el cable USB, vuelva a introducir
el CD del software y siga las instrucciones que aparecen en pantalla.
•Desactive temporalmente los cortafuegos y cierre los programas antivirus. Reinicie estos programas una vez que haya instalado el software de la impresora.
Ayuda de la impresora
La impresora imprime en varias hojas a la vez
En caso de que esto ocurra, compruebe lo siguiente:
•Peso del papel: utilice papel de acuerdo a las especificaciones recomendadas.
Papel Carta: de 65 a 90 g/m² (de 20 a 24 lb). Papel Legal: de 70 a 90 g/m² (de 20 a 24 lb). Sobres: de 70 a 90 g/m² (de 16 a 24 lb).
Tarjetas: hasta 200 g/m² (un máximo de 110 lb de fichas). Papel fotográfico: hasta 280 g/m² (un máximo de 75 lb de fichas).
•Bandeja de papel: vuelva a cargar el papel en la bandeja correspondiente, colóquelo hasta llegar al tope y, a continuación, deslice la guía del papel hasta el borde de la pila de papel.
La impresora no suministra papel
Pruebe una de las siguientes soluciones:
•Reduzca el número de hojas en la bandeja de entrada.
•Retire el papel de la bandeja de entrada y vuelva a cargarlo.
•Utilice sólo un tipo y tamaño de papel a la vez.
•Utilice un tipo de papel diferente.
Español
 Loading...