


 Loading...
HP Access Control (HP AC)
Getting Started Guide
© Copyright 2014 Hewlett-Packard
Development Company, L.P.
Microsoft, Windows, and Windows NT are U.S. registered trademarks of Microsoft Corporation.
July 2014
Confidential computer software. Valid license from HP required for possession, use or copying. Consistent with FAR 12.211 and 12.212, Commercial Computer Software, Computer Software Documentation, and Technical Data for Commercial Items are licensed to the U.S. Government under vendor’s standard commercial license.
The information contained herein is subject to change without notice. The only warranties for HP products and services are set forth in the express warranty statements accompanying such products and services. Nothing herein should be construed as constituting an additional warranty. HP shall not be liable for technical or editorial errors or omissions contained herein.

Table of contents
1 Introduction .................................................................................................................................................. |
1 |
2 Prerequisites ................................................................................................................................................ |
2 |
3 License tile ................................................................................................................................................... |
4 |
4 Settings tile .................................................................................................................................................. |
5 |
4.1 Database tab .................................................................................................................................................... |
5 |
4.2 Device tab ........................................................................................................................................................ |
6 |
4.3 Email tab .......................................................................................................................................................... |
9 |
4.4 IIS tab ............................................................................................................................................................. |
11 |
4.5 SPPE tab ......................................................................................................................................................... |
15 |
4.6 SPP Enterprise tab ......................................................................................................................................... |
17 |
4.7 Alias tab ......................................................................................................................................................... |
21 |
4.8 Agent tab ....................................................................................................................................................... |
22 |
4.9 Print server tab .............................................................................................................................................. |
24 |
4.10 IPM tab ......................................................................................................................................................... |
25 |
4.11 FDT tab ......................................................................................................................................................... |
28 |
5 Devices tile ................................................................................................................................................. |
29 |
5.1 Scan the network for printers ....................................................................................................................... |
32 |
5.2 Scan the network for XT devices ................................................................................................................... |
33 |
5.3 Manually add a device ................................................................................................................................... |
34 |
5.4 Delete a device from the device list .............................................................................................................. |
34 |
5.5 Import/Export device data ............................................................................................................................ |
34 |
5.6 Organize and manage devices ...................................................................................................................... |
34 |
5.7 Install and configure components on HP FutureSmart and non-FutureSmart devices .............................. |
36 |
5.8 Configure components on HP Officejet Pro printers .................................................................................... |
38 |
5.8.1 Unregister an Officejet Pro printer .......................................................................................... |
41 |
5.9 Configure components on HP S900 series devices ...................................................................................... |
43 |
5.9.1 Pull printing at the device ........................................................................................................ |
49 |
5.10 Install and configure components on Lexmark devices ............................................................................. |
50 |
5.10.1 Install HP Access Control (HP AC) Lexmark Applications ...................................................... |
52 |
5.10.2 Configure AC Lexmark Applications ...................................................................................... |
53 |
5.10.3 Lexmark device security settings .......................................................................................... |
53 |
5.10.4 Using the AC Lexmark applications ....................................................................................... |
54 |
iii
|
5.11 Install and configure components on Xerox devices ................................................................................. |
56 |
|
5.11.1 Configure AC Xerox Applications ........................................................................................... |
57 |
|
5.11.2 Using the AC Xerox Applications ............................................................................................ |
58 |
|
5.12 Configure XT devices ................................................................................................................................... |
59 |
|
5.12.1 Pull print using XT card readers ............................................................................................ |
59 |
6 |
Print server tile ........................................................................................................................................... |
60 |
7 |
Server Information tile ................................................................................................................................ |
61 |
8 |
HP Access Control (HP AC) Print Client ........................................................................................................... |
62 |
iv

List of tables
Table 5-1 |
Supported HP OfficeJet Pro printers and firmware ........................................................................................... |
38 |
Table 5-2 |
Supported printers ............................................................................................................................................. |
56 |
v

List of figures
Figure 1-1 |
Home screen ........................................................................................................................................................ |
1 |
Figure 2-1 |
Database setup ................................................................................................................................................... |
2 |
Figure 2-2 Retrieve user data ............................................................................................................................................... |
2 |
|
Figure 2-3 Push mode setup ................................................................................................................................................ |
3 |
|
Figure 2-4 Device password setup ....................................................................................................................................... |
3 |
|
Figure 2-5 Web service setup ............................................................................................................................................... |
3 |
|
Figure 3-1 |
License tile ........................................................................................................................................................... |
4 |
Figure 4-1 Settings file menu ............................................................................................................................................... |
5 |
|
Figure 4-2 |
Database tab ....................................................................................................................................................... |
6 |
Figure 4-3 |
Device tab ............................................................................................................................................................ |
7 |
Figure 4-4 |
Device settings .................................................................................................................................................... |
7 |
Figure 4-5 |
Tracking settings ................................................................................................................................................. |
8 |
Figure 4-6 OPS server settings ............................................................................................................................................. |
8 |
|
Figure 4-7 |
SNMP settings ..................................................................................................................................................... |
8 |
Figure 4-8 |
Concurrent connections ...................................................................................................................................... |
9 |
Figure 4-9 |
Email tab ........................................................................................................................................................... |
10 |
Figure 4-10 POP3 IMAP settings ........................................................................................................................................ |
10 |
|
Figure 4-11 |
SMTP settings ................................................................................................................................................. |
11 |
Figure 4-12 |
IIS tab .............................................................................................................................................................. |
12 |
Figure 4-13 Web service settings ....................................................................................................................................... |
12 |
|
Figure 4-14 CORS trusted sites .......................................................................................................................................... |
13 |
|
Figure 4-15 Agent license service settings ........................................................................................................................ |
14 |
|
Figure 4-16 |
Push mode ...................................................................................................................................................... |
14 |
Figure 4-17 |
IPM authentication .......................................................................................................................................... |
14 |
Figure 4-18 |
SPPE settings .................................................................................................................................................. |
15 |
Figure 4-19 Pull Printing settings ...................................................................................................................................... |
16 |
|
Figure 4-20 |
QR code ........................................................................................................................................................... |
16 |
Figure 4-21 |
Email section ................................................................................................................................................... |
17 |
Figure 4-22 |
Job Accounting ................................................................................................................................................ |
17 |
Figure 4-23 SPP Enterprise settings .................................................................................................................................. |
18 |
|
Figure 4-24 Server Information settings ........................................................................................................................... |
18 |
|
Figure 4-25 Pull print queues settings ............................................................................................................................... |
19 |
|
Figure 4-26 |
Options ............................................................................................................................................................ |
20 |
Figure 4-27 |
Email settings ................................................................................................................................................. |
20 |
Figure 4-28 |
Alias tab .......................................................................................................................................................... |
21 |
Figure 4-29 |
Alias window ................................................................................................................................................... |
22 |
vi
Figure 4-30 |
Agent tab ......................................................................................................................................................... |
22 |
Figure 4-31 HP install files ................................................................................................................................................. |
23 |
|
Figure 4-32 |
Lexmark install ............................................................................................................................................... |
23 |
Figure 4-33 IRM quota web service .................................................................................................................................... |
23 |
|
Figure 4-34 Print server tab ............................................................................................................................................... |
24 |
|
Figure 4-35 |
IPM tab ............................................................................................................................................................ |
25 |
Figure 4-36 IPM web service settings ................................................................................................................................ |
25 |
|
Figure 4-37 Print activity log .............................................................................................................................................. |
25 |
|
Figure 4-38 Notification desktop client ............................................................................................................................. |
26 |
|
Figure 4-39 |
Cost per page .................................................................................................................................................. |
27 |
Figure 4-40 |
User grouping .................................................................................................................................................. |
27 |
Figure 4-41 |
FDT tab ............................................................................................................................................................ |
28 |
Figure 5-1 |
Devices tile ........................................................................................................................................................ |
29 |
Figure 5-2 Configure window ............................................................................................................................................. |
30 |
|
Figure 5-3 Devices dropdown menu .................................................................................................................................. |
31 |
|
Figure 5-4 |
QR code ............................................................................................................................................................. |
31 |
Figure 5-5 |
IP range ............................................................................................................................................................. |
32 |
Figure 5-6 Devices menu .................................................................................................................................................... |
33 |
|
Figure 5-7 IP range window ................................................................................................................................................ |
33 |
|
Figure 5-8 |
Add devices ....................................................................................................................................................... |
34 |
Figure 5-9 Add device groups ............................................................................................................................................. |
35 |
|
Figure 5-10 |
Group devices .................................................................................................................................................. |
35 |
Figure 5-11 |
Filter devices ................................................................................................................................................... |
36 |
Figure 5-12 |
Device install ................................................................................................................................................... |
37 |
Figure 5-13 |
Configure device ............................................................................................................................................. |
38 |
Figure 5-14 Default website properties ............................................................................................................................. |
39 |
|
Figure 5-15 Assign an existing certificate .......................................................................................................................... |
39 |
|
Figure 5-16 |
Select certificate ............................................................................................................................................. |
40 |
Figure 5-17 |
Edit bindings ................................................................................................................................................... |
40 |
Figure 5-18 |
SSL certificate ................................................................................................................................................. |
41 |
Figure 5-19 |
OfficeJet configure .......................................................................................................................................... |
41 |
Figure 5-20 |
Unregister officeJet ........................................................................................................................................ |
42 |
Figure 5-21 Card Reader settings ...................................................................................................................................... |
44 |
|
Figure 5-22 Insert card reader prompt .............................................................................................................................. |
44 |
|
Figure 5-23 Card reader registration ................................................................................................................................. |
45 |
|
Figure 5-24 |
Default settings .............................................................................................................................................. |
46 |
Figure 5-25 Home screen settings ..................................................................................................................................... |
47 |
|
Figure 5-26 Home screen registration ............................................................................................................................... |
47 |
|
Figure 5-27 Custom image ................................................................................................................................................. |
47 |
|
Figure 5-28 Standard Application settings ........................................................................................................................ |
48 |
|
Figure 5-29 Standard Application registration .................................................................................................................. |
48 |
|
vii
Figure 5-30 External accounting application settings ....................................................................................................... |
49 |
||
Figure 5-31 |
Apps ................................................................................................................................................................. |
50 |
|
Figure 5-32 |
Lexmark application ....................................................................................................................................... |
52 |
|
Figure 5-33 Lexmark welcome ........................................................................................................................................... |
55 |
||
Figure 5-34 Lexmark swipe ................................................................................................................................................ |
55 |
||
Figure 5-35 |
Lexmark select ................................................................................................................................................ |
55 |
|
Figure 5-36 |
Xerox application ............................................................................................................................................ |
57 |
|
Figure 5-37 |
Xerox welcome ............................................................................................................................................... |
58 |
|
Figure 5-38 |
Xerox documents ............................................................................................................................................ |
58 |
|
Figure 6-1 |
Print server tile ................................................................................................................................................. |
60 |
|
Figure 7-1 |
Server Information tile ..................................................................................................................................... |
61 |
|
Figure 8-1 |
HP AC Print Client connection ........................................................................................................................... |
62 |
|
Figure 8-2 |
HP AC Print Client configuration ....................................................................................................................... |
63 |
|
viii
1 Introduction
This guide is intended for administrators with experience using Windows servers. The following chapters explain how to use the HP Access Control (HP AC) configuration tool and introduce you to the process of configuring HP Access Control (HP AC) solutions on printers.
To open the HP Access Control (HP AC) configuration tool, go to Start > All Programs > HP Access Control, then click HP AC Configuration utility.
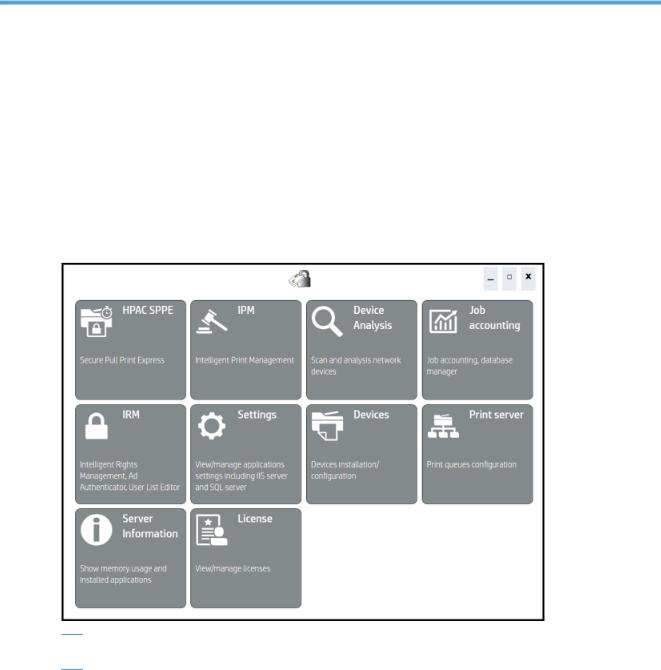
The HP Access Control (HP AC) configuration tool consists of components organized as tiles on the home screen.
Figure 1-1 Home screen
 NOTE: The tiles may vary, depending on what HP Access Control (HP AC) components are installed on the server.
Click a tile from the HP Access Control (HP AC) home screen to use the component. Return to the home screen at any time by clicking the back button in the top left corner.
This guide provides information about the License, Settings, Devices, Print Server, and Server Information tiles. For more information about HP Access Control (HP AC) components, see the individual component guides.
To view the individual component guides, click a component tile. Go to the Help menu, then click
Administrator Guide or User Guide.
1

2 Prerequisites
Before using HP Access Control (HP AC) components, make sure to complete the following steps.
●If you will be using Job Accounting, go to the Settings tile > Database tab > Database Configuration section and verify the SQL server connection settings. Click Test to test the connection to the Job Accounting database in SQL. Click Apply to apply the settings.
Figure 2-1 Database setup
●If you will be using Job Accounting, you must scan the Active Directory domain to allow for accurate user tracking. Go to the Job Accounting tile > Administration > Active Directory > Retrieve User Data. Enter the correct information regarding your domain and administrator credentials, then click the Go button. For more information, see the HP Access Control (HP AC) Job Accounting User Guide.
Figure 2-2 Retrieve user data
●If you will be using Agent or print server to send tracking information to the Job Accounting server, go to the Settings tile > IIS tab > Push mode section. Select a transfer protocol to auto-upload, or push, tracking data. Click Test to test the connection to the Job Accounting server. Click Apply.
2 Chapter 2 Prerequisites
Figure 2-3 Push mode setup
●If you will be configuring devices, go to the Settings tile > Device tab > Device section. Enter a device password in the Administrator password field. This device password must match the device passwords in all printers. Click Apply.
Figure 2-4 Device password setup
●If you will be using Job Accounting, IPM, Secure Pull Print, Secure Pull Print Express, Secure Pull Print Enterprise, or IRM, go to the Settings tile > IIS tab > Web service section and verify the server information. Click Test to test the connection. Click Apply.
Figure 2-5 Web service setup
3

3 License tile
The License tile shows your server license number, Activation Keys for installed components and expiration dates of licenses.
Figure 3-1 License tile
 NOTE: Information in the License tile may vary depending on what components of HP Access Control (HP AC) are installed on the server.


 NOTE: The License tile is highlighted red on the HP Access Control (HP AC) home screen if a component license is expired.


 NOTE: The Secure Pull Print Express license resets after 24 hours. This allows for users to pull print at new devices every day.
The ID key field contains the server license number that identifies your server for the HP Licensing Support team. To receive Activation Keys for components, you need to contact the HP licensing customer support center:
1.Go to the HP licensing customer support center at http://licensing.hp.com.
2.Click Contact HP Licensing on the left.
3.Fill in all required fields. In the Your comments field, make sure to include your server license number. Then submit the form.
After your license request is processed, you will receive an email containing Activation Keys. Copy the component Activation Keys and paste into the Activation Key fields in the License tile.
4 Chapter 3 License tile

4 Settings tile
The Settings tile allows you to view and change all the settings of installed components from one location.
 IMPORTANT: After making changes in the Settings tile, be sure to click the corresponding Apply button to apply the settings.


 NOTE: Information in the Settings tile may vary depending on what components of HP Access Control (HP AC) are installed on the server.
Click the File menu to import or export setting information. Information you select and enter in the Settings tile can be exported as an XML file. It is recommended to export settings in case the server or application needs to be reinstalled.
Figure 4-1 Settings file menu
●Click Import setting if you want to import an XML file of previously saved settings.
●Click Export setting if you want to save your current settings as an XML file.
The Database tools menu allows you to repair or backup the database of setting information in case the server or application needs to be reinstalled. Information you select and enter in the Settings tile is stored in a database.
●Click Compact and repair database to compact the database file.
●Click Backup database to save the database as an SDF file.
4.1Database tab
The Database tab allows you to setup or modify the connection to the SQL Server database where job accounting reports are stored.
Section 4.1 Database tab |
5 |

Figure 4-2 Database tab
 NOTE: The Database tab displays if HP Access Control (HP AC) Job Accounting is installed.
The Database configuration section contains the method to connect to the SQL database/instance containing job accounting data. The SQL Server field displays the name and instance of the SQL Server installed. If you are connecting to a SQL Server on a different server, make sure the name and instance of the SQL Server is correct.
There are two possible authentication methods to connect to the job accounting database stored in SQL Server: Windows authentication or SQL authentication.
●If SQL authentication is selected, make sure the SQL credentials in the User and Password fields are correct.
●If Windows authentication is selected, make sure the LocalSystem account checkbox in the Agent configuration section is unchecked. Enter the correct Windows credentials in the Domain\User and Password fields.
The Agent configuration section contains credential fields to allow access to the Job Accounting website. When the LocalSystem account checkbox is unchecked, Windows credentials must be entered in the Domain \User and Password fields. Click the Enable IIS anonymous authentication checkbox to assign the IIS anonymous user identity to the username entered in the Domain\User field. This allows only the domain user to access the Job Accounting website.
4.2 Device tab
The Device tab allows you to setup the device administrator password, setup the OPS server, select tracking options, and modify the SNMP connection to devices.
6 Chapter 4 Settings tile

Figure 4-3 Device tab
 NOTE: The Device tab displays if DTM, Device Analysis, Agent, or Secure Pull Print Express is installed.
Figure 4-4 Device settings
In the Device section, the device administrator user name and password is required for communication between the server and devices. This is necessary to install and configure solutions on devices. Make sure the Administrator user name and password in the Device section matches the administrator user names and passwords of all the devices you want to configure.
Click the Disable Device Ping checkbox to not allow pinging between devices and the server, and to only perform telnet communications between devices and the server. By default, ping is used to detect the presence of a device IP, then telnet is used to verify that the device is a printer. Select this checkbox if ping is disabled in your network, so that only telnet will be used.
The Certificate field displays the OPS certificate required to configure pull printing on HP Officejet Pro printers. HP OXPd Professional Services (OPS) brings OXPd functionality to HP Officejet Pro devices by hosting all printer configurations. The OPS certificate is created to establish secure communication between the server and Officejet Pro printers.
Section 4.2 Device tab |
7 |

Figure 4-5 Tracking settings
In the Tracking section, select what device information you want to display in job accounting reports when HP FutureSmart devices are configured for tracking.
●Select Device name to display the device names in job accounting reports.
●Select Network name to display the host names of devices in job accounting reports. Make sure the Get community name is entered in the SNMP section to be able to read the network/host names of devices.
Figure 4-6 OPS server settings
With the OPS Server, you can configure HP Officejet Pro single-function and multi-function devices for authentication and pull printing. When Agent or Secure Pull Print Express is installed on the server, the OPS Server is installed and started. For more information about configuring HP Officejet Pro devices, see the HP Access Control (HP AC) Secure Pull Print Express Admin Guide.
In the OPS Server section, make sure the OPS Server field displays the correct server name where OPS is installed. Also, make sure port 8081 is open for connection between the OPS Server and HP Officejet Pro devices.
Click the Override OPS settings if you will be configuring an Officejet Pro printer that was previously configured on a different server. This checkbox allows you to override previous configuration settings when the printer is configured on the current server.
Enter the correct User name and Password that was set up during the installation of OPS Server.
 NOTE: The OPS password can be changed by reinstalling OPS. The opssetup.exe installation file can be found in the C:\Program Files\Hewlett-Packard\HP Access Control\Misc folder.
Click Test to test the connection to the OPS Server and make sure port 8081 is open.
Figure 4-7 SNMP settings
In the SNMP section, set the Get and Set community names for communication to and from devices. The Get community name allows the server to retrieve device and tracking data from a configured device. The Set community name allows the server to send information to the device, such as a reboot command. By default,
8 Chapter 4 Settings tile

the Get and Set community names are “public”. For communication between the server and devices, the Get and Set community names on the server must match the Get and Set community names on all devices.
 NOTE: The SNMP section displays if Job Accounting, Device Analysis, Agent, or Secure Pull Print Express is installed on the server.
In the Trap level field, select the type of traps you want to track with Direct Tracking Module (DTM). A trap is a packet of information provided by the printer that indicates basic job information and print job status.
●Print Confirmation traps is the default Trap level. With Print Confirmation traps selected, only printed job traps are sent from the device. This is used to reduce the network traffic with unwanted traps.
●All traps are to track all jobs, printed, copied, or digitally sent. Some versions of HP JetDirect require that All traps mode is selected.
The UDP port field is the port used by the trap service. By default, the trap service uses UDP port 162. If the port is used by another application or service on the same server, the Job Accounting Trap service can use another port. If the port is changed, the Job Accounting Trap service (HPACJA_SnmpTrap) needs to be stopped and restarted. Printers also need to be reconfigured using the new port.
The Filter Delay is used if JetDirect sends the same trap multiple times in a very short interval. This occurs on external JetDirect 300x and 500x. The delay value can be set to 50 ms for 300x and 500x. For other devices, the default value can remain at 0.
In the Concurrent connections section, set the number of network devices you want to install and configure at one time. The maximum number of concurrent connections allowed is 50.
Figure 4-8 Concurrent connections
4.3 Email tab
The Email tab allows you to setup email server settings to send HP Access Control (HP AC) notifications to users and to allow users to email jobs for pull printing.
Section 4.3 Email tab |
9 |

Figure 4-9 Email tab
 NOTE: The Email tab displays if Job Accounting, Device Analysis, IPM, Agent, or Secure Pull Print Express is installed.
In the POP3/IMAP section, enter your company’s email server information if you want to allow users to email jobs for pull printing. The Secure Pull Print Express email service checks for and processes emailed jobs from users.
Figure 4-10 POP3 IMAP settings
 NOTE: The POP3/IMAP section displays only if Secure Pull Print Express is installed.
In the Connection field, select POP3 or IMAP as the connection method to the email server.
In the Server name field, type the name or address of the email server you want the Secure Pull Print Express email service to check for emailed jobs from users.
The Server port field displays the default server port for POP3 or IMAP. The default POP3 server port is 110. The default IMAP server port is 143. Click the SSL checkbox if the email server requires a secure connection. If you click the SSL checkbox, the Skip SSL validation checkbox displays. Click Skip SLL validation to allow the service to connect to the email server via SSL without installing a valid certificate on the server.
In the Login and Password fields, type the login name and password for access to the email server.
In the Interval (seconds) field, you can change how often the Secure Pull Print Express email services checks for emails. The default time is 30 seconds.
10 Chapter 4 Settings tile
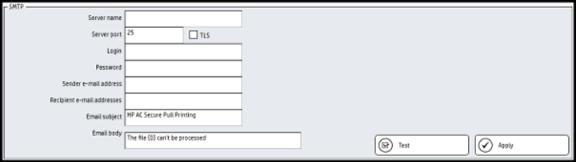
Figure 4-11 SMTP settings
The SMTP section allows you to configure emails you want to send from the server. The following information can be emailed:
●Job Accounting reports
●Results of Device Analysis scheduled scans
●IPM notifications via the Email rule
●Secure Pull Print Express or Secure Pull Print Enterprise notification if a user’s job cannot be processed
●AD User Editor information, AD Group Manager information, and User List Editor PINs
In the Server name field, type the name or address of your company email server.
In the Server port field, type the email server port. The default port is 25. Click the TLS checkbox to enable the Transport Layer Security protocol to encrypt and deliver mail securely.
In the Login and Password fields, type the login name and password for access to the email server.
In the Sender email address field, type the email address you want to appear in the “From” field of emails. For Secure Pull Print Express purposes, it is recommended to use the same email address that users email jobs to, so that users receive notification emails from the same address they emailed.
In the Recipient email addresses field, type email addresses to test the connection between the email server and recipient email addresses. This determines if a recipient can receive an email from the email server. Click the Test button to send an email to the recipients. A popup window appears to display information about the connection.
In the Email subject field, type the subject of the notification email. If Secure Pull Print Express is installed, the default email subject is “HP AC Secure Pull Printing”.
In the Email body field, type what you want to appear in the body of the notification email. If Secure Pull Print Express is installed, the default is “The file {0} can’t be processed”, where {0} represents the name of the job.
4.4 IIS tab
The IIS tab contains IIS and web service settings.
Section 4.4 IIS tab 11

Figure 4-12 IIS tab
 NOTE: The IIS tab displays if Job Accounting, Agent, IPM, Secure Pull Print, Secure Pull Print Enterprise, or Secure Pull Print Express is installed.
Figure 4-13 Web service settings
The Web service is used for the following:
●For multi-function devices to communicate with the Job Accounting website to determine quotas for copies and digital sending jobs
●To send IPM notifications to client desktops
●For users to access Pull Printing jobs from a printer, mobile device or web page
●For the server to communicate with the IRM license website
●For central management of printer fleets. When multiple servers are entered in the Web service settings and when devices are configured in the Devices tile, a dropdown list displays in the Configure window, allowing you to select the server you want to configure the device to. From one central server, you can configure printers to be managed by a different server.
The Server name and Server IP fields display the name and IP address of the server containing the Quota, IPM, and Pull Printing web services. Make sure the information is correct to allow for communication between the web service and client desktops or devices. To add additional servers, enter the Fully Qualified Domain Name (FQDN) of the additional server in the Server name column and enter the IP address of the server in the
12 Chapter 4 Settings tile
IP column. Click the Test button to test the connection. The Status column should display OK. Then click
Apply.
Click the Encrypt all web communication (devices) checkbox if you want to enable the HTTPS protocol for communications between devices and the server.
Click the Use server name instead of IP (devices) checkbox for one or both of the following reasons:
●If the server name was entered during the installation and configuration of the OPS server. See the HP Access Control (HP AC) Install Guide for more information about the installation of the OPS server.
●If the web service security feature Cross-Origin Resource Sharing (CORS) is enabled on FutureSmart devices. To pull print at the device with Secure Pull Print Express, make sure the server name is added to the CORS Trusted Sites list. To use tracking at the device with Job Accounting, make sure the server name is listed in the CORS Trusted Sites list. To pull print at the device with Secure Pull Print, make sure "localhost" is listed in the CORS Trusted Sites list.
Figure 4-14 CORS trusted sites
 NOTE: If OPS is configured on the server and you want to change the configuration of OPS to use the server name or the server IP address, follow the steps below:
1.Close the HP Access Control (HP AC) configuration tool.
2.Navigate to the C:\Program Files (x86)\Hewlett-Packard\OPS\config folder and open the ops.cfg file in a text editor application. After “host=”, enter the server IP address or servername.domain.com, where servername is the name of the server, and domain is the name of the domain. Save and close the file.
3.Navigate to the C:\Program Files\Hewlett-Packard\HP Access Control folder and delete the OPS certificate file.
4.Go to Administrative Tools > Services and restart the OPS service. Restarting the OPS service creates a new OPS certificate using the server name or server IP address.
5.Open the HP Access Control (HP AC) configuration tool. Go to the Settings tile > Device tab and verify that the OPS certificate file name and the OPS server field contain the server name or server IP address.
Section 4.4 IIS tab 13

Click Test to test the connection to the web service.
The Agent license service section allows you to assign a different server to handle licensing for IRM. This must be done before devices are configured. Enter the IP address of the server to handle licensing for IRM. By default, the field is populated with the IP address of the current server. After making any changes, click
Apply.
Figure 4-15 Agent license service settings
In the Push mode section, select a transfer protocol to auto-upload, or push, IPA tracking data from configured devices to the job accounting server.
Figure 4-16 Push mode
 NOTE: The Push mode section displays if Agent or the standalone Job Accounting Print Server is installed.
In the HTTP/FTP field, select one of the transfer protocols:
●Hypertext Transfer Protocol (HTTP) connections are usually terminated after a particular request has been completed. If HTTP is selected, Windows credentials are required in the Login and Password fields. Also, if IIS 7 or newer is installed on the server, Basic Authentication needs to be enabled. Devices require Basic Authentication to pass data via HTTP when IPA sends tracking data to the Job Accounting Print Server. The default port is 80.
●File Transfer Protocol (FTP) is best for uploading data to an internal database server. If FTP is selected, any credentials can be used in the Login and Password fields. By default, the login and password are “Anonymous”. The default port is 21. Select the PASV checkbox to enable passive mode FTP if you want to allow data to transfer more easily through firewalls.
The Interval (minutes) field determines how often tracking data is pushed from devices to the job accounting server.
Click Test to test the HTTP or FTP connection.
The IPM authentication section contains credential fields to allow access to the IPM web service to retrieve user grouping information (user grouping is setup in the Settings tile > IPM tab > User grouping section). Windows credentials must be entered in the Login and Password fields.
Figure 4-17 IPM authentication
14 Chapter 4 Settings tile
Loading...