


Instructions for use
MICROWAVE OVEN
|
|
Contents |
EN |
|
|
Electrical Connection, 4 |
|
EN |
|
|
|
|
Installation, 5-7 |
|
|
|
|
Installation |
|
English, 1 |
|
||
Placement |
|
||
|
|
Building in |
|
|
|
Install the grill pan |
|
|
|
Turntable Installation |
|
MWH 424.1 X
Setting up your oven, 8
Overall view
Names of Oven Parts and Accessories Control Panel and Features
Start-up and use, 9-14
Operation instruction
Important safety instructions, 15-17
Utensils, 18
Utensil Test
Materials you can use in microwave oven Materials to be avoided in microwave oven
Maintenance and care, 19
Cleaning
Troubleshooting, 20
Assistance, 21
Guarantee, 22
After Sales Service, 23

Electrical Connection
DANGER
Electric Shock Hazard Touching some of the internal components can cause serious personal injury or death. Do not disassemble this appliance.
WARNING
The electrical connections must be made before installing the appliance in its housing.
Electrical safety must be guaranteed by correct installation in the housing. During installation and maintenance operations, the appliance must be disconnected from the mains circuit-breaker or the fuses must be removed.
The appliance must be connected using a
power cable equipped with |
3 1.5mm2 |
conductors (live + neutral + |
Earth), H05RR-F |
phase 230-240V~network in accordance with installation requirements. The safety wire (green-yellow) is connected to the
appliance’s Earth terminal and must be connected to the installation Earth.
If the appliance has an electrical connection, it
must remain accessible after the appliance has been built in.
The oven’s neutral (blue wire) must be connected to the network’s neutral.
It must be possible to disconnect the appliance from the power supply, by  tting a switch on the
  xed wiring system in accordance with installation rules.
Ensure that:
-The electrical power has  ent voltage.
-the power cable is in good condition
-the diameter of the wires complies with installation requirements.
-your electrical installation is equipped with protection of at least 16 amps.
CAUTION
Personal Injury Hazard
It is hazardous for anyone other than a compentent person to carry out any service or repair operation that involves the removal of a cover which gives protection against exposure to microwave energy.
•Please observe the installation instructions provided and note that this appliance should only be installed
•In case a new connection is needed, installation and cable connection must only be done by an approved
accessible following installation, a double-pole disconnecting device must be present on the installation site with a contact gap of at least 3 mm.
•Adaptors, multiway strips and extension cables must
Disposal - Also see Page 23
|
When disposing of packaging material: observe local |
|
|
legislation so that the packaging may be reused. |
|
|
The European Directive 2012/19/EEC on Waste |
|
|
Electrical and Electronic Equipment (WEEE), requires |
|
• |
that old household electrical appliances must not be |
|
disposed of in the normal unsorted municipal waste |
||
|
||
• |
stream. Old appliances must be collected separately |
|
in order to optimise the recovery and recycling of |
||
|
||
|
the materials they contain and reduce the impact |
|
|
on human health and the environment. The crossed |
|
|
out “wheeled bin” symbol on the product reminds |
|
|
you of your obligation, that when you dispose of the |
|
|
appliance it must be separately collected. |
|
|
Consumers may take their old appliance to public |
|
|
waste collection areas, other communal collection |
|
|
areas, or if national legislation allows return it to a |
|
|
retailer when purchasing a similar new product. |
|
|
All major household appliance manufacturers are |
|
|
active in the creation of systems to manage the |
|
|
collection and disposal of old appliances. |
4

Installation
!Read these instructions carefully before using your EN microwave oven, and keep it carefully.
If you follow the instructions, your oven will provide you with many years of good service.
!SAVE THESE INSTRUCTIONS CAREFULLY
PRECAUTIONS TO AVOID POSSIBLE EXPOSURE TO EXCESSIVE MICROWAVE ENERGY.
a)Do not attempt to operate this oven with the door open since this can result in harmful exposure to microwave energy. It is important not to break or tamper with the safety interlocks.
b)Do not place any object between the oven front face and the door or allow soil or cleaner residue to accumulate on sealing surfaces.
c)WARNING: If the door or door seals are damaged, the oven must not be operated until it has been repaired by a competent person.
ADDENDUM
If the apparatus is not maintained in a good state of cleanliness, its surface could be degraded and affect the lifespan of the apparatus and lead to a dangerous situation.
Installation
Important information about installing
•This appliance is NOT intended for use in a commercial environment.
Installation dimensions
Placement
• Danger! Do not disassemble this appliance. Touching internal components of this appliance can cause serious personal injury or death.
• Place the microwave oven on a rm, at surface.
•Make sure that there is su cient ventilation around the microwave oven. At the rear and sides keep at least 10 cm free.
•Do not cover the air vents.
• |
The adjustable feet should not be removed. |
• |
Do not place the microwave oven near a heat source. |
•Transmitting and receiving equipment such as radios and televisions can a ect the operation of the microwave oven.
The accessible surface may be hot during operation.
|
|
|
|
45 |
|
|
|
|
|
|
|
|
|
|
|
|
|
600 |
|
|
|
|
|
|
|
|
|
560 |
558-568 |
|
|
|
|
|
|
|
|
|
|
|
450 |
|
|
|
|
|
|
min. |
|
|
|
|
|
|
|
|
550 |
|
|
|
|
560-568 |
|
|
|
|
min458+2 |
||
|
|
|
|
|
|
min 460 |
|||
202 |
542 550 |
|
min |
202 |
|
542 |
550 |
|
|
|
550 |
|
|
540 |
|||||
454.5 |
444 |
|
|
454455.5 |
|
|
|
444 |
|
455 |
600 |
|
|
|
|
|
|
||
|
|
|
|
|
|
|
|
|
|
|
|
|
|
|
|
|
|
min. aerationb luchtingsoppsurface. |
|
5 |
68 |
|
|
|
594 |
|
5 |
250 cm2 |
|
594 |
|
|
|
5 |
|
68 |
|
|
|
5 |
|
|
|
|
595 |
|
|
||
|
595 |
|
|
|
|
|
|
|
|
|
min. baerationluchtingsoppsurface. 250 cm2 |
min 580 |
|
|
|
|
|
||
Note: There should be gap above the oven.
5

Building in
•Do not hold or carry the appliance by the door handle.
The door handle cannot hold the weight of the appliance and may break off.
1.Carefully push the microwave into the box, making sure that it is in the centre.
2.Open the door and fasten the microwave with the screws that were supplied.
•Fully insert the appliance and centre it.
•Do not kink the connecting cable.
•Screw the appliance into place.
•The gap between the worktop and the appliance must not be closed byaddtional battens.
Install the grill pan
1. Be sure the angle of the shaft.
2. Adjust the angel of the grill pan and the shaft.
EN
3. Put the pan into the cavity and adjust slightly.
Specifications
Model: |
MWH 424.1 X |
||||||
|
|
|
|
|
|
|
|
Rated Voltage: |
240V~50Hz |
||||||
|
|
|
|
|
|
|
|
Rated Input Power |
1650W |
||||||
(Microwave): |
|||||||
|
|||||||
|
|
|
|
|
|
|
|
Rated Output Power |
900W |
||||||
(Microwave): |
|||||||
|
|||||||
|
|
|
|
|
|
|
|
Rated Input Power |
1750W |
||||||
(Grill): |
|||||||
|
|||||||
|
|
|
|
|
|
|
|
Rated Input Power |
1750W |
||||||
(Convection): |
|||||||
|
|||||||
|
|
|
|
|
|
|
|
Max Power: |
3350W |
||||||
|
|
|
|
|
|
|
|
Oven Capacity: |
44L |
||||||
|
|
|
|
|
|
|
|
Turntable Diameter: |
ø 360mm |
||||||
|
|
|
|
|
|
|
|
External Dimensions: |
594x454.5x568mm |
||||||
|
|
|
|
|
|
|
|
Net Weight: |
Approx. 41 kg |
||||||
|
|
|
|
|
|
|
|
|
|
|
|
|
|
According to Waste of Electri- |
|
|
|
|
|
|
|
cal and Electronic Equipment |
|
|
|
|
|
|
|
||
|
|
|
|
|
|
(WEEE) directive, WEEE |
|
|
|
|
|
|
|
||
|
|
|
|
|
|
||
|
|
|
|
|
|
should be separately collected |
|
|
|
|
|
|
|
and treated. If at any time in |
|
|
|
|
|
|
|
||
|
|
|
|
|
|
future you need to dispose of |
|
|
|
|
|
|
|
||
|
|
|
|
|
|
this product please do NOT |
|
|
|
|
|
|
|
dispose of this product with |
|
|
|
|
|
|
|
household |
|
|
|
|
|
|
|
|
|
6
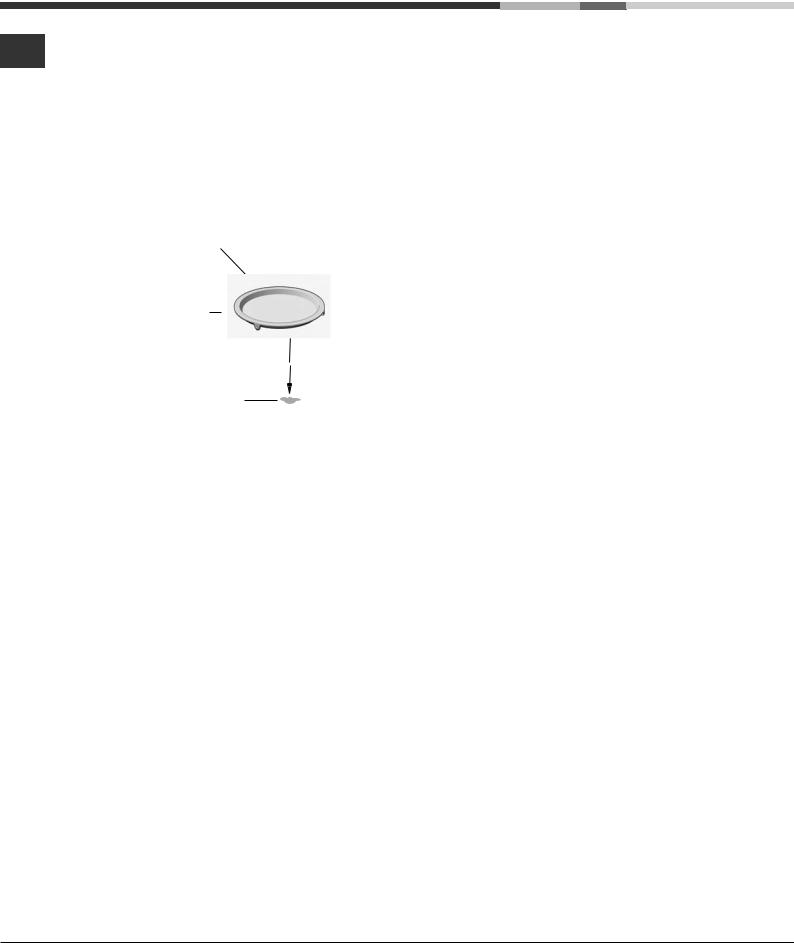
Turntable Installation
EN
a)Never place the enamel tray upside down. The enamal tray should never be restricted.
b)The enamal tray must always be used during cooking.
c)All food and containers of food are always placed on the enamel tray for cooking.
d)If enamel tray cracks or breaks, contact your nearest authorized service center.
Hub (underside)
Enamel tray
Turntable shaft
7

Setting up your oven
Overall view
Names of Oven Parts and Accessories
Remove the oven and all materials from the carton and oven cavity. Your oven comes with the following accessories:
Enamel Tray |
1 |
Turntable ring assembly |
1 |
Instruction Manual |
1 |
1
2
3 
4
5
6 
1. |
Control panel |
|
2. |
Grill element |
EN |
3.Light
4.Level
5.Door glass
6.Hinge
7.Turntable shaft
8.Short Grill Rack
9.Long Grill Rack
10.Grill Pan
8
9
10
Control Panel and Features
|
|
|
|
|
|
|
|
|
|
|
|
|
|
|
|
|
|
|
|
|
|
|
|
|
|
|
|
|
|
|
|
|
|
|
|
|
|
|
|
|
|
|
1 |
|
|
|
|
|
|
|
6 |
|
8 |
||
|
2 |
3 |
4 |
|
7 |
5 |
|||||||
|
|
|
|
|
|
||||||||
1) |
Function knob |
|
|
|
|
5) |
Temperature/automenu button |
||||||
2) |
Power/Weight button |
|
|
|
|
6) |
Clock button |
|
|
|
|
||
3) |
Quickly preheating button |
|
|
|
|
7) |
Start/Pause button |
|
|
||||
4) |
On/Off Button |
|
|
|
|
8) |
Selection knob |
|
|
|
|||
8

Start-up and use
Operation instruction
EN
This microwave oven uses modern electronic control to adjust cooking parameters to meet your needs better for cooking.
1.Clock Setting
When the microwave oven is electrified, “00:00” will blink, buzzer will ring once.
1)Turn 
 knob to set the right time (between 00:00 and 23:59.)
2)After you have set the right time, press “ ”. The clock has been set.
Note:
1)If you want to change the time, you have to press and hold the “ ” button for 3 seconds.
The actuall time disappears and then the time will blink in the display.
Turn 
 knob to set the new time and press the “
 ” button to confirm the setting.
2)If you do not want to see the clock in the display, press “ ” button briefly. The time disappears. Press “
 ” again, and the clock appears in the display again.
2.Microwave Cooking
1)Press the “ON/OFF” button to activate the microwave function. “01:00” is blinking in the display and the microwave icon appears. If no operation
in 10 seconds, the current power will be confirmed automatically.
2)Turn 
 knob to set the cooking time.
The max. cooking time depends on the power that has been set. When the power is 900W, the MAX. time is 30 minutes and other powers are 90 minutes.
3)Press “
 ” button to adjust the microwave power.
4)Turn 
 knob to set the microwave power. (between 100W to 900W).
5)Press “

 ” button to start cooking.
Note:
the step quantities for the adjustment time of the coding switch are as follow:
0---1 min |
1 second |
|
|
1---5 min |
10 seconds |
|
|
5---15 min |
30 seconds |
|
|
15---60 min |
1 minute |
|
|
60 min |
5 minutes |
|
|
Microwave Power Chart
Display 900W 700W 450W 300W 100W
You can see from the table below from which power levels you can choose and for which foods the power levels are suitable.
Power level |
Food |
|
|
|
|
900 W |
- Boiling water, reheating |
|
- Cooking chicken, fish, vegetables |
||
|
||
|
|
|
|
- Reheating |
|
700 W |
- Cooking mushrooms, shell fish |
|
|
- Cooking dishes containing eggs and cheese |
|
|
|
|
450 W |
- Cooking rice, soup |
|
|
|
|
300 W |
- Defrosting |
|
- Melting chocolate and butter |
||
|
||
|
|
|
|
- Defrosting sensitive/delicate foods |
|
100 W |
- Defrosting irregularly-shaped foods |
|
- Softening ice cream |
||
|
||
|
- Allowing dough to rise |
|
|
|
9
 Loading...