


Hitachi C28W511TN, C28W510TN, C28W510SN, C24W511TN, C32W511TN User Manual
...User Guide
C28W510SN
C28W510TN
C32W510SN
C24W511TN
C24W511SN
C28W511TN
C32W511TN
C28WD2TN2
C32WD2TN2

 TV
TV
 Introduction


Dear Hitachi Customer,
Congratulations on your purchase of the very latest ‘state of the art’ television from HITACHI. At Hitachi we pride ourselves on producing high quality televisions with outstanding picture and audio capabilities, coupled with Hitachi’s reputation for superior reliability.
You should enjoy many years of trouble free operation from your TV. Take some time to read the Operating Guide thoroughly, and if you encounter any difficulty, firstly refer to the Trouble Shooting guide at the rear of this manual. If, in the unlikely event of a problem occurring on your TV, contact your dealer immediately. Please read the Guarantee carefully.
*Dolby Pro Logic Surround Sound is the domestic version of Cinema Dolby stereo sound, and allows the viewer to enjoy full cinematic sound quality when watching films or events recorded in Dolby Surround. The surround channels reinforce the stereo image, allowing front to rear sound movements (such as overhead aircraft effects) which immerses the viewer in ambience and special effects. In addition to this, the Pro Logic circuitry is able to create a centre channel, this anchors dialogue and central sounds to the screen so that speech does not become disembodied or lost in sound effects.
Dolby Pro Logic together with Hitachi’s unique 3DS Spatial Sound system will allow you to enjoy full Cinema Sound in your own home. In addition to this your Hitachi TV has full expansion sockets to accommodate optional speaker systems, so you can set up your
listening area to match your most exacting audio demands and aesthetic preferences. These features along with outstanding picture quality and of course our reputation for superior reliability will continually reward your decision for choosing HITACHI.
*Manufactured under license from Dolby Laboratories Licensing Corporation. DOLBY, the
double-D Symbol 
 and “PRO LOGIC” are the trademarks of Dolby Laboratories Licensing Corporation.
|
CONTENTS |
Introduction & Contents |
2 |
TV Safety |
3 |
Battery Installation & Safety |
4 |
TV Installation |
5 |
General TV Controls Overview |
6 |
Automatic Tuning Procedure |
7 |
Manual Tuning Procedure |
9 |
Picture & Audio Controls |
12 |
HITACHI 3DS System |
14 |
Speaker Configuration Menu |
15 |
Sound Mode |
16 |
Surround Setup Menu |
17 |
Connecting External Audio Equipment |
18 |
Feature Menu |
19 |
Widescreen Modes |
20 |
Connecting External AV equipment |
22 |
Teletext & VCR Operation |
24 |
Handset Layout |
25 |
Handset Functions |
26 |
Trouble Shooting Guide |
27 |
Your Guarantee |
28 |
Technical Specifications |
29 |
Environmental Notice from HITACHI |
30 |
2


 TV
TV


 Safety
This television has been designed and manufactured to meet international safety standards, but like any electrical equipment, care must be taken if you are to obtain the best results and safety is to be assured.
DO read the operating instructions before you attempt to use the equipment.
DO ensure that all connections, (including the mains plug, extension leads and inter-connections between the pieces of equipment), are properly made and in accordance with the manufacturers instructions. Switch off and withdraw the mains plug before making or changing connections.
Should you require to replace the fuse in the moulded mains plug with a new fuse then please replace with one of the same value, type and approval as the original. Ensure the fuse cover is returned to its original position.
3
 Battery
 Installation


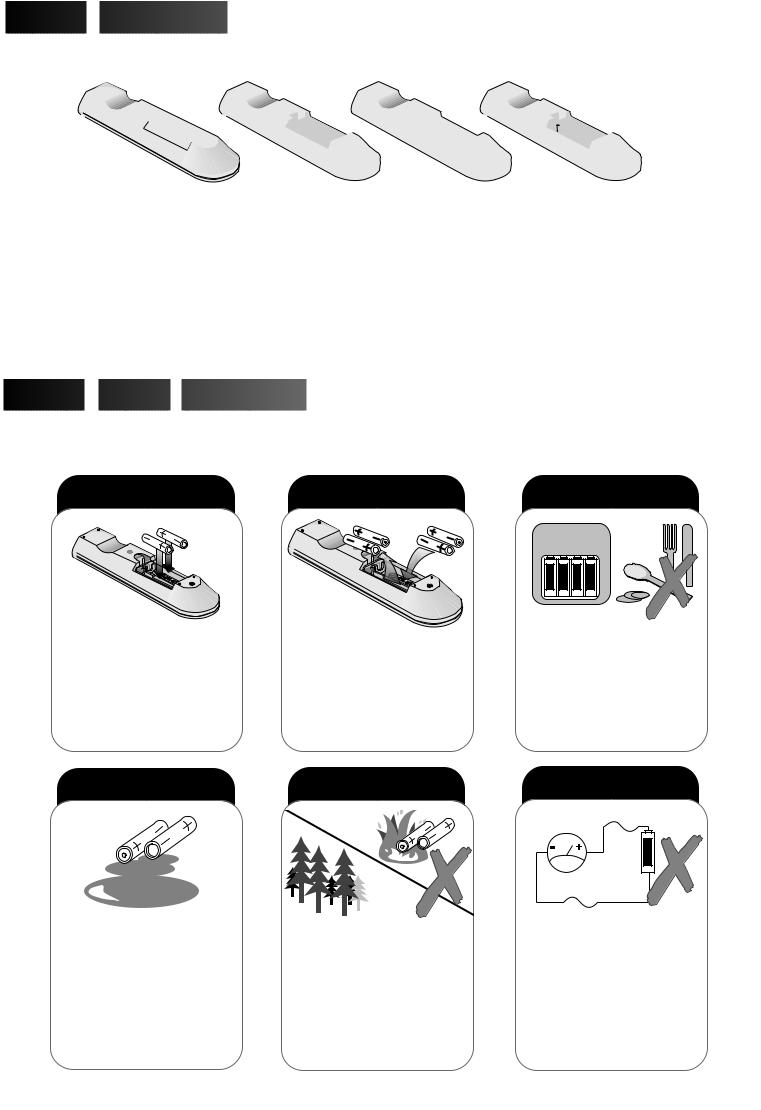
1 |
Remove cover of handset by lifting up the cover at the recess. |
2 |
Insert batteries into handset as shown and replace cover. |
1.
2.
3.
 Battery
 Safety

 Guidelines


Used correctly, batteries are a safe and dependable source of portable power. However, problems can occur if they are misused or abused - resulting in leakage, or in extreme cases, fire or explosion. Here are some simple guidelines to safe battery use designed to eliminate any such problems.
always |
always |
always |
+ |
+ |
+ |
+ |
- |
- |
- |
- |
Take care to fit your |
Replace the whole set of |
Store unused batteries in |
||
batteries correctly, observing |
batteries at one time, taking |
their packaging and away |
||
the plus ‘+’ and minus ‘-’ |
care not to mix old and new |
from metal objects which |
||
marks on the battery and |
batteries of different types, |
may cause a short circuit |
||
appliance. Incorrect fitting |
since this can result in leak- |
resulting in leakage, or in |
||
can cause leakage, or in |
age, or in extreme cases, |
extreme cases, fire or |
||
extreme cases, fire or |
fire or explosion. |
explosion. |
||
always |
never! |
never! |
||
|
|
|
|
|
|
|
|
|
|
Remove dead batteries from equipment, and all batteries from equipment that is to be left for long periods of time without any use. Otherwise the batteries may leak and
cause damage.
CHARGE
Never dispose of batteries in |
Never attempt to recharge |
|
ordinary batteries, either in a |
||
fire as this can cause an |
||
charger or by applying heat to |
||
explosion. |
||
them. They may leak, cause |
||
Respect the environment - |
||
fire or even explode. |
||
always dispose of batteries |
||
Rechargeable NiCAD batteries |
||
in an environmentally friendly |
||
and |
||
manner. |
||
chargers can be purchased |
||
|
||
|
from any good High Street |
|
|
electrical retailer. |
4
TV Installation
Before installing your TV please read the following important notes:
If you intend placing this TV into a cabinet or a wall alcove, please ensure there is at least a 100mm (10cm) gap to the sides, rear and top of the Television. This is to allow for adequate ventilation during TV operation.
Don’t allow soft furnishings such as curtains to be draped over the TV whilst in operation.
Never place the TV on to a carpet during normal operation - this could obstruct ventilation slots on the base of the TV. Always place the TV on a flat surface , or if supplied, the stand accessory.
Failure to observe the above guidelines could result in serious overheating of your TV, or in extreme cases, even fire.
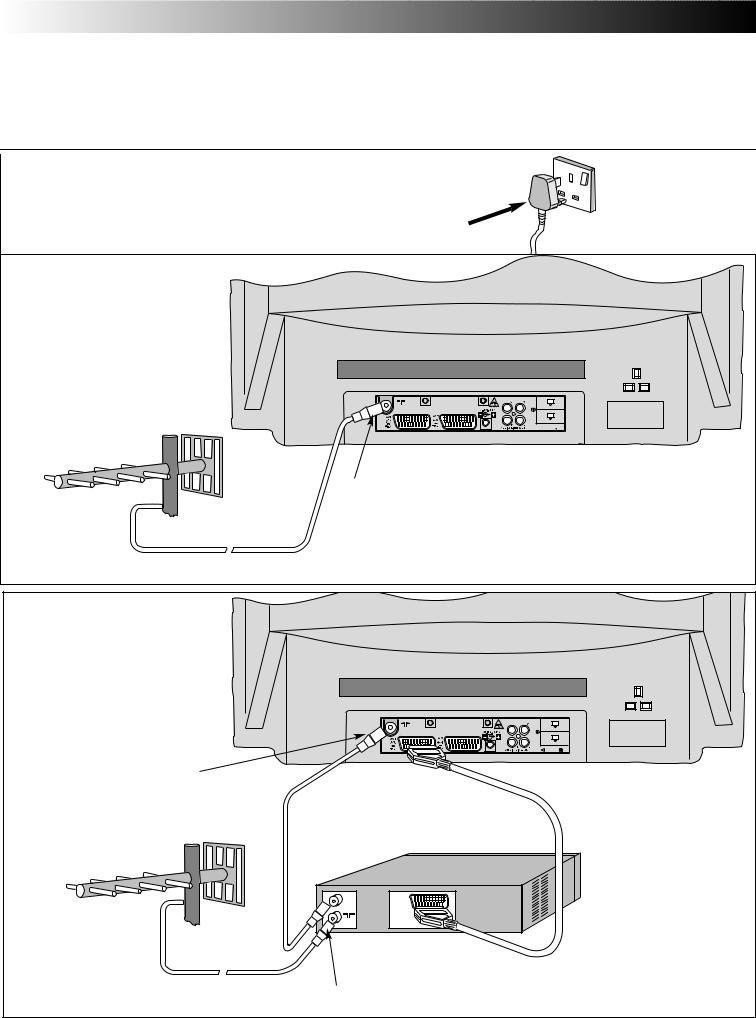
Connecting your TV to the mains socket.
(Please read the Safety Notes in the ‘TV Safety
Section’ with reference to unattended operation). Insert Plug and Switch on
TV only installation.
L
R
 2 x 12W 8

Aerial (RF) Socket
Aerial (RF) Lead |
|
|
Installation via a VCR. |
|
|
|
|
L |
|
|
R |
|
|
2 x 12W 8 |
Aerial (RF) Socket TV |
*Optional Scart Lead: |
|
|
|
|
|
|
TV to VCR |
(RF) connecter lead |
VCR to TV |
|
Aerial (RF) Lead |
Aerial (RF) Socket VCR |
|
|
|
|
*A scart lead should be fitted between your TV and VCR to enhance your picture and sound quality. Scart leads are essential if you have a stereo TV and VCR and wish to obtain stereo sound from your equipment. These leads can be purchased from your Hitachi dealer or any good ‘High Street’ electrical retailer.
5

TV Controls Overview
PLEASE NOTE: The model illustrated throughout this User Guide is the C28W511TN. Other models may differ.
FRONT CONTROL PANEL
Access to the front control panel is gained by pushing the door in and releasing. The front control panel contains items such as the Headphone socket, Audio/Video sockets, Programme + /- and Volume +/- buttons. Also located on the front are the ON/OFF button, Infra Red Lens and TV Mode Light.
* This button is only available on models C28W510TN C28W511TN C28W510SN
On/off |
Headphone |
S-VHS |
Audio/Video |
Volume+/- |
P+/P- |
MENU |
TV Mode |
Switch |
Socket |
Socket |
Input Sockets |
Buttons |
Buttons |
Button |
Light |
*
*IMPORTANT NOTE The 18 Volt Output socket is used for connection of HITACHI auxiliary equipment only and under no circumstances should be connected to other
external equipment. Failure to observe this may result in serious damage to your equipment.
REAR CONNECTING SOCKETS
The rear of your TV contains an aerial RF input and two scart sockets, AV1 and AV2. The RF/ aerial socket is permanently connected to an RF source i.e. an aerial antenna shown in ‘TV Installation section’. The scart sockets are used to connect external equipment such as VCR’s, Satellite Receivers / Decoder etc. Connection of this equipment is explained in greater detail in the ‘Connecting of External AV Equipment section’ of this manual. Also located on the rear of the TV are the Audio Sockets and the *18 Volt Output socket.
Consult your HITACHI dealer with regards to purchasing HITACHI auxiliary equipment.
L
R
 2 x 12W 8
|
|
|
L |
|
|
|
|
|
|
R |
|
** Din sockets are |
|
|
|
|
2 x 12W 8 |
|
not available on |
|
|
|
|
|
|
models |
|
|
|
|
|
|
C28W510TN |
|
RF Aerial |
Scart Socket |
Scart Socket |
Audio Output |
External Speaker |
C28W511TN |
|
C28W510SN |
||||||
Input Socket |
AV1 |
AV2 |
Sockets |
Sockets ** |
||
|
SWITCHING ON
To switch your TV on, press the ON/OFF button shown above. If the TV fails to display anything on the screen, but the red TV mode light appears bright, then the TV is in Stand by mode. Press the Stand by button on your handset to activate the TV. The red TV mode light will then dim and you should allow the TV a few seconds for a picture to appear.
6


 Automatic

 Tuning

 Procedure

SIGNAL QUALITY - If poor or noisy signals are experienced from your TV during normal operation, fit the supplied Relay RF cable between your VCR and TV. This measure will improve the picture quality on your TV.
To automatically tune this TV to your local broadcasting stations follow the step by step guide below. Once the TV has found all your local stations, then they are automatically assigned into the following order:
1.BBC1; 2: BBC2; 3: ITV; 4:CH4/S4C; 5: CH5 (subject to availability); 6: Satellite.
Alternatively, if you are familiar with local broadcasting frequency or CH numbers, then these can be entered manually. Please refer to the Manual Tuning Procedure section of this booklet.
IMPORTANT NOTE: If you have a VCR or a Satellite receiver connected to this TV please ensure that they are switched on before Autotune commences. In the case of a VCR, insert a prerecorded tape and begin playback of your equipment. With a Satellite receiver, select SKY NEWS. These measures ensure that all your equipment is tuned in during the AUTOTUNE procedure. (Satellite equipment installation is explained in the ‘Connecting of External AV Equipment section’).
Note: The VCR programme number should always be set to 0
1
2
3
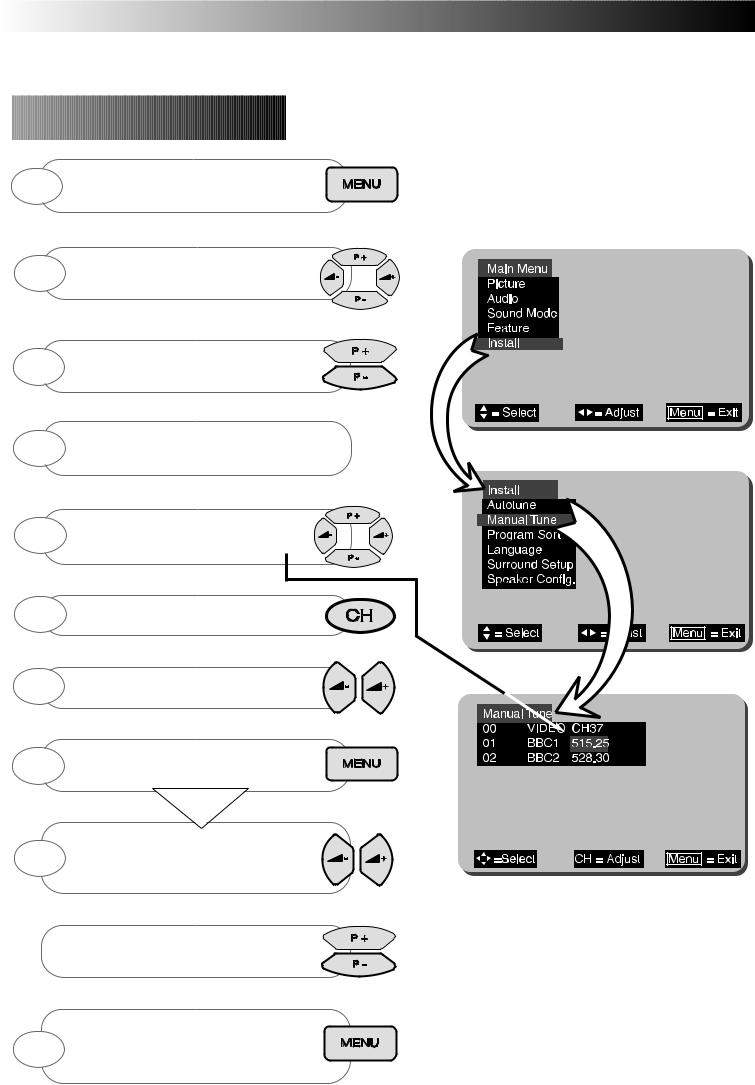
Highlight INSTALL using the up/down
follow step
buttons select menu is
If language setting is incorrect, use 4 up/down buttons to highlight
LANGUAGE, and select using the left/right buttons.
5
6
to highlight
to begin
Completed Autotune example.
7

Automatic Tuning cont.
Program Sort |
The PROGRAM SORT menu allows the user to swap programme numbers from one |
|
location to another. If necessary follow the steps below. |
||
|
1
2 |
highlight |
|
left/right |
||
|
3 |
highlight |
|
4 |
select |
|
5
6
7
8


9
10
8
In this example BBC1 on Program 1 has been selected so that it may be swapped with Program 3 (ITV).
Manual Tuning Procedure
If desired, you may manually tune this TV. There are several methods of Manual Tuning, these include Search Tuning / Fine Tuning and Frequency or CH manual input (this requires you to know your local broadcasting frequency or CH number). This section will also deal with items such as assigning AV sockets to program numbers and Program
Naming.
Search Tuning / Fine Tuning |
This section deals with locating broadcasting stations using the Search |
|
Tuning and combined Fine Tuning facility. Fine Tuning may be required |
|
after Search or Automatic Tuning is complete. |
1
2
3
7
9
to highlight |
left/right buttons |
highlight |
to begin |
simply |
will |
|
When complete repeatedly press the |
10 |
above |
|
9

 Manual
 Tuning
 cont.
cont.


Entering Known Frequencies |
Broadcasting stations transmit the signal to your TV on a particular defined |
frequency i.e. 525.25MHz. These frequencies can be entered manually if |
|
|
you can obtain this information by calling your local operator. In |
addition |
CHANNEL Nº is also used e.g. CH34, and this too can be directly |
input |
on this TV). |
1
Use up/down buttons  to highlight 2 using the
3
4
5
6
are commonly used, for example, if you view camcorder frequently, then we suggest assigning a dedicated proyour TV. This can be any program number that has not
. Follow the step by step guide below.
|
Press and HOLD the MENU button |
until |
1 |
shown. Use up/down |
|
INSTALL - select by |
||
|
pressing the left/right buttons. |
|
2
3
4
5
6 |
sock- |
|
button |
||
|
AV2 assigned to Program 6
10
 Loading...