


C28W410TN

C28W410SN - C28W410TN - C28W411TN
WIDE SCREEN COLOUR TELEVISION
INSTRUCTION BOOKLET

Dear Hitachi Customer,
Congratulations on your purchase of the very latest ‘state
of the art’ television from HITACHI. At Hitachi we pride
ourselves on producing high quality televisions with
outstanding picture and audio capabilities, coupled with
Hitachi’s reputation for superior reliability.
You should enjoy many years of trouble free operation
from your TV. Take some time to read the Operating
Guide thoroughly, and if you encounter any difficulty, firstly
refer to the Trouble Shooting guide at the rear of this
manual. If, in the unlikely event of a problem occurring on
your TV, contact your dealer immediately. Please read the
Guarantee carefully, this is found on page 24.
TV Introduction
TV Introduction
CONTENTS
2
2
Introduction & Contents Page 2
TV Safety Page 3
Battery Safety & Installation Page 4
TV Installation Page 5
General TV Controls Overview Page 6
Automatic Tuning Procedure Page 7 - 8
Manual Tuning Procedure Page 9 - 11
Picture & Audio Controls Page 12 - 13
Feature Menu Page 14
NICAM Features Page 15
Widescreen Modes Page 16 - 17
Handset Layout Page 18
Handset Functions Page 19
Connecting External AV equipment Page 20 - 21
Teletext & VCR Operation Page 22
Trouble Shooting Guide Page 23
Your Guarantee Page 24
Technical Specifications Page 25
Environmental Notice from HITACHI Page 26
TV Safety
TV Safety
3
3
DO observe the manufacturers instructions when connecting extension leads to your TV. The fuse
should be a 5 Amp fuse with the safety symbols and displayed. If you are in any doubt
about the extension installation, please consult a competent electrician.
This television has been designed and manufactured to meet international
safety standards, but like any electrical equipment, care must be taken if
you are to obtain the best results and safety is to be assured.
DO NOT cut off the fitted mains plug as it may contain a special radio interference filter, the
removal of which could lead to impaired performance. If you wish to extend the lead, obtain
an appropriate extension lead or consult your dealer.
DO NOT continue to operate the equipment if you are in any doubt about it working
normally or if it is damaged in any way - switch off, withdraw the mains plug and consult
your dealer.
IF you intend placing this TV into a cabinet or a wall alcove, please ensure there is at least
a 100mm (10cm) gap to the sides, rear and top of the TV. This is to allow for adequate ven-
tilation during your TV's operation.
DO NOT leave equipment switched on when it is unattended unless it is specifically stated
that it is designed for unattended operation or has a stand-by mode. Switch off using the
switch on the equipment and show your family how to do this. Make special arrangements
for infirm or handicapped people.
DO NOT obstruct the ventilation of the equipment, for example with curtains or soft
furnishings. Overheating will cause damage and shorten the lifespan of your equipment.
DO NOT use makeshift stands and NEVER fix legs with wood screws - to ensure complete
safety, always fit the manufacturers approved stand or legs with the fixings provided
according to the instructions.
DO NOT allow electrical equipment to be exposed to rain or moisture.
NEVER let anyone, especially children, push anything into holes, slots, or
any other opening in the case - this could result in a fatal electrical shock.
NEVER guess or take chances with electrical equipment of any kind -
it is better to be safe than sorry!
DO be careful with any glass panels or doors on equipment.
DO consult your dealer if you are in any doubt about installation, operation or safety of your equipment.
DO place your TV on a flat surface, or if supplied, the stand accessory.
DO NOT remove any fixed cover as this may expose dangerous voltages.
DO ensure that all connections, (including the mains plug, extension leads and inter-connections
between the pieces of equipment), are properly made and in accordance with the manufacturers
instructions
. Switch off and withdraw the mains plug before making or changing connections.
DO NOT listen to headphones at high volume, as such use can permanently damage
your hearing.
DO read the operating instructions before you attempt to use the equipment.
DO NOT use equipment such as personal stereos or radios so that you are distract-
ed from the requirements of traffic safety. It is illegal to watch television whilst driving.
DO NOT place hot objects such as candles or nightlights on, or close to, equipment.
High temperatures can melt plastic and lead to fires.
Should you require to replace the fuse in the moulded mains plug with a new fuse then please
replace with one of the same value, type and approval as the original. Ensure the fuse cover is
returned to its original position.
Battery Installation
Battery Installation
Battery Safety Guidelines
Battery Safety Guidelines
Used correctly, batteries are a safe and dependable source of portable power. However, problems can
occur if they are misused or abused - resulting in leakage, or in extreme cases, fire or explosion. Here are
some simple guidelines to safe battery use designed to eliminate any such problems.
4
4
always
Take care to fit your batteries
correctly, observing the plus
‘+’ and minus ‘-’ marks on
the battery and appliance.
Incorrect fitting can cause
leakage, or in extreme
cases, fire or explosion.
always
Replace the whole set of
batteries at one time, taking
care not to mix old and new
batteries of different types,
since this can result in leak-
age, or in extreme cases, fire
or explosion.
always
Store unused batteries in
their packaging and away
from metal objects which
may cause a short circuit
resulting in leakage, or in
extreme cases, fire or explo-
sion.
+
-
+
-
+
-
+
-
always
Remove dead batteries from
equipment, and all batteries
from equipment that is to be
left for long periods of time
without any use. Otherwise
the batteries may leak and
cause damage.
never!
Never dispose of batteries in
fire as this can cause an
explosion.
Respect the environment -
always dispose of batteries in
an environmentally friendly
manner.
never!
Never attempt to recharge ordi-
nary batteries, either in a charg-
er or by applying heat to them.
They may leak, cause fire or
even explode. Rechargeable
NiCAD batteries and
chargers can be purchased
from any good High Street
electrical retailer.
CHARGE
+
-
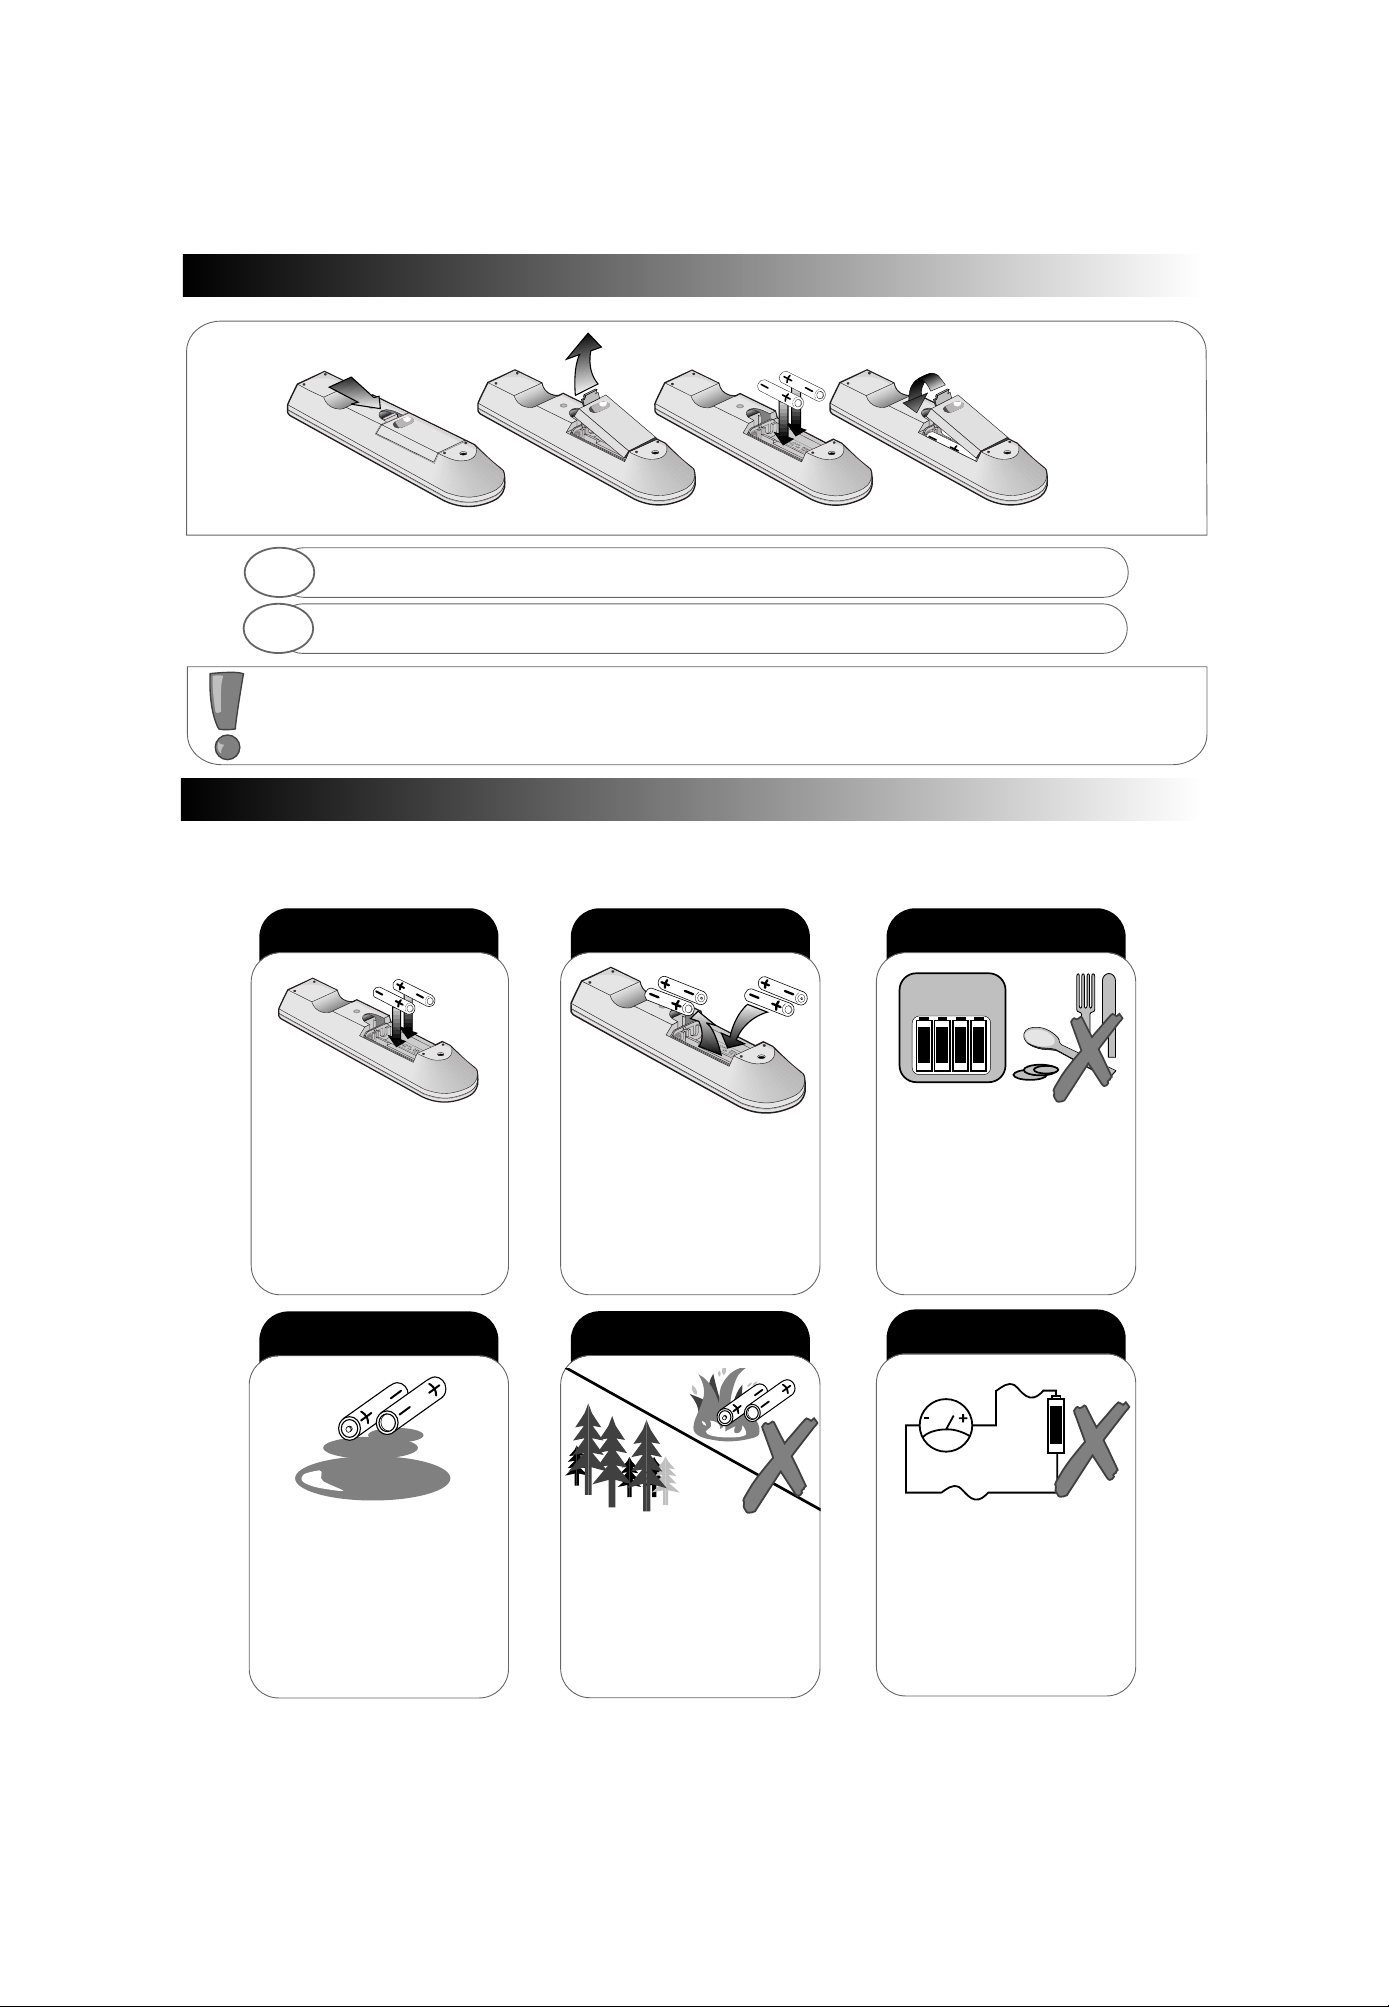
1. When inserting the batteries make sure the polarities are correct, that is, ‘+’ to ‘+’, ‘-’ to ‘-’.
2. Replace the batteries with the equivalent ‘AA’ type.
3. Discard old batteries safely, following the battery safety guidelines.
1
2
Remove cover of handset by lifting up the cover at the recess.
Insert batteries into handset as shown and replace cover.

Before installing your TV please read the following important notes:
If you intend placing this TV into a cabinet or a wall alcove, please ensure there is at least a 100mm (10cm) gap to the
sides, rear and top of the T elevision. This is to allow for adequate ventilation during TV operation.
Don’t allow soft furnishings such as curtains to be draped over the TV whilst in operation.
Never place the TV on to a carpet during normal operation - this could obstruct ventilation slots on the base of the TV .
Always place the TV on a flat surface , or if supplied, the stand accessory.
Failure to observe the above guidelines could result in serious overheating of your TV, or in extreme cases, even fire.
TV Installation
TV Installation
*A scart lead should be fitted between your TV and VCR to enhance your picture and sound quality. Scart leads are
essential if you have a stereo TV and VCR and wish to obtain stereo sound from your equipment. These leads can be
purchased from your Hitachi dealer or any good ‘High Street’ electrical retailer.
Step 1.
Connecting your TV to the mains socket.
(Please read the Safety Notes on page 3 with reference
to unattended operation).
Insert Plug and
Switch on
5
5
Step 2.
TV only installation.
Step 3.
Installation via a VCR.
Aerial (RF) Lead
Aerial (RF) Socket
Aerial (RF) Lead
Aerial (RF) Socket VCR
Aerial (RF) Socket TV
(RF) connecter lead VCR to TV
OUT
*Optional Scart Lead TV
to VCR
wall socket
wall socket
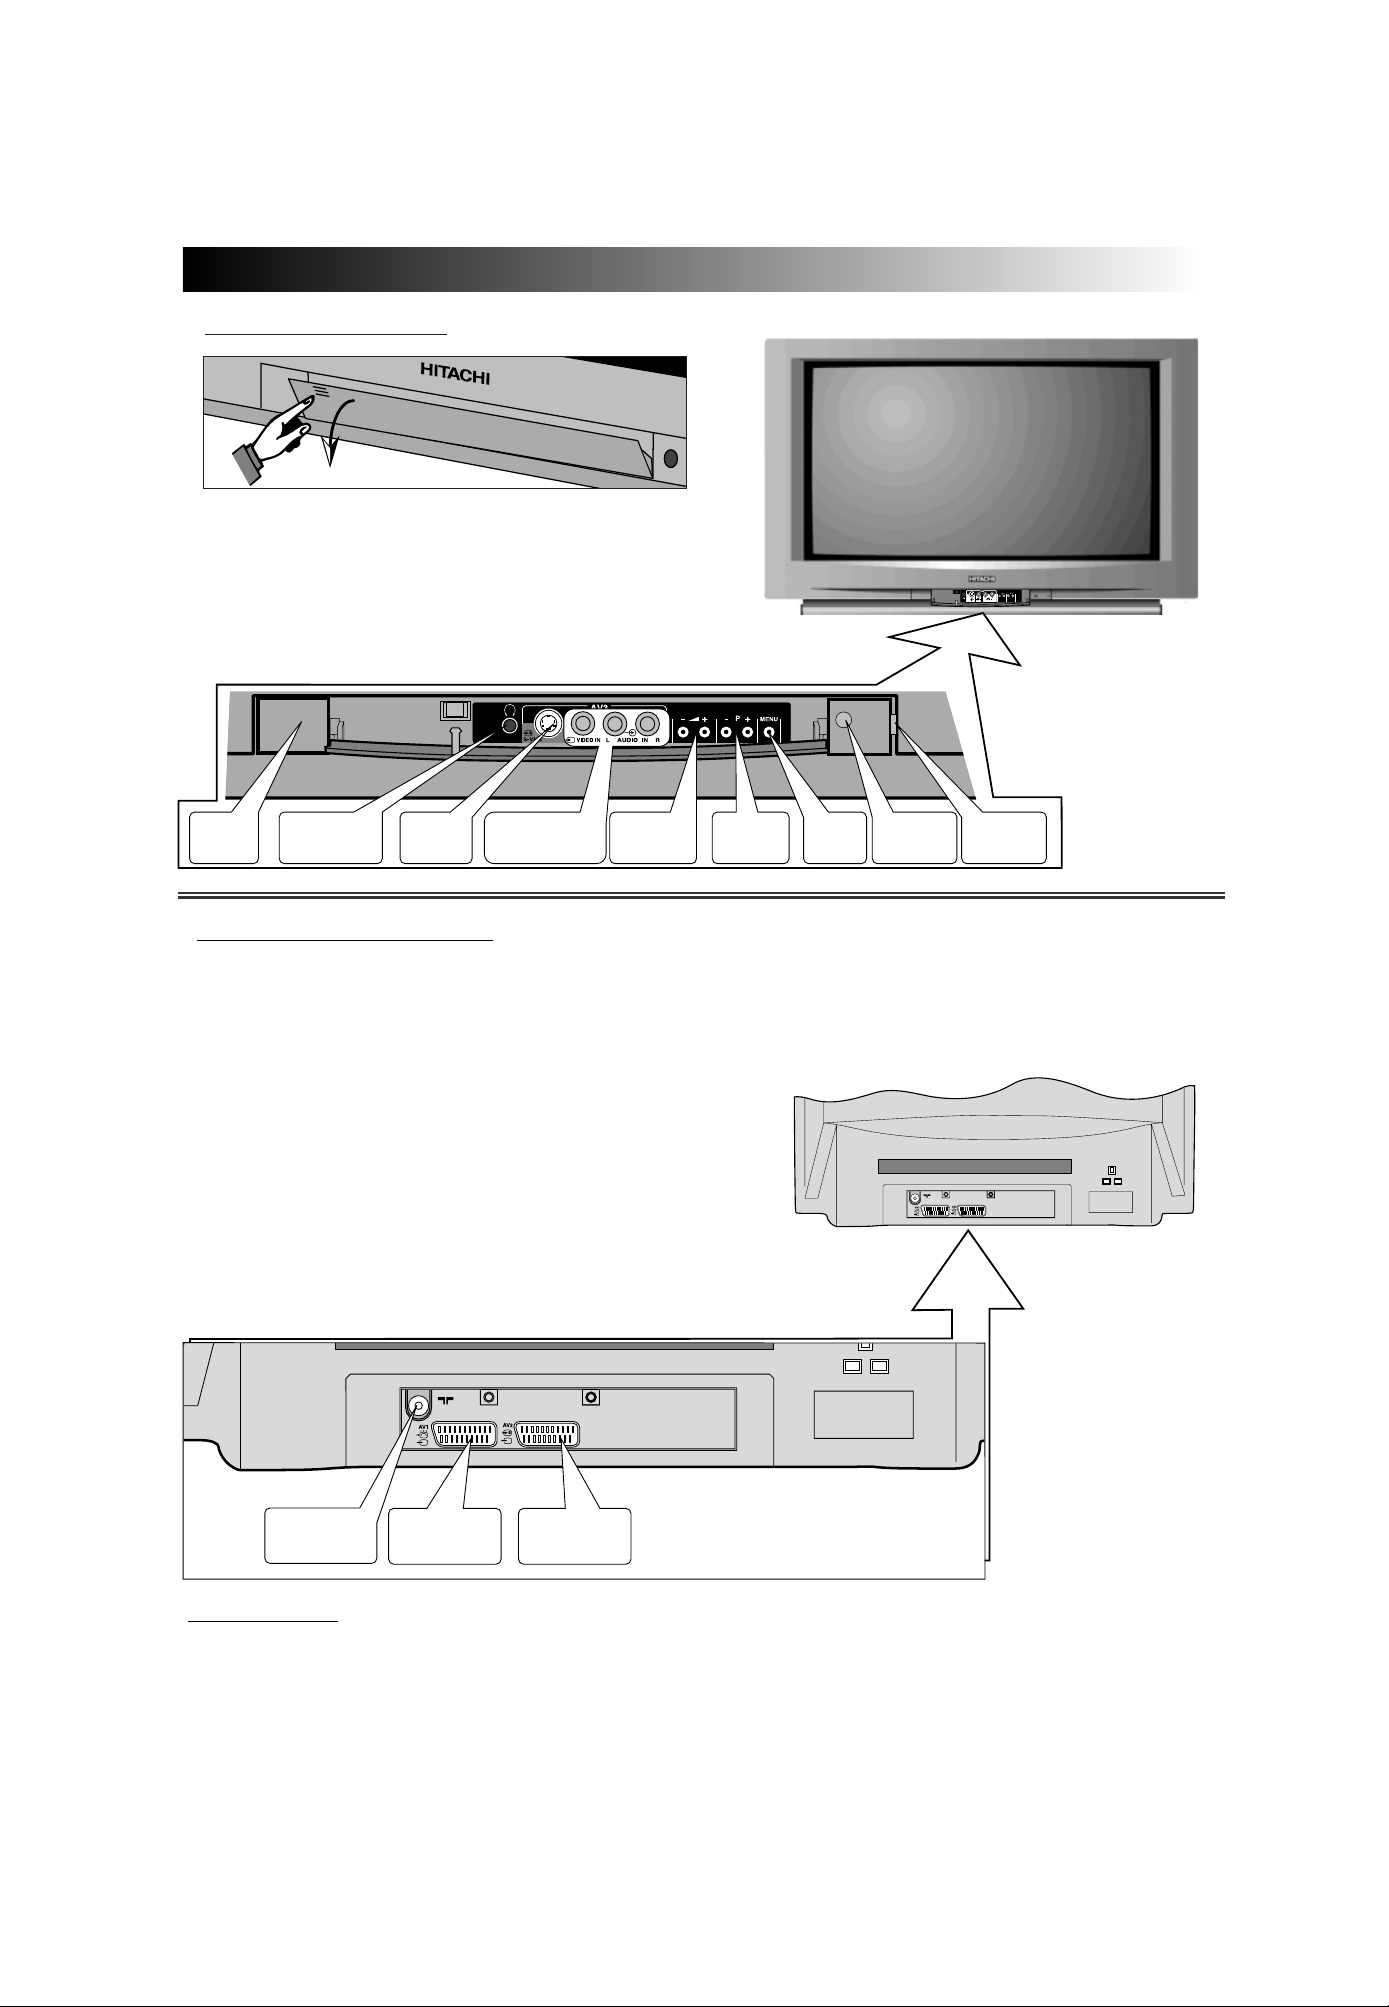
TV Controls Overview
TV Controls Overview
On/off
Switch
Headphone
Socket
S-VHS
Socket
Audio/Video
Input Sockets
Volume+/-
Buttons
InfraRed
lens
TV Mode
Light
P+/P-
Buttons
MENU
Button
FRONT CONTROL PANEL
Access to the front control panel is gained by pushing
the door in and releasing. The front control panel con-
tains items such as the Headphone socket, Audio/Video
sockets, Programme + /- and Volume +/- buttons. Also
located on the front are the ON/OFF button, Infra Red
Lens and TV Mode Light.
REAR CONNECTING SOCKETS
The rear of your TV contains an aerial RF input and two
scart sockets, AV1 and AV2. The RF/ aerial socket is per-
manently connected to an RF source i.e. an aerial anten-
na (shown on Page 5). The scart sockets are used to
connect external equipment such as VCR’s, Satellite
Receivers / Decoder etc. Connection of this equipment is
explained in greater detail on Page 20 and 21 of this man-
ual.
Consult your HITACHI dealer with regards to purchasing
HITACHI auxiliary equipment.
RF Aerial
Input Socket
Scart Socket
AV1
Scart Socket
AV2
SWITCHING ON
To switch your TV on, press the ON/OFF button shown above. If the TV fails to display anything on the screen, but the
red TV mode light appears bright, then the TV is in Stand by mode. Press the Stand by button on your handset (key 2)
to activate the TV. The red TV mode light will then dim and you should allow the TV a few seconds for a picture to
appear.
6
6

Automatic T
Automatic T
uning Procedure
uning Procedure
7
7
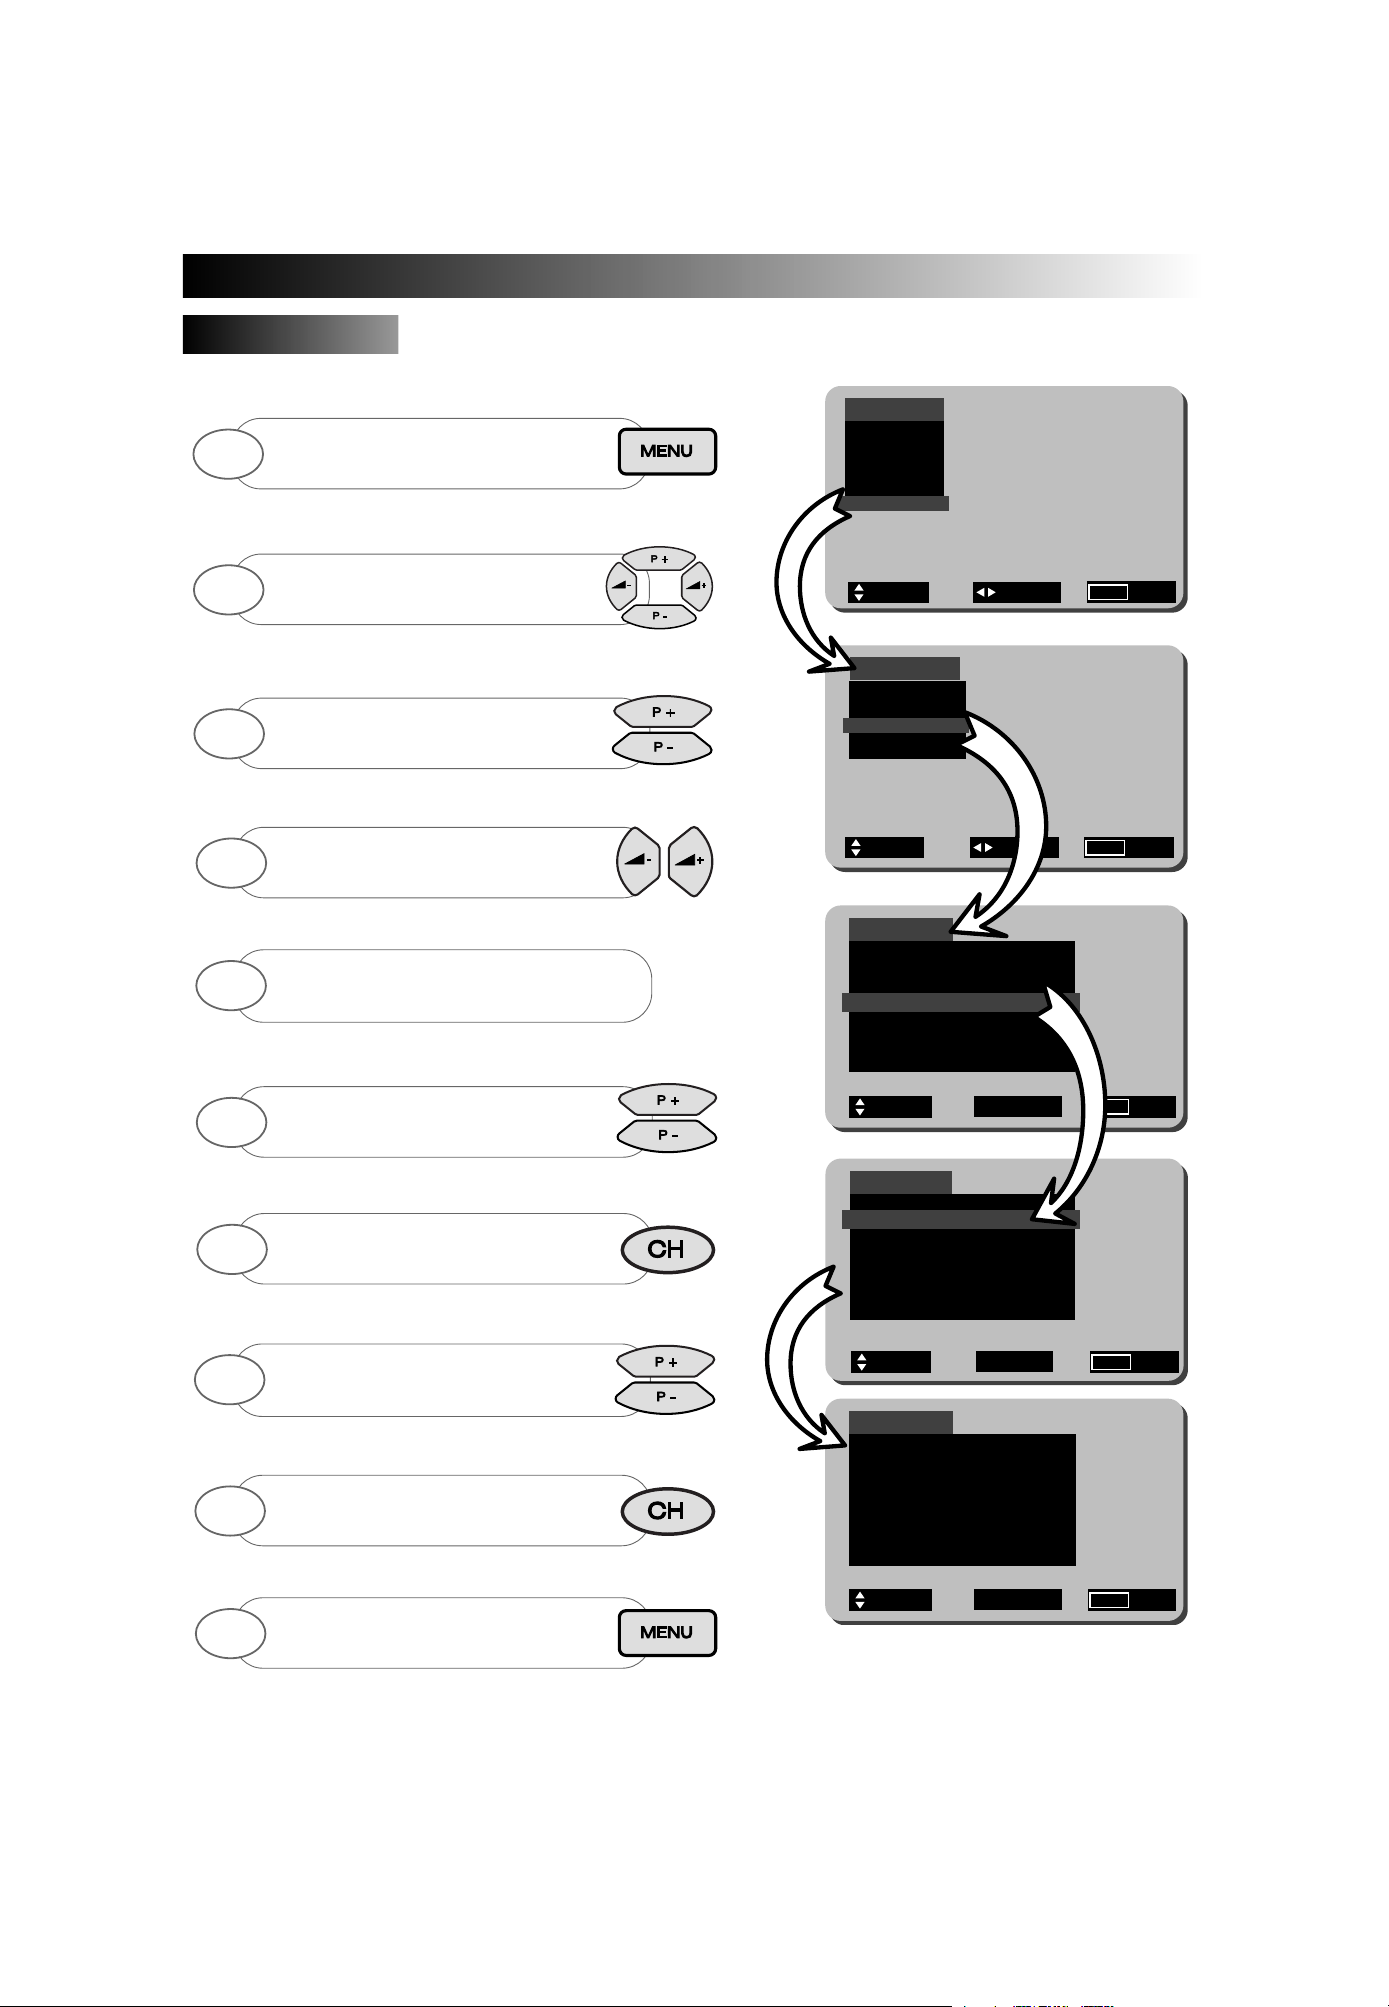
Main Menu
Picture
Audio
Sound Mode
Feature
Install
Install
Autotune
Manual Tune
Program Sort
Language
Autotune
00 VIDEO CH37 AV1
01 BBC1 515.25
02 BBC2 528.30
03 ITV 544.65
04 CH4 566.55
05 CH5 572.10
06 Sat 525.25
=Select =Adjust Menu =Exit
= Select = Adjust Menu = Exit
Menu = Exit
English
Completed Autotune example.
SIGNAL QUALITY - If poor or noisy signals are experienced from your TV during normal
operation, fit the supplied Relay RF cable between your VCR and TV. This measure will improve
the picture quality on your TV.
To automatically tune this TV to your local broadcasting stations follow the step by step guide below. Once
the TV has found all your local stations, then they are automatically assigned into the following order:
1.BBC1; 2: BBC2; 3: ITV; 4:CH4/S4C; 5: CH5 (subject to availability); 6: Satellite.
Alternatively, if you are familiar with local broadcasting frequency or CH numbers, then these can be
entered manually. Please refer to the Manual Tuning Procedure section of this booklet.
IMPORTANT NOTE: If you have a VCR or a Satellite receiver connected to this TV please ensure
that they are switched on before Autotune commences. In the case of a VCR, insert a
pre-recorded tape and begin playback of your equipment. With a Satellite receiver, select SKY
NEWS. These measures ensure that all your equipment is tuned in during the AUTOTUNE
procedure. (Satellite equipment installation is explained on Page 20 and 21).
Note: The VCR programme number should always be set to 0
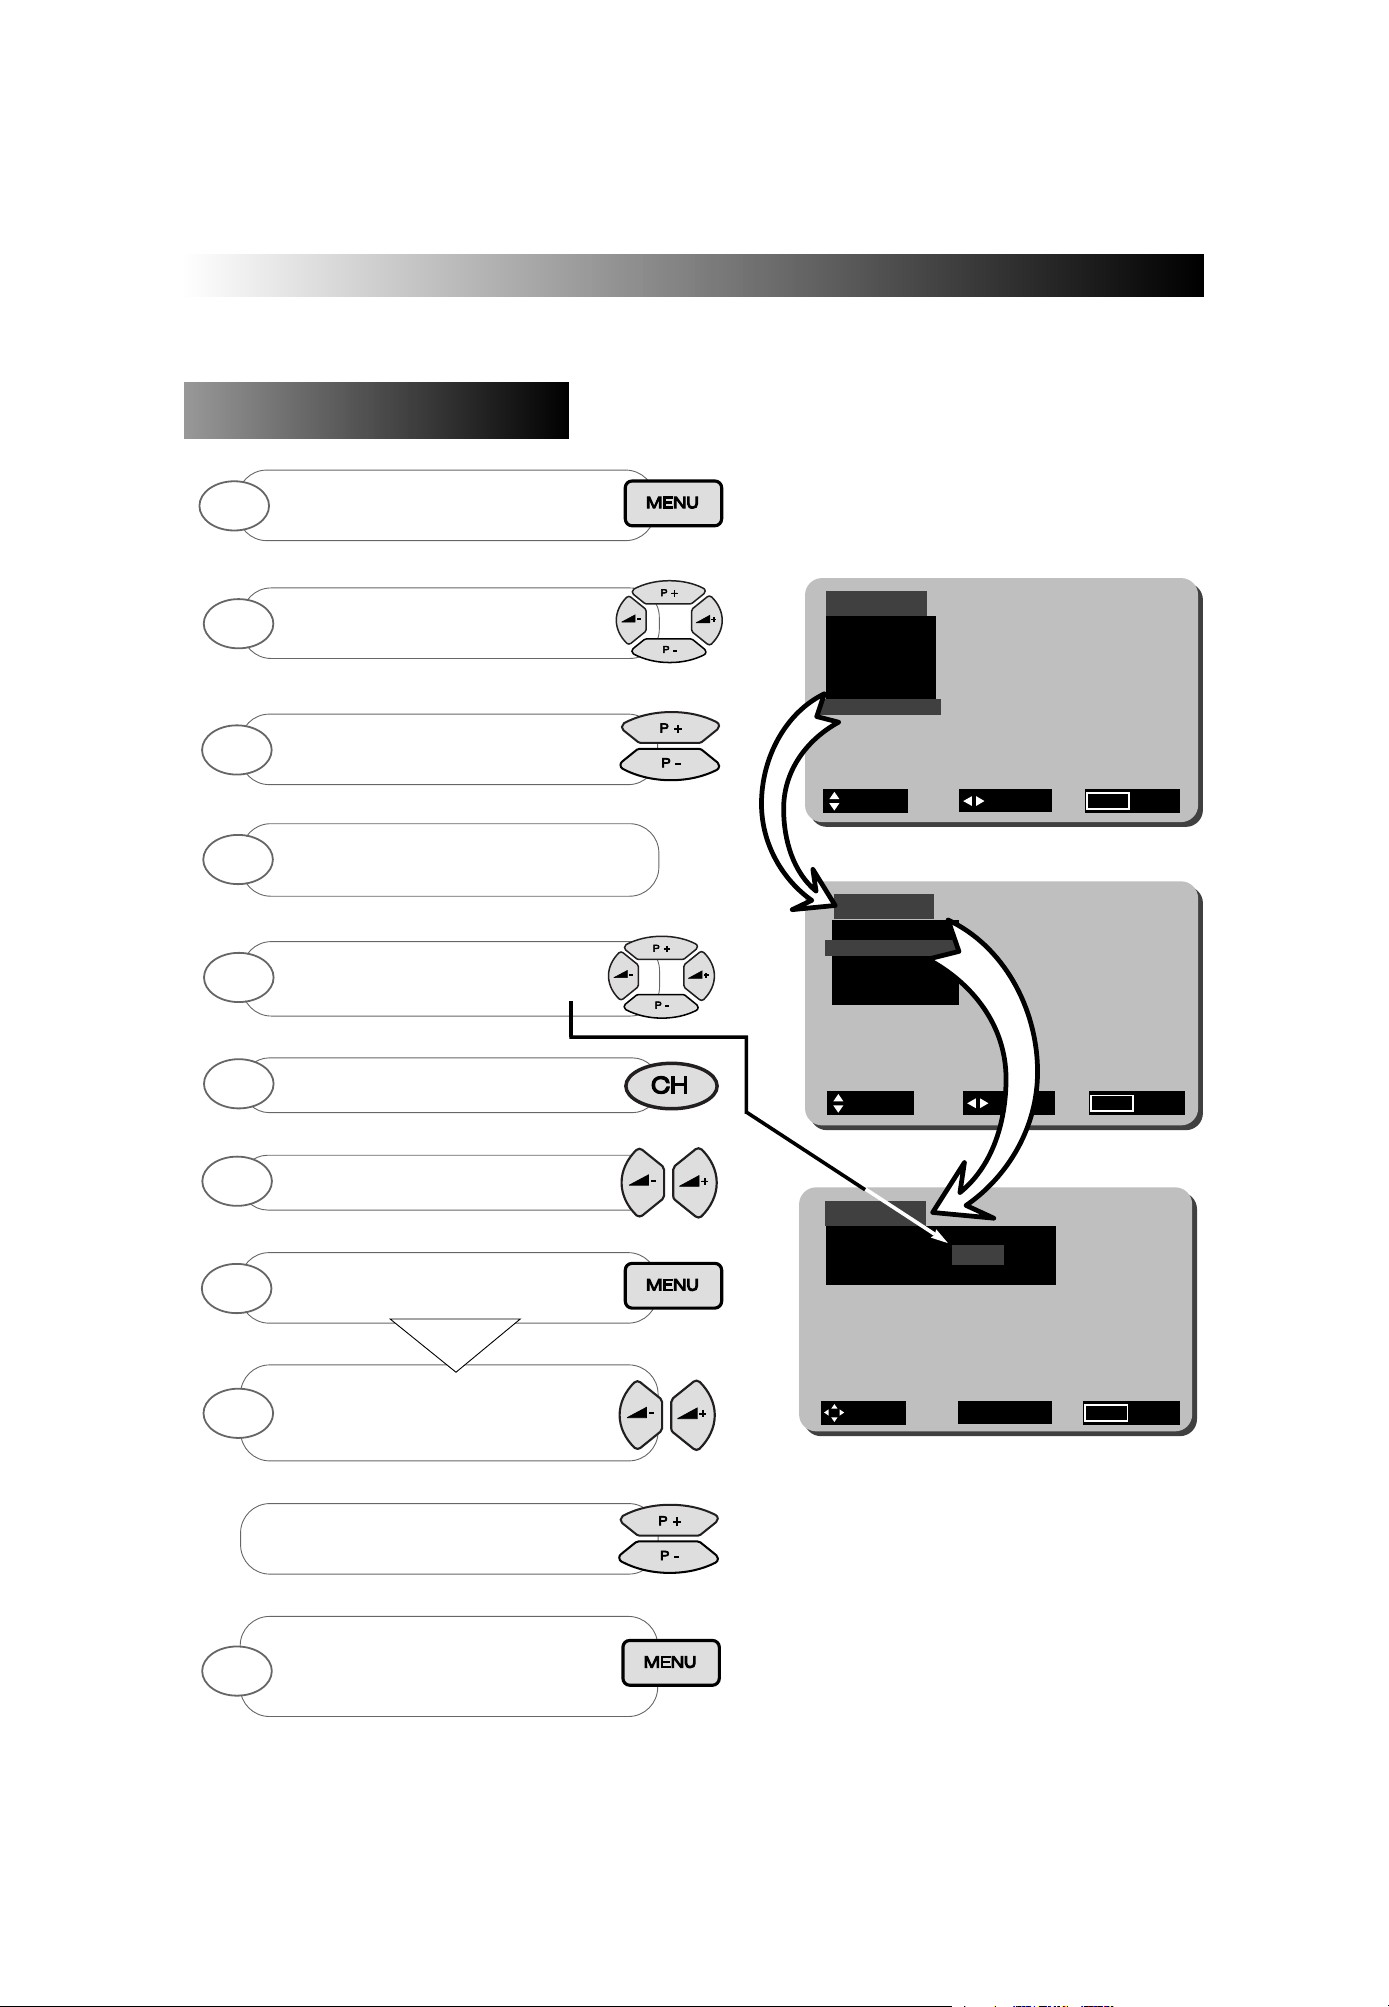
Press and HOLD the MENU button until
MAIN MENU with INSTALL is shown
Highlight INSTALL using the up/down
buttons
(if INSTALL is not shown follow step
above once more).
Press the left right buttons select
INSTALL. The INSTALL menu is
shown.
1
2
3
If language setting is incorrect, use
up/down buttons to highlight
LANGUAGE, and select using the
left/right buttons.
Use the up/down buttons to highlight
AUTOTUNE.
Use the left/right buttons to begin
AUTOTUNE.
4
5
6
The PROGRAM SORT menu allows the user to swap programme numbers from one
location to another. If necessary follow the steps below.
Program Sort
Program Sort
Automatic T
Automatic T
uning cont.
uning cont.
8
8
Main Menu
Picture
Audio
Sound Mode
Feature
Install
Install
Autotune
Manual Tune
Program Sort
Language
Program Sort
00 VIDEO CH37 AV1
01 BBC1 515.25
02 BBC2 528.30
03 ITV 544.65
04 CH4 566.55 I
05 CH5 572.10 I
06 Sat 525.25 I
Program Sort
00 VIDEO CH37 AV1
01 BBC1 515.25
02 BBC2 528.30
03 ITV 544.65
04 CH4 566.55
05 CH5 572.10
06 Sat 525.25
= Select = Adjust Menu = Exit
= Select = Adjust Menu = Exit
= Select CH = Adjust Menu = Exit
Program Sort
00 VIDEO CH37 AV1
01 ITV 544.65
02 BBC2 528.30
03 BBC1 515.25
04 CH4 566.55
05 CH5 572.10
06 Sat 525.25
= Select CH = Adjust Menu = Exit
= Select CH = Swap Menu = Exit
In this example BBC1 on Program 1 has been
selected so that it may be swapped with
Program 3 (ITV).
Press and HOLD the MENU button until
MAIN MENU with INSTALL is shown
Use up/down buttons to highlighht
INSTALL and use the left/right
buttons to select.
Use the up/down buttons to highlight
PROGRAM SORT.
1
2
3
The PROGRAM SORT menu is displayed.
Use the up/down buttons to highlight
Program to change (example shows
Program 3 ITV)
Press the ‘CH’ button to select
(selection bar turns RED in colour)
5
6
7
Use the up/down buttons to highlight
Program to be replaced (example
shows Program 1 BBC1)
Once highlighted press CH key once
more to confirm selection (selection bar
returns to BLUE)
Repeat above to swap other programs, or
repeatedly press MENU button to return to
TV operation.
8
9
10
Use left/right buttons to select
PROGRAM SORT.
4
To FINE TUNE press the up/down
buttons until the picture becomes clear.
Manual T
Manual T
uning Procedure
uning Procedure
If desired, you may manually tune this TV. There are several methods of Manual Tuning, these include Search Tuning /
Fine Tuning and Frequency or CH manual input (this requires you to know your local broadcasting frequency or CH num-
ber). This section will also deal with items such as assigning AV sockets to program numbers and Program Naming.
This section deals with locating broadcasting stations using the Search
Tuning and combined Fine Tuning facility. Fine Tuning may be required
after Search or Automatic Tuning is complete.
Search T
Search T
uning / Fine T
uning / Fine T
uning
uning
9
9
Main Menu
Picture
Audio
Sound Mode
Feature
Install
Install
Autotune
Manual Tune
Program Sort
Language
Manual Tune
00 VIDEO CH37
01 BBC1 515.25
02 BBC2 528.30
= Select = Adjust Menu = Exit
= Select =Adjust Menu = Exit
=Select CH = Adjust Menu = Exit
The MANUAL TUNE menu is displayed
(bottom right).
Use the up/down/left/right buttons to
highlight frequency bar of
programme Nº to Search Tune.
Press ‘CH’ button to select
(bar turns RED)
4
5
6
When a broadcast is found either
repeatedly press the MENU button to
store and exit to TV
To continue SEARCH TUNE simply
press the left/right buttons the TV will
start searching once more..
8
9
When complete repeatedly press the
MENU button to exit, or repeat above
to Search/Fine Tune other program
numbers if necessary.
10
OR
Press and HOLD the MENU button until
MAIN MENU with INSTALL is shown
Use up/down buttons to highlight
INSTALL and use the left/right buttons
to select.
1
2
Use the up/down buttons to highlight
MANUAL TUNE.
3
Press the left/right buttons to begin
SEARCH TUNE.
7
 Loading...