


HLTW600AXW

Top-Load Clothes Washer
User Manual
HLTW600AXW
Designed for
+LJK(ƬFLHQF\
use HE detergent.
IMPORTANT
Do Not Return This Product To The Store
If you have a problem with this product, please contact the
“Haier Customer Satisfaction Center” at
1-877-337-3639.
DATED PROOF OF PURCHASE, MODEL #, AND SERIAL #
REQUIRED FOR WARRANTY SERVICE
IMPORTANT
Ne pas Réexpédier ce Produit au Magasin
Pour tout problème concernant ce produit, veuillez contacter
le service des consommateurs “Haier Customer Satisfaction Center” au
1-877-337-3639.
UNE PREUVE D’ACHAT DATEE EST REQUISE POUR BENEFICIER DE LA GARANTIE.
IMPORTANTE
No regrese este producto a la tienda
Si tiene algún problema con este producto, por favor contacte el
“Centro de Servicio al Consumidor de Haier” al
1-877-337-3639 (Válido solo en E.U.A).
NECESITA UNA PRUEBA DE DE COMPRA FECHADA, NÚMERO DE MODELO
Y DE SERIE PARA EL SERVICIO DE LA GARANTÍA
Made in China
Fabriqué en Chine
Hecho en China
Haier America
Wayne, NJ 07470
HLTW600AXW
Issued: $SULO 2015 Printed in China Part # 00XXXXXXXXX
SAFETY AND PRECAUTIONSCONTENTS
This manual contains important information on the installation, use, and
care of your appliance. Please read this manual carefully before
installation and operation of this machine to prevent injury and property
damage.
WHAT YOU NEED TO KNOW ABOUT SAFETY INSTRUCTIONS
Warnings and Important Safety Instructions in this manual DO NOT cover all possible
conditions and situations that may occur. It is your responsibility to use common sense,
caution and care when installing, maintaining and operating your washer.
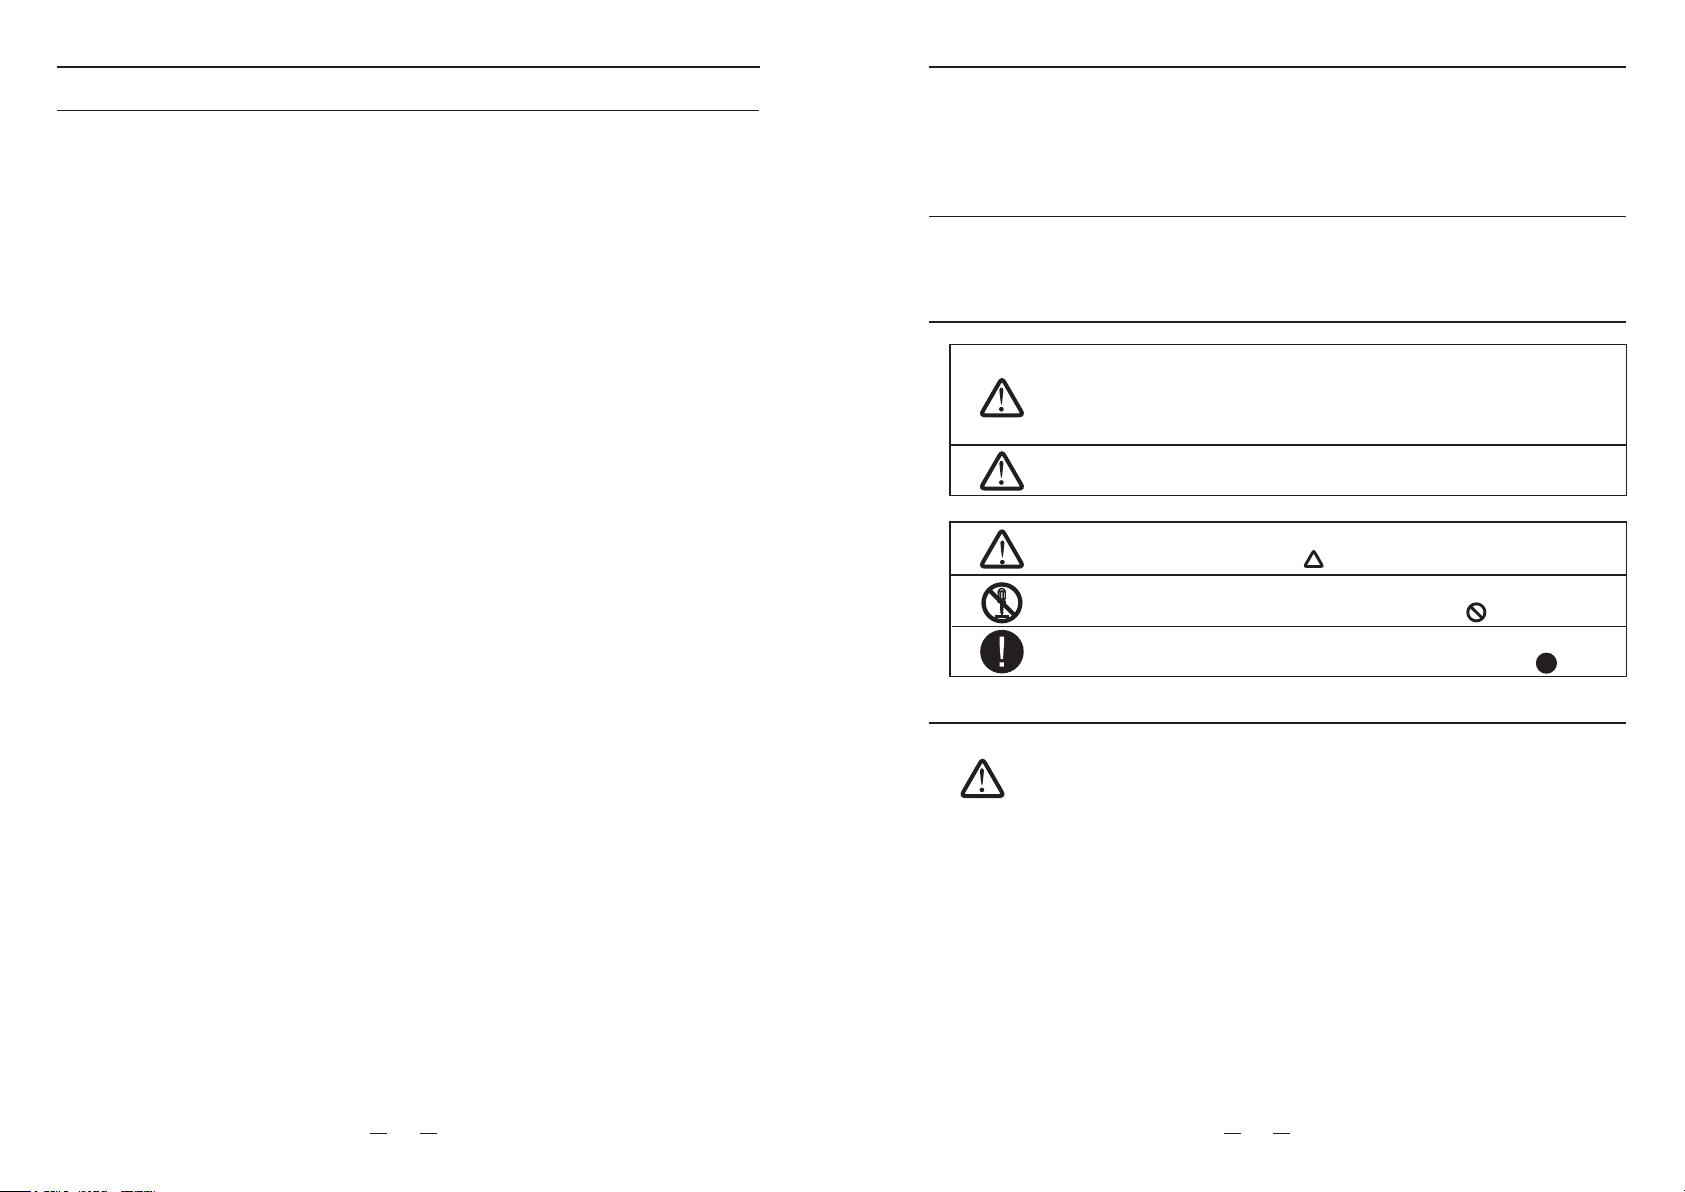
IMPORTANT SAFETY SYMBOLS AND PRECAUTIONS
WARNING
CAUTION
This indicates that hazards or unsafe practices may cause
serious personal injury or death.
To reduce the risk of fire, explosion, electric shock, or
personal injury when using your washer, these basic safety
precautions SHOULD be followed.
This indicates that hazards or unsafe practices may
cause minor personal injury or property damage.
Contents
SAFETY AND PRECAUTIONS..........................................................
........................................................
Installation warnings and precautions.........................................
Usage and maintenance warnings and precautions......................
INSTALLATION INSTRUCTIONS.......................................................
Removing from the package.......................................................
Package list......
.......................................................................
Tools and parts needed in installation..........................................
Parts identification...................................................................
Location requirement...............................................................
Installation steps.....................................................................
OPERATING INSTRUCTIONS......
...................................................
Control panel..........................................................................
Washing a load of laundry.........................................................
Useful functions.....................................................................
Detergent use.........................................................................
USER MAINTENANCE INSTRUCTIONS......................
......................
TROUBLESHOOTING....................................................................
APPENDIX...................................................................................
REGISTRATION INFORMATION......................................................
Important safety instructions
2
3
4
5
9
9
9
9
10
11
14
17
17
18
22
22
23
24
27
28
1
2
This graphic represents CAUSE ATTENTION, and detailed cautions will
be displayed in side the graphic .
This graphic represents OPERATION PROHIBITED, and detailed
prohibitive items will be displayed in side the graphic .
This graphic represents FORBIDDEN EXECUTION, and detailed
forbidden execution items will be displayed inside the graphic .
State of California Proposition 65 Warnings
WARNING
TheCaliforniaSafe Drinking Water and Toxic Enforcement Act requires the
Governor of California to publish a list of substances known to the State of
California to cause cancer, birth defects, or other reproductive harm, and
requires business to warn of potential exposure to such substances.
This product contains a chemical known to the State of California to cause
cancer, birth defects, or other reproductive harm. This appliance can cause
low-level exposure to some of the substances listed, including benzene,
formaldehyde, and carbon monoxi
de.

SAFETY AND PRECAUTIONSSAFETY AND PRECAUTIONS
IMPORTANT SAFETY INSTRUCTIONS
WARNING
1.
2.
3.
4.
5.
6.
7.
8.
9.
10.
11.
12.
13.
14.
15.
16.
17.
18.
19.
Read all instructions beforeusingtheappliance
Use this appliance only for its intended purpose as described in this
ownerಬs Manual
Before usethe washer must be properly installed as described in this
manual
Do not wash or dryarticles that have been previouslycleanedinwashed
insoakedinor spottedwithgasolinedrycleaningsolventsother
flammableorexplosivesubstances as they give off vapors that could
igniteorexplo
de
Do not allow childrentoplayonorintheapplianceClosesupervision
of
childrenisnecessarywhentheapplianceisusednearchildren
Beforetheapplianceisremovedfromserviceordiscardedremovethe
lidofthewashing or dryingcompartment
Do not reachintotheapplianceifthebasketismoving
Do not install or storethisappliancewhereitwillbeexposedtothe
weather or freezing temperatures
Do not tamper with the contr
ols
Do not repairor
replaceanypart of the appliance or attemptany
servicingunlessitisspecifically recommendedintheusermaintenance
instructionsorinpublisheduserrepairinstructionsthatyouunderstand
andhavetheskillstocarryout
Do not add gasolinedrycleaningsolventsorotherflammableor
explosivesubstancestothewashwaterThesesubstancesgiveoff
vaporsthatcouldigniteorexplode
Under cert
ain conditionshydrogengasmaybeproducedinahotwater
systemthathas not been used for 2 weeks or more
HYDROGEN GAS IS EXPLOSIVE. 8QGHUFHUWDLQFRQGLWLRQVK\GURJHQJDV
PD\EHSURGXFHGLQDKRWZDWHUV\VWHPWKDWKDVQRWEHHQXVHGIRUZHHNVRU
PRUH,IWKHKRWZDWHUV\VWHPKDVQRWEHHQXVHGIRUZHHNVRUPRUHEHIRUH
XVLQJDZDVKHURUFRPELQDWLRQZDVKHUGU\HUWXUQRQDOOKRWZDWHUIDXFHWVDQG
OHWWKHZDWHUIORZIURPHDFKIRUVHYHUDOPLQXWHV7KLVZLOOUHOHDVHDQ\
DFFXPXODWHGK\GURJHQJDV$VWKHJDVLVIODPPDEOHGRQRWVPRNHRUXVHDQ
RSHQIODPHGXULQJWKLVWLPH
Keep the area underneath and around your appliances free of
combustible materials lintpaperragsetcgasolinechemicals and
other flammable vapors and liquids
Do not place items exposed to cooking oil in your washerItems
contaminated with cooking oils may contribute to a chemical reaction
that could cause a load to catch fire
This washer is not designed for maritime use or for mobile installations
such as i
n RVsaircraftetc
Turn off the water faucets and unplug the washer if the machine is to be
left for an extended period of timesuch as during vacations
Packaging material can be dangerous for childrenThere is a risk of
suffocationKeep all package away from children
Always check the inside of the washer for foreign objects before loading
laundryKeep the lid closed when not in use
Installation Warnings and Precautions
WARNING
Plug the power cord into an AC 120V/60Hz wall socket rated at 15amps
or higher. Use the socket for this washer only.
Do not use an extension cord.
- Sharing a wall socket with other appliance, using a power strip, or
extending the power cord may result in electric shock or fire.
- Do not use an electric transformer. It may result in electric shock or fire.
- Ensure that the power voltage, frequency, and current match the
product’s specifications. Failing to do so may result in electric shock or
fire.
Have this appliance installed by a qualified technician or service
company.
- Failin
g to do so may result in electric shock, fire, explosion, problems
with the product, or injury.
Remove all foreign substances such as dust or water from the power
plug terminals and contact points using a dry cloth on a regular basis.
- Unplug the power plug and clean it with a dry cloth.
- Failing to do so may result in electric shock or fire.
Plug the power plug into the wall socket in the right direction so that the
cord runs towards the floor.
- If you plug the power plug into the socket in the opposite direction, the
electric wires within the cable may be damaged and this may result in
electric shock or fire.
Plug t
he power plug into the wall socket firmly. Do not use a damaged
power plug, or loosen wall socket.
- This may result in electric shock or fire.
Do not pull or excessively bend the power cord.
Do not twist or tie the power cord.
Do not hook the power cord over a metal object, place a heavy object on
the power cord, insert the power cord between objects, or push the
power cord into the space behind the appliance.
- This may result in electric shock or fire.
Do not pull the power cord when unplugging the power plug.
- Unplug the power plug by holding the plug.
- Failing to do so may result in electric shock or fire.
If the powe
r plug or power cord are damaged, contact your nearest
service center.
PowerCord
andSocket
This appliance must be properly grounded.
Do not ground the appliance to a gas pipe, plastic water pipe, or
telephone line.
- Improper grounding may result in electric shock, fire, explosion, or
problems with the product.
- Never plug the power cord into a socket that is not grounded correctly.
Make sure the socket you use is grounded in accordance with local and
national codes.
Grounding
Do not install this appliance near a heater or inflammable material.
Do not install this appliance in a humid, oily, or dusty location, or in a
location exposed to direct sunlight or water (rain drops).
Do not install this appliance in a location where gas may leak.
- This may result in electric shock or fire.
If the washer is moved to a new location, have it checked and re-installed
by a qualified service technician.
- Failing to follow this warning may result in electric shock or fire.
Location
1.
2.
3.
4.
5.
6.
7.
8.
9.
10.
11.
1.
2.
1.
2.
3.
4.
3
4
Usage and Maintenance Warnings and Precautions
WARNING
Do not let children or infirm persons use this washer unsupervised.
- Failing to do so may result in electric shock, burns or injury.
Do not attempt to repair, disassemble, or modify the appliance yourself.
- Do not use any fuse (such as cooper, steel wire, etc.) other than the
standard fuse.
- If you need to repair or reinstall the appliance, contact your nearest
service center.
- Failing to do so may result in electric shock, fire, problems with the
product, or injury.
If any foreign substance such as water enters the appliance in any area
other than the tub, unplug the power plug and conta
ct your nearest
service center.
- Failing to do so may result in electric shock or fire.
If the water supply hose comes loose from the faucet and floods the
appliance, unplug the power plug.
- Failing to do so may result in electric shock or fire.
Do not mix chlorine bleach with ammonia or acids such as vinegar.
- Incorrect usage can produce poisonous gas, result in serious injury.
Do not reach into the washer while parts are moving. Before loading,
unloading, or adding items, press the START/PAUSE button and allow
the basket to come to complete stop before reaching inside.
- Failing to do so may res
ult in electric shock, injury or fire.
Do not allow children to play on or in the washer. Close supervision of
children is necessary when the washer is used near children. As children
grow, teach them the proper, safe use of all appliances.
- Failing to do so may result in serious injury to persons.
Keep laundry products out of children’s reach. Observe all warnings on
product labels and follow to do.
- Failing to do so may result in serious injury to persons.
Disconnect this appliance from the power supply before attempting any
user maintenance. Turning the controls to the OFF position does n
ot
disconnect this appliance from the power supply.
- Failing to do so may result in electric shock, injury or fire.
Do not clean the appliance by spraying water directly onto it.
Do not use benzene, thinner, or alcohol to clean the appliance.
- This may result in discoloration, deformation, damage, electric shock
or fire.
SAFETY AND PRECAUTIONSSAFETY AND PRECAUTIONS
Usage and Maintenance Warnings and Precautions
WARNING
If the appliance is flooded, cut the power immediately and contact your
nearest service center.
If the appliance emits a strange noise, a burning smell, or smoke, unplug
the power plug immediately and contact your nearest service center.
- Failing to do so may result in electric shock or fire.
In the event of a gas leak (such as propane gas, LP gas, etc.), ventilate
the area immediately. Do not turn any appliance or light on or off.
- Do not use a ventilating fan.
- A spark may result in an explosion or fire.
Do not wash items contaminated with gasoline, kerosene, benzene,
paint thinner, a
lcohol, dry cleaning detergent or other flammable or
explosive substances.
- This may result in electric shock, fire, or an explosion.
Do not force the washer lid open while the washer is operating (high-
temperature washing / drying / spinning).
- Water flowing out of the washer may cause burns or cause the floor to
be slippery. This may result in injury.
- Forcing the lid open can damage the product or cause injury.
Make sure to remove the packaging (sponge, styrofoam) attached to the
bottom of the washer before using it.
Do not insert your hand or a metal object under the washer.
- This ma
y result in injury.
Do not attempt to operate this appliance if it is damaged, malfunctioning,
partially disassembled, or has missing or broken parts, including a
damaged cord or plug.
- This may result in electric shock, fire or death.
Do not touch the power plug with wet hands.
- This may result in electric shock.
Do not turn the appliance off by unplugging the power plug while the
washer is in operation.
- Plugging the power plug into the wall socket again may cause a spark
and result in electric shock or fire.
Keep all packaging material well out of the reach of children, as
packaging mate
rials can be dangerous to children.
- If a child places a bag over its head, it may suffocate.
Unplug the power plug when the appliance is not being used for long
periods of time or during a thunder/lightning storm.
- Failing to do so may result in electric shock or fire.
Keep hands and foreign objects clear of the lid and latch area when
closing the lid.
- Failing to do so may result in personal injury.
If the washer is contaminated by a foreign substance such as detergent,
dirt, food waste, etc., unplug the power plug and clean the washer with a
damp, soft cloth.
- Failing to do so may result in discoloration, d
eformation, damage or
rust.
The clear portion of the lid can be broken by a strong impact. Take care
when using the washer.
- If the clear portion is cracked or broken, it may result in injury.
After a water supply failure or when reconnecting the water supply hose,
open the faucet slowly.
Installation Warnings and Precautions
CAUTION
Do not install on carpet. Install washer on a level and solid floor that can
support its weight.
- Failing to do so may result in abnormal vibrations, noise, or problems
with the product.
The washer is heavy. Two or more people may be needed to install and
move the appliance.
- Failing to do so may result in bodily or other injuries.
Store and install the washer where it will not be exposed to temperatures
below freezing or exposed to outdoor weather conditions.
- Failing to do so may result in serious leak damage.
Position the appliance so that the power plug is easily accessible.
- Faili
ng to do so may result in electric shock or fire due to electric
leakage.
To reduce the risk of injury to persons, adhere to all industry
recommended safety glasses.
- Failing to follow all of the safety warnings in this manual may result in
property damage, or injury to persons.
Usage and Maintenance Warnings and Precautions
CAUTION
1.
2.
3.
4.
5.
1.
2.
3.
4.
5.
6.
7.
8.
9.
10.
11.
12.
13.
14.
15.
16.
17.
18.
19.
20.
21.
22.
1.
2.
3.
4.
5.
5
6

Usage and Maintenance Warnings and Precautions
CAUTION
SAFETY AND PRECAUTIONSSAFETY AND PRECAUTIONS
Usage and Maintenance Warnings and Precautions
CAUTION
Open the faucet slowly after a long period of non-use.
- The air pressure in the water supply hose or the water pipe may result
in damage to a part or in water leakage.
If a drain error occurs during an operation, check if there is a draining
problem.
- If the washer is used when it is flooded because of a draining problem,
it may result in electric shock or fire due to electric leakage.
Do not insert your hand or a metal object under the washer.
- This may result in injury.
Insert the laundry into the washer completely so that laundry does not
get caught in the lid.
- If laundry gets caught in the lid, it may resul
t in damage to the laundry
or the washer, or result in water leakage.
Ensure that the faucet is turned off when the washer is not being used.
- Ensure that the water supply hose connectors are properly tightened.
- Failing to do so may result in property damage or injury.
Open the faucet and check if the water supply hose connector is firmly
tightened and that there is no water leaking before using the product.
- If the water supply hose connectors are loose, it may result in water
leakage.
Do not stand on top of the appliance or place objects (such as laundry,
lighted candles, lighted cigarettes, dish
es, chemicals, metal objects,
etc.) on the appliance.
- This may result in electric shock, fire, problems with the product, or
injury.
Do not operate the appliance with wet hands.
- This may result in electric shock.
Do not spray volatile material such as insecticide onto the surface of the
appliance.
- As well as being harmful to humans, it may also result in electric shock,
fire, or problems with the product.
Do not place an object that generates an electromagnetic field near the
washer.
- This may result in injury due to a malfunction.
Since the water drained during a high tempe
rature wash or drying cycle
is hot, do not touch the water.
- This may result in burns or injury.
Do not wash, spin, or dry water-proof seats, mats, or clothing.
- Do not wash thick, hard mats even if the washer mark is on the care
label.
This may result in injury or damage to the washer, walls, floor, or
clothing due to abnormal vibrations.
Do not operate the washer when detergent dispenser is removed.
- This may result in electric shock or injury due to water leakage.
Do not insert your hand into the detergent dispenser after opening it.
- This may result in injury as your hand may be caught.
Do not place any no
n-laundry objects, such as shoes, food waste, or
animals into the washer.
- This can cause abnormal vibrations that can damage the washer, and,
in the case of pets, cause severe injury or death.
Do not press the buttons using sharp objects such as pins, knifes,
fingernails, etc.
- This may result in electric shock or injury.
Do not wash laundry contaminated by oils, creams, or lotions usually
found in skincare shops or massage clinics.
- Thismayresultintherubbersealbecomingdeformedandwater
leakage
Ensurethatthewaterinlet
pipeisconnectedandthe
tapisopened
before washingclothes
Do not leave metal objects (safety pins, hair pins, etc.) or bleach in the
tub for long periods of time.
- This may cause the tub to rust.
- If rust appears on the surface of the tub, apply a neutral cleansing
agent to the surface and use a sponge to clean it. Never use a metal
brush.
Do not use hot water from water cooling/heating devices.
- This may result in problems with the washer.
Do not use natural hand-washing soap in the washer.
- If it hardens and accumulates inside the washer, it may cause
problems with the produc
t, discoloration, rust, or bad odors.
Do not wash large laundry items such as bedding in the washing net.
- Failing to do so may result in injury due to abnormal vibrations.
- Place smaller items, such as lace socks and lingerie in the washing
net.
Do not use hardened detergent.
- If it accumulates inside the washer, it may result in water leakage.
Do not wash throw rugs or doormats.
- If you wash throw rugs or doormats, the sand will accumulate inside
the washer. It may result in error such as no draining.
6.
7.
8.
9.
10.
11.
12.
13.
14.
15.
16.
17.
18.
19.
20.
21.
22.
23.
24.
25.
26.
27.
28.
29.
D
o not wash laundry contaminated by oils, creams, or lotions usually
found in skincare shops or massage clinics.
- Thismayresultintherubbersealbecomingdeformedandwater
leakage
Ensurethatthewaterinletpipeisconnectedand
thetapisopened
before washingclothes
Do not leave metal objects (safety pins, hair pins, etc.) or bleach in the
tub for long periods of time.
- This may cause the tub to rust.
- If rust appears on the surface of the tub, apply a neutral cleansing
agent to the surface and use a sponge to clean it
. Never use a metal
brush.
Do not use hot water from water cooling/heating devices.
- This may result in problems with the washer.
Do not use natural hand-washing soap in the washer.
- If it hardens and accumulates inside the washer, it may cause
problems with the product, discoloration, rust, or bad odors.
Do not wash large laundry items such as bedding in the washing net.
- Failing to do so may result in injury due to abnormal vibrations.
- Place smaller items, such as lace socks and lingerie in the washing
net.
Do not use hardened detergent.
- If it accumulates inside the washer, it may result in wate
r leakage.
Do not wash throw rugs or doormats.
- If you wash throw rugs or doormats, the sand will accumulate inside
the washer. It may result in error such as no draining.
7
8
SAVE THESE INSTRUCTIONS
INSTALLATION INSTRUCTIONSINSTALLATION INSTRUCTIONS
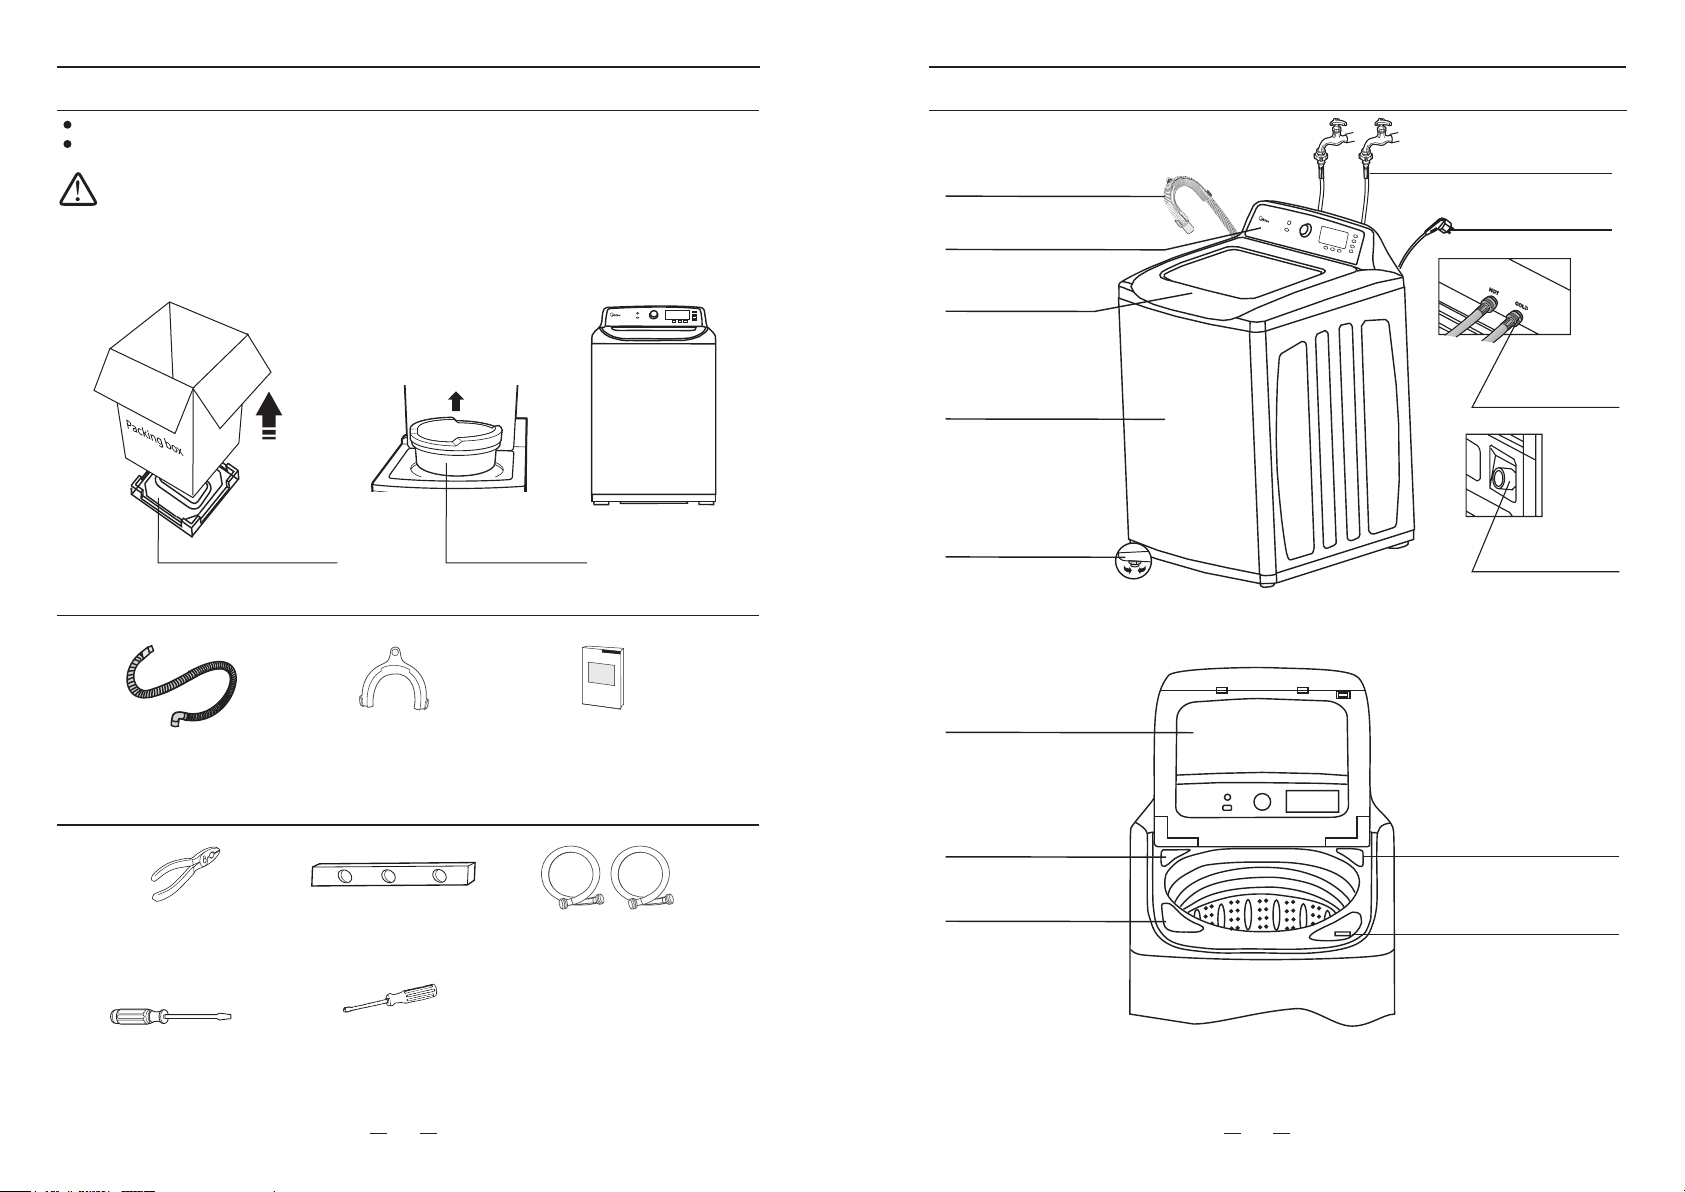
Removing from the package
Remove the package and take out the machine from the carton box and foam cushion.
Open the lid of washer to take out all accessories including a protection foam.
Packaging materials can be dangerous to children;
Keep all packaging material (plastic bags, polystyrene, etc.) well out of children’s
reach.
IMPORTANT: Do not operate this appliance on the foam cushion.
- Failing to do so will result in serious vibration.
Package list
TOOLS and PARTS needed in installation
WARNING
Parts identification
Base foam cushion Protection foam
+RVHKROGHU
2ZQHUಬVPDQXDO
Pliers level
Water inlet hoses
Faucet and Water inlet hose
(Not supplied)
Power cord
water inlet valve
Drainage hole
Drainage hose and holder
Control panel
Top lid
Cabinet
Adjustable leg
Look through window
Bleach compartment
Detergent
compartment
Softener compartment
Drain hose
9
10
(Two legs on front)
Door locker
flat screwdriver
Phillips screwdriver
INSTALLATION INSTRUCTIONSINSTALLATION INSTRUCTIONS
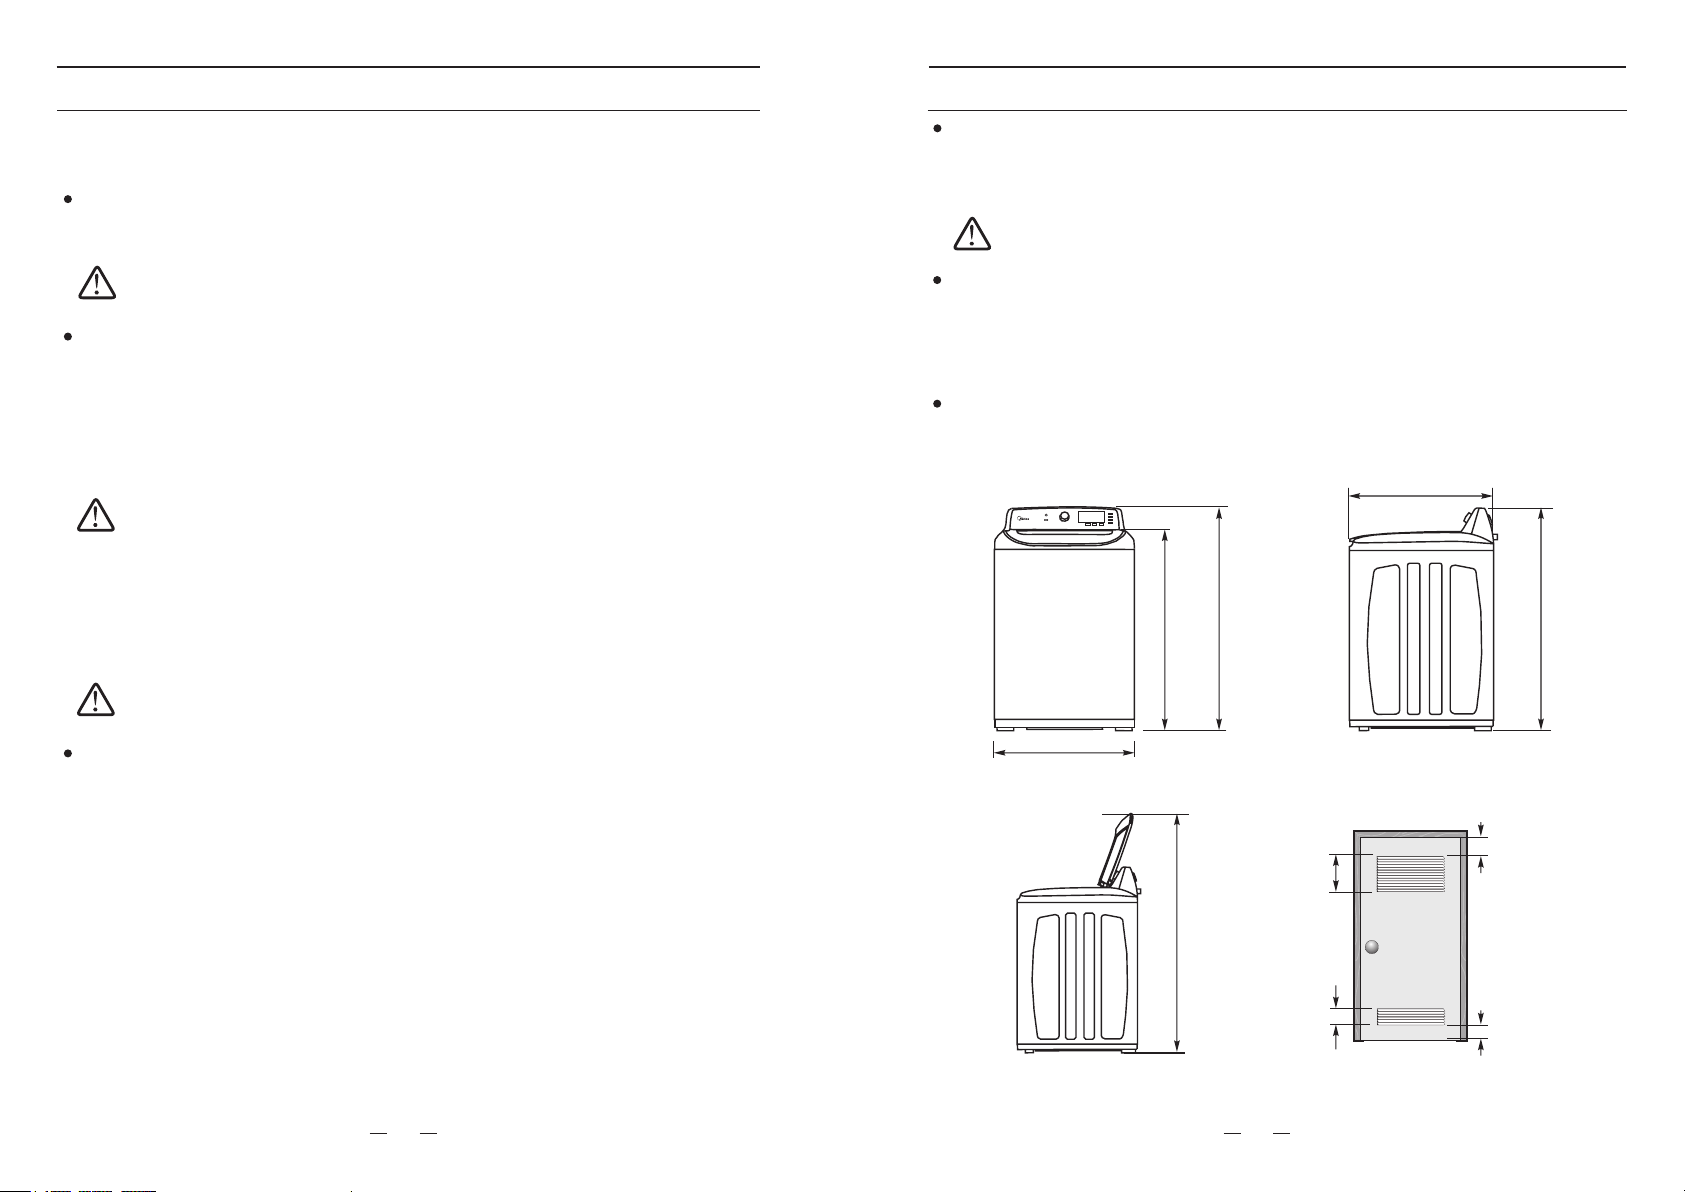
Location Requirements
Flooring
For best performance, you must install your washer on a solidly constructed floor. Wood
floors may need to be reinforced to minimize vibration and/or unbalanced load situations.
- Carpeting and soft tile surfaces are contributing factors to vibration which can cause
your washer to move slightly during the spin cycle.
NEVER INSTALL ON A PLATFORM OR WEAKLY SUPPORTED STRUCTURE.
CAUTION
Drain facility
The recommended height of the standpipe is 48in. / 120cm.
The suitable drainage is available in various up to 96in. / 240cm.
The drain hose must be routed through the drain hose clip to the standpipe.
The standpipe must be large enough to accept the outside diameter of the drain hose.
The drain hose is attached to the washer at the factory.
height
Room for washer
Required dimensions for installation
LQ
FP
44.2 in.
112.0cm
38.5 in.
97.5 cm
29 in.
736cm
&ORVHWRU'RRU
48 in²
310 cm²
24 in²
155 cm²
3 in
76 cm
Requiredspacing
Location Requirements
Electric
- 120Volt 60Hz 15 Amps fuse or circuit breaker.
- Individual branch circuit serving only for your washer is recommended.
- Your washer is equipped with a power cord.
NEVER USE AN EXTENSION CORD.
CAUTION
Grounding
ELECTRICAL GROUNDING IS REQUIRED FOR THIS APPLIANCE.
- This appliance must be grounded. In the event of malfunction or breakdown, grounding
will reduce the risk of electric shock by providing a path of least resistance for electric
current.
- This appliance is equipped with a power cord having a three-prong grounding plug for
use in a properly installed and grounded outlet.
- The plug must be plugged into an appropriate outlet that is properly installed and
grounded in accordance with all local codes and ordinances.
An improperly connected equipment-grounding conductor can increase the risk of
electrical shock. Check with a qualified electrician or serviceman if you are not
sure whether the appliance is properly grounded. Do not modify the plug provided
with the appliance.
- If it does not fit the outlet, have a proper outlet installed by a qualified electrician.
To prevent unnecessary risk of fire, electrical shock or personal injury, all wiring
and grounding must be done in accordance with the National Electrical Code
ANSI/FNPA, No.70 Latest Revision and local codes and ordi
nances. It is the
personal responsibility of the appliance owner to provide adequate electrical
service for this appliance.
WARNING
NEVER CONNECT THE GROUND WIRE TO PLASTIC PLUMBING LINES, GAS
LINES, OR HOT WATER PIPES.
CAUTION
Water
To correctly fill your washer in the proper amount of time, water pressure of 14 to 116psi
(100 to 800kPa) is required.
- Water pressure less than 14psi may cause water valve failure, or may not allow the
water valve to shot off completely, or may extend the fill time beyond what your washer
controls allow, causing your washer to turn off and set off an error alarm. A time limit is
built into the controls to prevent flooding in your home if a hose becomes loose.
The water faucet must be within 4 feet / 122cm of the back of your washer to match the
inlet hoses provided with your washer.
Inlet hoses are available in va
rious lengths up to 8 feet / 240cm for faucets that are
further away from the back of your washer.
To avoid the possibility of water damage:
- Have water faucets easily accessible
- Turn off faucets when the washer is not in use.
- Periodically check that there is no leakage from the water inlet hose fittings.
44.2 in.
112.0cm
59 in.
150.0cm
3 in
76 cm
11
12
IMPORTANT: Do not install your washer in areas where water may freeze, since your washer will
always retain some water in its water valve, pump, and hose areas. Frozen water can damage the
belts, the pump, hoses, and other components.
IMPORTANT: Check all connections at the water valve and faucet for leaks.

11 in
esaC 1
3
9 ni
01 cm
esaC 2 2
8 ni
7 cm
A B
1 in. (2.5cm)
1 in.
2.5cm
27 in.
68.6cm
1 in.
2.5cm
27 in.
68.6cm
27.9cm
2 in.
5.1cm
29 in.
73.6cm

INSTALLATION INSTRUCTIONS
Installation Steps
STEP 4: Leveling your washer
See if the washer is level by checking the position of the tub or
using a leveling gauge.
1. Slide the washer into position.
2. Open the lid of the washer, and pour the water into the tub to just
below the pulsator level.
3. If the washer is level, the pulsator is positioned at the center of
the washer as shown in the figure right. If not, level your washer
by turning the front leveling feet clockwise or counterclockwise
as necessary.
Pulsator
loosen lock
Adjustable legs
Plug the power cord into a 3-prong, grounded 120Volt 60Hz
approved electrical outlet protected by a 15-amp fuse or
comparable circuit breaker.
Your washer is grounded through the third prong of the power cord
when plugged into a 3-prong grounded electrical outlet.
STEP 5: Powering your washer
Run a test cycle as following to check if your washer is properly installed.
1. Load about 6 pounds of laundry into the tub.
2. Press the Power button to turn on your washer.
3. Select the Rinse+Spin cycle by turning the Cycle Selector.
4. Press the Start/Pause button to start the test cycle.
5. The washer should not rock or vibrate excessively when water is supplied or when
washing or spinning, and should drain well during the spin cycle.
STEP 6: Running a test cycle
INSTALLATION INSTRUCTIONS
Installation Steps
6. Turn on the HOT and COLD water supplies and check all the
water supply intake connections and the faucets for water leaks.
STEP 3: Connect the drain hose
1. Connect the drain pipe onto your washer.
The drain pipe is attached as accessory with your washer.
Move the hoop forward
Insert the drain hose onto
the unit.
Move the hoop backward
A. Find the hoop on one end of the drain hose. Move the hoop
forward as shown in right figure.
B. Insert the end with hoop onto the washer. Be sure to slide
the drain hose over the sewer completely.
C. Move the hoop backward to fix the drain hose onto the
washer tightly.
2. Position the other end of the drain hose.
It can be positioned in three ways.
A. Over the edge of a wash basin
Secure the guide to the side of the basin wall
with a hook or to the tap with a piece of string
to prevent the drain hose from moving.
B. In a standpipe
The standpipe must b
e no shorter than 39 in.
(99cm) and no longer than 96 in. (245cm).
C. in a laundry tub.
The laundry tub must be no shorter than 39 in.
(99cm) and no higher than 96 in. (245cm).
Standpipe
Hose
Retainer
Tie
strap
96 in. Max
39 in. Min
Laundry tub
Hose
Retainer
Tie
strap
96 in. Max
39 in. Min
15
16
IMPORTANT: To ensure the correct water usage, connect both the HOT
and COLD water faucets. If either or both are not connected, an error
code can occur.
If you do not want to use the HOT water supply hose, insert the water
intake cap into the HOT water supply intake hole. In this case, you must
select the Tap Cold option for the water temperature.
IMPORTANT: Failure to slide the drain hose over the sewer
completely may result in water leakage.
Failure to move the hoop back will result in water leakage.
IMPORTANT: Make sure that the connection between
the drain hose and the wash basin, or standpipe, or
laundry tub is not airtight.
IMPORTANT: DO NOT use the washing machine without leveling.
It may result in malfunction caused by the production of excess
vibration and noise.
Use the leveling feet only when you level the washing machine .
If you raise the leveling feet unnecessarily, it may cause abnormal
vibration of the washing machine.
IMPORTANT: If water leaks while water is being supplied or drained, check the water connections.
Refer to the “Connect the water hose” and “Connect the drain hose” section for instructions.
If the washer rocks and vibrates excessively, level your washer again. Refer to the “Leveling
your washer” section for instructions.
Hand Wash
Active Wear
Normal
Whites
Heavy Duty
Tub Clean
Drain & Spin
Bulky
Colors
Quick
Delicates
Rinse & Spin
Wash
Rinse
Spin
Done
Hold 3 Sec
Start/Pause
Power
Extra Heavy
Hot
Heavy
Warm
Medium Eco Warm
Light
Extra Light Tap Cold
Cold
Child Lock
Eco
Delay
Soak
Extra
Rinse
Buzzer
Fabric
Softner
Energy Saver
Favorite
Ener
E
gy Sa
gy
gy
v
err
Hold 3 Sec
F
a
a
v
orite
ote
Hold 3 Sec
Soak
Temp
Soil Level
Delay
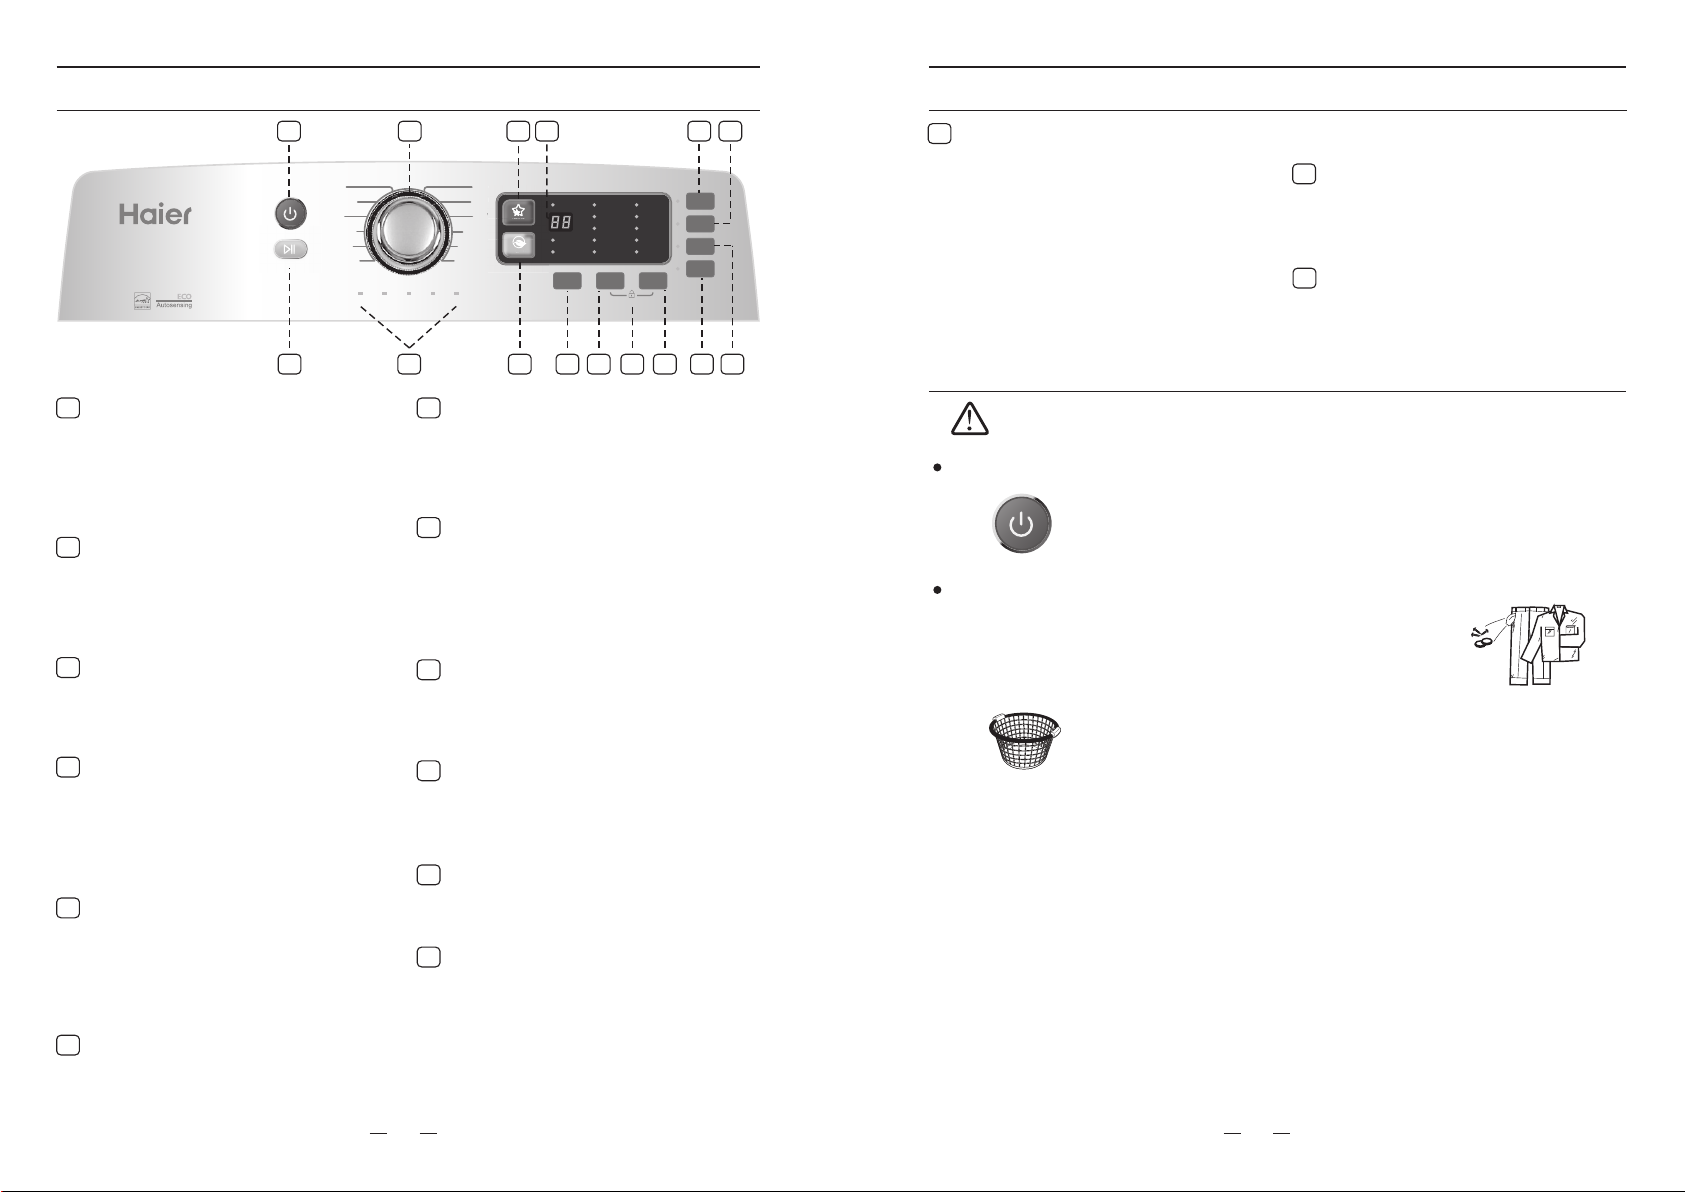
OPERATING INSTRUCTIONS
Control panel
OPERATING INSTRUCTIONS
Control Panel
1
2
7
3 4 5 6
9 10 11 12 13 14 158
Power button
Press once to turn your washer on.
Press again to turn your washer off.
If the washer is left on for more than
10 minutes without Start/Pause
button being pressed, the power will
automatically turn off.
1
Cycle selector
Select the appropriate cycle for the
type of load.
The cycle you select determines the
tub pattern for the cycle.
For detail, refer to page 20.
2
Favorite
Press and hold for 3 seconds to
remember your favorite washing cycle.
Press once to load your favorite cycle
setting.
3
Soak button
Press once to select soak function.
Press again to cancel selection.
This function is especially for heavy
soiled garments to remove stains more
thoroughly by specifying additional
time.
5
Extra rinse button
Press once to add an extra rinse into
the washing program.
Press again to cancel selection.
6
Start/pause button
Press once to start the program.
Press again to pause the program. You
can’t change any setting except add a
garment.
Press again to restart the program.
7
Cycle status lights
The relative light will be lighted when
the washer is in its washing program,
say the soak will light when the washer
is operating in soak process.
When the whole program is finished,
the Done light will flash.
8
Energy Saver wash button
Press once to select this function so
that you can save money with similar
washing performance.
Press again to cancel selection.
9
Delay button
Delay the start of any cycle for up to 24
hours in one-hour increments.
Displayed hour indicates the time the
wash will be started.
10
Soil level button
Press the button to select the soil level.
Different soil level will result in different
washing time.
11
Child lock
Press the “Soil level” and “Tem p”
buttons simultaneously
for over 3
seconds to activate this function.
Press again for another 3 seconds to
deactivate the function.
All selection except the “Power” will
be out of function. For detail, refer to
page 22.
12
Tap cold - Cold water with no warm
water added.
Buzzer button
15
Press once to stop the buzzer sound.
Press again to active the sound.
Washing a load of laundry
To reduce the risk of fire, electric shock, or injury to persons when using your
washer, follow important safety instructions, including the following:
WARNING
STEP 1: Power on your washer
- Sort laundry by fabric type, soil level, color and load size as needed.
Refer to FABRIC CARE CHART on page 28.
- You can fill the tub with dry, unfolded clothes. Load the tub no more
than 3/4 full.
- Overloading may reduce washing efficiency, cause excess wear,
and possibly cause creasing or wrinkling of the load.
- Wash delicate items such as bras, hosiery, and other lingerie in the
Delicate cycle with similar lightweight items.
- Wash wool items such as wool sweater in the Hand Wash cycle.
- When washing big bulky items or a few smaller items that don’t fill
the tub completely, for example, a rug, a p
illow, stuffed toys, or one
or two sweaters, add a few towels to improve spin performance.
- Do not insert bulky items except for Bulky cycle.
- When washing heavily soiled loads, do not overload your washer to
ensure good cleaning results.
- To add a garment:
1. Press the Start/Pause button to pause the washer.
2. Wait for the door to unlock automatically, and then open the
door.
3. Add the item, close the door, and then press the Start/Pause
button. The cycle will resume.
STEP 2: Load your washer
- Press this “Power” button to power your washer on.
- Your washer will start up with initial setting, “Normal” on Cycle
Selector, “Medium” on Soil level, “Warm” on Temp with “--"
displayed.
Digital display
The LED digital display will show your
remaining time for cycle selected.
The initial display will be “--” for some
selected cycles.
The LED will show selected delay time
when setting the delay time.
4
17
18
Fabric Softner
14
If you are using fabric softner, Press
this button to set dispenser to
automatically add fabric softner to
the load at the correct time.
Temp button
Press the button to select the washing
water temperature. The rinsing water
temperature will always keep in Tap
Cold.
Hot - Whites and heavily soiled,
colorfast items.
Warm - Colorfast items.
Energy Saver - Moderately soiled,
colorfast items; most wrinkle-free items
Cold - Brightly colored, very lightly
soiled items.
13
IMPORTANT: Before loading your laundry, be sure to take out coins,
keys and other hard objects, and close the zip to prevent clothes
from damage.
OPERATING INSTRUCTIONS
Washing a load of laundry
OPERATING INSTRUCTIONS
Washing a load of laundry
- Loading the Bleach compartment (Liquid chlorine bleach only)
1. Add chlorine bleach to the bleach compartment.
2. DO NOT exceed the bleach compartment.
3. As no water inlet to bleach dispenser, the bleach will directly load
into the tub when you pour in.
- Avoid splashing or over-filling the compartment.
- Loading the Fabric softener compartment
1. Pour the recommended amount of liquid fabric softener into the
softener compartment.
2. The dispenser automatically releases liquid fabric softener at
the proper time during the rinse cycle.
3. If using fabric so
ftener on NORMAL cycles, please make sure to
press the FABRIC SOFTENER button on.
Use the softener compartment ONLY for liquid fabric softener s.
-
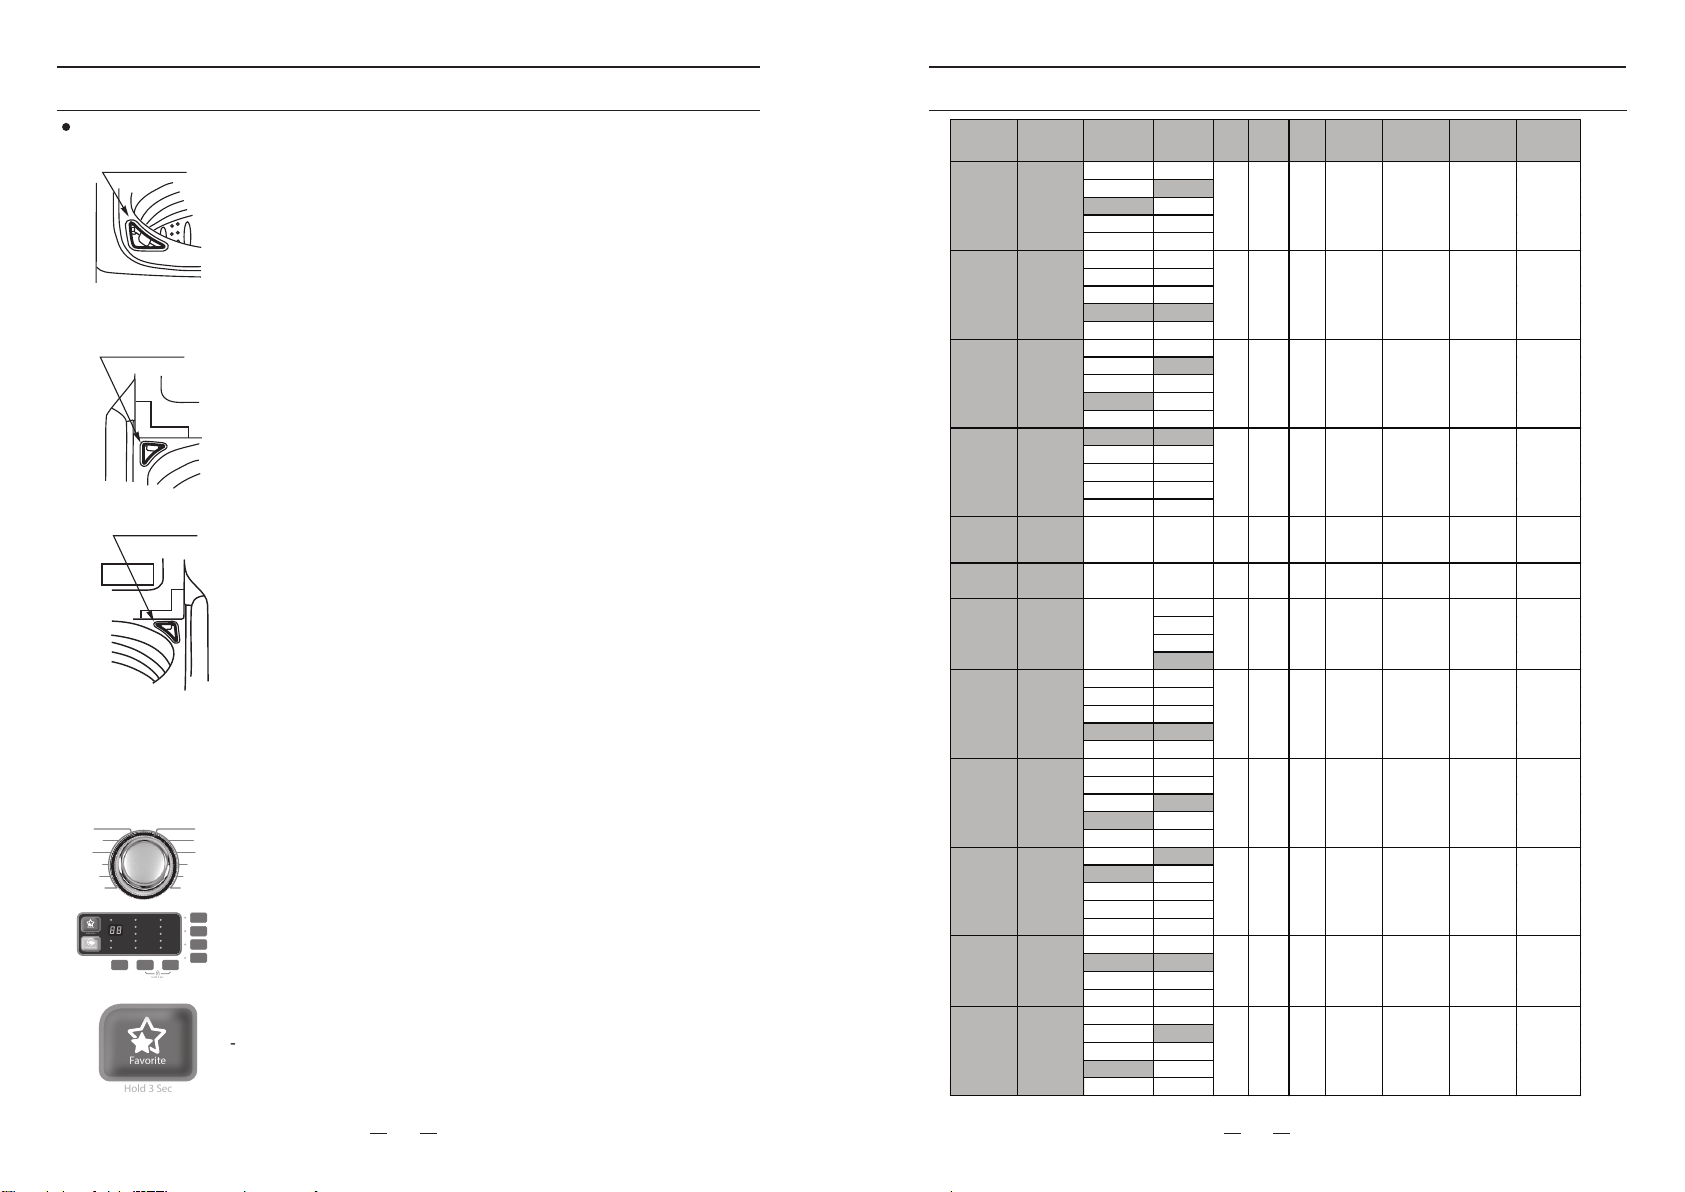
Your favorite washing Cycle
Once you have set the cycle selector and option function, you
can push and hold this “Favorite” button for 3 seconds to
program memory this setting as your favorite cycle before
starting your appliance. The light beside the knob will flash to
confirm the memory with beeps.
- You can finish this Step by just push the “Favorite” button once
to use your favorite cycle or make some additional change.
- Select appropriate cycle b
y Cycle Selector according to cycle chart
on next page.
- Select appropriate option function according to cycle chart on page
20.
Note:
If Energy Saver function is selected, the Soak and Extra Rinse
function will be automatically cancelled.
Cycle Fabric type Soil Level Temp ECO Delay Soak Favorite Extra Rinse
Estimated
Cycle
Time (min.)
Extra Heavy Hot
Heavy Warm
Medium Eco warm
Light Cold
Extra light Tap cold
Hot
Heavy Warm
Medium Eco w arm
Light Cold
Extra light Tap cold
Hot
Warm
Medium Eco w arm
Light Cold
Extra light Tap cold
Extra Heavy Hot
Heavy Warm
Medium Eco w arm
Light Cold
Tap cold
Tub Clean Extra Heavy Hot ●
Drain&spin
Warm
Eco warm
Cold
Tap cold
Hot
Warm
Medium Eco w arm
Light Cold
Extra light Tap cold
Hot
Heavy Warm
Medium Eco w arm
Light Cold
Extra light Tap cold
Extra H
eavy Hot
Heavy Warm
Medium Eco w arm
Light Cold
Extra light Tap cold
Heavy Warm
Medium Eco w arm
Light Cold
Extra light Tap cold
Hot
Warm
Medium Eco w arm
Light Cold
Extra light Tap cold
● ●
Active Wear
● ● ● ● ●
Normal
● ● ● ●
●
Heavy Duty
● ● ●
Whites
● ● ● ● ● ●
● ● ●
● ●●
●
Delicate
Hand Wash
● ●
● ●
Rinse&spin ●
●
Bulky
● ● ● ● ●
● ●
●
●
Colors ● ● ● ● ● ●
● ● ●
Quick
Fabric
Softener
STEP 3: Add detergent and additives to the dispenser
- Loading the liquid or powder detergent compartment
Refer to page 22 for recommended detergent.
1. Pour the recommended amount of laundry detergent directly
into the detergent compartment before starting your washer.
2. If you are using color-safe bleach, add it with the detergent
to the detergent compartment.
When adding color-safe bleach with detergent, it is best if both
laundry products are in the same form - liquid.
Detergen t
com partment
Ble ach
com partment
Sof tener
compartm ent
19
20
* Table i n grey is an init ial setting . Dots are al l optional fu nctions you c an select .
●
Hand Wash
Active Wear
Normal
Whites
Heavy Duty
Tub Clean
Drain & Spin
Bulky
Colors
Quick
Delicates
Rinse & Spin
Hold 3 Sec
Extra Heavy
Hot
Heavy
Warm
Medium Eco Warm
Light
Extra Light Tap Cold
Cold
Child Lock
Eco
Delay
Soak
Extra
Rinse
Buzzer
Fabric
Softner
Energy Saver
Favorite
Hold 3 Sec
Temp
Soil Level
Delay
Favorite
Hold 3 Sec
IMPORTANT: Never pour undiluted liquid chlorine bleach directly onto the
load or into the tub. It is a powerful chemical and can cause fabric damage,
such as weakening of the fibers or color loss, if not used properly.
If you prefer to use color-safe, non-chlorine bleach, add it to the appropriate
detergent compartment.
DO NOT pour color-safe bleach into the Bleach compartment.
IMPORTANT: DO NOT use the Downy Ball in the fabric softener
compartment with this washer. It will not add fabric softener at the
appropriate time. Use the detergent compartment. Do not use liquid
fabric softener that is too sticky as it may not mix with the water
sufficiently.
IMPORTANT: You can NOT set as favorite cycle when the Cycle Selector
is on “Tub Clean”, “Rinse&Spin” or “Drain&Spin” position.
STEP 4: Select the appropriate cycle and options for the load
Cottons,
linens
and mixed
garments
Sportswear
and sports
dress
White
garments
Heavily
soiled,
durable
colorfast
fabrics
Unsoiled
garments
Lightly
soiled and
small loads
Lingerie,
sheer
fabrics with
lace trim
Sheets,
sleeping
bags, small
comforters,
and jackets
Colorful
loads and
mixed loads
Cottons,
linens
and mixed
garments
Do not put
clothes in the
washer with
this cycle
Clean,
soaking wet
garmets
40 - 78
48 - 64
50 - 66
58 - 74
56
13
22 - 25
47
43
77 - 95
48 - 64
38
'
H
O
D\
&KLOGORFN
(
FR
Washing a load of laundry
STEP 7: Unloading your laundry
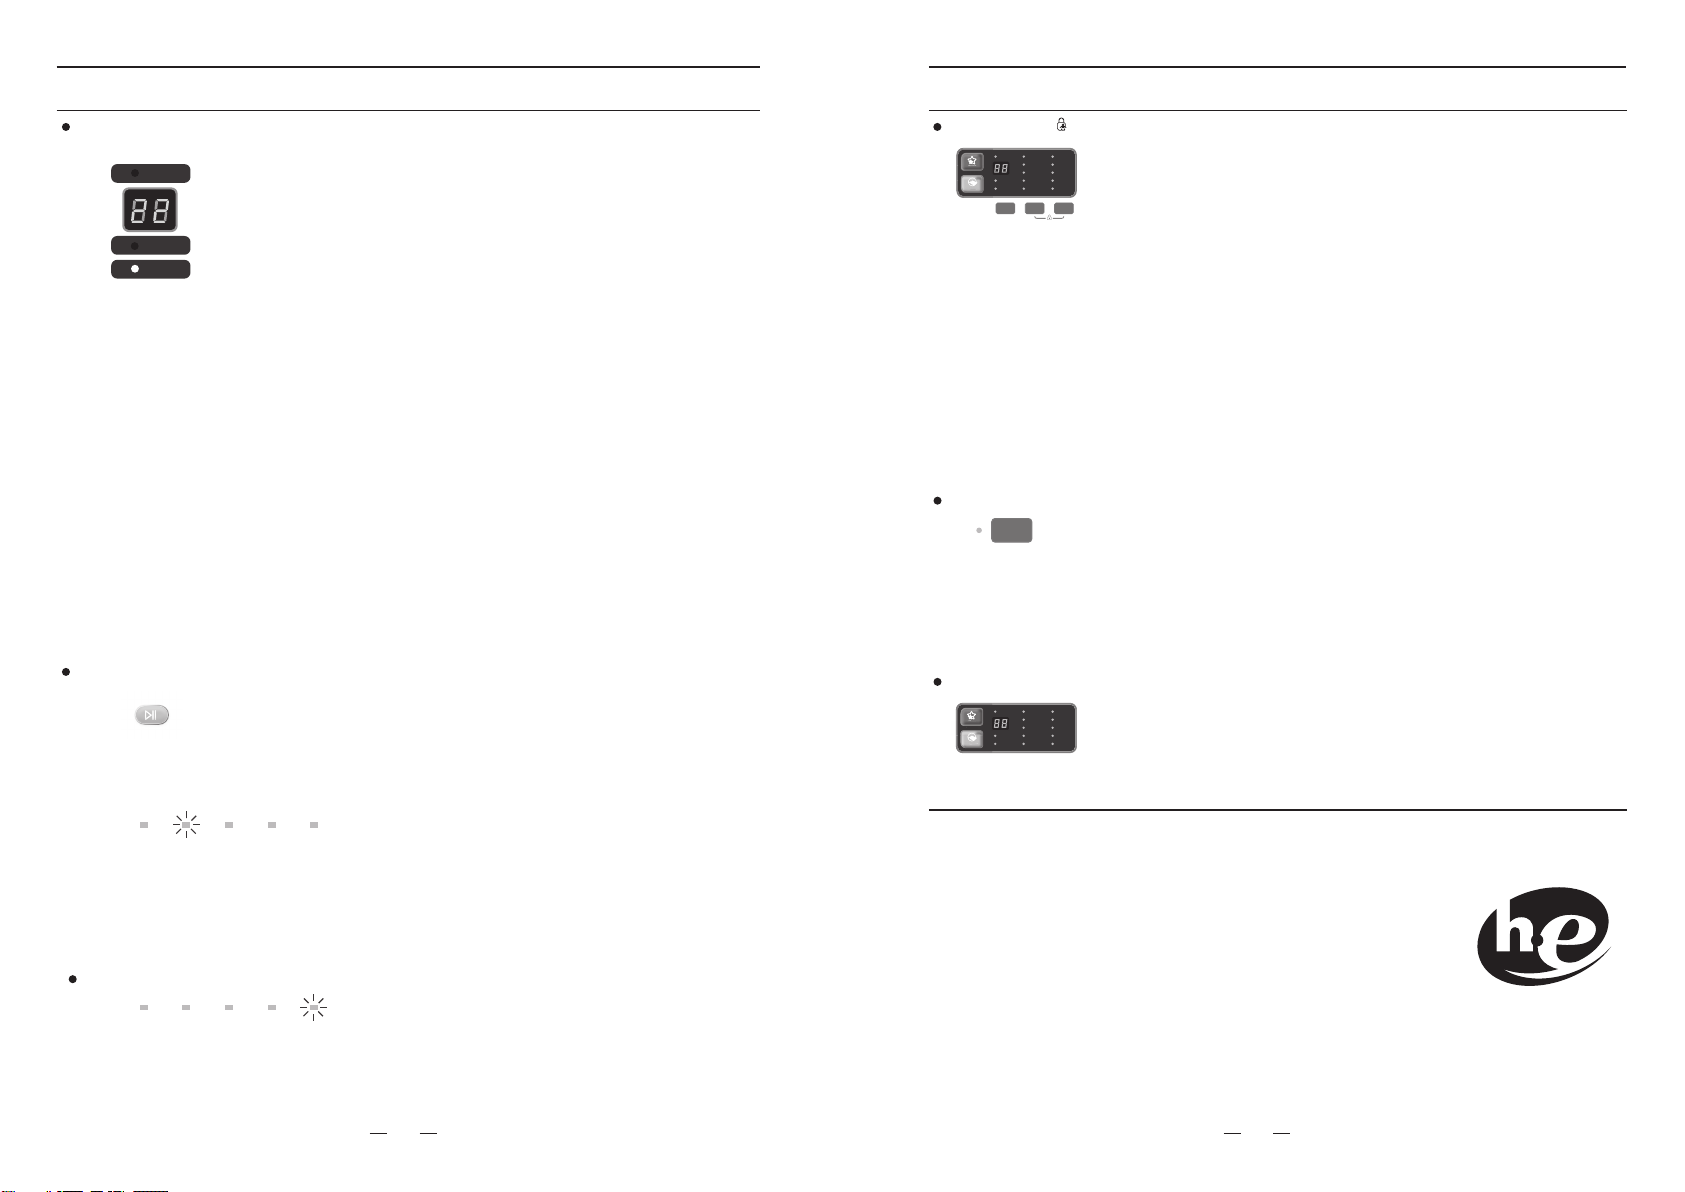
- You can set a period time in hours to delay your washing operation.
- Press the “Delay” button once to enter the delay start setting
function with the digital displaying your last setting time or “0" for
initial setting with “Delay” light flashing.
- Press the “Delay” button every time, the delay start time in hours
displayed will change in sequence: 0, 1, 2, 3, 4, 5, 6, 7, 8, 9, 10, 11,
12, 13, 14, 15, 16, 17, 18, 19, 20, 21, 22, 23, 24, then back to 0.
Or, you can press and hold the “Delay” button to quickly adjust the
setting time until your desired time displayed.
- Select your desired delay start time.
- When “0" is di
splayed, the Delay Start function will be cancelled.
- The “Done” light on the process bar will flash when your laundry
work has been finished.
- The washer will produce 6 beeps after the cycles done and the lid
will be unlocked.
STEP 5: Set Delay Start
Note: You can skip this step if you don’t want this function.
STEP 6: Start your washer
Now, it’s time to start your washer.
- If you have selected desired Delay Start time, the “Delay” light will
be ON and your washer will start count down the delay start time.
- If you don’t have any delay start setting or the delay start time has
been finished, the unit will start your selected program. The relavant
process light will flash accordingly.
Notes:
You can just press the “Power” button to turn your washer OFF and
then press again to turn it ON to cancel the Delay Start function.
- When you do so, you should reset your setting program.
Any time you pause the unit or open the lid, you should press th
e
“Start/Pause” button to resume the operation.
Useful functions
OPERATING INSTRUCTIONS
OPERATING INSTRUCTIONS
Child Lock
This function is useful to prevent children from playing with the unit.
- Press and hold the “Soil Level” and “Temp” buttons simultaneously
for 3 seconds to activate this function. The red light “Child lock” will
turn ON.
- Press and hold the “Soil Level” and “Temp” buttons simultaneously
again for 3 seconds to deactivate this function. The light “Child
lock” will turn OFF.
- When this function is activated, all buttons will be out of function
except the POWER and DEACTIVATE function above.
- You can just Power ON the unit and activate this function, then
Power the unit OFF. T
his operation will help to keep the child from
operating the unit. At this time, you should deactivate the function
next time when you want to operate the unit.
- When the Child Lock function is activated with the top lid OPEN,
the unit will display “E3" for lid open alarm. You should close the lid
in 20 seconds. The unit will alarm, display “CL” and drain all water
out of the tub if the lid keeps open over 20 seconds. You can stop
and clear the “CL” display easily by turning OFF the unit.
Notes:
- If you don’t press any button when you are setting delay start time
in 3 seconds, the washer will return to remaini
ng time display for
selected washing program with “Delay” light ON. Press the button
“Delay” again will back to “Delay” setting with light flashing.
- If you want to change your cycle setting when you are setting delay
start time, just rotate the knob or press relative option buttons. The
display will change to remaining time for selected program with
“Delay” light ON.
- Any time you want to check the delay start setting, just press the
“Delay” button, the display will show the setting delay start time.
- Before you press the Start/Pause button, you can easily cancel this
funct
ion by changing the cycle selection with the knob. Then you
should reset all options as STEP 4.
- THE DELAY START TIME CAN NOT BE CHANGED AFTER THE
PROGRAM HAS BEEN STARTED.
Buzzer
- Any time a button is pressed, you washer will beep once.
- When your washer finish a full cycle, it will beep 6 times.
- You can stop the beeping sound by pressing the “Buzzer” button
with the green light On.
- To resume the beeping, press the button again with the light Off.
Note: The beeping can’t be stopped when the unit is in ERR status.
You can power off the unit to stop the sound in ERR status.
Energy Saver
- This function will reduce the energy consumption by reducing
washing time but increasing spinning time.
- A longer spinning time will help to reduce the remaining moisture in
your clothes so that you will cost less energy to dry them.
Detergent use
Your washer is designed to use high efficiency (HE) detergents.
- For best cleaning results, use a high efficiency detergents such
as Tide HE, Wisk HE, Cheer HE or Gain HE*. High efficiency
detergents contain suds suppressors that reduce or eliminate
suds. When fewer suds are produced, the load tumbles more
efficiency and cleaning is maximized.
- Reducing the amount of detergent may reduce the quality of
cleaning. It is important to pre-treat stains, sort carefully by color
and soil level, and avoid overloading.
* Brand names are trademarks of their respective manufac
turers.
21
22
Extra Heavy
Hot
Heavy
Warm
Medium Eco Warm
Light
Extra Light Tap Cold
Cold
Child Lock
Eco
Delay
Energy Saver
Favorite
Ener
Ener
E
gy Sa
gy Sa
gy
v
er
r
Hold 3 Sec
F
a
v
orite
Hold 3 Sec
Start/Pause
Power
Wash
Rinse
Spin
Done
Soak
Wash
Rinse
Spin
Done
Soak
Hold 3 Sec
Extra Heavy
Hot
Heavy
Warm
Medium Eco Warm
Light
Extra Light Tap Cold
Cold
Child Lock
Eco
Delay
Energy Saver
Favorite
Ener
Ener
E
gy Sa
gy Sa
gy
v
er
r
Hold 3 Sec
F
a
v
orite
Hold
3
Sec
Temp
Soil Level
Delay
Buzzer
IMPORTANT: Regular detergent is not recommended. Use HE detergents only.

Cleaning the exterior
Check these solutions if your washer...
TROUBLESHOOTING
USER MAINTENANCE INSTRUCTIONS
Turn off the water faucets after final use.
This will shut off the water supply to your washer and prevent the unlikely possibility of
damage from escaping water. Leave the lid open to allow the inside of your washer to dry
out.
Use a soft cloth to wipe up all detergent, bleach or other spills as they occur.
Clean the following as recommended:
Control Panel - Clean with a soft, damp cloth. Do not use abrasive powders or
pads. Do not spray cleaners directly on the panel.cleaning
Cleaning the detergent, bleach, softener compartments
You may find laundry product residue leftover in your compartments. To remove residue,
wipe with a damp cloth and towel dry. Do not attempt to remove the compartments or
trims for cleaning. The compartments and trims are not removable.
Storing your washer
Washers can be damaged if water is not removed from hoses and internal components
before storage.
Preparing your washer for storage as follows:
- Select the Quick wash cycle and add bleach to the washer. Run your washer through
the cycle without a load.
- Turn the water faucets off and disconnect the inlet hoses.
- Unplug your washer from the electrical outlet and leave your washer lid open to let air
circulate inside the drum.
- If your washer has been stored in below-freezing temperatures, allow time for any
leftover water in your washer to thaw out before use.
Tub clean
Tub clean is a self-cleaning cycle that removes mold that may occur
inside the washer.
1. Press the Power button.
2. Select the Tub clean on Cycle selector.
- Once the Tub cle an is selected, you can only set Delay Start
function and Buzzer.
3. Press the Start/Pause button.
- If you press the Start/Pause button, Tub clean begins.
Using Tub clean, you can clean the tub and drum without using a
cleansing agent.
Problem Solution
The unit doesn’t
start
- Check the fuse or reset the circuit breaker.
- Make sure your washer is plugged in.
- Make sure the lid is closed.
- Make sure the water source faucets are open.
- Make sure to press the Start/Pause button to start your washer.
- Make sure Child Lock is not activated. See page 22.
- Check if a Delay Start is set. See page 21.
- Before your washer starts to fill, it will make a series of clicking
noises to check the lid lock and go a quick drain.
No water or not
enough water.
Detergent /
Softener remains
in its box after
the wash cycle is
completed.
- Turn both faucets on fully.
- Check if the water pressure is in the range as page 11.
- Straighten the water inlet hoses.
- Disconnect hoses and clean the screens. Hose filter screens
may be clogged.
If your washer has any following problems, you can check from the
solutions listed below before making a service call. This will help you
save time and money.
Vibrates or is too
noisy.
- Make sure your washer is set on a level surface. If the surface is
not level, adjust your washer’s feet to level the appliance.
- Make sure your washer is not touching any other object.
- Make sure the laundry load is balanced.
During the spin process, if clothes are piled at one side of
basket, it will stop due to imbalance. The unit will try to
solve the problem automatically. If the washer can’t solve the
problem in three trials, you should replace the clothes and
make it as even as possible manually.
Stops - Plug the power cord into a live electrical outlet.
- Check the fuse or reset the circuit breaker.
- Close the lid and press the Start/Pause button to start your
washer. For your safety, your washer will not spin unless the lid
is closed.
- Before your washer starts to fill, it will make s series of clicking
noises to check the lid lock and do a quick drain.
- There may be a pause or sock period in the cycle. Wait and it
may start.
- Check the screens on the inlet hoses at the faucets for
obstructions. Clean the screens periodically.
Lid locked or will
not open.
- Press the Start/Pause button to stop your washer.
- It may take a few moments for the lid lock to disengage.
Does not drain or
spin.
- Check the fuse or reset the circuit breaker.
- Straighten the drain hoses. Eliminate kinked hoses. If there is a
drain restriction, call for service.
- close the lid and press the Start/Pause button. For your safety,
your washer will not spin unless the lid is closed.
- Check the height of drain hose end. See page 15.
23
24
Cleaning the interior
Clean the interior of your washer periodically to remove any dirt, soil, odor, mold, mildew,
or bacterial residue that may remain in your washer as a result of washing clothes.
Failure to follow these instructions may result in unpleasant conditions, including odors
and/or permanent stains on your washer or laundry.
Hard water deposits may be removed, if needed. Use cleaners labeled “Washer safe”.
Hand Wash
Active Wear
Normal
Whites
Heavy Duty
Tub Clean
Drain & Spin
Bulky
Colors
Quick
Delicates
Rinse & Spin
IMPORTANT: Never use Tub clean cycle when laundry is in the washer.
This may cause damage to the laundry or a problem with the washer.
Check these solutions if your washer...
Check these solutions if your washer...
TROUBLESHOOTING
TROUBLESHOOTING
Problem Solution
Fills with wrong
temperature
water.
- Turn both faucets fully.
- Make sure the temperature selection is correct.
- Make sure the hoses are connected to the correct faucets.
Flush water lines.
- Disconnect the hoses and clean the screens. The hose filter
screens may be clogged.
Load is too wet
at the end of the
cycle.
- Use high efficiency detergent to reduce over-sudsing.
- The load is too small. Very small loads (one or two items) may
become unbalanced and not spin out completely.
Leaks water. - Make sure all hose connections are tight.
- Make sure the end of the drain hose is correctly inserted and
secured to the drainage system.
- Avoid overloading.
- Use high efficiency detergent to prevent over-sudsing.
Has excessive
suds.
- Use high efficiency detergent to prevent over-sudsing.
- Reduce the detergent amount for soft water, small or lightly soiled
loads.
- Non-HE detergent is NOT recommended.
Has an odor.
- Run a Tub Clean cycle to clean the tub and basket periodically.
See page 23.
- Check your detergent. Excessive suds collect in nooks and
crannies and cause mold.
- Dry the interior of your washer after the total cycle has finished.
25
26
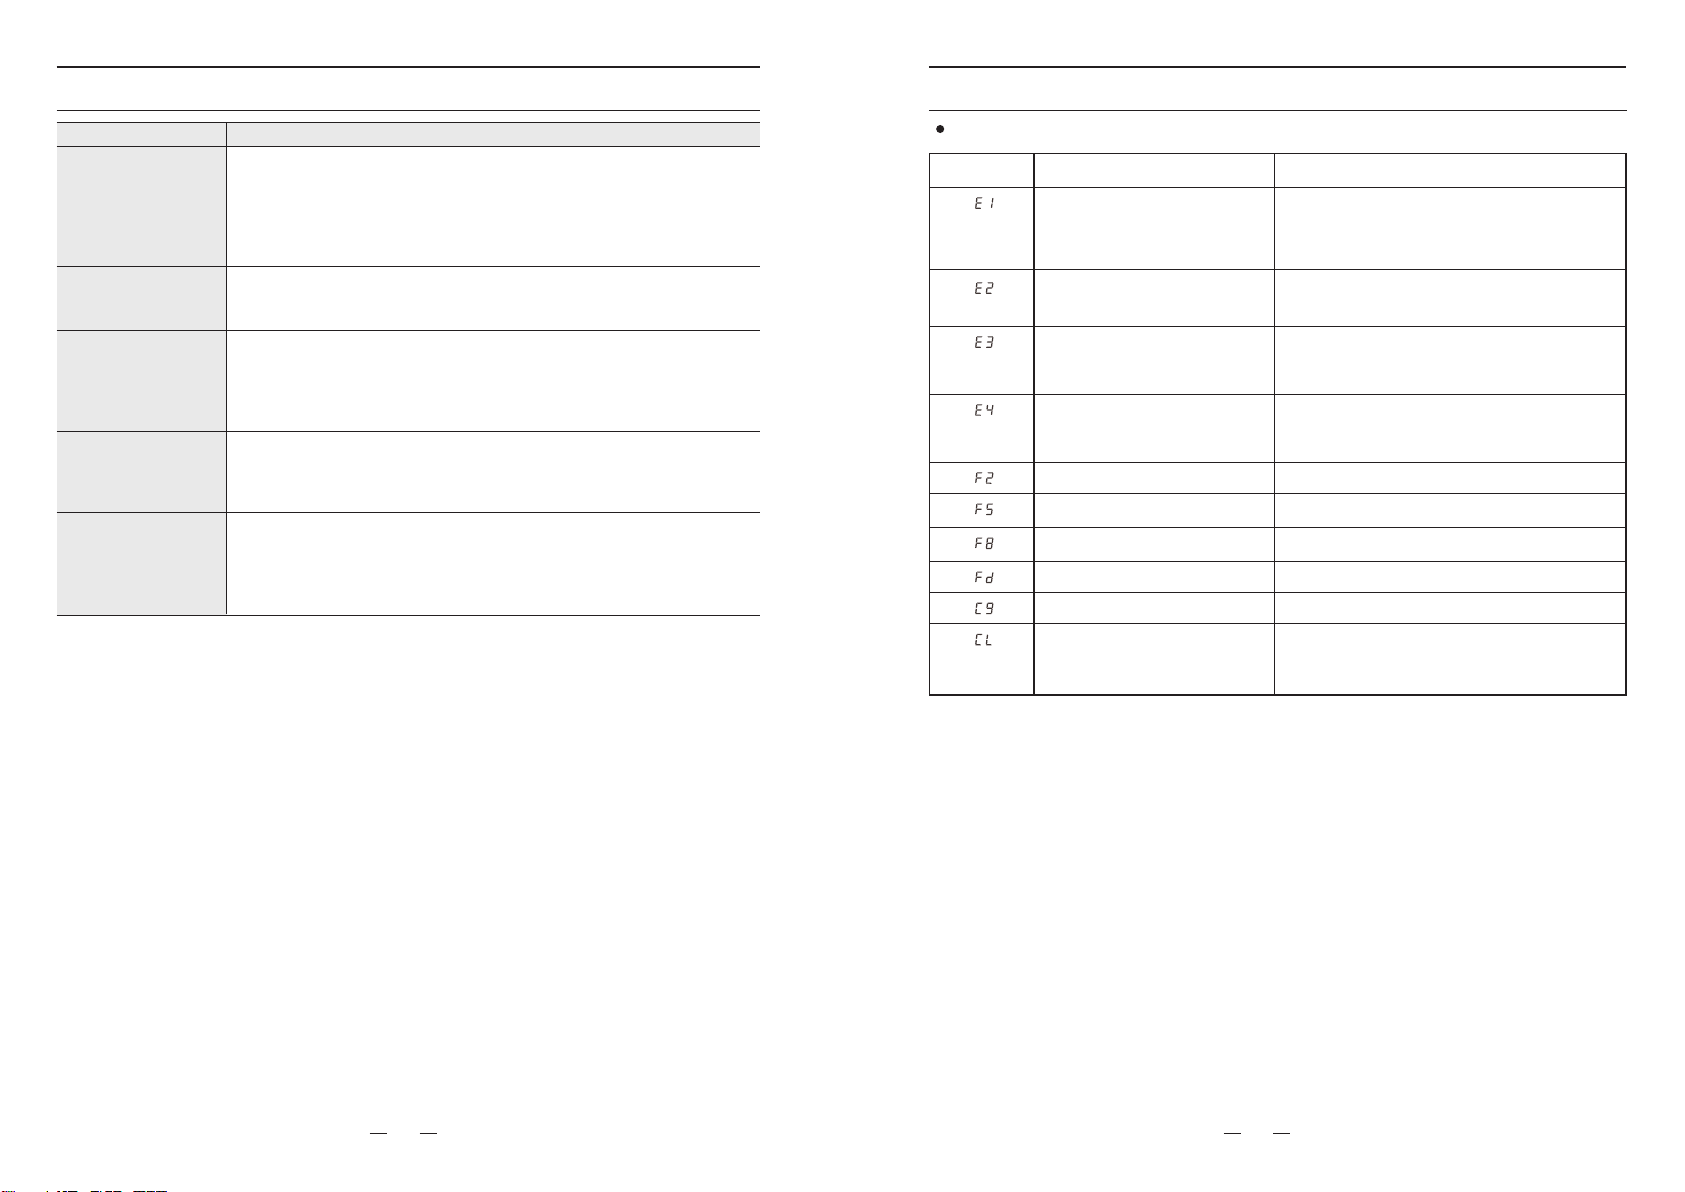
SolutionsError Code Possible Cause
The unit takes more than 1
hour to fill water.
Check if the lid is open.
Check as “No water or not enough water”
as on page 24.
Check for water leakage.
The unit takes more than 10
minutes to drain.
Check as “Does not drain or spin” as on
page 24.
The lid is open. Close the lid.
The door lock or PCB is failed. Call service
center.
Error Codes
The unit is out of balance in
spin operation.
Check as “Vibrates or is too noisy” as on
page 24.
Call service center.
The PCB failed Call service center.
Load sensing failed Call service center.
Water leveling sensor failed Call service center.
Door lock failed Call service center.
The PCB failed Call service center.
The door opened over 20
seconds with Child Lock
function activated.
Power off the unit.
Deactivate the Child Lock function.
Call service center.
 Loading...