


Dishwasher
TFE3 Series
Instructions for Use
HDW9-TFE3WH
HDW9-TFE3SS
0120505889A
en

Index |
en |
Safety information |
2 |
Installation |
4 |
Getting to know your appliance |
11 |
How to fill the rinse aid container |
12 |
How to fill the detergent dispenser |
13 |
Non-Dishwasher Items |
14 |
Arranging crockery, glasses, etc. in the dishwasher |
15 |
Programme overview |
16 |
Washing dishes |
17 |
Care & Maintenance |
20 |
Trouble shooting |
22 |
Technical data |
27 |
Important information |
27 |
Disposal
The symbol  on the product or on its packaging indicates that this product may not be treated as household waste. Instead it should be handed over to the applicable collection point for the recycling of electrical and electronic equipment. By ensuring this product is disposed of correctly, you will help prevent potential negative consequences for the environment and human health, which could otherwise be caused by inappropriate waste handling of this product.
For more detailed information about recycling of this product, please contact your local council, your household waste disposal service or the shop where you purchased the product.
1

Safety information |
en |
At time of delivery
Check packaging and dishwasher immediately for signs of transport damage. If the appliance is damaged, do not use it and contact the retailer or our approved customer service department without delay.
Please dispose of packaging materials properly.
During installation
Unpack the dishwasher and connect in accordance with the installation instructions.
The dishwasher must not be connected to the electricity supply while installation is being carried out.
Ensure that the domestic wiring is properly earthed.
The mains electricity supply must conform to the details shown on the dishwasher rating plate.
Do not connect the dishwasher to the electricity supply using an extension cable.
After the appliance has been installed, the mains plug should still be easily accessible.
 During installation, the power cable must not be excessively or dangerously kinked or flattened.
This appliance cannot be installed outdoors, even if the area in which it is installed is covered by a roof. It is very dangerous to leave the appliance exposed to rain and the elements.
During normal use
The dishwasher must only be used by adults for the washing of household dishes and cooking utensils. Do not place any heavy objects on the door or stand on the door when it is open. The appliance could tip forward.
The water inside the dishwasher is not suitable for drinking.
Do not use solvents of any kind inside your dishwasher. There is a risk of explosion.
Open the door carefully if the dishwasher is operating. Steam or Hot Water may come out of the door. Fundamental rules to follow when using the appliance:
-Never touch the dishwasher when barefoot or with wet hands or feet.
-Do not use extension cords and multiple sockets.
-If the appliance is not operating properly or maintenance must be performed, disconnect the appliance from the power supply.
2

en
If your family includes children or the infirm
 The appliance is not intended for use by young children or infirm persons without supervision.
Keep detergents out of the reach of children.
If a fault occurs
If the appliance malfunctions, turn off the water supply to the appliance, switch it off and disconnect the plug from the wall socket. Then, consult the section entitled "Trouble shooting". If you cannot solve the problem, contact a service centre.
Only specialised personnel are authorised to make repairs.
If the power cable is damaged, it must be replaced by the manufacturer or a manufacturer-approved service engineer.
To maintain the EFFICIENCY and SAFETY of this appliance, we recommend:
-Call only the service centres authorised by the manufacturer, or the approved service agents.
-Always use original spare parts.
When disposing of old appliances
Appliances which are no longer being used must be made inoperable by disconnecting the plug from the wall socket, cutting the power cable and removing the door lock.
Take the appliance to a designated waste disposal centre.
Dangerous voltage
Warning
Children could get locked or stuck in the appliance (risk of suffocation). Therefore, remove the mains plug and cut the mains wire.
The door locking mechanism should also be removed/destroyed to ensure children cannot be trapped in the appliance.
3

Installation |
en |
Before you start
Safety and compliance
 These instructions are intended as a guide only. It is the responsibility of the installer to ensure that installation complies with applicable regulations and local government by-laws.
 Installation must be performed by a suitably qualified person. Incorrect installation or malfunctioning resulting from incorrect installation are not covered by warranty.
 Carefully read through the ‘Safety and warnings’ section of this document.
 The dishwasher must not be connected to the electrical supply while it is being installed. Ensure all domestic wiring is properly earthed.
 If an old appliance is being replaced, make sure it is disposed of properly. To avoid children getting trapped or injured while playing with an old appliance, ensure you remove any doors, door locks and cables from it.
 In order to ensure that the dishwasher is stable, it must be installed under a continuous surface which is attached to adjacent cupboards.
Unpacking and handling
 Check packaging and dishwasher for signs of transport damage. If the dishwasher is in any way damaged, do not install it. Contact the dealer the dishwasher was purchased from.
 Disposal of packaging: some of the packaging is recyclable. Check the symbols and labels and recycle if possible.
 Never lift the dishwasher from the door handle or the top panel. Doing so may cause damage. Always be careful with the hoses and power cord at the back of the dishwasher. Careful handling will prevent damage and malfunction from squashing, kinking or cuts.
 While installing the dishwasher, check the drain hose is not restricted or kinked.
Connections and services
 Check that the power cord is long enough to reach the outlet. If it isn’t, it must be replaced by a Haier authorised technician. Extension cords or multi-outlet power boards should not be used to connect the dishwasher to the power supply.
 Check that the hoses are long enough to reach the services. If a hose needs extending, ensure that the extension hose is new and of equal quality and diameter to the one already fitted.
Note: the drain hose should not be longer than 4 m, as a longer drain hose will cause reduced performance.
 The dishwasher should not be connected to a water system where the temperature exceeds 60oC, or where there is no temperature control, e.g. wetback system, unless the system is fitted with a suitable tempering valve.
 The dishwasher must not be connected to an undersink high-pressure “push-through” type hot water system, as damage to the system will result.
4
en
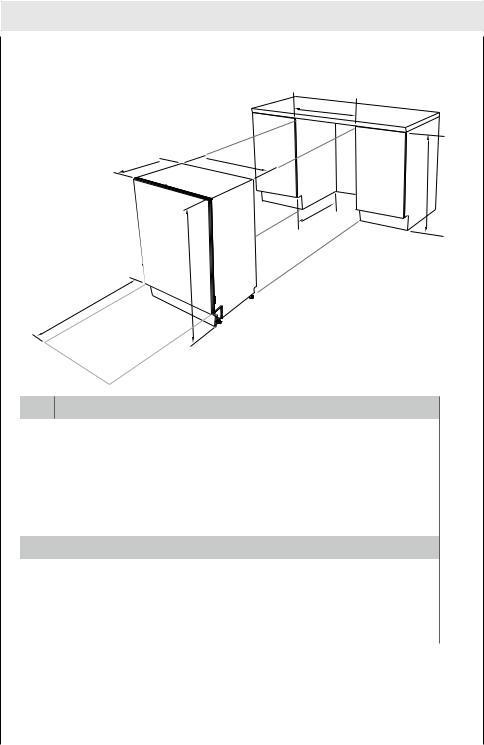
Product and cabinetry dimensions
F
C 
 B
B
E
G
A
D
Product dimensions(mm)
A |
overall height of product |
|
|
with top panel in place |
850 (min) -870 (max)** |
|
with top panel removed* |
820 (min) -840 (max)** |
B |
overall width of product |
450 |
C |
overall depth of product |
600 |
D |
depth of open door |
595 |
|
(measured from front of kickstrip) |
|
|
Cabinetry dimensions(mm) |
|
E |
inside height of cavity |
|
|
with top panel in place |
855 (min) -875 (max)** |
|
with top panel removed* |
825 (min) -845 (max)** |
F |
inside width of cavity |
455 |
G |
inside depth of cavity |
605 |
* The top panel may be removed to suit underbench cavity height. See instructions further below. **Depending on feet height adjustment.
5
en
Preparing the product and cabinetry
The top panel may be removed to suit underbench cavity height. See the illustrations below.
1
2 |
3 |
|
|
|
|
|
|
|
Important!
To prevent possible steam damage to the cabinetry, ensure that any bare wood surrounding the dishwasher is
sealed with an oil-based paint or moisture-proof polyurethane.
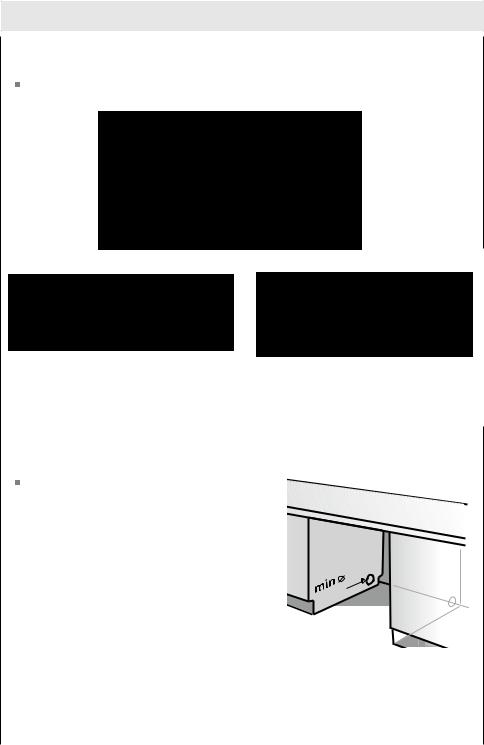
Services can be located either side of the dishwasher. Ensure that the services hole has a minimum diameter of 50 mm.
 mm
mm
6

en
Levelling and positioning the dishwasher
Before sliding the dishwasher into position, adjust the feet with a spanner (1) to ensure that the dishwasher is level (2) and the required height.
Do not lift the dishwasher from the door handle or top panel. Position the dishwasher in the cavity, ensuring that the hoses
and power cord don’t get bent, crimped, or trapped under the dishwasher in the process (3). If you install the dishwasher with the top panel removed, we recommend that you fix the dishwasher to the bench using the top brackets, as shown (4).
Important!
Ensure that you do not damage the bench by using fixing screws that are too long for it.
2
Only if top panel removed
4
3
1
7

en
. min
Plumbing -- Waste connection
These drainage options are designed to eliminate problems that occur with combined sink-dishwasher waste systems.
Drainage option A: Separate sink and dishwasher waste systems
The standpipe must have a minimum diameter of 38 mm and stand 750 mm above the floor. Use the supplied drain hose support to hold the drain hose in place in the standpipe.
Important!
We do not recommend connecting the drain hose or drain pipe directly to a built-in waste disposal unit.
|
|
|
Waste disposal |
min. |
|
|
unit (optional) |
120 |
min. |
|
|
mm |
|
Waste |
|
750 mm |
|
||
|
|
||
min.38 mm |
min. |
Water |
|
|
|
750 mm |
|
|
|
|
Waste |
|
|
|
min. 200 mm |
|
Power outlet with |
Hose supplied |
|
|
disconnection switch |
|
|
Drainage option B: Combined sink and dishwasher waste systems
When connecting the drain hose to a sink trap with a drain hose spigot, make sure that the drain hose is supported to the height of the bench.
Ensure the drain spigot has a minimum hole diameter of 15 mm and it has been drilled out. Secure the drain hose connection with the clip supplied.
Ensure drain hose is supported to height of bench
Ø21 |
mm |
|
5mm |
Vent |
|
Ø1 |
|
||
|
. |
|
Waste |
|
min |
|
|
||
|
|
|
Hose supplied |
Water |
min. 200 mm
Power outlet with disconnection switch
8
 Loading...