


Installation and User Manual Instructions d’installation et guide de l’utilisateur Instrucciones de instalación y Manual del usuario
HRB15N3
Bottom Mount Refrigerator
Réfrigérateur à congélateur inférieur
Refrigerador de montaje inferior
Part # 0570001012 REV A

TABLE OF CONTENTS |
|
REFRIGERATOR SAFETY......................................................................................................................................................................... |
2 |
PARTS AND FEATURES........................................................................................................................................................................... |
3 |
INSTALLATION REQUIREMENTS............................................................................................................................................................. |
4 |
Location Requirements............................................................................................................................................................................................... |
4 |
Electrical Requirements.............................................................................................................................................................................................. |
4 |
INSTALLATION INSTRUCTIONS.............................................................................................................................................................. |
5 |
Step 1 - Unpack the Refrigerator................................................................................................................................................................................ |
5 |
Step 2 - Door Reversing.............................................................................................................................................................................................. |
5 |
Step 3 - Complete the Installation............................................................................................................................................................................. |
9 |
Step 4 - Leveling and Door Adjustment................................................................................................................................................................... |
10 |
REFRIGERATOR USE............................................................................................................................................................................. |
10 |
Using the Controls..................................................................................................................................................................................................... |
10 |
Features..................................................................................................................................................................................................................... |
12 |
REFRIGERATOR CARE........................................................................................................................................................................... |
13 |
Cleaning..................................................................................................................................................................................................................... |
13 |
Lights......................................................................................................................................................................................................................... |
14 |
Vacation and Moving Care........................................................................................................................................................................................ |
14 |
Reinstalling/Using Refrigerator Again...................................................................................................................................................................... |
14 |
TROUBLESHOOTING............................................................................................................................................................................ |
14 |
LIMITED WARRANTY............................................................................................................................................................................ |
16 |
RECORD KEEPING
Thank you for purchasing this Haier product. This user manual will help you get the best performance from your new refrigerator.
For future reference, record the model and serial number located on the inside wall of the refrigerator, and the date of purchase.
Staple your proof of purchase to this manual to aid in obtaining warranty service if needed.
___________________________________________________________
Model number
___________________________________________________________
Serial number
___________________________________________________________
Date of purchase
1
REFRIGERATOR SAFETY
Your safety and the safety of others are very important.
We have provided many important safety messages in this manual and on your appliance. Always read and obey all safety messages.
This is the safety alert symbol.
This symbol alerts you to potential hazards that can kill or hurt you and others. All safety messages will follow the safety alert symbol and either the word “DANGER,” “WARNING” or “CAUTION.”
These words mean:
 DANGER
  WARNING
 CAUTION
An imminently hazardous situation. You could be killed or seriously injured if you don’t immediately follow instructions.
A potentially hazardous situation which, if not avoided, could result in death or serious bodily injury.
A potentially hazardous situation which, if not avoided, may result in moderate or minor injury.
All safety messages will tell you what the potential hazard is, tell you how to reduce the chance of injury, and tell you what can happen if the instructions are not followed.
IMPORTANT SAFETY INSTRUCTIONS
WARNING: Toreducetheriskoffire,electricalshock,injurytopersons,ordamagewhenusingtherefrigerator,followbasic precautions, including the following:
•Use this appliance only for its intended purpose as described in this user manual.
•This refrigerator must be properly installed in accordance with the installation instructions before it is used. See grounding instructions in the installation section.
•Flammable refrigerant used. Do not use mechanical devices to defrost freezer. Do not puncture refrigerant tubing.
•Flammable refrigerant used. To be repaired only by trained service personnel. Do not puncture refrigerant tubing.
•Flammable refrigerant used. Dispose of properly in accordance with federal or local regulations.
•Flammable refrigerant used. Follow handling instructionscarefully.Riskoffireorexplosiondueto puncture of refrigerant tubing.
•Plug into a grounded 3 prong outlet.
•Do not remove ground prong.
•Do not use an adapter.
•Donotuseanextensioncord.
•Do not repair or replace any part of the appliance unless specificallyrecommendedinthemanual.Allother servicingshouldbereferredtoaqualifiedtechnician.
•Disconnect power before servicing.
•Replace all parts and panels before operating.
•Usenonflammablecleaner.
•Keepflammablematerialsandvapors,suchasgasoline, away from refrigerator.
•Cabinet edges along stamp/ cutout areas may be sharp.
Avoidplacinghands,fingersorotherappendagesnear these areas.
•Before discarding or removing from service, remove the doors. This will reduce the possibility of danger to children.
READ AND SAVE THESE INSTRUCTIONS
State of California Proposition 65 Warnings:
WARNING: This product contains one or more chemicals known to the State of California to cause cancer.
WARNING: This product contains one or more chemicals known to the State of California to cause birth defects or other reproductive harm.
2
PROPER DISPOSAL OF YOUR OLD REFRIGERATOR
 WARNING
Su ocation Hazard
Remove doors from your old refrigerator.
Failure to do so can result in death or brain damage.
IMPORTANT: Childentrapmentandsuffocationarenotproblems of the past. Junked or abandoned refrigerators are still dangerous - even if they will sit for “just a few days.” If you are getting rid of your old refrigerator, please follow these instructions to help prevent accidents.
Before You Throw Away Your Old Refrigerator or Freezer:
•Takeoffthedoors.
•Leave the shelves in place so that children may not easily climb inside.
Important information to know about disposal of refrigerants:
Dispose of freezer in accordance with Federal and Local regulations. Refrigerants must be evacuated by a licensed, EPA certifiedrefrigeranttechnicianinaccordancewithestablished procedures.
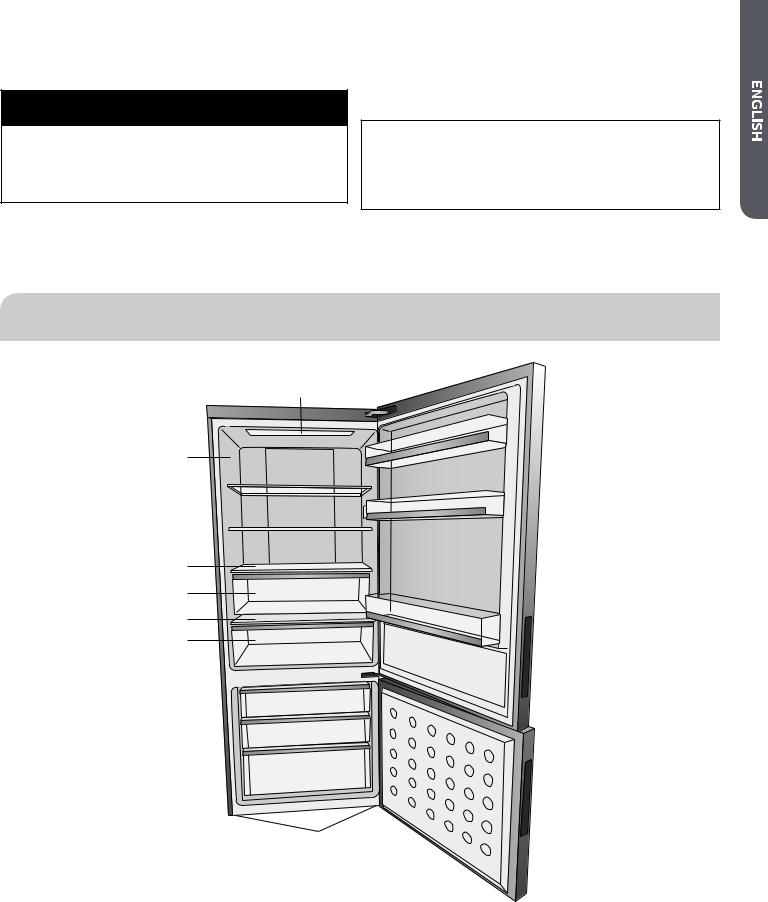
PARTS AND FEATURES
A
 D
D
B
C
 D
D
C
E
F
G
D
H
I
I
I
J
A LED Light |
F Refrigerator Drawer |
B Rating Plate |
G My Zone Cover |
C Glass Shelves (2) |
H My Zone Drawer |
D Refrigerator Door Bins (3) |
I Freezer Storage Drawers (3) |
E Refrigerator Drawer Cover |
J Adjustable Leveling Legs (2) |
3

INSTALLATION REQUIREMENTS
LOCATION REQUIREMENTS
 WARNING
Explosion Hazard
Keep ammable materials and vapors, such as gasoline, away from appliance.
Failure to do so can result in death, explosion or re.
IMPORTANT: This refrigerator is designed for indoor, household use only.
To ensure proper ventilation for your refrigerator, allow for 1"
(2.54cm)of space on each side and at the top. Allow for 2" (5.08 cm) of space behind the refrigerator. When installing your refrigerator nexttoafixedwall,leave4" (10 cm) minimum to allow for the door to swing open.
NOTE: This refrigerator is intended for use in a location where the temperature ranges from a minimum of 55°F (13°C) to a maximumof110°F (43°C). The preferred room temperature range for optimum performance, which reduces electricity usage and
provides superior cooling, is between 60°F (15°C) and 90°F (32°C). It is recommended that you do not install the refrigerator near a heat source, such as an oven or radiator.
ELECTRICAL REQUIREMENTS
 WARNING
Electrical Shock Hazard
Plug into a grounded 3 prong outlet.
Do not remove the ground prong from the power cord plug.
Do not use an adapter.
Do not use an extension cord.
Failure to do so can result in death, re or electrical shock.
Beforeyoumoveyourrefrigeratorintoitsfinallocation,itis important to make sure you have the proper electrical connection.
Recommended Grounding Method
A 115 volt, 60 Hz, AC only 15or 20-amp fused, grounded electrical supply is required. It is recommended that a separate circuit serving only your refrigerator be provided. Use an outlet that cannot be turnedoffbyaswitch.Donotuseanextensioncord.
NOTE: Before performing any type of installation or cleaning, disconnect the refrigerator from the electrical source. When you arefinished,reconnecttherefrigeratortotheelectricalsourceand reset the temperature controls to the desired setting.
4
INSTALLATION INSTRUCTIONS
STEP 1 - UNPACK THE
REFRIGERATOR
 WARNING
Excessive Weight Hazard
Use two or more people to move and install refrigerator. Failure to do so can result in back or other injury.
 WARNING
Fire or Explosion Hazard
Do not puncture refrigerant tubing. Follow handling instructions carefully. Flammable refrigerant used.
Failure to do so can result in death, explosion or re.
IMPORTANT: Handle with care when moving to avoid either damaging the refrigerant tubing or increasing the risk of a leak.
REMOVE THE PACKAGING
•Remove tape and glue residue from surfaces before turning on the refrigerator. Rub a small amount of liquid dish soap over the adhesivewithyourfingers.Wipewithwarmwateranddry.
•Donotusesharpinstruments,rubbingalcohol,flammable fluids,orabrasivecleanerstoremovetapeorglue.These products can damage the surface of your refrigerator. For more information, see “Refrigerator Safety.”
•Dispose of/recycle all packaging materials.
When Moving Your Refrigerator:
Your refrigerator is heavy. When moving the refrigerator forcleaningorservice,besuretocoverthefloorwith cardboardorhardboardtoavoidfloordamage.Alwayspull
the refrigerator straight out when moving it. Do not wiggle or
“walk”therefrigeratorwhentryingtomoveit,asfloordamage could occur.
CLEAN BEFORE USING
After you remove all of the packaging materials, clean the inside of the refrigerator before using it. See the cleaning instructions in “Refrigerator Care.”
Important information to know about glass shelves and covers:
Do not clean glass shelves or covers with warm water when theyarecold.Shelvesandcoversmaybreakifexposedto sudden temperature changes or impact, such as bumping.
Tempered glass is designed to shatter into many small, pebblesize pieces. This is normal. Glass shelves and covers are heavy. Use both hands when removing them to avoid dropping.
STEP 2 - DOOR REVERSING
(OPTIONAL)
The door hinges are factory installed on the right-hand side. If you want the doors to open from the opposite direction, you can reverse the door swing.
IMPORTANT:
•Before you begin, unplug the refrigerator, or disconnect power.
•Remove food and the bins from the refrigerator door.
•The door hinges are designed to be right-hand swing or left- handswingspecific.Replacetheright-handhingeswiththeleft- hand hinges provided in the parts bag. After removing, keep the right-hand hinges in case you would need to reverse the door swing.
Parts Provided:
•Top Hinge
•Center Hinge
•Bottom Hinge
Tools Needed:
•Flat-blade Screwdriver
•Phillips-head Screwdriver
•8 mm Socket Wrench
REMOVE AND REVERSE REFRIGERATOR DOOR
1.Unplug refrigerator or disconnect power.
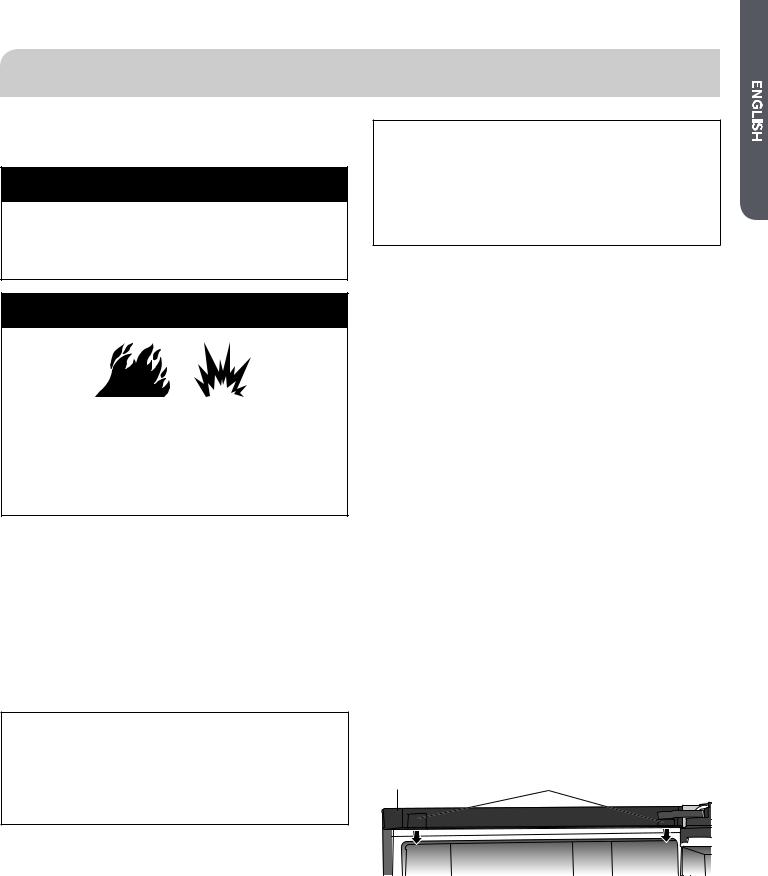
2.Pull down to remove the hinge screw covers from the wiring cover.
NOTE: The wiring cover spans the width of the cabinet top.
A B
A Wiring Cover
B Hinge Screw Covers
5
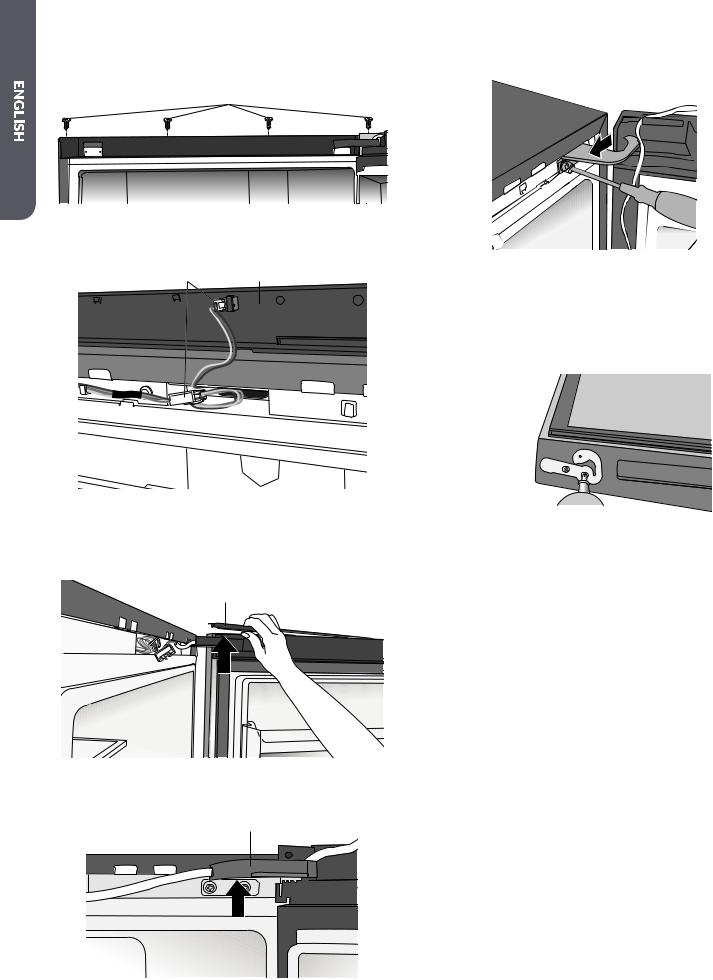
3.Using a Phillips screwdriver, remove the four screws attaching the wiring cover to the top of the refrigerator cabinet. Lift up on the wiring cover and allow it to rest on the top of the cabinet.
A
A Screws
4.Disconnect the wiring harnesses, by pinching each end and gently pulling them apart. Set wiring cover aside.
AB
A Wiring Harnesses
B Wiring Cover
5.Withyourthumbsintheopeningnexttothehinge,press upward on the top plate to release and remove it from the refrigerator door. Set the top plate aside.
A
A Top Plate
6.Lift up to remove the hinge cover, and keep it for possible future use.
A
A Hinge Cover
7.Using an 8 mm socket wrench, remove the two screws attaching the top hinge to the cabinet.
8.Slide the top hinge to disengage it from the third screw on the cabinet, and then lift up to remove the hinge pin from the door.
NOTE: Save the top hinge for possible future use.
9.Lifttherefrigeratordooroffofthecenterhinge,andgentlylay the door on a covered surface.
10.Using a Phillips screwdriver, remove the plastic door closure and the metal door stop from the bottom of the door.
A
B
A Door Closure
B Door Stop
11.Remove the screw from the door closure, and replace the screw into the hole from which it was removed.
12.Move the door stop to the opposite side. Insert screw into the center hole and fasten.
 A
A
 B
B
A Screw
B Door Stop
6
13.Move the door closure to the opposite side. Flip over the door closure so that the curved edge of the closure is toward the center of the door.
14.Remove innermost screw. Fit the door closure on top of the door stop screw, and fasten with the innermost screw.

 A
A
A Door Closure
REMOVE AND REVERSE FREEZER DOOR
1.Remove the two screws attaching the center hinge to the bottom of the refrigerator compartment. Remove the center hinge and save for possible future use.
2.Lift the freezer compartment door from the bottom hinge.
3.Move the hole plugs and the screw to the opposite side.
A
A Hole Plugs
4.Move the hole plug on the top of the freezer door to the opposite side.
A
A Hole Plug
5.Using a Phillips screwdriver, remove the two screws fastening the plastic door closure and the metal door stop to the bottom of the door.
A
B
A Door Closure
B Door Stop
6.Remove the screw from the door closure, and replace the screw into the hole from which it was removed.
7.Move the door stop to the opposite side. Insert screw into the center hole and fasten.
 A
A
 B
B
A Screw
B Door Stop
7
8.Move the door closure to the opposite side. Flip over the door closure so that the curved edge of the closure is toward the center of the door.
9.Remove innermost screw. Fit the door closure on top of the door stop screw, and fasten with the innermost screw.

 A
A
A Door Closure
 WARNING
Excessive Weight Hazard
Use two or more people to move and install refrigerator. Failure to do so can result in back or other injury.
10.Usingtwoormorepeoplelaytherefrigeratoronthefloor.
11.Remove the three screws attaching the bottom hinge to the cabinet. Remove the bottom hinge and save for possible future use.
A
 B
B
A Bottom Hinge
B Screws
12.Remove a new bottom hinge from the accessory bag. Using the three screws removed earlier, fasten the bottom hinge to the opposite side of the cabinet.
A
B


A Bottom Hinge
B Screws
REINSTALL DOORS
1.Align the hole in the bottom of the freezer compartment door with the hinge pin and gently lower the door onto the bottom hinge.
2.Align the edge of the freezer door with the side of the cabinet before installing the center hinge.
3.Remove the new center hinge from the accessory bag, insert the hinge pin into the top of the freezer compartment door, and then fasten the hinge to the bottom of the refrigerator compartment opening.
4.Remove the new top hinge from the accessory bag. Insert the hinge pin into the hinge hole in the top of the refrigerator door, and then gently lower the door onto the center hinge.
5.Align the edge of the refrigerator door with the side of the cabinet before fastening the top hinge.
6.Using the top hinge screws, removed earlier, fasten the top hinge to the refrigerator cabinet.
8

7.Remove the new hinge cover from the accessory bag. Insert the wiring cable through the clips on the underside of the cover, and thenfitthecoveroverthehinge.
A
A Wiring Cable
8.Flip the hinge screw cover, and insert it into the interior edge of the door.
A
A Hinge Screw Cover 9. Replace the door top plate.
A
A Top Plate
10.Connect the ends of both wire harnesses.
NOTE: Makesurethewiringispressedfirmlyintotheclips,and fittheexcesslengthintothecabinetopening.
AB
A Wiring Harnesses
B Wiring Cover
11.Replace the wiring cover on top of the refrigerator cabinet, and fasten with the four screws.
A
A Screws
12.Insert the hinge screw covers into the wiring cover on the top of the cabinet.
A
A Hinge Screw Covers
STEP 3 - COMPLETE THE
INSTALLATION
 WARNING
Electrical Shock Hazard
Plug into a grounded 3 prong outlet.
Do not remove the ground prong from the power cord plug.
Do not use an adapter.
Do not use an extension cord.
Failure to do so can result in death, re or electrical shock.
1.Plug into a grounded 3 prong outlet.
2.Return all removable door parts to door and food to refrigerator.
NOTE: This refrigerator begins operating as soon as it is connected to the power supply.
9

STEP 4 - LEVELING AND DOOR ADJUSTMENT (IF NEEDED)
The refrigerator must be level to maintain optimal performance and appearance.
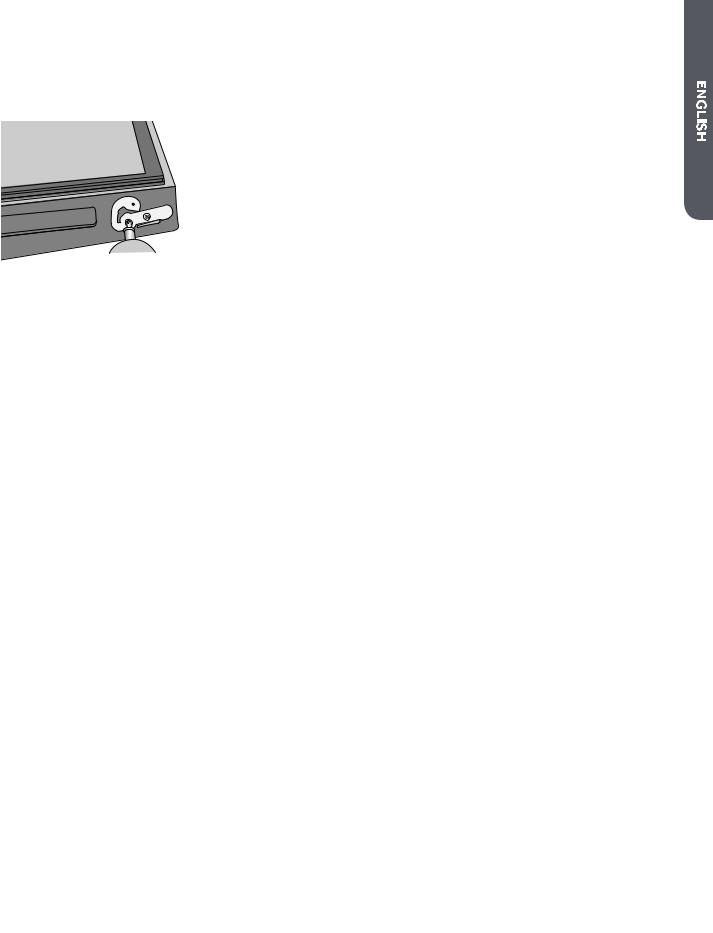
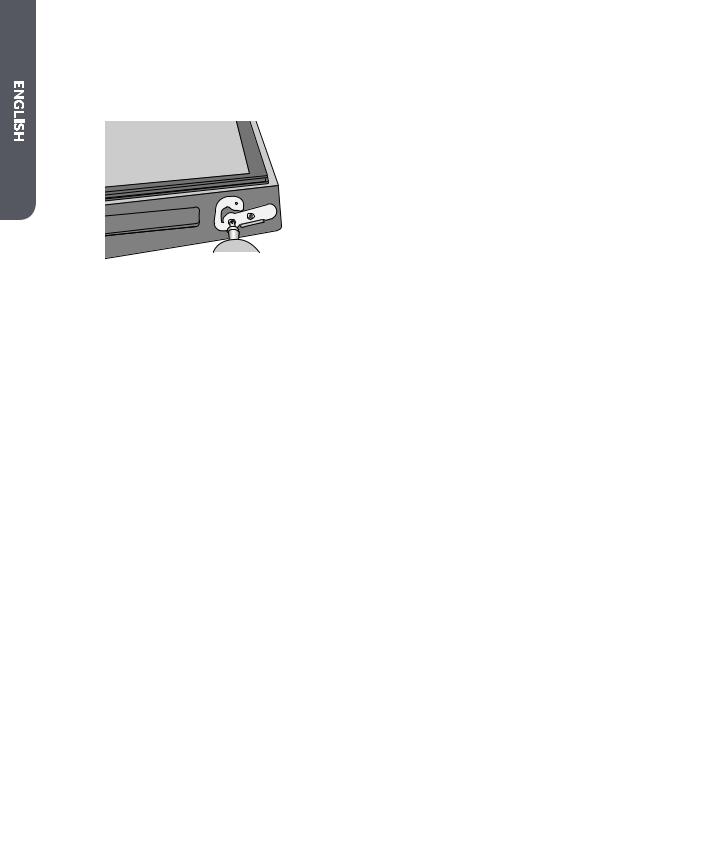
LEVELING
1.Movetherefrigeratortoitsfinallocation.
2.Turn the feet on the bottom, front of the cabinet to raise or lower that side of the refrigerator until the refrigerator is level side-to-side.
3.Turn both front legs, by the same amount, to slightly raise the front of the refrigerator. This will make it easier for the doors to close.
NOTE: Having someone push against the top of the refrigerator takessomeweightoffthelevelingscrews.Thismakesiteasier to turn the screws.
REFRIGERATOR USE
USING THE CONTROLS
A


Fridge |
H |
B |
|
My Zone |
I |
C |
|
Freezer |
J |
|
|
|
Quick Cool |
K |
|
|
|
|
|
||
D |
|
|
|
L |
|
|
|
Quick Freeze |
|||
|
|
|
|||
E |
|
|
|
M |
|
|
|
Hold 3 sec. |
|||
F |
|
||||
|
|
|
|||
|
|
|
|||
G |
|
N |
|||
|
|
|
|
||
A Refrigerator Temperature |
H Fridge Temperature Control |
||||
Indicator |
I My Zone Temperature |
||||
B My Zone Temperature |
|||||
|
Control |
||||
Indicator |
J Freezer Temperature |
||||
C Freezer Temperature |
|||||
|
Control |
||||
Indicator |
K Quick Cool Control |
|
D Quick Cool Indicator |
||
L Quick Freeze Control |
||
E Quick Freeze Indicator |
||
M Sabbath Mode Control |
||
F Sabbath Indicator |
||
N Lock Control |
||
G Lock Indicator |
||
|
TOUCH PADS
The controls are touch pads, which respond when lightly touched.
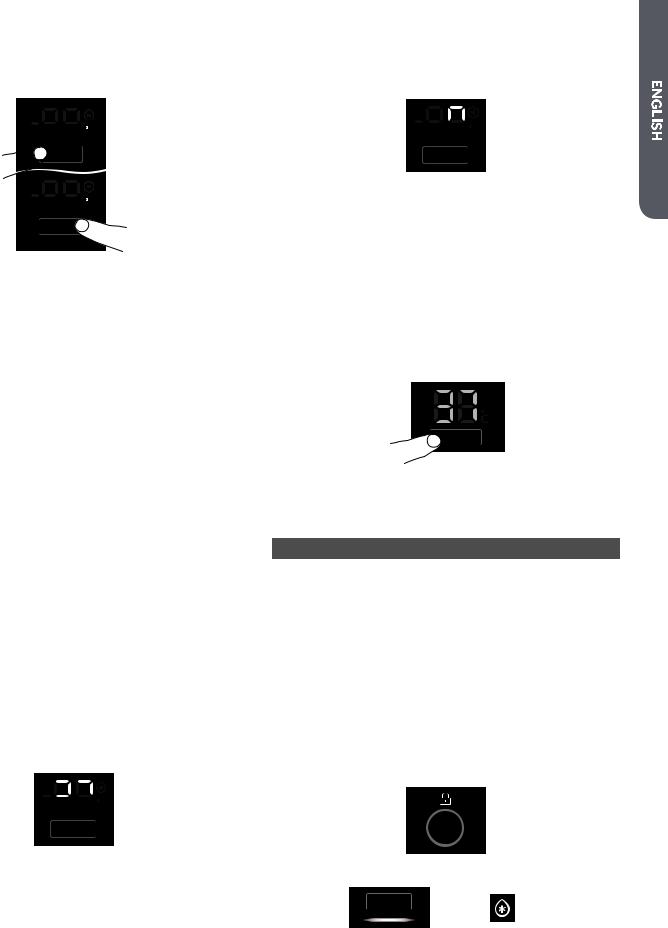
CONTROL PANEL LOCK
The control panel is automatically locked after 30 seconds of nonuse. To change any settings the control panel must be unlocked.
To Unlock the Control Panel:
Lock
Hold 3 sec.
1.Press and hold LOCK for 3 seconds. The Lock indicator will turn OFF.
To Lock the Control Panel:
1.Press and hold LOCK for 3 seconds. The Lock indicator will turn on.
TEMPERATURE DISPLAY
C |
|
C |
|
C |
Fridge |
|
My Zone |
|
Freezer |
|
|
|
||
|
|
|
|
|
When no buttons or doors are operated for 30 seconds, all the LEDs ondisplaypanelturnoff.
When a button is pressed or a door opened, the LEDs on display panel illuminate.
UNITS SELECT
The Units Select feature allows you to choose between displaying the set temperature in either degrees Fahrenheit (°F) or degrees Celsius (°C).
The default temperature unit is degrees Fahrenheit.
1.If locked, unlock the control panel by pressing and holding LOCK for 3 seconds.
2.Press and hold FRIDGE and FREEZER at the same time for
3seconds.°Cwillappearnexttothetemperaturedisplayto indicate that the unit has been changed to degrees Celsius.
10
3.To return to displaying the set temperature in degrees Fahrenheit, press and hold FRIDGE and FREEZER at the same time for 3 seconds. The °C will disappear from the Temperature display.


 C
C
 Fridge


 C
C
Freezer
TEMPERATURE CONTROLS
The temperature range for the refrigerator compartment is 34°F to 42°F (1°C to 6°C). The temperature range for the freezer compartment is -6°F to 4°F (-21°C to -16°C). The temperature range for the My Zone compartment is 27°F to 41°F (-3°C to 5°C).
The refrigerator and My Zone compartments are preset to the recommended temperature of 37°F (3°C) and the freezer
compartment is preset to the recommended temperature of 0°F
(-18°C).Whentherefrigeratorisfirstpluggedin,thedisplaywill show the recommended temperature settings.
IMPORTANT:
•The recommended setting should be correct for normal household refrigerator use.
•Whentherefrigeratorisfirstturnedon,itmaytakeupto
12hourstocooltothepresettemperatures.Wait24hoursfor your refrigerator to cool completely before adding food. If you add food before the refrigerator has cooled completely, your food may spoil.
•If the temperature is too warm or too cold in the refrigerator or freezer,firstchecktheairventstobesuretheyarenotblocked before adjusting the controls.
Adjusting Controls
Exceptwhenfirstturningontherefrigerator,donotadjusteither temperature more than one degree at a time. Wait 24 hours between adjustments for the temperature to stabilize.
NOTE: The temperature cannot be adjusted if any other control function such as Quick Freeze, Quick Cool or Sabbath Mode is activated, or the Control Panel is locked. The corresponding indicator will illuminate and a tone will sound.
To Adjust the Refrigerator Temperature:
1.If locked, unlock the control panel by pressing and holding LOCK for 3 seconds.
2.Press Fridge to adjust the temperature.
NOTE: The temperature increases by one degree and a tone sounds with each press of the button.


 C
C
Fridge
After 5 seconds have passed with no button being pressed the temperaturesettingconfirmsautomatically.
To Adjust the Freezer Temperature:
1.If locked, unlock the control panel by pressing and holding LOCK for 3 seconds.
2.Press the Freezer button to adjust the temperature.
NOTE: The temperature decreases by one degree and a tone sounds with each press of the button.


 C
C
Freezer
After 5 seconds have passed with no button being pressed the temperaturesettingconfirmsautomatically.
To Adjust the My Zone Temperature:
1.If locked, unlock the control panel by pressing and holding LOCK for 3 seconds.
2.Press MY ZONE to adjust the temperature.
NOTES:
•The temperature increases by two degrees F (one degree C) and a tone sounds with each press of the control.
•The temperature in the My Zone compartment cannot be set warmer than the temperature of the refrigerator compartment.
My Zone
3.PressanycontrolexceptMyZonetoconfirm.Theindicatorlight willstopflashing.
NOTE: Temperaturesettingwillconfirmautomaticallyafter 5secondshavepassed.
Setting |
Description |
|
|
35°F - 41°F |
Fruits and Vegetables |
(2°C - 5°C) |
Suitable to store fruits and vegetables |
|
|
|
|
27°F (-3°C) |
Defrost Frozen Food |
|
Rapid cooling of beverages |
|
|
29°F - 35°F |
Meats |
(-2°C - 2°C) |
Suitabletostorefreshfish,meatandcookedfood |
|
for 1 to 2 days. |
QUICK COOL
The Quick Cool feature accelerates the cooling of fresh food and protects the foods already stored from undesirable warming.
1.If locked, unlock the control panel by pressing and holding LOCK for 3 seconds.
Lock
Hold 3 sec.
2.Press the Quick Cool button. The Quick Cool indicators will illuminate.
3.Repeatsteps1and2tomanuallyturnofftheQuickCool feature.
NOTE: QuickCoolwillautomaticallyturnoffafter3hours.
11
QUICK FREEZE
The Quick Freeze function accelerates the freezing of fresh food and protects frozen food from undesirable warming. If you need to freeze a large amount of food, it is recommended to select the Quick Freeze feature a few hours in advance.
1.If locked, unlock the control panel by pressing and holding LOCK for 3 seconds.
Lock
Hold 3 sec.
2.Press the Quick Freeze button. The Quick Freeze indicators will illuminate.
Quick Freeze
3.Repeatsteps1and2tomanuallyturnofftheQuickFreeze feature.
NOTE: QuickFreezewillautomaticallyturnoffafter24hours.
SABBATH
The Sabbath function is designed for those whose religious observancesrequireturningoffthelights.Allinteriorlightsand alarms will be disabled.
1.If locked, unlock the control panel by pressing and holding LOCK for 3 seconds.
2.Press and hold SABBATH for 3 seconds until the Sabbath indicator illuminates.
NOTES:
•All alert tones and lights are deactivated.
•If Quick Cool and/or Quick Freeze was on, Sabbath mode turnsoffthesefeaturesautomatically.
•The Control Panel will remain unlocked while in Sabbath mode.
Hold 3 sec.
3.To deselect Sabbath mode, press and hold SABBATH for 3 seconds.
FEATURES
Important information to know about glass shelves and covers:
Do not clean glass shelves or covers with warm water when theyarecold.Shelvesandcoversmaybreakifexposedto sudden temperature changes or impact, such as bumping.
Tempered glass is designed to shatter into many small, pebblesize pieces. This is normal. Glass shelves and covers are heavy. Use both hands when removing them to avoid dropping.
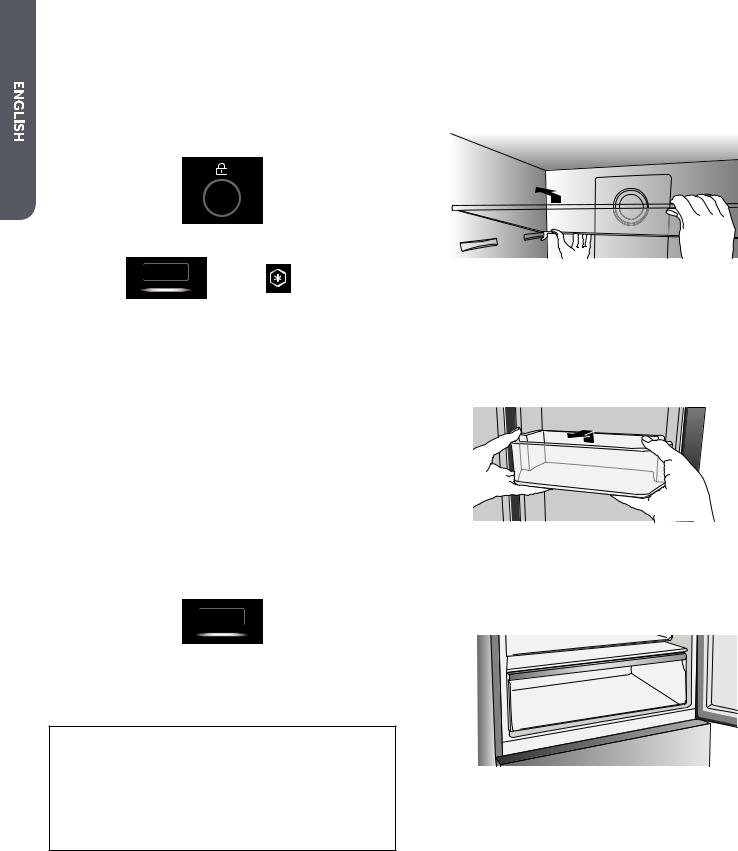
ADJUSTABLE SHELVES
Theheightoftheshelvescanbeadjustedtofityourstorageneeds.
1.To remove a shelf, lift up on both the front and back edge to disengage the shelf hooks from the shelf supports along the refrigerator wall and pull it out.
2.To reinstall a shelf, rest the shelf on both the front and rear supports. Push the shelf toward the rear of the refrigerator until the back of the shelf hooks around the rear shelf supports.
REMOVABLE DOOR BINS
To Remove/Replace a Door Bin:
1.Place hands on both sides of the bin and lift upward, and pull out.
2.Replace the door bin by inserting it above the support and press down to engage.
MY ZONE DRAWER
The My Zone compartment allows you to store temperature sensitive foods at the correct temperature to ensure optimal nutritional value.
NOTE: My Zone is not recommended for the storage of cheese or cold-sensitive fruits and vegetables such as avocados, bananas, potatoes, cucumbers, tomatoes.
A
A My Zone Drawer
12
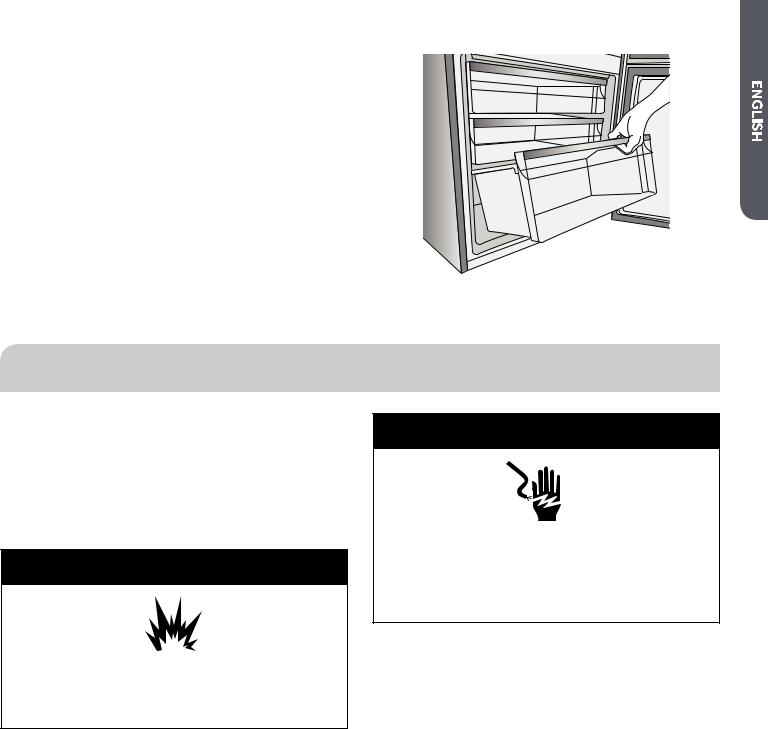
REMOVABLE FREEZER STORAGE DRAWERS
IMPORTANT: Do not overload the drawers.
To Remove and Replace a Freezer Drawer:
1. Removethefreezerdrawbyextendingthedrawerfully,andthen lift up on the drawer and pull out to remove.
2. Replace the drawer by tilting the back of the drawer downward onto the support and sliding it in.
REFRIGERATOR CARE
CLEANING
Both the refrigerator and freezer sections defrost automatically. However, clean both sections about once a month to avoid buildup of odors. Wipe up spills immediately.
Because air circulates between both sections, any odors formed in one section will transfer to the other. You must thoroughly clean both sections to eliminate odors. To avoid odor transfer and drying out of food, wrap or cover foods tightly.
 WARNING
Explosion Hazard
Use non ammable cleaner.
Failure to do so can result in death, explosion or re.
IMPORTANT:
•Do not use harsh chemicals, ammonia, chlorine bleach, concentrated detergent, solvents, abrasives or metal scouring pads to clean your refrigerator inside or out. They can damage and/ordiscolortherefrigeratorfinish.
•Do not use warm water to clean glass shelves while they are still cold.Glassmaybreakwhenexposedtosuddentemperature changes or impact.
 WARNING
Electrical Shock Hazard
Unplug your appliance or disconnect power before cleaning.
Failure to do so can result in death, electric shock or personal injury.
1.Unplug refrigerator or disconnect power.
2.Clean the interior. Hand wash, rinse, and dry removable parts and interior surfaces thoroughly. Use a clean sponge or soft cloth and a mild detergent in warm water.
3.Cleantheexteriorsurfaces.
Painted metal: Washpaintedmetalexteriorswithaclean,soft cloth or sponge and a mild detergent in warm water. Rinse surfaces with clean, warm water and dry immediately to avoid water spots.
Stainless steel: Stainless steel is corrosion resistant and not corrosion-proof. To help avoid corrosion of your stainless steel, wash stainless steel surfaces with a clean, soft cloth or sponge and a mild detergent in warm water. Rinse surfaces with clean, warm water and dry immediately to avoid water spots.
NOTE: When cleaning stainless steel, always wipe in the direction of the grain to avoid cross-grain scratching.
4.Plug in refrigerator or reconnect power.
13
LIGHTS
Theinteriorlightsoftherefrigeratorturnoffwhenthedoorsare open for more than 7 minutes.
IMPORTANT: Your refrigerator is equipped with LED lighting. These lights are designed to last for the life of your refrigerator. However, ifthelightsstopoperating,pleasecontactaqualifiedtechnicianfor replacement.
VACATION AND MOVING CARE
 WARNING
Fire or Explosion Hazard
Do not puncture refrigerant tubing. Follow handling instructions carefully. Flammable refrigerant used.
Failure to do so can result in death, explosion or re.
VACATION
If You Choose to Leave the Refrigerator On While You’re Away: 1. Use up any perishables and freeze other items.
IfYouChoosetoTurnOfftheRefrigeratorBeforeYouLeave:
1.Remove all food from the refrigerator and freezer.
2.Unplug refrigerator or disconnect power.
3.Clean refrigerator, wipe it, and dry well.
4.Tape rubber or wood blocks to the tops of both doors to prop them open far enough for air to get in. This stops odor and mold from building up.
MOVING
 WARNING
Excessive Weight Hazard
Use two or more people to move and install refrigerator. Failure to do so can result in back or other injury.
When you are moving your refrigerator to a new home, follow these steps to prepare it for the move.
1.Remove all food from the refrigerator and pack all frozen food in dry ice.
2.Unplug refrigerator.
3.Clean, wipe, and dry thoroughly.
4.Take out all removable parts, wrap them well, and tape them together so they don’t shift and rattle during the move.
5.Raisethelevelinglegssotheydon’tscrapethefloor.See
“Leveling.”
6.Tape the doors closed and tape the power cord to the back of the refrigerator.
7.When you get to your new home, replace removable parts. Refer to the “Installation Instructions” section to prepare the refrigerator for use.
REINSTALLING/USING
REFRIGERATOR AGAIN
If the refrigerator has been placed in a horizontal or tilted position for any period of time wait 24 hours before plugging it in to allow the refrigerant to settle.
1.Clean refrigerator. See “Cleaning.“
2.Place refrigerator in desired location and level. See “Installation Instructions.”
TROUBLESHOOTING
Trythesolutionssuggestedherefirstinordertoavoidthecostofanunnecessaryservicecall.
REFRIGERATOR IS NOT OPERATING
PROBLEM |
POSSIBLE CAUSE(S) |
SOLUTION |
|
|
|
|
|
Refrigerator does not run. |
Refrigerator is unplugged. |
Plug power cord into power source. |
|
|
|
|
|
|
Breakeristrippedorturnedoff/Fuseis |
Reset / Turn on breaker or replace fuse. |
|
|
blown. |
|
|
|
Refrigerator is in defrost mode. |
Wait about 40 minutes for defrost cycle to end and cooling |
|
|
|
system to restart. |
|
Refrigerator compressor |
Refrigeratorisfirstpluggedin. |
This is normal. Allow 24 hours for the refrigerator to cool down. |
|
runs frequently or for long |
|
|
|
Warm or large amounts of food added. |
This is normal. |
||
periods of time. |
|||
|
|
||
NOTE: This refrigerator is |
Door is left open. |
Ensure that door is not being held open by an item. |
|
|
|
||
Hot weather or frequent openings |
This is normal. |
||
designed to run for longer |
|||
periods of time at a lower |
|
|
|
Temperature control set to coldest |
Adjust temperature to a warmer setting. |
||
energy usage. |
|||
setting. |
|
||
|
|
||
|
|
|
14

Refrigerator has an odor |
Food is not sealed or packaged properly. |
Resealpackaging.Placeanopenedboxofbakingsodainthe |
|
|
|
|
refrigerator, replace every 3 months. |
|
|
|
|
|
|
|
|
Interior needs to be cleaned. |
Clean the interior. See “Cleaning.” |
|
|
|
|
|
|
|
|
Food stored too long. |
Dispose of spoiled food. |
|
|
|
|
|
|
|
Light does not come on |
Refrigerator is unplugged. |
Plug refrigerator in to power source. |
|
|
|
|
|||
|
||||
|
LED light is burned out. |
ContactaqualifiedtechniciantoreplacetheburnedoutLED. |
|
|
|
|
|
|
|
|
Sabbath Mode is activated. |
Lights are disabled in Sabbath mode. To turn on lights you must |
|
|
|
|
turnoffSabbathMode.See“SabbathMode”forinstructions. |
|
|
Doors do not close properly |
Refrigerator is not level. |
See “Leveling.” |
|
|
|
|
|
|
|
|
Something is obstructing door closure. |
Check for and remove obstructions. |
|
|
|
|
|
|
|
Vibration or rattling |
Refrigeratorisnotrestingfirmlyonfloor. |
See “Leveling.” |
|
|
|
|
|
|
|
Normal Sounds |
Itsoundslikewaterisflowingfromthe |
Refrigerantflowinginthelineswillmakethissoundwhenthe |
|
|
|
refrigerator. |
compressor starts and stops. |
|
|
|
|
The refrigerator has an automatic defrosting system. The |
|
|
|
|
defrosted water will make this sound. |
|
|
|
Humming or buzzing sounds |
The compressor and fans for cold air circulation can make this |
|
|
|
|
sound. If the refrigerator is not level, the sound will be louder. |
|
|
|
Cracking or clicking sounds |
The interior parts will make this sound as they contract and |
|
|
|
|
expandinresponsetotemperaturechanges. |
|
|
TEMPERATURE AND MOISTURE
PROBLEM |
POSSIBLE CAUSE(S) |
SOLUTION |
|
|
|
|
|
Refrigerator or |
Temperature control is not set low enough. |
Adjust the compartment to a colder setting; allow 24 hours for the |
|
freezer is too warm |
|
temperature to adjust. |
|
|
Doors opened frequently or left open. |
Keep door closed / Check that a package is not preventing door |
|
|
|
from closing. |
|
|
Warm food added recently. |
Allow time for food and refrigerator to cool. |
|
|
|
|
|
|
The space between the back of the |
Allow 2" (5 cm) space between the back of the refrigerator and the |
|
|
refrigerator and the wall is too close. |
wall. |
|
|
Items against back of compartments are |
Store items only inside the trim of the glass shelves; don’t place |
|
|
blockingproperairflow. |
items against sides of the compartments or directly in front of any |
|
|
|
vents. |
|
Refrigerator or |
Temperature control is set too low. |
Adjusttemperatureinthecompartmenttothenextwarmer |
|
freezer is too cold |
|
setting; allow 24 hours to adjust. |
|
Moisture on |
High humidity |
This is normal. Dry surface and adjust temperature to slightly colder |
|
exterior/interiorof |
|
setting. Turn on the “Dehumidify” function if moisture appears on |
|
refrigerator |
|
the hinged bar on the left-hand refrigerator door. |
|
|
Doors opened frequently or left open. |
Keep door closed. Check that a package is not preventing door from |
|
|
|
closing. |
|
|
Open container of water in refrigerator |
Cover or seal container. |
|
|
|
|
|
Frost or ice crystals |
Freezer door left open or opened frequently. |
Adjust the temperature to a warmer setting; allow 24 hours to |
|
on frozen food |
|
adjust. |
|
|
Items blocking freezer air vents and |
Move items away from rear wall. |
|
|
preventingproperairflow. |
|
|
Food freezing in |
Food placed too close to the air vent. |
Move items away from back and top of the refrigerator. |
|
refrigerator |
|
|
|
Temperature control set too cold. |
Adjust the temperature to a less cold setting. |
||
|
|||
|
|
|
FOR MORE HELP, VISIT HAIERAMERICA.COM OR CALL THE CONSUMER HELP LINE AT 1 877 337 3639.
15
 Loading...