


Portable Air Conditioner
Climatiseur Portatif
Acondicionador De
Aire Portatil
User & Care Guide
Guide d'utilisation et d'entretien |
HPY08XCM |
|
|
Guía de uso y cuidado |
|
Some models may have an additional letter after the model number.
Sur certainsmodèles, le numéro de modéle peut être suivi d'une lettre.
Algunos de los modelos pueden tener una letra adicional después del número de modelo.
Please read instructions carefully before operating the air conditioner.
Lisez attentivement les instructions acant de faire fonctionner le climatiseur.
Por favor lea estas instrucciones cuidadosamente antes de operar el acondicionador.

table of contents |
|
SAFETY INFORMATION............................................................................................................. |
2 |
Important Safety Precautions................................................................................................ |
2-3 |
Important Instructions................................................................................................................ |
4 |
Installation............................................................................................................................ |
5 |
Tools and Parts............................................................................................................................. |
5 |
Assembly and installation ....................................................................................................... |
6-7 |
Parts andFeatures....................................................................................................................... |
8 |
operation................................................................................................................................. |
9 |
Operation..................................................................................................................................... |
9 |
Control Panel Operation..................................................................................................... |
10-11 |
Remote Control Operation................................................................................................. |
12-13 |
Care and Cleaning...................................................................................................................... |
14 |
Storage....................................................................................................................................... |
15 |
troubleshooting............................................................................................................... |
16 |
Warranty............................................................................................................................... |
17 |
Englis h
PRODUCT REGISTRATION
Thank you for purchasing our Haier product. This easy-to-use manual will guide you in getting the best use of your product.
Remember to record the model and serial numbers. They are on a label on the side of your unit.
Model number
Serial number
Date of purchase
Staple your receipt to your manual. You will need it to obtain warranty service.

ENGLISH
Important safety precautions
 WARNING
Following these basic precautions will reduce the risk of fire, electrical shock, injury or death when using your air conditioner.
1.Air conditioner must be connected to proper electrical outlet with the correct electrical supply. (see table previous page)
2.Proper grounding must be ensured to reduce the risk of shock and fire. DO NOT CUT OR REMOVE THE GROUNDING PRONG. If you do not have a three-prong electric receptacle outlet in the wall, have a certified electrician install the proper receptacle. The wall receptacle MUST be properly grounded.
3.Do not operate air conditioner if power cord is frayed or otherwise damaged. Avoid using it if there are cracks or abrasion damage along the length, plug connector or if the unit malfunctions or is damaged in any manner. Contact an authorized service technician for examination, repairs or adjustments.
4.DO NOT USE AN ADAPTER OR AN EXTENSION CORD.
5.Do not block airflow around the air conditioner. The exhaust hose should be free of any obstructions. Maintain at least 20” of clearance around the air conditioner.
6.Always unplug the air conditioner before servicing it, cleaning it or moving it.
7.Do not install or use the air conditioner in any area where the atmosphere contains combustible gases or where the atmosphere is contaminated. Avoid any chemicals coming in contact with your air conditioner.
8.Do not place any object on the top of the unit.
9.Never operate the air conditioner without the filters in place.
10.Do not use the air conditioner near a bathtub, shower or wash basin or other wet area.
Page 2

Important safety precautions
READ and FOLLOW THE
SAFETY INSTRUCTIONS CAREFULLY.
SAVE THESE INSTRUCTIONS
Englis h
Page 3

ENGLISH
important instructions
•Please keep this manual in a safe place.
•Do not use liquid or spray to clean this product. Use a damp cloth.
•Do not place the product on an unstable surface or elevated place as it may fall and cause damage or injury.
•Never spill liquid on the control panel; it may cause electrical short to the electronic parts inside and disable them or cause them to function improperly.
•Never try to disassemble or service the product by yourself. When maintenance is required, please contact the local service center or distributor.
Page 4
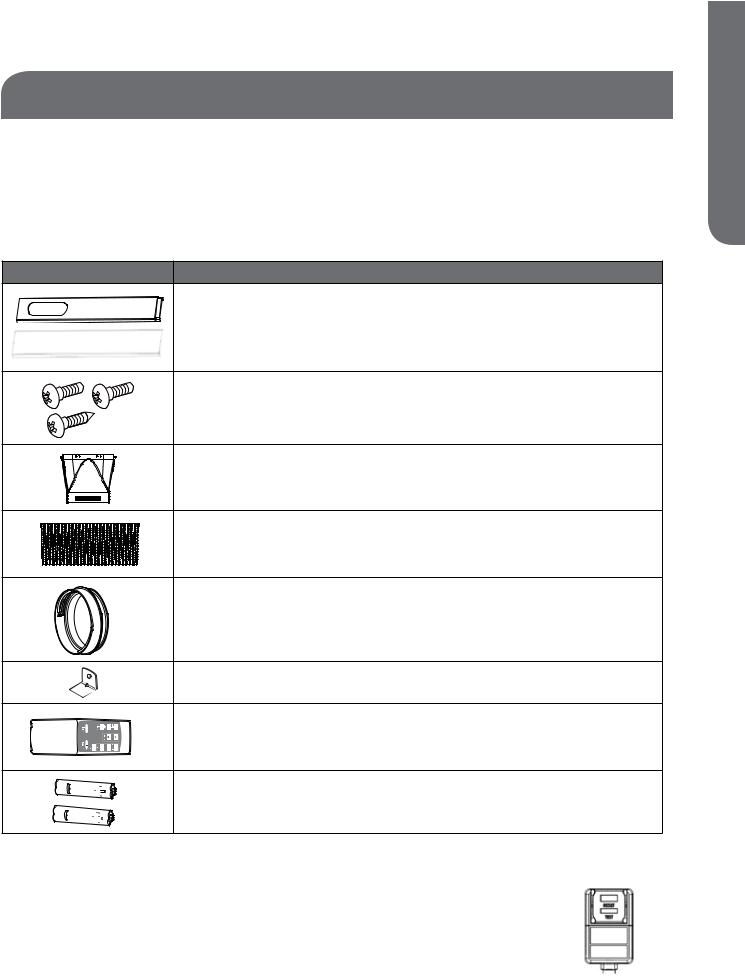
TOOLS AND PARTS
Read and follow the instructions provided with any tools listed here.
Parts supplied:
Check that all parts for your specific air conditioner are included in the parts package. Note: If parts are missing, call Haier Customer Service: 1-877-337-3639.
Image
Dy


Part |
# Pieces |
|
Main window panel and extension panels |
3 |
|
(extends from 20" up to 55") |
||
|
||
Screws |
3 |
|
Exhaust nozzle |
1 |
|
Exhaust hose |
1 |
|
Hose connector |
1 |
|
Bracket |
1 |
|
Remote Control |
1 |
|
Batteries |
2 |
|
|
|
POWER SUPPLY CORD
Be sure to test the Power Supply Cord before operation. Press the test button then press the reset button to restore power.
Englis h
Page 5

ENGLISH
Assembly and installation
1.Depending on your window opening, use 1, 2 or 3 of the window extension panels. Insert screw(s) through holes on center panel as necessary to secure the panel(s).
2.Open the window and place the window panel assembly into the window. Adjust the extension panels to fit the width or height of the window as shown below (see figure A). Secure the extension panels using 2 blunt tip screws (see figure B). Close window.
A |
B |
3.Secure the bracket to the window with remaining screw. This prevents the window from being opened from the outside (see figure C).
C
Page 6
Assembly and installation
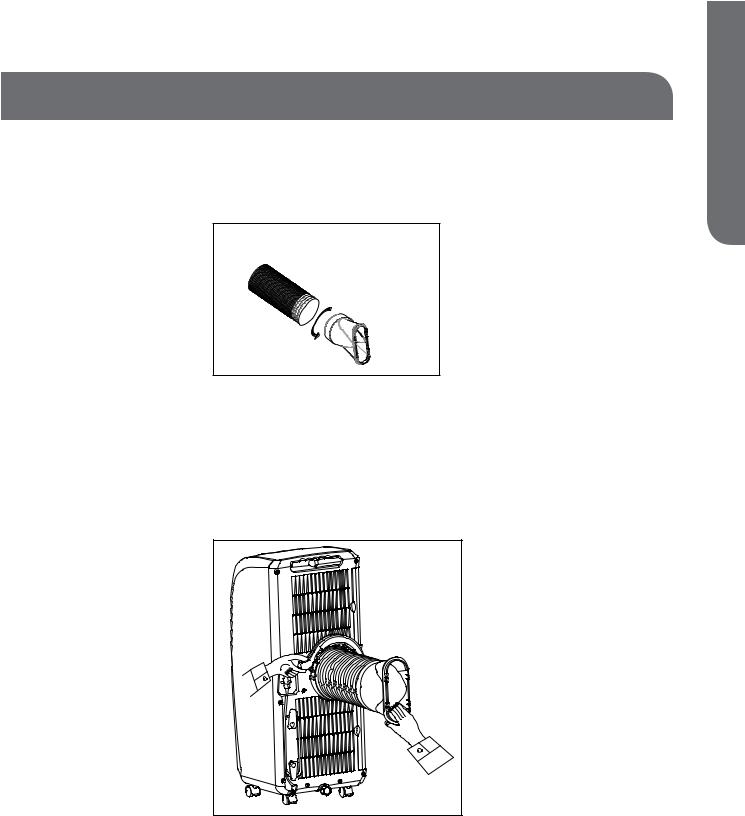
4.Expand the 2 ends of the exhaust hose. Connect the exhaust nozzle to one end of the exhaust hose by turning counter-clockwise (see figure D).
D
5.Raise the handle of the “C” shaped clamp on the back of the unit and insert the hose connector end of the hose assembly into the lower part of the hose clamp. Secure the hose assembly onto the back of the unit by lowering the “C” shaped clamp completely. Ensure that the hose assembly is securely fastened before operation (see figure E).
E |
6.Insert the exhaust hose with nozzle end into the window panel.
7.Plug the power cord into the wall outlet and press the "Reset” button to ensure the safety plug is providing power to the unit.
8.Please allow 20" of space around the unit for proper air circulation.
Englis h
Page 7

ENGLISH
parts and features
CONTROL PANEL
Horizontal Air
Discharge Louver
Vertical Air
Discharge Louver
CASTERS
Rear Handle (Remote
Control Holder)
“C” Shaped Clamp


 Filters (4 pieces) Power Cord


CORD STORAGE HOOKS
Lower Drain Cap*
*Please ensure the Lower Drain Cap is closed securely before operation to prevent water leaks.
Page 8
operation
NOTE: Wait 24 hours before turning on the air conditioner if the unit has been tilted on its side for any reason. This allows the oil to return to the compressor and prevents premature failure of the air conditioner.
BEFORE USE
1.Use a 115 Volt, 15 Amp outlet for the air conditioner. Use a dedicated circuit for the air conditioner. Do not use any other electrical appliances on this circuit or you may trip the circuit breaker/fuse.
2.Do not place the air conditioner in direct sunlight or close to any heating baseboard heaters, stoves, etc.)
3.Operate on a flat, level surface only.
4.Keep the unit free of any obstructions such as drapes, curtains, blinds, etc.
5.Keep unit at least 20” away from any wall.
DURING USE
1.When turning on the unit for the first time after plugging it into an electrical outlet, the unit will start in high fan cooling mode set at 75º F. The temperature display on the LCD will show the current room temperature. When turning on the unit during regular usage, it will remember the last setting used.
2.After a normal shut down, please wait for 3 minutes before restarting the unit.
3.In cooling mode, this portable air conditioner should not require water to be removed. The unit has a unique design which continuously evaporates the water. When the unit is operated in high humidity conditions, you may need to empty the water tank periodically. The unit will shut down automatically when the water tank is full and the “Full” warning light will turn on.
4.To empty the water tank: Place a shallow 1 quart or larger pan (not included) below the lower drain located on the back of the unit (near the bottom of the air conditioner), remove the cap and the rubber plug and drain the water tank. Re-insert the drain plug and screw the cap snugly into place. You can then restart your portable air conditioner.
5.Check and clean the filters once every week for highest efficiency. NOTE: Do not operate the unit without the filters in place.
AFTER USE
If the unit is not being used for a long period of time, drain the water from the water tank. Please see step 4 of the "During Use" section above for more information.
Englis h
Page 9
ENGLISH
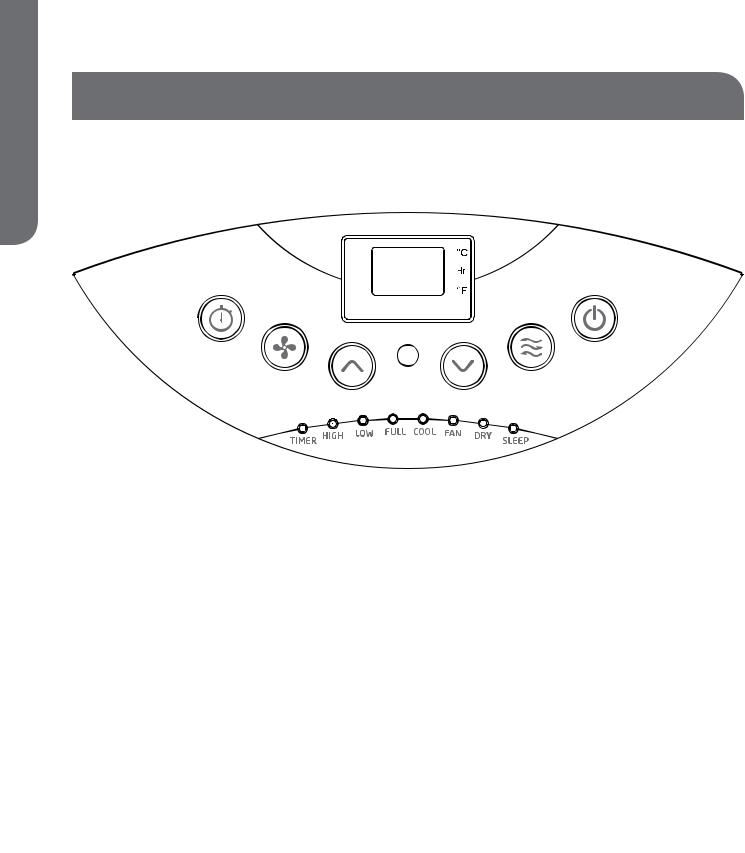
control panel operation
Power 
Turns the unit on or off
Mode 
Press the mode button for the desired setting:
Cool – Cools the room to the desired set temperature
Dry – Reduces the humidity in the room
Fan – Circulates the air in the room without cooling
Fan Speeds 
There are 2 adjustable speeds in the cool and fan mode, choose high or low to match your needs. Please note the fan speed cannot be adjusted in “Dry” mode.
Setting the Temperature 

Press the up or down buttons to adjust the Temperature
The temperature can be set between 62º - 86º F (17º - 30º C). Please note the temperature cannot be set in the Fan or Dry modes.
Page 10

control panel operation
Timer On/Off 
To set the Timer for a 1 to 24-hour delay until the air conditioner turns off while the air conditioner is running:
1.Press the Timer button
2.Adjust the hours until the unit shuts off using the Up/Down buttons. Wait approximately 5 seconds for the time off to be saved.
3.To cancel the timer, press the Timer button once, the hours remaining will flash, press the timer button again and the timer will be cancelled.
To set the Timer for a 1 to 24-hour delay until the air conditioner turns on while the air conditioner is off:
1.Press the Timer button
2.Adjust the hours until the unit turns on using the Up/Down buttons. Wait approximately 5 seconds for the time on to be saved.
3.To cancel the timer, press the Timer button once, the hours remaining will flash, press the timer button again and the timer will be cancelled.
Full Indicator Light
When the “Full” indicator light turns on, the internal water tank has filled with condensed water and the air conditioner will turn off automatically. See Operation/During Use/Item 4 above for directions on draining the air conditioner.
Englis h
Page 11
ENGLISH
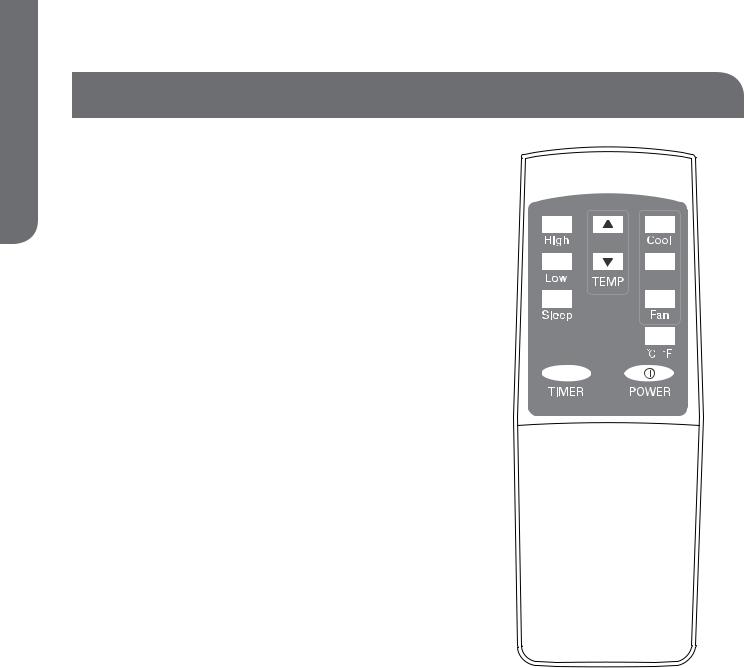
remote control operation
Power
Turns the unit on or off
Cool
Cools the room to the desired set temperature
Dry
Reduces the humidity in the room
Dry
Fan
Circulates the air in the room without cooling
High
Selects high fan speed in Cool or Fan mode
Low
Selects Low fan speed in Cool or Fan mode (Please note the fan speed cannot be adjusted in “Dry” mode or during the sleep function)
Setting the Temperature
Press the up or down buttons to adjust the Temperature
The temperature can be set between 62º - 86º F (17º - 30º C). Please note the
temperature cannot be set in the Fan or Dry modes.
Timer On/Off
To set the Timer for a 1 to 24-hour delay until the air conditioner turns off while the air conditioner is running:
1.Press the Timer button
2.Adjust the hours until the unit shuts off using the Up/Down buttons. Wait approximately 5 seconds for the time off to be saved.
3.To cancel the timer, press the Timer button once, the hours remaining will flash, press the timer button again and the timer will be cancelled.
To set the Timer for a 1 to 24-hour delay until the air conditioner turns on while the air conditioner is off:
1.Press the Timer button
2.Adjust the hours until the unit turns on using the Up/Down buttons. Wait approximately 5 seconds for the time on to be saved.
3.To cancel the timer, press the Timer button once, the hours remaining will flash, press the timer button again and the timer will be cancelled.
Page 12

remote control operation
Sleep Setting
When activated, the sleep mode increases the set temperature by 2º F (1º C) after 2 hours and another 2º F (1º C) after 2 more hours. The fan is set at Low and cannot be adjusted. The Sleep Setting can be cancelled by pressing the Sleep button on the remote control or any of the Mode Buttons (Cool, Fan or Dry) on the remote control The unit can be turned off using the Power button on the air conditioner or the remote to turn the unit off.
ºF/ºC
Use this button to change the display from Fahrenheit to Celsius.
Englis h
Page 13

ENGLISH
care and cleaning
•Always unplug your air conditioner before cleaning.
•The air filters should to be cleaned at least once a week for your unit to operate at optimum efficiency. Slide out the filters from the back by pulling on the tabs. There are secondary filters accessible after the main filters are removed (see page 8). The filter may be washed or vacuumed. Remove the excess water from the filter by gently shaking the filter. This will
remove dust and particles trapped in the filter. After cleaning, reinstall the filters. DO NOT use your air conditioner without the air filters in place.
•To clean the cabinet, DO NOT use chemicals, abrasives, ammonia, chlorine bleach, concentrated detergents, solvents or scouring pads. Some of these chemicals/items may damage and/or discolor your air conditioner.
•Always use a soft cloth dampened with water to clean the cabinet. Wipe dry with a soft cloth.
Page 14

storage
•To store your air conditioner when not being used for a long period of time, drain the water tank as described on page 9 under the "During Use" section, step 4. Remove exhaust hose, clean the filters, cover with plastic bag and store in a cool, dry place.
Customer Service
IMPORTANT |
|
Do Not Return This Product To The Store |
|
If you have a problem with this product, please contact the |
|
Haier Customer Satisfaction Center at 1-877-337-3639. |
1-877-337-3639 |
|
|
DATED PROOF OF PURCHASE, MODEL # AND SERIAL # |
|
REQUIRED FOR WARRANTY SERVICE |
|
Englis h
Page 15
 Loading...