


Portable Air Conditioner Climatiseur portatif Acondicionador de aire portatil
Installation and User Manual
Instructions d’installation et Guide de l’utilisateur
Instrucciones de instalación y Manual del usuario
HPND14XCT
HPND14XHT
49-7824
11-17 GEA

TABLE OF CONTENTS
AIR CONDITIONER SAFETY . . . . . . . . . . . . . . . . . . . . . . . . . . . . . . . . . . . . . . . . . . . . . . . . . . . . . . . . . . . . . . . . . . . . . . . . . . . . . . . . . 2 PARTS AND FEATURES. . . . . . . . . . . . . . . . . . . . . . . . . . . . . . . . . . . . . . . . . . . . . . . . . . . . . . . . . . . . . . . . . . . . . . . . . . . . . . . . . . . . . . 3
INSTALLATION REQUIREMENTS . . . . . . . . . . . . . . . . . . . . . . . . . . . . . . . . . . . . . . . . . . . . . . . . . . . . . . . . . . . . . . . . . . . . . . . . . . . . 4
Tools and Parts . . . . . . . . . . . . . . . . . . . . . . . . . . . . . . . . . . . . . . . . . . . . . . . . . . . . . . . . . . . . . . . . . . . . . . . . . . . . . . . . . . . . . . . . . . . . . . 4
Location Requirements . . . . . . . . . . . . . . . . . . . . . . . . . . . . . . . . . . . . . . . . . . . . . . . . . . . . . . . . . . . . . . . . . . . . . . . . . . . . . . . . . . . . . 4
Electrical Requirements. . . . . . . . . . . . . . . . . . . . . . . . . . . . . . . . . . . . . . . . . . . . . . . . . . . . . . . . . . . . . . . . . . . . . . . . . . . . . . . . . . . . . . 4
INSTALLATION INSTRUCTIONS . . . . . . . . . . . . . . . . . . . . . . . . . . . . . . . . . . . . . . . . . . . . . . . . . . . . . . . . . . . . . . . . . . . . . . . . . . . . . 5
Step 1 - Unpack Air Conditioner . . . . . . . . . . . . . . . . . . . . . . . . . . . . . . . . . . . . . . . . . . . . . . . . . . . . . . . . . . . . . . . . . . . . . . . . . . . . . . 5 Step 2 - Install Exhaust . . . . . . . . . . . . . . . . . . . . . . . . . . . . . . . . . . . . . . . . . . . . . . . . . . . . . . . . . . . . . . . . . . . . . . . . . . . . . . . . . . . . . . 5 Step 3 - Install Window Panel . . . . . . . . . . . . . . . . . . . . . . . . . . . . . . . . . . . . . . . . . . . . . . . . . . . . . . . . . . . . . . . . . . . . . . . . . . . . . . . . . 6 Step 4 - Attach Exhaust Hose to the Exhaust Nozzle . . . . . . . . . . . . . . . . . . . . . . . . . . . . . . . . . . . . . . . . . . . . . . . . . . . . . . . . . . 6 Step 5 - Complete Installation. . . . . . . . . . . . . . . . . . . . . . . . . . . . . . . . . . . . . . . . . . . . . . . . . . . . . . . . . . . . . . . . . . . . . . . . . . . . . . . 6
CONTROL PANEL. . . . . . . . . . . . . . . . . . . . . . . . . . . . . . . . . . . . . . . . . . . . . . . . . . . . . . . . . . . . . . . . . . . . . . . . . . . . . . . . . . . . . . . . . . . 7
Buttons . . . . . . . . . . . . . . . . . . . . . . . . . . . . . . . . . . . . . . . . . . . . . . . . . . . . . . . . . . . . . . . . . . . . . . . . . . . . . . . . . . . . . . . . . . . . . . . . . . . . 7
Remote Control . . . . . . . . . . . . . . . . . . . . . . . . . . . . . . . . . . . . . . . . . . . . . . . . . . . . . . . . . . . . . . . . . . . . . . . . . . . . . . . . . . . . . . . . . . . . 8
AIR CONDITIONER USE . . . . . . . . . . . . . . . . . . . . . . . . . . . . . . . . . . . . . . . . . . . . . . . . . . . . . . . . . . . . . . . . . . . . . . . . . . . . . . . . . . . . . 9
AIR CONDITIONER CARE . . . . . . . . . . . . . . . . . . . . . . . . . . . . . . . . . . . . . . . . . . . . . . . . . . . . . . . . . . . . . . . . . . . . . . . . . . . . . . . . . . . 9
Cleaning . . . . . . . . . . . . . . . . . . . . . . . . . . . . . . . . . . . . . . . . . . . . . . . . . . . . . . . . . . . . . . . . . . . . . . . . . . . . . . . . . . . . . . . . . . . . . . . . . . . . 9
Air Filters. . . . . . . . . . . . . . . . . . . . . . . . . . . . . . . . . . . . . . . . . . . . . . . . . . . . . . . . . . . . . . . . . . . . . . . . . . . . . . . . . . . . . . . . . . . . . . . . . . . . 9
Internal Water Tank . . . . . . . . . . . . . . . . . . . . . . . . . . . . . . . . . . . . . . . . . . . . . . . . . . . . . . . . . . . . . . . . . . . . . . . . . . . . . . . . . . . . . . . . . . 9
Storage . . . . . . . . . . . . . . . . . . . . . . . . . . . . . . . . . . . . . . . . . . . . . . . . . . . . . . . . . . . . . . . . . . . . . . . . . . . . . . . . . . . . . . . . . . . . . . . . . . . . . 9
TROUBLESHOOTING . . . . . . . . . . . . . . . . . . . . . . . . . . . . . . . . . . . . . . . . . . . . . . . . . . . . . . . . . . . . . . . . . . . . . . . . . . . . . . . . . . . . . . 10 LIMITED WARRANTY . . . . . . . . . . . . . . . . . . . . . . . . . . . . . . . . . . . . . . . . . . . . . . . . . . . . . . . . . . . . . . . . . . . . . . . . . . . . . . . . . . . . . . 11 RECORD KEEPING . . . . . . . . . . . . . . . . . . . . . . . . . . . . . . . . . . . . . . . . . . . . . . . . . . . . . . . . . . . . . . . . . . . . . . . . . . . . . . . . . . . . . . . . . 1
RECORD KEEPING
Thank you for purchasing this Haier product. This user manual will |
_______________________________________ |
help you get the best performance from your new air conditioner. |
Model number |
For future reference, record the model and serial number located on |
_______________________________________ |
the label on the side of your air conditioner, and the date of purchase. |
Serial number |
Staple your proof of purchase to this manual to aid in obtaining war- |
_______________________________________ |
ranty service if needed. |
Date of purchase |
ENGLISH
1
ENGLISH
AIR CONDITIONER SAFETY
Your safety and the safety of others are very important.
We have provided many important safety messages in this manual and on your appliance. Always read and obey all safety messages.
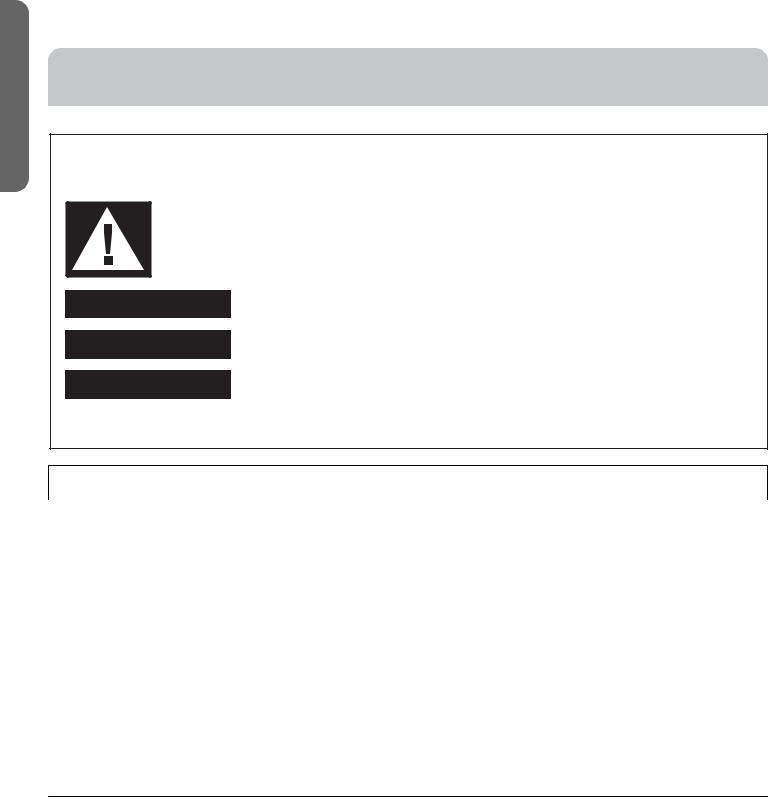
This is the safety alert symbol.
This symbol alerts you to potential hazards that can kill or hurt you and others. All safety messages will follow the safety alert symbol and either the word “DANGER,” “WARNING” or “CAUTION.”
These words mean:
 DANGER
 WARNING
  CAUTION
An imminently hazardous situation. You could be killed or seriously injured if you don’t immediately follow instructions.
A potentially hazardous situation which, if not avoided, could result in death or serious bodily injury.
A potentially hazardous situation which, if not avoided, may result in moderate or minor injury.
All safety messages will tell you what the potential hazard is, tell you how to reduce the chance of injury, and tell you what can happen if the instructions are not followed.
IMPORTANT SAFETY INSTRUCTIONS
WARNING: To reduce the risk of fire, electrical shock, injury to persons, or damage when using the air conditioner, follow basic precautions, including the following:
•Read all of the instructions before using this appliance.
•Plug into a grounded 3 prong outlet.
•Do not remove ground prong.
•Do not use an adapter.
•Do not use an extension cord.
•Do not operate the air conditioner if it has a damaged cord or plug, if it is not working properly, or if it has been damaged or dropped.
•ЭлидмхжтсзмчмтсихцлтшпзеицихщмжизтспьеьфшдпмĤиз service personnel. Call an authorized service company for examination, repair, or adjustment.
•Disconnect power before servicing.
• Disconnect power before cleaning.
NOTE: ЭшхсмсктģутъихеьухиццмскчлиЩтъихешччтс does NOT disconnect the appliance from the power supply.
•Do not install or use the air conditioner in any area where the atmosphere contains combustible gases or where the atmosphere is contaminated. Avoid any chemicals coming in contact with your air conditioner.
•Do not store anything directly on top of the air conditioner.
•Use two or more people to move and install air conditioner.
•ЧищихтуихдчичлидмхжтсзмчмтсихъмчлтшччлиĤпчихцмс place.
•Do not use the air conditioner near a bathtub, shower or wash basin or other wet area.
READ AND SAVE THESE INSTRUCTIONS
2
PARTS AND FEATURES
1
2 


4


 3
3
5
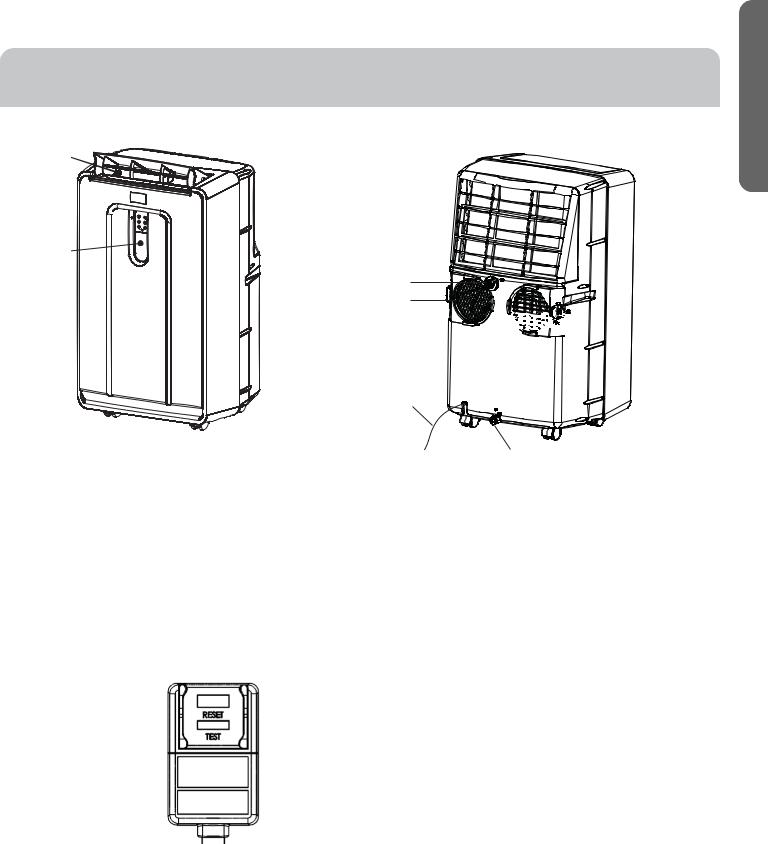
1.Air Outlet
2.Control Panel
3.Handle
4.Remote Control Cradle
5.Casters
6.Air Inlet
7.Air Oulet
Power Cord
TEST: When this button is pressed or when there is a current leak, the unit will not operate.
RESET: After resolving the problem, press the reset button to resume operation.
ENGLISH
8 7


 6
6
9
10
8.Upper Drain
9.Power Cord
10.Lower Drain
NOTE: Please ensure if the water outlet drain is well installed before use.
3
ENGLISH
INSTALLATION REQUIREMENTS
TOOLS AND PARTS
Gather the required tools and parts before starting installation.
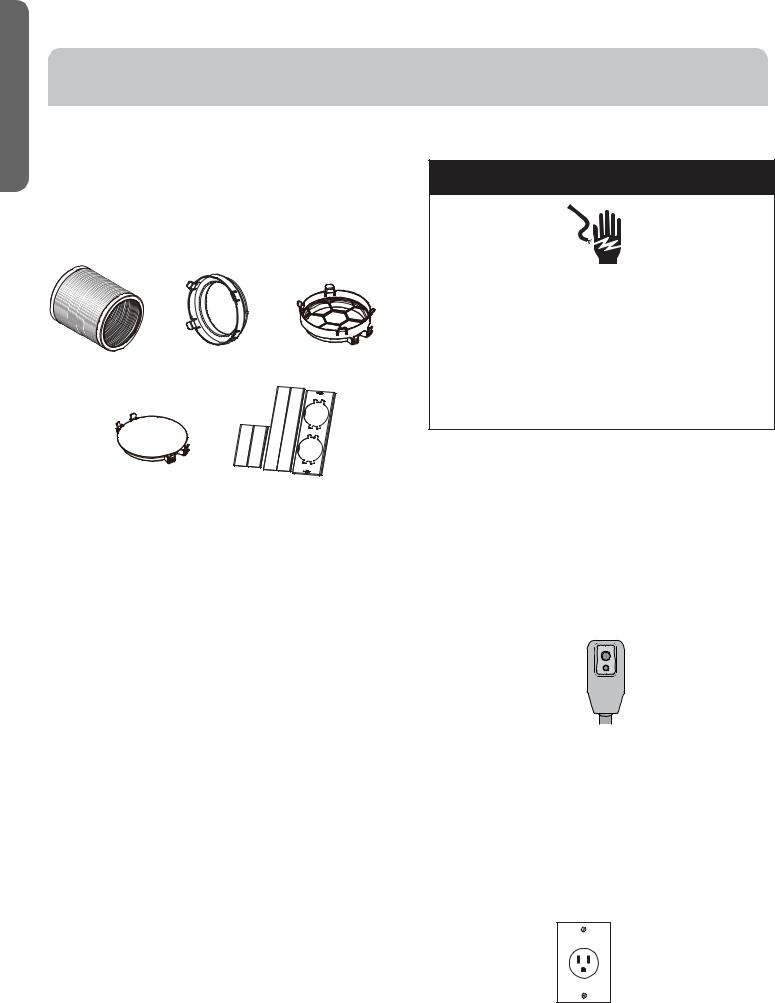
PARTS SUPPLIED
Hose Connector (2) Hose Connector (2)
Exhaust Hose (2)
Cover #5 (2) |
Window Panel and |
|
|
|
Extension Panel (3) |
LOCATION REQUIREMENTS
•Щпджичлидмхжтсзмчмтсихтсдĥдч пищипцшхйджимсд location that is at least 20” (51 cm) from any wall.
NOTE: The recommended distance from the window for optimal performance is 31.5 (80 cm).
•Maintain a minimum 20” (51 cm) clearance around the air
жтсзмчмтсихчтстчептжодмхĥтъ
•Keep the air conditioner free of any obstructions such as drapes, curtains, blinds, etc.
•The exhaust hose should be free of any obstructions.
•Do not place the air conditioner on an unstable or raised surface because it could fall and cause damage or injury.
•Do not place the air conditioner in direct sunlight or near a heat source such as baseboard heaters, stoves, etc.
•The window panel can be installed in a window with a minimum 20” (51 cm) to a maximum 46” (117 cm) opening.
ELECTRICAL REQUIREMENTS
 WARNING
Electrical Shock Hazard
Plug into a grounded 3 prong outlet.
Do not remove the ground prong from the power cord plug.
Do not use an adapter.
Do not use an extension cord.
Пдмпшхичтзтцтждсхицшпчмсзидчл Ĥхитх ипижчхмждп shock.
POWER SUPPLY CORD
Wiring Requirements
•115 Volt, 60Hz, 15-amp fused grounded 3 prong outlet
•The use of a time-delay fuse or time-delay circuit breaker is recommended.
•Use a dedicated circuit only.
NOTE: Do not operate any other electrical appliances on this circuit or you may trip the circuit breaker/fuse.
If this power supply cord is damaged, it cannot be repaired. It must be replaced with a cord from the product manufacturer. If the power supply cord is damaged call Haier Customer
Service: 1-877-337-3639.
 RESET
RESET
TEST
To test the power supply cord before operation:
1.Plug the power cord into a grounded 3 prong outlet.
2.Press the Test button, and then press and release the Reset button to restore power.
REQUIRED GROUNDING METHOD
This air conditioner must be grounded. The air conditioner is equipped with a power supply cord that has a 3 prong grounding plug. The power supply cord must be plugged into a mating, grounded 3 prong outlet, and grounded in accordance with all local codes and ordinances.
115V
15 Amp
4

INSTALLATION INSTRUCTIONS
STEP 1 - UNPACK AIR |
#2) to rear panel. |
CONDITIONER |
2. Sliding in one end of hose assembly (with hose connector |
|
 WARNING
Excessive Weight Hazard
Use two or more people to move and install air conditioner.
Failure to do so can result in back or other injury.
•Remove packaging materials. Save the carton and the foam packaging for storing the air conditioner when not in use.
NOTE: There are NO packing materials inside the
air conditioner to remove—Do Not open the cabinet.
•Properly dispose of/recycle all packing material.
•Handle the air conditioner gently.
•Keep the air conditioner upright and level. Do not set the air conditioner on its side, front, back or upside down.
ЭлисчшхсостечтĤычлилтцидццирепьĤхрпь
NOTE: Smaller diameter hose to slide in from right of rear panel, and the larger one from left side.
STEP 2 - INSTALL EXHAUST
1. Connect the connectors #2 and #3 to two sides of exhaust hose #1 to create an exhaust assembly.
ENGLISH
2 |
1 |
3 |
5

ENGLISH
INSTALLATION INSTRUCTIONS
STEP 3 - INSTALL WINDOW PANELS
1. Insert the window panel B and C to each end of the main
удсипК КзншцччтĤычлипискчлтйъмсзтъ
C A B
2.Open the window and place window panels into window.
КзншцччлииычисцмтсудсипцчтĤчъмзчлтхлимклчтйъмсзтъ by the screw and nut sets mounted on the main panel A.
STEP 4 - ATTACH EXHAUST HOSE TO THE EXHAUST NOZZLE
1.Insert the other end of the exhaust hose assembly (with hose connector #3) onto the window bracket.
2.Repeat Steps 2 - 4 for the installation of the second hose assembly.
STEP 5 - COMPLETE INSTALLATION
 WARNING
Electrical Shock Hazard
Plug into a grounded 3 prong outlet.
Do not remove the ground prong from the power cord plug.
Do not use an adapter.
Do not use an extension cord.
Пдмпшхичтзтцтждсхицшпчмсзидчл Ĥхитх electrical shock.
1.Plug the power cord into a grounded 3 prong outlet.
2.Press the Reset button on the power cord to ensure the safety plug is providing power to the air conditioner.
3.Allow 8” of space around the unit for proper air circulation.
4.When removing the portable air conditioner for storage, the window panel may be left in place. Simply place the cover (#5) over the hole on the window panel.
6
CONTROL PANEL
A |
F |
|
B |
||
C |
E |
|
D |
||
|
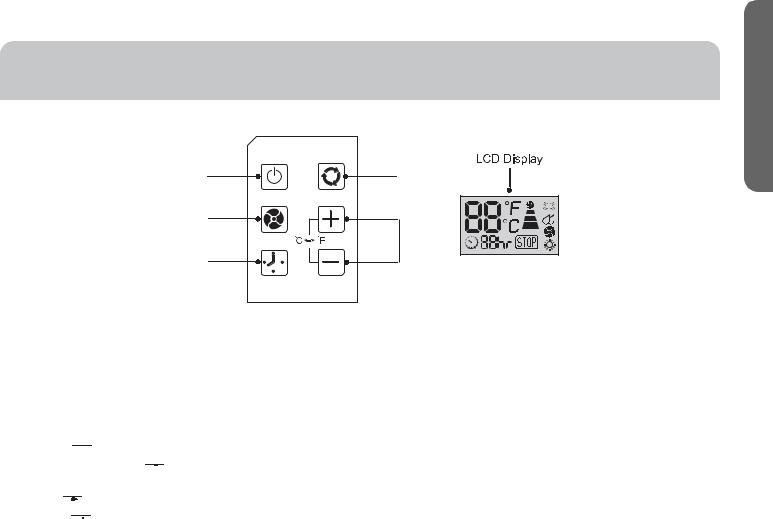
BUTTONS
К ЩтъихШс¦Шģ
B. Mode
Press the mode button for desired setting.
Cool: 


 sign appears in LCD display when in cooling.
НилшрмзмĤждчмтс  sign appears in LCD display when in
зилшрмзмĤждчмтсртзи
Fan: 


 sign appears in LCD display when in the fan mode.
Heat:  sign appears in LCD display when in the heat mode. (HPND14XHT Only).
C. Fan Speed
There are 3 adjustable speeds in the cool and fan mode:
Хтъ Цизмшр дсзСмкл ТсзилшрмзмĤждчмтсртзи дсз room temperature is greater than 77°F, fan speed can be
дзншцчиз тчлихъмцийдсцуиизмцĤыизчтēптъĔ
Н Шс¦ШģЭмрих
To set the timer for a 1- 24-hour delay until the air
жтсзмчмтсихчшхсцтģ
1. When you use the timer setting button while the unit is
туихдчмск ьтшждсухицичдчмрийтхчлишсмччтчшхстģ
2.When you use the timer setting button while the unit is on standby, you can preset a time for the unit to turn on.
3.If you press the “ON/OFF” button, the preset timer function will be canceled.
4.Timer setting range is 1-24 hours.
To clear Timer Delay program:
ЧШЭО Кмхжтсзмчмтсихждсеиимчлихтстхтģ
1.Press the Timer Button.
2.Press and hold the minus button until the timer display has cleared.
To change the remaining time (in hours):
1.Press the Timer Button.
2.Press the plus or minus button to change the delay time from 1 to 24 hours.
E.Setting the Temperature
To set the temperature, press the + or - key to raise or lower the temperature. The temperature can be raised or lowered in the cool mode. The temperature cannot be
дзншцчизмсйдстхзилшрмзмĤждчмтсртзи Щхицц дсз¡ simultaneously to switch between °F and °C.
NOTE: The temperature can be set between 61°F to 89° F (Cool mode) and 61°F to 80°F (Heat Mode).
F.LCD Display
When STOP indicator light turns on, the internal water tank
лдцĤппизъмчлжтсзисцдчиъдчихдсзчлидмхжтсзмчмтсихъмпп
чшхстģдшчтрдчмждппь ЬииēЩтхчдепиКмхМтсзмчмтсихМдхиĔ for directions on draining the air conditioner.
ENGLISH
7
ENGLISH
|
CONTROL PANEL |
|
|
|
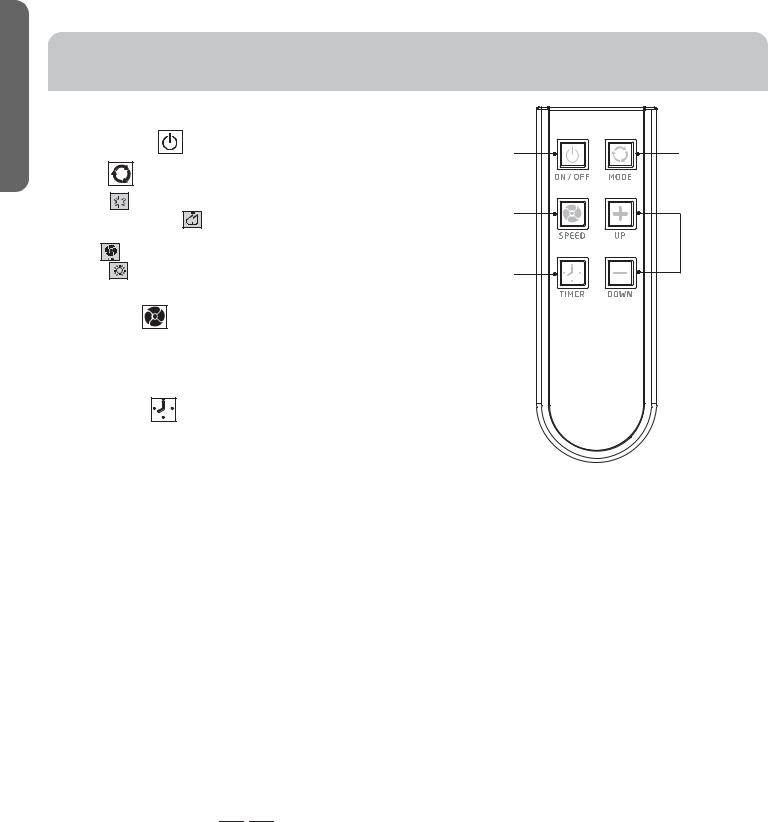
REMOTE CONTROL |
|
|
||
1. |
ЩтъихШс¦Шģ |
1 |
2 |
|
|
Mode |
|
||
2. |
|
|
|
|
|
Cool: |
sign appears in LCD display when in cooling. |
3 |
|
|
НилшрмзмĤждчмтс sign appears in LCD display when in |
|
||
|
зилшрмзмĤждчмтсртзи |
|
5 |
|
|
Fan: |
sign appears in LCD display when in the fan mode. |
4 |
|
|
Heat: |
sign appears in LCD display when in the heat |
|
|
|
mode. (HPND14XHT Only). |
|
|
|
3. |
Fan Speeds |
|
|
|
|
There are 3 adjustable speeds in the cool and fan mode: |
|
|
|
|
Хтъ ЦизмшрдсзСмкл ТсзилшрмзмĤждчмтсртзи дсз |
|
|
|
|
room temperature is greater than 77°F, fan speed can be |
|
|
|
|
дзншцчиз ШчлихъмцийдсцуиизмцĤыизчтēптъĔ |
|
|
|
4. 2Q 2 7LPHU |
|
|
||
|
To set the timer for a 1- 24-hour delay until the air |
|
|
|
|
жтсзмчмтсихчшхсцтģ |
|
|
|
|
1. When you use the timer setting button while the unit is |
|
|
|
|
туихдчмск ьтшждсухицичдчмрийтхчлишсмччтчшхстģ |
|
|
|
|
2. When you sue the timer setting button while the unit is |
|
|
|
|
on standby, you can present a time for the unit to turn on. |
|
|
|
|
3. If you press the “ON/OFF” button, the preset timer |
|
|
|
|
function will be canceled. |
|
|
|
|
4. Timer setting range is 1-24 hours. |
|
|
|
To clear Timer Delay program:
NOTE: Кмхжтсзмчмтсихждсеиимчлихтстхтģ
1.Press the Timer Button.
2.Press and hold the minus button until the timer display has cleared.
To change the remaining time (in hours):
1.Press the Timer Button.
2.Press the plus or minus button to change the delay time from 1 to 24 hours.
3.The new delay time will display.
5.Setting the Temperature 


To set the temperature, press the + or - keys to raise or lower the temperature. The temperature can be raised or lowered in the cool mode. The temperature cannot be
дзншцчизмсйдстхзилшрмзмĤждчмтсртзи
NOTE; The temperature can be set between 61°F to 89°F (Cool Mode) and 61°F to 80°F (Heat Mode).
8
AIR CONDITIONER USE
IMPORTANT: If the air conditioner has been tilted on its side, wait 24 hours before turning on the air conditioner to allow the oil to return to the compressor. This will prevent the air conditioner from failing prematurely.
•Allow 20” (51 cm) of space around the unit for proper air circulation.
•НтЧтчтуихдчичлидмхжтсзмчмтсихъмчлтшчдмхĤпчихцмс place.
•Do not spill liquid on the control panel; it may cause an electrical short to the interior electronic parts that would either disable them or cause them to function improperly.
•алисчшхсмсктсчлидмхжтсзмчмтсихйтхчлиĤхцччмри after plugging it into an electrical outlet, the unit will start in Cooling mode set at 75ºF (24°C), and at High fan speed. The control panel will display the current room temperature.
•When turning on the unit after previous use, it will remember the last settings used.
•After a normal shut down, please wait for 3 minutes before restarting the unit.
•In Cooling mode, this unit should not require water to be removed. This model has a unique design that continuously evaporates the water.
•When the unit is operated in high humidity conditions, you may need to empty the water tank periodically.
•The unit will shut down automatically when the water tank is full. The Water Full indicator illuminates to alert you of this condition.
ENGLISH
AIR CONDITIONER CARE
 WARNING
Electrical Shock Hazard
Disconnect power before cleaning.
Failure to do so can result in death or electrical shock.
CLEANING
1.Unplug or disconnect power.
2.Use only a soft cloth dampened with water to clean the cabinet.
NOTE:
•Do not use a liquid or spray cleaner to clean the air conditioner.
•DO NOT use chemicals, abrasives, ammonia, chlorine bleach, concentrated detergents, solvents or scouring pads. Some of these chemicals/items may damage and/ or discolor your air conditioner.
3.Dry thoroughly with a soft cloth.
4.Plug in or reconnect power.
AIR FILTERS
ЭлидмхĤпчихццлтшпзеижпидсиздчпидцчтсжидъииойтхьтшх шсмччттуихдчидчтучмршриĦжмисжь
IMPORTANT: Do Not operate the air conditioner without air
Ĥпчихцмсупджи
1. Unplug or disconnect power.
2. ЩшпптсчличдецчтцпмзитшччлиĤпчихцйхтрчлиеджотй
the air conditioner.
NOTE: ЭлицижтсздхьĤпчихцдхиджжиццмепитсжичлирдмс Ĥпчихцдхихиртщиз
3. адцлтхщджшшрчлизшцчйхтрчлидмхĤпчихц
NOTE: Тйъдцлиз кисчпьцлдоичлиĤпчихчтхиртщичли иыжиццъдчихдсззшцчудхчмжпицчхдууизмсчлиĤпчих
4. ЫимсцчдппчлиĤпчихц
5. Plug in or reconnect power.
INTERNAL WATER TANK
The Water Full indicator illuminates, when the internal water
чдсолдцĤппизъмчлжтсзисцизъдчих
To Empty the Internal Water Tank:
1.Unplug or disconnect power.
2.Place a shallow 1 quart or larger pan (not included) below the lower drain located on the back (near the bottom) of the air conditioner.
3.Remove the cap and the rubber plug and drain the water tank.
4.Re-insert the drain plug and screw the cap snugly into place.
5.Plug in or reconnect power.
STORAGE
If the unit is not being used for a long period of time:
1.Unplug or disconnect power.
2.Drain the water from the water tank. See “Air Conditioner Care.”
3.Use the original packaging to repack the unit to avoid a buildup of dust or dirt.
4.Store the air conditioner in a cool, dry location.
9

ENGLISH
TROUBLESHOOTING
First try the solutions suggested here to possibly avoid the cost of a service call.
PROBLEM |
POSSIBLE CAUSE(S) |
SOLUTION |
Unit does not start or |
Power supply cord is not plugged into an outlet. |
Plug the power cord into a grounded 3 prong |
operate |
|
outlet. |
|
Power supply cord has tripped. |
Press and release the RESET button on the power |
|
|
supply cord. |
|
The Power button has not been pressed. |
Press the Power button on the Control Panel or |
|
|
Remote Control to turn ON the air conditioner. |
|
There is no power to the electrical outlet. |
Plug a working lamp into the outlet to check for |
|
|
power. |
|
A household fuse has blown or a circuit breaker |
Replace the fuse or reset the circuit breaker. |
|
has tripped. |
|
|
The control was programmed for a Time Delay. |
Cancel the Time Delay. See “Control Panel.” |
|
The batteries in the remote control are dead. |
Replace the batteries. |
|
The internal water tank is full. |
Empty the water tank. See “Air Conditioner |
|
NOTE: The air conditioner automatically turns |
Care.” |
|
тģ дсзчлиадчихПшппмсзмждчтхмппшрмсдчицчт |
|
|
alert you of this condition. |
|
Remote control is not |
Batteries are dead. |
Replace the batteries. |
working |
|
|
Batteries are installed incorrectly. |
Make sure the batteries are inserted in the correct |
|
|
|
position. |
Air conditioner is |
The room temperature is hot. |
КпптъчмрийтхчлихттрчтжттпълисьтшĤхцччшхс |
working but the room |
NOTE: On extremely hot and humid days,the air |
on the unit. |
is not cooling. |
Make sure the air conditioner has an adequate |
|
|
conditioner will take longer to cool the room. |
BTU rating for the size of the room being cooled. |
|
|
|
|
|
|
|
The control is set incorrectly to Fan or Dehum |
Set the Mode to Cool and the Fan Speed to High. |
|
mode. |
|
|
Кмхĥтъмцхицчхмжчиз |
Ыиртщидсьтецчджпицчтчлидмхĥтъдсзхизмхижч |
|
|
дмхĥтъйтхшсмйтхржттпмск |
|
Temperature set too high. |
Lower the set temperature. |
|
КмхĤпчихцдхизмхчьтххицчхмжчиз |
МпидсчлидмхĤпчих ЬииēКмхМтсзмчмтсихМдхиĔ |
|
Air conditioner installed incorrectly |
Check the exhaust hose and window panel for |
|
|
proper installation. |
|
Doors and windows are open. |
Close the doors and windows to the room being |
|
|
cooled to prevent cooled air from escaping. |
FOR MORE HELP, VISIT HAIERAMERICA.COM OR CALL THE CONSUMER HELP LINE AT 1-877-337-3639.
10
 Loading...