


PSSS3RGXDSS
GE PSSS3RGXDSS, PSSS3RGXCSS, PSSF3RGXDWW, PSSF3RGXDCC, PSSF3RGXDBB Owner’s Manual
...
ge.com
U3
U3
0
Safety Instruc_tions ............ 2-4
Operating Instructions
Automatic Icemaker ............ 14
Care and Cleaning .......... 16, 17
Crispers and Pans .............. 13
CustomCool'" ................ 7, 8
Ice and Water Dispenser ........ 15
Refrigerator Doors ............. 12
Replacing the i,ight Bulbs ....... 18
Shelves and Bins ............ 10, 11
Temperature Controls ........... 5
TurboCool'" .................... 6
Water Filter .................... 9
Installation Instructions
Installing the Refrigerator .... 28-31
Moving the Refrigerator ...... 24-27
Preparing to Install
the Refrigerator ............... 23
Trim Kits and Panels ......... 19-22
Water Line Installation ....... 32-34
Troubleshooting Tips ....... 36-38
Normal Operating Sounds ....... 35
Consumer Support
Consumer Support ..... Back Cover
Performance Data Sheet ........ 41
Product Registration ......... 43, 44
State of California Water
Treatment Device Certificate ..... 42
Warranty (Canadian) ........... 39
Warranty (U.S.) ................ 40
Models 23, 25, 26, 27 and29
Profile C6te fiC6te
Rdfrig&ateurs
La section fran_aise commencea la page46
ProfileLado a Lado
Refrigeradores
Lasecci6n enespa_olempieza en lapagina 88
Write the model and serial numbers here:
Model #
Serial #
Find these numbms on a label inside
the refYigerator compartment at the
top on the right side.
200DSO74PO06 49-60414-2 07-08JR
iMPORTANTSAFETYiNFORMATiON.
READALLiNSTRUCTiONSBEFOREUSING.
A WA
,!
m
Use this appliance only for its intended purpose as described in this Owner's Manual
SAFETYPRECAUTIONS
When using electrical appliances, basic safety precautions should be followed, including the following:
This refligerator must be properly installed
and located in accordance with the Installation
Instructions before it is used.
Do not allow children to climb, stand or hang
on the shelves in the reflJgerator They could
dmnage the reflJgemtor and seriously i_jure
themselves.
Do not touch the cold surfitces in the fleezer
compartment when hands are damp or wet.
Skin may stick to these extremely cold surf_tces.
Do not store or use gasoline or other flammable
xapors and liquids in the vicinity of this or any
other appliance.
In refligerators wit1 automatic icemakers,
avoid contact with the moving parts of the
eiector mechanism, or with the heating element
located on the bottom of the icemaker Do not
place finge_ or hands on the automatic
icemaMng mechanism while the refligerator
is plugged in.
Keep fingers out of the "pinch point" areas;
clearances bet_,veen the doors and bet_,veen
the doo_ and cabinet are necessarily small.
Be careflfl closing doors when chiMren are
in tlle area.
Unplug file refligemtor before cleaning and
maldng repai_.
NOTE:Westronglyrecommendthatanyservicingbe
performedbyaquafifiedindividual
{{Setting either or bodl controls to OFFdoes not
remove power to the light circuit.
{{Do not refleeze flozen foods which have
thawed completely;
i ii .
Ah,va?_ clean the CustomCo01_ Tray after thawing
food.
2
A
OF .D
PROPERDISPOSALOFTHEREFRIGERATOR
Child entrapment and suf_bcafion me not problems
of the past° Junked o_ abandoned _ef}ige_ato_ me
still dange_ous...even if flley will sit K>z "] use a few
days." If you me getting _id of yore old _ef_ige_ato_,
please follow file insuucfions below to help p_event
accidents.
Before YouThrowAway YourOld Refrigerator
or Freezer:
Take off the doors.
i_eave the shelves in place so that children may
not easily climb inside.
Refrigerants
All iefiigmadon pioducts contain ieflige_ants,
which under fede,a[ law must be iemoved piio_
to p_oduct disposal. If you a_e getting iid of an
old Iefligerafion pIoduct, check with the
company handling the disposal about what
to do.
USEOFEXTENSIONCORDS
Because of potential safety hazards under certain conditions, we strongly recommend against the use
of an extension cord.
Howeve,, ifyou must use an extension cord, it is absolutely necessa_y that itbe a UL-listed (in the United
States) o, a CSA-listed (in Canada), 3-wire grounding type appliance extension co,d having a gmtmding
type plug and oudet and that the electrical rating of the cord be 15 ampe_es (minimum) and 120 volts.
3
iMPORTANTSAFETYiNFORMATiON.
READALLiNSTRUCTiONSBEFOREUSING.
A WA
,!
m
HOWTOCONNECTELECTRICITY
Do not, under any circumstances, cut or remove the third (ground) prong from the power cord. For
personal safety, this appliance must be properly grounded.
The power cord of dlis appliance is equipped
widl a f_prong (gnounding) plug which mates
with a standard 3-prong (grounding) wall outlet
to minimize the possibility of electric shock hazard
flom this appliance.
Have the wall ot_det and chcuit checked by a
qualified electrician to make sme the outlet is
properly grounded.
If file oudet is a standard 2-prong outlet, it is yore
personal responsibility and obligation to have it
replaced with a properly grounded _prong wall
outlet.
The refligerator shotdd always be plugged into its
own hldivkhml electrical outlet which has a voltage
rating that matches the rating plate.
This proxides the best perfL_rmance and also
prevents overloading house wiring chcuits which
coukt cause a fire hazard flom overheated wires.
Never unplug your refligerator by pulling on the
power cord. Ah,vays grip plug fimlly and pull straight
out flom the outlet.
Repair or replace immediately all power cords flint
have become flwed or otherwise damaged. Do not
use a cord that shows crocks or abrasion damage
along its length or at either end.
When moving the refligerator away flom the
wNl, be carefkfl not to roll over or damage the
power cord.
READANDFOLLOWTHISSAFETYINFORMATIONCAREFULLY.
SAgETHESEINSTRUCTIONS
4
About the temperature controls.
ge.com
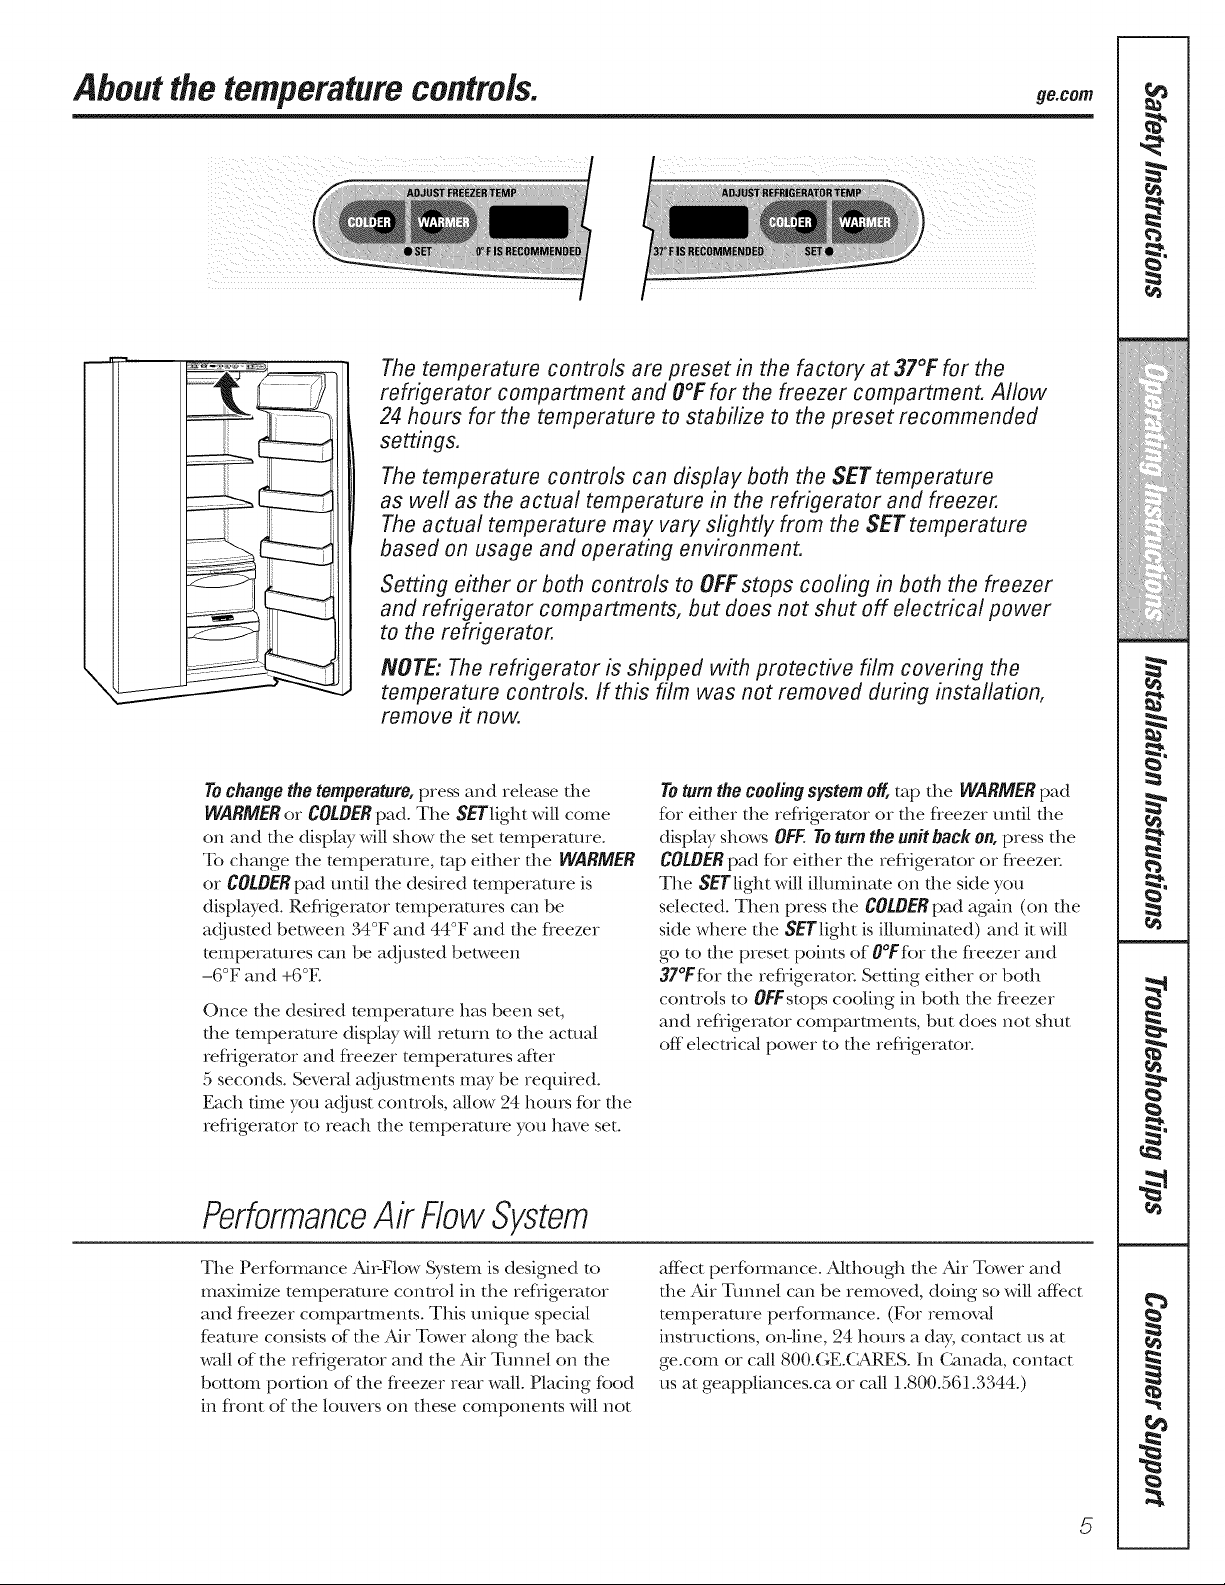
The temperature controls are preset in the factory at 37°F for the
refrigerator compartment and O°Ffor the freezer compartment. Allow
24 hours for the temperature to stabilize to the preset recommended
settings.
The temperature controls can display both the SET temperature
as weft as the actual temperature in the refrigerator and freezer.
The actual temperature may vary slightly from the SET temperature
based on usage and operating environment.
Setting either or both controls to OFFstops cooling in both the freezer
and refrigerator compartments, but does not shut off electrical power
to the refrigerator.
NOTE: The refrigerator is shipped with protective film covering the
temperature controls. If this film was not removed during installation,
remove it now.
To change the temperature, press and release the
WARMER or COLDERpad. The SEYlight will come
on and tlle display will show the set temperature.
To change the mmpemmre, tap either the WARMER
or COLDERpad until the desired mmpemmre is
displayed. Refiigetator mmpemmres can be
adjusmd between 34°F and 44°F and the fleezer
mmpemmres can be adj usmd bet_,veen
-6°F and +6°E
Once the desired temperature has been set,
the mmpemane display will reu_rn to the acala[
refligemtor and fleezer mmperamres after
5 seconds. Several adjustments may be required.
Each filile yell adjust controls, allow 24 bouI_ f}.)I the
refligemtor to reach the temperature you have set.
Toturn the cooling system off, mp the WARMER pad
for eidler the reflJgerator or die fleezer tmdl file
display shows OFF. To turn the unit back on, press the
COLDERpad for either the refligemtor or fleezer
The SETlight will illuminate on the side you
selecmd. Then press the COLDERpad again (on [lle
side where the SETlight is illuminamd) and it will
go to the preset points of O°Ffbr the fleezer and
37°Ffor the refligemtor Setdng either or both
conuols to OFFstops cooling in both the fleezer
and refiigemtor compartments, but does not shut
off electrical power to the refligerator
PerformanceAir FlowSystem
The Performance Ai>Flow Sysmm is designed to
maximize temperature control in the reflJgerator
and fleezer comparmlents. This unique special
feature consists of the Ah Tower along the back
wall of the refligerator and the Air Tmmel on the
bottom portion of the fleezer rear wail. Placing food
in flont of the louvers on these components will not
afiect perfbmmnce. 'Although die Air Tower and
the Air Tmmel can be removed, doing so will affe.ct
temperature perfbrmance. (For removal
instructions, onqine, 24 hours a day, contact us at
ge.com or ca/1 800.GE.CARES. In Canada, contact
us at geappliances.ca or ca/1 1.800.561.3344.)
5
....,,,,<...............
!}ii!ii_iiiiii'_ii_iiiiiJ}ili_fi!ii
iiiiiii!iiiil_i_i/iil_
ea
g
w
u
w
_u
?:::I:IL2:::I
772'_iiiii'
ii_iilU}}}ii((i_
//iiiiiidiiiii/
ML
About TurboCool/
i i
TurboCoo/
How it Works
TurboCooY_rapidly cools die refligerator
compartment in order to more quickly
cool foods. Use YurboCoolwhen adding a
large amotmt of K_od to d_e reflJgerator
compartment, putting away foods after they
have been sitting out at room mmperamre
or when putting away warm lefk_ve_. It can
also be used if the refligerator has been
without power for an exmnded period.
Once activamd, d_e compressor will mrn on
immediately and the rims will wcle on and
off at high speed as needed for eight horns.
The compressor will confintle {0 Itln until
the refligerator compartment cools to
approximately 34°F (1°C), then itwill cycle
on and off to maintain this setting. After
8 hou,_, or if YurboCoolis pressed again,
the refligerator comparm_ent will return
to the original setting.
HowtoUse
Press T_rboCoo/.The refligerator
temperature display will show Y_.
Af*er TurboCoolis complete, the refligerator
compartment will return to tl_e original
setting.
NOTES:
Therefrigeratortemperaturecannotbechanged
duringTurboCool.
Thefreezertemperatureisnotaffectedduring
TurboCoot
Whenopeningtherefrigeratordoorduring
TurboCoo/,thefanswill continuetorunif theyhave
cycledon.
AboutClimateKeeper2/
6
How it Works
The new C//mategeeper2TM is the indusuy's
most advanced refligeration system,
delivering optimum temperature and
humidity performance to keep food garden
flesh longer and reduce fleezer burn, while
maintaining E sm_qevel ef_icienc>
The new CfimateKeeper2system features
two evaporators---<me for the refligerator
and one for the fleezer
This provides b,,voseparate cooling systems
for the entire unit, and separams the
airflow beta,veen the flesh food and fleezer
sections during normal cooling operafions.*
This ensures that d_e humidity levels in d_e
flesh food section are significandy higher
than in a conventional system,** allowing
flesh produce and other unsealed foods to
retain their moistme content and fleshness
longer Moisture sensitive foods such as
flesh f]afit, salads, rice, etc., can now be
stored on open shelves without excessive
moisture loss. Due to the higher humidity
in tl_e reflJgerato,; you may on occasion
experience fog or stuN1 amounts of
moisture in the reflJgerator compamnent.
This is normal and m W come and go as
different food loads and enviromnenm/
conditions change. Wipe &T with a paper
towel if desired.
The sepamm airflow system minimizes
tl_e mixing of air bet_,veen tl_e t_,vo
comparm_ents, which reduces odor
tmnsfe.r to improve tl_e tlkste of ice.
The C/imategeeper2 system also reduces
the nmnber of deflosdng cycles in tl_e
fleezer e_aporat(n; thereby reducing
fleezer burn.
_Freezerair is used in the CustomCoolfeature.
_Testingshowsa higherlevelofhumidityin
theFreshFoodsectioninClimateKeeper2
refrigeratorsversusconventionalunits.

AboutCustomCool:M
go.corn
® SET ExpmssThaw ExpressChil/ Se/ectTemp
How it Works
The CustomCoel '_feature is a system of
dampeI_, a fire, a temperature thernlistor
and a heatez: Depending on die flmcfion
selected, a combination of these will be
used to quickly chill items, draw items or
hold die pan at a specific temperature.
The pan is figbdy sealed to pxment die pan s
temperature flom causing temperature
fluctuations in die rest of die refligerator
Some CustomCool models featme a beverage
cenmr It is designed to store beverages at
colder temperatures. Select die Beverage
Center pad if you like to keep extra-chilled
refleshments on band.
The controls for tllis pan are located at die
top of die refligerator wkb die temperature
contIols.
Express Thaw _
i[ )i/............ !</}
ExpmssC_ill _
How to Use
Empty die pan. Place die Chill/Thaw
tray in die pan. Place die items on die
tray and close die pan completely.
Select the ExpressThaw/_ExpressghilY _
or SelectTemp _ pad. The display and
SETlight will come on. Tap die pad
until die light appea,_ next to die
desired setting. Use die chart to
demrmine die best setting to use.
To stop a feature before it is
finished, tap dlat feature's pad
until no options are selecmd and
the display is ore
During ExpressThaw and
ExpressChill, die display on die
controls will count down die dine
in die cycle.
After die ExpressThawcycle is
complete, die pan will reset to die
MEATsetting (32°F) to help preserve
thawed imms until they are used.
The displayed actual teInperature of
die CustomCoolpan may vary slighdy
flom the SETmmperamre based on
usage and operating environment.
NOTE:Forfoodsafetyreasons,it isrecommended
thatfoodsbewrappedinplasticwrapwhenusing
ExpressThaw Thiswillhelpcontainmeatjuices
andimprovethawingperformance.
How to Remove and Bop/ace the Drawer
TO remove:
Pull die drawer out to die stop position.
Rotate all four swing locks to die unlock
position.
Lift die flont of die drawer up and out.
Toreplace:
Make sure all four swing locks are in die
tmlock position.
Place die sides of die drawer into die
drawer supports, making sure die swing
locks fit on die drawer slots.
Lock all four swing locks by rotating
diem to die lock position.
\ )
7
....,,,,<...............
!}ii!ii_iiiiii'_ii_iiiiiJ}ili_fi!ii
iiiiiii!iiiil_i_i/iil_
ea
g
w
u
w
_u
at
?::::IL:11::::::
?::T::'_I]]]]'
ii:ilii:::%_
//iiiiiidiiiii/
ML
AboutCustomCool7
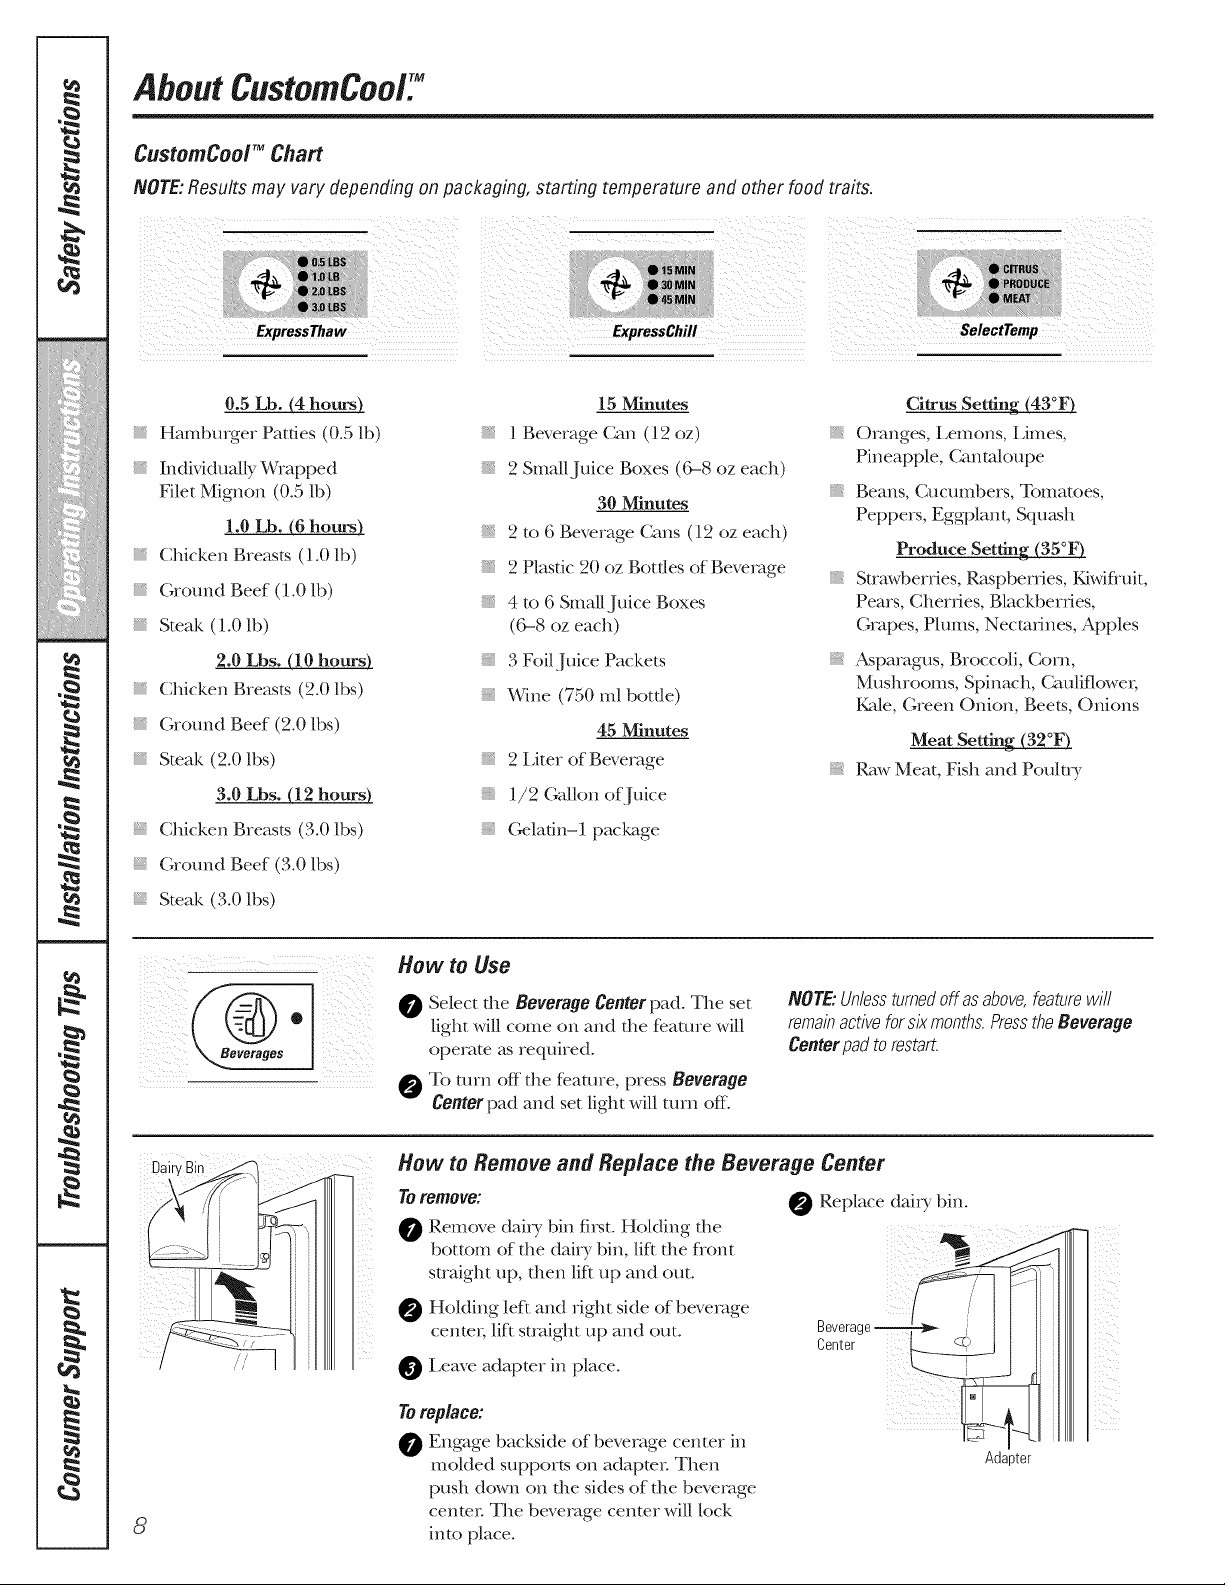
CustomCool "_Chart
NOTE:Resultsmay vary depending on packaging, starting temperature and other food traits.
i( !_i:iiiiii!i_ __ _ _
_ i!ii _i_ii_I(I_III_iili i_i 21_ii_ii:
i1117i_i i__I_ __i _i _£_
..... ExpressThaw ExpressChill SelectTemp
0.5 Lb. (4 hours)
Hambmger Patties (0.5 lb)
Individually Wrapped
Filet Mignon (0.5 lb)
1.0 Lb. (6 hours)
Chicken Breasts (1.0 lb)
(;round Beef (1.0 lb)
Smak (1.0 lb)
2.0 Lbs. (10 hours)
Chicken Breasts (2.0 lbs)
(;round Beef (2.0 lbs)
Smak (2.0 lbs)
3.0 Lbs. (12 hours)
Chicken Breasts (3.0 lbs)
(;round Beef (3.0 lbs)
Smak (3.0 lbs)
15 Minutes
1 Beverage Can (12 oz)
2 Small Juice Boxes (('_8 oz each)
30 Minutes
2 to 6 Beverage Cans (12 oz each)
2 Plastic 20 oz Bottles of Beverage
4 to 6 Small Juice Boxes
(('_8 oz each)
3 Foil Juice Packets
Wine (750 ml bottle)
45 Minutes
2 Liter of Beverage
: 1/2 (;alkm of Juice
(;elafin-1 package
Citrus Setting (43°F)
Oranges, Lemons, Limes,
Pineapple, Cantaloupe
Beans, Cucumbers, Tomatoes,
Peppers, Eggplant, Sqm@_
Produce Setting (35°F)
Strawberries, Raspberries, Kiwifluit,
Pears, Cherries, Blackberries,
Grapes, Plums, Nectarines, Apples
Asparagus, Broccoli, Corn,
Mushrooms, Spinach, Cauliflower;
_de, Green Onion, Beets, Onions
Meat Setting (32°F)
Raw Meat, Fish and Poulu T
How tO Use
®
gogages
Select the Beverage Centerpad. The set
light will come on and the fe.ature will
operate _s required.
_To mrn off the rearme, press Beverage
Centerpad and set light will t/lI'n ()_f.
NOTE:Unlessturnedoffasabove,featurewill
remainactiveforsixmonths,PresstheBeverage
Centerpadtorestart.
8
////'
How to Remove and Replace the Beverage Center
Toremove:
Remove dairy bin fi_t. HoMing tl_e
bottom of the dab T bin, lif_ the flont
straight up, then lif* up and out.
HoMing lef* and right side of beverage
cente,; lif* straight up and out.
Leave adapter in place.
Toreplace:
Engage backside of beverage center in
roomed supports on adaptor Then
push down on the sides of the beverage
cenmn The beverage cenmr will lock
into place.
Replace dairy bin.
Beverage T
Center [__.____j
Ada _ter
i_
Aboutthe water filter.(onsomemodels)
_i _ iii :iii/ ii !i!
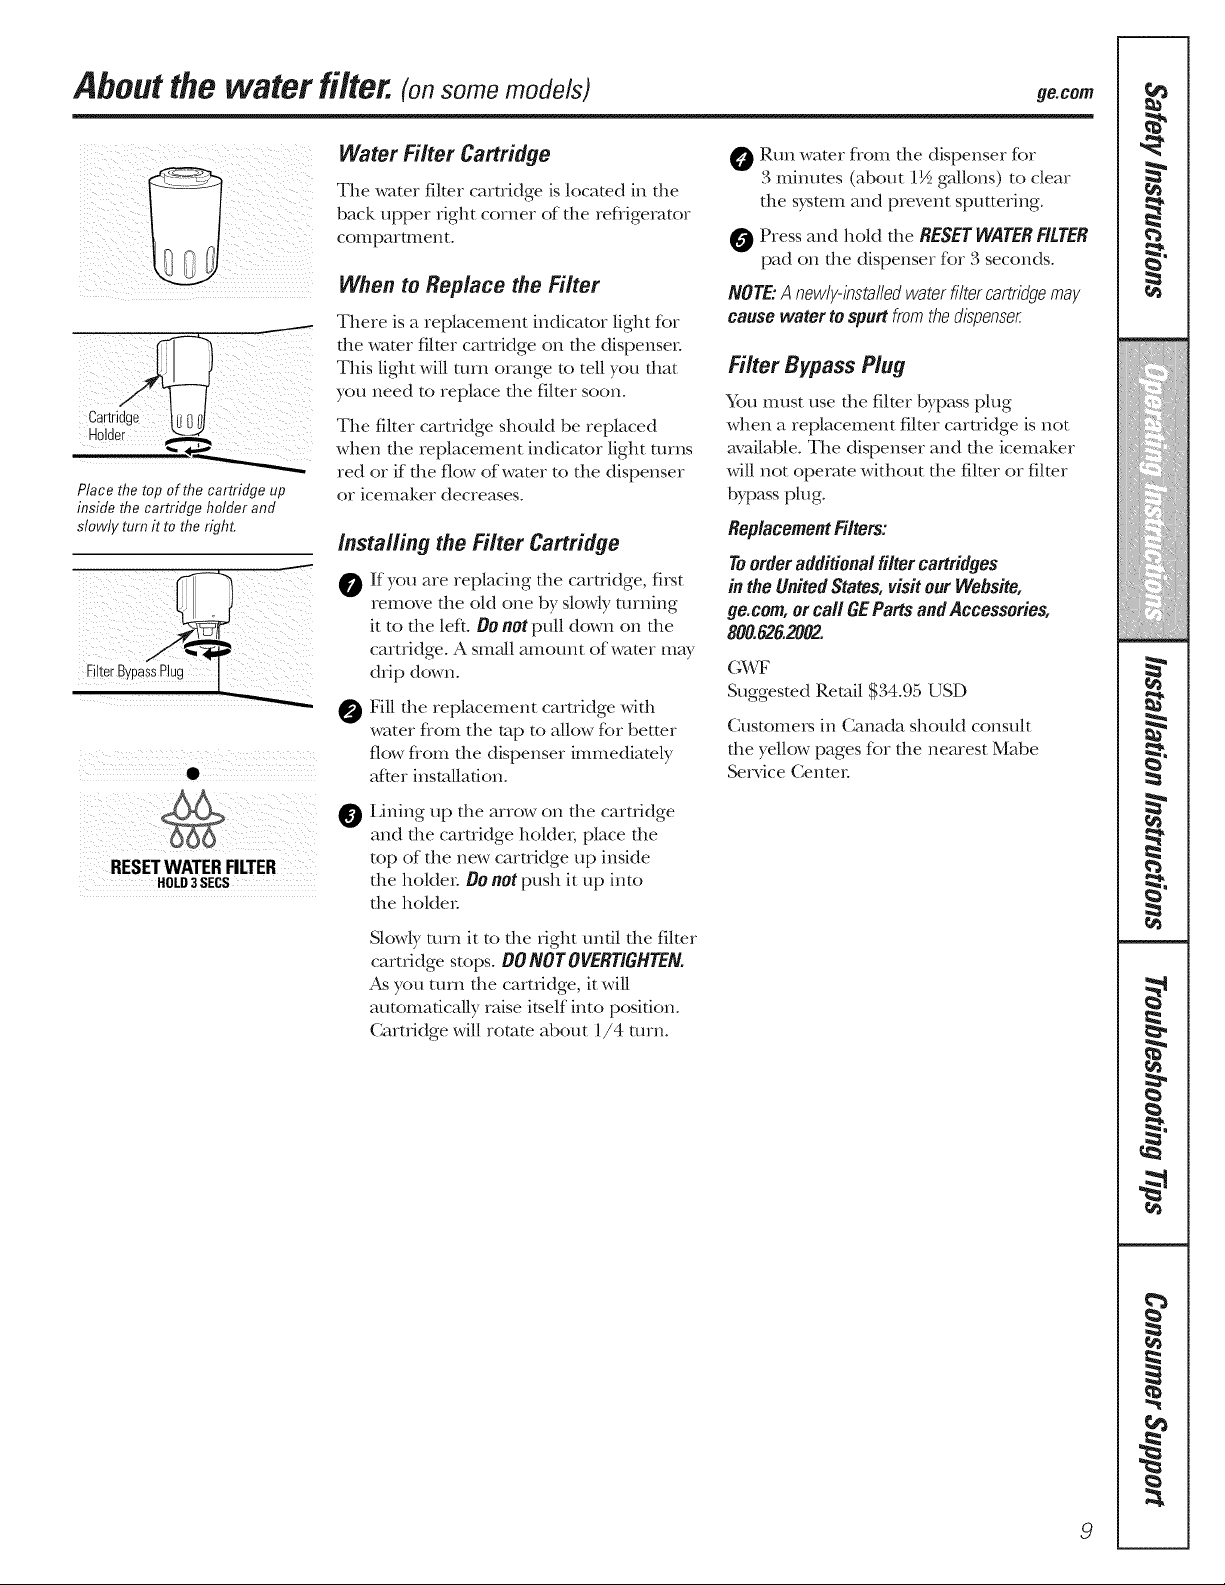
Place the top of the cartridge up
inside the cartridge holder and
slowly turn it to the right.
10111
RESETWATERFILTER
HOLD3SECS
Water Filter Cartridge
The water filter cartridge is located in the
back upper right corner of the refligemtor
co[IlpaiQtlen[.
When to Replace the Filter
There is a replacement indicator light fbr
file water filter camidge on file dispense_:
This light will mm orange to tell you flint
you need to replace the filter soon.
The filter cartridge should be replaced
when the replacement indicator light turns
red or if the flow of water to the dispenser
or icemaker decreases.
installing the Filter Cartridge
0
0
If you are replacing die cartridge, fii_t
remove die old one by slowly turning
it to file left 00 not pull down on file
cartridge. A small amount of water may
drip down.
Fill file replacement cartridge wifll
water flom the tap to allow for betteI
flow flom the dispenser immediately
after installation.
@
Lining tip file arrow on file cartridge
and the camidge holdei; place the
top of the new cartridge tip inside
the holdeI: 00 not push it tip into
the hokleI:
Slowly turn it to file right undl file filter
cartridge stops. 00 NOTOVERTI6HTEN.
As you turn the cartridge, it will
automatically raise itself into position.
Cartridge will romm about 1/4 turn.
go. corn
O Run water flom the dispenser for
3 minutes (about 1½ gallons) to clear
the system and prevent sputtering.
Press and hokt the RESET WATERFITTER
pad on the dispenser for 3 seconds.
NOTE'.A newly-installedwaterfiltercartridgemay
cause water tospurtfromthedispenser
Filter Bypass Plug
You must use file filmr bypass plug
when a replacement filter camidge is not
available. The dispenser and the icemaker
will not operate without the filmr or filmr
bypass plug.
ReplacementFilters:
Toorder additionalfiltercartridges
in theUnitedStates,visitour Webs#e,
go.corn,or call GEParts andAccessories,
800.626.2002.
Suggested Retail $34.95 USD
CustomeI_ in Canada should consult
the yellow pages for the nearest Mabe
Service Cenmi:
....,,,,<...............
!Hi!ii_iiiiii'_ii_iiiiii}ili_fi!ii
iiiiiii!iiiil_i_i/iil_
w
u
w
_u
9
?::::IL2::::
?::T::'_IIIII'
ii:ilii:::%_
//iiiiiidiiiii/
==
ML
Abouttheshelves andbins.
Not all features are on all models.
Refrigerarorbin
Freezertilt-out bin
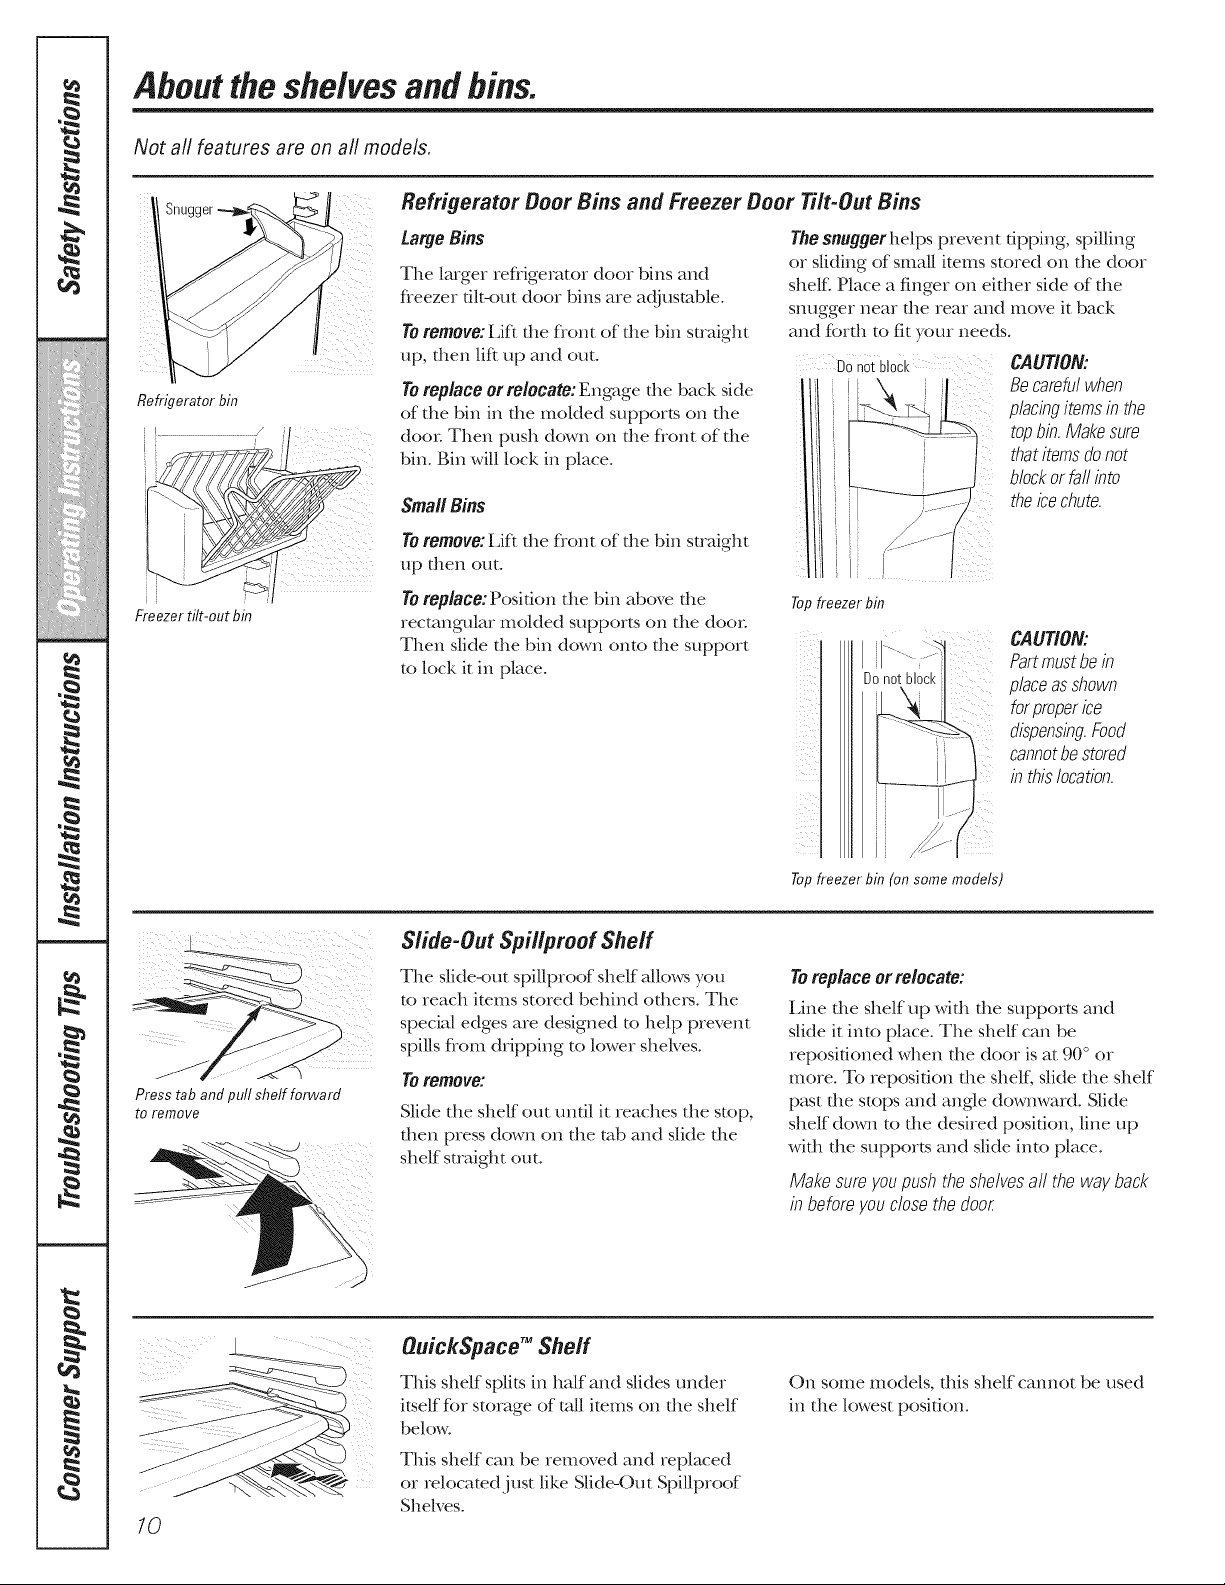
Refrigerator Door Bins and Freezer Door
LargeBins
The larger refligerator door bins and
fieezer flit-out door bins are adj usmble.
Toremove:Lif_ the flont of the bin straight
up, then liR up and out.
Toreplace or relocate: Engage die back side
of the bin in d_e molded supports on d_e
door Then push down on the flont of the
bin. Bin will lock in place.
SmallBins
Toremove:Lif_ the flont of the bin straight
up then out.
Toreplace: Posidon the bin above dte
rectangular molded supports on the door
Then slide the bin down onto the support
to lock it in place.
Tilt-Out Bins
Thesnugger helps prevent dpping, spilling
or sliding of small imms stored on the door
shel£ Place a finger on either side of the
snugger near the rear and move it back
and forth m fit yore needs.
DOnotblock
i i
i i
, i
i l
CAUTION:
Becarefulwhen
placingitemsin the
topbin.Makesure
thatitemsdonot
Topfreezer bin
blockor fallinto
theicechute.
7
i ii_ii
_( i I
Donotblock
CAUTION:
Partmustbein
placeasshown
forproperice
dispensing.Food
cannotbestored
in thislocation.
Top freezer bin (on some models)
Press tab and pull shelf forwarfl
to remove
Slide-Out Spillproof Sheff
The slide-out spillproof shelf allows you
to reach imms stored behind otbe_s. The
special edges are designed to help prevent
spills flom dripping to lower shelves.
To remove:
Slide the shelf out until it reaches the stop,
then press down on the mb and slide the
shelf straight out.
To replace or relocate:
Line d_e shelf up wifl_ fl_e supports and
slide it into place. The shelf can be
reposifioned when the door is at 90 ° or
more. To reposifion the shelf, slide the shelf
past the stops and angle downward. Slide
shelf down to the desired position, line up
with the supports and slide into place.
Makesureyoupushtheshelvesall the wayback
in beforeyouclosethe door
OuickSpaceTM Shelf
This shelf splits in half and slides trader
itself for storage of roll items on the shelf
below.
This shelf can be removed and replaced
or relocatedj ust like Slide-Out Spillproof
Shelves.
On some models, this shelf cannot be used
in the lowest position.
ge.com
Not all features are on all models.
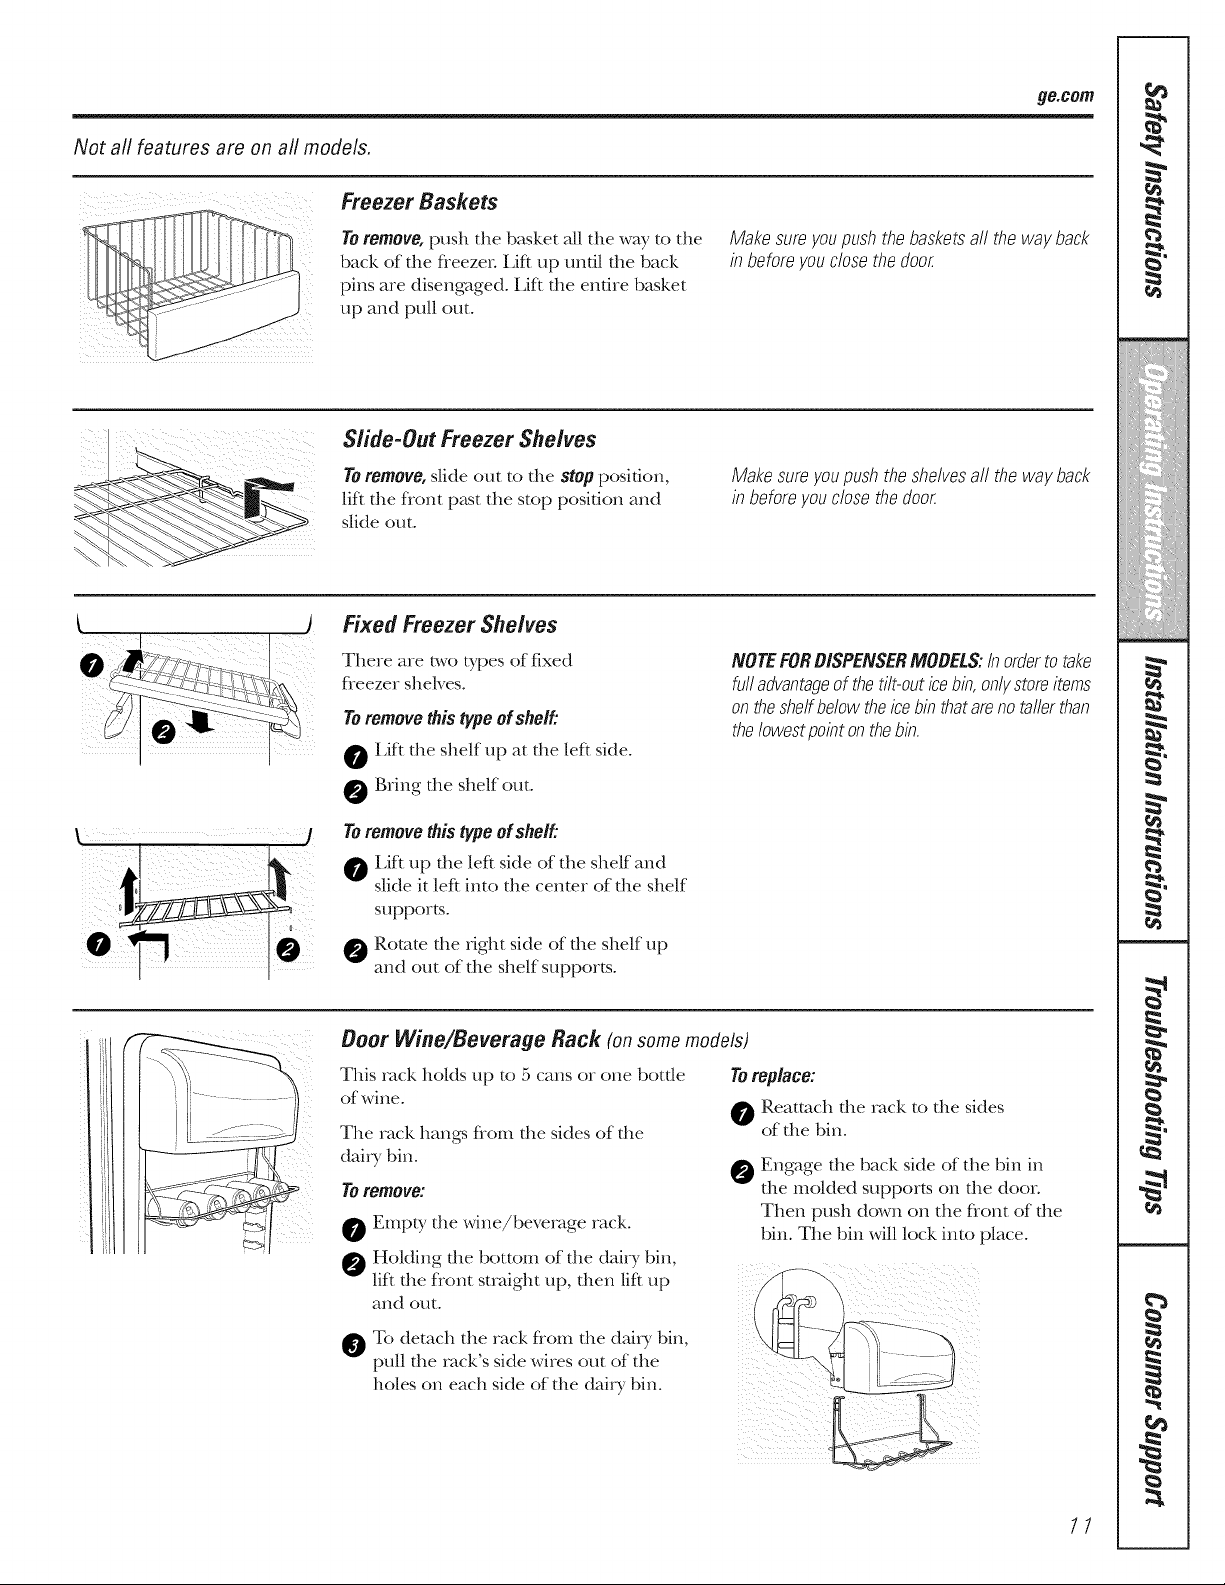
Freezer Baskets
Toremove,push the basket all the way to the
back of the fleeze_; LiR up undl the back
pins are disengaged. LiR the entire basket
up and pull out.
Makesureyoupushthebasketsall thewayback
in beforeyouclosethe door
¸¸7¸¸¸¸¸¸¸¸¸((;i
Slide-Out Freezer Shelves
Toremove, slide out to the StOpposition,
lif_ the flont p;kst the stop posidon and
slide out.
Makesureyoupushtheshelvesall theway back
in beforeyouclosethedoo_
Fixed Freezer Shelves
There are two types of fixed
fleezer shekes.
Toremovethistypeof shelf"
O Lift the shelf up at the left side.
O Bring the shelf out.
Toremovethistypeofshelf"
Lift up the left side of the shelf and
slide it left into the center of the shelf
supports.
Rotate the fight side of the shelf up
and out of the shelf supports.
NOTEFORDISPENSERMODELS."/nordertotake
fulladvantageof theti/tlOUticebin,onlystoreitems
onthesheffbelowtheicebin thatarenotallerthan
theIowestpointonthebin.
Door Wine/Beverage Rack (onsomemodels)
This rack hoMs up to 5 cans or one botde
of wine.
The rack hangs flom die sides of die
dab Tbin.
Toremove:
Emp[y the wine/beverage rack.
O Holding the bottom of the daicy bin,
lift the flont straight up, then lift up
and out.
O To detach the rack flom the daiD_bin,
pull the rack's side wires out of the
holes on each side of the daiW bin.
Toreplace:
O Reattach the rack to the sides
of the bin.
Engage the back side of the bin in
the molded supports on the door.
Then push down on the flont of the
bin. The bin will lock into place.
11
....,,,,<...............
!}il}{{_ii{iii'_i}_ii]}i}}ili_li!ii
iiiiiii!ii{il i i/ii l:
ea
i
g
w
u
w
_u
:l
'?:::111221:11
?2F'_IIIII'
ii_iilUiii{ii,i((i_
//iiiiiiiii_!_iiiii/
ML
Abouttherefrigeratordoors.
_ill i
i_il i
ill
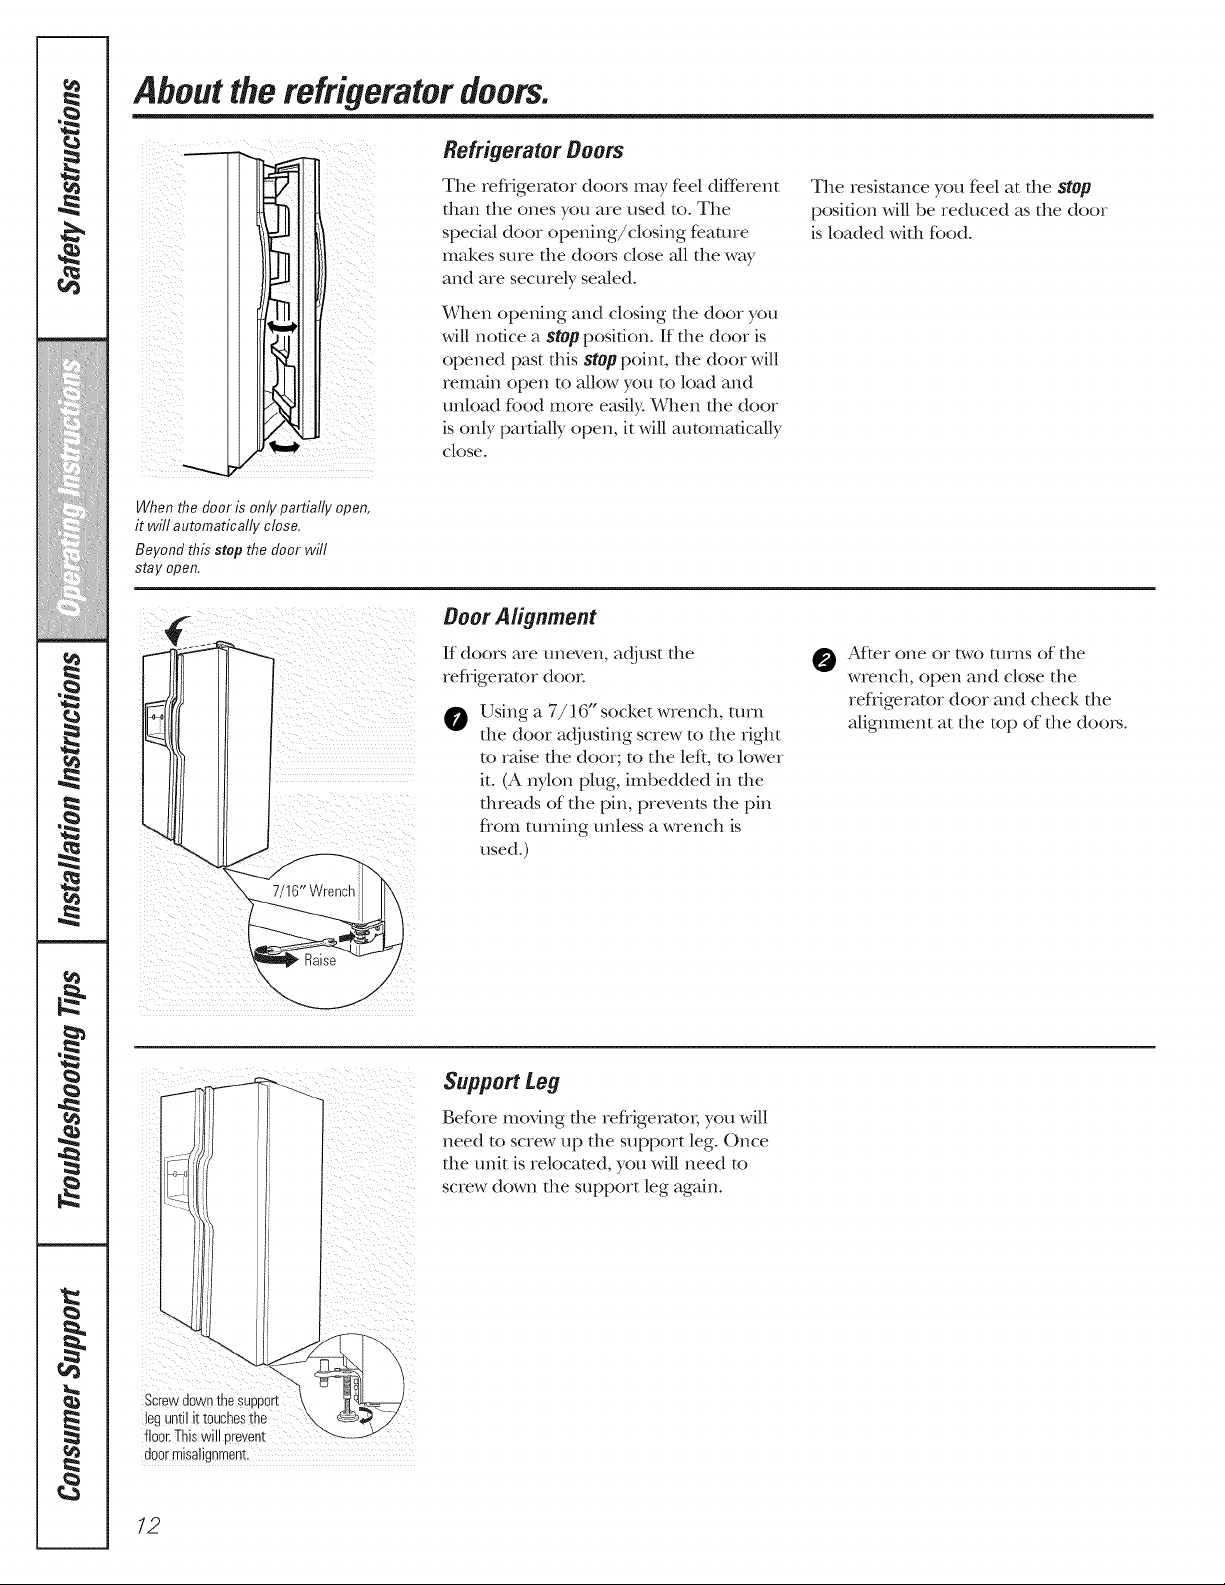
When the door is only partially open,
it will automatically close.
Beyond this stop the door will
stay open.
Re#igerator Doors
The refligemtor dooI_ may feel different
fllan the ones you are used to. The
special door opening/closing feature
makes sure the do(n_ close all the way
and are securely sealed°
When opening and closing d_e door you
will nodce a stop position. If the door is
opened past dfis StOppoint, tl_e door will
remain open to allow you to load and
unload K_od more easily° ¼,q_en fl_e door
is only parfiNly open, it will automaficNly
close°
The resistance you feel at the StOp
posidon will be reduced as the door
is loaded with foodo
Door Alignment
If doors are uneven, adjust the
refligerator door
Using a 7/16" socket wrench, mrn
the door adjusting screw to the right
to raise the door; to the left, to lower
it. (A nylon plug, imbedded in the
threads of the pin, prevents the pin
fiom turning unless a wrench is
used.)
@ After one or two turns of the
wrench, open and close the
refligerator door and check the
alignment at the top of the do(n_.
Support Leg
Before moving d_e refligemto_; you will
need to screw up the support leg. Once
the unit is relocamd, you will need to
screw down the support leg again.
doormisa!ignment.
12
Aboutthe crispers andpans. ge.com
Not all features are on all models.
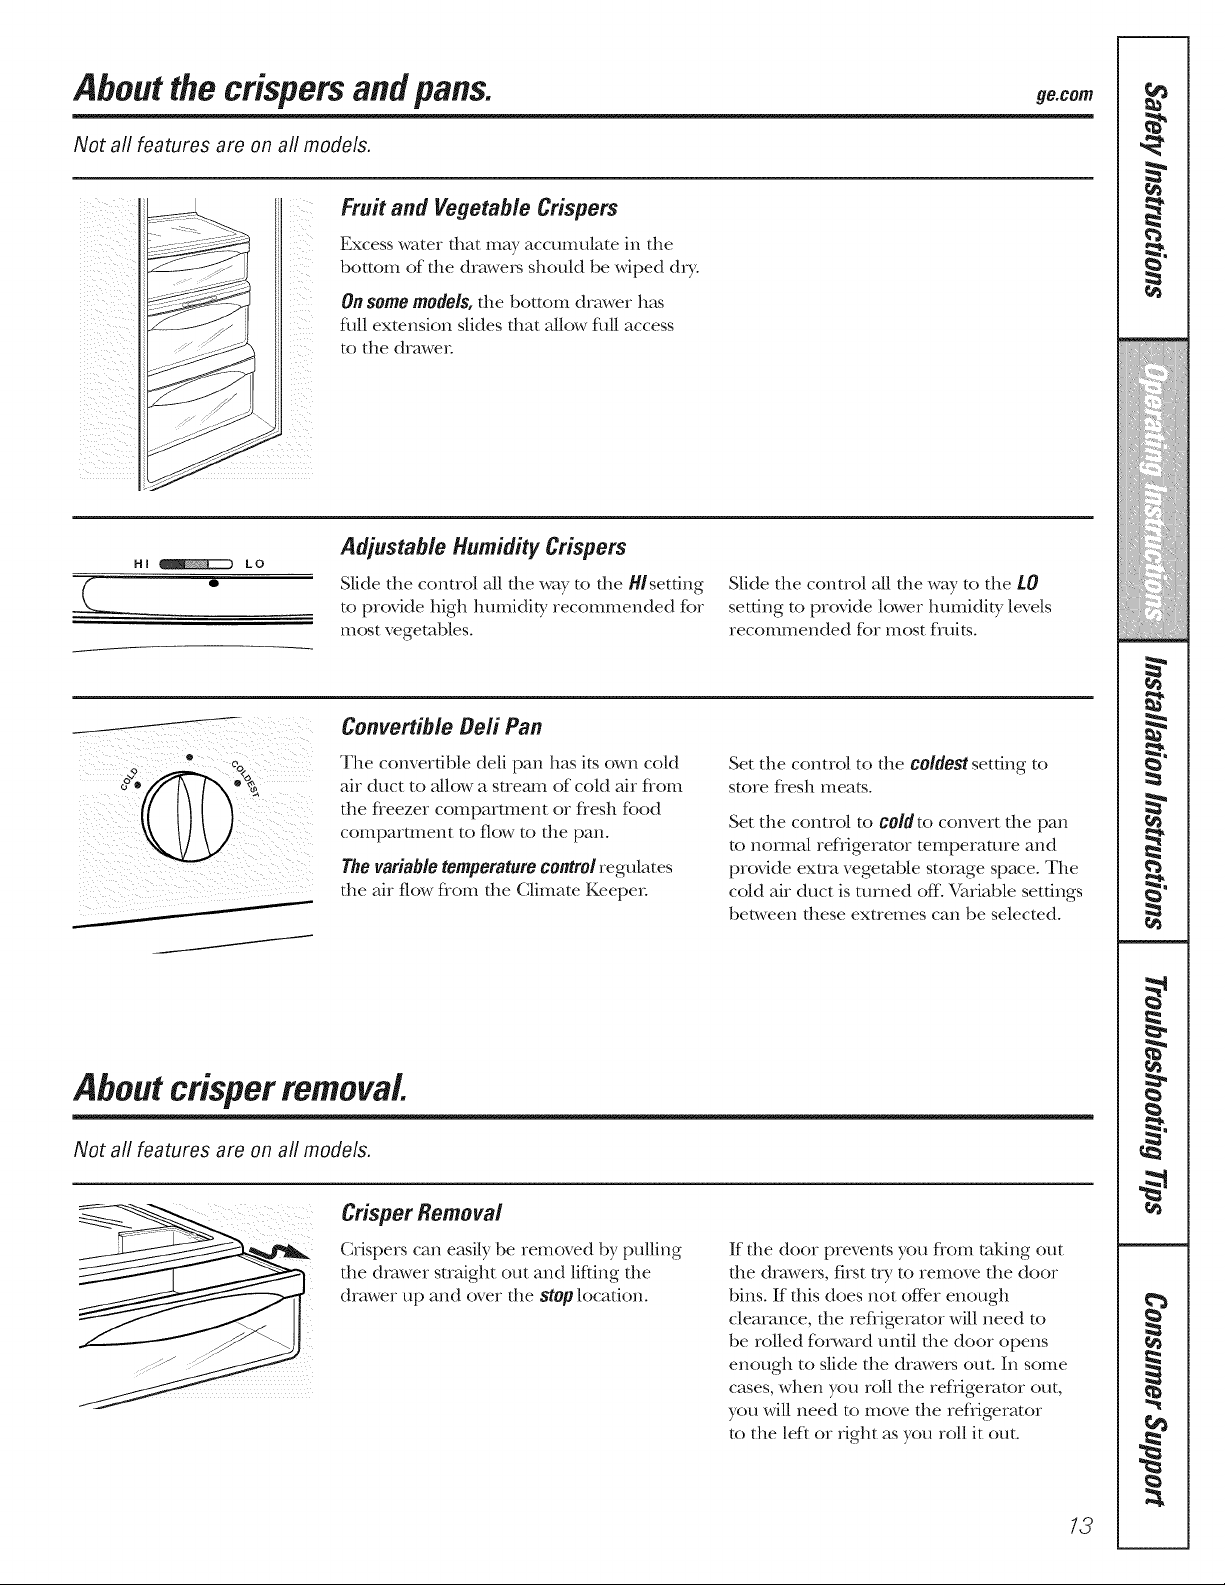
Fruit and Vegetable Crispers
Excess water that may accumulate in the
bottom of file draweI_ should be wiped dry.
On some models, file bottom drawer ]l_-k_
filll extension slides that allow filll access
to the drawer
HI _ LO
(
Adjustable Humidity Crispers
Slide the control all the way to the Hlsetfing
to provide high humidity recommended for
most vegetables.
Slide the control all the way to the LO
setting to provide lower humidity levels
reconmlended for most fluits.
ii!i/iiiiiiiii_i!iii_i_iii_!i iiii%11!iiiiiiiiiiiiiiiiiiiiilliiiiII
i _iii_i/iiiii_i}_iii_!i_ i _ii_ _
i i
Convertible Deft Pan
The com_ertible deli pan has its own caM
air duct to allow a stream of caM air flom
the fleezer compartment or flesh food
compartment to flow to the pan.
The variable temperature control regulates
the air flow flom the Climate Keeper
Set the control to the coldest setting to
store flesh meats.
Set the control to cold[o convert die pan
to nomml refligerator mmperamre and
provide extra vegetable storage space. The
cold air duct is turned off-\4uiable settings
between these extremes can be selecmd.
Aboutcrisperremoval.
Not all features are on all models.
Crisper Removal
Crispers can easily be removed by pulling
the drawer straight ()tit and lifting the
drawer zip and over the StOplocation.
If file door prevents you flom taldng ()tit
the draweI_, first try to remove the door
bins. If this does not of Ier enough
clearance, the refligerator will need to
be rolled forward until the door opens
enough to slide the draweI_ ()tit. In some
cases, when you roll the refligerator ()tit,
you will need to move [lie refligerator
to the left or right as you roll it ()tit.
13
....,,< ...............
!Hi!ii_iiiiii'_ii_iiiiij}ili_fi!ii
iiiiiii!iiiilii/iil_
ea
g
w
u
w
_u

?:::i:22:11
ii_iilUiii{iii{{i_
//iiiiiiiii_!_iiiii/
ML
Abouttheautomaticicemaker.
A newly installed refrigerator may take 12to 24 hours to begin making ice.
Automatic lcemaker
On dispensermodels,
to access ice or reach
thepower switch:
o Lift the bin, then pull it
forward until the bin stops.
o ower the bin to access ice
or reach thepower switch.
NOTE:/n order to take full advantage
of the tilt-out ice bin, only store items
on the shelf below the ice bin that
are no taller than the lowest point
on the bin.
The icemaker will produce seven cubes
per cycle--approximately 100-130 cubes
in a 24-hour period, depending on fleezer
coIIlpartlnent teIilperat/lie, iOOlil
Wmperamre, nmnber of door openings
and ofl_er use condiuons.
If fl_e refligemtor is operated before fl_e
water connection is made to fl_e icemake_;
set the power swimh in the OFFposifion.
_&,q_enthe refiigemtor has been connecmd
to the wamr supply, set the power switch to
the ON position.
The icemaJ<er will fill wiflt water when it
cools to 15°F (-10°C). A newly installed
refligemtor may rake 12 to 24 ]loui_ to begin
mNdng ice cubes.
You will hear a buzzing sound each dine
the icemaker fills with wamr.
Throw away the first few batches of ice to
allow the water line to clear
Be sure nothing interferes with the sweep
of the re.clef arm.
When file bin fills to file level of file feeler
arm, file icemaker will stop producing
ice. It is normal for several cubes to be
joined together
If ice is not used fiequently, old ice cubes
will become cloudy, tasm stale and shrink.
Special note about dispenser models:
Dispenser models have a tilt-out ice bin.
The bin can be dlmd out as shown in the
illustrations, and it will hold itself up
while you rake ice out or mrn the
icemaker power swimh on and (fie Be
sme to put the bin back in place before
closing the door
To restore your ice level from an empty
bucket stage, the following steps are
recommended:
12 hours after the fixer batch of ice
has fidlen into the bin, dispense
3 to 4 cubes.
After an additional 6 hours, dispense
3 to 4 cubes again°
These steps will restore your ice level
in the shortest amount of time.
Switch
o Lift the bin, then pull it
forward until the bin stops.
Removing ice Bin (dispensermodels)
CAUTION:Theice bin is heavywhenfull
Set the power switch to the OFFposition
before removing the bin.
When replacing the bin, be sure to press it
firefly into place. If it does not go all fire
way back, relilove it and romm the drive
mechanism 1/4 turn. Then push the bin
back again.
Drive
Dispenser Models only
o ift andpull forward again
to remove the bin.
14
About the ice and water dispenser.(onsome models)
ge. COrn
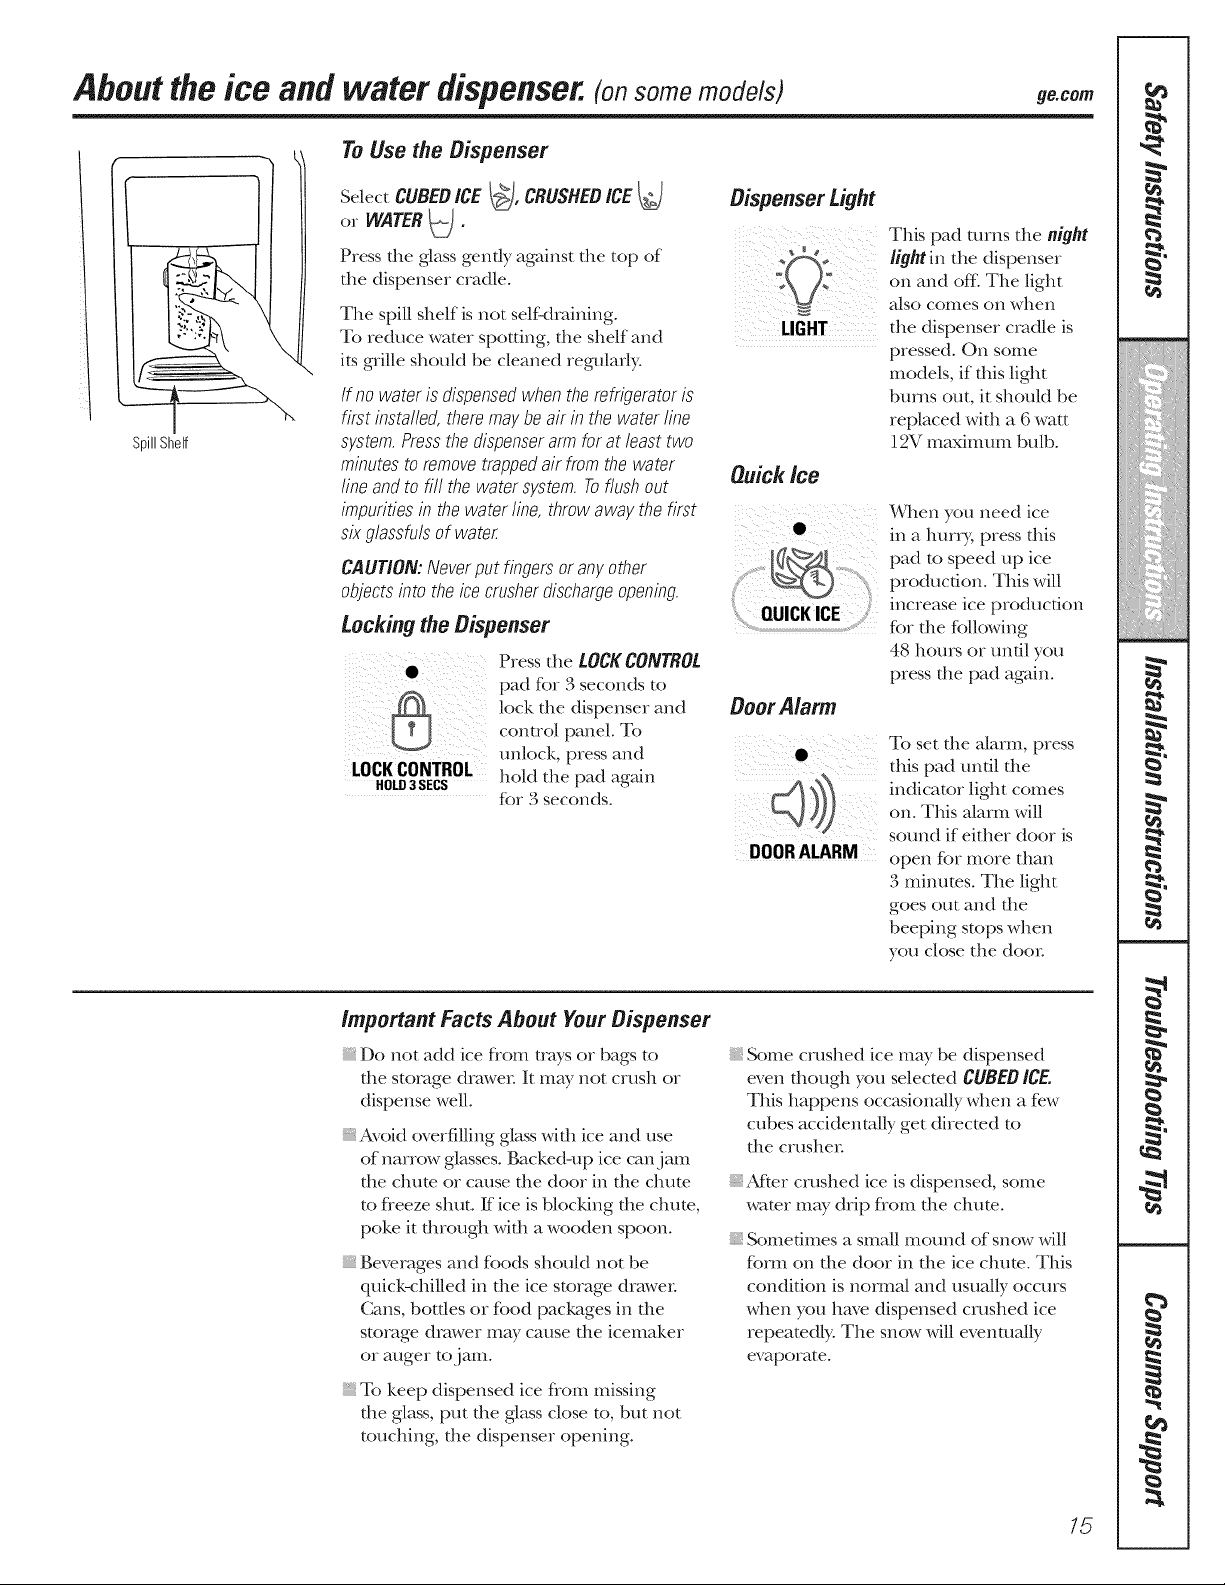
SpillShelf
To Use the Dispenser
SelectCUBEDICE!_),CRUSHEDICEI_)
Dispenser Light
WATER
OI"
_1.
Press the glass gently against the top of __*
:.@:"die dispenser cradle°
The spill shelf is not self:draining.
To reduce water spotdng, die shelf and LIGHT
its grille shoukt be cleaned regularly.
If no wateris dispensedwhentherefrigeratoris
first installed,theremaybe air in thewaterline
system.Pressthedispenserarmforat least two
minutesto removetrappedairfromthewater Quick lee
fineandto fi// the watersystem.Toflushout
impuritiesin the waterline, throwawaythefirst
sixglassfulsof wate_
CAUTION:Neverputfingersoranyother
objectsinto theicecrusherdischargeopening.
Locking the Dispenser
@ Press the LOCI(CONTROL
[_ padf_,,-:_seco,,dsto
lockthed_spe,,se,a,,d
co,,t,olp,,,el.To
unlock, press and
LOCKCONTROL hold the --a-Ia_a;n
HOLD3 SECS
b.,._
for 3 seconds.
This pad turns the night
fight in the dispenser
on and off: The light
also COllies on when
the dispenser cradle is
pressed. On some
models, if this light
burns out, it should be
replaced with a 6 watt
] 2X; IIl_tXiIIl/llIl bulb.
¼,qlen you need ice
@.. in a huriT, press this
¢_ p.dtospeed.p ice
: :} p,od.ct o. l, sw,1
QUICKICE increase ice production
fbr the fbllowing
48 hours or undl you
press the pad again.
Door A/arm
To set file alarm, press
this pad until the
o,,.This.1.,-.,win
sound if either door is
DOORALARM open for more than
3 minutes. The light
goes out and the
beeping stops when
you close the do(n:
/mportant Facts About YourDispenser
Do not add ice from trays or bags to
the storage drawer It may not crush or
dispense well.
Avoid overfilling glass widl ice and use
of narrow glasses. Backed-up ice can jam
the chute or cause the door in the chute
to fleeze shut. If ice is blocking the chum,
poke it through with a wooden spoon.
Beverages and foods should not be
quick-chilled in the ice storage drawer
Cans, bottles or food packages in the
storage drawer mW cause the icemaker
or auger tojam.
To keep dispensed ice flom missing
the glass, put the glass close to, but not
touching, the dispenser opening.
Some crushed ice may be dispensed
even dlough you selected CUBEDICE.
This happens occasionally when a fe.w
cubes accidentally get direcmd to
the crusher
After crushed ice is dispensed, some
water may drip fiom the chute.
Sometimes a small mound of snow will
form on tile door in the ice chum. This
condition is nox_na/and usually occurs
when you have dispensed crushed ice
repeatedly: The snow will eventually
evaporate.
/5
....,,,,<...............
!iil}{{_ii{iii'_i}_ii]}i}}ili_fi!ii
iiiiiii!ii{il_i_i/iil_
ea
w
u
w
_u
?:::I:IL2:::I
772'_iiiii'
ii_iilU}}}ii((i_
//iiiiiidiiiii/
ML
t:
Careandcleaningoftherefrigerator.
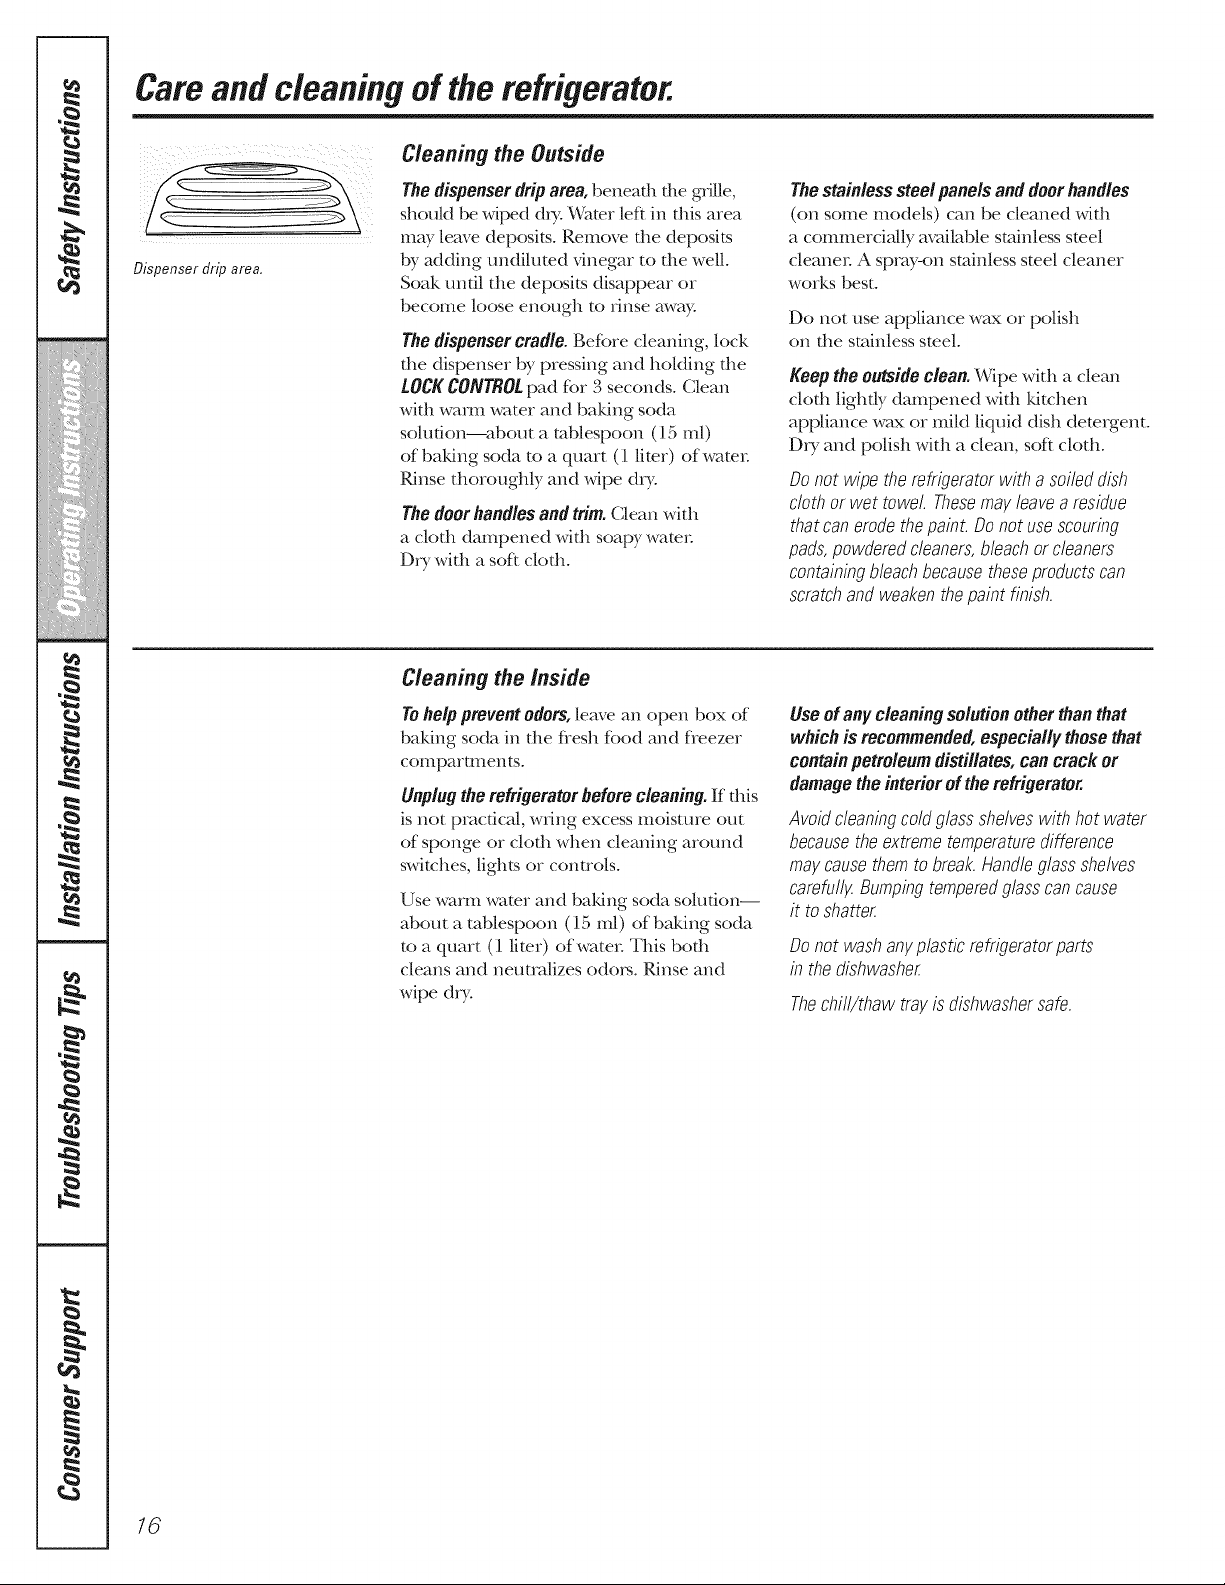
Dispenser drip area.
Cleaning the Outside
Thedispenserdriparea,beneath file gnille,
should be wiped dx T. _;ater left in fills area
may leave deposits. Remove file deposits
by adding undiluted vinegar to file well.
Soak until the deposits disappear or
become loose enough to rinse away.
Thedispensercradle.Before cleaning, lock
the dispenser by pressing and homing the
LOCKCONTROLpad for 3 seconds. Clean
with wam_ water and baking soda
solution--about a tablespoon (15 ml)
of baMng soda to a quart (1 liter) of wamr
Rinse thoroughly and wipe d,>
Thedoorhandlesandtrim.Clean with
a cloth dampened with soapy water
D_Twith a sol* clodL
The stainless steel panels and door handles
(on some models) can be cleaned wid_
a commercially available stainless steel
cleaner A spray-on stainless smel cleaner
works best.
Do not use appliance wax or polish
on the stainless steel.
Keep the outside clean. Wipe with a clean
clod_ lightly dampened wid_ kitchen
appliance wax or mild liquid dish demxgent.
Dry and polish with a clean, soR cloth.
Donotwipetherefrigeratorwith a soileddish
clothor wet towel Thesemayleavea residue
thatcanerodethepaint.Donotusescouring
pads,powderedcleaners,bleachorcleaners
containingbleachbecausetheseproductscan
scratchandweakenthepaintfinish.
Cleaning the Inside
Tohelppreventodors,leave an open box of
baking soda in the flesh food and fleezer
coI-_lpartlllents.
Unplugtherefrigeratorbeforecleaning.If d_is
is not practical, wring excess moisture out
of sponge or cloth when cleaning around
switches, lights or controls.
Use warm water and baking soda solution--
about a tablespoon (15 ml) of baking soda
to a quart (1 limr) of water This both
cleans and neumdizes od(n_. Rinse and
wipe dry.
Useof anycleaningsolutionotherthanthat
which is recommended,especiallythosethat
containpetroleumdistillates,can crack or
damagetheinteriorof therefrigerator.
Avoidcleaningcoldglassshelveswith hotwater
becausetheextremetemperaturedifference
maycausethemto break.Handleglassshelves
carefullgBumpingtemperedglasscancause
it toshatter
Donotwashangplasticrefrigeratorparts
in thedishwasher
Thechill/thaw trayisdishwashersafe.
/6
ge.com
Behind the Refrigerator
Be careflfl when mcMng file refligerator
away flom file wall. All types of floor
coverings can be damaged, particularly
cushioned coverings and those with
embossed surf_ces.
Pull the refligerator straight out and return
it to position by pushing it straight in.
Moving tile refligerator in a side direction
m_ result in damage to the floor covering
or refligerator
Whenpushingtherefrigeratorback,makesure
youdon't roll overthepower cordor icemaker
supplyline.
Preparing for Vacation
For long vacations or absences, reInove
food and unplug the refligeratoI: Clean the
interior with a baMng soda solution of one
tablespoon (15 till) of baMng soda to one
quart (1 limr) of water Leave tile doo_s
open.
Set the icemaker power switch to tile OFF
position and shut off tile water supply to
tile reflJgerator
If die temperature can drop below fleezing,
have a qualified servicer drain tile water
supply system to prevent serious proper b,
damage due to flooding.
Preparing to Move
Secure all loose items such as shelves and
drawers by roping them securely in place
to prevent damage.
When using a hand truck to move file
refligeratoi; do not rest the flont or back
of the refligemtor against the hand truck.
This could damage the reflJgerator Handle
only flom tile sides of tile refligemtor
Besuretherefrigeratorstaysinanupright
positionduringmoving.
17
....,,,,<...............
!}il}{{_ii{iii'_i}_ii]}i}}ili_fi!ii
iiiiiii!ii{il i i/ii l:
g
w
u
w
_u
?:::I:IL2:::I
772'_i]]]]'
ii_iiliii?{{{iii{(i_
//iiiiiidiiiii/
ML
t:
Replacingthelightbulbs.
Setting the controls to OFFdoes not remove power to the light circuit.
ReveaP appliance bulbs are used on some models. They can be identified by their blue color when they
are not illuminated.
Not aft features are on aft models.
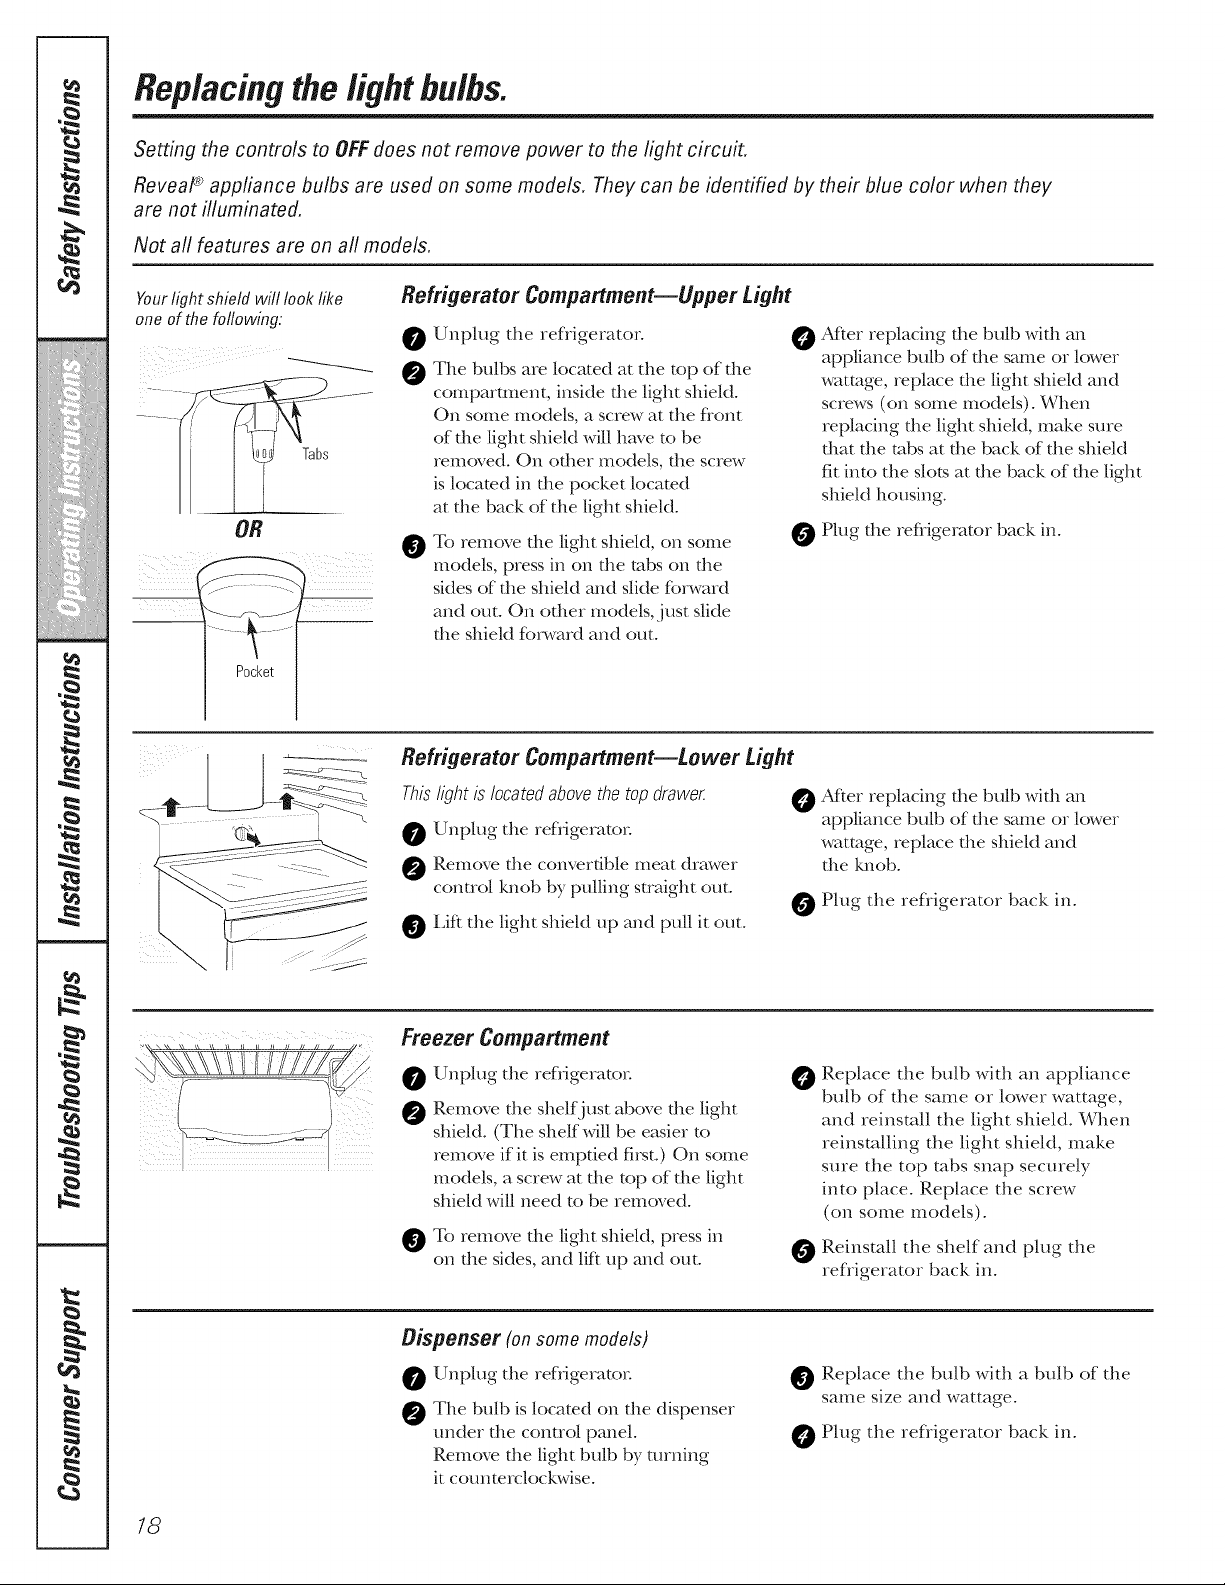
Yourlight shield will look like
one of the following."
Tabs
OR
f .....
/_¸.¸ ........ -.
Pocket
Refrigerator Compartment--Upper Light
0
0
@
Unplug the refrigerator.
The bulbs are located at the top of file
compartment, inside file light shield.
On some models, a screw at the flont
of file light shield will have to be
removed. On ofl_er models, fl_e screw
is located in fl_e pocket located
at rite back of the light shield.
To remove fl_e light shield, on some
models, press in on the tabs on the
sides of the shield and slide fbrward
and out. On other models, just slide
the shield fbn, vard and out.
O After replacing d_e bulb wid_ an
appliance bulb of d_e same or lower
wattage, replace the light shield and
screws (on some models). When
replacing the light shield, make sure
that the tabs at the back of the shield
fit into the slots at the back of the light
shield housing.
Plug the refligerator back in.
Refrigerator Compartment--tower Light
This light is located above the top drawe_
Unplug the reflJgerato_:
@ Remove the convertible meat drawer
conuol knob by pulling straight out.
Lift the light shield up and pull it out.
After replacing the bulb with an
appliance bulb of the same or lower
wattage, replace the shield and
the knob.
Plug the refligerator back in.
Freezer Compartment
0
0
Unplug the reflJgerator
Remove dte shelfj us[ above dte light
shield. (The shelf will be easier _o
rernove if it is emptied fi_t.) On some
models, a screw at the top of the light
shield will need to be removed.
O To remove the light shield, press in
on the sides, and lift up and out.
Replace the bulb wkb an appliance
bulb of the same or lower wattage,
and reinstall the light shield. When
reinstalling the light shield, make
sure the top tabs snap securely
into place. Replace the screw
(on some models).
O Reinstall the shelf and plug the
refrigerator back in.
Oispenser (onsome models)
Unplug the reflJgerato_:
The bulb is located on the dispenser
under the control panel.
Remove the light bulb by turning
it counterclockwise.
Replace the bulb with a bulb of the
same size and wattage.
Plug the refligerator back in.
/8

Trimkits anddecoratorpanels.
For CustomStyle"_models
Read these instructionscompletely and carefully.
Before YouBegin
Some models are equipped with trim kits that aflow you to instafi door panels. You can order
pre-cut black, white, bisque or stainless steel decorator panels from GE Parts and Accessories,
800.626.2002,or you can add wood panels to match your kitchen cabinets.
Panels less than I/4" (6 ram) thick
When installing wood panels less than 1/4" (6 ram) dlick, you need to create a filler panel, such as
1/8" cardboard, fllat will fit between file fitce of the door and file wood panel. If you are installing
file pre-cut decorator panels, pre-cut filler panels are included in file ldt. The combined fldckness
of the decorator or wood panel and file filler panel should be 1/4" (6 ram).
Panels1/4"thickorless
1/4" max
3/4" (19ram)or Raised Panel
A raised panel design screwed or glued to a 1/4" (6ram) thick backing, or a 3/4" (119ram) routed board
can be used. The raised portion of the panel must be fldxicated to pemdt clearances of at le_kst2" (5.1 cm)
flom the handle side for fingertip clearance.
Panels thicker than 1/4" (6 ram), up to 3/4" (19 ram) max, will require that the outer 5/16" (8 ram) of
panel perimeter be no thicker than 1/4" (6 ram).
Weightlimitationsfor custompanels.
FreshFood38Ibs.(17kg)max.
FreezerDoor28Ibs.(13kg)max.
Panelsthickerthan1/4"(6mm)
1/4"(6mm)
ThickRacking
5/16"(8ram)
1/4" (6mm)max
3/4"(19 mm)
p"
2"(5.1 cm)
Clearance
HandleSide
Appearance
Panel
(19mm)
Refrigerator
Door
19
m
8"
i!iiii!iii_!iiii_J[iiiiii!
]II':F.:::::::I]!!!!1!!:
....::,,27_::::::::_
!li;{!li;{i!iiii!li;
M_
1::
m
w
Trimkits anddecoratorpanels.
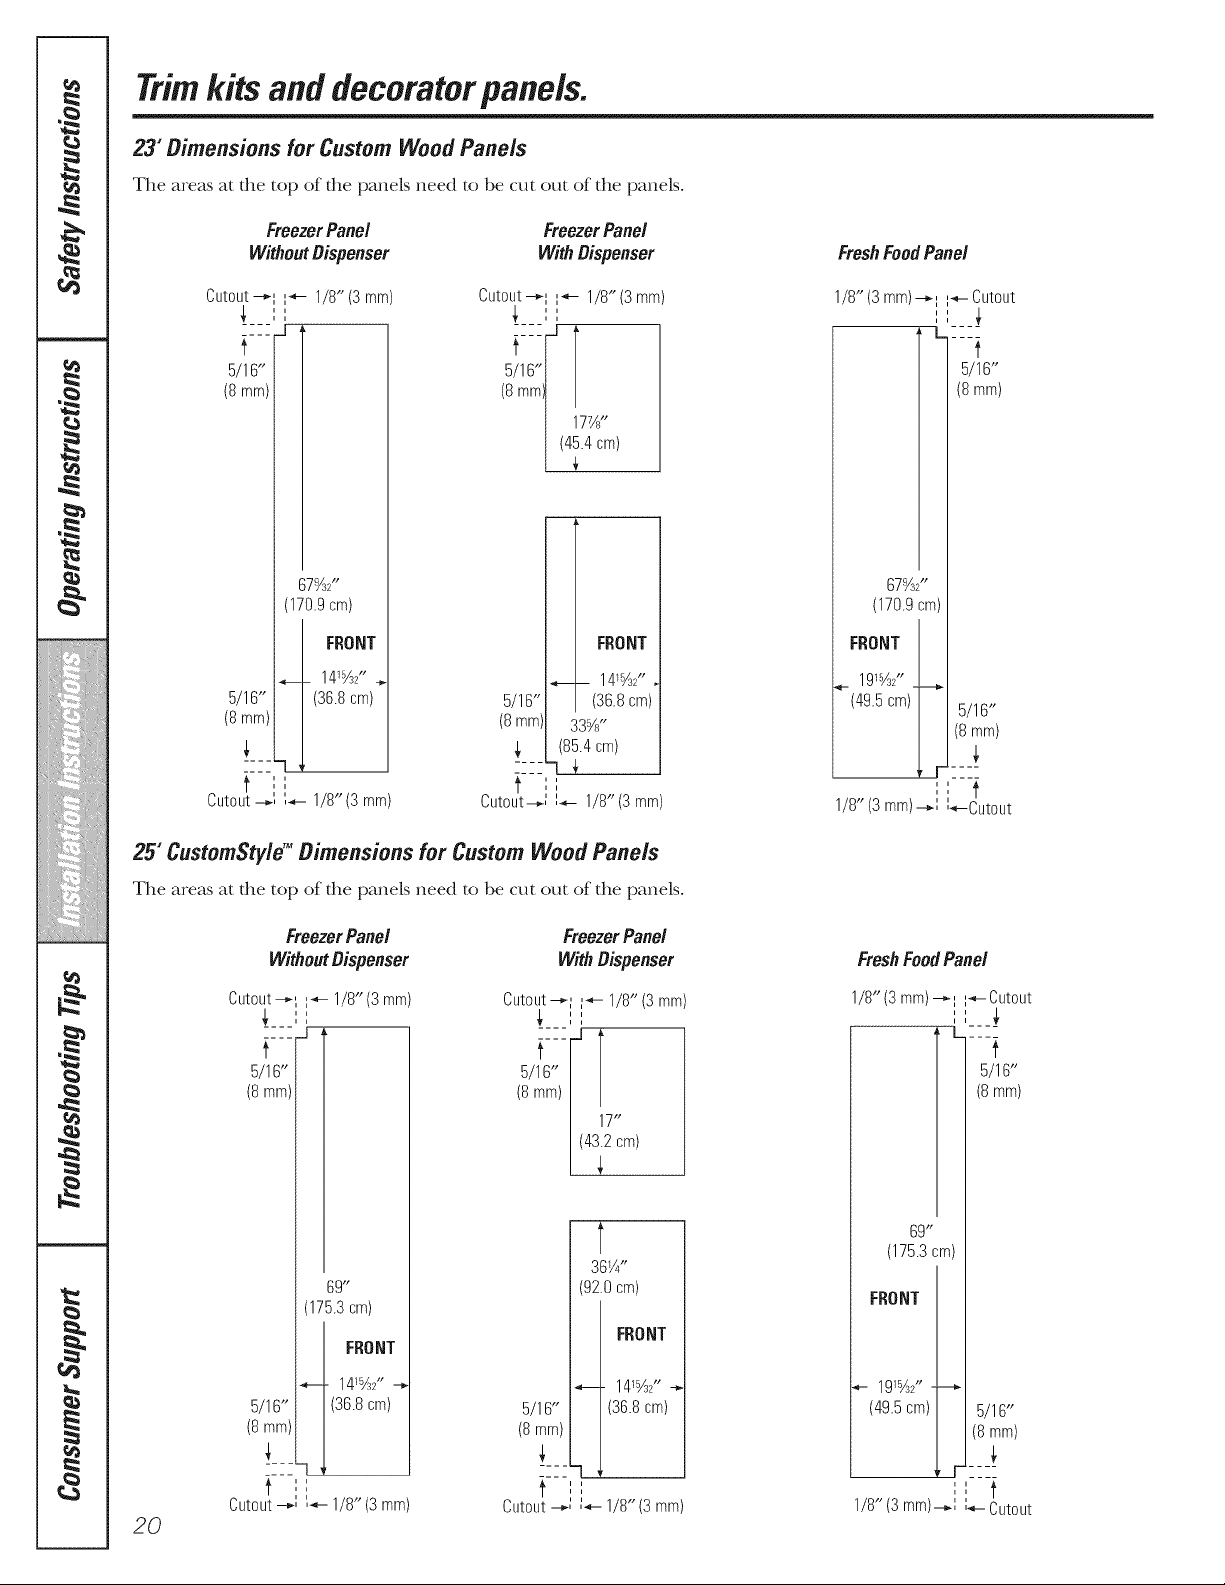
23" Dimensions for Custom Wood Panels
The areas at the top of the panels need to be cut out of the panels°
FreezerPanel
WithoutDispenser
FreezerPanel
WithDispenser
Cutout--_ ,,_'- 1/8" (3 mm)
1 i
.... _]
f
5/16"
(8 mm)
67%/'
(170.9 cm)
FRONT
,__ 1415_2" __
5/16" (36.8 cm)
(8 mm)
:::: I"
f II',
Cutout ',_-- 1/8" (3 ram)
Cutout-_ ,,_- 1/8"(3mm)
______ _
.... J
f
5/16"
(8 mm
17W'
(45.4cm)
FRONT
- 14_%/".
5/16" (36.8cm)
(8 mm', 33%"
,_ (85.4cm)
:::: 1 f
f ',',
Cutout--_l ',_- 1/8"(3 mm)
25"CustomStyleTM Dimensions for CustomWood Panels
The areas at die top of die panels need _o be cu[ ou_ of _he panels°
FreezerPanel
WithoutDispenser
FreezerPanel
WithDispenser
Cutout--,. V'- 1/8"(3 mm)
___1 I
.... J
f
5/16"
(8 mm)
69"
(175.3 cm)
FRONT
_--. 141%2"
5/16" (36.8 cm)
(8 mm)
:::_ 1 ,
f ',',
Cutout --_', ',_- 1/8" (3 mm)
Cutout--_i i_- 1/8" (3 mm)
',',
mmtI I
I 17"
1(43i2cm)
t
36W'
(92.0 cm)
FRONT
_. 141_/'
5/16" (36.8 cm)
(8 mm)
f ',',
Cutout __,.II_- 1/8" (3 mm)
20
FreshFoodPanel
1/8"(3 mm)--_,, ,,_- Cutout
',',
L ....
t
5/16"
(8 mm)
67%2"
(170.9 cm)
FRONT
(49.5 cm)-
5/16"
(8 mm)
F ....
',i t
1/8" (3 mm)--_', '_-Cutout
FreshFoodPanel
1/8" (3 mm) --_,, l_-Cutout
,'
i i
, L ....
f
5/16"
(8 mm)
69"
(175.3 cm)
FRONT
_- 191%2" ----_
(49.5 cm) 5/16"
(8 ram)
r r ....
',', f
1/8"(3 rnrn)--,.', "_- Cutout
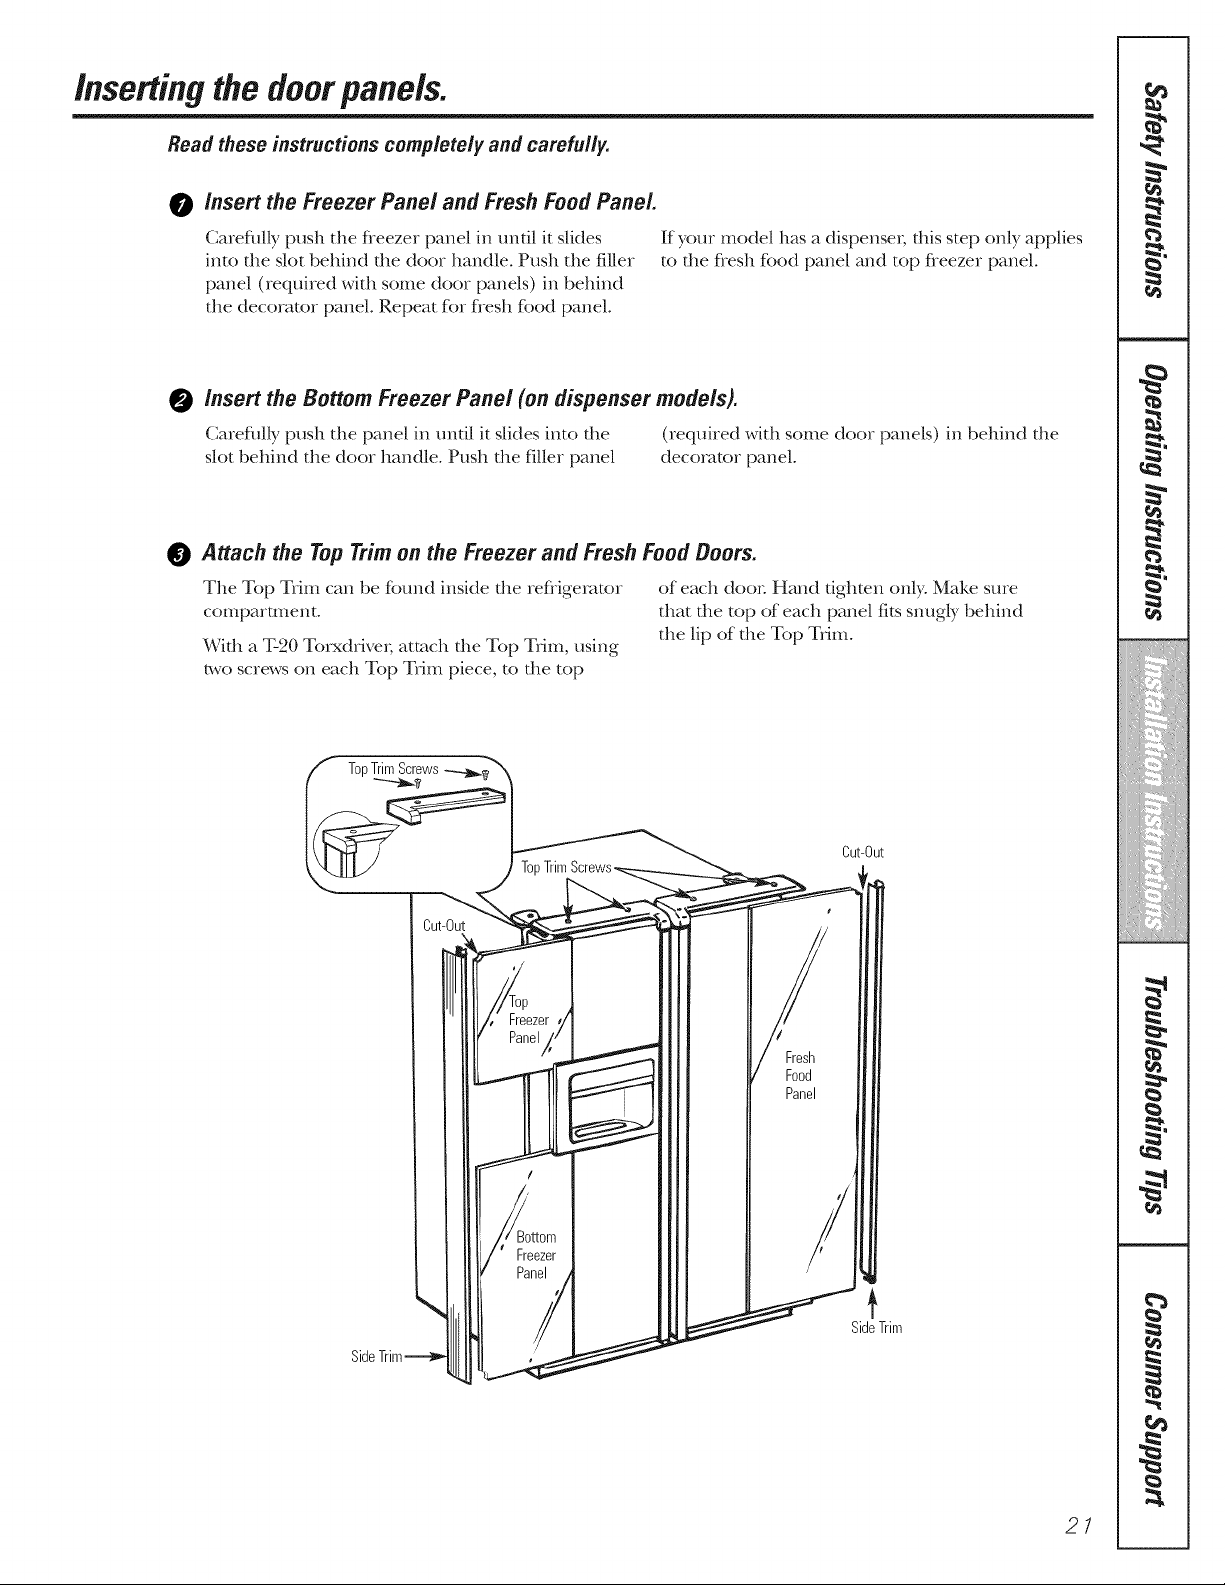
Insertingthedoorpanels.
Read these instructions completely and carefully.
0 Insert the Freezer Panel and Fresh Food Panel.
Caxefiflly push the fleezet panel in until it slides
into the slot behind the doo, handle. Push the filler
panel (,equired with some doo, panels) in behind
the decorator panel. Repeat fbr flesh food panel.
If you, model has a dispenser; this step only applies
to the flesh food panel and top fleezer panel.
0 Insert the Bottom Freezer Panel (on dispenser models).
Caxefiflly push the panel in until it slides into the (xequiFed with some door panels) in behind the
slot behind the door handle. Push the filler panel decorator panel.
0 Attach the TopTrimon the Freezer and FreshFood Boors.
The Top THIn can be found inside the refligemtor of each do(m Hand tighten only. Make su_e
comparmlent, that the top of each panel fits snugly behind
_ . the lip of the Top THIn.
With a T-20 T_,xdrlve,; attach the Top THIn, using
two screws on each Top THIn piece, to the top
TopTrim Screws
Cut-Out
Cut-Out
Panel
Fresh
Food
Panel
+
SideTrim
21
m
i!i]ii!iii_!iiii_i[iiiiii!
III'?I:L:IS!:
....E?IjI:I_
iiiiii'%}ib:@_Ti
/!iii4Zi'ii,_,i_i{
!li;{!li;ii!iiii!li;
M_
't=
m
w
e,
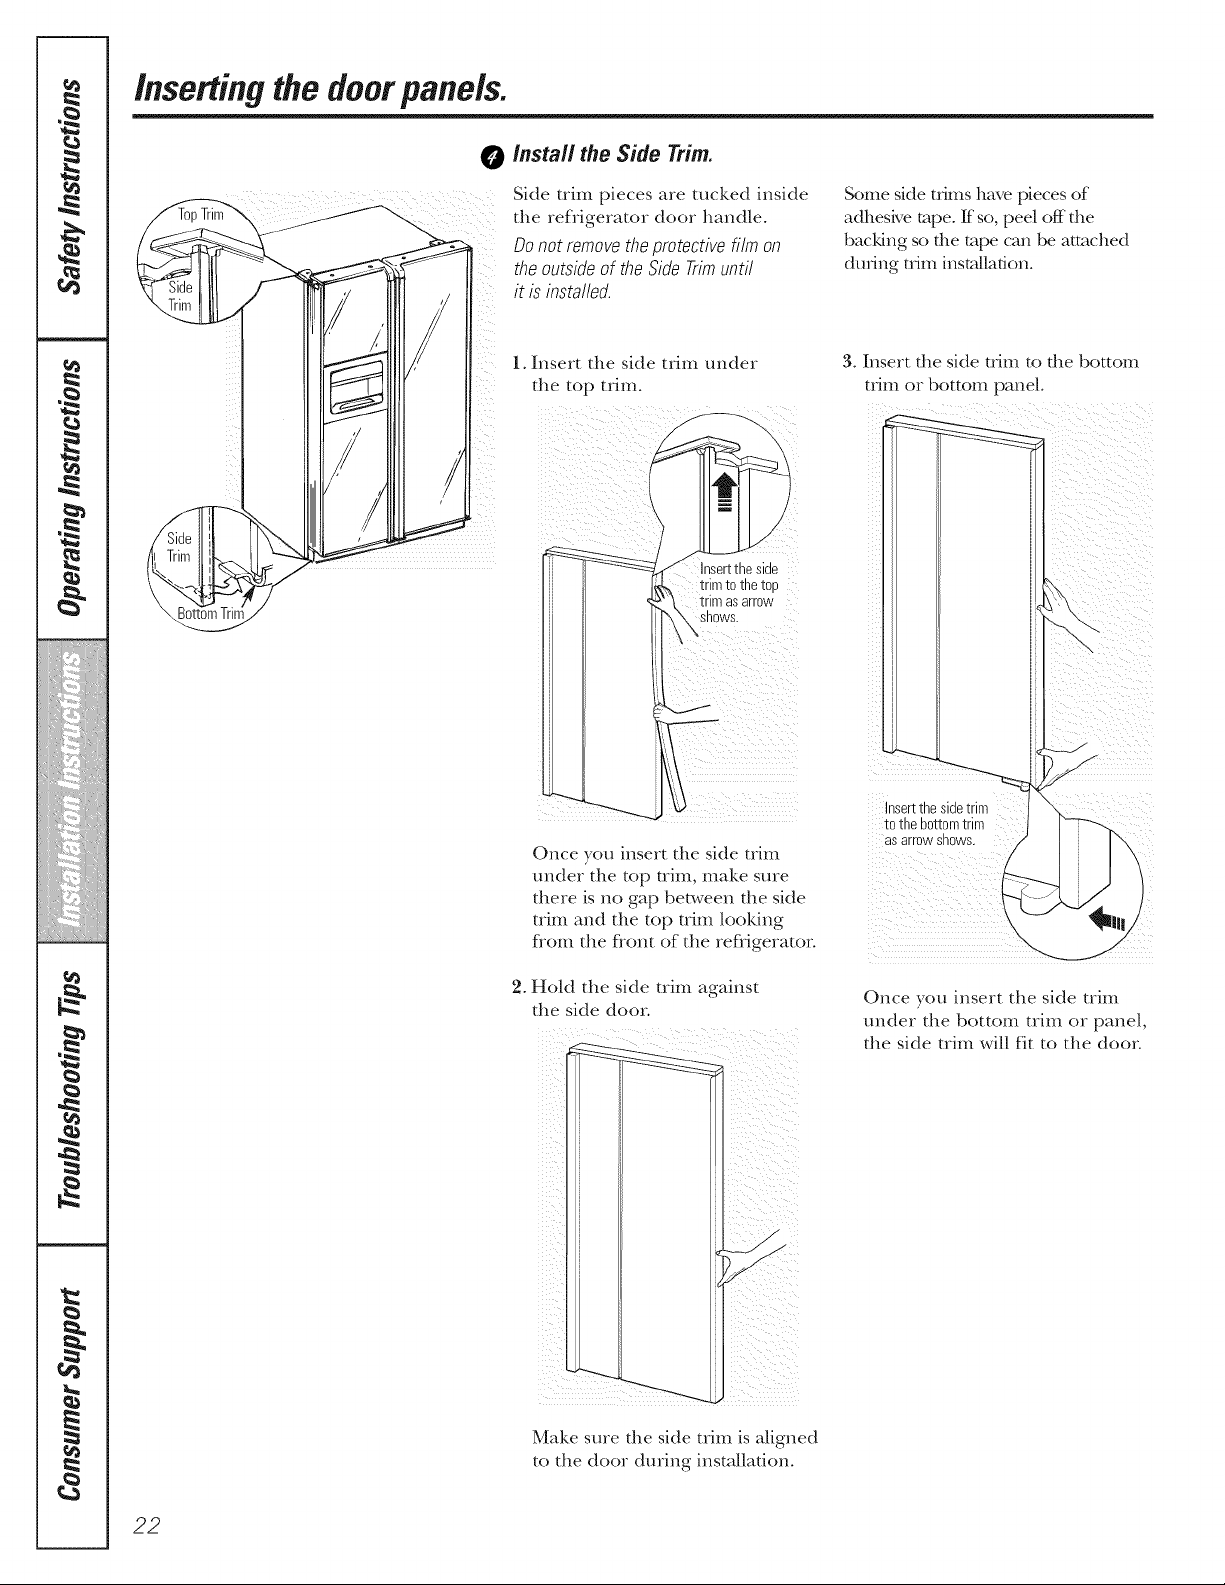
Insertingthedoorpanels.
O Install the Side Trim.
Side [rim pieces are rocked inside
the cefligerator door handle.
Dono:remove:neoro:ecdvefilm on
meoutsideof theSideTrim_nti,
i_is nstalled.
I.Insert the side nim under
the top trim.
J \
inserttheside
trim to the to[
,_,xmm asarrow
shows.
Some side uims have pieces of
adhesive tape. ff so, peel off d_e
bacldng so fl_e tape can be attached
during trim installation.
3. Insert the side trim to the bottom
trim or bottom panel.
Once, ou insert the side trim
under the top uim. make sure
there is no gap between d_e side
trim and the top aim looking
flom the flont of the refligeraton
2. Hold the side trim against
the side dooi.
insert thesidetrim
tothe bottomtrim
asarrowshows.
Once you insert the side trim
under the bottom trim or panel,
the side trim will fit to the door.
Make sure the side trim is aligned
to the door during installation.
22
I
stall ti
structi
Refri rator
Models 23, 25, 26, 27 & 29
Questions? Call 800.GE.CARES (800.432.2737) or Visit our Website at: go.corn
in Canada, call 1.800.561.3344 or Visit our Website at: geappliances.ca
BEFORE YOU BEGIN
Read these instructions completely
and carefully.
• IMPORTANT - Savethese
instructions for local inspector's use.
° IMPORTANT - Observeall
governing codes and ordinances.
• Note to Installer- Be sure to leave these
instructions with the Consumer.
Note to Consumer - Keep these
instructions for future reference.
• Skill level - Installation of this appliance
requires basic mechanical skills.
• Completion time- Refrigerator Installation
30 minutes
Water Line Installation
30 minutes
Proper installation is the responsibility of
the installer.
,, Product failure due to improper installation
is not covered under the Warranty.
If the refrigerator has already been installed,
remove the base grille (see Step 2 in Moving
the Refrigerator), then skip to Step 5 in
Installing the Refrigerator.
PREPARATION
WATER SUPPLY TO THE ICEMAKER
If the refrigerator has an icemaker, it will have
to be connected to a cold water line. AGE
water supply kit (containing tubing, shutoff
valve, fittings and instructions) is available at
extra cost from your dealer, by visiting our
Website at go.corn (in Canada at
geappliances,ca) or from Parts and
Accessories, 800.626.2002 (in Canada
1.800.661.1616).
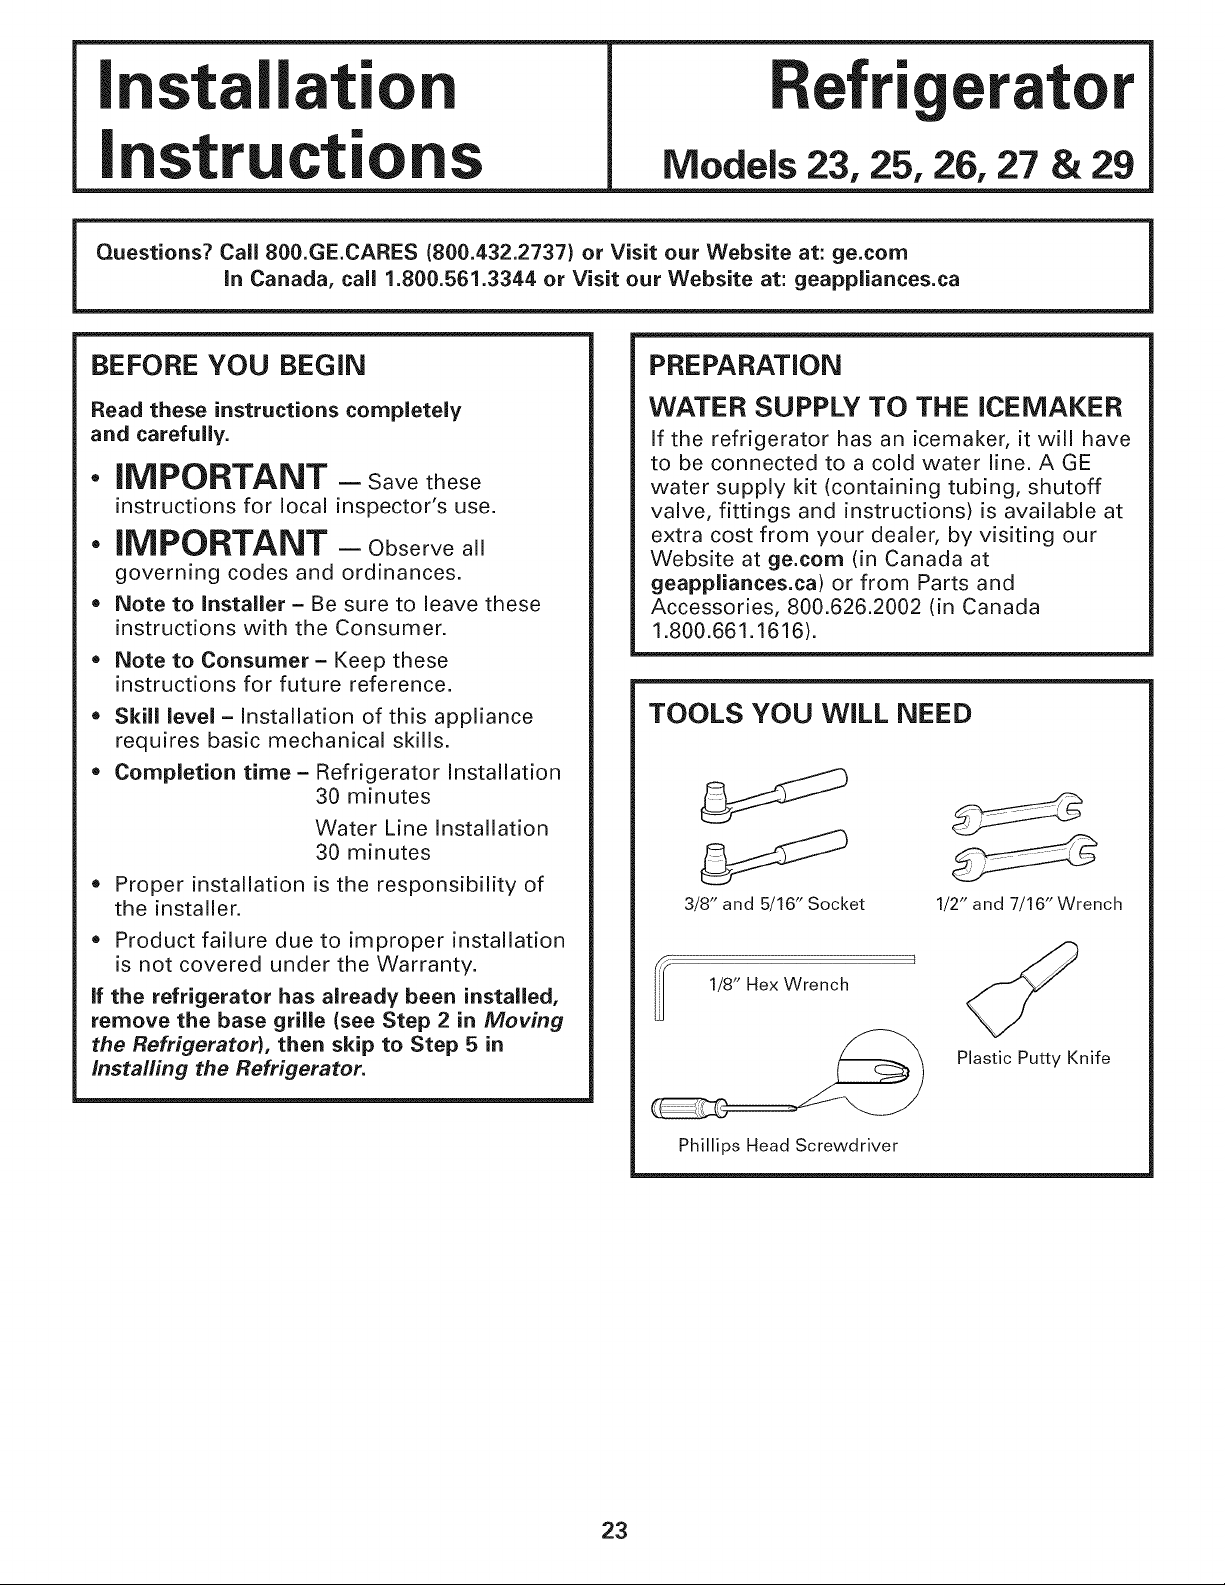
TOOLS YOU WILL NEED
3/8" and 5/16" Socket
1/8" Hex Wrench
1/2" and 7/16" Wrench
U
Plastic Putty Knife
Phillips Head Screwdriver
23
Installation instructions
MOVING THE REFRIGERATOR
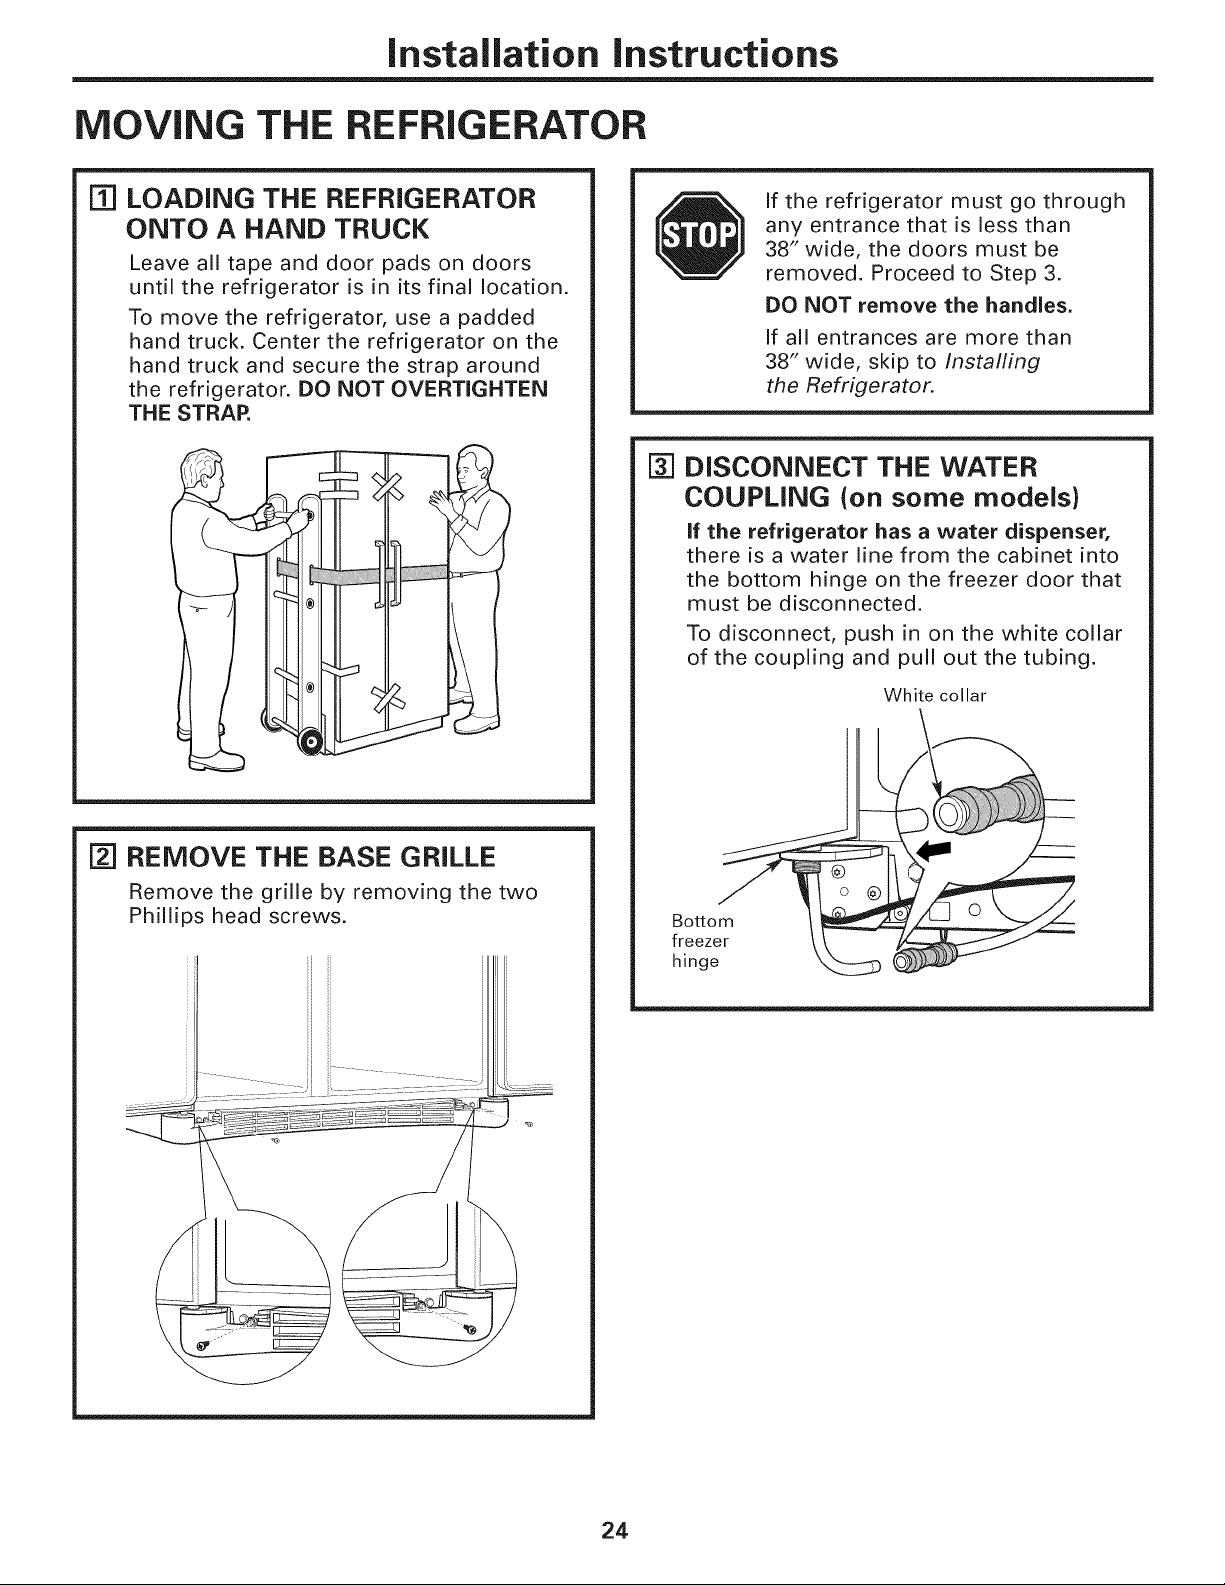
Fq LOADING THE REFRIGERATOR
ONTO A HAND TRUCK
Leave all tape and door pads on doors
until the refrigerator is in its final location.
To move the refrigerator, use a padded
hand truck. Center the refrigerator on the
hand truck and secure the strap around
the refrigerator. DO NOT OVERTIGHTEN
THE STRAP.
I_1REMOVE THE BASE GRILLE
Remove the grille by removing the two
Phillips head screws.
ii
ii
ii
If the refrigerator must go through
any entrance that is less than
38" wide, the doors must be
removed. Proceed to Step 3.
DO NOT remove the handles.
If all entrances are more than
38" wide, skip to Installing
the Refrigerator.
F3-]DISCONNECT THE WATER
COUPLING (on some models)
If the refrigerator has a water dispenser,
there is a water line from the cabinet into
the bottom hinge on the freezer door that
must be disconnected.
To disconnect, push in on the white collar
of the coupling and pull out the tubing.
White collar
Bottom
freezer
hinge
24
Installation instructions
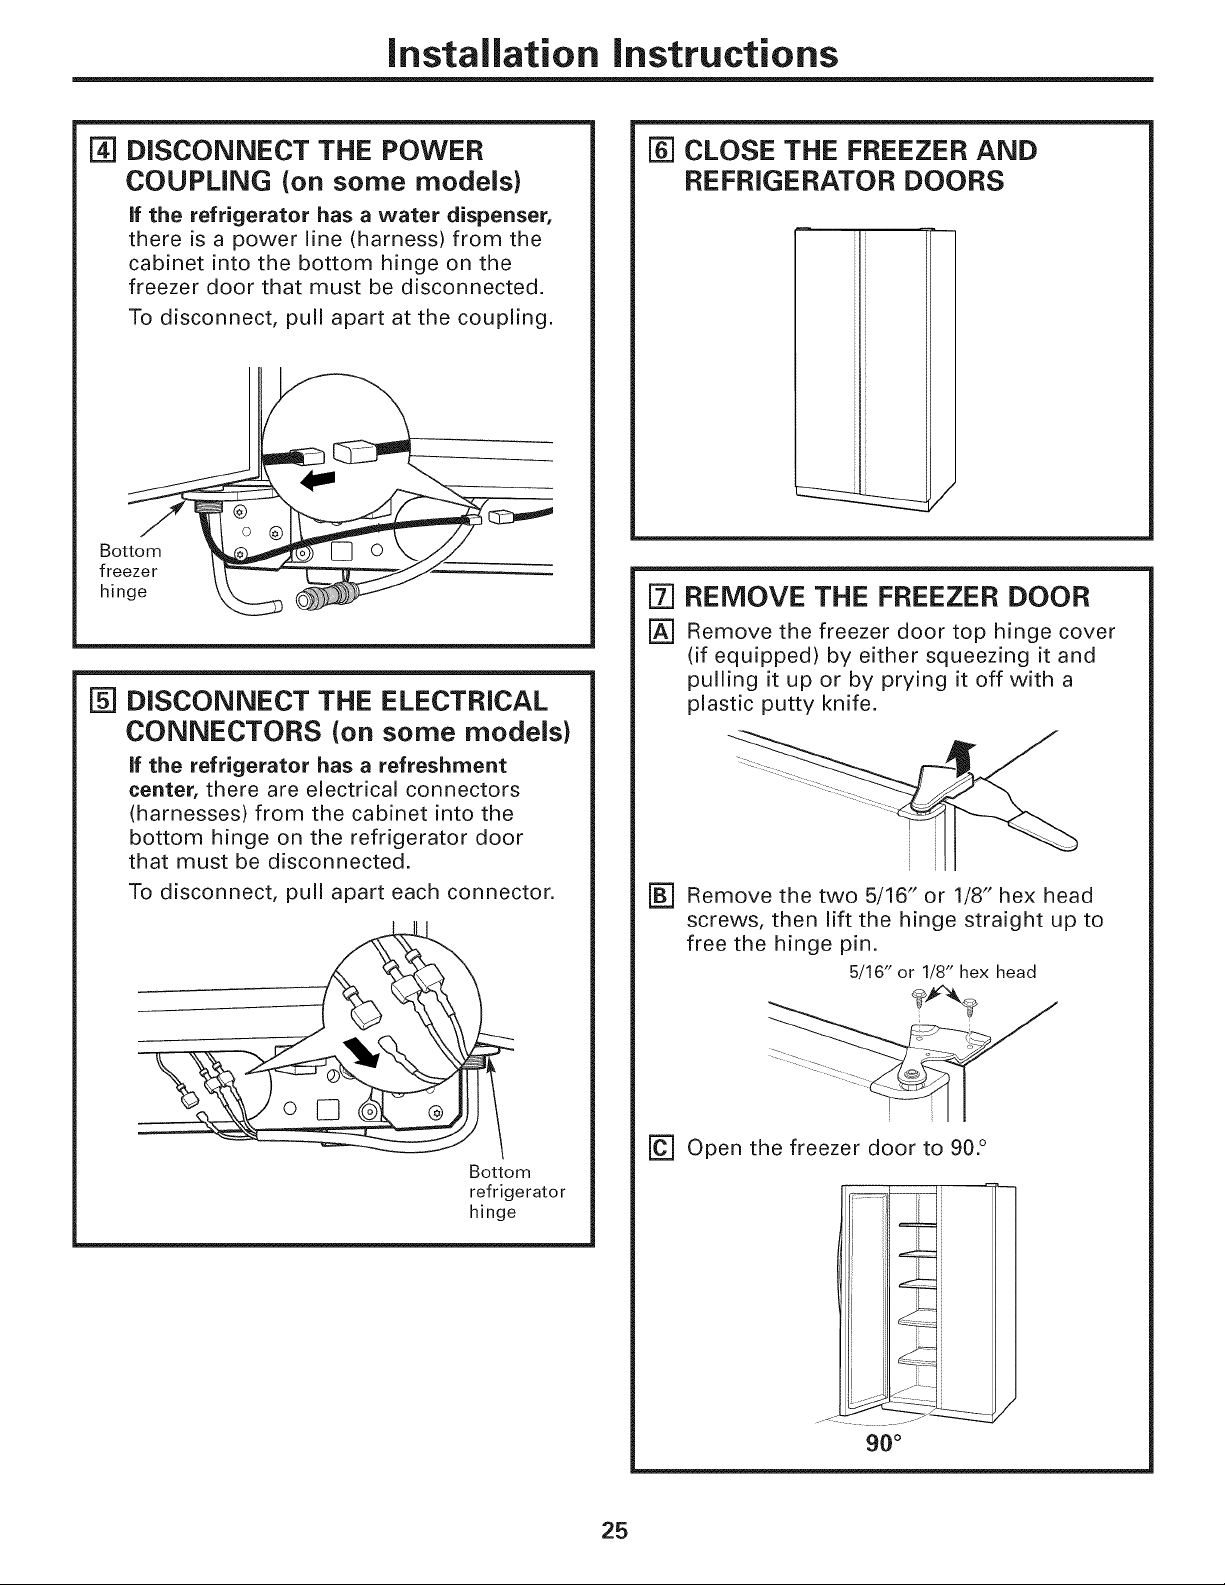
I_1DISCONNECT THE POWER
COUPLING (on some models)
if the refrigerator has a water dispenser,
there is a power line (harness) from the
cabinet into the bottom hinge on the
freezer door that must be disconnected.
To disconnect, pull apart at the coupling.
F5-1DISCONNECT THE ELECTRICAL
CONNECTORS (on some models)
if the refrigerator has a refreshment
center, there are electrical connectors
(harnesses) from the cabinet into the
bottom hinge on the refrigerator door
that must be disconnected.
To disconnect, pull apart each connector.
Bottom
refrigerator
hinge
[] CLOSE THE FREEZER AND
REFRIGERATOR DOORS
[] REMOVE THE FREEZER DOOR
r_ Remove the freezer door top hinge cover
(if equipped) by either squeezing it and
pulling it up or by prying it off with a
plastic putty knife.
[] Remove the two 5/16" or 1/8" hex head
screws, then lift the hinge straight up to
free the hinge pin.
5/16" or 1/8" hex head
[] Open the freezer door to 90. °
r
f _
i i
/ jj'_ i
90 °
25
Installation instructions
MOVING THE REFRIGERATOR (CONT.I
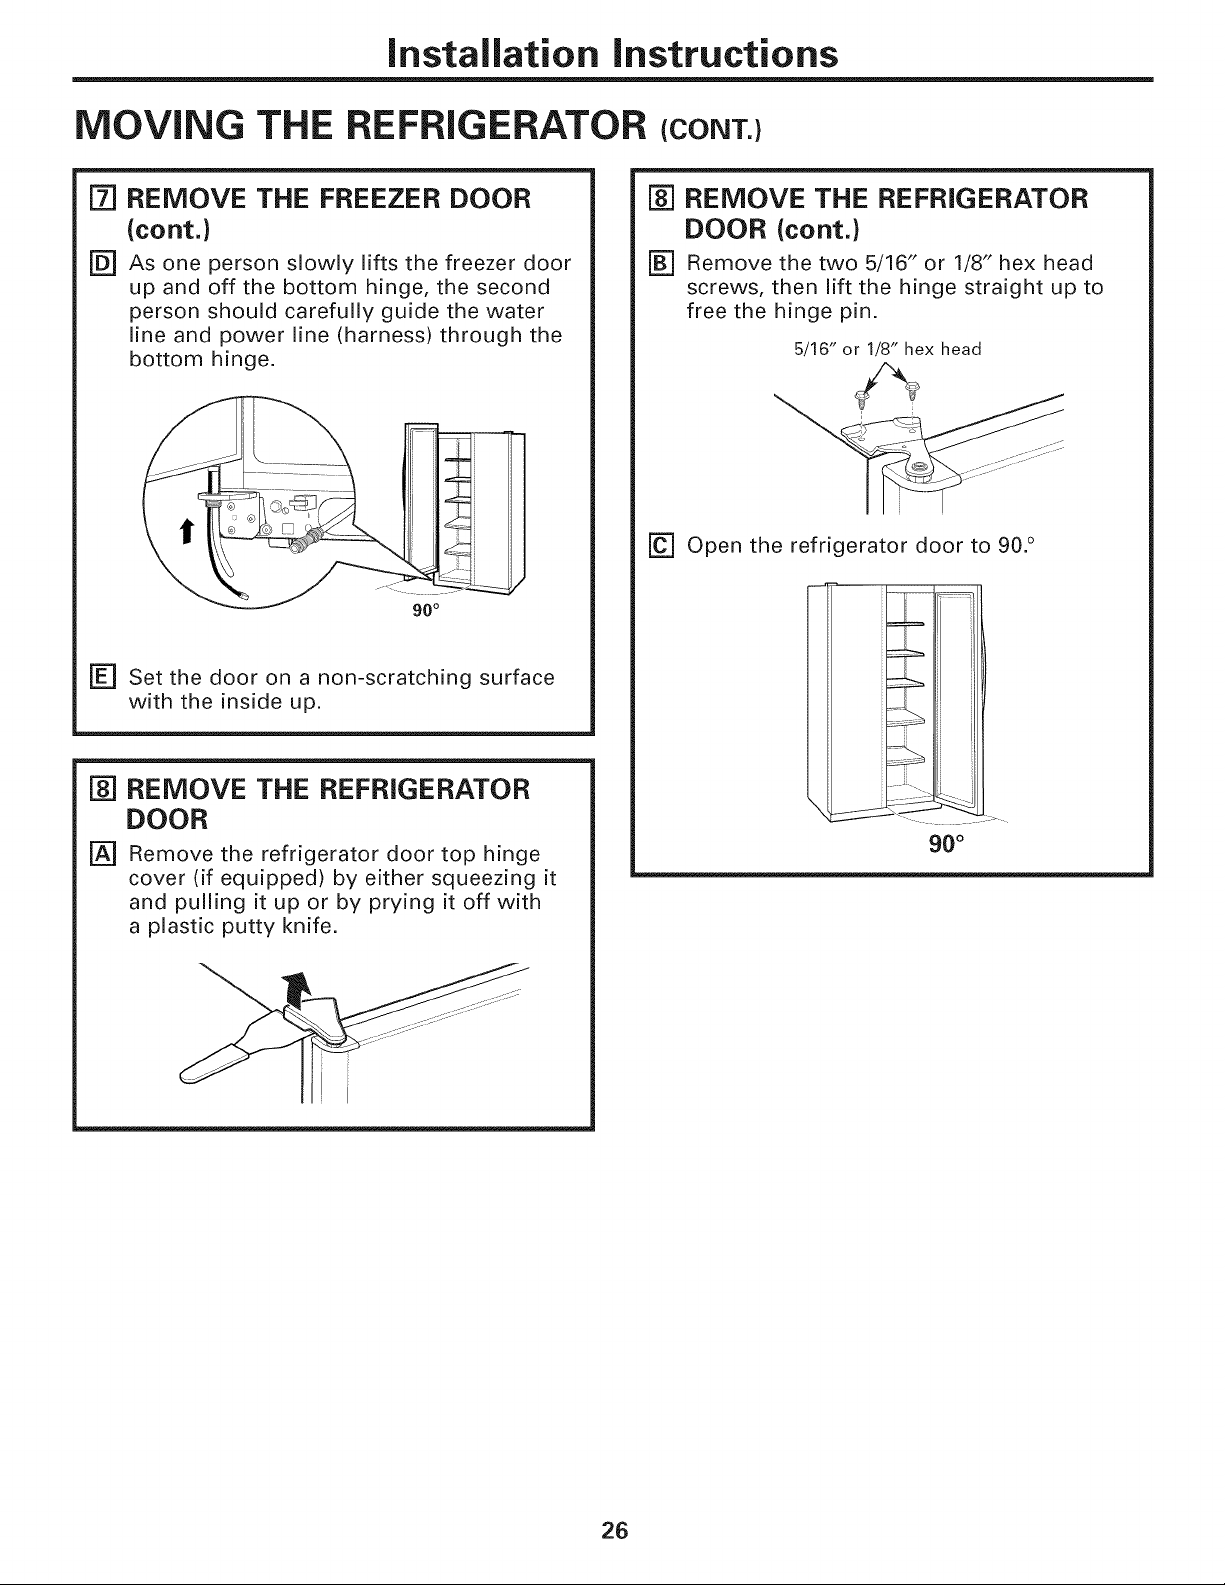
[Z] REMOVE THE FREEZER DOOR
(cont.)
r_ As one person slowly lifts the freezer door
up and off the bottom hinge, the second
person should carefully guide the water
line and power line (harness) through the
bottom hinge,
F_ Set the door on a non-scratching surface
with the inside up,
[] REMOVE THE REFRIGERATOR
DOOR
r_ Remove the refrigerator door top hinge
cover (if equipped) by either squeezing it
and pulling it up or by prying it off with
a plastic putty knife.
[_ REMOVE THE REFRIGERATOR
DOOR (cont.)
rB] Remove the two 5/16" or 1/8" hex head
screws, then lift the hinge straight up to
free the hinge pin.
5/16" or 1/8" hex head
rc-] Open the refrigerator door to 90. °
i H
, i
....ii.... i
90 °
26
Installation instructions
@
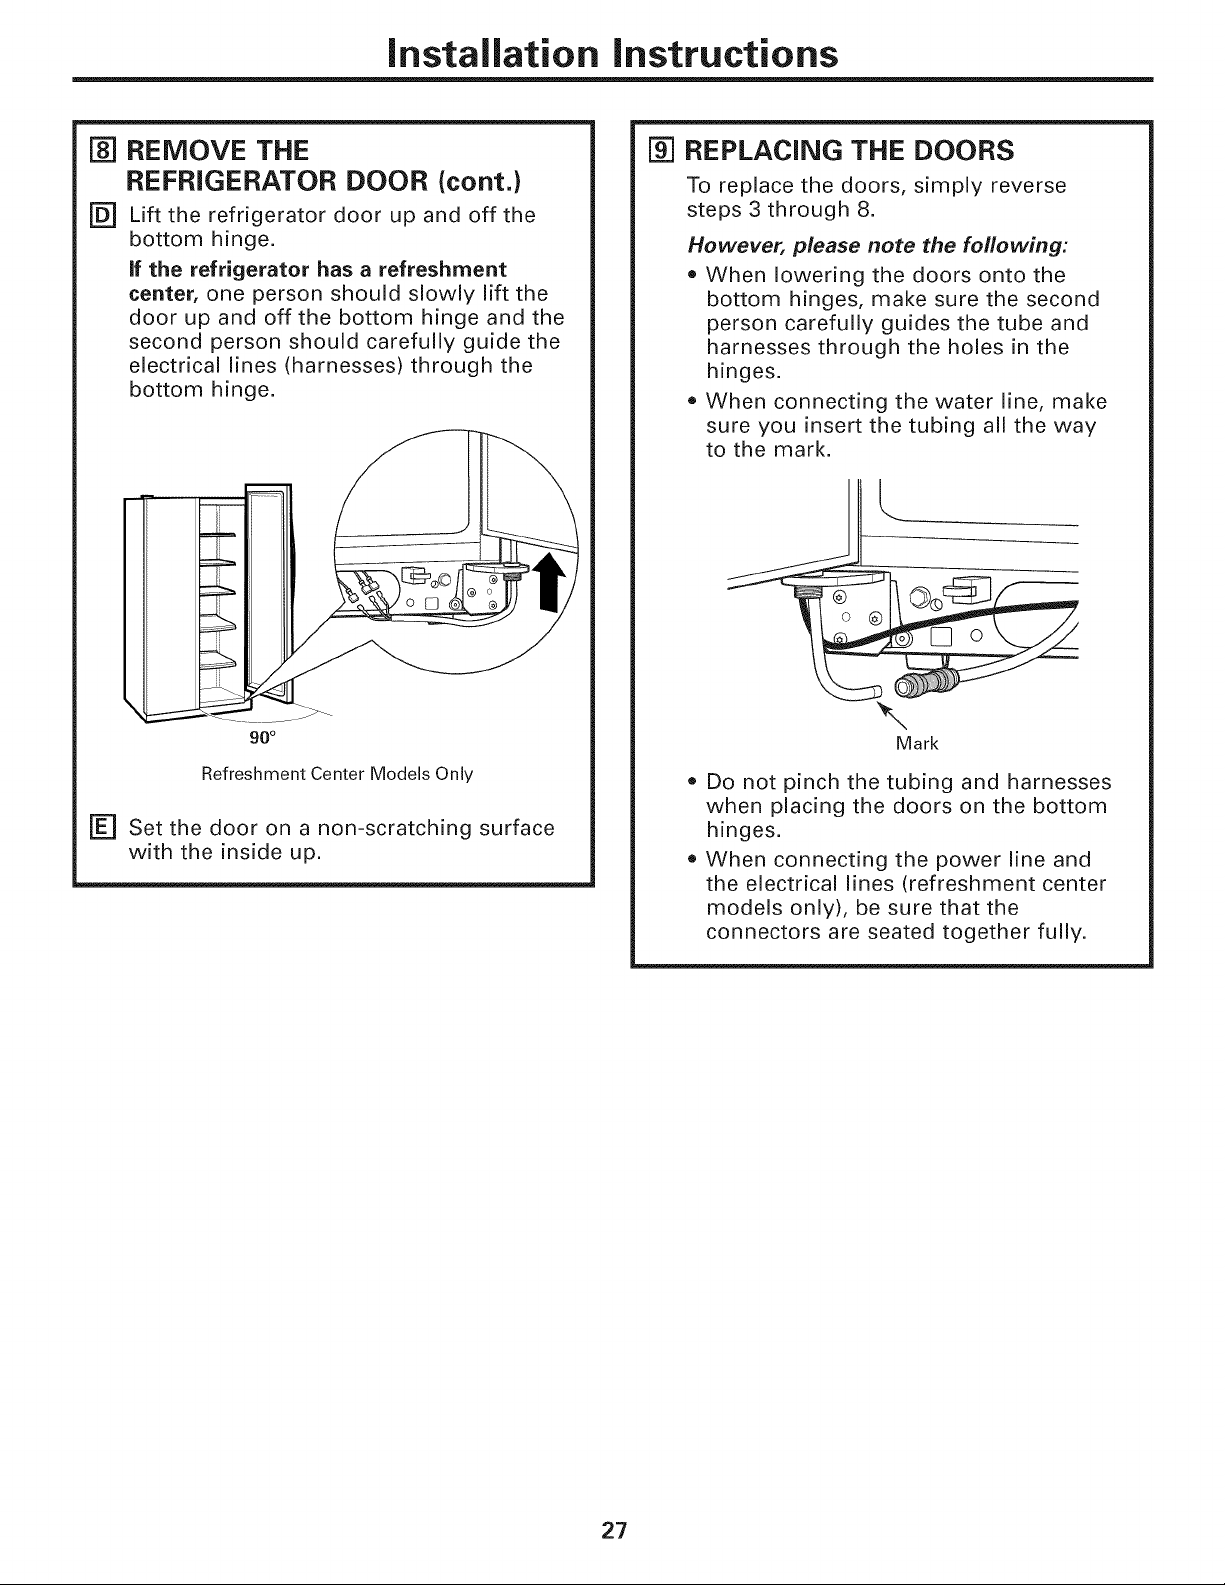
REMOVE THE
REFRIGERATOR DOOR (cont.)
Lift the refrigerator door up and off the
bottom hinge.
If the refrigerator has a refreshment
center, one person should slowly lift the
door up and off the bottom hinge and the
second person should carefully guide the
electrical lines (harnesses) through the
bottom hinge.
Refreshment Center Models Only
F_ Set the door on a non-scratching surface
with the inside up.
191REPLACING THE DOORS
To replace the doors, simply reverse
steps 3 through 8.
However, please note the following:
• When lowering the doors onto the
bottom hinges, make sure the second
person carefully guides the tube and
harnesses through the holes in the
hinges.
When connecting the water line, make
sure you insert the tubing all the way
to the mark.
J
Mark
Do not pinch the tubing and harnesses
when placing the doors on the bottom
hinges.
When connecting the power line and
the electrical lines (refreshment center
models only), be sure that the
connectors are seated together fully.
27
Installation instructions
iNSTALLiNG THE REFRIGERATOR
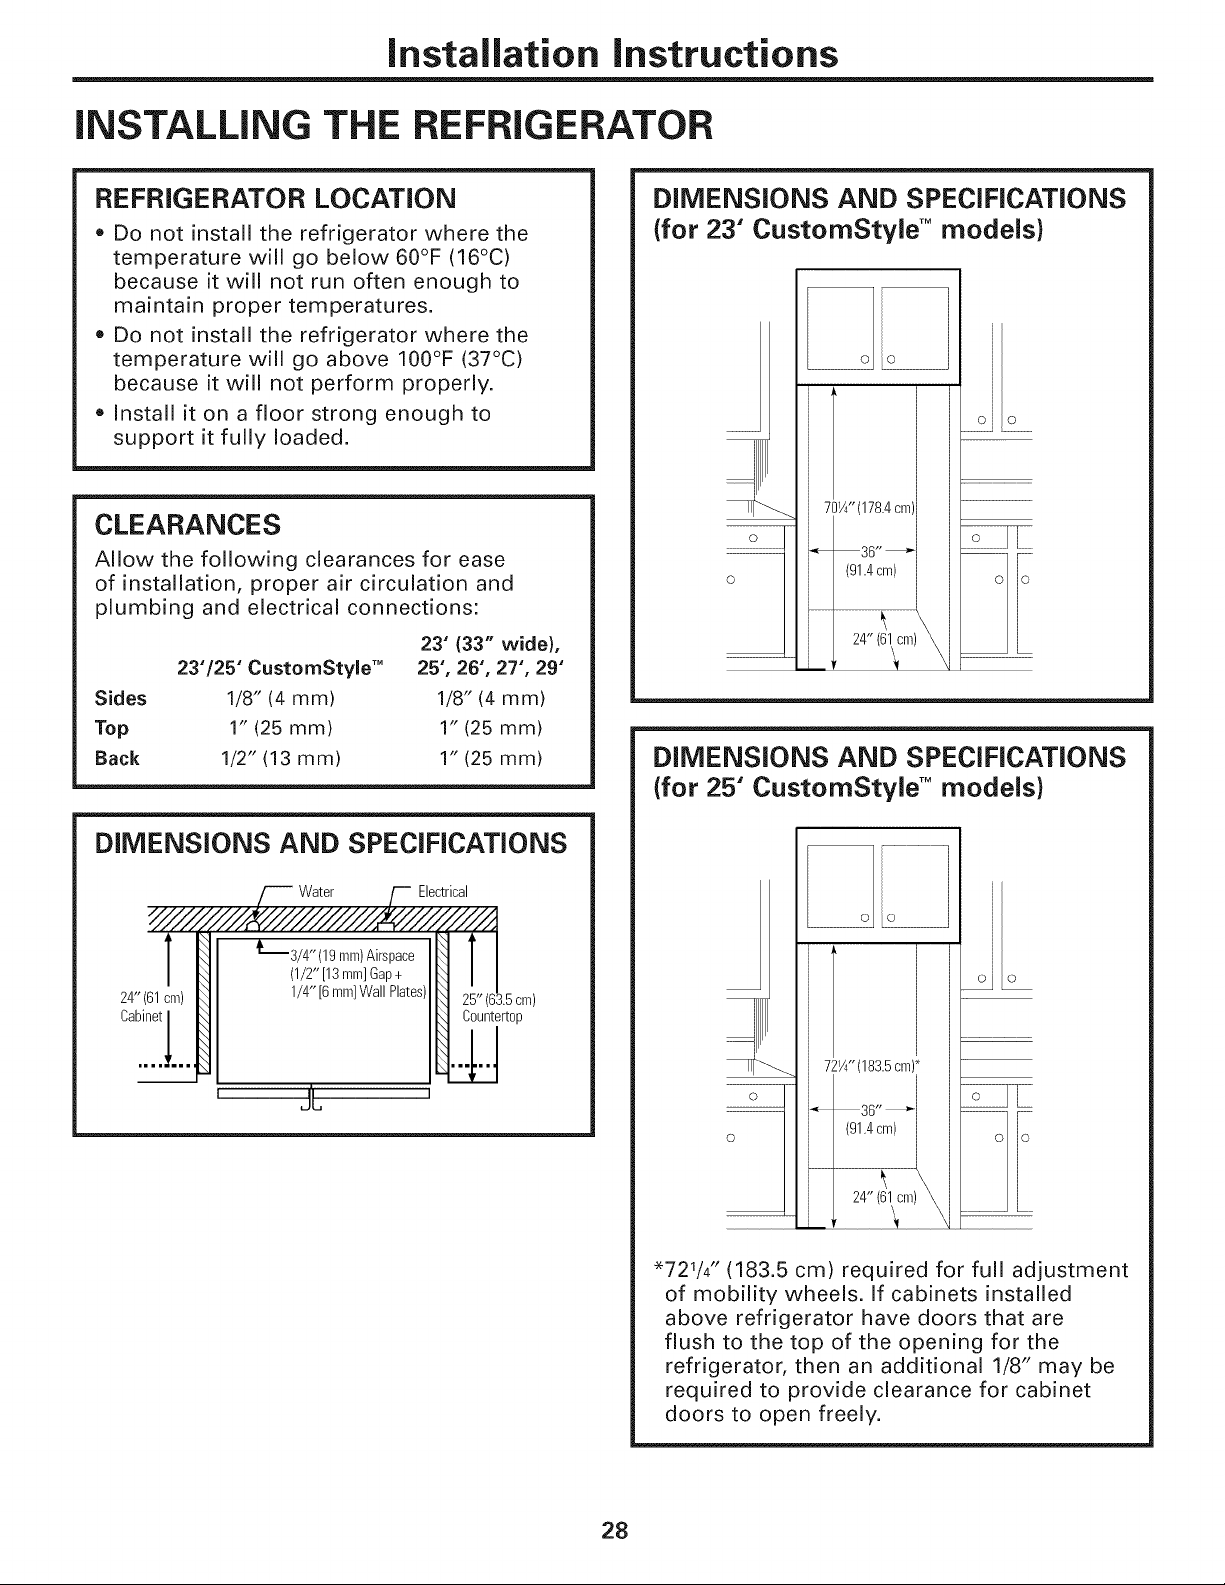
REFRIGERATOR LOCATION
,, Do not install the refrigerator where the
temperature will go below 60°F (16°C)
because it will not run often enough to
maintain proper temperatures.
,, Do not install the refrigerator where the
temperature will go above 100°F (37°C)
because it will not perform properly.
,, Install it on a floor strong enough to
support it fully loaded.
CLEARANCES
Allow the following clearances for ease
of installation, proper air circulation and
plumbing and electrical connections:
23" 133" wide),
23"/25" CustomStyle'" 25", 26", 27", 29"
Sides 1/8" (4 mm) 1/8" (4 mm)
Top 1" (25 mm) 1" (25 mm)
Back 1/2" (13 mm) 1" (25 mm)
DIMENSIONS AND SPECIFICATIONS
Water Electrical
L3/4"(19 mm)Airspace
(1/2"[13mm]Gap+
24"(61cm) 1/4" [6mm]WallPlates) }.5cm)
Cab.ii,lt.[.. ' Coantert0p
1
DIMENSIONS AND SPECIFICATIONS
(for 23" CustomStyle TM models)
l 2::i::i:2:2:2:1_:
DIMENSIONS AND SPECIFICATIONS
(for 25" CustomStyle TM models)
©
©
721A"(183.5cm)*
©
"721/4 " (183.5 cm) required for full adjustment
of mobility wheels. If cabinets installed
above refrigerator have doors that are
flush to the top of the opening for the
refrigerator, then an additional 1/8" may be
required to provide clearance for cabinet
doors to open freely.
28
Installation instructions
[Ti CONNECTING THE REFRIGERATOR
TO THE HOUSE WATER LiNE
(icemaker and dispenser models)
A cold water supply is required for
automatic icemaker and dispenser
operation, if there is not a cold water
supply, you will need to provide one.
See Installing the Water Line section.
NOTES:
,, Before making the connection to the
refrigerator, be sure the refrigerator
power cord is not plugged into the wall
outlet.
,, if your refrigerator does not have a
water filter, we recommend installing
one if your water supply has sand or
particles that could clog the screen
of the refrigerator's water valve. Install
it in the water line near the refrigerator.
If using GE SmartConnect TMRefrigerator
Tubing Kit, you will need an additional
tube (WX08X10002) to connect the filter.
Do not cut plastic tube to install filter.
r_ if you are using copper tubing, place a
compression nut and ferrule (sleeve) onto
the end of the tubing coming from the
house cold water supply.
if you are using the GE SrnartConnect TM
tubing, the nuts are already assembled to
the tubing.
F_ if you are using copper tubing, insert
the end of the tubing into the refrigerator
connection, at the back of the refrigerator,
as far as possible. While holding the
tubing, tighten the fitting.
if you are using GE SrnartConnect TM
tubing, insert the molded end of the
tubing into the refrigerator connection,
at the back of the refrigerator, and tighten
the compression nut until it is hand tight.
Then tighten one additional turn with a
wrench. Overtightening may cause leaks.
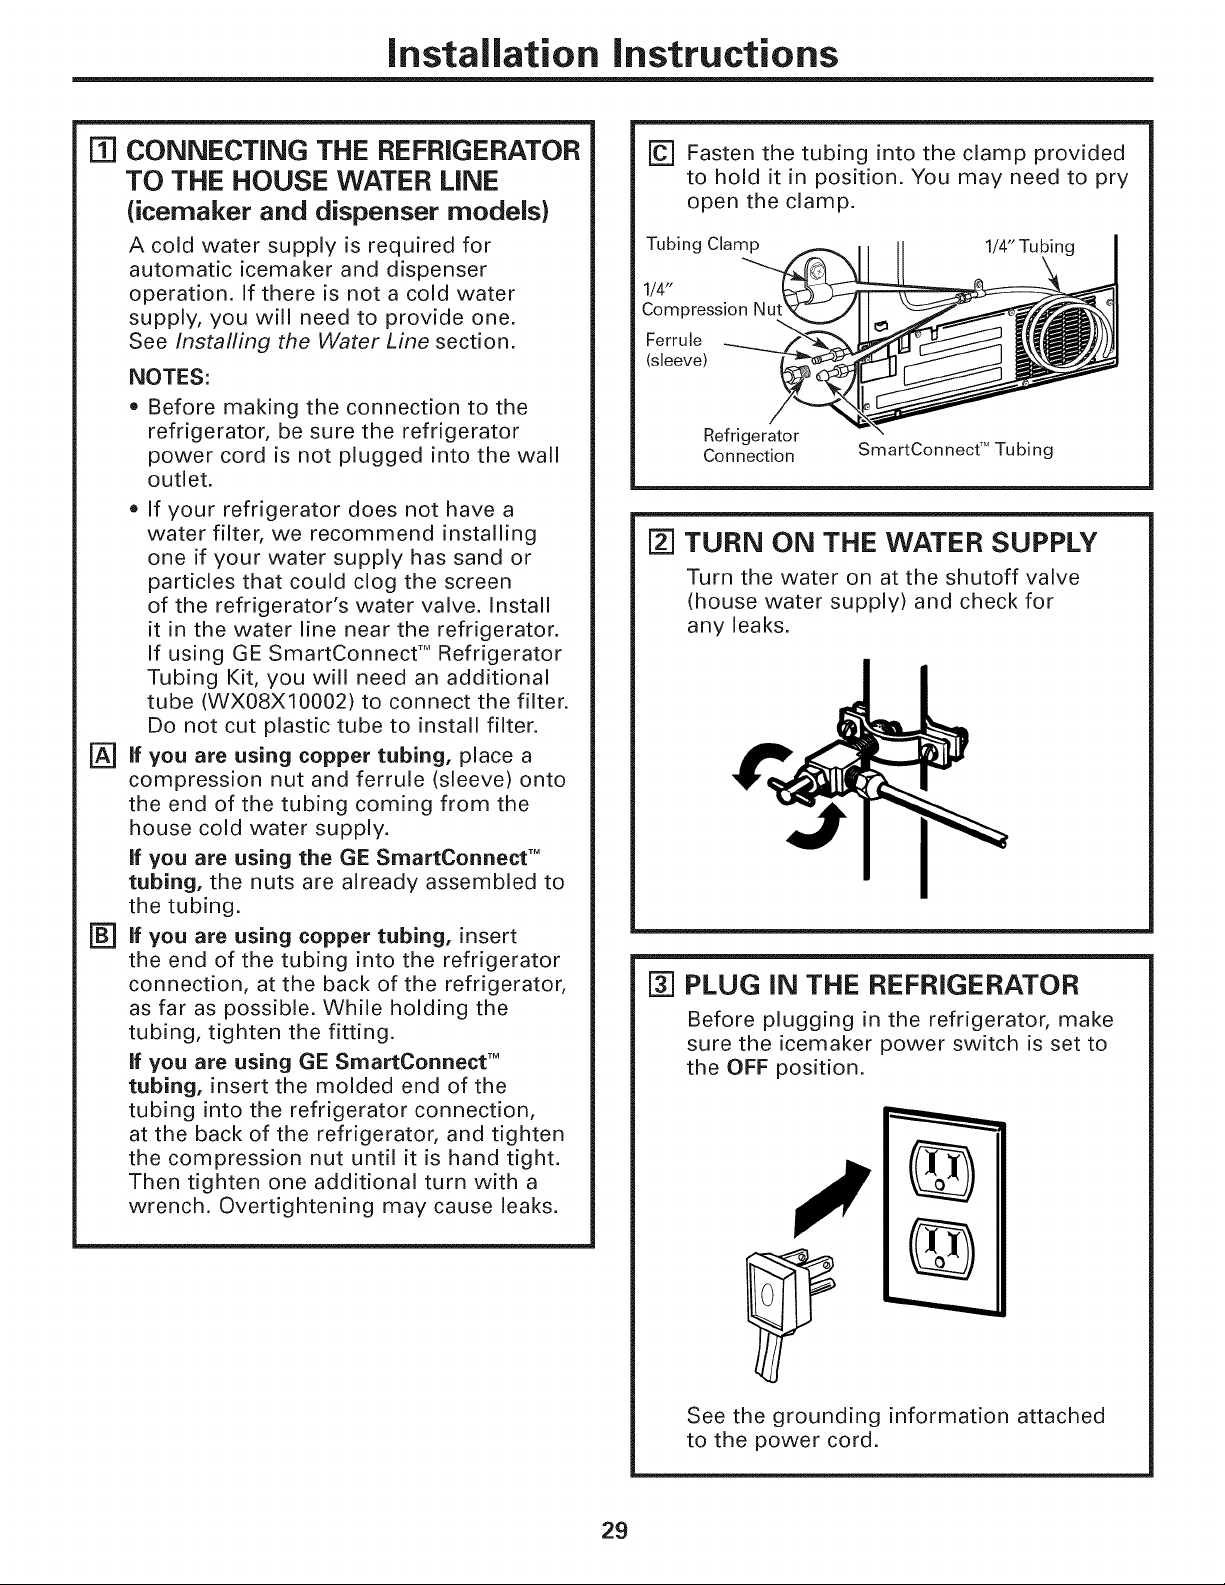
rc--I Fasten the tubing into the clamp provided
to hold it in position. You may need to pry
open the clamp,
Tubing Clamp 1/4" Tubing
1/4"
Compression Nu
Ferrule
(sleeve)
Refrigerator
Connection
SmartConnect TMTubing
I_1TURN ON THE WATER SUPPLY
Turn the water on at the shutoff valve
(house water supply) and check for
any leaks.
[] PLUG IN THE REFRIGERATOR
Before plugging in the refrigerator, make
sure the icemaker power switch is set to
the OFF position.
See the grounding information attached
to the power cord.
29
Installation instructions
iNSTALLiNG THE REFRIGERATOR (CONT.)
I_1PUT THE REFRIGERATOR
iN PLACE
Move the refrigerator to its final location.
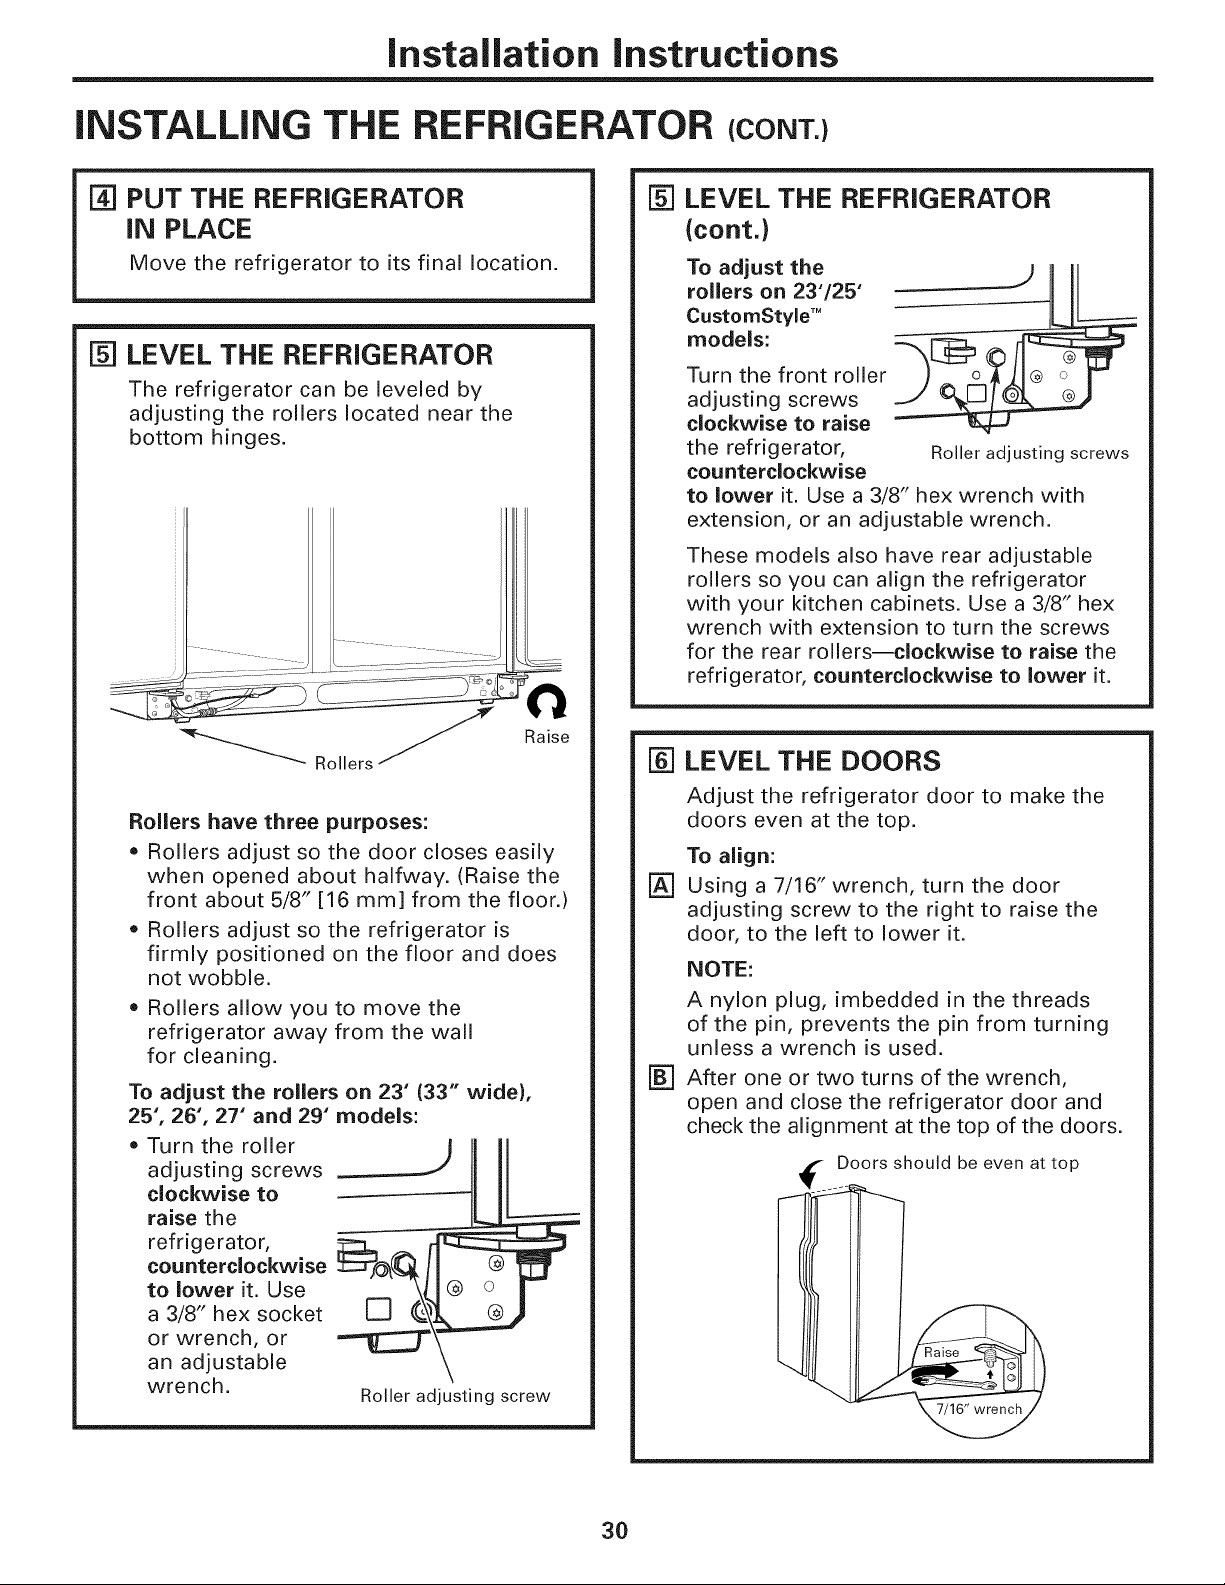
[] LEVEL THE REFRIGERATOR
The refrigerator can be leveled by
adjusting the rollers located near the
bottom hinges.
Raise
Rollers have three purposes:
,, Rollers adjust so the door closes easily
when opened about halfway. (Raise the
front about 5/8" [16 mm] from the floor.)
,, Rollers adjust so the refrigerator is
firmly positioned on the floor and does
not wobble.
,, Rollers allow you to move the
refrigerator away from the wall
for cleaning.
To adjust the rollers on 23" (33" wide),
25", 26", 27" and 29" models:
• Turn the roller S L_
adjusting screws
clockwise to
raise the
refrigerator,
counterclockwise
to lower it. Use
a 3/8" hex socket
or wrench, or
an adjustable
wrench. Roller adjusting screw
F5=ILEVEL THE REFRIGERATOR
(cont.)
To adjust the
rollers on 23"125"
CustomStyle'"
models:
Turn the front roller
adjusting screws
clockwise to raise
the refrigerator,
counterclockwise
Roller adjusting screws
to lower it. Use a 3/8" hex wrench with
extension, or an adjustable wrench.
These models also have rear adjustable
rollers so you can align the refrigerator
with your kitchen cabinets. Use a 3/8" hex
wrench with extension to turn the screws
for the rear rollers--clockwise to raise the
refrigerator, counterclockwise to lower it.
[] LEVEL THE DOORS
Adjust the refrigerator door to make the
doors even at the top.
[]
To align:
Using a 7/16" wrench, turn the door
adjusting screw to the right to raise the
door, to the left to lower it.
NOTE:
A nylon plug, imbedded in the threads
of the pin, prevents the pin from turning
unless a wrench is used.
After one or two turns of the wrench,
open and close the refrigerator door and
check the alignment at the top of the doors.
Doors should be even at top
I
30
 Loading...