


GE PT7550SF8SS, PT7550SF7SS, PT7550SF6SS, PT7550SF5SS, PT7550SF4SS Owner’s Manual
...WALL OVEN
Direct Air Convection Built-In Electric
SAFETY INFORMATION . . . . . . . . . . 2
WARRANTY. . . . . . . . . . . . . . . . . . . . . . . . 6
ASSISTANCE / ACCESSORIES. . . 7
USING THE OVEN
Oven Controls. . . . . . . . . . . . . . . . . . . . . . . . . . 8
Special Features . . . . . . . . . . . . . . . . . . . . . . . .10
Sabbath (SAbbAtH). . . . . . . . . . . . . . . . . . . . .12
Oven Racks . . . . . . . . . . . . . . . . . . . . . . . . . . . .13
Aluminum Foil and Oven Liners. . . . . . . . . . .14
Cookware. . . . . . . . . . . . . . . . . . . . . . . . . . . . . .14
Cooking Modes . . . . . . . . . . . . . . . . . . . . . . . . .15
Probe . . . . . . . . . . . . . . . . . . . . . . . . . . . . . . . . .16
Cooking Guide . . . . . . . . . . . . . . . . . . . . . . . . .17
CARE AND CLEANING
Control Panel . . . . . . . . . . . . . . . . . . . . . . . . . .18
Oven Exterior . . . . . . . . . . . . . . . . . . . . . . . . . .18
Stainless Steel Surfaces. . . . . . . . . . . . . . . . . .18
Oven Interior. . . . . . . . . . . . . . . . . . . . . . . . . . .18
Oven Racks . . . . . . . . . . . . . . . . . . . . . . . . . . . .19
Maintenance . . . . . . . . . . . . . . . . . . . . . . . . . . 20
TROUBLESHOOTING TIPS. . . . . . . 22
Write the model and serial numbers here:
Model #_________________
Serial # _________________
You can find them on a label on the side trim or on the front of the (lower) oven behind the oven door.
OWNER’S MANUAL
PT7050 - 30" Single Wall Oven
PT9050 - 30" Single Wall Oven
CT9050 - 30" Single Wall Oven
PT7550 - 30" Double Wall Oven
PT9550 - 30" Double Wall Oven
CT9550 - 30" Double Wall Oven
ESPAÑOL
Para consultar una version en español de este manual de instrucciones, visite nuestro sitio de internet GEAppliances.com.
GE is a trademark of the General Electric Company. Manufactured under trademark license.
49-80754-2 10-16 GEA

SAFETY INFORMATION
IMPORTANT SAFETY INFORMATION
READ ALL INSTRUCTIONS BEFORE USING THE APPLIANCE
WARNING Read all safety instructions before using the product. Failure to follow these instructions may result in fire, electrical shock, serious injury or death.
STATE OF CALIFORNIA PROPOSITION 65 WARNINGS
 WARNING This product contains one or more chemicals known to the State of California to cause cancer, birth defects or other reproductive harm.
Self-clean electric ovens: Self clean ovens can cause low level exposure to some of the Proposition 65 substances, including carbon monoxide, during the cleaning cycle. Exposure to these substances can be minimized by opening a window or using a ventilation fan or hood.

 WARNING GENERAL SAFETY INSTRUCTIONS
Ŷ 8VH WKLV DSSOLDQFH RQO\ IRU LWV LQWHQGHG SXUSRVH DV described in this Owner’s Manual.
Ŷ %H VXUH \RXU DSSOLDQFH LV SURSHUO\ LQVWDOOHG DQG grounded by a qualified installer in accordance with the provided installation instructions.
Ŷ 'R QRW DWWHPSW WR UHSDLU RU UHSODFH DQ\ SDUW RI \RXU oven unless it is specifically recommended in this manual. All other servicing should be performed by a qualified technician.
Ŷ %HIRUH SHUIRUPLQJ DQ\ VHUYLFH GLVFRQQHFW WKH power supply at the household distribution panel by removing the fuse or switching off the circuit breaker.
Ŷ 'R QRW OHDYH FKLOGUHQ DORQH FKLOGUHQ VKRXOG QRW be left alone or unattended in an area where an appliance is in use. They should never be allowed to climb, sit or stand on any part of the appliance.
Ŷ 
 CAUTION 'R QRW VWRUH LWHPV RI LQWHUHVW to children in cabinets above an oven - children climbing on the oven to reach items could be seriously injured.
Ŷ 8VH RQO\ GU\ SRW KROGHUV PRLVW RU GDPS SRW KROGHUV RQ KRW VXUIDFHV PD\ UHVXOW LQ EXUQV IURP VWHDP 'R
QRW OHW SRW KROGHUV WRXFK KRW KHDWLQJ HOHPHQWV 'R not use a towel or other bulky cloth in place of pot holders.
Ŷ 1HYHU XVH \RXU DSSOLDQFH IRU ZDUPLQJ RU KHDWLQJ the room.
Ŷ 'R QRW WRXFK WKH KHDWLQJ HOHPHQWV RU WKH LQWHULRU surface of the oven. These surfaces may be hot enough to burn even though they are dark in color.
'XULQJ DQG DIWHU XVH GR QRW WRXFK RU OHW FORWKLQJ or other flammable materials contact any interior area of the oven; allow sufficient time for cooling first. Other surfaces of the appliance may become hot enough to cause burns. Potentially hot surfaces include the oven vent opening, surfaces near the opening and crevices around the oven door.
Ŷ 'R QRW KHDW XQRSHQHG IRRG FRQWDLQHUV 3UHVVXUH could build up and the container could burst, causing an injury.
Ŷ 'R QRW XVH DQ\ W\SH RI IRLO RU OLQHU WR FRYHU WKH oven bottom or anywhere in the oven, except as described in this manual. Oven liners can trap heat or melt, resulting in damage to the product and risk of shock, smoke or fire.
Ŷ $YRLG VFUDWFKLQJ RU LPSDFWLQJ JODVV GRRUV RU FRQWURO
SDQHOV 'RLQJ VR PD\ OHDG WR JODVV EUHDNDJH 'R not cook on a product with broken glass. Shock, fire or cuts may occur.
Ŷ &RRN PHDW DQG SRXOWU\ WKRURXJKO\ PHDW WR DW OHDVW an internal temperature of 160°F and poultry to at least an internal temperature of 180°F. Cooking
to these temperatures usually protects against foodborne illness.
READ AND SAVE THESE INSTRUCTIONS
2 |
49-80754-2 |

IMPORTANT SAFETY INFORMATION
READ ALL INSTRUCTIONS BEFORE USING THE APPLIANCE
WARNING KEEP FLAMMABLE MATERIALS AWAY FROM THE OVEN
Failure to do so may result in fire or personal injury.
Ŷ 'R QRW VWRUH RU XVH IODPPDEOH PDWHULDOV LQ RU QHDU |
Ŷ 1HYHU ZHDU ORRVH ILWWLQJ RU KDQJLQJ JDUPHQWV ZKLOH |
an oven, including paper, plastic, pot holders, |
using the appliance. These garments may ignite if |
linens, wall coverings, curtains, drapes and gasoline |
they contact hot surfaces, causing severe burns. |
or other flammable vapors and liquids. |
Ŷ 'R QRW OHW FRRNLQJ JUHDVH RU RWKHU IODPPDEOH |
|
|
|
materials accumulate in or near the oven. Grease in |
|
the oven or near the oven may ignite. |
 WARNING IN THE EVENT OF A FIRE, TAKE THE FOLLOWING STEPS TO PREVENT INJURY AND FIRE SPREADING
Ŷ 'R QRW XVH ZDWHU RQ JUHDVH ILUHV 1HYHU SLFN XS D |
Ŷ ,I WKHUH LV D ILUH LQ WKH RYHQ GXULQJ VHOI FOHDQ WXUQ |
|
flaming pan. |
WKH RYHQ RII DQG ZDLW IRU WKH ILUH WR JR RXW 'R QRW |
|
Ŷ ,I WKHUH LV D ILUH LQ WKH RYHQ GXULQJ EDNLQJ VPRWKHU |
IRUFH WKH GRRU RSHQ ,QWURGXFWLRQ RI IUHVK DLU DW VHOI |
|
clean temperatures may lead to a burst of flame |
||
the fire by closing the oven door and turning the |
||
from the oven. |
||
oven off or by using a multi-purpose dry chemical or |
||
|
||
foam-type fire extinguisher. |
|

 WARNING OVEN SAFETY INSTRUCTIONS
Ŷ 6WDQG DZD\ IURP WKH RYHQ ZKHQ RSHQLQJ WKH RYHQ door. Hot air or steam which escapes can cause burns to hands, face and/or eyes.
Ŷ .HHS WKH RYHQ YHQW XQREVWUXFWHG
Ŷ .HHS WKH RYHQ IUHH IURP JUHDVH EXLOGXS *UHDVH LQ the oven may ignite.
Ŷ 3ODFH RYHQ UDFNV LQ GHVLUHG ORFDWLRQ ZKLOH RYHQ LV
FRRO ,I UDFN PXVW EH PRYHG ZKLOH RYHQ LV KRW GR QRW let pot holder contact hot heating element in oven.
Ŷ :KHQ XVLQJ FRRNLQJ RU URDVWLQJ EDJV LQ WKH RYHQ follow the manufacturer’s directions.
Ŷ 3XOOLQJ RXW WKH VWDQGDUG UDFNV WR WKHLU VWRS ORFNV or the extension rack to its fully open position is
D FRQYHQLHQFH LQ OLIWLQJ KHDY\ IRRGV ,W LV DOVR D precaution against burns from touching hot surfaces of the door or oven walls.
Ŷ 'R QRW OHDYH LWHPV VXFK DV SDSHU FRRNLQJ XWHQVLOV
RU IRRG LQ WKH RYHQ ZKHQ QRW LQ XVH ,WHPV VWRUHG LQ an oven can ignite.
Ŷ 1HYHU SODFH FRRNLQJ XWHQVLOV SL]]D RU EDNLQJ VWRQHV or any type of foil or liner on the oven floor. These items can trap heat or melt, resulting in damage to the product and risk of shock, smoke or fire.

 WARNING SELF-CLEANING OVEN SAFETY INSTRUCTIONS
The self-cleaning feature operates the oven at temperatures high enough to burn away food soils in the oven. Follow these instructions for safe operation.
Ŷ 'R QRW WRXFK RYHQ VXUIDFHV GXULQJ VHOI FOHDQ |
Ŷ %HIRUH VHOI FOHDQLQJ WKH RYHQ UHPRYH VKLQ\ VLOYHU |
RSHUDWLRQ .HHS FKLOGUHQ DZD\ IURP WKH RYHQ GXULQJ |
colored oven racks (on some models), the probe, |
self-cleaning. Failure to follow these instructions |
any aluminum foil, and any broiler pan, grid, and |
may cause burns. |
other cookware. Only porcelain coated oven racks |
|
may be left in the oven. |
INFORMATION SAFETY
READ AND SAVE THESE INSTRUCTIONS
49-80754-2 |
3 |

SAFETY INFORMATION
IMPORTANT SAFETY INFORMATION
READ ALL INSTRUCTIONS BEFORE USING THE APPLIANCE

 WARNING SELF-CLEANING OVEN SAFETY INSTRUCTIONS (Cont.)
Ŷ %HIRUH RSHUDWLQJ WKH VHOI FOHDQ F\FOH ZLSH JUHDVH and food soils from the oven. Excessive amount of grease may ignite, leading to smoke damage to your home.
Ŷ ,I WKH VHOI FOHDQLQJ PRGH PDOIXQFWLRQV WXUQ WKH oven off and disconnect the power supply. Have it serviced by a qualified technician.
Ŷ 'R QRW FOHDQ WKH GRRU JDVNHW 7KH GRRU JDVNHW LV essential for a good seal. Care should be taken not to rub, damage or move the gasket.
Ŷ 'R QRW XVH RYHQ FOHDQHUV 1R FRPPHUFLDO RYHQ cleaner or oven liner protective coating of any kind should be used in or around any part of the oven.
The remote enable equipment installed on this oven has been tested and found to comply with the limits for
D &ODVV % GLJLWDO GHYLFH SXUVXDQW WR SDUW RI WKH )&&
Rules. These limits are designed to:
(a) provide reasonable protection against harmful interference in a residential installation. This equipment generates, uses and can radiate radio frequency energy and, if not installed and used in accordance with the instructions, may cause harmful interference to radio communications. However, there is no guarantee that
LQWHUIHUHQFH ZLOO QRW RFFXU LQ D SDUWLFXODU LQVWDOODWLRQ ,I this equipment does cause harmful interference to radio or television reception, which can be determined by turning the equipment off and on, the user is encouraged to try to correct the interference by one or more of the following measures:
Ŷ 5HRULHQW RU UHORFDWH WKH UHFHLYLQJ DQWHQQD
Ŷ ,QFUHDVH WKH VHSDUDWLRQ EHWZHHQ WKH HTXLSPHQW DQG receiver.
Ŷ &RQQHFW WKH HTXLSPHQW LQWR DQ RXWOHW RQ D FLUFXLW different from that to which the receiver is connected.
Ŷ &RQVXOW WKH GHDOHU RU DQ H[SHULHQFHG UDGLR 79 technician for help.
(b) accept any interference received, including interference that may cause undesired operation of the device.
Note that any changes or modifications to the wireless communication device installed on this oven that are not expressly approved by the manufacturer could void the user's authority to operate the equipment.
READ AND SAVE THESE INSTRUCTIONS
4 |
49-80754-2 |

Notes
49-80754-2 |
5 |
WARRANTY
Thank You! ... IRU \RXU SXUFKDVH RI D *( $SSOLDQFHV %UDQG DSSOLDQFH
Register Your Appliance: Register your new appliance online at your convenience!
www.geappliances.com/service_and_support/register/
Timely product registration will allow for enhanced communication and prompt service under the terms of your warranty, should the need arise. You may also mail in the pre-printed registration card included in the packing material.
GE Electric Range Warranty
GEAppliances.com
All warranty service is provided by our Factory Service Centers, or an authorized Customer Care® technician. To schedule service online, visit us at www.geappliances.com/service_and_support/, or call GE Appliances at 800.GE.CARES (800.432.2737). Please have your serial number and your model number available when calling for service.
Servicing your appliance may require the use of the onboard data port for diagnostics. This gives a GE Appliances factory service technician the ability to quickly diagnose any issues with your appliance and helps GE Appliances improve its
SURGXFWV E\ SURYLGLQJ *( $SSOLDQFHV ZLWK LQIRUPDWLRQ RQ \RXU DSSOLDQFH ,I \RX GR QRW ZDQW \RXU DSSOLDQFH GDWD WR EH sent to GE Appliances, please advise your technician not to submit the data to GE Appliances at the time of service.
For the period of |
GE Appliances will replace |
One year |
Any part RI WKH UDQJH ZKLFK IDLOV GXH WR D GHIHFW LQ PDWHULDOV RU ZRUNPDQVKLS 'XULQJ WKLV |
From the date |
limited one-year warranty, GE Appliances will provide, free of charge, all labor and in-home |
of the original |
service to replace the defective part. |
purchase |
|
Proof of the original purchase |
service under the warranty. |
your receipt here. |
needed to obtain |
Staple |
date is |
|
|
What GE Appliances will not cover:
ŶService trips to your home to teach you how to use the product.
Ŷ ,PSURSHU LQVWDOODWLRQ GHOLYHU\ RU PDLQWHQDQFH
Ŷ )DLOXUH RI WKH SURGXFW LI LW LV DEXVHG PLVXVHG modified or used for other than the intended purpose or used commercially.
Ŷ 5HSODFHPHQW RI KRXVH IXVHV RU UHVHWWLQJ RI FLUFXLW breakers.
Ŷ 'DPDJH WR WKH SURGXFW FDXVHG E\ DFFLGHQW ILUH floods or acts of God.
Ŷ ,QFLGHQWDO RU FRQVHTXHQWLDO GDPDJH FDXVHG E\ possible defects with this appliance.
Ŷ 'DPDJH FDXVHG DIWHU GHOLYHU\
Ŷ 3URGXFW QRW DFFHVVLEOH WR SURYLGH UHTXLUHG VHUYLFH
Ŷ 6HUYLFH WR UHSDLU RU UHSODFH OLJKW EXOEV H[FHSW IRU /(' lamps.
EXCLUSION OF IMPLIED WARRANTIES
<RXU VROH DQG H[FOXVLYH UHPHG\ LV SURGXFW UHSDLU DV SURYLGHG LQ WKLV /LPLWHG :DUUDQW\ $Q\ LPSOLHG ZDUUDQWLHV including the implied warranties of merchantability or fitness for a particular purpose, are limited to one year or the shortest period allowed by law.
This warranty is extended to the original purchaser and any succeeding owner for products purchased for home use
ZLWKLQ WKH 86$ ,I WKH SURGXFW LV ORFDWHG LQ DQ DUHD ZKHUH VHUYLFH E\ D *( $SSOLDQFHV $XWKRUL]HG 6HUYLFHU LV QRW DYDLODEOH you may be responsible for a trip charge or you may be required to bring the product to an Authorized GE Appliances
6HUYLFH ORFDWLRQ IRU VHUYLFH ,Q $ODVND WKH ZDUUDQW\ H[FOXGHV WKH FRVW RI VKLSSLQJ RU VHUYLFH FDOOV WR \RXU KRPH
Some states do not allow the exclusion or limitation of incidental or consequential damages. This warranty gives you specific legal rights, and you may also have other rights which vary from state to state. To know what your legal rights are, consult your local or state consumer affairs office or your state’s Attorney General.
Warrantor: GE Appliances
Extended Warranties: Purchase a GE Appliances extended warranty and learn about special discounts that are available while your warranty is still in effect. You can purchase it online anytime at
www.geappliances.com/service_and_support/shop-for-extended-service-plans.htm
or call 800.626.2224 during normal business hours. GE Appliances Service will still be there after your warranty expires.
6 |
49-80754-2 |

Have a question or need assistance with your appliance?
Try the GE Appliances website (www.geappliances.com/service_and_support/) 24 hours a day, any day of the year! For greater convenience and faster service, you can now download Owner’s Manuals, order parts, or even
schedule service online.
Schedule Service: Expert GE Appliances repair service is only one step away from your door. Schedule your service online at www.geappliances.com/service_ and_support/ or call GE Appliances at 800.GE.CARES (800.432.2737) during normal business hours.
Parts and Accessories: ,QGLYLGXDOV TXDOLILHG WR VHUYLFH their own appliances can have parts or accessories sent
GLUHFWO\ WR WKHLU KRPHV 9,6$ 0DVWHU&DUG DQG 'LVFRYHU cards are accepted).Order online today, 24 hours every day or by phone at 800.626.2002 during normal business hours.
,QVWUXFWLRQV FRQWDLQHG LQ WKLV PDQXDO FRYHU SURFHGXUHV to be performed by any user. Other servicing generally should be referred to qualified service personnel. Caution must be exercised, since improper servicing may cause unsafe operation.
Real Life Design Studio: GE Appliances supports the
8QLYHUVDO 'HVLJQ FRQFHSW RI SURGXFWV VHUYLFHV DQG environments that can be used by people of all ages,
VL]HV DQG FDSDELOLWLHV :H UHFRJQL]H WKH QHHG WR GHVLJQ for a wide range of physical and mental abilities and
LPSDLUPHQWV )RU GHWDLOV RI *( $SSOLDQFHV¶ 8QLYHUVDO
'HVLJQ DSSOLFDWLRQV LQFOXGLQJ NLWFKHQ GHVLJQ LGHDV IRU people with disabilities, check out our website today.
)RU WKH KHDULQJ LPSDLUHG SOHDVH FDOO 7'' *($&
(800.833.4322).
Contact Us: Contact us on our website with all the details including your phone number, or write to:
General Manager, Customer Relations
GE Appliances, Appliance Park Louisville, KY 40225
Accessories
Looking For Something More?
GE Appliances offers a variety of accessories to improve your cooking and maintenance experiences!
To place an order visit us online at: www.GEApplianceParts.com 8 6 RU www.GEAppliances.ca (Canada)
or call 800.626.2002 8 6 800.661.1616 (Canada) The following products and more are available:
Accessories
|
6PDOO %URLOHU 3DQ ô ´ [ ó´ [ ò ³ |
:% ; 86 ' * &DQDGD |
|
/DUJH %URLOHU 3DQ ô ´ [ ó´ [ ò ³ |
:% ; 86 ' * &DQDGD |
|
;/ %URLOHU 3DQ ´ [ ó´ [ ³ |
:% ; 86 1RW DYDLODEOH LQ &DQDGD |
Parts
Oven racks |
Part numbers vary by model |
Oven elements |
Part numbers vary by model |
/LJKW EXOEV |
3DUW QXPEHUV YDU\ E\ PRGHO |
Probe |
Part numbers vary by model |
Cleaning Supplies
|
&LWUX6KLQH 6WDLQOHVV 6WHHO :LSHV |
:; ; |
|
&HUDPD%U\WH 6WDLQOHVV 6WHHO $SSOLDQFH &OHDQHU |
30 ; |
|
*UDSKLWH /XEULFDQW |
:% 7 |
7KH ODUJH EURLOHU SDQ GRHV QRW ILW LQ ´ ´ UDQJHV7KH ;/ EURLOHU SDQ GRHV QRW ILW LQ ´ ZDOO RYHQV ´GURS LQV RU ´ ´ UDQJHV
How to Remove Protective Shipping Film and Packaging Tape
Carefully grasp a corner of the protective shipping film |
product, the safest way to remove the adhesive from |
with your fingers and slowly peel it from the appliance |
packaging tape on new appliances is an application of |
VXUIDFH 'R QRW XVH DQ\ VKDUS LWHPV WR UHPRYH WKH ILOP |
a household liquid dishwashing detergent. Apply with a |
Remove all of the film before using the appliance for the |
soft cloth and allow to soak. |
first time. |
NOTE: 7KH DGKHVLYH PXVW EH UHPRYHG IURP DOO SDUWV ,W |
|
|
To assure no damage is done to the finish of the |
cannot be removed if it is baked on. |
ACCESSORIES / ASSISTANCE
49-80754-2 |
7 |
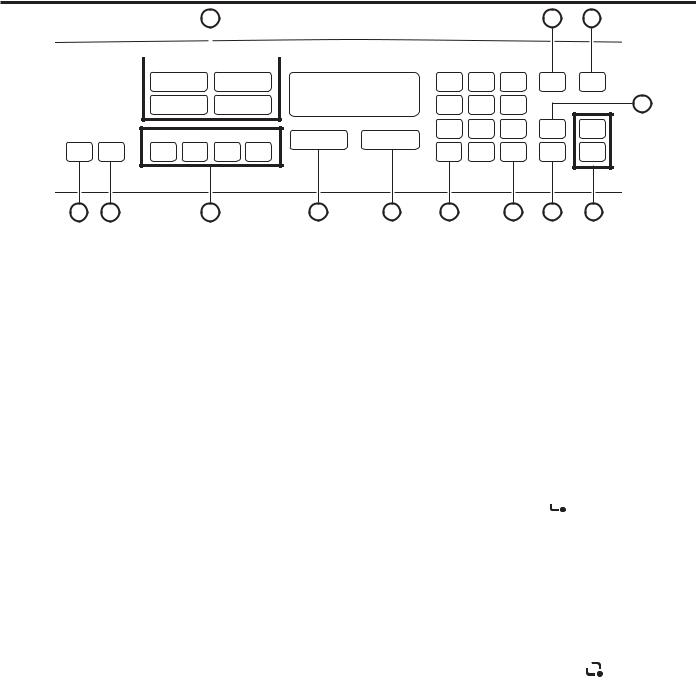
USING THE OVEN: Oven Controls
Single Wall Oven
1 |
Control button shapes are representative; |
11 |
10 |
|||
your oven may have alternate button shapes. |
||||||
|
|
|
|
|||
|
|
|
|
|
|
|
|
|
|
Convection |
|
|
|
|
|
|
|
|
|
|
|
Bake |
|
Broil |
|
1 |
2 |
3 |
Oven |
Probe |
|
|
|
Hi/Lo/Crisp |
|
Lights |
||||||
|
|
|
Bake |
Roast |
|
4 |
5 |
6 |
|
9 |
|
|
|
Multi Rack |
|
|
|||||||
|
|
|
|
|
|
||||||
|
|
|
|
|
|
|
7 |
8 |
9 |
Delay |
Steam |
|
|
|
Traditional |
|
|
Time |
|||||
|
|
|
Cancel |
Start |
|
|
|
AM/PM |
Clean |
||
|
|
|
|
|
Off |
|
|
Set |
|
|
|
Remote |
Lock |
Bake |
Broil |
|
|
Cook |
0 |
Timer |
Self |
||
Proof |
Warm |
|
Clock |
||||||||
Enable |
Controls |
Hi/Lo |
|
Time |
On/Off |
Clean |
|||||
|
|
|
|
|
|
AM/PM |
|||||
|
Hold 3 Sec |
|
|
|
|
|
|
|
|
|
|
12 |
13 |
|
2 |
|
5 |
4 |
6 |
|
7 |
8 |
3 |
1.Convection Cooking Modes: Convection
cooking modes use increased air circulation to improve performance. The type of benefit depends on the mode. Your oven has the following convection cooking modes:
%DNH %DNH 0XOWL 5DFN 5RDVW %URLO +L %URLO /R DQG
%URLO &ULVS 6HH WKH &RRNLQJ 0RGHV VHFWLRQ IRU PRUH information.
2.Traditional Cooking Modes: Your oven has the
IROORZLQJ WUDGLWLRQDO FRRNLQJ PRGHV %DNH %URLO +L %URLO
/R 3URRI DQG :DUP 6HH WKH &RRNLQJ 0RGHV VHFWLRQ IRU more information.
3.Clean: Your oven has two cleaning modes: Self Clean
and Steam Clean. See the Cleaning the Oven section for important information about
using these modes.
4.Start: Must be pressed to start any cooking, cleaning, or
timed function.
5.Cancel/Off: &DQFHOV $// RYHQ RSHUDWLRQV H[FHSW WKH
clock and timer.
6.Cook Time: Counts down cooking time and turns off
the oven when the cooking time is complete. Press the Cook Time pad, use the number pads to program a cooking time in hours and minutes, then press Start.
7KLV FDQ RQO\ EH XVHG ZLWK 7UDGLWLRQDO %DNH &RQYHFWLRQ %DNH &RQYHFWLRQ %DNH 0XOWL DQG &RQYHFWLRQ 5RDVW
7.Clock: Sets the oven clock time. Press the Clock pad
and the number pads to program the clock. Make sure to select AM or PM. Press Start to save the time.
8.Timer: :RUNV DV D FRXQWGRZQ WLPHU 3UHVV WKH Timer
pad and the number pads to program the time in hours and minutes. Press the Start pad. The oven will continue to operate when the timer countdown is complete. To turn the timer off press the Timer pad.
9.Delay Time: 'HOD\V ZKHQ WKH RYHQ ZLOO WXUQ RQ 8VH
this to set a time when you want the oven to start. Press the Delay Time pad and use the number pads to program the time of day for the oven to turn on. Press the desired cooking mode and temperature then press Start. A cook time may also be programmed if desired. This can only be
XVHG ZLWK 7UDGLWLRQDO %DNH &RQYHFWLRQ %DNH &RQYHFWLRQ %DNH 0XOWL 5DFN &RQYHFWLRQ 5RDVW DQG 6HOI &OHDQ
NOTE: :KHQ XVLQJ WKH GHOD\ WLPH IHDWXUH foods that VSRLO HDVLO\ VXFK DV PLON HJJV ILVK VWXIILQJV SRXOWU\
DQG SRUN VKRXOG QRW EH DOORZHG WR VLW IRU PRUH WKDQ hour before or after cooking. Room temperature promotes
WKH JURZWK RI KDUPIXO EDFWHULD %H VXUH WKDW WKH RYHQ light is off because heat from the bulb will speed harmful bacteria growth.
10. Probe: Monitors internal food temperature and turns the oven off when the food reaches the programmed
WHPSHUDWXUH ,QVHUW WKH SUREH SURJUDP WKH FRRNLQJ PRGH and program the probe temperature. See the Cooking Modes section for more information. The probe can only
EH XVHG ZLWK 7UDGLWLRQDO %DNH &RQYHFWLRQ %DNH DQG
Convection Roast.
11.Oven Light(s): Turns the oven light(s) on or off.
12.Remote Enable (on some models):
CONNECTING YOUR OVEN
Off - Oven is not connected. Open the app then press and hold Remote Enable pad for 5 seconds to begin the connecting process.
Slow flash - Oven is in discovery mode and looking for a network.
Rapid flash - An error occurred during the connecting process.
Solid - Oven is connected to the network and can be remotely controlled by a connected mobile device when in operation, but it cannot be started remotely.
REMOTE STARTING YOUR OVEN  REMOTE
To be able to start the oven remotely, press the Remote Enable pad and the REMOTE icon will turn on in the display. The oven can now be remotely started with a connected device. Opening an oven door or turning off the oven will turn off the REMOTE icon. The REMOTE icon must be lit to start the oven remotely. The REMOTE icon is not required to change the oven settings or to turn the oven off.
After using the oven, remember to verify that the REMOTE icon is lit if you wish to start the oven remotely in the future.
13. Lock Controls: /RFNV RXW WKH FRQWURO VR WKDW SUHVVLQJ the pads does not activate the controls. Press and hold the Lock Controls pad for three seconds to lock or unlock the control. Cancel/Off is always active, even when the control is locked.
8 |
49-80754-2 |

Double Wall Oven
1 |
|
|
2 |
Control button shapes are representative; |
|
5 |
|
|
|
your oven may have alternate button shapes. |
|
||||
|
|
|
Convection Upper Oven |
|
|
||
Upper Oven |
|
Bake |
Broil |
Start |
|||
|
|
|
|
Hi/Lo/Crisp |
|
|
|
Lower Oven |
|
Bake |
Roast |
|
|
||
|
|
Multi Rack |
|
Upper Oven |
|||
|
|
|
|
|
|||
|
|
|
|
|
Cancel |
Oven |
|
|
|
|
Traditional |
Off |
Light |
||
|
|
|
|
|
|||
Remote |
Lock |
Bake |
Broil |
Proof Warm |
Cancel |
Oven |
|
Enable |
Controls |
Hi/Lo |
Off |
Light |
|||
|
|
||||||
|
Hold 3 Sec |
|
|
|
Lower Oven |
||
|
|
|
|
|
|||
13 |
14 |
|
3 |
6 |
|
12 |
|
10 11
1 |
2 |
3 |
|
4 |
5 |
6 |
|
7 |
8 |
9 |
|
Cook |
0 |
Set |
|
Clock |
|||
Time |
|||
|
AM/PM |
||
|
|
 7 8
7 8
Delay |
Probe |
|
Time |
|
|
AM/PM |
|
|
Upper Oven |
|
|
Timer |
Steam |
|
On/Off |
Clean |
4 |
Timer |
Self |
|
On/Off |
Clean |
|
Lower Oven |
|
|
9 |
|
|
1.Upper Oven and Lower Oven: 'HVLJQDWHV ZKLFK
oven to use. Press the Upper Oven or Lower Oven pad to select an oven, then press the desired cooking mode pad. The oven control will default to the upper oven.
2.Convection Cooking Modes: Convection
cooking modes use increased air circulation to improve performance. The type of benefit depends on the mode. Your oven has the following convection cooking modes:
%DNH %DNH 0XOWL 5DFN 5RDVW %URLO +L %URLO /R DQG
%URLO &ULVS 6HH WKH &RRNLQJ 0RGHV VHFWLRQ IRU PRUH information.
3.Traditional Cooking Modes: Your oven has the
IROORZLQJ WUDGLWLRQDO FRRNLQJ PRGHV %DNH %URLO +L %URLO
/R 3URRI DQG :DUP 6HH WKH &RRNLQJ 0RGHV VHFWLRQ IRU more information.
4.Clean: Your oven has two cleaning modes: Self Clean
and Steam Clean. See the Cleaning the Oven section for important information about using these modes.
5.Start: Must be pressed to start any cooking, cleaning, or
timed function.
6.Cancel/Off: &DQFHOV $// RYHQ RSHUDWLRQV H[FHSW WKH
clock and timer.
7.Cook Time: Counts down cooking time and turns off
the oven when the cooking time is complete. Press the Cook Time pad, use the number pads to program a cooking time in hours and minutes, then press Start.
7KLV FDQ RQO\ EH XVHG ZLWK 7UDGLWLRQDO %DNH &RQYHFWLRQ %DNH &RQYHFWLRQ %DNH 0XOWL DQG &RQYHFWLRQ 5RDVW
8.Clock: Sets the oven clock time. Press the Clock pad
and the number pads to program the clock. Make sure to select AM or PM. Press Start to save the time.
9.Timer: :RUNV DV D FRXQWGRZQ WLPHU 3UHVV WKH Timer
pad and the number pads to program the time in hours and minutes. Press the Start pad. The oven will continue to operate when the timer countdown is complete. To turn the timer off press the Timer pad.
10. Delay Time: 'HOD\V ZKHQ WKH RYHQ ZLOO WXUQ RQ 8VH this to set a time when you want the oven to start. Press the Delay Time pad and use the number pads to program the time of day for the oven to turn on. Press the desired cooking mode and temperature then press Start. A cook time may also be programmed if desired. This can only be
XVHG ZLWK 7UDGLWLRQDO %DNH &RQYHFWLRQ %DNH &RQYHFWLRQ %DNH 0XOWL 5DFN &RQYHFWLRQ 5RDVW DQG 6HOI &OHDQ
NOTE: :KHQ XVLQJ WKH GHOD\ WLPH IHDWXUH foods that VSRLO HDVLO\ VXFK DV PLON HJJV ILVK VWXIILQJV SRXOWU\
DQG SRUN VKRXOG QRW EH DOORZHG WR VLW IRU PRUH WKDQ hour before or after cooking. Room temperature promotes
WKH JURZWK RI KDUPIXO EDFWHULD %H VXUH WKDW WKH RYHQ light is off because heat from the bulb will speed harmful bacteria growth.
11. Probe: Monitors internal food temperature and turns the oven off when the food reaches the programmed temperature. Select upper or lower, insert the probe, program the cooking mode, and program the probe temperature. See the Cooking Modes section for more information. The probe can only be used with Traditional
%DNH &RQYHFWLRQ %DNH DQG &RQYHFWLRQ 5RDVW
12.Oven Light(s): Turns the oven light(s) on or off.
13.Remote Enable (on some models):
CONNECTING YOUR OVEN
Off - Oven is not connected. Open the app then press and hold Remote Enable pad for 5 seconds to begin the connecting process.
Slow flash - Oven is in discovery mode and looking for a network.
Rapid flash - An error occurred during the connecting process.
Solid - %RWK RYHQV DUH FRQQHFWHG WR WKH QHWZRUN DQG can be remotely controlled by a connected mobile device when in operation, but cannot be started remotely
REMOTE STARTING YOUR OVEN REMOTE
To be able to start the oven remotely, press the Remote Enable pad and the REMOTE icon will turn on in the display. Either oven can now be remotely started with a connected device. Opening any oven door or turning off either oven will turn off the REMOTE icon. The REMOTE icon must be lit to start the oven remotely. The REMOTE icon is not required to change the oven settings or to turn either oven off.
After using the oven, remember to verify that the REMOTE icon is lit if you wish to start an oven remotely in the future.
14. Lock Controls: /RFNV RXW WKH FRQWURO VR WKDW SUHVVLQJ the pads does not activate the controls. Press and hold the Lock Controls pad for three seconds to lock or unlock the control. Cancel/Off is always active, even when the control is locked.
Controls Oven OVEN: THE USING
49-80754-2 |
|
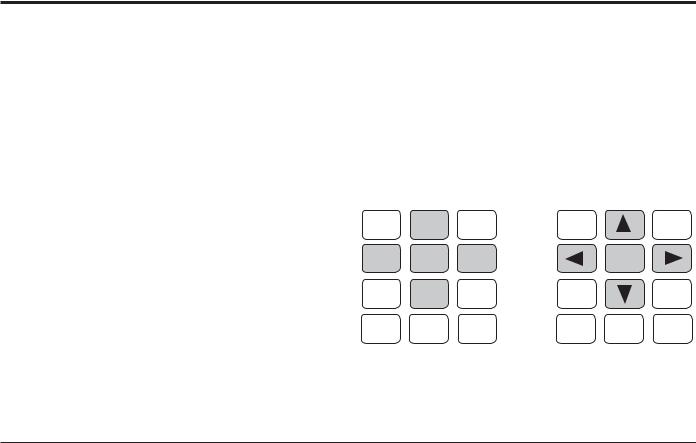
USING THE OVEN: Special Features
Special Features
There are numerous special features that are controlled using the number key pad. |
|
|
|
|
||||
Ŷ 'HJUHH )DKUHQKHLW RU &HOVLXV WHPSHUDWXUH GLVSOD\ |
Ŷ 12hr shutoff - 12 Hour Shutoff |
|
|
|
||||
Ŷ End tone - Cycle End Tone |
Ŷ |
Sabbath - Sabbath mode |
|
|
|
|||
Ŷ 6RXQG 7RQH 9ROXPH |
Ŷ Temp Offset - Adjust the oven temperature |
|
||||||
Ŷ Setting - Clock Setting |
|
'RXEOH RYHQV KDYH XSSHU DQG ORZHU RSWLRQV |
|
|||||
Ŷ /LJKW %DU 7XUQV WKH OLJKW LQGLFDWRU RQ RU RII |
|
|||||||
Ŷ Auto Recipe - Auto Recipe Conversion |
|
|||||||
IRU &RQYHFWLRQ %DNLQJ |
Ŷ |
'HIDXOW 5HVHW FRQWURO WR IDFWRU\ VHWWLQJV |
|
|||||
|
|
|
|
|
|
|
|
|
To change the Special Features settings follows these |
|
|
|
|
|
|
|
|
guidelines. |
|
|
|
|
|
|
|
|
Press and hold the Traditional Bake and Traditional |
|
1 |
2 |
3 |
|
1 |
|
3 |
Broil pads for 3 seconds simultaneously. |
|
|
|
|
= |
|
|
|
:KHQ \RX HQWHU WKH VSHFLDO IHDWXUHV PRGH |
|
4 |
5 |
6 |
|
Enter |
|
|
Ŷ The numbers 2 and 8 act as up and down to scroll |
|
7 |
8 |
9 |
|
7 |
|
9 |
thru the features and their settings. |
|
|
|
|||||
Ŷ The numbers 4 and 6 act as right and left to change |
|
Cook |
0 |
Set |
|
Cook |
0 |
Set |
back and forth from scrolling thru the features to |
|
AM/PM |
|
AM/PM |
||||
|
Time |
|
Time |
|||||
|
|
|
Clock |
|
|
Clock |
||
changing the feature settings.
Ŷ The number 5 acts as an enter pad.
Press and hold the Traditional Bake and Traditional Broil pads for 3 seconds simultaneously to exit the special feature mode.
Example: Adjusting the Oven Temperature
1.Press and hold the Traditional Bake and Traditional Broil pads for 3 seconds simultaneously to enter special features mode.
2.Press the number 2 pad until the display reads
³833(U W( 3 R))6(W´ GRXEOH ZDOO RYHQV ZLOO KDYH D selection for both the upper and lower ovens).
3.Press the number 6 pad to change the special feature setting.
4.Press the number 2 or 8 pads to either increase or decrease the temperature in one degree Fahrenheit increments up to + 35º F or down to -35º F.
5.Press the number 5 pad to save your desired change.
6.Press the number 4 pad to return to the other features.
7.Press and hold the Traditional Bake and Traditional Broil pads for 3 seconds simultaneously to exit the special feature mode.
10 |
49-80754-2 |
Special Features (cont.)
Fahrenheit or Celsius (dEGrEE)
Your oven control is set to use Fahrenheit temperature units but can be changed to use Celsius temperature units if preferred.
Cycle End Tone (End tonE)
This is the tone that signals the end of a timer. You can change it to be one tone (bEEP) or a continuous repeating tone (Con bEEP).
Tone Volume (SoUnd)
This feature allows the oven tone volume to be adjusted
EHWZHHQ +L VWG GHIDXOW /R DQG R))
Clock Setting (SEttinG)
This feature specifies how the time of day will be displayed. Options are for a standard 12-hour clock with AM and PM selections (12 Hr), 24-hour military time display (24 Hr), or for no display (oFF).
Auto Recipe Conversion (AUto rECiPE)
:KHQ XVLQJ &RQYHFWLRQ %DNH RU &RQYHFWLRQ %DNH
Multi cooking modes, Auto Recipe conversion will automatically reduce the programmed cooking
WHPSHUDWXUH 1RWH WKDW WKLV RSWLRQ GRHV QRW FRQYHUW convection baking times, only temperatures.
12-hour Shutoff (12 Hr SHUtoFF)
:KHQ WKLV IHDWXUH LV WXUQHG RQ WKH RYHQ ZLOO DXWRPDWLFDOO\ turn off after 12 continuous hours of use.
Adjust the Oven Temperature (UPPEr tE-P oFFSEt)
(Upper and Lower on some models)
This feature allows the oven temperature to be adjusted
XS WR ) KRWWHU RU GRZQ WR ) FRROHU 8VH WKLV feature if you believe your oven temperature is too hot or too cold and wish to change it. For double oven models the upper and lower ovens are adjusted separately (UPPEr tE-P OFFSET and Lo-Er tE-P oFFSEt). This
DGMXVWPHQW DIIHFWV 7UDGLWLRQDO %DNH &RQYHFWLRQ %DNH DQG &RQYHFWLRQ %DNH 0XOWL 5DFN PRGHV
Light Bar (LiGHt bAr) (on some models)
This feature uses a light bar between the door and the control panel for easy visual indication of preheat and cook time status. This feature can be turned on or off in the special features of your oven. This feature works with
&RQYHFWLRQ %DNH &RQYHFWLRQ %DNH 0XOWL &RQYHFWLRQ %URLO &RQYHFWLRQ 5RDVW 7UDGLWLRQDO %DNH 7UDGLWLRQDO
%URLO :DUP 3URRI 6HOI &OHDQ &RRN 7LPH DQG 7LPHU
On a double wall oven the notification lighting indicates
WKH VWDWXV RI WKH XSSHU RYHQ RQO\ %HORZ LV D GHVFULSWLRQ of the different light conditions.
OFF 1R RYHQ RU WLPHU IXQFWLRQ is running or the feature has been turned off in special features.


 PULSING BAR - The oven is pre-


 heating. The light bar will pulse until the oven set temperature has been reached.
PROGRESS BAR :LOO VORZO\ progress to a fully lit bar as the timer counts down.
NOTE: ,I WKH Cook Time button is used, the light bar
DQG WKH RYHQ ZLOO WXUQ RII ZKHQ WKH WLPH UHDFKHV ]HUR ,I
Timer button is used the light bar will remain solid when time reaches zero.
SOLID BAR - The oven is at the set temperature and/or function or your kitchen timer is complete.
NOTE: The progress bar for timed functions takes priority over the solid or pulsating functions if both are being used at the same time.
Default (dEFAULt)
This feature resets all of the special features to the default settings originally on the oven.
Features Special OVEN: THE USING
49-80754-2 |
11 |

USING THE OVEN: Sabbath (SAbbAtH)
Sabbath (SAbbAtH)
Sabbath mode disables the oven lights (the oven light will not turn on when the door is opened and the notification
OLJKW EDU ZLOO EH GLVDEOHG DOO VRXQGV WKH FRQWURO ZLOO QRW EHHS ZKHQ D SDG LV SUHVVHG &RQYHFWLRQ PRGHV %URLO PRGHV :DUP 3URRI DQG DOO WLPH IXQFWLRQV 6DEEDWK PRGH FDQ RQO\ EH XVHG ZLWK 7UDGLWLRQDO %DNH 7KLV IHDWXUH FRQIRUPV WR WKH 6WDU . -HZLVK 6DEEDWK UHTXLUHPHQWV
NOTE: ,I D SRZHU RXWDJH RFFXUV GXULQJ ZKHQ WKH RYHQ LV LQ 6DEEDWK 0RGH WKH XQLW ZLOO UHWXUQ WR 6DEEDWK 0RGH when power is restored.
Enter the Sabbath Mode
Press the Traditional Bake and Traditional Broil pads
DW WKH VDPH WLPH DQG KROG IRU WKUHH VHFRQGV 8VH WKH number 2 or 8 pad to scroll thru the special features
RSWLRQV WR ³6$EE$W+´ DQG WKHQ SUHVV WKH QXPEHU SDG to allow the number 2 or 8 pad to change the Sabbath
IHDWXUH VHWWLQJ IURP ³R)) WR ³RQ´
Press the number 5 pad to enter the selection. Press and hold the Traditional Bake and Traditional Broil pads for 3 seconds to exit special features mode. The ] icon will appear in the display to signify that the unit is in Sabbath Mode. The clock will not be displayed.
1RWH WKDW LI \RX KDYH D GRXEOH ZDOO RYHQ ZKHQ \RX place the control into Sabbath mode, both ovens are now in Sabbath mode and available for cooking.
Start a Sabbath Bake
Press Traditional Bake. The control will default the temperature to 350F but you can use the number pads to enter a temperature between 170ºF and 550ºF and press Start 1R VRXQG ZLOO EH JLYHQ ZKHQ WKH NH\V DUH pressed. At a random time between 30 seconds and 1 minute, the ][ icon will appear in the display indicating the oven is running.
For double wall ovens, both ovens can be used while in Sabbath mode. Press the Upper Oven or Lower Oven pad prior to pressing Traditional Bake %\ GHIDXOW WKH upper oven is selected if the Upper Oven or Lower Oven SDG LV QRW SUHVVHG ILUVW ,I XVLQJ ERWK RYHQV please wait until one oven indicates it is running before starting the second oven.
Timed Bake During Sabbath
,I \RX ZLVK WR XVH WKH &RRN 7LPH IHDWXUH WR EDNH LQ WKH oven and then have the oven automatically turn off, do not enter Sabbath mode. You will need to change the Cycle End Tone from a continuous beep to a single
EHHS WXUQ WKH 7RQH 9ROXPH RII DQG WXUQ WKH RYHQ OLJKW on using the control panel or remove the light bulb. Then you can program the oven for the desired cook time in bake.
Exit the Sabbath Mode
To end a bake cycle, press Cancel/Off. The ][ icon will change to the ] icon, indicating that the oven has turned off.
Press the Traditional Bake and Traditional Broil pads
DW WKH VDPH WLPH DQG KROG IRU WKUHH VHFRQGV 8VH WKH number 2 or 8 pad to scroll thru the special features
RSWLRQV WR ³6$EE$W+´ DQG WKHQ SUHVV WKH QXPEHU 6 pad to allow the number 2 or 8 pad to change the Sabbath
IHDWXUH VHWWLQJ IURP ³RQ WR ³R))´
Press the number 5 pad to enter the selection. Press and hold the Traditional Bake and Traditional Broil pads for 3 seconds to exit special features mode. The clock will be displayed again indicating the oven is out of Sabbath Mode.
Adjust the Temperature During a Sabbath Bake
Press Traditional Bake, use the number pads to enter a new temperature between 170ºF and 550ºF, and press Start 1R VRXQG ZLOO EH JLYHQ ZKHQ WKH NH\V DUH pressed. Since no feedback is given during temperature change, an oven thermometer can be used to confirm temperature changes.
For double wall ovens press the Upper Oven or Lower Oven pad prior to pressing Traditional Bake %\ GHIDXOW the upper oven is selected if the Upper Oven or Lower Oven SDG LV QRW SUHVVHG ILUVW ,I XVLQJ ERWK RYHQV please wait until one oven indicates it is running before starting or turning off the second oven.
12 |
49-80754-2 |

Oven Racks
Your oven has six rack positions. Recommended rack positions for various types of foods are provided in the Cooking Guide. Adjusting rack position is one way to impact cooking results. For example, if you would prefer darker tops on cakes, muffins, or cookies, try moving
IRRG RQH UDFN SRVLWLRQ KLJKHU ,I \RX ILQG IRRGV DUH WRR brown on top try moving them down next time.
:KHQ EDNLQJ ZLWK PXOWLSOH SDQV DQG RQ PXOWLSOH UDFNV
HQVXUH WKHUH LV DW OHDVW ò EHWZHHQ SDQV WR DOORZ sufficient space for air to flow.
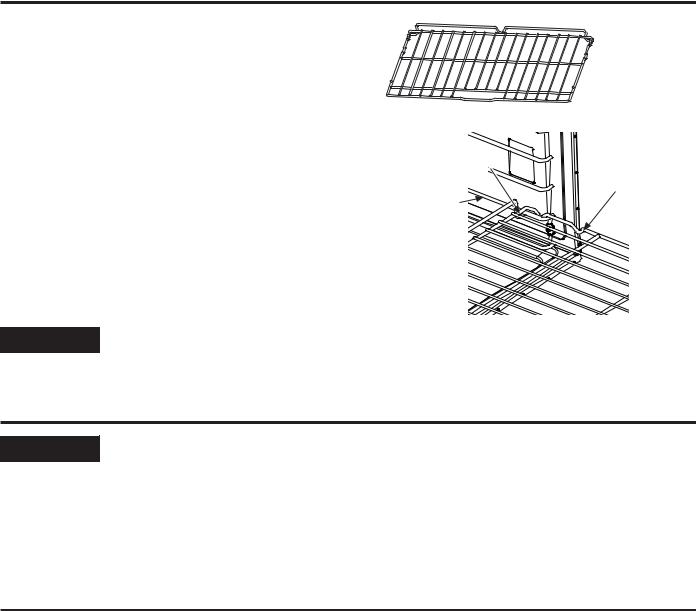
Oven Racks
Your oven may have extension racks and/or traditional flat racks.
To avoid possible burns, place the racks in the desired position before you turn the oven on.
Extension Racks
The oven has 6 rack positions
Handle
Handle 8SSHU )URQW 5DLO
Extension racks have an install feature that locks into the rack supports (guides) on both sides. Once the install feature is locked into place, always pull the rack out,
by its upper front rail, to its full extension stop position, when placing or removing cookware.
,I H[WHQVLRQ UDFNV DUH GLIILFXOW WR H[WHQG OXEULFDWH WKH racks with the graphite lubricant provided with your oven. Remove the rack from the oven, remove debris in the slide tracks with a paper towel, shake the graphite lubricant and place 4 small drops on the two bottom tracks of the left and right sides. Open and close the rack several times to distribute the lubricant.
To order additional graphite lubricant, read the Assistance and Accessories section at the beginning of this manual.
To Remove An Extension Rack:
1.Make sure the rack is pushed all the way into the oven.
2.Grasp the rack by both its upper front rail and its lower handles on two sides and lift straight up to unlock the rack from the rack supports.
3.Firmly holding onto both the upper front rail and lower handles on both sides, pull the rack forward. Grasp the rack on both sides if necessary. Then remove it from the oven.
To Replace An Extension Rack:
1.Place the rear portion of the rack onto the rack supports (guides) as shown in the picture.
2.Hold the upper front rail and lower handles and push the rack all the way in until the install feature locks into the front rack support.
,I H[WHQVLRQ UDFNV DUH GLIILFXOW WR UHSODFH RU UHPRYH ZLSH
WKH RYHQ UDFN VXSSRUWV ZLWK FRRNLQJ RLO 'R QRW ZLSH RLO on the rack slides.
8SSHU )URQW 5DLO
/LIW WR XQORFN |
Handle |
Handle |
|
8SSHU )URQW 5DLO |
|||
from the rack |
|
||
|
|
||
support |
|
|
,QVWDOO )HDWXUH
Hold the upper front rail and lower handles and push the rack all the way in until the install feature locks on the front support
Front Rack
/RFN
Racks Oven OVEN: THE USING
49-80754-2 |
13 |
USING THE OVEN:2YHQ5DFNV$OXPLQXP)RLODQG2YHQ/LQHUV&RRNZDUH
Oven Racks (cont.)
Traditional Flat Racks
The racks have stops so that when placed correctly on the supports they will stop before coming completely out
DQG ZLOO QRW WLOW :KHQ SODFLQJ DQG UHPRYLQJ FRRNZDUH pull the rack out until it stops.
To Remove a Rack
Pull it toward you, tilt the front end up and pull it out.
To Replace a Rack
Tilt the front of the rack up, hook the rear locating posts under the rack supports, push the rack back (past the stoppers) and lower it into position. Push the rack all the way in.
,I IODW UDFNV DUH GLIILFXOW WR VOLGH DQG RU UHPRYH SODFH some cooking oil on a soft cloth or paper towel and rub onto the sides of the rack and each rack support.
Flat Rack
/RFDWLQJ
Post
Rack |
Stopper |
|
|
Support |
|
 CAUTION Use caution when removing a rack from lowest position as door may be hot.
Aluminum Foil and Oven Liners

 CAUTION Do not use any type of foil or oven liner to cover the oven bottom. These items can trap heat or melt, resulting in damage to the product and risk of shock, smoke or fire. Damage from improper use of these items is not covered by the product warranty.
)RLO PD\ EH XVHG WR FDWFK VSLOOV E\ SODFLQJ D VKHHW RQ D ORZHU UDFN VHYHUDO LQFKHV EHORZ WKH IRRG 'R QRW XVH PRUH
IRLO WKDQ QHFHVVDU\ DQG QHYHU HQWLUHO\ FRYHU DQ RYHQ UDFN ZLWK DOXPLQXP IRLO .HHS IRLO DW OHDVW ´ IURP RYHQ ZDOOV to prevent poor heat circulation.
Cookware
Cookware Guidelines
The material, finish, and size of cookware affect baking performance.
'DUN FRDWHG DQG GXOO SDQV DEVRUE KHDW PRUH UHDGLO\ than light, shiny pans. Pans that absorb heat more readily can result in a browner, crisper, and thicker crust.
,I XVLQJ GDUN DQG FRDWHG FRRNZDUH FKHFN IRRG HDUOLHU
WKDQ PLQLPXP FRRN WLPH ,I XQGHVLUDEOH UHVXOWV DUH obtained with this type of cookware consider reducing oven temperature by 25º F next time.
Shiny pans can produce more evenly cooked baked goods such as cakes and cookies.
Glass and ceramic pans heat slowly but retain heat well. These types of pans work well for dishes such as pies and custards.
Air insulated pans heat slowly and can reduce bottom browning.
.HHS FRRNZDUH FOHDQ WR SURPRWH HYHQ KHDWLQJ
14 |
49-80754-2 |

Cooking Modes
Your new oven has a variety of cooking modes to help you get the best results. These modes are described below. Refer to the Cooking Guide section for recommendations for specific foods. Remember, your new oven may perform differently than the oven it is replacing.
Baking and Roasting Modes
Select a mode for baking and roasting based on the type
DQG TXDQWLW\ RI IRRG \RX DUH SUHSDULQJ :KHQ SUHSDULQJ baked goods such as cakes, cookies, and pastries always preheat the oven first. Follow recipe recommendations for
IRRG SODFHPHQW ,I QR JXLGHOLQHV DUH SURYLGHG FHQWHU IRRG in the oven.
Traditional Bake
The traditional bake mode is intended for single rack cooking. This mode uses heat primarily from the lower element but also from the upper element to cook food. To use this mode press the Bake pad under Traditional, enter a temperature, and then press Start. Preheating is generally recommended when using this mode.
Convection Bake with Direct Air
7KH &RQYHFWLRQ %DNH PRGH LV LQWHQGHG IRU VLQJOH UDFN cooking. This mode uses heat from the lower element and also the upper and rear elements, along with air movement directly down from the top of the oven to enhance evenness. Your oven is equipped with Auto Recipe Conversion, so it is not necessary to convert the temperature when using this mode. To use this mode press the Bake pad under Convection, enter a
temperature, and then press Start. Preheating is generally recommended when using this mode.
Convection Bake Multi Rack
7KH &RQYHFWLRQ %DNH 0XOWL 5DFN PRGH LV LQWHQGHG IRU baking on multiple racks at the same time. This mode uses heat primarily from the rear element but also heat from
the upper and lower elements, along with air movement from the convection fan to enhance cooking evenness. Your oven is equipped with Auto Recipe Conversion, so it is not necessary to convert the temperature when using
WKLV PRGH %DNLQJ WLPH PLJKW EH VOLJKWO\ ORQJHU IRU PXOWLSOH racks than what would be expected for a single rack. To use this mode press the Bake Multi Rack pad under Convection, enter a temperature, and then press Start. Always preheat when using this mode.
Convection Roast with Direct Air
The Convection Roast mode is intended for roasting whole cuts of meat on a single rack. This mode uses heat from the lower, upper, and rear elements along with air movement directly down from the top of the oven to improve browning
DQG UHGXFH FRRNLQJ WLPH ,W LV QRW QHFHVVDU\ WR FRQYHUW temperature. Check food earlier than the recipe suggested time when using this mode, or use the probe. To use this mode press the Roast pad under Convection, enter a temperature, and then press Start ,W LV QRW QHFHVVDU\ WR preheat when using this mode.
Broiling Modes
Always broil with the door closed. The broil element in this oven is very powerful. Monitor food closely while broiling.
8VH FDXWLRQ ZKHQ EURLOLQJ RQ XSSHU UDFN SRVLWLRQV DV placing food closer to the broil element increases smoking, spattering, and the possibility of fats igniting. Broiling on rack position 6 is not recommended.
Try broiling foods that you would normally grill. Adjust rack positions to adjust the intensity of the heat to the food. Place foods closer to the broil element when a seared surface and rare interior is desired. Thicker foods and foods that need to be cooked through should be broiled on a rack
SRVLWLRQ IDUWKHU IURP WKH EURLOHU RU E\ XVLQJ 7UDGLWLRQDO %URLO
/R RU &RQYHFWLRQ %URLO /R )RU EHVW SHUIRUPDQFH FHQWHU food below the broil heating element.
Traditional Broil Hi
7KH 7UDGLWLRQDO %URLO +L PRGH XVHV LQWHQVH KHDW IURP
WKH XSSHU HOHPHQW WR VHDU IRRGV 8VH %URLO +L IRU WKLQQHU cuts of meat and/or foods you prefer less done on the interior. To use this mode press the Broil pad once under
Traditional and then press Start ,W LV QRW QHFHVVDU\ WR preheat when using this mode.
Traditional Broil Lo
7KH 7UDGLWLRQDO %URLO /R PRGH XVHV OHVV LQWHQVH KHDW IURP the upper element to cook food thoroughly while also
SURGXFLQJ VXUIDFH EURZQLQJ 8VH %URLO /R IRU WKLFNHU FXWV of meat and/or foods that you would like cooked all the way through. To use this mode press the Broil pad twice under Traditional and then press Start ,W LV QRW QHFHVVDU\ to preheat when using this mode.
Convection Broil Hi with Direct Air
7KH &RQYHFWLRQ %URLO +L PRGH XVHV LQWHQVH KHDW IURP WKH upper element along with air movement directly down from the top of the oven for improved searing and browning.
To use this mode press the Broil pad once under Convection and then press Start. For best results preheat 5 minutes when using this mode.
Convection Broil Lo with Direct Air
7KH &RQYHFWLRQ %URLO /R PRGH XVHV OHVV LQWHQVH KHDW IURP the upper element along with air movement directly down from the top of the oven. To use this mode press the Broil pad twice under Convection and then press Start. For best results preheat 5 minutes when using this mode.
Convection Broil Crisp with Direct Air
7KH &RQYHFWLRQ %URLO &ULVS PRGH LV LQWHQGHG DV D ILQLVKLQJ mode at the end of a cooking cycle to add surface browning to a dish such as a casserole or a roast. To
use this mode press the Broil pad three times under Convection and then press Start. Monitor food closely to prevent over browning.
Modes Cooking OVEN: THE USING
49-80754-2 |
15 |
 Loading...