


GE Consumer & Industrial
Technical Service Guide
June 2007
Profile Side-By-Side
Refrigerators
PSF26PGWBB
PSS26PSWSS
PSC25PSWSS
PSW26RSWSS
HOME |
WATER |
HELP |
CRUSHED |
LOCK |
CUBED |
31-9153
GE Appliances
General Electric Company
Louisville, Kentucky 40225
Downloaded from www.Manualslib.com manuals search engine

IMPORTANT SAFETY NOTICE
The information in this service guide is intended for use by individuals possessing adequate backgrounds of electrical, electronic, and mechanical experience. Any attempt to repair a major appliance may result in personal injury and property damage. The manufacturer or seller cannot be responsible for the interpretation of this information, nor can it assume any liability in connection with its use.
WARNING
To avoid personal injury, disconnect power before servicing this product. If electrical power is required for diagnosis or test purposes, disconnect the power immediately after performing the necessary checks.
RECONNECT ALL GROUNDING DEVICES
If grounding wires, screws, straps, clips, nuts, or washers used to complete a path to ground are removed for service, they must be returned to their original position and properly fastened.
GE Consumer & Industrial
Technical Service Guide
Copyright © 2007
All rights reserved. This service guide may not be reproduced in whole or in part in any form without written permission from the General Electric Company.
– 2 –
Downloaded from www.Manualslib.com manuals search engine
Table of Contents |
|
3-Way Valve..................................................................................................................................................................... |
40 |
Beverage Center Blower Motor ............................................................................................................................... |
30 |
Check Valve ...................................................................................................................................................................... |
29 |
Components..................................................................................................................................................................... |
25 |
Components Locator Views...................................................................................................................................... |
20 |
Condenser Fan................................................................................................................................................................ |
32 |
Control Board Connector Locator.......................................................................................................................... |
52 |
Control Diagnostics Using LCD Screen ................................................................................................................ |
49 |
Control Features............................................................................................................................................................. |
8 |
CustomCool™ Assembly ............................................................................................................................................ |
44 |
Defrost Cycles.................................................................................................................................................................. |
35 |
Dispenser Assembly ..................................................................................................................................................... |
46 |
Evacuation and Charging Procedure.................................................................................................................... |
24 |
Freezer Evaporator........................................................................................................................................................ |
25 |
Freezer Evaporator Fan............................................................................................................................................... |
31 |
Freezer Section Cooling .............................................................................................................................................. |
22 |
Fresh Food and Freezer Section Cooling ............................................................................................................ |
23 |
Fresh Food Evaporator................................................................................................................................................ |
28 |
Fresh Food Evaporator Fan....................................................................................................................................... |
29 |
Fresh Food Section Cooling....................................................................................................................................... |
22 |
Icemaker Service Test Mode..................................................................................................................................... |
63 |
Introduction ...................................................................................................................................................................... |
4 |
Inverter ............................................................................................................................................................................... |
37 |
Inverter Compressor..................................................................................................................................................... |
38 |
Nomenclature.................................................................................................................................................................. |
7 |
Precise Fill ......................................................................................................................................................................... |
47 |
Precise Fill Troubleshooting....................................................................................................................................... |
62 |
QuickFreeze™ Fan Motor ........................................................................................................................................... |
32 |
Refrigeration System ................................................................................................................................................... |
22 |
Replacing the 3-Way Valve....................................................................................................................................... |
42 |
Schematic.......................................................................................................................................................................... |
64 |
Single-Speed Compressor ......................................................................................................................................... |
39 |
Technical Data................................................................................................................................................................. |
6 |
Thermistors....................................................................................................................................................................... |
34 |
Troubleshooting.............................................................................................................................................................. |
49 |
Warranty............................................................................................................................................................................ |
66 |
– 3 –
Downloaded from www.Manualslib.com manuals search engine
Introduction
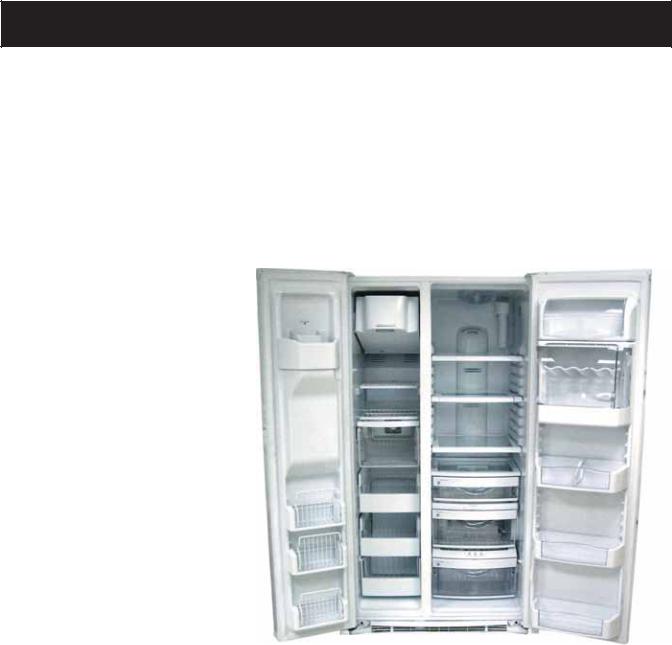
*This new Profile Side by Side dual evaporator refrigerator has the following features:
•New integrated dispenser with LED lighting, child lock, and door alarm combined with LCD screen provides customer control of temperatures and features presented in computer-style menus.
•Separate freezer and fresh food evaporators with independent cooling.
•No damper/air inlet assembly in the fresh food section creates more usable space on the top shelf.
•Greater fresh food humidity to keep food fresher, longer.
•20% less freezer defrost for better food preservation.
•3-way valve to direct refrigerant flow.
•Nearly silent, only 30 dBA.
•Precise Fill technology dispenses fresh, filtered water in accurate measurements.
•QuickFreezeTM ― Freeze items 2 times faster to enhance food preservation. During normal freezing, ice crystals form in the shape of needles that puncture the cell walls of meat. Punctured cell walls lose fluid during defrosting thus losing nutrients and freshness. The QuickFreeze option freezes the cell walls before ice needles develop.
•Quick Ice ― Increases ice production by approximately 40%.
•TurboCoolTM ― Rapidly cools the refrigerator compartment in order to more quickly cool foods.
•CustomCoolTM ― Quickly chill, thaw, or hold items at a specific temperature.
•Electronic Beverage Center ― Keeps beverages and treats icy cold and easily accessible.
•GE Reveal® Lighting ― Casts a clean, beautiful light throughout the refrigerator.
The 3-speed compressor* is controlled by an inverter that receives input from the low voltage DC side of the main control board. The inverter always has 120 VAC applied when the refrigerator is connected to power. The main control board still makes compressor decisions based on the input of thermistors, door-open time, and input from the LCD display. The main control also operates all other electrical components in the refrigerator such as the water valve, fan motors, lights, etc.
* Features may vary by model.
– 4 –
Downloaded from www.Manualslib.com manuals search engine
About ClimateKeeperTM
How it Works
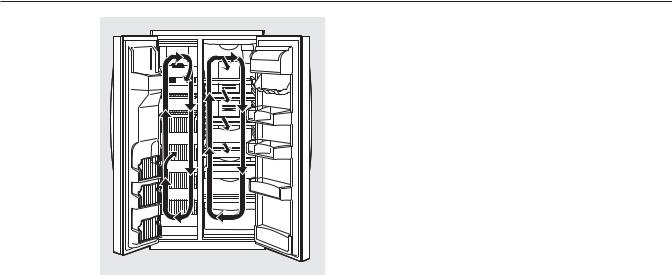
The ClimateKeeper2™ is the industry’s most advanced refrigeration system, delivering optimum temperature and humidity performance to keep food garden fresh longer and reduce freezer burn, while maintaining E starlevel efficiency.
The ClimateKeeper2 system features two evaporators― one for the refrigerator and one for the freezer. This provides two separate cooling systems, and separates
the airflow between the fresh food and freezer compartments during normal cooling operations.*
This ensures that the humidity levels in the fresh food compartment are significantly higher than in a conventional system,** allowing fresh produce and other unsealed foods to retain their moisture content and freshness longer. Moisture sensitive foods such as fresh fruit, salads, rice, etc., can now be stored on open shelves without excessive moisture loss. Due to the higher humidity in the refrigerator, you may on
occasion experience fog or small amounts of moisture in the refrigerator compartment. This is normal and may come and go as different food loads and environmental
conditions change. Wipe dry with a paper towel if desired.
The separate airflow system minimizes the mixing of air between the two compartments, which reduces fresh food odor transfer to improve the taste of ice. The ClimateKeeper2 system also reduces the number of defrosting cycles in the freezer evaporator, thereby reducing freezer burn.
*Freezer air is used in the CustomCool™ feature.
**Testing shows a higher level of humidity in the Fresh Food section in ClimateKeeper2 refrigerators versus conventional units.
– 5 –
Downloaded from www.Manualslib.com manuals search engine
Technical Data
38B2>==42C ?>F4A 2>A3 145>A4 B4AE828=6 8<?>AC0=CA42>==42C 0;; 6A>D=38=6 34E824B
0[[ _Pacb ^U cWXb P__[XP]RT RP_PQ[T ^U R^]SdRcX]V T[TRcaXRP[ RdaaT]c PaT Va^d]STS 8U Va^d]SX]V fXaTb bRaTfb bcaP_b R[X_b ]dcb ^a fPbWTab dbTS c^ R^\_[TcT P _PcW c^ Va^d]S PaT aT\^eTS U^a bTaeXRT cWTh \dbc QT aTcda]TS c^ cWTXa ^aXVX]P[ _^bXcX^] P]S _a^_Ta[h UPbcT]TS
4;42CA820; B?4285820C8>=B
CT\_TaPcdaT 2^]ca^[ ?^bXcX^]$& 5 3TUa^bc 2^]ca^[ % Wab / #$\X] f ]^ S^^a ^_T]X]Vb >eTacT\_TaPcdaT CWTa\^bcPc # 5 3TUa^bc CWTa\Xbc^a & 5 4[TRcaXRP[ APcX]V) $E 02 % 7i % 0\_ <PgX\d\ 2daaT]c ;TPZPVT &$\0 <PgX\d\ 6a^d]S ?PcW ATbXbcP]RT # >W\b
=> ;>03 ?4A5>A<0=24
2^]ca^[ ?^bXcX^] <83 <83 P]S 0\QXT]c ^U)& 5 ( 5
5aTbW 5^^S 5 "# # "# # 5a^iT] 5^^S 5 " " " " Ad] CX\T / & , #"
/ ( , %(
A45A864A0C8>= BHBC4<
ATUaXVTaP]c 2WPaVT A "#P$^d]RTb 2^\_aTbb^a & $1CD Wa <X]X\d\ 2^\_aTbb^a 2P_PRXch !! X]RWTb <X]X\d\ 4`dP[XiTS ?aTbbdaT / & 5 # ?B86 / ( 5 $! ?B86
8<?>AC0=C B054CH =>C824
CWXb X]U^a\PcX^] Xb X]cT]STS U^a dbT Qh X]SXeXSdP[b _^b bTbbX]V PST`dPcT QPRZVa^d]Sb ^U T[TRcaXRP[ T[TRca^]XR P]S \TRWP]XRP[ Tg_TaXT]RT 0]h PccT\_c c^ aT_PXa P \PY^a P__[XP]RT \Ph aTbd[c X] _Tab^]P[ X]Ydah P]S _a^_Tach SP\ PVT CWT \P]dUPRcdaTa ^a bT[[Ta RP]]^c QT aTb_^]bXQ[T U^a cWT X]cTa_aTcPcX^] ^U cWXb X]U^a\PcX^] ]^a RP] Xc Pbbd\T P]h [XPQX[Xch X] R^]]TRcX^] fXcW Xcb dbT
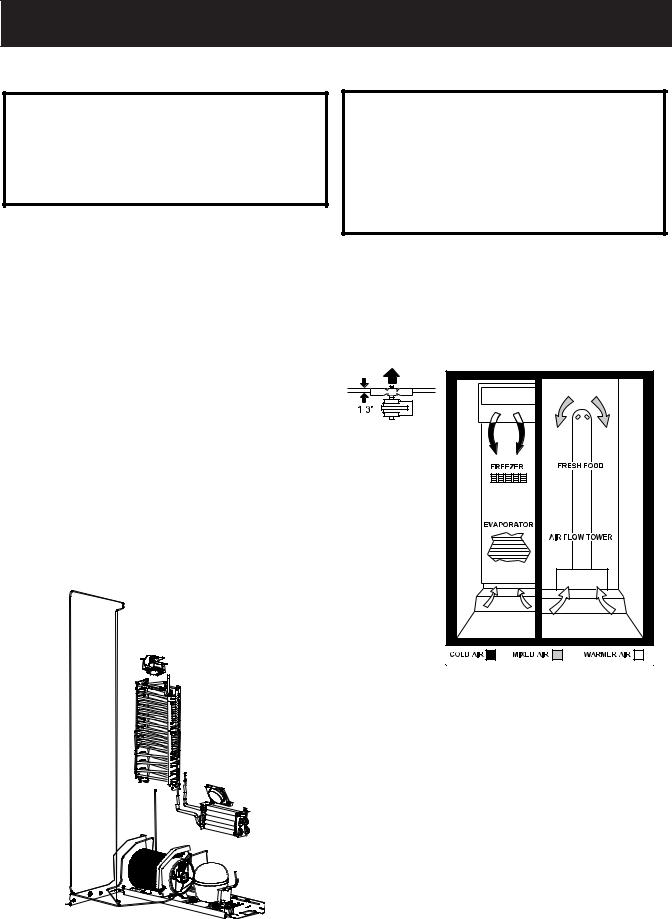
8=BC0;;0C8>=
<X]X\d\ R[TPaP]RT aT`dXaTS U^a PXa RXaRd[PcX^])
|
C>? |
|
|
B834B !$ |
|
|
A40A$ |
|
08A 5;>F
6 *", /", |
– 6 –
Downloaded from www.Manualslib.com manuals search engine
Nomenclature
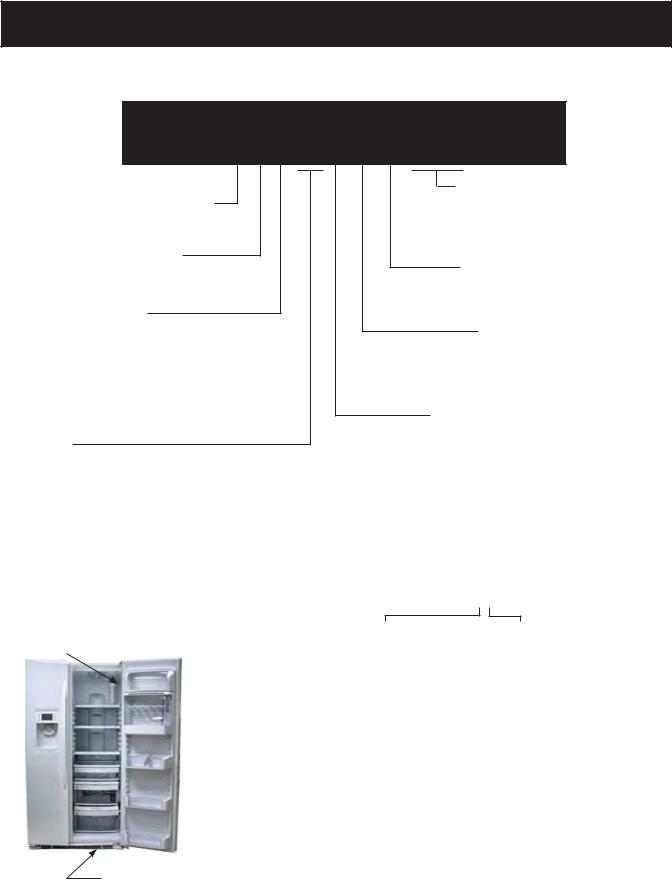
P S F 26 P G W B B
Brand/Product
P - Profile
Configuration
S - Side by Side
Depth/Power
H - Inverter Compressor/Energy Star
S - Standard Depth
C - Counter Depth
F - High Gloss Smooth
W - Full Wrap
Capacity
(cubic feet) AHAM Rated Volume
The nomenclature plate is located on the upper right wall of the fresh food compartment. It contains the following information:
• |
Model and Serial |
Nomenclature |
Number |
• |
Minimum |
|
Installation |
|
Clearances |
• |
Electrical Voltage, |
|
Frequency |
• |
Maximum |
|
Amperage Rating |
• |
Refrigerant Charge |
|
and Type |
Mini-Manual Location
The Mini-Manual is located behind the base grill and taped under the cabinet.
Exterior Color
WW - White on White
BB - Black on Black
Model Year
W - 2007
Icemaker/Exterior
G - 1-Year Filter
Cubed/Crushed
Interior Features/Shelves
P - Dual Evaporator
R - Dual Evaporator New Appearance
Serial Number
The first two numbers of the serial number identify the month and year of manufacture.
Example: AM123456S = January, 2007
A - JAN |
2007 |
- M |
D - FEB |
2006 |
- L |
F - MAR |
2005 |
- H |
G - APR |
2004 |
- G |
H - MAY |
2003 |
- F |
L - JUN |
2002 |
- D |
M - JUL |
2001 |
- A |
R - AUG |
2000 |
- Z |
S - SEP |
1999 |
- V |
T - OCT |
1998 |
- T |
V - NOV |
1997 |
- S |
Z - DEC |
1996 |
- R |
The letter designating the year repeats every 12 years.
Example:
T - 1974
T - 1986
T - 1998
– 7 –
Downloaded from www.Manualslib.com manuals search engine
Control Features
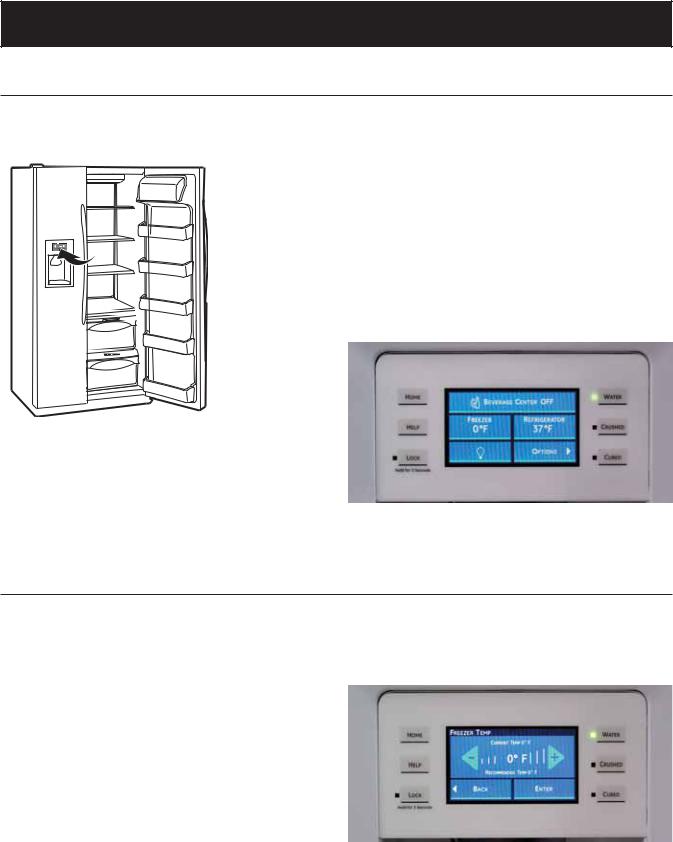
About the home screen
Not all features are on all models.
The Home screen is the initial screen presented after power-up. The status bar at the top displays the status of many of the refrigerator features. Freezer and Refrigerator sections display present compartment temperatures.
•Press displayed set temperatures. Set temperatures then can be changed.
•Press the light icon to operate the dispenser LED.
•Press Options to provide access to Freezer, Refrigerator, and Dispenser options as well as access to Information and Settings.
Note: The refrigerator is shipped with protective film covering the controls. If this film was not removed during installation, remove it now.
About the temperature controls
The temperature controls are preset in the factory at 37°F(3°C) for the refrigerator compartment and 0°F (-18°C) for the freezer compartment. Allow 24 hours for the temperature to stabilize to the preset recommended settings.
Refrigerator temperatures can be adjusted between 34°F and 46°F (1°C to 8°C), and the freezer temperatures can be adjusted between –6°F and +6°F (–21°C to –14°C).
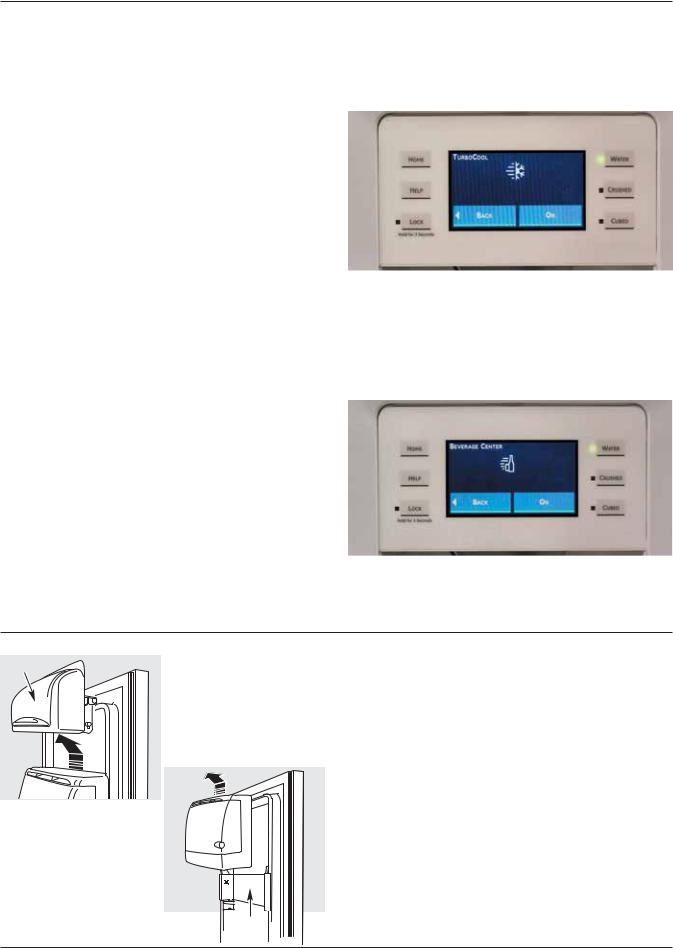
To change the Refrigerator temperature:
Access By: Home > Refrigerator
Activate By: Using the arrows to select the desired temperature. You must press ENTER to set the new temperature.
(Continued next page)
– 8 –
Downloaded from www.Manualslib.com manuals search engine
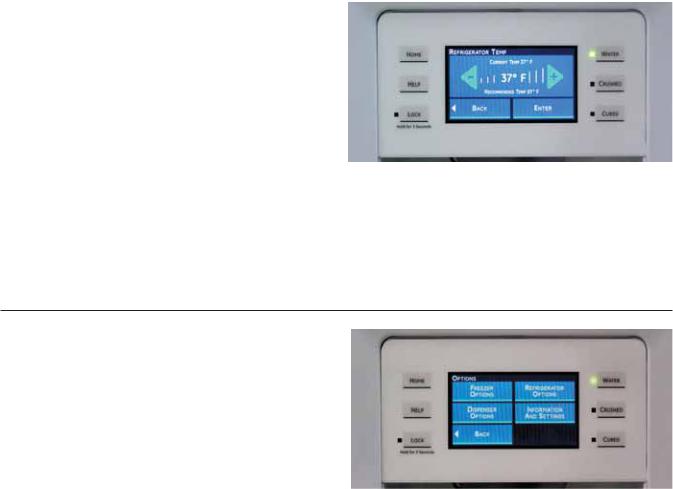
To change the Freezer temperature:
Access By: Home > Freezer
Activate By: Using the arrows to select the desired temperature. You must press ENTER to set the new temperature.
Once the desired temperature has been set, the display will return to the HOME screen and show the set temperatures underneath the actual temperature display for several seconds. Several adjustments may be required. Each time you adjust the controls, allow 24 hours for the refrigerator to reach the temperature you have set.
The temperature controls can display both the SET temperature as well as the actual temperature in the refrigerator and freezer. The actual temperature may vary slightly from the SET temperature based on usage and operating environment.
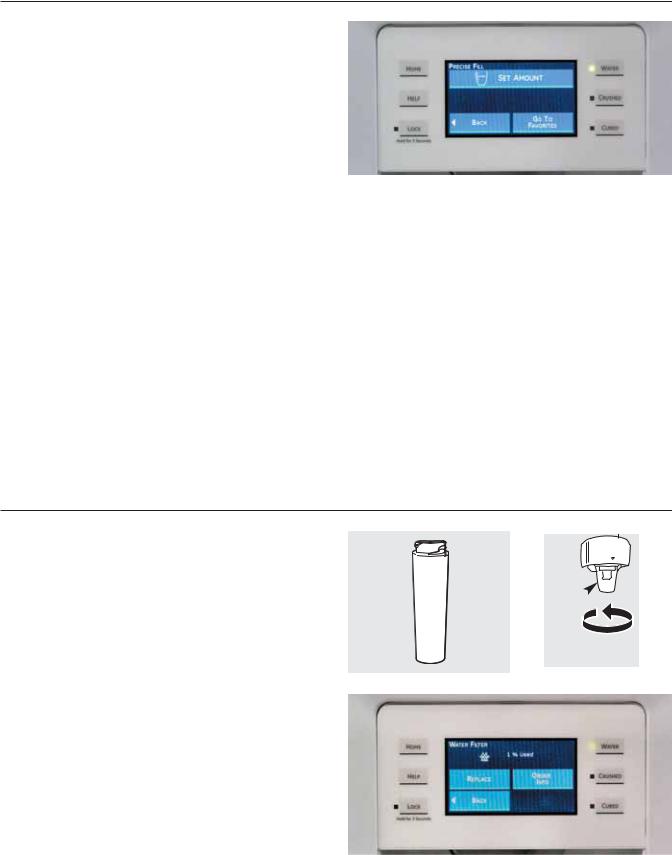
Options
Use options to access Refrigerator Options, Freezer Options, Dispenser Options, and Information and Settings menus. Access by: Home> Options.
•Press Freezer Options to access QuickIce and QuickFreeze.
•Press Refrigerator Options to access CustomCool, TurboCool, and Beverage Center.
•Press Dispenser Options to access Precise Fill and Reset Water Filter.
•Press Information and Settings to access Settings, Screen Appearance, and Feature Info.
– 9 –
Downloaded from www.Manualslib.com manuals search engine

Quick Ice
When you need to speed up ice production, use the Quick Ice feature. While this feature is turned on, the freezer fan runs continuously for 48 hours, or until the feature is turned OFF. During this period, ice production will increase up to 40% (up to 2 lbs/day). Models with the integrated ice feature system require at FIRST USE at least half an 8 oz. glass of ice to be dispensed every 6 to 12 hours. This will help the icemaker fill the bucket properly so that dispensing is better.
Note: Ice production will vary according to usage conditions, or if the same feature is deactivated earlier.
How to Use
Access by pressing: Home > Options > Freezer Options >Quick Ice. Activate by pressing ON. Deactivate by pressing OFF.
About QuickFreeze.™ (on some models)
The QuickFreeze plate is only to be used with the QuickFreeze™ feature. Use QuickFreeze to freeze items faster to enhance food preservation.
Quickfreeze
Plate
How to Use
Place food (wrapped in plastic wrap) on QuickFreeze plate. Turn the feature on via the LCD controls. Access by pressing: Home > Options > FreezerOptions > QuickFreeze. Activate by using the arrows to select the time and pressing Enter. Deactivate by pressing OFF.
Note:
•While the QuickFreeze feature is enabled, the actual freezer temperature may drop as low as –3°F (–19°C). This is normal.
•QuickFreeze can operate for 2.5 hours up to 3.25 hours depending on the weight of the food or until you manually turn the feature off.
– 10 –
Downloaded from www.Manualslib.com manuals search engine
About CustomCoolTM (on some models)
How it Works
The CustomCool™ feature is used to quickly chill items, thaw items, or hold the pan at a specific temperature. This feature is a system of dampers, a fan, a temperature thermistor, and a heater. The pan is tightly sealed to prevent temperature fluctuations
in the rest of the refrigerator. The controls for this pan are located on the dispenser with the temperature controls.
How to Use
Empty the pan. Place the Chill/Thaw tray in the pan. Place the items on the tray and close the pan completely.
Access by: Home > Options >Refrigerator Options >
CustomCool Pan
Use the following list to determine the best setting to use.
•On some models, ExpressChill™ has only one 45 minute setting.
•To stop a feature before it is finished; go into that feature’s menu and press the OFF button.
•During ExpressThaw™ and ExpressChill, the display on the controls will count down the time in the cycle (on some models).
•After the ExpressThaw cycle is complete, the pan will reset to the MEAT setting (32°F [0°C]) to help preserve thawed items until they are used.
•The displayed actual temperature of the CustomCool pan may vary slightly from the SET temperature based on usage and operating environment.
Note: For food safety reasons, it is recommended that foods be wrapped in plastic wrap when using ExpressThaw. This will help contain meat juices and improve thawing performance.
How to Remove and Replace the Drawer
To remove: Pull the drawer out to the stop position. Rotate all four swing locks to the unlock position. Lift the front of the drawer up and out.
To replace: Make sure all four swing locks are in the unlock position. Place the sides of the drawer into the drawer supports, making sure the swing locks fit on the drawer slots. Lock all four swing locks by rotating them to the lock position.
– 11 –
Downloaded from www.Manualslib.com manuals search engine
About TurboCoolTM
How it Works |
How to Use |
TurboCool™ rapidly cools the refrigerator compartment |
Access by pressing: Home > Options > Refrigerator |
in order to more quickly cool foods. Use TurboCool |
Options > TurboCool. Activate by pressing ON. Deactivate |
when adding a large amount of food to the refrigerator |
by pressing OFF. |
compartment, putting away foods after they have been |
|
sitting out at room temperature or when putting away |
|
warm leftovers. It can also be used if the refrigerator |
|
has been without power for an extended period. Once |
|
activated, the compressor will turn on immediately and |
|
the fans will cycle on and off at high speed as needed |
|
for eight hours. The compressor will continue to run until |
|
the refrigerator compartment cools to approximately |
|
34°F (1°C), then it will cycle on and off to maintain this |
|
setting. After 8 hours, or if TurboCool is pressed again, |
|
the refrigerator compartment will return to the original |
|
setting. |
Note: The refrigerator temperature cannot be changed |
|
|
|
during TurboCool. The freezer temperature is not affected |
|
during TurboCool. When opening the refrigerator door |
|
during TurboCool, the fans will continue to run if they |
How to Use the Beverage Center |
have cycled on. |
|
|
Some CustomCool models feature a beverage center. It |
|
is designed to store beverages at colder temperatures. |
|
Select this feature if you like to keep extra-chilled |
|
refreshments on hand. Access by pressing Home > |
|
Options > Refrigerator Options > Beverage Center |
|
Activate by pressing ON. Deactivate by pressing OFF. |
|
Note: Unless turned off as above, feature will remain |
|
active for six months. Press the Beverage Center pad to |
|
restart. |
|
How to Remove and Replace the Beverage Center
Dairy Bin
Beverage
Center
To remove:
Remove dairy bin first. Holding the bottom of the dairy bin, lift the front straight up, then lift up and out. Holding left and right side of beverage center, lift straight up and out. Leave adapter in place.
To replace:
Engage backside of beverage center in molded supports on adapter. Then push down on the sides of the beverage center. The beverage center will lock into place. Replace dairy bin.
– 12 –
Downloaded from www.Manualslib.com manuals search engine
Precise Fill (on some models)
This water dispenser is equipped with a feature called “precise fill.” This feature allows you to choose a precise amount of water (cups, ounces, pints, or liters) that you would like dispensed. Access by pressing: Home >
Options > Dispenser Options > Precise Fill > Set Amount. Activate by using the arrow buttons to select the desired amount. Press MORE UNITS to select between CUPS, OUNCES, PINTS or LITERS.
Select the precise amount of water you would like dispensed. If you selected OUNCES, press the arrowpads on either side of the display to select the number of ounces you would like to have dispensed between 1–128 ounces. If you selected Liters you can dispense between 0-4 liters. If you selected Pints you can dispense between 0-8 pints.
If you selected CUPS, press the arrow pads on the left of the display to select the whole cups (1–16 cups) and/or the arrow pads on the right side of the display to select fractions of a cup (1/4–3/4 cups).
Press the cup against the cradle and water will begin dispensing. It will automatically stop when the amount set has been dispensed. The display will show there is no water left to dispense, then reset.
Note: Do not leave the dispenser unattended when water is being dispensed.
If you would like to stop dispensing water before the specified amount has been dispensed, just remove the cup from the cradle. The display will show the amount left to dispense.
About the water filter.
Water Filter Cartridge
The water filter cartridge is located in the back upper right corner of the refrigerator compartment.
When to Replace the Filter
A pop-up screen will appear on the LCD screen to remind you to replace the water filter. You can check the status of the water filter manually. Access by pressing: Home > Options > Dispenser Options> Reset Water Filter.
The filter cartridge (part #WR02X12345) should be replaced when the replacement indicator light turns red or if the flow of water to the dispenser or icemaker decreases.
Filter Bypass Plug
You must use the filter bypass plug (part #WR02X12343) when a replacement filter cartridge is not available. The dispenser and the icemaker will not operate without the filter or filter bypass plug.
Filter
Bypass
Plug
SmartWater
– 13 –
Downloaded from www.Manualslib.com manuals search engine
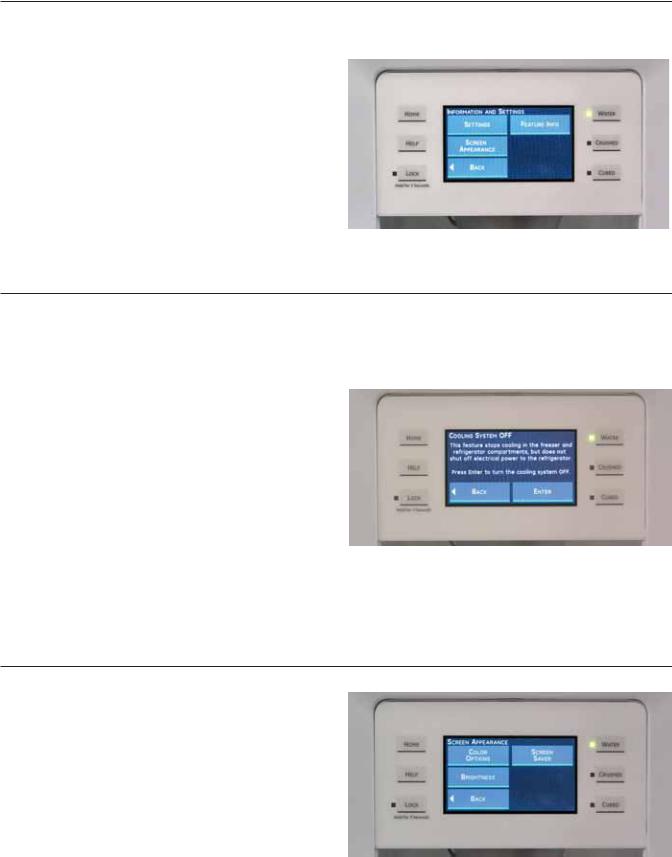
Information and Settings
Use Information and Settings to access Settings, Screen Appearances, and Feature Info. Access by: Home> Options> Information and Settings.
•Press Settings to access Button Beep, Door Alarm, Units Metric/English, and Cooling System Off.
•Press Screen Appearance to access Color Options, Brightness, and Screen Saver.
•Press Feature Info to access information related to Precise fill, CustomCool, QuickFreeze, LCD Screen Colors, Beverage Center, Temperature Set, Quick Ice, and TurboCool..
Cooling System Off
Access by: Home> Options> Information and Settings> Setting> Cooling System Off. Press Enter to turn the cooling system off. To turn the cooling system back on, press the touch screen and press the ON button.
Activate By: Pressing ENTER.
Note
•Turning the cooling system OFF stops cooling in both the freezer and refrigerator compartments, but does not shut off electrical power to the refrigerator.
•When the unit is turned back on, it will be set to the standard settings and will take up to 24 hours to stabilize.
Screen Appearance
Access by: Home> Options> Information and Settings > Screen Appearance.
•Press Color Options to select the color theme of the touch screen.
•Press Brightness to adjust the brightness of the touch screen.
•Press Screen Saver to turn on or off the screen saver display.
– 14 –
Downloaded from www.Manualslib.com manuals search engine
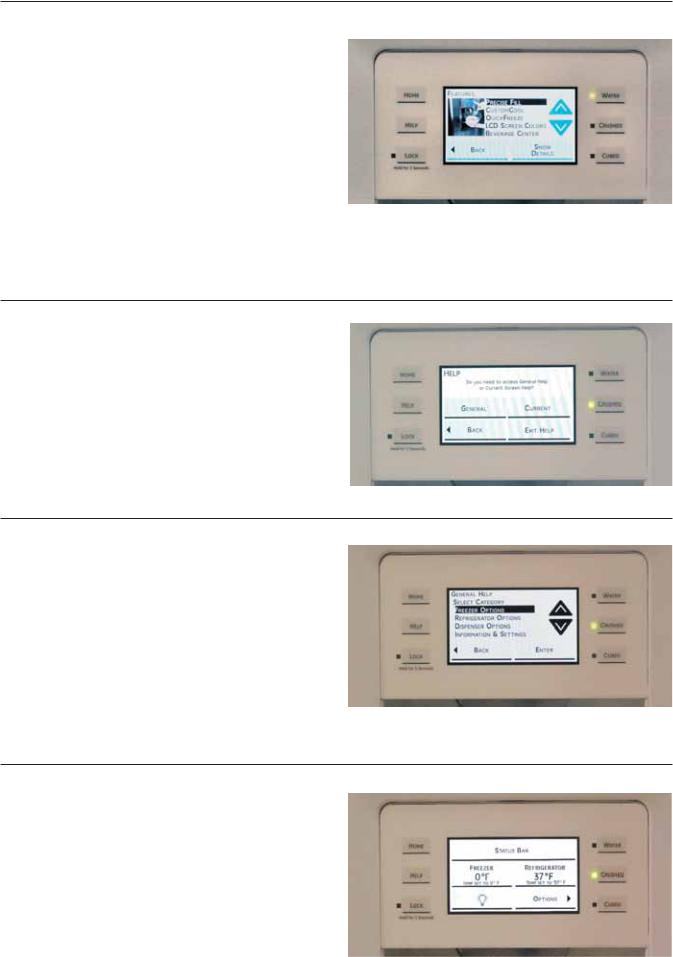
Feature Info
Access by: Home> Options> Information and Settings> Feature Info. Features will access information related to:
•Precise Fill
•CustomCool™
•QuickFreeze™
•LCD Screen Colors
•Beverage Center
•Temperature Set
•Quick Ice
•TurboCool™
About the help screen
The Help screen provides General information and guidance to certain features of the refrigerator. The help screen can also provide help regarding the Current screen displayed. To access Help, press the Help pad.
General
Access by: Help> General. Scroll to select help on Freezer, Refrigerator, and Dispenser Options, Information and Settings, and Status Bar.
Current
Access by: Help> Current. Press Status Bar, Freezer, Refrigerator, or Options to receive help on selected item.
– 15 –
Downloaded from www.Manualslib.com manuals search engine
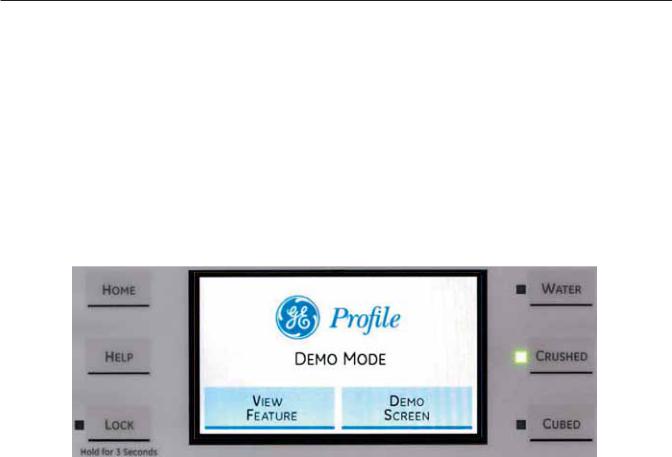
Demo Mode
The LCD screen has a DEMO MODE that can be accessed. To enter the DEMO Mode press the HOME and HELP pads simultaneously for 3 seconds. Upon entering, the cooling system will turn off.
The VIEW FEATURE selection provides a description and instructions on how to use 8 features of the refrigerator. The 8 features presented are Precise Fill, CustomCoolTM, QuickFreezeTM, LCD Screen Colors, Beverage Center, Temperature Set, Quick Ice, and TurboCoolTM.
DEMO SCREEN offers instructions on how to select and change compartment temperatures and set dispenser light LEDs on or off. An OPTIONS setting will display freezer options QuickFreeze and Quick Ice, and refrigerator options CustomCool, Beverage Center, and TurboCool.
To exit the DEMO MODE press the HOME and HELP pads simultaneously for 3 seconds. Upon exiting, the cooling system will turn on and the DEMO MODE temperature settings will be used to operate the refrigerator.
– 16 –
Downloaded from www.Manualslib.com manuals search engine
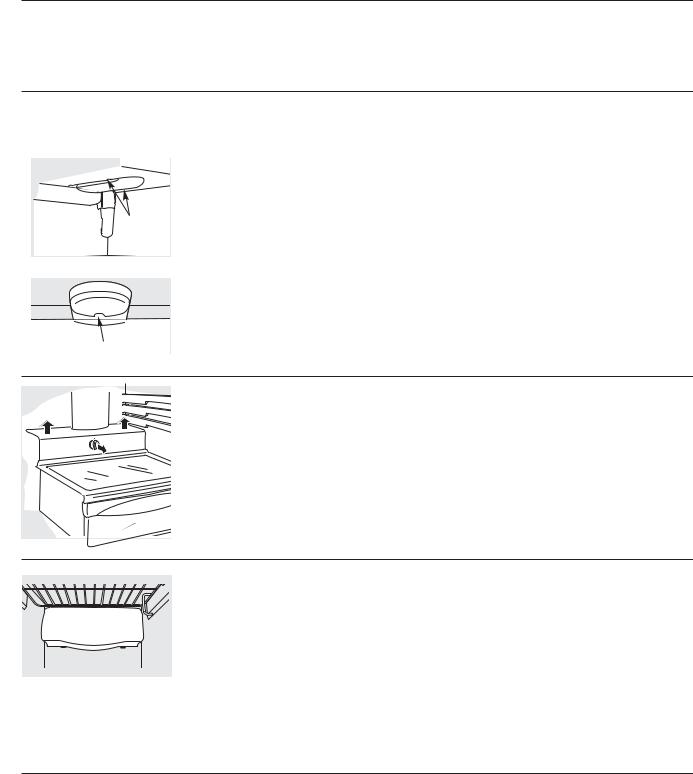
Replacing the light bulbs.
Setting the controls to OFF does not remove power to the light circuit.
Reveal® appliance bulbs are used on some models. They can be identified by their blue color when they are not illuminated.
Not all features are on all models.
Your light shield will look like one of the following.
Tabs
OR
Refrigerator Compartment ―
Upper Light
Unplug the refrigerator.
The bulbs are located at the top of the compartment, inside the light shield. On some models, a screw at the front of the light shield will have to be removed. On other models, the screw is located in the pocket located at the back of the light shield.
To remove the light shield, on some models, press in on the tabs on the sides of the shield and slide forward and out. On other models, just slide the shield forward and out.
After replacing the bulb with an appliance bulb of the same or lower wattage, replace the light shield and screws (on some models). When replacing the light shield, make sure that the tabs at the back of the shield fit into the slots at the back of the light shield housing.
Plug the refrigerator back in.
Refrigerator Compartment ―
Lower Light
This light is located above the top drawer. Unplug the refrigerator.
Remove the convertible meat drawer  control knob by pulling straight out.
Lift the light shield up and pull it out. After replacing the bulb with an appliance
bulb of the same or lower wattage, replace the shield and the knob.
Plug the refrigerator back in.
Freezer Compartment
Unplug the refrigerator.
Remove the shelf just above the light shield. On some models, a screw at the top of the light shield will need to be removed.
To remove the light shield, press in on the sides, and lift up and out. Replace the bulb with an appliance
bulb of the same or lower wattage, and
reinstall the light shield. When reinstalling the light shield, make sure the top tabs snap securely into place. Replace the screw (on some models).
Reinstall the shelf and plug the refrigerator back in.
– 17 –
Downloaded from www.Manualslib.com manuals search engine
Dispenser LED Light
The LIGHT selection on the LCD screen turns the dispenser LED lights on and off. When the light selection is turned off, the LEDs will fade out. The dispenser LEDs will come on automatically when the dispenser cradle is pressed and will fade out approximately 5 seconds after it is released. The LIGHT selection will not turn off the LEDs during dispensing.
Dispensing Functions
The water, crushed ice, and cubed ice functions are controlled by the main control board. To select a function, press the appropriate pad on the dispenser. The LED will light to identify the selection.
To dispense ice cubes or crushed ice, choose the appropriate pad and depress the dispenser cradle. The solenoid and linkage assembly will open the ice chute duct door to dispense the ice. If cubed ice is selected, a solenoid located behind the ice bucket will lift a rod along the side of the bucket. This rod pulls a flapper away from the cutter blades, allowing cubes to bypass the ice crusher. The dispenser duct door will remain open for approximately 3 seconds after dispensing to allow all ice to clear the chute.
The dispenser light LEDs will come on automatically when the dispenser cradle is pressed and will fade out 5 seconds after it is released.
Dispenser Lock
When the dispenser system is locked, no dispenser command will be accepted. This includes the dispenser cradle and will prevent accidental dispensing that may be caused by children or pets. If the touch screen, pad, or the cradle is depressed with the system locked, it will be acknowledged with three pulses of the LOCK LED accompanied by an audible tone.
To lock or unlock communication between the dispenser and main control board, press the LOCK pad and hold it for 3 seconds. The LOCK LED will flash while the LOCK pad is pressed. When the communication is locked, the LOCK LED will be illuminated.
On some models, the status of other functions selected prior to the initiation of the lock feature will be displayed. If the lock is engaged while a mode is active, the LED will remain on until that mode times out.
If the lock is engaged when the filter timer expires, the LED will come on but cannot be reset until the lock is turned off.
The lock feature will be restored in the event of a power disruption.
Liner Protection Mode
The dual evaporator model has separate liner protection modes for each section. The specific evaporator fan (freezer or fresh food) will start and run on high speed if the door has been open for 3 minutes.
This mode is controlled by 2 timers. Timer #1 monitors door-open time. A 3-minute door-open count begins when the door is opened. If 3 minutes elapse before the door is closed, the liner protection mode will become active. Once the door is closed, timer #1 resets and liner protection mode goes into standby. In standby, normal fan operation resumes and timer #2 begins a 3-minute door-closed count. If 3 minutes elapse without a door opening, liner protection mode will completely deactivate. If a door is opened within the timer #2 door-closed count, the remaining time in the door-closed count will be deducted from the timer #1 door-open count.
– 18 –
Downloaded from www.Manualslib.com manuals search engine
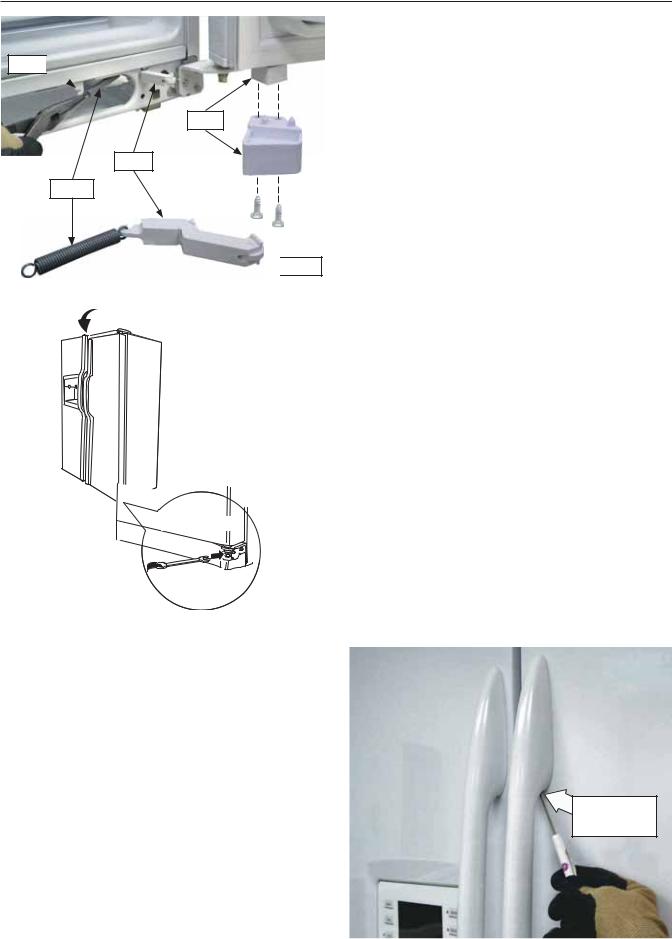
About the refrigerator doors.
Hook 
Cam
Lever
Spring

 Roller
Door Closure Mechanism
The closure mechanism consists of a lever, attached with a spring to a hook in the base channel, which interacts with a cam mounted to the bottom of each door with two T-20 Torx screws. A pair of pliers can be used to remove the spring from the hook. The spring and lever can then be pulled out through the hole in the base channel.
Door Alignment
If doors are uneven, adjust the refrigerator door.
1. Using a 7/16-in. wrench, turn the door adjusting screw to the right to raise the door, to the left to lower it. (A nylon plug, imbedded in the threads of the pin, prevents the pin from turning unless a wrench is used.)
2. After one or two turns of the wrench, open
7/16Wrench-in.
and close the refrigerator door and check the alignment at the top of the doors.
 Raise
Raise
Door Handle Removal
Note: Each door handle is held to an upper and lower fastener and locked in position by a recessed tab. Each fastener is located behind the handle and attached to the door panel.
Using a flat blade screwdriver, press the tab on the top underside of the handle toward the front of the handle while sliding the handle up and off of the mounting fasteners.
Door Handle Installation
Install the handle to the handle mounting fasteners by aligning the slots with the handle mounting fasteners. Slide the handle down until it is firmly locked into position.
Recessed Tab
Location
– 19 –
Downloaded from www.Manualslib.com manuals search engine

Components Locator Views
Rear View (Non-Inverter model shown)
|
|
Main Control Board |
|
|
|
Condenser Fan |
3-Way Valve |
|
Compressor |
|
|
|
|
|
|
Water Valve |
|
Dryer |
Condenser |
|
|
|
Jumper Tube
Rear View (Inverter model shown with drain tube and selected wiring removed for clearer view.)
Compressor
Inverter
(Continued next page)
– 20 –
Downloaded from www.Manualslib.com manuals search engine
 Loading...