


GE PSB48YSKCSS, PSB48YSKBSS, PSB42YSKCSS, PSB42YSKBSS, CSB48WSKCSS Owner’s Manual
...REFRIGERATORS
Side by Side
SAFETY INSTRUCTIONS. . . . . 3
USING THE REFRIGERATOR
Controls . . . . . . . . . . . . . . . . . . . . . . . . . . 5
Dispenser . . . . . . . . . . . . . . . . . . . . . . . . . 7
Automatic Icemaker. . . . . . . . . . . . . . . . 8
Water Filter . . . . . . . . . . . . . . . . . . . . . . . 9
Climate Controlled Drawer . . . . . . . . . 10
Storage Drawers. . . . . . . . . . . . . . . . . . . 11
Shelves . . . . . . . . . . . . . . . . . . . . . . . . . . 12
Bins and Baskets . . . . . . . . . . . . . . . . . 13
Care and Cleaning . . . . . . . . . . . . . . . . 14
INSTALLATION INSTRUCTIONS
Preparing to Install the
Refrigerator. . . . . . . . . . . . . . . . . . . . . . 16 Installing the Refrigerator. . . . . . . . . . 19
TROUBLESHOOTING TIPS. . 26
Normal Operating Conditions . . . . . . 25
CONSUMER SUPPORT
MWF Performance Data Sheet. . . . . . 29
MWF Water Filter Cartridge
Limited Warranty . . . . . . . . . . . . . . . 30
Warranty . . . . . . . . . . . . . . . . . . . . . . . . 31
Consumer Support . . . . . . . . . . . . . . . . 32
Write the model and serial numbers here:
Model #_________________
Serial # _________________
Find these numbers on a label on the left side, near the middle of the refrigerator compartment.
OWNER’S MANUAL &
INSTALLATION
INSTRUCTIONS
PSB42
PSB48
CSB42
CSB48
ENGLISH/FRANÇAIS/
ESPAÑOL
GE is a trademark of the General Electric Company. Manufactured under trademark license.
49-60814 01-18 GEA

THANK YOU FOR MAKING GE APPLIANCES A PART OF YOUR HOME.
Whether you grew up with GE Appliances, or this is your first, we’re happy to have you in the family.
We take pride in the craftsmanship, innovation and design that goes into every GE Appliances product, and we think you will too. Among other things, registration of your appliance ensures that we can deliver important product information and warranty details when you need them.
Register your GE appliance now online. Helpful websites and phone numbers are available in the Consumer Support section of this Owner’s Manual. You may also mail in the pre-printed registration card included in the packing material.
2 |
|
49-60814 |

IMPORTANT SAFETY INFORMATION
READ ALL INSTRUCTIONS BEFORE USING THE APPLIANCE
 WARNING To reduce the risk of fire, explosion, electric shock, or injury when using your refrigerator, follow these basic safety precautions:
Ŷ 7KLV UHIULJHUDWRU PXVW EH SURSHUO\ LQVWDOOHG |
Ŷ 7R SUHYHQW VXIIRFDWLRQ DQG HQWUDSPHQW KD]DUGV |
|
DQG ORFDWHG LQ DFFRUGDQFH ZLWK WKH ,QVWDOODWLRQ |
WR FKLOGUHQ UHPRYH WKH IUHVK IRRG DQG IUHH]HU |
|
,QVWUXFWLRQV EHIRUH LW LV XVHG |
doors from any refrigerator before disposing of it or |
|
Ŷ 8QSOXJ WKH UHIULJHUDWRU EHIRUH PDNLQJ UHSDLUV RU |
discontinuing its use. |
|
cleaning. |
Ŷ 7R DYRLG VHULRXV LQMXU\ RU GHDWK FKLOGUHQ VKRXOG QRW |
|
NOTE: Power to the refrigerator cannot be |
stand on, or play in or with the appliance. |
|
disconnected by any setting on the control panel. |
Ŷ &KLOGUHQ DQG SHUVRQV ZLWK UHGXFHG SK\VLFDO VHQVRU\ |
|
NOTE: Repairs must be performed by a qualified |
||
or mental capabilities or lack of experience and |
||
Service Professional. |
||
knowledge can use this appliance only if they are |
||
|
||
Ŷ 5HSODFH DOO SDUWV DQG SDQHOV EHIRUH RSHUDWLQJ |
supervised or have been given instructions on safe |
|
Ŷ 'R QRW XVH DQ H[WHQVLRQ FRUG |
XVH DQG XQGHUVWDQG WKH KD]DUGV LQYROYHG |
|
Ŷ 7KLV DSSOLDQFH LV LQWHQGHG WR EH XVHG LQ KRXVHKROG |
||
Ŷ 'R QRW VWRUH RU XVH JDVROLQH RU RWKHU IODPPDEOH |
||
and similar applications such as: staff kitchen areas |
||
vapors and liquids in the vicinity of this or any other |
||
LQ VKRSV RIILFHV DQG RWKHU ZRUNLQJ HQYLURQPHQWV |
||
appliance. |
||
IDUP KRXVHV E\ FOLHQWV LQ KRWHOV PRWHOV EHG |
||
Ŷ 'R QRW VWRUH H[SORVLYH VXEVWDQFHV VXFK DV DHURVRO |
||
EUHDNIDVW DQG RWKHU UHVLGHQWLDO HQYLURQPHQWV |
||
cans with a flammable propellant in this appliance. |
catering and similar non-retail applications. |

 CAUTION To reduce the risk of injury when using your refrigerator, follow these basic safety precautions.
Ŷ 'R QRW FOHDQ JODVV VKHOYHV RU FRYHUV ZLWK ZDUP water when they are cold. Glass shelves and covers may break if exposed to sudden temperature changes or impact, such as bumping or dropping. Tempered glass is designed to shatter into many small pieces if it breaks.
Ŷ .HHS ILQJHUV RXW RI WKH ³SLQFK SRLQW´ DUHDV clearances between the doors and between the doors and cabinet are necessarily small. Be careful closing doors when children are in the area.
Ŷ 'R QRW WRXFK WKH FROG VXUIDFHV LQ WKH IUHH]HU compartment when hands are damp or wet, skin may stick to these extremely cold surfaces.
Ŷ 'R QRW UHIUHH]H IUR]HQ IRRGV ZKLFK KDYH WKDZHG completely.
Ŷ ,Q UHIULJHUDWRUV ZLWK DXWRPDWLF LFH PDNHUV DYRLG contact with the moving parts of the ejector mechanism, or with the heating element that
UHOHDVHV WKH FXEHV 'R QRW SODFH ILQJHUV RU KDQGV on the automatic ice making mechanism while the
IUHH]HU LV SOXJJHG LQ
STATE OF CALIFORNIA PROPOSITION 65 WARNINGS
 WARNING This product contains one or more chemicals known to the State of California to cause cancer and birth defects or other reproductive harm.
INSTALLATION

 WARNING
 EXPLOSION HAZARD
.HHS IODPPDEOH PDWHULDOV DQG YDSRUV VXFK DV JDVROLQH DZD\ IURP UHIULJHUDWRU )DLOXUH WR GR VR FDQ UHVXOW LQ ILUH explosion, or death.

 WARNING

 Tip Over Hazard.
These appliances are top heavy, especially with any doors open, and must be secured to prevent tipping forward which could result in death or serious injury. Read and follow the entire installation instructions for securing the appliance with the anti-tip system.
READ AND SAVE THESE INSTRUCTIONS
INFORMATION SAFETY
49-60814 |
3 |

SAFETY INFORMATION
IMPORTANT SAFETY INFORMATION
READ ALL INSTRUCTIONS BEFORE USING THE APPLIANCE
CONNECTING ELECTRICITY

 WARNING
 ELECTRICAL SHOCK HAZARD
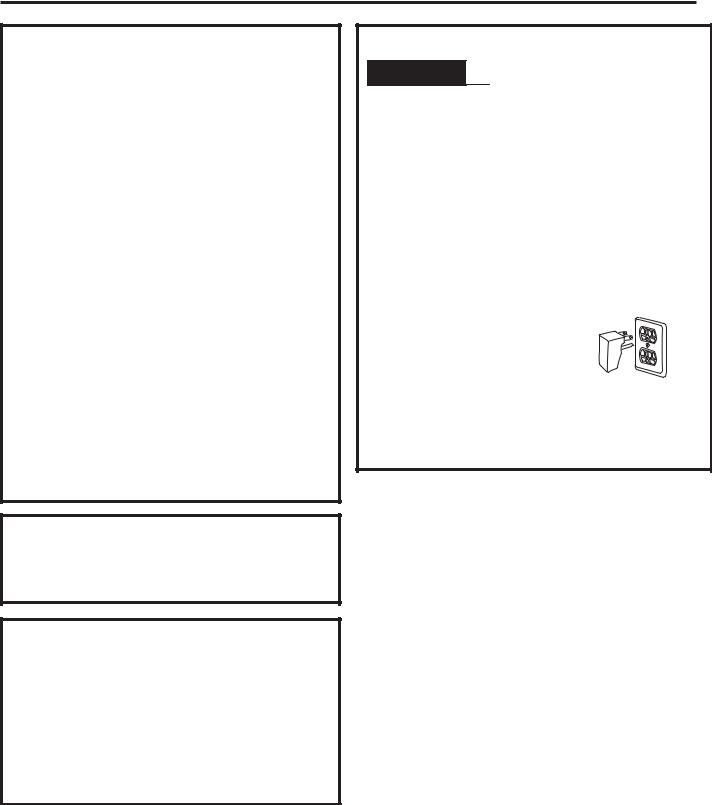
Plug into a grounded 3-prong outlet
'R QRW UHPRYH WKH JURXQG SURQJ 'R QRW XVH DQ DGDSWHU
)DLOXUH WR IROORZ WKHVH LQVWUXFWLRQV FDQ UHVXOW LQ GHDWK ILUH RU HOHFWULFDO VKRFN
Do not, under any circumstances, cut or remove the third (ground) prong from the power cord. For personal safety, this appliance must be properly grounded.
The power cord of this appliance is equipped with a 3-prong (grounding) plug which mates with a standard
SURQJ JURXQGLQJ ZDOO RXWOHW WR PLQLPL]H WKH SRVVLELOLW\ RI HOHFWULF VKRFN KD]DUG IURP WKLV DSSOLDQFH
Have the wall outlet and circuit checked by a qualified electrician to make sure the outlet is properly grounded.
Where a standard 2-prong wall outlet is encountered, it is your personal responsibility and obligation to have it replaced with a properly grounded 3-prong wall outlet.
'R QRW XVH DQ DGDSWHU
The refrigerator should always be plugged into its own individual electrical outlet which has a voltage rating that matches the rating plate.
$ 9ROW $& +] RU DPS IXVHG JURXQGHG electrical supply is required. This provides the best performance and also prevents overloading house
ZLULQJ FLUFXLWV ZKLFK FRXOG FDXVH D ILUH KD]DUG IURP overheated wires.
Never unplug your refrigerator by pulling on the power cord. Always grip plug firmly and pull straight out from the outlet.
,PPHGLDWHO\ GLVFRQWLQXH XVH RI D GDPDJHG VXSSO\
FRUG ,I WKH VXSSO\ FRUG LV GDPDJHG LW PXVW EH replaced by a qualified service professional with an
DXWKRUL]HG VHUYLFH SDUW IURP WKH PDQXIDFWXUHU
When moving the refrigerator away from the wall, be careful not to roll over or damage the power cord.
PROPER DISPOSAL OF YOUR OLD REFRIGERATOR

 WARNING SUFFOCATION AND ENTRAPMENT HAZARD
)DLOXUH WR IROORZ WKHVH GLVSRVDO LQVWUXFWLRQV FDQ UHVXOW LQ GHDWK RU VHULRXV LQMXU\
IMPORTANT: Child entrapment and suffocation |
Before You Throw Away Your Old Appliance |
|
are not problems of the past. Junked or abandoned |
Ŷ 7DNH RII WKH IUHVK IRRG DQG IUHH]HU GRRUV |
|
refrigerators are still dangerous even if they will sit |
Ŷ Leave the shelves in place so that children may not |
|
IRU ³MXVW D IHZ GD\V ´ ,I \RX DUH JHWWLQJ ULG RI \RXU ROG |
||
easily climb inside. |
||
refrigerator, please follow the instructions below to help |
||
|
||
prevent accidents. |
|
Refrigerant and Foam Disposal:
'LVSRVH RI DSSOLDQFH LQ DFFRUGDQFH ZLWK )HGHUDO DQG /RFDO 5HJXODWLRQV &RQWDFW \RXU ORFDO DXWKRULWLHV IRU WKH environmentally safe disposal of your appliance.
READ AND SAVE THESE INSTRUCTIONS
4 |
49-60814 |
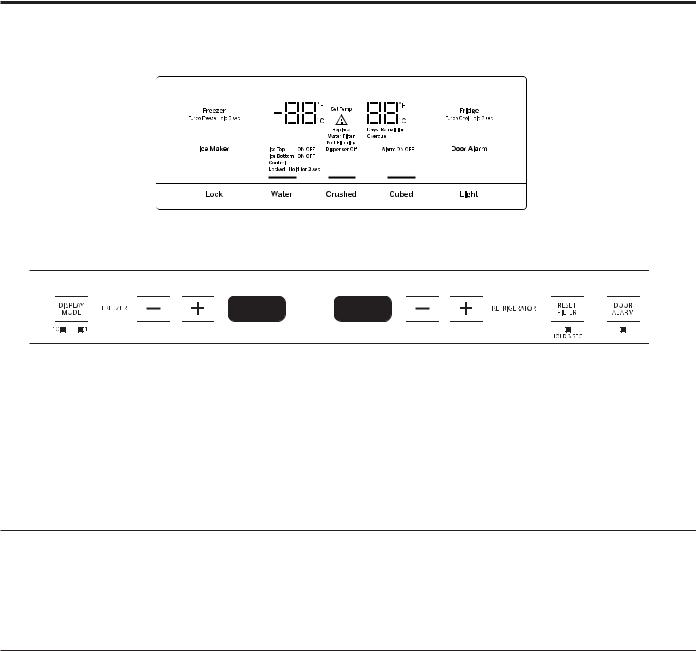
Controls
'LVSHQVH 0RGHOV
Non-dispense Models
NOTE: The refrigerator is shipped with protective film covering the temperature controls.
,I WKLV ILOP ZDV QRW UHPRYHG GXULQJ LQVWDOODWLRQ UHPRYH LW QRZ
7KH WHPSHUDWXUH FRQWUROV DUH SUHVHW LQ WKH IDFWRU\ DW ) & IRU WKH UHIULJHUDWRU FRPSDUWPHQW DQG ) & IRU WKH IUHH]HU FRPSDUWPHQW $OORZ KRXUV IRU WKH WHPSHUDWXUH WR VWDELOL]H WR WKH SUHVHW UHFRPPHQGHG VHWWLQJV
The temperature controls can display both the SET temperature as well as the actual temperature in the refrigerator
DQG IUHH]HU 7KH DFWXDO WHPSHUDWXUH PD\ YDU\ VOLJKWO\ IURP WKH SET temperature based on usage and operating environment.
Changing the Temperature for Non-dispense Models
To change the temperature, press and release the |
To turn OFF cooling system, press and hold either (+) |
(+) or (-) pad to the desired temperature set point for |
pad until both displays show OFF. |
IUHVK IRRG DQG IUHH]HU VHSDUDWHO\ $OORZ KRXUV IRU WKH |
|
refrigerator to reach the temperature you have set. |
|
Changing the Temperature for Dispense Models
To change the temperature, press and release the |
To turn OFF cooling system, press and hold Fridge |
Freezer or Fridge pad. The display will show the set |
and Ice Maker simultaneously for 3 seconds. When the |
temperature. To change the temperature, press either the |
cooling system is OFF the display should read OFF. |
Freezer or Fridge pad until the desired temperature is |
|
displayed. |
|
Controls REFRIGERATOR: THE USING
49-60814 |
5 |

USING THE REFRIGERATOR: Controls
Controls
Not all features available on all models.
Refrigerator temp control $GMXVW IUHH]HU FRPSDUWPHQW WHPSHUDWXUH
Fresh food temp control
Adjust fresh food compartment temperature.
TurboFreeze™ setting
$FWLYDWH 7XUER)UHH]H WR TXLFNO\ UHVWRUH IUHH]HU temperatures after frequent door openings.
TurboCool™ setting
Activate TurboCool to quickly restore fresh food temperature after frequent door openings.
Lock controls
Press and hold 3 seconds to lock out ice and water dispenser and all feature and temperature buttons.
LED dispenser light
/(' OLJKWLQJ WKDW FDQ EH WXUQHG RQ RII WR OLJKW \RXU dispenser.
Door Alarm
6RXQGV WR DOHUW ZKHQ WKH IUHH]HU RU IUHVK IRRG GRRUV have been open for more than 2 minutes. Press and hold Door Alarm pad and it will toggle the sound between low, high and off.
Ice maker setting
7XUQ \RXU LFH PDNHUV RQ RII
Cooling system On/Off
3UHVV DQG KROG )ULGJH ,FH 0DNHU VLPXOWDQHRXVO\ IRU
3 seconds to turn the cooling system on or off.
Metric/English units
3UHVV DQG KROG ,FH 0DNHU GRRU DODUP VLPXOWDQHRXVO\ for 3 seconds to switch between Metric & English units.
Display mode, °C/°F
&KDQJH WHPSHUDWXUH GLVSOD\ EHWZHHQ )DKUHQKHLW DQG
Celsius.
Reset water filter
3UHVV DQG KROG WKH 5(6(7 ),/7(5 %XWWRQ IRU QRQ dispense models or press and hold the WATER button for dispense models to reset the filter indicator.
6 |
49-60814 |

Ice and Water Dispenser (On some models.)
To dispense water or ice: select
Water, Crushed, or Cubed. Press the glass gently against the top of the dispenser cradle.
The drip tray is not self-draining. To reduce water spotting, the shelf and its grille should be cleaned regularly.
,I QR ZDWHU LV GLVSHQVHG ZKHQ the refrigerator is first installed, there may be air in the water line system. Press the dispenser
cradle for at least two minutes to remove trapped air from
the water line and to fill the water system. To flush out impurities in the water line, throw away the first gallon
OLWHUV RI ZDWHU
 CAUTION Never put fingers or any other objects into the ice crusher discharge opening.
Locking the Dispenser:
Touch Lock for 3 seconds to lock the dispenser and control pad. To unlock, touch Lock again for 3 seconds.
Light:
This feature turns the light on and off. The light also
FRPHV RQ ZKHQ WKH GLVSHQVHU FUDGOH LV SUHVVHG ,I WKLV light burns out, contact factory service.
Ice Storage Drawer on Dispenser Models
To remove:
Lift up the access door to reach the icemaker. Set the icemaker power switch to the OFF position. With the access door closed, support the storage bin at the bottom while slightly lifting. Pull bin straight out.
$FFHVV 'RRU
,FH 6WRUDJH %LQ
To replace:
Slide the bin back until the tab on the bin locks into the
VORW RQ WKH VKHOI ,I WKH ELQ GRHV QRW JR DOO WKH ZD\ EDFN
UHPRYH LW DQG URWDWH WKH GULYH PHFKDQLVP WXUQ 7KHQ push the bin back again.
Rotate
Drive
Mechanism
Important Facts About Your Dispenser
Ŷ 'R QRW DGG LFH IURP WUD\V RU EDJV WR WKH VWRUDJH ELQ ,W may not crush or dispense well.
Ŷ $YRLG RYHUILOOLQJ JODVV ZLWK LFH DQG XVH RI QDUURZ JODVVHV
Backed-up ice can jam the chute or cause the door in the
FKXWH WR IUHH]H VKXW ,I LFH LV EORFNLQJ WKH FKXWH SRNH LW through with a wooden spoon.
Ŷ %HYHUDJHV DQG IRRGV VKRXOG QRW EH TXLFN FKLOOHG LQ WKH ice storage bin. Cans, bottles or food packages in the storage bin may cause the icemaker or auger to jam.
Ŷ 7R NHHS GLVSHQVHG LFH IURP PLVVLQJ WKH JODVV SXW WKH glass close to, but not touching, the dispenser opening.
Ŷ 6RPH FUXVKHG LFH PD\ EH GLVSHQVHG HYHQ WKRXJK \RX selected Cubed. This happens occasionally when a few cubes have been left in the crusher.
Ŷ $IWHU FUXVKHG LFH LV GLVSHQVHG VRPH ZDWHU PD\ GULS IURP the chute.
Ŷ 6RPHWLPHV D VPDOO PRXQG RI VQRZ ZLOO IRUP RQ WKH GRRU in the ice chute. This condition is normal and usually occurs when you have dispensed crushed ice repeatedly. The snow will eventually evaporate.
Ŷ 7KH ILUVW JODVV RI ZDWHU GLVSHQVHG PD\ EH ZDUPHU WKDQ the following ones. This is normal.
Ŷ 'LVSHQVHG ZDWHU LV QRW LFH FROG )RU FROGHU ZDWHU VLPSO\ add crushed ice or cubes before dispensing water.
Ŷ 7R HOLPLQDWH GULSV RQ WKH GULS WUD\ WLOW WKH JODVV LQ slightly when dispensing water.
'LVSHQVHU:DWHUDQG,FHREFRIGERATOR: THE USING
49-60814 |
7 |
USING THE REFRIGERATOR:$XWRPDWLF,FHPDNHU
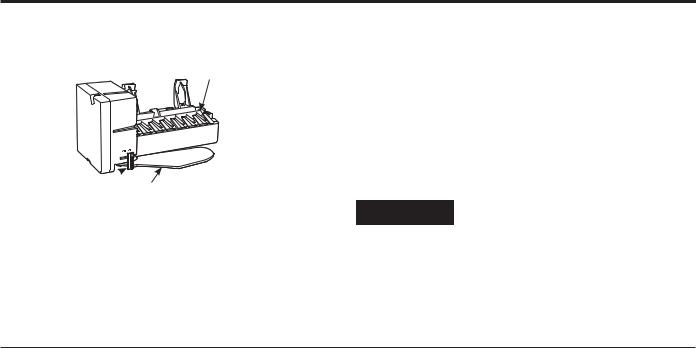
Automatic Icemaker
A newly-installed refrigerator may take 12–24 hours to begin making ice.
Automatic Icemaker
Power
Switch )HHOHU $UP
,FHPDNHU |
When the refrigerator has been connected to the water |
|
supply, set the power switch on the icemaker to ON. |
|
)RU GLVSHQVH PRGHOV WKH LFHPDNHU FDQ EH WXUQHG RQ DQG |
|
off using the power switch on the icemaker or by using |
|
the Ice Maker EXWWRQ RQ WKH FRQWURO SDQHO ,I \RX XVH WKH |
|
control panel to turn the icemaker off you will have to use |
|
the control panel to turn it back on. The same is true for the |
|
power switch on the icemaker. |
The icemaker will produce seven cubes per cycle— approximately 15 cycles in a 24-hour period, depending
RQ IUHH]HU FRPSDUWPHQW WHPSHUDWXUH URRP WHPSHUDWXUH number of door openings and other use conditions.
,I WKH UHIULJHUDWRU LV RSHUDWHG EHIRUH WKH ZDWHU FRQQHFWLRQ is made to the icemaker, set the power switch on the icemaker to OFF.

 CAUTION Avoid contact with the moving parts of the ejector mechanism, or with the heating element (located on the bottom of the ice maker) that releases the cubes. Do not place fingers or hands on the automatic ice making mechanism while the refrigerator is plugged in.
Important Facts About Your Icemaker
Ŷ <RX PD\ KHDU D EX]]LQJ VRXQG HDFK WLPH WKH LFHPDNHU fills with water.
Ŷ Throw away the first few batches of ice to allow the water line to clear.
Ŷ Be sure nothing interferes with the sweep of the feeler arm.
Ŷ When the bin fills to the level of the feeler arm, the
LFHPDNHU ZLOO VWRS SURGXFLQJ LFH ,W LV QRUPDO IRU VHYHUDO cubes to be joined together.
Ŷ ,I LFH LV QRW XVHG IUHTXHQWO\ ROG LFH FXEHV ZLOO EHFRPH cloudy, taste stale and shrink.
NOTE: ,Q KRPHV ZLWK ORZHU WKDQ DYHUDJH ZDWHU SUHVVXUH you may hear the icemaker cycle multiple times when
PDNLQJ RQH EDWFK RI LFH ,FHPDNHU ZRUNV EHVW EHWZHHQ DQG SVL N3D
|
49-60814 |

Water Filter Cartridge (On some models.)
Water filter cartridge |
Installing the filter cartridge |
The water filter cartridge is located behind the upper cover at the top of the refrigerator.
When to replace the filter on models with a replacement indicator light
There is a replacement indicator light for the water filter cartridge on the dispenser. This light will turn orange to tell you that you need to replace the filter soon.
The filter cartridge should be replaced when the replacement indicator light turns red or if the flow of water to the dispenser or icemaker decreases.
Removing the filter cartridge
'LVSHQVH 0RGHOV
1RQ 'LVSHQVH 0RGHOV
,I \RX DUH UHSODFLQJ WKH FDUWULGJH ILUVW UHPRYH WKH ROG one by slowly turning it to the left. Do not pull down on the cartridge. A small amount of water may drip down.
NOTE: To reduce the risk associated with property damage due to water leakage, read and follow instructions before installation and use of this system.
,QVWDOODWLRQ DQG XVH 0867 FRPSO\ ZLWK DOO VWDWH DQG ORFDO plumbing codes.
1)LOO WKH UHSODFHPHQW FDUWULGJH ZLWK ZDWHU IURP WKH tap to allow for better flow from the dispenser immediately after installation.
2Line up the arrow on the cartridge and the cartridge holder. Place the top of the new cartridge up inside the holder. Do not push it up into the holder.
3Slowly turn it to the right until the
ILOWHU FDUWULGJH VWRSV '2 127
29(57,*+7(1 $V \RX WXUQ WKH cartridge it will automatically raise CartridgeHolder
itself into position. The cartridge
ZLOO PRYH DERXW D WXUQ
4Run water from the dispenser for
JDOORQV OLWHUV DERXW WKUHH PLQXWHV WR clear the system and prevent sputtering.
53UHVV DQG KROG WKH 5(6(7 ),/7(5 %XWWRQ IRU QRQ dispense models or press and hold the WATER button for dispense models to reset the filter indicator.
NOTE: A newly installed water filter cartridge may cause water to spurt from the dispenser.
Filter bypass plug |
|
You must use the filter bypass plug |
|
when a replacement filter cartridge is |
)LOWHU |
not available. The dispenser and the |
Bypass |
icemaker will not operate without the filter |
Plug |
or filter bypass plug. |
|

 WARNING
To reduce the risk associated with choking, do not allow children under 3 years of age to have access to small parts during the installation of this product.
The disposable filter cartridge should be replaced every 6 months at the rated capacity, or sooner if noticeable reduction in flow rate occurs.
)RU WKH PD[LPXP EHQHILW RI \RXU ILOWUDWLRQ V\VWHP *( $SSOLDQFHV UHFRPPHQGV WKH XVH RI *( $SSOLDQFHV EUDQGHG ILOWHUV RQO\ 8VLQJ *( $SSOLDQFHV EUDQGHG ILOWHUV LQ *( $SSOLDQFHV DQG +RWSRLQW UHIULJHUDWRUV SURYLGHV RSWLPDO
SHUIRUPDQFH DQG UHOLDELOLW\ *( $SSOLDQFHV ILOWHUV PHHW ULJRURXV LQGXVWU\ 16) VWDQGDUGV IRU VDIHW\ DQG TXDOLW\ WKDW are important for products that are filtering your water. GE Appliances has not qualifed non-GE Appliances branded filters for use in GE Appliances and Hotpoint refrigerators and there is no assurance that non-GE Appliances branded filters meet GE Appliances standards for quality, performance and reliability.
If you have questions, or to order additional filter cartridges, visit our website at www.gewaterfilters.com or call GE Appliances Parts and Acessories, 877.959.8688. In Canada, call 800.661.1616.
&DUWULGJH)LOWHU:DWHU REFRIGERATOR: THE USING
49-60814 |
9 |

USING THE REFRIGERATOR:&OLPDWH&RQWURO'UDZHU
Climate Control Drawer
The Climate Control feature is a system of dampers, a fan, a temperature thermistor, and a heater. The Climate Control drawer can be used to store items at their optimum temperatures.
The drawer is tightly sealed to prevent the drawer’s temperature from causing temperature fluctuations in the rest of the refrigerator.
SELECT TEMP—8VH WKLV IHDWXUH WR VWRUH LWHPV DW their optimum temperatures. See Climate Control Chart below.
CONTROL LOCK—8VH WKLV IHDWXUH WR ORFN WKH temperature controls.
NOTE: When the controls on the Climate Control drawer are turned off, the drawer will maintain temperatures at
) &
Climate Control Chart
NOTE: Results may vary depending on packaging, starting
temperature and other food traits.
Citrus Setting (39–47°F) (3.9-8.3°C)
Oranges, Lemons, Limes, Pineapple, Cantaloupe
Beans, Cucumbers, Tomatoes, Peppers, Eggplant,
Squash
Produce Setting (31–38°F) (-0.6 - 3.3°C)
6WUDZEHUULHV 5DVSEHUULHV .LZLIUXLW 3HDUV &KHUULHV
Blackberries, Grapes, Plums, Nectarines, Apples
Asparagus, Broccoli, Corn, Mushrooms, Spinach,
&DXOLIORZHU .DOH *UHHQ 2QLRQV %HHWV 2QLRQV
Meat Setting (27–37°F) (-2.8 - 2.8°C)
5DZ 0HDW )LVK DQG 3RXOWU\
Control Lock
Press and hold this pad for 3 seconds to lock the settings for the Climate Control drawer. To unlock, press and hold for another 3 seconds.
10 |
49-60814 |
Storage Drawers
Sealed Deli Pan
8VH WKH 6HDOHG 'HOL 3DQ IRU WKH FRQYHQLHQW VWRUDJH RI lunch meats and cheese, hors d’oeuvres, spreads and snacks. The pan and shelf to which it is attached can be adjusted to any height.
Excess water that may accumulate in the bottom of the drawers should be emptied and the drawers wiped dry.
Sealed Produce Pan
The top pan is designed to provide constant high humidity levels.
Make sure the drawers are closed completely to maintain the correct humidity level.
Excess water that may accumulate in the bottom of the drawers should be emptied and the drawers wiped dry.
Drawer/Pan Removal
To remove a drawer/pan: |
To replace a drawer/pan: |
|
1. 3XOO WKH GUDZHU SDQ RXW WR WKH VWRS SRVLWLRQ |
1. 3ODFH WKH EDFN RI WKH GUDZHU SDQ LQ WKH ZLUH KROGHU |
|
2. /LIW WKH IURQW RI WKH GUDZHU SDQ XS DQG RXW RI WKH ZLUH |
making sure the wire holder fits into the grooves on |
|
WKH EDFN RI WKH GUDZHU SDQ |
||
holder. |
||
2. /RZHU WKH IURQW RI WKH GUDZHU SDQ LQWR WKH ZLUH KROGHU |
||
3. /LIW WKH EDFN RI WKH GUDZHU SDQ XS DQG RXW |
||
3. 3UHVV ILUPO\ RQ WKH WRS RI WKH GUDZHU SDQ WR VQDS LW |
||
|
||
|
into the wire holder. |
'UDZHUV6WURUDJH REFRIGERATOR: THE USING
49-60814 |
11 |
USING THE REFRIGERATOR: Shelves
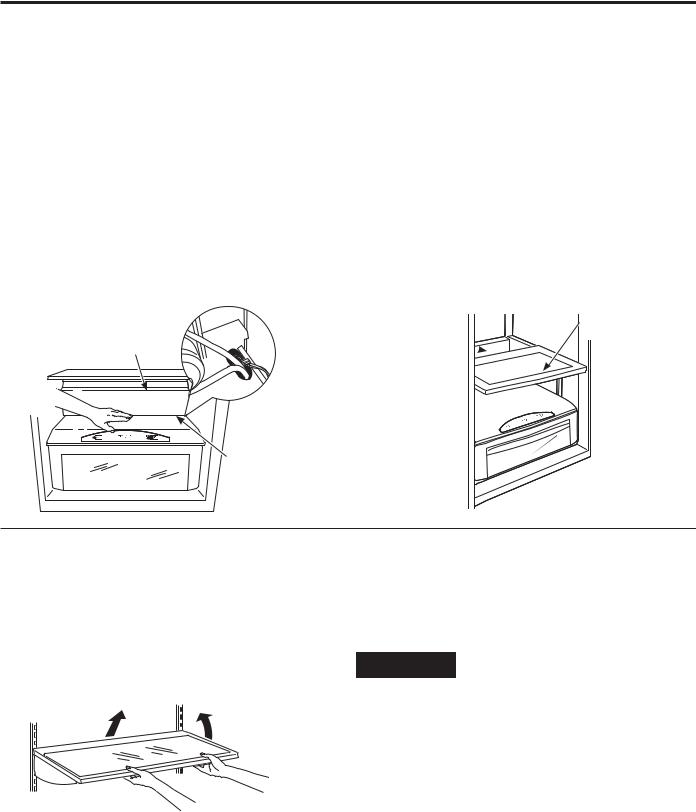
Shelves
Lighted Vegetable Drawer Shelf
The lighted vegetable drawer shelf provides lighting for the lower compartments. The lights are recessed into the shelf to illuminate the drawers below.
To remove shelf:
1.Remove the top drawer (see Drawer/pan removal section).
2.Push down gently on the back center of the climate control drawer top surface to release the bottom of the water tank cover. Pull out and down to remove the water tank cover and expose the wire harness.
3.Lift the shelf and carefully pull forward to expose the wires.
4. 8QSOXJ WKH VKHOI DQG FDUHIXOO\ UHPRYH LW IURP WKH refrigerator.
Water Tank Cover 

Climate
Control
'UDZHU 7RS
Surface
To replace shelf:
1.Carefully set the shelf onto the side rails, leaving the plug exposed.
2.Plug the shelf into the refrigerator.
3.Carefully slide the shelf into place.
4. ,QVHUW WKH ZDWHU WDQN FRYHU WRS ILUVW VR WKDW LW JRHV XS behind the gasket hanging down from the vegetable drawer shelf. Gently push the bottom of the water tank cover until the bottom snaps into the the top of the
&OLPDWH &RQWURO 'UDZHU FRYHU
5. Replace the drawer (see Drawer/pan removal section).
Lighted
Vegetable
Water Tank 'UDZHU 6KHOI
Cover 
To rearrange shelves
Tempered glass shelves in the fresh food compartment
DQG ZLUH VKHOYHV LQ WKH IUHH]HU FRPSDUWPHQW DUH adjustable, enabling you to make efficient shelf arrangements to fit your family’s food storage needs.
To remove shelves:
Tilt shelf up at front, then lift it up and out of tracks on rear wall of refrigerator.
To replace shelves:
Select desired shelf height. With shelf front raised slightly, engage top lugs in tracks at rear of cabinet. Then lower front of shelf until it locks into position.

 CAUTION Handle glass shelves carefully. Glass shelves and covers may break if exposed to impact, such as bumping or dropping. Tempered glass is designed to shatter into many small pieces if it breaks.
12 |
49-60814 |

Bins and Baskets
Door bins
All door bins, except for the deep gallon door bin, are adjustable using one of 2 tabs on each end of the bin. They can be moved up and down to many different positions to meet your storage needs. The deep gallon door bin can be removed for cleaning.
To remove any bin:
Lift the bin up and slide it toward you.
Adjustable
'RRU %LQ
Gallon
'RRU %LQ
Freezer baskets
:LUH VOLGH RXW IUHH]HU EDVNHWV FDQ EH SXOOHG RXW IRU HDV\ DFFHVV WR IUR]HQ IRRGV
To remove:
Pull basket out. Lift the front of the basket up and then take it out.
Baskets and Bins REFRIGERATOR: THE USING
49-60814 |
13 |

CARE AND CLEANING
Care and Cleaning
Cleaning the Outside
The stainless steel panels, door handles and trim.
The stainless steel doors and door handles can be cleaned with a commercially available stainless steel
FOHDQHU &OHDQHUV ZLWK R[DOLF DFLG VXFK DV %DU .HHSHUV )ULHQG 6RIW &OHDQVHU ZLOO UHPRYH VXUIDFH UXVW WDUQLVK
DQG VPDOO EOHPLVKHV 8VH RQO\ D OLTXLG FOHDQVHU IUHH of grit and rub in the direction of the brush lines with a
GDPS VRIW VSRQJH 'R QRW XVH DSSOLDQFH ZD[ RU SROLVK on the stainless steel.
Silver-accented plastic parts.
Wash parts with soap or other mild detergents. Wipe clean with a sponge, damp cloth or paper towel.
'R QRW XVH VFRXULQJ SDGV SRZGHUHG FOHDQHUV EOHDFK RU cleaners containing bleach because these products can scratch and weaken the paint finish.
Should drip tray need cleaning use lime remover.
Cleaning the Inside
To help prevent odors, leave an open box of baking
VRGD LQ WKH UHIULJHUDWRU DQG IUHH]HU FRPSDUWPHQWV
Unplug the refrigerator before cleaning.
,I WKLV LV QRW SUDFWLFDO ZULQJ H[FHVV PRLVWXUH RXW RI sponge or cloth when cleaning around switches, lights or controls.
8VH DQ DSSOLDQFH ZD[ SROLVK RQ WKH LQVLGH VXUIDFH between the doors.
8VH ZDUP ZDWHU DQG EDNLQJ VRGD VROXWLRQ DERXW D tablespoon (15 ml) of baking soda to a quart (1 liter) of
ZDWHU 7KLV ERWK FOHDQV DQG QHXWUDOL]HV RGRUV 5LQVH DQG wipe dry.

 CAUTION 'R QRW FOHDQ JODVV VKHOYHV RU FRYHUV with warm water when they are cold. Glass shelves and covers may break if exposed to sudden temperature changes or impact such as bumping or dropping. Tempered glass is designed to shatter into many small pieces if it breaks.
'R QRW ZDVK DQ\ SODVWLF UHIULJHUDWRU SDUWV LQ WKH dishwasher.
Behind the Refrigerator
Be careful when moving the refrigerator away from the wall. All types of floor coverings can be damaged, particularly cushioned coverings and those with embossed surfaces.
Raise the leveling legs located at the bottom front of the refrigerator.
Pull the refrigerator straight out and return it to position by pushing it straight in. Moving the refrigerator in a side direction may result in damage to the floor covering or refrigerator.
Lower the leveling legs until they touch the floor.
When pushing the refrigerator back, make sure you don’t roll over the power cord or water supply line.
Preparing for Vacation
Set the icemaker power switch to the OFF position and be sure to shut off the water supply to the refrigerator.
For long vacations or absences, remove food from
WKH UHIULJHUDWRU IUHH]HU 6HW WKH FRQWURO WR 2)) DQG clean the interior with a baking soda solution of one tablespoon (15 ml) of baking soda to one quart (1 liter) of water. Leave the door open.
For shorter vacations, remove perishable foods and leave controls at regular settings. However, if the room
WHPSHUDWXUH LV H[SHFWHG WR GURS EHORZ ) & follow the same instructions as for long vacations.
14 |
49-60814 |
Care and Cleaning
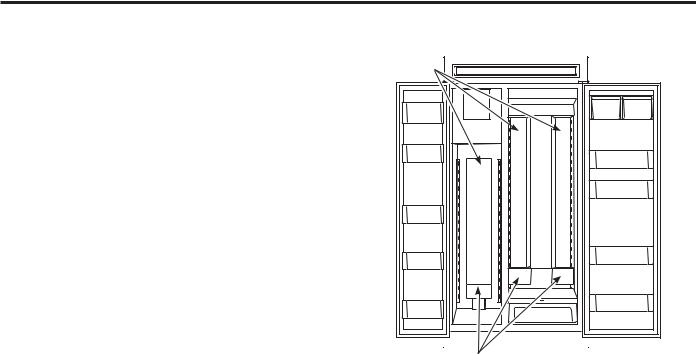
Replacing the Lights
The columns along the back wall of the fresh food and
IUHH]HU FRPSDUHPHQWV DUH OLW XS E\ /(' OLJKWV ORFDWHG behind the top pan in the fresh food compartment and the
ERWWRP EDVNHW LQ WKH IUHH]HU FRPSDUWPHQW
$Q DXWKRUL]HG WHFKQLFLDQ ZLOO QHHG WR UHSODFH WKH /(' light.
,I WKLV DVVHPEO\ QHHGV WR EH UHSODFHG FDOO *( $SSOLDQFHV 6HUYLFH DW LQ WKH 8QLWHG 6WDWHV RULQ &DQDGD
Light |
Columns |
/(' /LJKWV |
CLEANING AND CARE
49-60814 |
15 |
INSTALLATION INSTRUCTIONS
Installation Refrigerator
Instructions
Questions? Call 800.GE.CARES (800.432.2737) or visit our Website at: GEAppliances.com In Canada, call 1.800.561.3344 or visit our Website at: www.GEAppliances.ca
BEFORE YOU BEGIN
Read these instructions completely and carefully.
• IMPORTANT — Save these instructions for local inspector’s use.
• IMPORTANT — Observe all governing codes and ordinances.
•Note to Installer – Be sure to leave these instructions with the Consumer.
•Note to Consumer – .HHS WKHVH LQVWUXFWLRQV IRU future reference.
•Skill level – ,QVWDOODWLRQ RI WKLV DSSOLDQFH UHTXLUHV basic mechanical skills.
•Completion time – 5HIULJHUDWRU ,QVWDOODWLRQ
15minutes
•Proper installation is the responsibility of the installer.
•Product failure due to improper installation is not covered under the Warranty.
 WARNING
 Electrical Shock Hazard.
Plug into a grounded 3-prong outlet.
'R QRW UHPRYH WKH JURXQG SURQJ 'R QRW XVH DQ DGDSWHU
,PPHGLDWHO\ GLVFRQWLQXH XVH RI D GDPDJHG VXSSO\
FRUG ,I WKH VXSSO\ FRUG LV GDPDJHG LW PXVW EH replaced by a qualified service professional with an
DXWKRUL]HG VHUYLFH SDUW IURP WKH PDQXIDFWXUHU 'R QRW XVH DQ H[WHQVLRQ FRUG ZLWK WKLV DSSOLDQFH
)DLOXUH WR IROORZ WKHVH LQVWUXFWLRQV FDQ UHVXOW LQ GHDWK fire, or electrical shock.
)ROORZ WKH LQVWUXFWLRQV LQ WKH VHFWLRQ *URXQGLQJ WKH unit.
This appliance must be installed with a means in the fixed house wiring or circuit breaker for disconnecting the appliance from the electrical supply after installation.
 WARNING
 Explosion Hazard.
.HHS IODPPDEOH PDWHULDOV DQG YDSRUV VXFK DV
JDVROLQH DZD\ IURP DSSOLDQFH )DLOXUH WR GR VR FDQ result in fire, explosion, or death.
 WARNING

 Tip Over Hazard.
These appliances are top heavy, especially with any doors open, and must be secured to prevent tipping forward which could result in death or serious injury. Read and follow the entire installation instructions for securing the appliance with the anti-tip system.
 WARNING To reduce the risk associated with choking, do not allow children under 3 years of age to have access to small parts during the installation of this product.
 CAUTION Lifting Hazard
This unit is very heavy. To reduce the risk of person injury during maneuvering and installing this appliance, 4 people are required for proper installation.
 CAUTION .HHS ILQJHUV RXW RI WKH ³SLQFK SRLQW´
DUHDV FOHDUDQFHV EHWZHHQ WKH GRRUV DQG EHWZHHQ the doors and cabinet are necessarily small. Be careful closing doors when children are in the area.
REFRIGERATOR LOCATION
•'R QRW LQVWDOO WKH UHIULJHUDWRU ZKHUH WKH
WHPSHUDWXUH ZLOO JR EHORZ ) & EHFDXVH it will not run often enough to maintain proper temperatures.
•'R QRW LQVWDOO WKH UHIULJHUDWRU ZKHUH WKH
WHPSHUDWXUH ZLOO JR DERYH ) & EHFDXVH LW will not perform properly.
•'R QRW LQVWDOO WKH UHIULJHUDWRU LQ D ORFDWLRQ H[SRVHG WR water (rain, etc.) or direct sunlight.
•,QVWDOO LW RQ D IORRU VWURQJ HQRXJK WR VXSSRUW LW IXOO\ loaded.
For proper installation, the refrigerator/freezer must be placed on a level surface of hard material the same height as the rest of the flooring. This surface should be strong enough to support a fully loaded refrigerator, or approximately
1,500 lbs. (680.39 kg) each.
16 |
49-60814 |
Installation Instructions
THE INSTALLATION SPACE
42" Models 18"
48" Models 20"
|
|
|
|
|
|
|
|
|
*Finished Width |
|
|
|
|
|
|
|
|
|
|
|||||||||||||
|
|
|
|
|
|
|
|
|
|
|
|
|
|
|
|
|
|
|
|
|
|
|||||||||||
|
|
|
|
|
|
6" |
|
|
|
|
|
|
|
|
|
|
|
|
|
|
|
|
|
|
|
|
|
|||||
|
|
|
|
|
|
|
|
|
|
|
|
|
|
|
|
|
|
|
|
|
|
|
|
|
|
|
||||||
|
|
|
|
|
|
|
|
|
|
|
|
|
|
|
|
|
|
|
|
|
|
|
|
|
|
|
||||||
|
|
|
|
|
|
|
|
|
|
|
|
|
|
|
|
|
|
|
|
|
|
|
|
|
|
|
||||||
85" max |
|
Electrical |
|
|
|
|
|
|
|
|
|
|
|
|
|
|
|
|
|
|
|
|
|
|||||||||
|
Area |
|
|
|
|
|
5" |
|
|
|
|
|
|
|
|
|
|
|
|
|
||||||||||||
Finished |
|
|
|
|
|
|
|
|
|
|
|
|
|
|
|
|
|
|||||||||||||||
|
|
|
|
|
|
|
|
|
|
|
|
|
|
|
|
|
|
|
|
|
|
|
|
|
|
|
||||||
Opening |
|
|
|
|
|
|
|
|
|
|
|
|
|
|
|
|
|
|
|
|
|
|
|
75" From Floor |
||||||||
|
|
|
|
|
|
|
|
|
|
|
|
|
|
|
|
|
|
|
|
|
|
|
|
|
|
|
|
|
||||
|
|
|
|
|
|
24" |
|
|
|
|
|
|
|
|
|
|
|
|
|
|
|
|
|
|
|
to Bottom |
||||||
|
|
|
|
|
|
|
|
|
|
|
|
|
|
|
|
|
|
|
|
|
|
|
|
|
of Electrical |
|||||||
|
|
|
|
|
|
|
|
|
|
|
|
|
|
|
|
|
|
|
|
|
|
|
|
|
|
|
|
|
|
|
Area |
|
|
|
|
|
|
|
|
5" |
|
Water Supply |
|
|
5" |
|
|
|
|
|
|||||||||||||||
|
|
|
|
|
|
|
|
|
|
|
|
|
|
|
||||||||||||||||||
|
|
|
|
|
|
|
|
|
|
|
|
|
|
|
|
|
|
|
|
|||||||||||||
|
|
|
|
|
|
|
|
|
|
|
|
|
|
|
|
|
|
|
|
|
|
|
|
|
|
|
|
|
|
|
|
|
|
|
|
|
|
|
|
|
|
|
|
|
3 1/2" |
|
|
|
|
|
|
|
|
|
|
|
|
||||||||
|
|
|
|
|
|
3 1/2" |
|
|
|
|
|
|
|
|
|
|
|
|
|
|||||||||||||
|
|
|
|
|
|
|
|
|
|
|
|
|
|
|
|
|
||||||||||||||||
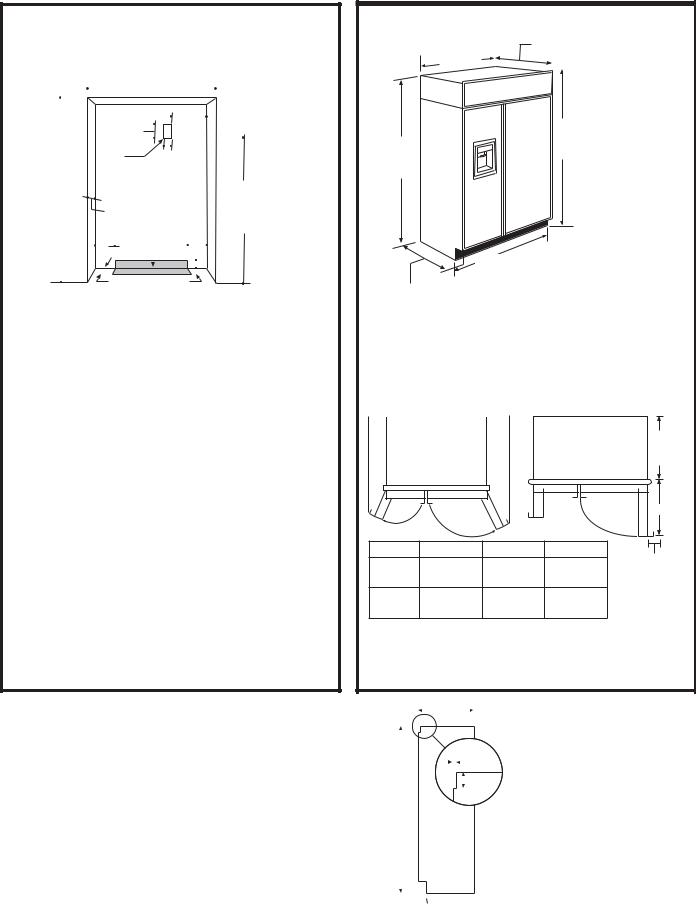
*The finished cutout width must be:
´ FP IRU ´ PRGHOV
´ FP IRU ´ PRGHOV
Water And Electrical Locations
The opening must be prepared with the electrical and the cold water supply located as shown.
The Cutout Depth Must Be 24” (60.96 cm)
The refrigerator will project forward, slightly beyond adjacent cabinetry for standard installation.
Additional Specifications
$ YROW +] RU DPS SRZHU VXSSO\ LV required. An individual properly grounded branch
FLUFXLW RU FLUFXLW EUHDNHU LV UHFRPPHQGHG ,QVWDOO a properly grounded 3-prong electrical receptacle recessed into the back wall. Electrical must be located on the rear wall as shown.
•The water line can enter the opening through the floor or back wall. The water line should be
´ 2 ' FRSSHU WXELQJ RU 6PDUW&RQQHFW kit between the cold water line and water connection location, long enough to extend to the front of the
UHIULJHUDWRU ,QVWDOODWLRQ RI DQ HDVLO\ DFFHVVLEOH shut-off valve in the water line is required.
DIMENSIONS AND CLEARANCES
41", or 47" |
|
26-1/8" |
||
|
||||
Case Width |
|
|
|
|
|
|
|
|
|
|
*84" |
|
*83-1/2" |
From |
|
Floor |
||
at |
||
|
||
Rear |
|
42" or 48"
Frame to Frame
Depth Including Handles: 28-7/8"
*Shipping height. The refrigerator can be adjusted to fit into a cutout
WKDW LV ´
(214.63 cm)
LQ KHLJKW 8VH leveling legs and wheels for
D PD[LPXP ´
(2.54 cm) height adjustment.
Product Clearances
These refrigerators are equipped with a 3-position door stop. The factory-set 115° door swing can be adjusted to 90° if clearance to adjacent cabinets or walls is restricted.
'RRU 6ZLQJ 'RRU 6ZLQJ
 A
A

 B
B 

|
|
|
|
23-7/8" |
|
|
|
|
|
Behind |
|
|
|
|
|
Frame |
|
|
|
|
|
C |
|
Models |
A |
B |
C |
*Min. Distance |
|
´ |
´ |
´ |
´ |
||
to Wall |
|||||
|
(33.02cm) |
FP |
(67.63cm) |
||
|
|
||||
´ |
´ |
´ |
´ |
|
|
|
FP |
FP |
(72.71cm) |
|
)RU D GRRU VZLQJ DOORZ ´ FP PLQ clearance to a wall, for framed and stainless steel
PRGHOV ,I WKH GRRU VWRS SRVLWLRQ LV XVHG SDQ DFFHVV is maintained, but pan removal is restricted.
SIDE PANELS |
|
|
|
|
|
|
|
|
|
|
|
|
24" |
|
|
|
|
|
|
|
|
Side panels must be used whenever the sides of the |
|
|
|
|
|
|
|
|
|
|
|
|
|
|
|
|
|
|
|
||
|
|
|
|
|
|
|
|
|
|
|
|
|
|
|
|||||||
|
|
|
|
|
|
|
|
|
|
|
|
|
|
|
|
|
|
|
|
|
|
|
|
|
|
|
|
|
|
|
|
|
|
|
|
|
|
|
|
|
|
|
|
|
|
|
|
|
|
|
|
|
|
|
|
|
|
|
|
|
|
|
|
|
|
|
|
|
|
|
|
|
|
|
|
|
|
|
|
|
|
|
|
|
|
|
|
UHIULJHUDWRU ZLOO EH H[SRVHG 7KH ´ FP VLGH |
|
|
|
|
|
|
|
|
3/16" |
||||||||||||
|
|
|
|
|
|
|
|
|
|
|
|
|
|
|
|
||||||
panels will slip into the side case trim. Secure the |
|
|
|
|
|
|
|
|
|
|
|
|
|
|
|
|
|
|
|
1-7/8" |
|
|
|
|
|
|
|
|
|
|
|
|
|
|
|
|
|
|
|
|
|||
panels to the refrigerator with stick-on hook and loop |
|
|
|
|
|
|
|
|
|
|
|
|
|
|
|
|
|
||||
|
|
|
|
|
|
|
|
|
|
|
|
|
|
|
|
|
|
|
|
|
|
|
|
|
|
|
|
|
|
|
|
|
|
|
|
|
|
|
|
|
|
|
|
fastener strips. Order the side panels from the cabinet |
|
|
|
|
|
|
|
|
|
|
|
|
|
|
|
|
|
|
|
|
|
*84" |
|
|
|
|
|
|
|
|
|
|
|
|
|
|
|
|
|
|
|
||
manufacturer. |
|
|
|
|
|
|
|
|
|
|
|
|
|
|
|
|
|
|
|
||
|
|
|
|
|
|
|
|
|
|
|
|
|
|
|
|
|
|
|
|
|
|
• Cut a notch in the top front corner as shown to allow |
|
|
|
|
|
|
|
|
|
|
|
|
|
|
|
|
|
|
|
|
|
clearance for corner keys in the front side trim. |
|
|
|
|
|
|
|
|
|
|
|
|
|
|
|
|
|
|
|
|
|
|
|
|
|
|
|
|
|
|
|
|
|
*3" to 4" |
|||||||||
|
|
|
|
|
|
|
|
|
|
|
|||||||||||
|
|
|
|
|
|
|
|
|
|
2-9/16" |
|
|
|
|
'HSHQGLQJ RQ LQVWDOODWLRQ KHLJKW |
||||||
|
|
|
|
|
|
|
|
|
|
|
|
||||||||||
|
|
|
|
|
|
|
|
|
|
|
|
||||||||||
INSTRUCTIONS INSTALLATION
49-60814 |
17 |
INSTALLATION INSTRUCTIONS
Top View
90° DOOR SWING
Scale 1:1
Installation Instructions
|
|
|
|
|
|
|
|
|
|
|
|
|
Frameless Cabinets: |
|
|
|
|
|
|
|
|
|
|
|
|
|
|
The case trim overlaps |
|
|
|
|
|
|
|
|
|
|
|
|
|
|
cabinets at the top |
|
|
|
|
|
|
|
|
|
|
|
|
|
|
and sides. Therefore, |
|
Refrigerator |
|
|
|
|
|
frameless cabinets may |
||||||||
|
|
|
|
|
|
|
|
|
|
Case Trim |
|
require filler strips to |
||
|
|
|
|
|
|
|
|
|
|
|
prevent interference |
|||
|
|
|
|
|
|
|
|
|
|
|
||||
|
|
|
|
|
|
|
|
|
|
|
|
|
||
|
|
|
|
|
|
|
|
|
|
|
|
|
with cabinet door |
|
|
|
|
|
|
|
|
|
|
|
|
|
|
swing. The opening |
|
|
|
|
|
|
|
|
|
|
|
|
|
|
must allow for filler |
|
|
|
|
|
|
|
|
|
|
|
|
|
|
strips. |
|
|
|
|
|
|
|
|
|
|
|
|
|
|
||
|
|
|
|
|
|
|
|
|
23-9/16" |
|
|
|||
|
|
|
|
|
|
|
|
|
|
|
From Rear of |
|||
|
|
|
|
|
|
|
|
|
|
|
Refrigerator |
|
|
|
|
|
|
|
|
|
|
|
|
|
|
|
|
|
|
|
|
|
|
|
|
|
|
|
|
|
|
|
|
|
|
|
|
|
|
|
|
|
|
|
|
|
|
|
|
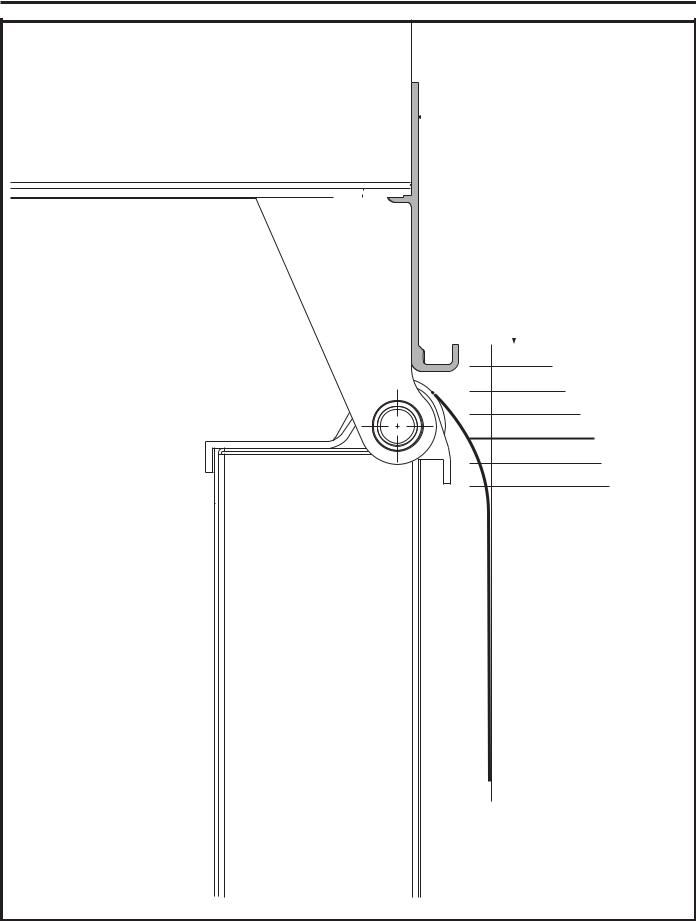
1/4"
1/2"
3/4"
1"
1-1/4"
1-1/2"
Door Stainless
Steel
3/4"
|
49-60814 |
Installation Instructions
TOOLS AND MATERIALS
REQUIRED
•Tinsnips to cut banding
•Stepladder
´ %LW H[WHQVLRQ
•Tape measure
•Gloves
´ 'U\ZDOO VFUHZV
• 5-Gal. Bucket with cover
´ 6SLULW OHYHO
•Appliance hand truck
•Tubing cutter
´ RSHQ HQG ZUHQFK
• #2 Phillips screwdriver
'ULOO DQG DSSURSULDWH ELWV
´ ´ VRFNHW
• Safety glasses
´ RSHQ HQG ZUHQFK
• Pliers
´ ´ &RPER 5DFKHW´ ORQJ [ IRU $QWL 7LS VXSSRUW
´ FRSSHU ZDWHU OLQH WXELQJ RU 6PDUW&RQQHFW
Refrigerator Tubing kits
•Water shut-off valve
•Custom panels for doors and grille panel
•Screws to secure refrigerator to cabinetry
•Stick-on hook and loop fastener strips for
´ VLGH SDQHOV
HARDWARE SUPPLIED
•Water filter bypass plug
•Toekick
´ QXW DQG IHUUXOH
FLOORING
)RU SURSHU LQVWDOODWLRQ WKLV UHIULJHUDWRU PXVW EH placed on a level surface of hard material that is at the same height as the rest of the flooring. This surface should be strong enough to support a fully loaded refrigerator, or approximately 1,500 lbs.
NJ
NOTE: Protect the finish of the flooring. Cut a large section of the cardboard carton and place under the refrigerator where you are working.
GROUNDING THE REFRIGERATOR
 WARNING
 Electrical Shock Hazard.
)DLOXUH WR IROORZ WKHVH LQVWUXFWLRQV FDQ UHVXOW LQ GHDWK fire, or electrical shock.
The power cord of this appliance is equipped with a 3-prong (grounding) plug which mates
with a standard 3-prong (grounding) wall receptacle
WR PLQLPL]H WKH SRVVLELOLW\ RI HOHFWULF VKRFN KD]DUG IURP this appliance.
Have the wall outlet and circuit checked by a qualified electrician to make sure the outlet is properly grounded.
Where a standard 2-prong wall outlet is encountered, it is your personal responsibility and obligation to have it replaced with a properly grounded 3-prong wall outlet.
'2 127 81'(5 $1< &,5&8067$1&(6 &87 25 5(029( 7+( 7+,5' *5281' 3521* )520 7+( 32:(5 &25'
'2 127 86( $1 $'$37(5  3/8* 72 &211(&7 7+( 5()5,*(5$725 72 $ 3521* 287/(7
'2 127 86( $1 (;7(16,21 &25' :,7+ 7+,6 $33/,$1&(
INSTRUCTIONS INSTALLATION
49-60814 |
19 |
INSTALLATION INSTRUCTIONS
Installation Instructions
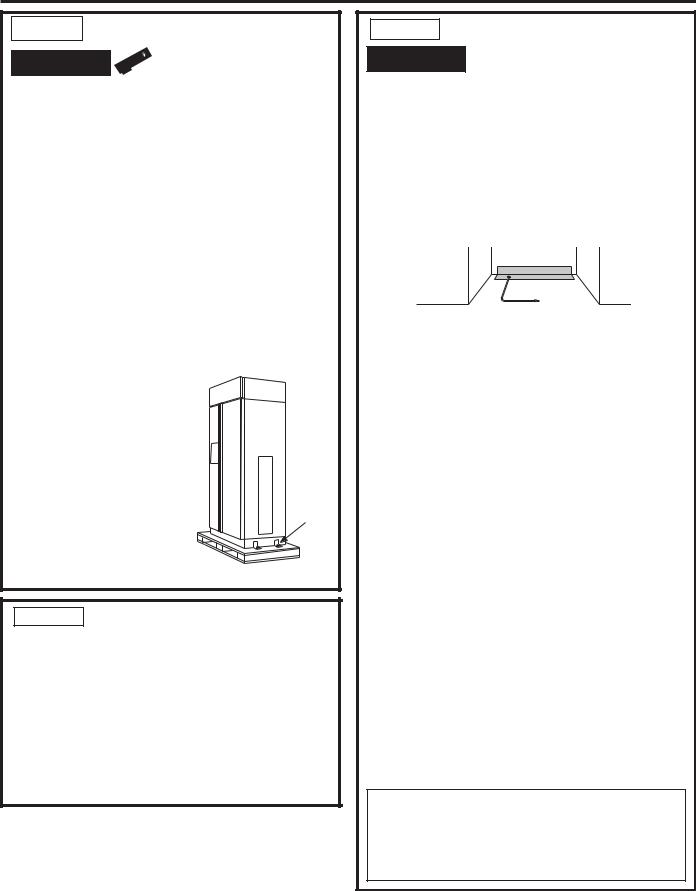
STEP 1 REMOVE PACKAGING
 WARNING

 Tip Over Hazard.
The refrigerator is much heavier at the top than at the bottom—be careful when moving. When using a hand truck, handle from the side only.
•Carefully cut banding at the top and bottom, remove the outer carton.
•Slide out the back corner posts (2).
•Slide the carton off the top of the cabinet.
NOTE: ,7 ,6 127 1(&(66$5< 72 /$< 7+( &$%,1(7 '2:1 ,1 25'(5 72 5(029( 7+( 6.,'
•The unit is secured to the skid with 4 slotted tie-
GRZQ VWUDSV 5HPRYH WKH VL[ ´ EROWV IURP WKH base channels in the tie-downs.
5HPRYH WKH VL[ ´ EROWV VHFXULQJ WKH VWUDSV WR the skid.
NOTE: '2 127 $77(037 72 52// 81,7 2)) 6.,'
• The support blocks on the bottom of the refrigeration
case must be removed |
|
|
|
before the refrigerator is |
|
|
|
taken off the skid or damage |
|
|
|
will occur. Carefully tilt the |
|
|
|
refrigerator and slide the |
|
|
|
blocks out from beneath. |
|
|
|
• Remove the toekick and set |
Toekick |
|
|
aside for final installation. |
Remove |
||
• Lift the refrigerator off the |
Tie Dow |
||
|
|||
skid with an appliance dolly. |
|
|
|
Handle from the sides. |
|
|
STEP 2 MOVE THE
REFRIGERATOR INTO THE HOUSE
•Re-use the corner posts from the packaging to protect stainless steel models. Run the appliance dolly straps over the posts and under the handles.
•Leave the protective film on the refrigerator until installation is complete. IMPORTANT: Never lift the refrigerator by the handle or push against the grille
SDQHO WKLV FRXOG FDXVH GDPDJH RU PLVDOLJQPHQW
•Avoid laying the unit on its back or side to prevent sealed system restrictions.
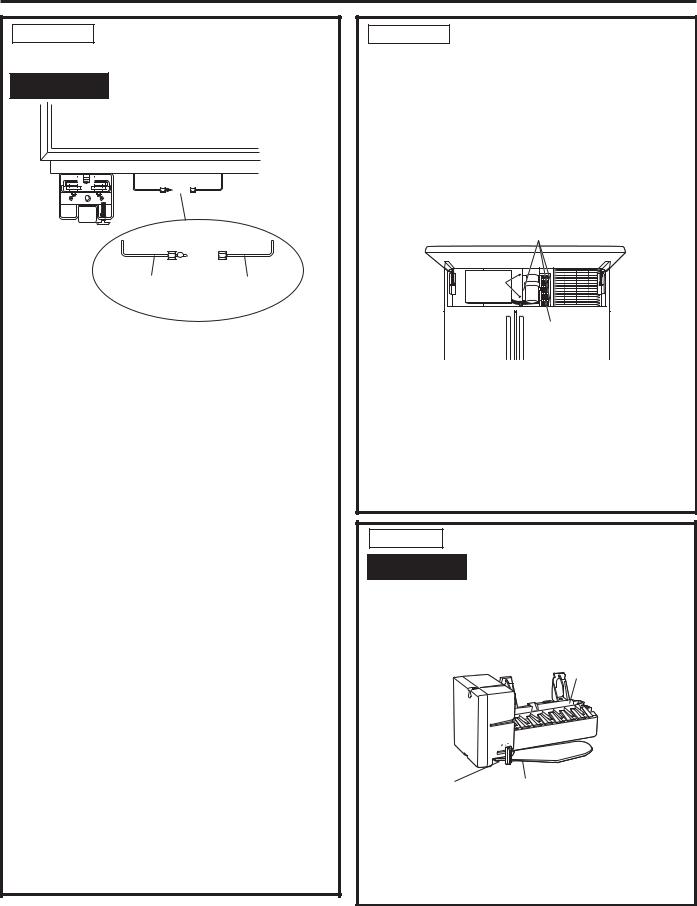
STEP 3 INSTALL WATER LINE
 WARNING Connectonly. to potable water supply
•A cold water supply is required for automatic icemaker operation. The water pressure must be
EHWZHHQ DQG S V L N3D
5RXWH ´ 2' FRSSHU RU 6PDUW&RQQHFW plastic tubing between house cold water line and the water connection location.
•The tubing should be long enough to extend to the front of the refrigerator. Allow enough tubing to accommodate the bend leading into the water line connection.
Floor
 Cold Water Line
NOTE: The only GE Appliances approved plastic tubing is supplied in the SmartConnect Refrigerator
7XELQJ NLWV 'R QRW XVH DQ\ RWKHU SODVWLF ZDWHU VXSSO\ line because the line is under pressure at all times. Other types of plastic may crack or rupture with age and cause water damage to your home.
SmartConnect 5HIULJHUDWRU 7XELQJ .LWV DUH DYDLODEOH in the following lengths:
¶ P :; ;
¶ P :; ;
¶ P :; ;
¶ P :; ;
Shut off the main water supply.
Turn on the nearest faucet long enough to clear the line of water.
,QVWDOO D VKXW RII YDOYH EHWZHHQ WKH LFHPDNHU ZDWHU valve and cold water pipe in a basement or cabinet. The shut-off valve should be located where it will be easily accessible.
•Turn on the main water supply and flush debris. Run about a quart of water through the tubing into a bucket. Shut off the water supply at the shut-off valve.
NOTE: Saddle type shut-off valves are included in many water supply kits. Before purchasing, make sure a saddle type valve complies with your local plumbing codes.
NOTE: Commonwealth of Massachusetts
3OXPELQJ &RGHV &05 VKDOO EH DGKHUHG WR
Saddle valves are illegal and use is not permitted in Massachusetts. Consult with your licensed plumber.
20 |
49-60814 |
Installation Instructions
STEP 4 INSTALLATION WITH HOUSEHOLD WATER FILTRATION SYSTEM
Skip this step if you do not have a household water filtration system
,I WKH ZDWHU VXSSO\ WR WKH UHIULJHUDWRU LV IURP DQ\ household water filtration system, the filter cartridge
VKRXOG EH UHPRYHG )RU EHWWHU LFH DQG ZDWHU performance, remove the filter and install the filter bypass plug.
|
|
)LOWHU %\SDVV |
Rotate Counterclockwise |
|
|
|
Plug |
|
To Remove |
|
|
|
|
STEP 5 INSTALL SIDE PANELS
Skip this step when not using side panels.
,I \RX DUH XVLQJ ´ FP VLGH SDQHOV WKH\
VKRXOG EH LQVHUWHG LQWR WKH FDVH WULP )DVWHQ WKH panels to the refrigerator with stick-on hook and loop fastener strips before setting the refrigerator in place.
STEP 6 ANTI-TIP PROCEDURE

 WARNING

 Tip Over Hazard.
These refrigerators are top heavy, especially with any doors open, and must be secured to prevent tipping forward which could result in death or serious injury. Read and follow the entire installation instructions for securing the refrigerator with the anti-tip system.
&XW D ´ [ ´ EORFN
´ FP long and secure
the block to the mounting brackets
provided using #12 or #14 wood screws.
• Secure the bracket with wood block to
the back wall so that
LW LV ´ FP from the finished
IORRU 8VH RU
#14 wood screws. See the illustration.
STEP 6 ANTI-TIP PROCEDURE (Cont.)
•The screws must penetrate at least one inch into the vertical wall studs.
,I PHWDO ZDOO VWXGV XVH VHOI WDSSLQJ VKHHW PHWDO screws in place of wood screws.
IMPORTANT: When the refrigerator is installed under a soffit or if there is not enough height for this method of security, brackets cannot be used. Proceed to step 7 to level the refrigerator and then
WR VWHS WR VHFXUH UHIULJHUDWRU WR FDELQHWV The refrigerator must be secured to prevent tipping.
Connect power cord:
•Before pushing the refrigerator into the opening, plug the power cord into the receptacle. The water filter guard will need to be removed for access (some models). Remove the 3 screws holding it
LQ SODFH ,I DFFHVV LV VWLOO WRR WLJKW UHPRYH WKH screws holding the water filter bracket and move aside. Open the grille panel and reach into the opening at the back to grasp the power cord. Pull the power cord into the opening as you push the refrigerator back. Secure the bracket and guard with the original screws.
•Gently push refrigerator into the opening with hands against front corners.
INSTRUCTIONS INSTALLATION
49-60814 |
21 |

INSTALLATION INSTRUCTIONS
Installation Instructions
STEP 7 LEVEL REFRIGERATOR
All models have 4-point leveling. The front is supported by leveling legs, the rear is supported by adjustable wheels. Both are accessible from the front of the refrigerator.
7R OHYHO WKH EDFN RI WKH UHIULJHUDWRU WXUQ WKH ´ hex nut located above the front wheels. Turn clockwise to raise or  counterclockwise to lower
  the refrigerator.
)RU IURQW OHYHOLQJ XVH D
´ RSHQ HQG ZUHQFK
• Adjust height of refrigerator to match
installation cutout opening
´ FP
The refrigerator should be level and plumb with cabinetry.
NOTICE: The rear leveling wheels and front leveling
OHJV DUH OLPLWHG WR D PD[LPXP KHLJKW DGMXVWPHQW RI ´FP ,I WKH LQVWDOODWLRQ UHTXLUHV PRUH WKDQ
´ FP KHLJKW WKH LQVWDOOHU VKRXOG elevate the refrigerator on a sheet of plywood or runners. Cabinetry trim could also be added across the top of the opening to shorten the opening. If you attempt to raise the refrigerator more than 1” (2.54 cm), you will damage the front leveling legs and the rear leveling wheels. Make adjustments in small increments.
STEP 8 ALTERNATE ANTI-TIP
PROCEDURE
The refrigerator must be secured to prevent tipping.
• Raise the grille panel to access case trim.
8VH D ´ ELW WR GULOO IRXU HYHQO\ VSDFHG FOHDUDQFH holes through the metal top case trim.
STEP 8 ALTERNATE ANTI-TIP PROCEDURE (Cont.)
8VH D ´ ELW WR GULOO WR SLORW KROHV WKURXJK WKH metal clearance holes and into the wood soffit.
7KH KROHV VKRXOG EH FHQWHUHG LQ WKH VRIILW RU D ´
(1.91 cm) min. wood brace. The brace spanning the enclosure must be securely fastened to cabinets on both sides.
,QVWDOO IRXU ´ GU\ZDOO VFUHZV LQWR WKH SLORW KROHV
'ULOO VFUHZV LQWR DGMDFHQW FDELQHWV WKURXJK VLGH FDVH trim.
STEP 9 ADJUST DOOR SWING
NOTE: This refrigerator has a 2-position door stop. When space does not allow the door to swing open fully to 115°, you may change the door swing to a 90° opening. The 130°, door swing option is not to be
XVHG IRU WKH 6[6 ´ DQG ´ PRGHOV Skip this step if door opening is satisfactory for your installation situation.
•Open the door to view the bottom hinge.
Note the door stop pin locations. The pin is factory installed in
the 115° position.
• Close the
GRRU )URP below, use pliers to unscrew the door stop and reinstall into the 90° position.
WARNING |
Door Trim Pinch Point |
|
Hazard |
||
|
,PSURSHU LQVWDOODWLRQ FDQ OHDG WR D ILQJHU SLQFK SRLQW
KD]DUG EHWZHHQ WKH VLGH GRRU WULP DQG WKH FDELQHWV when operating the door, especially with children.
7R PLQLPL]H WKLV ULVN \RX PXVW IROORZ WKH LQVWDOODWLRQ instructions for cabinet dimensions, trim assembly, and door stop angle.
22 |
49-60814 |
Installation Instructions
STEP 10 CONNECT WATER
SUPPLY
 WARNING Connectonly. to potable water supply
|
|
|
|
|
|
|
|
|
|
|
|
|
|
|
|
|
|
|
|
|
|
|
|
|
|
|
|
|
|
|
|
|
|
|
|
|
|
|
|
|
|
|
|
|
|
|
|
|
|
|
|
|
|
|
|
|
|
|
|
|
|
|
|
|
|
|
|
|
|
|
|
|
|
|
|
|
|
|
|
|
|
|
|
|
|
|
|
|
|
|
|
|
|
|
|
|
|
|
|
|
|
|
|
|
|
|
|
|
|
|
|
|
|
|
|
|
|
|
|
|
|
|
|
|
|
|
|
|
|
|
|
|
|
|
|
|
|
|
|
|
|
|
|
|
|
|
|
|
|
|
|
|
|
|
|
|
|
|
|
Refrigerator |
|
|
|
House |
|||||
|
|
|
|
|
|
|
Water Supply |
|
Water Supply |
|||||||
•Locate and bring the tubing to the front of the cabinet.
•Turn the water on to flush debris from the line. Run about a quart of water through the tubing into a bucket, then shut off the water.
Copper Tubing:
6OLS D ´ QXW DQG IHUUXOH SURYLGHG RYHU ERWK HQGV
RI WKH FRSSHU WXELQJ ,QVHUW WKH WXEH LQWR WKH XQLRQ fitting on the unit and tighten the nut to the union.
• Turn on the water to check for leaks.
SmartConnect™ Tubing:
NOTE: The only GE Appliances-approved plastic tubing is supplied in the SmartConnect Refrigerator
7XELQJ NLWV 'R QRW XVH DQ\ RWKHU SODVWLF ZDWHU VXSSO\ line because the line is under pressure at all times. Other types of plastic may crack or rupture with age and cause water damage to your home.
SmartConnect 5HIULJHUDWRU 7XELQJ .LWV DUH DYDLODEOH in the following lengths:
¶ P :; ;
¶ P :; ;
¶ P :; ;
¶ P :; ;
,QVHUW WKH PROGHG HQG RI WKH WXELQJ LQWR WKH refrigerator connection. Tighten the compression nut until it is just hand tight.
•Tighten one additional turn with a wrench.
2YHUWLJKWHQLQJ FDQ FDXVH OHDNV
•Turn on the water to check for leaks.
NOTE: Make sure excess tubing length does not interfere with the toekick installation.
STEP 11 CONNECT POWER, CLOSE GRILLE PANEL
•Open the grille panel.
•Plug in the power cord (if necessary) by reaching into the opening next to the water filter. The water filter guard will need to be removed for access (some models). Remove the 3 screws holding it in
SODFH ,I DFFHVV LV VWLOO WRR WLJKW UHPRYH WKH VFUHZV holding the water filter bracket and move aside. Plug in the power cord. Secure the bracket and guard with the original screws.
Screws |
Bracket |
Screws |
Water Filter |
Guard in Front of |
Electric Outlet |
Access |
•Check to make sure power to refrigerator is on by opening refrigerator door to see if interior lights are on.
7KH WHPSHUDWXUH FRQWUROV DUH SUHVHW DW ) & IRU WKH IUHVK IRRG VHFWLRQ DQG ) & IRU WKH IUHH]HU
$OORZ KRXUV WR VWDELOL]H EHIRUH PDNLQJ adjustments.
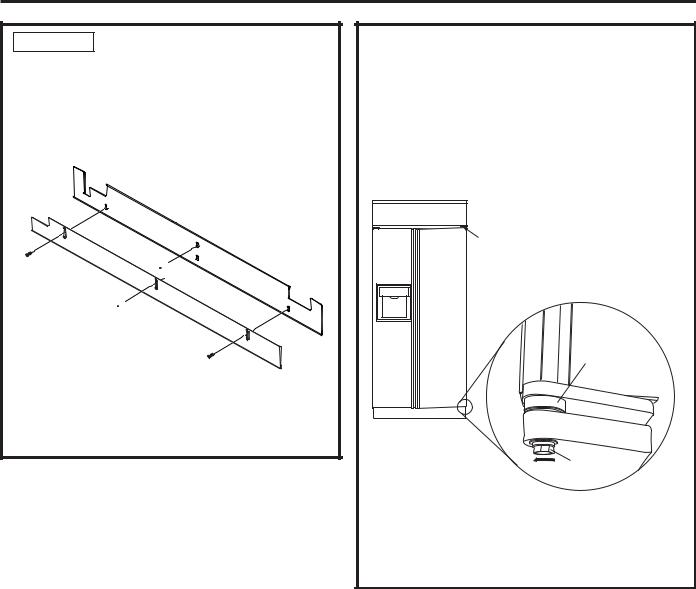
STEP 12 START ICEMAKER

 CAUTION Avoid contact with the moving parts of the ejector mechanism, or with the heating element (located on the bottom of the icemaker) that
UHOHDVHV WKH FXEHV 'R QRW SODFH ILQJHUV RU KDQGV on the automatic ice making mechanism while the refrigerator is plugged in.
,FHPDNHU
Power
Switch )HHOHU $UP
•Slide the power switch to ON.
•The icemaker will begin operation automatically.
•Be sure nothing interferes with the sweep of the feeler arm.
'LVFDUG WKH ILUVW IXOO EXFNHW RI LFH FXEHV7R WXUQ WKH LFHPDNHU RII VOLGH WKH VZLWFK WR 2))
INSTRUCTIONS INSTALLATION
49-60814 |
23 |
INSTALLATION INSTRUCTIONS
Installation Instructions
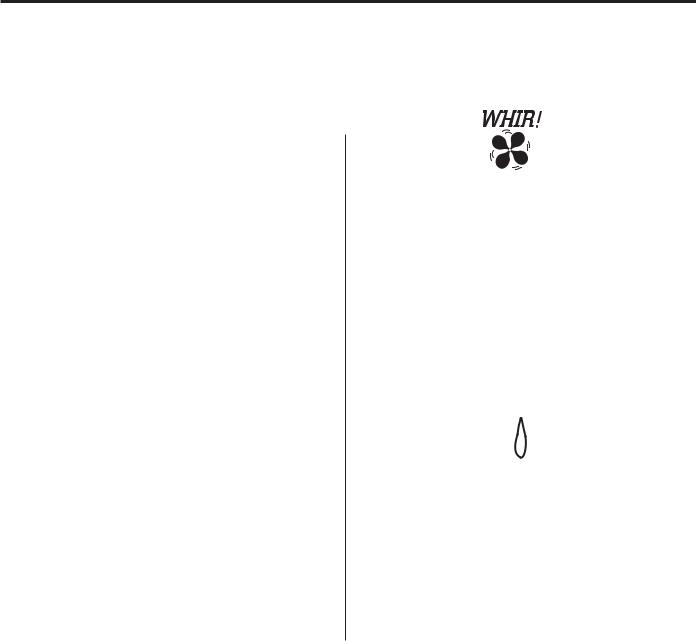
STEP 13 INSTALL TOEKICKS
•Locate the supplied toekicks (shipped taped to the side of the refrigerator.
•Attach the LARGER toekick to the refrigerator using ONLY the top center hole (1).
•Attach the toekick skirt to the refrigerator using the three lower slots (2).
1


2 


•A custom toekick can be installed to match or
FRPSOHPHQW WKH VXUURXQGLQJ FDELQHWU\ 8VH WKH supplied toekick as a template to cut the shape.
INSPECT FINAL INSTALLATION
Check door alignment. Stand back away from the refrigerator to inspect the final installation.
•Check to be sure the handles are evenly aligned with each other at the top. To adjust, loosen the handle screws and slide up or down. Tighten the screws.
•Shipping or the addition of heavy door panels may have caused the doors to move slightly out of alignment.
Door Out of
Alignment
Bushing
Door Hinge
Case Hinge
5/16" Wrench
Raise
,I QHFHVVDU\ WKH IUHVK IRRG GRRU PD\ EH DGMXVWHG XS RU GRZQ WR DOLJQ ZLWK WKH IUHH]HU GRRU
8VH D ´ ZUHQFK WR DGMXVW WKH KLQJH SLQ DV shown.
24 |
49-60814 |
Normal Operating Conditions.
Newer refrigerators sound different from older refrigerators. Modern refrigerators have more features and use newer technology.
'R \RX KHDU ZKDW , KHDU" 7KHVH VRXQGV DUH QRUPDO
|
|
|
HUMMM... |
|
|
||
|
|
|
|
WHOOSH... |
|
|
|
|
|
|
|
|
|
||
|
|
|
|
|
|
||
|
|
|
|
|
|||
Ŷ The new high efficiency compressor may run faster |
|
|
|||||
and longer than your old refrigerator and you may |
Ŷ |
You may hear the fans spinning at high speeds. |
|||||
hear a high-pitched hum or pulsating sound while it |
|||||||
|
This happens when the refrigerator is first plugged in, |
||||||
is operating. |
|
||||||
|
when the doors are opened frequently or when |
||||||
Ŷ Sometimes the refrigerator runs for an extended |
|
||||||
|
a large amount of food is added to the refrigerator |
||||||
period, especially when the doors are opened |
|
||||||
|
RU IUHH]HU FRPSDUWPHQWV 7KH IDQV DUH KHOSLQJ WR |
||||||
IUHTXHQWO\ 7KLV PHDQV WKDW WKH )URVW *XDUG |
|
||||||
|
maintain the correct temperatures. |
||||||
IHDWXUH LV ZRUNLQJ WR SUHYHQW IUHH]HU EXUQ DQG |
|
||||||
Ŷ |
,I HLWKHU GRRU LV RSHQ IRU RYHU PLQXWHV \RX PD\ |
||||||
improve food preservation. |
|||||||
|
hear the fans come on in order to cool the light bulbs. |
||||||
Ŷ You may hear a whooshing sound when the doors |
|
||||||
Ŷ |
The fans change speeds in order to provide optimal |
||||||
FORVH 7KLV LV GXH WR SUHVVXUH HTXDOL]LQJ ZLWKLQ WKH |
|||||||
|
cooling and energy savings. |
||||||
refrigerator. |
|
||||||
|
|
||||||
|
|
|
|
||||
|
CLICKS, POPS, |
|
WATER SOUNDS |
||||
CRACKS and CHIRPS |
|
|
|||||
ŶYou may hear cracking or popping sounds when the refrigerator is first plugged in. This happens as the
refrigerator cools to the correct temperature. |
Ŷ |
7KH IORZ RI UHIULJHUDQW WKURXJK WKH IUHH]HU FRROLQJ |
|
Ŷ Electronic dampers click open and closed to provide |
|
coils may make a gurgling noise like boiling water. |
|
|
|
||
optimal cooling and energy savings. |
Ŷ |
Water dropping on the defrost heater can cause a |
|
Ŷ The compressor may cause a clicking or chirping |
|
VL]]OLQJ SRSSLQJ RU EX]]LQJ VRXQG GXULQJ WKH GHIURVW |
|
sound when attempting to restart (this could take up |
|
cycle. |
|
to 5 minutes). |
Ŷ |
A water dripping noise may occur during the defrost |
|
Ŷ The electronic control board may cause a clicking |
|
cycle as ice melts from the evaporator and flows into |
|
sound when relays activate to control refrigerator |
|
the drain pan. |
|
components. |
Ŷ |
Closing the door may cause a gurgling sound due to |
|
Ŷ Expansion and contraction of cooling coils during |
|||
|
SUHVVXUH HTXDOL]DWLRQ |
||
and after defrost can cause a cracking or popping |
|
|
|
sound. |
|
|
|
Ŷ On models with an icemaker, after an icemaking |
|
|
|
cycle, you may hear the ice cubes dropping into the |
|
|
|
ice bucket. |
|
|
Conditions Operating Normal TIPS: TROUBLESHOOTING
49-60814 |
25 |

TROUBLESHOOTING TIPS
Troubleshooting Tips... Before you call for service
6DYH WLPH DQG PRQH\ 5HYLHZ WKH FKDUWV RQ WKH IROORZLQJ SDJHV ILUVW DQG \RX PD\ QRW QHHG WR FDOO IRU VHUYLFH
Problem |
Possible Causes |
What To Do |
|
Refrigerator does not |
Refrigerator in defrost cycle. |
Wait about 30 minutes for defrost cycle to end. |
|
operate |
|
|
|
Freezer control in 0 (off) |
0RYH WKH IUHH]HU FRQWURO WR D ORZHU WHPSHUDWXUH |
||
|
position. |
setting. |
|
|
Refrigerator is unplugged. |
Push the plug completely into the outlet. |
|
|
The fuse is blown/circuit |
Replace fuse or reset the breaker. |
|
|
breaker is tripped. |
|
|
|
Energy Smart™ feature |
Wait about 2 hours for normal operation to |
|
|
is altering refrigerator |
continue. |
|
|
performance |
|
|
5HIULJHUDWRU RU IUHH]HU |
Temperature control not set |
See About the controls. |
|
compartment too warm |
cold enough. |
|
|
|
Warm weather or frequent door |
Set the temperature control one step colder. See |
|
|
openings. |
About the controls. |
|
|
Door left open. |
Check to see if package is holding door open. |
|
|
Energy Smart™ feature |
SHH $ERXW (QHUJ\ 6PDUW 0RGHOV |
|
|
is altering refrigerator |
|
|
|
performance |
|
|
Vibration or rattling |
Front rollers need adjusting. |
See Rollers. Slight vibration is normal. |
|
Motor operates for long |
Normal when refrigerator is first |
Wait 24 hours for the refrigerator to completely |
|
periods or cycles on and |
plugged in. |
cool down. |
|
off frequently. (Modern |
|
|
|
Often occurs when large |
This is normal. |
||
refrigerators with more |
|||
amounts of food are placed in |
|
||
storage space and a |
|
||
refrigerator. |
|
||
ODUJHU IUHH]HU UHTXLUH PRUH |
|
||
operating time. They start |
Door left open. |
Check to see if package is holding door open. |
|
and stop often to maintain |
|
|
|
Hot weather or frequent door |
This is normal. |
||
even temperatures.) |
|||
openings. |
|
||
|
|
||
|
Temperature controls set at the |
See About the controls. |
|
|
coldest setting. |
|
|
)URVW RU LFH FU\VWDOV RQ |
Door left open. |
Check to see if package is holding door open. |
|
IUR]HQ IRRG IURVW ZLWKLQ |
|
|
|
Too frequent or too long door |
|
||
package is normal) |
|
||
openings. |
|
||
|
|
||
'LYLGHU EHWZHHQ UHIULJHUDWRU |
Automatic energy saver |
This helps prevent condensation on the outside. |
|
DQG IUHH]HU FRPSDUWPHQWV |
system circulates warm liquid |
|
|
feels warm |
around front edge of freezer |
|
|
|
compartment. |
|
|
Automatic icemaker does not |
Icemaker power switch is in the |
Slide the power switch to the ON position. |
|
work (on some models) |
2)) position. |
|
|
|
Water supply turned off or not |
6HH ,QVWDOOLQJ WKH ZDWHU OLQH |
|
|
connected. |
|
|
|
Freezer compartment too warm. |
Wait 24 hours for the refrigerator to completely |
|
|
|
cool down. |
|
|
Piled up cubes in the storage |
Level cubes by hand. |
|
|
bin cause icemaker to shut off. |
|
|
|
Ice cubes stuck in icemaker. |
Turn off the icemaker, remove cubes and turn the |
|
|
|
icemaker back on. |
26 |
49-60814 |

Troubleshooting Tips... Before you call for service
Problem |
Possible Causes |
What To Do |
,FH FXEHV KDYH RGRU WDVWH |
Ice storage bin needs cleaning. |
(PSW\ DQG ZDVK ELQ 'LVFDUG ROG FXEHV |
|
Food transmitting odor/taste to |
Wrap foods well. |
|
ice cubes. |
|
|
Interior of refrigerator needs |
See Care and cleaning. |
|
cleaning. |
|
Small or hollow cubes |
Water filter clogged. |
Replace filter cartridge with new cartridge or with |
|
|
plug. |
6ORZ LFH FXEH IUHH]LQJ |
Door left open. |
Check to see if package is holding door open. |
|
Temperature control not set |
See About the controls. |
|
cold enough. |
|
|
Energy Smart™ feature |
6HH $ERXW (QHUJ\ 6PDUW 0RGHOV |
|
is .altering refrigerator |
|
|
performance |
|
'RRU QRW FORVLQJ SURSHUO\ |
Door gasket on hinge side |
Apply petroleum jelly on face of gasket |
|
sticking or folding over. |
|
2UDQJH JORZ LQ IUHH]HU |
Defrost heater is on. |
This is normal. |
Cube dispenser does not |
Icemaker or water supply turned |
Turn on icemaker or water supply. |
work (on some models) |
off. |
|
|
Ice cubes are frozen to |
Remove cubes. |
|
icemaker feeler arm. |
|
|
Irregular ice clumps in storage |
Break up with fingertip pressure and discard |
|
container. |
remaining clumps. |
|
|
)UHH]HU PD\ EH WRR ZDUP $GMXVW WKH IUHH]HU FRQWURO |
|
|
to a colder setting, one position at a time, until |
|
|
clumps do not form. |
|
Dispenser is /2&.('. |
Press and hold the Lock pad for 3 seconds. |
:DWHU KDV SRRU WDV WH RGRU |
Water dispenser has not been |
'LVSHQVH ZDWHU XQWLO DOO ZDWHU LQ V\VWHP LV |
(on some models) |
used for a long time. |
replenished. |
Water in first glass is warm |
Normal when refrigerator |
Wait 24 hours for the refrigerator to completely cool |
(on some models) |
|
down. |
|
Water dispenser has not been |
'LVSHQVH ZDWHU XQWLO DOO ZDWHU LQ V\VWHP LV |
|
used for a long time. |
replenished. |
|
Water system has been drained. |
Allow several hours for replenished supply to chill. |
Water dispenser does not |
Water supply line turned off or |
6HH ,QVWDOOLQJ WKH ZDWHU OLQH |
work (on some models) |
not connected. |
|
|
Water filter clogged. |
Replace filter cartridge or remove filter and install |
|
|
plug. |
|
Air may be trapped in the water |
Press the dispenser arm for at least two minutes. |
|
system. |
|
|
Dispenser is /2&.('. |
Press and hold the Lock pad for 3 seconds. |
Water spurting from |
Newly-installed filter cartridge. |
Run water from the dispenser for 3 minutes (about |
dispenser |
|
11 2 gallons [5.7 liters]). |
Water is not dispensed |
Water in reservoir is frozen. |
Call for service. |
No water or ice cube |
Supply line or shutoff valve is |
Call a plumber. |
production |
clogged. |
|
|
Water filter clogged. |
Replace filter cartridge or remove filter and install |
|
|
plug. |
|
Dispenser is /2&.('. |
Press and hold the Lock pad for 3 seconds. |
TIPS TROUBLESHOOTING
49-60814 |
27 |

TROUBLESHOOTING TIPS
Troubleshooting Tips... Before you call for service
Problem |
Possible Causes |
What To Do |
Refrigerator has odor |
Foods transmitting odor to |
)RRGV ZLWK VWURQJ RGRUV VKRXOG EH WLJKWO\ ZUDSSHG |
|
refrigerator. |
|
|
|
.HHS DQ RSHQ ER[ RI EDNLQJ VRGD LQ WKH UHIULJHUDWRU |
|
|
replace every three months. |
|
Interior needs cleaning. |
See Care and cleaning. |
|
Defrost water drainage system |
See Care and cleaning. |
|
needs cleaning. |
|
Moisture forms on outside |
Not unusual during periods of |
Wipe surface dry. |
of refrigerator |
high humidity. |
|
Moisture collects inside |
Too frequent or too long door |
|
|
openings. |
|
,QWHULRU OLJKW GRHV QRW ZRUN |
No power at outlet. |
Replace fuse or reset the breaker. |
|
Light bulb burned out. |
See Replacing the light bulbs. |
Water on kitchen floor or |
Drain in the bottom of the |
See Care and cleaning. |
RQ ERWWRP RI IUHH]HU |
freezer clogged. |
|
|
Cubes jammed in chute. |
Poke ice through with a wooden spoon. |
Hot air from bottom of |
Normal air flow cooling motor. |
|
refrigerator |
In the refrigeration process, it is |
|
|
normal that heat be expelled in |
|
|
the area under the refrigerator. |
|
|
Some floor coverings are |
|
|
sensitive and will discolor |
|
|
at these normal and safe |
|
|
temperatures. |
|
&XEHG ,FH ZDV VHOHFWHG |
Last setting was &UXVKHG ,FH. |
A few cubes were left in the crusher from the |
EXW &UXVKHG ,FH ZDV |
|
previous setting. This is normal. |
dispensed (on some |
|
|
models) |
|
|
)UHTXHQW ³EX]]LQJ´ VRXQG |
Icemaker power switch is in the |
6OLGH WKH SRZHU VZLWFK WR WKH 2)) SRVLWLRQ .HHSLQJ |
|
|
it in the ON position will damage the water valve. |
|
49-60814 |

3HUIRUPDQFH 'DWD 6KHHW
SmartWater )LOWUDWLRQ 6\VWHP GE Appliances 0:) &DUWULGJH
The concentration of the indicated substances in water entering the system was reduced to a concentration less than or equal to the
SHUPLVVLEOH OLPLW IRU ZDWHU OHDYLQJ WKH V\VWHP DV VSHFLILHG LQ 16)$16, 6WDQGDUG DQG 6WDQGDUG 6\VWHP WHVWHG DQG FHUWLILHG E\ 16) ,QWHUQDWLRQDO DJDLQVW 16)$16, 6WDQGDUG DQG 6WDQGDUG IRU WKH UHGXFWLRQ RI VXEVWDQFHV OLVWHG EHORZ
Capacity 300 Gallons (1,135 Liters). Contaminant Reduction Determined by NSF testing.
Substance Tested |
Average |
NSF specified |
Avg % |
Average |
Max Permissible |
NSF Reduction |
NSF |
Challenge |
Product Water |
Product Water |
|||||
for Reduction |
Influent |
Concentration |
Reduction |
Concentration |
Concentration |
Requirements |
Test Report |
Chlorine Taste and Odor |
2.0 mg/L |
2.0 mg/L ± 10% |
97.4% |
0.05 mg/L |
N/A |
|
J-00137878 |
Nominal Particulate Class |
11,333,333 pts/mL |
At least 10,000 particles/mL |
99.9% |
5,510 pts/mL |
N/A |
|
J-00137881 |
, WR P |
|||||||
Cyst* |
101,000 cysts/L |
Minimum 50,000 cysts/L |
99.99% |
1 cyst/L |
N/A |
|
J-00100036 |
Asbestos |
133 MF/L |
107 to 108 fibers/L; fibers |
>99% |
0) / |
N/A |
|
J-00137886 |
JUHDWHU WKDQ P LQ OHQJWK |
|||||||
Atrazine |
0.008 mg/L |
0.009 mg/L ± 10% |
91.3% |
0.0007 mg/L |
0.003 mg/L |
N/A |
J-00137910 |
Benzene |
0.014 mg/L |
0.015 mg/L ± 10%± |
96.5% |
0.0005 mg/L |
0.005 mg/L |
N/A |
J-00137912 |
Carbofuran |
0.08 mg/L |
0.08 mg/L ± 10% |
74.5% |
0.01 mg/L |
0.04 mg/L |
N/A |
J-00147488 |
Endrin |
0.007 mg/L |
0.006 mg/L ± 10% |
97.1% |
0.0002 mg/L |
0.002 mg/L |
N/A |
J-00100039 |
Lead @ pH 6.5 |
0.148 mg/L |
0.15 mg/L ± 10% |
99.3% |
0.001 mg/L |
0.010 mg/L |
N/A |
J-00137914 |
Lead @ pH 8.5 |
0.155 mg/L |
0.15 mg/L ± 10% |
99.3% |
0.001 mg/L |
0.010 mg/L |
N/A |
J-00137915 |
Lindane |
0.002 mg/L |
0.002 mg/L ± 10% |
96.5% |
0.00002 mg/L |
0.0002 mg/L |
N/A |
J-00137924 |
Mercury @ pH 6.5 |
0.006 mg/L |
0.006 mg/L ± 10% |
87.6% |
0.0004 mg/L |
0.002 mg/L |
N/A |
J-00137925 |
Mercury @ pH 8.5 |
0.006 mg/L |
0.006 mg/L ± 10% |
93.2% |
0.0007 mg/L |
0.07 mg/L |
N/A |
J-00092355 |
P-Dichlorobenzene |
0.223 mg/L |
0.225 mg/L ± 10% |
99.8% |
0.005 mg/L |
0.075 mg/L |
N/A |
J-00137926 |
Tetrachloroethylene |
0.014 mg/L |
0.015 mg/L ± 10% |
96.5% |
0.0005 mg/L |
0.005 mg/L |
N/A |
J-00137929 |
Toxaphene |
0.017 mg/L |
0.015 mg/L ± 10% |
>93.9% |
0.001 mg/L |
0.003 mg/L |
N/A |
J-00137928 |
2, 4-D |
0.192 mg/L |
0.210 mg/L ± 10% |
77.7% |
0.040 mg/L |
0.07 mg/L |
N/A |
J-00147489 |
*Based on the use of Cryptosporidium parvum oocysts.
The following pharmaceutical reduction claims have not been certified by NSF International or the state of California. Claims tested and verified by independent laboratory:
Contaminant |
Average |
NSF specified |
Avg % |
Average |
Max Permissible |
NSF Reduction |
NSF |
Challenge |
Product Water |
Product Water |
|||||
Reduction |
Influent |
Concentration |
Reduction |
Concentration |
Concentration |
Requirements |
Test Report |
Atenolol |
978 ng/L |
N/A |
99.5% |
5.0 ng/L |
N/A |
N/A |
J-00121587 |
Fluoxetine |
907 ng/l |
N/A |
99.4% |
5.4 ng/L |
N/A |
N/A |
J-00121587 |
Ibuprofen |
885 ng/L |
N/A |
94.1% |
52.3 ng/L |
N/A |
N/A |
J-00121588 |
Progesterone |
1097 ng/L |
N/A |
99.5% |
5.0 ng/L |
N/A |
N/A |
J-00121589 |
Trimethoprim |
415 ng/L |
N/A |
99.5% |
2.0 ng/L |
N/A |
N/A |
J-00121587 |
Application Guidelines/Water Supply Parameters
6HUYLFH )ORZ |
0.5 gpm (1.9 lpm) |
Water Supply |
Potable Water |
Water Pressure |
SVL EDU |
Water Temperature |
) ) & & |
,W LV HVVHQWLDO WKDW WKH PDQXIDFWXUHU¶V UHFRPPHQGHG LQVWDOODWLRQ PDLQWHQDQFH DQG ILOWHU UHSODFHPHQW UHTXLUHPHQWV EH FDUULHG RXW IRU WKH SURGXFW WR SHUIRUP DV DGYHUWLVHG 6HH ,QVWDOODWLRQ 0DQXDO IRU :DUUDQW\ LQIRUPDWLRQ
Note: While the testing was performed under standard laboratory conditions, actual performance may vary. Contaminant reduction testing is conducted every five years by certifying agency to maintain certification.
5HSODFHPHQW &DUWULGJH 0:) )RU HVWLPDWHG FRVWV RI UHSODFHPHQW
HOHPHQWV SOHDVH FDOO RU YLVLW RXU ZHEVLWH DW www.geapplianceparts.com.

 WARNING
To reduce the risk associated with ingestion of contaminants:
•Do not use with water that is microbiologically unsafe or of unknown quality without adequate disinfection before and after the system. Systems certified for cyst reduction may be used on disinfected water that may contain filterable cysts.
|
Tested and certified by NSF International against |
|
NSF/ANSI Standard 42 and Standard 53 in model |
|
GE Appliances MWF for the reduction of the |
REPLACEMENT |
claims specified on the performance data sheet. |
ELEMENT |
|
NOTICE
To reduce the risk associated with property damage due to water leakage:
•Read and follow use instructions before installation and use of this system.
,QVWDOODWLRQ DQG XVH MUST comply with all state and local plumbing codes.
•Do not LQVWDOO LI ZDWHU SUHVVXUH H[FHHGV SVL EDU ,I \RXU ZDWHU SUHVVXUH H[FHHGV SVL EDU \RX must install a pressure-limiting valve. Contact a plumbing professional if you are uncertain how to check your water pressure.
•Do not LQVWDOO ZKHUH ZDWHU KDPPHU FRQGLWLRQV PD\ RFFXU ,I water hammer conditions exist you must install a water hammer arrester. Contact a plumbing professional if you are uncertain how to check for this condition.
•Do not install on hot water supply lines. The maximum operating
ZDWHU WHPSHUDWXUH RI WKLV ILOWHU V\VWHP LV ) &
•Protect filter from freezing. 'UDLQ ILOWHU ZKHQ WHPSHUDWXUHV GURS EHORZ ) &
•The disposable filter cartridge should be replaced every 6 months at the rated capacity, or sooner if a noticeable reduction in flow rate occurs.
49-60814 |
29 |
 Loading...