


GE PS960SL2SS, PS960SL1SS, PS960FL2DS, PS960FL1DS, PS960EL2ES Owner’s Manual
...RANGES
Electric Front Control
SAFETY INFORMATION . . . . . . . . . . 3
USING THE RANGE
Surface Units. . . . . . . . . . . . . . . . . . . . . . . . . . . 8 Cookware for Radiant Glass Cooktop. . . . . . 11 Oven Controls. . . . . . . . . . . . . . . . . . . . . . . . . .12 Options . . . . . . . . . . . . . . . . . . . . . . . . . . . . . . .13 Settings . . . . . . . . . . . . . . . . . . . . . . . . . . . . . . .13 Sabbath Mode. . . . . . . . . . . . . . . . . . . . . . . . . .15 Oven Racks . . . . . . . . . . . . . . . . . . . . . . . . . . . .16 Aluminum Foil and Oven Liners. . . . . . . . . . .16 Cookware. . . . . . . . . . . . . . . . . . . . . . . . . . . . . .16 Cooking Modes . . . . . . . . . . . . . . . . . . . . . . . . .16 Probe . . . . . . . . . . . . . . . . . . . . . . . . . . . . . . . . .18 Cooking Guide . . . . . . . . . . . . . . . . . . . . . . . . .19
CARE AND CLEANING
Cleaning the Range – Exterior . . . . . . . . . . . 20
Cleaning the Range – Interior . . . . . . . . . . . .21
Cleaning the Glass Cooktop . . . . . . . . . . . . . 22
Probe . . . . . . . . . . . . . . . . . . . . . . . . . . . . . . . . 23
Oven Light. . . . . . . . . . . . . . . . . . . . . . . . . . . . 24
Oven Doors . . . . . . . . . . . . . . . . . . . . . . . . . . . 25
TROUBLESHOOTING TIPS. . . . . . . 26
WARRANTY. . . . . . . . . . . . . . . . . . . . . . . 30
ACCESSORIES . . . . . . . . . . . . . . . . . . . . .31
CONSUMER SUPPORT . . . . . . . . . . . 32
Write the model and serial numbers here:
Model #_________________
Serial # _________________
You can find them on a label behind the door or drawer.
OWNER’S MANUAL
30" Front Control Range
PS960
ESPAÑOL
Para consultar una version en español de este manual de instrucciones, visite nuestro sitio de internet GEAppliances.com.
GE is a trademark of the General Electric Company. Manufactured under trademark license.
49-80808 09-17 GEA

THANK YOU FOR MAKING GE APPLIANCES A PART OF YOUR HOME.
Whether you grew up with GE Appliances, or this is your first, we’re happy to have you in the family.
We take pride in the craftsmanship, innovation and design that goes into every GE Appliances product, and we think you will too. Among other things, registration of your appliance ensures that we can deliver important product information and warranty details when you need them.
Register your GE appliance now online. Helpful websites and phone numbers are available in the Consumer Support section of this Owner’s Manual. You may also mail in the pre-printed registration card included in the packing material.
2 |
|
49-80808 |

IMPORTANT SAFETY INFORMATION
READ ALL INSTRUCTIONS BEFORE USING THE APPLIANCE
WARNING Read all safety instructions before using the product. Failure to follow these instructions may result in fire, electrical shock, serious injury or death.
ANTI-TIP DEVICE
To reduce the risk of tipping the range, the range must be secured by a properly installed anti-tip bracket. See installation instructions shipped with the bracket for
complete details before attempting to install.
For Free-Standing and Slide-In Ranges
To check if the bracket is installed and engaged properly, look underneath the range to see that the rear leveling leg is
engaged in the bracket. On some models, the storage drawer or kick panel can be removed for easy inspection. If visual inspection is not possible,
slide the range forward, confirm the anti-tip bracket is securely attached to the floor or wall, and slide the range back so the rear leveling leg is under
the anti-tip bracket.
If the range is pulled from the wall for any reason, always repeat this procedure to verify the range is properly secured by the anti-tip bracket.
Never completely remove the leveling legs or the range will not be secured to the anti-tip device properly.

 WARNING GENERAL SAFETY INSTRUCTIONS
Ŷ 8VH WKLV DSSOLDQFH RQO\ IRU LWV LQWHQGHG SXUSRVH DV described in this Owner’s Manual.
Ŷ %H VXUH \RXU DSSOLDQFH LV SURSHUO\ LQVWDOOHG DQG grounded by a qualified installer in accordance with the provided installation instructions.
Ŷ 'R QRW DWWHPSW WR UHSDLU RU UHSODFH DQ\ SDUW RI \RXU range unless it is specifically recommended in this manual. All other servicing should be transferred to a qualified technician.
Ŷ %HIRUH SHUIRUPLQJ DQ\ VHUYLFH XQSOXJ WKH UDQJH or disconnect the power supply at the household distribution panel by removing the fuse or switching off the circuit breaker.
Ŷ 'R QRW OHDYH FKLOGUHQ DORQH FKLOGUHQ VKRXOG QRW be left alone or unattended in an area where an appliance is in use. They should never be allowed to climb, sit or stand on any part of the appliance.
Ŷ 
 CAUTION 'R QRW VWRUH LWHPV RI LQWHUHVW WR children above a range or on the backguard of a
UDQJH FKLOGUHQ FOLPELQJ RQ WKH UDQJH WR UHDFK items could be seriously injured.
Ŷ 8VH RQO\ GU\ SRW KROGHUV PRLVW RU GDPS SRW holders on hot surfaces may result in burns from
VWHDP 'R QRW OHW SRW KROGHUV WRXFK KRW VXUIDFH
XQLWV RU KHDWLQJ HOHPHQWV 'R QRW XVH D WRZHO RU other bulky cloth in place of pot holders.
Ŷ 1HYHU XVH \RXU DSSOLDQFH IRU ZDUPLQJ RU KHDWLQJ the room.
Ŷ 'R QRW WRXFK WKH VXUIDFH XQLWV WKH KHDWLQJ HOHPHQWV or the interior surface of the oven. These surfaces may be hot enough to burn even though they are
GDUN LQ FRORU 'XULQJ DQG DIWHU XVH GR QRW WRXFK or let clothing or other flammable materials contact the surface units, areas nearby the surface units or any interior area of the oven; allow sufficient time for cooling first. Other surfaces of the appliance may become hot enough to cause burns. Potentially hot surfaces include the cooktop, areas facing the cooktop, oven vent opening, surfaces near the opening and crevices around the oven door.
Ŷ 'R QRW KHDW XQRSHQHG IRRG FRQWDLQHUV 3UHVVXUH could build up and the container could burst, causing an injury.
READ AND SAVE THESE INSTRUCTIONS
INFORMATION SAFETY
49-80808 |
3 |

SAFETY INFORMATION
IMPORTANT SAFETY INFORMATION
READ ALL INSTRUCTIONS BEFORE USING THE APPLIANCE

 WARNING GENERAL SAFETY INSTRUCTIONS (Cont.)
Ŷ 'R QRW XVH DQ\ W\SH RI IRLO RU OLQHU WR FRYHU WKH oven bottom or anywhere in the oven, except as described in this manual. Oven liners can trap heat or melt, resulting in damage to the product and risk of shock, smoke or fire.
Ŷ $YRLG VFUDWFKLQJ RU LPSDFWLQJ JODVV GRRUV FRRN WRSV RU FRQWURO SDQHOV 'RLQJ VR PD\ OHDG WR JODVV
EUHDNDJH 'R QRW FRRN RQ D SURGXFW ZLWK EURNHQ glass. Shock, fire or cuts may occur.
Ŷ &RRN PHDW DQG SRXOWU\ WKRURXJKO\ PHDW WR DW OHDVW an internal temperature of 160°F and poultry to at least an internal temperature of 180°F. Cooking
to these temperatures usually protects against foodborne illness.
|
KEEP FLAMMABLE MATERIALS AWAY FROM THE RANGE |
WARNING |
|
|
Failure to do so may result in fire or personal injury. |
|
Ŷ 'R QRW VWRUH RU XVH IODPPDEOH PDWHULDOV LQ DQ RYHQ or near the cooktop, including paper, plastic, pot holders, linens, wall coverings, curtains, drapes and gasoline or other flammable vapors and liquids.
Ŷ 1HYHU ZHDU ORRVH ILWWLQJ RU KDQJLQJ JDUPHQWV ZKLOH using the appliance. These garments may ignite if
they contact hot surfaces causing severe burns.
Ŷ 'R QRW OHW FRRNLQJ JUHDVH RU RWKHU IODPPDEOH materials accumulate in or near the range. Grease in the oven or on the cooktop may ignite.
Ŷ &OHDQ YHQWLODWLQJ KRRGV IUHTXHQWO\ *UHDVH VKRXOG not be allowed to accumulate on the hood or filter.
WARNING IN THE EVENT OF A FIRE, TAKE THE FOLLOWING STEPS TO PREVENT INJURY AND FIRE SPREADING
Ŷ 'R QRW XVH ZDWHU RQ JUHDVH ILUHV 1HYHU SLFN XS a flaming pan. Turn the controls off. Smother a flaming pan on a surface unit by covering the pan completely with a well-fitting lid, cookie sheet or flat
WUD\ 8VH D PXOWL SXUSRVH GU\ FKHPLFDO RU IRDP W\SH fire extinguisher.
Ŷ ,I WKHUH LV D ILUH LQ WKH RYHQ GXULQJ EDNLQJ VPRWKHU the fire by closing the oven door and turning the
oven off or by using a multi-purpose dry chemical or foam-type fire extinguisher.
Ŷ ,I WKHUH LV D ILUH LQ WKH RYHQ GXULQJ VHOI FOHDQ WXUQ the oven off and wait for the fire to go out. 'R QRW force the door open. Introduction of fresh air at selfclean temperatures may lead to a burst of flame from the oven. Failure to follow this instruction may result in severe burns.

 WARNING COOKTOP SAFETY INSTRUCTIONS
Ŷ 1HYHU OHDYH WKH VXUIDFH XQLWV XQDWWHQGHG DW PHGLXP or high heat settings. Boilovers cause smoking and greasy spillovers that may catch on fire.
Ŷ 1HYHU OHDYH RLO XQDWWHQGHG ZKLOH IU\LQJ ,I DOORZHG to heat beyond its smoking point, oil may ignite resulting in fire that may spread to surrounding
FDELQHWV 8VH D GHHS IDW WKHUPRPHWHU ZKHQHYHU possible to monitor oil temperature.
Ŷ 7R DYRLG RLO VSLOORYHU DQG ILUH XVH D PLQLPXP amount of oil when shallow pan-frying and avoid cooking frozen foods with excessive amounts of ice.
Ŷ 2QO\ FHUWDLQ W\SHV RI JODVV JODVV FHUDPLF earthenware or other glazed containers are suitable for cooktop service; others may break because of the sudden change in temperature.
Ŷ 7R PLQLPL]H WKH SRVVLELOLW\ RI EXUQV LJQLWLRQ RI flammable materials and spillage, the handle of a container should be turned toward the center of the range without extending over nearby surface units.
Ŷ :KHQ SUHSDULQJ IODPLQJ IRRGV XQGHU D KRRG WXUQ the fan on.
READ AND SAVE THESE INSTRUCTIONS
4 |
49-80808 |

IMPORTANT SAFETY INFORMATION
READ ALL INSTRUCTIONS BEFORE USING THE APPLIANCE

 WARNING GLASS COOKTOP SAFETY INSTRUCTIONS
Ŷ 8VH FDUH ZKHQ WRXFKLQJ WKH FRRNWRS 7KH JODVV surface of the cooktop will retain heat after the controls have been turned off.
Ŷ 'R QRW FRRN RQ D EURNHQ FRRNWRS ,I JODVV FRRNWRS should break, cleaning solutions and spillovers may penetrate the broken cooktop and create a risk of electric shock. Contact a qualified technician immediately.
Ŷ $YRLG VFUDWFKLQJ WKH JODVV FRRNWRS 7KH FRRNWRS can be scratched with items such as knives, sharp instruments, rings or other jewelry, and rivets on clothing.
Ŷ 8VH &(5$0$ %5<7(® ceramic Cooktop Cleaner and CERAMA BRYTE® Cleaning Pad to clean the cooktop. Wait until the cooktop cools and the
indicator light goes out before cleaning. A wet sponge or cloth on a hot surface can cause steam burns. Some cleaners can produce noxious fumes if applied to a hot surface. NOTE: Sugar spills are an exception. They should be scraped off while still hot using an oven mitt and a scraper. See the Cleaning the glass cooktop section for detailed instructions.
Ŷ 5HDG DQG IROORZ DOO LQVWUXFWLRQV DQG ZDUQLQJV RQ WKH cleaning cream label.
Ŷ 'R QRW SODFH RU VWRUH LWHPV WKDW FDQ PHOW RU FDWFK fire on the glass cooktop, even when it is not being used. If the cooktop is inadvertently turned on, they may ignite. Heat from the cooktop or oven vent after it is turned off may cause them to ignite also.

 WARNING OVEN SAFETY INSTRUCTIONS
Ŷ 6WDQG DZD\ IURP WKH UDQJH ZKHQ RSHQLQJ WKH RYHQ door. Hot air or steam which escapes can cause
EXUQV WR KDQGV IDFH DQG RU H\HV
Ŷ 'R QRW XVH WKH RYHQ LI D KHDWLQJ HOHPHQW GHYHORSV a glowing spot during use or shows other signs
of damage. A glowing spot indicates the heating element may fail and present a potential burn, fire, or shock hazard. Turn the oven off immediately and have the heating element replaced by a qualified service technician.
Ŷ .HHS WKH RYHQ YHQW XQREVWUXFWHG
Ŷ .HHS WKH RYHQ IUHH IURP JUHDVH EXLOGXS *UHDVH LQ the oven may ignite.
Ŷ 3ODFH RYHQ UDFNV LQ GHVLUHG ORFDWLRQ ZKLOH RYHQ LV cool. If rack must be moved while oven is hot, do not let pot holder contact hot heating element in oven.
Ŷ :KHQ XVLQJ FRRNLQJ RU URDVWLQJ EDJV LQ WKH RYHQ follow the manufacturer’s directions.
Ŷ 3XOO WKH RYHQ UDFN WR WKH VWRS ORFN SRVLWLRQ ZKHQ loading and unloading food from the oven. This helps prevent burns from touching hot surfaces of the door and oven walls.
Ŷ 'R QRW OHDYH LWHPV VXFK DV SDSHU FRRNLQJ XWHQVLOV or food in the oven when not in use. Items stored in an oven can ignite.
Ŷ 1HYHU SODFH FRRNLQJ XWHQVLOV SL]]D RU EDNLQJ VWRQHV or any type of foil or liner on the oven floor. These items can trap heat or melt, resulting in damage to the product and risk of shock, smoke or fire.
INFORMATION SAFETY
READ AND SAVE THESE INSTRUCTIONS
49-80808 |
5 |

SAFETY INFORMATION
IMPORTANT SAFETY INFORMATION
READ ALL INSTRUCTIONS BEFORE USING THE APPLIANCE

 WARNING SELF-CLEANING OVEN SAFETY INSTRUCTIONS
The self-cleaning feature operates the oven at temperatures high enough to burn away food soils in the oven. Follow these instructions for safe operation.
Ŷ 'R QRW WRXFK RYHQ VXUIDFHV GXULQJ VHOI FOHDQ
RSHUDWLRQ .HHS FKLOGUHQ DZD\ IURP WKH RYHQ GXULQJ self-cleaning. Failure to follow these instructions may cause burns.
Ŷ %HIRUH RSHUDWLQJ WKH VHOI FOHDQ F\FOH UHPRYH SDQV shiny metal oven racks and other utensils from the oven. Only gray porcelain-coated oven racks may
EH OHIW LQ WKH RYHQ 'R QRW XVH VHOI FOHDQ WR FOHDQ other parts, such as drip pans or bowls.
Ŷ %HIRUH RSHUDWLQJ WKH VHOI FOHDQ F\FOH ZLSH JUHDVH and food soils from the oven. Excessive amount of grease may ignite leading to smoke damage to your home.
Ŷ ,I WKH VHOI FOHDQLQJ PRGH PDOIXQFWLRQV WXUQ WKH oven off and disconnect the power supply. Have it serviced by a qualified technician.
Ŷ 'R QRW FOHDQ WKH GRRU JDVNHW 7KH GRRU JDVNHW LV essential for a good seal. Care should be taken not to rub, damage or move the gasket.
Ŷ 'R QRW XVH RYHQ FOHDQHUV 1R FRPPHUFLDO RYHQ cleaner or oven liner protective coating of any kind should be used in or around any part of the oven.
STATE OF CALIFORNIA PROPOSITION 65 WARNINGS

 WARNING This product contains one or more chemicals known to the State of California to cause cancer, and birth defects or other reproductive harm.
Self clean ovens can cause low level exposure to some of the Proposition 65 substances, including carbon monoxide, during the cleaning cycle. Exposure to these substances can be minimized by opening a window or using a ventilation fan or hood.
READ AND SAVE THESE INSTRUCTIONS
6 |
49-80808 |

IMPORTANT SAFETY INFORMATION
READ ALL INSTRUCTIONS BEFORE USING THE APPLIANCE
Remote Enable Equipment
This device complies with part 15 of the FCC Rules. Operation is subject to the following two conditions: (1) This device may not cause harmful interference, and
(2) this device must accept any interference received, including interference that may cause undesired operation.
The wireless communication equipment installed on this range has been tested and found to comply with the limits for a Class B digital device, pursuant to part 15 of the FCC Rules. These limits are designed to:
(a) provide reasonable protection against harmful interference in a residential installation. This equipment generates, uses, and can radiate radio frequency energy and, if not installed and used in accordance with the instructions, may cause harmful interference to radio communications. However, there is no guarantee that interference will not occur in a particular installation. If this equipment does cause harmful interference to radio or television reception, which can be determined by turning the equipment off and on, the user is encouraged to try to correct the interference by one or more of the following measures:
Ŷ 5HRULHQW RU UHORFDWH WKH UHFHLYLQJ DQWHQQD
Ŷ ,QFUHDVH WKH VHSDUDWLRQ EHWZHHQ WKH HTXLSPHQW DQG receiver.
Ŷ &RQQHFW WKH HTXLSPHQW LQWR DQ RXWOHW RQ D FLUFXLW different from that to which the receiver is connected.
Ŷ &RQVXOW WKH GHDOHU RU DQ H[SHULHQFHG UDGLR 79 technician for help.
(b) accept any interference received, including interference that may cause undesired operation of the device.
Note that any changes or modifications to the wireless communication device installed on this oven that are not expressly approved by the manufacturer could void the user’s authority to operate the equipment.
How to Remove Protective Shipping Film and Packaging Tape
Carefully grasp a corner of the protective shipping film with your fingers and slowly peel it from the appliance
VXUIDFH 'R QRW XVH DQ\ VKDUS LWHPV WR UHPRYH WKH ILOP
Remove all of the film before using the appliance for the first time.w
To assure no damage is done to the finish of the product, the safest way to remove the adhesive from packaging tape on new appliances is an application of a household liquid dishwashing detergent. Apply with a soft cloth and allow to soak.
NOTE: The adhesive must be removed from all parts. It cannot be removed if it is baked on.
READ AND SAVE THESE INSTRUCTIONS
INFORMATION SAFETY
49-80808 |
7 |

USING THE RANGE:6XUIDFH8QLWV
Surface Units
Operating the Cooktop Elements
WARNING |
FIRE HAZARD: Never leave the |
/(' |
range unattended with the cooktop on medium or |
Lights |
|
|
||
high settings. Keep flammable items away from the |
|
|
cooktop. Turn off all controls when done cooking. |
|
|
Failure to follow these instructions can result in fire, |
|
|
serious injury or death. |
|
|
Before using the cooktop for the first time, clean it with CERAMA BRYTE® Ceramic Cooktop Cleaner. This helps protect the top and makes cleanup easier.
Turn element(s) On: Touch and hold On/Off pad about half a second. A chime can be heard with each touch to any pad.
Power level can be selected in any of the following ways:
1. Swipe the gray arc (on the graphics) to the desired power level. There is no sensor on the LEDs, or;
2.Touch Anywhere along the gray arc, or;
3.Touch + or - pads to adjust power level, or;
4. Shortcut to Hi: Immediately after turning unit on, touch the + pad, or;
5. Shortcut to Low: Immediately after turning unit on, touch the - pad.
NOTE: When changing from a high heat setting to a lower heat setting, the surface unit may stop glowing. This is normal. The unit is still on and hot.
NOTE: This cooktop has a rapid heat-up feature. If the cooktop is cool when turned on, it will glow red for a short period of time until the desired power setting is reached.
Gray Arc Swipe Area
Gray Arc
Swipe Area
8 |
49-80808 |

Surface Units (Cont.)
Using the Warming Zone

 WARNING
FOOD POISON HAZARD: Bacteria may grow in food at temperatures below 140°F.
Ŷ $OZD\V VWDUW ZLWK KRW IRRG 'R QRW XVH ZDUP VHWWLQJ WR heat cold food.
Ŷ 'R QRW XVH ZDUP VHWWLQJ IRU PRUH WKDQ KRXUV
The WARMING ZONE, located in the back center of the glass surface, will keep hot, cooked food at serving
For best results, all foods on the WARMING ZONE should be covered with a lid or aluminum foil. When warming pastries or breads, the cover should be vented to allow moisture to escape.
The initial temperature, type and amount of food, type of pan, and the time held will affect the quality of the food.
Always use pot holders or oven mitts when removing food from the WARMING ZONE, since cookware and plates will be hot.
WHPSHUDWXUH $OZD\V VWDUW ZLWK KRW IRRG 'R QRW XVH WR |
NOTE: The surface warmer will not glow red. |
heat cold food. Placing uncooked or cold food on the |
|
WARMING ZONE could result in foodborne illness. |
|
To use the WARMING ZONE: |
|
Press the WARMING ZONE pad, select the desired level |
|
(1, 2 or 3) using the number pads, and press start. |
|
To turn off the WARMING ZONE: |
|
Press the WARMING ZONE pad. |
|
NOTE: &DQFHO 2II ZLOO 127 WXUQ RII WKH ZDUPLQJ ]RQH |
|
How To Synchronize Left Elements
To Turn On
Hold the Sync Burners pad for about half a second to connect the two elements. Operate either element as described in Operating the Cooktop Elements to adjust power level.
To Turn Off
1.Touch the On/Off pad on either element to turn off the Sync Burners.
or
2. Touch the Sync Burners to turn both elements off.
8QLWV6XUIDFH RANGE: THE USING
Multi-Ring Burner (Can be Dual or Triple)
To Turn On/Off
1. Touch the On/Off pad for the right front surface unit.
8VH WKH DUF RU + or – pad to choose the desired power setting.
3.Touch the Burner Size pad as needed to select the desired burner size.
The light next to the Burner Size pad indicates which size the surface unit is on. To turn the surface unit off, touch the On/Off pad.
49-80808 |
9 |

USING THE RANGE:6XUIDFH8QLWV
Surface Units (Cont.)
Home Canning Tips
Be sure the canner is centered over the surface unit. Make sure the canner is flat on the bottom.
To prevent burns from steam or heat, use caution when canning.
8VH UHFLSHV DQG SURFHGXUHV IURP UHSXWDEOH VRXUFHV
These are available from manufacturers such as Ball®
DQG .HUU® DQG WKH 'HSDUWPHQW RI $JULFXOWXUH ([WHQVLRQ
Service.
)ODW ERWWRPHG FDQQHUV DUH UHFRPPHQGHG 8VH RI ZDWHU bath canners with rippled bottoms may extend the time required to bring the water to a boil.
Radiant Glass Cooktop
The radiant cooktop features heating units beneath a smooth glass surface.
NOTE: A slight odor is normal when a new cooktop is used for the first time. It is caused by the heating of new parts and insulating materials and will disappear in a short time.
NOTE: On models with light-colored glass cooktops, it is normal for the cooking zones to change color when hot or cooling down. This is temporary and will disappear as the glass cools to room temperature.
The surface unit will cycle on and off to maintain your selected control setting.
It is safe to place hot cookware on the glass surface even when the cooktop is cool.
Even after the surface units are turned off, the glass cooktop retains enough heat to continue cooking. To avoid overcooking, remove pans from the surface units when the food is cooked. Avoid placing anything on the surface unit until it has cooled completely.
Ŷ :DWHU VWDLQV PLQHUDO GHSRVLWV DUH UHPRYDEOH XVLQJ the cleaning cream or full-strength white vinegar.
Ŷ 8VH RI ZLQGRZ FOHDQHU PD\ OHDYH DQ LULGHVFHQW ILOP RQ the cooktop. The cleaning cream will remove this film.
Ŷ 'RQ¶W VWRUH KHDY\ LWHPV DERYH WKH FRRNWRS ,I WKH\ drop onto the cooktop, they can cause damage.
Ŷ 'R QRW XVH WKH VXUIDFH DV D FXWWLQJ ERDUG
Never cook directly on the glass. Always use cookware.
Always place the pan in the center of the surface unit you are cooking on.
'R QRW VOLGH FRRNZDUH DFURVV WKH FRRNWRS EHFDXVH
LW FDQ VFUDWFK WKH JODVV WKH JODVV LV VFUDWFK resistant, not scratch proof.
Temperature Limiter on Radiant Glass Cooktops
Every radiant surface unit has a temperature limiter.
The temperature limiter protects the glass cooktop from getting too hot.
The temperature limiter may cycle the surface units off for a time if:
Ŷ WKH SDQ ERLOV GU\
Ŷ WKH SDQ ERWWRP LV QRW IODW
Ŷ WKH SDQ LV RII FHQWHU
Ŷ WKHUH LV QR SDQ RQ WKH XQLW
10 |
49-80808 |
Cookware for Radiant Glass Cooktop
The following information will help you choose cookware which will give good performance on glass cooktops.
NOTE: Follow all cookware manufacturer’s recommendations when using any type of cookware on the ceramic cooktop.
Recommended
Stainless Steel
Aluminum:
heavy weight recommended
Good conductivity. Aluminum residues sometimes appear as scratches on the cooktop but can be removed if cleaned immediately. Because of its low melting point, thin weight aluminum should not be used.
Copper Bottom:
Copper may leave residues which can appear as scratches. The residues can be removed, as long as the cooktop is cleaned immediately. However, do not let these pots boil dry. Overheated metal can bond to glass cooktops. An
overheated copper bottom pot will leave a residue that will permanently stain the cooktop if not removed immediately.
Enamel (painted) on Cast Iron:
recommended if bottom of pan is coated
Avoid/Not Recommended
Enamel (painted) on Steel:
Heating empty pans can cause permanent damage to cooktop glass. The enamel can melt and bond to the ceramic cooktop.
Glass-ceramic:
Poor performance. Will scratch the surface.
Stoneware:
Poor performance. May scratch the surface.
Cast Iron:
QRW UHFRPPHQGHG XQOHVV GHVLJQHG specifically for glass cooktops
Poor conductivity and slow to absorb heat. Will scratch the cooktop surface.
Check pans for flat bottoms by using a straight edge.
Pans with rounded, curved, ridged or warped bottoms are not recommended.
For Best Results
Ŷ 3ODFH RQO\ GU\ SDQV RQ WKH VXUIDFH HOHPHQWV 'R QRW place lids on the surface elements, particularly wet lids. Wet pans and lids may stick to the surface when cool.
Ŷ 'R QRW XVH ZRNV WKDW KDYH VXSSRUW ULQJV 7KLV W\SH RI wok will not heat on glass surface elements.
Ŷ :H UHFRPPHQG WKDW \RX XVH RQO\ D IODW ERWWRPHG wok. They are available at your local retail store. The bottom of the wok should have the same diameter as the surface element to ensure proper contact.
Ŷ 6RPH VSHFLDO FRRNLQJ SURFHGXUHV UHTXLUH VSHFLILF cookware such as pressure cookers or deep-fat fryers. All cookware must have flat bottoms and be the correct size.
'R QRW SODFH ZHW SDQV RQ WKH JODVV FRRNWRS
'R QRW XVH ZRNV ZLWK VXSSRUW ULQJV RQ WKH JODVV FRRNWRS
8VH IODW ERWWRPHG ZRNV RQ WKH JODVV FRRNWRS
Cooktop Glass Radiant for Cookware RANGE: THE USING
49-80808 |
11 |

USING THE RANGE: Oven Controls
Oven Controls
3 11 7
1
1
6 |
4 |
2 |
8 |
11 |
1. Upper Oven and Lower Oven:
'HVLJQDWHV ZKLFK RYHQ WKH FRQWUROV ZLOO RSHUDWH
Select an oven before following the steps for starting a cooking or cleaning mode.
2. Convection Cooking Modes: Convection
cooking modes use increased air circulation to improve performance. See the Cooking Modes section for more information.
3. Traditional Cooking Modes: Your oven
has the following traditional cooking modes: Bake, Broil, and Warm. See the Cooking Modes section for more information.
4. Clean: Your oven has two cleaning modes: Self Clean and Steam Clean. See the Cleaning the Oven section for important information about using these modes.
5. Start/Enter: Must be pressed to start any cooking, cleaning, or timed function. Also used to start the Warming Zone on the cooktop.
6. Cancel/Off: Cancels ALL oven operations
H[FHSW WKH FORFN DQG WLPHU 'RHV 127 FDQFHO WKH
Warming Zone on the cooktop.
7. Timer: Works as a countdown timer. Press the Timer pad and number pads to program the time in hours and minutes. Press the Start pad. The timer countdown is complete. To turn the timer off press the Timer pad.
9 10 5
8. Remote Enable: Allows you to control your oven remotely. The oven must be connected to WiFi before Remote Enable can be activated. For instructions on how to connect your oven, see
WKH :L)L &RQQHFW 5HPRWH (QDEOH VHFWLRQ XQGHU
Settings in this manual.
9.Oven Light: Turns the oven light on or off.
10.Lock Controls: Locks out the control so that
pressing the pads does not activate the controls. Press and hold the 0 pad, for three seconds to lock or unlock the control. Cancel/Off is always active, even when the control is locked.
11. Options and Settings: The Options and
Settings pads open up more detailed menus in the display that allow access to additional functions and cooking modes. For each you select the function in the display using the associated number pad. You can exit at any time by pressing the Options or Settings pad again. See the Settings, Options, and Cooking Modes Sections for more details.
12 |
49-80808 |

Options
The options pad opens up a menu of more cooking modes when the oven is off. It opens a menu with additional features if a cooking mode is already in process. You can exit the menu at any time by pressing the Options pad again.
You must first select an oven and a mode (bake, convection bake, convection roast) and then select Options to get to the following functions.
Cook Time
Counts down cooking time and turns off the oven when the cooking time is complete. Select a desired cooking
PRGH 8VH WKH QXPEHU SDGV WR SURJUDP D EDNLQJ temperature. Press the Options pad and select Cook Time 8VH WKH QXPEHU SDG WR SURJUDP FRRN WLPH LQ KRXUV and minutes. Then press Start/Enter. This can only
be used with Bake, Convection Bake, and Convection Roast.
Delay Time
'HOD\V ZKHQ WKH RYHQ ZLOO WXUQ RQ 8VH WKLV WR VHW D time when you want the oven to start. Press the desired
FRRNLQJ PRGH SDG 8VH WKH QXPEHU SDG WR SURJUDP D baking temperature. Press the Options pad and select
Delay Time 8VH WKH QXPEHU SDGV WR SURJUDP WKH WLPH RI day for the oven to turn on, and then press Start/Enter.
'HOD\ 7LPH LV QRW DYDLODEOH ZLWK DOO PRGHV
NOTE: :KHQ XVLQJ WKH 'HOD\ 7LPH IHDWXUH IRRGV WKDW spoil easily – such as milk, eggs, fish, stuffing, poultry, and port – should not be allowed to sit for more than 1 hour before or after cooking. Room temperature
promotes the growth of harmful bacteria. Be sure that the oven light is off because heat from the bulb will speed harmful bacteria growth.
Oven Probe (Lower oven only)
NOTE: Only accessible through traditional and convection cooking modes.
Monitors internal food temperature and turns the oven off when the food reaches the programmed temperature. Insert the probe, press the desired cooking mode, and program the probe temperature. See the Cooking Modes Section for more information. The probe can only be used with Bake, Convection Bake, and Convection Roast.
Settings
The Options and Settings pads open up more detailed menus in the display that allow access to additional functions. For each you select the function in the display using the associated number pad. You can exit at any time by pressing the Options or Settings pad again.
WiFi Connect/Remote Enable
Your oven is designed to provide you with two-way communication between your appliance and smart device. By using the WiFi Connect features, you will be able to control essential oven operations such as temperature settings, timers and cooking modes using your smartphone or tablet.*
Select Settings then Wifi - follow the instructions on your oven display and phone app. It is necessary to turn on WiFi before using Remote Enable on your oven.
Connecting your WiFi Connect Enabled Oven
What you will need
Your GE Appliances oven uses your existing home WiFi network to communicate between the appliance and your smart device. In order to setup your GE Appliances oven, you will need to gather some information:
1.Each GE Appliances oven has a connected appliance information label that includes an Appliance Network Name and Password. These are the two important details that you will need to connect to the appliance. The label is typically located inside the door of the oven or drawer.
Connected Appliance Information
FCC: ZKJ-WCATA001 |
Network: GE_XXXXXX_XXXX |
IC: 10229A-WCATA001 |
Password: XXXXXXXX |
MAC ID: XX - XX - XX - XX - XX - XX |
PT. NO. 229C6272G001-0 |
Sample Label
2.Have your smart phone or tablet ready with the ability to access the internet and download apps.
3.You will need to know the password of your home WiFi router. Have this password ready while you are setting up your GE Appliances oven.
Connect your GE Appliances oven
1.On your smart phone or tablet visit
ZZZ *($SSOLDQFHV FRP FRQQHFW WR OHDUQ PRUH DERXW connected appliance features and to download the appropriate app.
2.Follow the app onscreen instructions to connect your GE Appliances oven.
3.Once the process is complete, the connection light located on your GE Appliances oven display will stay on solid and the app will confirm you are connected.
* Compatible Apple or Android devices and home WiFi network required.
6HWWLQJV2SWLRQVRANGE: THE USING
49-80808 |
13 |

USING THE RANGE: Settings
Settings
Wifi Connect (cont.)
4.If the connection light does not turn on or is blinking, follow the instructions on the app to reconnect. If issues continue, please call the Connected Call Center 1.866.626.2000 and ask for assistance regarding oven wireless connectivity.
To connect additional smart devices, repeat steps 1 and 2.
Note that any changes or modifications to the remote enable device installed on this oven that are not expressly approved by the manufacturer could void the user’s authority to operate the equipment.
REMOTE STARTING YOUR OVEN
To be able to start the oven remotely once connected to WiFi, press the Remote Enable pad and the icon will turn on in the display. The oven can now be remotely started with a connected device. Opening an oven door or turning off the oven will turn off the icon. The
icon must be lit to start the oven remotely. The icon is not required to change the oven temperature while it is running, set a timer or to turn the oven off from the phone app while the icon shows it is Wifi Connected.
After using the oven, remember to verify that the icon is lit if you wish to start the oven remotely in the future.
NOTE: )RRGV WKDW VSRLO HDVLO\ VXFK DV PLON HJJV ILVK
VWXIILQJV SRXOWU\ DQG SRUN VKRXOG QRW EH DOORZHG WR sit for more than 1 hour before or after cooking. Room temperature promotes the growth of harmful bacteria. Be sure that the oven light is off because heat from the bulb will speed harmful bacteria growth.
Clock
This setting sets the oven clock time. Press the Settings pad and select Set Clock. Follow the instructions to set the clock. This feature also specifies how the time of day will be displayed. You can select a standard 12-hour clock (12H), 24-hour military time display (24H), or no clock displayed (Off). Press the Settings pad, select Set Clock and select either 12/24 hr or On/Off.
Bluetooth® - Chef Connect
This is a pairing feature for use with other compatible Chef Connect enabled products like an over-the-range microwave oven or range hood. To pair those products to the range Press the Settings pad and select Bluetooth®. Select Pair and follow the corresponding instructions included with the mating Chef Connect enabled product. The range will cancel pairing mode after two minutes if no mating device is detected. Select Remove to confirm product is paired or to un-pair from range.
Auto Conv (Auto Conversion)
When using Convection Bake cooking, Auto Recipe Conversion will automatically convert the regular baking temperatures entered to convection bake cooking temperatures when turned on. Note that this option does not convert convection bake cooking times, it only converts temperatures. This feature may be turned On or Off. Select Settings and Auto Conversion, then follow the prompts to turn this feature on or off.
Auto Off
This feature shuts the oven down after 12 hours of continuous operation. It may be enabled or disabled. Select Settings, More, and Auto Off to turn this feature on or off.
Sound
You can adjust the volume and type of alert your appliance uses. Select Settings, More, and Sound. Follow prompts for making volume adjustments or for changing between continuous and single alert tones. A continuous setting will continue to sound a tone until a button on the control is pressed. The oven tone volume can be adjusted between several settings and off. The control will sound the oven tone at the new volume level each time the sound level is changed.
F/C (Fahrenheit or Celsius)
The oven control is set to use Fahrenheit temperatures (F), but you can change it to use Celsius temperatures
(C). Select Settings, More, and F/C to alter between temperature scales displayed.
Adjust the Oven temperature
This feature allows the oven cooking modes to be
DGMXVWHG XS WR ) KRWWHU RU GRZQ WR ) FRROHU 8VH this feature if you believe your oven temperature is too hot or too cold and wish to change it. This adjustment affects Bake and Convection Bake modes. No other cooking modes are affected. Select Settings and Oven Adjust to add More Heat or Less Heat and then press
Save (for double ovens use the Upper Oven or Lower Oven menu selection corresponding to the oven to be adjusted).
Oven Info
To display the model number and software version on your unit, select Settings, More, and Oven Info.
14 |
49-80808 |

Sabbath Mode
7KH 6DEEDWK PRGH IHDWXUH FRPSOLHV ZLWK VWDQGDUGV VHW IRUWK E\ 6WDU . 6RPH RI WKHVH VWDQGDUGV WKDW ZLOO EH QRWLFHG by the consumer include the disabling of tones, disabling of oven lights, and delays of about 30 seconds to one minute on display changes. Only continuous baking or timed baking is allowed in the Sabbath mode. Cooking in the Sabbath mode is a two-step process, first the Sabbath mode must be set and then the bake mode must be set.
Setting the Sabbath Mode
Press the Settings pad, select Sabbath, and select Turn on. A single bracket “]” will appear in the display indicating that the Sabbath mode is set. The clock will not be displayed. Continuous bake or timed bake can now be programmed.
Starting a Continuous Bake
1.Press the Bake pad. (For double ovens, this operates the upper oven. If desiring to use Lower Oven, press
Lower Oven and then Bake.)
2.If the desired temperature is 350F, press Start/ Enter. If a different cooking temperature is desired, use the 1 through 5 number pads to select a preset cooking temperature, then press Start/Enter. Refer to the graphic below to determine which pad sets the desired cooking temperature.
After a delay, a second bracket “] [“ will appear in the display indicating that the oven is baking.
Temperature (°F) |
|
|
|
|
|
|
|
|||
|
|
|
|
|
|
|
|
|
|
|
|
|
|
|
|
|
|
||||
200 |
|
|
250 |
300 |
|
|||||
|
|
|
|
|
|
|
|
|||
Time (hours) |
|
|
|
|
|
|||||
|
|
|
|
|
|
|
|
|
|
|
|
|
|
|
|
|
|
|
|||
325 |
|
|
400 |
|
|
2h |
||||
|
|
|
|
|
|
|
|
|
|
|
|
|
|
|
|
|
|
|
|||
|
|
|
2.5h |
3h |
|
|
3.5h |
|||
|
|
|
|
|
|
|
|
|
|
|
|
|
|
|
|
|
|
|
|
|
|
|
|
|
|
|
|
|
|
|
|
|
|
|
|
|
|
|
|
|
|
|
|
4h
1 = 200° F, 2 = 250° F, 3 = 300° F, 4 = 325° F, 5 = 400° F
6 = 2 hours, 7 = 2.5 hours, 8 = 3 hours, 9 = 3.5 hours, 0 = 4 hours
Adjusting the Temperature
1.Press Bake (or press Lower Oven and then Bake for lower oven in a double oven unit), use the 1 through 5 number pads to select a different preset cooking temperature, and press Start/Enter.
2.Since no feedback is given during temperature change, an oven thermometer can be used to confirm temperature changes.
Starting a Timed Bake
1.Press the Bake pad.
2.If the desired temperature is 350F, use the 6 through 0 number pads to select a cooking time. If a cooking temperature other than 350F is desired, use the 1 through 5 number pads to select a preset cooking temperature, then select the cooking time. Refer to the graphic on this page to determine which pad sets the desired cooking temperature and cooking time.
3.Press Start/Enter.
After a delay, a second bracket “] [“ will appear in the display indicating that the oven is baking. When the cook time expires, the display will change back to a single bracket “]” indicating that the oven is no longer baking. No tone will sound when the cook time is complete.
Exit the Sabbath Mode
Exiting the Sabbath mode should be done after the Sabbath is over.
1.Press Cancel/Off to end any bake mode that may be running.
2.Press and hold Settings pad until Sabbath Mode off is displayed.
Sabbath Mode Power Outage Note
If a power outage occurs while the oven is in Sabbath Mode, the unit will return to Sabbath Mode when power
LV UHVWRUHG KRZHYHU WKH RYHQ ZLOO UHWXUQ WR WKH R VWDWH even if it was in the middle of a bake cycle when the power outage occurred.
Mode Sabbath RANGE: THE USING
49-80808 |
15 |
USING THE RANGE:2YHQ5DFNV$OXPLQXP)RLODQG2YHQ/LQHUV&RRNZDUH
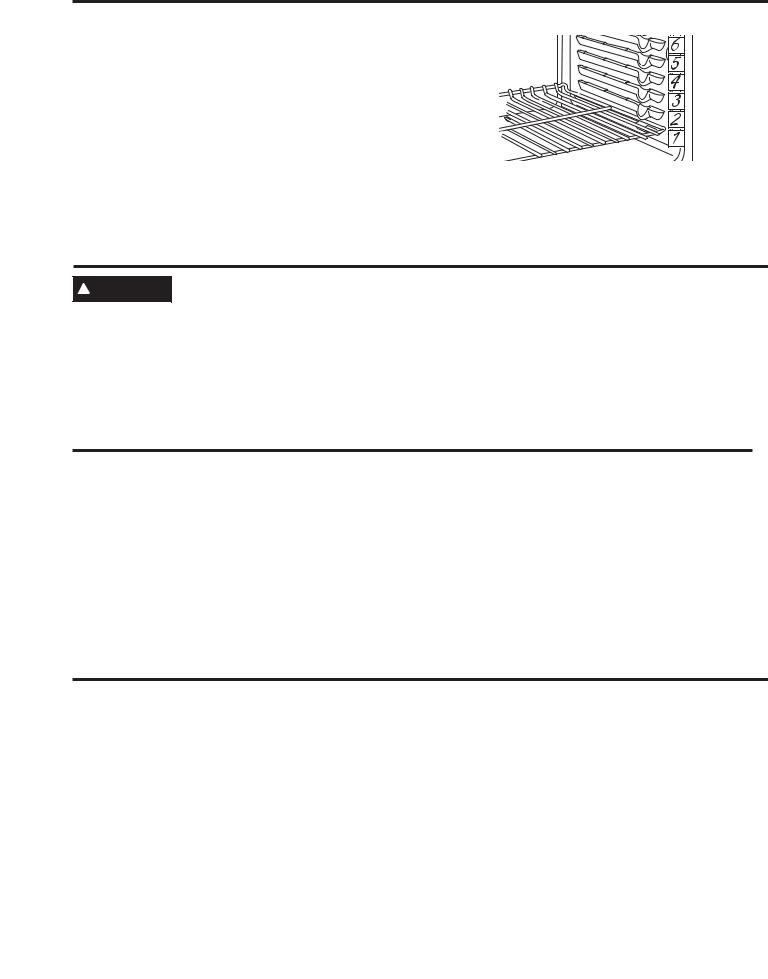
Oven Racks
Recommended rack positions for various types of
foods are provided in the Cooking Guide. Adjusting rack position is one way to impact cooking results. For example, if you would prefer darker tops on cakes, muffins, or cookies, try moving food one rack position higher. If you find foods are too brown on top try moving them down next time.
When baking with multiple pans and on multiple racks, ensure there is at least 1½" between pans to allow
sufficient space for air to flow.
The number of rack positions may vary by model.
To avoid possible burns, place the racks in the desired position before you turn the oven on.
Aluminum Foil and Oven Liners

 CAUTION Do not use any type of foil or oven liner to cover the oven bottom. These items can trap heat or melt, resulting in damage to the product and risk of shock, smoke or fire. Damage from improper use of these items is not covered by the product warranty.
)RLO PD\ EH XVHG WR FDWFK VSLOOV E\ SODFLQJ D VKHHW RQ D ORZHU UDFN VHYHUDO LQFKHV EHORZ WKH IRRG 'R QRW XVH PRUH
IRLO WKDQ QHFHVVDU\ DQG QHYHU HQWLUHO\ FRYHU DQ RYHQ UDFN ZLWK DOXPLQXP IRLO .HHS IRLO DW OHDVW ´ IURP RYHQ ZDOOV to prevent poor heat circulation.
Cookware
Cookware Guidelines
The material, finish, and size of cookware affect baking performance.
'DUN FRDWHG DQG GXOO SDQV DEVRUE KHDW PRUH UHDGLO\ than light, shiny pans. Pans that absorb heat more readily can result in a browner, crisper, and thicker crust. If using dark and coated cookware check food earlier than minimum cook time. If undesirable results are obtained with this type of cookware consider reducing oven temperature by 25ºF next time.
Shiny pans can produce more evenly cooked baked goods such as cakes and cookies.
Glass and ceramic pans heat slowly but retain heat well. These types of pans work well for dishes such as pies and custards.
Air insulated pans heat slowly and can reduce bottom browning.
.HHS FRRNZDUH FOHDQ WR SURPRWH HYHQ KHDWLQJ
Cooking Modes
Your new oven has a variety of cooking modes to help you get the best results. These modes are described below. Refer to the Cooking Guide section for rack position and other recommendations for specific modes and foods.
Bake
The bake mode is for baking and roasting. When preparing baked goods such as cakes, cookies and pastries, always preheat the oven first. To use this mode press the Bake pad, enter a temperature with the number pads, and then press Start/Enter.
Warm
Warm mode is designed to keep hot foods hot. Cover foods that need to remain moist and do not cover foods
WKDW VKRXOG EH FULVS 3UHKHDWLQJ LV QRW UHTXLUHG 'R not use warm to heat cold food It is recommended that food not be kept warm for more than 2 hours. Press the
Warm pad and then press Start/Enter.
16 |
49-80808 |

Cooking Modes
Broiling Modes
Always broil with the oven door closed. Monitor food
FORVHO\ ZKLOH EURLOLQJ 8VH FDXWLRQ ZKHQ EURLOLQJ SODFLQJ food close to the broil element increases smoking, spattering and the possibility of fats igniting. It is not necessary to preheat when using the Broil modes.
Broil Hi
The Broil Hi mode uses intense heat from the upper
HOHPHQW WR VHDU IRRGV 8VH %URLO +L IRU WKLQQHU FXWV
Baked Goods
The Baked Goods mode is designed for cooking cakes, breads, cookies, and similar foods on a single rack. This mode is designed to provide lighter top browning and better volume. Some foods may require slightly longer cook times relative to when cooked in the traditional bake mode. Press Options and select Baked Goods than follow any display prompts to access this mode.
Convection Bake
RI PHDW DQG RU ZKHQ \RX ZRXOG OLNH WR KDYH D VHDUHG surface and rare interior. To use this mode press the Broil pad once and then press Start/Enter.
Broil Lo
The Broil Lo mode uses less intense heat from the upper element to cook food thoroughly while also browning the
VXUIDFH 8VH %URLO /R IRU WKLFNHU FXWV RI PHDW DQG RU IRRGV that you would like cooked all the way through. To use this mode press the Broil pad twice and then press Start/ Enter.
The Convection Bake mode is intended for baking on multiple racks at the same time. This mode uses air movement from the convection fan to enhance cooking evenness. Your oven is equipped with Auto
Recipe Conversion, so it is not necessary to adjust the temperature when using this mode. Always preheat when using this mode. Baking times may be slightly longer for multiple racks than what would be expected for a single rack. To use this mode press the Conv Bake pad, enter a temperature with number pads, and then press Start/Enter.
Frozen - Snacks
The Frozen Snacks modes are designed to cook frozen foods such as potato nuggets, French fries, and similar frozen snacks and appetizers. Most foods will cook within package recommended time. Adjust cooking time according to individual preferences.
8VH )UR]HQ 6QDFNV 6LQJOH ZKHQ FRRNLQJ IUR]HQ VQDFNV on a single rack. This mode does not require preheating the oven. Food should be placed in the oven before or immediately upon starting this mode.
8VH )UR]HQ 6QDFNV 0XOWL ZKHQ FRRNLQJ IUR]HQ VQDFNV on two racks simultaneously. This mode includes a preheating cycle to prepare the oven for multi-rack baking. Press Options and select Frozen then follow any display prompts to access this mode.
Frozen - Pizza
The Frozen Pizza modes are designed to cook frozen pizzas. Most pizzas will cook within package recommended times. Adjust cooking time according to individual preferences.
8VH )UR]HQ 3L]]D 6LQJOH ZKHQ FRRNLQJ RQ D VLQJOH UDFN
This mode does not require preheating the oven. Food should be placed in the oven before or immediately upon starting this mode.
8VH )UR]HQ 3L]]D 0XOWL ZKHQ FRRNLQJ RQ WZR UDFNV simultaneously. This mode includes a preheating cycle to prepare the oven for multi-rack baking. Press Options and select Frozen then follow any display prompts to access this mode.
Convection Roast
The Convection Roast mode is intended for roasting whole cuts of meat on a single rack. This mode uses movement from the convection fan to improve browning and reduce cooking time. It is not necessary to convert temperature. Check food earlier than the recipe suggested time when using this mode, or use the probe. To use this mode press the Conv Roast pad, enter a temperature with the number pads, and then press Start/ Enter.
Proof
Proof mode maintains a warm environment for rising yeast-leavened dough move this to the end of the Proof section.
If the oven is too warm, Proof mode will not operate and the display will show "Oven too hot for Proof".
For best results, cover the dough while proofing and check early to avoid over-proofing.
 CAUTION 'R QRW XVH WKH 3URRI PRGH IRU ZDUPLQJ food or keeping food hot. The proofing oven temperature is not hot enough to hold foods at safe temperatures.
Modes Cooking RANGE: THE USING
49-80808 |
17 |

USING THE RANGE: Probe
Probe (Lower oven only)

 WARNING Consuming undercooked food can result in foodborne illness. Use probe according to the following instructions to ensure all portions of the food reach minimum safe cooking temperatures. Recommendations for minimum safe food temperatures can be found at
www.foodsafety.gov or www.IsItDoneYet.gov.
Internal food temperature is frequently used as an indicator of doneness, especially for roasts and poultry. The Probe mode monitors the internal food temperature and turns the oven off when the internal food temperature reaches the programmed temperature.
Always check the temperature at multiple locations in the food with a food thermometer after cooking to ensure that all portions of the food have reached the minimum safe internal temperature for that food.
Proper Probe Placement
After preparing the meat and placing it on the cooking pan follow these instructions for proper probe placement.
Ŷ ,QVHUW WKH SUREH LQWR WKH IRRG VR WKDW WKH WLS RI WKH probe will rest in the center of the thickest part of the food. For best performance the probe should be fully inserted into the food. If the probe is not located properly, it may not accurately measure the temperature of the coolest portion of the food. Some foods, particularly small items, are not well suited for cooking with the probe due to their shape or size.
Ŷ 7KH SUREH VKRXOG QRW WRXFK ERQH IDW RU JULVWOH
Ŷ )RU ZKROH SRXOWU\ LQVHUW WKH SUREH LQWR WKH WKLFNHVW part of the breast.
Ŷ )RU ERQHOHVV URDVWV LQVHUW WKH SUREH LQWR WKH FHQWHU of the roast.
Ŷ )RU ERQH LQ KDP RU ODPE LQVHUW WKH SUREH LQWR WKH center of the lowest large muscle or joint.
Ŷ )RU FDVVHUROHV RU GLVKHV VXFK DV PHDWORDI LQVHUW WKH probe into the center of the dish.
Ŷ )RU ILVK LQVHUW WKH SUREH IURP MXVW DERYH WKH JLOO LQWR the meatiest area, parallel to the backbone.
Probe Usage
The temperature probe can only be used with Bake, Convection Bake, and Convection Roast
To use the probe with preheating:
1.Press the desired cook mode (Bake, Convection Bake, or Convection Roast) pad and enter the desired cooking temperature with the number pads.
2.Insert the probe into the food (see Proper Probe Placement).
3.Once the oven is preheated, place the food in the oven and connect the probe to the probe outlet,
PDNLQJ VXUH LW LV IXOO\ LQVHUWHG 8VH FDXWLRQ WKH RYHQ walls and probe outlet are hot.
4.When the probe is connected, the display will prompt you to enter the desired food temperature. The maximum internal food temperature that you can set is 200° F.
To use the probe without preheating:
1.Insert the probe into the food (see Proper Probe Placement).
2.Place the food in the oven and connect the probe into the probe outlet in the oven.
3.Press the Cook Mode pad (Traditional Bake, Convection Bake, or Convection Roast) and enter the desired cooking temperature with the number pads. Press Options and select Probe then follow the display prompts to enter the desired food temperature.
Probe Care Guidelines
Ŷ 8VH RI SUREHV RWKHU WKDQ WKH RQH SURYLGHG ZLWK WKLV product may result in damage to the probe outlet.
Ŷ 8VH WKH KDQGOHV RI WKH SUREH DQG SOXJ ZKHQ LQVHUWLQJ and removing them from the meat and outlet
Ŷ 7R DYRLG GDPDJLQJ \RXU SUREH GR QRW XVH WRQJV WR pull on the cable when removing it.
Ŷ 7R DYRLG EUHDNLQJ WKH SUREH PDNH VXUH IRRG LV completely defrosted before inserting the probe.
Ŷ 7R SUHYHQW SRVVLEOH EXUQV GR QRW XQSOXJ WKH SUREH from the outlet until the oven has cooled.
Ŷ 1HYHU OHDYH WKH SUREH LQVLGH WKH RYHQ GXULQJ D VHOI RU steam clean cycle.
Ŷ 'R QRW VWRUH WKH SUREH LQ WKH RYHQ
18 |
49-80808 |

Cooking Guide
|
RECOMMENDED |
OVEN |
RECOMMENDED |
|
|
FOOD TYPE |
MODE(S) |
(Upper / Lower) |
RACK POSITION(S) |
ADDITIONAL SUGGESTIONS |
|
Baked Goods |
|
|
|
|
|
Layer Cakes, sheet cakes, |
Bake |
8SSHU |
1 |
8VH VKLQ\ FRRNZDUH |
|
Lower |
3 |
||||
bundt cakes, muffins, quick |
|
|
|||
breads on a Single Rack |
Baked Goods |
Lower |
3 |
|
|
|
|
||||
Layer cakes* on Multiple |
Bake |
Lower |
2 and 4 |
Ensure adequate airflow |
|
Racks |
Convection Bake |
(see illustration below). |
|||
|
|
||||
Chiffon cakes (angel food) |
Baked Goods |
Lower |
1 |
8VH VKLQ\ FRRNZDUH |
|
Cookies, biscuits, scones on |
Bake |
8SSHU |
1 |
8VH VKLQ\ FRRNZDUH |
|
Lower |
3 |
||||
a Single Rack |
Baked Goods |
Lower |
3 |
|
|
|
|
||||
Cookies, biscuits, scones on |
Convection Bake |
Lower |
2 and 4 |
Ensure adequate airflow. |
|
Multiple Racks |
|||||
|
|
|
|
||
|
Proof |
8SSHU |
1 |
Cover dough loosely |
|
|
Lower |
3 |
|||
|
|
|
|||
Yeast Breads |
Bake |
8SSHU |
1 |
|
|
|
Lower |
3 |
|
||
|
|
|
|||
|
Baked Goods |
Lower |
3 |
|
|
Beef & Pork |
|
|
|
|
|
|
|
|
|
8VH D EURLO SDQ PRYH IRRG GRZQ IRU PRUH |
|
Hamburgers |
Broil High |
Lower |
6 |
GRQHQHVV OHVV VHDULQJ :DWFK IRRG FORVHO\ ZKHQ |
|
broiling. For best performance center food below |
|||||
|
|
|
|
||
|
|
|
|
the broil heating element |
|
|
|
|
|
8VH D EURLO SDQ PRYH IRRG GRZQ IRU PRUH |
|
Steaks & Chops |
Broil High |
Lower |
5 or 6 |
GRQHQHVV OHVV VHDULQJ :DWFK IRRG FORVHO\ ZKHQ |
|
broiling. For best performance center food below |
|||||
|
|
|
|
the broil heating element |
|
Roasts |
Bake |
Lower |
2 or 3 |
8VH D ORZ VLGHG SDQ VXFK DV D EURLO SDQ |
|
Convection Roast |
Preheating is not necessary |
||||
|
|
|
|||
Poultry |
|
|
|
|
|
Whole chicken |
Bake |
Lower |
2 or 3 |
8VH D ORZ VLGHG SDQ VXFK DV D EURLO SDQ |
|
Convection Roast |
|||||
|
|
|
|
||
Bone-in chicken breasts, |
Broil Low |
8SSHU |
1 |
If breaded or coated in sauce avoid Broil Hi modes. |
|
Broil skin side down first. Watch food closely when |
|||||
legs, thighs |
Bake |
Lower |
3 |
broiling. For best performance when broiling, |
|
|
|
|
|
center food below the broil heating element. |
|
|
Broil Low |
8SSHU |
1 |
If breaded or coated in sauce avoid Broil Hi modes. |
|
Boneless chicken breasts |
Broil skin side down first. Watch food closely when |
||||
Bake |
Lower |
3 |
broiling. For best performance when broiling, |
||
|
|||||
|
|
|
|
center food below the broil heating element |
|
Whole turkey |
Bake |
Lower |
1 |
8VH D ORZ VLGHG SDQ VXFK DV D EURLO SDQ |
|
Convection Roast |
|||||
|
|
|
|
||
Turkey Breast |
Bake |
Lower |
2 or 3 |
8VH D ORZ VLGHG SDQ VXFK DV D EURLO SDQ |
|
Convection Roast |
|||||
|
|
|
|
||
Fish |
Broil Low |
Lower |
WKLFN RU OHVV |
Watch food closely when broiling. For best performance |
|
! LQFK |
center food below the broil heating element. |
||||
|
|
|
|||
Casseroles |
Bake |
8SSHU |
1 |
|
|
Lower |
3 or 4 |
|
|||
|
|
|
|||
Frozen Convenience Foods |
|
|
|
|
|
Pizza on a single rack |
Frozen Pizza Single |
Lower |
3 |
'R QRW SUHKHDW |
|
Pizza on multiple racks |
Frozen Pizza Multi |
Lower |
2 and 4 |
Stagger pizzas left to right, do not place directly |
|
over each other |
|||||
|
|
|
|
||
Potato products, chicken |
|
8SSHU |
1 |
'R QRW SUHKHDW 8VH GDUN FRRNZDUH IRU PRUH |
|
nuggets, appetizers on a |
Frozen Snacks Single |
EURZQLQJ FULVSLQJ XVH VKLQ\ FRRNZDUH IRU OHVV |
|||
Lower |
4 |
||||
single rack |
|
browning. |
|||
|
|
|
|||
Potato products, chicken |
|
|
|
8VH GDUN FRRNZDUH IRU PRUH EURZQLQJ FULVSLQJ |
|
nuggets, appetizers on |
Frozen Snacks Multi |
Lower |
2 and 4 |
||
use shiny cookware for less browning. |
|||||
multiple racks |
|
|
|
||
|
|
|
|
||
*When baking four cake layers at a time, use racks |
Rear Placement |
|
|||
2 and 4. |
|
|
|
|
|
Cook food thoroughly to help protect against food |
|
|
|||
borne illness. Minimum safe food temperature |
|
|
|||
recommendations for food safety can be found at |
|
|
|||
www.IsItDoneYet.gov 8VH D IRRG WKHUPRPHWHU WR |
|
|
|||
take food temperatures. |
|
|
Front Placement |
||
|
|
|
|||
|
|
|
Baking four cake layers at a time |
||
Guide Cooking RANGE: THE USING
49-80808 |
19 |
CARE AND CLEANING: Cleaning the Range – Exterior
Cleaning the Range – Exterior
Be sure all controls are off and all surfaces are cool before cleaning any part of the range.
WARNING If your range is removed for cleaning, servicing or any reason, be sure the anti-tip device is reengaged properly when the range is replaced. Failure to
take this precaution could result in tipping of the range and can result in death or serious burns to children or adults.
Control Lockout
If desired, the touch pads may be deactivated before cleaning.
See Lock Controls in the Oven Controls section in this manual.
Clean up splatters with a damp cloth.
You may also use a glass cleaner.
5HPRYH KHDYLHU VRLO ZLWK ZDUP VRDS\ ZDWHU 'R QRW XVH abrasives of any kind.
Reactivate the touch pads after cleaning.
Control Panel
It’s a good idea to wipe the control panel after each use. |
'R QRW XVH DEUDVLYH FOHDQVHUV VWURQJ OLTXLG FOHDQVHUV |
Clean with mild soap and water or vinegar and water, |
plastic scouring pads or oven cleaners on the control |
rinse with clean water and polish dry with a soft cloth. |
SDQHO WKH\ ZLOO GDPDJH WKH ILQLVK LQFOXGLQJ %ODFN |
|
Stainless Steel. |
Oven Exterior
'R QRW XVH RYHQ FOHDQHUV DEUDVLYH FOHDQVHUV VWURQJ liquid cleansers, steel wool, plastic scouring pads, or cleaning powders on the interior or exterior of the oven. Clean with a mild soap and water or vinegar and water solution. Rinse with clean water and dry with a soft cloth. When cleaning surfaces, make sure that they are at room temperature and not in direct sunlight.
If stain on the door vent trim is persistent, use a mild abrasive cleaner and a sponge-scrubber for best results.
Spillage of marinades, fruit juices, tomato sauces and basting liquids containing acids may cause discoloration and should be wiped up immediately. Let hot surfaces cool, then clean and rinse.
Painted Surfaces and Black Stainless Steel
Painted surfaces include the sides of the range and the |
'R QRW XVH FRPPHUFLDO RYHQ FOHDQHUV FOHDQLQJ |
door, top of control panel and the drawer front. Clean |
powders, steel wool or harsh abrasives on any painted |
these with soap and water or a vinegar and water solution. |
surface, including Black Stainless Steel. |
Stainless Steel - Excluding Black Stainless Steel (on some models)
'R QRW XVH D VWHHO ZRRO SDG LW ZLOO VFUDWFK WKH VXUIDFH |
To inquire about purchasing cleaning products including |
|
To clean the stainless steel surface, use warm sudsy |
stainless steel appliance cleaner or polish, see the |
|
Accessories and Consumer Support sections at the end |
||
water or a stainless steel cleaner or polish. Always wipe |
||
of this manual. |
||
the surface in the direction of the grain. Follow the cleaner |
||
instructions for cleaning the stainless steel surface. |
|
20 |
49-80808 |
 Loading...