


WALL OVEN
Direct Air Convection Built-In Electric
SAFETY INFORMATION. . . . . . . . . .3
USING THE OVEN
Oven Controls . . . . . . . . . . . . . . . . . . . . . . . . .6
Double Oven . . . . . . . . . . . . . . . . . . . . . . . . . .7
Settings . . . . . . . . . . . . . . . . . . . . . . . . . . . . . .7
Sabbath . . . . . . . . . . . . . . . . . . . . . . . . . . . . . .9
Oven Racks . . . . . . . . . . . . . . . . . . . . . . . . . . 10
Aluminum Foil and Oven Liners. . . . . . . . . 12
Cookware. . . . . . . . . . . . . . . . . . . . . . . . . . . . 12
Cooking Modes . . . . . . . . . . . . . . . . . . . . . . . 13
Probe . . . . . . . . . . . . . . . . . . . . . . . . . . . . . . . 15
Cooking Guide . . . . . . . . . . . . . . . . . . . . . . . 16
CARE AND CLEANING
Cleaning The Oven - Exterior . . . . . . . . . . . 17
Cleaning The Oven - Interior . . . . . . . . . . . 18
Probe . . . . . . . . . . . . . . . . . . . . . . . . . . . . . . . 18
Oven Light. . . . . . . . . . . . . . . . . . . . . . . . . . . 19
Oven Door . . . . . . . . . . . . . . . . . . . . . . . . . . . 19
TROUBLESHOOTING TIPS. . . . . 20
LIMITED WARRANTY . . . . . . . . . . .22
ACCESSORIES . . . . . . . . . . . . . . . . . . .23
CONSUMER SUPPORT . . . . . . . . . 24
Write the model and serial numbers here:
Model #_________________
Serial # _________________
You can find them on a label on the side trim or on the front of the (lower) oven behind the oven door.
OWNER’S MANUAL
30" Single Wall Oven
PTS7000
PTS700L
PTS700R
30" Double Wall Oven
PTD7000
PTD700L
PTD700R
ESPAÑOL
Para consultar una version en español de este manual de instrucciones, visite nuestro sitio de internet GEAppliances.com.
GE is a trademark of the General Electric Company. Manufactured under trademark license.
49-2000375 Rev. 0 03-19 GEA

THANK YOU FOR MAKING GE APPLIANCES A PART OF YOUR HOME.
Whether you grew up with GE Appliances, or this is your first, we’re happy to have you in the family.
We take pride in the craftsmanship, innovation and design that goes into every GE Appliances product, and we think you will too. Among other things, registration of your appliance ensures that we can deliver important product information and warranty details when you need them.
Register your GE appliance now online. Helpful websites and phone numbers are available in the
Consumer Support section of this Owner’s Manual. You may also mail in the pre-printed registration card included in the packing material.
IMPORTANT SAFETY INFORMATION
READ ALL INSTRUCTIONS BEFORE USING THE APPLIANCE
 WARNING Read all safety instructions before using the product. Failure to follow these instructions may result in fire, electrical shock, serious injury or death.

 WARNING GENERAL SAFETY INSTRUCTIONS
Ŷ 8VH WKLV DSSOLDQFH RQO\ IRU LWV LQWHQGHG SXUSRVH DV described in this Owner’s Manual.
Ŷ %H VXUH \RXU DSSOLDQFH LV SURSHUO\ LQVWDOOHG DQG grounded by a qualified installer in accordance with the provided installation instructions.
Ŷ 'R QRW DWWHPSW WR UHSDLU RU UHSODFH DQ\ SDUW RI \RXU oven unless it is specifically recommended in this manual. All other servicing should be performed by a qualified technician.
Ŷ %HIRUH SHUIRUPLQJ DQ\ VHUYLFH GLVFRQQHFW WKH power supply at the household distribution panel by removing the fuse or switching off the circuit breaker.
Ŷ 'R QRW OHDYH FKLOGUHQ DORQH FKLOGUHQ VKRXOG QRW be left alone or unattended in an area where an appliance is in use. They should never be allowed to climb, sit or stand on any part of the appliance.
Ŷ 
 CAUTION 'R QRW VWRUH LWHPV RI LQWHUHVW to children in cabinets above an oven - children climbing on the oven to reach items could be seriously injured.
Ŷ 8VH RQO\ GU\ SRW KROGHUV PRLVW RU GDPS SRW KROGHUV RQ KRW VXUIDFHV PD\ UHVXOW LQ EXUQV IURP VWHDP 'R QRW OHW SRW KROGHUV WRXFK KRW KHDWLQJ HOHPHQWV 'R not use a towel or other bulky cloth in place of pot holders.
Ŷ 1HYHU XVH \RXU DSSOLDQFH IRU ZDUPLQJ RU KHDWLQJ the room.
Ŷ 'R QRW WRXFK WKH KHDWLQJ HOHPHQWV RU WKH LQWHULRU surface of the oven. These surfaces may be hot enough to burn even though they are dark in color.
'XULQJ DQG DIWHU XVH GR QRW WRXFK RU OHW FORWKLQJ or other flammable materials contact any interior area of the oven; allow sufficient time for cooling first. Other surfaces of the appliance may become hot enough to cause burns. Potentially hot surfaces include the oven vent opening, surfaces near the opening and crevices around the oven door.
Ŷ 'R QRW KHDW XQRSHQHG IRRG FRQWDLQHUV 3UHVVXUH could build up and the container could burst, causing an injury.
Ŷ 'R QRW XVH DQ\ W\SH RI IRLO RU OLQHU WR FRYHU WKH oven bottom or anywhere in the oven, except as described in this manual. Oven liners can trap heat or melt, resulting in damage to the product and risk of shock, smoke or fire.
Ŷ $YRLG VFUDWFKLQJ RU LPSDFWLQJ JODVV GRRUV RU FRQWURO SDQHOV 'RLQJ VR PD\ OHDG WR JODVV EUHDNDJH 'R not cook on a product with broken glass. Shock, fire or cuts may occur.
Ŷ &RRN PHDW DQG SRXOWU\ WKRURXJKO\ PHDW WR DW OHDVW an internal temperature of 160°F and poultry to at least an internal temperature of 180°F. Cooking
to these temperatures usually protects against foodborne illness.
 WARNING KEEP FLAMMABLE MATERIALS AWAY FROM THE OVEN
Failure to do so may result in fire or personal injury.
Ŷ 'R QRW VWRUH RU XVH IODPPDEOH PDWHULDOV LQ RU QHDU an oven, including paper, plastic, pot holders, linens, wall coverings, curtains, drapes and gasoline or other flammable vapors and liquids.
Ŷ 1HYHU ZHDU ORRVH ILWWLQJ RU KDQJLQJ JDUPHQWV ZKLOH using the appliance. These garments may ignite if they contact hot surfaces, causing severe burns.
Ŷ 'R QRW OHW FRRNLQJ JUHDVH RU RWKHU IODPPDEOH materials accumulate in or near the oven. Grease in the oven or near the oven may ignite.
Ŷ Remote Operation - This appliance is configurable
WR DOORZ UHPRWH RSHUDWLRQ DW DQ\ WLPH 'R QRW VWRUH any flammable materials or temperature sensitive items inside of the appliance.
INFORMATION SAFETY
READ AND SAVE THESE INSTRUCTIONS
49-2000375 Rev. 0 |
3 |

SAFETY INFORMATION
IMPORTANT SAFETY INFORMATION
READ ALL INSTRUCTIONS BEFORE USING THE APPLIANCE
 WARNING IN THE EVENT OF A FIRE, TAKE THE FOLLOWING STEPS TO PREVENT INJURY AND FIRE SPREADING
Ŷ 'R QRW XVH ZDWHU RQ JUHDVH ILUHV 1HYHU SLFN XS D |
Ŷ ,I WKHUH LV D ILUH LQ WKH RYHQ GXULQJ VHOI FOHDQ WXUQ |
|
flaming pan. |
the oven off and wait for the fire to go out. 'R QRW |
|
Ŷ ,I WKHUH LV D ILUH LQ WKH RYHQ GXULQJ EDNLQJ VPRWKHU |
force the door open ,QWURGXFWLRQ RI IUHVK DLU DW VHOI |
|
clean temperatures may lead to a burst of flame |
||
the fire by closing the oven door and turning the |
||
from the oven. Failure to follow this instruction may |
||
oven off or by using a multi-purpose dry chemical or |
||
result in severe burns. |
||
foam-type fire extinguisher. |
||
|

 WARNING OVEN SAFETY INSTRUCTIONS
Ŷ 6WDQG DZD\ IURP WKH RYHQ ZKHQ RSHQLQJ WKH RYHQ door. Hot air or steam which escapes can cause burns to hands, face and/or eyes.
Ŷ .HHS WKH RYHQ YHQW XQREVWUXFWHG
Ŷ .HHS WKH RYHQ IUHH IURP JUHDVH EXLOGXS *UHDVH LQ the oven may ignite.
Ŷ 3ODFH RYHQ UDFNV LQ GHVLUHG ORFDWLRQ ZKLOH RYHQ LV FRRO ,I UDFN PXVW EH PRYHG ZKLOH RYHQ LV KRW GR QRW let pot holder contact hot heating element in oven.
Ŷ :KHQ XVLQJ FRRNLQJ RU URDVWLQJ EDJV LQ WKH RYHQ follow the manufacturer’s directions.
Ŷ 3XOOLQJ RXW WKH VWDQGDUG UDFNV WR WKHLU VWRS ORFNV or the extension rack to its fully open position is
D FRQYHQLHQFH LQ OLIWLQJ KHDY\ IRRGV ,W LV DOVR D precaution against burns from touching hot surfaces of the door or oven walls.
Ŷ 'R QRW OHDYH LWHPV VXFK DV SDSHU FRRNLQJ XWHQVLOV RU IRRG LQ WKH RYHQ ZKHQ QRW LQ XVH ,WHPV VWRUHG LQ an oven can ignite.
Ŷ 1HYHU SODFH FRRNLQJ XWHQVLOV SL]]D RU EDNLQJ VWRQHV or any type of foil or liner on the oven floor. These items can trap heat or melt, resulting in damage to the product and risk of shock, smoke or fire.

 WARNING SELF-CLEANING OVEN SAFETY INSTRUCTIONS
The self-cleaning feature operates the oven at temperatures high enough to burn away food soils in the oven. Follow these instructions for safe operation.
Ŷ 'R QRW WRXFK RYHQ VXUIDFHV GXULQJ VHOI FOHDQ RSHUDWLRQ .HHS FKLOGUHQ DZD\ IURP WKH RYHQ GXULQJ self-cleaning. Failure to follow these instructions may cause burns.
Ŷ %HIRUH VHOI FOHDQLQJ WKH RYHQ UHPRYH VKLQ\ VLOYHU colored oven racks (on some models), the probe, any aluminum foil, and any broiler pan, grid, and other cookware. Only porcelain coated oven racks may be left in the oven.
Ŷ %HIRUH RSHUDWLQJ WKH VHOI FOHDQ F\FOH ZLSH JUHDVH and food soils from the oven. Excessive amount of grease may ignite, leading to smoke damage to your home.
READ AND SAVE THESE INSTRUCTIONS
4 |
49-2000375 Rev. 0 |
IMPORTANT SAFETY INFORMATION
READ ALL INSTRUCTIONS BEFORE USING THE APPLIANCE

 WARNING SELF-CLEANING OVEN SAFETY INSTRUCTIONS (Cont.)
Ŷ ,I WKH VHOI FOHDQLQJ PRGH PDOIXQFWLRQV WXUQ WKH |
Ŷ 'R QRW XVH RYHQ FOHDQHUV 1R FRPPHUFLDO RYHQ |
oven off and disconnect the power supply. Have it |
cleaner or oven liner protective coating of any kind |
serviced by a qualified technician. |
should be used in or around any part of the oven. |
Ŷ 'R QRW FOHDQ WKH GRRU JDVNHW 7KH GRRU JDVNHW LV |
|
essential for a good seal. Care should be taken not |
|
to rub, damage or move the gasket. |
|
The remote enable equipment installed on this oven has been tested and found to comply with the limits for
D &ODVV % GLJLWDO GHYLFH SXUVXDQW WR SDUW RI WKH )&&
Rules. These limits are designed to:
(a) provide reasonable protection against harmful interference in a residential installation. This equipment generates, uses and can radiate radio frequency energy and, if not installed and used in accordance with the instructions, may cause harmful interference to radio communications. However, there is no guarantee that
LQWHUIHUHQFH ZLOO QRW RFFXU LQ D SDUWLFXODU LQVWDOODWLRQ ,I this equipment does cause harmful interference to radio or television reception, which can be determined by turning the equipment off and on, the user is encouraged to try to correct the interference by one or more of the following measures:
Ŷ 5HRULHQW RU UHORFDWH WKH UHFHLYLQJ DQWHQQD
Ŷ ,QFUHDVH WKH VHSDUDWLRQ EHWZHHQ WKH HTXLSPHQW DQG receiver.
Ŷ &RQQHFW WKH HTXLSPHQW LQWR DQ RXWOHW RQ D FLUFXLW different from that to which the receiver is connected.
Ŷ &RQVXOW WKH GHDOHU RU DQ H[SHULHQFHG UDGLR 79 technician for help.
(b) accept any interference received, including interference that may cause undesired operation of the device.
Note that any changes or modifications to the wireless communication device installed on this oven that are not expressly approved by the manufacturer could void the user's authority to operate the equipment.
How to Remove Protective Shipping Film and Packaging Tape
Carefully grasp a corner of the protective shipping film with your fingers and slowly peel it from the appliance
VXUIDFH 'R QRW XVH DQ\ VKDUS LWHPV WR UHPRYH WKH ILOP
Remove all of the film before using the appliance for the first time.
To assure no damage is done to the finish of the product, the safest way to remove the adhesive from packaging tape on new appliances is an application of a household liquid dishwashing detergent. Apply with a soft cloth and allow to soak.
NOTE: 7KH DGKHVLYH PXVW EH UHPRYHG IURP DOO SDUWV ,W cannot be removed if it is baked on.
INFORMATION SAFETY
READ AND SAVE THESE INSTRUCTIONS
49-2000375 Rev. 0 |
5 |
USING THE OVEN: Oven Controls
Oven Controls
Control graphics are representative; your oven may have alternate graphic appearances.
12:30 PM
UPPER OVEN
|
|
|
|
|
|
|
|
|
|
|
|
|
|
12:30 PM |
|
|
|
|
|
|
|
LOWER OVEN |
|
|
|
|
|
|
GET CONNECTED |
|
|
||
|
|
|
|
|
|
|
|
|
|
|
|
|
|
|
||
|
|
|
|
|
GET CONNECTED |
|
|
|
|
|
|
|
|
Precision |
|
|
|
|
|
|
|
|
|
|
|
|
|
Bake |
Broil |
Convect |
More |
Recipes |
|
|
|
|
12:30 PM |
|
|
|
|
|
|
|
Cooking |
|||||
|
|
|
|
|
|
|
|
12:30 PM |
|
|
|
|
|
|
||
|
|
UPPER OVEN |
|
|
|
|
LOWER OVEN |
|
|
|
|
|
|
|
||
Bake |
Broil |
Convect |
More |
Precision |
Recipes |
Bake |
Broil |
Convect |
More |
Precision |
Recipes |
|
|
|
|
|
Cooking |
Cooking |
|
|
|
|
|
||||||||||
|
|
|
|
|
|
|
|
|
|
|
|
|
|
|
||
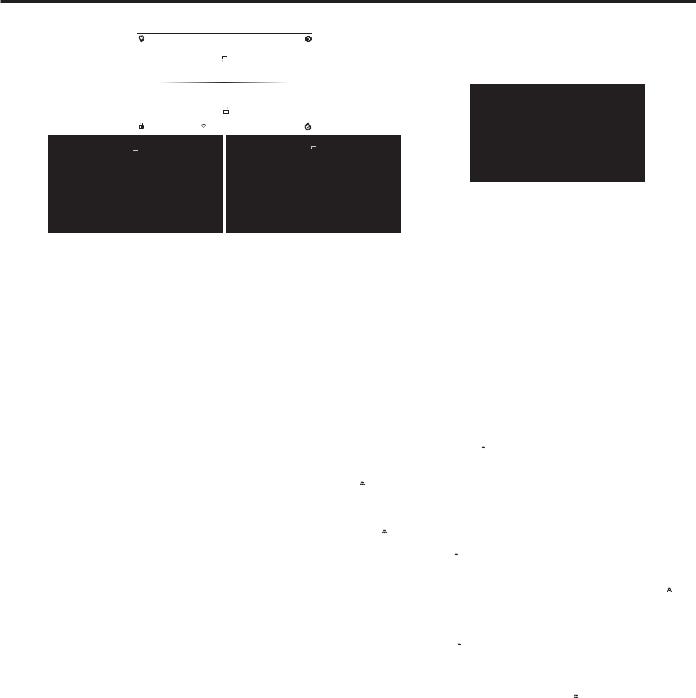
Single Wall Oven Main Menu
'RXEOH :DOO 2YHQ 0DLQ 0HQXV
Upper Oven and Lower Oven
When using a double oven you can set separate modes in each oven. The selected oven will appear above the cooking modes. NOTE: ,I XVLQJ D VLQJOH RYHQ WKHUH ZLOO not be an oven selection.
Bake
This option allows the user to access traditional the traditional bake mode.
Broil
%URLO FDQ EH VHOHFWHG WR DFFHVV %URLO /RZ DQG %URLO +LJK
See the Cooking Modes section for more information.
Convect
7KLV RSWLRQ DOORZV \RX WR XWLOL]H WKH FRQYHFWLRQ V\VWHP to cook in a variety of modes. See the Cooking Modes section for more information.
Settings 
Press the  to access the Settings. See the Settings section for more information.
Favorite 
This option allows the user to save their favorite cycles for easy access in the future. After selecting a cooking mode and setting the temperature and any timers, press the  to save it as a favorite for future use. After saving a cycle, press the
  on the main menu to quickly access the saved mode.
Kitchen Timer 
This feature works as a countdown timer. Press the
 , select the amount of time for the timer to operate, and press Start. The oven will continue to operate once the timer countdown is complete. To turn off the timer, select the
 and press Clear.
More
Select this option to access the Proof, Probe, Warm, Self Clean, and Steam Clean options.
Precision Cooking (upper only on double oven models)
3UHFLVLRQ &RRNLQJ LV D VXLWH RI FXVWRPL]HG FRRNLQJ cycles that have been designed for specific foods. The display will guide you through setting the oven and food appropriately for the cycle selected. Precision cooking cycles vary based on food type; see the Cooking Modes section for more detailed information.
Cook Time 
This function counts down cooking time and turns off the oven when the cooking time is complete. Press the 

 during a cycle, select the amount of cooking time, and press Start.
Delay Time 


7KLV IHDWXUH GHOD\V WKH VWDUW WLPH IRU DQ RYHQ F\FOH 8VH this feature to set a time when you want the oven to start. Select a cycle, then press the  . Select the time of day for the oven to turn on and press Start. A cook time can also be programmed if desired.
Recipes (upper only on double oven models)
This option allows you to access pre-loaded recipes for
FHUWDLQ IRRGV 1HZ UHFLSHV FDQ EH ORDGHG DQG IROORZHG WKURXJK WKH *( $SSOLDQFHV .LWFKHQ $SS RQFH \RXU phone is connected. See the Wi-Fi Connect section for instructions on connecting your phone.
Oven Light 
To turn on or off the oven cavity lights, press the  %RWK cavity lights will be illuminated if using a double oven.
Wi-Fi & Remote Enable
Press  GET CONNECTED to connect your oven to Wi-Fi. This option allows you to download content to your oven and control it remotely. The oven must be connected to Wi-Fi before Remote Enable can be activated. For instructions on how to connect your oven, see the Wi-Fi Connect/Remote Enable section under Settings in this manual.
6 |
49-2000375 Rev. 0 |
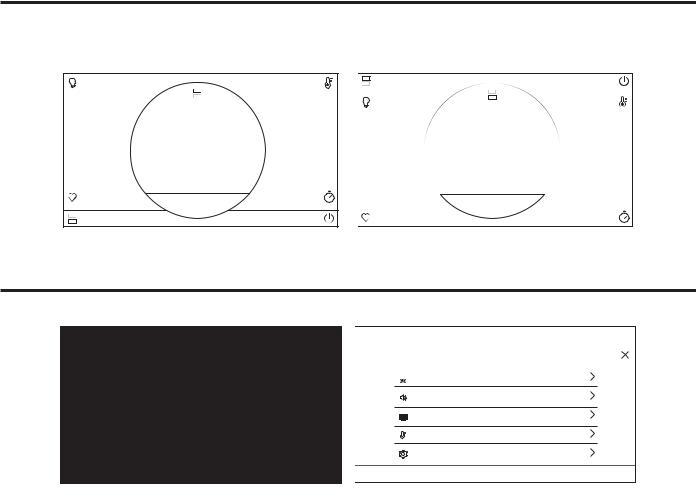
Double Oven
When using both cavities to cook, the control will allow you to switch back and forth between the upper and lower oven to review the cycle selection for each. When viewing the cooking mode screen you can access the alternate cavity by pressing on the banner at the top or bottom of the screen.
12:30 PM |
TO UPPER OVEN |
12:30 PM |
BAKE 350°F |
|
|
BAKE |
BAKE |
PREHEATED |
PREHEATED |
350 |
400 |
°F |
°F |
CANCEL |
CANCEL |
TO LOWER OVEN |
BAKE 400°F |
8SSHU 2YHQ %DNH &\FOH |
/RZHU 2YHQ %DNH &\FOH |
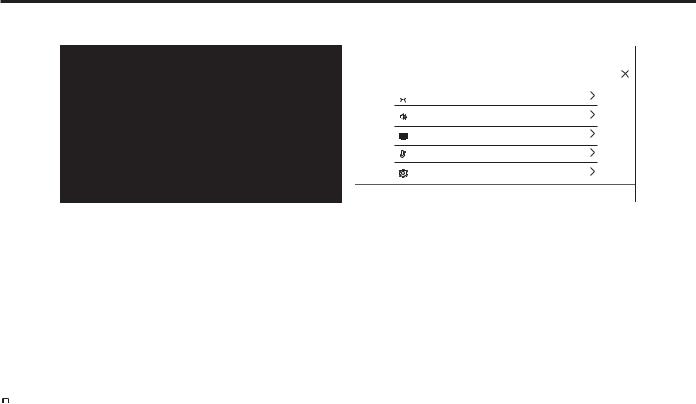
Settings
There are numerous settings that are accessed by pressing  in the top right corner of the main screen.
12:30 PM |
12:30 PM |
|
|
SETTINGS |
SETTINGS |
Wi-Fi & REMOTE ENABLE |
SABBATH |
|
|
SET CLOCK |
SOUND |
|
|
LOCK CONTROL |
DISPLAY |
SABBATH |
COOKING |
SOUND |
SYSTEM |
Slide up and down to access all the settings
Wi-Fi & Remote Enable
This appliance is configurable to allow remote operation
DW DQ\ WLPH 'R QRW VWRUH DQ\ IODPPDEOH PDWHULDOV RU WHPSHUDWXUH VHQVLWLYH LWHPV LQVLGH %\ XVLQJ WKH :L )L
Connect feature, you will be able to control essential oven operations such as temperature settings, timers and cooking modes using your smartphone or tablet.*
Select the  then Wi-Fi & Remote Enable - follow the
LQVWUXFWLRQV RQ \RXU RYHQ GLVSOD\ DQG SKRQH DSS ,W LV necessary to turn on Wi-Fi before using Remote Enable on your oven.
Connecting your Wi-Fi Connect Enabled oven
1.Have your smart phone or tablet ready with the ability to access the internet and download apps.
2.You will need to know the password of your home Wi-Fi router. Have this password ready while you are setting up your GE Appliances oven.
3.On your smart phone or tablet, visit
GEAppliances.com/connect to learn more about connected appliance features and to download the app to connect to your oven.
* Compatible Apple or Android devices and home Wi-Fi network required.
4.Follow the onscreen instructions in the app to connect your GE Appliances oven. When connected, your oven should show that it is connected to your home Wi-Fi network.
5.,I WKHUH DUH LVVXHV FRQQHFWLQJ ZLUHOHVVO\ WR \RXU RYHQ please call 800.220.6899 and ask for assistance regarding oven wireless connectivity.
To connect additional smart devices, repeat steps 3 and 4.
Remote Starting your Oven 
To be able to start the oven remotely once connected to Wi-Fi, press Remote Enable on the main menu or access Wi-Fi & Remote Enable in the settings menu and turn Remote Enable on. The oven can now be started remotely using a connected device. The  icon must be active to start the oven remotely. To disconnect your phone from Remote Enable, access the Wi-Fi & Remote Enable settings and turn Remote Enable off.
NOTE: )RRGV WKDW VSRLO HDVLO\ VXFK DV PLON HJJV ILVK VWXIILQJV SRXOWU\ DQG SRUN VKRXOG QRW EH DOORZHG WR sit for more than 1 hour before or after cooking. Room
WHPSHUDWXUH SURPRWHV WKH JURZWK RI KDUPIXO EDFWHULD %H sure that the oven light is off because heat from the bulb will speed harmful bacteria growth.
6HWWLQJV2YHQ'RXEOHOVEN: THE USING
49-2000375 Rev. 0 |
7 |
USING THE OVEN: Settings
Settings (Cont.)
There are numerous settings that are accessed by pressing  in the top right corner of the main screen.
12:30 PM |
12:30 PM |
|
SETTINGS
Wi-Fi & REMOTE ENABLE
SET CLOCK
LOCK CONTROL
SABBATH
SOUND
Slide up and down to access all the settings
Set Clock
This feature allows you to set the clock and specifies how the time of day will be displayed. Options are for a standard 12-hour clock with AM and PM selections or 24-hour military time display.
Lock Control
6HOHFW WKLV RSWLRQ LQ RUGHU WR ORFN WKH /&' IURP DQ\ undesired screen selections. To unlock the screen, press  and press Unlock on the next screen.
Sabbath
Sabbath mode disables the oven lights (the oven light will not turn on when the door is opened), all sounds (the control will not beep when the screen is pressed),
&RQYHFWLRQ PRGHV %URLO PRGHV :DUP 3URRI DQG DOO time functions. Sabbath mode can only be used with
WUDGLWLRQDO %DNH 7KLV IHDWXUH FRQIRUPV WR WKH 6WDU .
Jewish Sabbath requirements. Please reference the Sabbath Mode section for more information.
Sound
This setting screen allows you to change the volume, the end of cycle tone, and turn on or off the touch sound.
Display
This screen shows the options for brightness, clock off, energy saver, and screen time out. Clock off will remove the clock from the display when the screen is inactive, but it will be shown after pressing the screen. The screen can be set to never time out or it can be set to shut off after 1, 5, or 10 minutes.
Cooking
ŶThe oven is set to Fahrenheit, however, in this setting the cooking unit can be changed to Celsius.
ŶAuto Recipe Conversion can be turned on in order to automatically reduce the programmed cooking
WHPSHUDWXUH IRU &RQYHFWLRQ %DNH RU &RQYHFWLRQ %DNH 0XOWL 1RWH WKDW WKLV ZLOO RQO\ UHGXFH WKH FRRNLQJ temperature, not the baking time.
ŶWhen the 12 Hour Shut Off option is turned on, it will automatically shut off the oven after 12 hours of continuous use.
ŶAdjust Temperature allows the oven temperature to be adjusted up to 35°F hotter or down to 35°F
FRROHU 8VH WKLV IHDWXUH LI \RX EHOLHYH \RXU RYHQ temperature is too hot or cold and wish to change it. For double ovens, the upper and lower oven
WHPSHUDWXUHV DUH DGMXVWHG VHSDUDWHO\ 'R QRW XVH thermometers, such as those found in grocery stores, to check the temperature setting of your oven. These thermometers may vary 20–40 degrees.
System
This screen allows you to clear your saved user data and shows the current software version.
8 |
49-2000375 Rev. 0 |
 Loading...