


REFRIGERATORS
Bottom Freezer
SAFETY INFORMATION . . . . . 3
OPERATING INSTRUCTIONS
Features . . . . . . . . . . . . . . . . . . . . . . . . . . 6
Controls . . . . . . . . . . . . . . . . . . . . . . . . . . 9
Dispenser . . . . . . . . . . . . . . . . . . . . . . . . . 11
Autofill* . . . . . . . . . . . . . . . . . . . . . . . . . . 11
WiFi . . . . . . . . . . . . . . . . . . . . . . . . . . . . 12
Water Filter . . . . . . . . . . . . . . . . . . . . . . 13
Refrigerator Storage Options. . . . . . . 14
Climate Zone. . . . . . . . . . . . . . . . . . . . . 16
Convertible Drawer . . . . . . . . . . . . . . . 16
Freezer . . . . . . . . . . . . . . . . . . . . . . . . . . 17
Automatic Icemaker. . . . . . . . . . . . . . . 18
CARE AND CLEANING . . . . . . 19
Replacing the Lights . . . . . . . . . . . . . . 20
INSTALLATION INSTRUCTIONS
Preparing to Install the
Refrigerator. . . . . . . . . . . . . . . . . . . . . . 21 Installing the Refrigerator. . . . . . . . . . 24 Installing the Water Line. . . . . . . . . . . 34
TROUBLESHOOTING. . . . . . . . 37
Normal Operating Conditions . . . . . . 37 Troubleshooting Tips. . . . . . . . . . . . . . 38 Truth or Myth . . . . . . . . . . . . . . . . . . . .40
LIMITED WARRANTY . . . . . . . 42
CONSUMER SUPPORT
XWF Water Filter Cartridge
Limited Warranty . . . . . . . . . . . . . . . . . 43
Performance Data Sheet . . . . . . . . . . . 44
Consumer Support . . . . . . . . . . . . . . . . 46
*Select Models Only
Write the model and serial numbers here:
Model #_________________
Serial # _________________
Find these numbers on a label on the left side, near the middle of the refrigerator compartment.
OWNER’S MANUAL &
INSTALLATION
INSTRUCTIONS
Models PVD and GVE
ENGLISH/FRANÇAIS/
ESPAÑOL
GE is a trademark of the General Electric Company. Manufactured under trademark license.
49-1000332 Rev. 1 11-19 GEA

THANK YOU FOR MAKING GE APPLIANCES A PART OF YOUR HOME.
Whether you grew up with GE Appliances, or this is your first, we’re happy to have you in the family.
We take pride in the craftsmanship, innovation and design that goes into every GE Appliances product, and we think you will too. Among other things, registration of your appliance ensures that we can deliver important product information and warranty details when you need them.
Register your GE appliance now online. Helpful websites and phone numbers are available in the Consumer Support section of this Owner’s Manual. You may also mail in the pre-printed registration card included in the packing material.
2 |
|
49-1000332 Rev. 1 |
|

IMPORTANT SAFETY INFORMATION
READ ALL INSTRUCTIONS BEFORE USING THE APPLIANCE
WARNING To reduce the risk of fire, explosion, electric shock, or injury when using your refrigerator, follow these basic safety precautions:
Ŷ 7KLV UHIULJHUDWRU PXVW EH SURSHUO\ LQVWDOOHG |
Ŷ &KLOGUHQ DQG SHUVRQV ZLWK UHGXFHG SK\VLFDO VHQVRU\ |
|
and located in accordance with the Installation |
or mental capabilities or lack of experience and |
|
Instructions before it is used. |
knowledge can use this appliance only if they are |
|
Ŷ 8QSOXJ WKH UHIULJHUDWRU EHIRUH PDNLQJ UHSDLUV RU |
supervised or have been given instructions on safe |
|
cleaning. |
XVH DQG XQGHUVWDQG WKH KD]DUGV LQYROYHG |
|
NOTE: Power to the refrigerator cannot be |
Ŷ 7KLV DSSOLDQFH LV LQWHQGHG WR EH XVHG LQ KRXVHKROG |
|
disconnected by any setting on the cont rol panel. |
and similar applications such as: staff kitchen areas |
|
NOTE: Repairs must be performed by a qualified |
in shops, offices and other working environments; |
|
Service Professional. |
farm houses; by clients in hotels, motels, bed |
|
Ŷ 5HSODFH DOO SDUWV DQG SDQHOV EHIRUH RSHUDWLQJ |
& breakfast and other residential environments; |
|
Ŷ 'R QRW XVH DQ H[WHQVLRQ FRUG |
catering and similar non-retail applications. |
|
Ŷ &RQQHFW WR SRWDEOH ZDWHU VXSSO\ RQO\ $ FROG ZDWHU |
||
Ŷ .HHS IODPPDEOH PDWHULDOV DQG YDSRUV DZD\ IURP WKH |
||
refrigerator. |
supply is required for automatic icemaker operation. |
|
The water pressure must be between 40 and 120 psi |
||
Ŷ 'R QRW VWRUH H[SORVLYH VXEVWDQFHV VXFK DV DHURVRO |
||
(275-827 kilopascals). |
||
cans with a flammable propellant in this appliance. |
||
Ŷ 'R QRW DSSO\ KDUVK FOHDQHUV WR WKH UHIULJHUDWRU |
||
Ŷ 7R SUHYHQW VXIIRFDWLRQ DQG HQWUDSPHQW KD]DUGV |
||
Certain cleaners will damage plastic which may |
||
WR FKLOGUHQ UHPRYH WKH UHIULJHUDWRU DQG IUHH]HU |
||
cause parts such as the door or door handles to |
||
doors from any refrigerator before disposing of it or |
||
detach unexpectedly. See the Care and Cleaning |
||
discontinuing its use. |
||
section in your Owner’s Manual for detailed |
||
Ŷ 7R DYRLG VHULRXV LQMXU\ RU GHDWK FKLOGUHQ VKRXOG QRW |
||
instructions. |
||
stand on, or play in or with the appliance. |
|

 CAUTION To reduce the risk of injury when using your refrigerator, follow these basic safety precautions.
Ŷ 'R QRW FOHDQ JODVV VKHOYHV RU FRYHUV ZLWK ZDUP ZDWHU when they are cold. Glass shelves and covers may break if exposed to sudden temperature changes or impact, such as bumping or dropping. Tempered glass is designed to shatter into many small pieces if it breaks.
Ŷ .HHS ILQJHUV RXW RI WKH ³SLQFK SRLQW´ DUHDV clearances between the doors and between the doors and cabinet are necessarily small. Be careful closing doors when children are in the area.
Ŷ 'R QRW WRXFK WKH FROG VXUIDFHV LQ WKH IUHH]HU compartment when hands are damp or wet, skin may stick to these extremely cold surfaces.
Ŷ 'R QRW UHIUHH]H IUR]HQ IRRGV ZKLFK KDYH WKDZHG completely.
ŶIn refrigerators with automatic icemakers, avoid contact with the moving parts of the ejector mechanism, or with the heating element that
UHOHDVHV WKH FXEHV 'R QRW SODFH ILQJHUV RU KDQGV on the automatic ice making mechanism while the refrigerator is plugged in.

 WARNING FIRE OR EXPLOSION HAZARD
.HHS IODPPDEOH PDWHULDOV DQG YDSRUV DZD\ IURP UHIULJHUDWRU )DLOXUH WR GR VR FDQ UHVXOW LQ ILUH H[SORVLRQ RU death.
INFORMATION SAFETY
READ AND SAVE THESE INSTRUCTIONS
49-1000332 Rev. 1 |
3 |

SAFETY INFORMATION
IMPORTANT SAFETY INFORMATION
READ ALL INSTRUCTIONS BEFORE USING THE APPLIANCE

 WARNING
 FIRE OR EXPLOSION HAZARD Flammable Refrigerant
This appliance contains isobutane refrigerant, also known as R600a, a natural gas with high environmental compatibility. However, it is also combustible. Adhere to the warnings below to reduce the risk of injury or property damage.
1.When handling, installing and operating the appliance, care should be taken to avoid damage to the refrigerant tubing.
2.6HUYLFH VKDOO RQO\ EH SHUIRUPHG E\ DXWKRUL]HG
VHUYLFH SHUVRQQHO 8VH RQO\ PDQXIDFWXUHU DXWKRUL]HG service parts.
3.'LVSRVH RI UHIULJHUDWRU LQ DFFRUGDQFH ZLWK )HGHUDO
DQG /RFDO 5HJXODWLRQV )ODPPDEOH UHIULJHUDQW DQG insulation material used require special disposal procedures. Contact your local authorities for the environmentally safe disposal of your refrigerator.
4. .HHS YHQWLODWLRQ RSHQLQJV LQ WKH DSSOLDQFH enclosures or in the built-in structure clear of obstruction.
5.To remove frost,scrape with a plastic or wood
VSDWXOD RU VFUDSHU 'R QRW XVH DQ LFH SLFN PHWDO or sharp-edged instrument as it may puncture the
IUHH]HU OLQHU DQG WKHQ WKH IODPPDEOH UHIULJHUDQW tubing behind it.
6.'R QRW XVH HOHFWULFDO DSSOLDQFHV LQVLGH WKH IRRG storage compartment of the appliance.
7.'R QRW XVH DQ\ HOHFWULFDO GHYLFH LQ GHIURVWLQJ \RXU IUHH]HU
CONNECTING ELECTRICITY

 WARNING
 ELECTRICAL SHOCK HAZARD
Plug into a grounded 3-prong outlet
'R QRW UHPRYH WKH JURXQG SURQJ 'R QRW XVH DQ DGDSWHU 'R QRW XVH DQ H[WHQVLRQ FRUG
)DLOXUH WR IROORZ WKHVH LQVWUXFWLRQV FDQ UHVXOW LQ GHDWK ILUH RU HOHFWULFDO VKRFN
Do not, under any circumstances, cut or remove the third (ground) prong from the power cord. For personal safety, this appliance must be properly grounded.
The power cord of this appliance is equipped with a 3-prong (grounding) plug which mates with a standard
SURQJ JURXQGLQJ ZDOO RXWOHW WR PLQLPL]H WKH SRVVLELOLW\ RI HOHFWULF VKRFN KD]DUG IURP WKLV DSSOLDQFH
Have the wall outlet and circuit checked by a qualified electrician to make sure the outlet is properly grounded.
Where a standard 2-prong wall outlet is encountered, it is your personal responsibility and obligation to have it replaced with a properly grounded 3-prong wall outlet.
'R QRW XVH DQ DGDSWHU
The refrigerator should always be plugged into its own individual electrical outlet which has a voltage rating that matches the rating plate.
$ 9ROW $& +] RU DPS IXVHG JURXQGHG electrical supply is required. This provides the best performance and also prevents overloading house
ZLULQJ FLUFXLWV ZKLFK FRXOG FDXVH D ILUH KD]DUG IURP overheated wires.
Never unplug your refrigerator by pulling on the power cord. Always grip plug firmly and pull straight out from the outlet.
Immediately discontinue use of a damaged supply cord. If the supply cord is damaged, it must be replaced by a qualified service professional with an
DXWKRUL]HG VHUYLFH SDUW IURP WKH PDQXIDFWXUHU
When moving the refrigerator away from the wall, be careful not to roll over or damage the power cord.
READ AND SAVE THESE INSTRUCTIONS
4 |
49-1000332 Rev. 1 |

IMPORTANT SAFETY INFORMATION
READ ALL INSTRUCTIONS BEFORE USING THE APPLIANCE
PROPER DISPOSAL OF YOUR OLD REFRIGERATOR
 DANGER SUFFOCATION AND ENTRAPMENT HAZARD
)DLOXUH WR IROORZ WKHVH GLVSRVDO LQVWUXFWLRQV FDQ UHVXOW LQ GHDWK RU VHULRXV LQMXU\
IMPORTANT: Child entrapment and suffocation |
Before You Throw Away Your Old Appliance |
|
are not problems of the past. Junked or abandoned |
Ŷ 7DNH RII WKH UHIULJHUDWRU DQG IUHH]HU GRRUV |
|
refrigerators are still dangerous even if they will sit |
Ŷ Leave the shelves in place so that children may not |
|
IRU ³MXVW D IHZ GD\V ´ ,I \RX DUH JHWWLQJ ULG RI \RXU ROG |
||
easily climb inside. |
||
refrigerator, please follow the instructions below to help |
||
|
||
prevent accidents. |
|
Refrigerant and Foam Disposal:
'LVSRVH RI DSSOLDQFH LQ DFFRUGDQFH ZLWK )HGHUDO DQG /RFDO 5HJXODWLRQV )ODPPDEOH UHIULJHUDQW DQG LQVXODWLRQ material used requires special disposal procedures. Contact your local authorities for the environmentally safe disposal of your refrigerator.
READ AND SAVE THESE INSTRUCTIONS
INFORMATION SAFETY
49-1000332 Rev. 1 |
5 |
USING THE REFRIGERATOR:)HDWXUHV
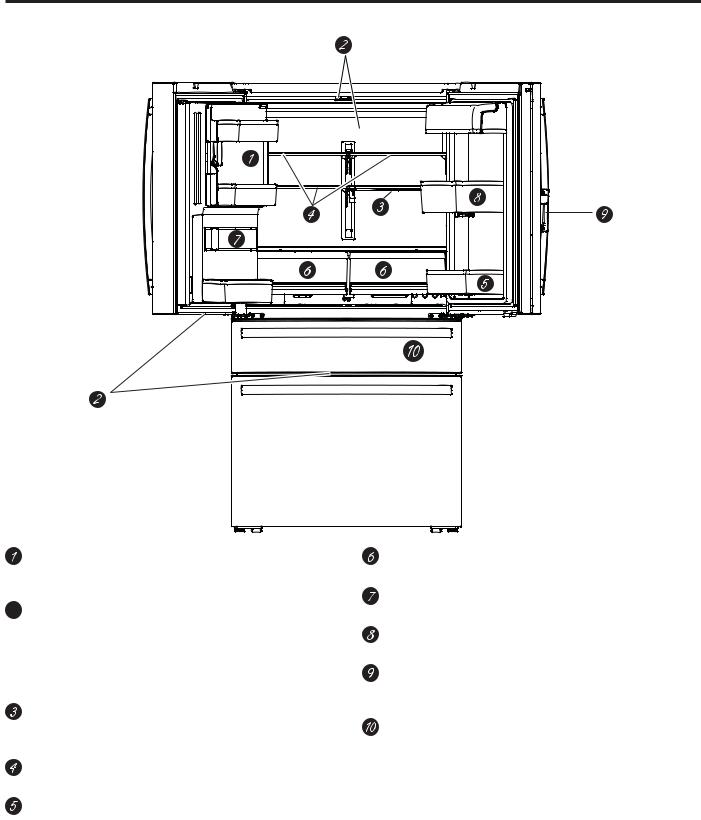
Features
Profile Models PVD28
Space-saving ice maker
Ice maker and bin are located on the door creating more usable storage space.
 Showcase LED lighting
/(' OLJKWLQJ LV SRVLWLRQHG WKURXJKRXW WKH LQWHULRU WR
VSRWOLJKW DUHDV LQ WKH UHIULJHUDWRU /('V DUH ORFDWHG under the refrigerator door to light the convertible
GUDZHU DQG /('V DUH XQGHU WKH FRQYHUWLEOH GUDZHU WR OLJKW WKH IUHH]HU GUDZHU
QuickSpace™ shelf
)XQFWLRQV DV D QRUPDO IXOO VL]HG VKHOI ZKHQ QHHGHG and easily slides back to store tall items below.
Spillproof shelves
'HVLJQHG WR FDSWXUH \RXU VSLOOV IRU HDVLHU FOHDQ XS
Removable door bin
Can be removed for those with a wall limiting the door opening.
Climate zone bin
Separate bins for produce storage.
Water filter
)LOWHUV ZDWHU DQG LFH
Rotating Bin (on some models)
Can be rotated out for easy access.
Door in Door Latch (on some models)
6TXHH]H WKH ODWFK RQ WKH XQGHUVLGH RI WKH KDQGOH WR open the outer door.
Convertible drawer
Select the best temperature to store your food.
6 |
49-1000332 Rev. 1 |
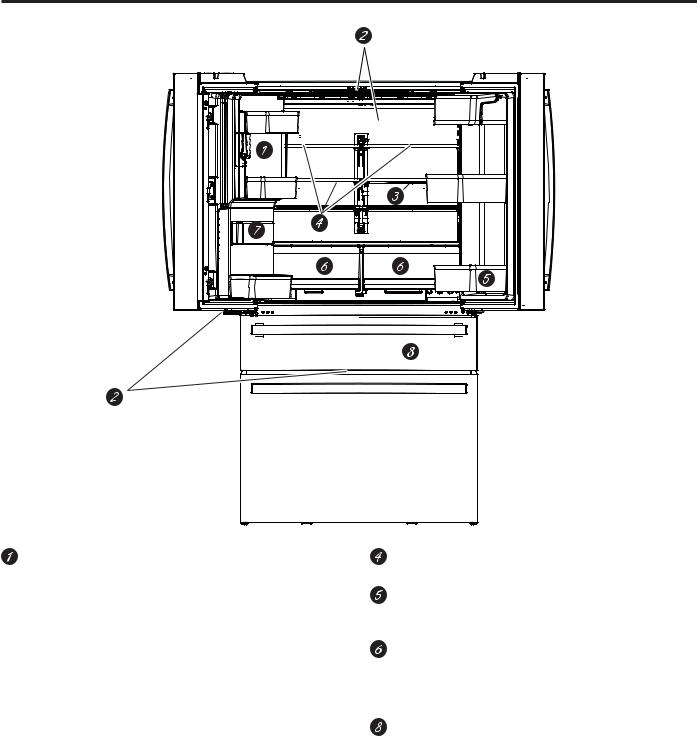
Features
GE Models GVE28
)HDWXUHVREFRIGERATOR: THE USING
Space-saving ice maker
Ice maker and bin are located on the door creating more usable storage space.
 Showcase LED lighting
/(' OLJKWLQJ LV SRVLWLRQHG WKURXJKRXW WKH LQWHULRU WR
VSRWOLJKW DUHDV LQ WKH UHIULJHUDWRU /('V DUH ORFDWHG under the refrigerator door to light the convertible
GUDZHU DQG /('V DUH XQGHU WKH FRQYHUWLEOH GUDZHU WR OLJKW WKH IUHH]HU GUDZHU
 QuickSpace™ shelf
)XQFWLRQV DV D QRUPDO IXOO VL]HG VKHOI ZKHQ QHHGHG and easily slides back to store tall items below.
Spillproof shelves
'HVLJQHG WR FDSWXUH \RXU VSLOOV IRU HDVLHU FOHDQ XS
Removable door bin
Can be removed for those with a wall limiting the door opening.
Climate zone bin
Separate bins for produce storage.
 Water filter
)LOWHUV ZDWHU DQG LFH
Convertible drawer
Select the best temperature to store your food.
49-1000332 Rev. 1 |
7 |
USING THE REFRIGERATOR: Controls
Features
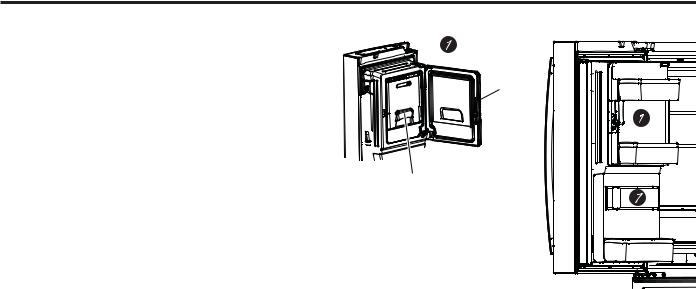
Door ice bin
1. Open left refrigerator door.
2. Pull down latch to release bin door.
8VLQJ KDQGKROG OLIW LFH EXFNHW XS DQG RXW WR FOHDU |
Latch |
|
locators in bottom of bin. |
|
|
4. To replace the ice bucket, set it on the guide |
|
|
brackets and push until the ice bucket seats properly. |
|
|
5. If bucket cannot be replaced, rotate the Ice Bucket |
|
|
)RUN WXUQ FORFNZLVH |
Ice bucket |
|
Ice/water filter |
||
|
||
Certified to reduce chlorine-resistant cysts, lead, select |
|
|
SKDUPDFHXWLFDOV DQG PRUH )RU HDV\ ILOWHU UHSODFHPHQW |
|
|
instructions see page 13. |
|
8 |
49-1000332 Rev. 1 |
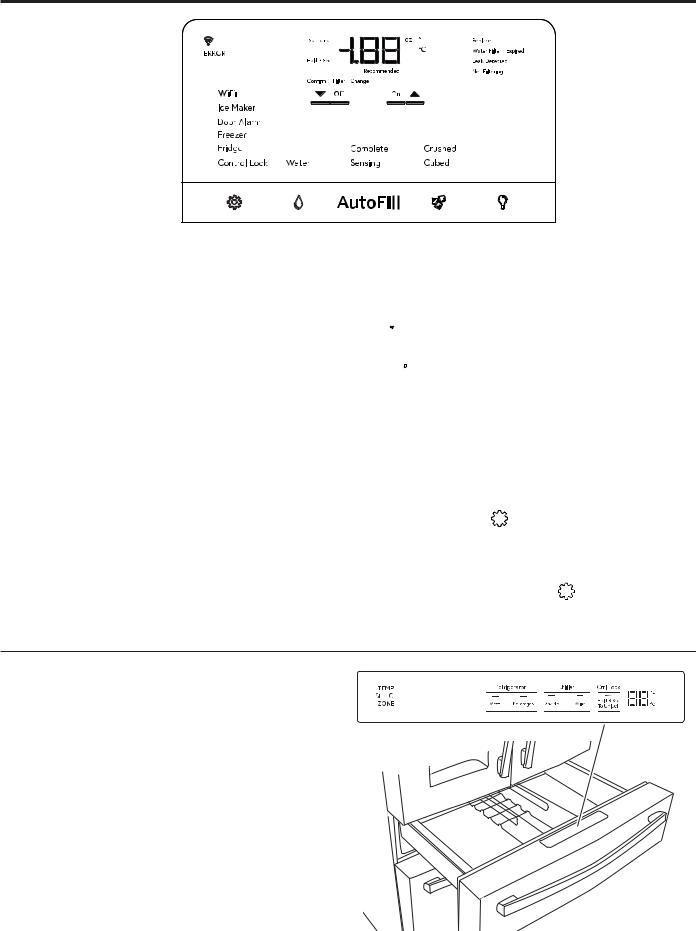
Controls
REFRIGERATOR/FREEZER CONTROLS
We are continuously updating our software. Please reference the full owner’s manual online for the latest functionality at GEAppliances.com. In Canada, visit GEAppliances.ca.
The refrigerator is shipped with protective film covering the controls. If the film was not removed during installation, remove it now.
7KH UHFRPPHQGHG WHPSHUDWXUH VHWWLQJV SUHVHW IURP WKH IDFWRU\ DUH ) & IRU WKH UHIULJHUDWRU DQG ) & IRU WKH IUHH]HU
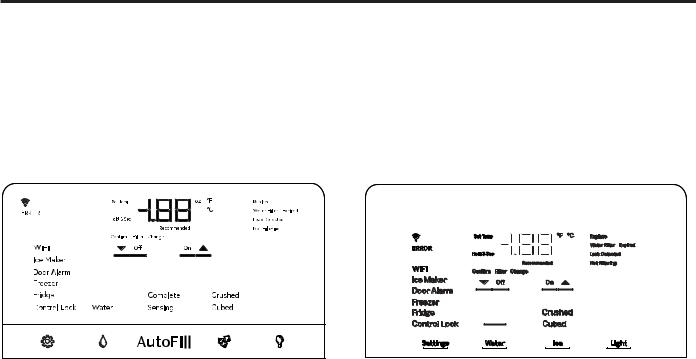
39' &RQWURO 6W\OH $ |
GVE28, Control Style B |
Changing the Temperature
To Change the Refrigerator Temperature:
Press the Settings EXWWRQ XQWLO ³)ULGJH´ LV KLJKOLJKWHG 3UHVV WKH 8S RU 'RZQ DUURZ EXWWRQV WR LQFUHDVH RU GHFUHDVH
temperature settings.
To Change the Freezer Temperature:
3UHVV WKH 6HWWLQJV EXWWRQ XQWLO ³)UHH]HU´ LV KLJKOLJKWHG 3UHVV WKH 8S RU 'RZQ DUURZ EXWWRQV WR LQFUHDVH RU decrease temperature settings.
7KH FRROLQJ V\VWHP FDQ EH WXUQHG RII E\ SUHVVLQJ WKH 6HWWLQJV EXWWRQ XQWLO HLWKHU ³)ULGJH´ RU ³)UHH]HU´ LV KLJKOLJKWHG
3UHVV DQG KROG ERWK WKH 8S DQG 'RZQ DUURZ EXWWRQV IRU VHFRQGV ³ ´ ZLOO EH GLVSOD\HG ZKHQ WKH V\VWHP LV RII
Turning the cooling system off stops the cooling to the refrigerator, but it does not shut off the electrical power. The
FRROLQJ V\VWHP FDQ EH WXUQHG RQ E\ UHWXUQLQJ WR WKH ³)ULGJH´ RU ³)UHH]HU´ VHWWLQJ DQG SUHVVLQJ WKH 2Q EXWWRQ
)HDWXUHVREFRIGERATOR: THE USING
49-1000332 Rev. 1 |
9 |
USING THE REFRIGERATOR: Controls
Controls
Settings ( ) - Press to scroll through the refrigerator functions.
Ɣ Control Lock - Press ON to lock out ice and water dispenser and all feature and temperature buttons.
3UHVV DQG KROG 2)) IRU VHFRQGV WR GHDFWLYDWH
Ɣ Fridge 3UHVV 8S RU 'RZQ EXWWRQ WR LQFUHDVH RU GHFUHDVH WHPSHUDWXUH IURP ) & WR ) &
Ɣ Freezer 3UHVV 8S RU 'RZQ EXWWRQ WR LQFUHDVH
RU GHFUHDVH WHPSHUDWXUH IURP ) & WR )
(-15°C).
Ɣ Door Alarm 6RXQGV DQ DOHUW ZKHQ WKH IUHH]HU
RU UHIULJHUDWRU GRRUV KDYH EHHQ OHIW RSHQ 6QRR]H the alert by pressing any key. Press On or Off to
DFWLYDWH RU GHDFWLYDWH 'RRU $ODUP ZKLOH DQ DOHUW LV not active.
Ɣ Ice Maker 3UHVV 2Q RU 2II WR VWDUW VWRS ,FH 0DNHU
Ɣ WiFi RQ VRPH PRGHOV 3UHVV 2Q WR VWDUW WKH :L)L connection process per the instructions on Page 12.
3UHVV 2II WR GLVDEOH :L)L 1RWH WKDW UHVWDUWLQJ :L)L UHTXLUHV UHSHDWLQJ WKH :L)L FRQQHFWLRQ SURFHVV
*( 3URILOH 'RRU LQ 'RRU PRGHOV 39' KDYH built-in Wifi
GEA models GVE28 are Connect Plus Ready
Water (  ) - Press to select Water to dispense when the paddle is pressed.
AutoFill* - Press to initiate automatic sensing to fill from dispenser.
Ice ( 
 ) - Press to select crushed or cubed ice when the paddle is pressed.
Light (  ) - Press to control dispenser lighting. Chime will accompany each press.
Fahrenheit / Celsius:
Temperature display can be switched between
)DKUHQKHLW DQG &HOVLXV 3UHVV 6HWWLQJV EXWWRQ ( ) to
) to
QDYLJDWH WR ³)ULGJH´ RU ³)UHH]HU´ WKHQ SUHVV DQG KROG WKH
Ice button and Light button for three seconds.
Volume Control:
Alert volume can be adjusted from High to Low and Off. Press Settings button (  ) WR QDYLJDWH WR ³,FHPDNHU´ then press and hold the Ice button and Light button for three seconds.
Sabbath Mode:
Simultaneously hold the Settings (  ), Water, and Light buttons for three seconds to enter and exit Sabbath mode.
CONVERTIBLE DRAWER
7HPSHUDWXUH LQ WKH &RQYHUWLEOH 'UDZHU LV VHOHFWHG E\ pressing the food item to be kept in the drawer. The corresponding temperatures are:
0HDW ) °C)
%HYHUDJHV ) °C)
6QDFNV ) °C)
:LQH ) °C)
The temperature setting is locked by default. Button must be pressed for 3 seconds to unlock.
*Select models only
10 |
49-1000332 Rev. 1 |
Dispenser
Water & Ice Dispenser
(See About the controls with temperature settings & About the control features)
Important Facts About Your Dispenser
Ŷ 'R QRW DGG LFH IURP WUD\V RU EDJV WR WKH GRRU LFH maker bucket. It may not crush or dispense.
ŶAvoid overfilling glass with ice and use of narrow glasses. Backed-up ice can jam the chute or cause the
GRRU LQ WKH FKXWH WR IUHH]H VKXW ,I LFH LV EORFNLQJ WKH chute remove the ice bucket, poke it through with a wooden spoon.
ŶBeverages and foods should not be quick-chilled in the door ice maker bin. Cans, bottles or food packages in the storage drawer may cause the ice maker or auger to jam.

 WARNING Laceration Hazard
ŶNever put fingers or any other object into ice crusher
GLVFKDUJH RSHQLQJ 'RLQJ VR FDQ UHVXOW LQ FRQWDFWLQJ the ice crushing blades and lead to serious injury or amputation
Ŷ 8VH D VWXUG\ JODVV ZKHQ GLVSHQVLQJ LFH $ GHOLFDWH glass may break and result in personal injury.
If no water is dispensed when the refrigerator is first installed, there may be air in the water line system. Press the dispenser paddle for at least five minutes to remove trapped air from the water line and to fill the water system. To flush out impurities in the water line, throw away the first six full glasses of water.
ŶTo keep dispensed ice from missing the glass, put the glass close to, but not touching, the dispenser opening.
ŶSome crushed ice may be dispensed even though you selected CUBED. This happens occasionally when a few cubes accidentally get directed to the crusher.
ŶAfter crushed ice is dispensed, some water may drip from the chute.
ŶSometimes a small mound of snow will form on the door in the ice chute. This condition is normal and usually occurs when you have dispensed crushed ice repeatedly. The snow will eventually evaporate.
AUTOFILL*
To Use HANDS FREE AUTOFILL:
Ŷ&HQWHU FRQWDLQHU RQ 5HFHVV 'LVSHQVHU 7UD\ DV IDU back as possible without activating paddle and remove hand from container
ŶPress AUTOFILL
To Stop AUTOFILL
Ŷ Press ANY key, including AutoFill, to stop.
Important Facts about AUTOFILL
Ŷ )RU RSWLPXP UHVXOWV XVH D XQLIRUP FRQWDLQHU EHWZHHQ´ FP WDOO DQG ´ FP ZLGH
Ŷ )LOO OHYHO DQG IXQFWLRQDOLW\ PD\ YDU\ RQ FRQWDLQHUV WDOOHU WKDQ ´ FP RU ZLGHU WKDQ ´ FP
Ŷ &RQWDLQHU YROXPHV PD\ YDU\ ,I ³(5525´ PHVVDJH LV given, try a different container.
Ŷ $872),// ZLOO WLPH RXW
ŶHandles, straws, and garnishes on the rim of the container my cause overfilling or variation in fill volumes.
ŶSplashing may occur depending on the location of the container, water flow rate, container shape, and ice cubes.
Ŷ .HHS VHQVRUV FOHDQ ZLWK D FOHDQ GDPS FORWK DQG GR not spray liquid or cleaners directly on sensors
Ŷ $872),// ZRUNV EHVW ZLWK KRXVHKROG ZDWHU SUHVVXUH of 60 to 100 psi (414 to 689 kPa).
ŶIce in container may affect fill volume. If issues are experienced, use less ice.
$XWR)LOO 6HQVRUV
*Select models only
'LVSHQVHU REFRIGERATOR: THE USING
49-1000332 Rev. 1 |
11 |

USING THE REFRIGERATOR::L)L
WiFi (on some models) (for customers in the United States, its territories, and Canada)
Ŷ 'RZQORDG WKH GE Appliances app.
•Available for iPhone from the Apple Store or from link at GEAppliances.com.
•Available for Android from Google Play or from link at GEAppliances.com.
ŶSelect Create Account on app.
•Enter information, and select Register. An e-mail will be generated.
•When you receive the e-mail, select Verify Account.
•Sign in with your credentials and select Authorize to allow the app to communicate with your refrigerator.
ŶSet up the app.
•Press the (+) on the bottom of the screen.
•Choose Fridge (Cap Touch).
•The info button will show a picture of the touch display on the appliance. Select OK.
•Select Next.
Ŷ 6HOHFW :L)L RQ WKH UHIULJHUDWRU GLVSOD\ E\ SUHVVLQJ WKH
Settings symbol.
•Select On WKH :L)L V\PERO ZLOO IODVK HYHU\ VHFRQG
•Select Next in the app.
Ŷ )LQG WKH SDVVZRUG LQVLGH WKH UHIULJHUDWRU GRRU RQ WKH ³&RQQHFWHG $SSOLDQFH ,QIRUPDWLRQ´ ODEHO
• Enter the password into the app.
Ŷ &RQQHFW WR WKH UHIULJHUDWRU¶V :L)L 0RGXOH LQ WKH
SKRQH¶V :L)L VHWWLQJV WKHQ UHWXUQ EDFN WR WKH .LWFKHQ
App and select Next.
• 7KH :L)L ZLOO KDYH WKH IRUPDW ³*(B02'8/(B
;;;;´ 7KH PRGXOH QXPEHU FDQ DOVR EH IRXQG RQ the Connected Appliance Information label inside the fridge door.
• &RQQHFW WR WKH KRPH :L)L QHWZRUN DQG W\SH LQ WKH KRPH :L)L SDVVZRUG
•If all check marks appear and the user gets a screen that says the device is connected, the device has been successfully connected.
-If the app fails to connect, the user will also show an error on the refrigerator’s display where the
/(' ZLOO HLWKHU EH IODVKLQJ RU VROLG
6HOHFW FRUUHFW /(' PRGH RQ WKH ³2RSV
6RPHWKLQJ :HQW :URQJ´ VFUHHQ 7KH XVHU ZLOO EH given possible reasons why connection failed and the option to retry.
REGULATORY INFORMATION
FCC/IC Compliance Statement:
7KLV GHYLFH FRPSOLHV ZLWK 3DUW RI WKH )&& 5XOHV 2SHUDWLRQ LV VXEMHFW WR WKH IROORZLQJ WZR FRQGLWLRQV
1.This device may not cause harmful interference, and
2.This device must accept any interference received, including interference that may cause undesired operation.
This equipment has been tested and found to comply with the limits for a Class B digital device, pursuant to Part
RI WKH )&& 5XOHV 7KHVH OLPLWV DUH GHVLJQHG WR SURYLGH UHDVRQDEOH SURWHFWLRQ DJDLQVW KDUPIXO LQWHUIHUHQFH LQ D residential installation. This equipment generates uses and can radiate radio frequency energy and, if not installed and used in accordance with the instructions, may cause harmful interference to radio communications. However, there is no guarantee that interference will not occur in a particular installation. If this equipment does cause harmful interference to radio or television reception, which can be determined by turning the equipment off and on, the user is encouraged to try to correct the interference by one or more of the following measures:
•Reorient or relocate the receiving antenna.
•Increase the separation between the equipment and receiver.
•Connect the equipment into an outlet on a circuit different from that to which the receiver is connected.
&RQVXOW WKH GHDOHU RU DQ H[SHULHQFHG UDGLR WHOHYLVLRQ WHFKQLFLDQ IRU KHOS
Labelling: Changes or modifications to this unit not expressly approved by the manufacturer could void the user’s authority to operate the equipment.
12 |
49-1000332 Rev. 1 |
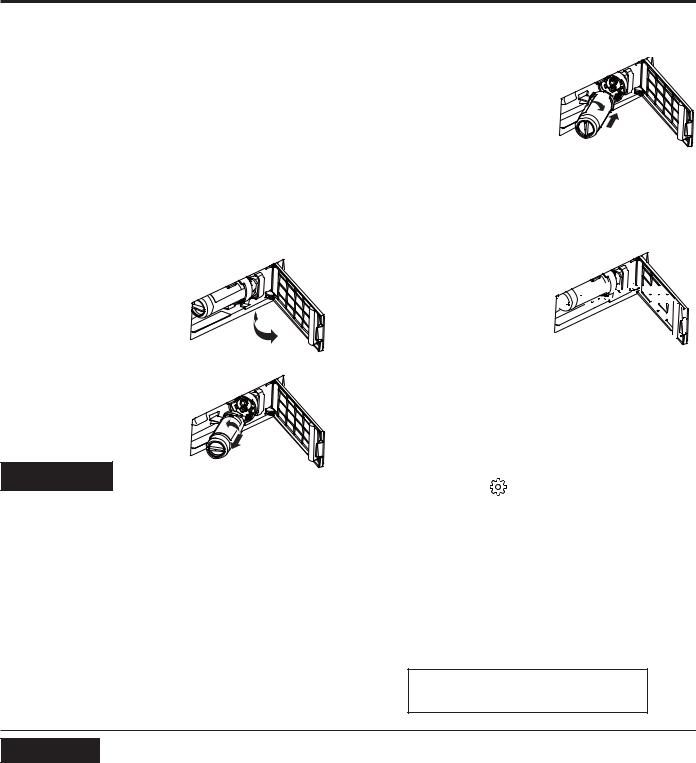
XWF Water Filter
Water Filter Cartridge
The water filter cartridge is located in the left-hand refrigerator door behind the rectangular access panel.
When to Replace the Filter Cartridge
The Replace Water Filter message on the control panel will illuminate when the water filter cartridge needs to be replaced soon. The Water Filter Expired message will illuminate when the water filter cartridge needs to be replaced. The water filter can be replaced earlier if the flow of water to the dispenser or icemaker decreases. Once either message is illuminated, dispensing water will show Confirm Filter Change; do not confirm until the water filter is replaced
REMOVING THE FILTER
If you are replacing the filter,
first remove the previous one by gently grasping the filter and
slowly turning it to the left, about a ¼ turn. The filter should automatically release itself when you have rotated it far enough to the left. A small
amount of water may drip down.

 CAUTION
If air has been trapped in the system, the filter cartridge
PD\ EH HMHFWHG DV LW LV UHPRYHG 8VH FDXWLRQ ZKHQ removing.
FILTER BYPASS PLUG
To reduce the risk of property damage due to water
OHDNDJH \RX 0867 XVH WKH ILOWHU E\SDVV SOXJ ZKHQ D replacement filter cartridge is not available. Some models do not come equipped with the filter bypass plug. To obtain a free bypass plug, call 800-GECARES. In Canada, call 800.561.3344. The dispenser and icemaker will not operate without either the filter or bypass plug installed. The bypass plug is installed in the same way as a filter cartridge.
INSTALLING THE FILTER IN A BOTTOM FREEZER REFRIGERATOR
1. Open the filter cartridge housing by pulling the door open.
2. Line up the ports on the filter with the ports on the filter cartridge holder, and gently insert the filter.
3.Slowly turn the filter to the
ULJKW XQWLO LW VWRSV '2 127 29(57,*+7(1 $V \RX turn the filter, it will automatically adjust itself into position. The filter will move about a ¼ turn or 90 degrees, until the filter cannot be turned, and the label faces outward.
4. Slowly push the filter up into the clips.
5. Close the filter cartridge 


 housing by gently pushing


 the door closed until the tabs


 lock into place.


6.Run water from the
dispenser for 2 gallons or approximately 5 minutes to clear the system. Water may spurt out and air bubbles may be visible during this process. If water is not flowing, check to make sure the filter has been fully rotated to the right.
7.When dispensing water, press the button underneath the Confirm Filter Change message. If replacing the water filter before the message appeared,
press the Settings ( ) EXWWRQ XQWLO ³,FHPDNHU´ LV highlighted, then hold down the Water and Ice buttons simultaneously for 3 seconds.
Application Guidelines/Water Supply
6HUYLFH )ORZ |
0.5 gpm (1.89 lpm) |
Water Supply |
Potable Water |
Water Pressure |
25-120 psi (172-827 kPa) |
Water Temperature |
) ) & & |
Capacity |
170 gallons (643.5 liters) |
Sign-up for TEXT REMINDERS by texting REPLACE to 70543.
 WARNING To reduce the risk associated with choking, do not allow children under 3 years of age to have access to small parts during the installation of this product. The disposable filter cartridge should be replaced every 6 months at the rated capacity, or sooner if a noticeable reduction in flow rate occurs.
)RU WKH PD[LPXP EHQHILW RI \RXU ILOWUDWLRQ V\VWHP *( $SSOLDQFHV UHFRPPHQGV WKH XVH RI *( $SSOLDQFHV EUDQGHG ILOWHUV RQO\ 8VLQJ *( $SSOLDQFHV EUDQGHG ILOWHUV LQ *( $SSOLDQFHV DQG +RWSRLQW® refrigerators provides optimal
SHUIRUPDQFH DQG UHOLDELOLW\ *( $SSOLDQFHV ILOWHUV PHHW ULJRURXV LQGXVWU\ 16) VWDQGDUGV IRU VDIHW\ DQG TXDOLW\ WKDW are important for products that are filtering your water. GE Appliances has not qualified non-GE Appliances-branded filters for use in GE Appliances and Hotpoint refrigerators and there is no assurance that non-GE Appliancesbranded filters meet GE Appliances standards for quality, performance and reliability.
If you have questions, or to order additional filter cartridges, visit our website at gewaterfilters.com or call GE Appliances Parts and Accessories, 877.959.8688.
Customers in Canada should consult the yellow pages for the nearest Camco Service Center.
)LOWHU:DWHU;:) REFRIGERATOR: THE USING
49-1000332 Rev. 1 |
13 |
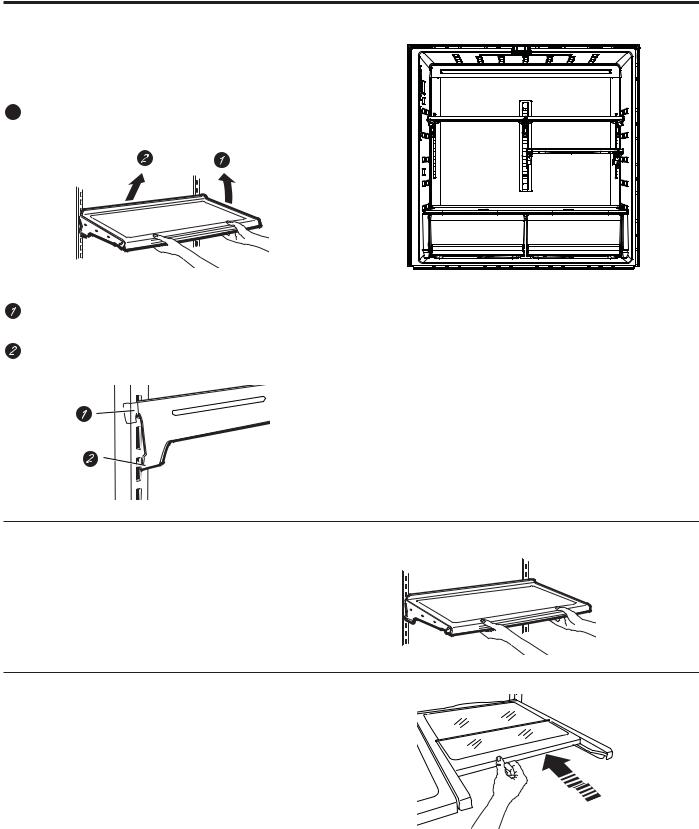
USING THE REFRIGERATOR: Refrigerator Storage Options
Refrigerator Storage Options
Rearranging the Shelves
Shelves in the refrigerator compartment are adjustable.
To remove:
 Remove all items from the shelf.
 Tilt the shelf up at the front.
 Lift the shelf up at the back and bring the shelf out.
To replace:
While tilting the shelf up, insert the top hook at the back of the shelf in a slot on the track.
Lower the front of the shelf until the bottom of the shelf locks into place.
Spillproof Shelves
Spillproof shelves have special edges to help prevent spills from dripping to lower shelves.
Quick Space Shelf
This shelf splits in half and slides under itself for storage of tall items on the shelf below.
This shelf can be removed and replaced or relocated (just like spillproof shelves).
NOTE: The back half of the Quick Space Shelf is not adjustable.
14 |
49-1000332 Rev. 1 |

Refrigerator Storage Options
Right Door Bins
FIXED BINS can easily be carried from refrigerator to work area.
To remove: Lift bin straight up, then pull out.
ROTATING BIN:
To remove: Rotate bin outward then lift straight up. To remove Place hand under metal base and lift up.
To remove Metal Base: Place hand under metal base and lift up.
Remove
Rotating Bin
)L[HG %LQV
5HPRYH )L[HG %LQV
Remove Metal Base
Left Door Bins
FIXED BIN
To remove: Lift the bin straight up, then pull out.
The ice maker door bins are not interchangeable, note the location upon removal and replace the bin in its proper location.
)L[HG %LQ
Options Storage Refrigerator REFRIGERATOR: THE USING
49-1000332 Rev. 1 |
15 |
USING THE REFRIGERATOR:&OLPDWH=RQH&RQYHUWLEOH'UDZHU
Climate Zone
.HHS IUXLWV DQG YHJHWDEOHV RUJDQL]HG LQ VHSDUDWH compartments for easy access.
Excess water that may accumulate in the bottom of the drawers or under the drawers should be wiped dry.
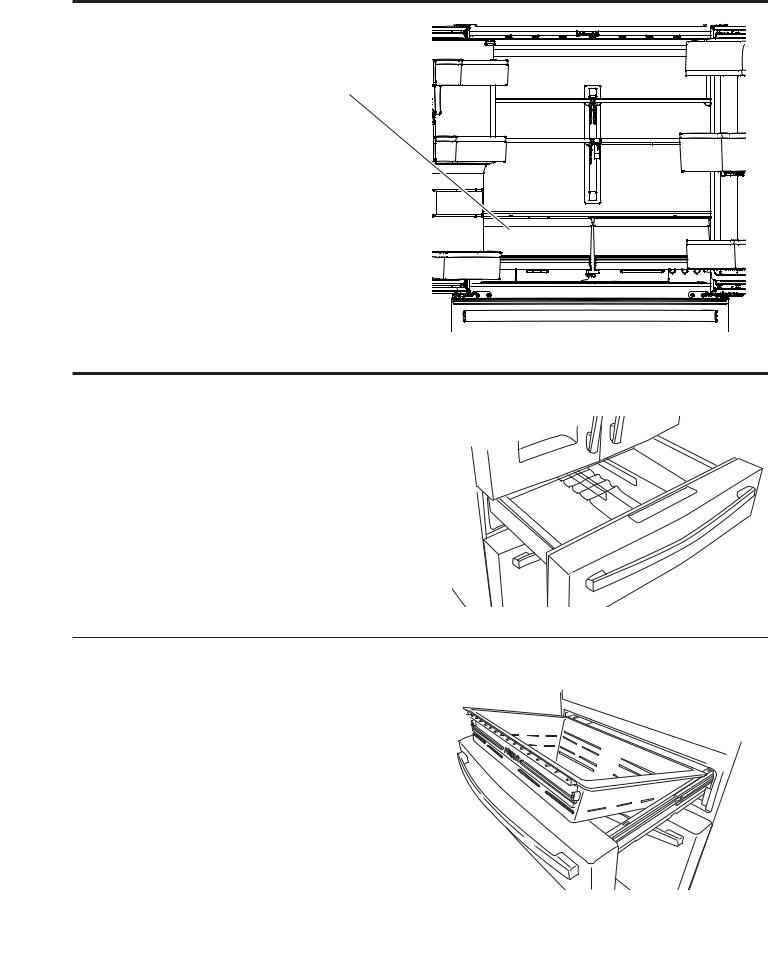
Convertible Drawer
How to Remove and Replace Drawer Organizer
To remove:
1. Pull the drawer out to the stop position.
6OLJKWO\ UDLVH WKH RUJDQL]HU WKHQ URWDWH WR UHPRYH
To replace:
1. Place the back of the divider on the rear wall of the drawer.
5RWDWH WKH RUJDQL]HU LQWR WKH GHVLUHG SRVLWLRQ
How to Remove and Replace Drawer
To remove:
1. Pull the drawer out to the stop position.
2. Remove the convertible drawer basket by lifting while rotating the basket upward.
To replace:
1. Place drawer back in first and rotate drawer front down to seat on slide.
2. Push the drawer in to closed position.
Convertible drawer basket will be loose if re-installed
EDFNZDUGV /RRN IRU ³)5217´ HPERVV WR KHOS ZLWK re-installation.
16 |
49-1000332 Rev. 1 |

Baskets, Drawers, and Bins
Freezer Basket and Drawer
 Basket.
 'UDZHU
Tilt-Out Bin in the Freezer
To remove:
Press the tab on the right side bracket to remove the
IUHH]HU GUDZHU ELQ
To replace:
Slide bin into location until it locks into place.
Basket Removal
To remove:
3XOO WKH WRS IUHH]HU GUDZHU EDVNHW IRUZDUG XQWLO LW LV
RXW RI WKH WUDFN LQ WKH IUHH]HU FRPSDUWPHQW /LIW ZKLOH rotating the basket upward to remove.
2.Press the tab on the right side bracket to remove the
IUHH]HU GRRU ELQ
/LIW WKH ERWWRP IUHH]HU GUDZHU EDVNHW VOLJKWO\ EDFN then up and out of the drawer.
4.Remove 2 screws from each side of the frame with a
´ VRFNHW
5.Remove door by lifting off hooks.
To replace, reverse removal steps.
%LQVDQG'UDZHUV%DVNHWVFREEZER: THE USING
49-1000332 Rev. 1 |
17 |

USING THE FREEZER: Automatic Icemaker
Automatic Icemaker
A newly installed refrigerator may take 12 to 24 hours to begin making ice.
 WARNING Connectonly. to potable water supply
A cold water supply is required for automatic icemaker operation. The water pressure must be between 40 and 120 psi (275-827 kilopascals).
Automatic Ice maker
The ice maker will produce seven cubes per cycle approximately 100–130 cubes in a 24-hour period,
GHSHQGLQJ RQ IUHH]HU FRPSDUWPHQW WHPSHUDWXUH URRP temperature, number of door openings and other use conditions.
7KH LFH PDNHU ZLOO ILOO ZLWK ZDWHU ZKHQ LW FRROV WR )
(-10°C). A newly installed refrigerator may take 12 to 24 hours to begin making ice cubes.
If the refrigerator is operated before the water line connection is made to the unit or if the water supply to an operating refrigerator is turned off, make sure that the ice maker is turned off. Once the water has been connected to the refrigerator, the ice maker may be turned on. See the table below for details.
<RX PD\ KHDU D EX]]LQJ VRXQG HDFK WLPH WKH LFH PDNHU fills with water.
To fill the bucket to maximum capacity after installation, dispense 3-4 cubes at 12 hours and 18 hours. Allow 2-3 days for the bucket to completely fill with ice.
Throw away the first few batches of ice to allow the water line to clear. 


Be sure nothing interferes with the sweep of the feeler arm.
When the bin fills to the level of the feeler arm, the ice maker will stop
producing ice. It is normal
for several cubes to be joined together.
If ice is not used frequently, old ice cubes will become cloudy, taste stale and shrink.
NOTE: In homes with lower-than-average water pressure, you may hear the ice maker cycle multiple times when making one batch of ice.
 CAUTION 7R PLQLPL]H WKH ULVN RI SHUVRQDO LQMXU\ avoid contact with the moving parts of the ejector mechanism, or with the heating element that releases
WKH FXEHV 'R QRW SODFH ILQJHUV RU KDQGV RQ WKH automatic ice making mechanism while the refrigerator is plugged in.
To turn the icemaker ON/OFF, use the Settings button to navicate to the Icemaker selection. See CONTROLS, page 10.
Ice Bucket and Dispenser
• Open the ice box door on inside
of the left door.
• Pull up and out on the ice bucket in the left hand door to remove it from the compartment.
• To replace the ice bucket, set it on the guide brackets and push until the ice bucket seats properly.
•If bucket cannot be replaced, rotate the ice bucket fork
WXUQ FORFNZLVH
18 |
49-1000332 Rev. 1 |

Care and Cleaning
Cleaning the Outside
FINGERPRINT RESISTANT STAINLESS STEEL*, BLACK STAINLESS, SLATE, DARK SLATE, PAINTED - Outside surfaces, door handles, and trim
 DO NOT use Stainless Steel cleaners on the door surfaces.
IMPORTANT: 7KH XVH RI LQFRUUHFW SURGXFWV PD\ GDPDJH WKH RXWHU ILQLVK RI )LQJHUSULQW 5HVLVWDQW 6WDLQOHVV DQG
Black Stainless models. Please follow these instructions and use only the appropriate items below to clean your appliance surfaces.
Ɣ &OHDQ LQWHULRU H[WHULRU VXUIDFHV ZLWK ZDUP ZDWHU PLOG VRDS RU GHWHUJHQW DQG D VRIW RU PLFURILEHU FORWK WR DYRLG damage.
Ɣ :LSH WKH DSSOLDQFH VXUIDFH GU\ ZLWK D VRIW FOHDQ FORWK RU PLFURILEHU WRZHO WR DYRLG VWUHDNLQJ RU ZDWHU VSRWWLQJ
DO USE |
DO NOT USE |
|
Soft, clean cloth or sponge |
Abrasive cloths, paper towels, scrubbing sponges (with or without soap), |
|
Microfiber cloth |
scouring or steel wool pads |
|
Mild detergent mixed with warm |
Abrasive powders, liquids, or sprays |
Oven cleaners |
water |
Window sprays, ammonia, or bleach |
Alkaline cleaners |
|
Citrus or plant oil-based cleaners |
Stainless steel cleaners |
|
Acidic or vinegar-based cleaners |
|
*Easily wipe away smudges and fingerprints.
STAINLESS STEEL - Outside surfaces, door handles, and trim
NOTE: DO NOT allow stainless steel cleaner to come in contact with any plastic parts such as trim pieces, handle hardware and liners. If unintentional contact of cleaners with plastic parts does occur, clean plastic part with a sponge and mild detergent mixed with warm water.
DO USE |
DO NOT USE |
Soft, clean cloth or sponge |
Abrasive cloths, scrubbing sponges (with or without |
|
soap), scouring or steel wool pads |
Mild detergent mixed with warm water |
Abrasive powders or sprays |
$SSURYHG VWDLQOHVV VWHHO FOHDQHUV )RU DSSURYHG |
Window Sprays or Ammonia |
stainless steel cleaners, visit GEAppliances.com/parts |
Citrus or plant oil-based cleaners |
or call 800.GE.CARES. |
Acidic or vinegar-based cleaners |
&OHDQHUV ZLWK R[DOLF DFLG VXFK DV %DU .HHSHUV )ULHQG 6RIW |
Oven cleaners |
Cleanser™ can be used to remove surface rust, tarnish |
Cleaners containing acetone (propanone) |
and small blemishes on stainless steel surfaces only. |
Any cleaner with WARNING about plastic contact |
Cleaning the Inside
To help prevent odors, leave an open box of baking
VRGD LQ WKH UHIULJHUDWRU DQG IUHH]HU FRPSDUWPHQWV
Unplug the refrigerator before cleaning.
If this is not practical, wring excess moisture out of sponge or cloth when cleaning around switches, lights or controls.
8VH DQ DSSOLDQFH ZD[ SROLVK RQ WKH LQVLGH VXUIDFH between the doors.
8VH ZDUP ZDWHU DQG EDNLQJ VRGD VROXWLRQ DERXW D tablespoon (15 ml) of baking soda to a quart (1 liter) of
ZDWHU 7KLV ERWK FOHDQV DQG QHXWUDOL]HV RGRUV 5LQVH DQG wipe dry.
To clean the inside metal panel*, open the outer door
XVLQJ WKH 'RRU LQ 'RRU /DWFK &OHDQ WKH SDQHO ZLWK D
PLOG GHWHUJHQW DQG WKHQ ZLSH GU\ ZLWK D VRIW FORWK 'R QRW use any stainless steel cleaner on the panel as it may damage the surrounding plastic.
 CAUTION 'R QRW FOHDQ JODVV VKHOYHV RU FRYHUV with warm water when they are cold. Glass shelves and covers may break if exposed to sudden temperature changes or impact such as bumping or dropping. Tempered glass is designed to shatter into many small pieces if it breaks.
'R QRW ZDVK DQ\ SODVWLF UHIULJHUDWRU SDUWV LQ WKH dishwasher.
CLEANING AND CARE
49-1000332 Rev. 1 |
19 |

CARE AND CLEANING
Care and Cleaning
Behind the Refrigerator
Be careful when moving the refrigerator away from the wall. All types of floor coverings can be damaged, particularly cushioned coverings and those with embossed surfaces.
Raise the leveling legs located at the bottom front of the refrigerator.
Pull the refrigerator straight out and return it to position by pushing it straight in. Moving the refrigerator in a side direction may result in damage to the floor covering or refrigerator.
Lower the leveling legs until they touch the floor.

 WARNING

 ELECTRICAL SHOCK HAZARD
When pushing the refrigerator back, make sure you don’t roll over the power cord or water supply line.
Preparing for Vacation
)RU ORQJ YDFDWLRQV RU DEVHQFHV UHPRYH IRRG DQG unplug the refrigerator. Clean the interior with a baking soda solution of one tablespoon (15 ml) of baking soda to one quart (1 liter) of water. Leave the doors open.
,I WKH WHPSHUDWXUH FDQ GURS EHORZ IUHH]LQJ KDYH D qualified service technician drain the water supply system to prevent serious property damage due to flooding.
1.Turn refrigerator off (see CONTROLS, page 10) or unplug the refrigerator.
2.Empty ice bucket
3.Turn water supply off
If you cut the water supply off, turn off the ice maker.
8SRQ UHWXUQLQJ IURP YDFDWLRQ
1.Replace the water filter.
2.Run 2 gallons (7.57 liters) of water through the cold water dispenser (about 5 minutes) to flush the system.
Preparing to Move
Secure all loose items such as shelves and drawers by taping them securely in place to prevent damage.
When using a hand truck to move the refrigerator, do not rest the front or back of the refrigerator against the hand truck. This could damage the refrigerator.
Handle only from the sides of the refrigerator.
Be sure the refrigerator stays in an upright position during moving.
Replacing the Lights
Refrigerator Lights (LEDs)
Appearance may vary by model.
7KHUH LV /(' OLJKWLQJ LQ WKH UHIULJHUDWRU FRPSDUWPHQW WKH bottom of the left-hand refrigerator door, and the bottom of the convertible drawer.
$Q DXWKRUL]HG WHFKQLFLDQ ZLOO QHHG WR UHSODFH WKH /(' light.
If this assembly needs to be replaced, visit
GEAppliances.com/service or call 800.GE.CARES. In Canada, visit GEAppliances.ca/service or call 800.561.3344.
20 |
49-1000332 Rev. 1 |
Installation
Instructions Refrigerator
Questions? Call 800.GE.CARES (800.432.2737) or visit our Website at: GEAppliances.com In Canada, call 1.800.561.3344 or visit our Website at: GEAppliances.ca
BEFORE YOU BEGIN
Read these instructions completely and carefully.
 WARNING

 Tip Over Hazard.
Built-in style models are top heavy, especially with any doors open. These models must be secured with the anti-tip floor bracket to prevent tipping forward, which could result in death or serious injury. Read and follow the entire installation instructions for installing the anti-tip floor bracket packed with your refrigerator.
• IMPORTANT — Observe all governing codes and ordinances. Save these instructions for local inspector’s use.
•Note to Installer – Be sure to leave these instructions with the Consumer.
•Note to Consumer – .HHS WKHVH LQVWUXFWLRQV IRU future reference.
•Skill level – Installation of this appliance requires basic mechanical skills.
•Completion time – Refrigerator Installation
can vary
Water Line Installation
30minutes
•Proper installation is the responsibility of the installer.
•Product failure due to improper installation is not covered under the Warranty.
PREPARATION
MOVING THE REFRIGERATOR INDOORS
If the refrigerator will not fit through a doorway,
WKH UHIULJHUDWRU GRRUV DQG IUHH]HU GUDZHU FDQ EH removed.
•To remove the refrigerator doors, see the Installing the Refrigerator section.
7R UHPRYH WKH IUHH]HU GUDZHU VHH WKH 5HPRYLQJ WKH )UHH]HU 'UDZHU VHFWLRQ
WATER SUPPLY TO THE ICEMAKER AND DISPENSER
If the refrigerator has an ice maker, it will have to be connected to a cold water line. A GE Appliances water supply kit (containing tubing, shutoff valve, fittings and instructions) is available at extra
cost from your dealer, by visiting our website at
GEAppliances.com (in Canada at
GEAppliances.ca) or from Parts and Accessories, 888.959.8688 (in Canada 1.800.661.1616).
TOOLS YOU MAY NEED
Adjustable Wrench |
Ǫ´6RFNHW 5DWFKHW 'ULYHU |
´ ´ ´ & ´ |
Phillips-Head Screwdriver |
Allen Wrenches |
|||
|
Pencil |
|
´ 1XW 'ULYHU |
´ 2XWHU 'LDPHWHU |
|
´ 'ULOO %LW DQG |
Tape Measure |
|
|
||
|
(OHFWULF RU +DQG 'ULOO |
|
|
Compression Nut |
Pliers |
|
|
DQG )HUUXOH VOHHYH |
|
|
Level |
)ODW +HDG 6FUHZGULYHU |
Torx T20, T25 |
|
||
|
|
INSTRUCTIONS INSTALLATION
49-1000332 Rev. 1 |
21 |
INSTALLATION INSTRUCTIONS
Installation Instructions
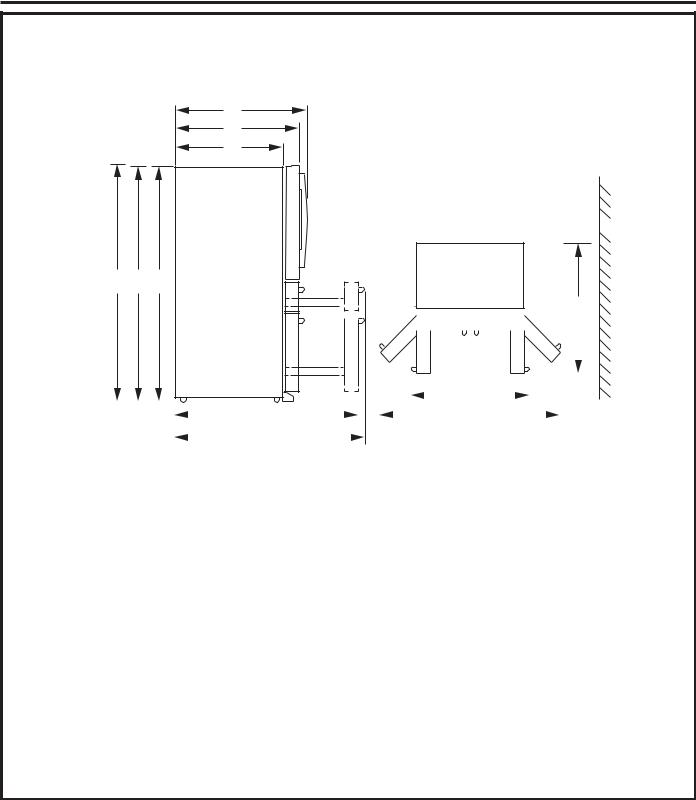
DIMENSIONS
NOTE: It is recommended that the floor be protected with a plastic covering throughout the installation process. NOTE: Not recommended for installation on carpeted flooring.
F
E
D
 H
H 
 K
K 

A B C
G
|
|
|
|
|
|
|
|
|
|
|
|
|
|
|
|
|
|
|
|
|
|
|
|
|
|
|
|
|
|
|
|
|
|
|
X |
|
|
|
|
|
|
|
|
|
|
|
|
I |
|
|
|
|
|
|
|
|
|
|
|
|
|
|
|
|
|
|
|
|
|
|
|
|
|
|
|
|
|
|
|
|
|
|
|
|
|
|
|||
|
|
|
|
|
|
|
|
|
|
|
|
|
|
|
|
|
|
|
|
|
|
|
|
|
|
|
|||
|
|
|
|
|
|
|
|
|
|
|
|
|
|
|
|
|
|
|
|
|
|
|
|
|
|
|
|||
|
|
|
|
|
|
|
|
|
|
|
|
|
|
|
|
|
|
||||||||||||
|
|
|
|
|
|
|
|
|
|
|
|
|
|
|
|
|
J |
|
|
|
|
|
|
|
|
|
|||
|
|
|
|
|
|
|
|
|
|
|
|
|
|
|
|
|
|
|
|
|
|||||||||
|
|
|
|
|
Y |
|
|
|
|
|
|
|
|
|
|
|
|
|
|
|
|
|
|
|
|
|
|
|
|
|
|
|
|
|
|
|
|
|
|
|
|
|
|
|
|
|
|
|
|
|
|||||||||
|
|
|
|
|
|
|
|
|
|
|
|
|
|
|
|
|
|
|
|
|
|
|
|
|
|||||
|
|
|
|
|
|
|
|
|
|
|
|
|
|
|
|
|
|
|
|
|
|
|
|
Standard Depth |
|||||
|
|
|
|
|
|
|
|
|
|
|
|
|
|
|
|
|
|
|
|
|
|
|
|
|
|
|
Models |
||
2YHUDOO +HLJKW WR 7RS RI WKH 'RRU $ |
|
|
|
|
|
|
´ PP |
||||||||||||||||||||||
Height to Top of Hinge Cover (B) |
|
|
|
|
|
|
´ PP |
||||||||||||||||||||||
Height to Top of Case (C) |
|
|
|
|
|
|
´ PP |
||||||||||||||||||||||
&DVH 'HSWK ZLWKRXW 'RRU ' |
|
|
|
|
|
|
´ PP |
||||||||||||||||||||||
&DVH 'HSWK ZLWK 'RRU OHVV 'RRU +DQGOH ( |
|
|
|
|
|
|
´ PP |
||||||||||||||||||||||
&DVH 'HSWK ZLWK 'RRU DQG +DQGOH ) |
|
|
|
|
|
|
´ PP |
||||||||||||||||||||||
'HSWK ZLWK 5HIULJHUDWRU 'RRU 2SHQ * |
|
|
|
|
|
|
´ PP |
||||||||||||||||||||||
Width (H) |
|
|
|
|
|
|
´ PP |
||||||||||||||||||||||
:LGWK ZLWK 'RRU 2SHQ ZLWK +DQGOH , |
|
|
|
|
|
|
´ PP |
||||||||||||||||||||||
:LGWK ZLWK 'RRUV )XOO\ 2SHQ - |
|
|
|
|
|
|
´ PP |
||||||||||||||||||||||
0LQ 'LVWDQFH %HWZHHQ &DVH DQG :DOO WR $OORZ 'RRUV WR )XOO\ 2SHQ . |
|
|
|
|
|
|
´ PP |
||||||||||||||||||||||
'HSWK ZLWK )UHH]HU 'RRU &RPSOHWHO\ 2SHQ ZLWKRXW +DQGOH ; |
|
|
|
|
|
|
´ PP |
||||||||||||||||||||||
'HSWK ZLWK )UHH]HU 'RRU &RPSOHWHO\ 2SHQ ZLWK +DQGOH < |
|
|
|
|
|
|
´ PP |
||||||||||||||||||||||
22 |
49-1000332 Rev. 1 |
Installation Instructions
MOVING THE REFRIGERATOR
8VLQJ WKH FKDUW EHORZ GHWHUPLQH LI WKH ZLGWK RI \RXU SDVVDJHZD\ FDQ DFFRPPRGDWH WKH GHSWK RI WKH refrigerator. Ensure you have clearance to prevent damage to the refrigerator before safely moving it to the final location.
•If passageways are large enough to accommodate the refrigerator without removing the handles skip to Step 6. Leave tape, film and all packaging on doors until the refrigerator is in the final location.
•NOTE: Use a padded hand truck or moving straps to move this refrigerator. Place the refrigerator on the hand truck with a side against the truck. We strongly recommend that two people move and complete this installation.
If your opening is less than the following dimensions, remove door parts in order until dimension is less than the opening.
)XOO\ $VVHPEOHG |
´ PP |
Remove Handles |
´ PP |
5HPRYH 'RRUV |
´ PP |
Remove Center Hinge |
´ PP |
INSTRUCTIONS INSTALLATION
49-1000332 Rev. 1 |
23 |
INSTALLATION INSTRUCTIONS
Installation Instructions
INSTALLING THE REFRIGERATOR
REFRIGERATOR LOCATION
Ŷ 'R QRW LQVWDOO WKH UHIULJHUDWRU ZKHUH WKH
WHPSHUDWXUH ZLOO JR EHORZ ) & EHFDXVH it will not run often enough to maintain proper temperatures.
Ŷ 'R QRW LQVWDOO WKH UHIULJHUDWRU ZKHUH WKH
WHPSHUDWXUH ZLOO JR DERYH ) & EHFDXVH it will not perform properly.
Ŷ'R QRW LQVWDOO WKH UHIULJHUDWRU LQ D ORFDWLRQ H[SRVHG to water (rain, etc.) or direct sunlight.
ŶInstall it on a floor strong enough to support it fully loaded.
CLEARANCES
Allow the following clearances for ease of installation, proper air circulation and plumbing and electrical connections.
6LGHV ´ PP
7RS ´ PP &DELQHW +LQJH &RYHU %DFN ´ PP
REMOVING THE REFRIGERATOR DOORS
ŶIMPORTANT NOTE: 7KLV UHIULJHUDWRU LV ´
(943 mm) deep (refer to chart on previous page).
'RRUV DQG SDVVDJHZD\V OHDGLQJ WR WKH LQVWDOODWLRQ
ORFDWLRQ PXVW EH DW OHDVW ´ PP ZLGH in order to leave the doors and handles attached to the refrigerator while transporting it into the installation location. If passageways are less
WKDQ ´ PP WKH UHIULJHUDWRU GRRUV DQG handles can easily be scratched and damaged. The top cap and doors can be removed to allow the refrigerator to be safely moved indoors. If
SDVVDJHZD\V DUH OHVV WKDQ ´ PP start with Step 1.
ŶIf it is not necessary to remove doors, skip to Step 11. Leave tape and all packaging on doors until the refrigerator is in the final location.
ŶNOTE: 8VH D SDGGHG KDQG WUXFN WR PRYH WKLV refrigerator. Place the refrigerator on the hand truck with a side against the truck. We strongly recommend that TWO PEOPLE move and complete this installation.
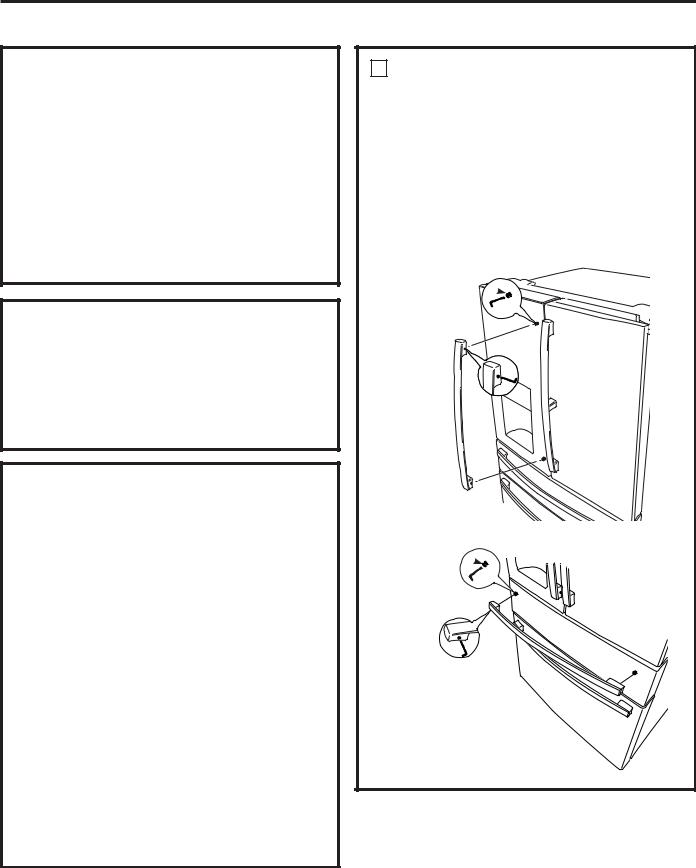
1REMOVE THE REFRIGERATOR AND FREEZER DOOR HANDLES
(if necessary)
Handle design varies; however installation is the same.
Ŷ 7LJKWHQ ORRVHQ WKH KDQGOH WR IURP WKH GRRU
E\ WXUQLQJ VHW VFUHZ ZLWK ´ $OOHQ ZUHQFK
Leave film on door until installation is finished.
Ŷ ,I KDQGOH PRXQWLQJ IDVWHQHUV QHHG WR EH
WLJKWHQHG RU UHPRYHG XVH D ´ $OOHQ wrench.
Mounting
)DVWHQHUV
Mounting
)DVWHQHUV 
24 |
49-1000332 Rev. 1 |
Installation Instructions
INSTALLING THE REFRIGERATOR (Cont.)
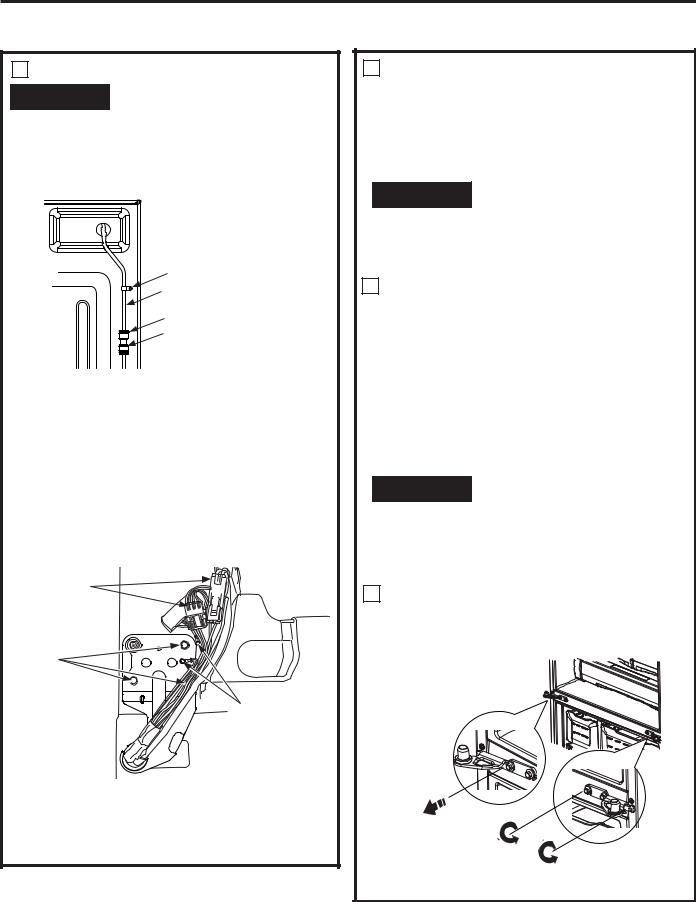
2 REMOVE THE LEFT-HAND DOOR

 WARNING )ROORZ DOO VWHSV IRU UHPRYLQJ
DQG UHLQVWDOOLQJ WKH GRRU )DLOXUH WR IROORZ WKHVH instructions, leaving off parts, or overtightening screws, can lead to the door falling off and result in injury and property damage.
Ŷ /RRVHQ WKH LFHPDNHU ZDWHU VXSSO\ WXEH
Tubing Clamp
Water Supply Tube
Collar
Connector
Ɣ 5HPRYH WKH EODFN FROODU IURP ZDWHU VXSSO\ WXEH connector at the top right back of the refrigerator.
Ɣ 3UHVV WKH ZKLWH IODQJH GRZQ DQG VHSDUDWH WKH water supply line from the connector.
Ɣ /RRVHQ DQG UHPRYH WKH WXELQJ FODPS IURP WKH back of the refrigerator and the water supply tube.
Ŷ 5HPRYH KLQJH FRYHU VFUHZV ZLWK D 3KLOOLSV KHDG
VFUHZGULYHU 5HPRYH OHIW KLQJH FRYHU 'LVFRQQHFW electrical connectors and pull icemaker water hose through case.
Electrical
Connections
Hinge
Screws
Ground
Screws
Ŷ 6HFXUHO\ WDSH WKH GRRU VKXW ZLWK PDVNLQJ WDSH RU have a second person support the door.
Ŷ 5HPRYH VFUHZV KROGLQJ KLQJH ZLWK D ´ VRFNHW
Lift hinge from refrigerator and door.
2 REMOVE REFRIGERATOR DOORS
(cont)
For proper installation later, please follow these next steps carefully:
ŶRemove the tape keeping the door as straight as possible, then lift up to remove.

 CAUTION Lifting Hazard.
A single person lift could cause injury. Gain assistance when handling, moving, or lifting refrigerator doors.
3REMOVE THE RIGHT-HAND DOOR
ŶRemove right hinge cover.
ŶSecurely tape the door shut with masking tape or have a second person support the door.
Ŷ 5HPRYH VFUHZV KROGLQJ KLQJH ZLWK D ´ VRFNHW
Lift hinge from refrigerator and door.
For proper installation later, please follow these next steps carefully:
ŶRemove the tape keeping the door as straight as possible, then lift up to remove.

 CAUTION Lifting Hazard.
A single person lift could cause injury. Gain assistance when handling, moving, or lifting refrigerator doors.
To reassemble doors, reverse removal steps.
4 REMOVE CENTER HINGE (if necessary)
Remove screws that secure hinge to the cabinet.
,QQHU VFUHZV QHHG D ´ VRFNHW 2XWHU VFUHZ needs a Phillips #2.
Remove center screw
Loosen outer  screws
INSTRUCTIONS INSTALLATION
49-1000332 Rev. 1 |
25 |
INSTALLATION INSTRUCTIONS
Installation Instructions
INSTALLING THE REFRIGERATOR (Cont.)
5 REINSTALLING THE LEFT-HAND
AND RIGHT-HAND DOORS
 WARNING )ROORZ DOO VWHSV IRU UHPRYLQJ
DQG UHLQVWDOOLQJ WKH GRRU )DLOXUH WR IROORZ WKHVH instructions, leaving off parts, or overtightening screws, can lead to the door falling off and result in
injury and property damage.
1. Reinstall center hinge first and
WRUTXH WKH ó´ VFUHZ WR LQ OEV
(7.34 N-m) and small screw to
25 in-lbs (2.82 N-m). Rotating the
VFUHZ E\ WXUQ DIWHU LW LV IOXVK with mating surface will achieve these torques.
2.Lower the refrigerator door onto the center hinge.
3.Securely tape the door shut with masking tape or have a second person support the door.
4.Reinstallation is the reverse of the removal instructions.
5.Be sure to reinstall the ground wire and strain relief to the top hinge.
6.Reinstall hinge cover. NOTE: Ensure wires are not pinched or under screw bosses before tightening screws.
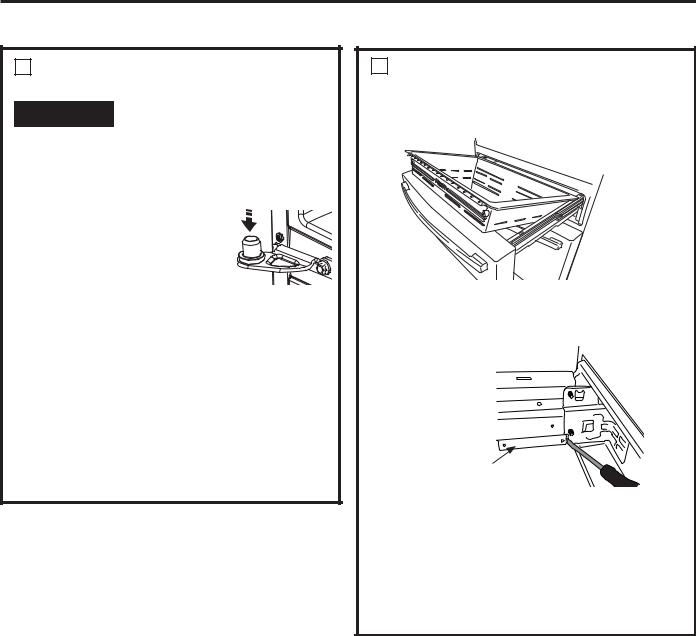
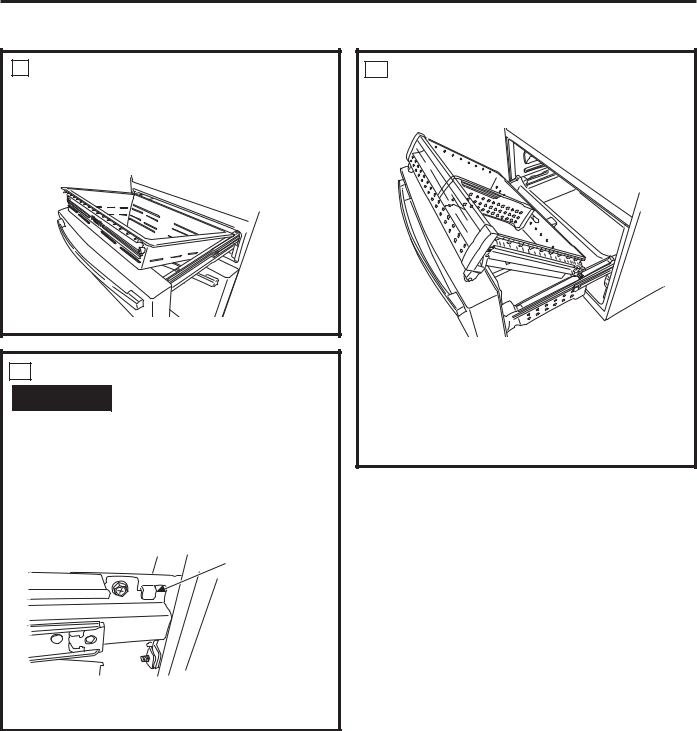
6REMOVING CONVERTIBLE DRAWER
1.Remove the convertible drawer basket by lifting while rotating the basket upward.
2.Remove 2 screws from each side of the frame with
D ´ VRFNHW
'LVFRQQHFW WKH FRQWURO FRQQHFWLRQ IRU WKH convertible drawer.
Control Connection Cover
Ɣ 8VLQJ D IODW KHDG VFUHZGULYHU UHPRYH FRYHU over electric connectors on inside right of the drawer frame. The cover hooks through the drawer frame toward the inside of the refrigerator.
Ɣ 3UHVV WKH WDE LQ WKH FHQWHU RI WKH FRQQHFWRU WR separate.
Ɣ 5HPRYH GRRU E\ OLIWLQJ RII KRRNV
26 |
49-1000332 Rev. 1 |

Installation Instructions
INSTALLING THE REFRIGERATOR (Cont.)
7 REMOVE LOWER FREEZER |
8 |
REMOVE THE FREEZER |
|
BASKET |
|
DRAWER |
|
Ŷ 3XOO WKH WRS IUHH]HU GUDZHU EDVNHW IRUZDUG XQWLO LW LV |
3XOO WKH IUHH]HU GUDZHU RSHQ WR IXOO H[WHQVLRQ |
||
RXW RI WKH WUDFN LQ WKH IUHH]HU FRPSDUWPHQW /LIW ZKLOH |
2. Remove two screw from each side of the frame |
||
rotating the basket upward to remove. |
|
ZLWK D ´ VRFNHW |
|
Ŷ 3UHVV WKH WDE RQ WKH ULJKW VLGH EUDFNHW WR UHPRYH WKH |
|
||
|
|
|
|
IUHH]HU GRRU ELQ |
|
|
|
Ŷ /LIW WKH ERWWRP IUHH]HU GUDZHU EDVNHW VOLJKWO\ EDFN WKHQ |
|
|
|
up and out of the drawer. |
|
|
|
|
|
CAUTION |
Lifting Hazard |
|
|
Freezer door is heavy Use both hands to |
|
|
|
secure the door before lifting. |
|
|
3. Remove the door by lifting off hooks. |
||
Ŷ 3XOO WKH ORZHU EDVNHW DQG VOLGH PHFKDQLVP WR IXOO |
|
|
|
extension using both hands. |
|
|
|
Ŷ 5HPRYH WKH WRS IUHH]HU GUDZHU E\ IXOO\ H[WHQGLQJ WKH |
|
|
|
drawer then lifting up and out. |
|
|
|
Ŷ 5HPRYH WKH EDVNHW UHVWLQJ RQ WKH VOLGHV |
|
|
|
Ŷ 3XVK WKH ERWWRP EDVNHW VOLGHV EDFN XQWLO WKH VOLGH |
|
|
|
mechanism self retracts. |
|
|
|
49-1000332 Rev. 1 |
|
|
|
INSTRUCTIONS INSTALLATION
27
INSTALLATION INSTRUCTIONS
Installation Instructions
INSTALLING THE REFRIGERATOR (Cont.)
9 RE-INSTALL CONVERTIBLE
DRAWER
To reassemble doors, reverse removal steps. Convertible drawer basket will be loose if re-installed
EDFNZDUGV /RRN IRU ³)5217´ HPERVV WR KHOS ZLWK re-installation.
10 REPLACE FREEZER DRAWER

 CAUTION Lifting Hazard
Freezer door is heavy Use both hands to secure the door before lifting.
1.Pull the lower basket slide mechanism to full extension with both hands.
/LIW WKH IUHH]HU GRRU DQG DOLJQ WKH KRRNV ZLWK WKH notches on the slide mechanisms. NOTE: Place one side in first, then align the other side.
)UHH]HU GRRU hook and slide mechanism notch
11 RE-INSTALL LOWER FREEZER
BASKET
5H LQVWDOO ORZHU IUHH]HU EDVNHW
2. Check for smooth operation of basket.
5H LQVWDOO IUHH]HU GUDZHU E\ SODFLQJ WKH GUDZHU wheels onto the top of the track mounted to the
VLGH RI WKH IUHH]HU ZDOOV 7KH ZKHHOV RQ WKH
IUHH]HU GUDZHU VKRXOG EH RQ WRS RI WKH ERWWRP basket sides.
3.Replace the attachment screws and torque the screws to 65 in-lb (7.34 N-m).
28 |
49-1000332 Rev. 1 |

Installation Instructions
INSTALLING THE REFRIGERATOR (Cont.)
12 CONNECTING THE REFRIGERATOR TO THE HOUSE WATER LINE
A cold water supply is required for automatic ice maker operation. If there is not a cold water supply, you will need to provide one. See Installing the Water Line section.
NOTES:
•Before making the connection to the refrigerator, be sure the refrigerator power cord is not plugged into the wall outlet.
•If your refrigerator does not have a water filter, we recommend installing one if your water supply has sand or particles that could clog the screen of the refrigerator’s water valve. Install it in the water line near the refrigerator. If using SmartConnect™
5HIULJHUDWRU 7XELQJ .LW \RX ZLOO QHHG DQ additional tube (WX08X10002) to connect the
ILOWHU 'R QRW FXW SODVWLF WXEH WR LQVWDOO ILOWHU
•Before connecting the water line to the house, purge the house line for at least 2 minutes.
AIf you are using copper tubing, place a compression nut and ferrule (sleeve) onto the end of the tubing coming from the house cold water supply.
 WARNING
 Electrical Shock Hazard.
$WWDFK WXELQJ FODPS XVLQJ H[LVWLQJ KROH RQO\ '2
NOT drill into the refrigerator.
If you are using the SmartConnect™ tubing, the nuts are already assembled to the tubing.
BIf you are using copper tubing, insert the end of the tubing into the refrigerator connection, at the back of the refrigerator, as far as possible. While holding the tubing, tighten the fitting.
If you are using SmartConnect™ tubing, insert the molded end of the tubing into the refrigerator connection, at the back of the refrigerator, and tighten the compression nut
until it is hand tight. Then tighten one additional turn with a wrench. Over tightening may cause leaks.
C)DVWHQ WKH WXELQJ LQWR WKH FODPS SURYLGHG WR hold it in position. You may need to pry open the clamp.
 WARNING Connect to potable water supply only. A cold water supply is required for automatic icemaker operation. The water pressure must be between 40 and 120 psi (275-827 kilopascals)
´ &RPSUHVVLRQ 1XW SmartConnect™ |
|
)HUUXOH |
Tubing |
(sleeve) |
|
|
Refrigerator |
|
Connection |
INSTRUCTIONS INSTALLATION
49-1000332 Rev. 1 |
29 |
INSTALLATION INSTRUCTIONS
Installation Instructions
INSTALLING THE REFRIGERATOR (Cont.)
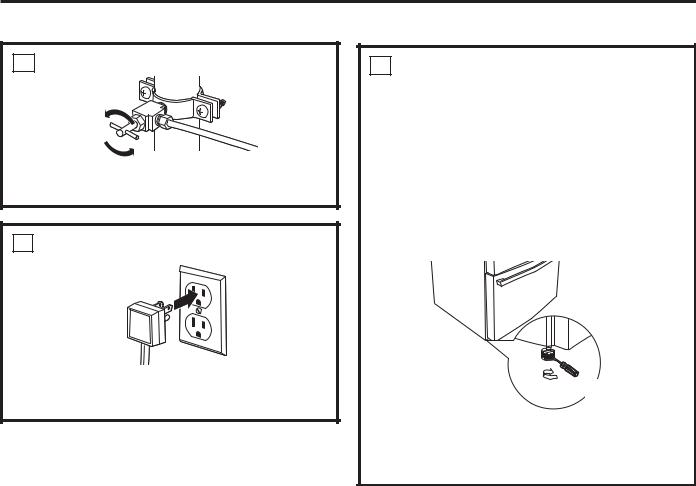
13 TURN ON THE WATER SUPPLY
Turn the water on at the shutoff valve (house water supply) and check for any leaks.
14 PLUG IN THE REFRIGERATOR
See the grounding information attached to the power cord.
15 LEVEL THE REFRIGERATOR
The leveling legs have 2 purposes:
1.Leveling legs adjust so the refrigerator is firmly positioned on the floor and does not wobble.
/HYHOLQJ OHJV VHUYH DV D VWDELOL]LQJ EUDNH to hold the refrigerator securely in position during operation and cleaning. The leveling legs also prevent the refrigerator from tipping.
ŶTurn the leveling legs clockwise to raise the refrigerator, counterclockwise to lower it.
Raise )ODW +HDG
Screwdriver
NOTICE: To avoid possible property damage, the leveling legs must be firmly touching the floor.
30 |
49-1000332 Rev. 1 |
 Loading...