


Owner's Manual
Convection / Microwave Oven
Model: CVM517P
Contents
Safety Information. . . . . . . . . . . . . . . . . . . . . . . . . . . . . . .3
Using the Oven
Features. . . . . . . . . . . . . . . . . . . . . . . . . . . . . . . . . . . . . .7 Controls . . . . . . . . . . . . . . . . . . . . . . . . . . . . . . . . . . . . . .8 Cooking Options. . . . . . . . . . . . . . . . . . . . . . . . . . . . . . . .9 Microwave Time and Auto Features . . . . . . . . . . . . . . .11 Power Level . . . . . . . . . . . . . . . . . . . . . . . . . . . . . . . . . .13 Microwave terms . . . . . . . . . . . . . . . . . . . . . . . . . . . . . .14 Microwave Sensor Features . . . . . . . . . . . . . . . . . . . . .14 Baking and Roasting Features. . . . . . . . . . . . . . . . . . . .18 Fast Cook Feature . . . . . . . . . . . . . . . . . . . . . . . . . . . . .19 Cookware Tips . . . . . . . . . . . . . . . . . . . . . . . . . . . . . . . .20 Best Method of Cooking Chart. . . . . . . . . . . . . . . . . . . .21 Other Features. . . . . . . . . . . . . . . . . . . . . . . . . . . . . . . .22
Care and Cleaning
Inside . . . . . . . . . . . . . . . . . . . . . . . . . . . . . . . . . . . . . . .25
Outside. . . . . . . . . . . . . . . . . . . . . . . . . . . . . . . . . . . . . .25
Replacing the LED Lamp. . . . . . . . . . . . . . . . . . . . . . . .26
Exhaust Feature . . . . . . . . . . . . . . . . . . . . . . . . . . . . . . .27
Troubleshooting . . . . . . . . . . . . . . . . . . . . . . . . . . . . . . .28
Optional Kits . . . . . . . . . . . . . . . . . . . . . . . . . . . . . . . . . .30
Limited Warranty. . . . . . . . . . . . . . . . . . . . . . . . . . . . . . .31
Consumer Support . . . . . . . . . . . . . . . . . . . . . . . . . . . . .32
Write the model and serial numbers here:
Model # _______________________________
Serial # _______________________________
You’ll find them on a label located behind the left burner knob or on the bottom of the rangetop.
Español
Para consultar una version en español de este manual de instrucciones, visite nuestro sitio de internet cafeappliances.com.
49-2000082 09-18 GEA

THANK YOU FOR MAKING CAFÉ A PART OF YOUR HOME.
We take pride in the craftsmanship, innovation and design that goes into every Café product, and we think you will too. Among other things, registration of your appliance ensures that we can deliver important product information and warranty details when you need them.
Register your Café appliance now online. Helpful websites are available in the Consumer Support section of this Owner’s Manual. You may also mail in the pre-printed registration card included in the packing material.
2 |
49-2000082 |

IMPORTANT SAFETY INFORMATION
READ ALL INSTRUCTIONS BEFORE USING THE APPLIANCE

 WARNING To reduce the risk of burns, electric shock, fire, injury to persons, or exposure to excessive microwave energy:
When using electrical appliances, basic safety precautions should be followed, including the following:
Ŷ 5HDG DOO LQVWUXFWLRQV EHIRUH XVLQJ WKLV DSSOLDQFH
Ŷ 5HDG DQG IROORZ WKH VSHFLILF SUHFDXWLRQV LQ WKH
PRECAUTIONS TO AVOID POSSIBLE EXPOSURE TO EXCESSIVE MICROWAVE ENERGY section on page 6.
Ŷ 8VH WKLV DSSOLDQFH RQO\ IRU LWV LQWHQGHG XVH DV described in this manual. Do not use corrosive chemicals or vapors in this appliance. This oven is specifically designed to heat, dry or cook food, and is not intended for laboratory or industrial use.
Ŷ 7KLV DSSOLDQFH PXVW RQO\ EH VHUYLFHG E\ TXDOLILHG service personnel. Contact nearest authorized service facility for examination, repair or adjustment.
INSTALLATION
Ŷ ,QVWDOO RU ORFDWH WKLV DSSOLDQFH RQO\ LQ DFFRUGDQFH with the provided installation instructions.
ŶThis appliance must be grounded. Connect only to properly grounded outlet. See “GROUNDING INSTRUCTIONS” found on page 6.
Ŷ 7KLV PLFURZDYH RYHQ LV 8/ OLVWHG IRU LQVWDOODWLRQ RYHU both gas and electric ranges.
Ŷ 7KLV XQLW LV VXLWDEOH IRU XVH DERYH JDV RU HOHFWULF FRRNLQJ HTXLSPHQW ´ RU OHVV ZLGH
Ŷ Do not operate this appliance if it has a damaged power cord or plug, if it is not working properly, or if it has been damaged or dropped.
Ŷ .HHS FRUG DZD\ IURP KHDWHG VXUIDFHV
ŶDo not let cord hang over the edge of the table or counter
Ŷ 'R QRW LPPHUVH FRUG RU SOXJ LQ ZDWHU
Ŷ 'R QRW FRYHU RU EORFN DQ\ RSHQLQJV RQ WKH appliance.
Ŷ 'R QRW VWRUH WKLV DSSOLDQFH RXWGRRUV 'R QRW XVH WKLV product near water—for example, in a wet basement, near a swimming pool, near a sink or in similar locations.
Ŷ 'R QRW PRXQW WKLV DSSOLDQFH RYHU D VLQN
TO REDUCE THE RISK OF FIRE IN THE CAVITY:
Ŷ Do not overcook food. Carefully attend appliance when paper, plastic or other combustible materials are placed inside the oven to facilitate cooking.
Ŷ 5HPRYH ZLUH WZLVW WLHV DQG PHWDO KDQGOHV IURP paper or plastic containers before placing them in the oven.
Ŷ 'R QRW VWRUH DQ\ PDWHULDOV LQ WKLV RYHQ ZKHQ QRW LQ use. Do not leave paper products, cooking utensils or food in the cavity when not in use. All racks should be removed from oven when not in use.
Ŷ ,I PDWHULDOV LQVLGH WKH RYHQ LJQLWH NHHS WKH RYHQ door closed, turn the oven off and disconnect the power cord or shut off power at the fuse or circuit breaker panel.
Ŷ 'R QRW RSHUDWH WKH PLFURZDYH IHDWXUH ZLWKRXW IRRG LQ the oven.
TO REDUCE THE RISK OF BURNS:
Ŷ %H FDUHIXO ZKHQ RSHQLQJ FRQWDLQHUV RI KRW IRRG 8VH pot holders and direct steam away from face and hands.
Ŷ 9HQW SLHUFH RU VOLW FRQWDLQHUV SRXFKHV RU SODVWLF bags to prevent build-up of pressure.
Ŷ %H FDUHIXO ZKHQ WRXFKLQJ WKH WXUQWDEOH GRRU UDFNV or walls of the oven which may become hot during use.
Ŷ /LTXLGV DQG FHUWDLQ IRRGV KHDWHG LQ WKH PLFURZDYH oven can present a risk of burn when removing them from the microwave. The potential for a burn is greater in young children, who should not be allowed to remove hot items from the microwave.
INFORMATION SAFETY
READ AND SAVE THESE INSTRUCTIONS
49-2000082 |
3 |

SAFETY INFORMATION
IMPORTANT SAFETY INFORMATION
READ ALL INSTRUCTIONS BEFORE USING THE APPLIANCE

 WARNING Continued
OPERATING AND CLEANING
Ŷ $V ZLWK DQ\ DSSOLDQFH FORVH VXSHUYLVLRQ LV necessary when used by children.
Ŷ 'R QRW VWRUH DQ\WKLQJ GLUHFWO\ RQ WRS RI WKH microwave oven surface when the microwave oven is in operation.
Ŷ 2YHUVL]HG IRRGV RU RYHUVL]HG PHWDO XWHQVLOV VKRXOG not be inserted in a microwave/convection oven as they may create a fire or risk of electric shock.
Ŷ 'R QRW FOHDQ ZLWK PHWDO VFRXULQJ SDGV 3LHFHV FDQ burn off the pad and touch electrical parts involving a risk of electric shock.
SUPER HEATED WATER
Ŷ /LTXLGV VXFK DV ZDWHU FRIIHH RU WHD DUH DEOH WR be overheated beyond the boiling point without appearing to be boiling. Visible bubbling or boiling when the container is removed from the microwave oven is not always present. THIS COULD RESULT IN VERY HOT LIQUIDS SUDDENLY BOILING OVER WHEN THE CONTAINER IS DISTURBED OR A SPOON OR OTHER UTENSIL IS INSERTED INTO THE LIQUID.
Ŷ 7R UHGXFH WKH ULVN RI LQMXU\ WR SHUVRQV
'R QRW RYHUKHDW WKH OLTXLG
Ŷ Do not use paper products in oven when appliance is operating in any cooking mode except microwave.
Ŷ 6RPH SURGXFWV VXFK DV ZKROH HJJV DQG VHDOHG containers—for example, closed jars—are able to explode and should not be heated in this oven.
Ŷ 'R QRW FRYHU UDFNV RU DQ\ RWKHU SDUW RI WKH RYHQ with meal foil. This will cause overheating of the microwave/convection oven.
Ŷ &RRN PHDW DQG SRXOWU\ WKRURXJKO\
meat to at least an INTERNAL temperature of 160°F, and poultry to at least an INTERNAL temperature
of 180°F. Cooking to these temperatures usually protects against foodborne illness.
Ŷ 0DNH VXUH DOO FRRNZDUH XVHG LQ \RXU PLFURZDYH oven is suitable for microwaving. Most glass casseroles, cooking dishes, measuring cups, custard cups, pottery or china dinnerware which does not have metallic trim or glaze with a metallic sheen can be used.in compliance with cookware manufacturers’ recommendations.
Ŷ ,W LV LPSRUWDQW WR NHHS WKH DUHD FOHDQ ZKHUH WKH door seals against the microwave. Use only mild, nonabrasive detergents applied with a clean sponge or soft cloth. Rinse well.
6WLU WKH OLTXLG ERWK EHIRUH DQG KDOIZD\ WKURXJK heating it.
-Do not use straight-sided containers with narrow necks.
-After heating, allow the container to stand in the microwave oven for a short time before removing the container.
-Use extreme care when inserting a spoon or other utensil into the container.
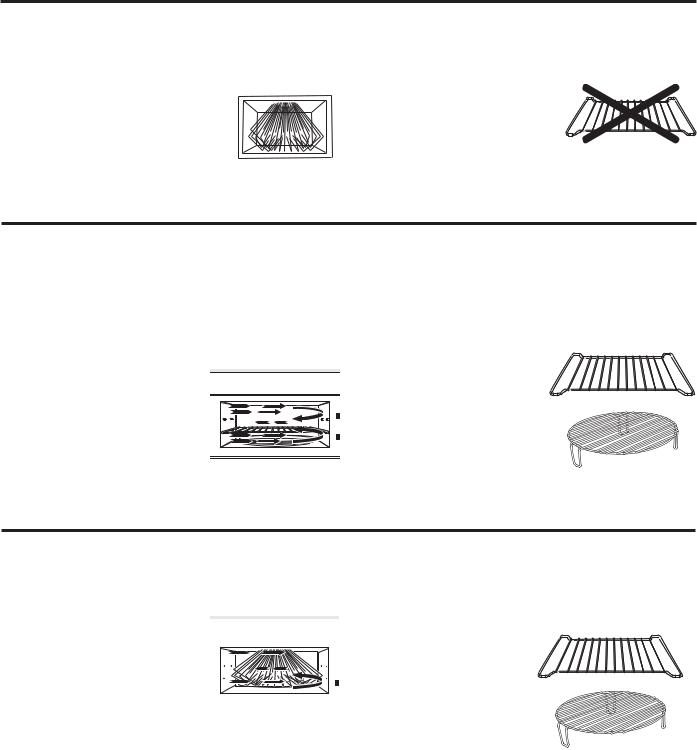
USE OF THE MICROWAVE RACK ACCESSORY
Ŷ 5HPRYH WKH PLFURZDYH UDFN IURP WKH RYHQ ZKHQ QRW in use.
Ŷ 8VH SRW KROGHUV ZKHQ KDQGOLQJ WKH PLFURZDYH UDFN and cookware. They may be hot.
Ŷ 'R QRW XVH UDFN VKHOI DQG FLUFXODU UDFN DW WKH VDPH time.
Ŷ %H VXUH WKDW WKH PLFURZDYH UDFN LV SRVLWLRQHG properly inside the oven to prevent product damage. Rack should not touch microwave walls.
READ AND SAVE THESE INSTRUCTIONS
4 |
49-2000082 |

IMPORTANT SAFETY INFORMATION
READ ALL INSTRUCTIONS BEFORE USING THE APPLIANCE
VENT FAN
The fan will operate automatically under certain conditions. Take care to prevent the starting and spreading of accidental cooking fires while the vent fan is in use.
Ŷ &OHDQ WKH XQGHUVLGH RI WKH PLFURZDYH RIWHQ 'R QRW Ŷ :KHQ SUHSDULQJ IODPLQJ IRRGV XQGHU WKH PLFURZDYH
allow grease to build up on the microwave or the |
turn the fan on. |
|
fan filters. |
Ŷ 1HYHU OHDYH VXUIDFH XQLWV EHQHDWK \RXU PLFURZDYH |
|
|
||
Ŷ ,Q WKH HYHQW RI D JUHDVH ILUH RQ WKH VXUIDFH XQLWV |
oven unattended at high heat settings. Boilovers |
|
below the microwave oven, smother a flaming pan |
cause smoking and greasy spillovers that may ignite |
|
on the surface unit by covering the pan completely |
and spread if the microwave vent fan is operating. |
|
with a lid, a cookie sheet or a flat tray. |
7R PLQLPL]H DXWRPDWLF IDQ RSHUDWLRQ XVH DGHTXDWH |
|
Ŷ 8VH FDUH ZKHQ FOHDQLQJ WKH YHQW IDQ ILOWHUV |
sized cookware and use high heat on surface units |
|
only when necessary. |
||
Corrosive cleaning agents, such as lye-based oven |
||
|
||
cleaners, may damage the filters. |
|
PACEMAKERS
Most pacemakers are shielded from interference from electronic products, including microwaves. However, patients with pacemakers may wish to consult their physicians if they have concerns.
READ AND SAVE THESE INSTRUCTIONS
INFORMATION SAFETY
49-2000082 |
5 |

SAFETY INFORMATION
IMPORTANT SAFETY INFORMATION
READ ALL INSTRUCTIONS BEFORE USING THE APPLIANCE
PRECAUTIONS TO AVOID POSSIBLE EXPOSURE TO EXCESSIVEMICROWAVE ENERGY
Ŷ Do Not Attempt to operate this oven with the door open since open-door operation can result in harmful exposure to microwave energy. It is important not to defeat or tamper with the safety interlocks.
Ŷ Do Not Place any object between the oven front face and the door or allow soil or cleaner residue to accumulate on sealing surfaces.
Ŷ Do Not Operate the oven if it is damaged. It is particularly important that the oven door close properly and that there is no damage to the:
(1)door (bent)
(2)hinges and latches (broken or loosened)
(3)door seals and sealing surfaces
Ŷ The Oven Should Not be adjusted or repaired by
DQ\RQH H[FHSW SURSHUO\ TXDOLILHG VHUYLFH SHUVRQQHO
Contact nearest authorized service facility for examination, repair or adjustment.birth defects or other reproductive harm.
GROUNDING INSTRUCTIONS
To prevent risk of electric shock, follow these instructions:
Ŷ Plug microwave into a grounded 3-prong outlet. Ŷ Do not remove the ground prong or use an
adapter.
Ŷ Do not use an extension cord.

 WARNING Improper use of the grounding plug can result in a risk of electric shock.
This appliance must be grounded. In the event of an electrical short circuit, grounding reduces the risk of electric shock by providing an escape wire for the electric current.
7KLV DSSOLDQFH LV HTXLSSHG ZLWK D SRZHU FRUG having a grounding wire with a grounding plug. The plug must be plugged into an outlet that is properly installed and grounded.
&RQVXOW D TXDOLILHG HOHFWULFLDQ RU VHUYLFH technician if the grounding instructions are not completely understood, or if doubt exists as to whether the appliance is properly grounded.
A short power-supply is provided to reduce the risks resulting from becoming entangled or tripping over a longer cord. Do not use an extension cord with this appliance. If the power
FRUG LV WRR VKRUW KDYH D TXDOLILHG HOHFWULFLDQ or service technician install an outlet near the appliance.
READ AND SAVE THESE INSTRUCTIONS
6 |
49-2000082 |
Features
Throughout this manual, features and appearance may vary from your model.
Features OVEN: YOUR USING
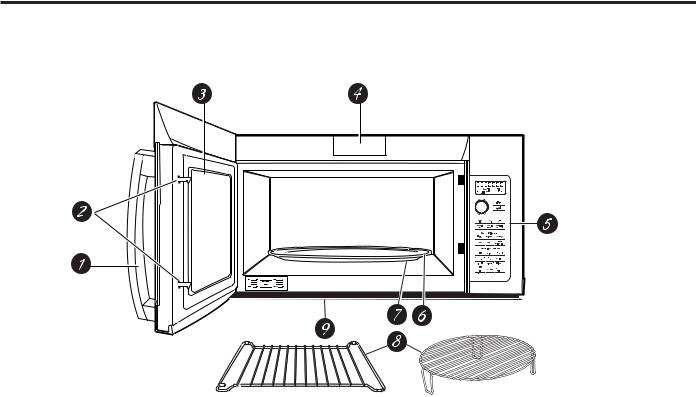
1.Door Handle.
2.Door Latches.
3.Window with Metal Shield. Screen allows cooking to be viewed while keeping microwaves confined in the oven.
4.Charcoal Filter Door. Push down two button to open the door. You can change charcoal filter easily.
5.Control Panel and Selector Dial.
6.Removable Turntable. Do not operate the oven in the microwave mode without the turntable and turntable support seated and in place.
7.Removable Turntable Support. Do not operate the oven in the microwave mode without the turntable and turntable support seated and in place.
8.Shelves. Use with Convection Bake, Convection Roast or Combination Fast Bake. (Do not use when microwave cooking.)
For best results, use one shelf in the lower position and leave at least a 1-inch gap between the cooking dish and the sides of the oven. For two-level Baking or Fast Baking use both shelves.
9Deflector. Provides robustness from cooktop heat. Do not remove.
49-2000082 |
7 |

USING THE OVEN: Controls
Controls
<RX FDQ FRRN E\ 0LFURZDYH &RQYHFWLRQ %DNH &RQYHFWLRQ 5RDVW RU &RPELQDWLRQ )DVW %DNH .HHS KRW FRRNHG foods at serving temperature with the Warm feature.
Microwave Cooking Time and Auto Features
Press |
Turn and push dial to enter |
Cook Time |
Amount of cooking time |
Press once (Cook Time I) to |
|
microwave any time between |
|
15 seconds and 99 minutes. |
|
Press twice (Cook Time II) to |
|
change power levels automatically |
|
during cooking. |
|
Mircrowave Express cook/ |
|
Add 30 sec. |
Starts immediately! |
Defrost
Press once (Weight Defrost) Food weight up to six pound
Press twice (Timer Defrost) |
Amount of defrosting time |
Power Level |
Power level 1–10 |
Sensor Features
Press |
Turn and push |
|
|
|
|
dial to enter |
Option |
|
|
Steam Cook |
Food type |
|
|
|
Popcorn |
Starts immediately! |
|
|
|
|
|
|
||
Beverage |
Starts immediately! |
|
|
|
Reheat |
Food type |
|
|
|
Cook |
Food type |
|
|
|
Convection Baking or Convection Roasting
Press |
Turn and push dial to enter |
Convection Bake or |
Oven temperature and cook time |
Convection Roast |
|
 Combination Fast Cooking
Press Turn and push dial to enter
Combination Fast Cook Oven temperature and cook time
8 |
49-2000082 |
Options
Microwave Cooking
Your oven uses microwave energy to cook by a set time or weight, or automatically by sensor.
Sensor microwave works by detecting the increasing humidity released during cooking. The oven automatically adjusts the cooking time to various types and amounts of food.
Cooking Method
Microwave energy is distributed evenly throughout the oven for thorough, fast cooking of food.
Heat Source
Microwave energy.
Heat Conduction
Heat produced within food by
instant energy penetration.
Benefits
Fast, high efficiency cooking.
Oven and surroundings do not get hot. Easy clean-up.
Convection Baking and Convection Roasting
During baking or roasting, a heating element is used to raise the temperature of the air inside the oven. Any oven temperature from 225°F. to 425°F. may be programmed. A fan gently circulates this heated air throughout the oven, over and around the food, producing golden brown exteriors and rich moist interiors. This circulation of heated air is called convection.
Because the heated air is kept constantly moving, not permitting a layer of cooler air to develop around the food, some foods cook faster than in regular oven cooking. 

Cooking Method
Hot air circulates around food to produce browned exteriors and seal in juices.
Heat Source
Circulating heated air (Convection).
Heat Conduction
Heat conducted from outside of food to inside.
Benefits
Aids in browning and seals in flavor. Cooks some foods faster than regular ovens.
or
Always use the shelf when baking. For best results, use one shelf in the lower position.
Combination Fast Cooking
Your oven also offers the option of Combination Fast Cook, using microwave energy along with convection cooking. You cook with speed and accuracy, while browning and crisping to perfection. .
Cooking Method
Microwave energy and convection
heat combine to cook foods up  to 25% faster than regular ovens,


 while browning and sealing in
  juices.


Heat Source
Microwave energy and circulating heated air.
Heat Conduction
Food heats from instant energy from penetration and heat conducted from outside 

of food.
Benefits
Shortened cooking time from
microwave energy, plus browning and crisping from convection heat.
or
Always use the shelf with Fast Bake. For best results, use one shelf in the lower position.
Options OVEN: THE USING
49-2000082 |
9 |
USING THE OVEN: Time and Auto Microwave Features
Time and Auto Microwave Features
Using the Dial
You can make selections on the oven by turning the dial and pressing it to enter the selection.
Pressing the dial can also be used in place of the Start/
Pause EXWWRQ IRU TXLFNHU SURJUDPPLQJ RI WKH RYHQ
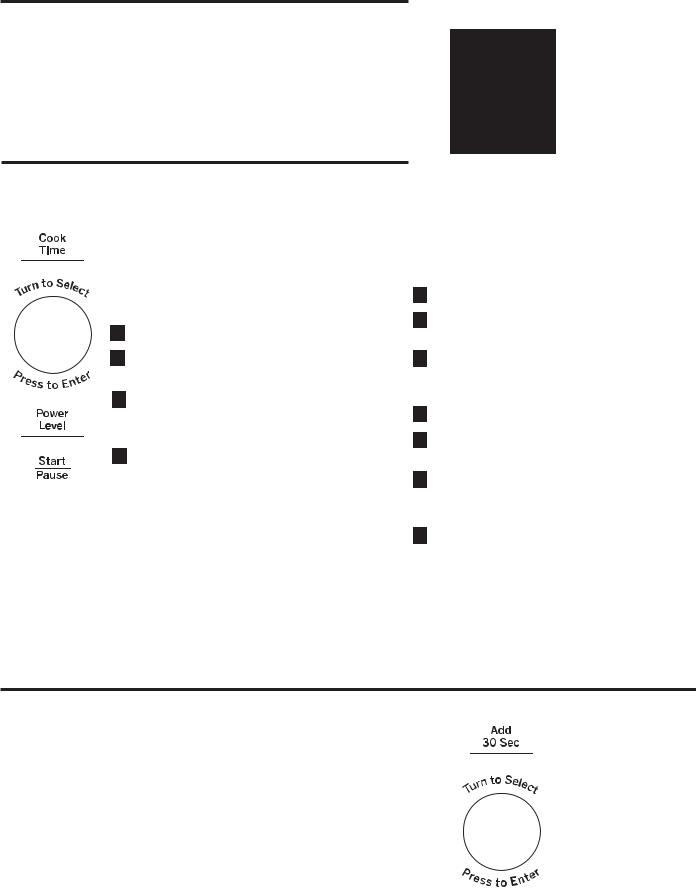
Cook Time
(Do not use the shelves when microwave cooking.)
Cook Time I |
Cook Time II |
Allows you to microwave for any time between 15 seconds and 99 minutes.
Power level 10 (High) is automatically set, but you may change it for more flexibility.
1 Press the Cook Time button.
2Turn the dial to set the cook time and press the dial to enter.
3Change power level if you don’t want full power. (Press Power Level. Turn the dial to select. Press the dial to enter.)
4Press the dial or the Start/Pause button to start cooking.
You may open the door during Cook Time to check the food. Close the door and press the dial or Start/Pause to resume cooking.
NOTE: You may change the cook time at any time during cooking by turning the dial. You may also change the power level by pressing the Power Level button.
Lets you change power levels automatically during cooking. Here’s how to do it:
1 Press the Cook Time button.
2Turn the dial to set the first cook time and press the dial to enter.
3Change the power level if you don’t want full power. (Press Power Level. Turn the dial to select. Press the dial to enter.)
4 Press the Cook Time button again.
5Turn the dial to set the second cook time and press the dial to enter.
6Change the power level if you don’t want full power. (Press Power Level. Turn the dial to select. Press the dial to enter.)
7Press the dial or the Start/Pause button to start cooking.
At the end of Cook Time I, Cook Time II counts down.
NOTE: You may change the cook time at any time during cooking by turning the dial. You may also change the power level by pressing the Power Level button.
Add 30 Sec
7KLV LV D TXLFN ZD\ WR VHW DQG VWDUW FRRNLQJ LQ VHFRQG blocks each time the Add 30 Second button is pressed. The cook time may be changed by turning the dial at any time during cooking.
The power level will automatically be set at 10 and the oven will start immediately.
The power level can be changed as time is counting down. Press the Power Level button, turn the dial and press to enter.
10 |
49-2000082 |
 Loading...