


CONVECTION/ MICROWAVE OVEN
SAFETY INFORMATION . . . . . . . . .3
USING THE MICROWAVE
Features . . . . . . . . . . . . . . . . . . . . . . . . . . . . . .6
Controls . . . . . . . . . . . . . . . . . . . . . . . . . . . . . .7
Microwaving Features . . . . . . . . . . . . . . . . . .8
Time and Auto Features . . . . . . . . . . . . . . . .9
Sensor Features . . . . . . . . . . . . . . . . . . . . . . 11
Other Features . . . . . . . . . . . . . . . . . . . . . . . 14
CARE AND CLEANING
Oven . . . . . . . . . . . . . . . . . . . . . . . . . . . . . . . . 17
Exhaust Feature . . . . . . . . . . . . . . . . . . . . . . 19
TROUBLESHOOTING. . . . . . . . . . . . 21
WARRANTY. . . . . . . . . . . . . . . . . . . . . 26
ACCESSORIES . . . . . . . . . . . . . . . . . . .27
CONSUMER SUPPORT . . . . . . . . . .28
Write the model and serial numbers here:
Model #_________________
Serial # _________________
You can find them on a label when the door is open.
OWNER’S MANUAL
CVM1790
ESPAÑOL
Para consultar una version en español de este manual de instrucciones, visite nuestro sitio de internet GEAppliances.com.
GE is a trademark of the General Electric Company. Manufactured under trademark license.
49-40773-1 12-16 GEA

THANK YOU FOR MAKING GE APPLIANCES A PART OF YOUR HOME.
Whether you grew up with GE Appliances, or this is your first, we’re happy to have you in the family.
We take pride in the craftsmanship, innovation and design that goes into every GE Appliances product, and we think you will too. Among other things, registration of your appliance ensures that we can deliver important product information and warranty details when you need them.
Register your GE appliance now online. Helpful websites and phone numbers are available in the Consumer Support section of this Owner’s Manual. You may also mail in the pre-printed registration card included in the packing material.
2 |
|
49-40773-1 |

IMPORTANT SAFETY INFORMATION
READ ALL INSTRUCTIONS BEFORE USING THE APPLIANCE

 WARNING To reduce the risk of burns, electric shock, fire, injury to persons, or exposure to excessive microwave energy:
When using electrical appliances, basic safety precautions should be followed, including the following:
Ŷ 5HDG DOO LQVWUXFWLRQV EHIRUH XVLQJ WKLV DSSOLDQFH
Ŷ 5HDG DQG IROORZ WKH VSHFLILF SUHFDXWLRQV LQ WKH
PRECAUTIONS TO AVOID POSSIBLE EXPOSURE TO EXCESSIVE MICROWAVE ENERGY section on page 4.
Ŷ 8VH WKLV DSSOLDQFH RQO\ IRU LWV LQWHQGHG XVH DV described in this manual. Do not use corrosive chemicals or vapors in this appliance. This oven is specifically designed to heat, dry or cook food, and is not intended for laboratory or industrial use.
Ŷ 7KLV DSSOLDQFH PXVW RQO\ EH VHUYLFHG E\ TXDOLILHG service personnel. Contact nearest authorized service facility for examination, repair or adjustment.
INSTALLATION
Ŷ ,QVWDOO RU ORFDWH WKLV DSSOLDQFH RQO\ LQ DFFRUGDQFH with the provided installation instructions.
ŶThis appliance must be grounded. Connect only to properly grounded outlet. See “GROUNDING INSTRUCTIONS” found on page 5.
Ŷ 7KLV PLFURZDYH RYHQ LV 8/ OLVWHG IRU LQVWDOODWLRQ RYHU both gas (less than 60,000BTU) and electric ranges.
Ŷ 7KLV RYHU WKH UDQJH RYHQ LV GHVLJQHG IRU XVH RYHU UDQJHV QR ZLGHU WKDQ Ǝ ,W PD\ EH LQVWDOOHG RYHU ERWK JDV DQG HOHFWULF FRRNLQJ HTXLSPHQW
Ŷ Do not operate this appliance if it has a damaged power cord or plug, if it is not working properly, or if it has been damaged or dropped.
Ŷ .HHS FRUG DZD\ IURP KHDWHG VXUIDFHV
ŶDo not let cord hang over the edge of the table or counter
Ŷ 'R QRW LPPHUVH FRUG RU SOXJ LQ ZDWHU
Ŷ 'R QRW FRYHU RU EORFN DQ\ RSHQLQJV RQ WKH appliance.
Ŷ 'R QRW VWRUH WKLV DSSOLDQFH RXWGRRUV 'R QRW XVH WKLV product near water—for example, in a wet basement, near a swimming pool, near a sink or in similar locations.
Ŷ 'R QRW PRXQW WKLV DSSOLDQFH RYHU D VLQN
TO REDUCE THE RISK OF FIRE IN THE CAVITY:
Ŷ Do not overcook food. Carefully attend appliance when paper, plastic or other combustible materials are placed inside the oven to facilitate cooking.
Ŷ 5HPRYH ZLUH WZLVW WLHV DQG PHWDO KDQGOHV IURP paper or plastic containers before placing them in the oven.
Ŷ ,I PDWHULDOV LQVLGH WKH RYHQ LJQLWH NHHS WKH RYHQ door closed, turn the oven off and disconnect the power cord or shut off power at the fuse or circuit breaker panel.
Ŷ 'R QRW VWRUH DQ\ PDWHULDOV LQ WKLV RYHQ ZKHQ QRW LQ use. Do not leave paper products, cooking utensils or food in the cavity when not in use. All racks should be removed from oven when not in use.
Ŷ 'R QRW RSHUDWH WKH PLFURZDYH IHDWXUH ZLWKRXW IRRG LQ the oven.
Ŷ 'R QRW XVH WKH 6HQVRU )HDWXUHV WZLFH LQ VXFFHVVLRQ on the same food portion. If food is undercooked
DIWHU WKH ILUVW FRXQWGRZQ XVH &22. %< 7,0( IRU additional cooking time.
TO REDUCE THE RISK OF BURNS:
Ŷ %H FDUHIXO ZKHQ RSHQLQJ FRQWDLQHUV RI KRW IRRG 8VH pot holders and direct steam away from face and hands.
Ŷ 9HQW SLHUFH RU VOLW FRQWDLQHUV SRXFKHV RU SODVWLF bags to prevent build-up of pressure.
Ŷ %H FDUHIXO ZKHQ WRXFKLQJ WKH WXUQWDEOH GRRU UDFNV or walls of the oven which may become hot during use.
Ŷ /LTXLGV DQG FHUWDLQ IRRGV KHDWHG LQ WKH PLFURZDYH oven can present a risk of burn when removing them from the microwave. The potential for a burn is greater in young children, who should not be allowed to remove hot items from the microwave.
INFORMATION SAFETY
READ AND SAVE THESE INSTRUCTIONS
49-40773-1 |
3 |

SAFETY INFORMATION
IMPORTANT SAFETY INFORMATION
READ ALL INSTRUCTIONS BEFORE USING THE APPLIANCE

 WARNING Continued OPERATING
Ŷ $V ZLWK DQ\ DSSOLDQFH FORVH VXSHUYLVLRQ LV necessary when used by children.
Ŷ 'R QRW RSHUDWH WKH RYHQ ZLWKRXW WKH WXUQWDEOH LQ place. The turntable must be unrestricted so it can turn.
Ŷ 0DNH VXUH DOO FRRNZDUH XVHG LQ \RXU PLFURZDYH oven is suitable for microwaving. Most glass casseroles,cooking dishes, measuring cups, custard cups, pottery or china dinnerware which does not have metallic trim or glaze with a metallic sheen can be used in compliance with cookware manufacturer’s recommendations.
Ŷ 'R QRW VWRUH DQ\WKLQJ GLUHFWO\ RQ WRS RI WKH microwave oven surface when the microwave oven is in operation.
Ŷ 6RPH SURGXFWV VXFK DV ZKROH HJJV DQG VHDOHG containers—for example, closed jars—are able to explode and should not be heated in this oven.
Ŷ 'R QRW RYHUFRRN SRWDWRHV 7KH\ FRXOG GHK\GUDWH DQG catch fire, causing damage to your oven.
Ŷ 'R QRW FRYHU DQ\ SDUW RI WKH RYHQ ZLWK PHDO IRLO 7KLV will cause overheating of the oven.
Ŷ &RRN PHDW DQG SRXOWU\ WKRURXJKO\
PHDW WR DW OHDVW DQ ,17(51$/ WHPSHUDWXUH RI ) and poultry to at least an INTERNAL temperature
RI ) &RRNLQJ WR WKHVH WHPSHUDWXUHV XVXDOO\ protects against foodborne illness.
Ŷ 7KLV RYHQ LV QRW DSSURYHG RU WHVWHG IRU PDULQH XVH
CLEANING
Ŷ .HHS WKH RYHQ IUHH IURP JUHDVH EXLOGXS
Ŷ :KHQ FOHDQLQJ VXUIDFHV RI GRRU DQG RYHQ WKDW comes together on closing the door, use only mild, nonabrasive soaps, or detergents applied with a clean sponge or soft cloth. Rinse well.
SUPER HEATED WATER
Ŷ /LTXLGV VXFK DV ZDWHU FRIIHH RU WHD DUH DEOH WR be overheated beyond the boiling point without appearing to be boiling. Visible bubbling or boiling when the container is removed from the microwave oven is not always present. THIS COULD RESULT IN VERY HOT LIQUIDS SUDDENLY BOILING OVER WHEN THE CONTAINER IS DISTURBED OR A SPOON OR OTHER UTENSIL IS INSERTED INTO THE LIQUID.
Ŷ 7R UHGXFH WKH ULVN RI LQMXU\ WR SHUVRQV
'R QRW RYHUKHDW WKH OLTXLG
6WLU WKH OLTXLG ERWK EHIRUH DQG KDOIZD\ WKURXJK heating it.
-Do not use straight-sided containers with narrow necks.
-After heating, allow the container to stand in the microwave oven for a short time before removing the container.
-Use extreme care when inserting a spoon or other utensil into the container.
NOTICE: PACEMAKERS
Most pacemakers are shielded from interference from electronic products, including microwaves. However, patients with pacemakers may wish to consult their physicians if they have concerns.
STATE OF CALIFORNIA PROPOSITION 65 WARNINGS
 WARNING This product contains one or more chemicals known to the State of California to cause cancer, and birth defects or other reproductive harm.
READ AND SAVE THESE INSTRUCTIONS
4 |
49-40773-1 |

IMPORTANT SAFETY INFORMATION
READ ALL INSTRUCTIONS BEFORE USING THE APPLIANCE
PRECAUTIONS TO AVOID POSSIBLE EXPOSURE TO EXCESSIVE MICROWAVE ENERGY
(a)Do Not Attempt to operate this oven with the door open since open-door operation can result in harmful exposure to microwave energy. It is important not to defeat or tamper with the safety interlocks.
(b)Do Not Place any object between the oven front face and the door or allow soil or cleaner residue to accumulate on sealing surfaces.
(c)Do Not Operate the oven if it is damaged.
It is particularly important that the oven door close properly and that there is no damage to the:
(1)door (bent),
(2)hinges and latches (broken or loosened),
(3)door seals and sealing surfaces.
(d)The Oven Should Not be adjusted or repaired by
DQ\RQH H[FHSW SURSHUO\ TXDOLILHG VHUYLFH SHUVRQQHO
GROUNDING INSTRUCTIONS

 WARNING Improper use of the grounding plug can result in a risk of electric shock.
Ensure proper ground exists before use.
This appliance must be grounded. In the event of an electrical short circuit, grounding reduces the risk of electric shock by providing an escape wire for the electric current.
7KLV DSSOLDQFH LV HTXLSSHG ZLWK D SRZHU FRUG KDYLQJ D grounding wire with a grounding plug. The plug must be plugged into an outlet that is properly installed and grounded.
&RQVXOW D TXDOLILHG HOHFWULFLDQ RU VHUYLFH WHFKQLFLDQ LI the GROUNDING INSTRUCTIONS are not completely understood, or if doubt exists as to whether the appliance is properly grounded.
If the outlet is a standard 2-prong wall outlet, it is your personal responsibility and obligation to have it replaced with a properly grounded 3-prong wall outlet.
Do not under any circumstances cut or remove the third (ground) prong from the power cord.
Do not use an extension cord. If the power cord is too
VKRUW KDYH D TXDOLILHG HOHFWULFLDQ RU VHUYLFH WHFKQLFLDQ install an outlet near the appliance.
)RU EHVW RSHUDWLRQ SOXJ WKLV DSSOLDQFH LQWR LWV RZQ electrical outlet to prevent flickering of lights, blowing of fuse or tripping of circuit breaker.
THE VENT FAN
The fan will operate automatically under certain
FRQGLWLRQV VHH 9HQW )DQ VHFWLRQ 7DNH FDUH WR prevent the starting and spreading of accidental cooking fires while the vent fan is in use.
ŶClean the underside of the Advantium often. Do not allow grease to build up on the Advantium or the fan filters.
ŶIn the event of a grease fire on the surface units below the Advantium, smother a flaming pan on the surface unit by covering the pan completely with a lid, a cookie sheet or a flat tray.
ŶUse care when cleaning the vent fan filters. Corrosive cleaning agents, such as lye-based oven cleaners, may damage the filters.
ŶWhen preparing flaming foods under the Advantium, turn the fan on.
ŶNever leave surface units beneath your Advantium unattended at high heat settings. Boilovers cause smoking and greasy spillovers that may ignite and spread if the Advantium vent fan is operating. To
PLQLPL]H DXWRPDWLF IDQ RSHUDWLRQ XVH DGHTXDWH sized cookware and use high heat on surface units only when necessary.
READ AND SAVE THESE INSTRUCTIONS
INFORMATION SAFETY
49-40773-1 |
5 |

USING THE MICROWAVE: )HDWXUHV
Features
Throughout this manual, features and appearance may vary from your model.
1.Door Handle
2.Door Latch
3.Window with Metal Sheild
Screen allows cooking to be viewed while keeping microwaves confined in the oven.
4.Control Panel and Selector Dial
5.Removable Turntable
Do not operate the oven in the microwave mode without the turntable and turntable support seated and in place.
6.Removable Turntable Support
Do not operate the oven in the microwave mode without the turntable and turntable support seated and in place.
6 |
49-40773-1 |
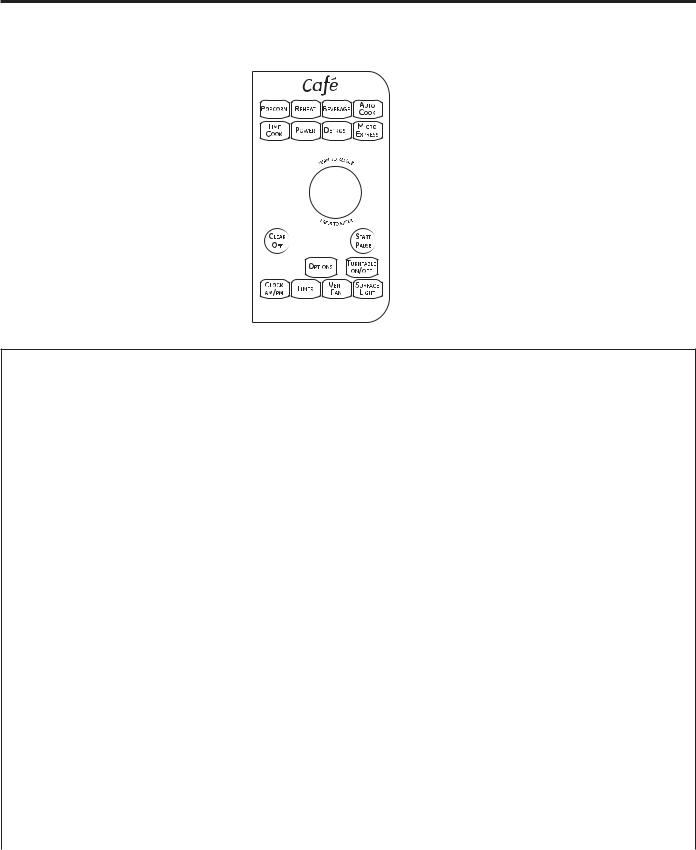
Controls
You can microwave by time or with the convenience features. Not all features on all models.
 Dial Selector
Microwave Cooking Time and Auto Features
Press |
Turn and push dial to enter |
|
TIME COOK |
Amount of cooking time |
|
Press once (Time Cook I) to micro- |
|
|
wave any time between 15 seconds |
|
|
and 95 minutes. |
|
|
Press twice (Time Cook II) to change |
|
|
power levels automatically during |
|
|
cooking. |
|
|
MICRO EXPRESS cook/Add 30 sec. |
Starts immediately! |
|
DEFROST |
|
|
3UHVV RQFH )DVW |
)RRG ZHLJKW XS WR RQH SRXQG |
|
Press twice (Auto) |
)RRG ZHLJKW XS WR VL[ SRXQGV |
|
Press three times (Time) |
Amount of defrosting time |
|
BEVERAGE |
Starts immediately! |
|
Press once (6-7 oz.) |
|
|
Press twice (8-9 oz.) |
|
|
Press three times (10-12 oz.) |
|
|
POWER Level |
Power level 1-10 |
|
Sensor Features |
|
|
Press |
Turn and push dieal to enter |
Option |
POPCORN |
Starts immediately! |
more/less time |
REHEAT |
Starts immediately! |
more/less time |
Press once (plate) |
|
|
Press twice (pasta) |
|
|
Press three times (1/2 to 1 cup) |
|
|
Press four times (1 to 2 cups) |
|
|
AUTO COOK |
)RRG 7\SH |
more/less time |
Controls MICROWAVE: THE USING
49-40773-1 |
7 |

USING THE MICROWAVE: 0LFURZDYLQJ)HDWXUHV
Microwaving Features
Cooking Tips
Your oven uses microwave energy to cook by a set time or weight, or automatically by sensor. Sensor microwave works by detecting the increasing humidity released during cooking. The oven automatically adjusts the cooking time to various types and amounts of food.
Cooking Method |
Heat Source |
Heat Conduction |
Benefits |
Microwave energy |
Microwave energy. |
Heat produced |
)DVW KLJK HIILFLHQF\ |
is distributed evenly |
|
within food by |
cooking. Oven and |
throughout the oven |
|
instant energy |
surroundings do |
for thorough, fast |
|
penetration. |
not get hot. |
cooking of food. |
|
|
Easy clean-up. |
Using the Dial
You can make selections on the oven by turning the dial and pressing it to enter the selection.
Pressing the dial can also be used in place of the
START/PAUSE EXWWRQ IRU TXLFNHU SURJUDPPLQJ RI WKH oven.
Power Level
The power level may be entered or changed immediately after entering the time for Time Cook, Time Defrost or Express Cook. The power level may also be changed during time countdown.
1.)LUVW IROORZ GLUHFWLRQV IRU Time Cook, Time Defrost or Express Cook.
2.Press the POWER button.
3.Turn the dial clockwise to increase and counterclockwise to decrease the power level. Press the dial to enter.
4.Press the START/PAUSE button to start cooking.
Variable power levels add flexibility to microwave cooking. The power levels on the microwave oven can be compared to the surface units on a range. Each power level gives you microwave energy a certain percent of the time. Power level 7 is microwave energy 70% of the time. Power level 3 is energy 30% of the time. Most cooking will be done on High (power level 10) which gives you 100% power. Power level 10 will
FRRN IDVWHU EXW IRRG PD\ QHHG PRUH IUHTXHQW VWLUULQJ rotating or turning over.
A lower setting will cook more evenly and need less stirring or rotating of the food. Some foods may have better flavor, texture or appearance if one of the lower settings is used. Use a lower power level when cooking foods that have a tendency to boil over, such as scalloped potatoes.
Rest periods (when the microwave energy cycles off)
JLYH WLPH IRU WKH IRRG WR ³HTXDOL]H´ RU WUDQVIHU KHDW WR the inside of the food. An example of this is shown with power level 3—the defrost cycle. If microwave energy did not cycle off, the outside of the food would cook before the inside was defrosted.
Here are some examples of uses for various power levels:
High 10: )LVK EDFRQ YHJHWDEOHV KHDWLQJ OLTXLGV
Med-High 7: Gentle cooking of meat and poultry; baking casseroles and reheating.
Medium 5: Slow cooking and tenderizing for stews and less tender cuts of meat.
Low 2 or 3: Defrosting; simmering; delicate sauces.
Warm 1: .HHSLQJ IRRG ZDUP VRIWHQLQJ EXWWHU
8 |
49-40773-1 |

Time and Auto Features
Time Cook
Time Cook I
Allows you to microwave for any time between 15 seconds and 95 minutes.
Power level 10 (High) is automatically set, but you may change it for more flexibility.
1.Press the TIME COOK button.
2.Turn the dial to set the cook time and press the dial to enter.
3.Change power level if you don’t want full power. (Press POWER. Turn the dial to select. Press the dial to enter.)
4.Press the dial or the START/PAUSE button to start cooking.
You may open the door during Time Cook to check the food. Close the door and press the dial or START/ PAUSE to resume cooking.
NOTE: You may change the cook time at any time during cooking by turning the dial. You may also change the power level by pressing the POWER button.
Time Cook II
Lets you change power levels automatically during cooking. Here’s how to do it:
1.Press the TIME COOK button.
2.Turn the dial to set the first cook time and press the dial to enter.
3.Change the power level if you don’t want full power. (Press POWER. Turn the dial to select. Press the dial to enter.)
4.Press the TIME COOK button again.
5.Turn the dial to set the second cook time and press the dial to enter.
6.Change the power level if you don’t want full power. (Press POWER. Turn the dial to select. Press the dial to enter.)
7.Press the dial or the START/PAUSE button to start cooking.
At the end of Time Cook I, Time Cook II counts down.
NOTE: You may change the cook time at any time during cooking by turning the dial. You may also change the power level by pressing the POWER button.
Micro Express Cook |
The power level will automatically be set at 10 and the |
|
7KLV LV D TXLFN ZD\ WR VHW DQG VWDUW FRRNLQJ |
||
oven will start immediately. |
||
in 30 second blocks each time the MICRO EXPRESS |
||
The power level can be changed as time is counting |
||
button is pressed. The cook timemay be changed by |
||
turning the dial at any time during cooking. |
down. Press the POWER button, turn the dial and press |
|
|
to enter. |
Time Defrost
Use Time Defrost to defrost for a selected length of time.
1.Press the DEFROST button three times.
2.Turn the dial to select the time you want. Press the dial to enter.
3.Press the START/PAUSE button to start defrosting.
4.Turn the food over if the oven signals TURN FOOD
OVER.
You may change the defrost time at any time during defrosting by turning the dial.
Power level is automatically set at 3, but can be changed.
<RX FDQ GHIURVW VPDOO LWHPV TXLFNO\ E\ UDLVLQJ WKH SRZHU level after entering the time. Power level 7 cuts the total defrosting time in about half; power level 10 cuts the total time to approximately 1/3. However, food will need more
IUHTXHQW DWWHQWLRQ WKDQ XVXDO
A dull thumping noise may be heard during defrosting. This is normal when oven is not operating at High power.
Defrosting Tips
Ŷ )RRGV IUR]HQ LQ SDSHU RU SODVWLF FDQ EH GHIURVWHG LQ the package. Closed packages should be slit, pierced
RU YHQWHG $)7(5 IRRG KDV SDUWLDOO\ GHIURVWHG 3ODVWLF storage containers should be partially uncovered.
Ŷ )DPLO\ VL]H SUHSDFNDJHG IUR]HQ GLQQHUV FDQ EH defrosted and microwaved. If the food is in a foil container, transfer it to a microwave-safe dish.
Ŷ )RRGV WKDW VSRLO HDVLO\ VKRXOG QRW EH DOORZHG WR VLW out for more than one hour after defrosting. Room temperature promotes the growth of harmful bacteria.
Ŷ )RU PRUH HYHQ GHIURVWLQJ RI ODUJHU IRRGV VXFK DV roasts, use Auto Defrost. Be sure large meats are completely defrosted before cooking.
Ŷ :KHQ GHIURVWHG IRRG VKRXOG EH FRRO EXW VRIWHQHG LQ all areas. If still slightly icy, return to the microwave very briefly, or let it stand a few minutes.
)HDWXUHV$XWRDQG7LPH MICROWAVE: THE USING
49-40773-1 |
9 |
 Loading...