


GE CYE22UP3MCD1, CYE22UP3MBD1, CYE22UP2MDS1, CYE22UP2MCS1, CYE22UP2MBS1 Owner’s Manual
...


 TM
TM
Owner's Manual and Installation Instructions
Bottom Freezer Refrigerators
Models that start with CFE are Standard Depth Models (SD)
Models that start with CYE and CWE are Counter Depth Models (CD)
Contents
Safety Information. . . . . . . . . . . . . . . . . . . . . . . . . . . . . . .3
Using the Refrigerator
Features. . . . . . . . . . . . . . . . . . . . . . . . . . . . . . . . . . . . . .6 Controls . . . . . . . . . . . . . . . . . . . . . . . . . . . . . . . . . . . . . .7 Dispenser. . . . . . . . . . . . . . . . . . . . . . . . . . . . . . . . . . . .11 Water Filter. . . . . . . . . . . . . . . . . . . . . . . . . . . . . . . . . . .12 Hot Water. . . . . . . . . . . . . . . . . . . . . . . . . . . . . . . . . . . .13 Single Serve Keurig K-Cup Brewer . . . . . . . . . . . . . . . .14 Appliance Communication . . . . . . . . . . . . . . . . . . . . . . .15 Fresh Food Storage Options . . . . . . . . . . . . . . . . . . . . .16 Climate Zone & Temperature
Controlled Drawer . . . . . . . . . . . . . . . . . . . . . . . . . . . . .18 Freezer. . . . . . . . . . . . . . . . . . . . . . . . . . . . . . . . . . . . . .20 Automatic Ice maker . . . . . . . . . . . . . . . . . . . . . . . . . . .21
Care And Cleaning . . . . . . . . . . . . . . . . . . . . . . . . . . . . .22
Replacing the Lights . . . . . . . . . . . . . . . . . . . . . . . . . . .23
Installation Instructions
Preparing to Install the Refrigerator. . . . . . . . . . . . . . . .24 Installing the Refrigerator. . . . . . . . . . . . . . . . . . . . . . . .26 Installing the Anti-Tip Bracket . . . . . . . . . . . . . . . . . . . .32 Installing the Water Line . . . . . . . . . . . . . . . . . . . . . . . .37
Troubleshooting Tips . . . . . . . . . . . . . . . . . . . . . . . . . . .18 Normal Operating Conditions. . . . . . . . . . . . . . . . . . . . .40 Truth or Myth . . . . . . . . . . . . . . . . . . . . . . . . . . . . . . . . .43
Limited Warranty. . . . . . . . . . . . . . . . . . . . . . . . . . . . . . .45
Consumer Support
RPWFE Water Filter Cartridge
Limited Warranty . . . . . . . . . . . . . . . . . . . . . . . . . . . . . .46 Performance Data Sheet . . . . . . . . . . . . . . . . . . . . . . . .47 Consumer Support. . . . . . . . . . . . . . . . . . . . . . . . . . . . .48
Write the model and serial numbers here:
Model # _______________________________
Serial # _______________________________
Find these numbers on a label on the left side, near the middle of the refrigerator compartment.
ENGLISH/FRANÇAIS/ESPAÑOL
Pub No. 49-60820 Rev. 1 01-19 GEA

THANK YOU FOR MAKING CAFÉ A PART OF YOUR HOME.
We take pride in the craftsmanship, innovation and design that goes into every Café product, and we think you will too. Among other things, registration of your appliance ensures that we can deliver important product information and warranty details when you need them.
Register your Café appliance now online. Helpful websites are available in the Consumer Support section of this Owner’s Manual. You may also mail in the pre-printed registration card included in the packing material.


 TM
TM
2 |
49-60820 Rev. 1 |
IMPORTANT SAFETY INFORMATION
READ ALL INSTRUCTIONS BEFORE USING THE APPLIANCE
WARNING To reduce the risk of fire, explosion, electric shock, or injury when using your refrigerator, follow these basic safety precautions:
Ŷ 7KLV UHIULJHUDWRU PXVW EH SURSHUO\ LQVWDOOHG and located in accordance with the Installation Instructions before it is used.
Ŷ 8QSOXJ WKH UHIULJHUDWRU EHIRUH PDNLQJ UHSDLUV replacing a light bulb, or cleaning.
NOTE: Power to the refrigerator cannot be disconnected by any setting on the control panel. NOTE: Repairs must be performed by a qualified Service Professional.
Ŷ 5HSODFH DOO SDUWV DQG SDQHOV EHIRUH RSHUDWLQJ Ŷ 'R QRW XVH DQ H[WHQVLRQ FRUG
Ŷ 'R QRW VWRUH RU XVH JDVROLQH RU RWKHU IODPPDEOH vapors and liquids in the vicinity of this or any other appliance.
Ŷ 'R QRW VWRUH H[SORVLYH VXEVWDQFHV VXFK DV DHURVRO cans with a flammable propellant in this appliance.
Ŷ 7R SUHYHQW VXIIRFDWLRQ DQG HQWUDSPHQW KD]DUGV to children, remove the fresh food and freezer doors from any refrigerator before disposing of it or discontinuing its use.
Ŷ 7R DYRLG VHULRXV LQMXU\ RU GHDWK FKLOGUHQ VKRXOG QRW stand on, or play in or with the appliance.
Ŷ &KLOGUHQ DQG SHUVRQV ZLWK UHGXFHG SK\VLFDO VHQVRU\ or mental capabilities or lack of experience and knowledge can use this appliance only if they are supervised or have been given instructions on safe use and understand the hazards involved.
Ŷ 7KLV DSSOLDQFH LV LQWHQGHG WR EH XVHG LQ KRXVHKROG and similar applications such as: staff kitchen areas
LQ VKRSV RIILFHV DQG RWKHU ZRUNLQJ HQYLURQPHQWV IDUP KRXVHV E\ FOLHQWV LQ KRWHOV PRWHOV EHG
EUHDNIDVW DQG RWKHU UHVLGHQWLDO HQYLURQPHQWV catering and similar non-retail applications.
Ŷ 'R QRW DSSO\ KDUVK FOHDQHUV WR WKH UHIULJHUDWRU
Certain cleaners will damage plastic which may cause parts such as the door or door handles to detach unexpectedly. See the Care and Cleaning section for detailed instructions.
Ŷ &RQQHFW WR SRWDEOH ZDWHU VXSSO\ RQO\ ZLWK ZDWHU pressure maximum of 120 psi (827 kilopascals).

 CAUTION To reduce the risk of injury when using your refrigerator, follow these basic safety precautions.
Ŷ 'R QRW FOHDQ JODVV VKHOYHV RU FRYHUV ZLWK ZDUP water when they are cold. Glass shelves and covers may break if exposed to sudden temperature changes or impact, such as bumping or dropping. Tempered glass is designed to shatter into many small pieces if it breaks.
Ŷ .HHS ILQJHUV RXW RI WKH ³SLQFK SRLQW´ DUHDV clearances between the doors and between the doors and cabinet are necessarily small. Be careful closing doors when children are in the area.
Ŷ 'R QRW UHIUHH]H IUR]HQ IRRGV ZKLFK KDYH WKDZHG completely.
Ŷ ,Q UHIULJHUDWRUV ZLWK DXWRPDWLF LFHPDNHUV DYRLG contact with the moving parts of the ejector mechanism, or with the heating element that releases the cubes. Do not place fingers or hands on the automatic ice making mechanism while the refrigerator is plugged in.
INSTALLATION
 WARNING
  EXPLOSION HAZARD
Keep flammable materials and vapors, such as gasoline, away from refrigerator. Failure to do so can result in fire, explosion, or death.
WARNING |
TIP OVER HAZARD. |
|
Built-in style models (models CYE and CWE) are top heavy, especially with any doors open. These models must be secured with the anti-tip floor bracket to prevent tipping forward, which could result in death or serious injury. Read and follow the entire installation instructions for installing the anti-tip floor bracket packed with your refrigerator.
READ AND SAVE THESE INSTRUCTIONS
INFORMATION SAFETY
49-60820 Rev. 1 |
3 |
SAFETY INFORMATION
IMPORTANT SAFETY INFORMATION
READ ALL INSTRUCTIONS BEFORE USING THE APPLIANCE
CONNECTING ELECTRICITY

 WARNING
 ELECTRICAL SHOCK HAZARD
Plug into a grounded 3-prong outlet
Do not remove the ground prong
Do not use an adapter
Do not use an extension cord.
Failure to follow these instructions can result in death, fire, or electrical shock.
Do not, under any circumstances, cut or remove the third (ground) prong from the power cord. For personal safety, this appliance must be properly grounded.
The power cord of this appliance is equipped with a 3-prong (grounding) plug which mates with a standard 3-prong (grounding) wall outlet to minimize the possibility of electric shock hazard from this appliance.
Have the wall outlet and circuit checked by a qualified electrician to make sure the outlet is properly grounded.
Where a standard 2-prong wall outlet is encountered, it is your personal responsibility and obligation to have it replaced with a properly grounded 3-prong wall outlet. Do not use an adapter.
The refrigerator should always be plugged into its own individual electrical outlet which has a voltage rating that matches the rating plate.
A 115 Volt AC, 60 Hz, 15or 20-amp fused, grounded electrical supply is required. This provides the best performance and also prevents overloading house wiring circuits which could cause a fire hazard from overheated wires.
Never unplug your refrigerator by pulling on the power cord. Always grip plug firmly and pull straight out from the outlet.
Immediately discontinue use of a damaged supply cord. If the supply cord is damaged, it must be replaced by a qualified service professional with an authorized service part from the manufacturer.
When moving the refrigerator away from the wall, be careful not to roll over or damage the power cord.
PROPER DISPOSAL OF YOUR OLD REFRIGERATOR

 WARNING SUFFOCATION AND ENTRAPMENT HAZARD
Failure to follow these disposal instructions can result in death or serious injury
IMPORTANT: Child entrapment and suffocation |
Before You Throw Away Your Old Appliance |
|
are not problems of the past. Junked or abandoned |
Ŷ 7DNH RII WKH IUHVK IRRG DQG IUHH]HU GRRUV |
|
refrigerators are still dangerous even if they will sit |
Ŷ Leave the shelves in place so that children may not |
|
IRU ³MXVW D IHZ GD\V ´ ,I \RX DUH JHWWLQJ ULG RI \RXU ROG |
||
easily climb inside. |
||
refrigerator, please follow the instructions below to help |
||
|
||
prevent accidents. |
|
Refrigerant and Foam Disposal:
Dispose of appliance in accordance with Federal and Local Regulations. Flammable insulation material used requires special disposal of your appliance. Contact your local authorities for the environmentally safe disposal of your appliance.
READ AND SAVE THESE INSTRUCTIONS
4 |
49-60820 Rev. 1 |

IMPORTANT SAFETY INFORMATION
READ ALL INSTRUCTIONS BEFORE USING THE APPLIANCE
HOT WATER DISPENSER
 WARNING
 Scalding Hazard.
The hot water dispenser is capable of heating water to a temperature of approximately 185°F (85°C). Water temperatures above 125°F (52°C) can cause severe burns or death from scalding. Children, the disabled, and the elderly are at highest risk of being scalded.
Use this appliance only for its intended purpose as described in this Owner’s Manual. To reduce the risk of severe burns, scald injuries, or death when using your hot water dispenser, the instructions below must be followed:
ŶDo not leave container unattended around children during or after hot water dispense.
ŶDo not permit children to use the hot water dispenser.
ŶThe hot water dispensing knob requires both twist and push motions in order to reduce the risk of hot water being dispensed unintentionally or by small children. Do not tamper with or modify the hot water dispensing knob.
ŶThe water coming from the dispenser is very hot.
8VH H[WUHPH FDXWLRQ ZKHQ GLVSHQVLQJ DQG GULQNLQJ water. Allow water to cool to a drinkable temperature before drinking. Your container should be close to the dispensing point to minimize the splashing of hot water.
ŶWhen dispensing hot water, the container can become
YHU\ KRW 8VH D WHPSHUDWXUH LQVXODWLQJ FRQWDLQHU VXFK
DV FHUDPLF RU IRDP 8VLQJ FRQWDLQHU PDWHULDOV VXFK DV paper or plastic may result in a burn while holding the cup. Do not use glass containers, as thermal shock can cause the container to break and may result in scalding or lacerations.
ŶAlways follow the formula manufacturer’s instructions for preparation of baby formula. When dispensing
ZDWHU EHORZ Û) FP DOZD\V WHVW WKH temperature of the water before drinking.
ŶThe first time the hot water feature is used, confirm if you live above 5000 feet (1524 meters) (high altitude). This limits the temperature of the hot water system to avoid boiling. To access the high altitude selection, go to the settings menu if available or for other models press Fridge and Door Alarm together to cycle from Hi AL to Lo AL (high altitude to low altitude).
ŶA newly installed water filter cartridge will cause water to spurt from the dispenser. Run 2 gallons (7.57 liters) of water through the cold water dispenser (about 5
PLQXWHV WR UHPRYH DLU IURP WKH V\VWHP 8QWLO WKLV DLU is removed from the system through the cold water dispenser, DO NOT use the hot water dispenser as it may result in spurting of hot water and lead to hot water scalding.
ŶDo not use with water that is microbiologically unsafe or of unknown quality.
ŶThe hot water dispenser is designed to only dispense water. Do not attempt to heat or dispense anything other than water. Do not attempt to disassemble or clean the tank.
ŶDo not modify the hot water system. Service with factory replacement part only.
INFORMATION SAFETY
READ AND SAVE THESE INSTRUCTIONS
49-60820 Rev. 1 |
5 |

USING THE REFRIGERATOR: Features
Features
Space-saving ice maker*
Ice maker and bin are located on the door creating more usable storage space.
 Showcase LED lighting
LED lighting is positioned throughout the interior to spotlight areas in the refrigerator. LEDs are located under the fresh food door to light the freezer when opened.
Drop-down tray*
Allows for extra door storage when you need it and tucks away when you don’t.
Full-width temperature controlled drawer
Adjustable temperature control bin that can accommodate larger items.
 Dairy bin
Separate compartment for your items.
 Ice bin/Ice maker*
Ice maker with ice storage bins.
QuickSpace™ shelf*
Functions as a normal full-sized shelf when needed and easily slides back to store tall items below.
 Spillproof shelves
Designed to capture your spills for easier clean up.
 Anti-slip Mat
Liner that captures spills, keeps containers from shifting when the door is opened and is easily removable for cleaning.
 Removable door bin
Can be removed for those with a wall limiting the door opening.
 Climate zone bin
Separate bins for produce storage.
 Water filter
Filters water and ice.
* Select models only.
6 |
49-60820 Rev. 1 |
Features
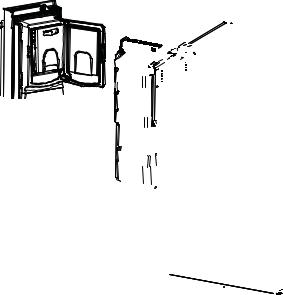
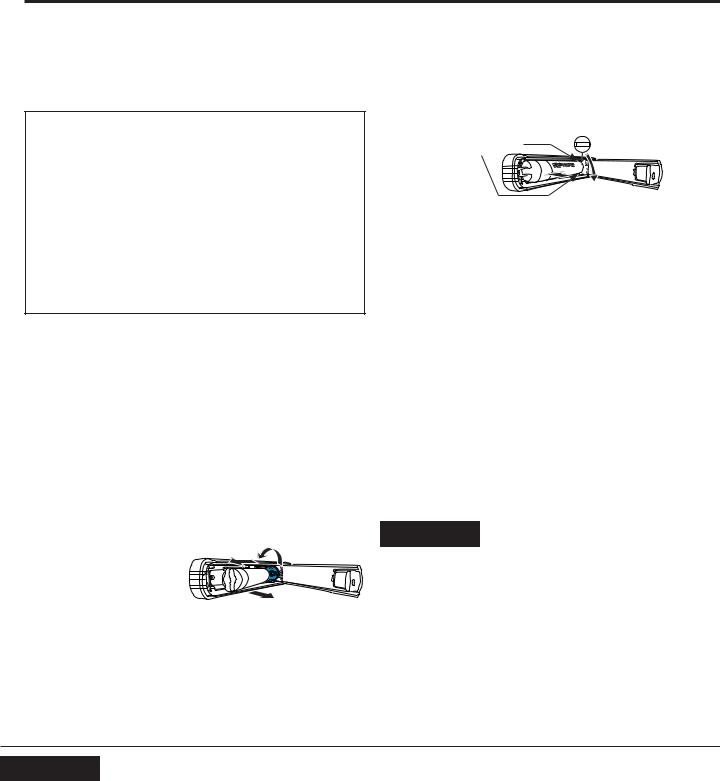
Door ice bin*
1.Open left fresh food door.
2.Pull down latch to release bin door.
8VLQJ KDQGKROG OLIW LFH EXFNHW up and out to clear locators in bottom of bin.
4.To replace the ice bucket, set it on the guide brackets and push until the ice bucket seats properly.
5.If bucket cannot be replaced, rotate the Ice Bucket Fork 1/4 turn clockwise.
Latch
Ice bucket
Drop down dairy bin*
1.Open right fresh food door.
2.Depress both buttons on lower sides and bin will drop down.
3.Reverse to reinstall.
Ice/water filter
Remove filter/bypass plug
Push the indent on the cover and open filter door. If your unit is equipped, pull out on filter/ bypass plug and pull straight back to remove.
Installing the filter cartridge
Push the indent at the bottom of the cover and open. Lift door and align tabs on filter to filter/holder and push filter into place.
NOTE: Certified to reduce chlorine-resistant cysts, lead, select pharmaceuticals, and more.
WARNING Scalding Hazard.*
8VH RI WKH KRW ZDWHU GLVSHQVHU SULRU WR purging air from the system may result in spurting of hot water and lead to hot water
VFDOGLQJ )ROORZ WKH LQVWUXFWLRQV IRU ³:DWHU
)LOWHU 6WHS ´ RQ SDJH WR SXUJH DOO DLU from the system through the cold water dispenser prior to using the hot water dispenser.
The first time the hot water feature is used, confirm if you live above 5000 feet (1524 meters) (high altitude). This limits the temperature of the hot water system to avoid boiling. To access the high altitude selection, see Controls.
*Select Models Only
Drop tray (tray open)
Features REFRIGERATOR: THE USING
49-60820 Rev. 1 |
7 |
USING THE REFRIGERATOR: Controls
Controls
CYE/CFE Control Style |
CWE Control Style |
Lock |
Temperature |
Express Modes |
Settings |
|
|
Precise |
|
Controls |
Water |
|
Fill |
|
|
|
|
Light |
|
|
Hot |
|
|
|
Water |
|
Water |
Crushed |
Cubed |
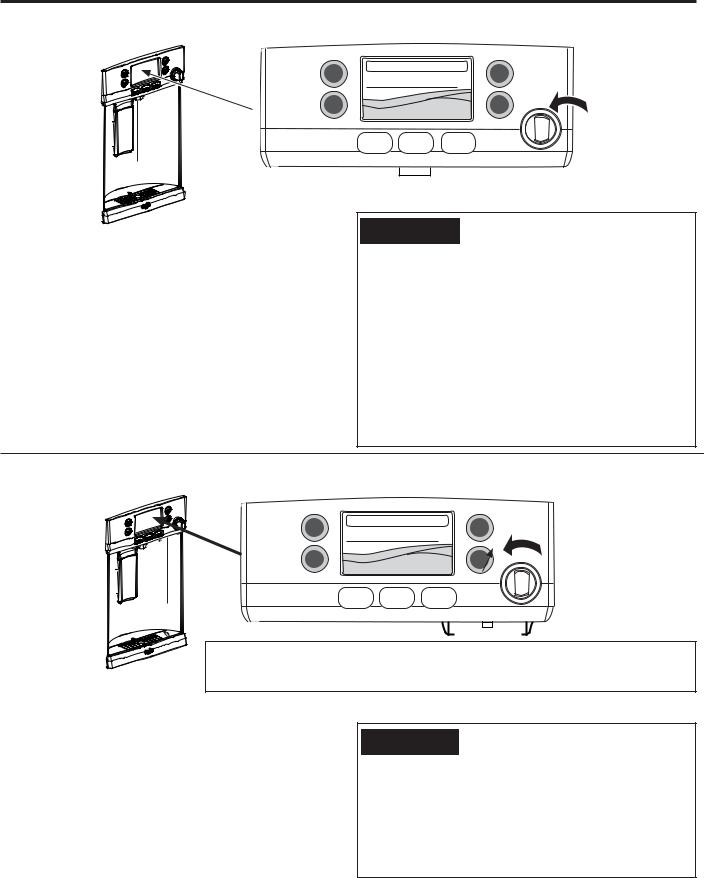
Changing the Temperature for Control Style CYE/CFE
To Change the Refrigerator Temperature: Access By: Temperature Button Temperature
Activate By: %HORZ WKH ZRUG ³5HIULJHUDWRU´ XVH WKH DUURZV to select the desired temperature. Press DONE when finished to return to HOME screen.
To Change the Freezer Temperature:
Access By: Temperature Button Temperature
Activate By: %HORZ WKH ZRUG ³)UHH]HU´ XVH WKH DUURZV WR select the desired temperature. Press DONE when finished to return to HOME screen.
To turn OFF cooling system, access SETTINGS from the HOME screen. Page over and tap COOLING SYSTEM ON. Press DONE to return to HOME screen.
To turn ON cooling system, access SETTINGS from the HOME screen. Page over and tap COOLING SYSTEM OFF. Press DONE to return to HOME screen.
Turning the cooling system off stops the cooling to refrigerator, but it does not shut off the electrical power.
NOTE: For optimal temperature performance, we recommend to avoid placing food or other items directly at the air flow vents or the fresh food air tower, thus blocking the air flow.
Changing Temp. for Control Style CWE
Temperature Display is located on inside of left-hand refrigerator door. To change the temperature, press and release the REFRIGERATOR or FREEZER pad. The ACTUAL TEMP light will come on and the display will show the actual temperature. To change the temperature, tap either the
REFRIGERATOR or FREEZER pad until the desired temperature is displayed.
To turn OFF cooling system, press and hold the REFRIGERATOR and FREEZER pads simultaneously for 3 seconds. When the cooling system is OFF the display should read OFF.
To turn ON cooling system, press either REFRIGERATOR or FREEZER pad. The display will show the preset temperature settings of 37°F (3°C) for refrigerator and 0°F (-18°C) for freezer. Turning the
cooling system off stops the cooling to refrigerator, but it does not shut off the electrical power.
8 |
49-60820 Rev. 1 |
Controls
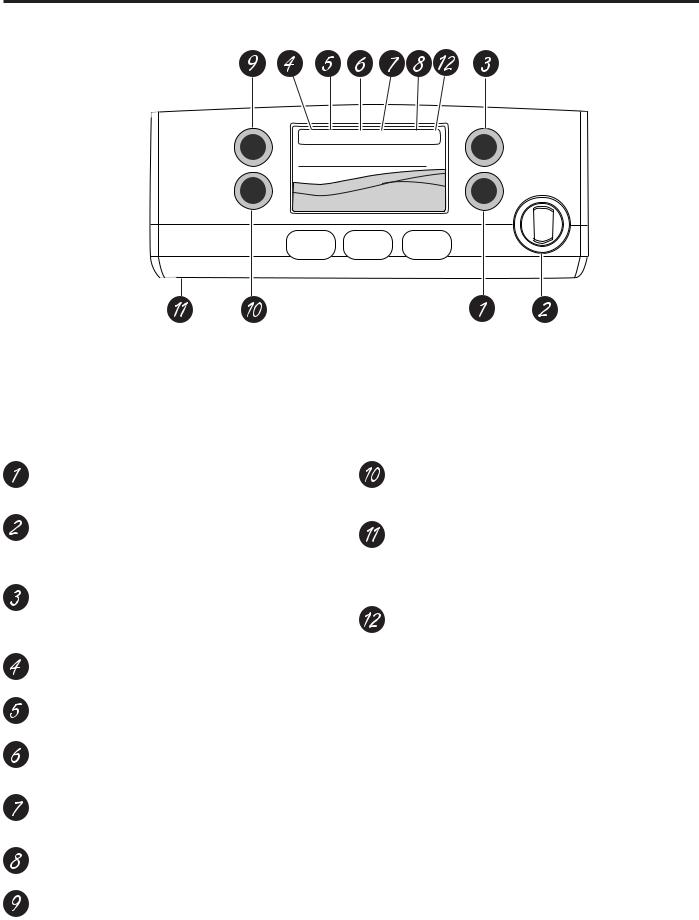
Control Style A, External Controls CFE/CYE Models
Lock |
Temperature |
Express Modes |
Settings |
|
|
Precise |
|
Controls |
Water |
|
Fill |
|
|
|
|
Light |
|
|
Hot |
|
|
|
Water |
|
Water |
Crushed |
Cubed |
NOTE: The refrigerator is shipped with protective film covering the temperature controls. If this film was not removed during installation, remove it now.
The temperature controls are preset in the factory at 37°F for the refrigerator compartment and 0°F for the freezer compartment. Allow 24 hours for the temperature to stabilize to the preset recommended settings.
The temperature controls can display both the SET temperature as well as the actual temperature in the refrigerator and freezer. The actual temperature may vary slightly from the SET temperature based on usage and operating environment.
Hot Water
Dispenses up to 10 ounces of filtered hot water from user selected ranges of 90°F to 185°F.
Hot Water Knob
Illuminates to indicate hot water is ready. Dispenses with two motions: a counter-clockwise twist and then push to dispense.
Precise Fill
Precisely dispenses filtered water in accurate measurements in ounces, cups, quarts, or liters using paddle.
Refrigerator temp control
Adjust freezer compartment temperature.
Fresh food temp control
Adjust fresh food compartment temperature.
TurboFreeze™ setting
Activate TurboFreeze to quickly restore freezer temperatures after frequent door openings.
TurboCool™ setting
Activate TurboCool to quickly restore fresh food temperature after frequent door openings.
Humidity setting
Humidity setting can be normal or high.
Lock controls
Press and hold 3 seconds to lock out ice and water dispenser and all feature and temperature buttons.
LED dispenser light
LED lighting that can be turned on/off to light your dispenser.
Photo Upload
,QVHUW 86% PHPRU\ VWLFN WR XSORDG SHUVRQDO SKRWRV to the refrigerator LCD screen. LCD will provide on screen prompts to load and view slideshow. Make
VXUH WKH SKRWRV DUH LQ WKH URRW GLUHFWRU\ LQ \RXU 86%
Additional Settings
•Connected Home ready
•Slideshow
•Reset filter
•Ice maker on/off
•Door alarm
•Sound control
•Cooling system On/Off
•Metric/English units
•Altitude
Additional Modes
•Sabbath Mode
Press and hold lock & light simultaneously for 3 seconds to enter/exit Sabbath mode. Sabbath Mode will turn off or dim interior lights, temperature control and advanced features. Compressor will run on a timed defrost when in Sabbath mode.
Controls REFRIGERATOR: THE USING
49-60820 Rev. 1 |
9 |
USING THE REFRIGERATOR: Controls
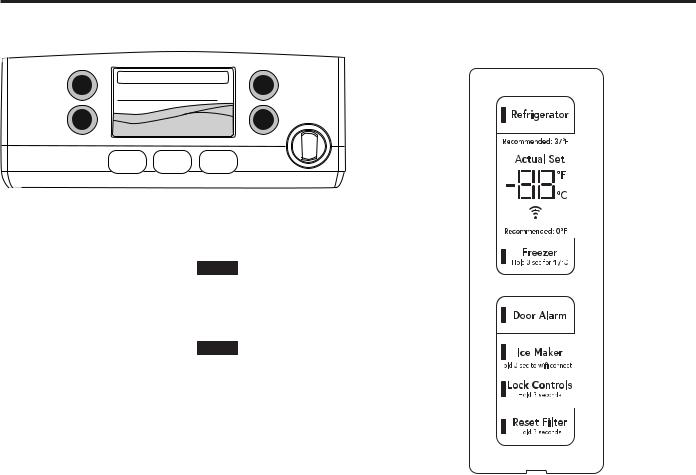
Controls
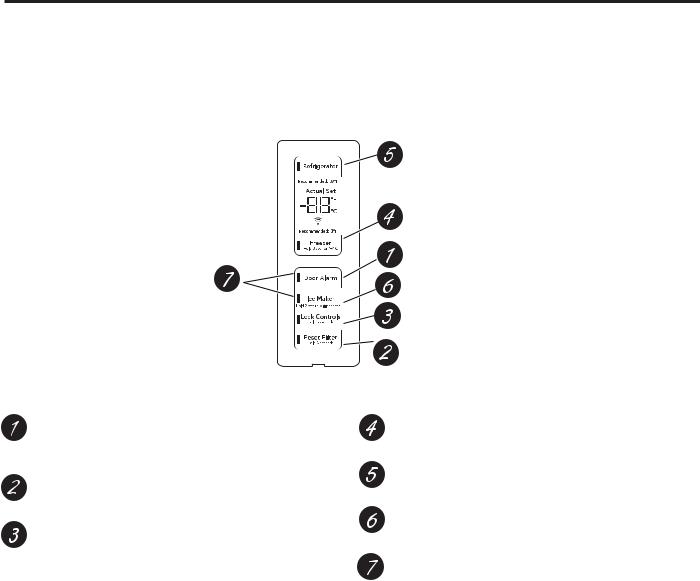
Controls Style B, Internal Controls CWE Models
Door Alarm
Sounds to alert when the freezer or fresh food doors have been left open.
Reset Filter
Hold for 3 seconds after replacing filter.
Lock Controls
Press and hold 3 seconds to lock out ice and water dispenser and all feature and temperature buttons.
Freezer temp control
Adjust freezer compartment temperature
Refrigerator temp control
Adjust fresh food compartment temperature
Ice maker setting
Turn your ice makers on/off.
Sabbath Mode
Press and hold Door Alarm and Ice Maker simultaneously for 5 seconds to enter/exit Sabbath Mode.
10 |
49-60820 Rev. 1 |
Dispenser (CFE & CYE Models Only)
Water & Ice Dispenser
(See About the controls with temperature settings
& About the control features)
Dispenser tray

 WARNING LACERATION HAZARD
ŶNever put fingers or any other object into ice crusher discharge opening. Doing so can result in contacting the ice crushing blades and lead to serious injury or amputation
Ŷ8VH D VWXUG\ JODVV ZKHQ GLVSHQVLQJ LFH $ GHOLFDWH glass may break and result in personal injury.
If no water is dispensed when the refrigerator is first installed, there may be air in the water line system. Press the dispenser paddle for at least five minutes to remove trapped air from the water line and to fill the water system. To flush out impurities in the water line, throw away the first six full glasses of water.
To remove Dispenser Tray
ŶPull Dispenser Tray out until it stops.
ŶLocate tab in the center on the bottom and push up.
ŶPull Dispenser Tray assembly out.
ŶLift metal Dispenser Tray out at center notch to clean.
To reinstall Dispenser Tray
ŶPlace the Dispenser Tray cover on top of catch tray and position under the two plastic retainers on either side.
ŶCenter Dispenser tray, and align with center guides.
ŶPush in until is firmly in place.
Important Facts About Your Dispenser
ŶDo not add ice from trays or bags to the door ice maker bucket. It may not crush or dispense.
ŶAvoid overfilling glass with ice and use of narrow glasses. Backed-up ice can jam the chute or cause the door in the chute to freeze shut. If ice is blocking the chute remove the ice bucket, poke it through with a wooden spoon.
ŶBeverages and foods should not be quick-chilled in the door ice maker bin. Cans, bottles or food packages in the storage drawer may cause the ice maker or auger to jam.
ŶTo keep dispensed ice from missing the glass, put the glass close to, but not touching, the dispenser opening.
ŶSome crushed ice may be dispensed even though you selected CUBED ICE. This happens occasionally when a few cubes accidentally get directed to the crusher.
ŶAfter crushed ice is dispensed, some water may drip from the chute.
ŶSometimes a small mound of snow will form on the door in the ice chute. This condition is normal and usually occurs when you have dispensed crushed ice repeatedly. The snow will eventually evaporate.
To Use the Internal Water Dispenser (CWE Models Only)
The water dispenser is located on the left wall inside the refrigerator compartment.
To dispense water:
1.Hold the glass against the recess.
2.Push the water dispenser button.
3.Hold the glass underneath the dispenser for 2–3 seconds after releasing the dispenser button. Water may continue to dispense after the button is released.
If no water is dispensed when the refrigerator is first installed, there may be air in the water line system. Press the dispenser button for at least 5 minutes to remove trapped air from the water line and to fill the water system. During this process, the dispenser noise may be loud as the air is purged from the water line system. To flush out impurities in the water line, throw away the first 6 glassfuls of water.
NOTE: To avoid water deposits, the dispenser should be cleaned periodically by wiping with a clean cloth or sponge.
Dispenser REFRIGERATOR: THE USING
49-60820 Rev. 1 |
11 |
USING THE REFRIGERATOR: Water Filter Cartridge - RPWFE
Water Filter Cartridge - RPWFE
Water Filter Cartridge
The water filter cartridge is located in the fresh food interior on the left side wall, near the top.
Select models use radio frequency identification (RFID) to detect leaks and monitor filter status. The RFID technology is certified by the FCC.
FCCID: ZKJ-EBX1532P001 ICID:
10229A-EBX1532P001
“This device complies with part 15 of the FCC Rules. Operation is subject to the following two conditions:
(1)This device may not cause harmful interference, and
(2)this device must accept any interference received, including interference that may cause undesired operation.”
“This device complies with Industry Canada licenceexempt RSS standard(s). Operation is subject to the following two conditions: (1) this device may not cause interference, and (2) this device must accept any interference, including interference that may cause undesired operation of the device.”
When to Replace the Filter Cartridge
The filter cartridge should be replaced every six months or earlier if 170 gallons (643.52 liters) of water has been dispensed or the flow of water to the dispenser or icemaker decreases.
Touch Screen Models: A filter status message will appear on the screen when the water filter needs to be replaced. The filter status will automatically update when the filter is replaced.
Non-touch Screen Models: A filter indicator light will illuminate on the screen when the water filter needs to be replaced.
Removing the Filter Cartridge/Bypass Plug
1. Remove the old |
2 |
|
cartridge or bypass plug |
|
|
by opening the filter |
|
|
door and pulling on the |
1 |
|
bottom of the cartridge/ |
||
|
bypass plug to disengage it from the filter clips. Swing the cartridge/bypass plug outward until you hear
the 'click' of the cartridge holder engaging with the bracket.
2.Twist the cartridge/bypass plug one-quarter turn counter-clockwise. After twisting, remove the cartridge/ bypass plug by pulling it away from the cartridge holder. A small amount of water may drip out.
Installing the Filter Cartridge/Bypass Plug
1.Align the filter cartridge/bypass plug with the cartridge holder with the word "FRONT" facing the top of the unit. Push the cartridge/bypass plug toward the rear of the unit until it is fully seated. Twist the filter cartridge/ bypass plug clockwise one-quarter turn, until the word
"FRONT" is facing outward.
Red indicators should not be
visible FRONT
4


 3
3
2.While continuing to ensure cartridge/bypass plug is fully seated in the holder, gently swing the filter inward until it is in position. If filter will not swing easily, check to ensure filter is properly aligned and fully seated within the cartridge holder. The RED indicators should not be visible.
NOTE: It is normal for water to appear discolored during the initial system flush. Water color will return to normal after first few minutes of dispensing.
Filter Bypass Plug
To reduce the risk of property damage due to water leakage, you MUST use the filter bypass plug when a replacement filter cartridge is not available. Some models do not come equipped with the filter bypass plug. To obtain a free bypass plug, visit us on-line at cafeappliances.com/service. In Canada, visit cafeappliances.ca/service. The dispenser and
icemaker will not operate without either the filter or the bypass plug installed. The bypass plug is installed in the
VDPH ZD\ DV D ILOWHU FDUWULGJH ´
 WARNING
 SCALDING HAZARD.*
8VH RI WKH KRW ZDWHU GLVSHQVHU SULRU WR SXUJLQJ DLU IURP the system may result in spurting of hot water and lead to hot water scalding. Follow the instructions above to purge all air from the system through the cold water dispenser prior to using the hot water dispenser.
*Select Models Only

 WARNING To reduce the risk associated with choking, do not allow children under 3 years of age to have access to small parts during the installation of this product. The disposable filter cartridge should be replaced every 6 months at the rated capacity, or sooner if a noticeable reduction in flow rate occurs.
For the maximum benefit of your filtration system, GE Appliances, a Haier company, recommends the use of GE
$SSOLDQFHV EUDQGHG ILOWHUV RQO\ 8VLQJ *( $SSOLDQFHV EUDQGHG ILOWHUV LQ &DIp UHIULJHUDWRUV SURYLGHV RSWLPDO SHUIRUPDQFH and reliability. Our filters meet rigorous industry NSF standards for safety and quality that are important for products that are filtering your water. There is no assurance that brands other than GE Appliances filters meet our standards for quality, performance and reliability.
If you have questions, or to order additional filter cartridges, visit gewaterfilters.com. In Canada, visit cafeappliances.ca/service or consult the yellow pages for the nearest Camco Service Center.
12 |
49-60820 Rev. 1 |
Hot Water
Hot Water Only Models
Lock |
Temperature |
Express Modes |
Settings |
|
|
Precise |
|
Controls |
Water |
|
Fill |
|
|
|
|
Light |
|
|
Hot |
|
|
|
Water |
Water Crushed Cubed
Important Facts about HOT WATER
To Use Hot Water Dispenser
ŶPress HOT WATER button.
ŶSelect desired water temperature on the LCD screen (90, 150, 170, 185, or Custom).
ŶWhen hot water is ready (indicated on the screen and by a beeping sound) hold container with left hand centered in the recess under the spout.
ŶTo dispense water, rotate the hot water knob counterclockwise and then push it in. The knob must be held in during dispense.

 WARNING
 SCALDING HAZARD.
ŶThe water coming from the dispenser is very hot and can cause scalds or burns. Read all warnings on page 5 prior to use.
ŶAlways use a container that is suitable for hot liquids (ceramic, foam, etc.)
ŶThe maximum single hot water dispense amount is 10 oz. Additional hot water can be dispensed by restarting the hot water feature through the LCD screen.
ŶHOT WATER works best with household water pressure of 40 to 100 psi.
ŶHOT WATER will time out if unused and may require a short reheat time.
For Models with K-Cup Brewing System
Lock |
Temperature |
Express Modes |
Settings |
|
|
Precise |
|
Controls |
Water |
|
Fill |
|
|
|
|
Light |
|
|
Hot |
|
|
|
Water |
Water Crushed Cubed
On Café refrigerators equipped with the K-Cup brewing system, ALL HOT WATER is dispensed from stainless steel dispense tube located under the right side of the control panel. The hot water is not dispensed from the center of the recess area.
To Use Hot Water Dispenser
ŶPress HOT WATER button.
ŶSelect desired water temperature on the LCD screen (90, 150, 170, 185, or Custom).*
Ŷ ,I VHOHFWLQJ ³.HXULJ . &XS 3RG´ WKH KRW ZDWHU V\VWHP will change into K-Cup mode. See page 14 for K-Cup mode instructions.
ŶWhen hot wa ter is ready (indicated on the screen and by a beeping sound) hold container with left hand centered in the recess under the spout.
ŶTo dispense water, rotate the hot water knob counterclockwise and then push it in. The knob must be held in during dispense.
Important Facts about HOT WATER

 WARNING
  Scalding Hazard
ŶSee Hot Water Warning: Scalding Hazard above.
ŶDo no permit children to use the brewer.
ŶAlways use a container that is suitable for hot liquids (ceramic, foam, etc.)
ŶDo not brew into a mug made of glass. Doing so may cause the glass to crack or break.
Water Hot REFRIGERATOR: THE USING
49-60820 Rev. 1 |
13 |
USING THE REFRIGERATOR: Single Serve Keurig K-Cup Brewer
Single Serve Keurig K-Cup Brewer
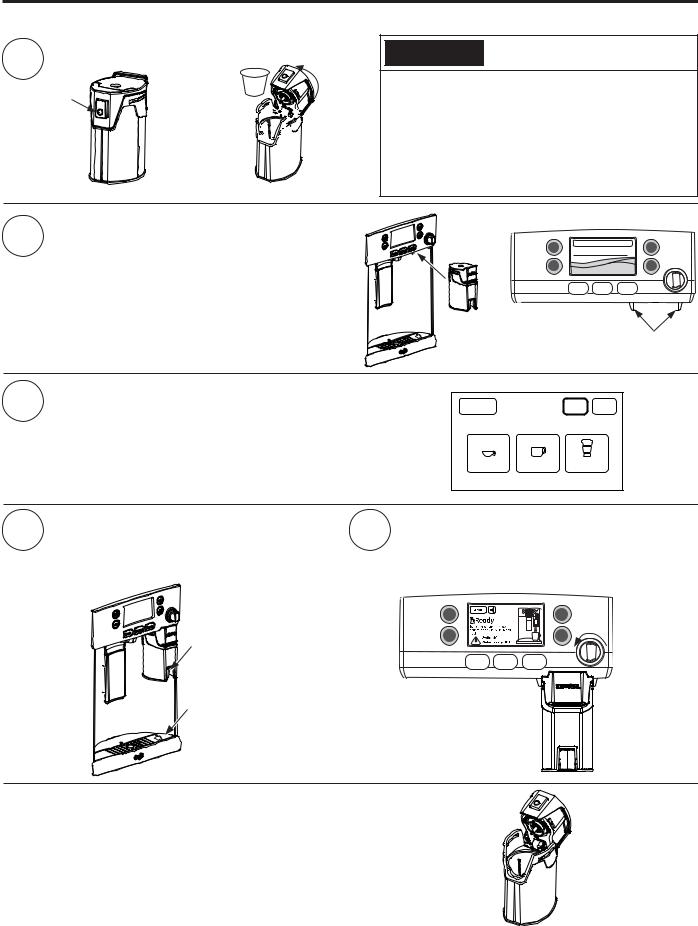
How to use the single serve dispenser
1Load Keurig K-Cup into brewer.
|
Drop K-Cup |
Push to |
into brewer and |
open |
press down |
|
firmly. |


 Close brewer.


 Lid will click


 when secure.

 CAUTION
 Cut/Puncture Hazard.
•There are two sharp needles located inside the K-Cup brewer. To avoid risk of injury, do not put
\RXU ILQJHUV LQVLGH WKH EUHZHU 8VH FDXWLRQ ZKHQ cleaning.
•Keep the K-Cup brewer out of the reach of children, as they may be injured in using the K-Cup brewer incorrectly.
2Two ways to brew:
1.Press Hot Water. Select K-Cup Pod. OR
2.Slide the brewer into the rails.
Lock |
Temperature |
Express Modes |
Settings |
|
|
Precise |
|
Controls |
Water |
|
Fill |
|
|
|
|
Light |
|
|
Hot |
|
|
|
Water |
Water Crushed Cubed
Rails for the brewer
|
Pick your size. |
|
|
|
|
|
|
3 NOTICE: If using a powdered beverage, select the Cocoa setting. |
Cancel |
|
Coffee |
Coffee Cocoa |
|||
|
|
Serving Size |
|
||||
|
|
|
|
6oz |
|
8oz |
10oz |
4 |
Place your mug under the brewer (on the |
5 |
Rotate the hot water knob counterclockwise |
||||
tray mug icon and under the red brew spout). |
and push in to brew and dispense. |
||||||
|
NOTICE: Make sure the mug being used is large |
|
NOTICE: Press any button or dispenser paddle, or open |
||||
|
enough for the size selected. |
|
either the left or right door to cancel dispense. |
||||
|
|
|
|
Lock |
6oz Brew |
|
Precise |
|
Red brew |
|
|
Controls |
|
|
Fill |
|
|
|
|
|
|
|
|
|
spout |
|
|
|
|
|
Water |
|
|
|
|
Light |
|
|
Hot |
|
for mug |
|
|
|
|
|
|
|
alignment |
|
|
Water |
Crushed |
Cubed |
|
|
Mug icon for |
|
|
|
|
|
|
|
placement |
|
|
|
|
|
|
Cleaning the brewer
Ŷ The K-Cup brewer is dishwasher safe. To clean it, open the lid and place the K-Cup brewer in the top rack of your dishwasher and run in a normal wash cycle.
Ŷ To maximize performance of your brewer, it is recommended to rinse it thoroughly after washing to remove all soap residue.
Ŷ Periodic cleaning of dispenser recess area is recommended as staining may occur with usage of the K-Cup brewer.
14 |
49-60820 Rev. 1 |
Appliance Communication
WiFi Connect (for customers in the United States, its territories, and Canada)
WiFi Connect Enabled*
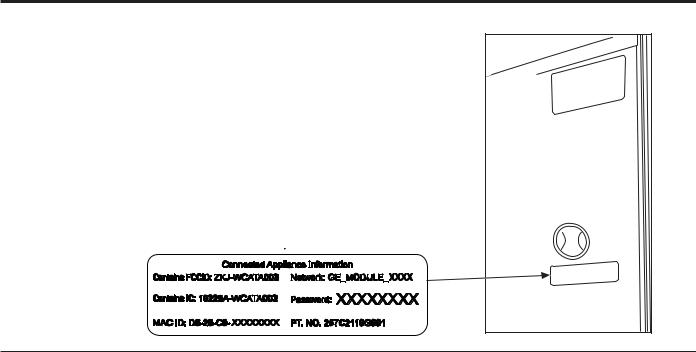
If your refrigerator has a Connected Appliance information label located on the inside as shown, your refrigerator can be connected to your WiFi network, allowing it to communicate with your smart phone for remote monitoring, control and notifications. Depending on the refrigerator model you have, you either have a WiFi communication card built into the product, or a port for an external WiFi ConnectPlus Module (sold
separately). Please visit cafeappliances.com/connect to learn more about connected appliance features, and to learn what connected appliance apps will work with your Smart Phone.
REGULATORY INFORMATION
FCC/IC Compliance Statement:
This device complies with Part 15 of the FCC Rules. Operation is subject to the following two conditions:
1.This device may not cause harmful interference, and
2.This device must accept any interference received, including interference that may cause undesired operation.
This equipment has been tested and found to comply with the limits for a Class B digital device, pursuant to Part 15 of the FCC Rules. These limits are designed to provide reasonable protection against harmful interference in a residential installation. This equipment generates uses and can radiate radio frequency energy and, if not installed and used in accordance with the instructions, may cause harmful interference to radio communications. However, there is no guarantee that interference will not occur in a particular installation. If this equipment does cause harmful interference to radio or television reception, which can be determined by turning the equipment off and on, the user is encouraged to try to correct the interference by one or more of the following measures:
•Reorient or relocate the receiving antenna.
•Increase the separation between the equipment and receiver.
•Connect the equipment into an outlet on a circuit different from that to which the receiver is connected.
•Consult the dealer or an experienced radio/television technician for help.
Labelling: Changes or modifications to this unit not expressly approved by the manufacturer could void the user’s authority to operate the equipment.
Communication Appliance REFRIGERATOR: THE USING
*Select Models Only
49-60820 Rev. 1 |
15 |
 Loading...